
2
20
00
01
1
C
CA
AM
MP
PA
AI
IG
GN
N
B
BU
UL
LL
LE
ET
TI
IN
NS
S
© 2006 GM Holden LTD. A.B.N. 84 006 893 232
Service Department
A “HOLDEN” Product.
BRISBANE SYDNEY MELBOURNE ADELAIDE PERTH
For the latest and/or any missing Campaign Bulletins,
please refer to Holden Lionheart

1
PRODUCT CAMPAIGN BULLETIN
01-H-01
February 16, 2001
SUBJECT : SEAT RAIL REINFORCEMENT
MODEL: SB BARINA & COMBO
This bulletin announces the initiation of a safety related recall on some SB Barina & Combo
vehicles.
DESCRIPTION O F DEFECT
Investigation has shown that a number of vehicles in a specific batch may exhibit material fatigue
of the front seat belt buckle anchor plate on the inner seat rail runner. If this condition is present,
there is a potential risk that under extreme conditions the front seat belt buckle anchor plate may
detach f r om the seat rail r unner .
DETAILS OF AFFECTED VEHICLES
IMPORTANT NOTES:
1. The affected range is determined by the Model Year identifier (alpha) and the vehicles Serial
Number (7 digit numeric) of the ISOVIN. i.e “P” = Model Year 1993 and “4016295” is the
sequential vehicle serial number .
2. The aff ect ed rang e covers mult iple model year vehicles ie “P???????” to “ X???????” includes
model years “P”, “ R”, “S”, “ T”, “ V” ,”W” and “X” .
3. Ignore the first nine (9) characters of t he I SO VI N.
4. Affected vehicles with a drivers’ seat “height adjuster”, ONLY requires the campaign action
perf or m ed t o the Passenger Seat (seats with height adj uster are not affected)
BARINA MO DELS
Model Year 1993(“P”) to Model Year 1999(“X”) Barina Swing and City and variants including
Lambada, Joy, Gr and Prix, Cabrio and Gsi) .
The ISOVI N r ange of affected vehicles is:-
BARINA
MY FROM TO
93 P4142331* P4224948*
94 R4016295 R4380456
95 S4000435 S4429411
96 T4004684 T4429794
97 V4000062 V4438327
98 W4000079 W4444370
99 X4000134 X4424418
* Only two vehicles in model year 93 range

2
COMBO
MY FROM TO
94 R3033834# R3033834#
95 S3028384 S3028384
96 T3002006 T3053916
97 V3015334 V3056810
98 W3000695 W3059380
99 X3000201 X3059911
00 Y3006529 Y3006929
# Only one vehicle in model year 94 range
All vehicles within the affected ranges shown above are affected by this recall campaign
irrespective of whether the customer presents a customer letter or not. Dealers must check the
ISOVIN and only those vehicles within the affected r ange req uir e cam paign action.
Dealers with electronic vehicle “flagging” systems requiring a Holden Tag No. can use the
following Tag No. r anges for f lagg ing pur poses only. The I SOVIN det ermines whether t he vehicle
IS or IS NO T aff ected by this recall campaign and m ust be established f rom the pr esented vehicle
befor e com plet ing the required action O R advising the customer t hat the vehicle is not affected
From Y001593 to Y999999 and Fr om 2000000 t o 2397521
TRAINING
Due to the complex nature of the rectification, Holden will be conducting training in nominated
metropolitan and rural centres. Before commencing work, technicians performing the rectification
on vehicles aff ected by this campaign m ust com plete and pass the tr aining.
OWNER NO TIFICATION
Owners will be contacted directly by letter from Holden, providing details of the recall and
requesting them to arrange for the campaign action to be carried out. Following is a draft of the
customer letter.
Dear Holden Customer ,
At Holden we continually strive to enhance the ownership experience of our customers through
continuous product im pr ovem ent, aft er sales ser v ice and ef fective custom er com m unication.
Holden’s foremost concern is the continued safety of our customers. Accordingly the recall
campaign described below is being under t aken as a safety precaut ion.
Holden has been alerted to the fact that in a number of vehicles within a determined production
range, material fatigue on the seat belt buckle anchor plate on the inner seat rail runner in the front
seats could potentially, under extreme conditions, detach from the seat rail runner.
Our records show that your Holden vehicle was manufactured within the vehicle range which may
include this component. It is therefore necessary for you to contact a Holden dealership of your
choice as soon as possible to have a seat rail r einf orcement kit fitted to your vehicle.

3
All work w ill be carried out fr ee of charge and provided the necessary arrangements with a Holden
dealer are made in advance, your vehicle can be rectified while you wait. The required work will
take approximat ely one ( 1) hour.
Holden has initiated this action as a precautionary measure to ensure the integrity of the seat belt
buckle anchor plate.
We know that effective communication is vital to helping your understanding of the issues involved
and trust that this letter provides you with all the information you need. If you should have any
questions, please contact your dealer or call the Holden Recall Assistance Line - 1800 632 826,
where one of our operators will be pleased to assist.
Thank you for your attention to this matter. We apologies for any inconvenience this action may
cause you.
Yours Sincerely
D. McMurray
Manager Customer Assistance
DEALERSHIP ACTION REQUIRED
On presentat ion of the vehicle considered by the customer to be affected by this campaig n:
• Confirm that the vehicle is in the affected ISOVIN range – Refer to Details of Affected
Vehicles on page 1 of this bulletin.
• Determine whether anchor plate version A or version B is required (refer to laminated A4
visual instruction sheet it em A2 or B2 for criteria)
• Rework affected vehicle in accordance with the applicable Rework Instruction. Refer to
attachment (A) Rework Inst ruction 01-H-01A for anchor plate version A or attachment (B) 01-
H-01B f or anchor plate version B.
• Apply a Campaign Complet ed Identification label.
CAMPAIGN COMPLETION IDENTIFICATION
All campaigned vehicles must have a Campaign Completed identif ication label applied to the right
hand front ‘A’ pillar, between the hinges, with details of the campaign, 01-H-01, Dealership code
and date legibly entered on t he label with a perm anent ink pen.
Extra campaign ident ification labels are available free of charge f rom:
Moore Business Systems
Facsimile: (03) 9270 8900
Attention: Mr. Bob Curry

4
Quote stock No. SD 28156 on a Moore Business Systems ‘packaged goods’ order form (or
facsim ile if not available) for a box of 100 labels.
As an additional continuous improvement initiative, which was triggered by the dealer network,
Campaign Completion Identif ication will now also be included on the Vehicle Service Histor y Label
(SD 28177 available from Moore Business Systems). Place an “X” at the E-4 co-ordinate of the
Vehicle Service History Label and apply it to the inner side of t he lower instr ument panel cover.
WARRANTY CLAIM INFORMATION
On completion of campaign action, dealers are requested to immediately submit a w arranty
claim.
Description:
Labour Operation No:
Standard Time:
Failure Code:
Case Type:
Fit rail reinfor cement bracket
One seat
T180501
0.3 Hours
96
08
Fit rail reinfor cement bracket
Both seats
T180502
0.4 hours
96
08
Please ensure correct vehicle details are included when submitting warranty claim information as
per the norm al warranty process.
Warranty claim submission is used to update our record of campaign completion and determines
whether furt her cust omer contact is necessary to action all affected vehicles.
Please ensure on completion of the cam paign action that a warrant y claim is submitted prom pt ly.
PARTS INFORMATION
DO NOT O RDER PARTS FOR THIS CAMPAI GN FROM HSPO
Seat Rail Reinforcement Kits for this campaign ar e available throug h SALMAT using the at tached
order form.
Controls on the quantity supplied will be enforced due to lim ited parts availability.
DO NOT campaign vehicles or order parts unnecessaril y!
Ensure the vehicle fall s within the guidelines specif i ed i n sect ion marked:
‘DETAILS OF AFFECTED VEHICLES’.
Should you require further information or clarification on the above, then please call Oliver
Mitrovski on telephone number ( 03) 9647 7619.
Joachim Burandt
General Service Manager
Attachment A: REWORK I NSTRUCTI ONS CAMPAIGN 01-H-01 VERSION A
Attachment B: REWORK INSTRUCTIONS CAMPAIGN 01-H-01 VERSION B
Attachment C: MATERIAL ORDER FORM
5
ATTACHMENT A
REWORK INSTRUCTION CAMPAIGN 01 -H-0 1 VERSION A
Rework For Seats With Anchor Plate Version “A”
The following instruction shows the rework of the right seat. The rework of the lef t seat has
to be carried out accordingly. The rework must be carried out in accordance to the rework
instruction. Only original parts of the reinforcement kit must be used.
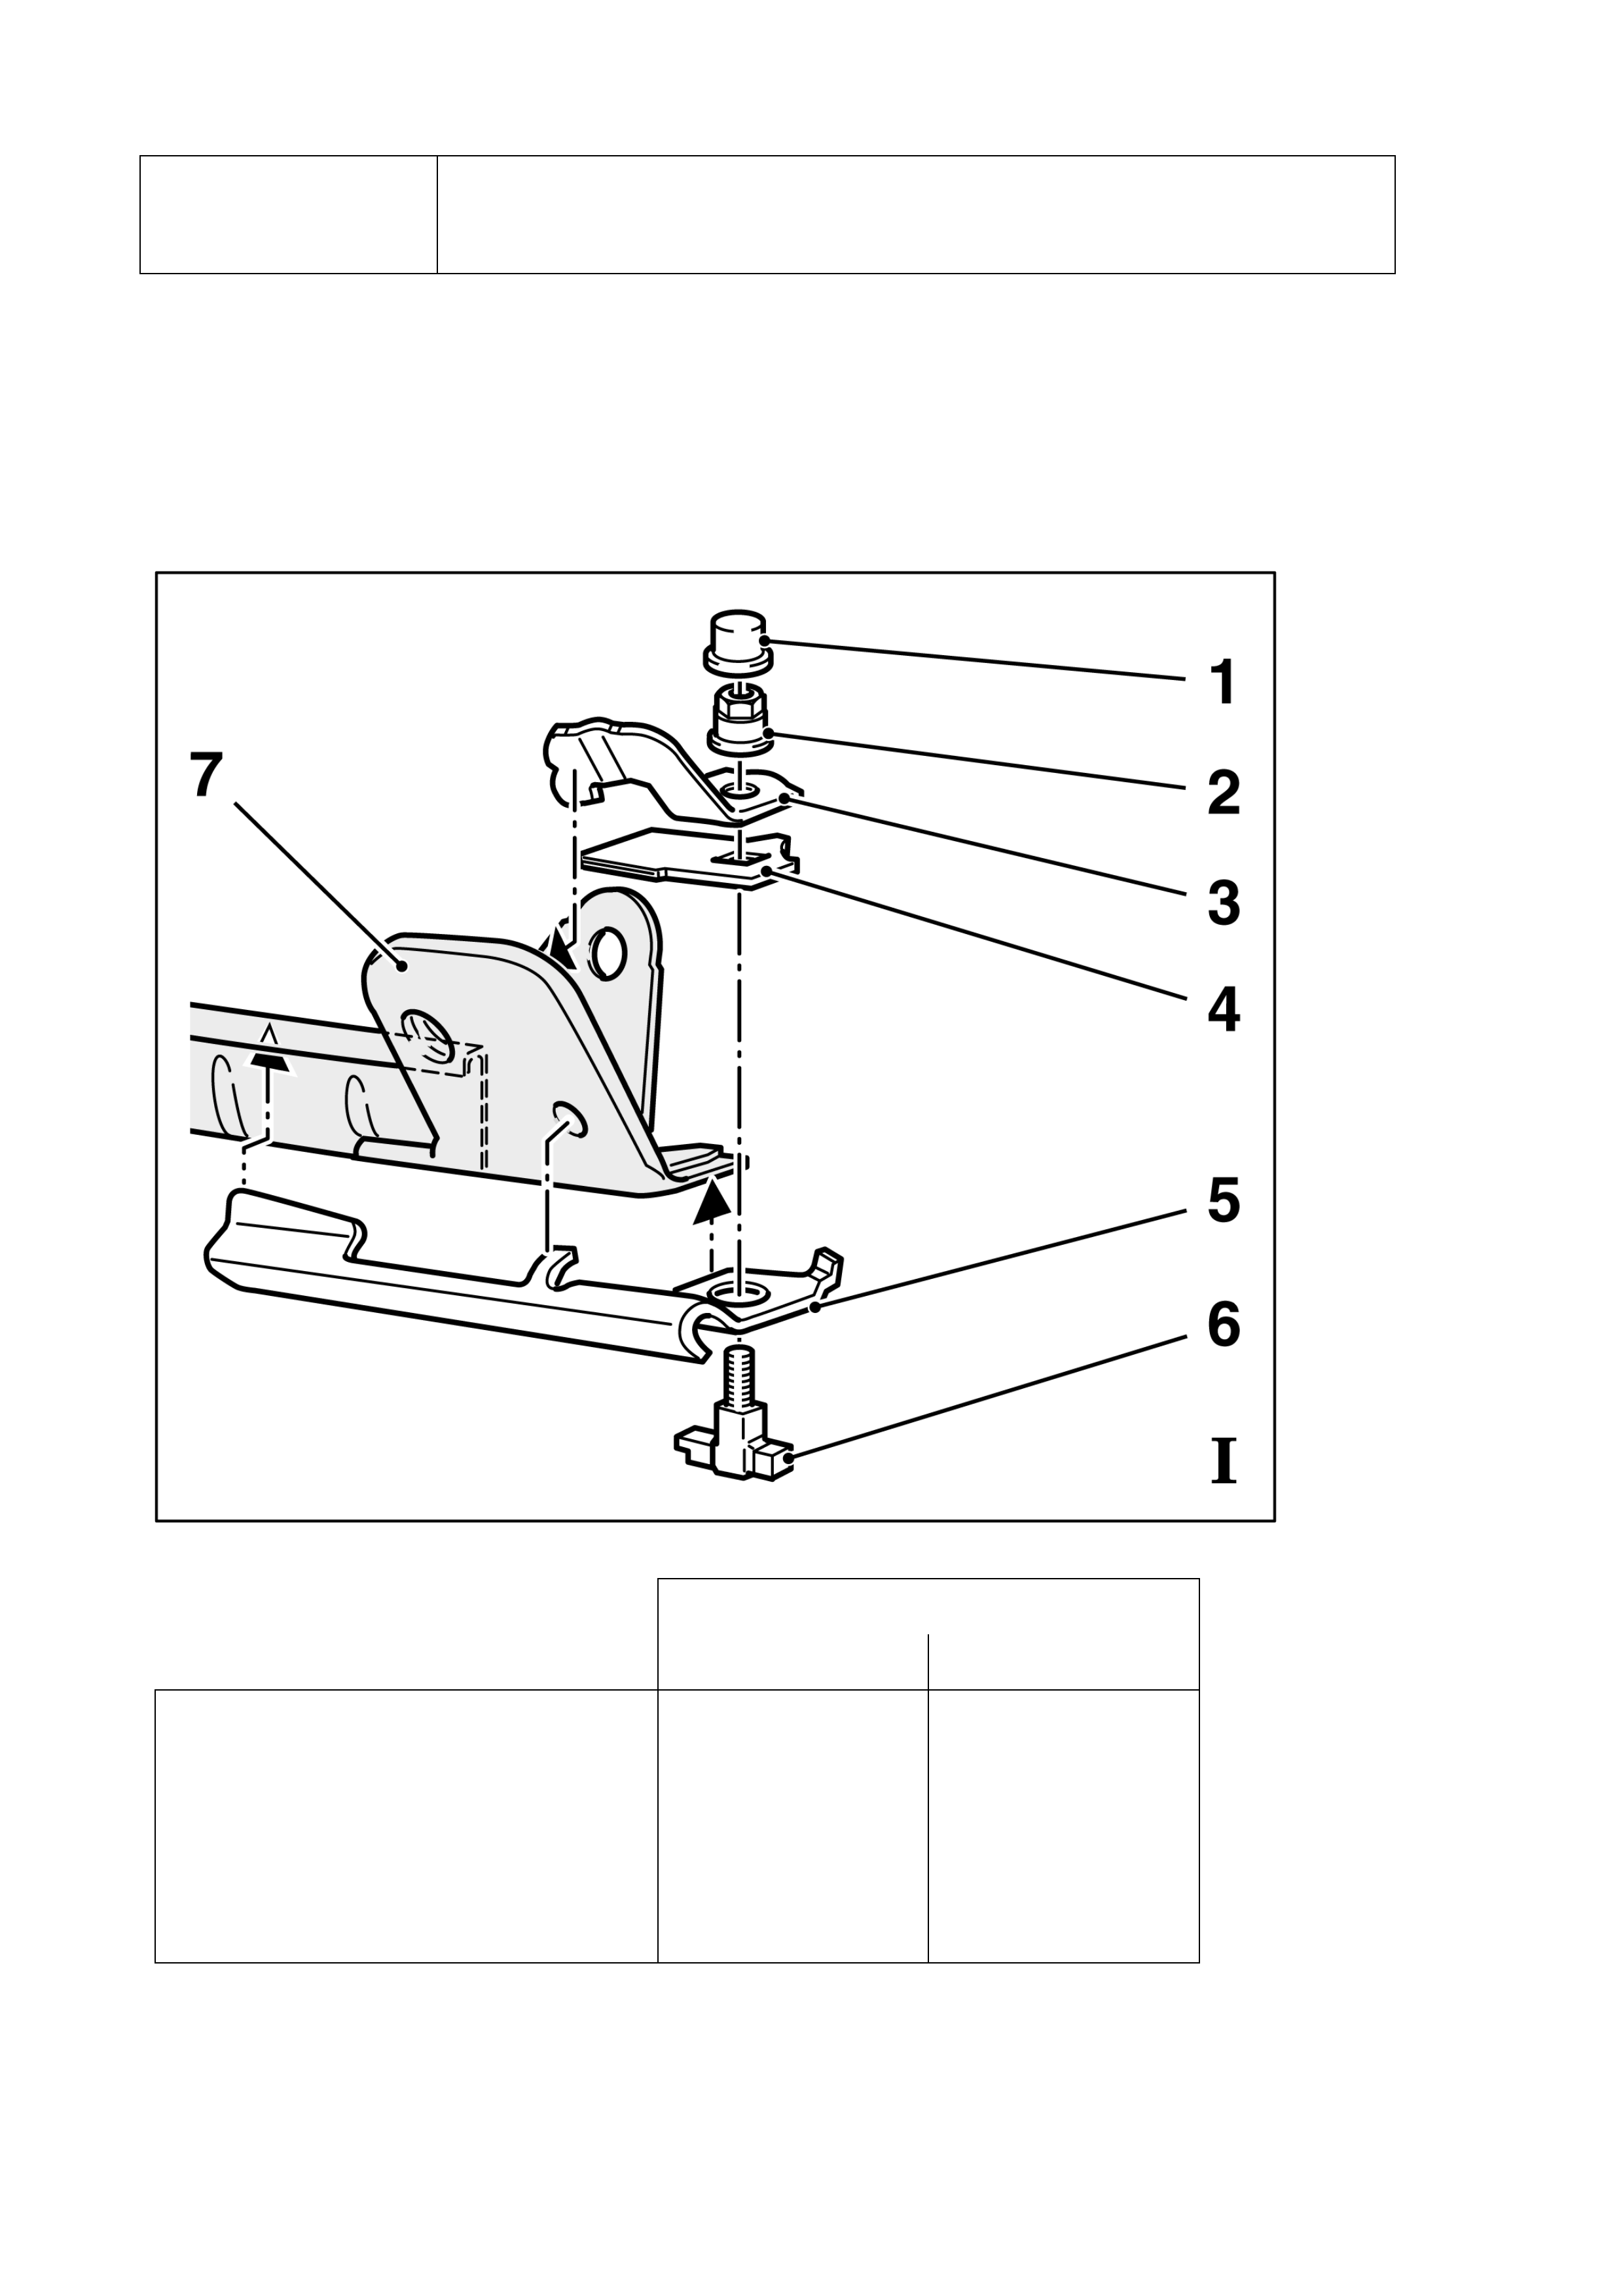
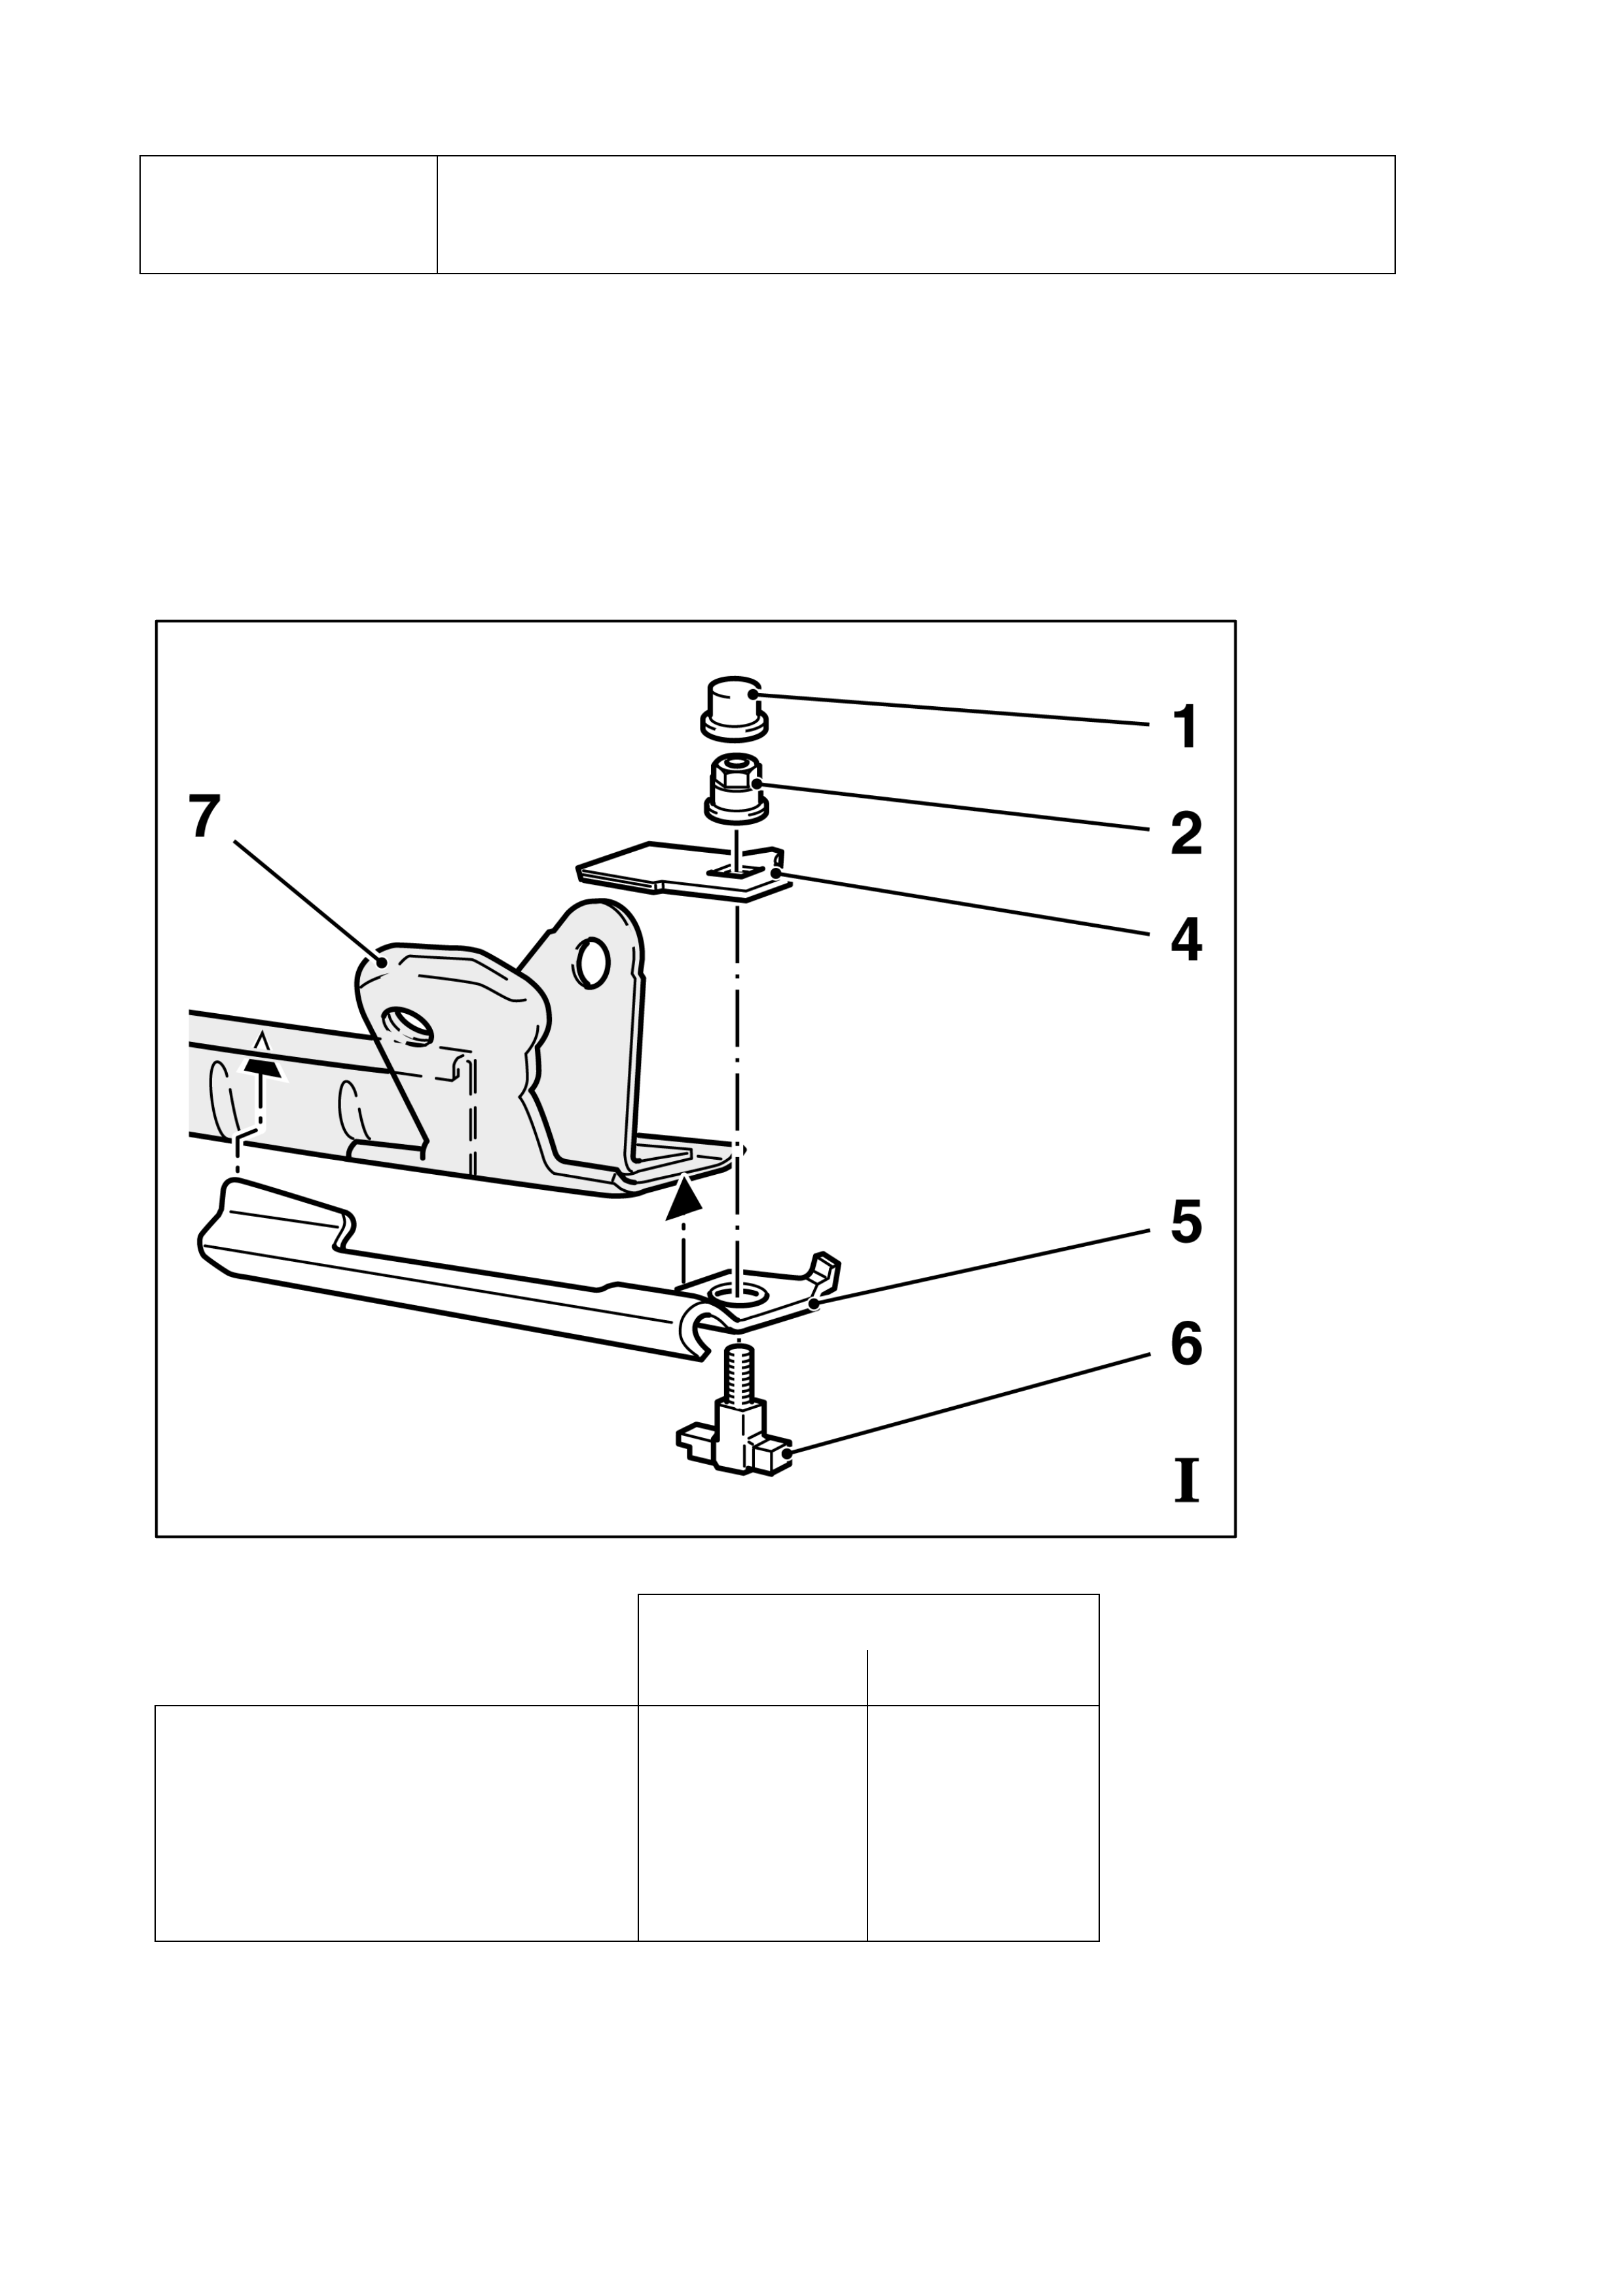
Identification markings for
left seat right seat
1 – Protection Cap*
2 – Shear-off Nut*
3 – Support Hook
4 – Reinforcing Plate
5 – Reinforcing Rail
6 – Hammer Screw*
7 – Seat Rail (part of the seat)
ALH
shape
ALH
ARH
shape
ARH
*) part has no marking – same part for all four types of reinforcement kits
6
Attention:
Only seats without height adjuster are to be
reworked.
Check the anchor plate version (A or B)
Check type of rework kit.
Check completeness of reinforcement kit.
The installation of the reinforcement kit can
be carried out with the seat in all positions.
However the easiest fitting is possible when
the seat is in the rearmost position.
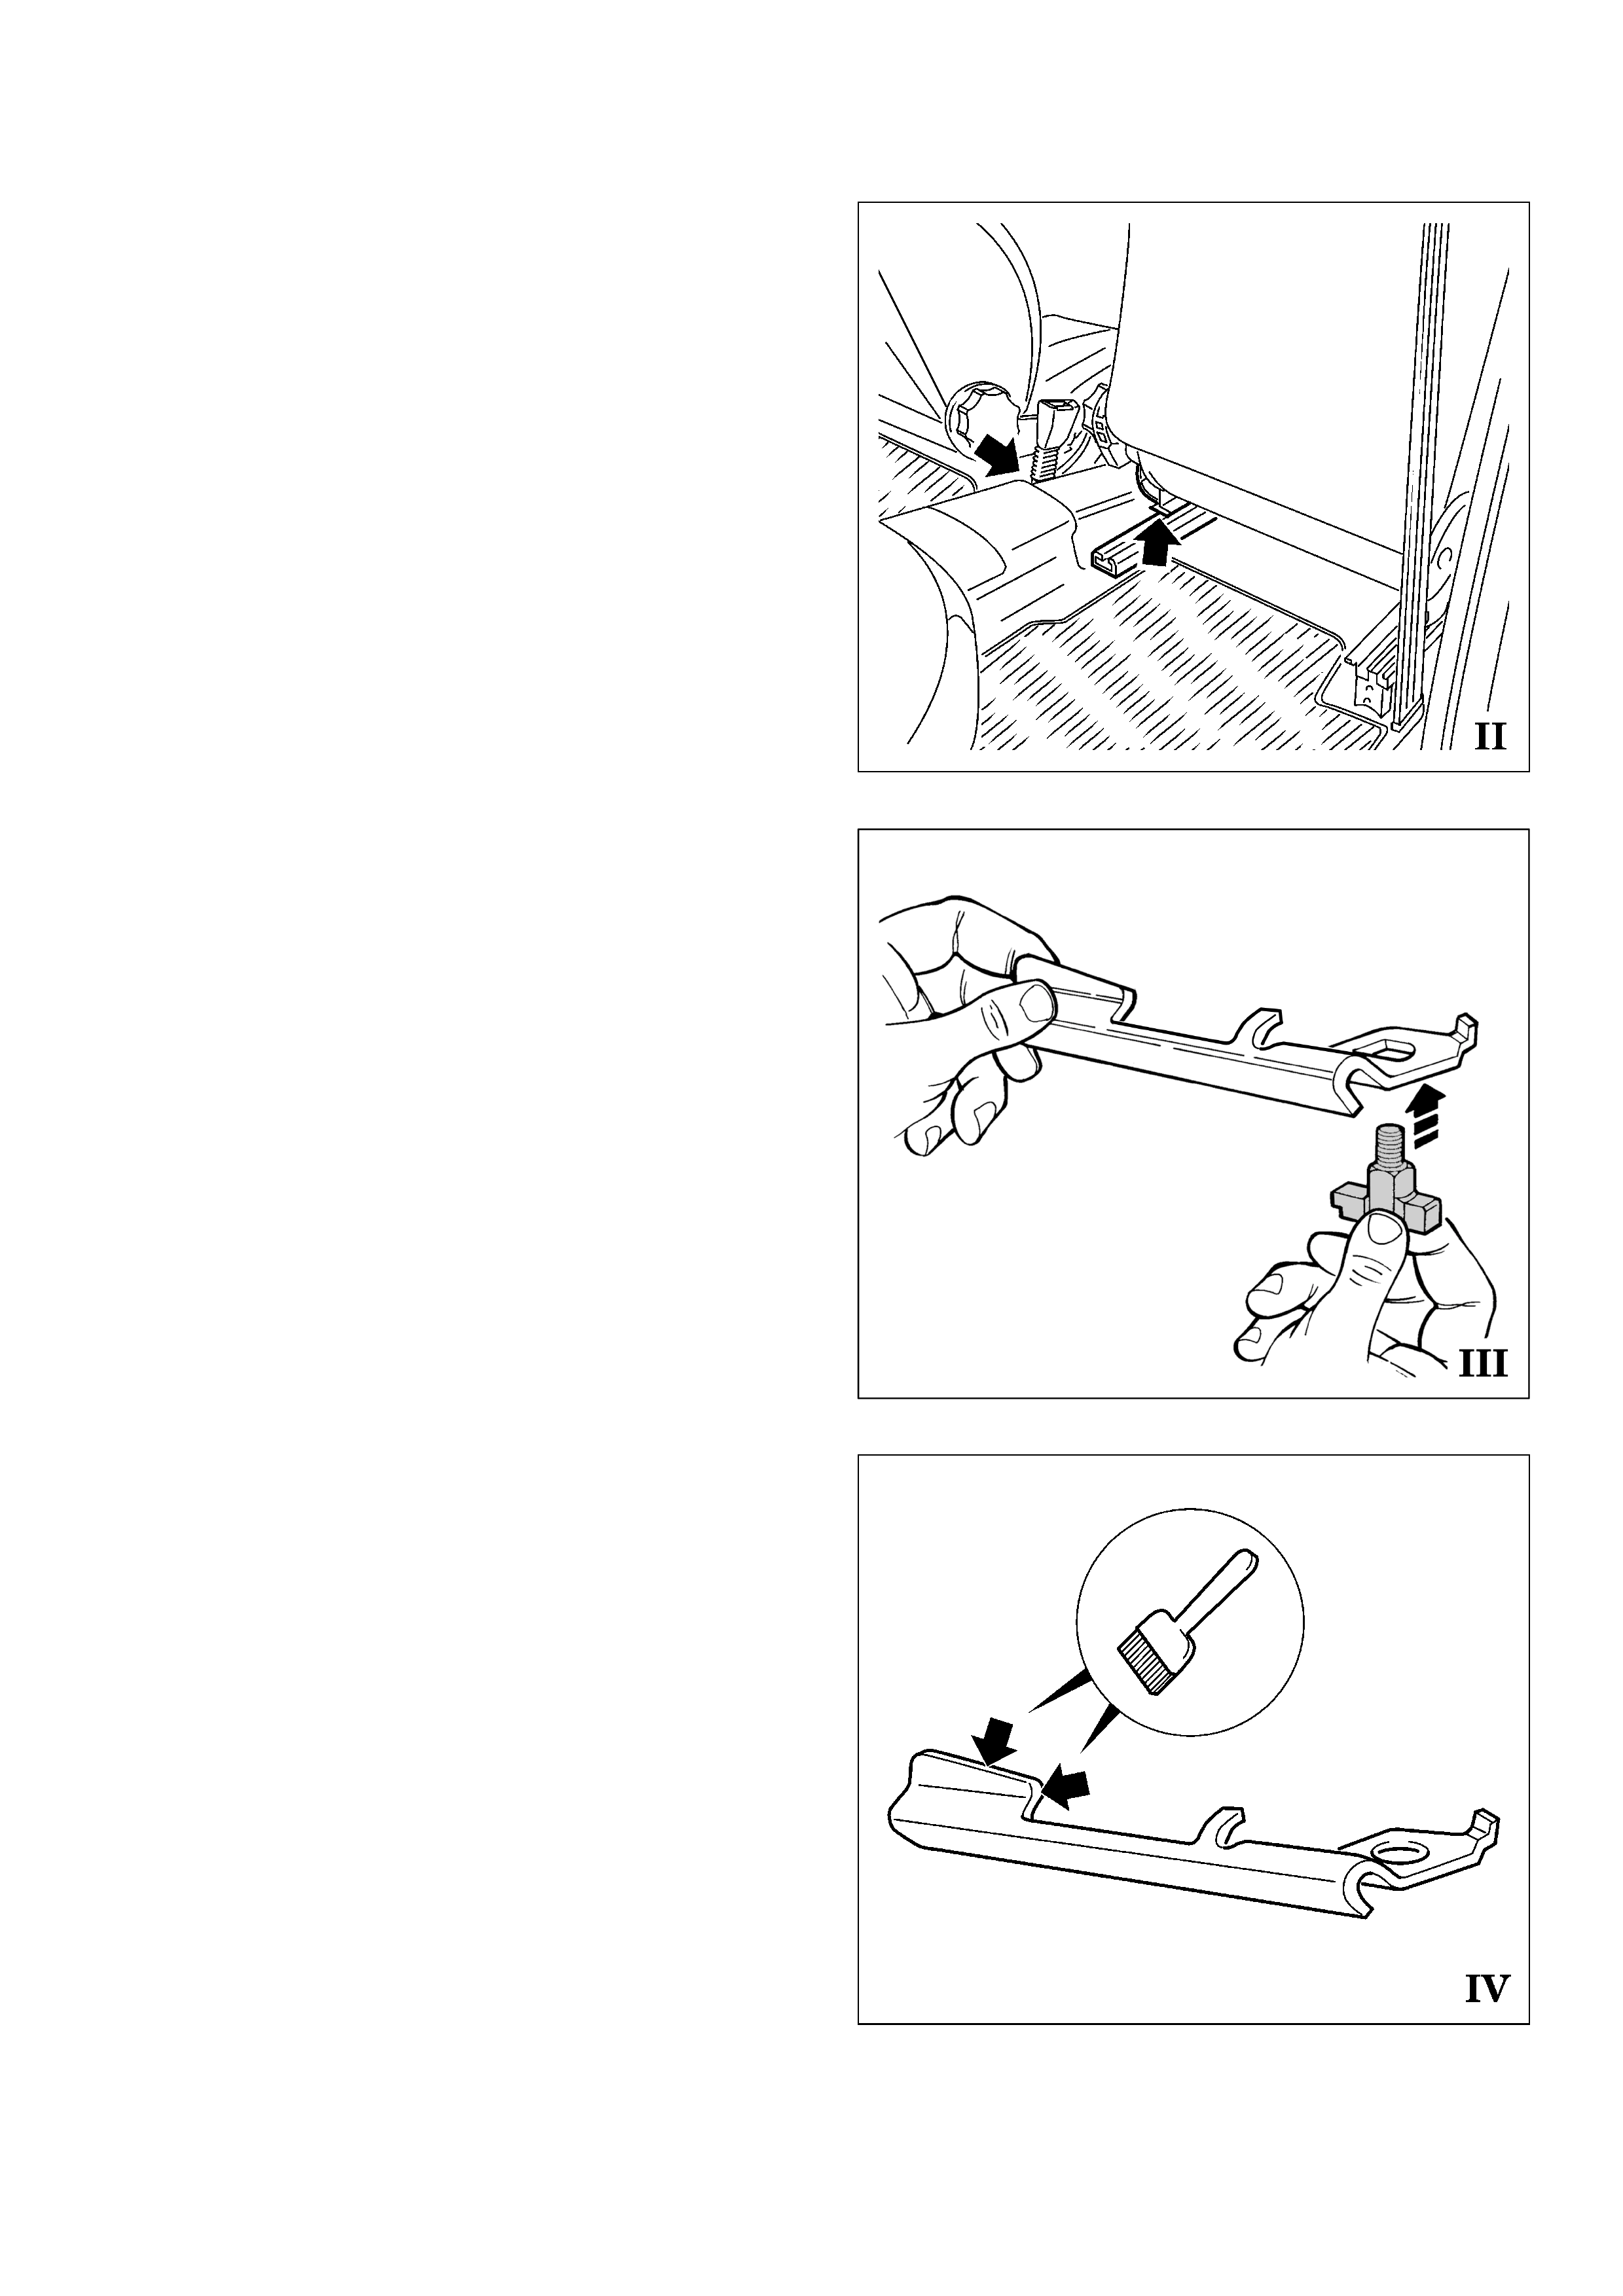
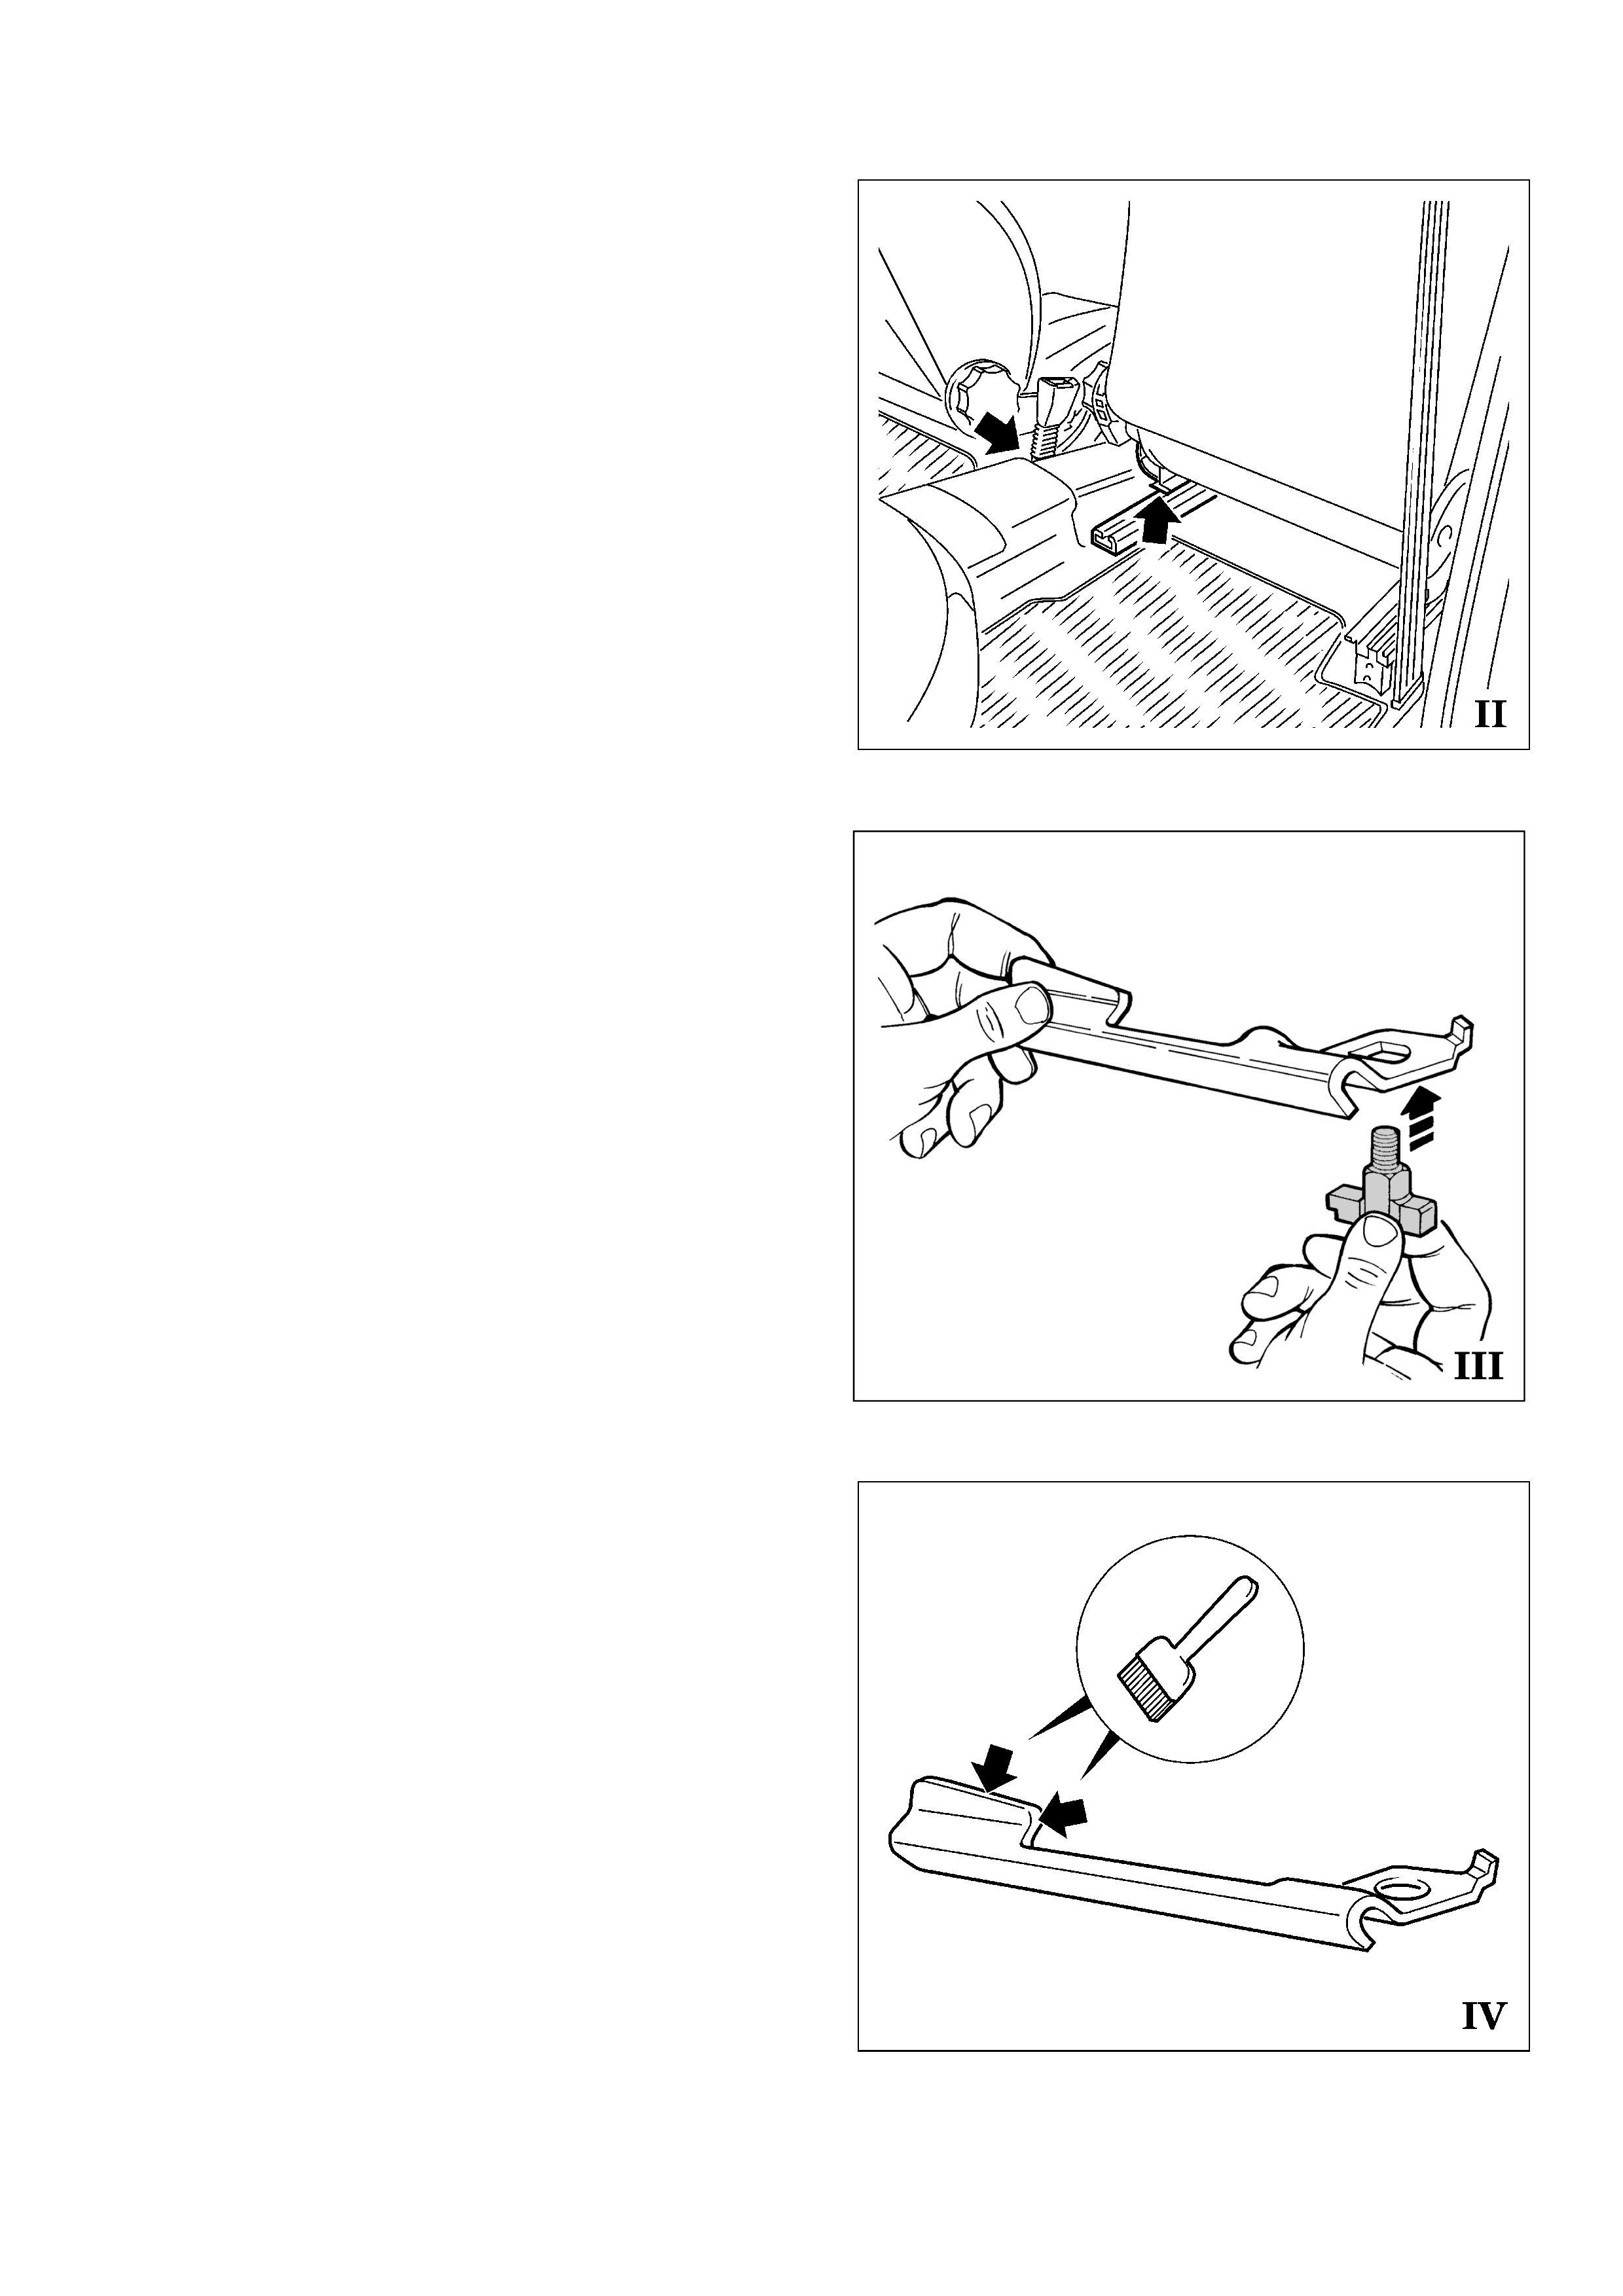
Assemble hammer screw with reinforcing
bracket as shown in figure III.
Note
When carrying out this rework for the first
time, it is recommended to apply a white paint
mark on the upper edges of the reinforcement
bracket (arrows). The white edges allow a
better check whether the reinforcement
bracket is correctly inserted into the seat rail
groove after fitting.
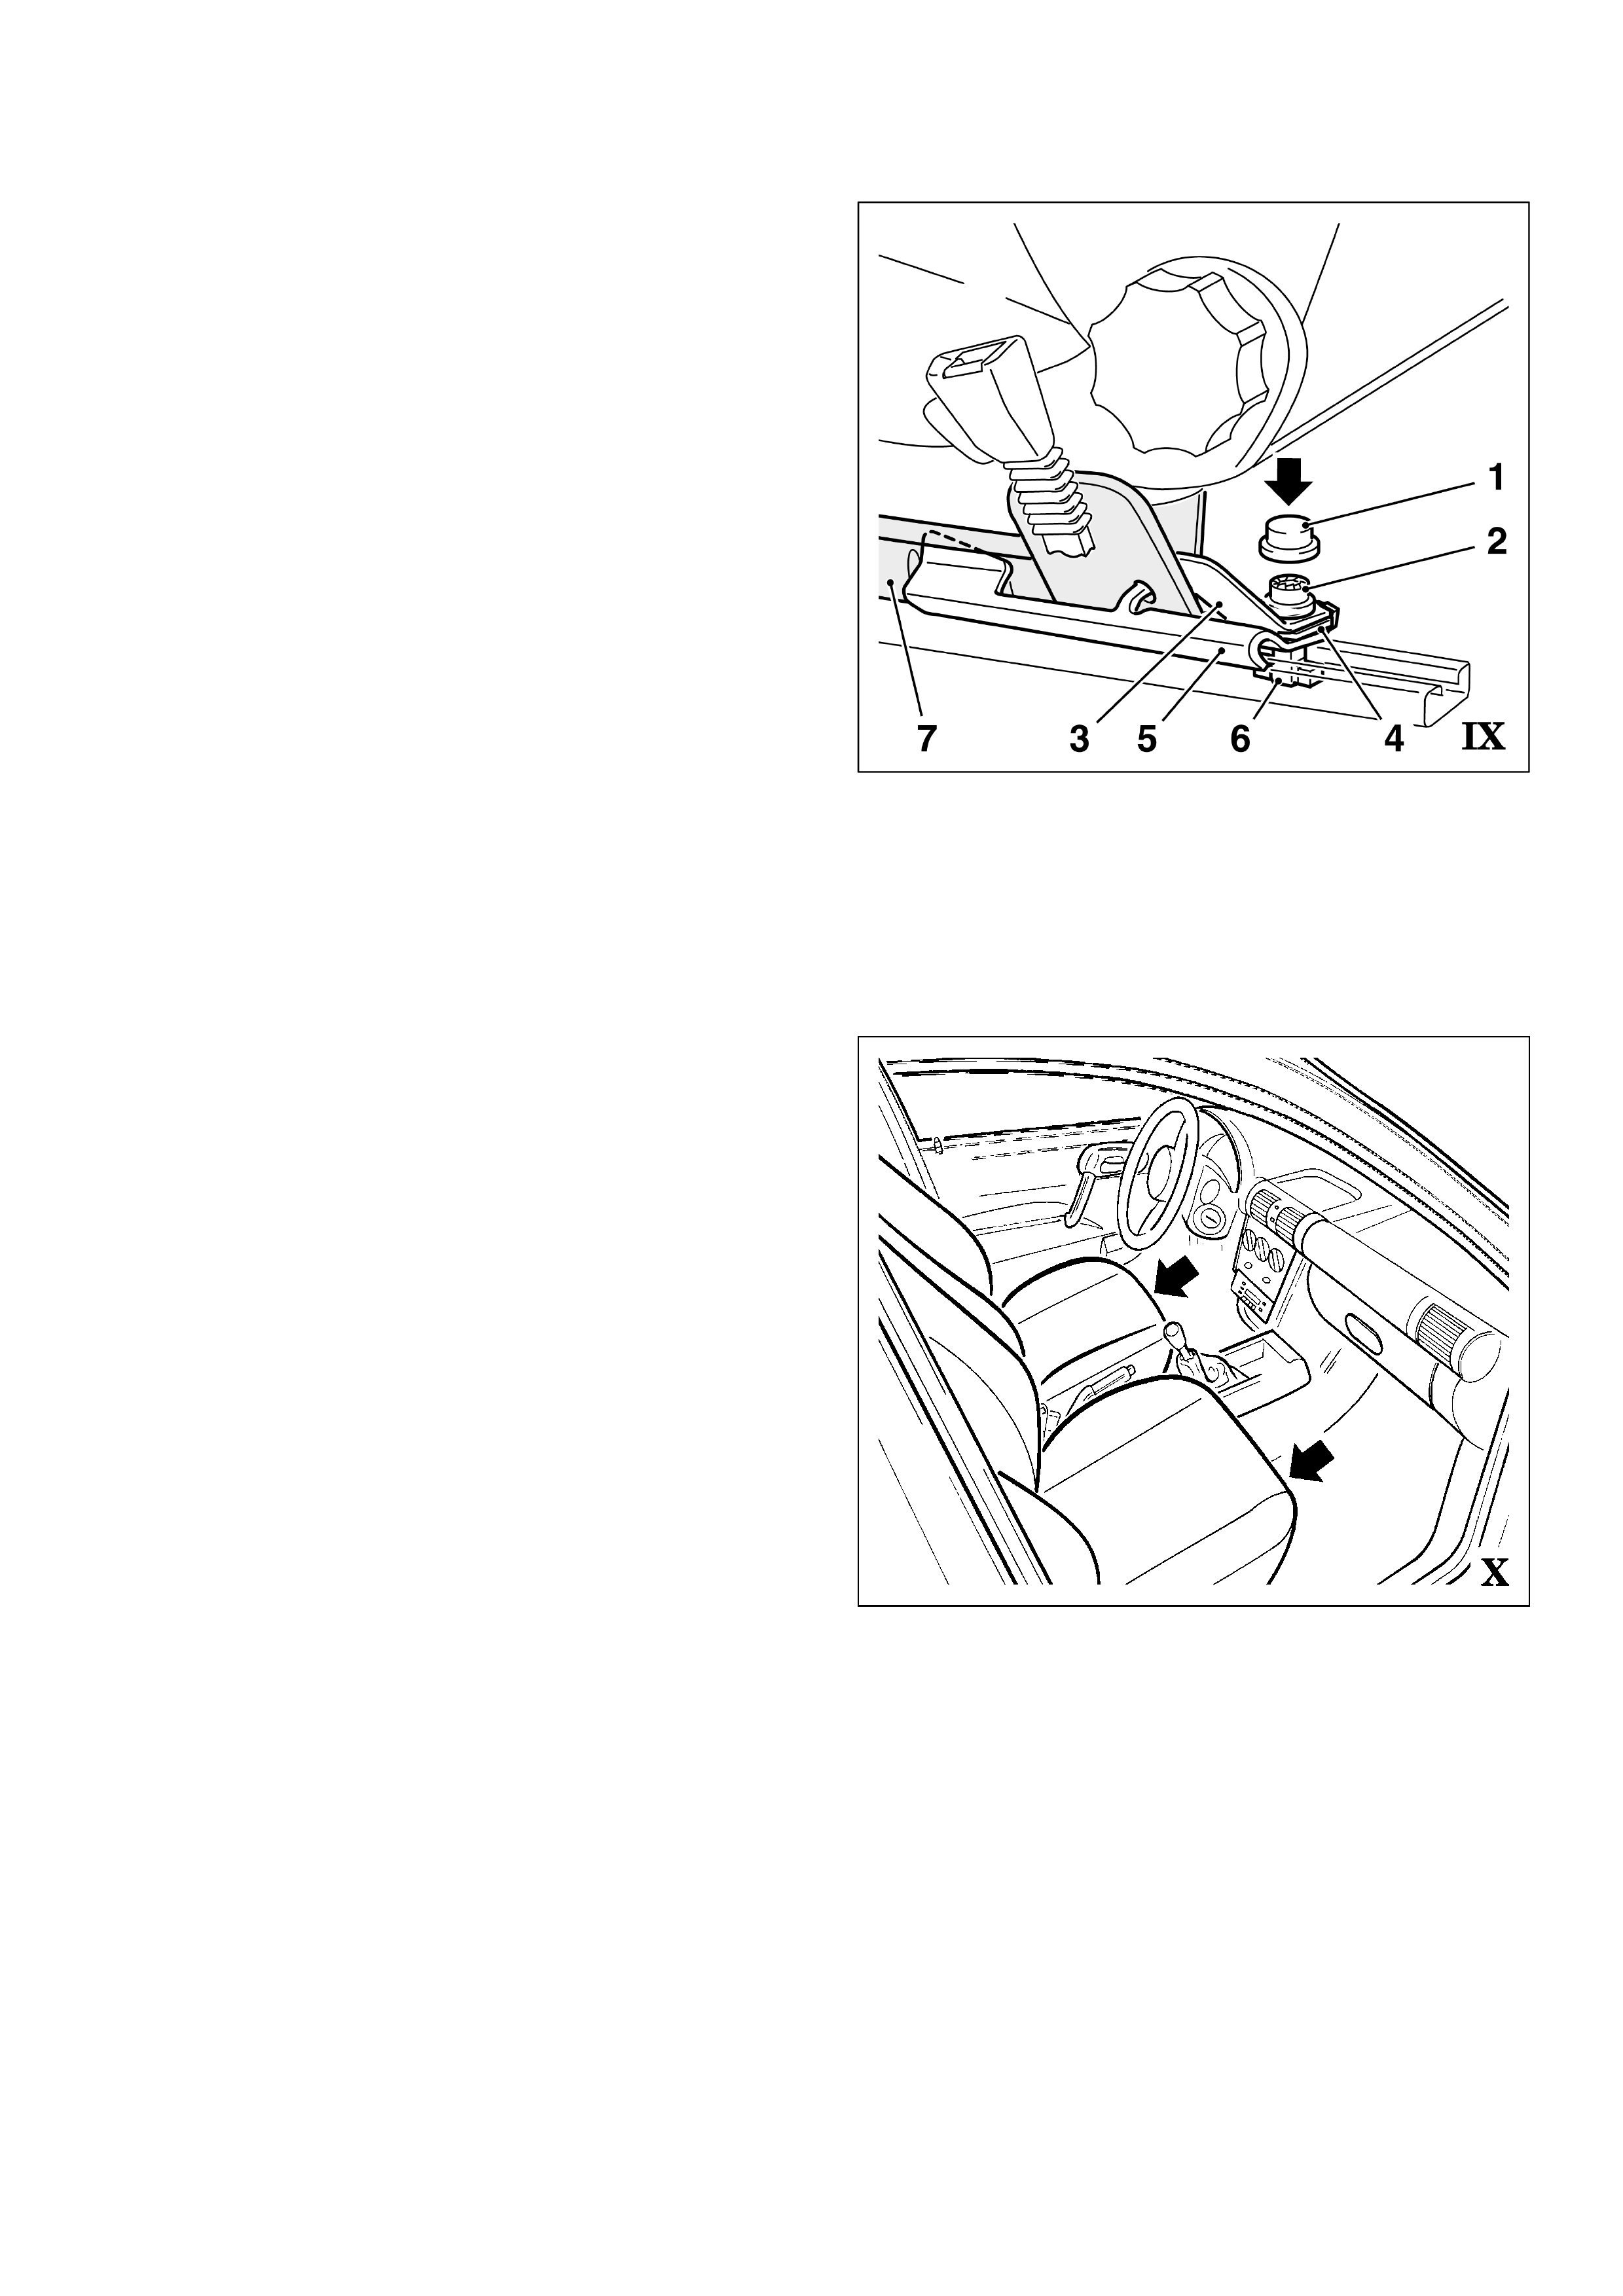
7
Assembly
Install reinforcing bracket (5) with inserted
hammer screw (6) onto seat rail.
(Reinforcing bracket and hammer screw are
easy to insert when the seat is moved to the
rear)
Note
If the reinforcing bracket (5) can’t be
positioned correctly, the tie strap on the belt
pre-tensioner (8) has to be turned in order to
achieve more clearance for the reinforcing
bracket.
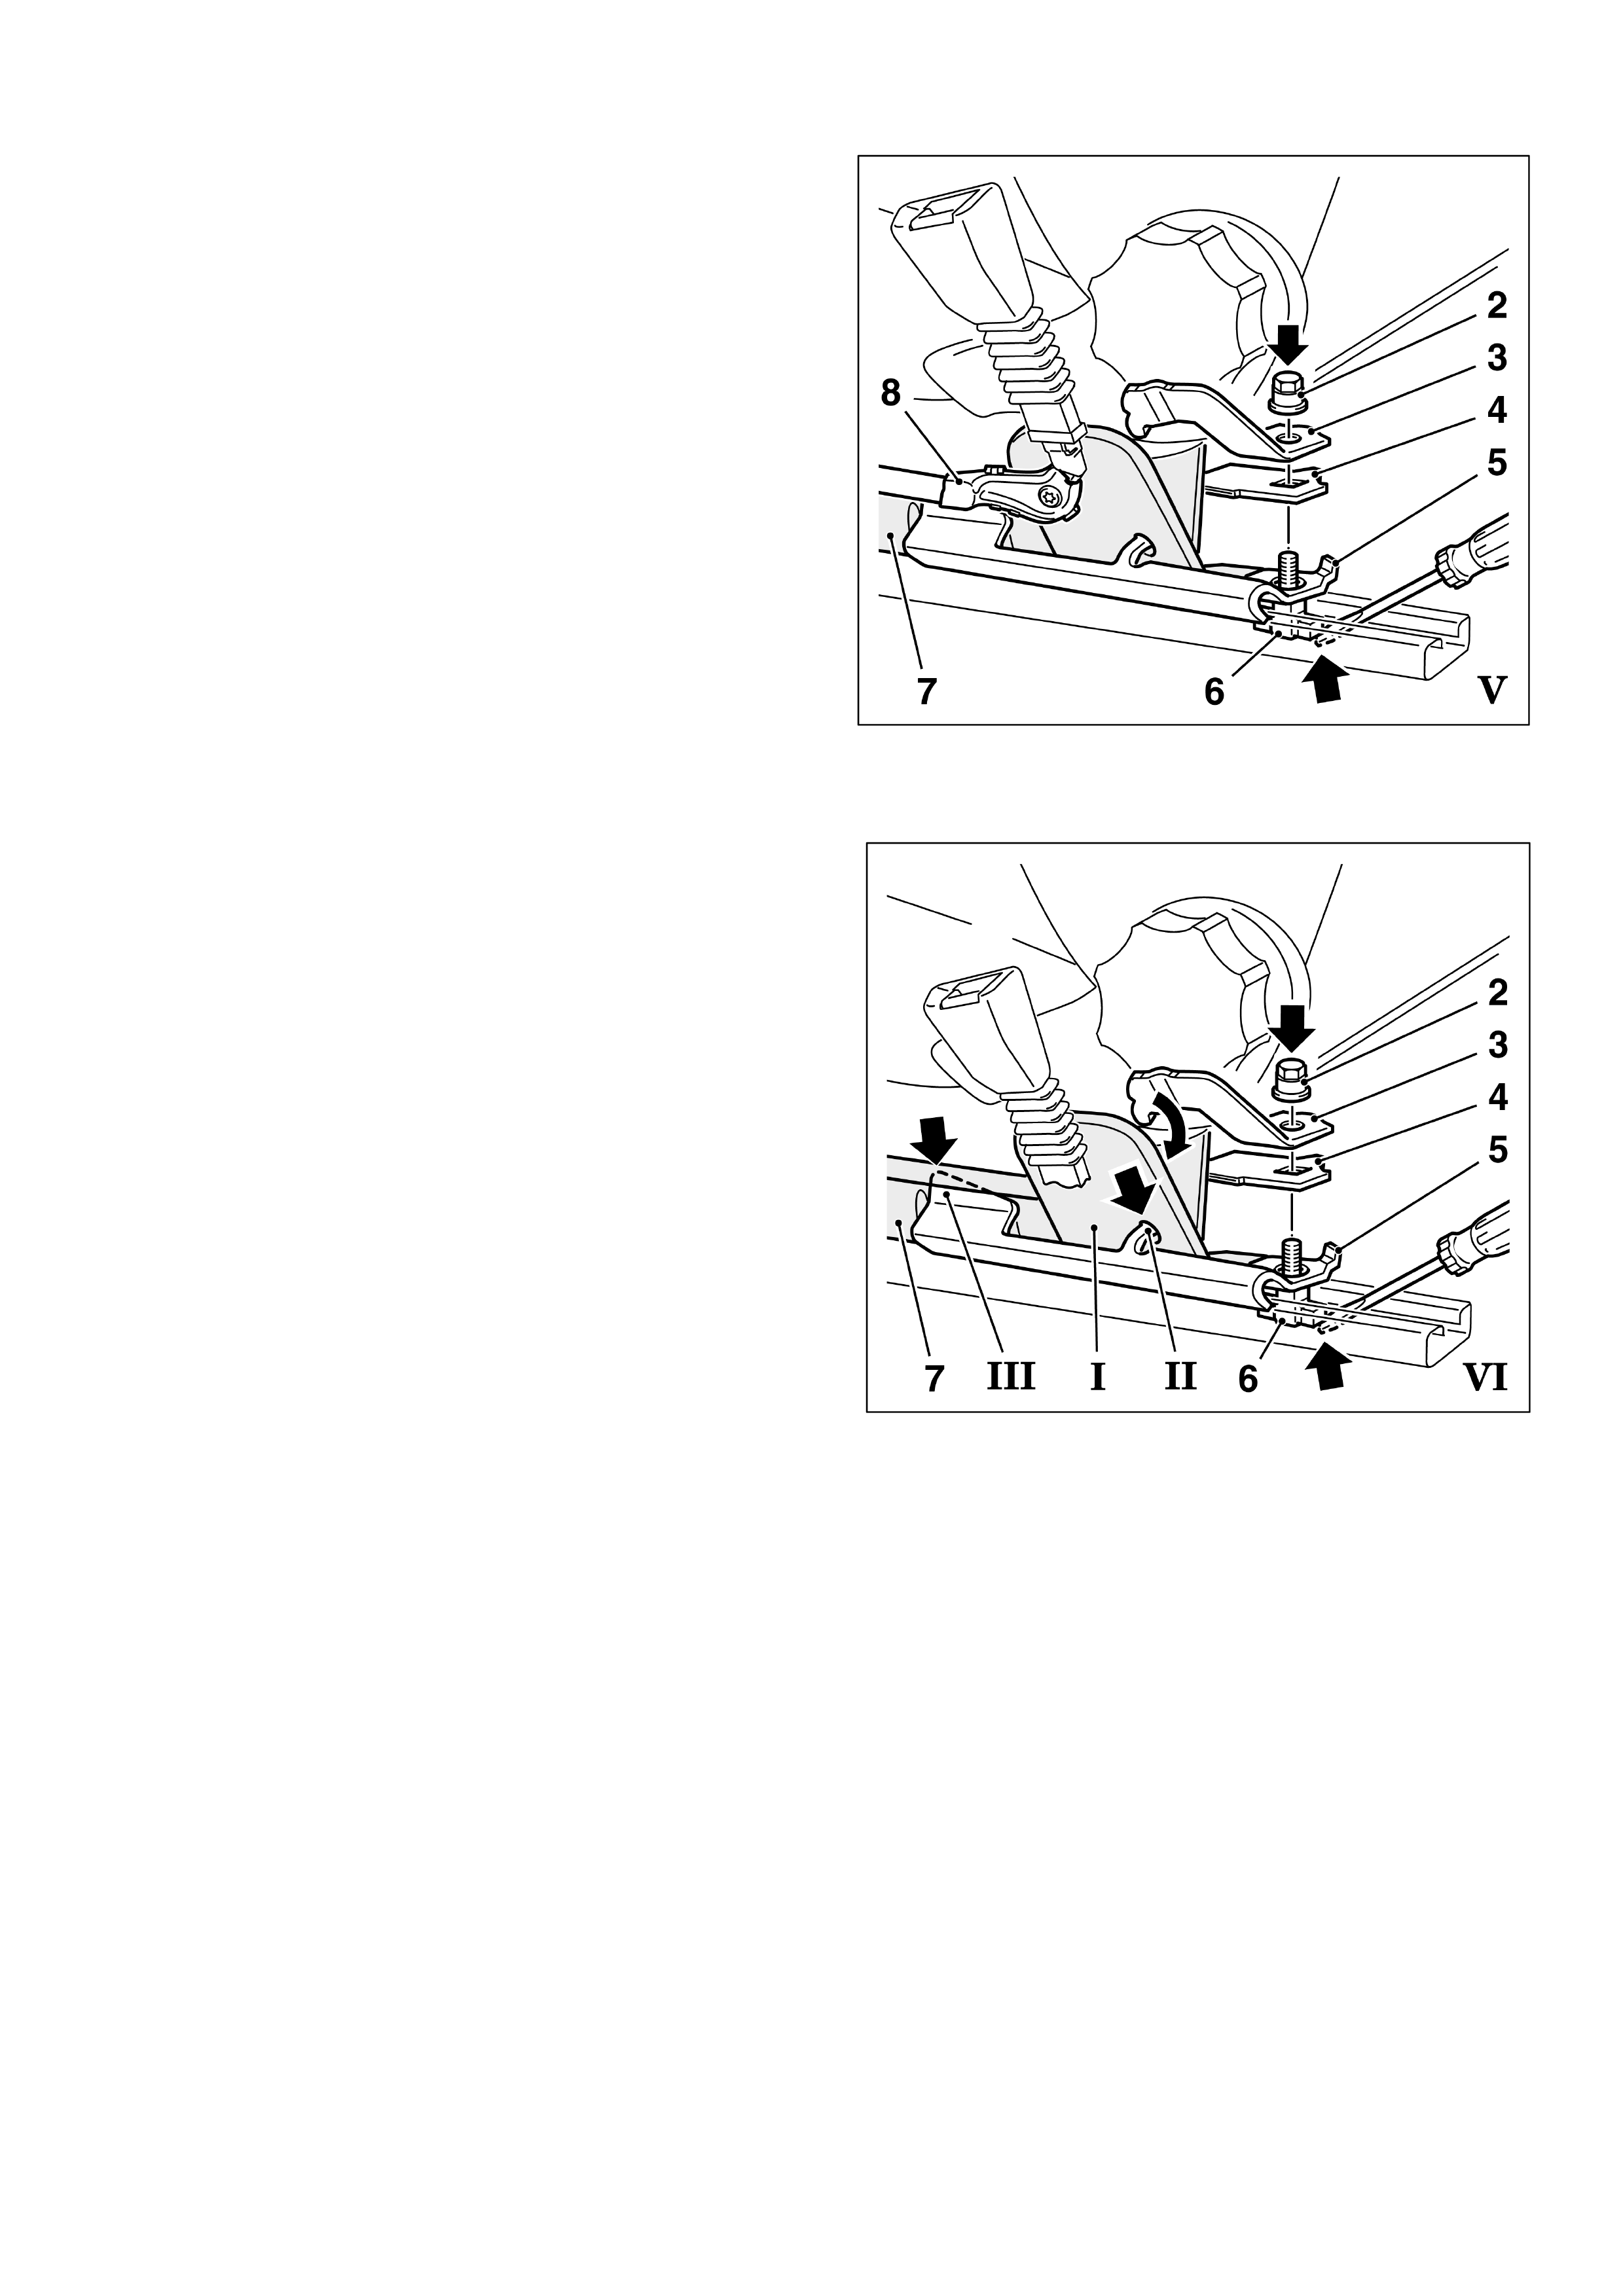
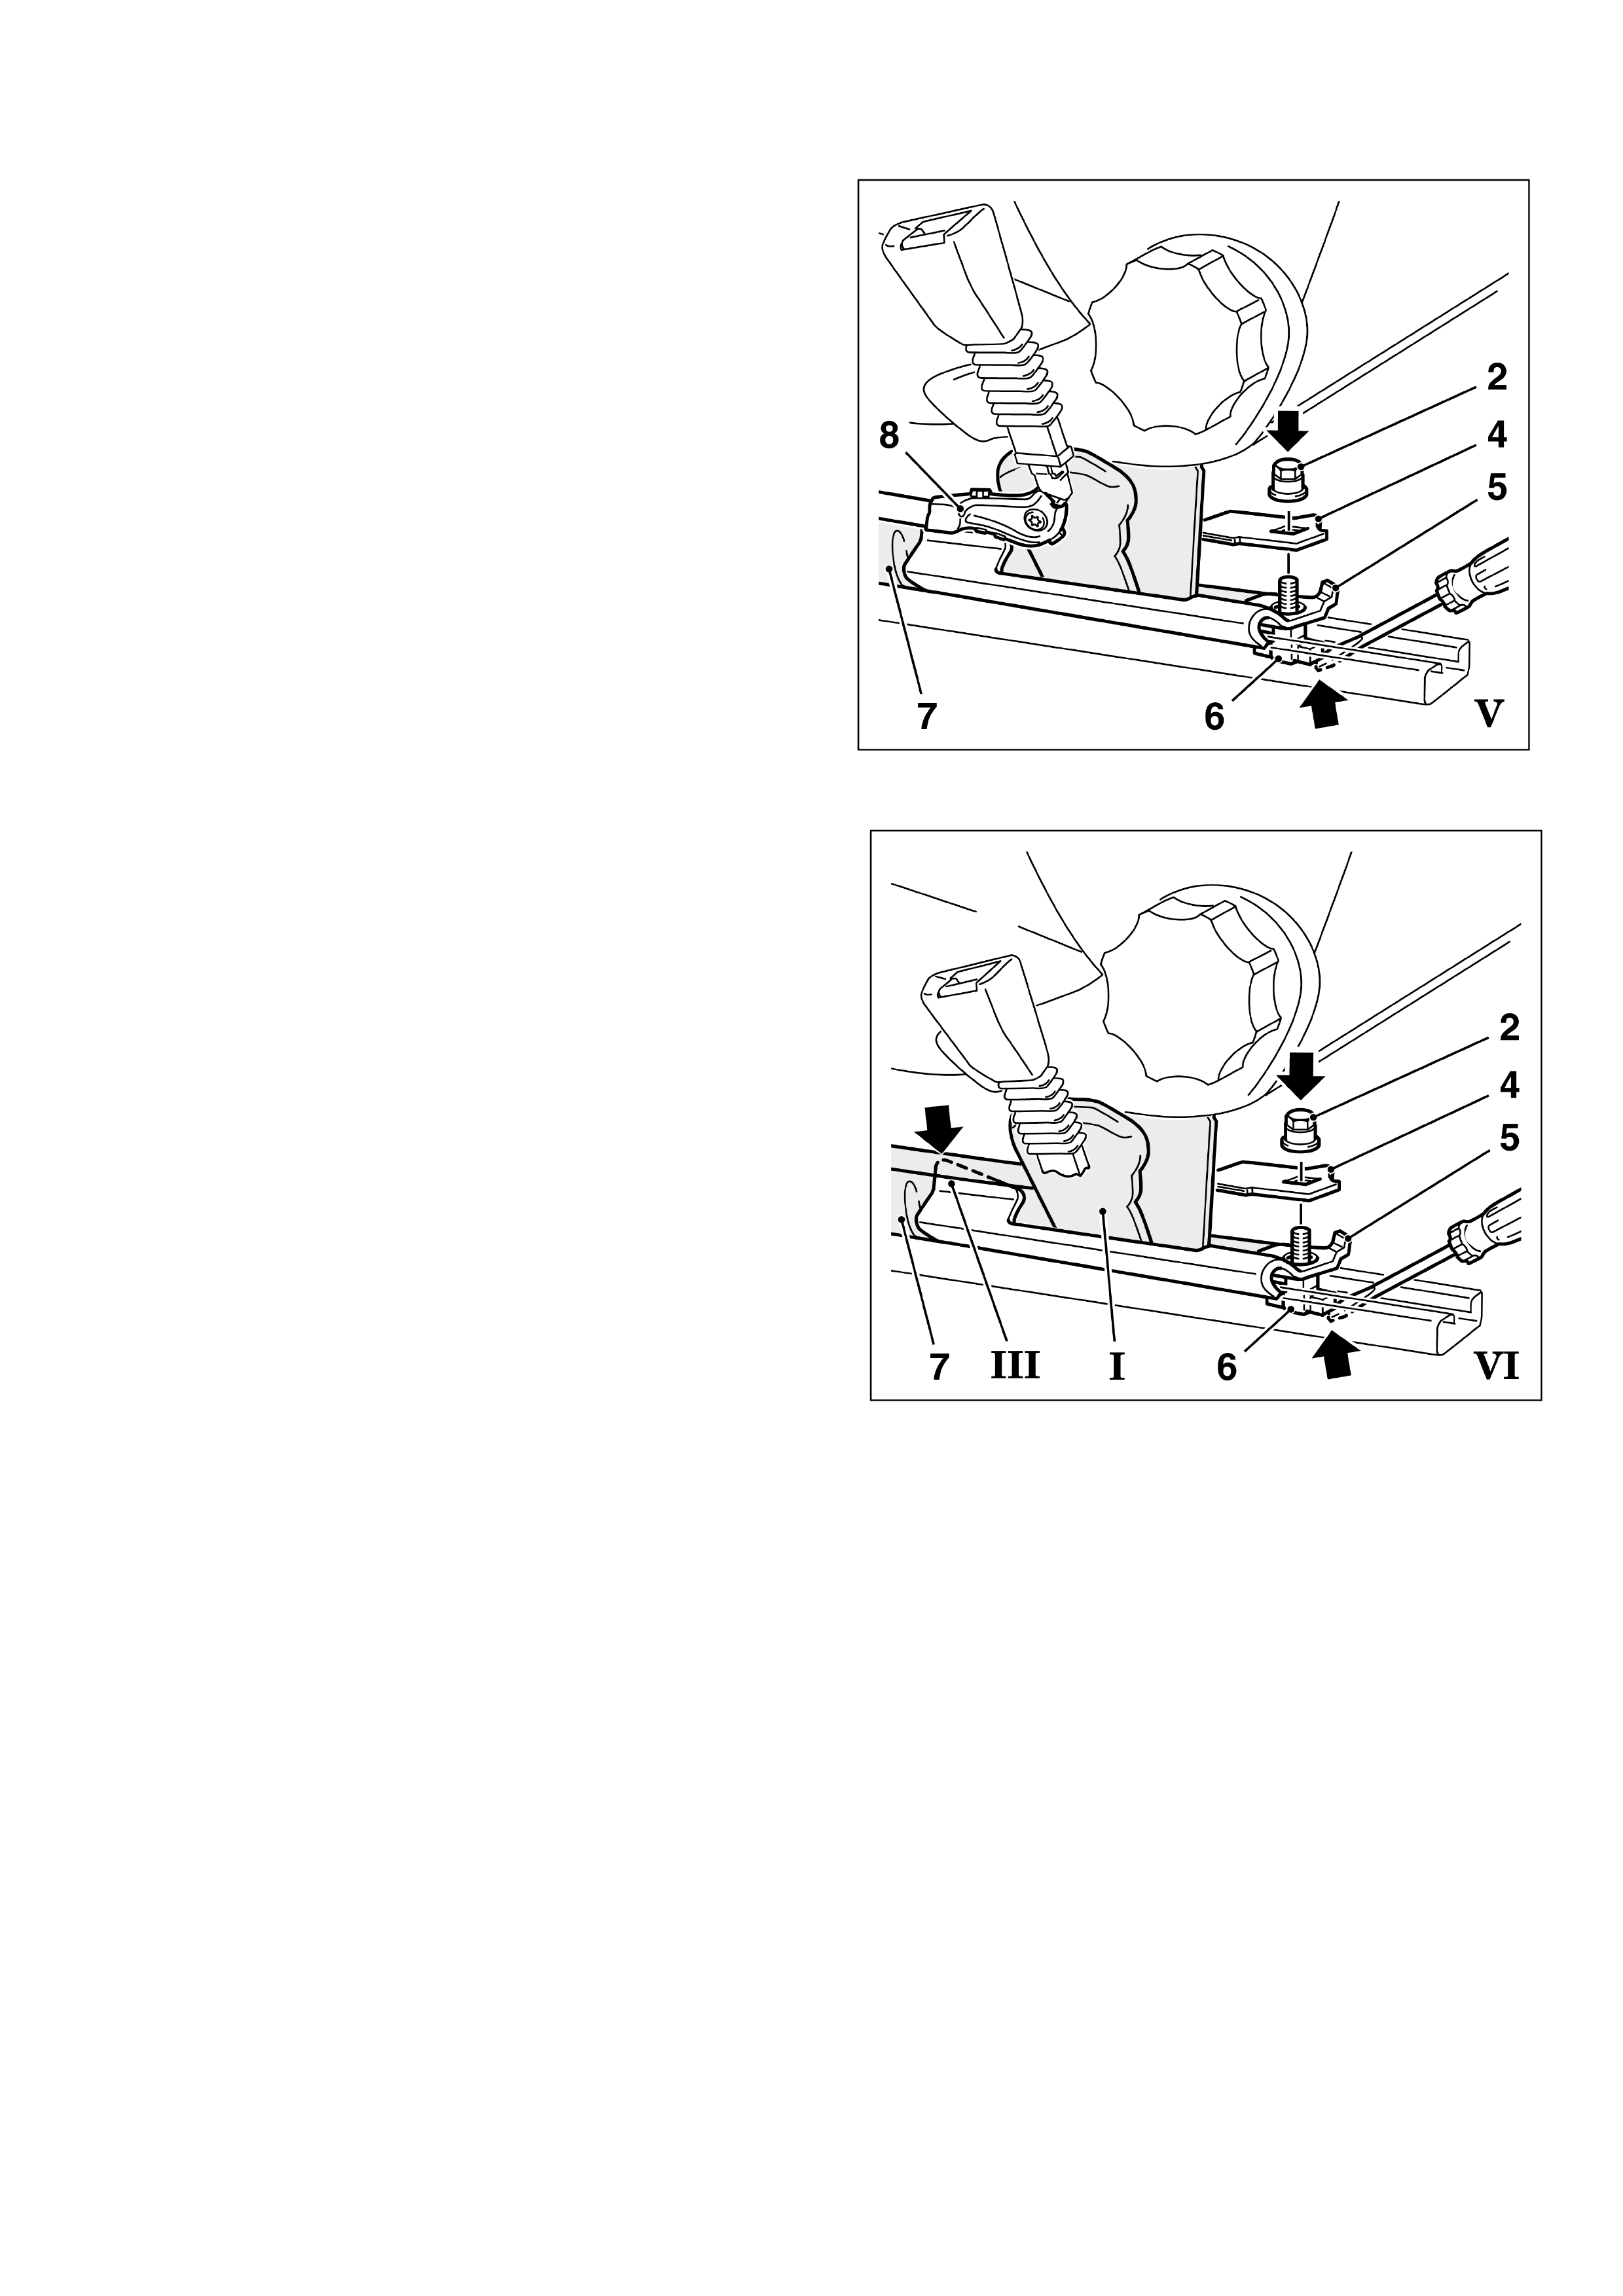
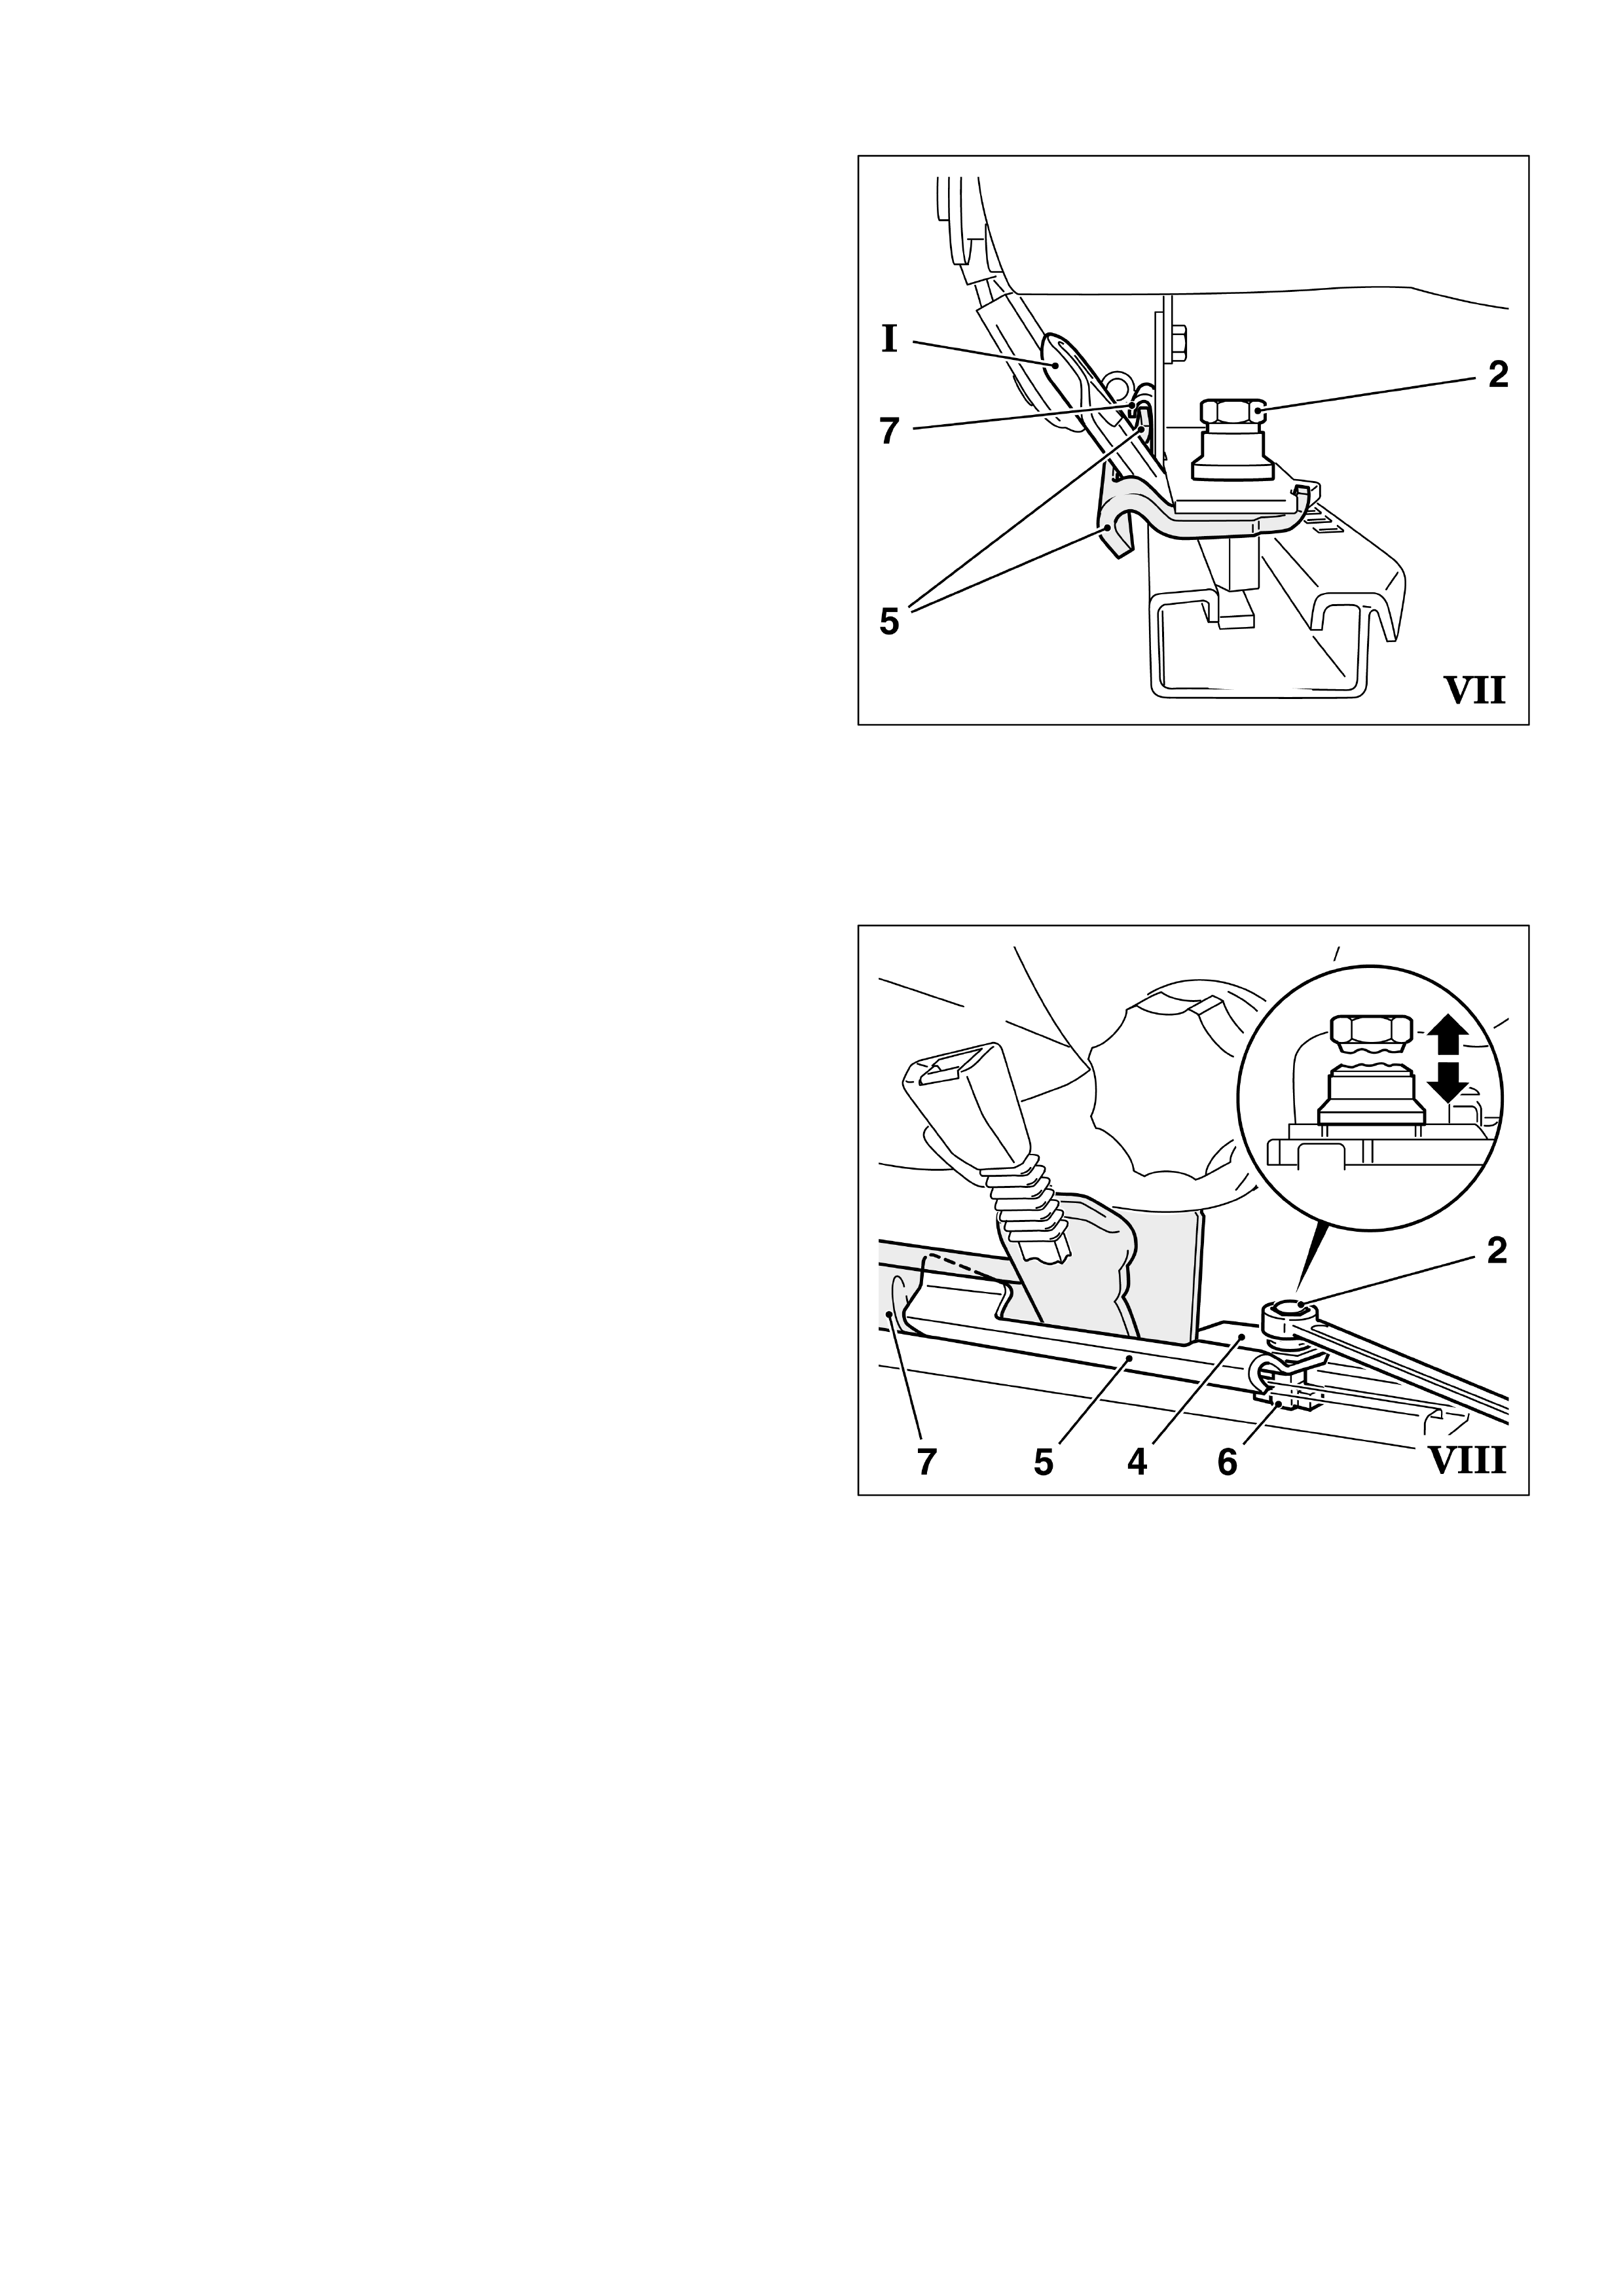
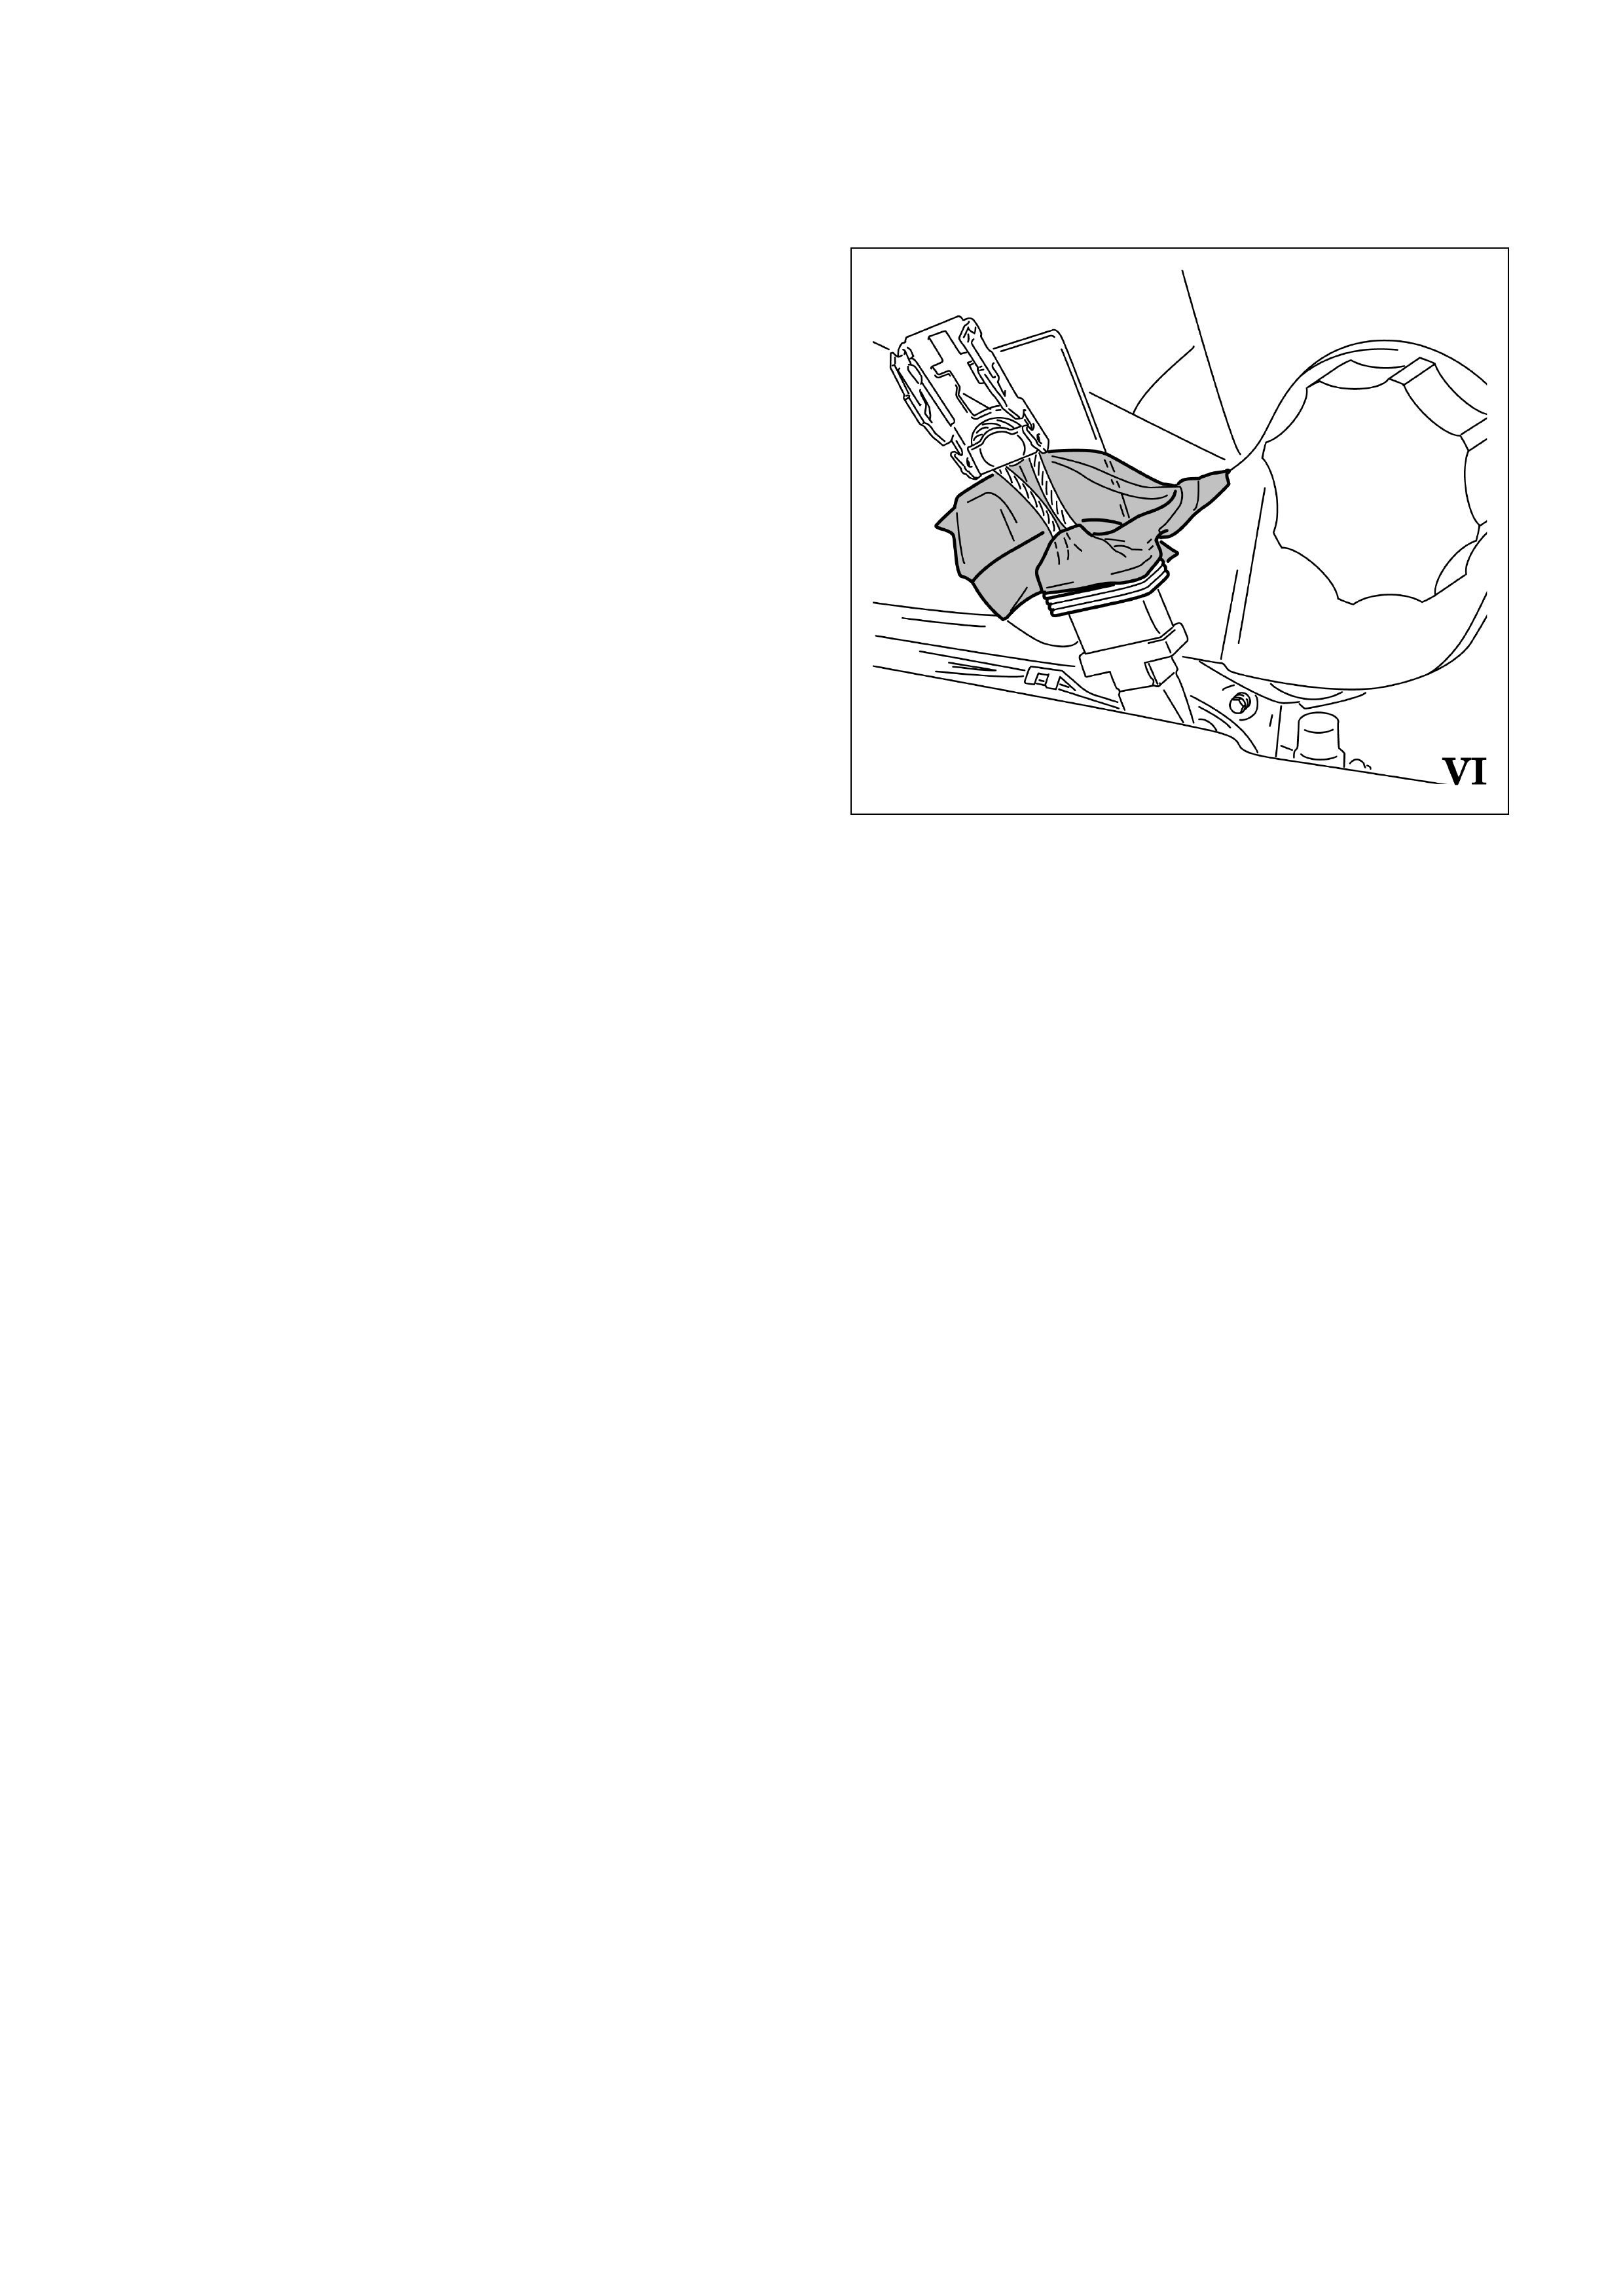
Figure VI shows the assembly of the
reinforcement kit. (Note: The pre-tensioner for
the seat belt has been removed from the
picture for a better overview)
Ensure
The front upper end ( I ) of reinforcing bracket
(5) must slip into the groove of the seat rail (7)
The finger ( II ) in the centre upper area of the
reinforcing bracket (5) must slip into the bore
of the anchor plate ( I ).
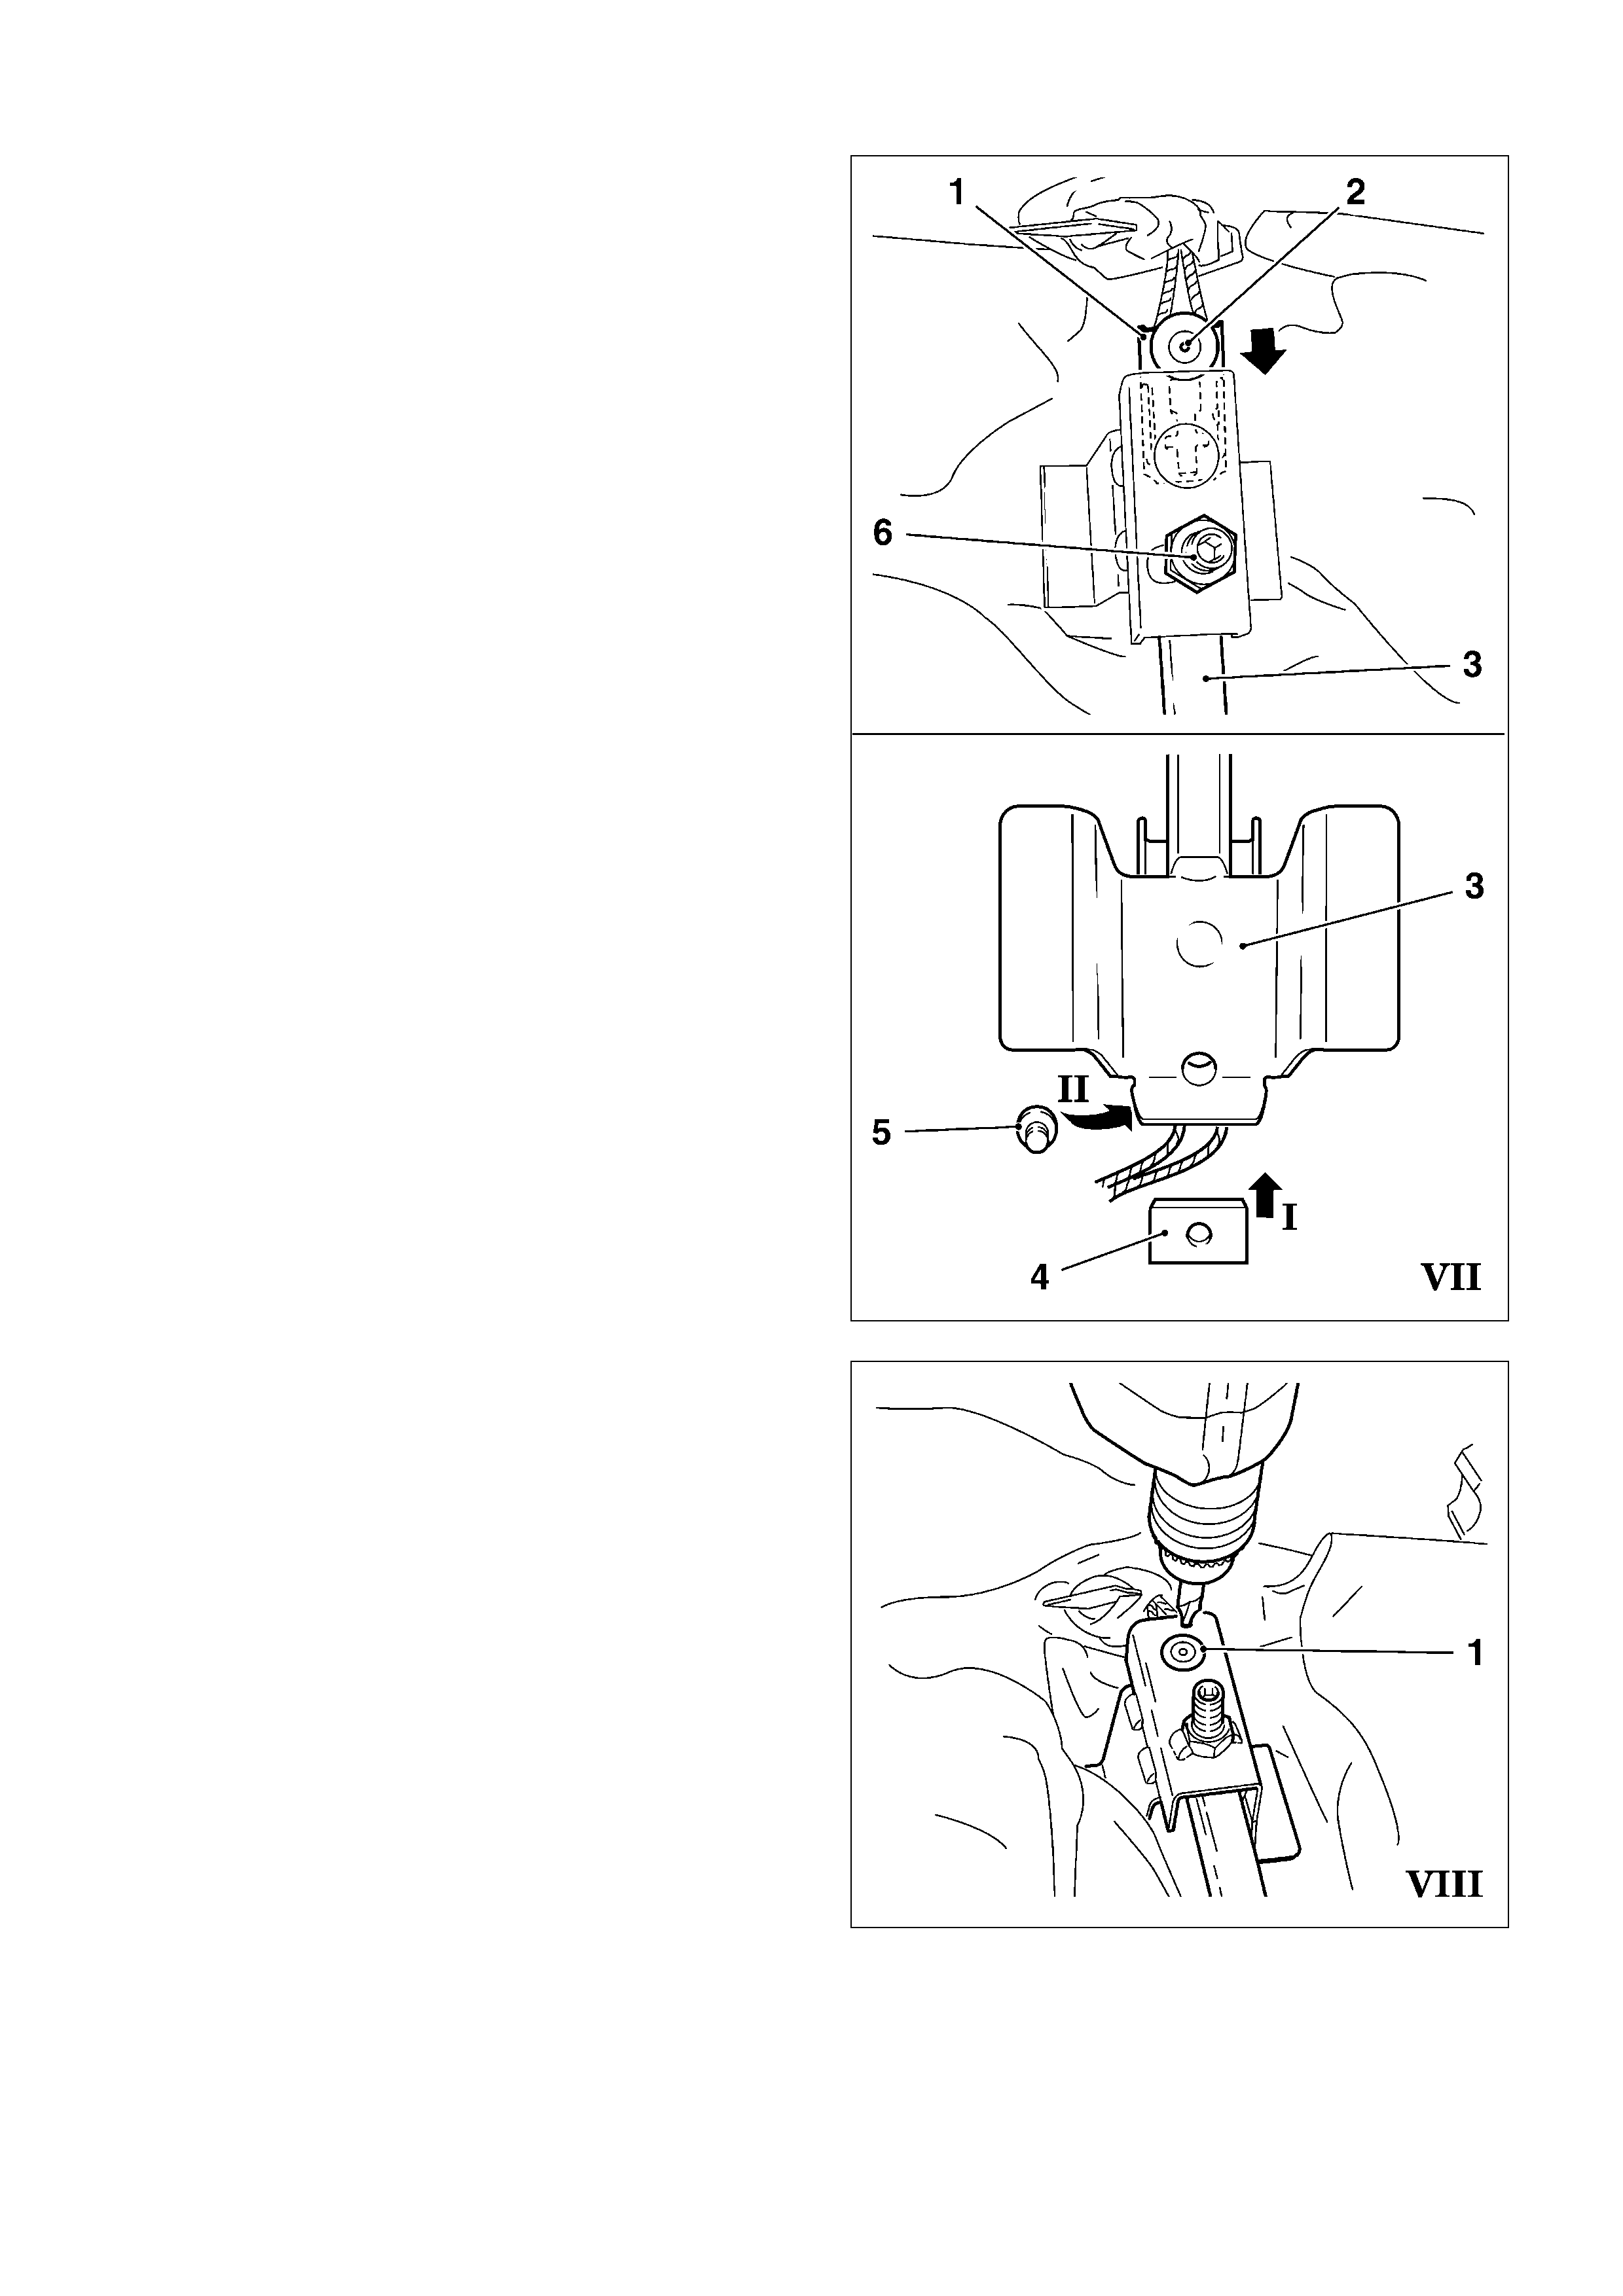
Install reinforcing plate (4) Ensure that the
reinforcing plate fits correctly with hammer
screw (6) and is aligned along the seat rail (7)
Install support hook (3) Ensure that the upper
end contacts the anchor plate ( III ).
Install shear nut (2) with hexagon head
positioned upwards.
Apply LOCTITE 262 to the shear nut.
Tightening the shear nut (3) loosely with ring
wrench.
Note
On right seats (ARH) the support hook (3) has
to be hold in position during tightening by
levering with a screwdriver between hook (3)
and shear nut (2).
8
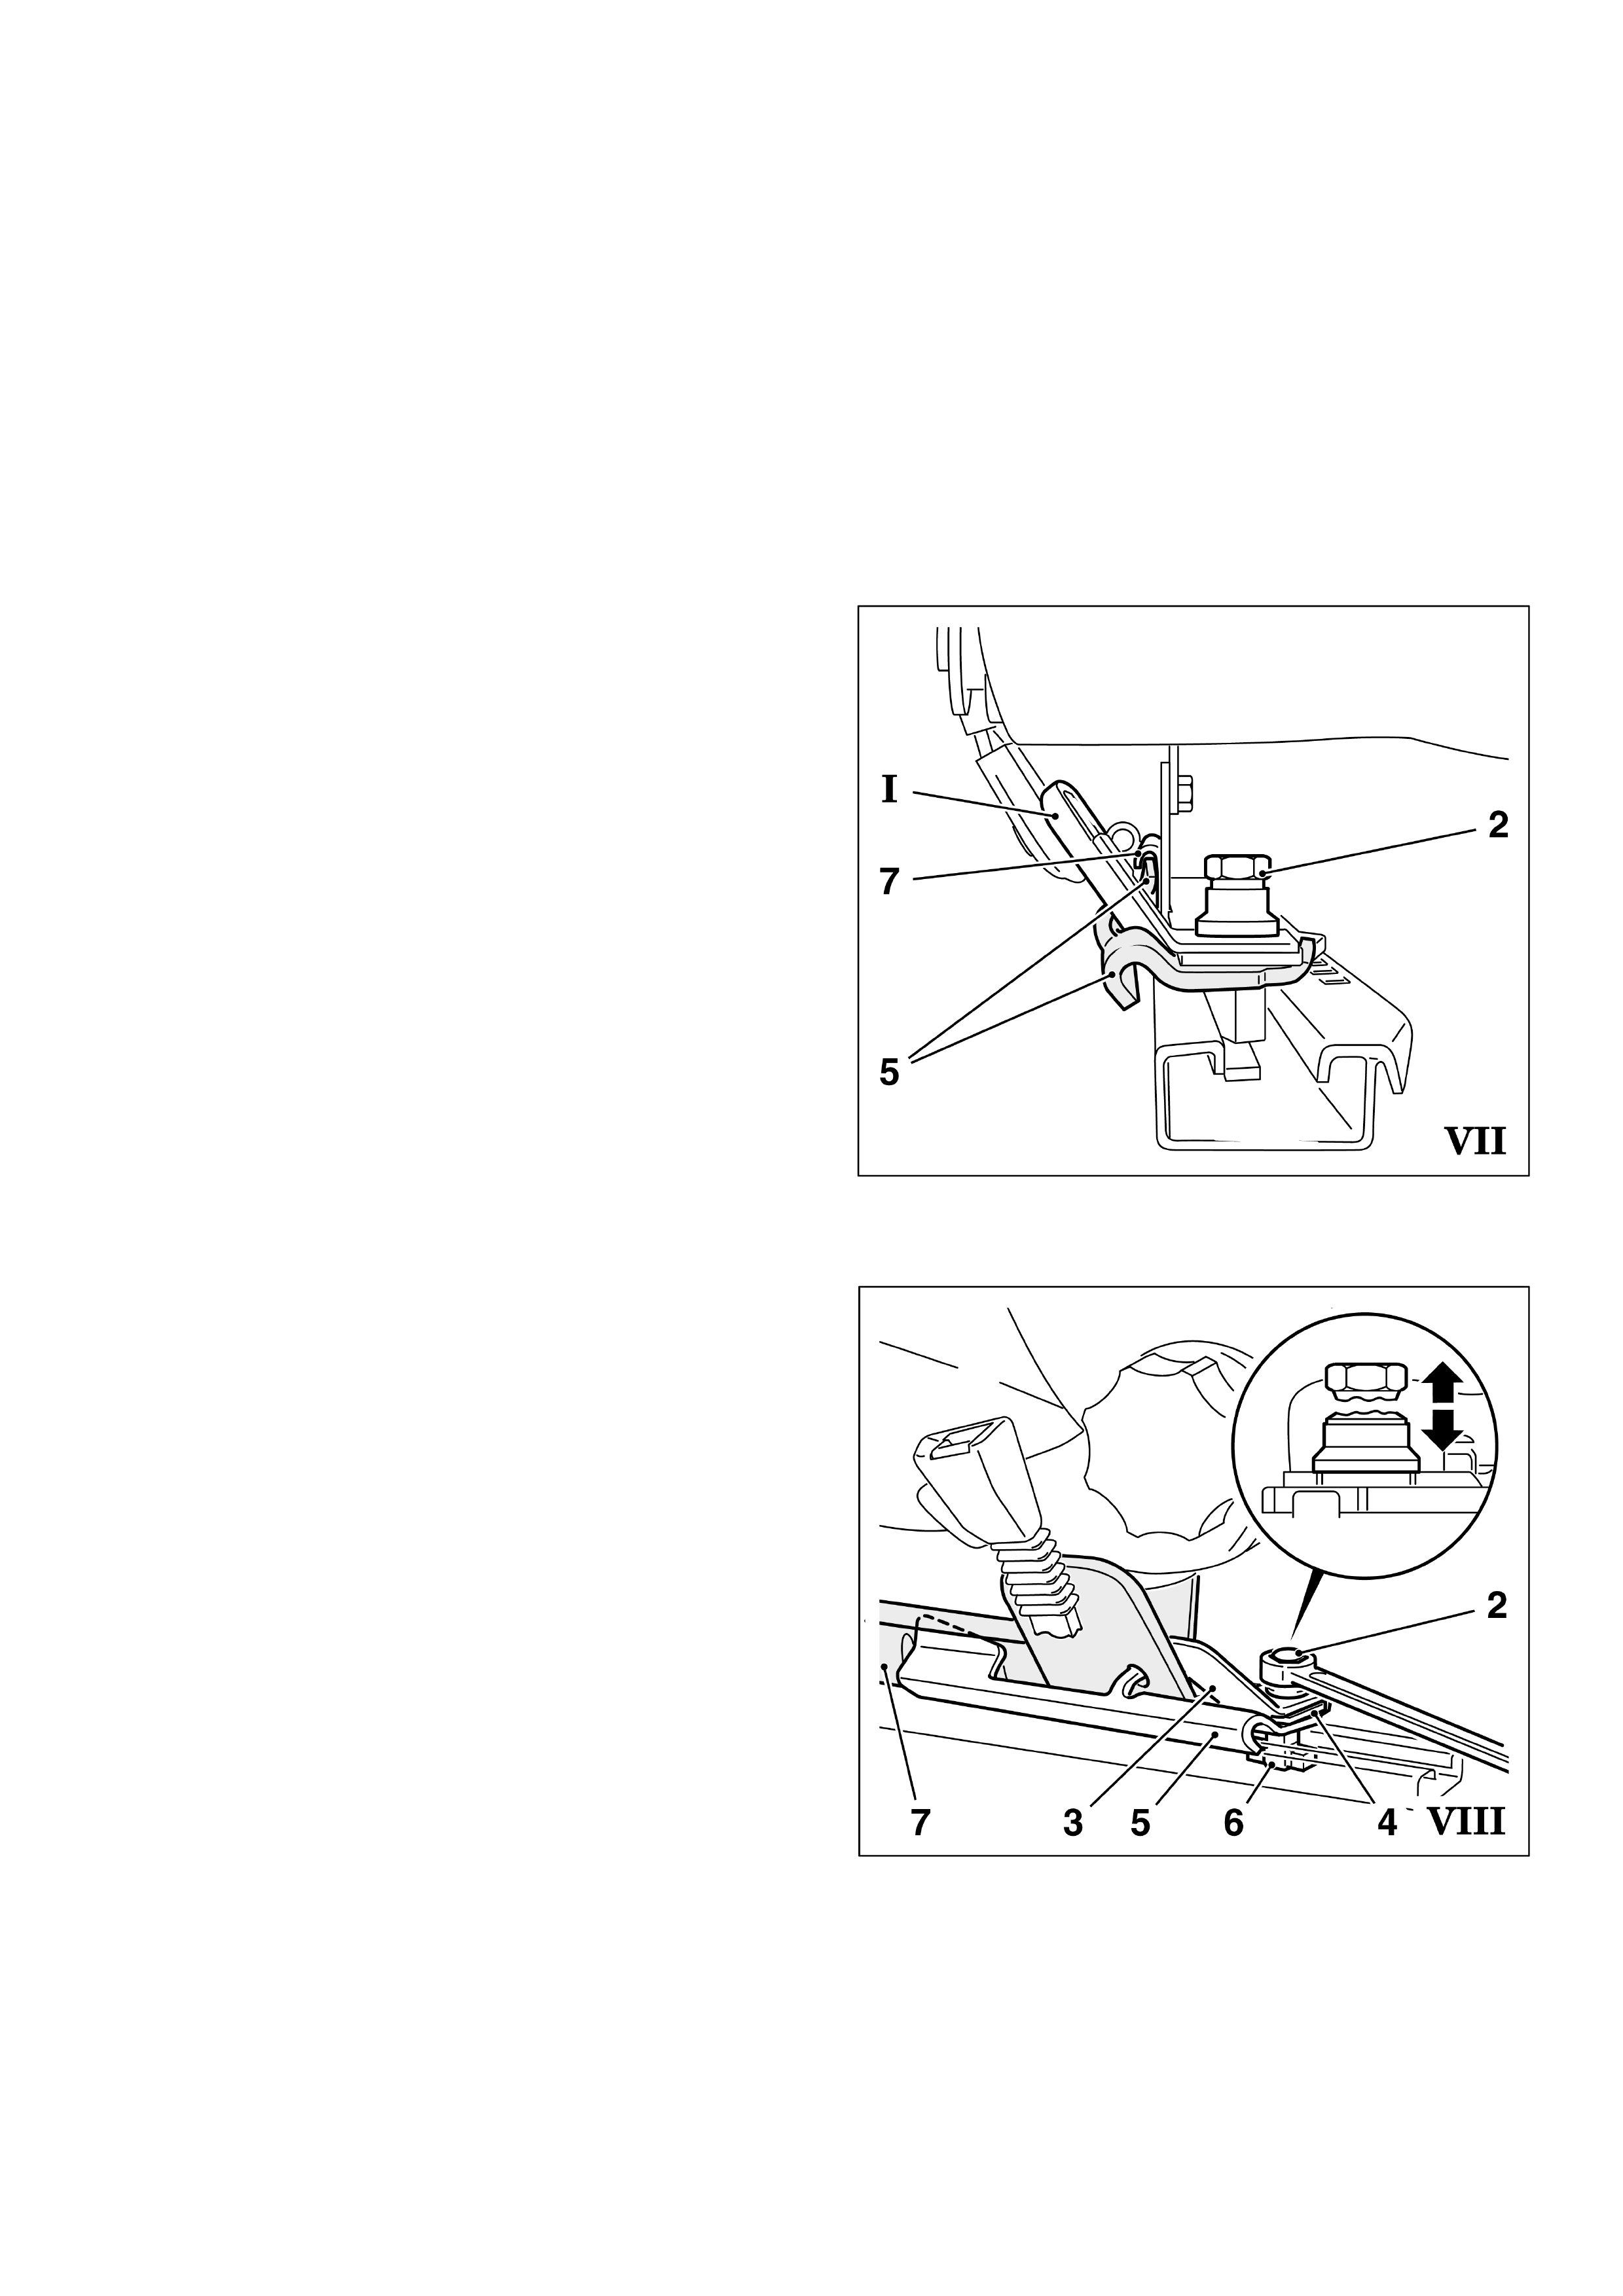
Important
Observe sequence indicated in figure (V).
It is recommended to use a screwdriver/ finger
to hold the hammer screw (6) in position
during assembling.
Important
Before the final torque is applied check
correct installation of the assembled
reinforcement kit as follow:
- Check that the seats move freely and that
the moving is not interfered by the fitted
components.
- Move seat to front most position. Look along
the reinforcing bracket with a torch and check
whether the upper end of the reinforcing
bracket (5) is inserted into seat rail groove.(7).
After correct installation, the reinforcement kit
must fit without any play.
Tighten the shear nut (2) until the nut shears
off.
Important
The head of the shear nut (2) will shear off
suddenly when reaching a torque of
approximately 40 Nm.
To prevent injuries use a ring spanner
only.
The shear nut will prevent removal of
reinforcement kit from seat rail. Therefore
make sure that the reinforcement kit is
correctly fitted before applying final torque.
If there is any problem with the reinforcement
kit after the nut head has been sheared-off,
the complete reinforcement kit must be
replaced.
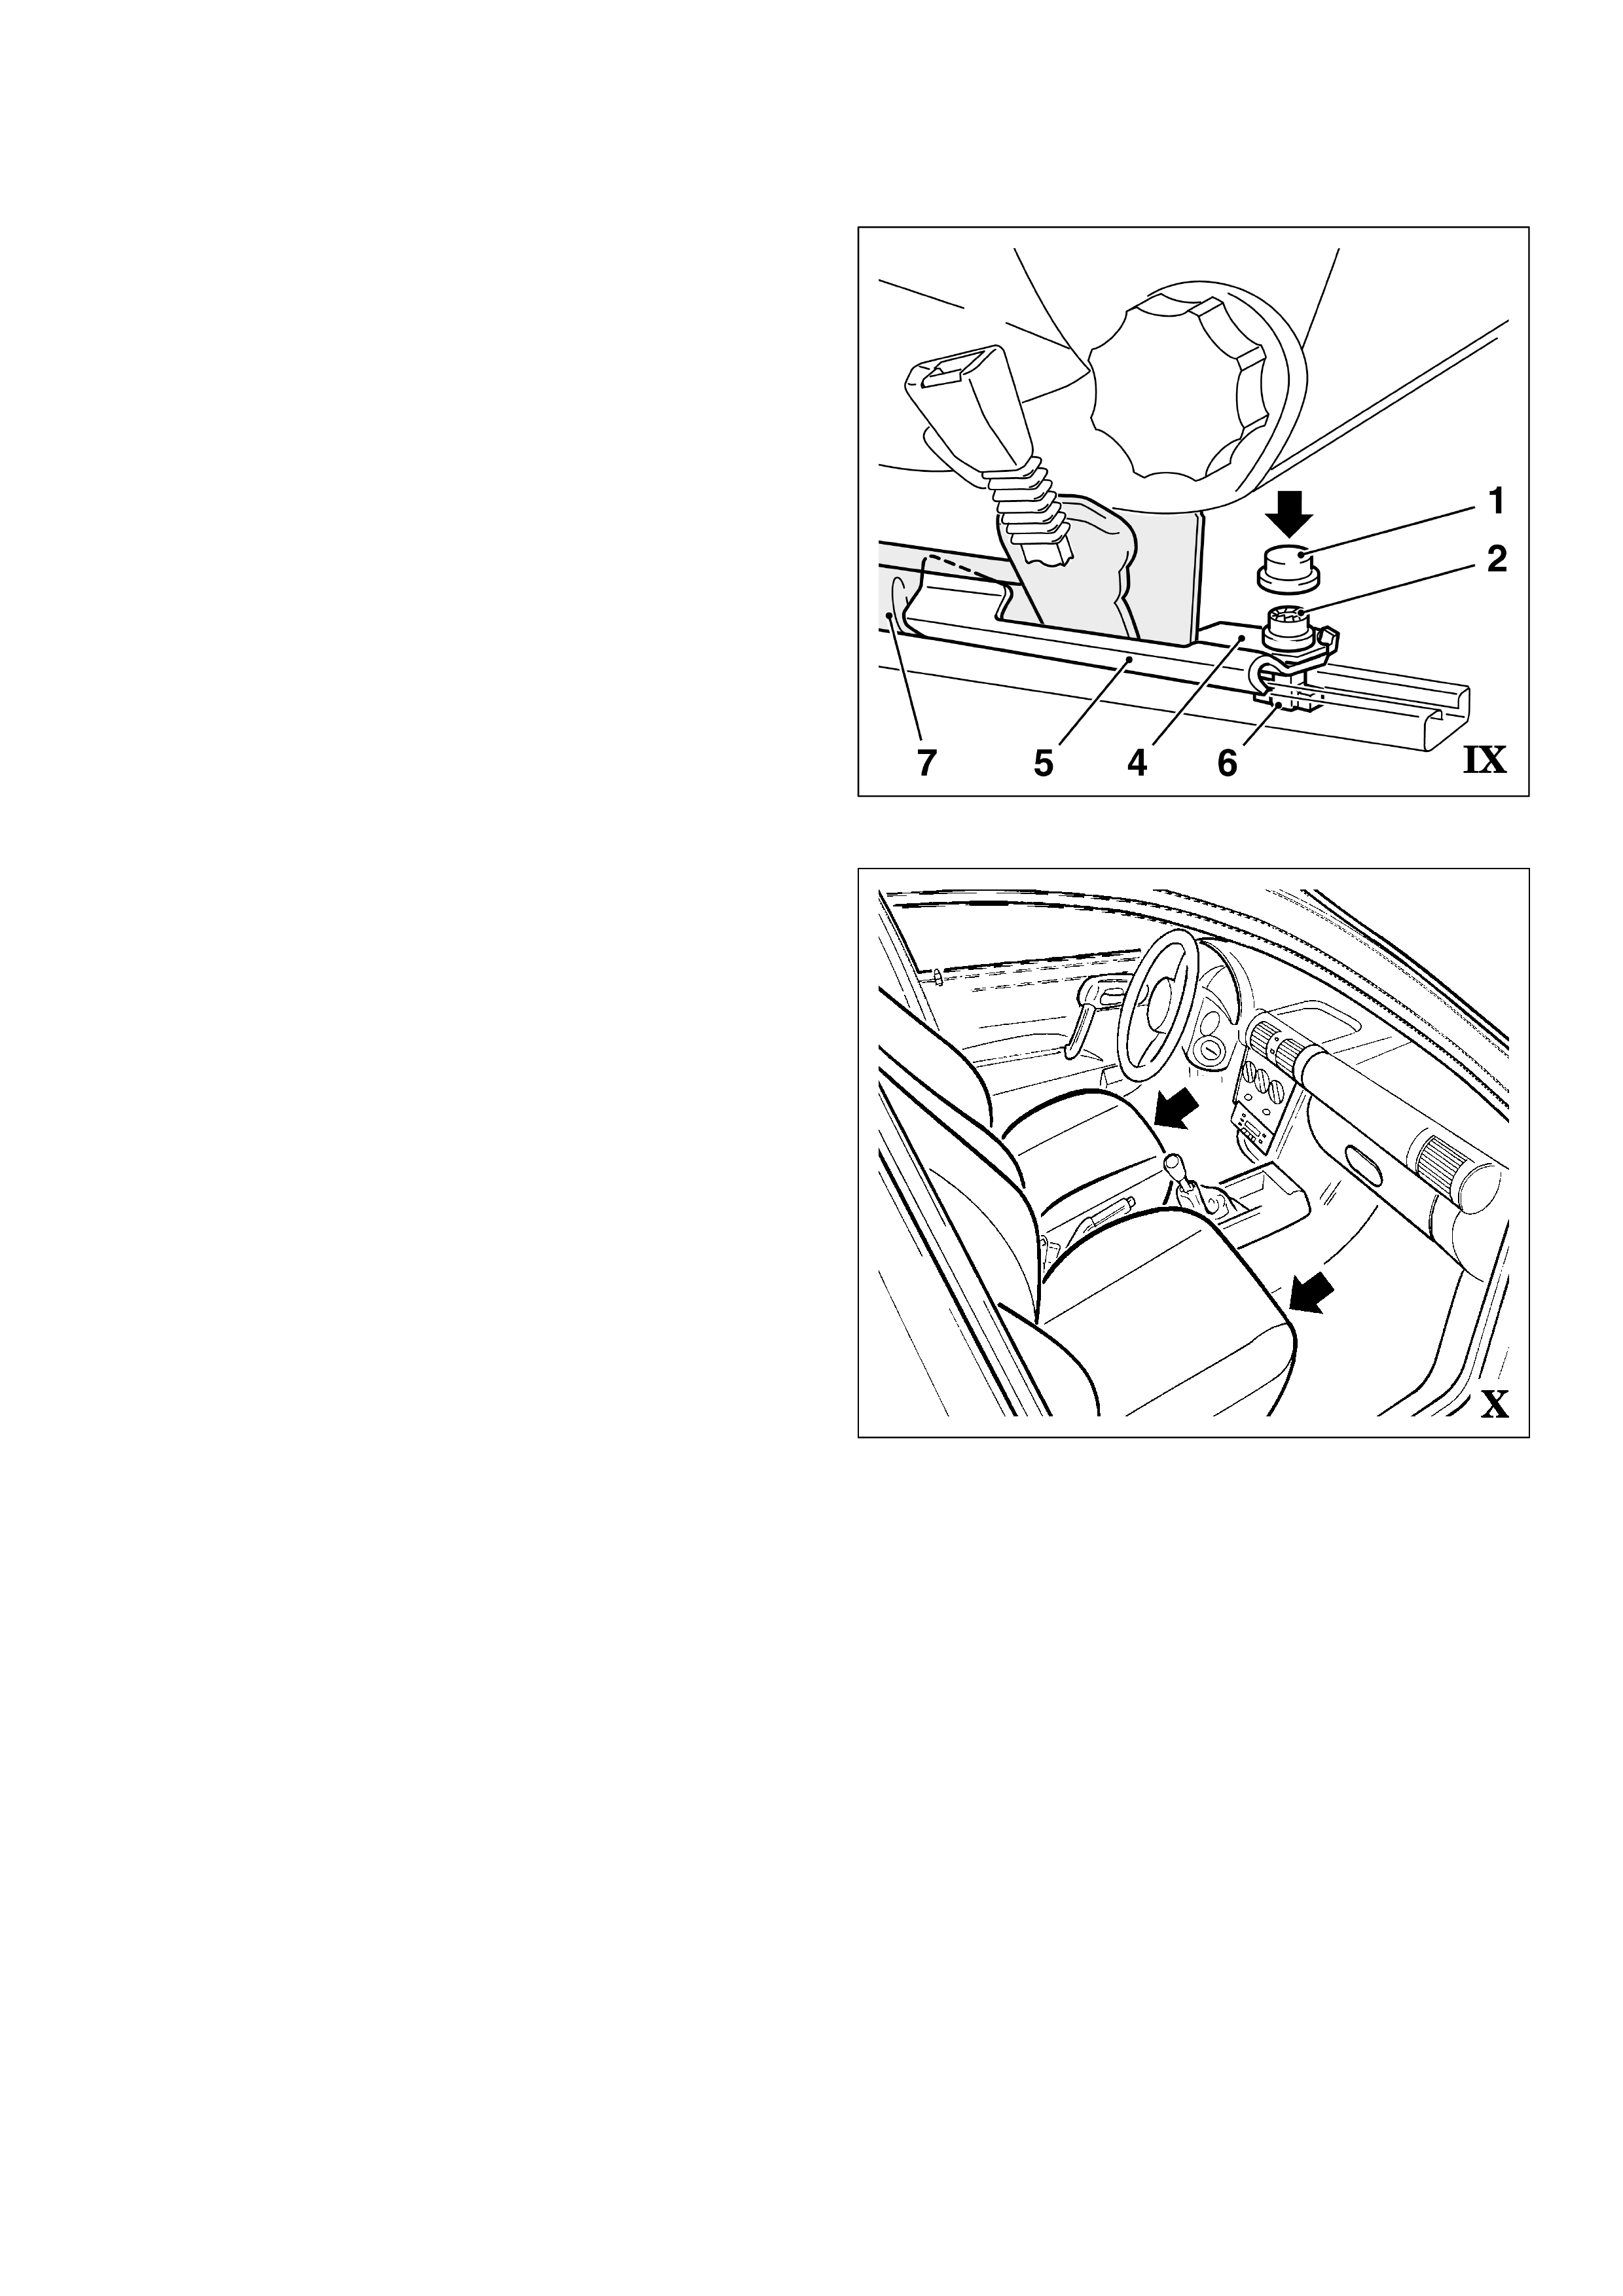
9
Push the protection cap (1) over the shear nut
(2) to cover the sharp edges.
Move the seats to the original position.
End.
10
ATTACHMENT B
REWORK INSTRUCTION CAMPAIGN 01-H-01 VERSION B
Rework For Seats With Anchor Plate Version “B”
The following instruction shows the rework of the right seat. The rework of the lef t seat has
to be carried out accordingly. The rework must be carried out in accordance to the rework
instruction and with the original parts of the reinforcement kit only.
Identification markings for
left seat right seat
1 – Protection Cap*
2 – Shear-off Nut*
4 – Reinforcing Plate
5 – Reinforcing Rail
6 – Hammer Screw*
7 – Seat Rail (part of the seat)
shape
BLH
shape
BRH
*) part has no marking – same part for all four types of reinforcement kits
11
Attention:
Only seats without height adjuster are to be
reworked.
Check the anchor plate version (A or B)
Check type of rework kit.
Check completeness of reinforcement kit.
The installation of the reinforcement kit can
be carried out with the seat in all positions.
However the easiest fitting is possible when
the seat is in the rearmost position.
Assemble hammer screw with reinforcing
bracket as shown in figure III.
Note
When carrying out this rework for the first
time, it is recommended to apply a white paint
mark on the upper edges of the reinforcement
bracket (arrows). The white edges allow a
better check whether the reinforcement
bracket is correctly inserted into the seat rail
groove after fitting.
12
Assembly
Install reinforcing bracket (5) with inserted
hammer screw (6) onto seat rail.
(Reinforcing bracket and hammer screw are
easy to insert when seat is moved to the rear)
Note
If the reinforcing bracket (5) can’t be
positioned correctly, the tie strap on the belt
pre-tensioner (8) has to be turned in order to
achieve more clearance for the reinforcing
bracket.
Figure VI shows the assembly of the
reinforcement kit. (Note the pre-tensioner for
the seat belt has been removed from the
picture for a better overview)
Ensure
The front upper end (I) of reinforcin g bracket
(5) must slip into the groove of the seat rail (7)
Install reinforcing plate (4) Ensure that the
reinforcing plate fits correctly with hammer
screw (6) and is aligned along the seat rail (7).
Important
Prior to installing the shear nut (2) apply a
small amount of LOCTITE 262 on the thread
of the hammer screw (6)
Install shear nut (2) with hexagon head
positioned upwards.
Tightening the shear nut (2) loosely with ring
wrench.
Important
Observe sequence indicated in figure (VI).
It is recommended to use a screwdriver/ finger
to hold the hammer screw (6) in position during
assembling.
13
Important
Before the final torque is applied check
correct installation of the assembled
reinforcement kit as follow:
- Check that the seats move freely and that
the moving is not interfered by the fitted
components.
- Move seat to front most position. Look along
the reinforcing bracket with a torch and check
whether the upper end of the reinforcing
bracket (5) is inserted into seat rail groove.(7).
After correct installation, the reinforcement kit
must fit without any play.
Tighten the shear nut (2) until the nut shears off.
Important
The head of the shear nut (2) will shear off
suddenly when reaching a torque of
approximately 40 Nm.
To prevent injuries use a ring spanner
only.
The shear nut will prevent removal of
reinforcement kit from seat rail. Therefore
make sure that the reinforcement kit is
correctly fitted before applying final torque.
If there is any problem with the reinforcement
kit after the nut head has been sheared-off,
the complete reinforcement kit must be
replaced.
14
Push the protection cap (1) over the shear nut
(2) to cover the sharp edges.
Move the seats to the original position.
End.

15
Attachment (C)
MATERIAL ORDER FORM
SAFETY RELATED RECALL 01-H-01
Fax No.: (03)-9251-6352
Attention: T. Nolan
PLEASE SUPPLY QUANTITY OF SEAT RAIL REINFO RCEMENT KIT AS NOTED BELOW.
NOTE: Only order sufficient quantities for pre-booked vehicles. Strict controls on the
quantity of parts supplied will be enforced due to limited parts availability.
RAIL KIT (ALH) Qty:
RAIL KIT (ARH) Qty:
RAIL KIT (BLH) Qty:
RAIL KIT (BRH) Qty:
From Dealer Code: ___________ Date: __________________
Dealership Name: ______________________________________
Person Ordering Parts (Contactable Person): ________________________________
(please PRINT your name)
Fax This Form To : SALMAT (03)-9251-6352

1
PRODUCT CAMPAIGN BULLETIN
01-H-02
February 16, 2001
SUBJECT : FRONT SEAT BUCKLE REPLACEMENT
MODEL: SB BARINA & COMBO
This bulletin announces the initiation of a safety related recall on some SB Barina & Combo
vehicles.
DESCRIPTION O F DEFECT
Holden has been aler ted to the f act t hat as a result of f atigue and under specif ic load conditions, the
locking spring of the front seat belt buckle mechanism may weaken. This condition can potentially
release the seat belt buckle belt latch mechanism prematurely.
DETAI L S OF AFFECTED VEHICLES
IMPORTANT NOTES:
1. The affected range is determined by the Model Year identifier (alpha) and the vehicles Serial
Number (7 digit numeric) of the ISOVIN. i.e “X” = Model Year 1999 and “4016295” is the
sequential vehicle serial number .
2. The af fect ed range covers multiple model year vehicles ie “X???????” to “Y???????” includes
vehicles built in both model years 1999 (“X”) and 2000 ( “ Y” ) .
3. Only Bar ina & Com bo vehicles with mechanical seat belt pre- tensioner devices are af fect ed by
this recall.
BARINA MO DELS
Model Year 1999(“X”) to Model Year 2000(“Y”) Barina Swing and City and variants including
Cabrio etc.
The ISOVI N r ange of affected vehicles is:-
BARINA
MY FROM TO
W0L0SBF08…….. W0L0SBF08……..
99 X4209509 X4290457
99 X4360565 X4424418
00 Y4045076 Y4304132
W0L0SBF68…….. W0L0SBF68……..
99 X4209337 X4290381
99 X4360580 X4424244
00 Y4045800 Y4304052

2
COMBO
MY FROM TO
W0L0SBF25…….. W0L0SBF25……..
99 X3031259 X3040410
99 X3050122 X3059911
00 Y3006529 Y3027005
Important Note: There are two ranges for model year 99 because there are two batches of
affected vehicles f or that m odel year.
All vehicles within the affected ranges shown above are affected by this recall campaign
irrespective of whether the customer presents a customer letter or not. Dealers must check the
ISOVIN and only those vehicles within the affected r ange req uir e campaign action.
Dealers with electronic vehicle “flagging” systems requiring a Holden Tag No. can use the
following Tag No. r anges for f lagg ing pur poses only. The I SOVIN det ermines whether t he vehicle
IS or IS NO T aff ected by this recall campaign and m ust be established f rom the pr esented vehicle
befor e com plet ing the required action O R advising the customer t hat the vehicle is not affected
From Y071063 to Y089916 and Fr om 2287358 t o 2554793
TRAINING
Due to the complex nature of the rectification, Holden will be conducting training in nominated
metropolitan and rural centres. Before commencing work technicians performing the rectification
on vehicles aff ected by this campaign m ust com plete and pass the tr aining.
SPECIAL TOOLS
There ar e t wo (2) special t ools associated with this recall.
(1) Hand Held Drill Jig
(2) Drill bit (dr ill bit life is approx. 30 vehicles – includes passenger and driver side)
Note: These tools will be supplied with the initial distribution of parts. As drill bit life is approx. 30
vehicles. Salmat will issue another drill bit once individual dealers have ordered the 20th buckle kit.
(One buck le kit contains two buckles)
OWNER NO TIFICATION
Owners will be contacted directly by letter from Holden, providing details of the recall and
requesting them to arrange for the campaign action to be carried out. Following is a draft of the
customer letter.
Dear Holden Customer ,
At Holden we continually strive to enhance the ownership experience of our customers through
continuous product im pr ovem ent, aft er sales ser v ice and ef fective custom er com m unication.

3
Holden’s foremost concern is the continued safety of our customers. Accordingly the recall
campaign described below is being under t aken as a safety precaut ion.
Holden has been alerted to the fact that in a number of vehicles within a determined production
range The locking spring of t he seat belt buckle mechanism may weaken as a result of f atigue under
specific load conditions. This condition could potentially result in the seat belt mechanism releasing
the belt latch prematurely.
Our records show that your Holden vehicle was manufactured within the vehicle range which may
include this component. It is therefore necessary for you to contact a Holden dealership of your
choice as soon as possible to have a revised seat belt buckle kit fitted to your vehicle.
All wor k w ill be car ried out f ree of charge and provided t he necessary ar rangem ents wit h a Holden
dealer are made in advance, your vehicle can be rect ified w hile you wait . The required work will take
approximately one and a half (1.5) hours.
Holden has initiated this action as a precautionary measure to ensure the integrity of the seat belt
buckle.
We know that effective communication is vital to helping your understanding of the issues involved
and trust that this letter provides you with all the information you need. If you should have any
questions, please contact your dealer or call the Holden Recall Assistance Line - 1800 632 826,
where one of our operators will be pleased to assist.
Thank you for your attention to this matter. We apologies for any inconvenience this action may
cause you.
Yours Sincerely
D. McMurray
Manager Customer Assistance
DEALERSHIP ACTION REQUIRED
On presentat ion of the vehicle considered by the customer to be affected by this campaig n:
• Confirm t hat the vehicle is in the af f e cted ISO VIN rang e – Ref er to Det ails of Af f ected Vehicles
on page 1 of this bulletin.
• Rework affected vehicle in accordance with the Rework Instructions. Refer to attachment (A)
Rework Instr uction 01-H-02.
• Apply a Campaign Completed I dentif icat ion label.
CAMPAIGN COMPLETION IDENTIFICATION
All campaigned vehicles must have a Campaign Completed identif ication label applied to the right
hand front ‘A’ pillar, between the hinges, with details of the campaign, 01-H-02, Dealership code
and date legibly entered on t he label with a perm anent ink pen.
Extra campaign ident ification labels are available free of charge f rom:
Moore Business Systems
Facsimile: (03) 9270 8900
Attention: Mr. Bob Curry

4
Quote stock No. SD 28156 on a Moore Business Systems ‘packaged goods’ order form (or
facsim ile if not available) for a box of 100 labels.
As an additional continuous improvement initiative, which was triggered by the dealer network,
Campaign Completion Identif ication will now also be included on the Vehicle Service Histor y Label
(SD 28177 available from Moore Business Systems). Place an “X” at the F-4 co-ordinate of the
Vehicle Service History Label and apply it to the inner side of t he lower instr ument panel cover.
WARRANTY CLAIM INFORMATION
On completion of campaign action, dealers are requested to immediately submit a w arranty
claim.
Description: Replace Both Front Seat Belt Buck les
Labour Operat ion No: T180601
Standard T ime: 1.1 Hours
Failure Code: 96
Case Type: 08
Please ensure correct vehicle details are included when submitting warranty claim information as
per the norm al warranty process.
Warranty claim submission is used to update our record of campaign completion and determines
whether furt her cust omer contact is necessary to action all affected vehicles.
Please ensure on completion of the cam paign action that a warrant y claim is submitted prom pt ly.
PARTS INFORMATION
DO NOT O RDER PARTS FOR THIS CAMPAI GN FROM HSPO
Front Seat Buckle Kits for this campaign are available through SALMAT using the attached order
form.
Controls on the quantity supplied will be enforced due to lim ited parts availability.
DO NOT campaign vehicles or order parts unnecessaril y!
Ensure the vehicle fall s within the guidelines specif i ed i n sect ion marked:
‘DETAILS OF AFFECTED VEHICLES’.
Should you require further information or clarification on the above, then please call Oliver
Mitrovski on telephone number ( 03) 9647 7619.
Joachim Burandt
General Service Manager
Attachment A: REW O RK INSTRUCTIONS CAMPAIGN 01-H-02
Attachment B: MATERIAL O RDER FORM
5
ATTACHMENT A REWORK INSTRUCTIONS CAMPAIGN 01-H-02
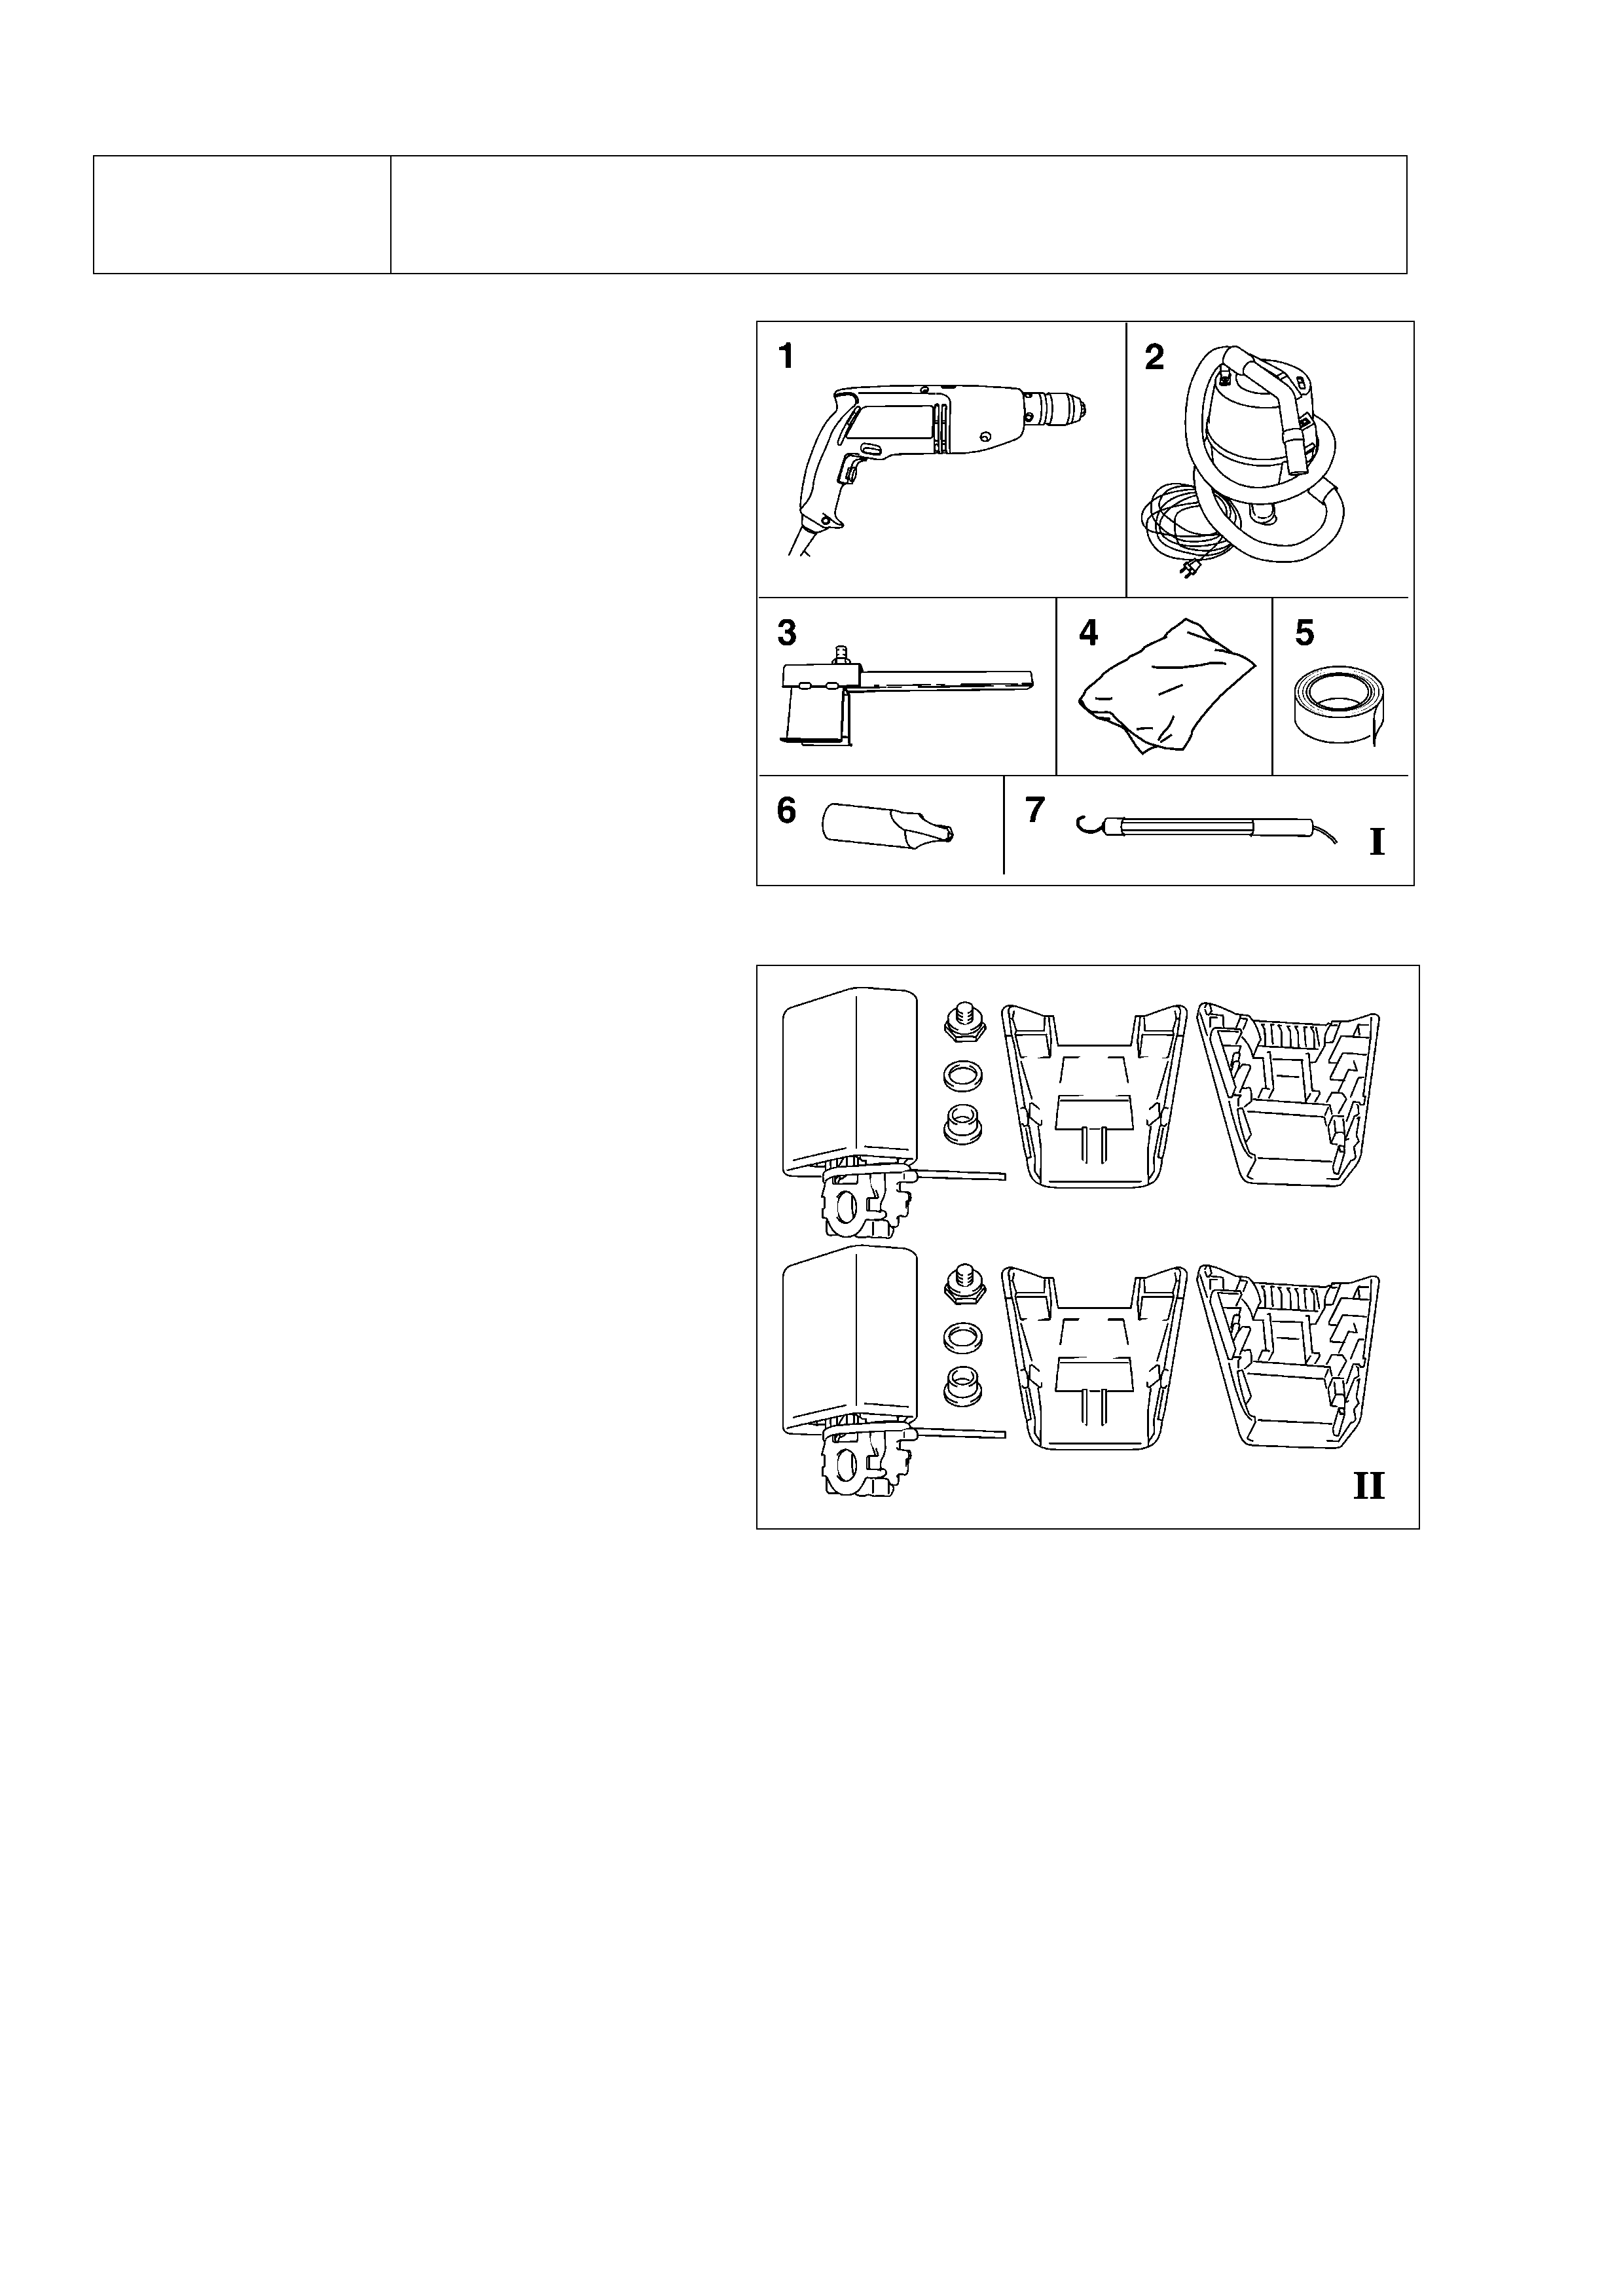
Tools:
Hand Held Drilling Machine(1) (13 mm Drill
Chuck)
Vacuum Cleaner(2)
Hand Held Drilling Jig (3)
Cleaning Cloth (4)
Tape (5)
Drill Bit (6)
Hand Lamp (7)
Repair Kit Seat Buckle:
2x Seat Buckle
2x Shear Bolt
2x Fixing Nut
2x Pulley
2x Seat Buckle Cap (Seat Side)
2x Seat Buckle Cap (Tunnel Side)
Rework Operation:
1. Disassembling of seat buckles
2. Drill out f ixing rivet of se at buckle frame
3. Fitting new seat buckle
4. Visual and functional check of seat buckles

6
Rework Details:
Check the vehicle for a white paint marking on the pre-tensioner, which is visible through the
aperture of the seat rail cover.
If no white paint mark is present on the pre-tensioner, both seat buckles have to be replaced in
accordance with the following instruction.
1. Disassembling of Seat Buckle:
The following Rework Instructions shows the replacement operation on the right seat buckle.
Both seat buckles have to be replaced.
Positioning of Seats
The seat to be reworked has to be moved in the rearmost position.
The other seat has to be moved in the front most position
Disassembling
Remove the seat rail cover. (4 Fixing Screws) to access seat belt pre-tensioner.
Note. Torxscrews
Securing of Pre-tensioner
The security fork has to be fitted in the
designated aperture of the pre-tensioner.
(Arrow)
Caution!
Before working on the pre-tensioner please,
observe the safety regulation for restraint
systems.
7
Note:
In the course of disassembling of the seat buckles, lock components may fall into the seat rails
or the footwell area. Use a cleaning cloth to cover the seat rails and the footwell area.
The components of the disassembled seat buckle must not be used again.
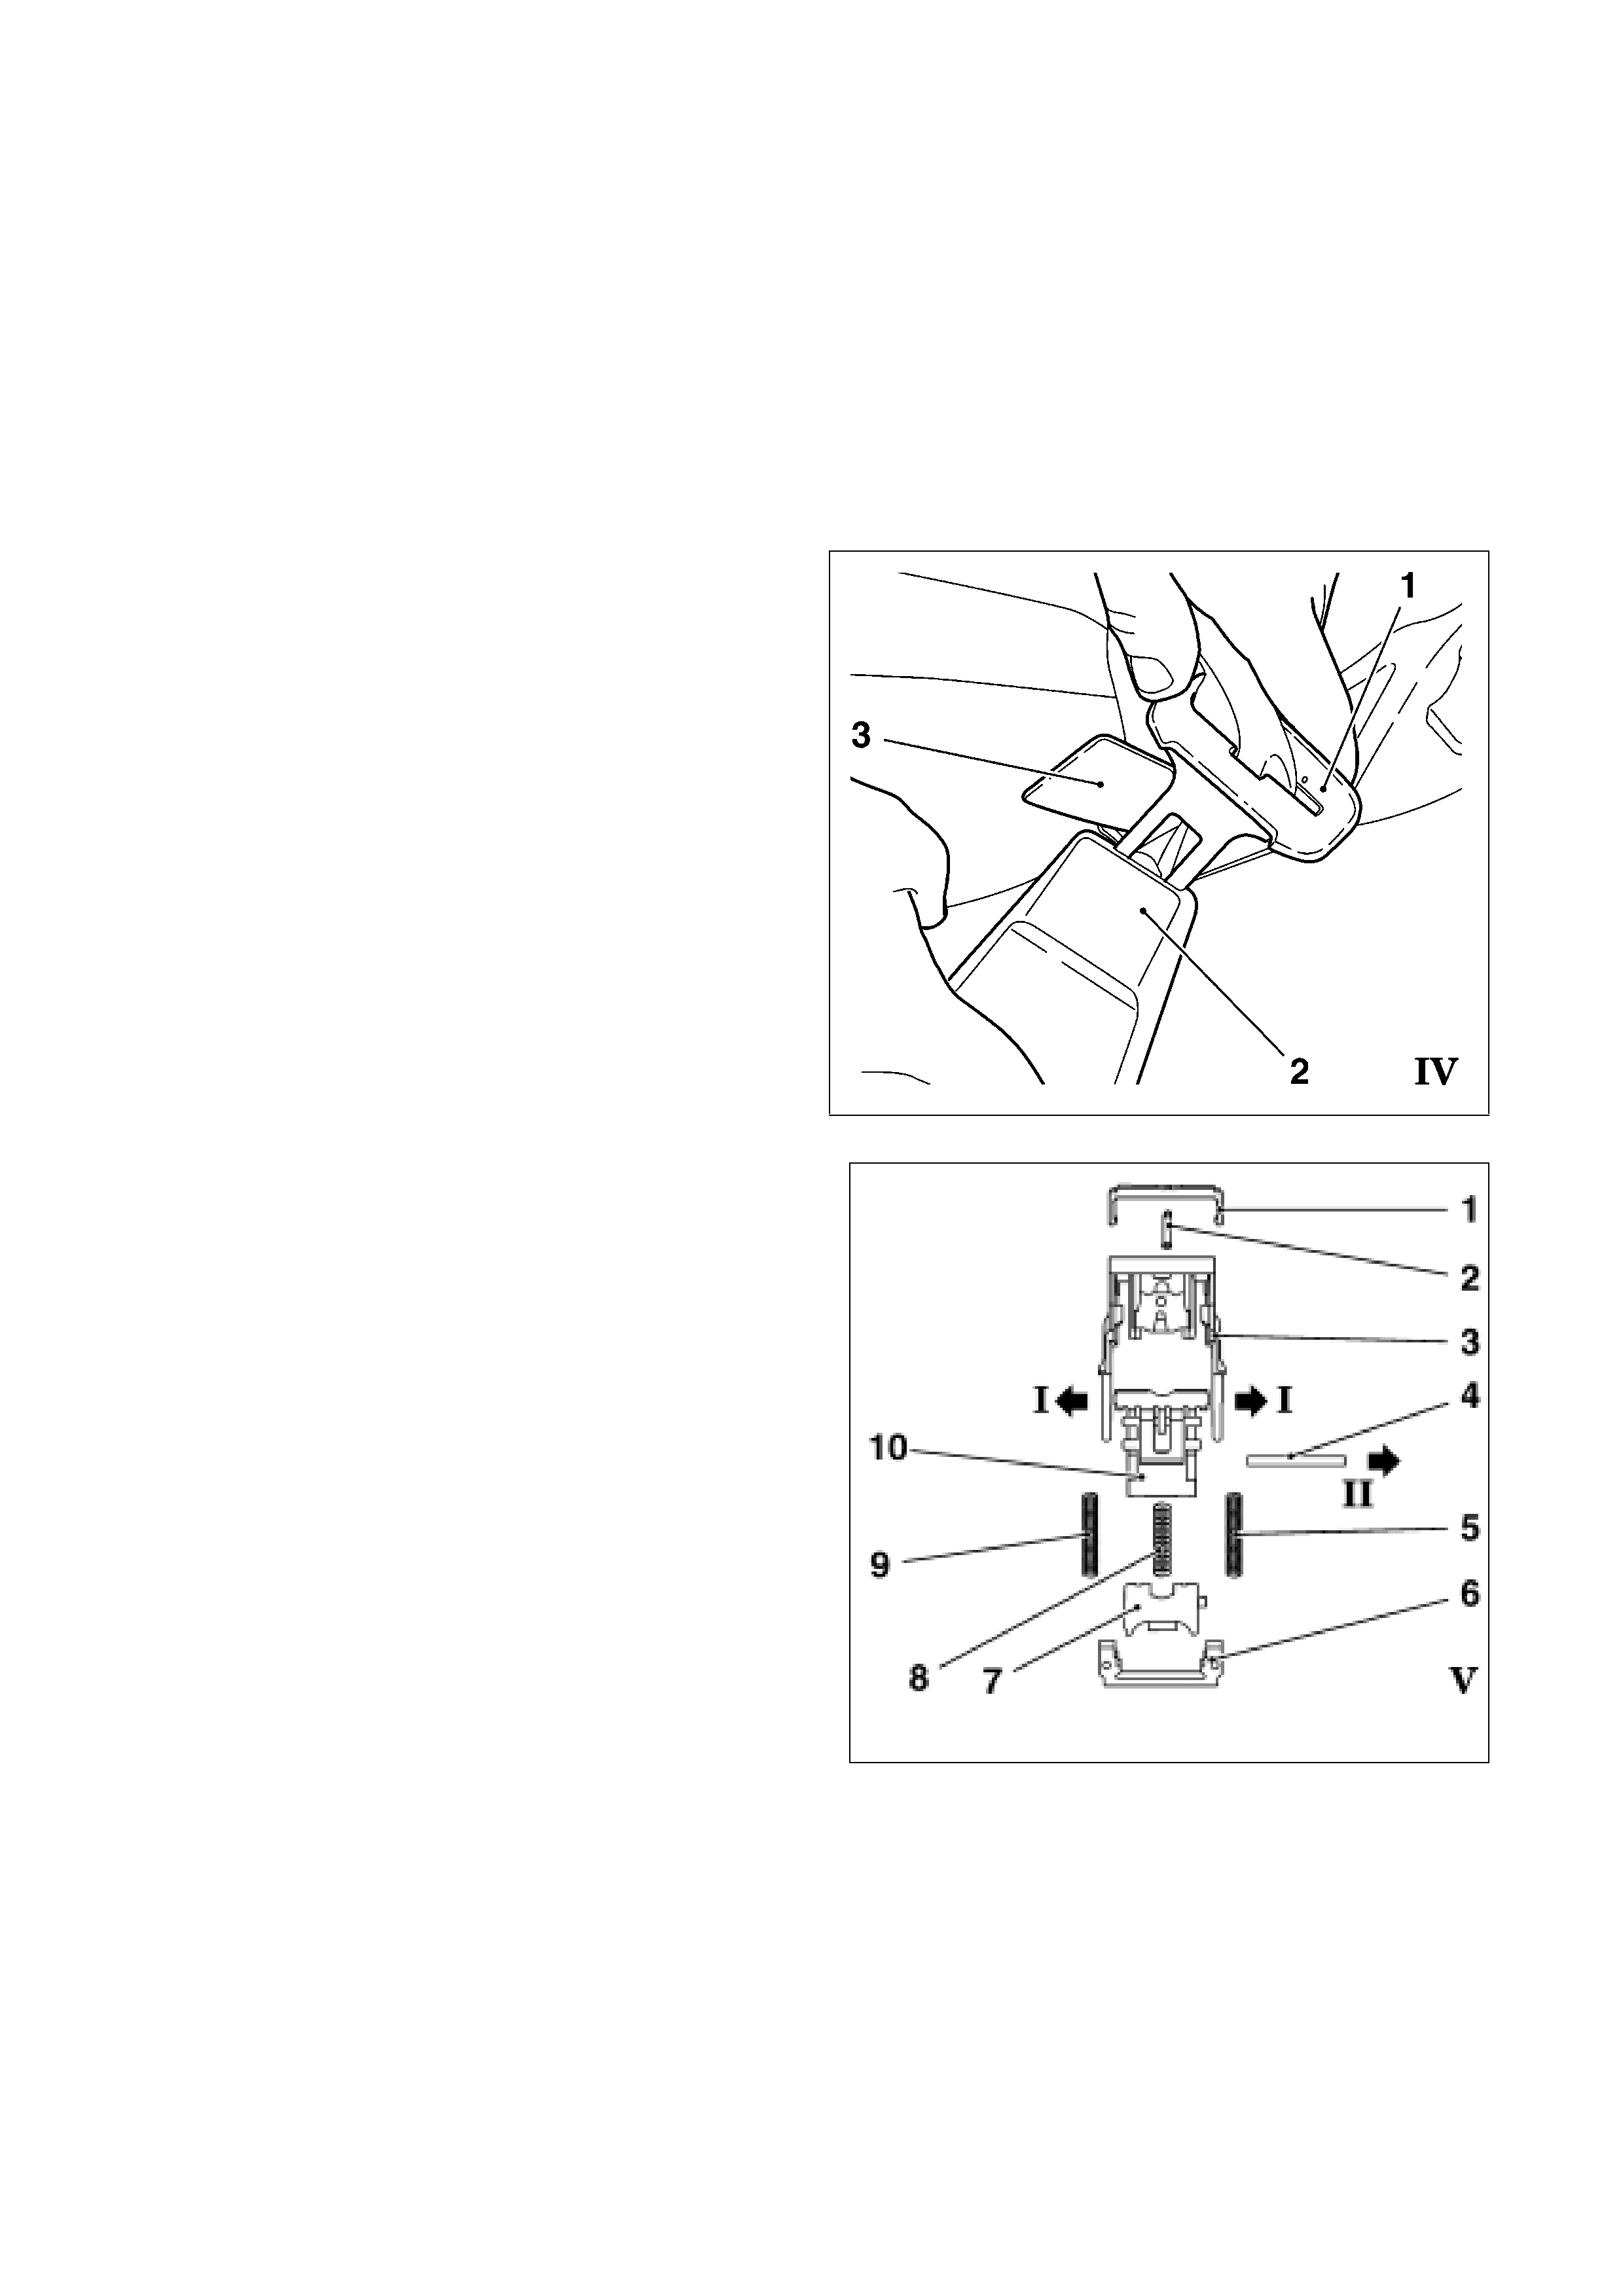
Disassembling
Pull out seat buckle boot by hand.
Pull out the triggering indication (3) for restraint
system from the seat buckle.
Insert the buckle latch (1) into the aperture o
f
the triggering indication of the seat buckle.
Unlatch the seat buckle caps (2) by turning the
buckle latch firmly.
Disassembling
Remove white clamp (6) and springs (5 and 9).
Clamp (1) and spring (2) remain installed.
Spread apart the spring guide (Arrow I) o
f
release butto n (3), re move the b utton b y pulling
up.
Pull out pin (4) in lat eral dire ction (A rrow II)
Remove spring element (10) with spring (8) and
guide (7).
8
2. Drill out Fixing Rivet of Seat Buckle Frame
Note
Move seat buckle boot downwards.
Fix triggering indication to the seat panel
with tape. Close the aperture of the boot with
tape as well, so no drilling swarf can ente
r
the boot.
Attention!
To achieve a correct drilling result, only the provided drill bit and hand held drilling jig must
be used.
Note:
During the drilling operation, the swarf has to be extracted with a vacuum cleaner by a
second technician.
9
Remove anti rotation block (4) from jig. Push
seat buckle frame into drilling jig (3) until the
stopper is reached and tightening the fixing
screw (6). Re install anti rotation block (4)
into drilling jig and tighten with the
designated bolt (5).
Drill out the seat buckle rivet (Picture VII, 2)
with centre bit (Picture VIII, 1) (machine
revolution – 500 rpm) – take care that the
drilling jig stands in carpet recess safely.
Important
Always wear eye protection when drilling.
10
Disassembling
Remove seat buckle frame from drilling jig – Caution: Components may be hot.
Visual check of cable for damage.
Remove cleaning cloth carefully.
Cleaning
Clean the working area using a vacuum cleaner and remove all drilling swarf.
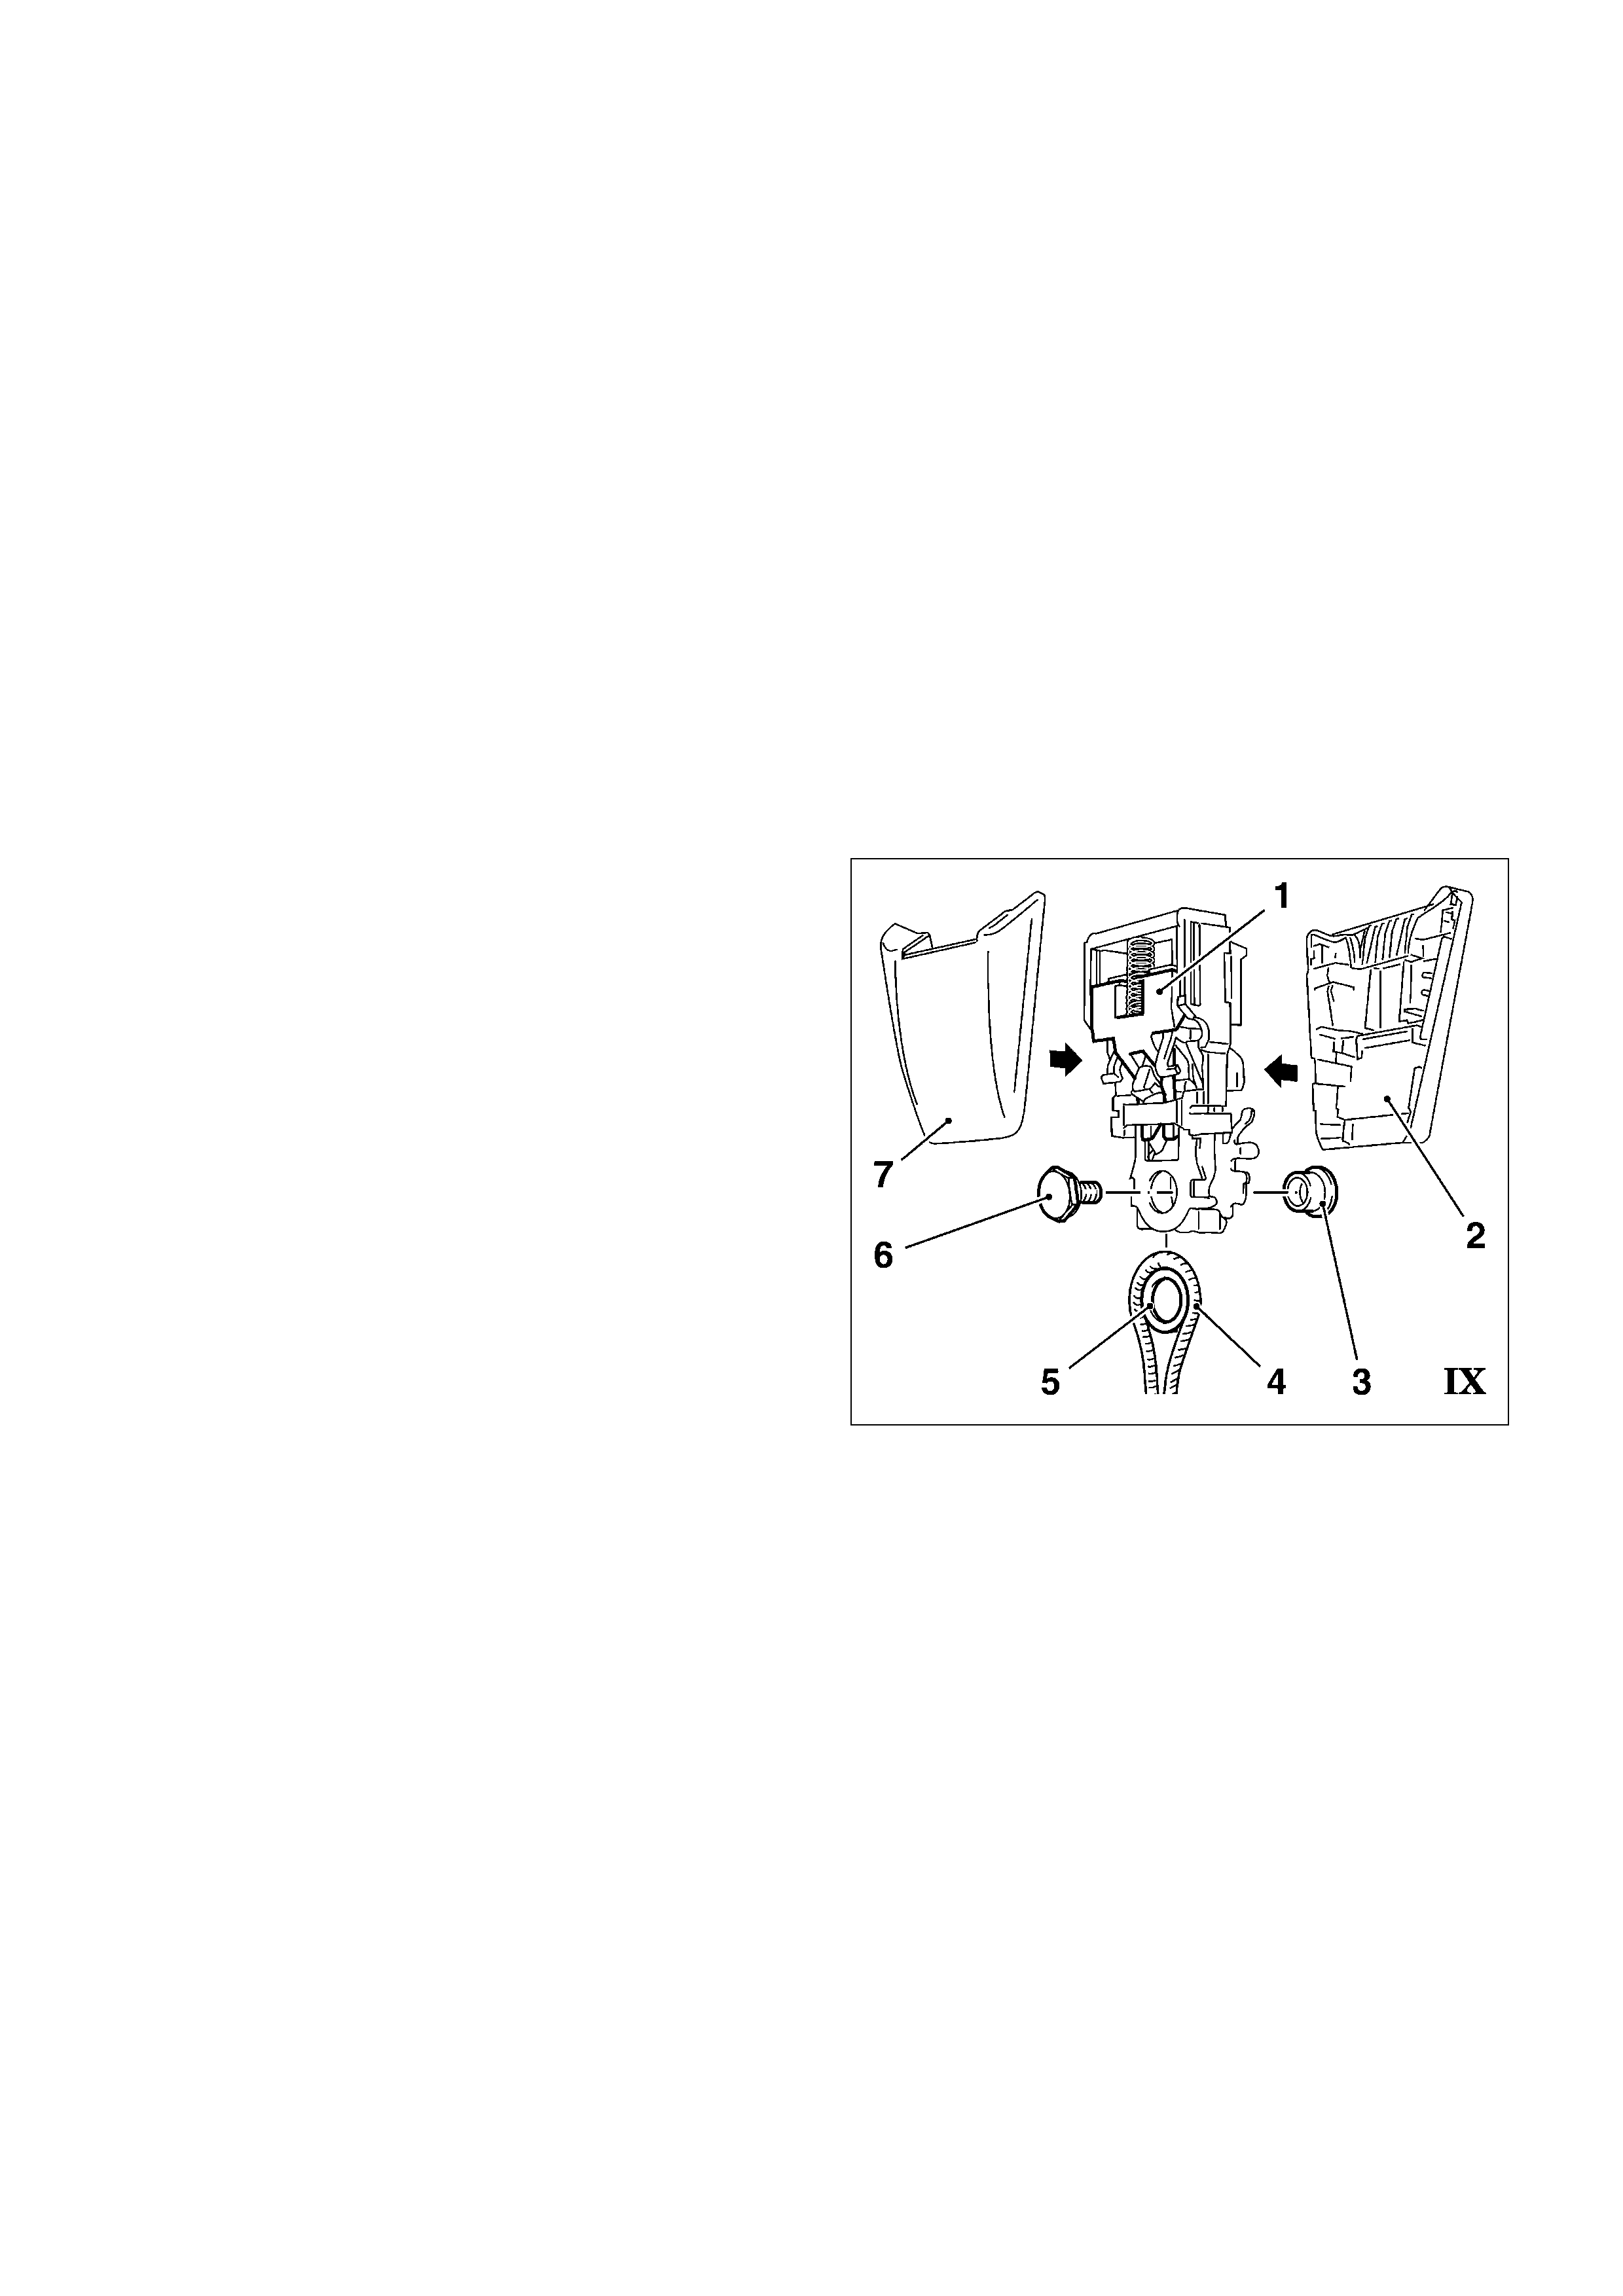
3. Installation of new Seat Buckle
Overview
1. Seat Buckle
2. Seat Buckle Cap (Seat Side)
3. Fixing Nut
4. Restraint Cable
5. Pulley
6. Shear Bolt
7. Seat Buckle Cap (Tunnel Side)
Caution !
The following operations are important for the correct function of the seat buckle.
The installation has to be carried out carefully and strictly in accordance with the
rew ork instruction.
Note
For a better overview and control of the parts which have to be used it is
recommended to put the contents of the repair kit in one box and to remove it when
needed during installation.
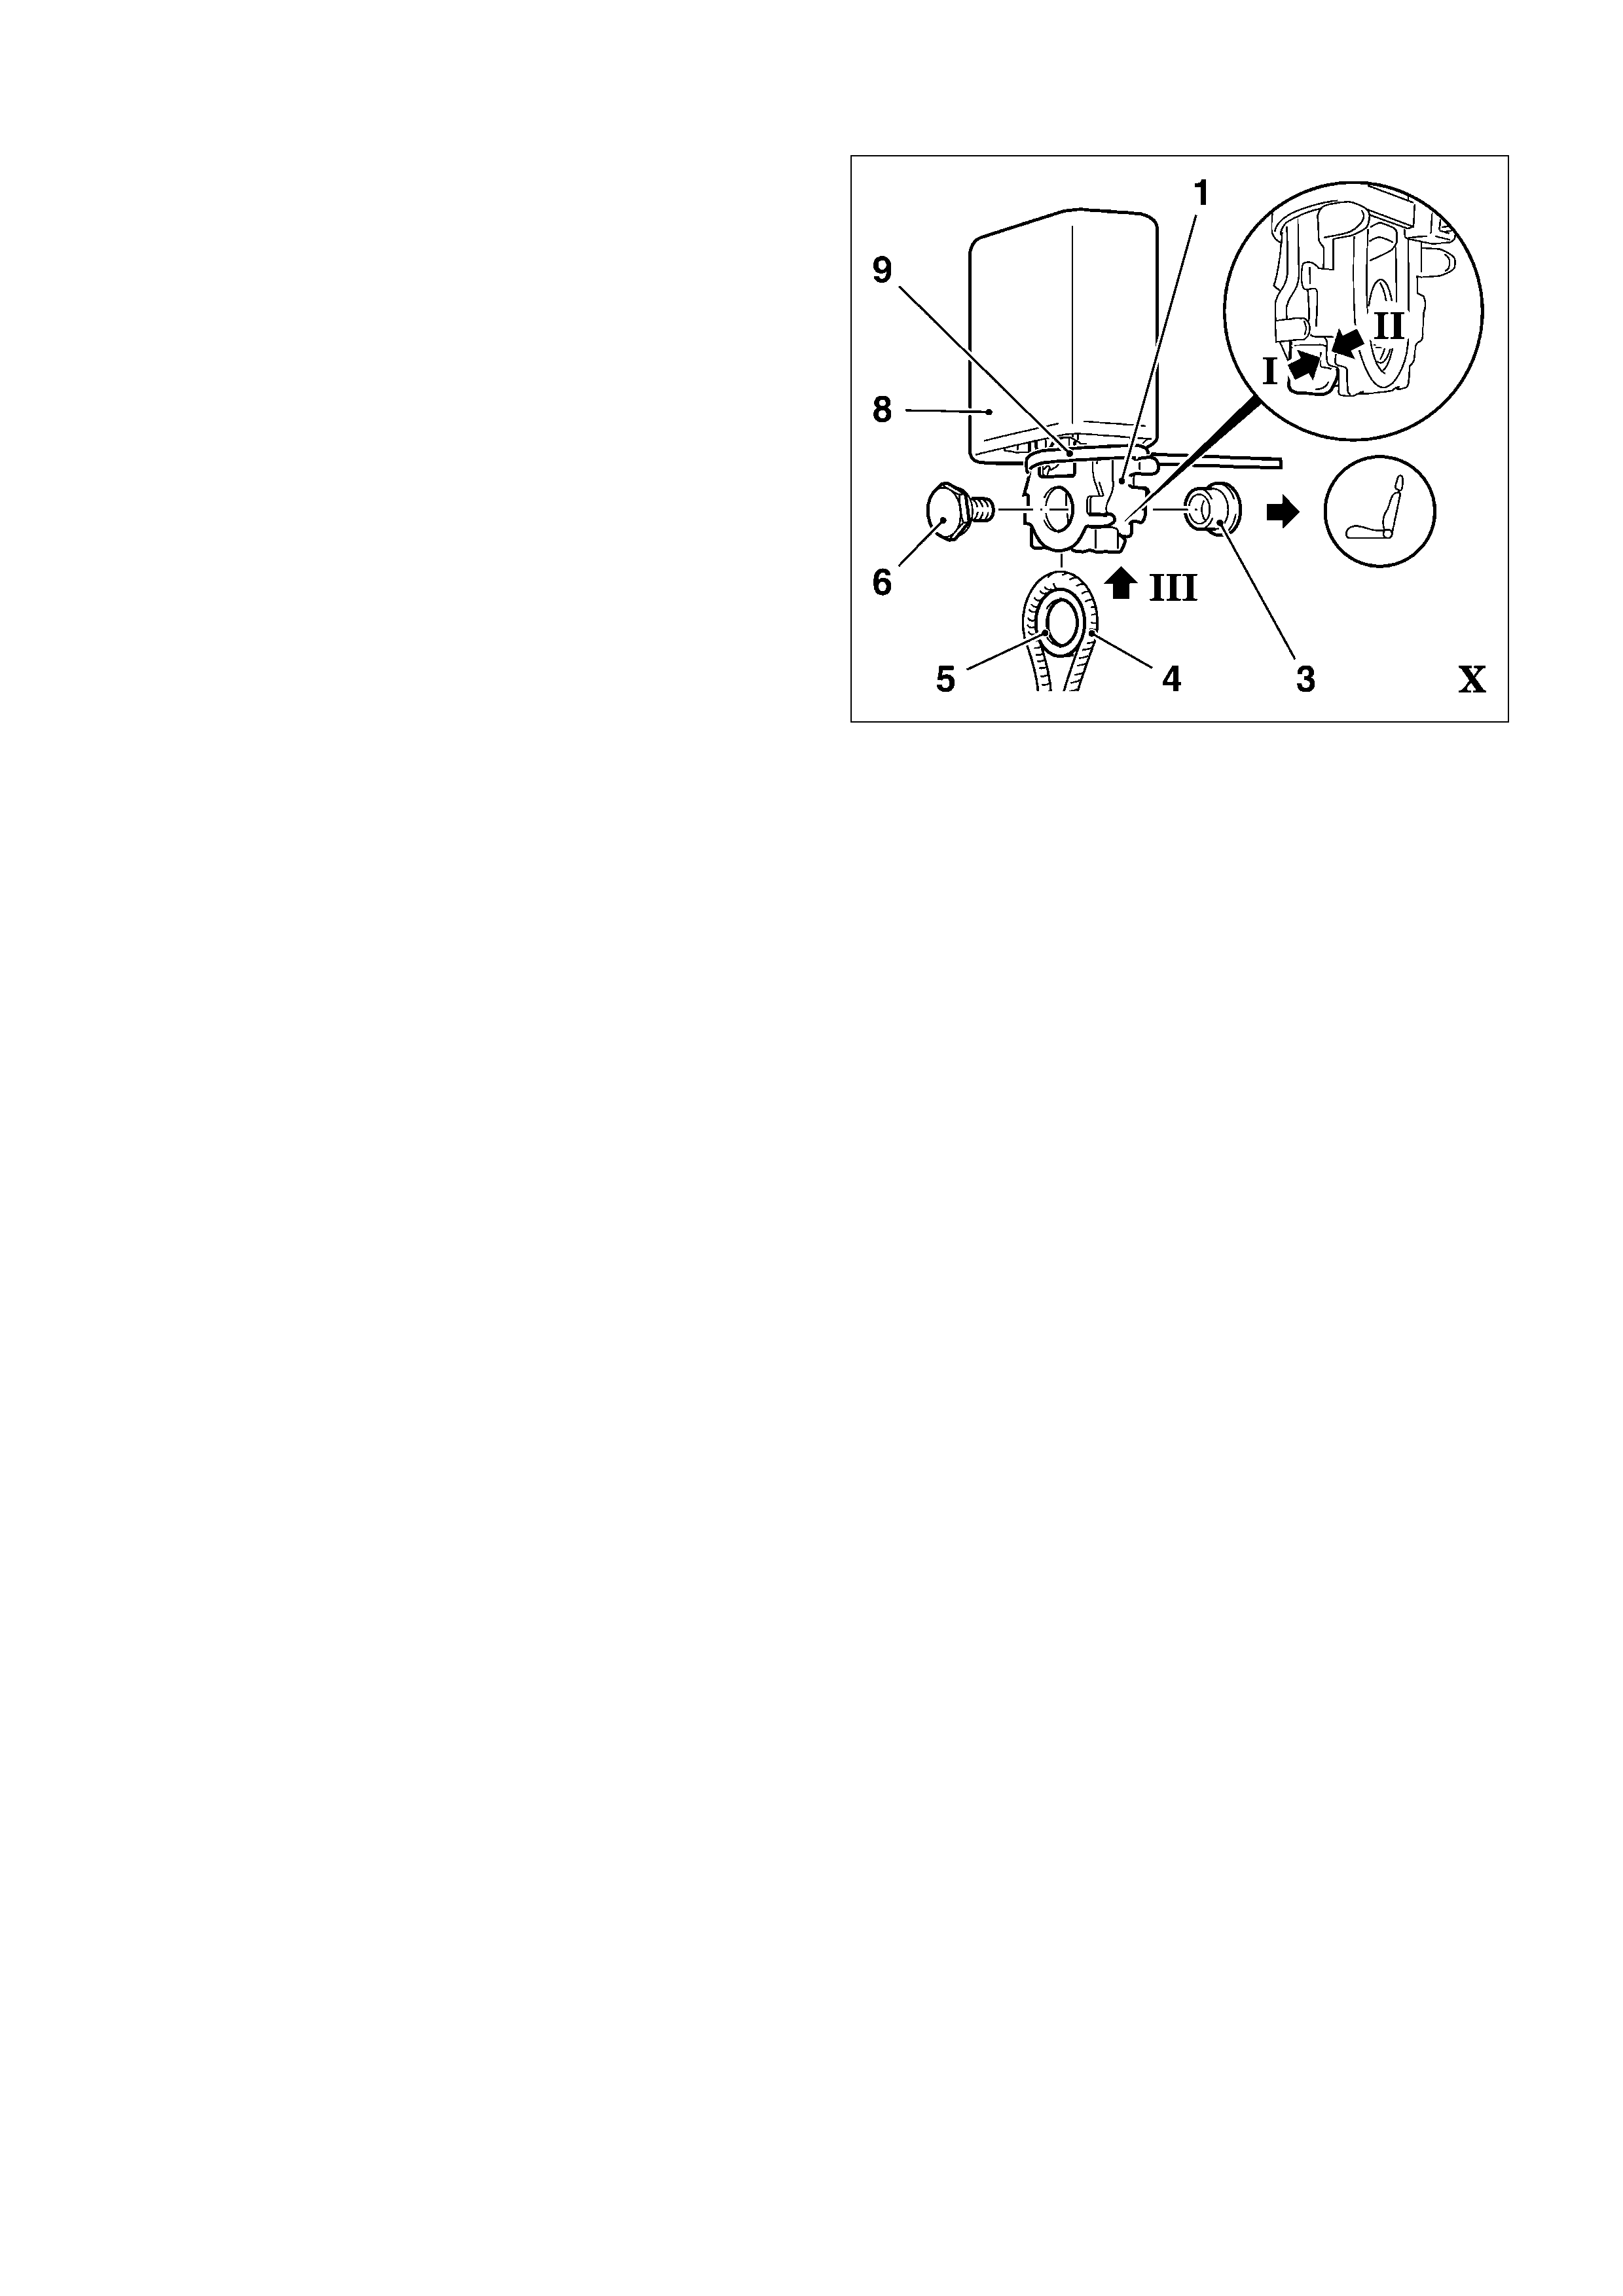
The protection cap (Picture X, 8) and the cable tie (Picture X, 9) remain installed during
fitting of the seat buckle.
11
Assembling Sequence
Insert pulley (5) and restraint cable (4) into the
seat buckle (1) (Arrow III) – Second technician
necessary.
The “black “side of the seat buckle has to
be positioned to the seat side, and the
galvanised side to the tunnel.
Insert the black fixing nut (3) through the
black side of the seat buckle and through the
pulley.
Screw in the shear bolt (6) and tightening the
bolt loosely ensuring correct location.
!! Cauti on !!
Before the bolt is sheared off the following items have to be checked:
- Seat buckle in correct position to the seat.
- Seat buckle mechanism correctly aligned (Arrow I and II, picture X )
- Pulley installed
- Alignment of seat buckle in direction to the triggering indication.
Tighten the bolt until t he screw head shears of f. Tak e care that the screw head does not fall into the
seat rails.
Remove cable tie (9) with side cutter, take care that no seat buckle components are
damaged.
Remove protection cap (8) from seat buckle.
Remove fitted tape.
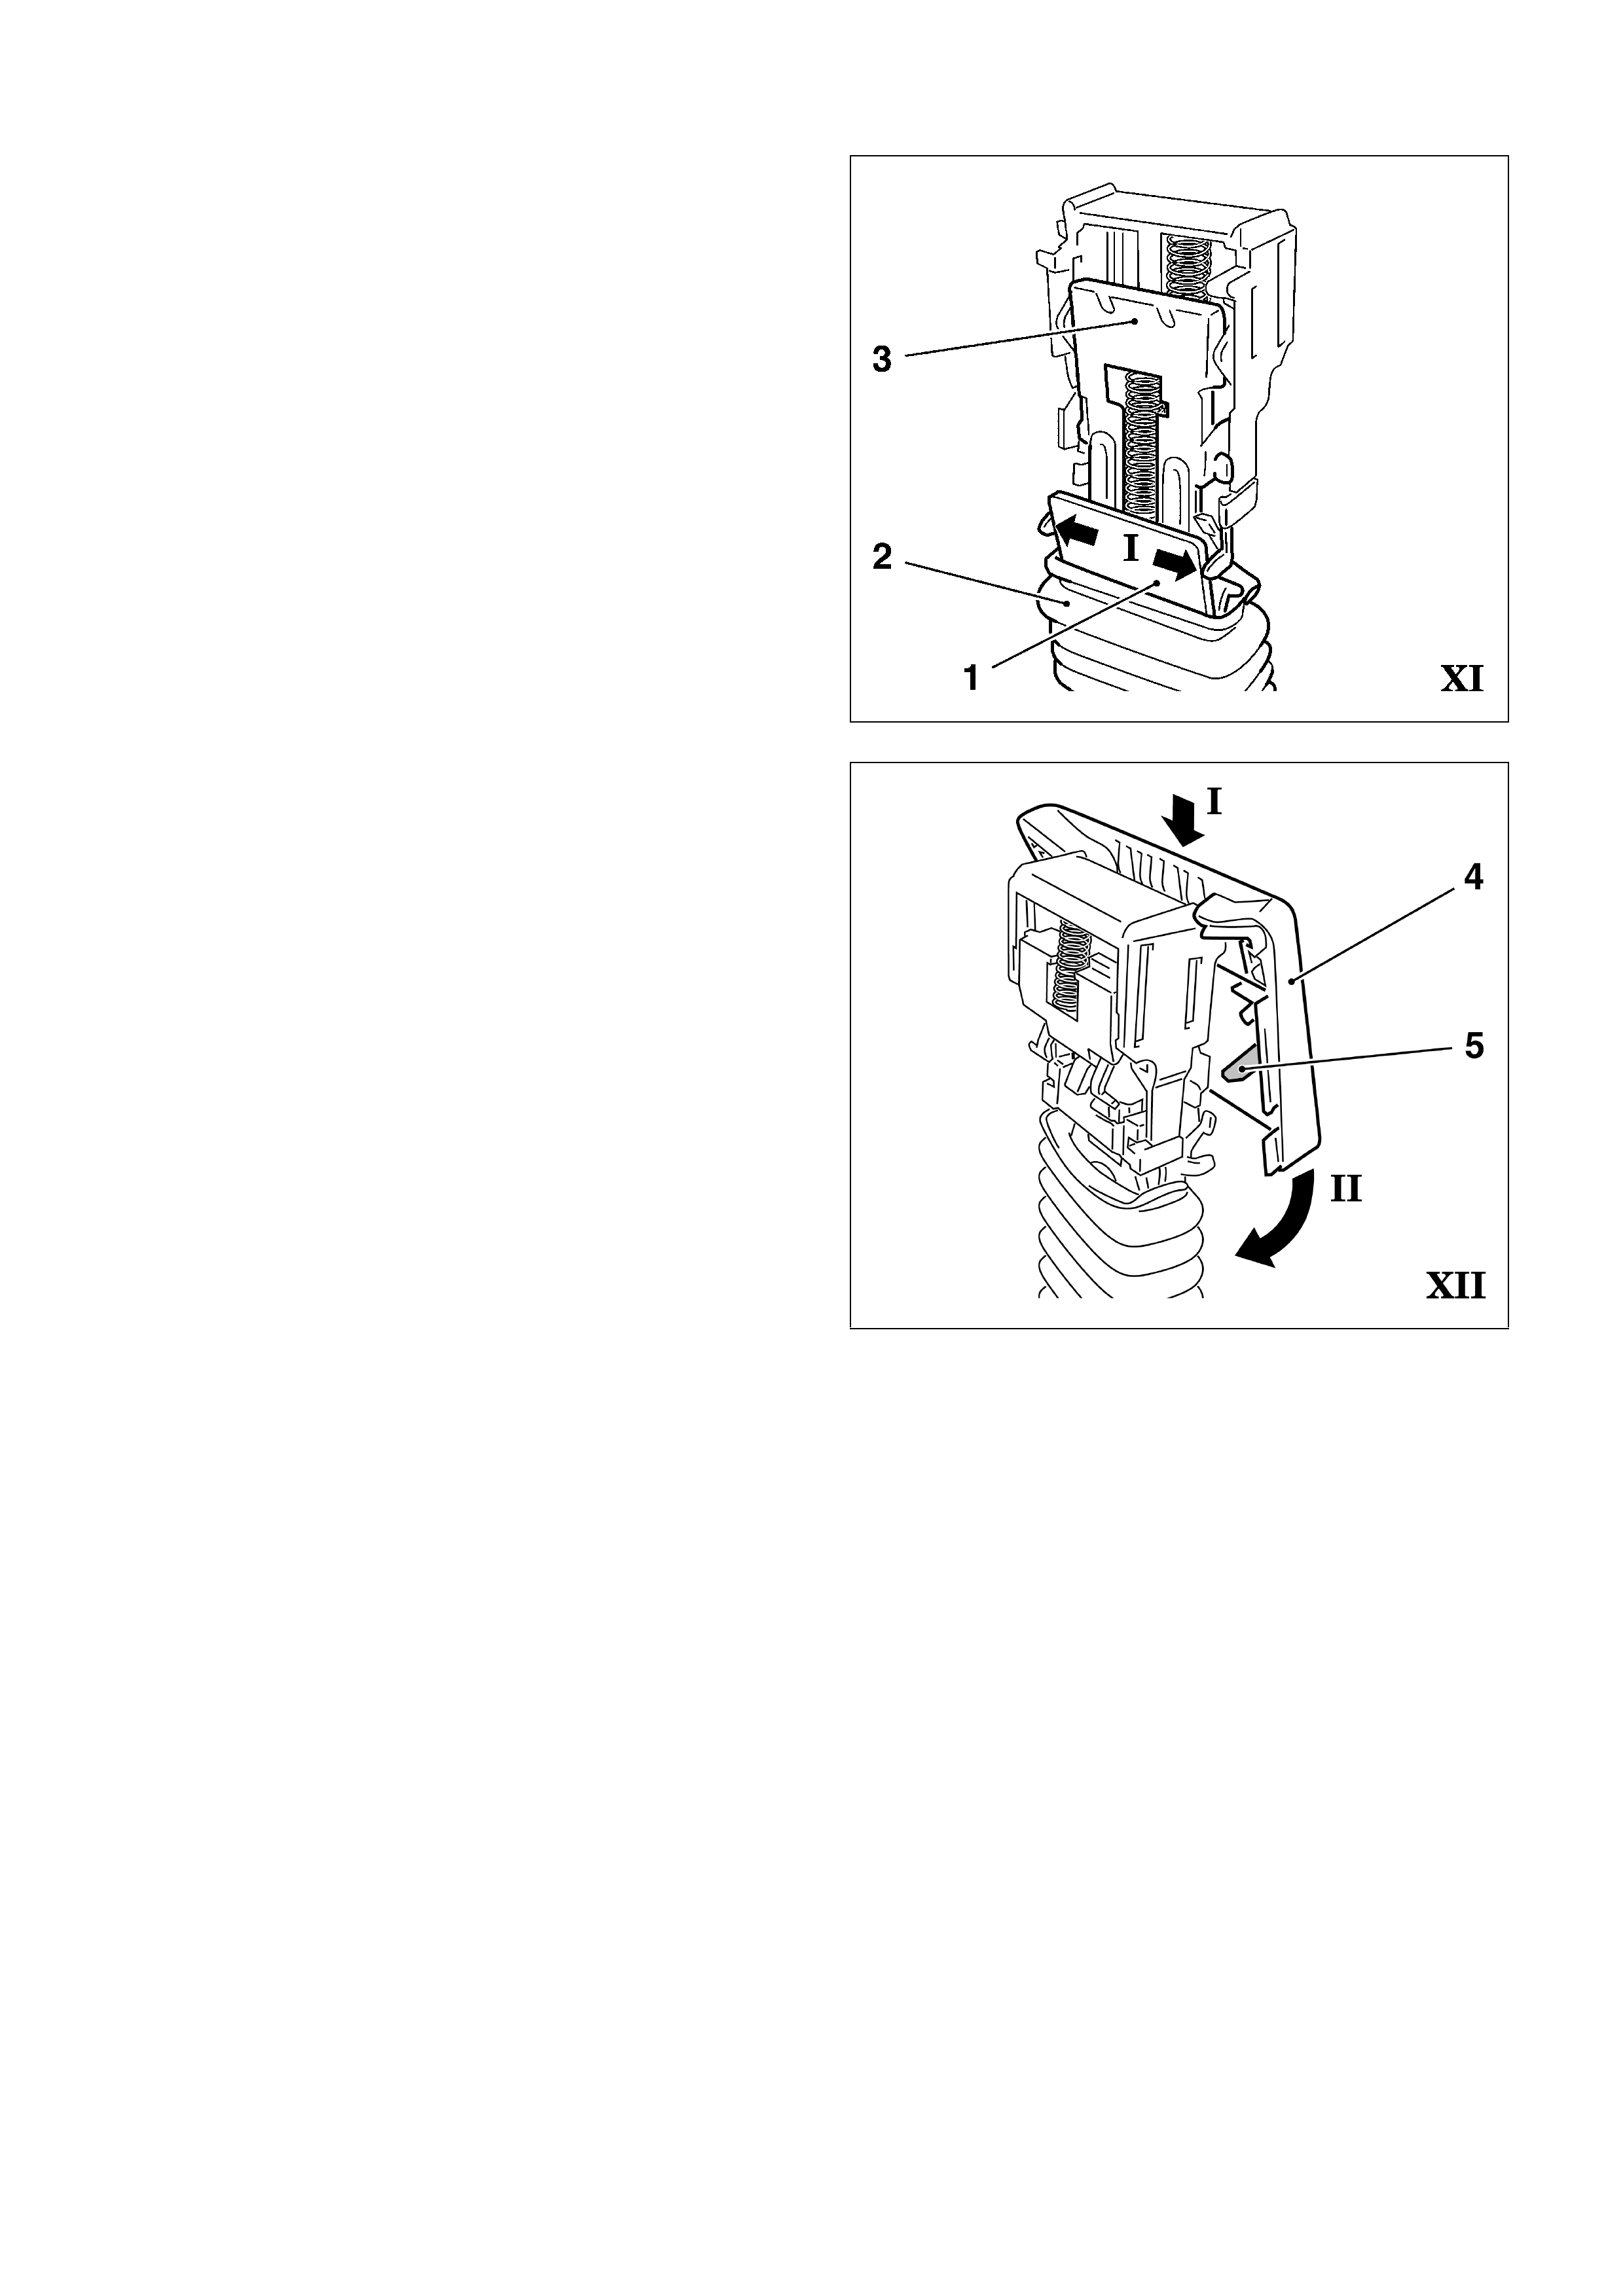
Fitting the Seat Buckle Caps
Caution!
Make sure that no components of the seat buckle are damaged during fitting of the
seat buckle caps. This may result in a malfunction of the seat buckle.
In no case should any tools be used for fitting of the seat buckle caps.
12
Assembling
Insert triggering indication (1) in the guide o
f
the seat buckle. (Arrow I)
Pull up the boot (2) to the screw head and
hold the boot in position with two fingers
from the side.
Fit the seat buckle cap (seat side) from the
top to the release button until the latch of the
seat buckle side (Picture XI, 3) is located in
the seat buckle cap. (Picture XII, Arrow I )
Swing the cap to the seat buckle (Arrow II)
and locate the cap completely with lock. (5).
Make sure that the upper lip of the boot is
fully inserted in the seat buckle cap.
Fit the seat buckle cap (tunnel side) to the seat buckle and press the caps together side
by side. (No tools must be used). An audible click must be observed when the caps are
assembled together– Make sure that the boot is completely inserted in the seat buckles.

13
4. Visual and Functional Check of the Seat Buckle
Checking
Functional check of the seat buckle must be performed by assembling and releasing the
buckle latch.
Assembling
Remove security fork of pre-tensioner and place it on the designated clips on the pre-
tensioner body.
Re-install the seat rail cover (4 fixing screws).
(IMPORTANT)
Vehicle Marking
Reworked vehicles have to be marked with a white line on the pre-tensioner unit on the
drivers side visible through the aperture of the seat rail cover.

14
Attachment (C) MATERIAL ORDER FORM
SAFETY RELATED RECALL 01-H-01
Fax No.: (03)-9251-6352
Attention: T. Nolan
PLEASE SUPPLY QUANTITY OF SEAT BUCKLE KIT AS NOTED BELOW.
NOTE: Only order sufficient quantities for pre-booked vehicles. Strict controls on the
quantity of parts supplied will be enforced due to limited parts availability.
FRONT SEAT BUCKLE KIT Qty:
(Contains two buckles per kit)
From Dealer Code: ___________ Date: __________________
Dealership Name: ______________________________________
Person Ordering Parts ( Cont act abl e Person) :
________________________________
(please PRINT your name)
SALMAT USE ONLY
Cumulative buckles shipped to dealer
Fax This Form To : SALMAT (03)-9251-6352

1
PRODUCT CAMPAIGN BULLETIN
01-H-03
July 26, 2001
SUBJECT : LOW BEAM HEADLAMP - RELAY
MODEL: VT, VX and WH Series Commodore, Calai s, St atesman and Caprice
This bulletin announces the initiation of a safety related recall to replace the LOW BEAM
HEADLAMP RELAY on some Holden Commodore, Calais, Statesman and Caprice vehicles
including Holden Special Vehicles (HSV) vehicles as detailed below.
The LOW BEAM HEADLAMP component of the rework program outlined in All Dealer Letter
DL 43/01, has been upgraded to a safety related recall. Vehicles that have previously been
reworked and identified by an ‘X’ in the E-2 co-ordinate of the Vehicle Service History Label DO
NOT REQUIRE THIS CAMPAIGN ACTION.
If the Vehicle does not have an ‘X’ in the E-2 co-ordinate of the Vehicle Service History Label this
Recall Campaign act ion applies.
DESCRIPTION O F DEFECT
Investigat ion has shown that a number of vehicles in a specific batch m ay be fitted with a low beam
headlamp relay that could f ail when the low beam headlamp is switched on or selected. This would
result in the low beam headlamp not turning on.
AFFECTED VEHICLE IDENTIFICATION
Some Holden VT/VX Commodore, Calais and WH Statesman and Caprice vehicles including
Holden Special Vehicles (HSV) vehicles identified below are included in this recall.
The af fected vehicles are:
Production Serial Number (PSN) range between L545674 to L659987 inclusive, PLUS a small
number of vehicles prior to L545674 which are listed in appendix D of All Dealer Letter DL 43/ 01
(issue 3)
The (PSN) is the last 7 characters of the vehicle identification number (VIN) located at the lower
left hand corner (passenger side) of the windscreen. The PSN is commonly referred to as the
“Tag ” number.
Customer Notif i cat ion
Owners will be contacted directly by letter from Holden, providing details of the recall and
requesting the customer to organise for their vehicle to have the appropriate rectification work
carried out by a dealership of their choice.

2
Dear Holden Customer SAFETY RELATED RECALL
You may have recently received a letter from Holden requesting you book your vehicle into a
Holden dealership of your choice to replace some potentially suspect components. The low beam
headlamp relay was one of the components t hat r equir ed replacement
Holden’s forem ost concern is your continued satisfact ion and safety. On that basis, we have made
a decision to upgrade the r eplacement pr ogram of the low beam headlam p relay to a safety related
recall.
Please ensure your vehicle is rect if ied by a Holden Dealer as soon as possible.
There is potential that the low beam headlamp relay could fail which would result in the low beam
headlamps not tur ning on.
It is necessary f or you to make a service booking with a Holden dealership of your choice as soon
as possible for the r ectification work to be performed on your vehicle. This wor k will be carried out
free of char ge.
At the tim e of booking, your dealer w ill be able to conf irm the length of tim e your vehicle is required
in service.
If you should have any questions, please contact your dealer or call the Holden Recall Assistance
line on - 1800 632826, where we will be pleased to assist.
Thank you f or your attention t o this matt er. Please accept our apologies f or any inconvenience this
may cause you.
Yours Sincerely
David McMu rra y
Manager Customer Assist ance
3
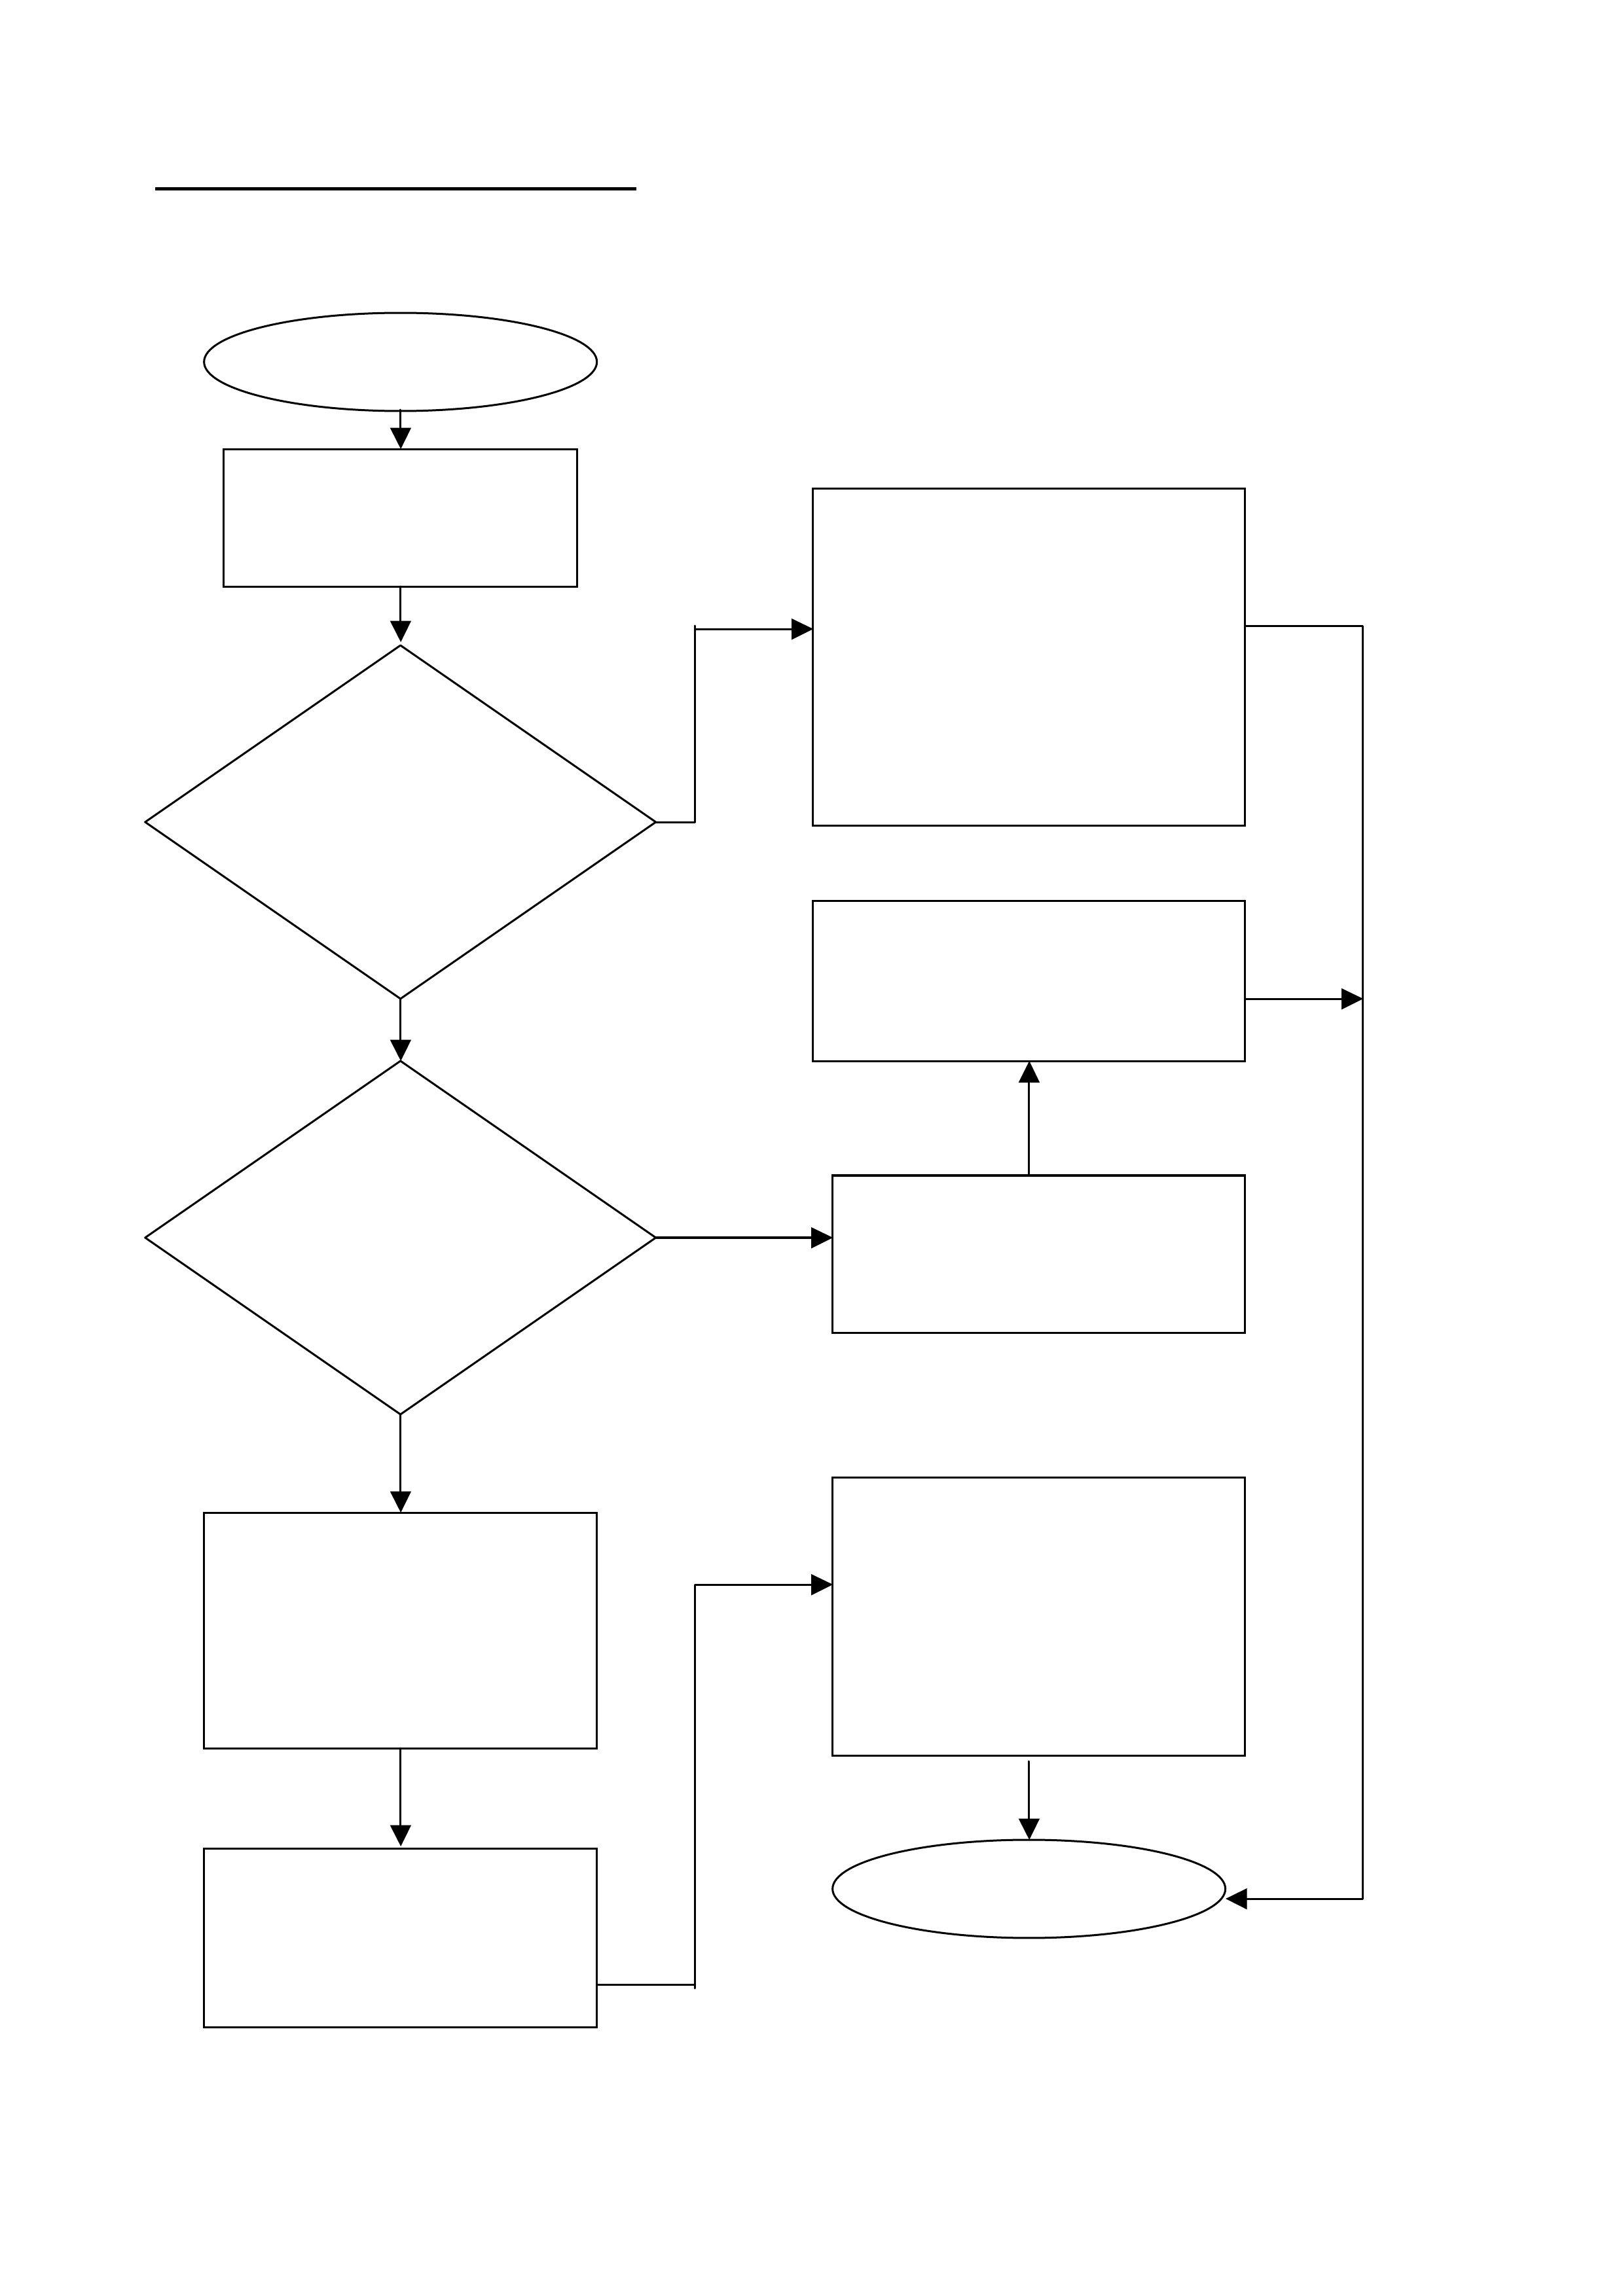
DEALERSHIP ACTION REQUIRED
On presentation of the vehicle considered by the customer to be affected by this campaign follow
the f lowchart to determine the action requir ed:
Is the
Vehicle in the affected
range or listed on appendix D?
Refer to Affected Vehicle
Identification found on
page 1 of this
document
NO
Does the
Vehicle have a
Vehicle Service History Label
with the E-2 c-ordinate
marked with
an ‘X’.
Customer Presents
vehicle for rectification
No further Recall Campaign
Action (01-H-03) is required.
Refer to DL43/01 issue 3 to
determine if hazard switch
replacement is required on this
vehicle. Mark the applicable
co-ordinate of the Vehicle
Service History Label if haz ard
switch is replaced
YES
Fit a Campaign Completion
Label and mark applicable co-
ordinates on the Vehicle Service
History Label
NO
Replace Low Beam
Headlamp Relay as per
instructions specified in
Appendix B of All Dealer
Letter DL43/01 (issue 3)
Complete all other reworks
(including fuel pump relay) in
line with guidelines specified
in All Dealer Letter DL43/01
(issue 3)
Complete and apply a
campaign completion label.
Additionally apply a Vehicle
Service History Label and
place an ‘X’ at the E-2 Co-
ordinate for relay replacement.
Mark other co-ordinates as
applicable to rework
performed
YES
START
FINISH
Complete all other reworks in
line with guidelines specified in
All Dealer Letter DL43/01
(issue 3)

4
CAMPAIGN COMPLETION IDENTIFICATION
All campaigned vehicles must have:
1. A Campaign Completed identification label applied to the right hand front ‘A’ pillar, between
the hinges, with details of the campaign, 01-H-03, Dealership code and date legibly entered
on the label with a permanent ink pen.
AND
2. For additional identification, place an “X” at the E-2 co-ordinate of a Vehicle Service History
Label and apply to the inner side of the lower instrum ent panel cover if not alr eady fitted.
Extra campaign identification and vehicle service history labels are available free of charge f r om:
Moore Business Systems
Facsimile: (03) 9270 8900
Attention: Mr. Bob Curry
For Campaign Completion Labels Quote stock No. SD 28156 on a Moore Business Systems
‘packag ed goods’ order form ( or facsimile if not available) for a box of 100 labels.
For Vehicle Service History Labels Quote stock No. SD 28177 on a Moore Business Systems
‘packag ed goods’ order form ( or facsimile if not available) for a box of 100 labels.
WARRANTY CLAIM I NFO RMATION
On complet ion of campaign action, deal ers are requested to immediatel y submit a w arranty
claim.
Refer to ALL DEALER LET TER DL 43/01 (Issue 3) for campaign claim informat ion.
Please ensure parts ar e returned in line with warranty procedure once requested by Repac
PARTS INFORMATION
DO NOT O RDER PARTS FOR THIS CAMPAI GN FROM HSPO
Important Not e:
Low Beam Headlamp Relays for this recall are the same as those already supplied to all
dealers. Additional quantities are available through SALMAT. Refer to All Dealer Letter
DL 43/01 (Issue 3) for par ts ordering inf or m ation.
DO NOT order parts unnecessarily!
Ensure the vehicle fall s within the guidel ines specifi ed i n sect i on marked:
‘AFFECTED VEHICLE IDENTIFICATION

5
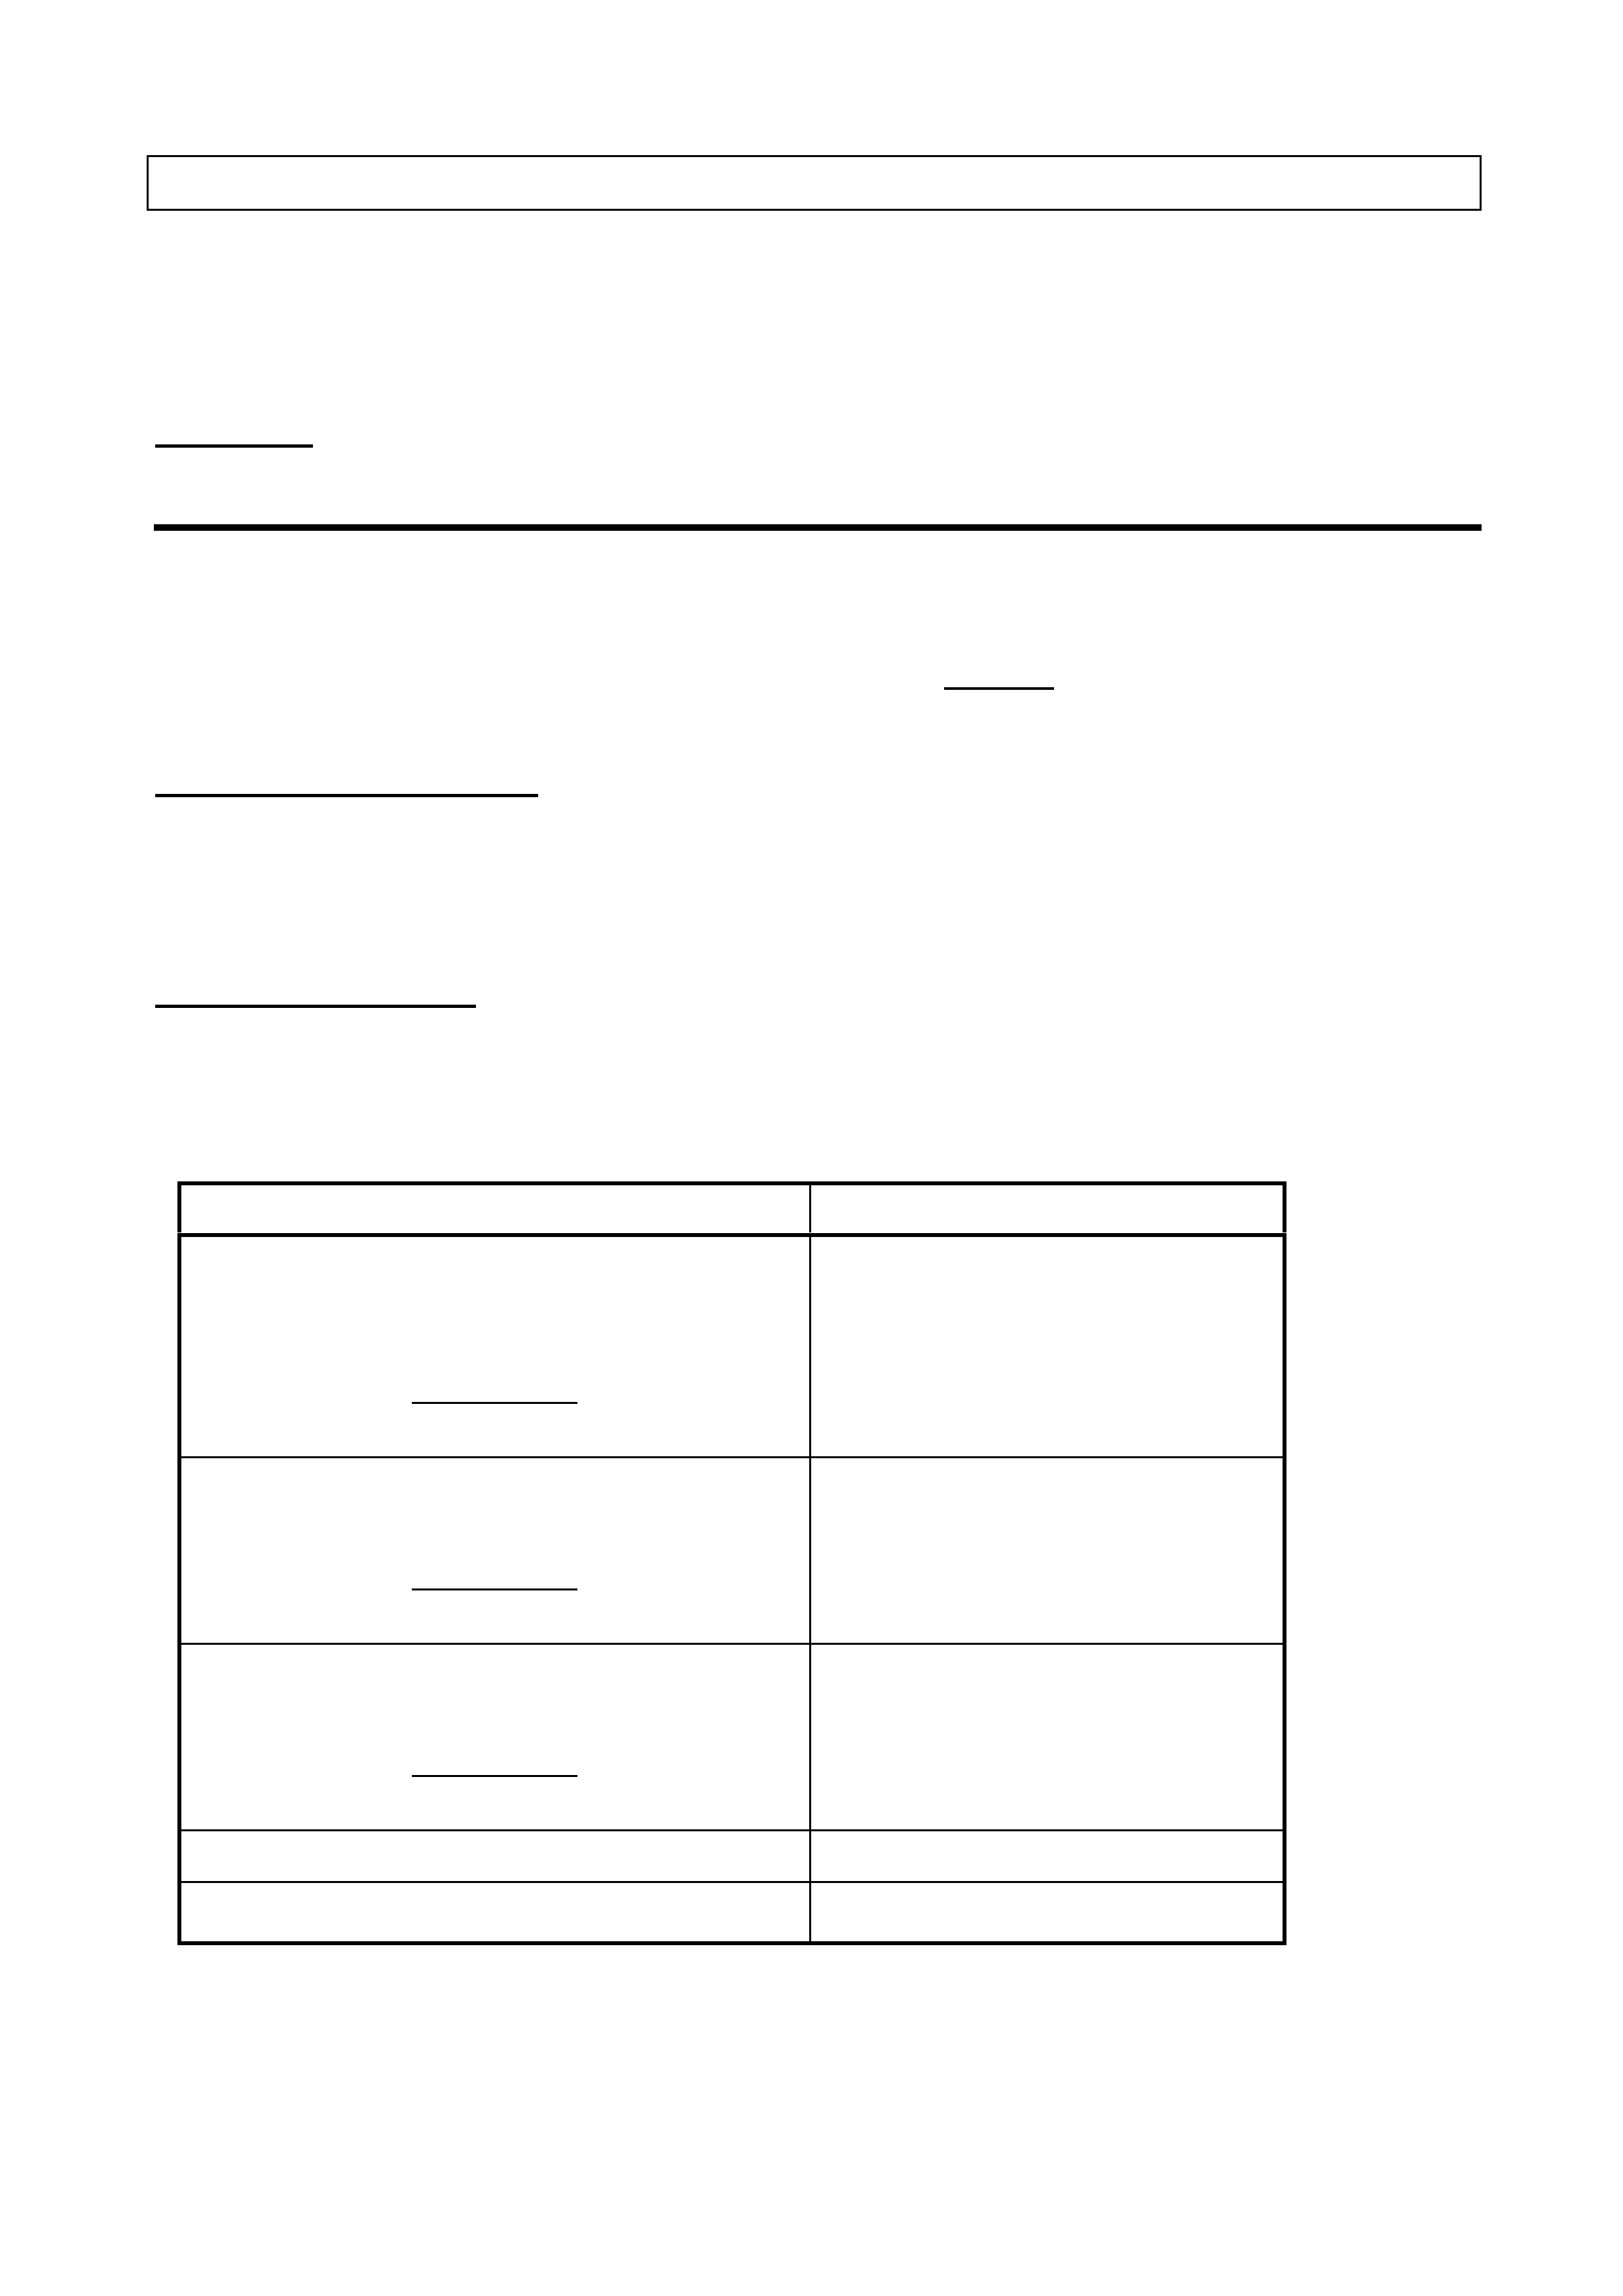
CONTACT INFORMATION
For further information or clarification on this recall campaign please contact the relevant person
below.
CONTACT NAME CONTACT NUMBER
General Inquiries Oliver Mitrovski (03) 9647 7619
Parts related inqui ri es Luke Jones (Salmat) (03) 9251 6306
Warranty related inquiries Warranty Administr at ion (03) 9647 2401
J. K. Hoffman
General Service Manager
1 of 23
PRODUCT CAMPAIGN BULLETIN
01-H-04
November 30, 2001
SUBJECT: TOWBAR TONGUE REPLACEMENT
This bulletin announces the initiation of a safety-related recall to replace the TOWBAR TONGUE
on some Holden vehicles fitt ed with genuine Holden accessor y towbars.
Only genuine Holden towbars and/or r eplacement tong ues installed af t er April 1, 2000 are aff ect ed
by this recall campaig n. This installat ion dat e is not the vehicle build date.
DESCRIPTION O F DEFECT
Investigation has shown that some towbar tongues (or “goosenecks”) manufactured by Frontline
Australasia Pty Ltd, are susceptible to embrittlement that may cause the towbar tongue to break.
This embrittlement is due t o the manufacturing pr ocess of the t ongue.
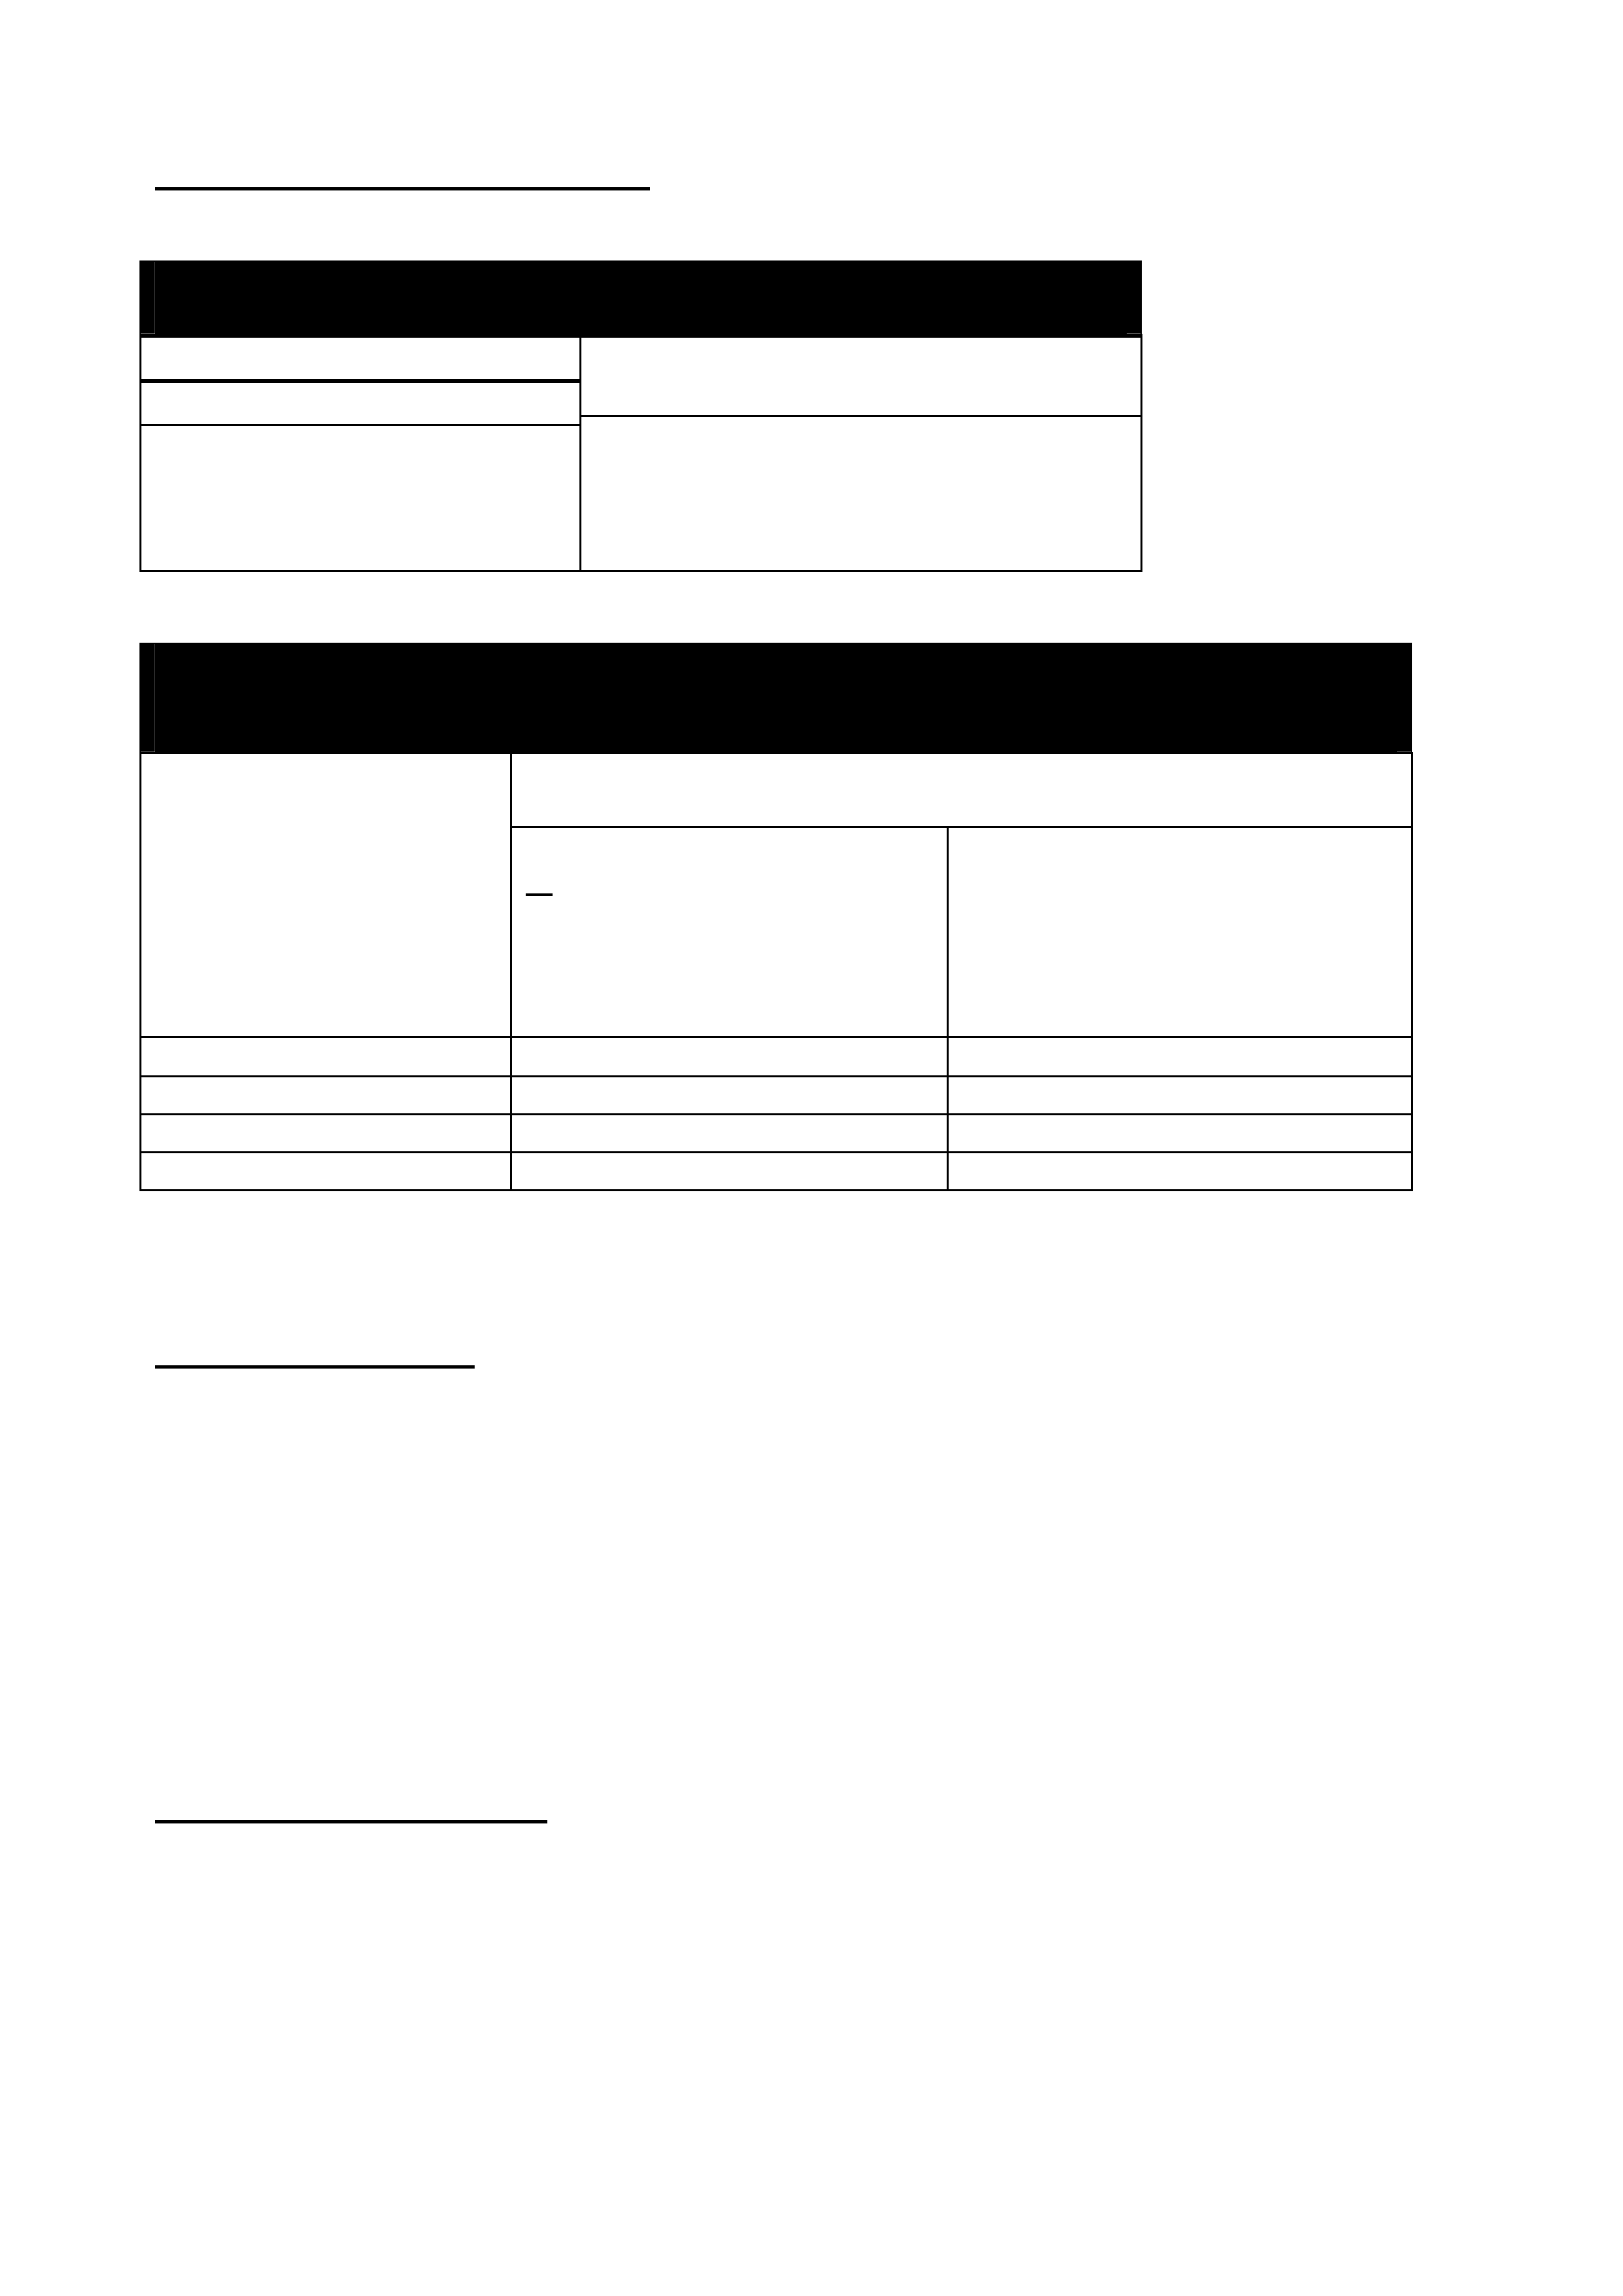
AFFECTED TOWBARS
This r ecall campaign act ion is limited t o genuine Holden towbars and tongues f itted between April
1, 2000 and November 30, 2001 inclusive, The affected towbars are fitted to the models shown
below.
MODEL RATING
SEDAN
All Series VS, VT , VX & WH Commodor e,
Calais, Statesman and Caprice
INCLUDING
Holden Special Vehicles
1,590kg,
1,600kg and 2,100k g
WAGON
All Series VT, VX Commodor e
INCLUDING
Holden Special Vehicles
1,600kg and 2,100k g
UTILITY VG, VP, VR, VS & VU
INCLUDING
HSV Maloo
1,200kg, 1,590kg & 1,600kg
TF Rodeo R7 & R9 1,800kg
TS Astra 1,000kg

2 of 23
DEALERSHIP ACTION REQUIRED
On presentat ion of a vehicle f itted with a towbar tongue considered by the customer to be affect ed
by this campaign carr y out t he following procedur e.
1. Determ ine whether genuine Holden towbar (refer Appendix B).
2. Rectify as per f low chart in Appendix A.
3. Aff ix a campaig n complet ion label and a vehicle service history label as specif ied in the sect ion
titled ‘Campaign Completion I dentif icat ion’.
4. Submit a warranty claim.
Note: All st ock vehicles or vehicles presented f or r outine ser vicing should also be inspected by the
dealership.
CAMPAIGN COMPLETION IDENTIFICATION
All campaigned vehicles must have:
1. A Campaign Com p let ed identif icat ion label applied to the right hand front ‘A’ pillar , between
the hinges, with details of the cam paign, 01-H-04, Dealership code and date legibly entered
on the label with a permanent ink pen. AND
2. For additional ident ification, place an “X” at the F-1 co-ordinate of a Vehicle Service Histor y
Label and apply to the inner side of the lower instrum ent panel cover if not already fitt ed.
Extra campaign identif icat ion and vehicle service histor y labels are available f r ee of charge from:
Moore Business Systems
Facsimile: (03) 9270 8900
Phone: (03) 9270 8777
Attention: Mr. Bob Curry
For Campaign Completion Labels Quote stock no. SD 28156 on a Moore Business Systems
‘packag ed goods’ order form for a box of 100 labels.
For Vehicle Service History Labels quote stock no. SD 28177 on a Moore Business Systems
‘packag ed goods’ order form for a box of 100 labels.
3 of 23
WARRANTY CLAIM INFORMATION
On completion of campaign action, dealer s ar e r equested t o im m ediately submit a warranty claim.
For Vehicles Buil t af ter 1/2/2000
(Will have received a campaign letter) :
Description:
Labour Operation No:
Standard Time:
Failure Code:
Case Type:
Fit New Level Towbar Tongue
T180801
0.4 hours
96
08
For Vehicles other t han t hose speci f ied above
(Will NOT have received a campaign letter, how ever, w ill be responding to newspaper
Safety Recall advertisement)
Fit New Level Towbar Tongue
Description:
For VG, VP & VR Utility.
or
For VS Commodor e, Calais,
Statesman, Caprice & Utility
with tag numbers from
L800000 to L999999
For all other affected vehicles
including the remaining VS
series with tag numbers from
L200000 and all VT, VU, WH
series, Astra & Rodeo built prior
to 1/2/00
Labour Operation No: R000100 R000103
Standard Time: 0.4 hr 0.4 hr
Failure Code: 95 95
Case Type: Not required Not required
Please ensure parts ar e r eturned in line with warranty procedure once req uested by Repac
PARTS INFORMATION
PARTS ARE TO BE PROCURED THRO UGH THE NORMAL HSPO
DISTRIBUTI ON CHANNELS (NOT SALMAT)
§ Order Par ts fo r t his campaign from HSPO using the nor m al HSPO ordering channels using
“RUSH” order s only.
§ Refer t o appendix B for part illustrations and part numbers.
§ Due to limited supply of part num ber s 92145225 and 92145254 or ders will only be accepted for
pre-book ed vehicles until Decem ber 10, 2001. Cust omers will not receive the recall let t er until
Friday December 7, 2001.
CUSTOMER NOTIFI CATION
Owners with vehicles built after February 2000 will be contacted directly by letter from Holden,
providing details of the recall and req uesting the custom er to organise f or their vehicle to have the
appropriate rectification work carried out by a dealership of their choice. For a draft of the
customer let ters refer t o Appendix C and D
Customers who may have purchased an af fected t owbar assembly af t er February 2000, for fitment
to an earlier built vehicle will be responding t o the newspaper advertisement.

4 of 23
CONTACT INFORMATION
For f ur t her inf or m ation or clarification on this recall campaign please cont act the relevant person
below.
CONTACT NAME CONTACT NUMBER
General enquiri es Oliver Mitrovski (03) 9647 7619
Parts related enquiri es HSPO Customer Assist ance (03) 97977332
Warranty related inquiries Warranty Administration (03) 9647 2401
J. K. Hoffman
General Service Manager
Attachments
Appendix A Dealer Inspection and Rectif icat ion Flow Chart
Appendix B Towbar Tongue Reference Char t s
Appendix C V& W carline Custom er Letter DRAFT
Appendix D TS Astra and TF Rodeo Customer Let ter DRAFT

5 of 23
APPENDIX A
(Dealer Inspection and Rectif i cat ion Flow Chart )
IS A GENUINE TOWBAR FITTED ?
YES
NO
IS THE TOWBAR AN AFFECTED DESIGN
(REFER APPENDIX B – 16 CHARTS)
YES
NO
HAS THE VEHICLE ALREADY BEEN CAMPAIGNED?
CHECK FOR CAMPAIGN STICKER MARKED WITH 01-H-04
NO
WHAT IS THE VEHICLE BUILD DATE?
AFTER 01/02/2000
WHAT WAS THE TOWBAR ACCESSORY
FITMENT DATE?
§ ASK OWNER
or
§ CHECK VEHICLE SALES RECORDS
IF YOU ARE THE SELLING DEALER
REPLACE TOWBAR TONGUE FIT
CAMPAIGN STICKER, MARK AN ‘X’ IN
THE F-1 CO-ORDINATE OF THE
VEHICLE SERVICE HISTORY LABEL
NOT AFFECTED
If customer has a letter instruct
them to tick appropriate box and
return customer letter in reply
paid envelope
YES
ON or BEFORE 01/02/2000
DON’T KNOW
OR NOT SURE AFTER
01/04/2000 BEFORE
01/04/2000

6 of 23
APPENDIX B (Towbar Tongue Ref e rence Chart )
Tongues AFFECTED
Model
Towbar Rating
GO TO
Diagram No.:
VT, VX, WH (I ncl. HSV)
• 1600kg & 2100kg – without Equaliser Hitch
1
• 1600kg & 2100kg – with Equaliser Hitch 2
• 1200kg & 1600kg – without Equaliser Hitch 3
VU Utility &
HSV VU Maloo Utility • 1200kg & 1600kg – with Eq ualiser Hitch 4
TF Rodeo • 1800kg – without Eq ualiser Hitch 5
• 1800kg – with Equaliser Hitch 6
TS Astra • 1000kg 7
VS Commodore & Calais
Sedans, Statesm an &
Caprice - Including HSV
(✳ NOT Utility or Wagon)
• 1590kg & 2100kg – without Equaliser Hitch
• 1590kg & 2100kg – with Equaliser Hitch 8
9
VG, VP, VR & VS Utility &
HSV Maloo Utility • 1590kg – without Eq ualiser Hitch
• 1590kg – with Equaliser Hitch 10
11
Tongues NOT AFFECTED
Model
Towbar Rating
GO TO
Diagram No.:
VS, VT, VX, WH (I ncl. HSV)
• 1200kg (s t andar d)
12
VP, VP, VR, VS Utility
• 1200kg 13
VT, VX, WH including HSV • 2100kg with Heavy Duty Equaliser Hitch
14
VS All including HSV
(✳ NOT Utility)
• 1590kg & 2100kg 15
VS Utility (I ncl. HSV)
• 1590kg 16
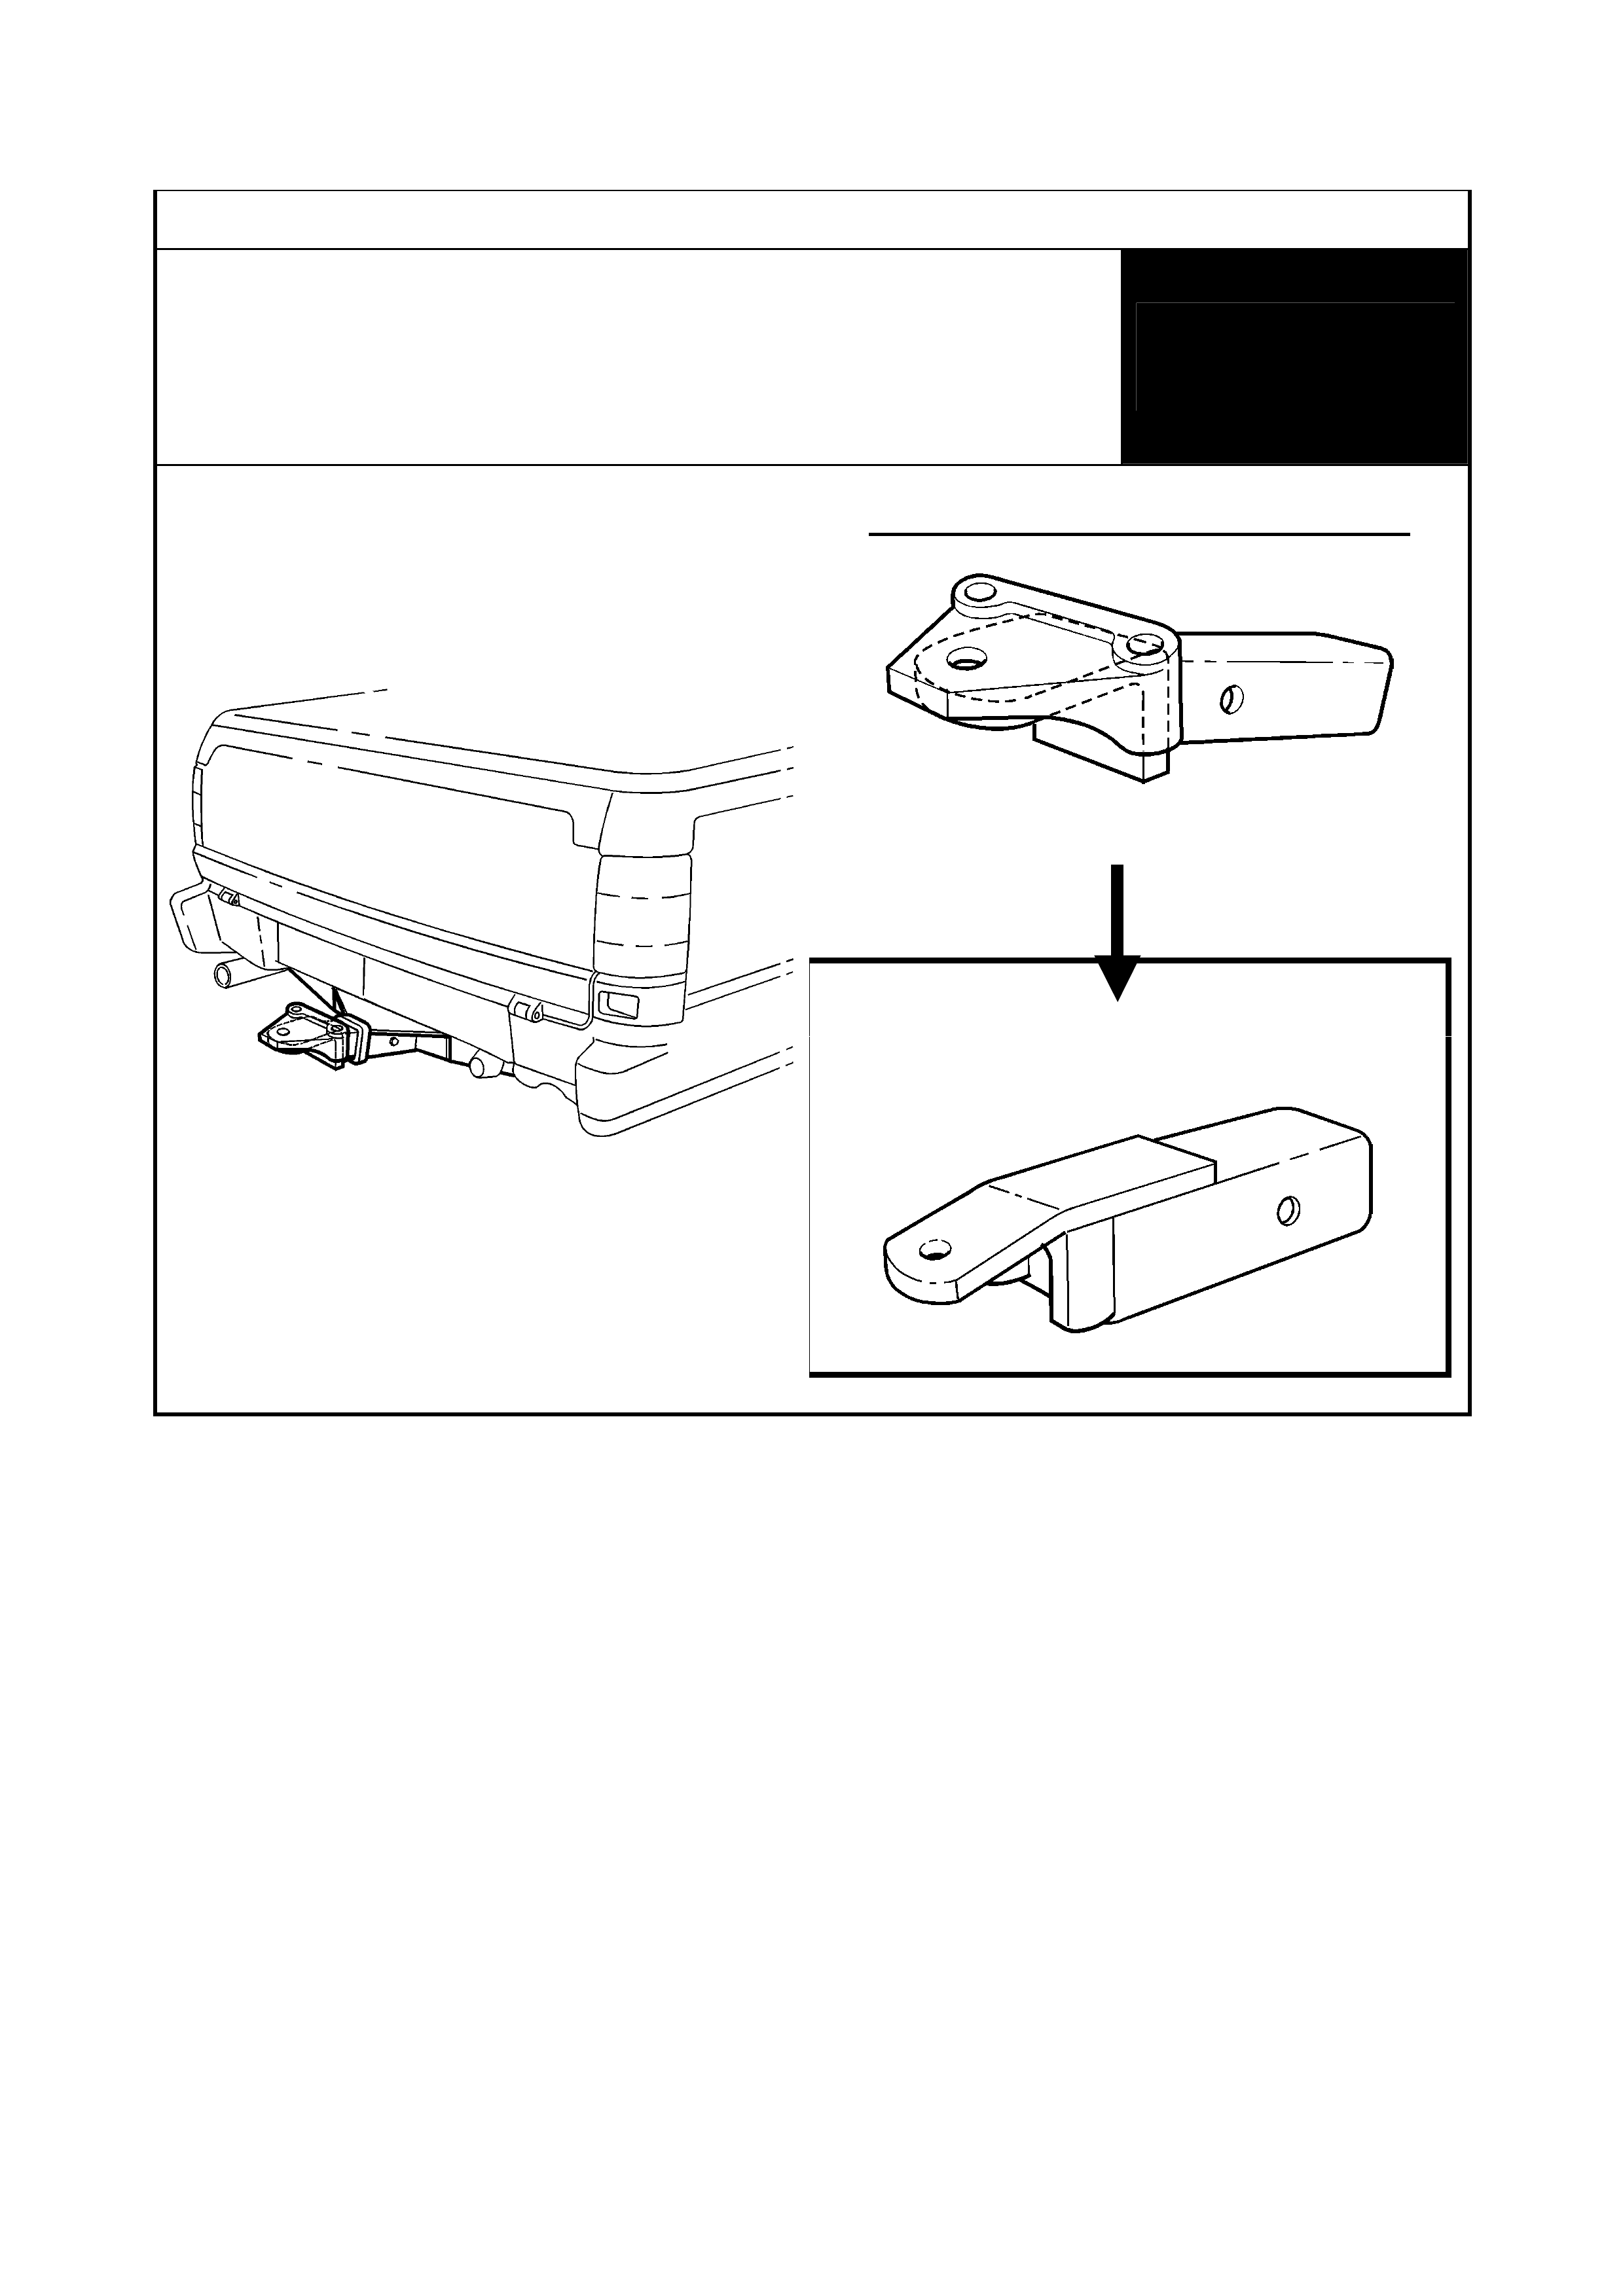
7 of 23
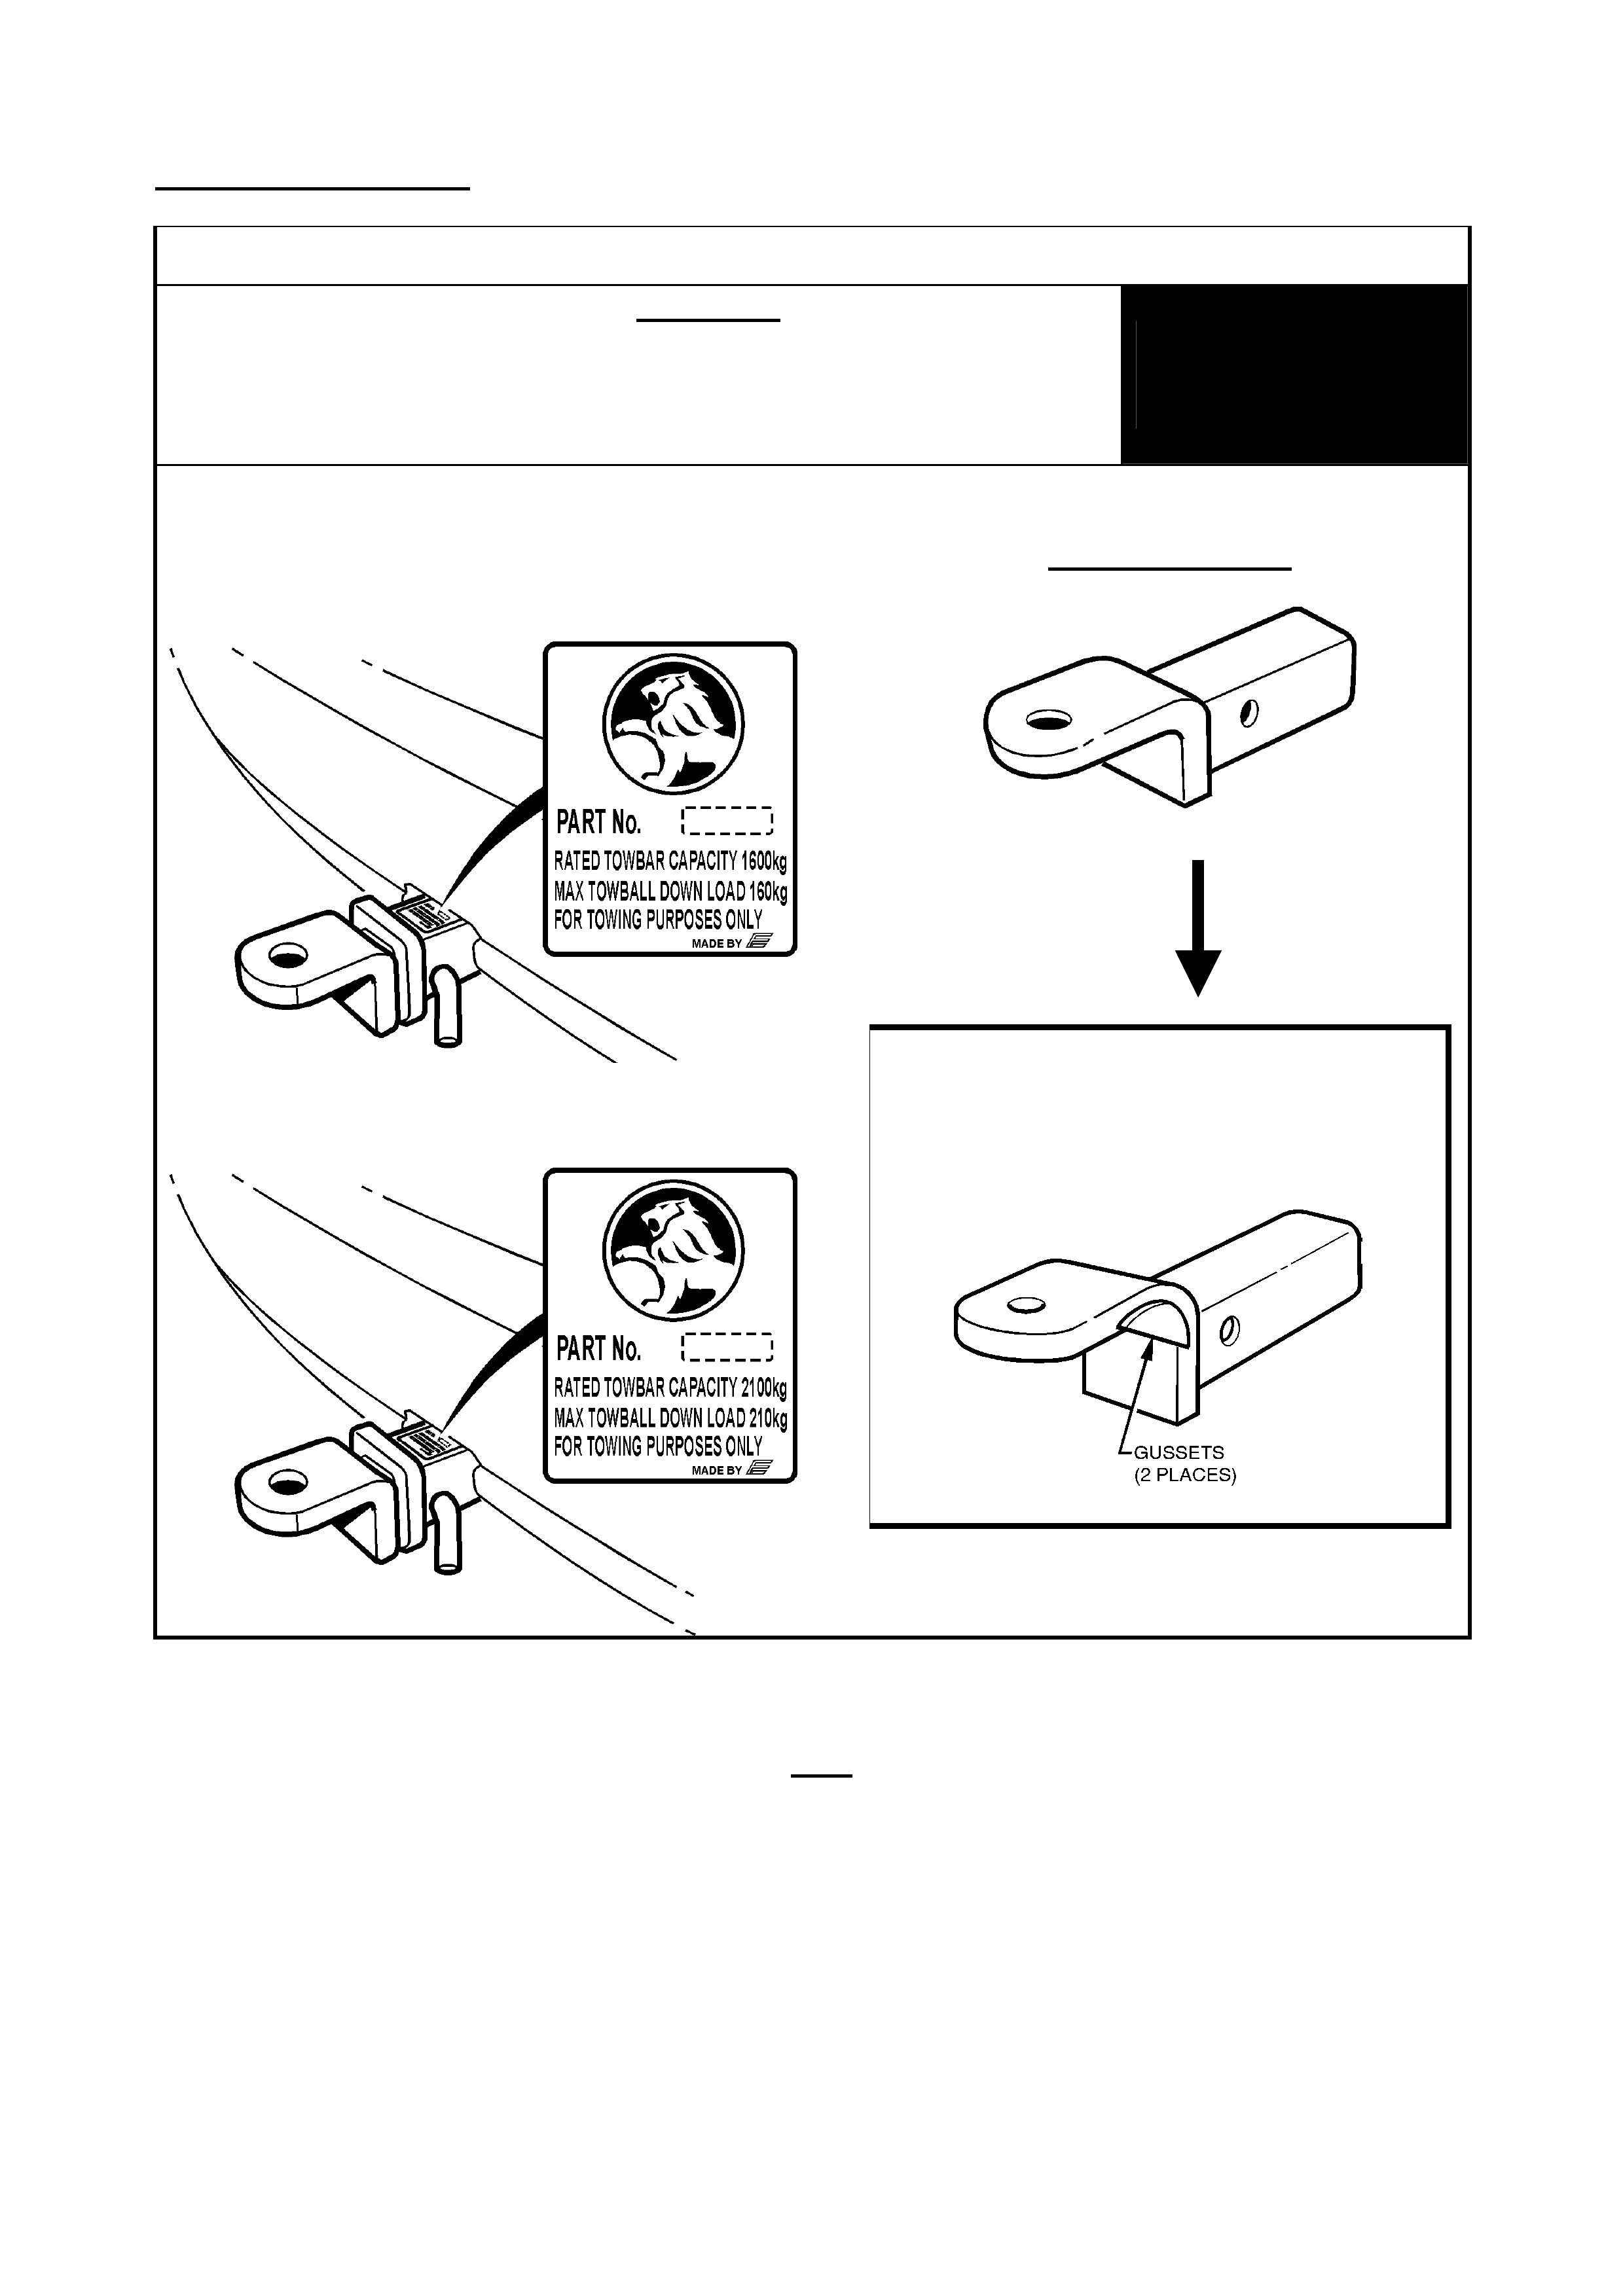
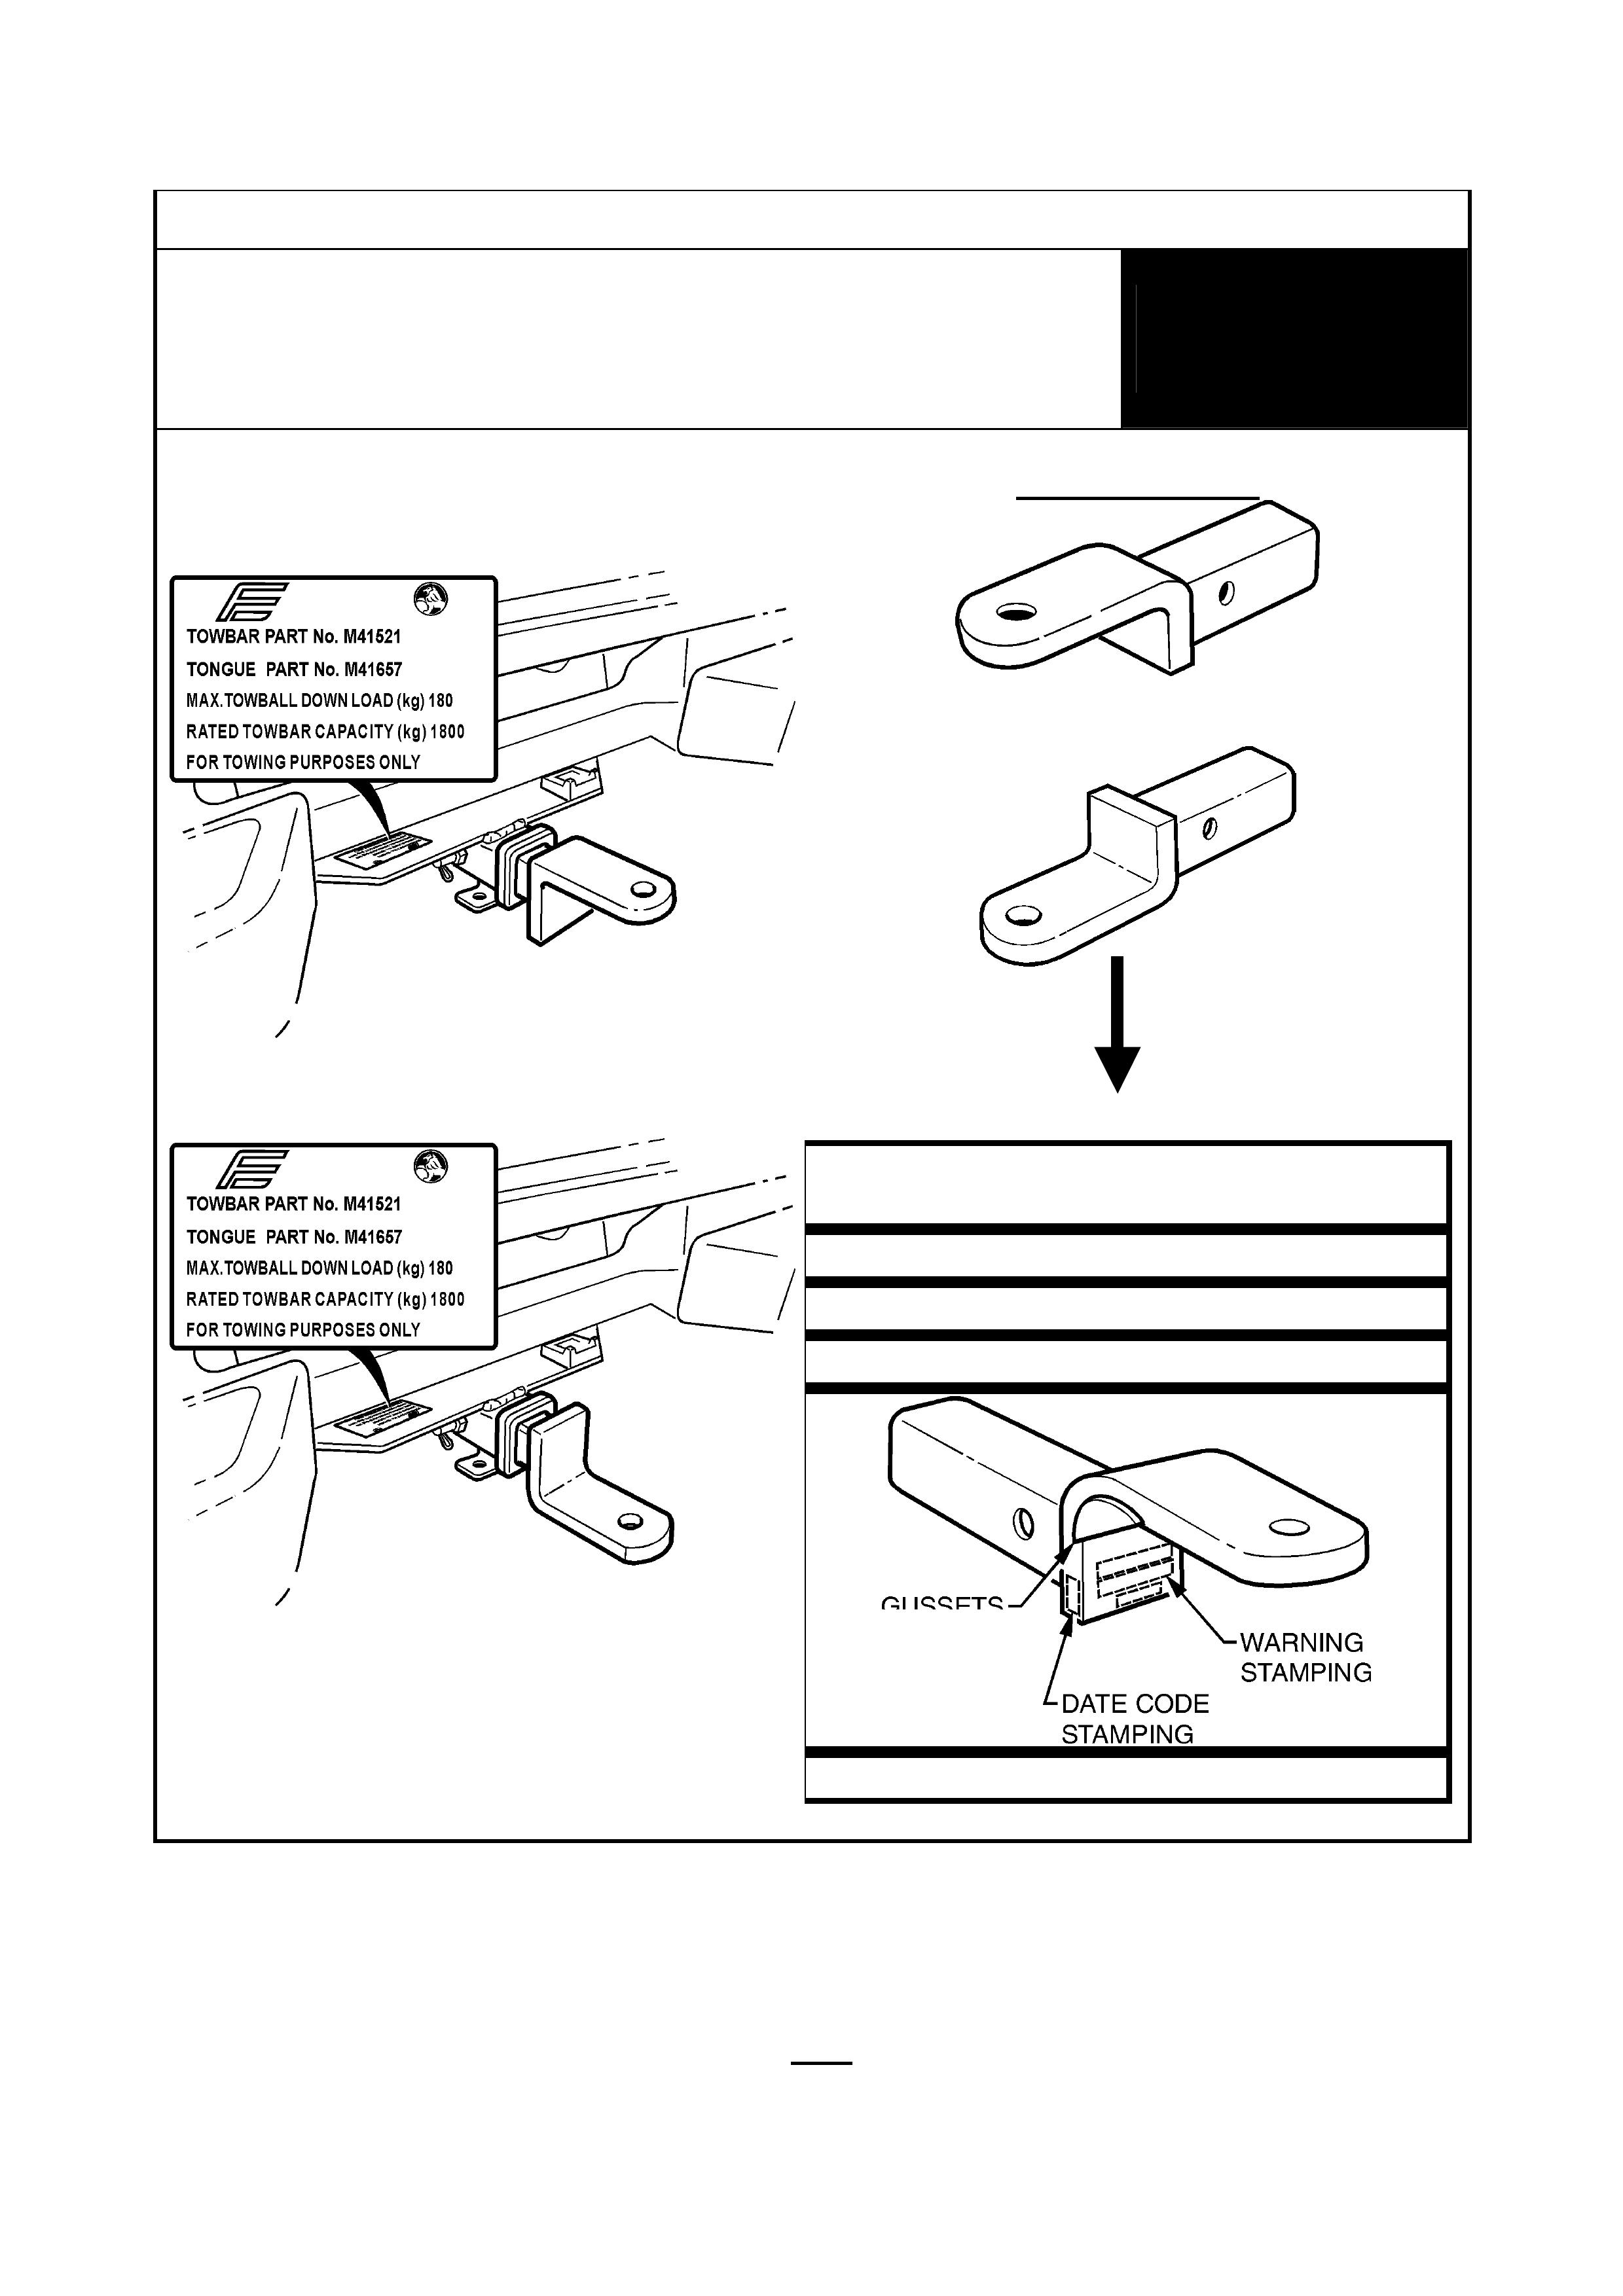
AFFECTED TONGUES
Identif i cat i on Diagram 1
VT, VX & WH - Including: HSV
1600kg & 2100kg Rating Towbars
(Equaliser Hi tch NOT used)
WITHOUT
EQUA LISER
HITCH
Genuine Holden towbar identified by label and/or
appearance:
1600kg:
OR:
2100kg:
Existing Tongue:
MUST be replaced w i t h Part Number:
92145107
(wit h gusset s)
Refer Identif i cat ion Diagram 2 - for Towbars wit h Equaliser Hitch.
Gussets (2 places) To
prevent equaliser fitm ent
8 of 23
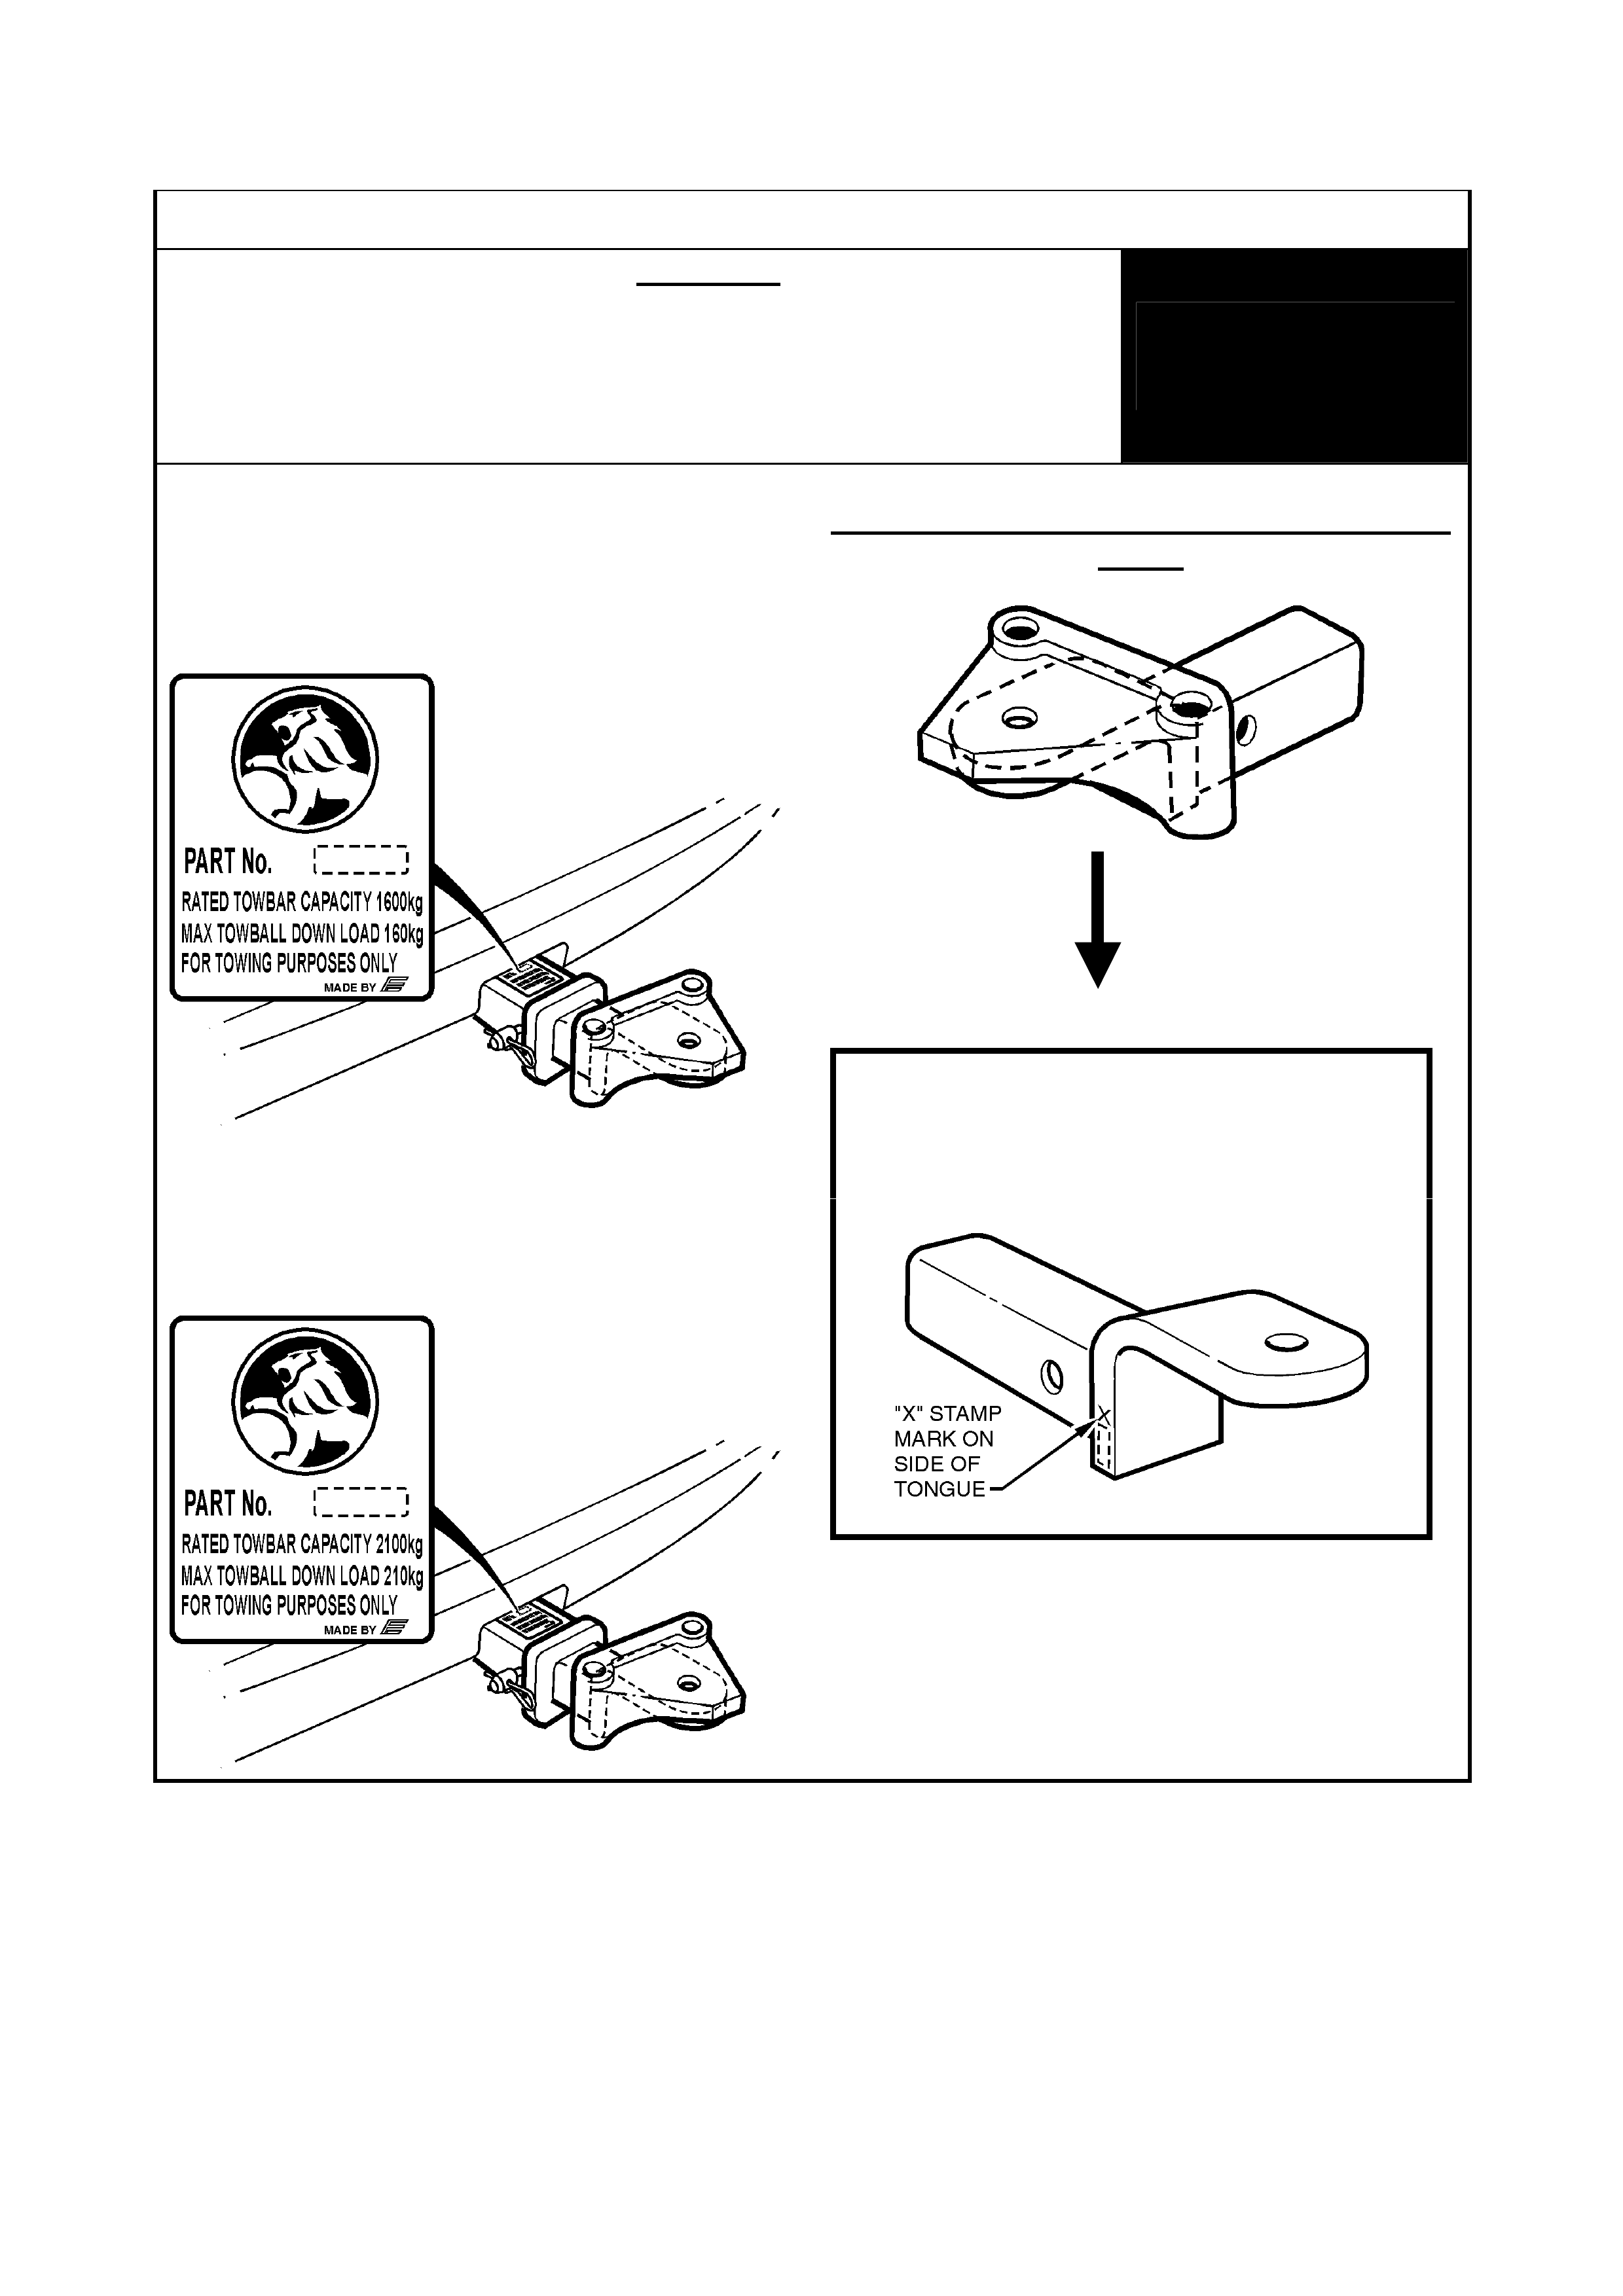
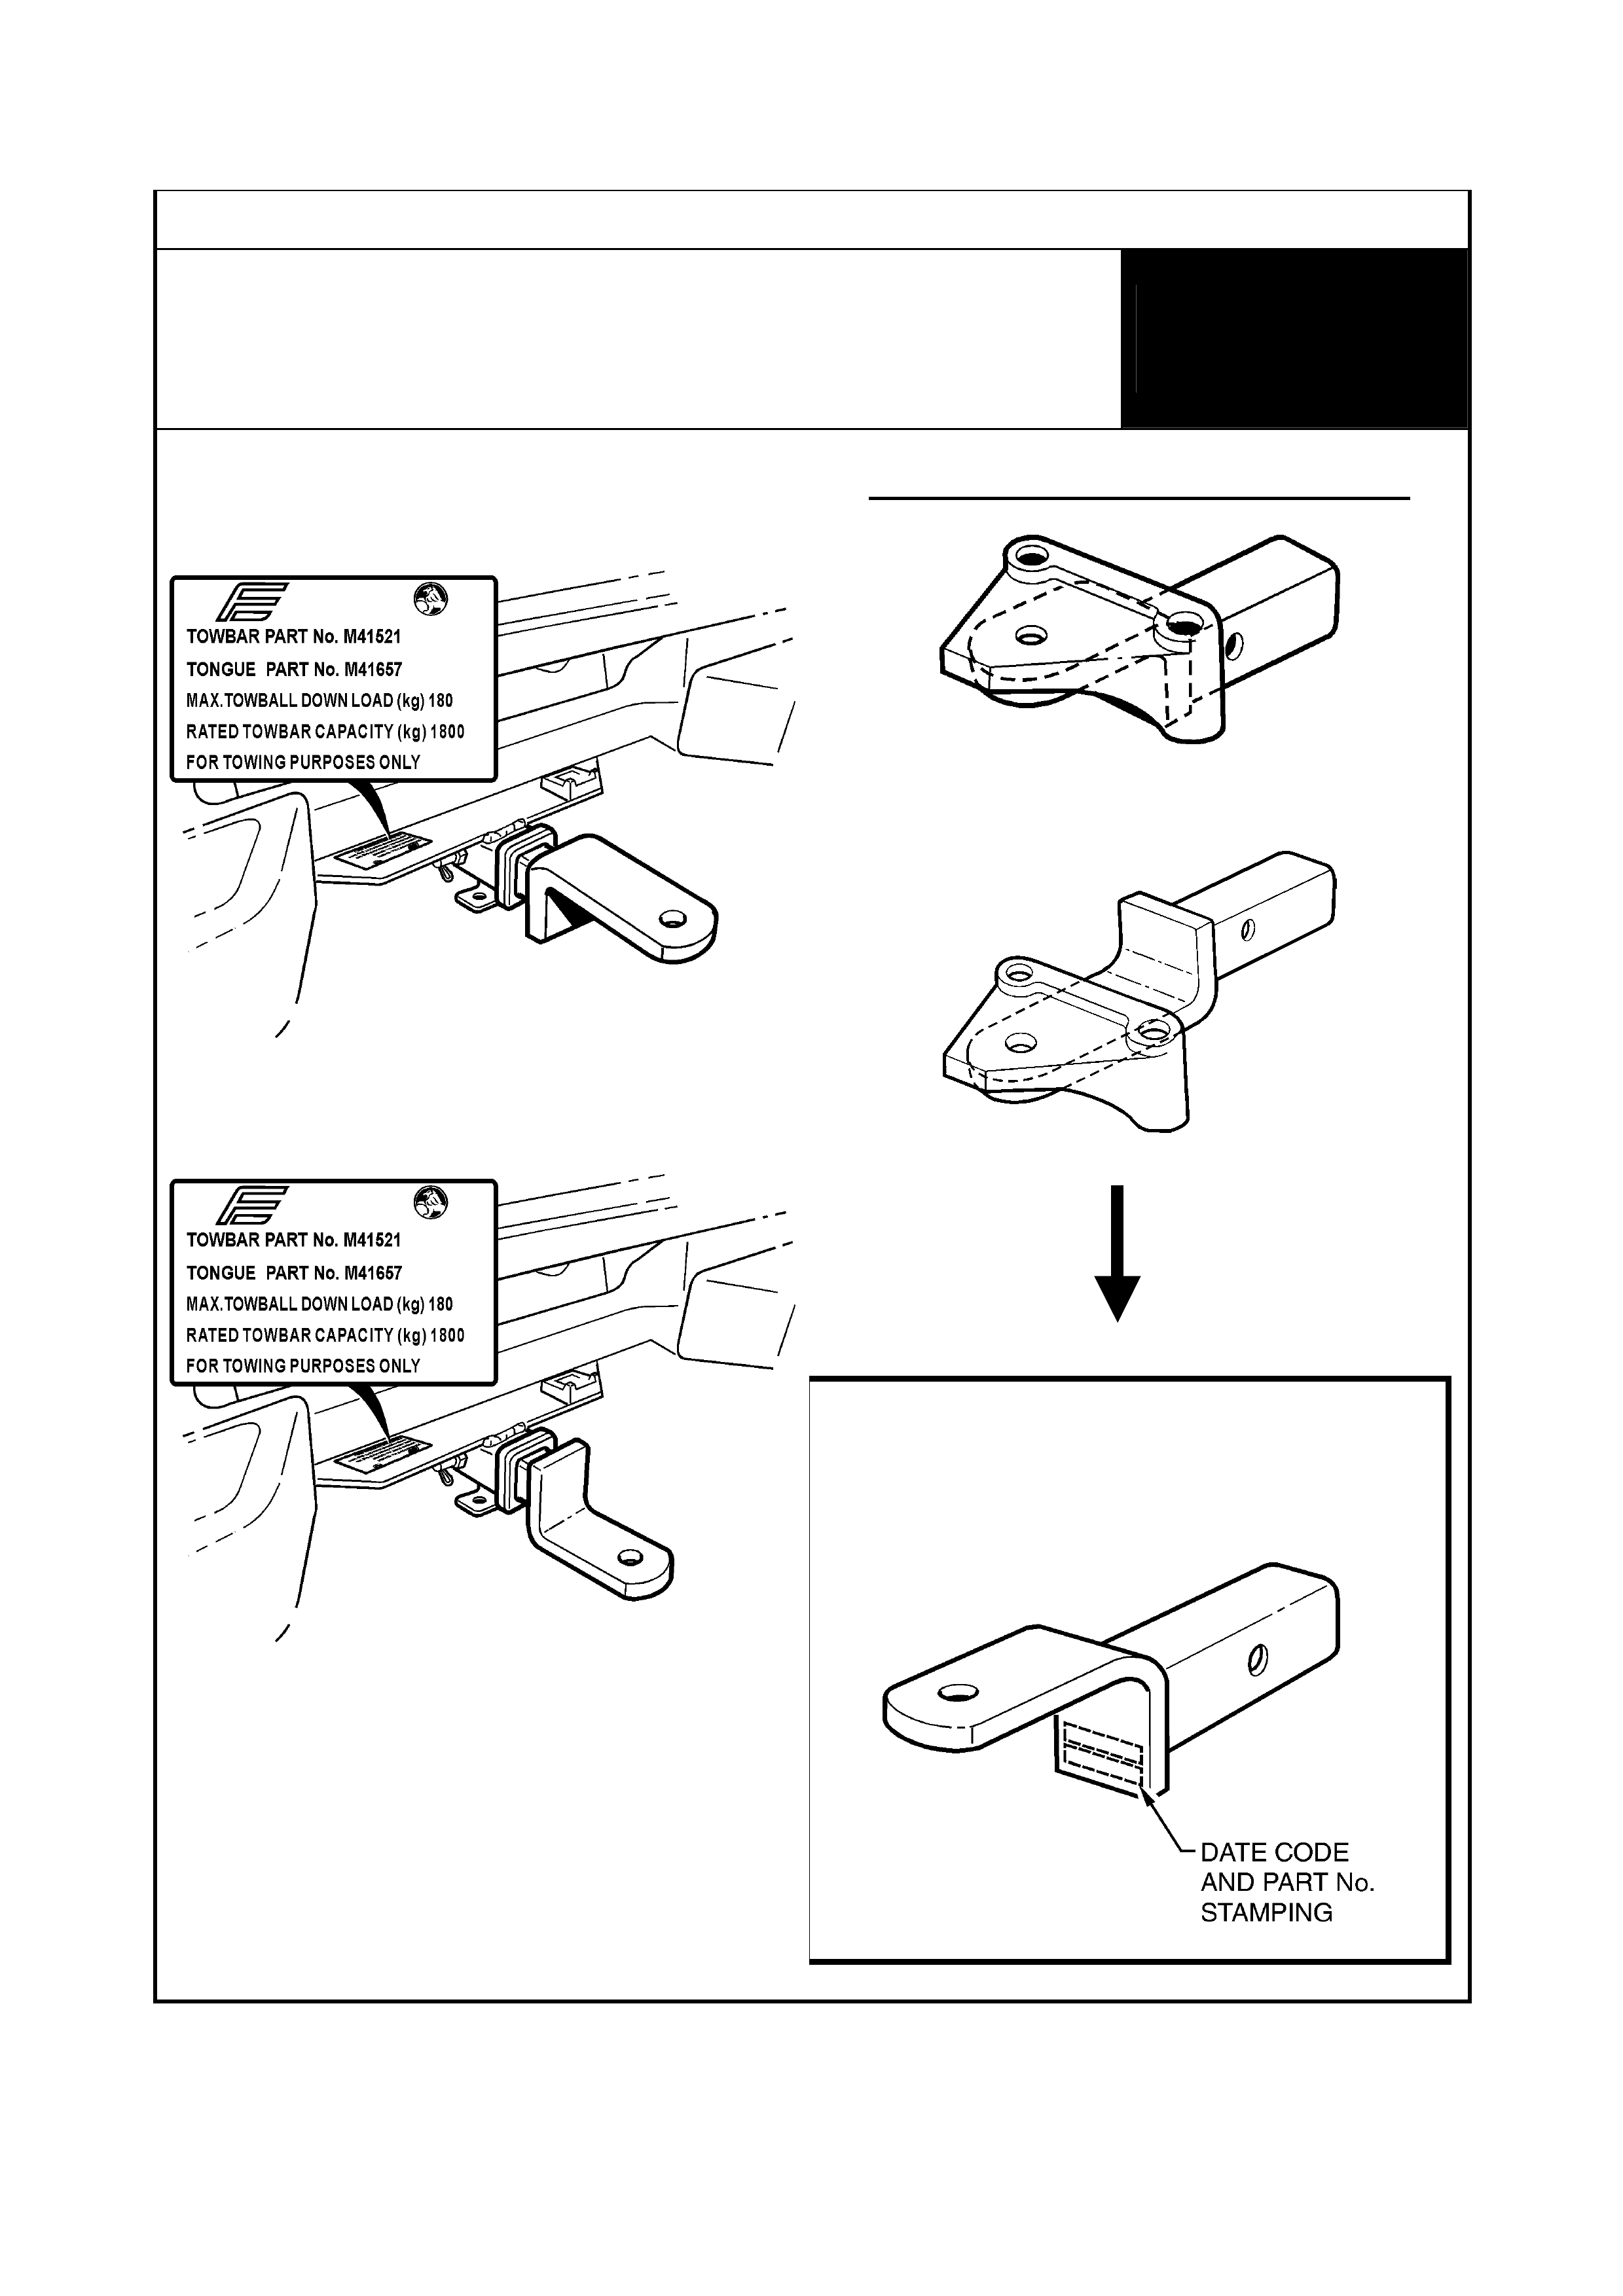
Identif i cat i on Diagram 2
VT, VX & WH - Including: HSV
1600kg & 2100kg Rating Towbars
(wit h Equal iser Hitch)
WITH
EQUA LISER
HITCH
Genuine Holden towbar identified by label
and/or appearance:
1600kg:
OR:
2100kg:
Existing Tongue wit h an exampl e Equaliser
Hitch:
MUST be replaced w i t h Part Number:
92145225
(w ith “X” mark)
9 of 23
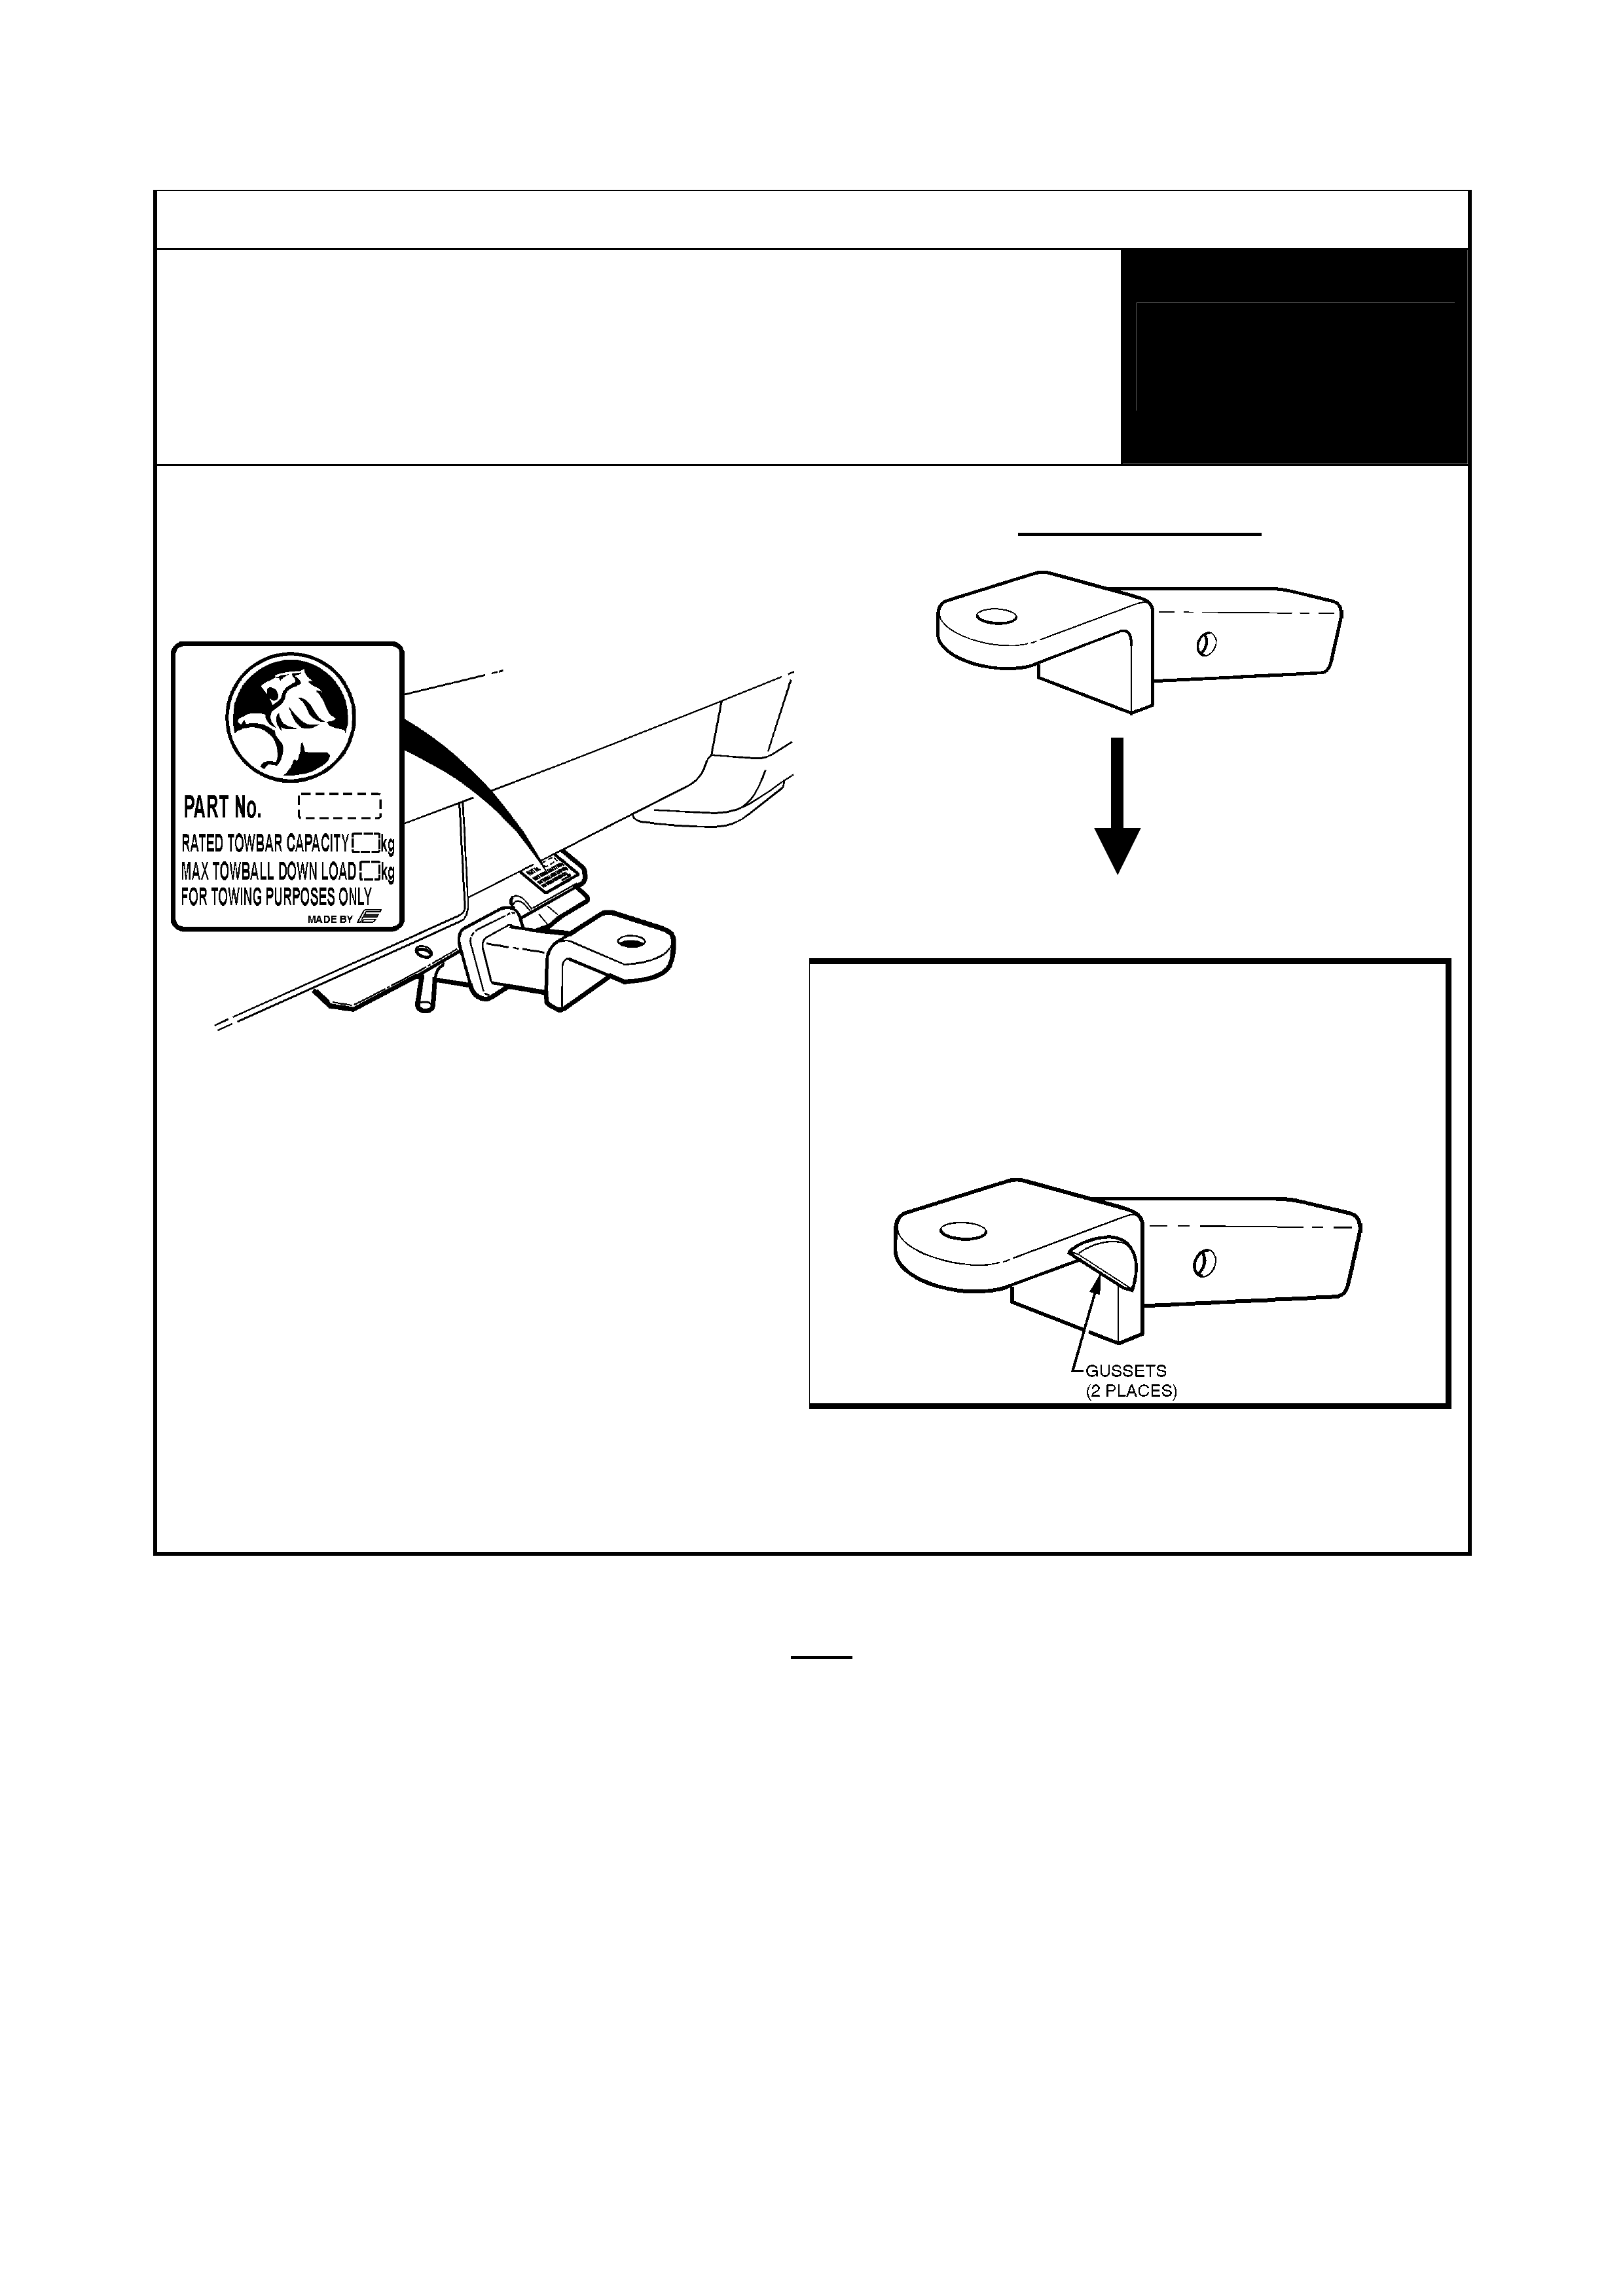
Identif i cat i on Diagram 3
VU Utility,
and HSV VU Maloo Utility
1200kg/1600kg Rating Towbars
(Equaliser Hi tch NOT used)
WITHOUT
EQUA LISER
HITCH
Genuine Holden tow bar identified by label
and/or appearance:
Existing Tongue:
MUST be replaced with HO LDEN Part No.:
92145106
(wit h gusset s)
NOTE: For HSV Maloo, Part No.: 14L-
010505 – order via normal HSV Parts
channels.
Refer Identif i cat ion Diagram 4 - for Towbars wit h Equaliser Hitch.
10 of 23
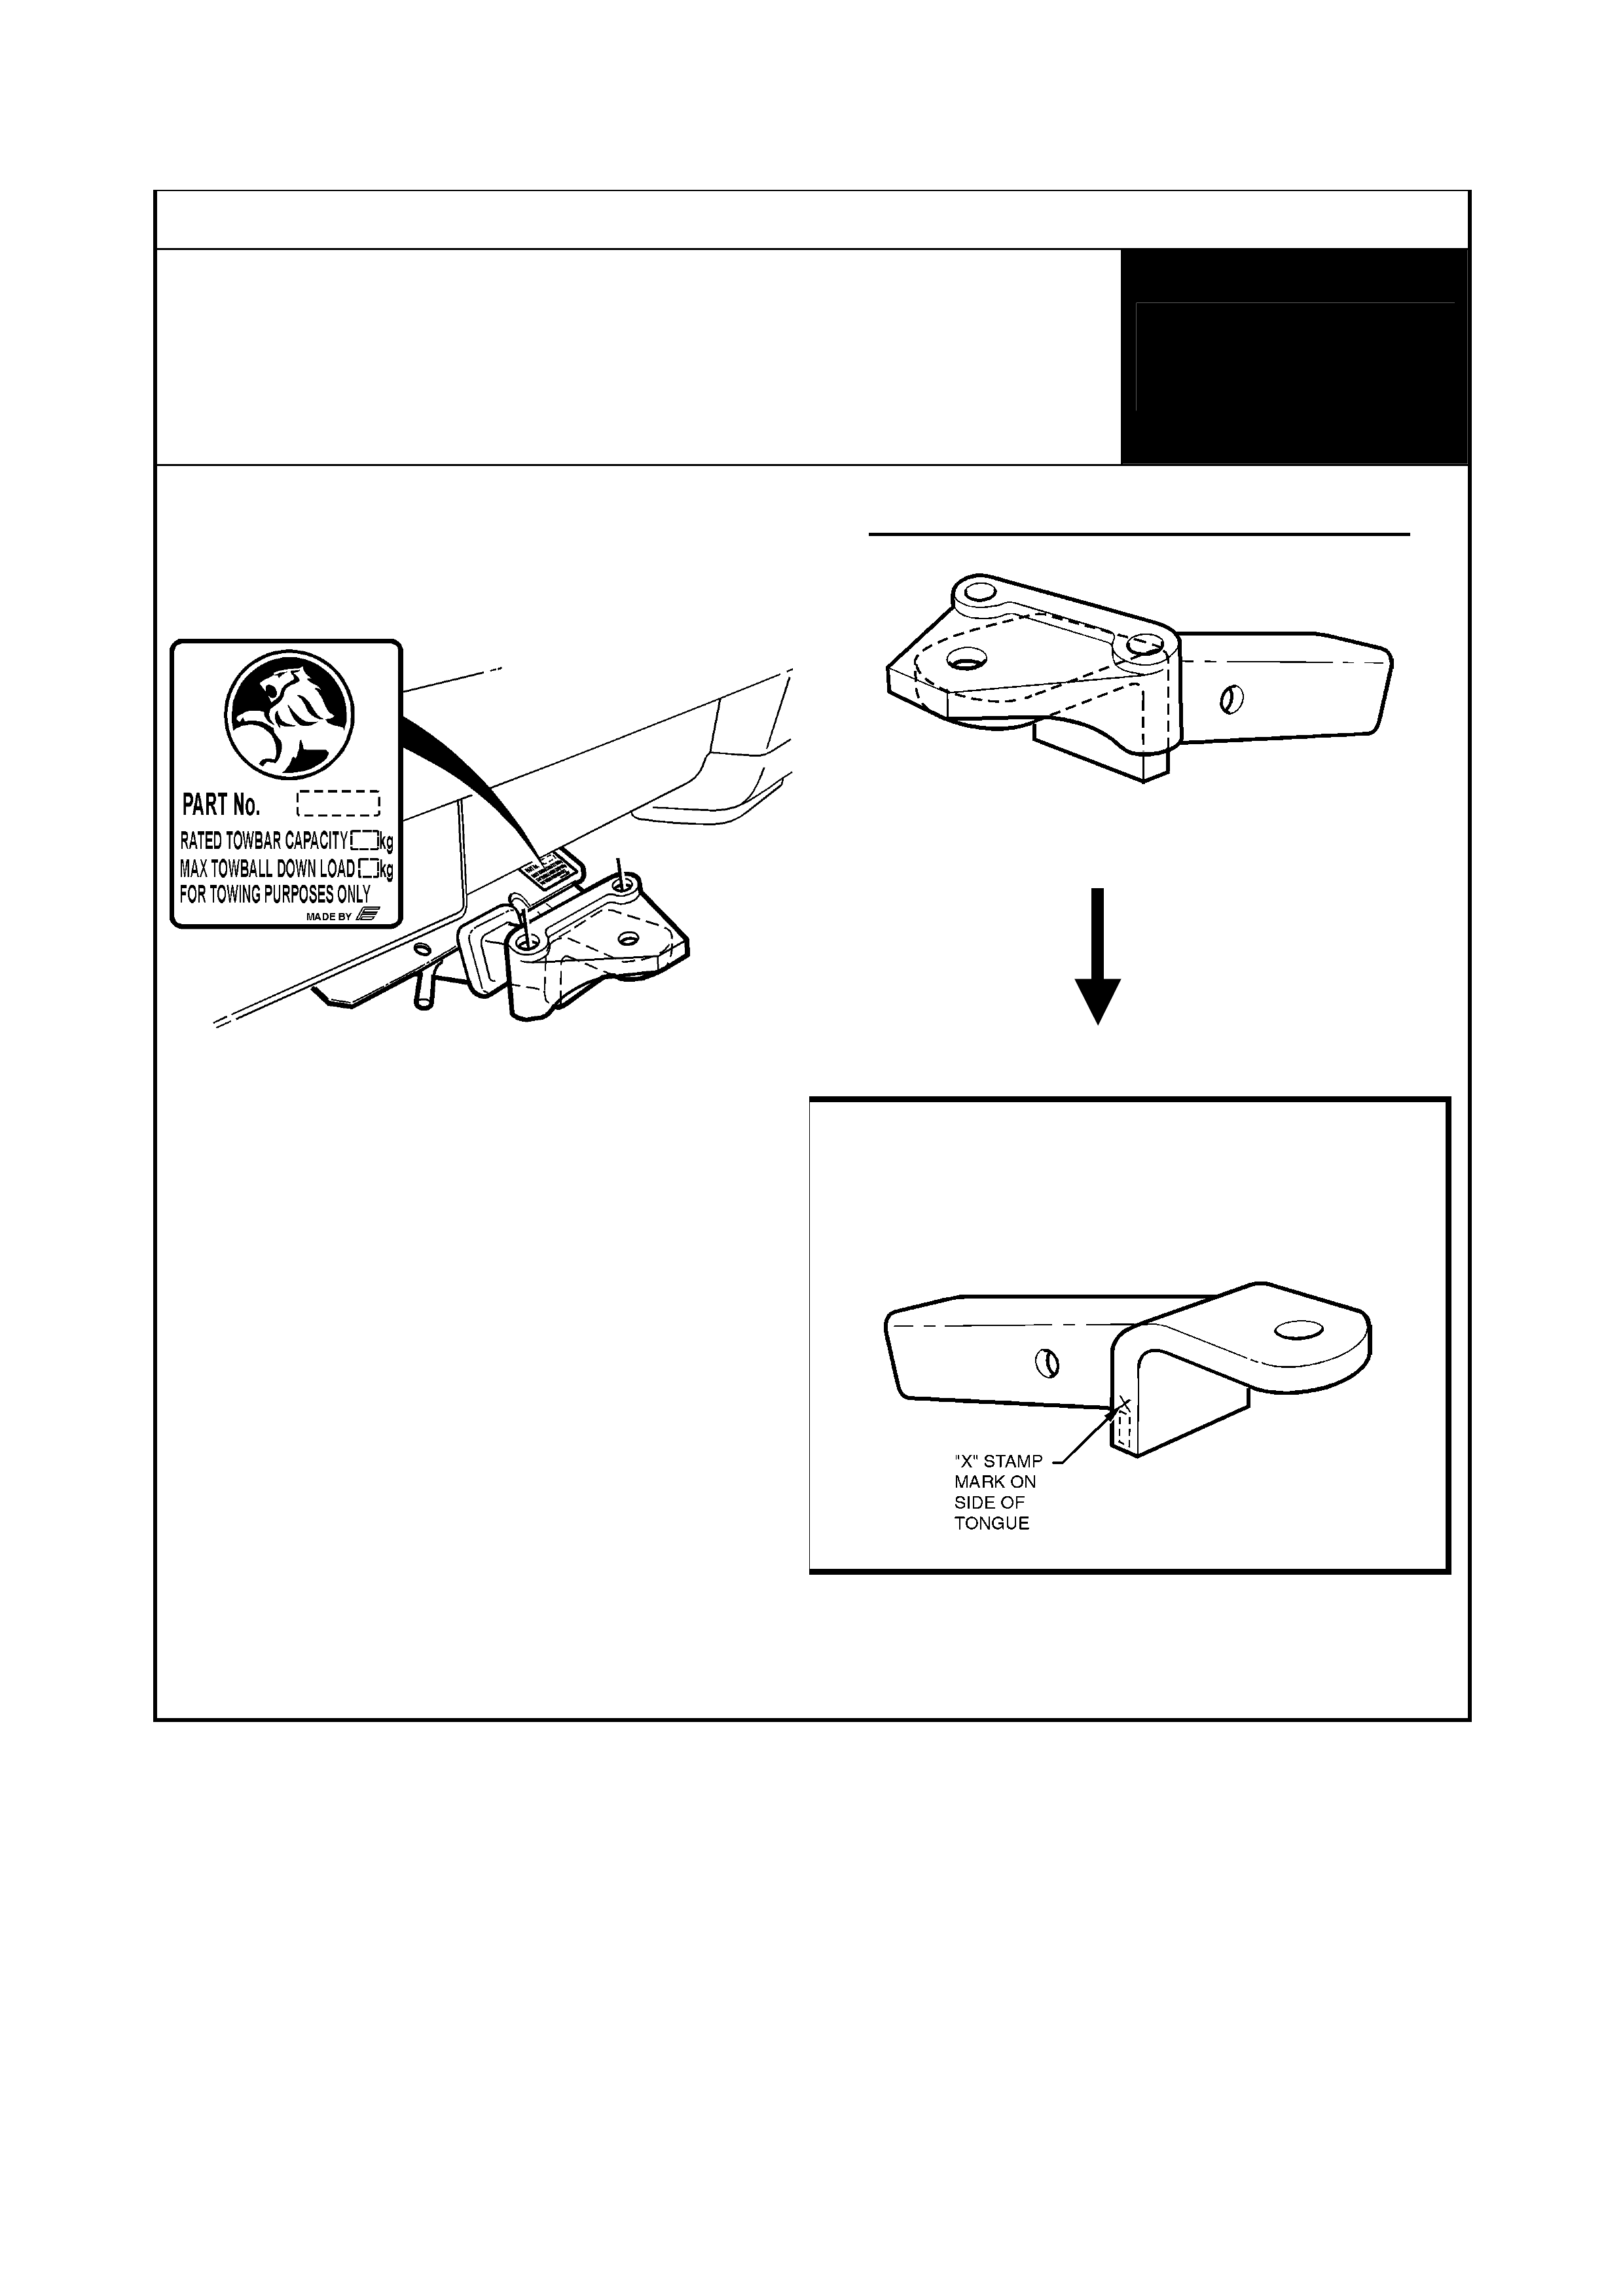
Identif i cat i on Diagram 4
VU Utility,
and HSV VU Maloo Utility
1200kg/1600kg Rating Towbars
(wit h Equal iser Hitch)
WITH
EQUA LISER
HITCH
Genuine Holden tow bar identified by label
and/or appearance:
Existing Tongue wi t h Equal iser Hitch:
MUST be replaced w i t h Part Number:
HOLDEN Part No.: 92145254
(w ith “X” mark)
NOTE: For HSV Maloo, Part No.: 14L-010505
– order via normal HSV Parts channels.
11 of 23
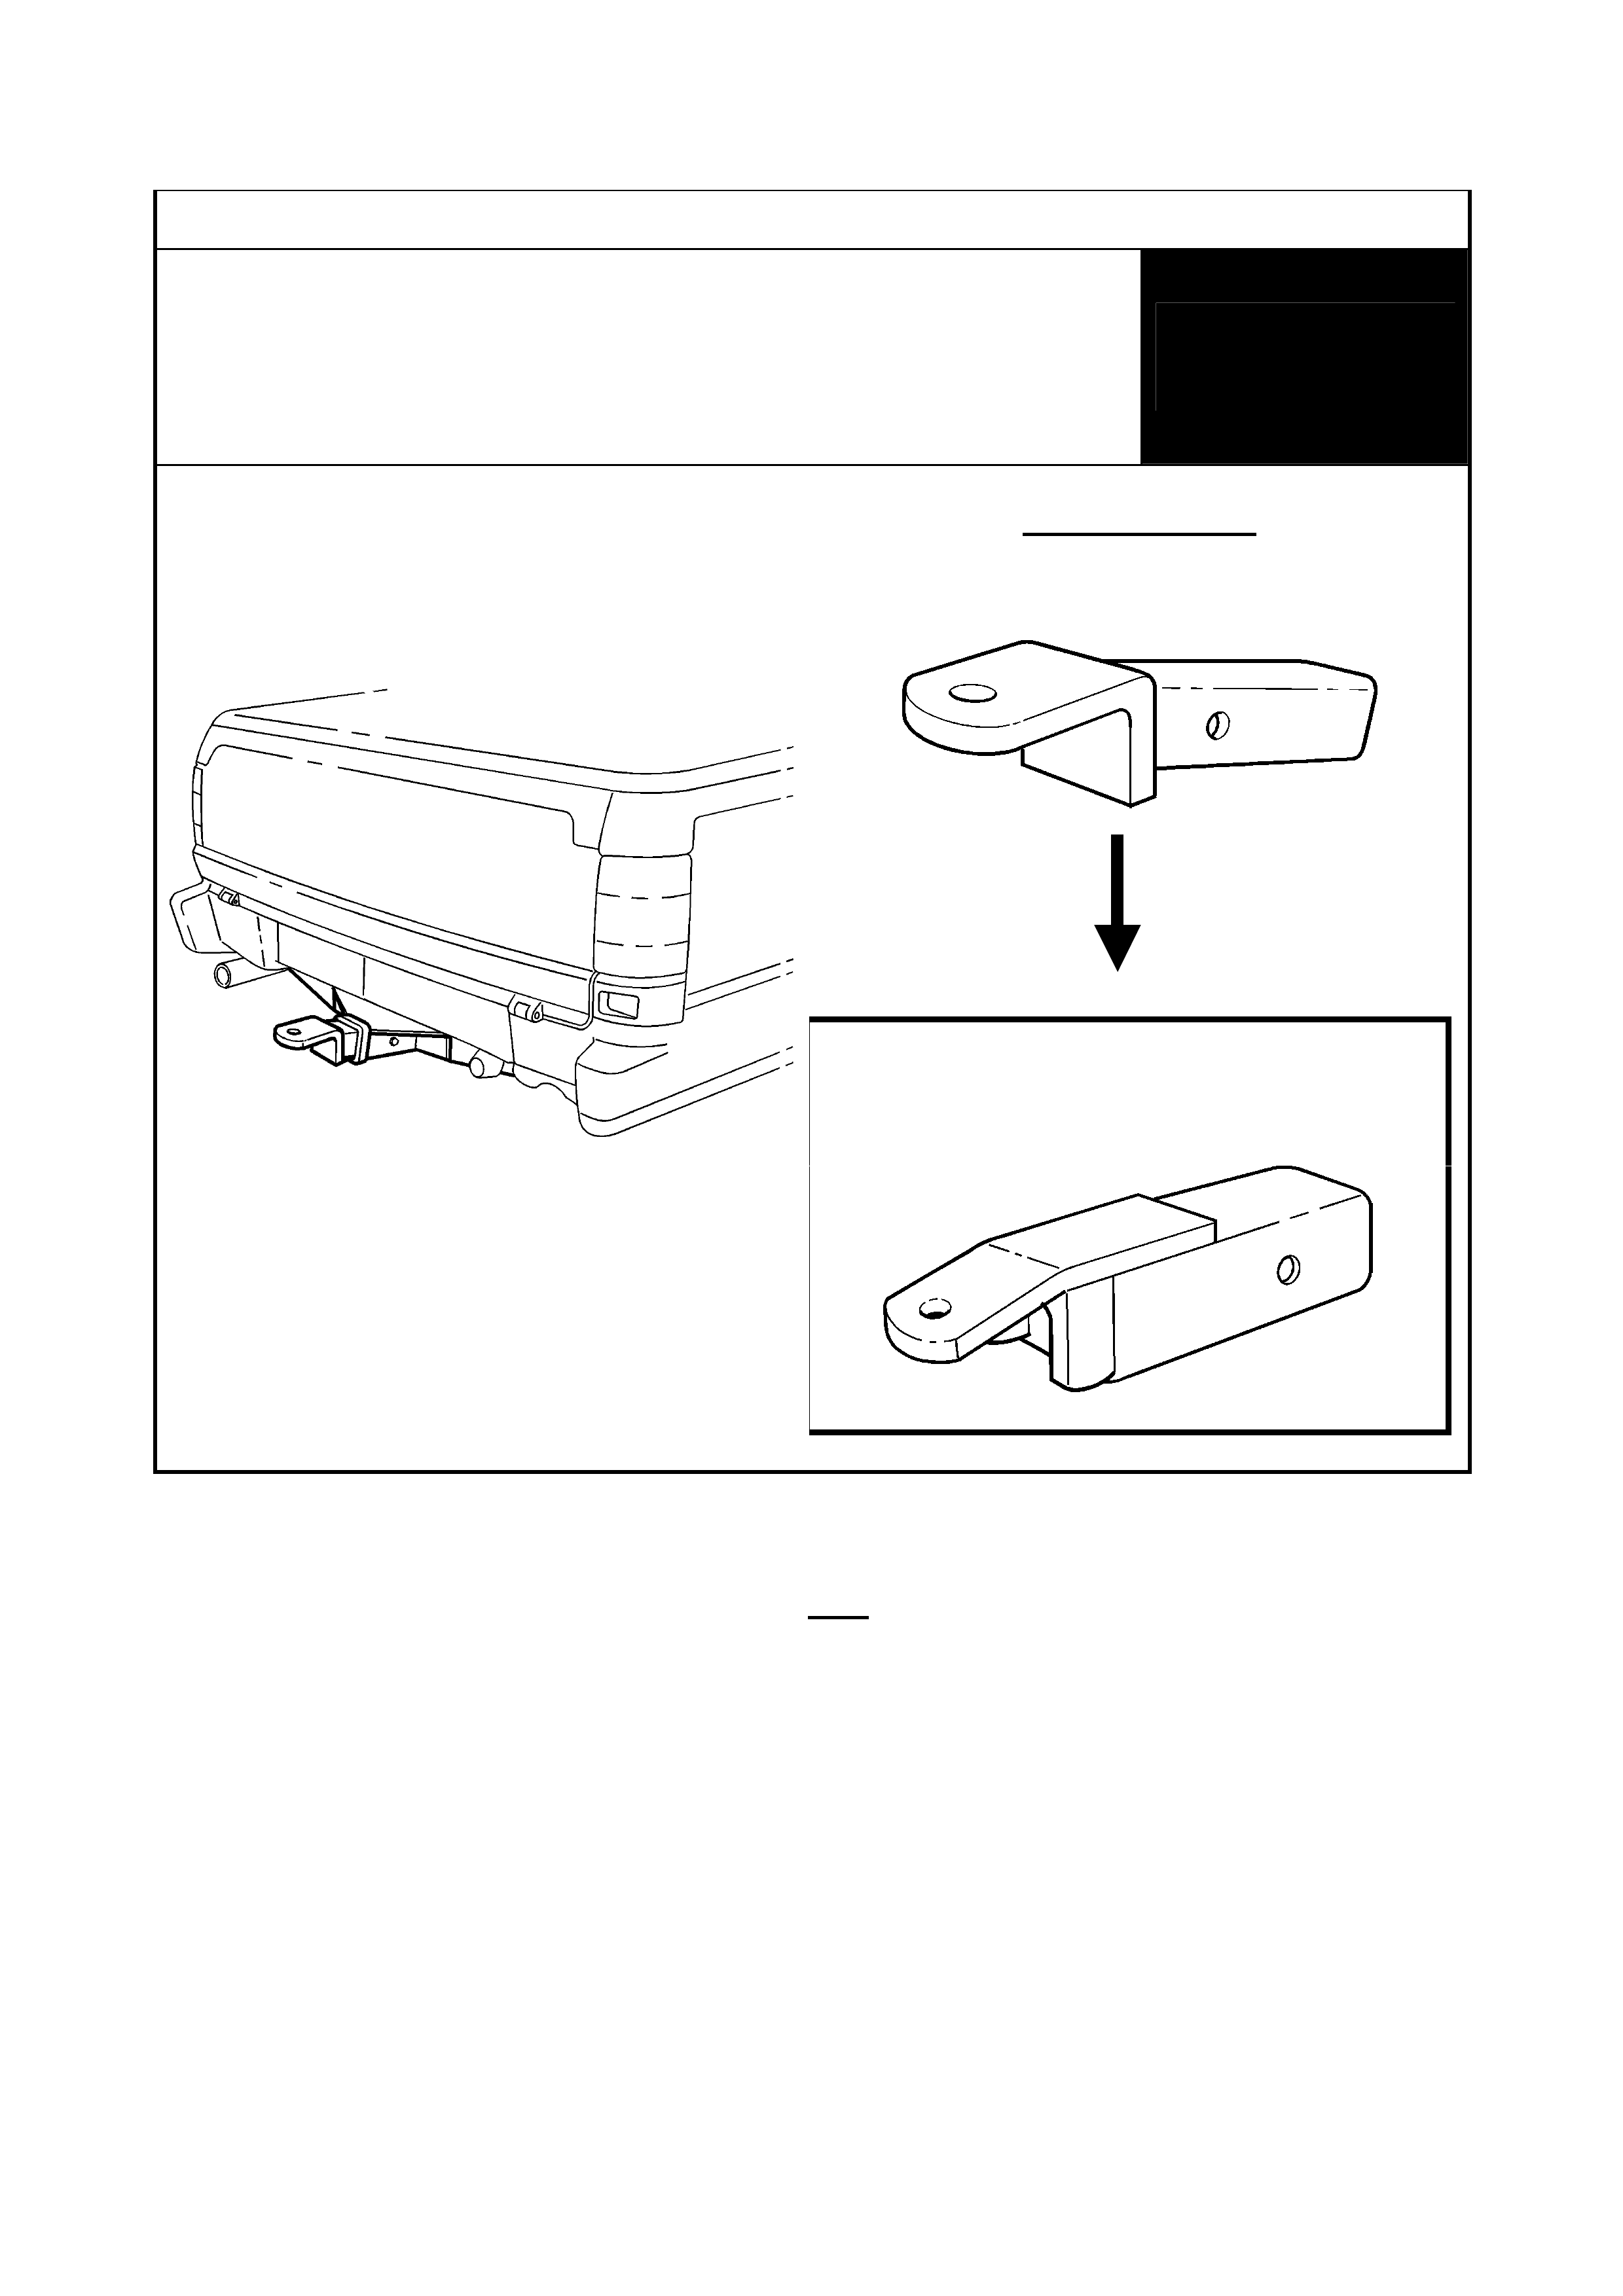
Identif i cat i on Diagram 5
TF Rodeo
1800kg Rating Towbars
(Equaliser Hi tch NOT used)
WITHOUT
EQUA LISER
HITCH
Genuine Holden tow bar identified by plate
and/or appearance:
OR:
Existing Tongue:
OR:
MUST be replaced w i t h Part Number:
92145181
(wit h gusset s)
Reinstall in applicable orientation
Refer Identif i cat ion Diagram 6 - for Towbars wit h Equaliser Hitch.
Gussets to
prevent equalis er
fitment
12 of 23
Identif i cat i on Diagram 6
TF Rodeo
1800kg Rating Towbar
(wit h Equal iser Hitch)
WITH
EQUA LISER
HITCH
Genuine Holden tow bar ident ified by plate
and/or appearance:
OR:
Existing Tongue wi t h Equal iser Hitch:
OR:
MUST be replaced w i t h Part Number:
92145223
Reinstall in applicable orientation
13 of 23
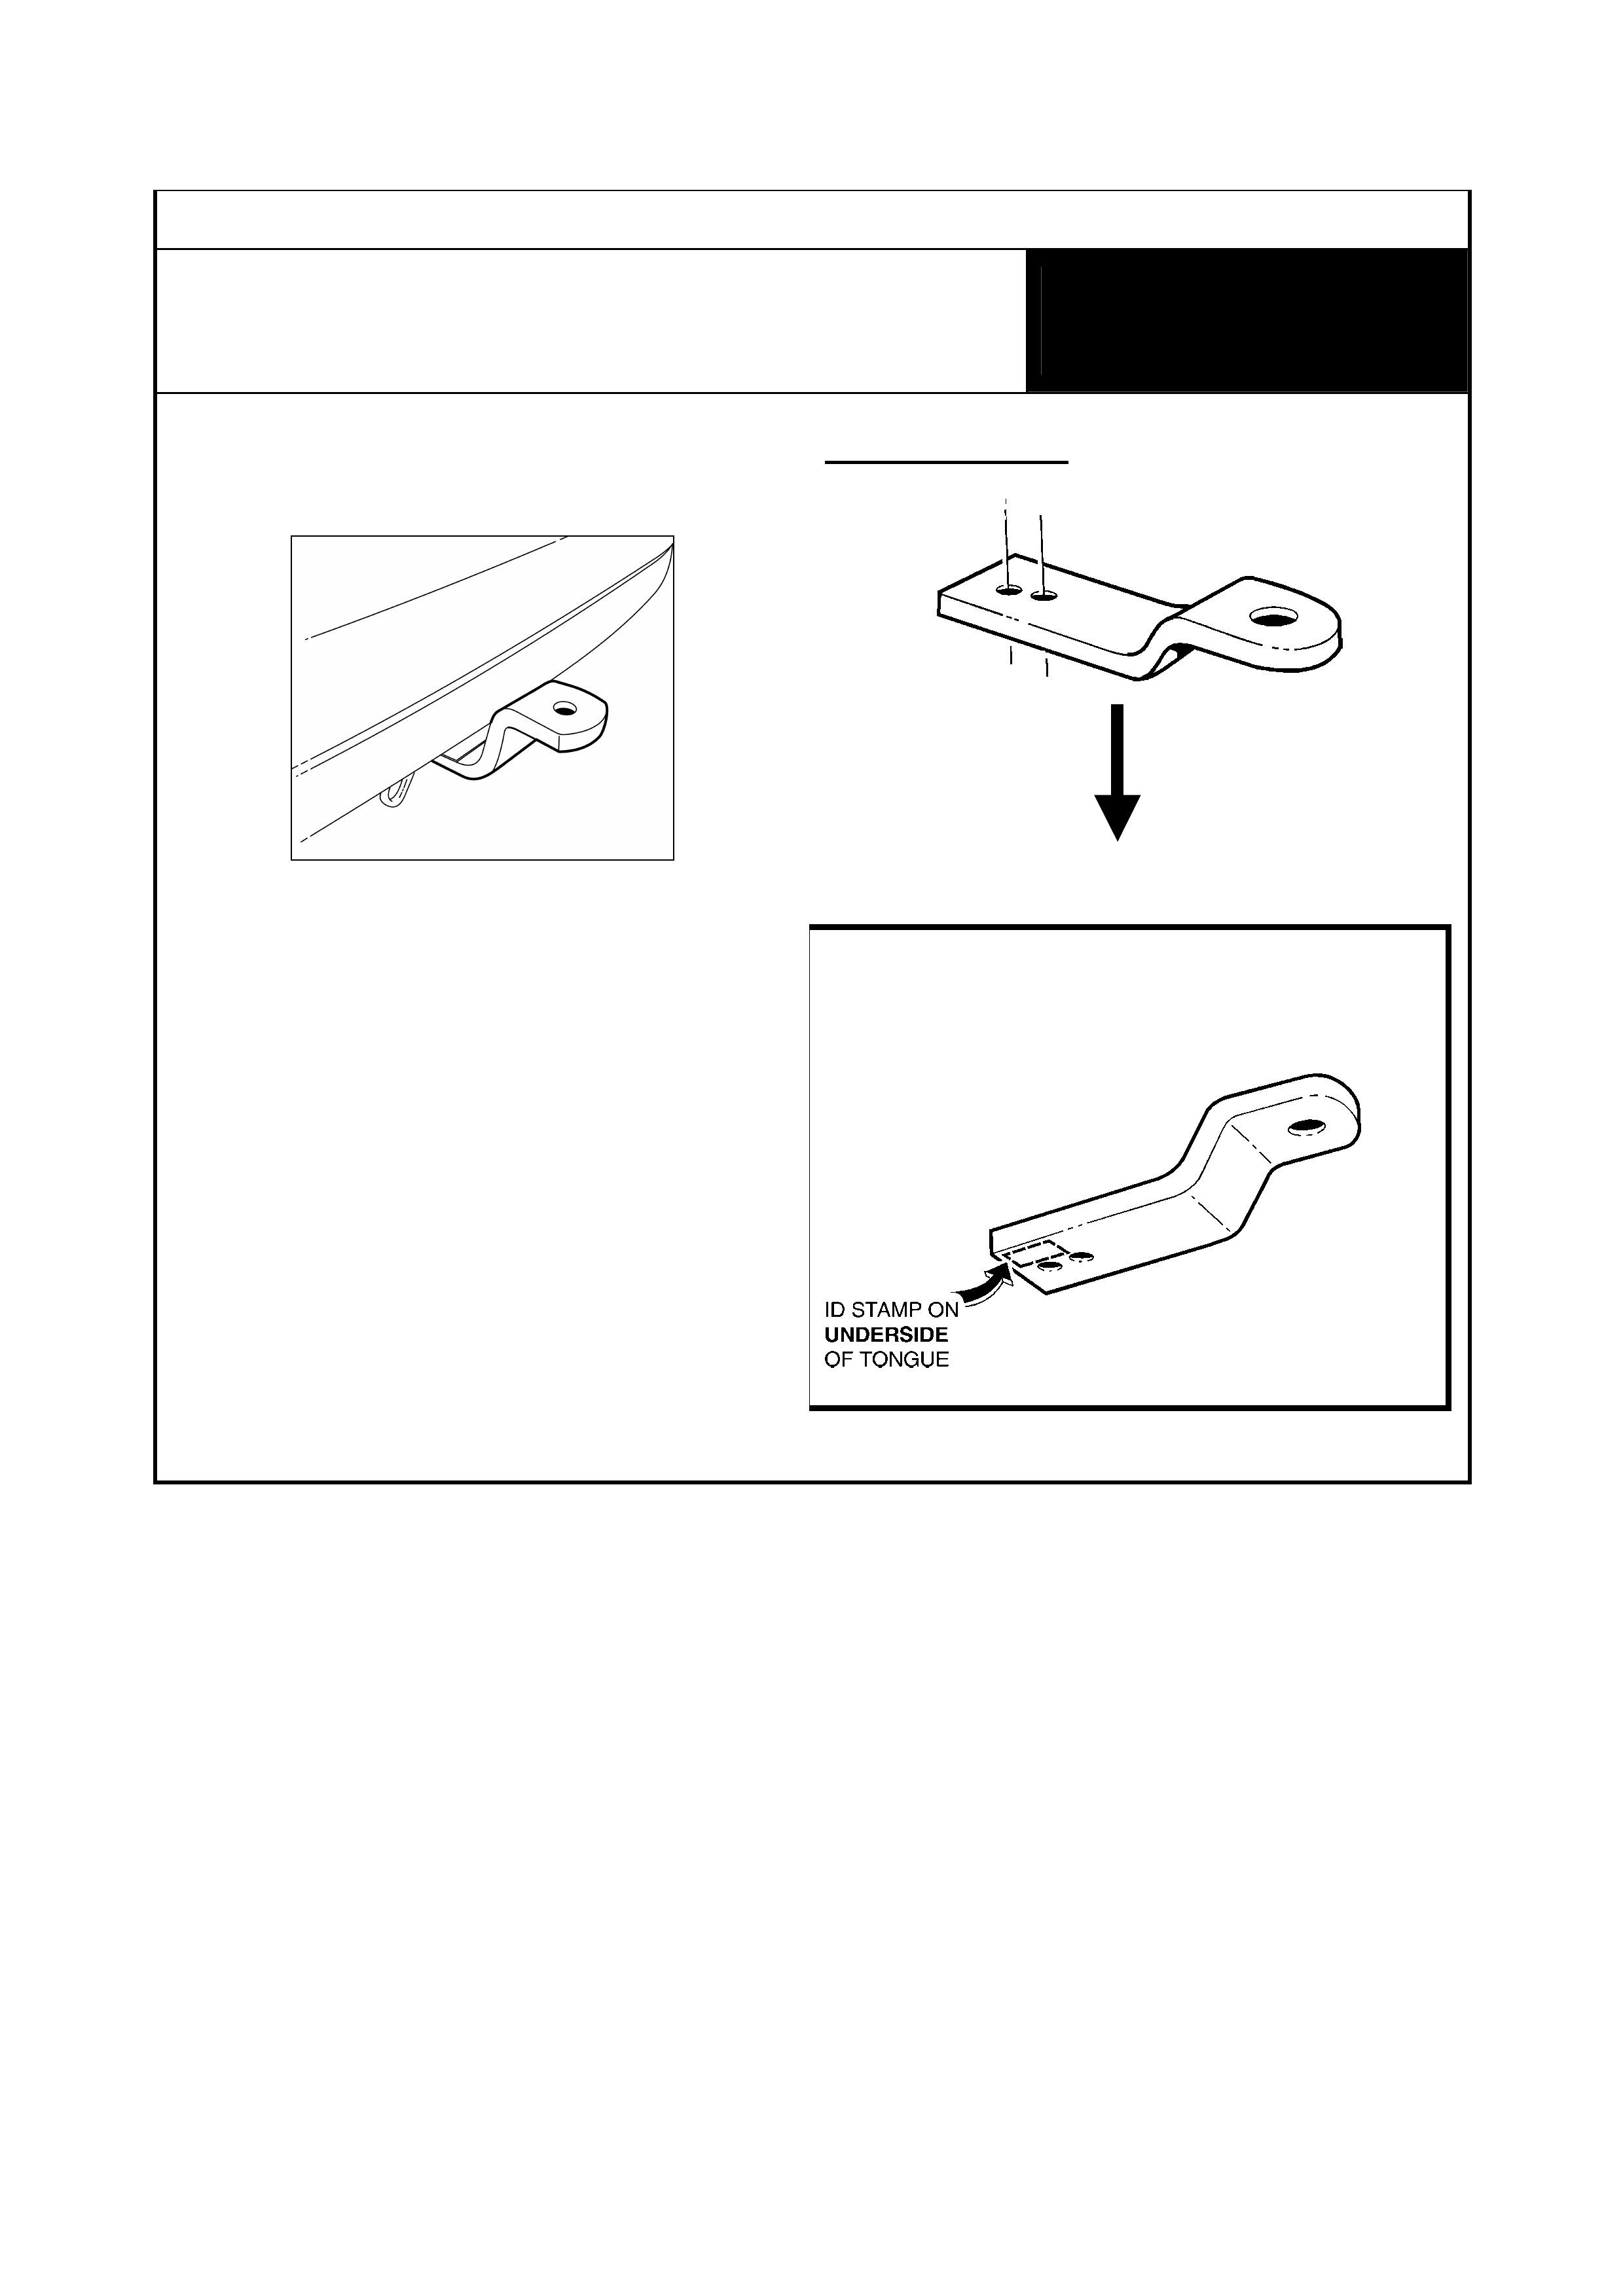
Identif i cat i on Diagram 7
TS Astra
1000kg Rating (Standard) Towbar
WITH OR WITHOUT
EQUA LISER
HITCH
Genuine Holden tow bar identified by
appearance:
Existing Tongue:
MUST be replaced w i t h Part Number:
92145222

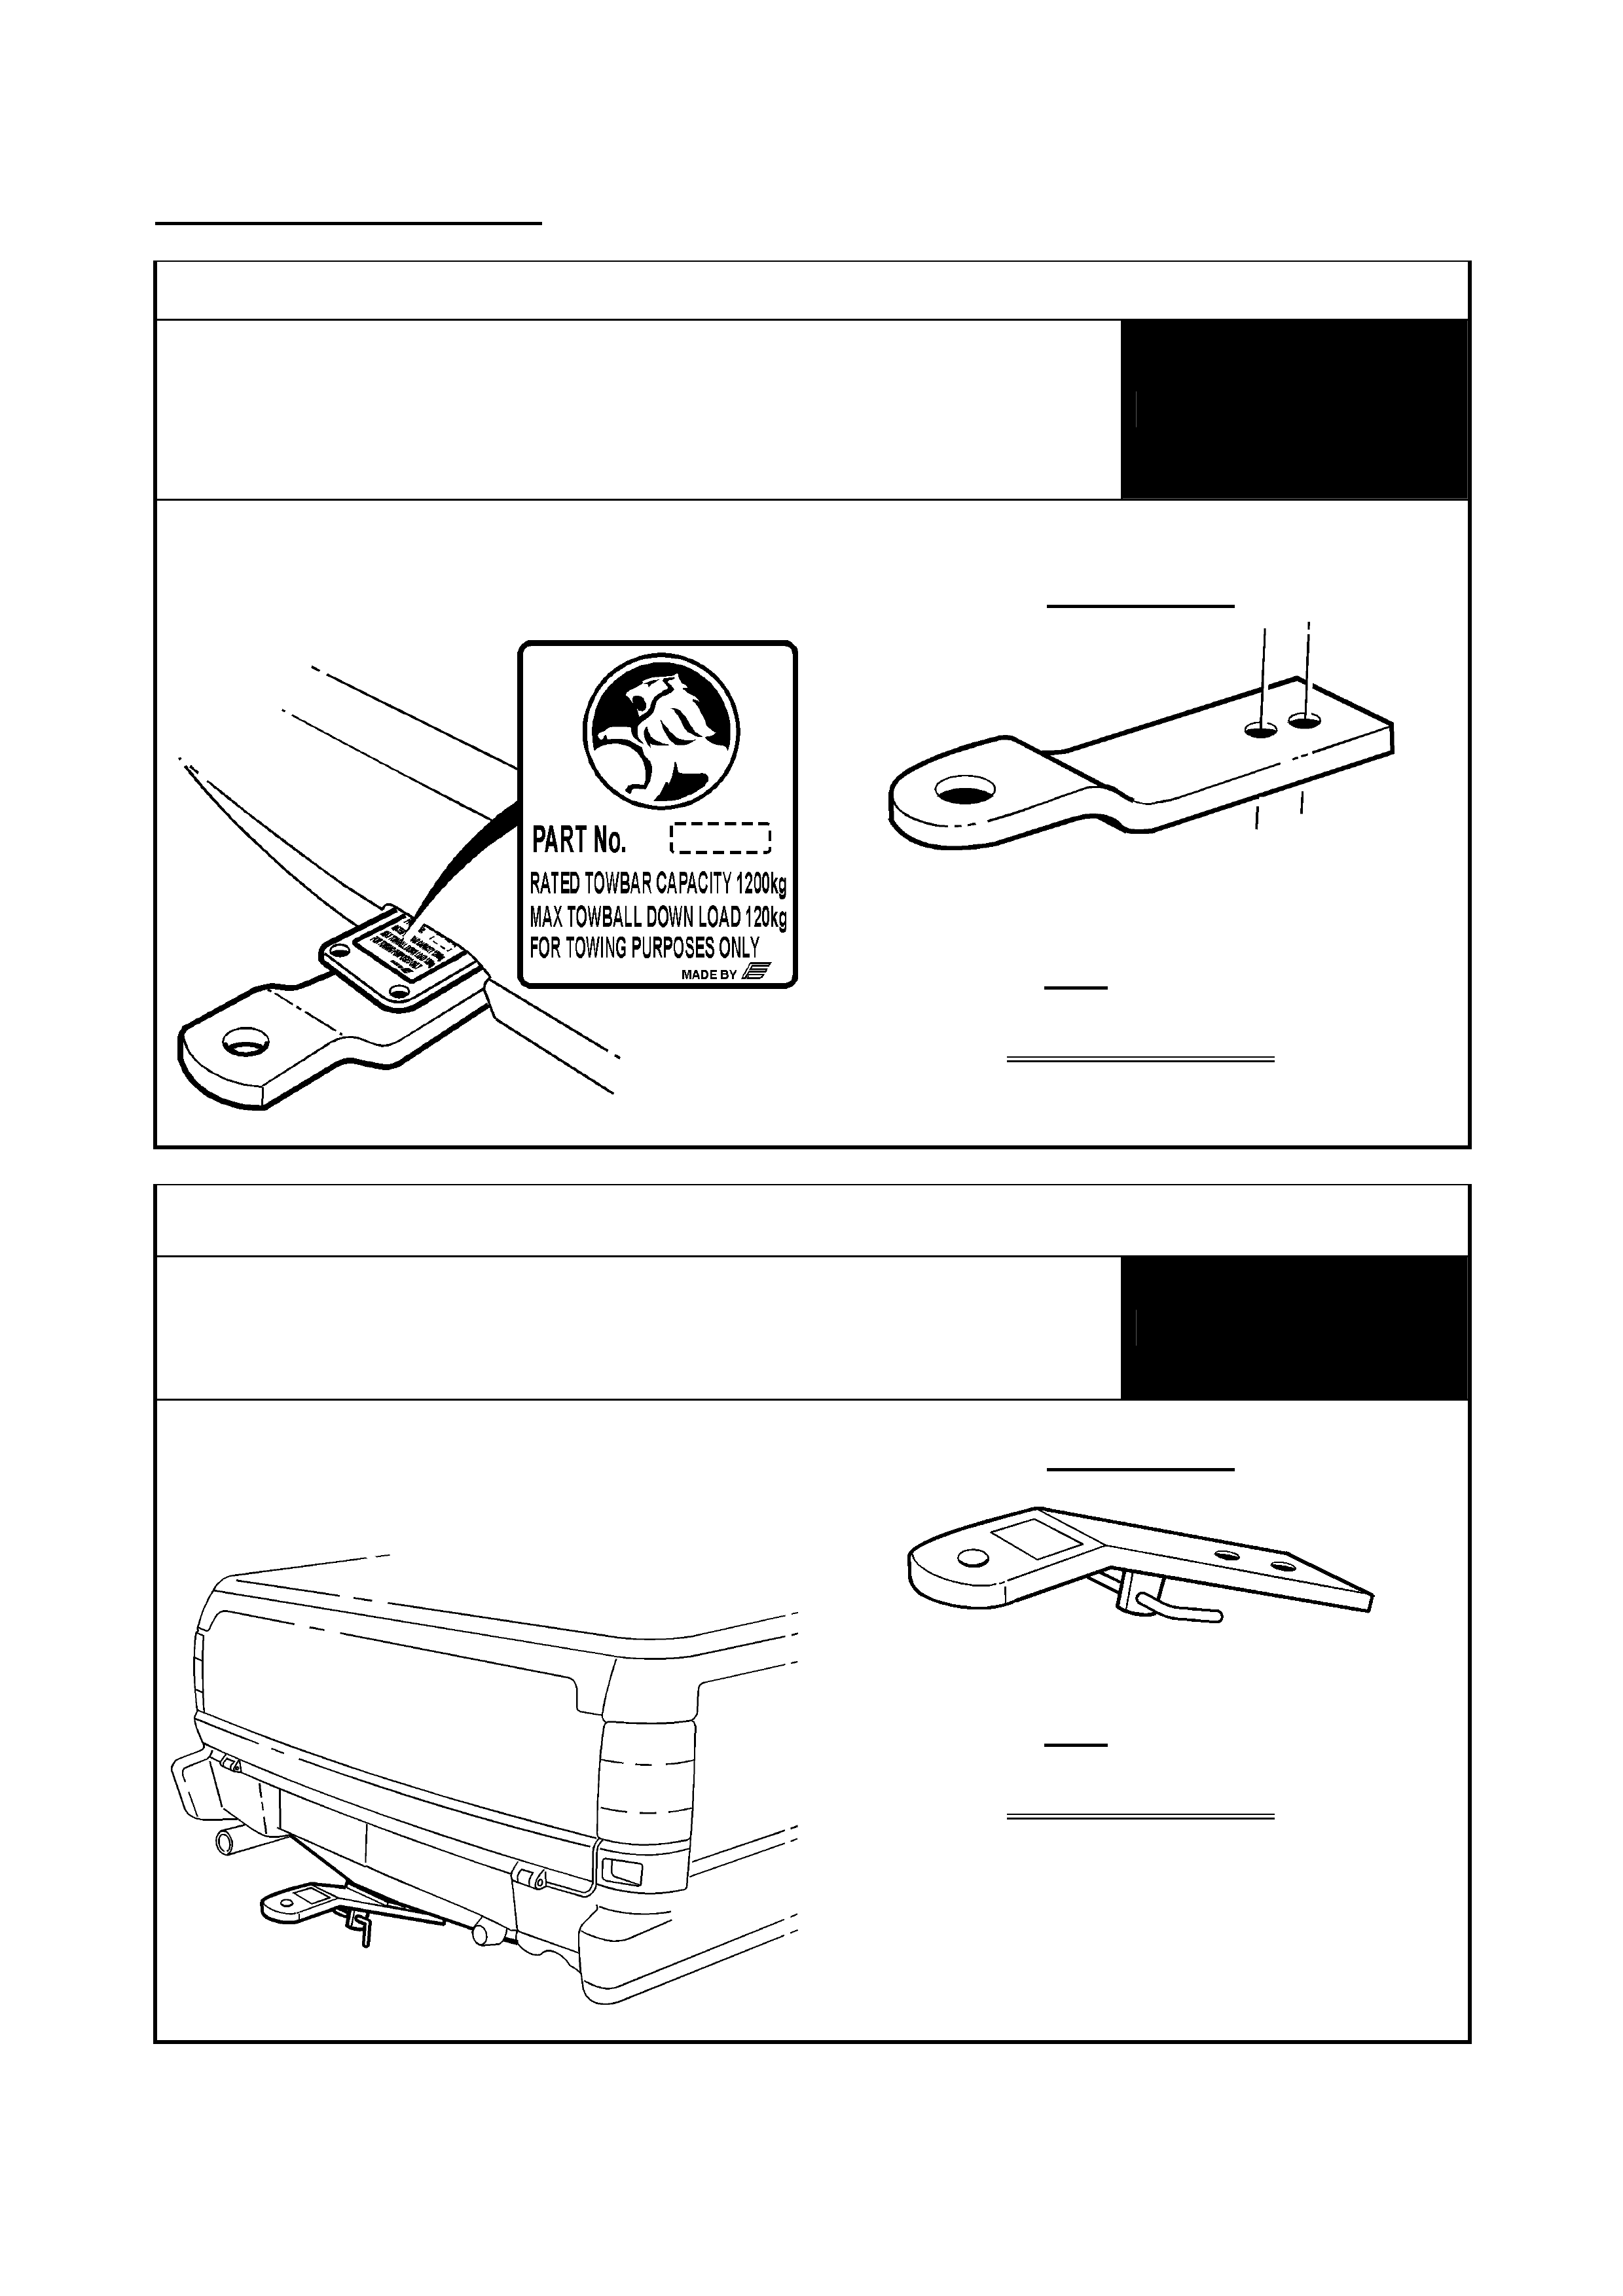
14 of 23
Identif i cat i on Diagram 8
VS Commodore & Calais Sedans,
Statesman & Caprice
- Including HSV
(✳ NOT Utility or Wagon!)
1590kg & 2100kg Rating Towbars
(Equaliser Hi tch NOT used)
WITHOUT
EQUA LISER
HITCH
Genuine Holden towbar Identified by
appearance:
Existing Tongue:
MUST be replaced w i t h Part Number:
92145275
Refer Identif i cat ion Diagram 9 - for Towbars wit h Equaliser Hitch.

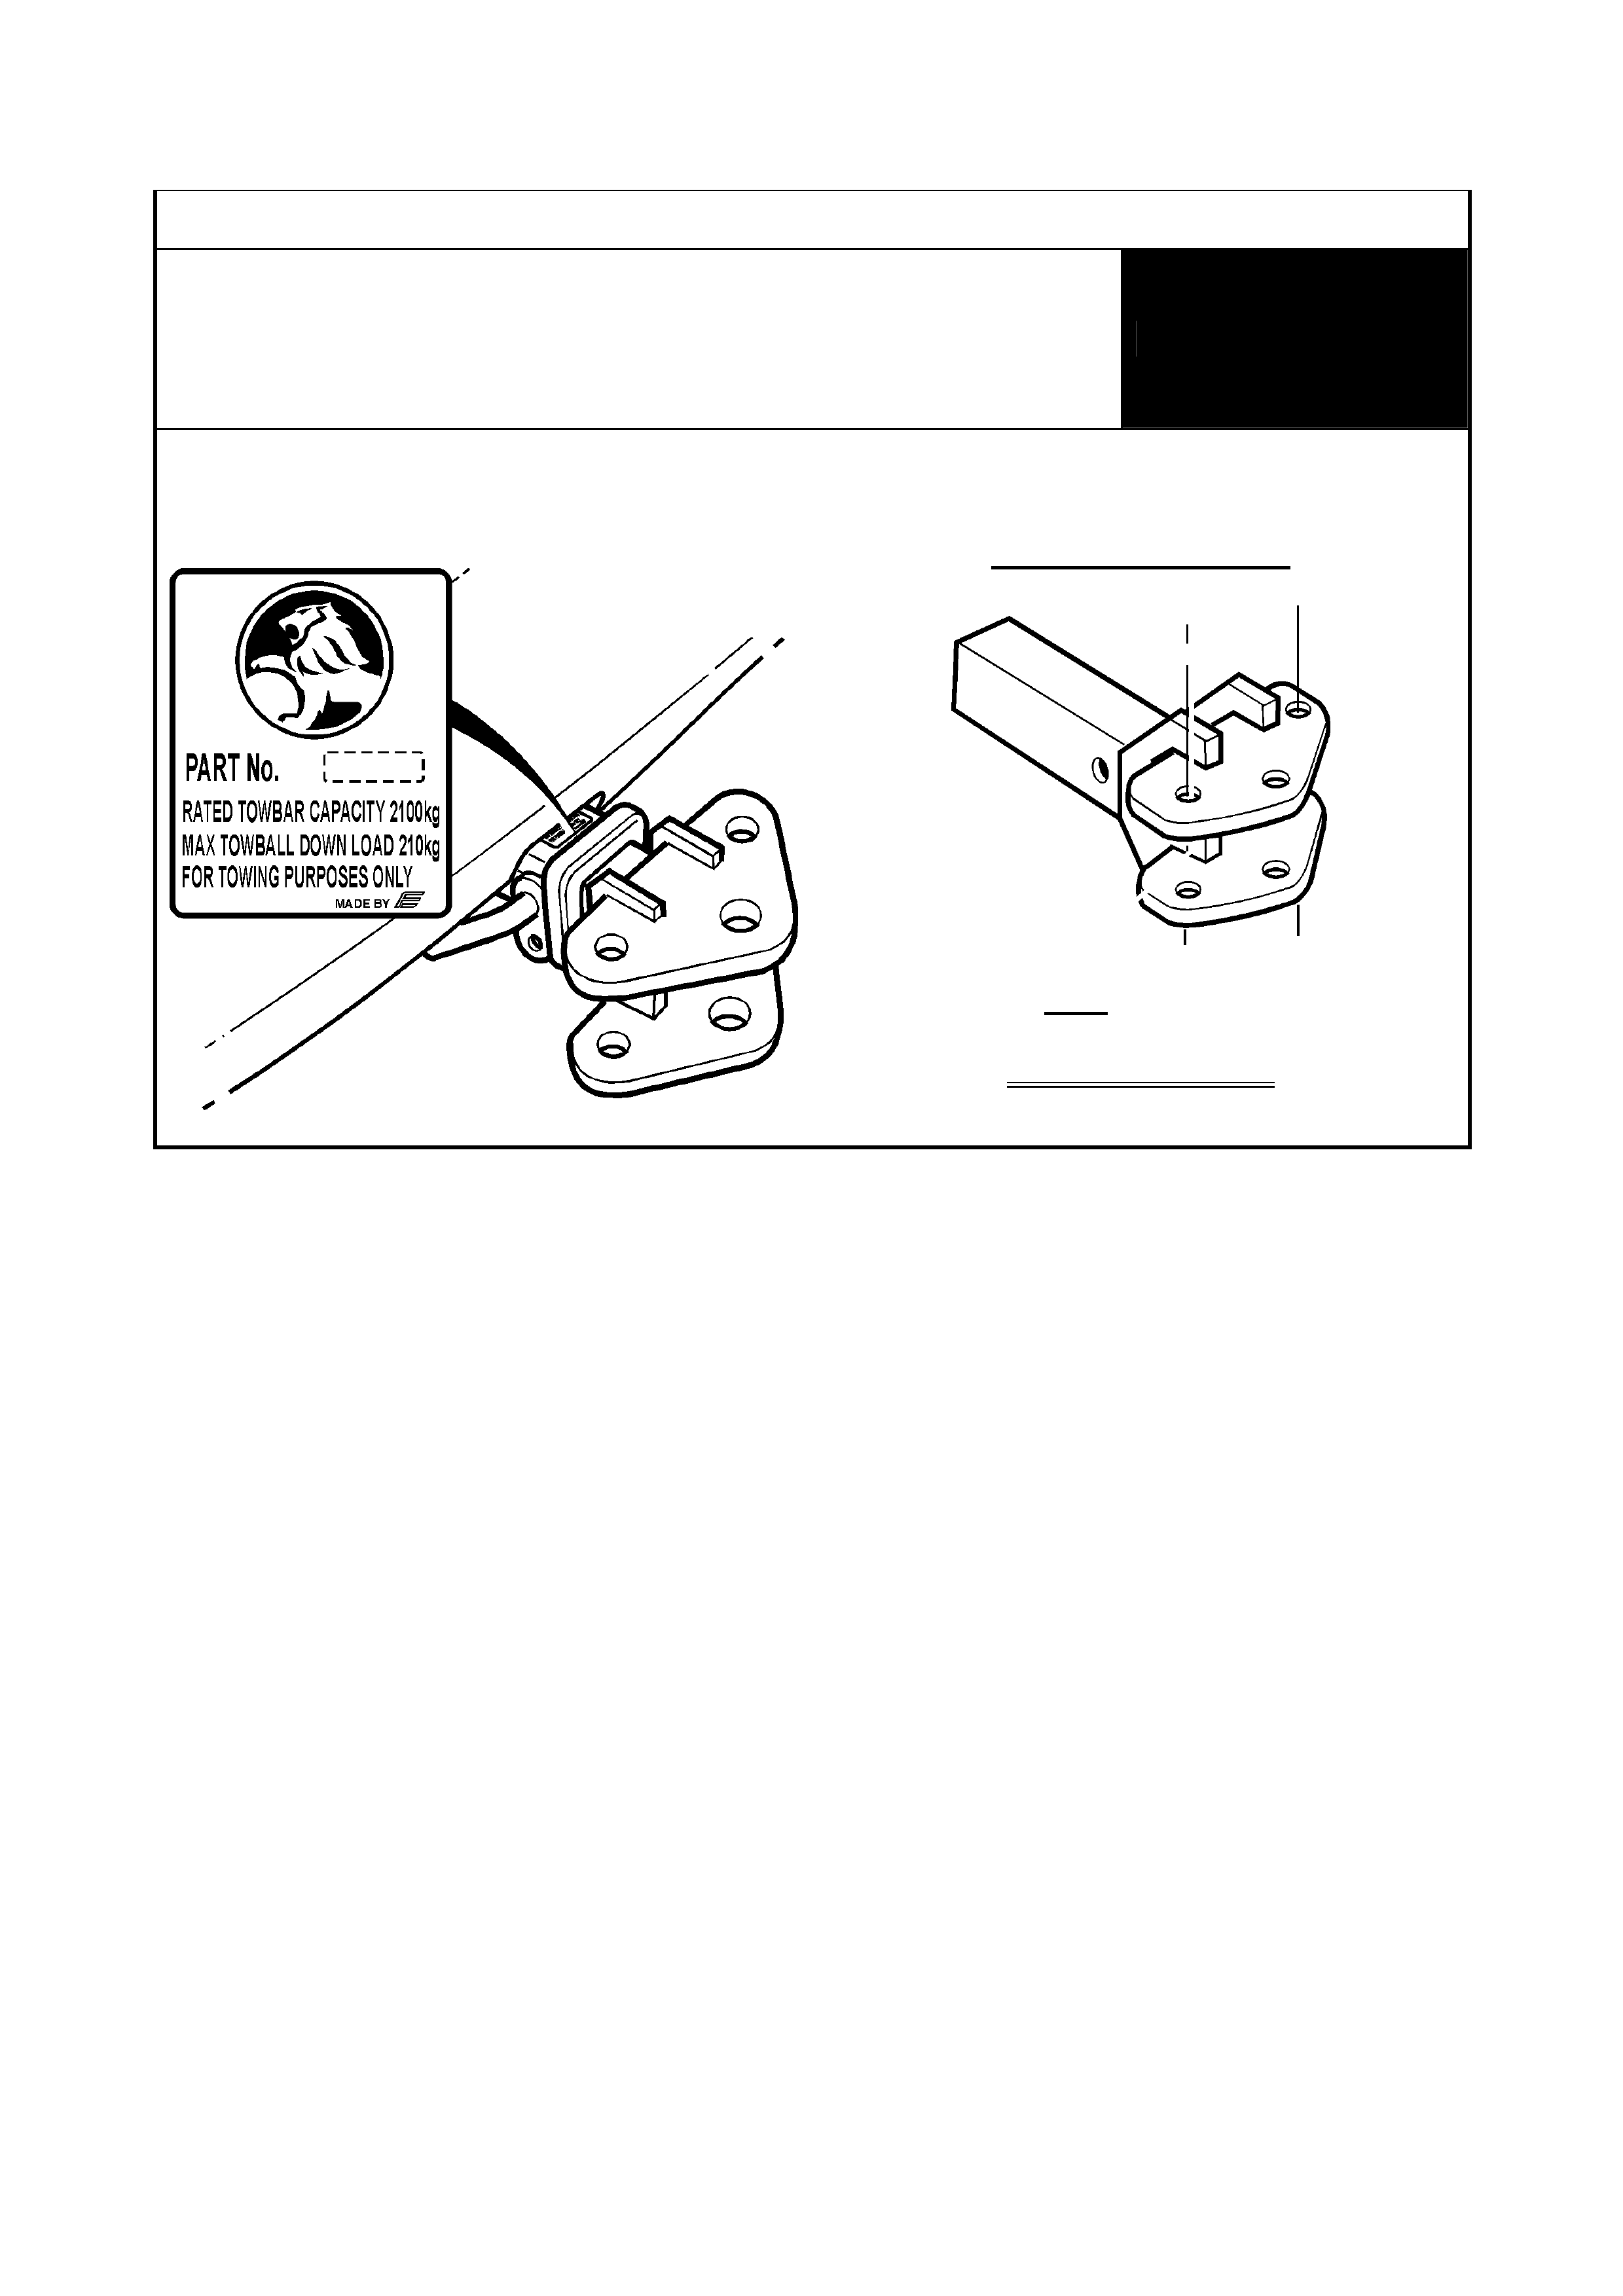
15 of 23
Identif i cat i on Diagram 9
VS Commodore & Calais Sedans,
Statesman & Caprice
- Including HSV
(✳ NOT Utility or Wagon!)
1590kg Rating Towbars
(wit h Equal iser Hitch)
WITH
EQUA LISER
HITCH
Genuine Holden towbar Identified by
appearance:
Existing Tongue wi t h Equal iser Hitch
MUST be replaced w i t h Part Number:
92145275
16 of 23
Identif i cat i on Diagram 10
VG, VP, VR & VS Utility,
Includi ng HSV
1590kg Rating Towbars
(Equaliser Hi tch NOT used)
WITHOUT
EQUA LISER
HITCH
Genuine Holden tow bar I dentified by
appearance:
Existing Tongue
MUST be replaced with HO LDEN Part
Number: 92145274
Refer Identif i cat ion Diagram 11 - for Towbars wit h Equaliser Hitch.
17 of 23
Identif i cat i on Diagram 11
VG, VP, VR & VS Utility,
Includi ng HSV
1590kg Rating Towbars
(wit h Equal iser Hitch)
WITH
EQUA LISER
HITCH
Genuine Holden tow bar I dentified by
appearance:
Existing Tongue wi t h Equal iser Hitch:
MUST be replaced with HO LDEN Part
Number: 92145274
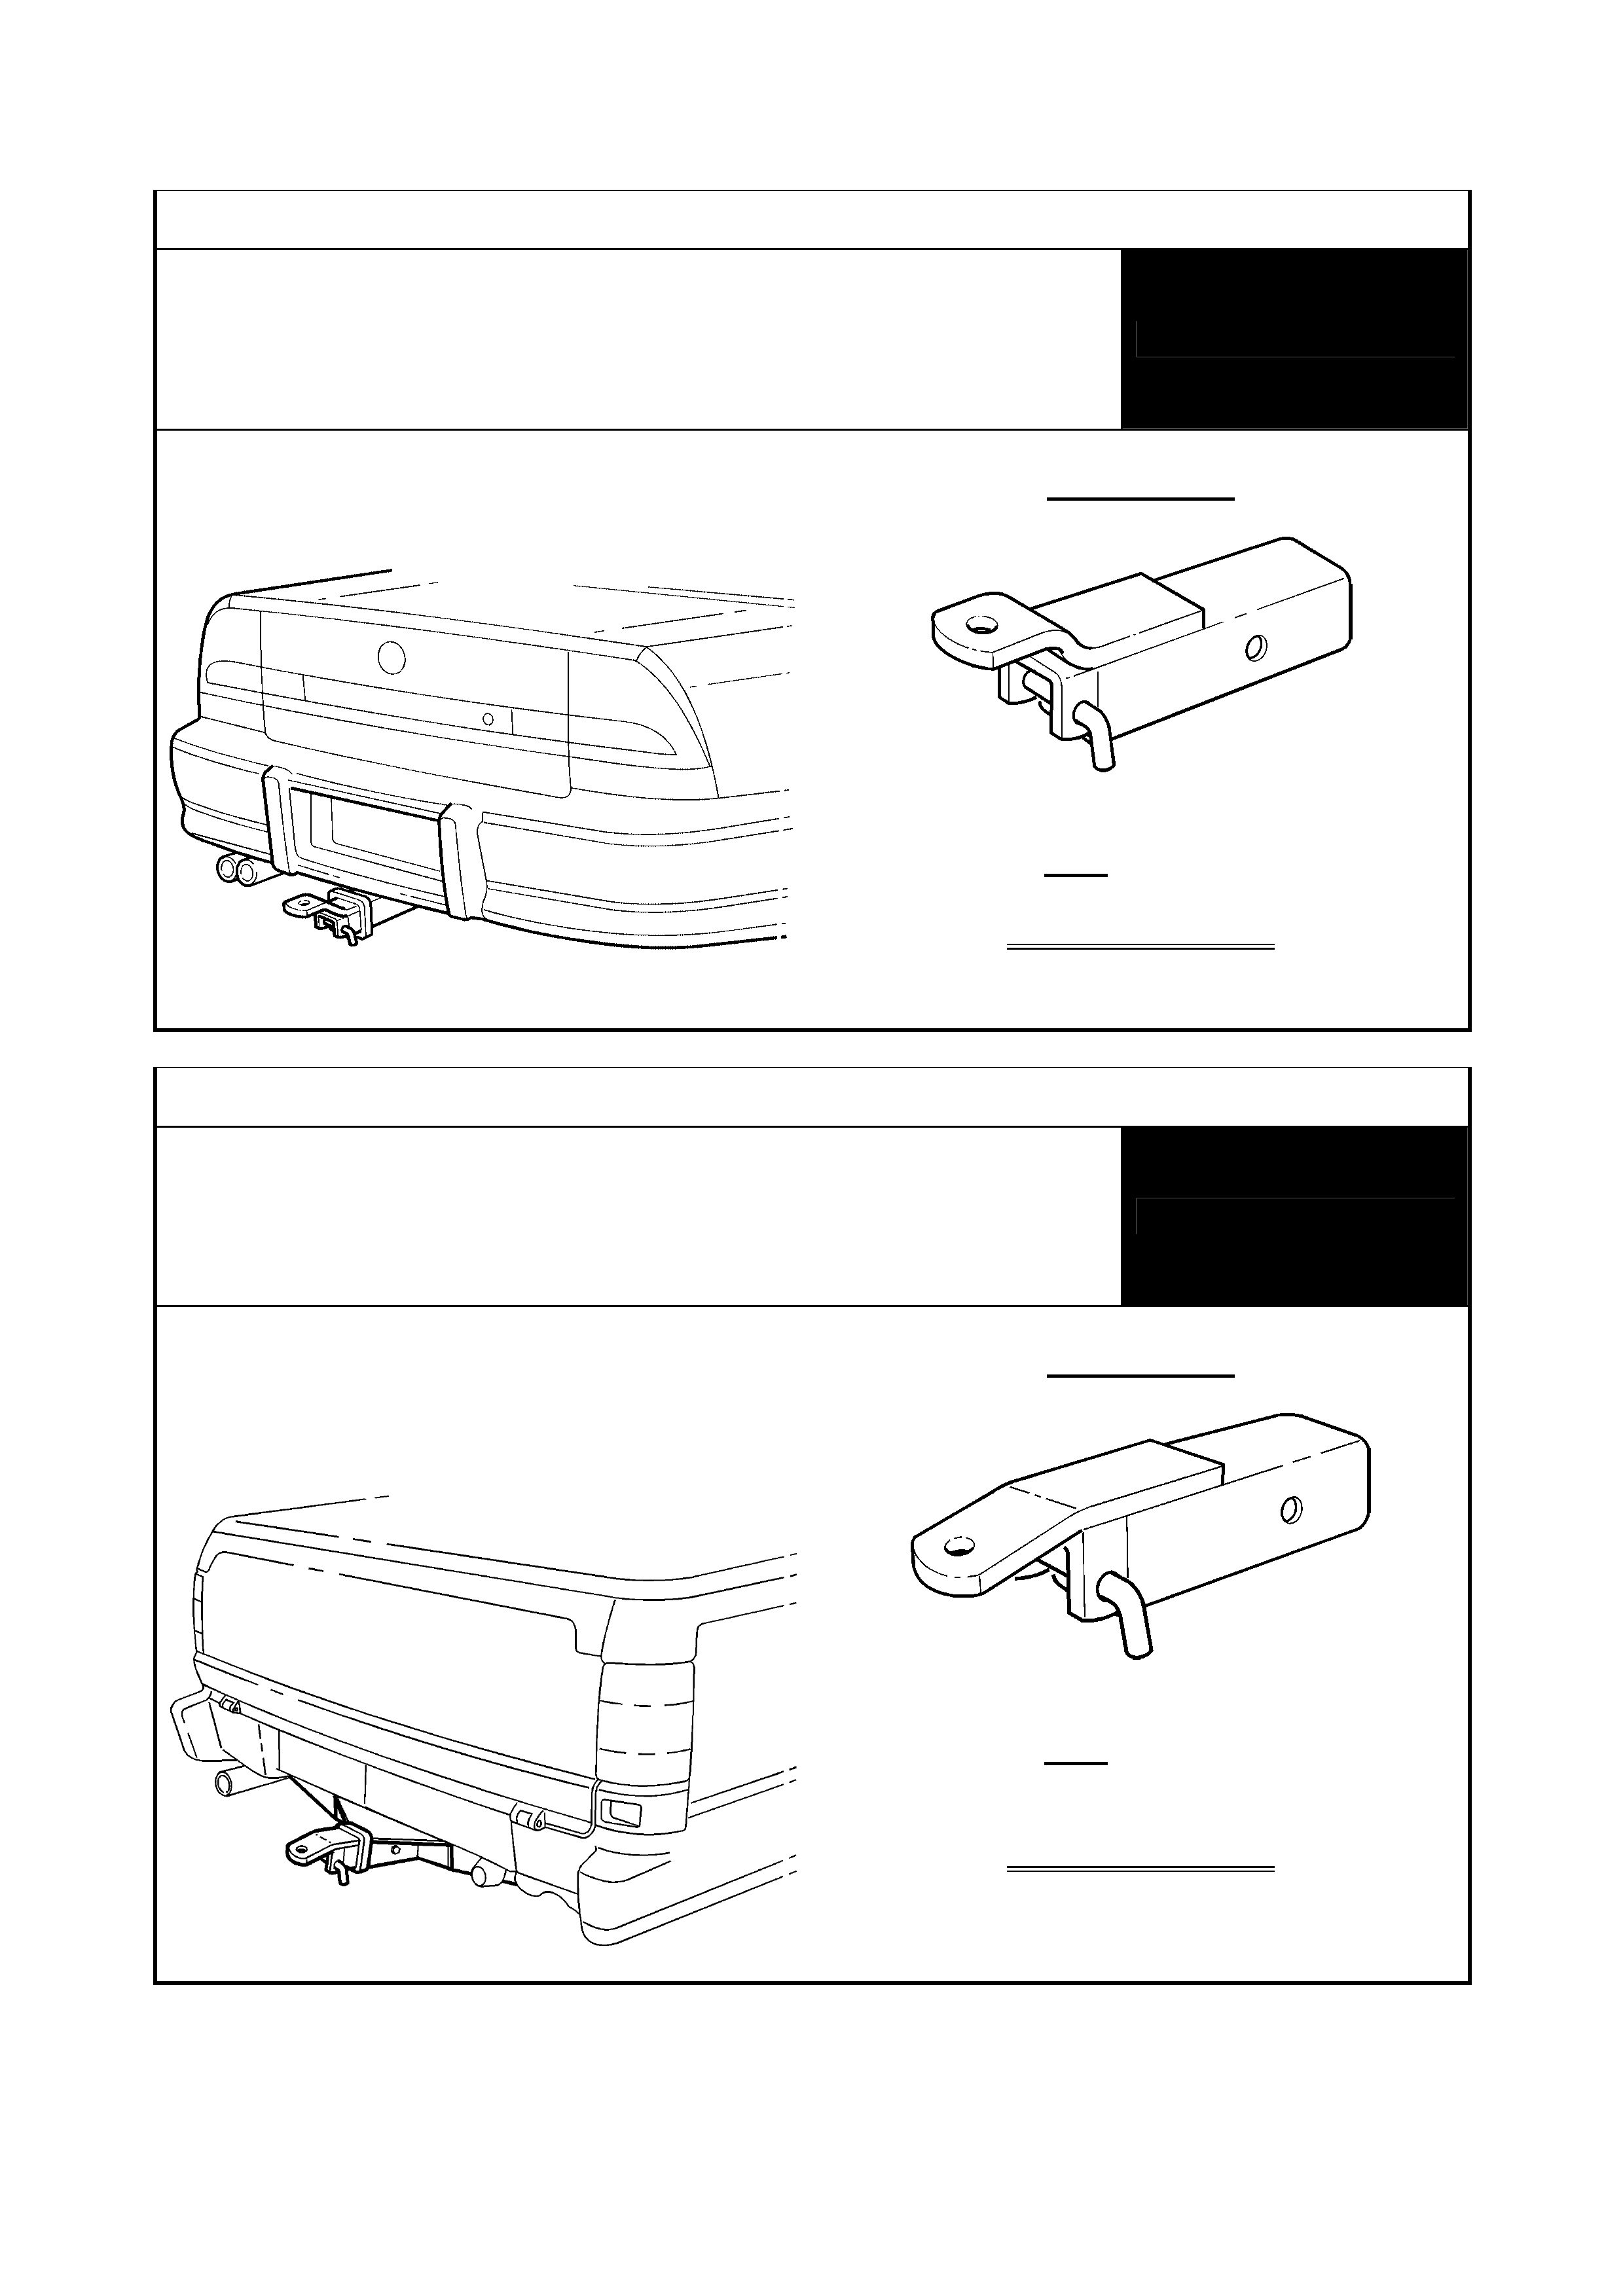
18 of 23
NOT AFFECTED TONGUES
Identif i cat i on Diagram 12
VS, VT, VX & WH
- Including HSV
1200kg Rating (Standard) Towbar
NOT AFFECTED
Genuine Holden towbar Identified by label
and/or appearance:
This Tongue:
IS NOT AFFECTED
DO NOT REPLACE
Identif i cat i on Diagram 13
VR, VP, VR & VS Utility - Including HSV
1200kg Rating Towbar
NOT AFFECTED
Genuine Holden towbar identified by
appearance:
This Tongue:
IS NOT AFFECTED
DO NOT REPLACE
19 of 23
Identif i cat i on Diagram 14
VT, VX & WH
- Including HSV
2100kg Rating Wit h Heavy Duty Equaliser Hi t ch
NOT AFFECTED
Genuine Holden towbar Identified by label
and/or appearance:
This Equaliser Hitch:
IS NOT AFFECTED
DO NOT REPLACE
20 of 23
Identif i cat i on Diagram 15
VS - All Including HSV
(✳ NOT Utility!)
1590kg & 2100kg Rating Towbar
NOT AFFECTED
Genuine Holden tow bar ident ified by
appearance:
This Tongue:
IS NOT AFFECTED
DO NOT REPLACE
Identif i cat i on Diagram 16
VS Utility
- Including: HSV
1590kg Rating Towbars
NOT AFFECTED
Genuine Holden tow bar ident ified by
appearance:
This Tongue:
IS NOT AFFECTED
DO NOT REPLACE

21 of 23
APPENDIX C
(Customer letter draft –V & W carlines)
VEHICLE TOWBAR SAFETY RECALL
Dear Holden Customer ,
As part of Holden’s ongoing commitment to your satisfaction and safety, we have initiated a safety
related recall in relation to towbar tongues manufactured by Frontline Australasia Pty Ltd from April
2000 to October 2001 which could affect your vehicle.
The towbar tongue, sometimes referred to as the ‘gooseneck’, may be susceptible to embrittlement
which may cause the tongue to break. If you have an affected towbar tongue you should cease
towing i mmedi at el y until your towbar tongue has been replaced.
Your vehicle is affect ed by this r ecall if it is f itt ed with an “ aff ected” towbar as shown in t he sketch on the
reverse of this letter. If your vehicle is affected, it is necessary for you to make a service booking as
soon as possible with a Holden dealership of your choice for a replacem ent tow bar t ongue to be fitted to
your vehicle.
If your vehicle has no t owbar or is f itted with a t owbar which is “ not affect ed”, as shown in t he sketch on
the reverse of this letter, you do not need to make a service booking. However, we ask that you
complete the det ails on the revers e of this lett er and retur n it in the reply paid envelope. This will enable
us to update our r ecor ds and avoid sending you aut om atic follow up r em inder s.
If you are in any doubt about whether your vehicle is affected, please contact a Holden dealership as
soon as possible to arrange f or an inspect ion.
All work w ill be carried out free of charge and can be performed w hile you wait, provided t he necessary
arrangement s with a Holden dealer are made in advance. The required w or k will take approxim at ely half
an hour.
If you have any questions, please contact your dealer or call the Holden Recall Hotline on – 1800
632826, where we will be pleased to assist.
Thank you for your at tention to this mat ter. Please accept our apologies for any inconvenience this may
cause you.
Yours Sincerely
David McMu rra y
Manager Customer Assist ance
22 of 23
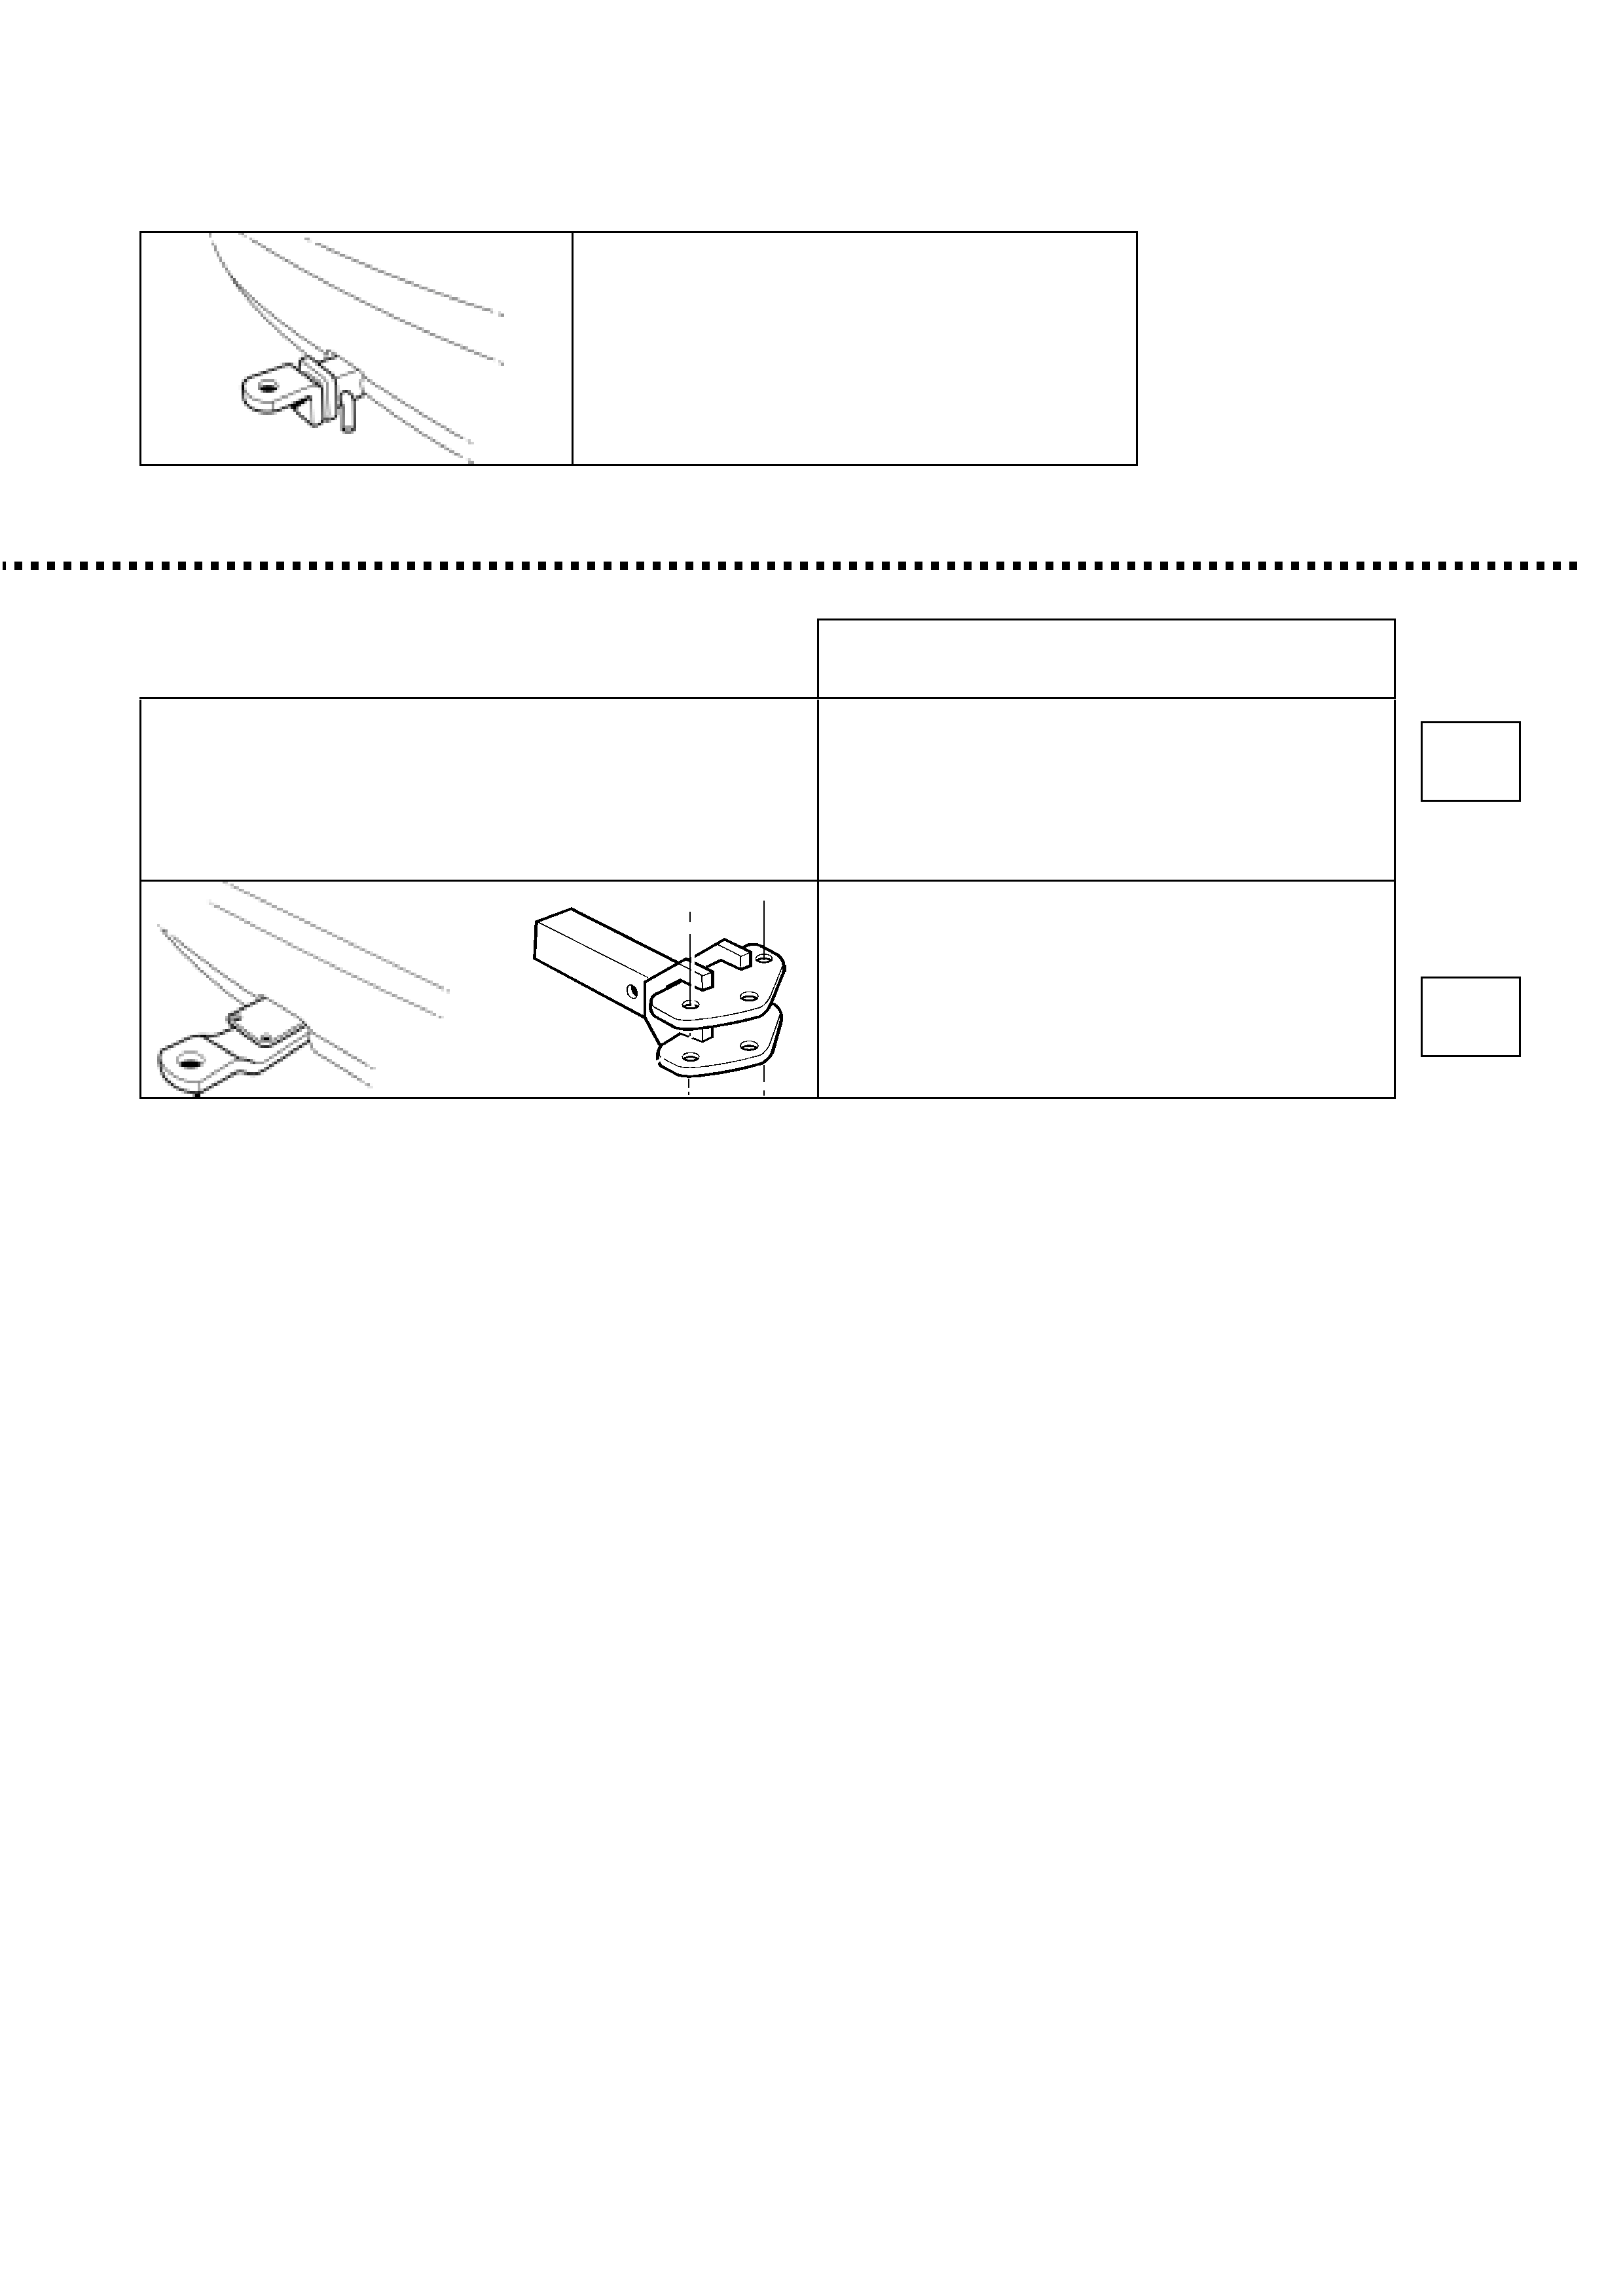
AFFECTED
IMMEDIATELY CEASE TOWING AND
CONTACT YOUR HOLDEN DEALER
TO HAVE YOUR VEHICLE RECTIFIED
PLEASE PRESENT THIS LETTER TO
YOUR DEALERSHIP
NOT AFFECTED
CUSTOMER ACTION
NO TOWBAR OR
NON GENUINE TOWBAR FITTED TO
VEHICLE
TICK BOX AND RETURN THIS
SECTION IN REPLY PAI D ENVELO PE
NO FURTHER ACTION IS REQUIRED
TICK BOX AND RETURN THIS
SECTION IN REPLY PAI D ENVELO PE
NO FURTHER ACTION IS REQUIRED
TICK
TICK
Tongue fitted to vehicle as per illustration.
Tongue fitted to vehicle as per illustration.
OR

23 of 23
APPENDIX D
(Customer letter draf t – TS and TF)
Dear Holden Customer ,
As part of Holden’s ongoing commitment to your satisfaction and safety, we have initiated a safety
related recall in relation to genuine Holden towbar tongues manufactured by Frontline Australasia Pty
Ltd from Apr il 2000 to October 2001 which could affect your vehicle.
The towbar tongue, sometimes referred to as the ‘gooseneck’, may be susceptible to embrittlement
which may cause the tongue to break. If you have a towbar you should cease towing immediately
until your t ow bar t ongue has been repl aced.
If your vehicle is fitted with a towbar it IS affected by this recall and it is necessary for you to make a
service booking with a Holden dealership of your choice f or a replacement towbar tongue to be fit ted to
your vehicle.
If your vehicle is NOT f itted with a t owbar it is NOT affect ed by this recall. W e do, however , request t hat
you advise us by ticking the follow ing box and returning it in the r eply paid envelope. This will enable us
to update our r ecor ds and avoid sending you aut omatic follow up r eminders.
All work will be carried out free of charge and can be perfor med while you wait, provided the necessary
arrangement s w ith a Holden dealer ar e made in advance. The r equired w ork w ill take appr oximately half
an hour.
If you have any questions, please contact your dealer or call the Holden Recall Hotline on - 1800
632826, where we will be pleased to assist.
Thank you f or your att ention to this matt er. Please accept our apologies for any inconvenience this may
cause you.
Yours Sincerely
David McMurray
Manager Customer Assist ance
VEHICLE TOWBAR SAFETY RECALL
NO TOWBAR FITTED
(TICK A ND RETURN THIS WHOLE LETTER
IN REPLY PAID ENVELOPE)