
2
20
00
04
4
C
CA
AM
MP
PA
AI
IG
GN
N
B
BU
UL
LL
LE
ET
TI
IN
NS
S
© 2006 GM Holden LTD. A.B.N. 84 006 893 232
Service Department
A “HOLDEN” Product.
BRISBANE SYDNEY MELBOURNE ADELAIDE PERTH
For the latest and/or any missing Campaign Bulletins,
please refer to Holden Lionheart
Technical Instructions
Technical Instructions
XC Combo
Campaign 04-H-01
Concern
The steering wheel may loosen
on the steering column
diminishing driver control.
Cause
The screw fastening the steering
wheel to steering column may be
below the required torque
specification.
Solution
Replace centre torx screw and
torque to 30 Nm.
Method
Models : MY 2003 – 2004 XC Combo
Part Required :
Quantity Part No. Part Description
1 24 454 509 Torx Screw
Special Tool Required
1 M15 x 1.5 thread tap
Affected Vehicle ISOVIN:
W0L0XCF2543006613
STEP 1
Disconnect negative lead from battery. Wait 1 minute
unit the capacitor has discharged.
Note: Ensure radio PIN number is available before
disconnecting the battery.
STEP 2
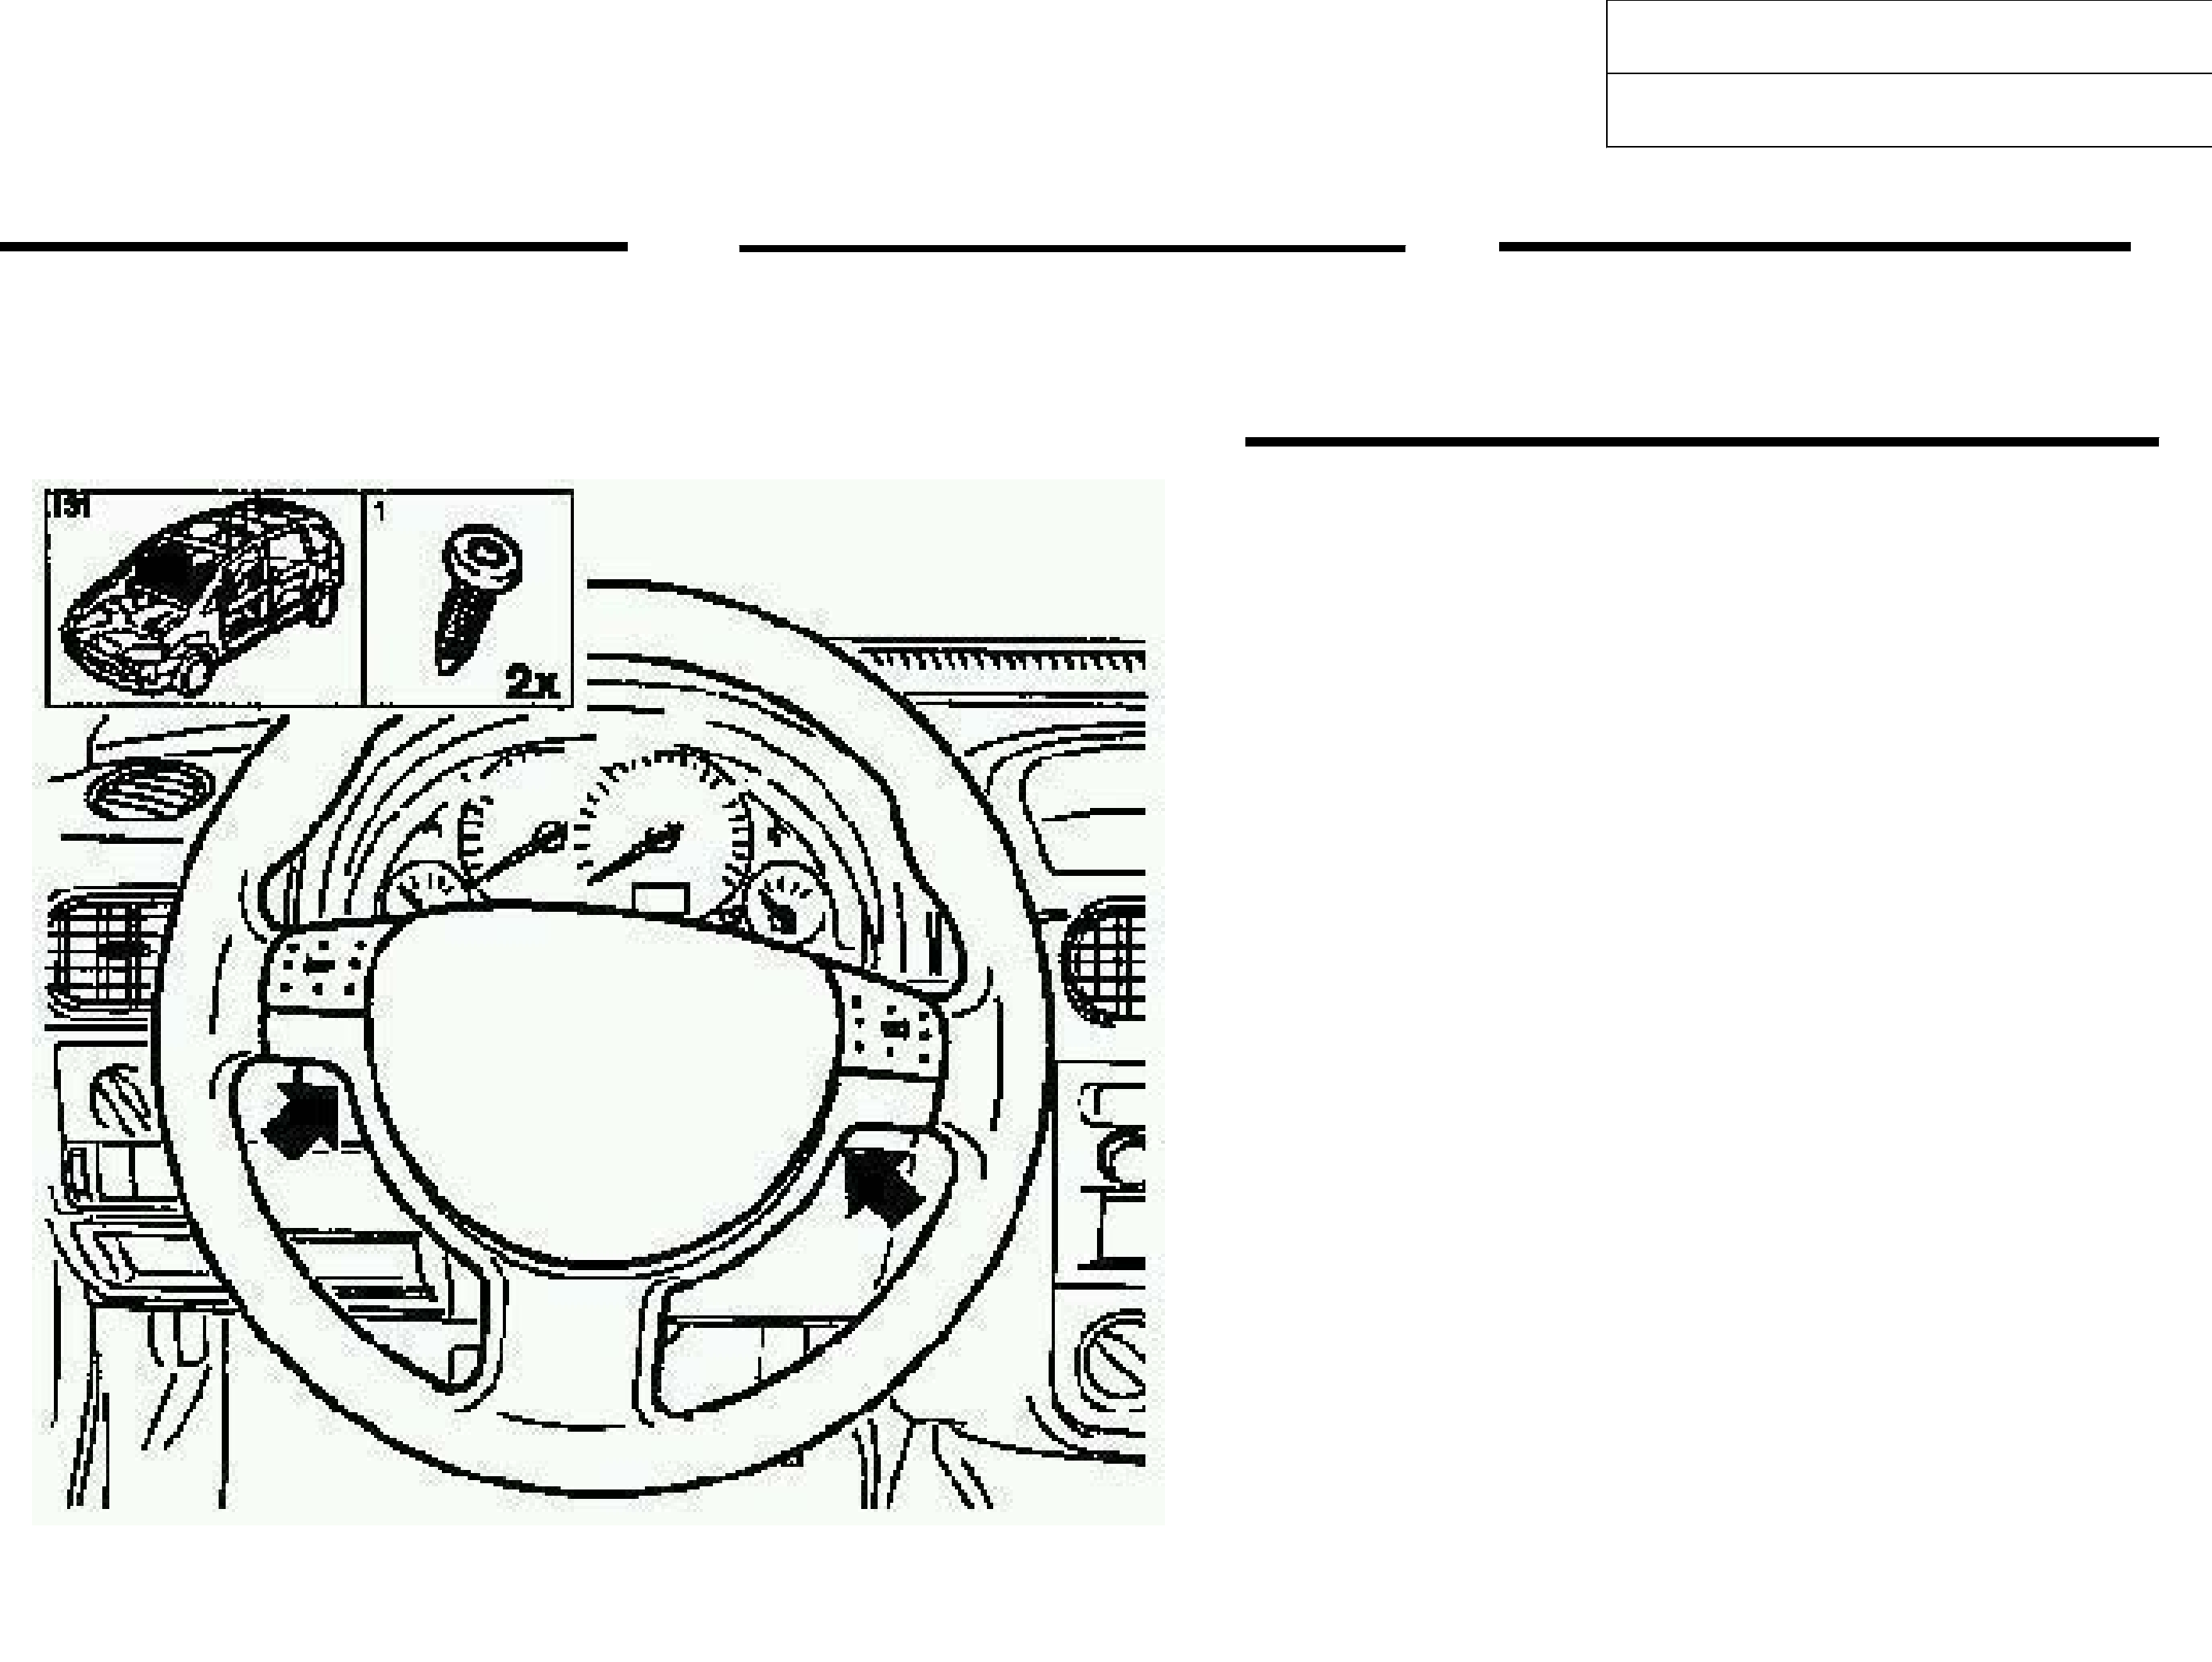
Dis-assemble two M6 x 20 torx screws from the rear
of the steering wheel assembly (Refer to Figure 1).
STEP 3
Carefully lift airbag unit, noting the wiring harness
route for reinstallation later. Release airbag wiring
harness plug and detach.
NOTE: Always set aside airbag unit with padded
side upwards.
Figure 1
XC Combo
Campaign 04-H-01
Method
STEP 4
Turn steering wheel to straight-ahead position,
remove ignition key and allow steering lock to
engage.
STEP 5
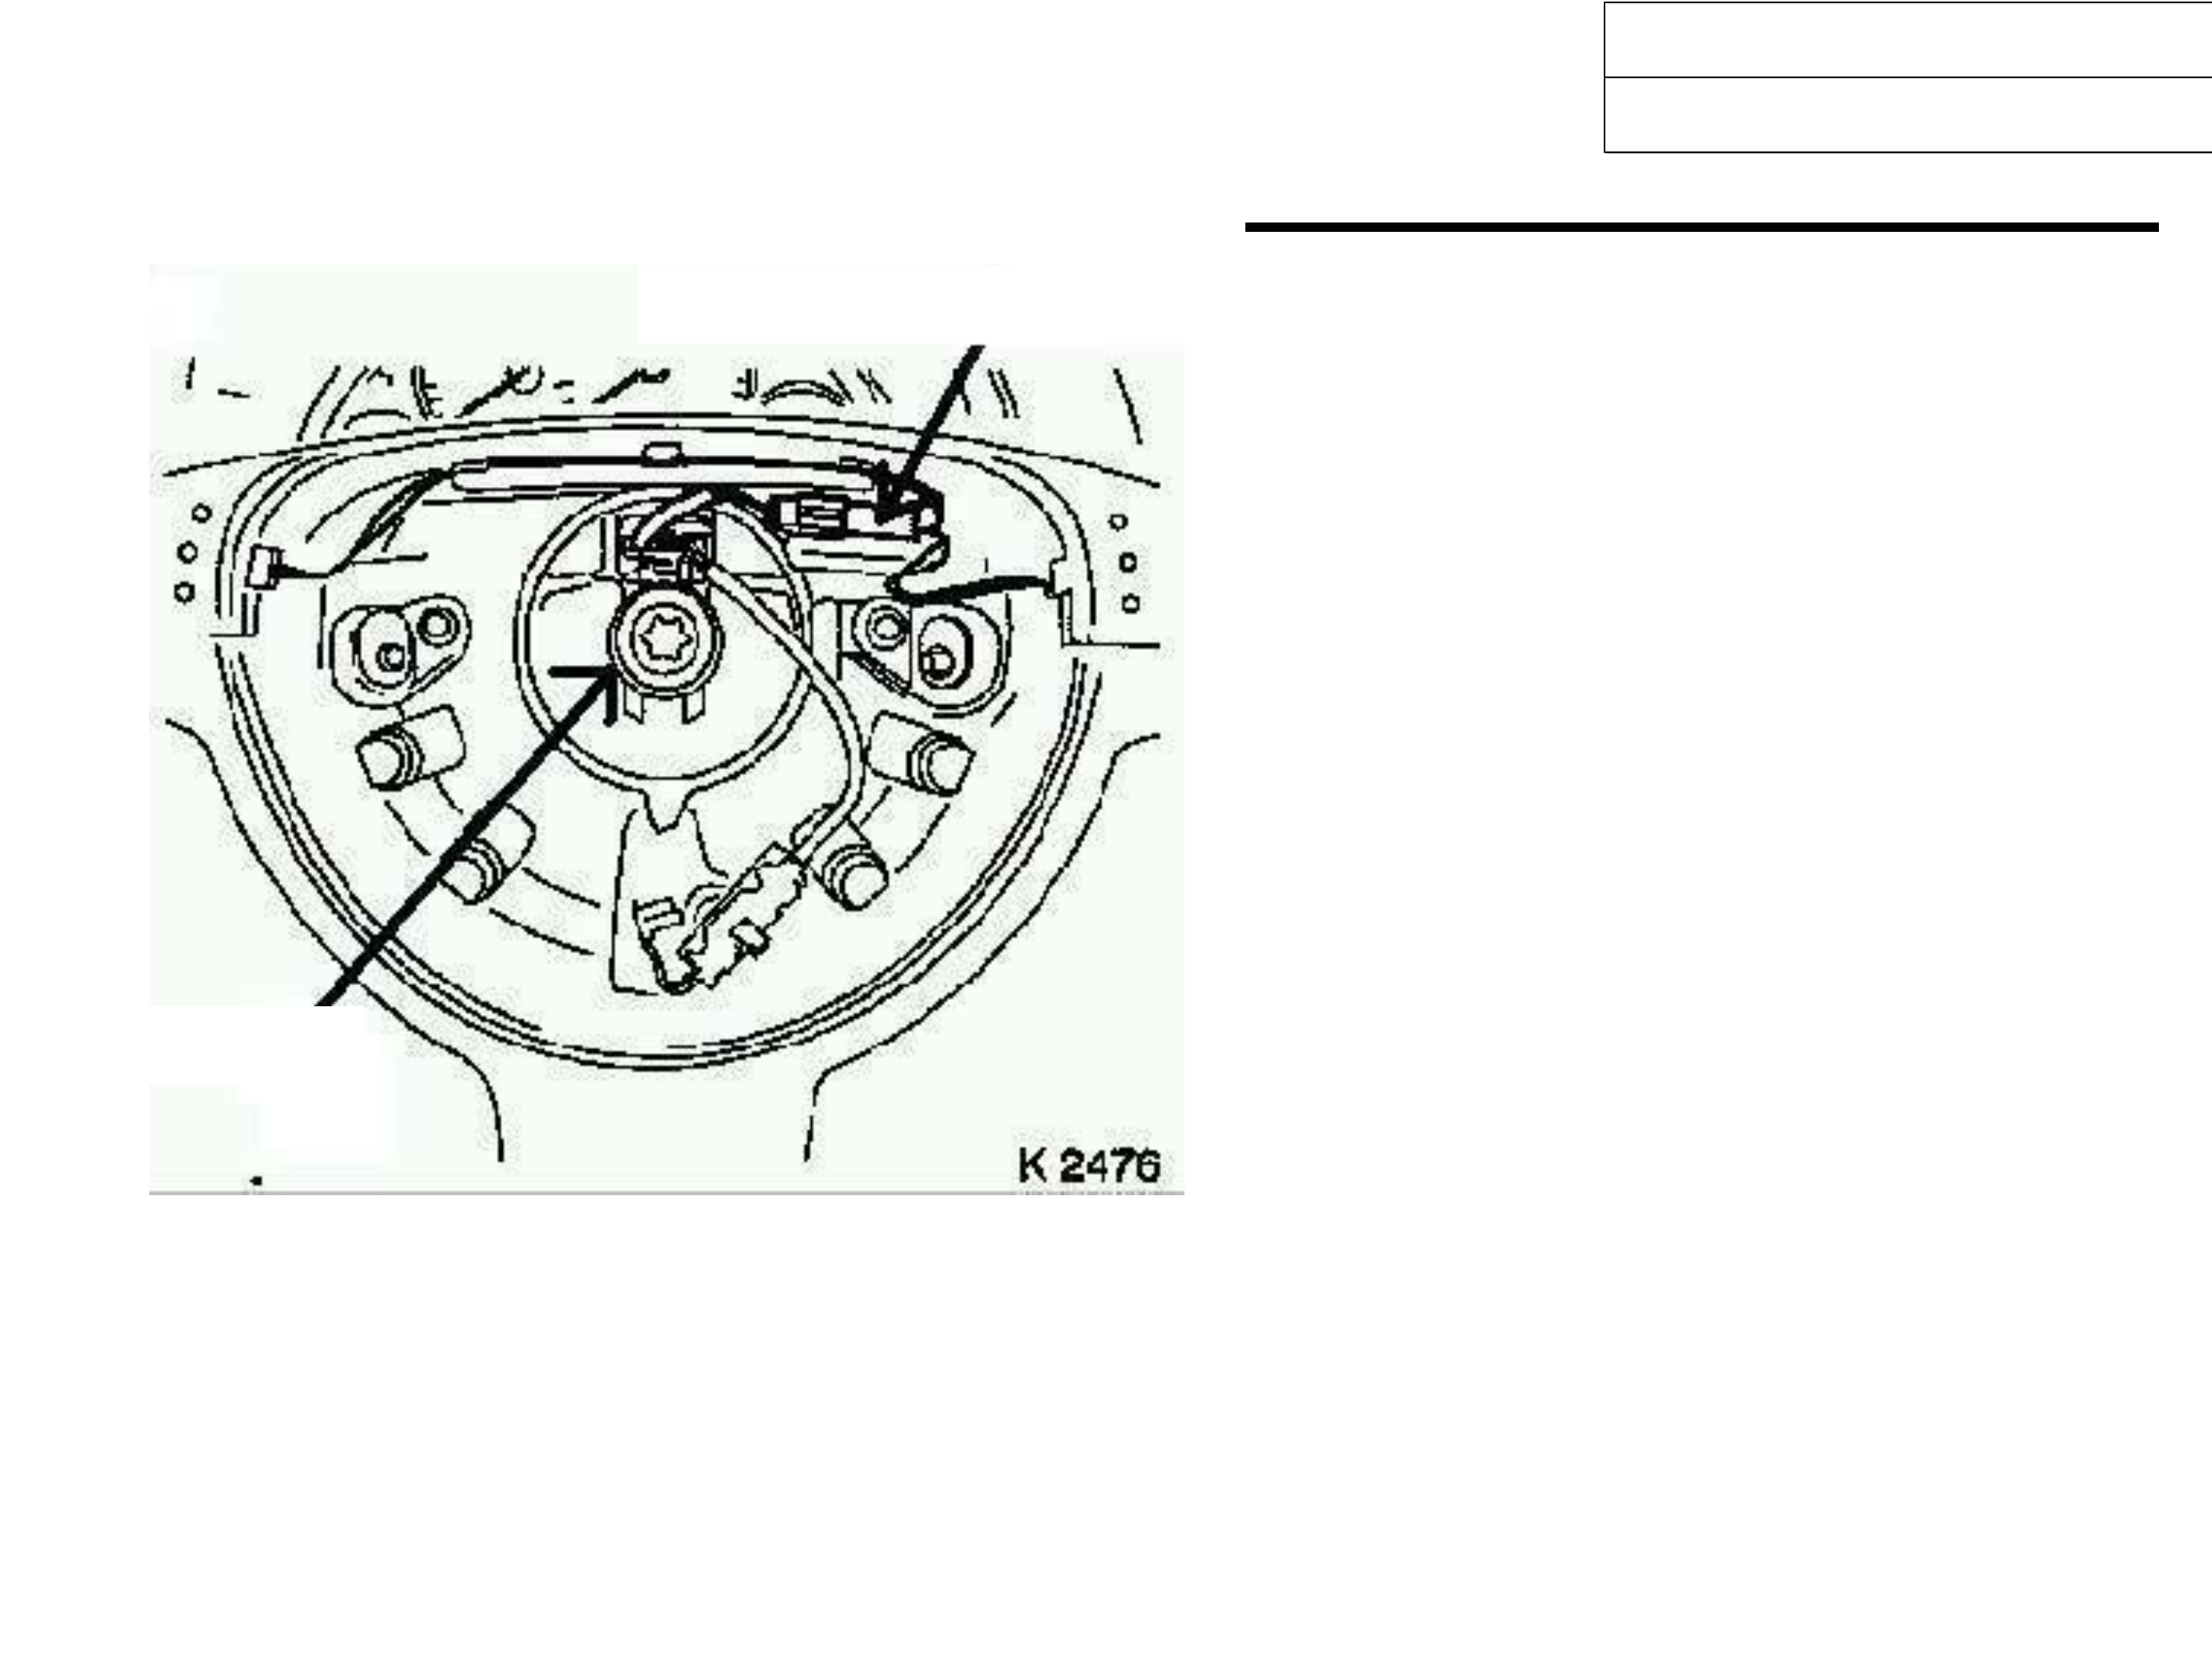
Remove horn wiring harness connector from steering
wheel bracket and disengage connector (Refer to
Figure 2).
STEP 6
Loosen and remove the M15 x 20 steering wheel
attaching torx screw (Refer to Figure 2). Retain this
M15 screw for return to Repac when requested via
Repac Report.
STEP 7
Use the Ø M15 x 1.5 thread tapping tool, to clean the
locking compound from the steering shaft thread (no
metal should be cut during this step). Run the tap
carefully down the thread. Never force the tap it
should rotate easily. To avoid breaking the tap, be
prepared to stop rotating clockwise once the tap
reaches the bottom of the hole.
NOTE: This step must be performed as it
will clean from the thread existing locking
compound.
Figure 2
Technical Instructions
Technical Instructions
Torx screw
Wiring harness connector
XC Combo
Campaign 04-H-01
Method
STEP 8
Assemble new M15 x 20 steering wheel attaching
torx screw and carefully tighten to 30 Nm with a
torque wrench (Refer to Figure 2).
Note: Tightening to 30Nm with a torque wrench in
this application is important.
STEP 9
Engage horn wiring harness connector and clip into
the bracket on the steering wheel. Route the wiring
harness as previously observed at step 3 (Refer to
Figure 2).
STEP 10
Assemble airbag wiring harness plug to airbag unit.
STEP 11
Assemble airbag unit to steering wheel using the two
original M6 x 20 torx screws and tighten to 8 Nm
(Refer to Figure 1).
Technical Instructions
Technical Instructions
STEP 12
Connect negative lead to battery and ensure radio
PIN is re-entered and radio operates correctly.
Campaign completed Identification:
Apply a Recall Campaign Label to the right hand
front “A” pillar between the hinges, with details of the
campaign, 04-H-01, Retailer code and Date legibly
entered on the label with a permanent ink pen.
Additionally, mark position C-1on the Vehicle Service
History Label and apply it to the inner side of the
lower instrument panel cover.
Warranty claim information
Description Replace torx screw
Labour Opern number T480801
Standard time 0.5 hr
Failure Code 96 (NOW J0096)
04-H-01 Contact Information
General
enquiries
Brett Fowler (03) 9647 1857
Technical
enquiries
TAS 1800 033 417
Warranty
enquiries
Warranty
Administration
(03) 9647 2401
21/04/04
1of 7
PRODUCT CAMPAIGN BULLETIN
04-H-02
April 20, 2004
SUBJECT: REPLACEMENT OF INCORRECT COMPLIANCE PLATE
MODELS AFFECTED: VY ONE TONNER & CREWMAN
This bulletin announces the initiation of a safety recall campaign to install the correct
compliance plate to some VY One tonner & Crewman model vehicles.
DESCRIPTION OF DEFECT
Since the start of VY One tonner & Crewman vehicle production the compliance
plate has displayed technically incorrect information in regard to the model
designation and approval number of the vehicle.
To correct this situation, Holden has initiated this recall action to ensure that every
affected vehicle is updated to include the correct compliance plate in accordance
with the Australian Motor Vehicle Standards Act 1989.
Correct VY One tonner compliance plates will display the following model
designation:
• Holden VY Utility (Since One tonner was certified under the “Utility”
compliance submission).
Correct VY Crewman compliance plates will display the following model
designation and approval number:
• Holden VY Utility (Since Crewman was also certified under the “Utility”
compliance submission).
• 24567
AFFECTED VEHICLES
Affected Build Date Range
Body Style
From To
Cab Chassis 05/05/2003 09/10/2003
Crew Cab 15/05/2003 09/10/2003
Note: For reference and vehicle flagging purposes in Retailer management systems
use the following Tag numbers:
L112322 to L182309
plus
L985274, L985304, L988652, L988664, L988686, L988688.
ACTION REQUIRED BY RETAILERS
1. Confirm vehicle Build date is within the range shown in the “Affected Vehicles”
table.
2. Confirm vehicle has not previously been reworked i.e:
Identified by an ‘X’ in the B-1 co-ordinate of the “Vehicle Service History”
label
Application of “04-H-02 Campaign Completed” label.
3. If vehicle has not been reworked, proceed with campaign.

21/04/04
2of 7
4. Organise a vehicle booking. (Allow 5 full days for shipping of the replacement compliance plate)
5. Immediately request the replacement compliance plate from SALMAT using the Salmat Material
Order Form attached. Note: Booking date will be required to order a replacement compliance
plate. Refer to Appendix C.
6. Double check that the VIN number on the supplied new plate matches the vehicle VIN number.
7. Remove originally installed compliance plate and install plate supplied by Salmat. Refer
Replacement Instruction Appendix B.
8. Affix a Campaign Completed Label and a Vehicle Service History Label as specified in the
section titled ‘Campaign Completion Identification’.
9. Return incorrectly stamped (replaced) compliance plate immediately to Salmat in the supplied
pre-paid satchel (after cutting into 2 pieces).
10. Submit a warranty claim. Refer “Warranty Claim Information”.
CUSTOMER NOTIFICATION
Owners of vehicles affected by this recall campaign will be contacted directly by letter from Holden.
The letter provides details of the recall campaign and requests the customer to contact their Holden
Retailer to make a service booking to have the appropriate work carried out. Refer to Appendix A
for a draft copy of the customer letter.
CAMPAIGN COMPLETION IDENTIFICATION
All campaigned vehicles must have:
1. A Campaign Completed label applied to the right hand front ‘A’ pillar, between the hinges, with
details of the campaign, 04-H-02, Dealership code and date legibly entered on the label with a
permanent ink pen.
AND
2. For additional identification, mark an “X” at the B-1 co-ordinate of a Vehicle Service History
Label and apply to the inner side of the lower instrument panel cover if not already fitted.
Extra Campaign Completed and Vehicle Service History labels are available free of charge from
Moore Business Systems.
• For Campaign Completed Labels Quote stock no. SD 28156 on a Moore Business Systems
‘Packaged Goods’ order form for a pack of 100 labels.
• For Vehicle Service History Labels quote stock no. SD 28177 on a Moore Business Systems
‘Packaged Goods’ order form for a pack of 100 labels.
Fax the order form to Moore Business Systems on Facsimile: (03) 9270 8925
Should you need to follow-up on a placed order, contact Moore customer service on telephone
number (03) 9270 8788.
21/04/04
3of 7
PARTS INFORMATION
A specific replacement compliance plate is available from Salmat for each affected vehicle. Once a
customer booking is made, immediately order the replacement Compliance Plate for the booked
vehicle by completing the Material Order Form attached, (refer to Appendix C) and fax it to
SALMAT. The fax number is shown on the Material Order form.
The replacement compliance plate will be forwarded to your retailer premises by “Registered Mail.”
Please note that to maintain Compliance Plate security, the person requesting the replacement
plate will be required to sign for receipt of the plate at the delivery address (retailer premises), or at
the local Post Office if unavailable to sign at the Retailer premises. The person requesting the plate
is also responsible for ensuring it is correctly fitted to the vehicle.
Once received, store the replacement plate in a safe and secure location to avoid loss or damage.
Please note that if compliance plates are lost or misplaced replenishment is not possible.
Two special pop rivets will be supplied to secure the compliance plate to the vehicle, these rivets
must be used.
WARRANTY CLAIM INFORMATION
On completion of campaign action, retailers are requested to submit a warranty claim using the
Labour Operation Number specified below.
Warranty Claim Information
Description
Replace Compliance Plate
Labour Operation No.:
Standard Time:
Failure Code:
Case Type:
T480901
0.5 hours
96 (NOW J0096)
08
CONTACT INFORMATION
For further information or clarification on this recall campaign please contact the relevant person
below.
CONTACT NAME CONTACT NUMBER
General enquiries Brett Fowler
(03) 9647 1857
Parts related enquiries Salmat (03) 9358 2990
Warranty related enquiries Warranty Administration (03) 9647 2401
J. K. Hoffman
General Service Manager
Attachments
Appendix A Customer Letter- Draft
Appendix B Replacement Instruction
Appendix C Material Order Form

21/04/04
4of 7
APPENDIX A - Draft – Customer Letter
Dear Holden Customer,
As part of Holden’s ongoing commitment to customer satisfaction, we have initiated
a Vehicle Recall Campaign affecting some One Tonner and Crewman model
vehicles.
Holden has become aware that an incorrect compliance plate has been fitted to
some of these vehicles.
In these cases the compliance plate does not specify the correct model designation
and, - in the case of the Crewman- approval number. It is a requirement under the
Australian Motor vehicle Standards Act (1989) C’th requirement that the
compliance plate information of a vehicle is correct.
To ensure the compliance plate includes the correct model designation and
approval number, the compliance plate needs to be replaced.
Our records show that your Holden vehicle was manufactured with the incorrect
compliance plate. It is therefore necessary for you to make a booking, at your earliest
convenience, with a Holden Retailer of your choice to have the correct compliance
plate fitted. Please allow the Holden Retailer at least 5 days to receive the specific
replacement compliance plate for your vehicle.
Work will be carried out free of charge, and provided the necessary arrangements
have been made with a Holden Retailer, can be completed while you wait.
If you have any questions, please contact your Holden retailer or call the Holden
Recall and Rework Assistance Centre on 1800 632 826, where we will be pleased to
assist.
Thank you for your attention to this matter. Please accept our apologies for any
inconvenience that may be caused to you.
Yours Sincerely
David McMurray
Manager Customer Assistance
VEHICLE SAFETY RECALL
21/04/04
5of 7
APPENDIX B – REPLACEMENT INSTRUCTION
Technical Procedure
1. Inspect the new Safety Compliance Plate supplied by SALMAT to confirm the VIN
corresponds with the VIN of the vehicle.
2. Mark a permanent line through the centre of the Safety Compliance Plate currently fitted to
the centre of the dash panel, prior to removal to allow easy identification of the old plate.
3. Drill out the rivet heads of the Safety Compliance Plate – do not drill into the vehicle sheet
metal - and remove without damaging the dash panel or paint.
Note 1: Due to the angle of the dash panel and engine location (V6 and V8) the rivet must be
approached from an angle as shown in figure 1. With a 6mm drill bit run the drill at high speed
before coming in contact the rivet head. Hold the drill position firmly and slowly drill out the rivet
head.
Note 2: Starting the drill while in contact with the rivet head will cause the drill to move and possibly
scratch the vehicle paint.
Figure 1
4. Fit the new Safety Compliance Plate in the existing locating holes in the dash panel using
the flower head rivets provided with the new Safety Compliance Plate.
Note: Three flower head rivets are provided with the replacement plate. One is a spare and can be
used if required however, if not required the third rivet must be returned with old plate.
5. Confirm the identification of the old Safety Compliance Plate by the line marked through the
centre, then cut the plate in half.

21/04/04
6of 7
6. Place the two Safety Compliance Plate pieces and spare rivet, if unused, in the provided
return envelope and post to the return address.
7. Apply a Campaign Completed sticker to the right a-pillar between the door hinges. Mark
location B1 on the Vehicle Service History Label located on the inside of the lower instrument
panel cover.

21/04/04
7of 7
APPENDIX C – SALMAT MATERIAL ORDER FORM
RECALL CAMPAIGN 04-H-02
VY CREWMAN & ONE TONNER Compliance Plate
Replacement
Fax This Form To: Salmat - (03) 9358 2999
Please supply the replacement Compliance Plate for the vehicle shown below
IMPORTANT: Only order parts when a customer has supplied the ISO VIN and confirmed a
booking date. ONLY 1 compliance plate can be ordered per Order Form.
Date _____________________
Retailer Code: _____________ Retailer Name:________________________
Retailer Address: _______________________________________________
Ph. No _________________________Fax No:_________________________
Name of person to receive
replacement Compliance Plate ______________________________
Via Registered Mail (Please print name clearly)
Vehicle ISOVIN (17 digits) Vehicle Registration Number Customer Booking Date
SALMAT USE ONLY
Retailer Order Acknowledgement Details (fax back to retailer same day)
Date Order Received Date Dispatched ___________________
Replacement
Compliance Plate

1 of 9
PRODUCT CAMPAIGN BULLETIN
04-H-03 (ISSUE 2)
May 26, 2004
SUBJECT: POWER STEERING COOLER HOSE REPLACEMENT
MODELS AFFECTED: VY,WK, and HSV VARIANTS INCLUDING
HSV COUPE SERIES II
This bulletin has been re-issued to clarify the vehicles affected by a safety recall
campaign, to replace the power steering cooler hose(s) fitted to VY,WK and
HSV models operating with V6 or V8 engines as first declared in RL 15/04
The main points of this revised issue are:
q HSV Coupe series II added.
q What to do if presented with a vehicle fitted with a low speed steering
shudder fix.
Revisions to issue 1 are indicated by an adjacent line in the right hand
margin of the page.
DESCRIPTION OF DEFECT
The material within the power steering cooler hose has inadequate strength in
the return side of the power steering system, consequently the power steering
cooler hose(s) may rupture during hard cornering operation.
To correct this situation, Holden has initiated this recall action to ensure that
every affected vehicle is fitted with a new improved power steering cooler
hose(s).
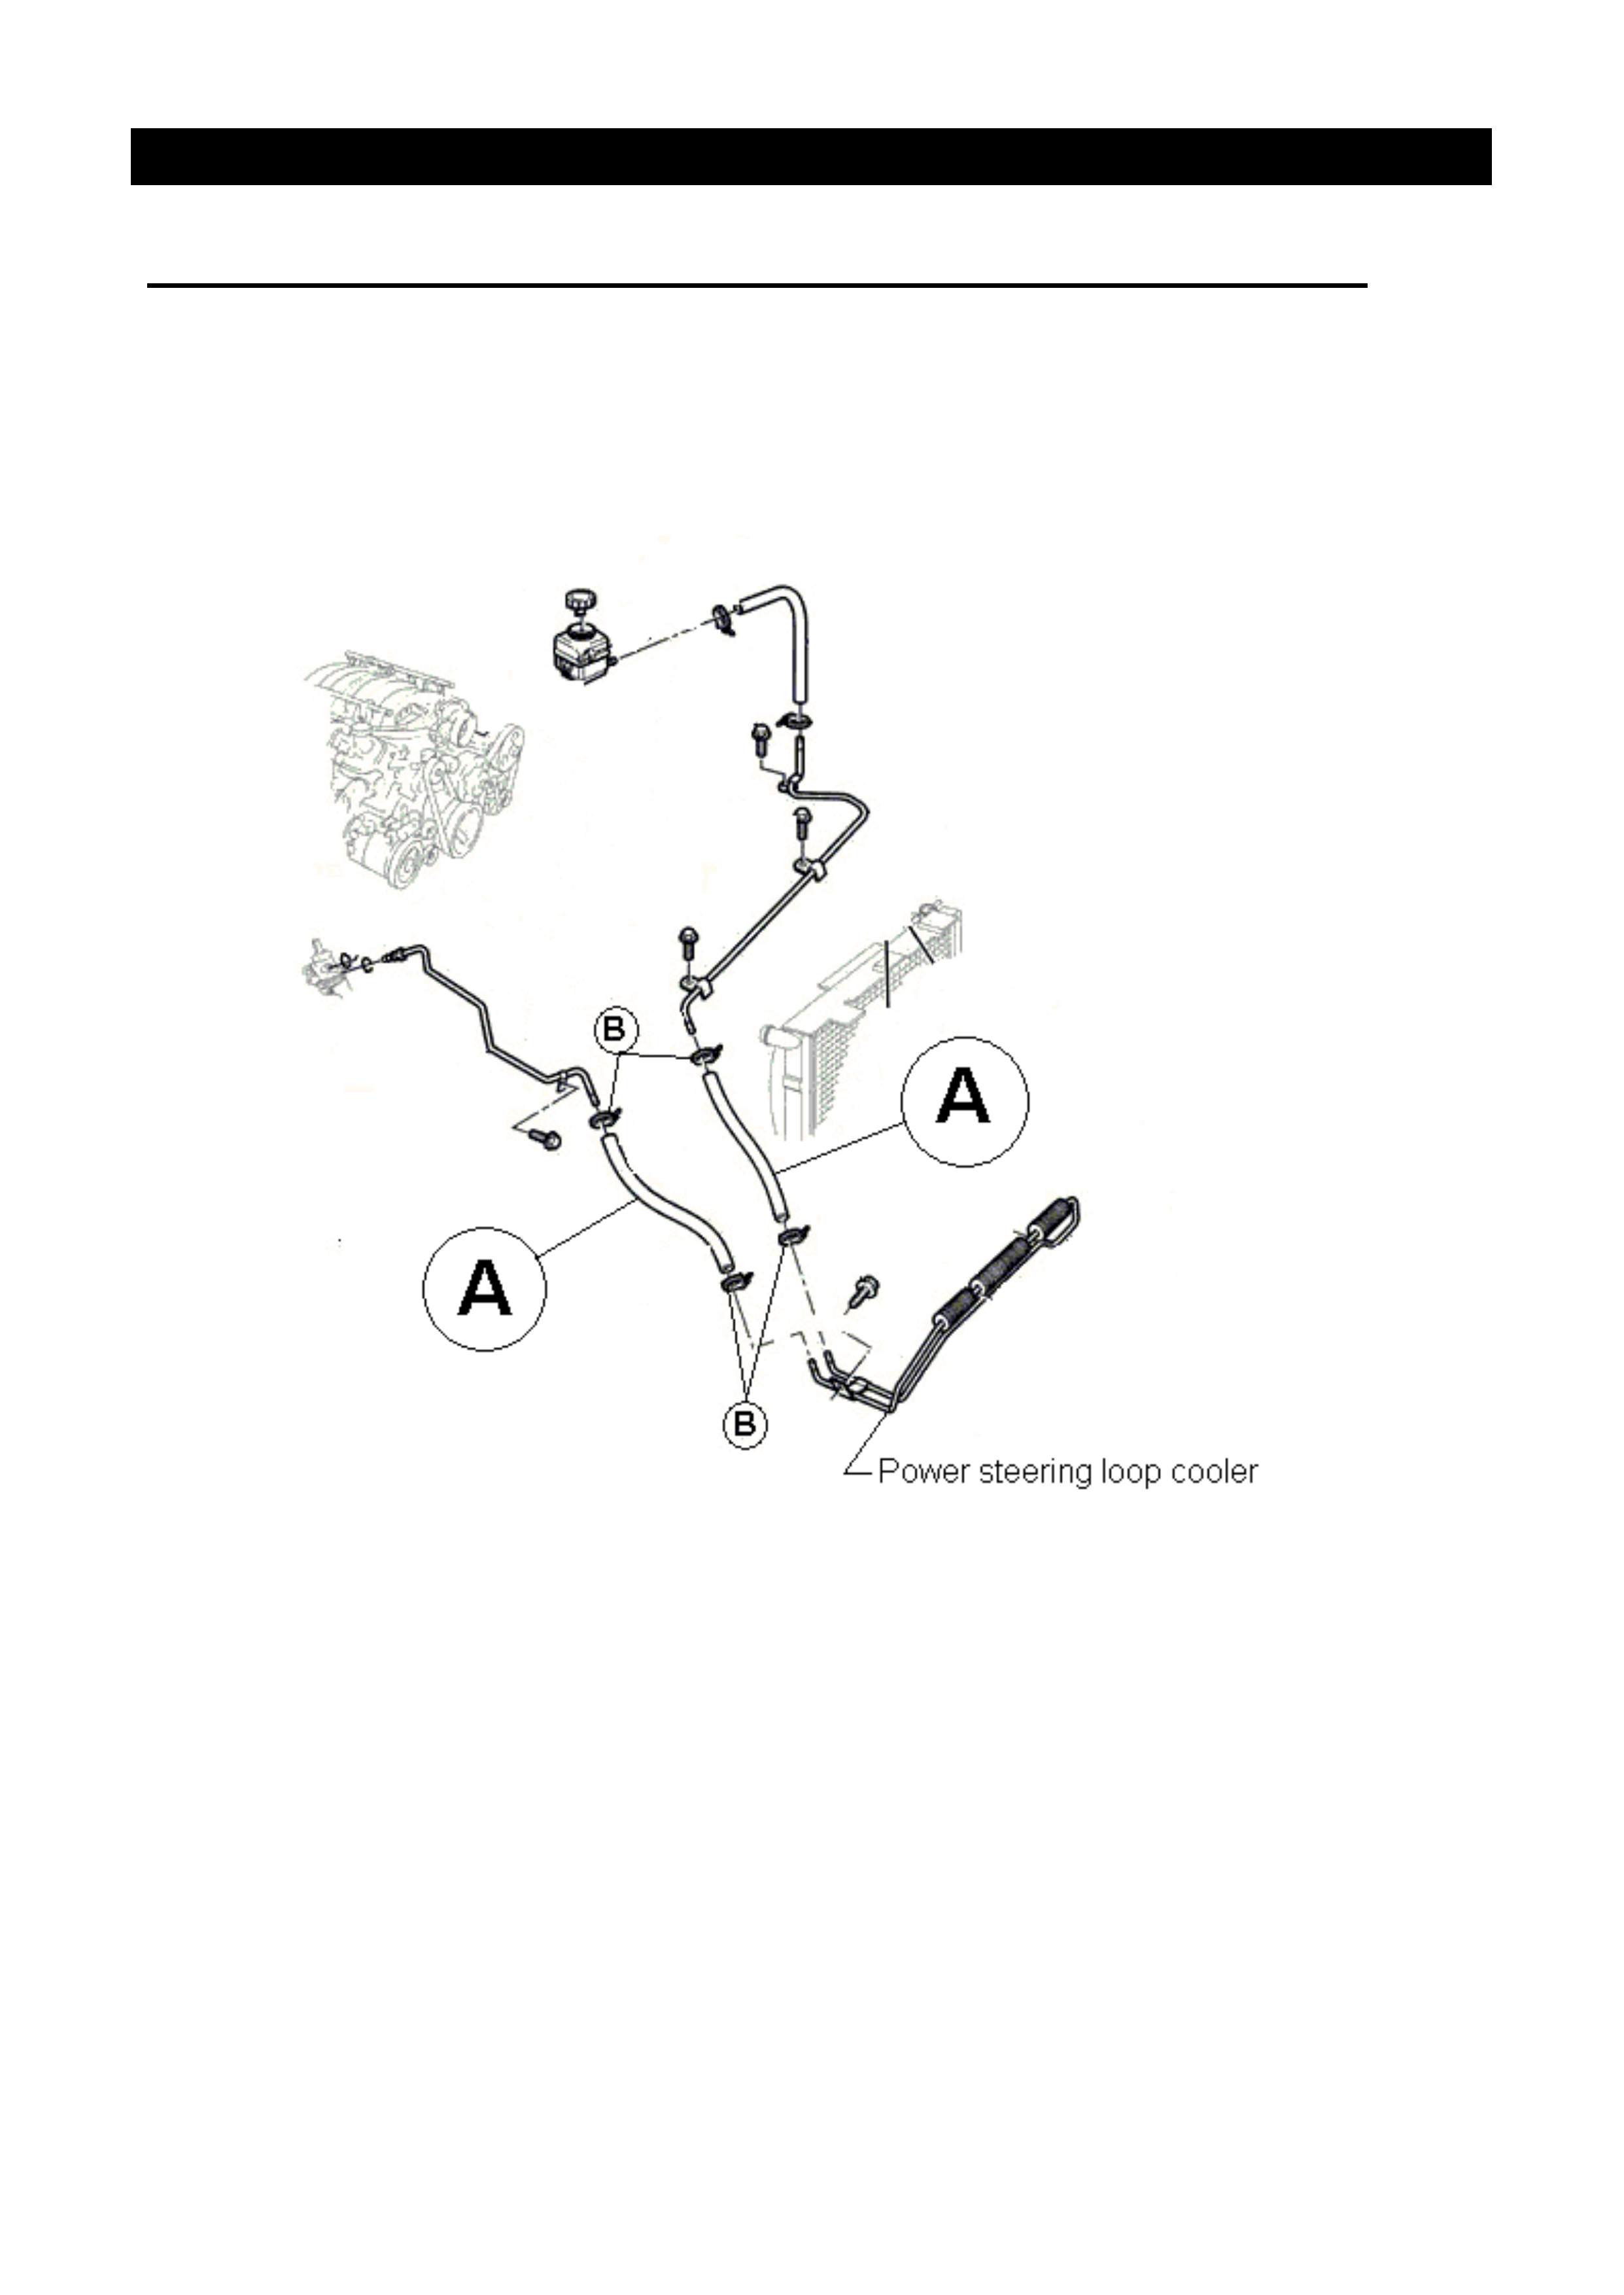
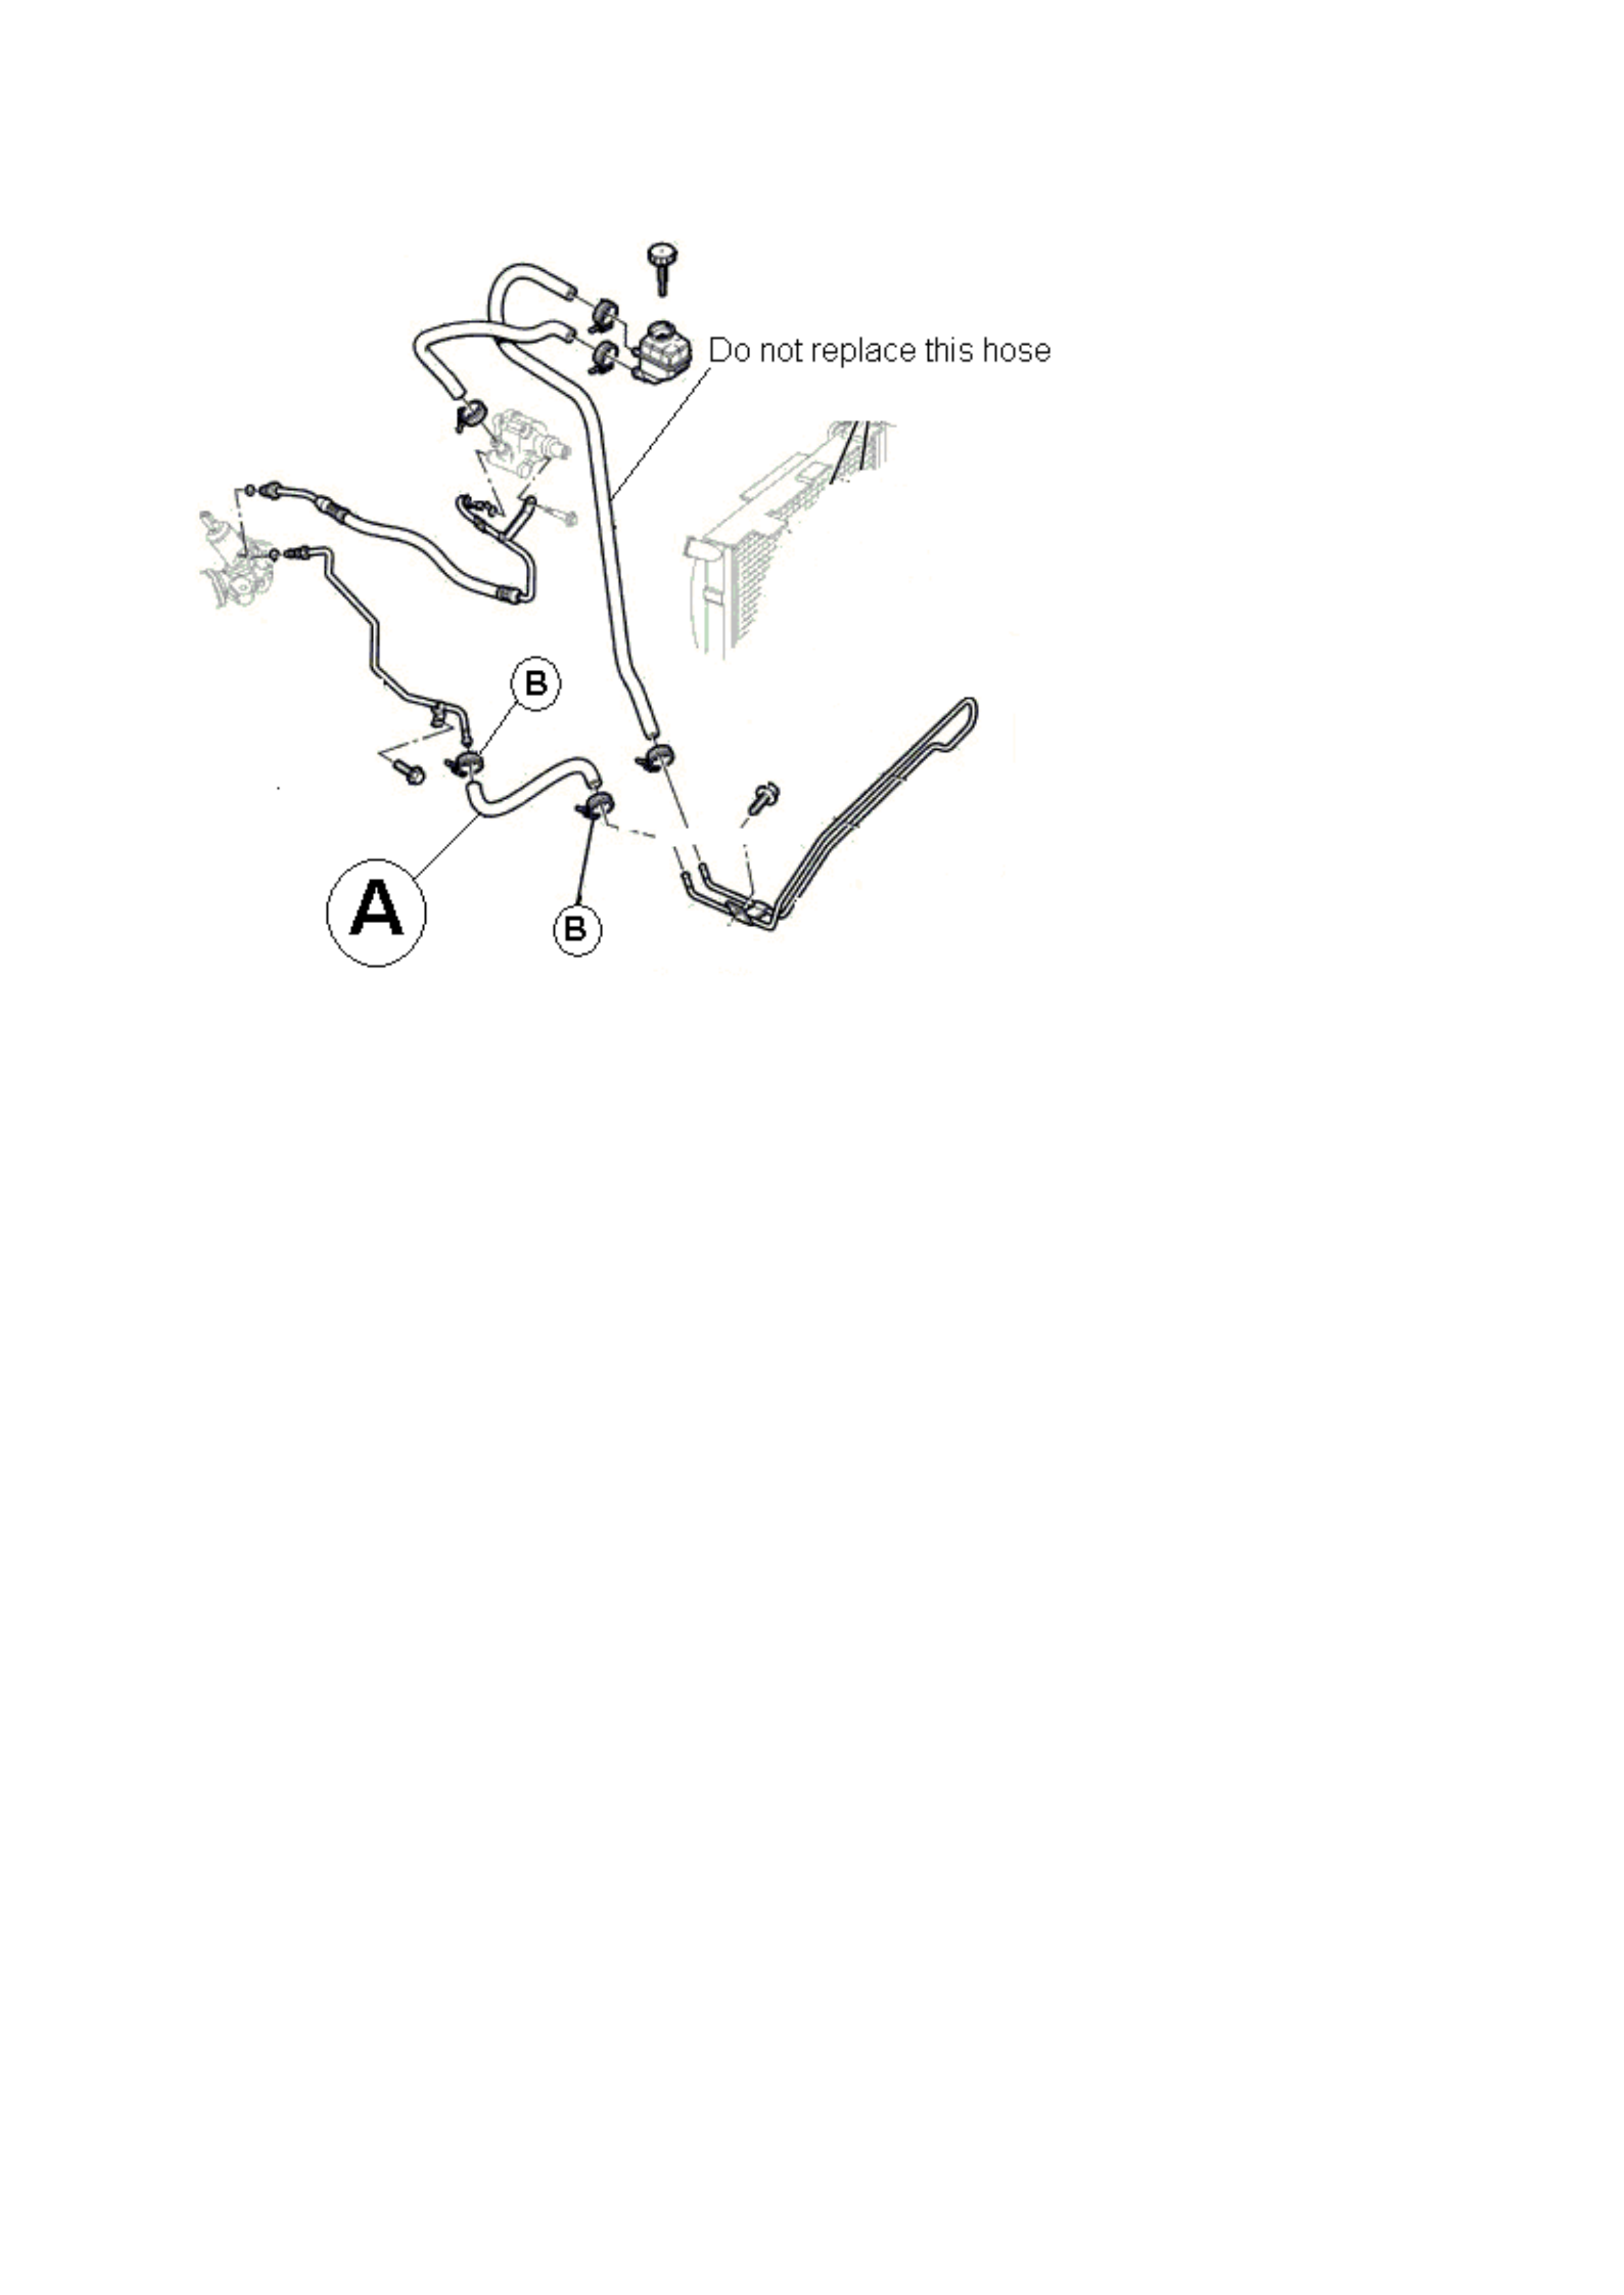
V6 engines have 1 power steering cooler hose.
V8 engines have 2 power steering cooler hoses.
AFFECTED VEHICLES
The Holden Monaro is not affected, but the HSV Coupe series II models are
affected by campaign 04-H-03.
Affected Build Date Range Model
From To
VY 26/08/2002 02/09/2003
WK 20/03/2003 02/09/2003
V2 II (HSV) 13/01/2003 02/09/2003
Note: The build date referred to in the above tables is shown on the vehicle
compliance plate not the I.D plate for HSV vehicles.
For VY
L899955 to L166789
For WK
L986609 to L167139
However the Build date shown on the compliance plate is the absolute indicator
for this recall campaign. Tag numbers are to be used for reference only.

2 of 9
VEHICLES FITTED WITH LOW SPEED STEERING SHUDDER FIXES.
Some V6 vehicles arriving for this recall may have a full length flexible return hose fitted from
the steering rack to the cooler instead of the normal rigid pipe and suspect hose. The fitting of
the flexible return hose was part of an early containment steering shudder service fix. Vehicles
inspected and found to be fitted with the full length flexible return hose do not require
replacement of the power steering cooler hose.
There is also a later release low speed steering shudder production fix which involves a
revised high pressure hose only between the pump and steering gear. This fix does not involve
the return side of the power steering system, therefore the power steering cooler hose still
requires replacement under campaign 04-H-03 on these vehicles.
ACTION REQUIRED BY RETAILERS
1. Confirm vehicle model is within the range shown in the “Affected Vehicles” table.
2. Confirm vehicle Build date is within the range shown in the “Affected Vehicles” table.
3. Confirm vehicle has not previously been reworked i.e:
q Identified by an ‘X’ in the A-4 co-ordinate of the “Vehicle Service History” label
q Application of “04-H-03 Campaign Completed” label.
4. Inspect for a flexible return hose fitted from steering rack to cooler as explained above
in “VEHICLES FITTED WITH LOW SPEED STEERING SHUDDER FIX ES”. If a
flexible hose is fitted go to step 6.
5. If vehicle has not been reworked or had a flexible hose installed from the rack to the
cooler, proceed with campaign and replace hoses as per Appendix B.
6. Affix a Campaign Completed Label and a Vehicle Service History Label as specified
in the section titled ‘Campaign Completion Identification’.
7. Submit a warranty claim. Refer “Warranty Claim Information”.
CUSTOMER NOTIFICATION
Owners of vehicles affected by this recall campaign, will be contacted directly by letter from
Holden sent to their recorded address. Also a recall notice will appear in major newspapers.
The letter and recall notice provide details of the recall campaign and request the customer to
contact their Holden Retailer to make a service booking to have the appropriate work carried
out. Refer to Appendix A for a draft copy of the customer letter.
CAMPAIGN COMPLETION IDENTIFICATION
All campaigned vehicles must have:
1. A Campaign Completed label applied to the right hand front ‘A’ pillar, between the hinges,
with details of the campaign, 04-H-03, Dealership code and date legibly entered on the
label with a permanent ink pen.
AND
2. For additional identification, mark an “X” at the A-4 co-ordinate of a Vehicle Service
History Label and apply to the inner side of the lower instrument panel cover if not already
fitted.

27/05/04 3of 7
Extra Campaign Completed and Vehicle Service History labels are available free of charge
from Moore Business Systems.
• For Campaign Completed Labels Quote stock no. SD 28156 on a Moore Business
Systems ‘Packaged Goods’ order form for a pack of 100 labels.
• For Vehicle Service History Labels quote stock no. SD 28177 on a Moore Business
Systems ‘Packaged Goods’ order form for a pack of 100 labels.
Fax the order form to Moore Business Systems on Facsimile: (03) 9270 8925
Should you need to follow-up on a placed order, contact Moore customer service on telephone
number (03) 9270 8788.
PARTS INFORMATION
PARTS ARE TO BE PROCURED THROUGH THE NORMAL HSPO DISTRIBUTION
CHANNELS (NOT SALMAT). NORMAL HSPO PRICEING WILL APPLY.
The new improved power steering cooler hoses will display P/N 92209162 on their exterior.
Parts required for each vehicle
Quantity per vehicle
Parts V6 V8
92209162
Hose power steering
1 2
WARRANTY CLAIM INFORMATION
On completion of campaign action, retailers are requested to submit a warranty claim using the
Labour Operation Number specified below.
Warranty Claim Information
Description
Replace Power Steering Cooler Hose(s)
Labour Operation No.:
Standard Time:
Failure Code:
T481001
0.5 hours
96 (NOW T0096)
Parts are to be claimed as per the normal Warranty process.
CONTACT INFORMATION
For further information or clarification on this recall campaign please contact the relevant
person below.
CONTACT NAME CONTACT NUMBER
(03) 96 47 18 57
General enquiries Brett Fowler
or
Alex Holt (03) 96 47 76 19
Technical enquiries TAS 1800 033 417
Parts related enquiries HSPO (03) 97 97 73 41
Warranty related enquiries Warranty Administration 1800 033 487
J. K. Hoffman

27/05/04 4of 7
General Service Manager
Attachments
Appendix A Customer Letter- Draft
Appendix B Replacement Instruction

27/05/04 5of 7
APPENDIX A - Draft – Customer Letter
Dear Holden Customer,
As part of Holden’s ongoing commitment to customer safety, we have initiated a
Vehicle Recall Campaign affecting the following models: Commodore (All variants),
Calais, Utility, Crewman, One Tonner, Statesman, and Caprice vehicles manufactured
from August 2002 to September 2003 including Holden Special Vehicles (HSV).
Our records indicate that your Holden vehicle was manufactured within the affected
range.
Holden is aware that a power steering cooler hose may rupture during cornering,
which could impact your vehicle control.
It is therefore necessary for you to contact a Holden Dealer of your choice, and make
a booking to have the power steering cooler hoses replaced as soon as possible.
Work will be carried out free of charge. At the time of booking, your Dealer will be able
to advise you how long your vehicle will be required for the work to be completed.
If you have any questions, please contact your Holden Dealer or call the Holden Recall
and Rework Assistance Centre on 1800 632 826, where we will be pleased to assist.
Thank you for your attention to this matter. Please accept our apologies for any
inconvenience that may be caused to you.
Yours sincerely
David McMurray
Manager Customer Assistance
VEHICLE SAFETY RECALL
27/05/04 6of 7
APPENDIX B – REPLACEMENT INSTRUCTION
VY & WK POWER STEERING COOLER HOSE REPLACEMENT INSTRUCTIONS
1. Determine vehicle engine type:
Gen III V8 will require the two rubber connecting hoses (Item A) to the inlet and outlet of the
power steering cooler to be replaced. Refer Figure 1.
Figure 1. V8 power steering hoses requiring replacement
27/05/04 7of 7
The V6 and V6 supercharged will require only the inlet connecting hose (Item A) to the power
steering cooler to be replaced . Refer Figure 2
Figure 2. V6 power steering hose to be replaced.
2. The hose(s) to be replaced are located at the bottom right hand corner of the engine bay.
3. Place vehicle on hoist observing all safety precautions associated with vehicles on hoists.
4. Loosen the two/four hose clamps (Items B) which secure the hose(s) between the power
steering cooler and the rigid pipe.
5. Place drain tray underneath hose(s) and remove hose from the vehicle. Note: Power
steering fluid may be HOT from vehicle operation.
6. Wipe any oil from the exterior of the rigid pipes.
7. Install new hose p/n 92209162
8. Use existing hose clamps (Item B) unless damaged when removed. If damaged replace
with p/n 11088301. Torque to 2-3 Nm.
9. Top up power steering reservoir.
10. Bleed power steering system as per the procedure in SIP as follows:
a) Raise the front of the vehicle and place on safety stands.
b) With the engine not running, add the power steering fluid to reservoir to the maximum mark
(or greater if it is known that the steering gear is empty).

27/05/04 8of 7
c) Start the engine and allow to run for only 2-3 seconds. Do not turn the steering wheel at this
point.
d) Continue with steps b and c until the power steering fluid level remains constant.
e) Start and run the engine at idle speed, turning the steering wheel from lock to lock, without
holding at the full lock positions (this will build up high pressures, atomising any entrapped air).
Repeat this procedure from six to eight times. Stop the engine, check the power steering fluid
level and top up to the maximum level, as required.
f) Start and run the engine at idle speed. Again turn the steering wheel from lock to lock but
now slowly build up the pressure levels by holding against the full lock position for 1-2 seconds.
Repeat this procedure from four to six times. Stop the engine and top up the power steering
fluid level to the maximum mark, as required.
Note: while the majority of entrapped air will be removed by the above process, a small
amount may remain, which can only be removed by alternate circulation and settling of the
power steering fluid for a prolonged period. This is usually achieved automatically after two to
three days, with daily driving and settling overnight.
g) Turn the steering wheel to the straight-ahead position, lower vehicle to the ground and turn
ignition “OFF”
11. Check for leaks and rectify if necessary.

9 of 9

1 of 9
PRODUCT CAMPAIGN BULLETIN
04-H-04
June 4, 2004
SUBJECT: VYII DRIVER’S SEAT ASSEMBLY.
MODELS AFFECTED: VY Series II
This bulletin announces the initiation of a safety recall campaign to inspect
and possibly replace the driver’s seat Track and Height Adjuster Asm fitted to
VY series II models. The intention of this campaign is to inspect the driver’s
seat track for correct mounting foot attachment and if found defective to
replace the Track and Height Adjuster Asm.
DESCRIPTION OF DEFECT
Due to a vendor equipment failure some driver’s seats may have been
manufactured with incomplete riveting and welding between the seat track
and the mounting foot. If the riveting and welding is incomplete between the
seat track and foot, occupant safety maybe compromised in a vehicle
accident condition.
AFFECTED VEHICLES
Only VY vehicles as listed in Appendix A, which were built during the first two
weeks of May 2004 are affected.
ACTION REQUIRED BY RETAILERS
1. Confirm vehicle Tag number is affected by checking list on Appendix A.
2. Confirm vehicle has not previously been inspected i.e:
Identified by an ‘X’ in the C-1 co-ordinate of the “Vehicle Service
History” label
Application of “04-H-04 Campaign Completed” label.
3. If vehicle has not been inspected, proceed with campaign instructions as
per Appendix B.
4. Affix a Campaign Completed Label and a Vehicle Service History Label as
specified in the section titled ‘Campaign Completion Identification’.
5. Submit a warranty claim. Refer “Warranty Claim Information”.

2 of 9
CUSTOMER NOTIFICATION
Owners of vehicles affected by this recall campaign, will be contacted directly by letter from
Holden sent to their recorded address. The letter provides details of the recall campaign
and requests the customer to contact their Holden Dealer to make a service booking to
have the appropriate work carried out. Refer to Appendix C for a draft copy of the customer
letter.
CAMPAIGN COMPLETION IDENTIFICATION
All campaigned vehicles must have:
1. A Campaign Completed label applied to the right hand front ‘A’ pillar, between the
hinges, with details of the campaign, 04-H-04, Dealership code and date legibly entered
on the label with a permanent ink pen.
AND
2. For additional identification, mark an “X” at the C-1 co-ordinate of a Vehicle Service
History Label and apply to the inner side of the lower instrument panel cover if not
already fitted.
Extra Campaign Completed and Vehicle Service History labels are available free of charge
from Moore Business Systems.
• For Campaign Completed Labels Quote stock no. SD 28156 on a Moore Business
Systems ‘Packaged Goods’ order form for a pack of 100 labels.
• For Vehicle Service History Labels quote stock no. SD 28177 on a Moore Business
Systems ‘Packaged Goods’ order form for a pack of 100 labels.
Fax the order form to Moore Business Systems on Facsimile: (03) 9270 8925
Should you need to follow-up on a placed order, contact Moore customer service on
telephone number (03) 9270 8788.
PARTS INFORMATION
If a defective driver’s Track and Height Adjust Asm is found, contact TAS immediately to
report the identification of a defective assembly and for availability of a replacement part.
When you receive the replacement part confirm its condition is OK by performing the
procedure in Appendix B.
Please return the defective part to REPAC when requested by the REPAC report.
Replacement part information:
Part Number Description
92146645 Track and Height Adjust Asm
– 2 Way RH
92146648 Track and Height Adjust Asm
– 4 Way RH
2 Way seats have only fore and aft adjustment. 4 Way seats have fore,aft and height
adjustment.
WARRANTY CLAIM INFORMATION

Page 3 of 9
On completion of campaign action, retailers are requested to submit a warranty claim using
the Labour Operation Numbers specified below.
Warranty Claim Information
Description
Inspect Track and Height
Adjust Asm
Replace Track and Height
Adjust Asm (includes
inspection)
Labour Operation No.:
Standard Time:
Failure Code:
T481101
0.5 hours
96 (NOW T0096)
T481102
1.3 hours
96 (NOW T0096)
CONTACT INFORMATION
For further information or clarification on this recall campaign please contact the relevant
person below.
CONTACT NAME CONTACT NUMBER
(03) 96 47 18 57
General enquiries Brett Fowler
or
Daniel Coburn (03) 96 47 15 24
Technical enquiries TAS 1800 033 417
Parts related enquiries TAS 1800 033 417
Warranty related enquiries Warranty Administration 1800 033 487
J. K. Hoffman
General Service Manager
Attachments
Appendix A Affected vehicle list
Appendix B Inspection Procedure
Appendix C Customer Letter- Draft
4 of 9
APPENDIX A
AFFECTED VEHICLE LISTING
Tag No. Tag No. Tag No. Tag No. Tag No. Tag No. Tag No.
L241701 L271617 L273951 L274325 L274556 L274770 L275002
L243248 L271619 L273962 L274326 L274559 L274773 L275003
L243900 L271620 L274004 L274329 L274560 L274783 L275005
L248879 L271621 L274018 L274331 L274561 L274786 L275006
L251817 L271624 L274024 L274335 L274562 L274791 L275011
L254051 L271628 L274036 L274343 L274563 L274794 L275017
L254060 L271629 L274040 L274375 L274565 L274797 L275019
L262286 L271637 L274078 L274376 L274566 L274808 L275021
L267604 L272302 L274079 L274379 L274569 L274809 L275022
L267959 L272303 L274091 L274388 L274573 L274811 L275023
L268740 L272304 L274095 L274391 L274576 L274812 L275027
L268743 L272307 L274100 L274392 L274580 L274813 L275032
L268745 L272308 L274112 L274403 L274587 L274816 L275036
L269422 L272309 L274120 L274404 L274590 L274824 L275039
L269430 L272311 L274130 L274406 L274594 L274830 L275040
L269439 L272312 L274143 L274411 L274607 L274831 L275041
L269455 L272313 L274148 L274412 L274612 L274832 L275043
L269477 L272315 L274155 L274426 L274615 L274841 L275048
L269481 L272321 L274158 L274427 L274619 L274852 L275049
L269483 L272323 L274166 L274432 L274621 L274855 L275051
L270199 L272327 L274167 L274435 L274622 L274857 L275052
L270200 L272328 L274174 L274445 L274624 L274860 L275053
L270204 L272333 L274175 L274453 L274631 L274865 L275055
L270836 L272335 L274178 L274466 L274635 L274867 L275056
L270838 L272339 L274180 L274467 L274636 L274869 L275060
L270844 L272973 L274188 L274475 L274638 L274873 L275061
L270851 L272989 L274189 L274478 L274642 L274874 L275066
L270864 L272990 L274193 L274479 L274649 L274877 L275183
L270870 L273019 L274195 L274487 L274666 L274878 L275185
L270872 L273027 L274197 L274510 L274668 L274880 L275186
L270882 L273036 L274203 L274511 L274672 L274882 L275188
L270890 L273047 L274205 L274512 L274684 L274900 L275191
L270891 L273054 L274208 L274513 L274688 L274908 L275192
L270892 L273580 L274213 L274516 L274689 L274911 L275193
L270894 L273590 L274221 L274517 L274697 L274912 L275195
L270897 L273596 L274234 L274519 L274698 L274931 L275198
L271571 L273607 L274237 L274520 L274704 L274932 L275199
L271582 L273611 L274243 L274522 L274707 L274934 L275200
L271583 L273620 L274249 L274523 L274714 L274938 L275202
L271584 L273637 L274250 L274524 L274719 L274940 L275203
L271585 L273639 L274253 L274526 L274720 L274944 L275205
L271588 L273644 L274257 L274527 L274728 L274945 L275207
L271590 L273648 L274259 L274528 L274733 L274947 L275208
L271591 L273653 L274264 L274530 L274736 L274952 L275209
L271594 L273660 L274266 L274531 L274744 L274955 L275210
L271595 L273686 L274268 L274532 L274745 L274965 L275211
L271599 L273702 L274269 L274533 L274747 L274970 L275212
L271601 L273705 L274275 L274535 L274752 L274972 L275214
L271603 L273708 L274277 L274537 L274754 L274980 L275217
L271604 L273716 L274290 L274538 L274755 L274985 L275218
L271605 L273724 L274292 L274545 L274761 L274987 L275219
L271608 L273725 L274312 L274546 L274762 L274988 L275220
L271609 L273727 L274313 L274551 L274766 L274989 L275221
L271610 L273732 L274314 L274552 L274768 L274994 L275222
L271613 L273946 L274322 L274553 L274769 L274998 L275223

5 of 9
Tag No. Tag No. Tag No. Tag No. Tag No. Tag No. Tag No.
L275224 L275437 L275559 L275705 L275924 L276122 L276231
L275226 L275441 L275562 L275706 L275925 L276123 L276236
L275228 L275442 L275567 L275707 L275927 L276126 L276238
L275229 L275443 L275570 L275709 L275930 L276127 L276241
L275300 L275446 L275574 L275711 L275934 L276128 L276244
L275301 L275448 L275581 L275712 L275935 L276129 L276245
L275302 L275450 L275584 L275716 L275937 L276131 L276246
L275304 L275451 L275586 L275717 L275938 L276133 L276249
L275307 L275454 L275590 L275718 L275940 L276137 L276251
L275311 L275456 L275593 L275720 L276035 L276140 L276254
L275313 L275458 L275597 L275722 L276036 L276144 L276261
L275315 L275459 L275602 L275725 L276039 L276145 L276263
L275325 L275466 L275606 L275728 L276040 L276148 L276264
L275326 L275471 L275607 L275729 L276043 L276149 L276266
L275327 L275474 L275609 L275734 L276044 L276150 L276269
L275329 L275475 L275610 L275736 L276047 L276152 L276270
L275330 L275476 L275612 L275737 L276048 L276154 L276273
L275334 L275478 L275613 L275739 L276050 L276155 L276274
L275335 L275480 L275614 L275741 L276051 L276163 L276277
L275338 L275481 L275620 L275742 L276055 L276164 L276279
L275339 L275483 L275621 L275745 L276056 L276167 L276283
L275342 L275484 L275622 L275746 L276058 L276169 L276286
L275345 L275487 L275625 L275747 L276060 L276171 L276287
L275347 L275490 L275626 L275748 L276061 L276172 L276289
L275348 L275492 L275629 L275750 L276062 L276177 L276291
L275351 L275494 L275630 L275751 L276063 L276178 L276292
L275353 L275495 L275633 L275753 L276066 L276181 L276294
L275355 L275497 L275634 L275759 L276067 L276182 L276295
L275356 L275499 L275635 L275762 L276070 L276184 L276296
L275359 L275500 L275639 L275764 L276072 L276185 L276298
L275363 L275501 L275640 L275766 L276074 L276186 L276302
L275368 L275504 L275645 L275767 L276076 L276190 L276303
L275370 L275505 L275646 L275768 L276081 L276191 L276304
L275382 L275507 L275647 L275770 L276082 L276194 L276308
L275384 L275508 L275649 L275771 L276083 L276195 L276309
L275387 L275510 L275650 L275775 L276085 L276198 L276313
L275388 L275518 L275651 L275777 L276086 L276199 L276314
L275389 L275519 L275656 L275778 L276087 L276203 L276315
L275390 L275520 L275657 L275781 L276090 L276204 L276317
L275392 L275522 L275658 L275782 L276091 L276205 L276319
L275393 L275523 L275663 L275785 L276094 L276207 L276322
L275395 L275524 L275669 L275787 L276095 L276208 L276324
L275398 L275525 L275670 L275788 L276096 L276209 L276326
L275403 L275527 L275673 L275791 L276097 L276211 L276329
L275405 L275531 L275674 L275796 L276099 L276215 L276330
L275410 L275532 L275675 L275797 L276100 L276217 L276331
L275412 L275535 L275682 L275799 L276102 L276218 L276332
L275417 L275536 L275686 L275800 L276104 L276219 L276334
L275419 L275546 L275687 L275804 L276108 L276220 L276335
L275422 L275548 L275688 L275805 L276109 L276221 L276336
L275426 L275550 L275691 L275918 L276112 L276223 L276340
L275432 L275551 L275694 L275919 L276113 L276224 L276342
L275433 L275552 L275698 L275920 L276114 L276227 L276343
L275434 L275554 L275699 L275921 L276119 L276229 L276344
L275435 L275555 L275702 L275922 L276120 L276230 L276346
6 of 9
Ta
g
No. Ta
g
No. Ta
g
No. Ta
g
No. Ta
g
No. Ta
g
No.
L276350 L276454 L276844 L276984 L277118 L277238
L276353 L276457 L276846 L276985 L277119 L277241
L276357 L276460 L276849 L276986 L277124 L277243
L276359 L276461 L276851 L276989 L277125 L277245
L276360 L276462 L276852 L276990 L277126 L277246
L276361 L276464 L276853 L276994 L277128 L277247
L276365 L276465 L276855 L276997 L277129 L277248
L276366 L276466 L276856 L277000 L277130 L277250
L276368 L276468 L276858 L277001 L277132 L277251
L276370 L276470 L276861 L277004 L277135 L277254
L276371 L276471 L276867 L277006 L277136 L277259
L276372 L276474 L276872 L277010 L277137 L277260
L276373 L276475 L276874 L277012 L277138 L277264
L276375 L276477 L276876 L277015 L277141 L277265
L276380 L276478 L276878 L277017 L277142 L277267
L276381 L276479 L276881 L277018 L277143 L277269
L276384 L276482 L276888 L277019 L277145 L277271
L276386 L276483 L276891 L277025 L277147 L277272
L276389 L276486 L276894 L277026 L277150 L277275
L276391 L276488 L276896 L277027 L277152 L277277
L276392 L276489 L276897 L277029 L277154 L277282
L276394 L276492 L276901 L277035 L277156 L277283
L276396 L276493 L276904 L277038 L277157 L277287
L276399 L276496 L276906 L277039 L277160 L277290
L276400 L276497 L276909 L277045 L277162 L277293
L276403 L276500 L276910 L277047 L277163 L277295
L276406 L276502 L276913 L277050 L277165 L277302
L276409 L276506 L276915 L277052 L277166 L277305
L276411 L276511 L276917 L277053 L277169 L277312
L276413 L276512 L276919 L277054 L277173 L277316
L276414 L276514 L276922 L277056 L277174 L277323
L276415 L276515 L276923 L277060 L277177 L277324
L276418 L276517 L276926 L277062 L277179 L277334
L276419 L276518 L276927 L277065 L277180 L277339
L276420 L276520 L276929 L277066 L277182 L277343
L276423 L276521 L276931 L277068 L277183 L277350
L276424 L276523 L276932 L277072 L277184 L277377
L276425 L276524 L276940 L277073 L277186 L277389
L276427 L276658 L276943 L277074 L277188 L277895
L276428 L276803 L276946 L277078 L277195 L277900
L276429 L276806 L276947 L277081 L277199 L277902
L276430 L276807 L276950 L277082 L277200 L277903
L276432 L276809 L276956 L277091 L277203 L277906
L276434 L276811 L276958 L277092 L277205 L277907
L276435 L276813 L276959 L277094 L277208 L277908
L276437 L276814 L276962 L277100 L277209 L277909
L276438 L276818 L276963 L277101 L277211 L277911
L276440 L276820 L276964 L277104 L277214 L277915
L276442 L276823 L276966 L277107 L277220 L277920
L276443 L276826 L276968 L277108 L277221 L277930
L276444 L276828 L276971 L277109 L277225 L277940
L276447 L276833 L276976 L277110 L277226
L276448 L276837 L276977 L277112 L277229
L276452 L276838 L276979 L277113 L277230
L276453 L276842 L276981 L277116 L277237
7 of 9
APPENDIX B
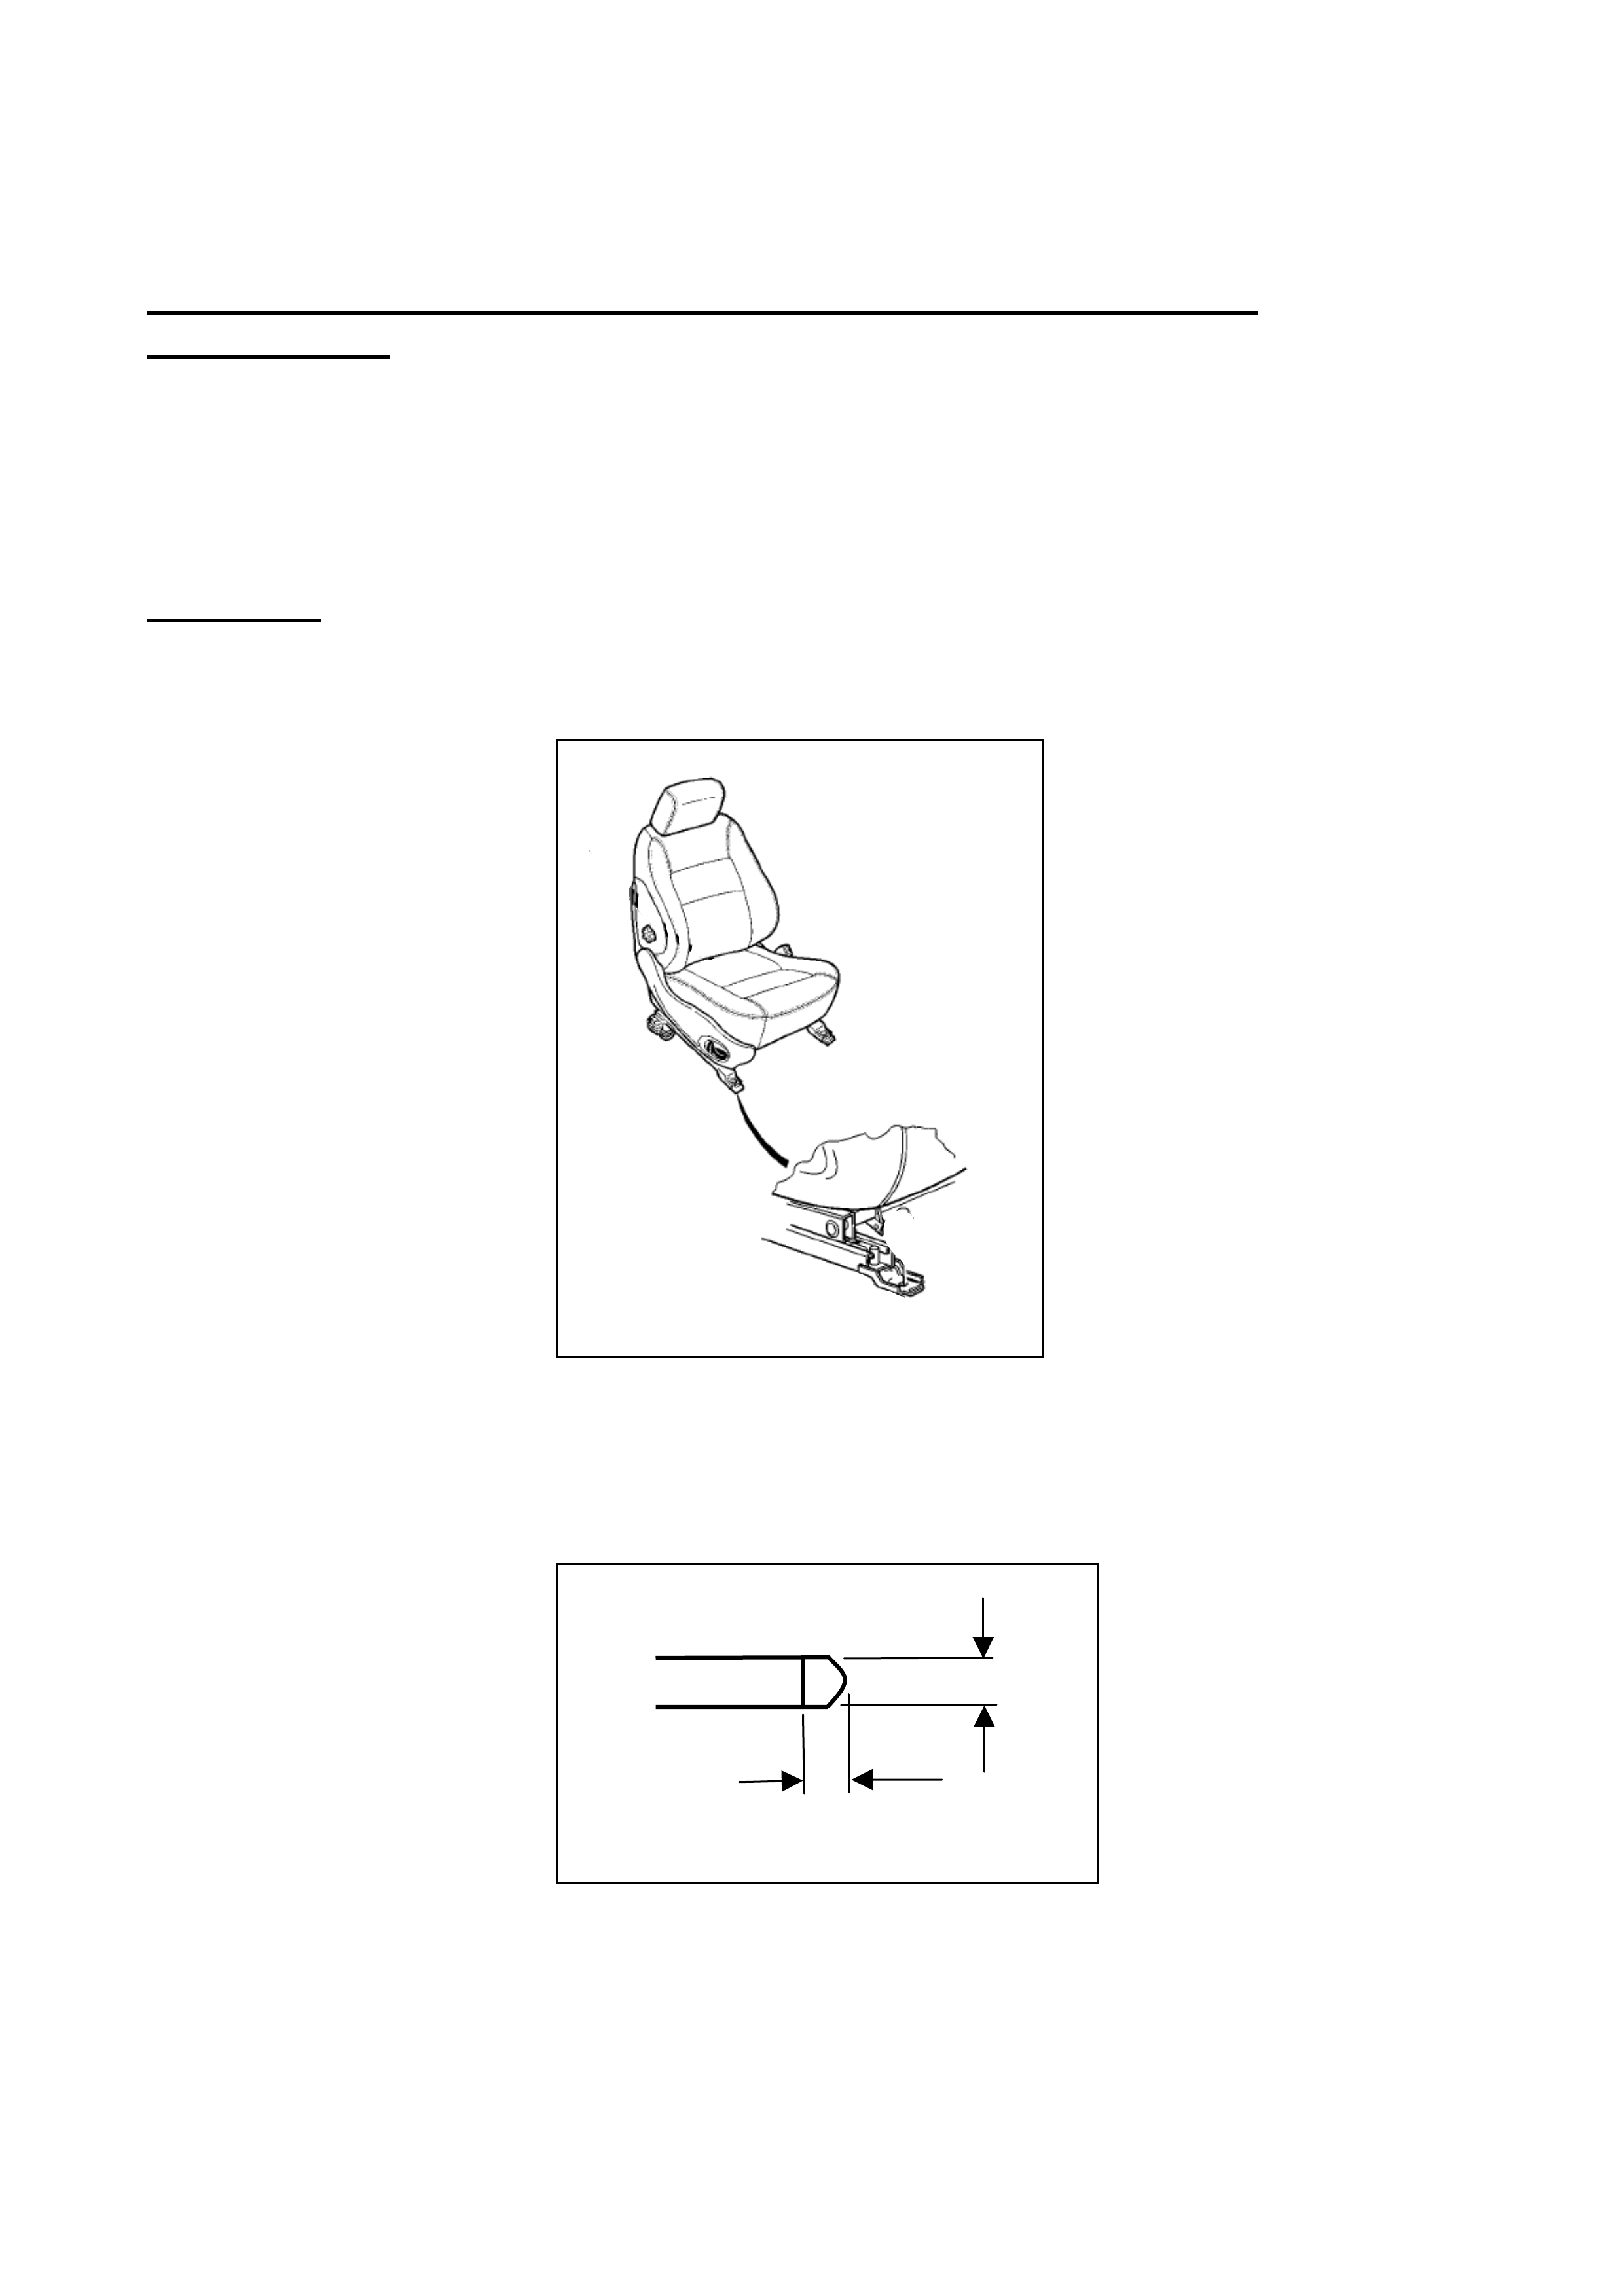
SEAT TRACK AND HEIGHT ADJUST ASM FOOT INSPECTION
PROCEDURE
VY Series II – R/H/S Track and Height Adjust Asm on Driver’s Seat,
applicable to vehicles listed in Appendix A:
Inspection:
1. Adjust the front R/H seat fore/aft adjustment to the rear most position.
2. Mark a line on a 1.00mm thick feeler gauge 3mm from the end as shown in figure
2.
3. With line facing up, try and place the 1mm feeler gauge between the front of the
mounting foot and outer rail track as shown in figure 3 & 4.
3mm
Fig 2
Max. 13 mm
Fig 1
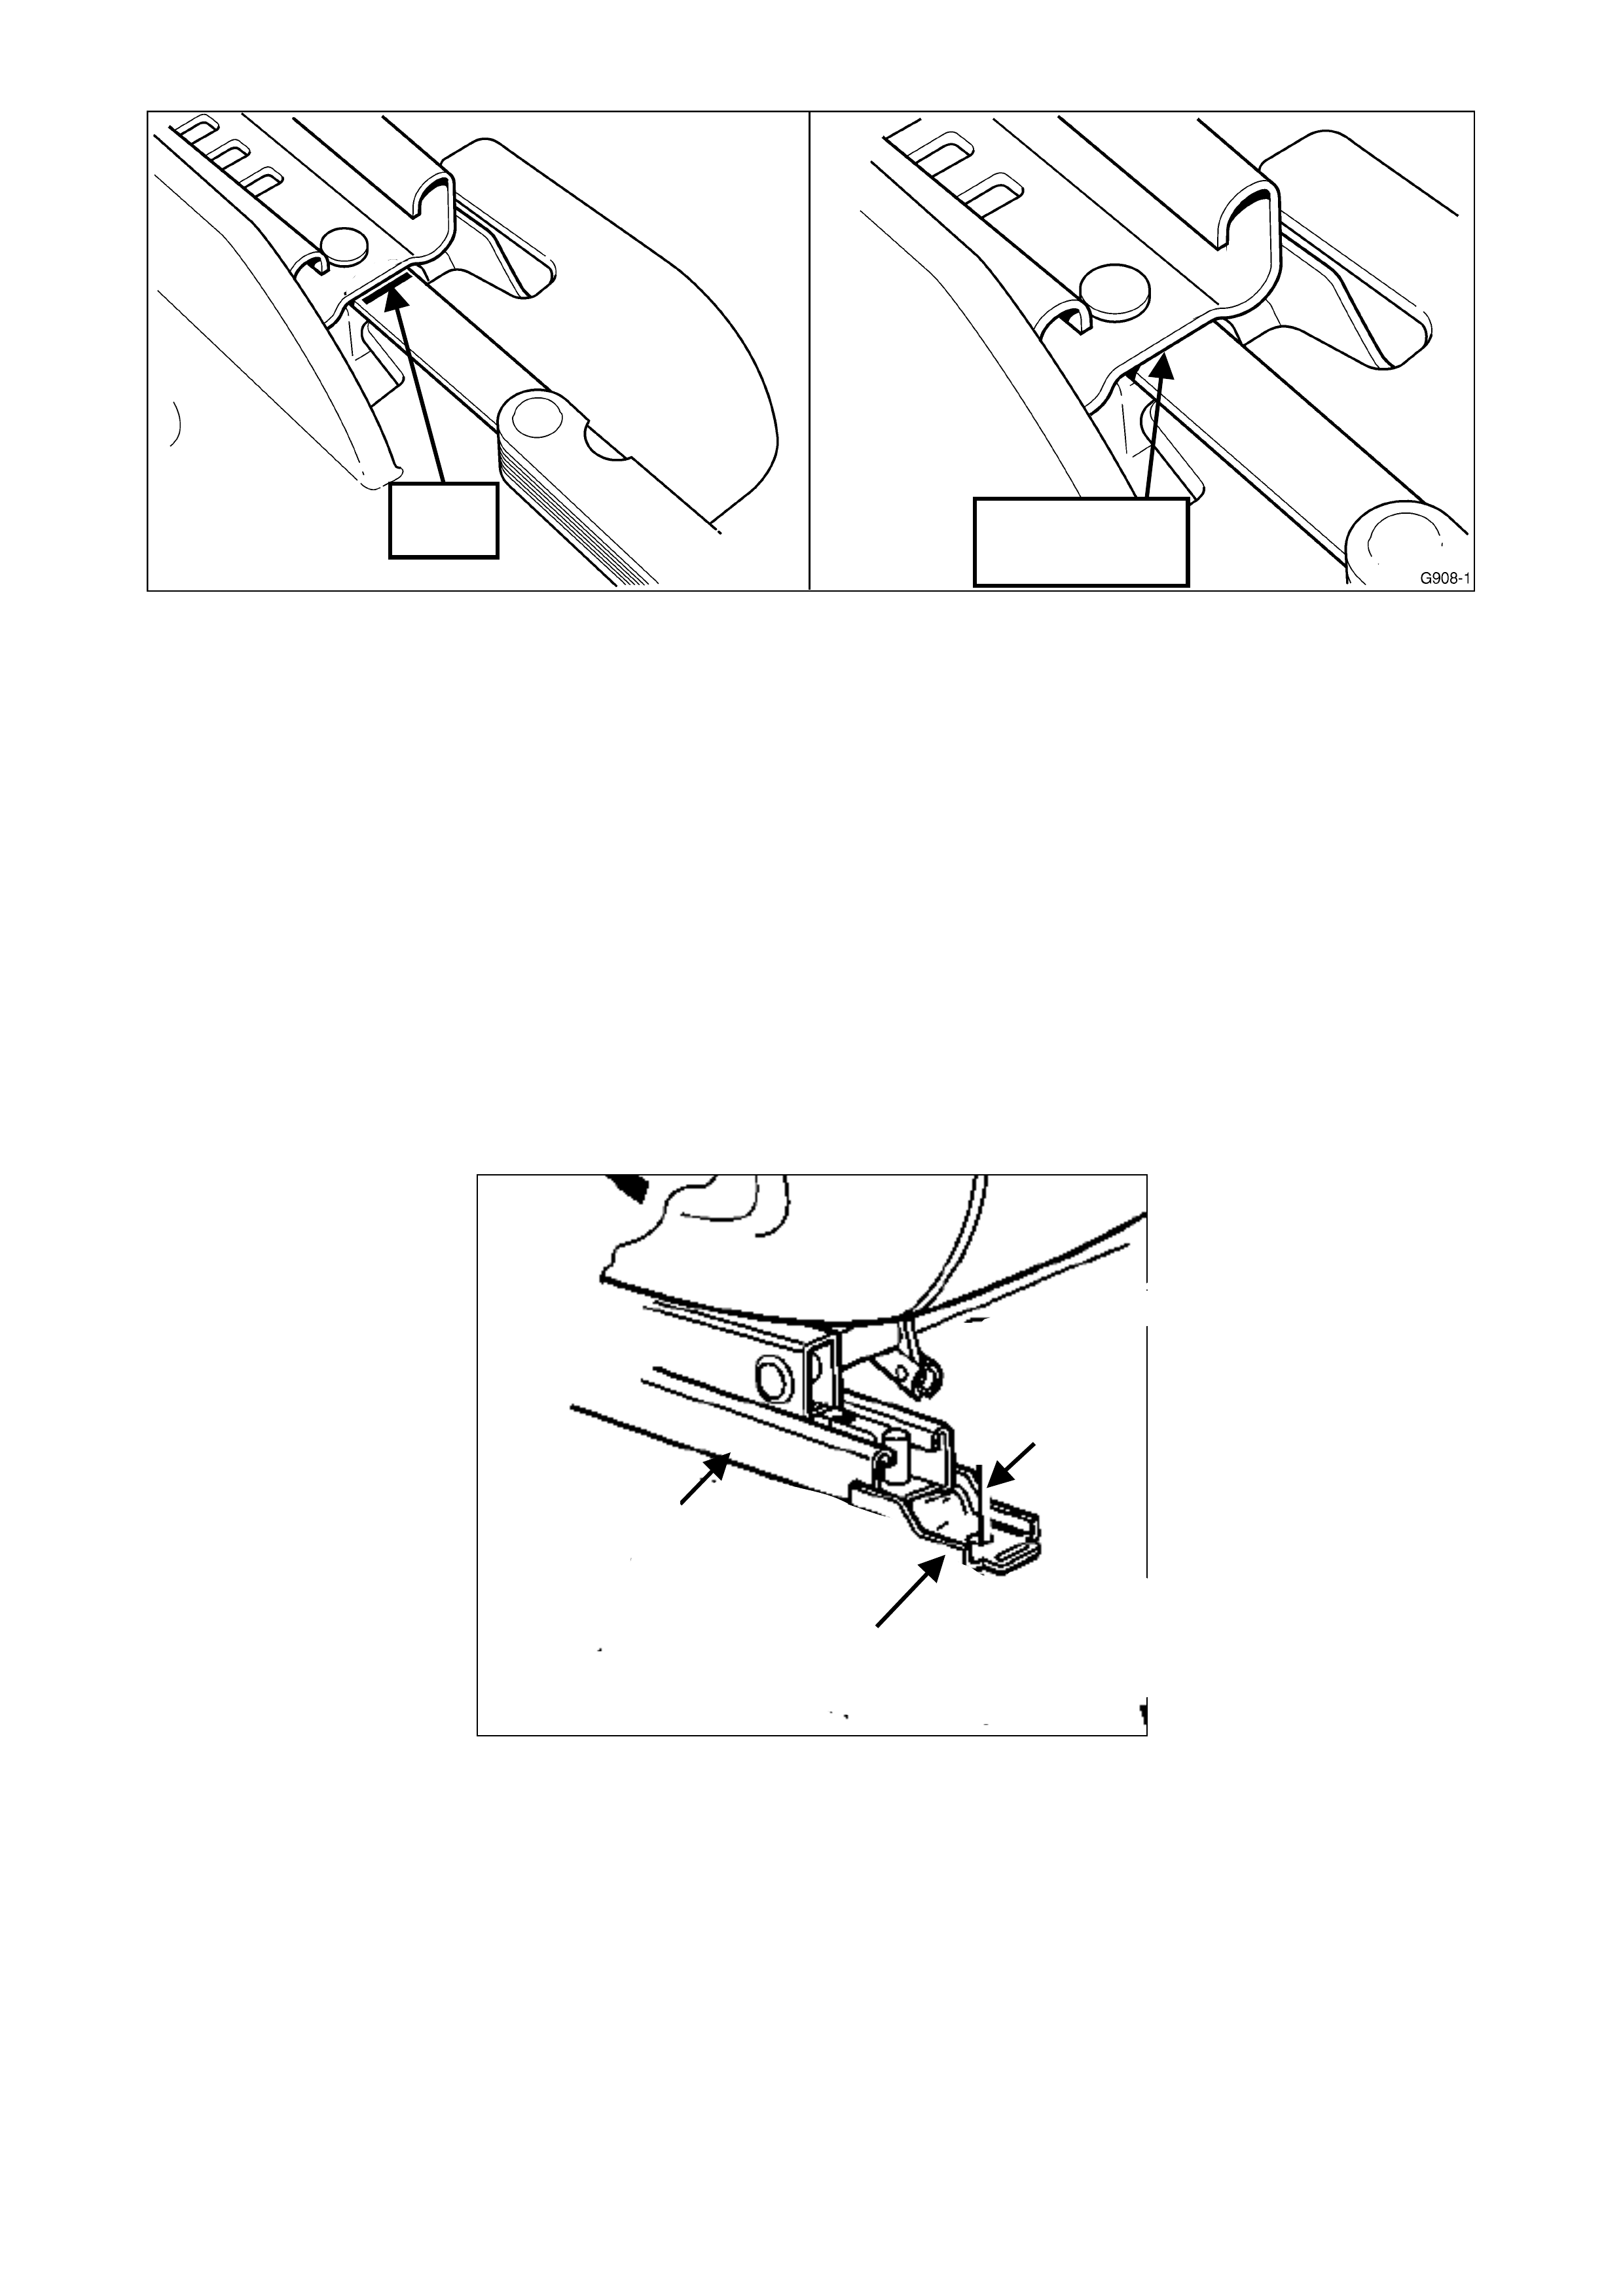
8 of 9
4. The feeler gauge should NOT travel any further than 3 mm into the gap. The
indicator line on feeler gauge must remain visible as shown in figure 3.
5. If feeler gauge travels further than 3 mm, covering the indicator line (shown in
figure 4), then the Track and Height Adjust Asm must be replaced. This
condition indicates the part has excessive clearance due to incorrect riveting.
Refer to SIP for instructions regarding the replacement of the Track and Height
Adjust Asm.
6. Inspect the inside of the right hand rail to check that the weld has been located
to weld the metal of the rail to the metal of the rail foot as shown by the “weld
location” arrow in fig 5.
7. If the weld is not in the correct position contact TAS for further instructions.
8. Fit a completed campaign sticker to vehicle.
Note: The seat assembly needs to pass both feeler
gauge check and weld location check to be in “OK”
condition.
Fig 5 Foot
Rail
Weld
Location
Fig 3 Fig 4
OK
Not OK

9 of 9
APPENDIX C - Draft – Customer Letter
Dear Holden Customer,
As part of Holden’s ongoing commitment to customer safety, we have initiated a Vehicle
Recall Campaign for Holden vehicles manufactured during the first two weeks of May
2004. This includes Executive, Acclaim, S, SS, SV8, Berlina, One Tonner, Crewman,
Adventra, and VY series II based HSV models.
Our records indicate that your Holden vehicle was manufactured within the affected range.
Holden’s seat supplier has advised that, some driver’s seats may have been manufactured
with incomplete riveting and welding between the seat track, and the mounting foot on the
front right hand side. If the riveting and welding is incomplete between the seat track and
foot, occupant safety maybe compromised in a vehicle accident.
It is therefore necessary for you to contact a Holden Dealer of your choice, and make a
booking to have the driver’s seat inspected as soon as possible.
Work will be carried out free of charge. At the time of booking, your Dealer will be able to
advise you how long your vehicle will be required for the work to be completed.
If you have any questions, please contact your Holden Dealer or call the Holden Recall and
Rework Assistance Centre on 1800 632 826, where we will be pleased to assist.
Thank you for your attention to this matter. Please accept our apologies for any
inconvenience that may be caused to you.
Yours sincerely
David McMurray
Manager Customer Assistance
VEHICLE SAFETY RECALL
Page 1 of 7
PRODUCT CAMPAIGN BULLETIN
04-H-07
November 5, 2004
SUBJECT: EXHAUST PIPE CLAMP REPLACEMENT
MODELS AFFECTED: ZC VECTRA MODEL YEAR 2004, Z22SE & Z32SE ENGINES
This bulletin announces the initiation of a Safety Recall to replace the centre exhaust pipe
clamp fitted to a specific range of ZC Vectra MY 04 vehicles.
DESCRIPTION OF DEFECT
The clamp used to secure the middle muffler to the front exhaust pipe may loosen during
operation due to incorrect material selection of the clamp.
Eventually the pipes may come apart and cause damage to the fuel tank and hand brake
cable.
AFFECTED VEHICLES
Model Year Body Style From VIN To VIN
2004 Hatch W0L0ZCF6841126554 W0L0ZCF6848108687
2004 Sedan W0L0ZCF6941019511 W0L0ZCF6941132955
ACTION REQUIRED BY DEALERS
1. Confirm vehicle VIN number is within the range shown in the “Affected Vehicles” section
(above). Affected vehicles will be flagged in NOW system for recall action. Affected
Stock vehicles must also be reworked prior to customer delivery or dealer transfer.
2. Confirm vehicle has not previously been reworked ie:
Identified by an ‘X’ in the B-1 co-ordinate of the “Vehicle Service History” label
Application of “04-H-07 Campaign Completed” label.
Confirm campaign status in NOW vehicle search.
3. Determine the clamp part number to be replaced.
Some Sedan vehicles with VINs prior to W0L0ZCF6941038081 (inclusive) are fitted with
a smaller clamp. These specific vehicles will need to be reworked using the smaller
diameter replacement clamp. Refer to Parts Information section on page 2.
Rework the other vehicles by fitting the larger clamp.
4. In the event the exhaust pipes have separated, call Holden’s Technical Assistance
Centre (TAS) for next step advice.

Page 2 of 7
In summary, TAS will clarify the dealers findings, fax next step repair instructions and
send replacement parts. A TAS case will also be opened. If necessary, the vehicle will
be quarantined with alternative transport to be arranged for the customer.
Holden will close the TAS case as soon as the replaced parts arrive at Repac.
5. Replace the affected exhaust pipe clamp in accordance with the Technical Instructions.
Refer Appendix B.
6. Affix a Campaign Completed Label and a Vehicle Service History Label as specified in
the section titled ‘Campaign Completion Identification’ to signify campaign completion.
7. Return replaced part/s to Repac when requested via the Repac Report.
8. Submit a warranty claim. Refer “Warranty Claim Information”.
CUSTOMER NOTIFICATION
Owners of vehicles affected by this recall campaign, will be contacted directly by letter to
their recorded address. The letter provides details of the recall campaign and requests the
customer to contact a Holden Dealer and make a service booking to have the appropriate
work carried out. Refer to Appendix A for a draft copy of the customer letter.
CAMPAIGN COMPLETION IDENTIFICATION
All campaigned vehicles must have:
1. A Campaign Completed label applied to the right hand front ‘A’ pillar, between the
hinges, with details of the campaign, ie
• Campaign No. “04-H-07”
• Dealer Code
• Date legibly entered on the label with a permanent ink pen.
AND
2. For additional identification, mark an “X” at the B-1 coordinate of vehicle service history
label and apply to the passenger side fuse box cover.
Extra Campaign Completed and Vehicle Service History labels are available free of charge
from Moore Business Systems. Fax your order to: (03) 9270 8925.
• For Campaign Completed Labels Quote stock no. SD 28156 on a Moore Business
Systems ‘Packaged Goods’ order form for a pack of 100 labels.
• For Vehicle Service History Labels quote stock no. SD 28177 on a Moore Business
Systems ‘Packaged Goods’ order form for a pack of 100 labels.
PARTS INFORMATION
Each dealer has been sent an initial quantity of three exhaust pipe clamps with this Recall
Campaign Bulletin package, comprising of:
• 2 x Part number 13205242
• 1 x Part number 13212335
Page 3 of 7
Additional clamps are available free of charge from Salmat by completing and faxing the
Material Order Form, Refer to Appendix C. Follow up Salmat to confirm receipt of Material
Order Form if written confirmation of receipt from Salmat is not received within 2 working
days.
Replacement part information:
Part Number Description Quantity
13205242 Clamp – 55 mm 1
*13212335 (Refer Note) Clamp – 50 mm 1
Note: *Only 20 vehicles will need to be fitted with the 50mm clamp. Therefore do not order
additional quantities unless the part number (13212335) supplied is used to rework an
affected vehicle.
WARRANTY CLAIM INFORMATION
On completion of campaign action, dealers are requested to submit a warranty claim using
the Labour Operation Numbers specified below:
Warranty Claim Information
Description
Replace exhaust pipe clamp.
Labour Operation No.:
Standard Time:
Failure Code:
Claim Type:
T481401
0. 5
T0096
08
CONTACT INFORMATION
For further information or clarification on this recall campaign please contact the relevant
person below:
ENQUIRY TYPE CONTACT NAME CONTACT NUMBER
(03) 9647 1857
General enquiries Martha Kostidis
or
Brett Fowler (03) 9647 5698
Technical enquiries TAS 1800 033 417
Parts related enquiries Salmat (03) 9358 2990
Warranty related enquiries Warranty Administration 1800 033 487
J. K. Hoffman
General Service Manager
Attachments
Appendix A Customer Letter- Draft
Appendix B Technical Procedure
Appendix C Material order form

Page 4 of 7
APPENDIX A - Draft Customer Letter
Dear Holden Customer,
As part of Holden’s ongoing commitment to customer safety, we have initiated
a vehicle safety recall campaign on some model year 2004 ZC Vectra vehicles.
The clamp holding the front exhaust pipes together may expand and allow
the pipes to come apart.
Driving in this condition for over fifteen minutes can cause damage to the
fuel tank and hand brake cable.
Our records indicate that your Holden vehicle was manufactured within the
affected range.
It is therefore necessary for you to contact a Holden Dealer of your choice, and
make a booking to have the clamp replaced with the upgraded design as soon
as possible.
Work will be carried out free of charge. At the time of booking, your Dealer will
be able to advise you how long your vehicle will be required for the work to be
completed.
If you have any questions, please contact your Holden Dealer or call the Holden
Recall and Rework Assistance Centre on 1800 632 826, where we will be pleased
to assist.
Thank you for your attention to this matter. Please accept our apologies for any
inconvenience that may be caused to you.
Yours sincerely
David McMurray
Manager, Customer Assistance
VEHICLE SAFETY RECALL
04-H-07
Page 5 of 7
1. Raise vehicle onto hoist.
2. In the event the exhaust pipes have
completely separated, immediately
contact Holden Technical Assistance
Centre TAS for next step advice.
IMPORTANT NOTE
Contact with Holden Technical
Assistance must be in line with the
standard TAS operating procedure
(nominated TAS contacts only).
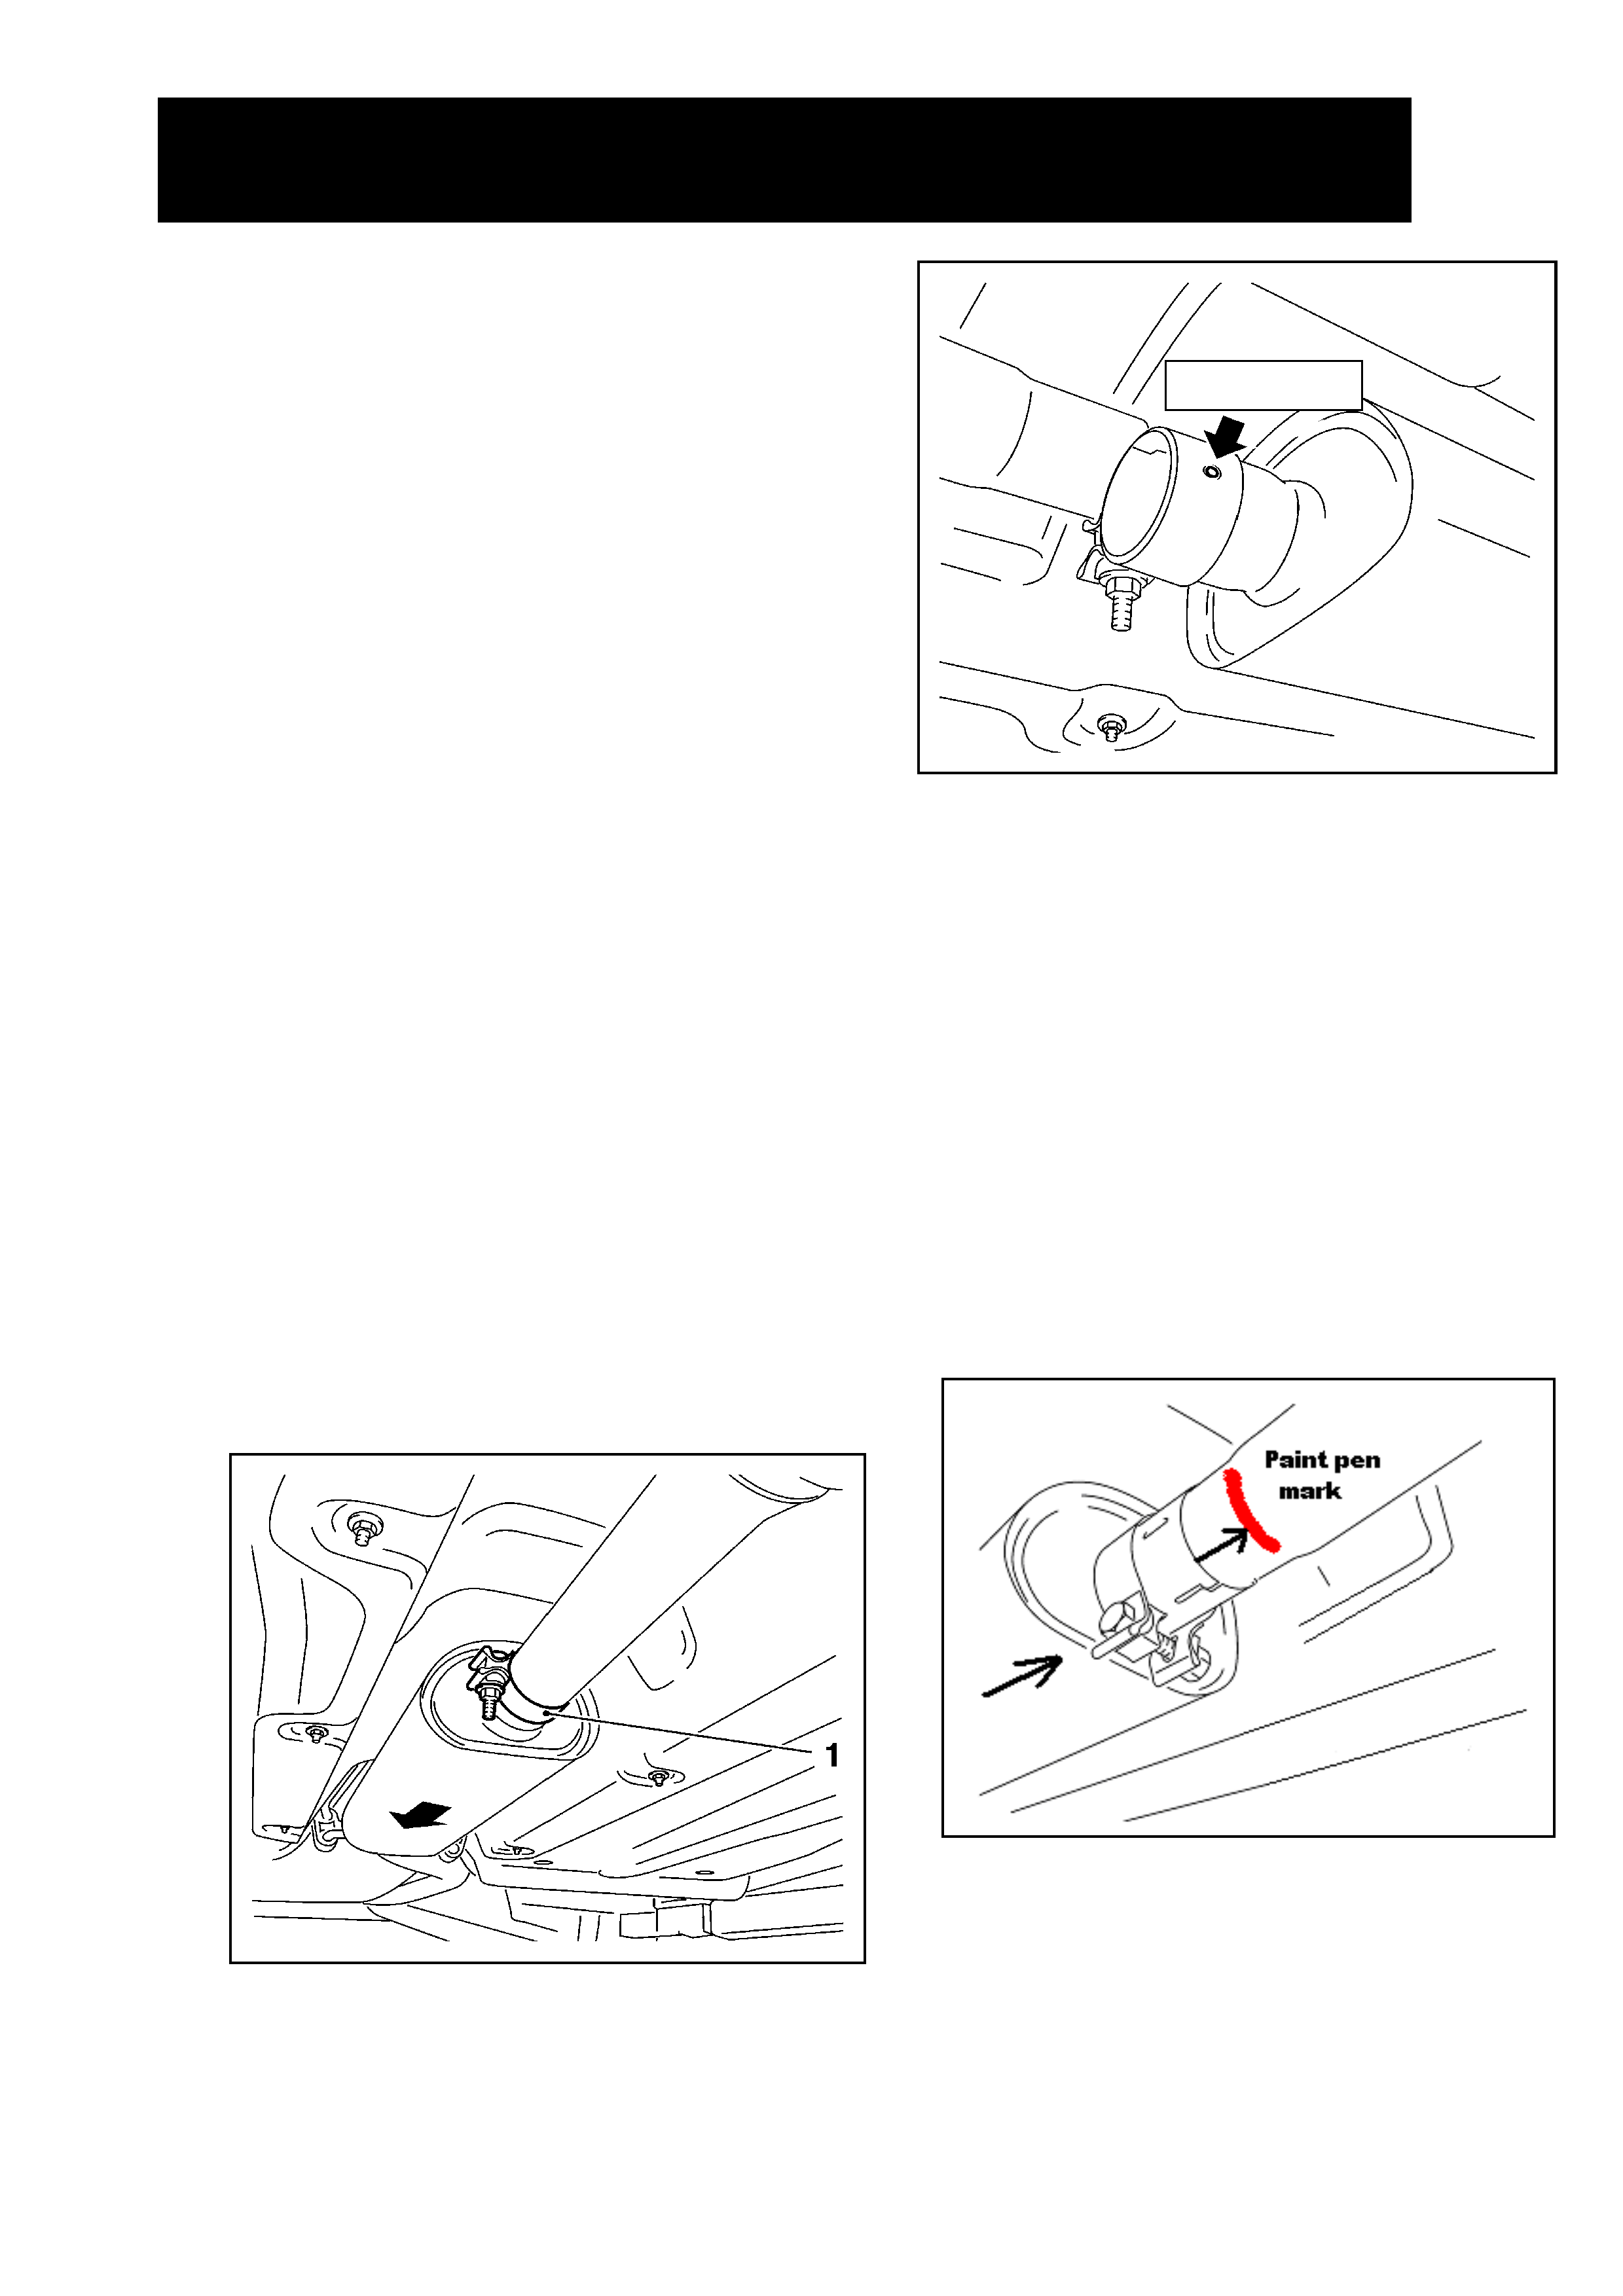
3. If exhaust pipes are connected,
proceed to remove the centre
exhaust clamp.
a) Using a ratchet and 15 mm
socket, loosen clamp (1). Refer
Fig 1.
b) Prior to separating exhaust pipe,
mark the join with a paint pen.
This will help identify the point at
which it is required to be re-fitted.
c) Carefully push the middle muffler
to the rear as shown by the arrow
until parts are apart. Refer Fig 1.
d) Remove clamp from middle
muffler by prising the clamp open.
In doing this, the spot weld should
also break. Refer Fig 2.
Hint: If necessary, a small cold
chisel can be used.
Figure 1
Figure 2
4. Install new clamp.
a) Slide new clamp over pipe.
b) Slide middle muffler to front
exhaust pipe.
c) Push middle muffler up to the paint
pen marking on the front exhaust
pipe as indicated by arrow in Fig 3.
Note: Spot weld only used for initial
assembly. Not necessary for service
replacement.
Figure 3
Mould heat shrink tubing using heat gun or
Hot water
APPENDIX B – TECHNICAL INSTRUCTIONS FOR CAMPAIGN 04-H-07 ZC VECTRA
EXHAUST CLAMP REPLACEMENT.
S
p
ot weld
Page 6 of 7
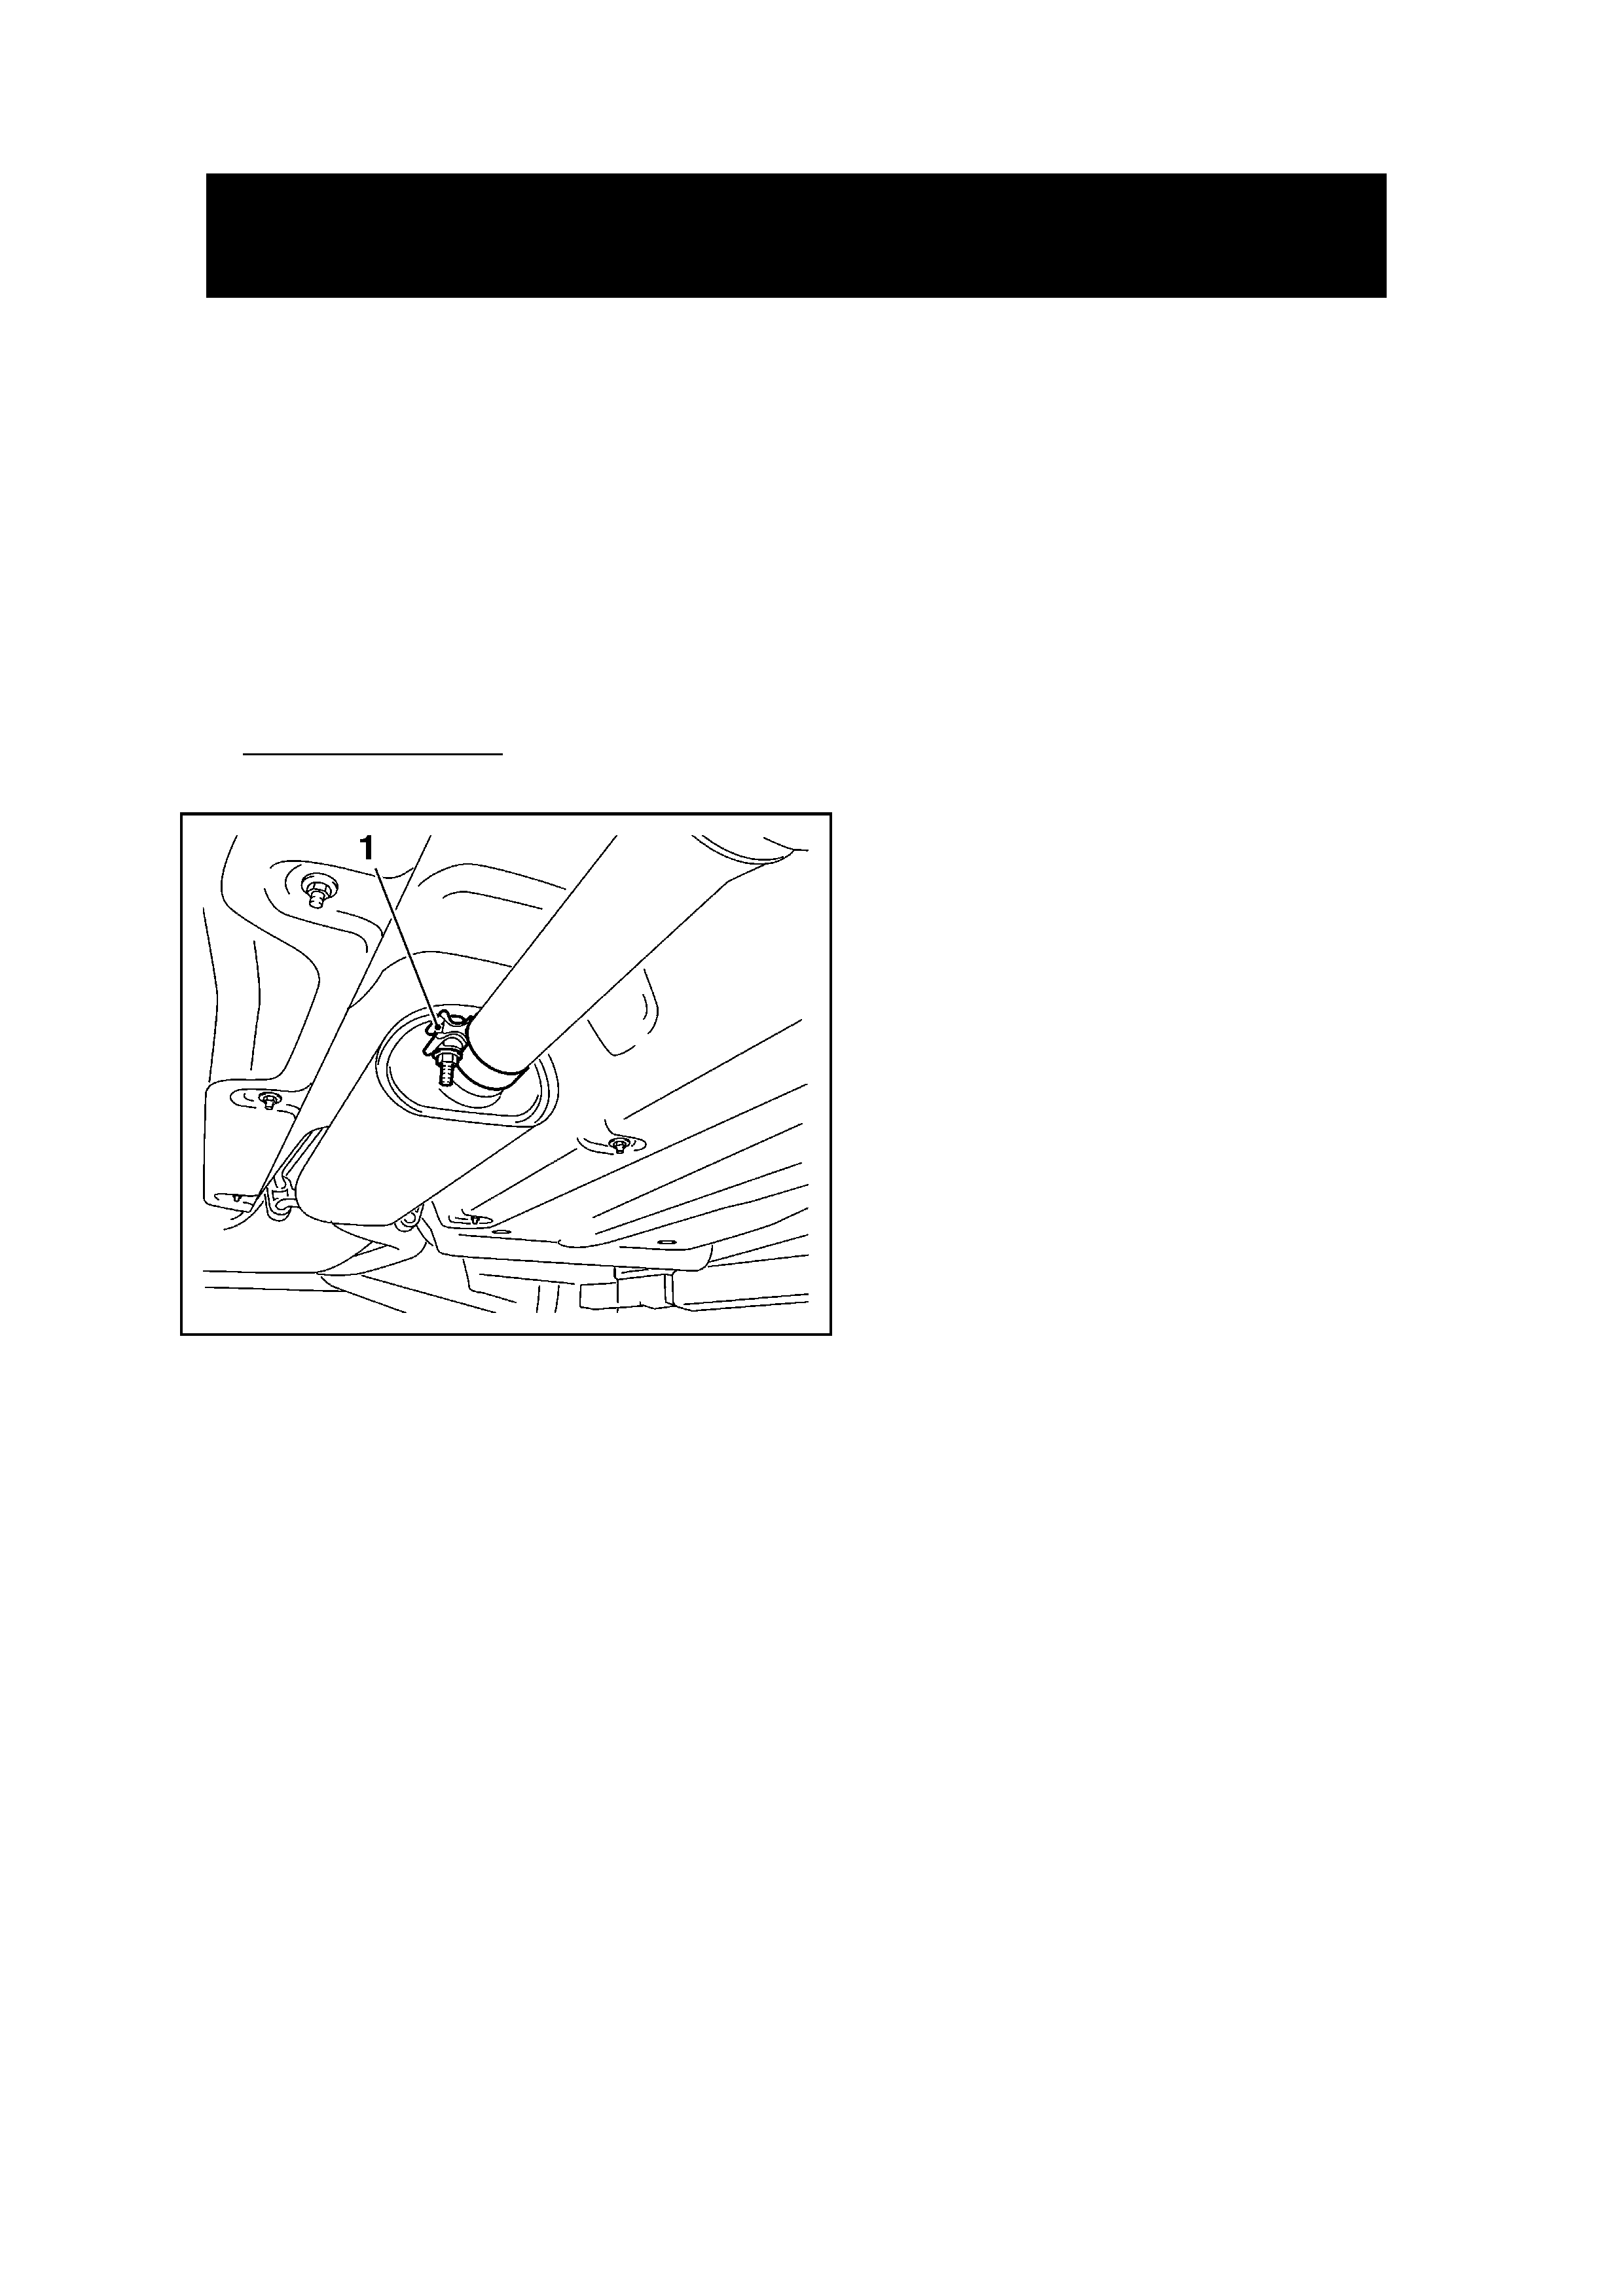
5. Align clamp horizontally as shown in
Fig.4 (1).
6. Torque to 45 Nm.
7. Check exhaust system for leaks.
8. Affix a Campaign Completed label and
a Vehicle Service history label as
specified in the section titled
‘Campaign Completion Identification’.
End of procedure.
Figure 4
APPENDIX B – TECHNICAL INSTRUCTIONS FOR CAMPAIGN 04-H-07 ZC
VECTRA EXHAUST CLAMP REPLACEMENT.
Page 7 of 7
Fax this order form to SALMAT ON: (03) 9358 – 2999
IMPORTANT:
The vehicle ISOVIN to be reworked must be specified below.
Part Number Description Quantity
13205242 Clamp – 55 mm
13212335 Clamp – 50 mm
VEHICLE ISOVIN
Contact Name: _______________________________________________
Dealer Code: _______________________ Date: ________________
Dealer Name: ______________________ Ph. No: ______________
Dealer Address: _______________________________________________
Fax No.: _______________________________________________
SALMAT USE ONLY
Dealer Order Acknowledgement faxed back to Dealer within 2 working days of receiving YES / NO
Confirmation of parts order received by Salmat on:
QUANTITY REQUESTED DESPATCHED YES / NO (PLEASE CIRCLE APPROPRIATE RESPONSE)
Date despatched
FREIGHT FORWARD AGENT
Consignment Note Number
APPENDIX C – SALMAT MATERIAL ORDER FORM FOR
CAMPAIGN 04-H-07
ZC VECTRA EXHAUST CLAMP REPLACEMENT.

Page 1 of 3
FAX COMMUNICATION
To: From:
Service Manager
Fax: Fax: (03) 9647 2525
Phone: Phone: (03)
PRODUCT CAMPAIGN BULLETIN
04- H- 09
December 2004
SUBJECT: LEFT HAND REAR DOOR REPLACEMENT
MODELS AFFECTED: VZ COMMODORE AND WL STATESMAN
This bulletin announces the initiation of a safety related recall to replace the left hand rear door fitted
to selected (few) VZ and WL Holden vehicles.
Further to the telephone conversation with a representative from your Service Department, the vehicle
shown against your Dealer Code in Attachment 1, MUST be Quarantined and reworked as per the
instructions below. Alternatively, if the vehicle against your Dealer Code has been delivered to a
customer, you will need to contact the customer and make arrangements for rework action.
1. Vehicle Affected is shown against your Dealer Code and listed on Attachment 1.
2. Description of Defect: Advice received from the vehicle assembly plant that some doors were
manufactured with defective spot welds. This condition may affect the structural integrity of the
doors and potentially affect occupant protection in the event of a side impact collision.
3. Rework Action required is to replace the Left Hand Rear Door. Refer to SIP CD, section VY-1A5:
Front & Rear Door Assembly, part 3.18: Rear Door Assembly.
4. Replacement parts will be sent to your dealership, following confirmation of customer booking
date by the Service Manager. Secure booking dates after Friday 17th December allowing enough
time for parts to arrive. Parts will be attentioned to the Service Manager, comprising of:
• 1 x fully trimmed left hand rear door
• 1 x belt line moulding
5. Campaign Completion Identification
All campaigned vehicles must have:
A Campaign Completed label applied to the right hand front ‘A’ pillar, between the hinges, with details
of the campaign, ie
• Campaign No. “04-H-09”
• Dealer Code
• Date legibly entered on the label with a permanent ink pen.
AND
For additional identification, mark an “X” at the B-2 coordinate of Vehicle Service History label and
apply to the inner side of the lower instrument panel cover.
Extra Campaign Completed and Vehicle Service History labels are available free of charge from
Moore Business Systems. Fax your order to: (03) 9270 8925.
Page 2 of 3- Recall Campaign 04-H-09
• For Campaign Completed Labels Quote stock no. SD 28156 on a Moore Business Systems
‘Packaged Goods’ order form for a pack of 100 labels.
• For Vehicle Service History Labels quote stock no. SD 28177 on a Moore Business Systems
‘Packaged Goods’ order form for a pack of 100 labels.
6. Warranty Claim Information
WARRANTY CLAIM INFORMATION
Description
Replace Left Hand Rear Door.
Labour Operation No:
Standard Time:
Failure Code:
Case Type:
T481601
2.0 hours
T0096
08
7. Sign and Fax Vehicle Rework Completed Confirmation Sheet – Refer to Attachment 1.
Prior to sending the fax ensure all items on the checklist below have been completed:
• Affected components MUST have been replaced as per Rework Instructions
• Campaign Completed Label and Vehicle Service History Label filled out.
• Warranty claim MUST have been submitted
8. Replaced (defective) components MUST be returned to Repac marked to the attention of Brett
Fowler. Use the same packaging the revised door was shipped in.
9. For Further Information or clarification on the above, then please contact Brett Fowler on
telephone number (03) 9647-1857 or Daniel Coburn on (03) 9647 1524.
J. K. Hoffman
General Service Manager
ATTACHMENTS
• Attachment 1 – Affected Vehicle List and Rework Completed Confirmation
Page 3 of 3 – Recall Campaign 04-H-09
Attachment 1
ATTENTION: BRETT FOWLER
04-H-09 Recall Campaign - Left Hand Rear Door Replacement
AFFECTED VEHICLES
AND
REWORK COMPLETED CONFIRMATION
1. The vehicle shown against your Dealer Code is affected by this Campaign Action.
2. Please complete all work mentioned in section 7 above.
3. Enter rework date, print Service Manager’s name and have Service Manager sign to confirm
Rework Completion.
4. Fax to Holden on 03 9647 2525.
Dealer
Code
ISOVIN AFFECTED DATE
REWORKED
SERVICE MANAGER
NAME (please print)
SERVICE MANAGER
Signature
573 6G1ZK54785L342707
636 6G1ZK52785L343181
636 6G1LY54785L348365
230 6G1ZK52B75L348439
895 6G1ZX54715L348480
438 6G1ZX54735L349288
449 6G1LY54715L349325
230 6G1ZK52B45L349385
336 6G1ZL54B05L349538
562 6G1ZK52B75L349591
422 6G1ZK52715L349601
230 6G1ZK52BX5L349603
FAX THIS REWORK COMPLETED CONFIRMATION to : (03) 9647 2525

Page 1 of 6
PRODUCT CAMPAIGN BULLETIN
04-H-11
March 15, 2005
SUBJECT: TYRE BEAD DAMAGE.
MODELS AFFECTED: VZ and WL
Note: This Campaign Bulletin supersedes ADL 53/04 that was released on
December 3, 2004.
This bulletin expands the safety recall campaign initiated by ADL 53/04 to increase the
affected range of vehicles, and also allow Dealers to self manage the sourcing of the five
replacement tyres required for affected vehicles listed in Appendix A.
DESCRIPTION OF DEFECT
There is a possibility that the tyre bead may have been damaged during tyre and wheel
assembly at the Vehicle Assembly Plant (VAP).
AFFECTED VEHICLES
Only VZ and WL vehicles as listed on Appendix A, and flagged in the NOW system.
ACTION REQUIRED BY RETAILERS
1. Confirm vehicle is affected by checking the list at Appendix A.
2. Confirm vehicle has not previously been reworked i.e:
Identified by an ‘X’ in the C-1 co-ordinate of the “Vehicle Service History” label
Application of “04-H-11 Campaign Completed” label.
Confirm campaign status in NOW vehicle search.
3. If vehicle has not been previously reworked, proceed with campaign instructions as per
Appendix B.
4. Affix a Campaign Completed Label and a Vehicle Service History Label as specified in
the section titled ‘Campaign Completion Identification’.
5. Submit a Warranty Claim. Refer “Warranty Claim Information”.
6. Replaced tyres must be returned to REPAC.

Page 2 of 6
CUSTOMER NOTIFICATION
Owners of vehicles affected by this recall campaign will be contacted directly by letter from
Holden sent to their recorded address. The letter provides details of the recall campaign
and requests the customer to contact their Holden Dealer to make a service booking to
have the appropriate work carried out. Refer to Appendix C for a draft copy of the customer
letter.
CAMPAIGN COMPLETION IDENTIFICATION
All campaigned vehicles must have:
1. A Campaign Completed label applied to the right hand front ‘A’ pillar, between the
hinges, with details of the campaign, 04-H-11, Dealership code and date legibly entered
on the label with a permanent ink pen.
AND
2. For additional identification, mark an “X” at the C-1 co-ordinate of a Vehicle Service
History Label and apply to the inner side of the lower instrument panel cover if not
already fitted.
Extra Campaign Completed and Vehicle Service History labels are available free of charge
from Moore Business Systems.
• For Campaign Completed Labels Quote stock no. SD 28156 on a Moore Business
Systems ‘Packaged Goods’ order form for a pack of 100 labels.
• For Vehicle Service History Labels quote stock no. SD 28177 on a Moore Business
Systems ‘Packaged Goods’ order form for a pack of 100 labels.
Fax the order form to Moore Business Systems on Facsimile: (03) 9270 8925
Should you need to follow-up on a placed order, contact Moore customer service on
telephone number (03) 9270 8788.
PARTS INFORMATION
Initially some replacement tyres were despatched to Dealers directly from the Vehicle
Assembly Plant. Tyres will no longer be despatched to Dealers from the Vehicle Assembly
Plant. Dealers requiring replacement tyres for affected vehicles should source identical
replacements for the original tyres from an Authorised Bridgestone Agent. To claim costs
incurred see Warranty Claim Information.
Note: Often the spare tyre will be a different size and specification to the road wheel tyres,
so ensure the exact same tyre is fitted to the spare as originally fitted.
Replaced tyres must be returned to REPAC when requested by the REPAC report.
Page 3 of 6
WARRANTY CLAIM INFORMATION
On completion of campaign action, Dealers are requested to submit a Warranty Claim using
the Labour Operation Number specified below.
WARRANTY CLAIM INFORMATION
Description
Replace Five Tyres
Labour Operation No.:
Standard Time:
Failure Code:
Case Type:
T481501
0.5 hours + sublet (fitting and tyres)
1.5 In house fitting+ sublet (tyres only
)
T0096
08
CONTACT INFORMATION
For further information or clarification on this recall campaign please contact the relevant
person below.
CONTACT NAME CONTACT NUMBER
(03) 9647 1857
General enquiries Brett Fowler / Rob Davies
or
Alex Holt (03) 9647 7619
Technical enquiries TAS 1800 033 417
Warranty related enquiries Warranty Administration 1800 033 487
J. K. Hoffman
General Service Manager
Attachments
Appendix A Affected vehicle list
Appendix B Tyre fitting Instructions
Appendix C Customer Letter- Draft
Note: All tyres
must be
invoiced as a
sublet.

Page 4 of 6
APPENDIX A
AFFECTED VEHICLE LISTING
This is a list of vehicles that require all five tyres to be replaced due to possible damage.
Before replacing tyres confirm vehicle has not previously been reworked.
ISOVIN ISOVIN ISOVIN
6G1LY54F05L363191 6G1LY54755L371957 6G1ZK43B45L373842
6G1LY54795L365515 6G1ZK54B35L372041 6G1ZK43B65L373843
6G1ZK42B45L369047 6G1ZK43B25L372219 6G1ZK43B75L373852
6G1ZK43B85L369809 6G1ZK43B95L372248 6G1ZK42B65L373861
6G1ZK43B15L369814 6G1ZK43B45L372254 6G1LY54705L374202
6G1ZK43B35L369815 6G1ZK43B35L372259 6G1LY54795L374229
6G1ZK42F15L369817 6G1ZK42B55L372264 6G1ZK43B05L374700
6G1ZK43B35L369829 6G1ZK43B05L372266 6G1LY54725L374959
6G1ZK43B15L369831 6G1ZK43B65L372269 6G1LY54765L375046
6G1ZK43B25L369837 6G1ZK43B45L372271 6G1LY54735L375084
6G1ZK43B95L369852 6G1ZK43B85L372273 6G1LY54715L375214
6G1LY54735L370290 6G1ZK43B75L372281 6G1LY54755L375300
6G1LY54F85L370342 6G1ZK43B95L372282 6G1LY54745L375322
6G1ZK43B65L370599 6G1LY54735L372332 6G1LY54745L375756
6G1ZK42B75L370600 6G1ZK52785L372387 6G1LY54725L375867
6G1LY54F75L370977 6G1LY54795L372402 6G1LY54705L375883
6G1LZ54F65L370997 6G1LY547X5L372425 6G1LY54795L375901
6G1LY54F35L371172 6G1ZK54B75L372446 6G1LY54725L375979
6G1LY54715L371177 6G1ZL84B05L372478 6G1LY54715L376007
6G1ZK52B75L371557 6G1ZK52B75L372479 6G1LY54715L376055
6G1ZK52B55L371573 6G1ZK34F65L372980 6G1LY54755L376169
6G1ZX54715L371581 6G1ZK03F15L373017 6G1LY54725L376193
6G1LY54F65L371604 6G1ZK43B15L373040 6G1LY54795L376224
6G1LY54725L371625 6G1ZK43B35L373041 6G1LY54F15L376578
6G1ZX54F75L371642 6G1ZK42B75L373044 6G1LY54F75L376648
6G1ZK527X5L371659 6G1ZK43B35L373055 6G1LY54F55L376843
6G1LY54F65L371666 6G1ZK43B55L373056 6G1LY54FX5L376885
6G1ZK52B15L371697 6G1ZK43B75L373060 6G1LY54F25L377464
6G1ZK52725L371705 6G1ZK43B05L373062 6G1LY54765L377511
6G1ZX54F55L371719 6G1ZK43B95L373075 6G1LY54745L377765
6G1ZK54F35L371734 6G1ZK43B15L373085 6G1LY54795L377776
6G1LY547X5L371744 6G1ZK43B65L373096 6G1LY54795L377793
6G1ZK54B85L371788 6G1ZK43B85L373102 6G1LY547X5L378273
6G1LY54F75L371918 6G1ZK43BX5L373103 6G1LY54F75L378304
6G1ZK84B45L371921 6G1ZK43B35L373105 6G1LY54F15L378329
6G1LY547X5L371923 6G1ZK43B65L373132 6G1LY54725L378459
6G1ZK43B15L373829
6G1ZK43B95L373836
NOTE: A further 73 vehicles have already been reworked.

Page 5 of 6
APPENDIX B
Tyre Fitting Instructions.
1. Five (includes the spare tyre) identical replacement tyres must be sourced from an
Authorised Bridgestone Agent.
2. Replacement tyres must be exactly the same as those originally fitted, including the
spare tyre which is often a different size and specification to the road tyres.
3. When fitted, check that the replacement tyres have been inflated to the correct
pressure as per the vehicles Tyre Placard.
4. Road test the vehicle to ensure it does not vibrate abnormally.
5. If the vehicle does vibrate have the wheel balance re-checked.
6. Apply a Campaign Completed label to the right hand front ‘A’ pillar, between the
hinges, with details of the campaign, 04-H-11, Dealership code and date legibly
entered on the label with a permanent ink pen.
And:
mark an “X” at the C-1 co-ordinate of a Vehicle Service History Label and apply to
the inner side of the lower instrument panel cover if not already fitted.
7. Ensure that replaced tyres are returned to REPAC.
8. Submit a Warranty Claim.

Page 6 of 6
APPENDIX C - Draft – Customer Letter
Dear Holden Customer,
As part of Holden’s ongoing commitment to customer safety, we have initiated a Vehicle
Recall Campaign on a small number of Holden vehicles manufactured from October 28,
2004 to November 22, 2004 inclusive.
Our records indicate that this Vehicle Recall Campaign affects your Holden vehicle.
There is a possibility that the tyre bead may have been damaged during tyre and wheel
assembly at the Vehicle Assembly Plant. This damage may lead to loss of tyre air
pressure.
It is therefore necessary for you to contact a Holden Dealer of your choice, and make a
booking to have your vehicle’s tyres replaced as soon as possible.
Work will be carried out free of charge. At the time of booking, your Dealer will be able to
advise you how long your vehicle will be required for the work to be completed.
If you have any questions, please contact your Holden Dealer or call the Holden Recall and
Rework Assistance Centre on 1800 632 826, where we will be pleased to assist.
Thank you for your attention to this matter. Please accept our apologies for any
inconvenience that may be caused to you.
Yours sincerely
David McMurray
Manager Customer Assistance
VEHICLE SAFETY RECALL