CCOPYRIGHT HOLDEN 2004
Reproduction in whole or part prohibited
without written approval of Holden LTD
REFRIGERATOR
Owner's Handbook
FD1280 06AUG04

Contents
Components......................................................................................................3
Intended Use ....................................................................................................4
Positioning the Refrigerator ..............................................................................4
Power................................................................................................................5
Connector Panel .........................................................................................5
Battery Operation........................................................................................6
Mains Operation .........................................................................................6
Operation ..........................................................................................................7
Control Panel ..............................................................................................7
Switching On...............................................................................................8
Switching Off...............................................................................................8
Using the Refrigerator.................................................................................8
Defrosting ...................................................................................................8
Cleaning......................................................................................................9
Service..............................................................................................................9
Replacing Internal Lamp.............................................................................9
Other Items .................................................................................................9
Troubleshooting ..............................................................................................10
Technical Specifications ..................................................................................11
Page 2 of 12
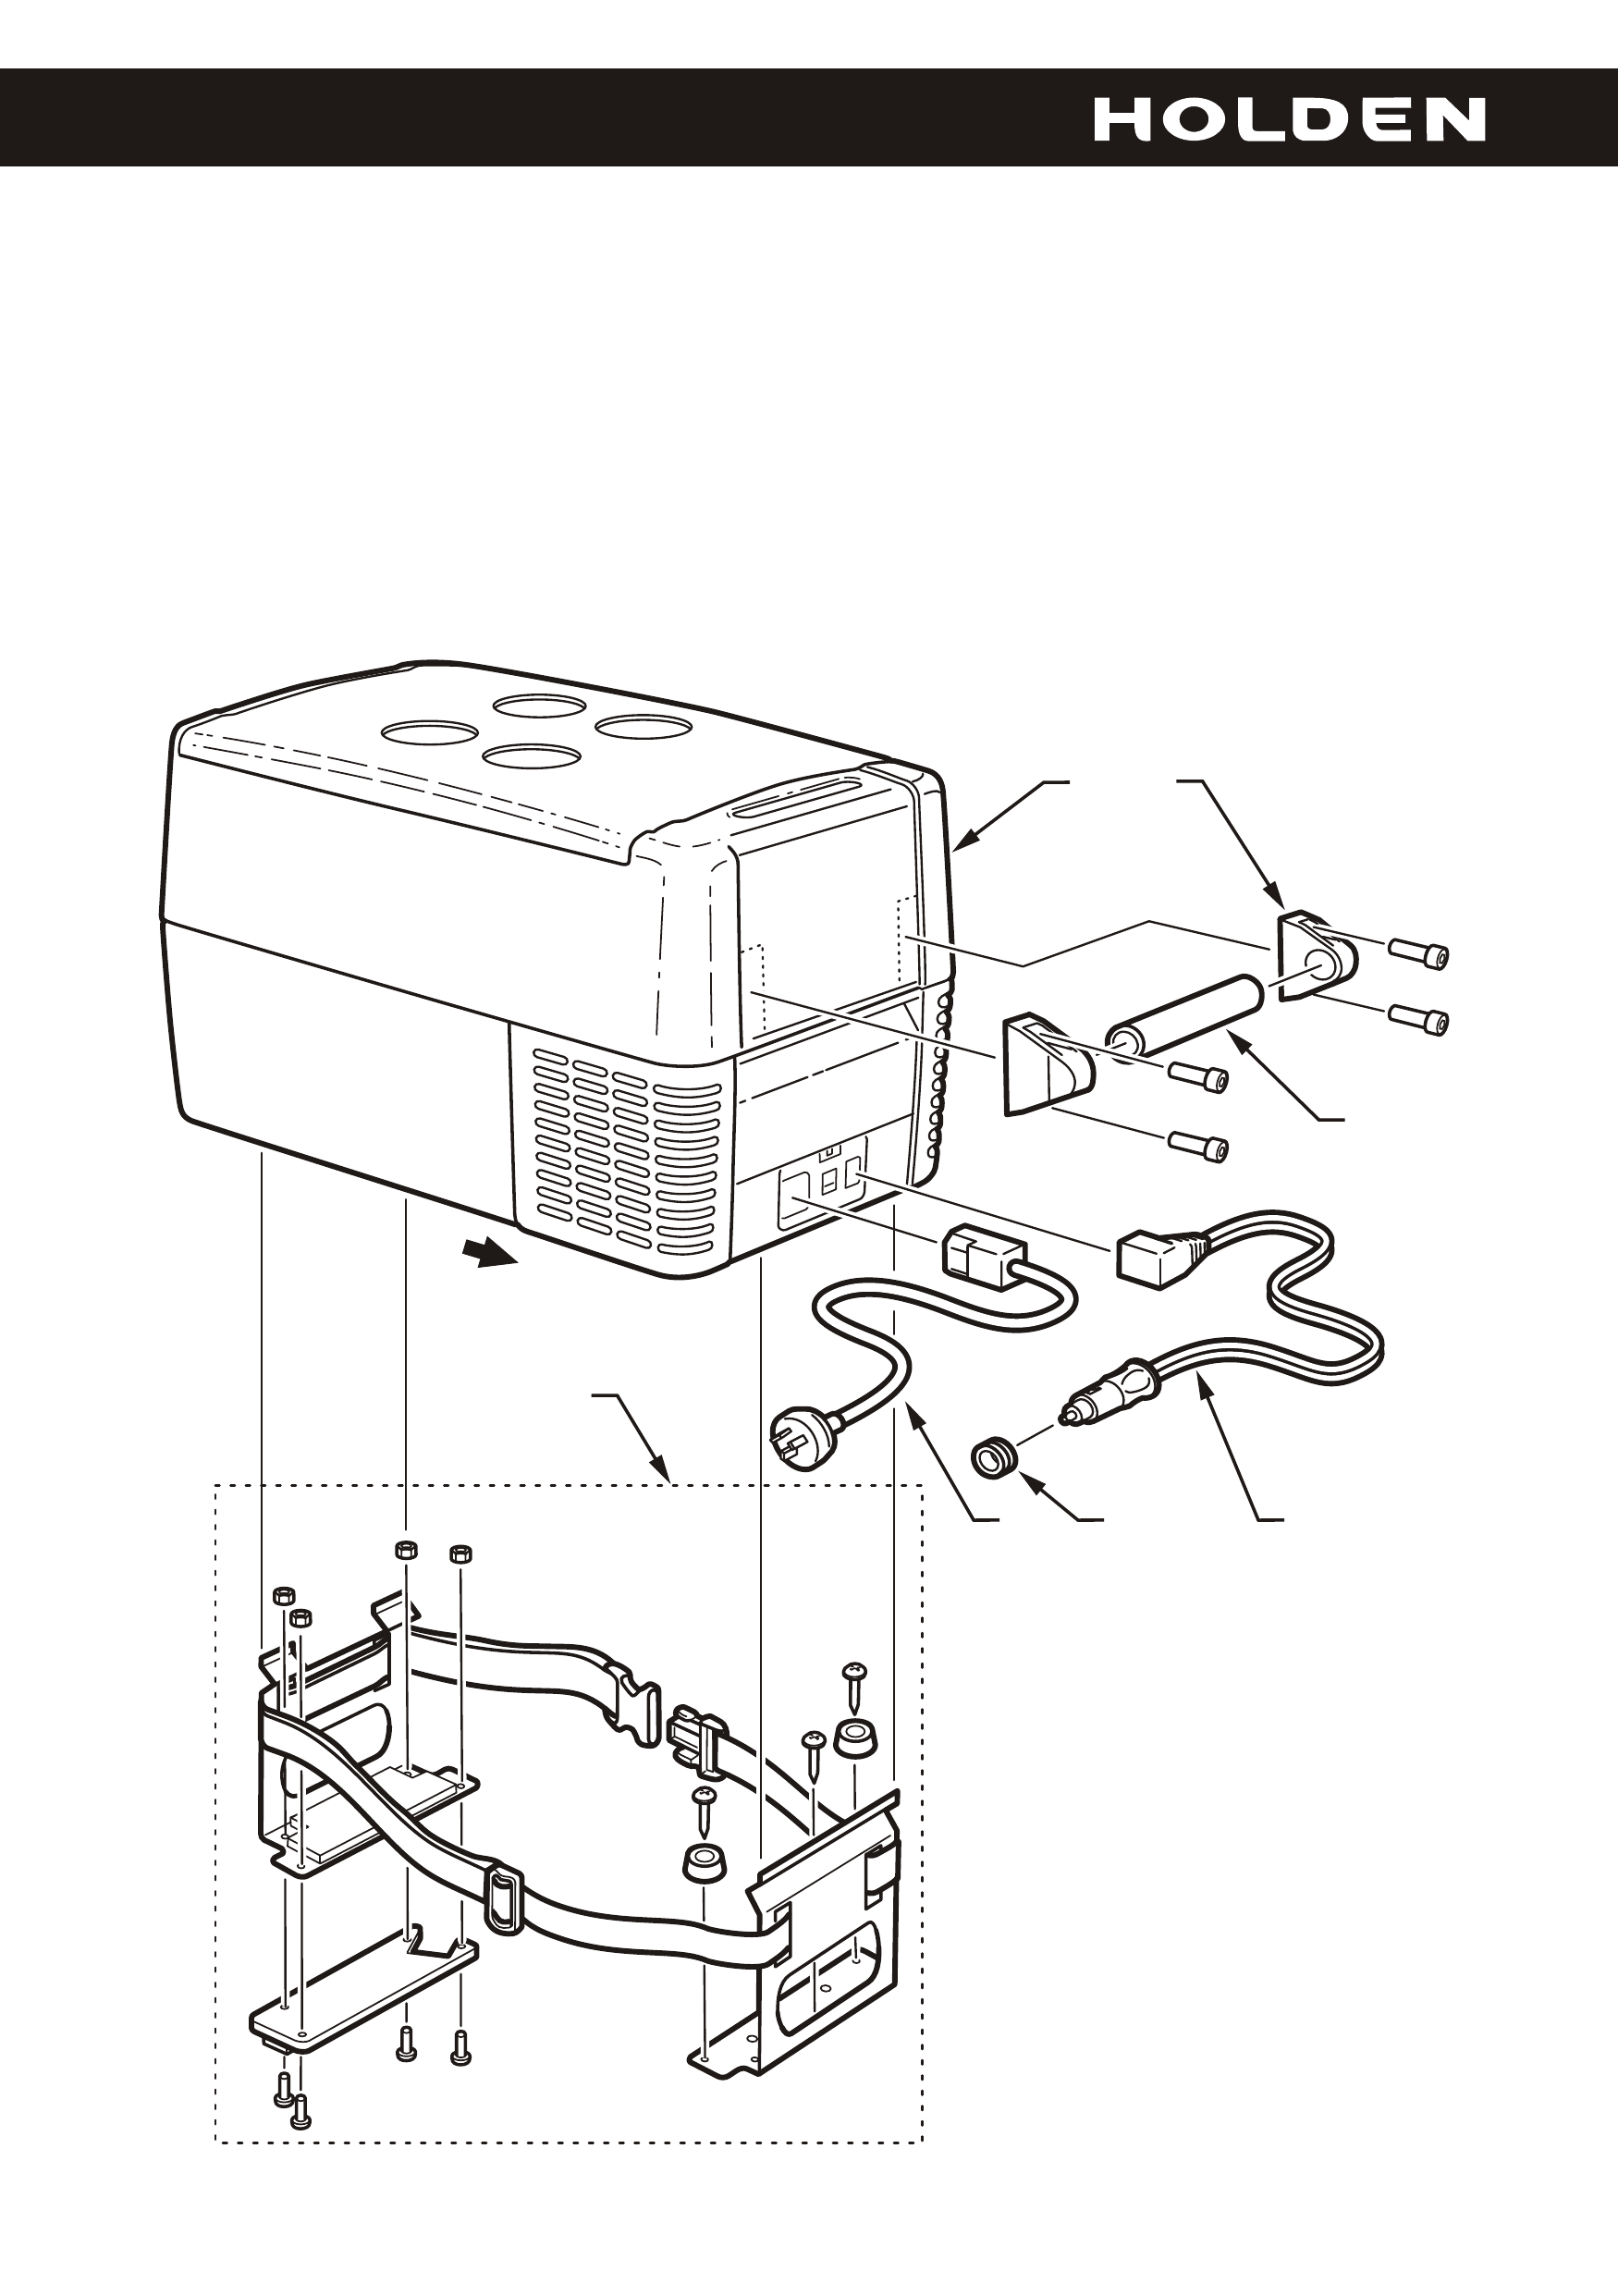
Components
Page 3 of 12
3
56
2
1
4
7
FRONT OF
VEHICLE
Item Qty
1. Refrigerator 1
2. Handle Mount 4
3. Handle Bar 2
4. 12V Power Lead 1
5. 12V Power Lead Adaptor 1
6. 240V AC Power Lead 1
7. Mounting Kit 1

Intended Use
Your refrigerator is designed to refrigerate or freeze food.
NOTE: Do not use the refrigerator to transport corrosive materials or substances
containing solvents.
Positioning the Refrigerator
A dedicated mounting kit is supplied with the refrigerator package and should be
installed in the rear compartment of your vehicle to position the refrigerator. Use
the strap supplied to secure the refrigerator to the mountings. Ensure that the
refrigerator is securely restrained by the mounting kit before driving the vehicle.
The refrigerator is designed to operate in ambient temperatures between -10°
and +55° Celsius in a maximum air humidity of 90%. The refrigerator can operate
continuously at an angle of up to, but not exceeding 30°.
NOTE: In order for the refrigerator the operate efficiently, air must be able to flow
through the vents. Ensure that the vents are not obstructed when the refrigerator
is in use.
When operating the refrigerator outside your vehicle, position the refrigerator in a
location that is level, cool and dry. Do not place the refrigerator directly adjacent
to sources of heat such as a heater, ovens, hot water or in direct sunlight.
Page 4 of 12
Power
Your refrigerator has two connections: 12 V DC (battery voltage) and 240 V AC
(mains power).
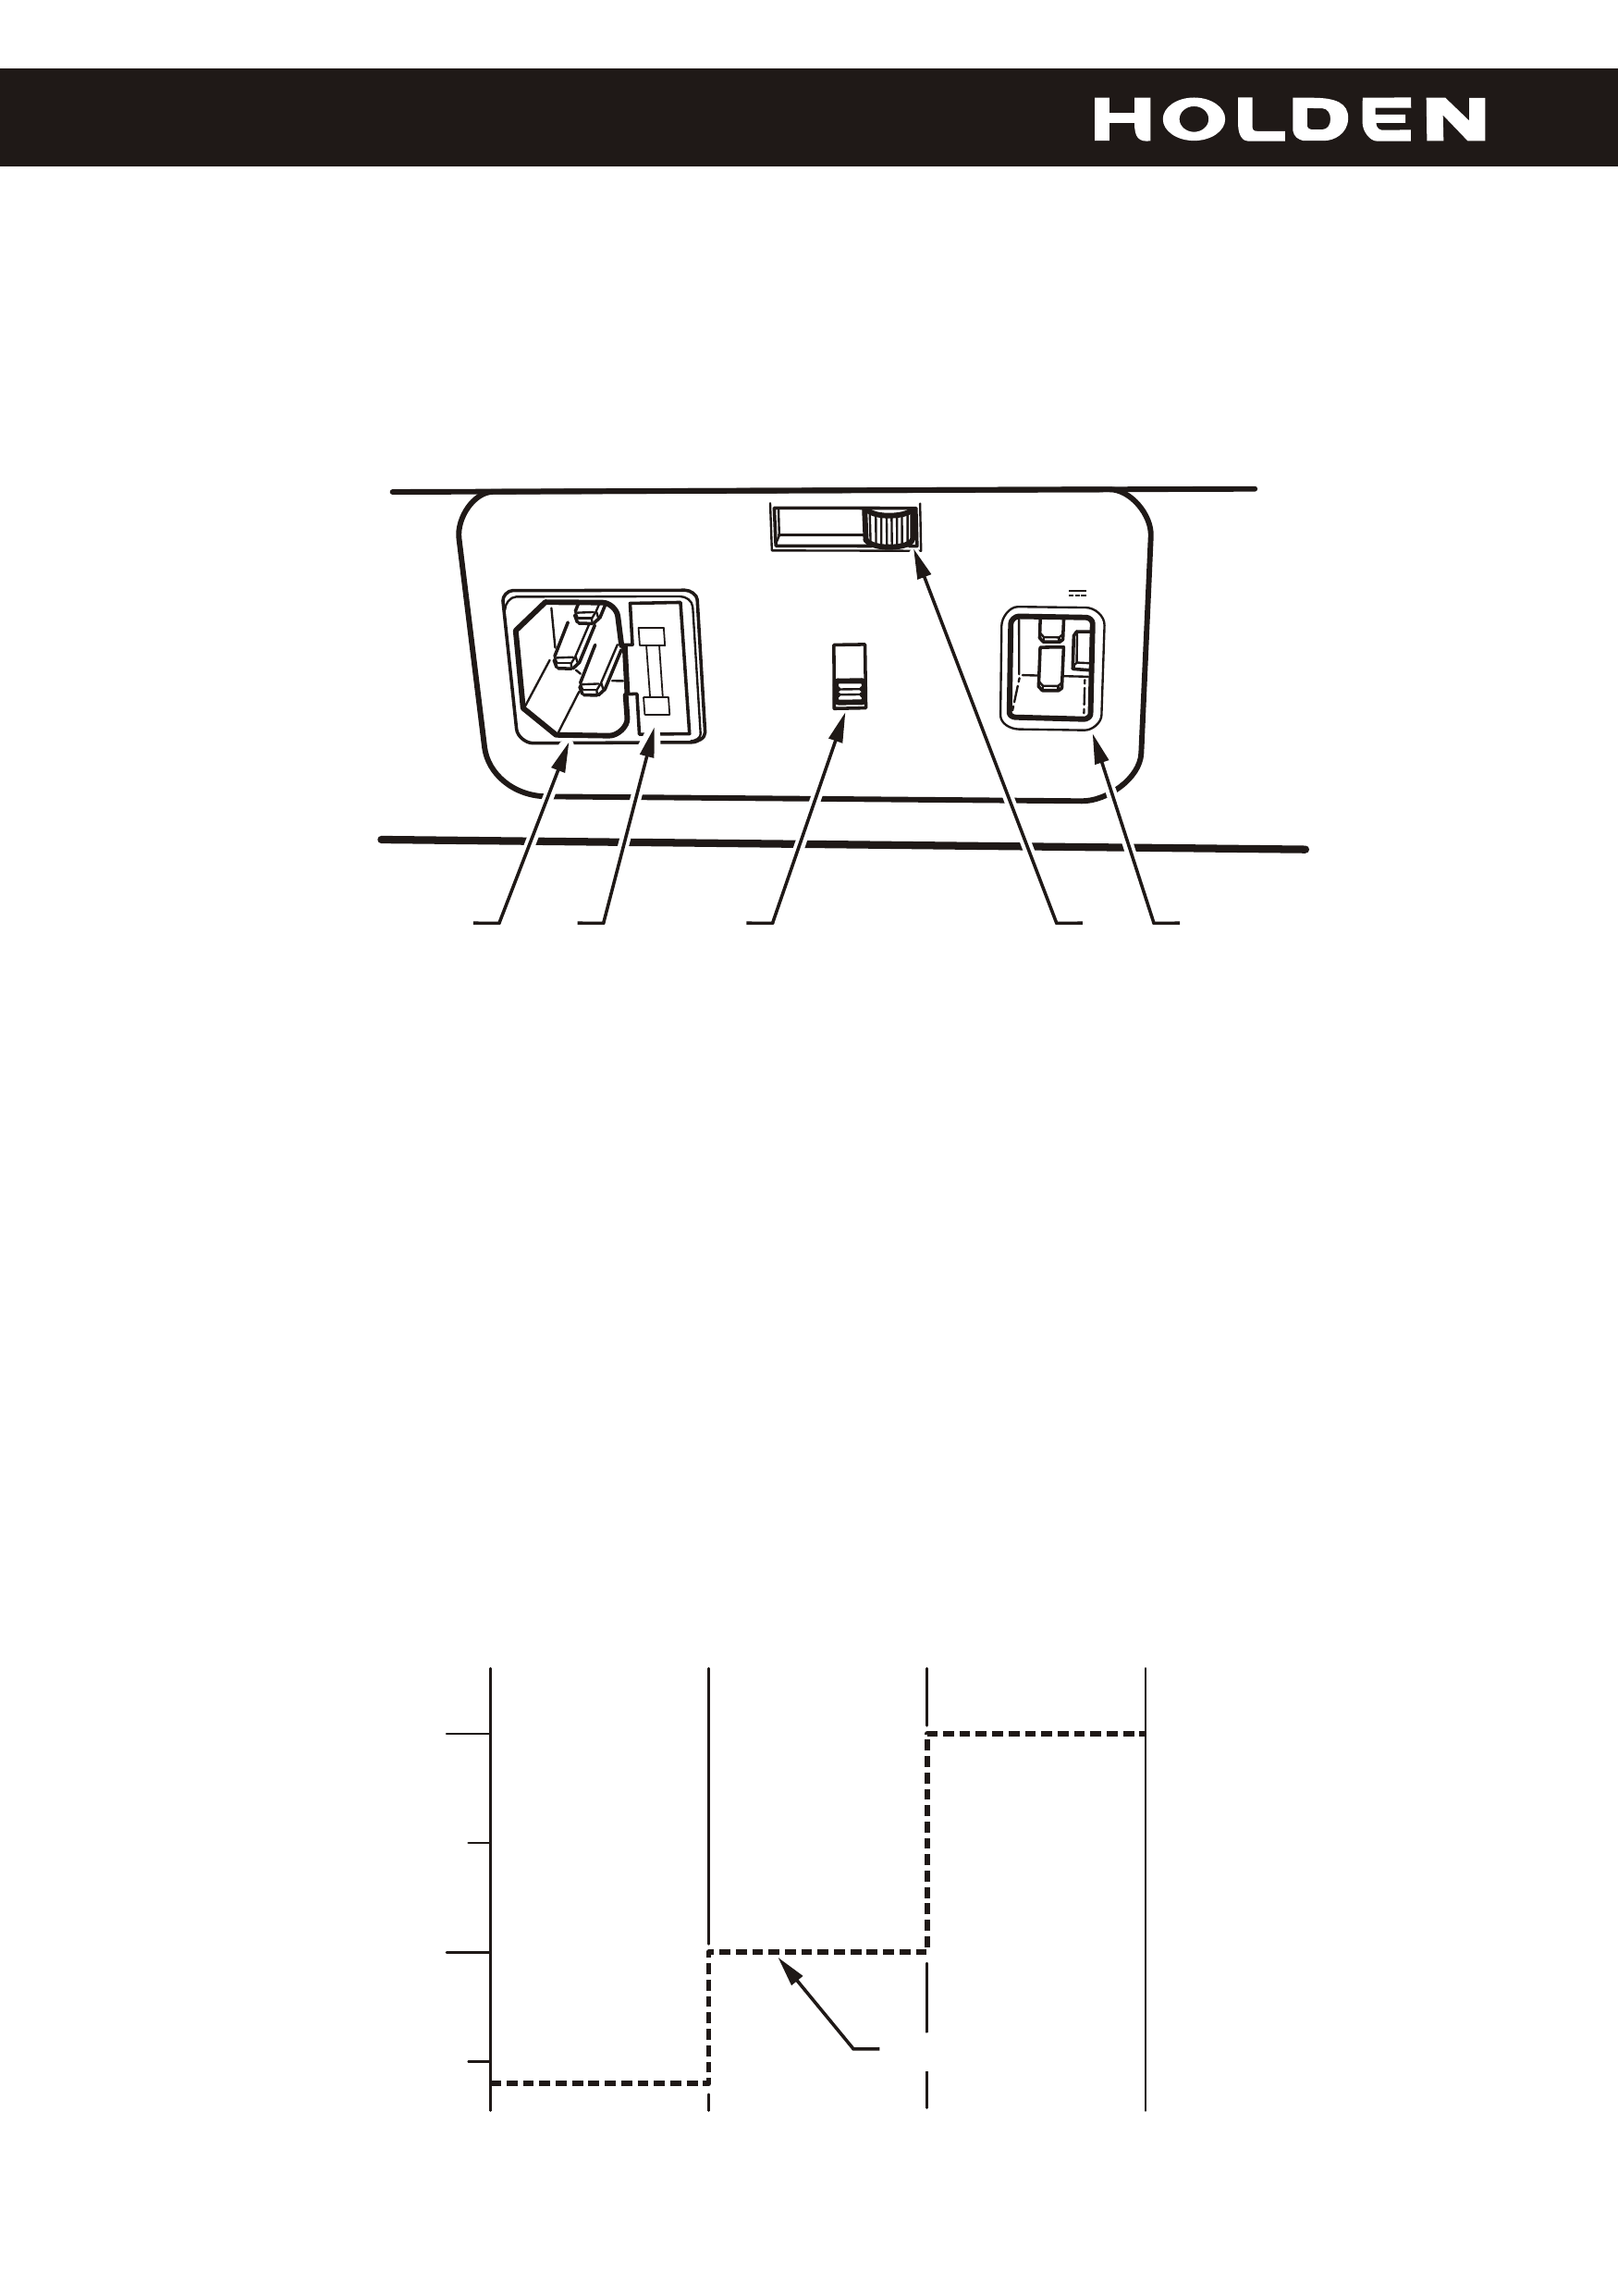
Connector Panel
1. Socket for AC mains supply.
2. Fuse (AC) - 2.5 Amp 3AG.
3. Emergency Switch: For normal operation, the switch should be "OFF". To
bypass the electronic control circuit and to provide continuous refrigeration,
position the switch to the "ON" position.
4. Socket for DC supply.
5. Battery protection voltage switch. This changes the setting at which the
refrigerator will turn off in order to preserve the vehicle battery. Setting the
switch to HIGH is recommended.
NOTE: Always turn refrigerator off when not in use, otherwise this will
contribute to reduced battery life.
Page 5 of 12
12.0
11. 0
11. 5
10.5
Low
Switch Setting: Medium High
Voltage at refrigerator
10.4
11. 0
12.0
12/24V DC
EMERGENCY
ON
OFF
FUSE
LOW MED HIGH
100-240V~AC
41 2 3 5
Cut-out voltage

Battery Operation
To connect the refrigerator to battery power, insert the DC power lead into the
vehicle's DC power outlet. Then insert the DC power lead into the refrigerator's
DC power socket.
Your refrigerator is internally protected against reverse battery voltage and short
circuit. As a protection for your battery, the refrigerator switches off automatically
if the voltage is too low, refer to Page 5, Item 5.
NOTE: Disconnect the refrigerator from the battery before using a high-
speed battery charger.
Mains Operation
Your refrigerator can be connected directly to the mains power supply.
The integrated power supply automatically switches over to the mains supply
when the DC cable is still connected. During the switching over process, it is
possible for the red error LED to flash for several minutes.
NOTE: It is recommended that a residual current device (earth leakage
protection) be used when operating your refrigerator on mains power.
Page 6 of 12
Operation
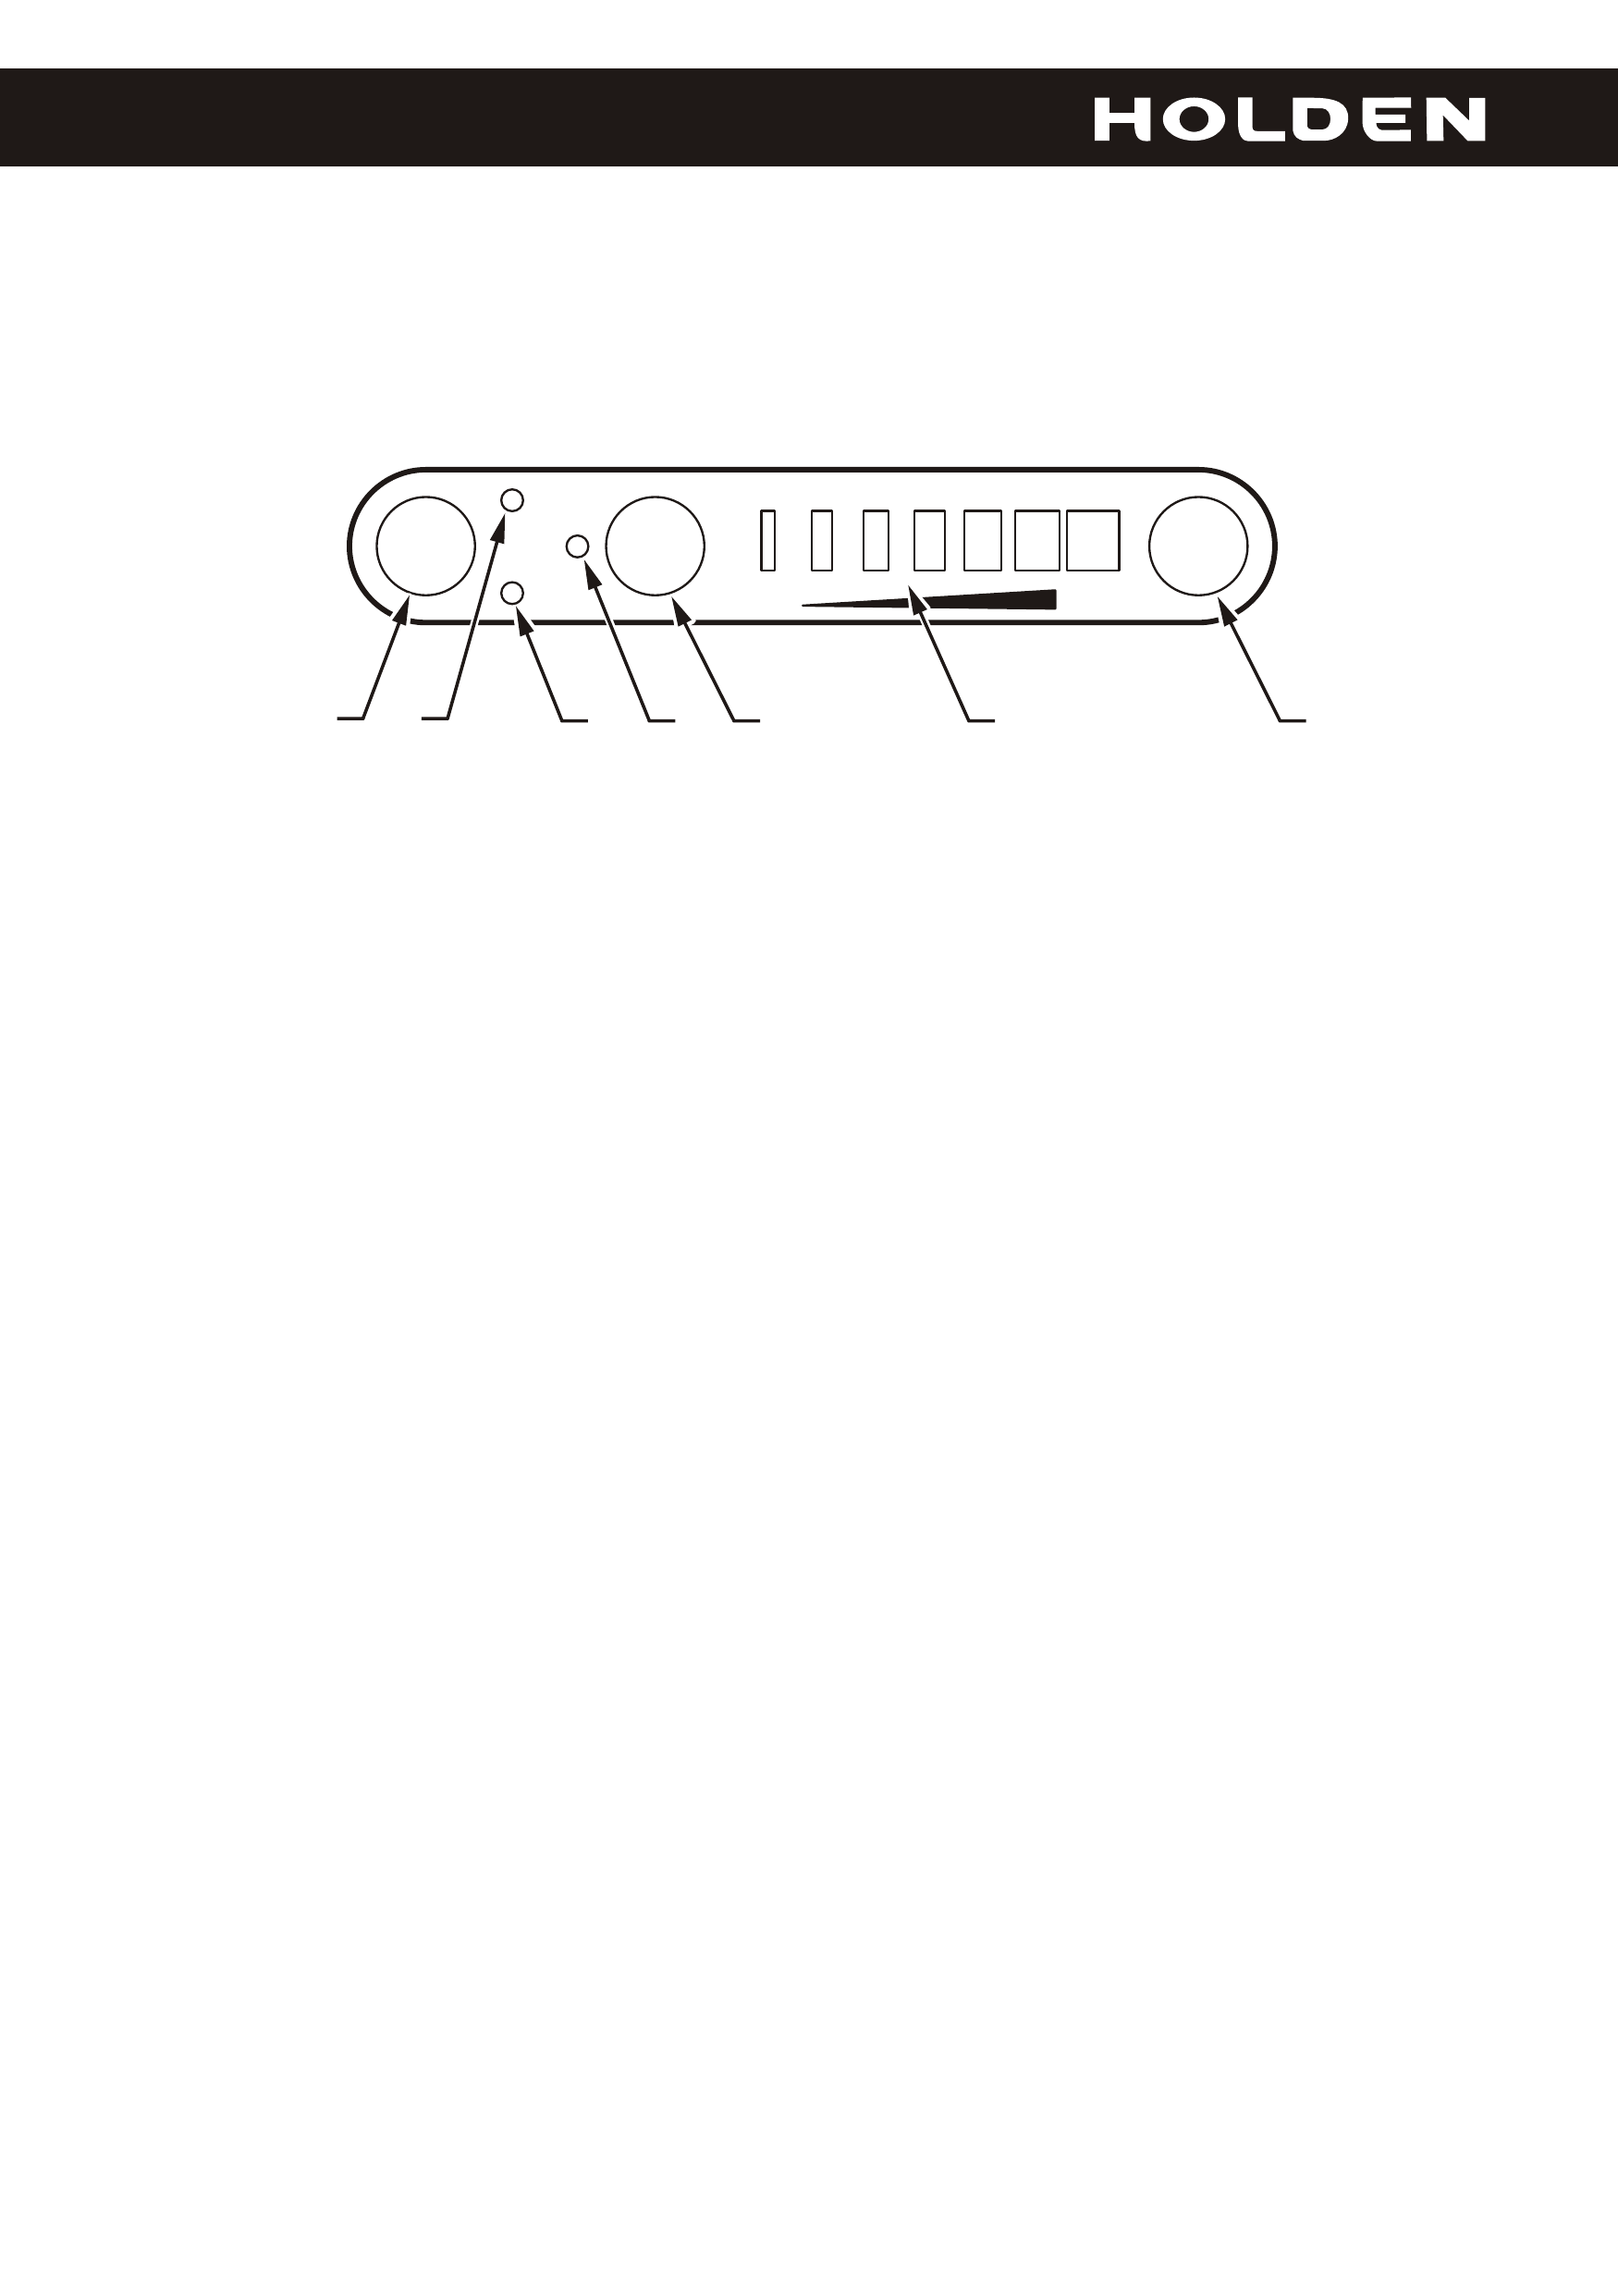
Control Panel
1. Power Switch: Press for ON/OFF
2. Power Control LED: The LED light illuminates green when the refrigerator is
ready to operate. The LED illuminates yellow when the preset temperature is
reached.
3. Error LED: The error LED flashes red when there is an error in the system.
4. Turbo Control LED: This indicator illuminates yellow to indicate that the
Turbo mode is switched on.
5. Turbo Switch: Press the turbo switch for fast cooling. Press the turbo switch
again to switch off the turbo mode. The turbo mode automatically switches off
when preset temperature is reached.
6. Temperature LEDs: The 7 LEDs indicate a temperature range from +10°C to
-18°C in steps of approximately 5°C. For example, use three LEDs to specify
a temperature of about 0°C.
7. Temperature Switch: Press once to activate next LED. Hold to cycle all
available settings.
Page 7 of 12
POWER
7
ERROR FREEZE
TEMP
54
1 2 3
TURBO
ON
OFF
COLD
6

Switching On
Switch on the refrigerator by pressing the "on/off" button (1). The power LED (2)
illuminates when the refrigerator is switched on.
Switching Off
The refrigerator consumes a small amount of idle current, even when power is
turned off using the power switch. Disconnect the refrigerator from the power
source when not in use.
If you do not wish to use the refrigerator for an extended period of time, remove
the battery power plug (if fitted) and the mains power plug (if fitted). Remove
perishable items from the refrigerator. Clean the refrigerator and leave the lid
slightly open to prevent the formation of mould.
Using the Refrigerator
The cooling compartment contains two compartments with different
temperature zones. The small compartment is generally 6°C warmer than the
main cooling compartment.
NOTE: Always allow food to cool before storing in the refrigerator.
Defrosting
Humidity in the air can be deposited as ice on the evaporator and in the cooling
compartment. When this occurs, the performance of the refrigerator is reduced.
Defrost your refrigerator periodically or when the evaporator is covered with a
layer of ice.
To defrost the refrigerator, take out the refrigerated products and store them in
another refrigerator so that they remain cool. Switch off the refrigerator and leave
the lid open. Remove the water and wipe the condensed water from the cooling
compartment.
NOTE: Do not use abrasives, sharp implements or heating devices to defrost the
refrigerator.
Page 8 of 12
Cleaning
It is recommended that you clean the refrigerator prior to initial use.
To clean your refrigerator, use a cloth moistened only with lukewarm water.
Ensure that there is no water ingress past any seals as this could damage the
refrigerator. Immediately after cleaning, dry off the refrigerator with a dry cloth.
NOTE: Do not use solvents, abrasives, brushes or sharp implements to clean
any part of the refrigerator.
Service
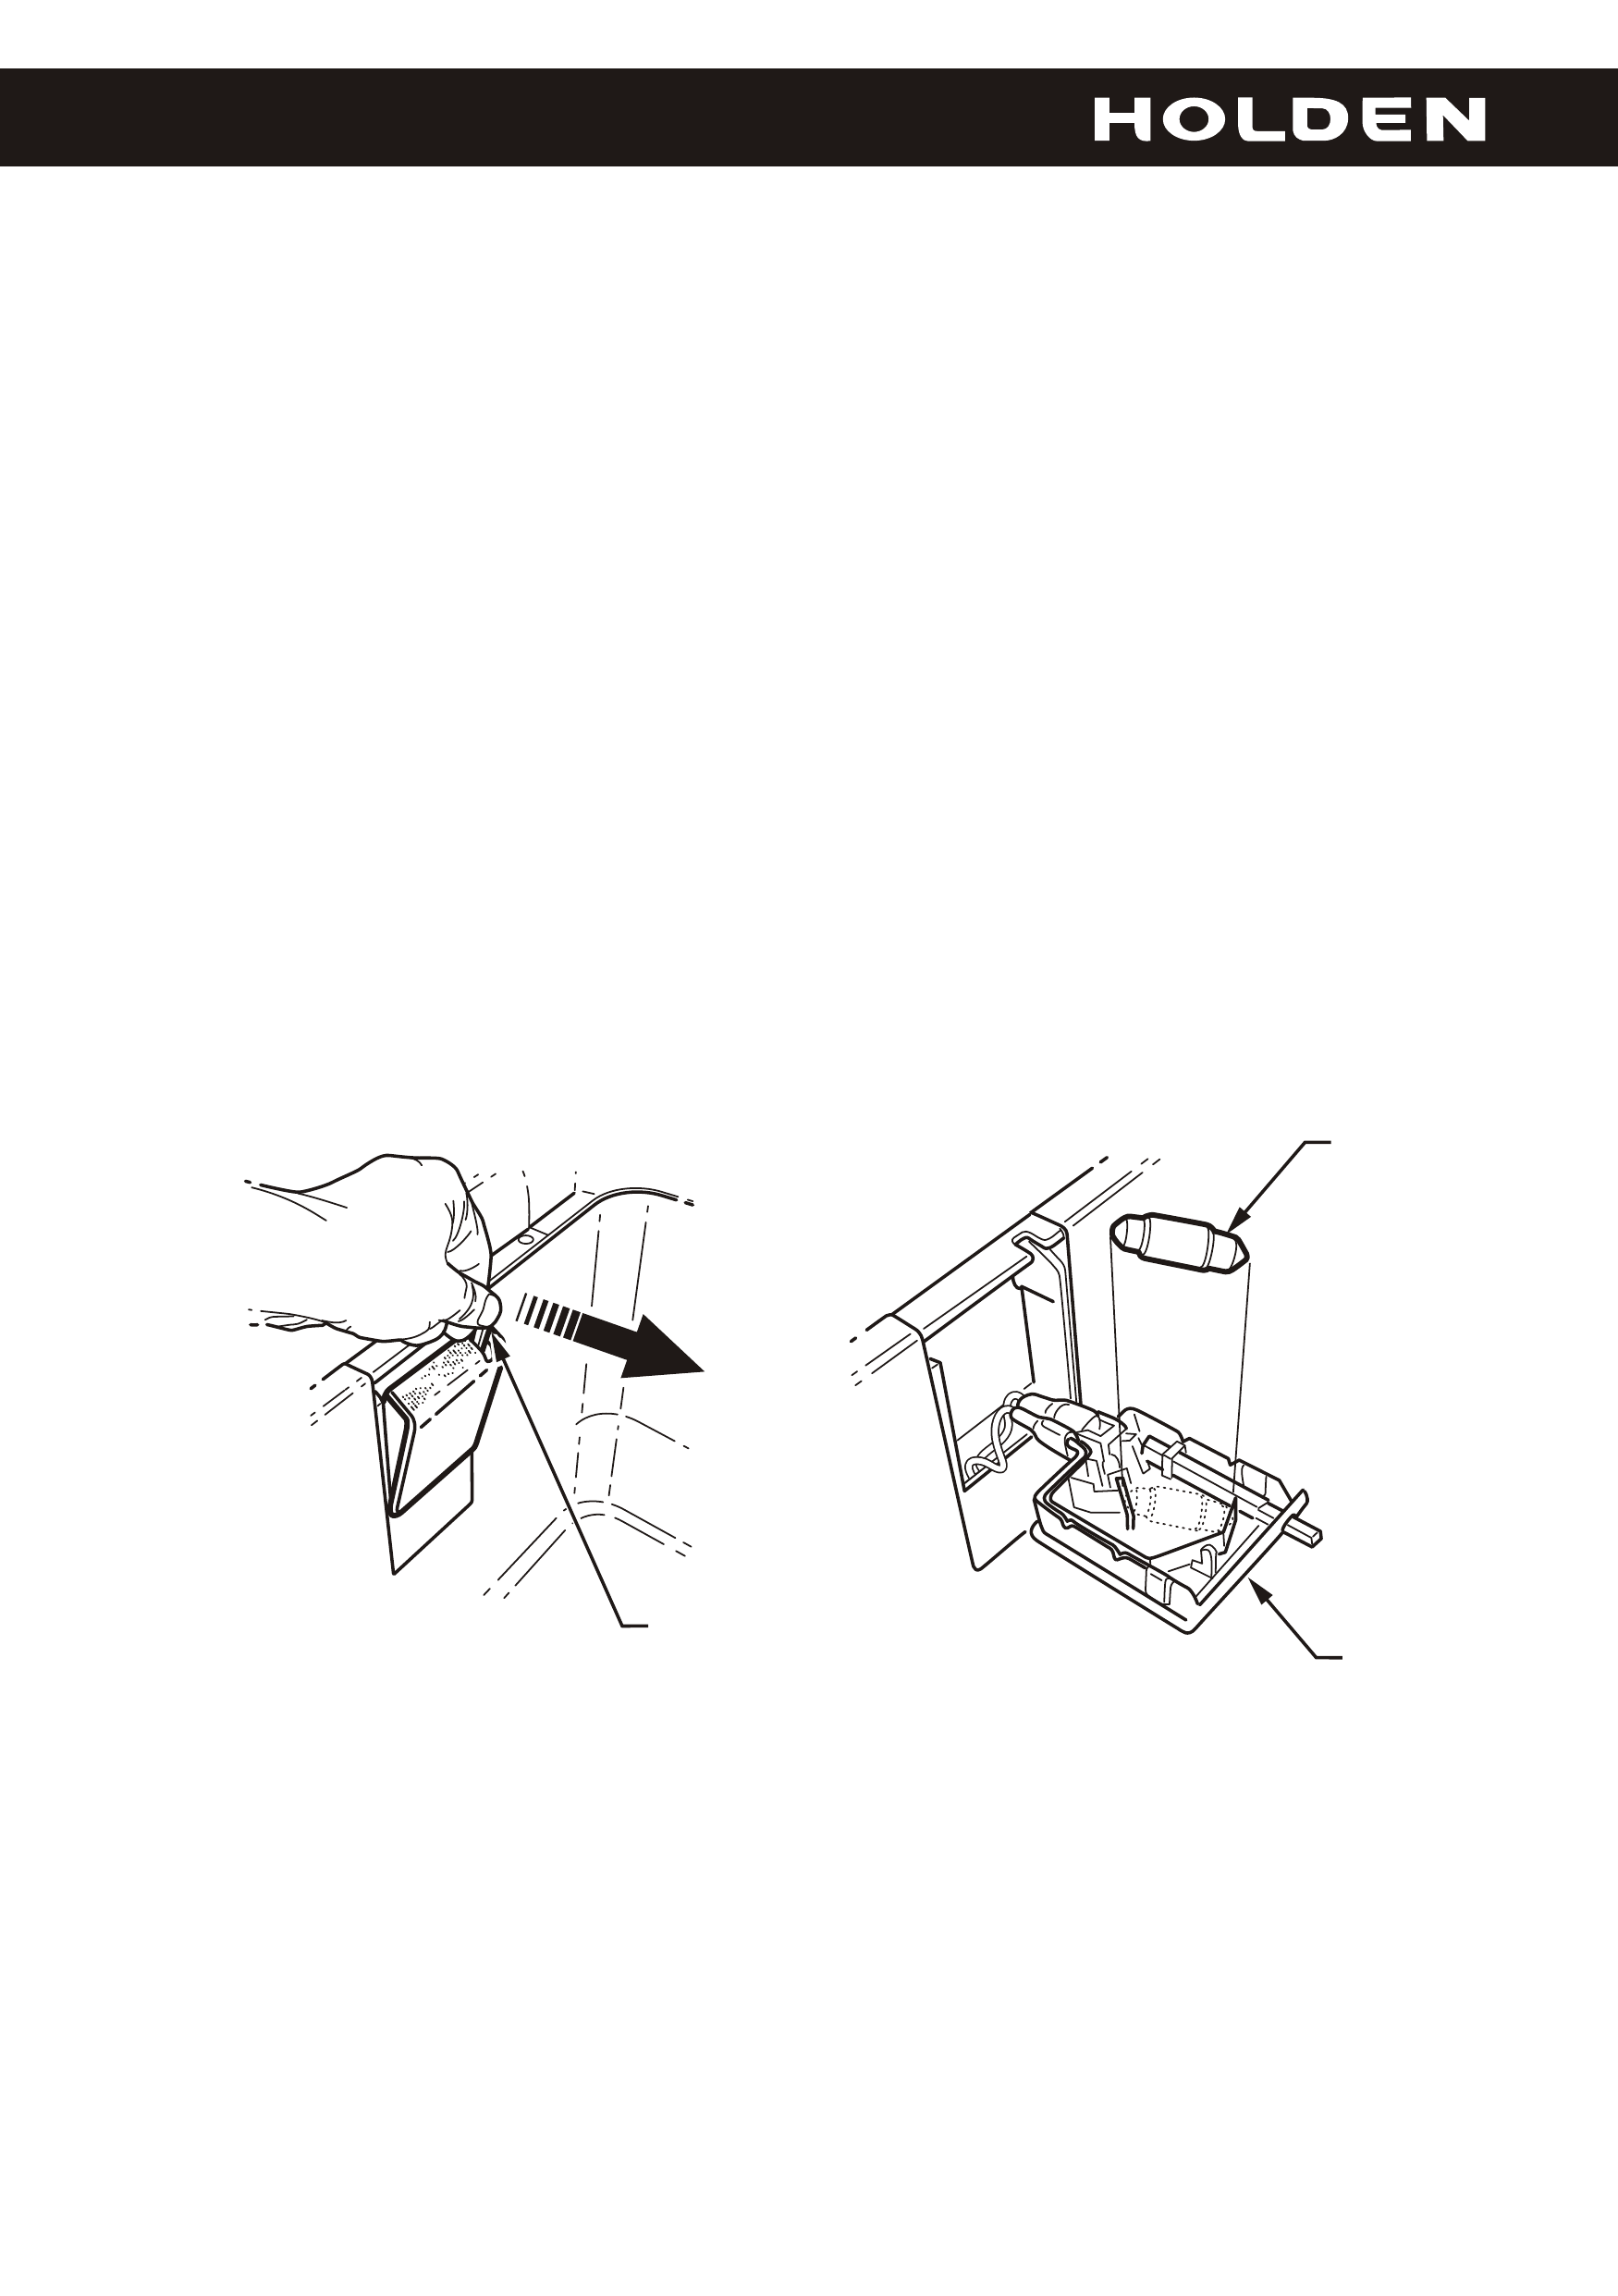
Replacing Internal Lamp
Other Items
Except for the internal lamp, your refrigerator has no seviceable components.
For service related issues, contact your Holden Dealer.
To change the bulb:
Grasp the switch pin (1) and pull the pin into the centre of the compartment.
Remove the bulb (2) from the housing (3).
Insert a new bulb and press the housing back into position.
Page 9 of 12
1
2
3
Page 10 of 12
Troubleshooting
Problem Cause and Solution
Error LED flashes
once every five
seconds.
This indicates a low battery voltage at the
refrigerator. This can be caused by a poor
connection to the battery or low battery voltage.
Contact your Holden Dealer.
Error LED flashes
three times every five
seconds.
This indicates a motor start error. There is
possibly a faulty compressor or a faulty control
module.
Apply power to the refrigerator and wait for five
minutes. If the error persists, then refer to your
Holden Dealer.
Error LED flashes five
times every five
seconds.
There is a thermal cut-out of the electronics.
This indicates that the refrigeration system is
too heavily loaded, or if the surrounding
temperature is high the electronics are running
too hot.
Increase the amount of ventilation around the
vents in your refrigerator.

Page 11 of 12
Technical Specifications
Dimensions (L × W × H) 580 × 360 × 385 mm
Volume 31 L
Refrigeration system Direct evaporator
Temperature range +10°C to -18°C
Weight 15 kg
Running time per hour
Ti = 5°C, Ta = 20°C 15%
Ti = 5°C, Ta = 32°C 19%
Nominal DC 12 V 6.0 A
AC 240 V 0.7 A
Compressor specification Fully hermetical Danfoss BD35F compressor
with control electronics and integrated low
voltage protection for 12 V and 24 V DC.
Dynamic ventilated condenser, Aluminium
Rollbond evaporator, electronic reverse
polarity protection, adjustable electronic
thermostat.
Battery controller The refrigerator is equipped with a battery
controller cutting the compressor in or out in
order to protect the battery and the
compressor.
Cut-out voltage: low med high
(at refrigerator) 10.4 11.0 12.0
Cut-in voltage: low med high
(at refrigerator) 11.2 12.0 12.9
Refer to your Holden Dealer for further information.
Holden Ltd
ABN 84 006 983 232
241 Salmon Street Port Melbourne
Victoria 3207 Australia
Subsidiary of General Motors Corp
All correspondence to:
PO Box 1714 Melbourne
Victoria 3001 Australia
Telephone (03) 9647 1111
Facsimile (03) 9647 2550
Please note that all information, illustrations and specifications in this Handbook are based
on the latest production information available at the time of printing.
Holden reserves the right to make any changes at any time without notice and without incurring any obligation.