
1. Remove plastic fasteners securing rear crossmember cover (sedan, 7 places/hatch, 4 places).
2. Remove crossmember cover by lifting vertically to release tabs along underside of top edge
of trim.
3. Fold tool compartment door to floor. (Door may be completely removed on hatch models).
4. Remove LHS tail lamp cover (hatch only).
5. Disconnect LH and RH tail lamp connectors from tail lamp assemblies.
6. Determine LH and RH ends of trailer harness, (labels are on connectors). Feed LH tail lamp
connectors behind LH corner trim to tail lamp connector (hatch only.)
7. Insert LH (passenger side) connectors of trailer harness between tail lamp and original body
harness connector.
8. Remove nut securing existing earth terminal to earth/tail lamp stud, at LHS of vehicle, refer
illustrations for location. Attach trailer harness earth terminal to stud, reusing nut.
9. Route trailer harness across rear panel, left to right, directly below existing harness. Tie to
existing harness beside each existing clip, using tie straps supplied (6 places).
10. Feed RH tail lamp connectors behind RH corner trim, to tail lamp connector (hatch only)
11. Insert RH connectors of trailer harness between tail lamp and the original connector.
12. Refit crossmember cover, routing flat harness to trailer plug out RH end of cover, refer
illustrations.
NOTE: Take care to align tabs on underside of crossmember cover with clips in sheetmetal when
refitting cover.
FITTING INSTRUCTIONS FOR
JS VECTRA TRAILER WIRING HARNESS (SEDAN & HATCH BACK)
Part No. 92078310
FD878
13MY98
COPYRIGHT
Page 1 of 2
G63-2-1
HOLDEN SERVICE PARTS OPERATIONS
Reproduction in whole or part
prohibited without written approval
Division of HOLDEN Ltd ACN 006 893 232
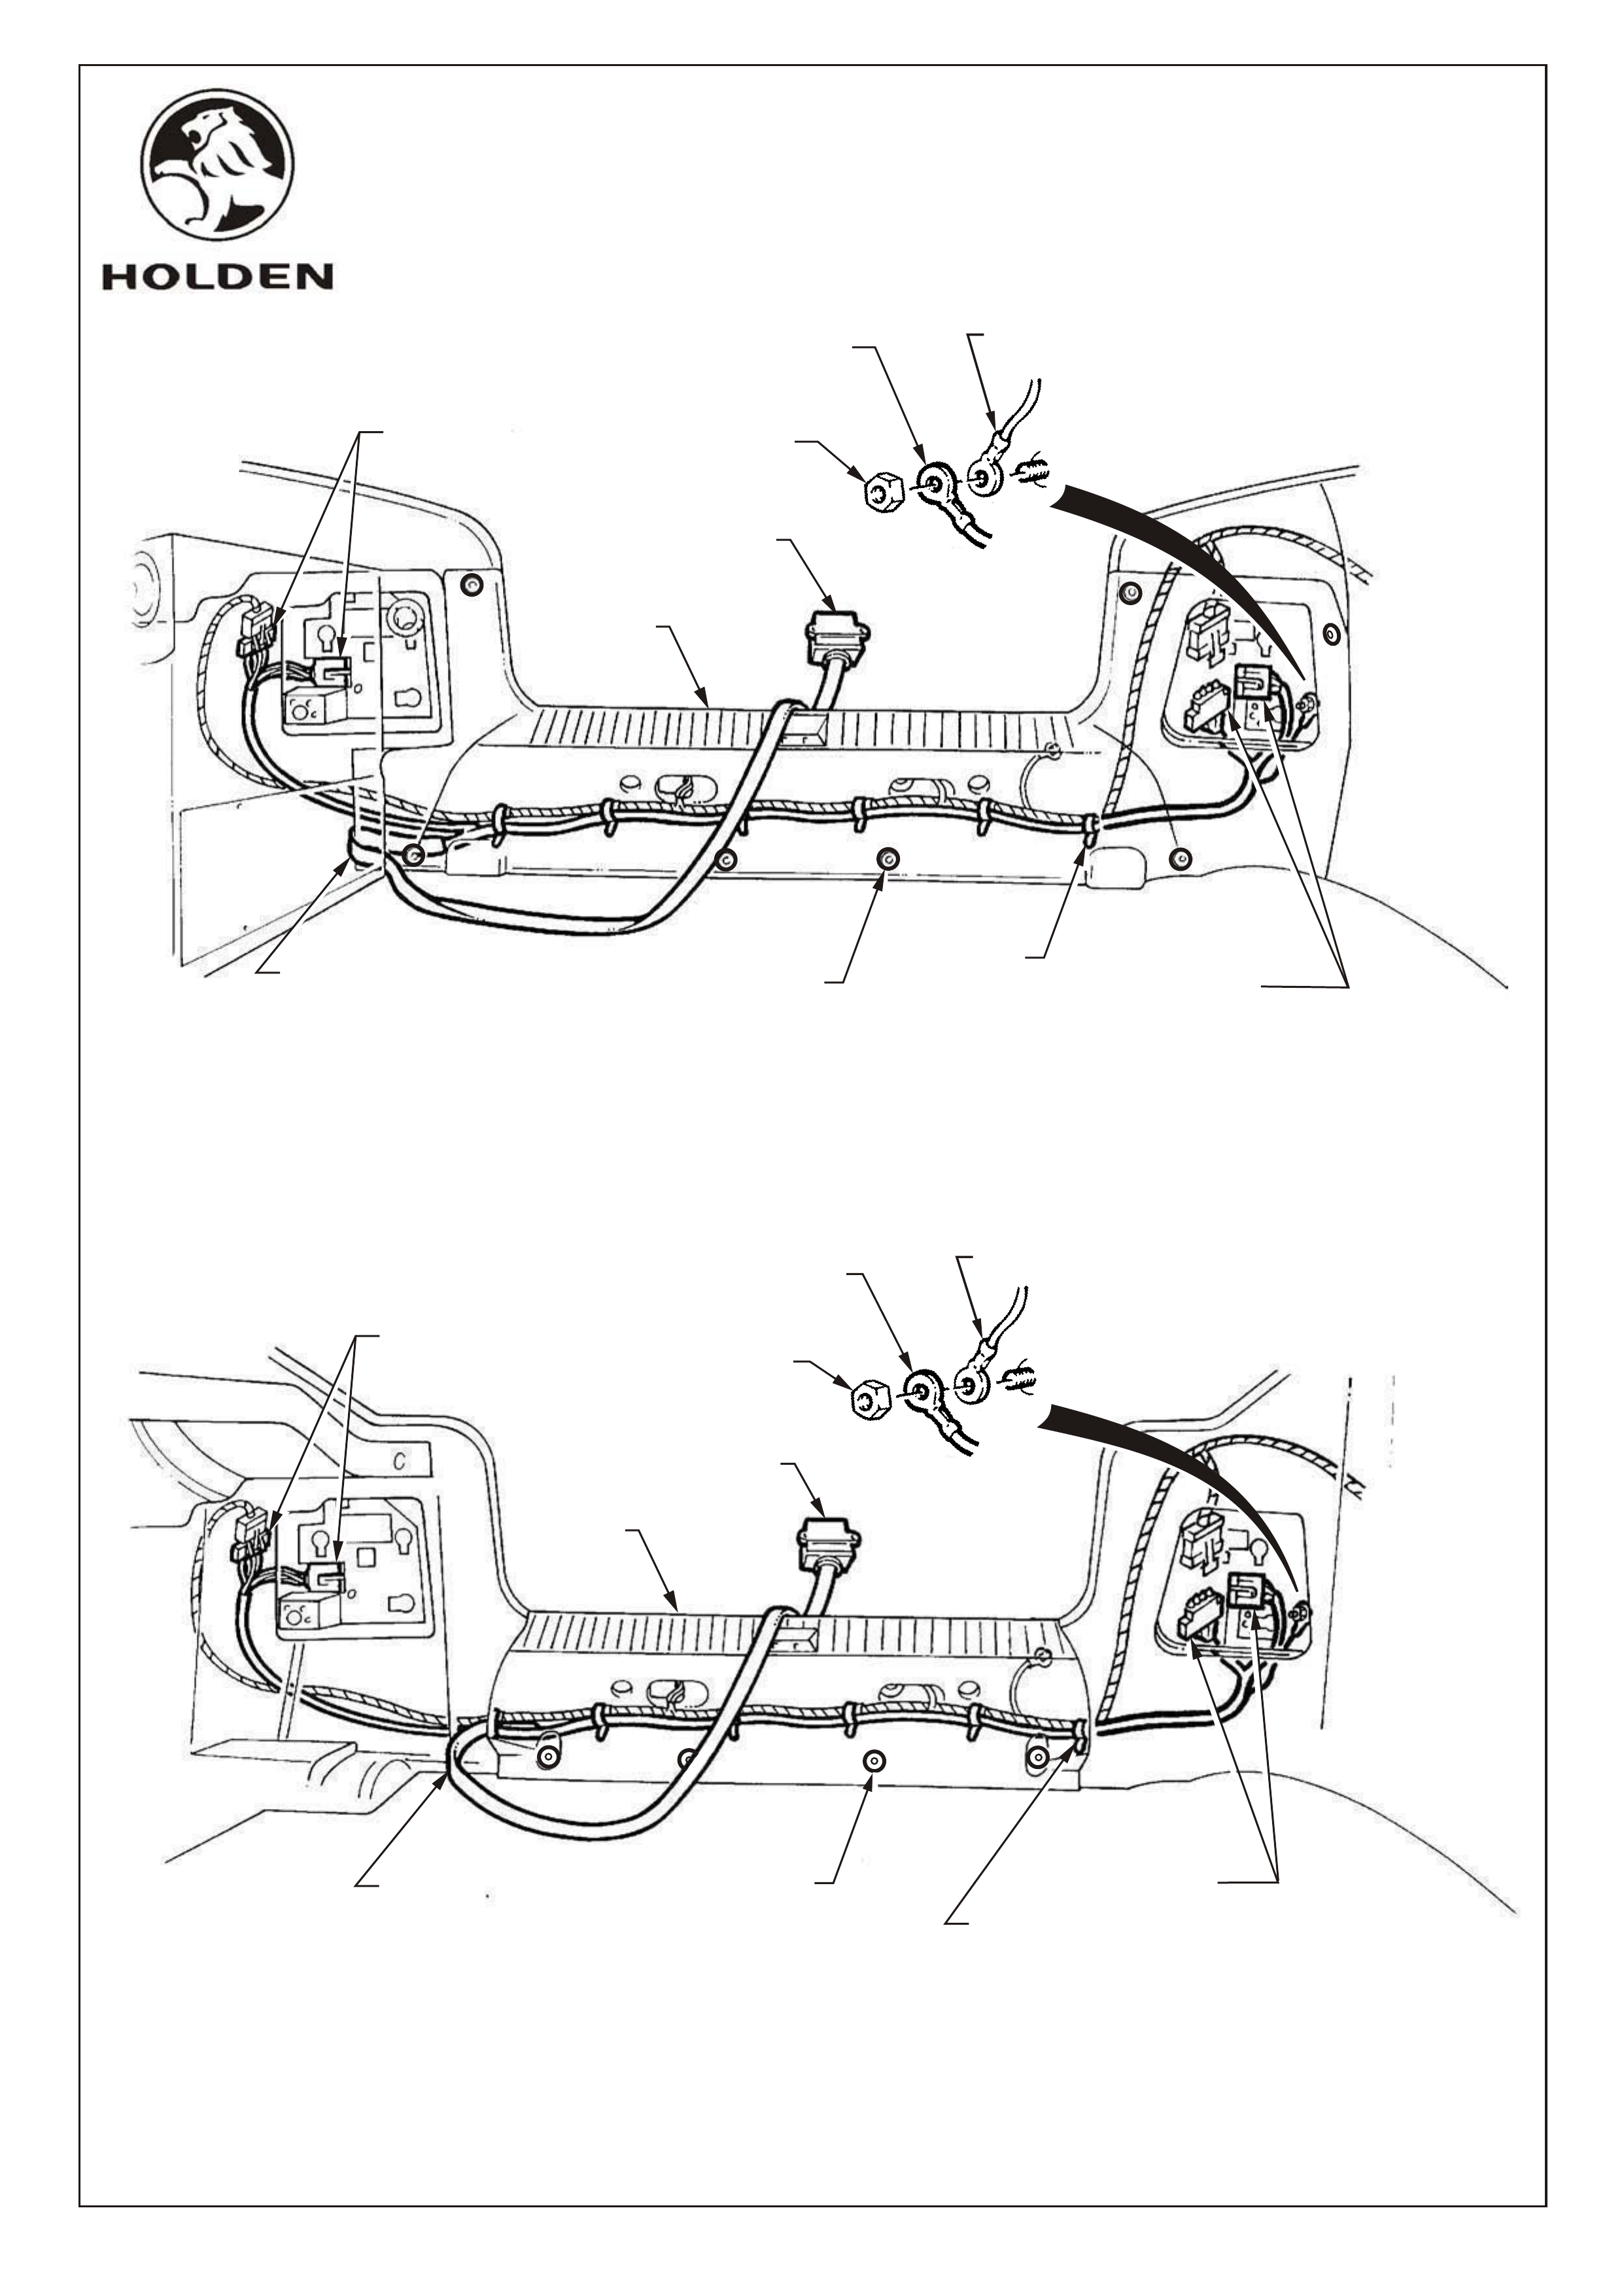
LH
(PASSENGER SIDE)
TRAILER HARNESS
CONNECTORS
ROUTE FLAT HARNESS
AROUND END OF
CROSSMEMBER COVER
INTO REAR COMPARTMENT
ROUTE FLAT HARNESS
AROUND END OF
CROSSMEMBER COVER
INTO REAR COMPARTMENT
CROSSMEMBER
COVER
CROSSMEMBER
COVER
TRAILER
PLUG
TRAILER
PLUG
TIE STRAP
(6 PLACES)
TIE STRAP
(6 PLACES)
SEDAN
HATCH
RH TRAILER HARNESS
CONNECTORS
RH TRAILER HARNESS
CONNECTORS
PLASTIC
FASTENER
(7 PLACES)
PLASTIC
FASTENER
(4 PLACES)
LH
(PASSENGER SIDE)
TRAILER HARNESS
CONNECTORS
FD878
13MY98
COPYRIGHT
Page 2 of 2
G63-2-2
HOLDEN SERVICE PARTS OPERATIONS
Reproduction in whole or part
prohibited without written approval
Division of HOLDEN Ltd ACN 006 893 232
CONNECT TRAILER
HARNESS EARTH LEAD
TO EXISTING EARTH STUD
CONNECT TRAILER
HARNESS EARTH LEAD
TO EXISTING EARTH STUD
REUSE
EXISTING
NUT
REUSE
EXISTING
NUT
EXISTING EARTH LEAD
EXISTING EARTH LEAD
FD890
25NO98
COPYRIGHT
Page 1 of 4
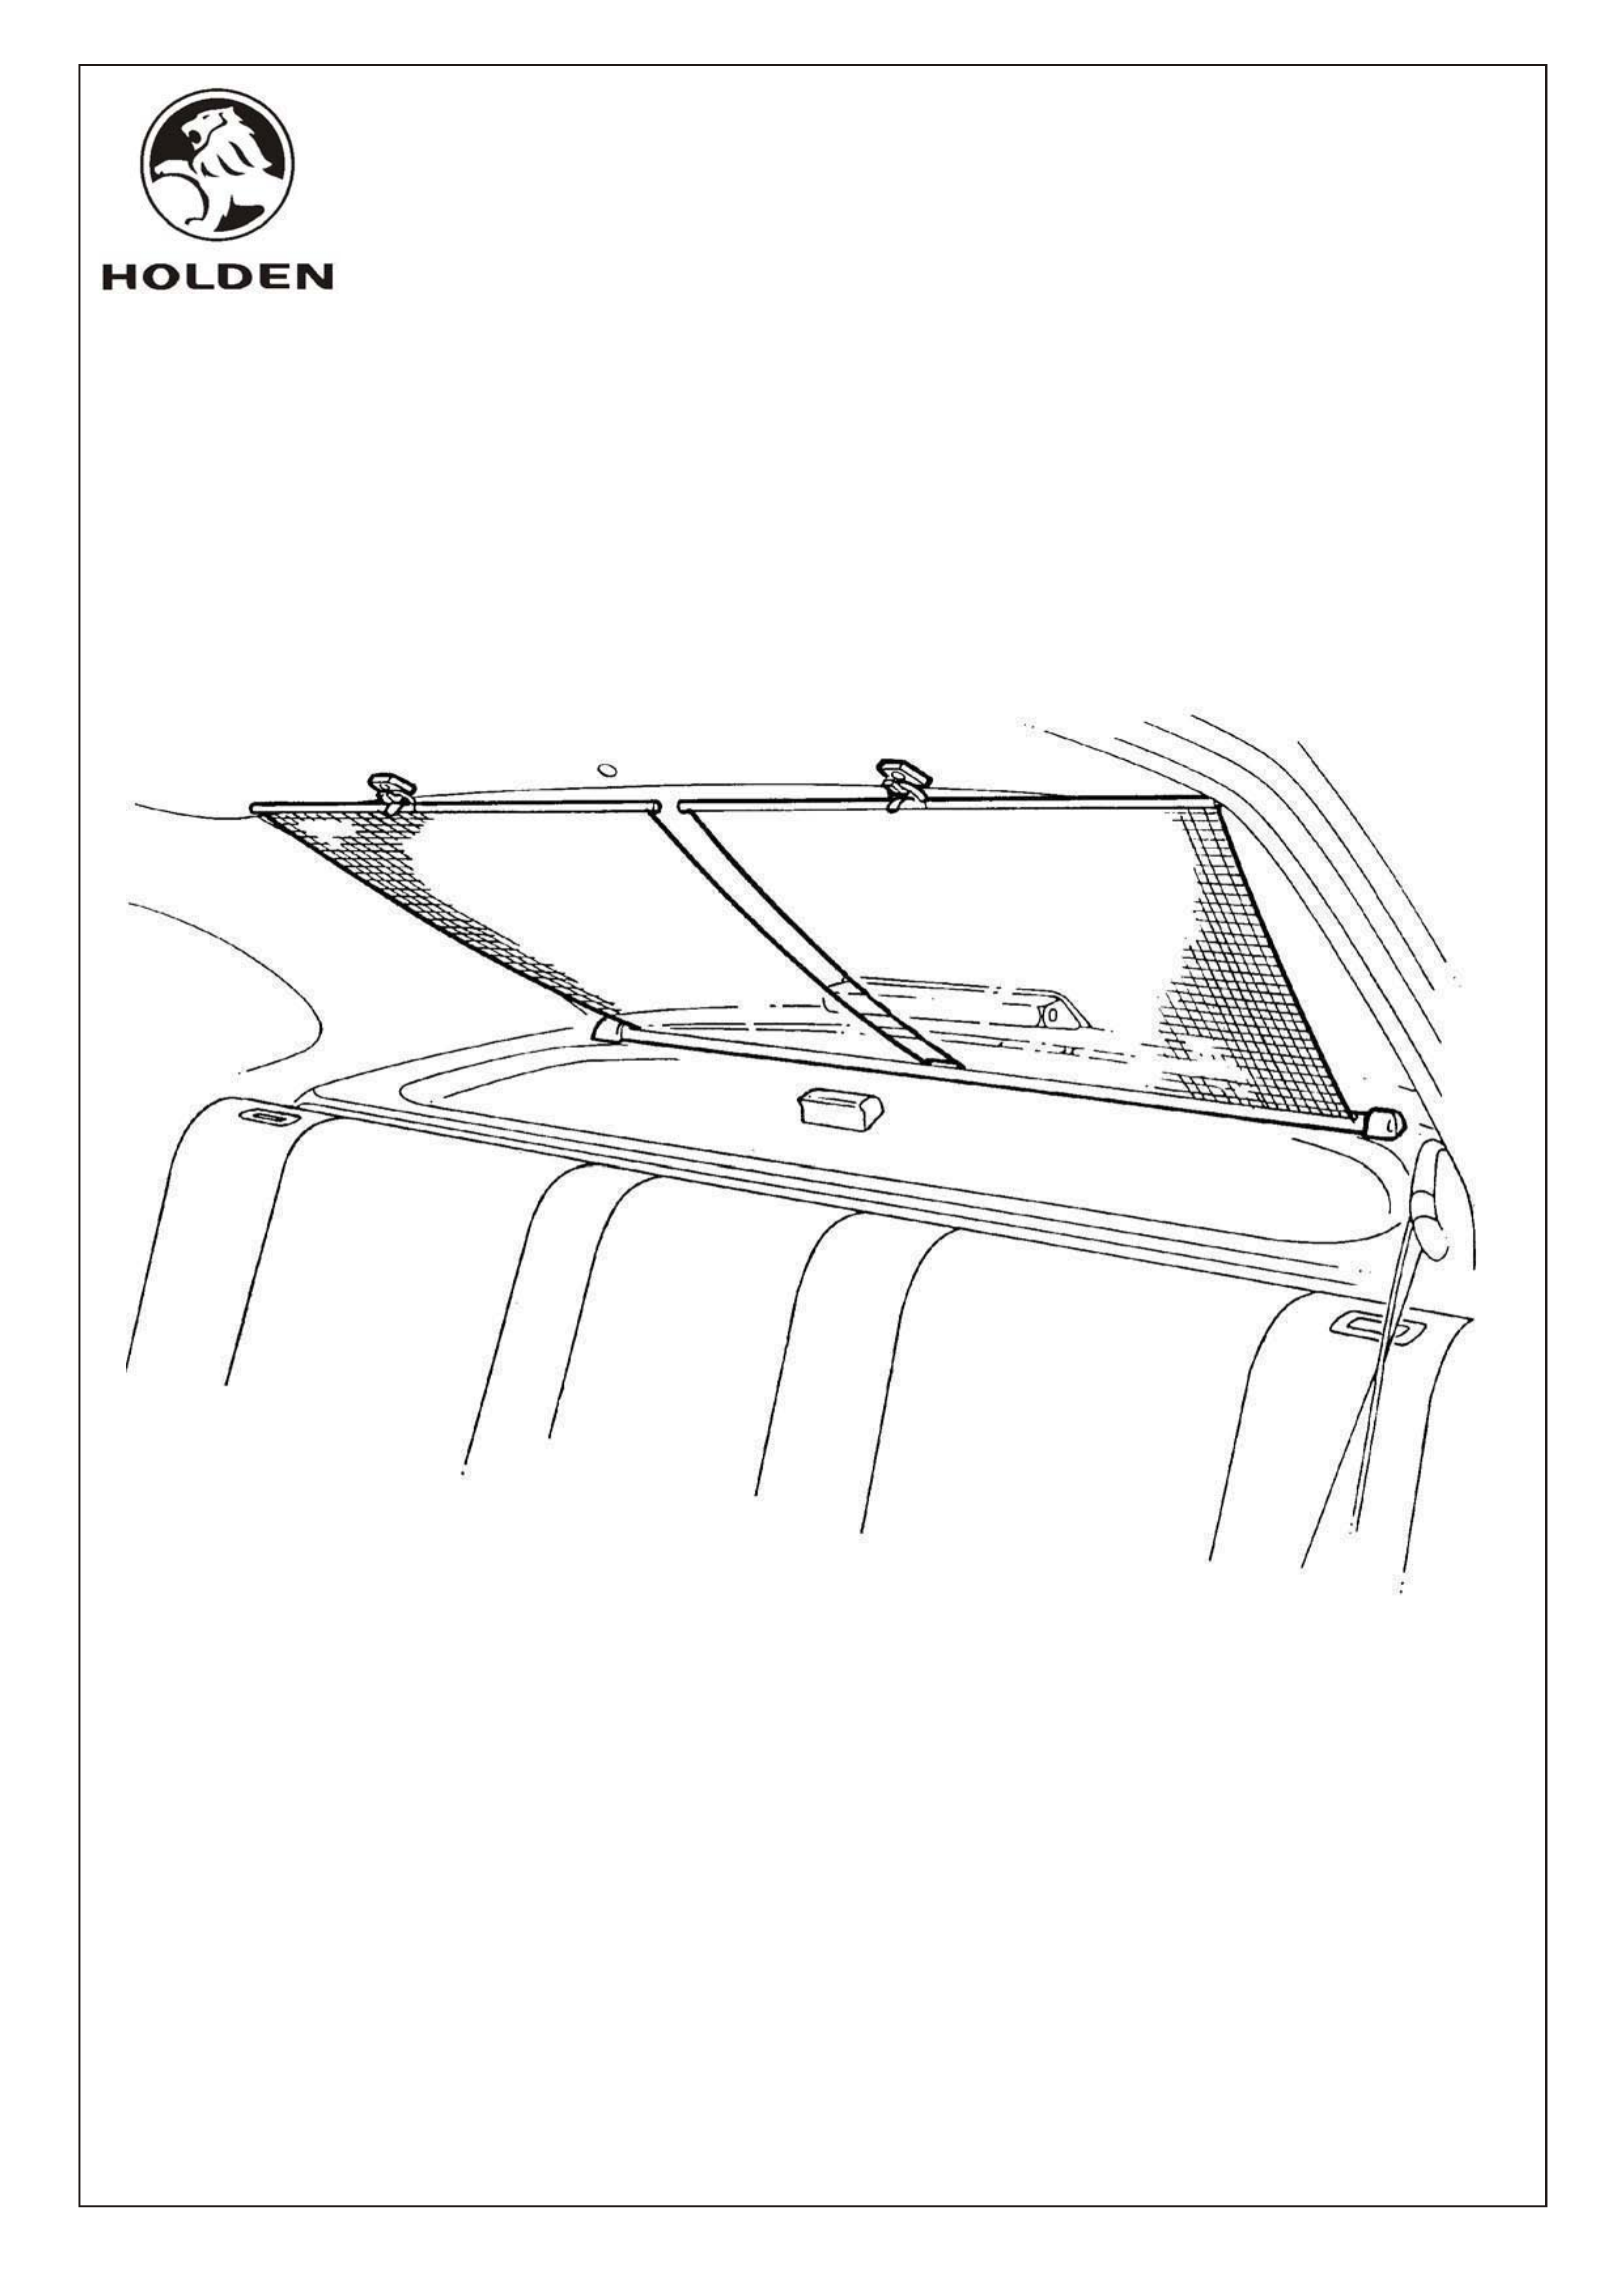
FITTING INSTRUCTIONS FOR
JS VECTRA SEDAN
REAR WINDOW BLIND
Part Number: 92141478
G80-S1
HOLDEN SERVICE PARTS OPERATIONS
Reproduction in whole or part
prohibited without written approval
Division of HOLDEN Ltd ACN 006 893 232
TOOLS REQUIRED:
- WORKSHOP MANUAL
- ??MM SPANNER OR SOCKET AND SOCKET WRENCH FOR SEAT BELT ANCHOR BOLTS
- PHILLIPS HEAD SCREWDRIVER
- POWER DRILL
- 4.0MM DRILL BIT FOR DRILLING PARCEL SHELF
- TORQUE WRENCH
FD890
25NO98
JS VECTRA SEDAN REAR WINDOW BLIND
FITTING INSTRUCTIONS
G80-S2
Page 2 of 4
HOLDEN SERVICE PARTS OPERATIONS
Reproduction in whole or part
prohibited without written approval
Division of HOLDEN Ltd ACN 006 893 232
COPYRIGHT
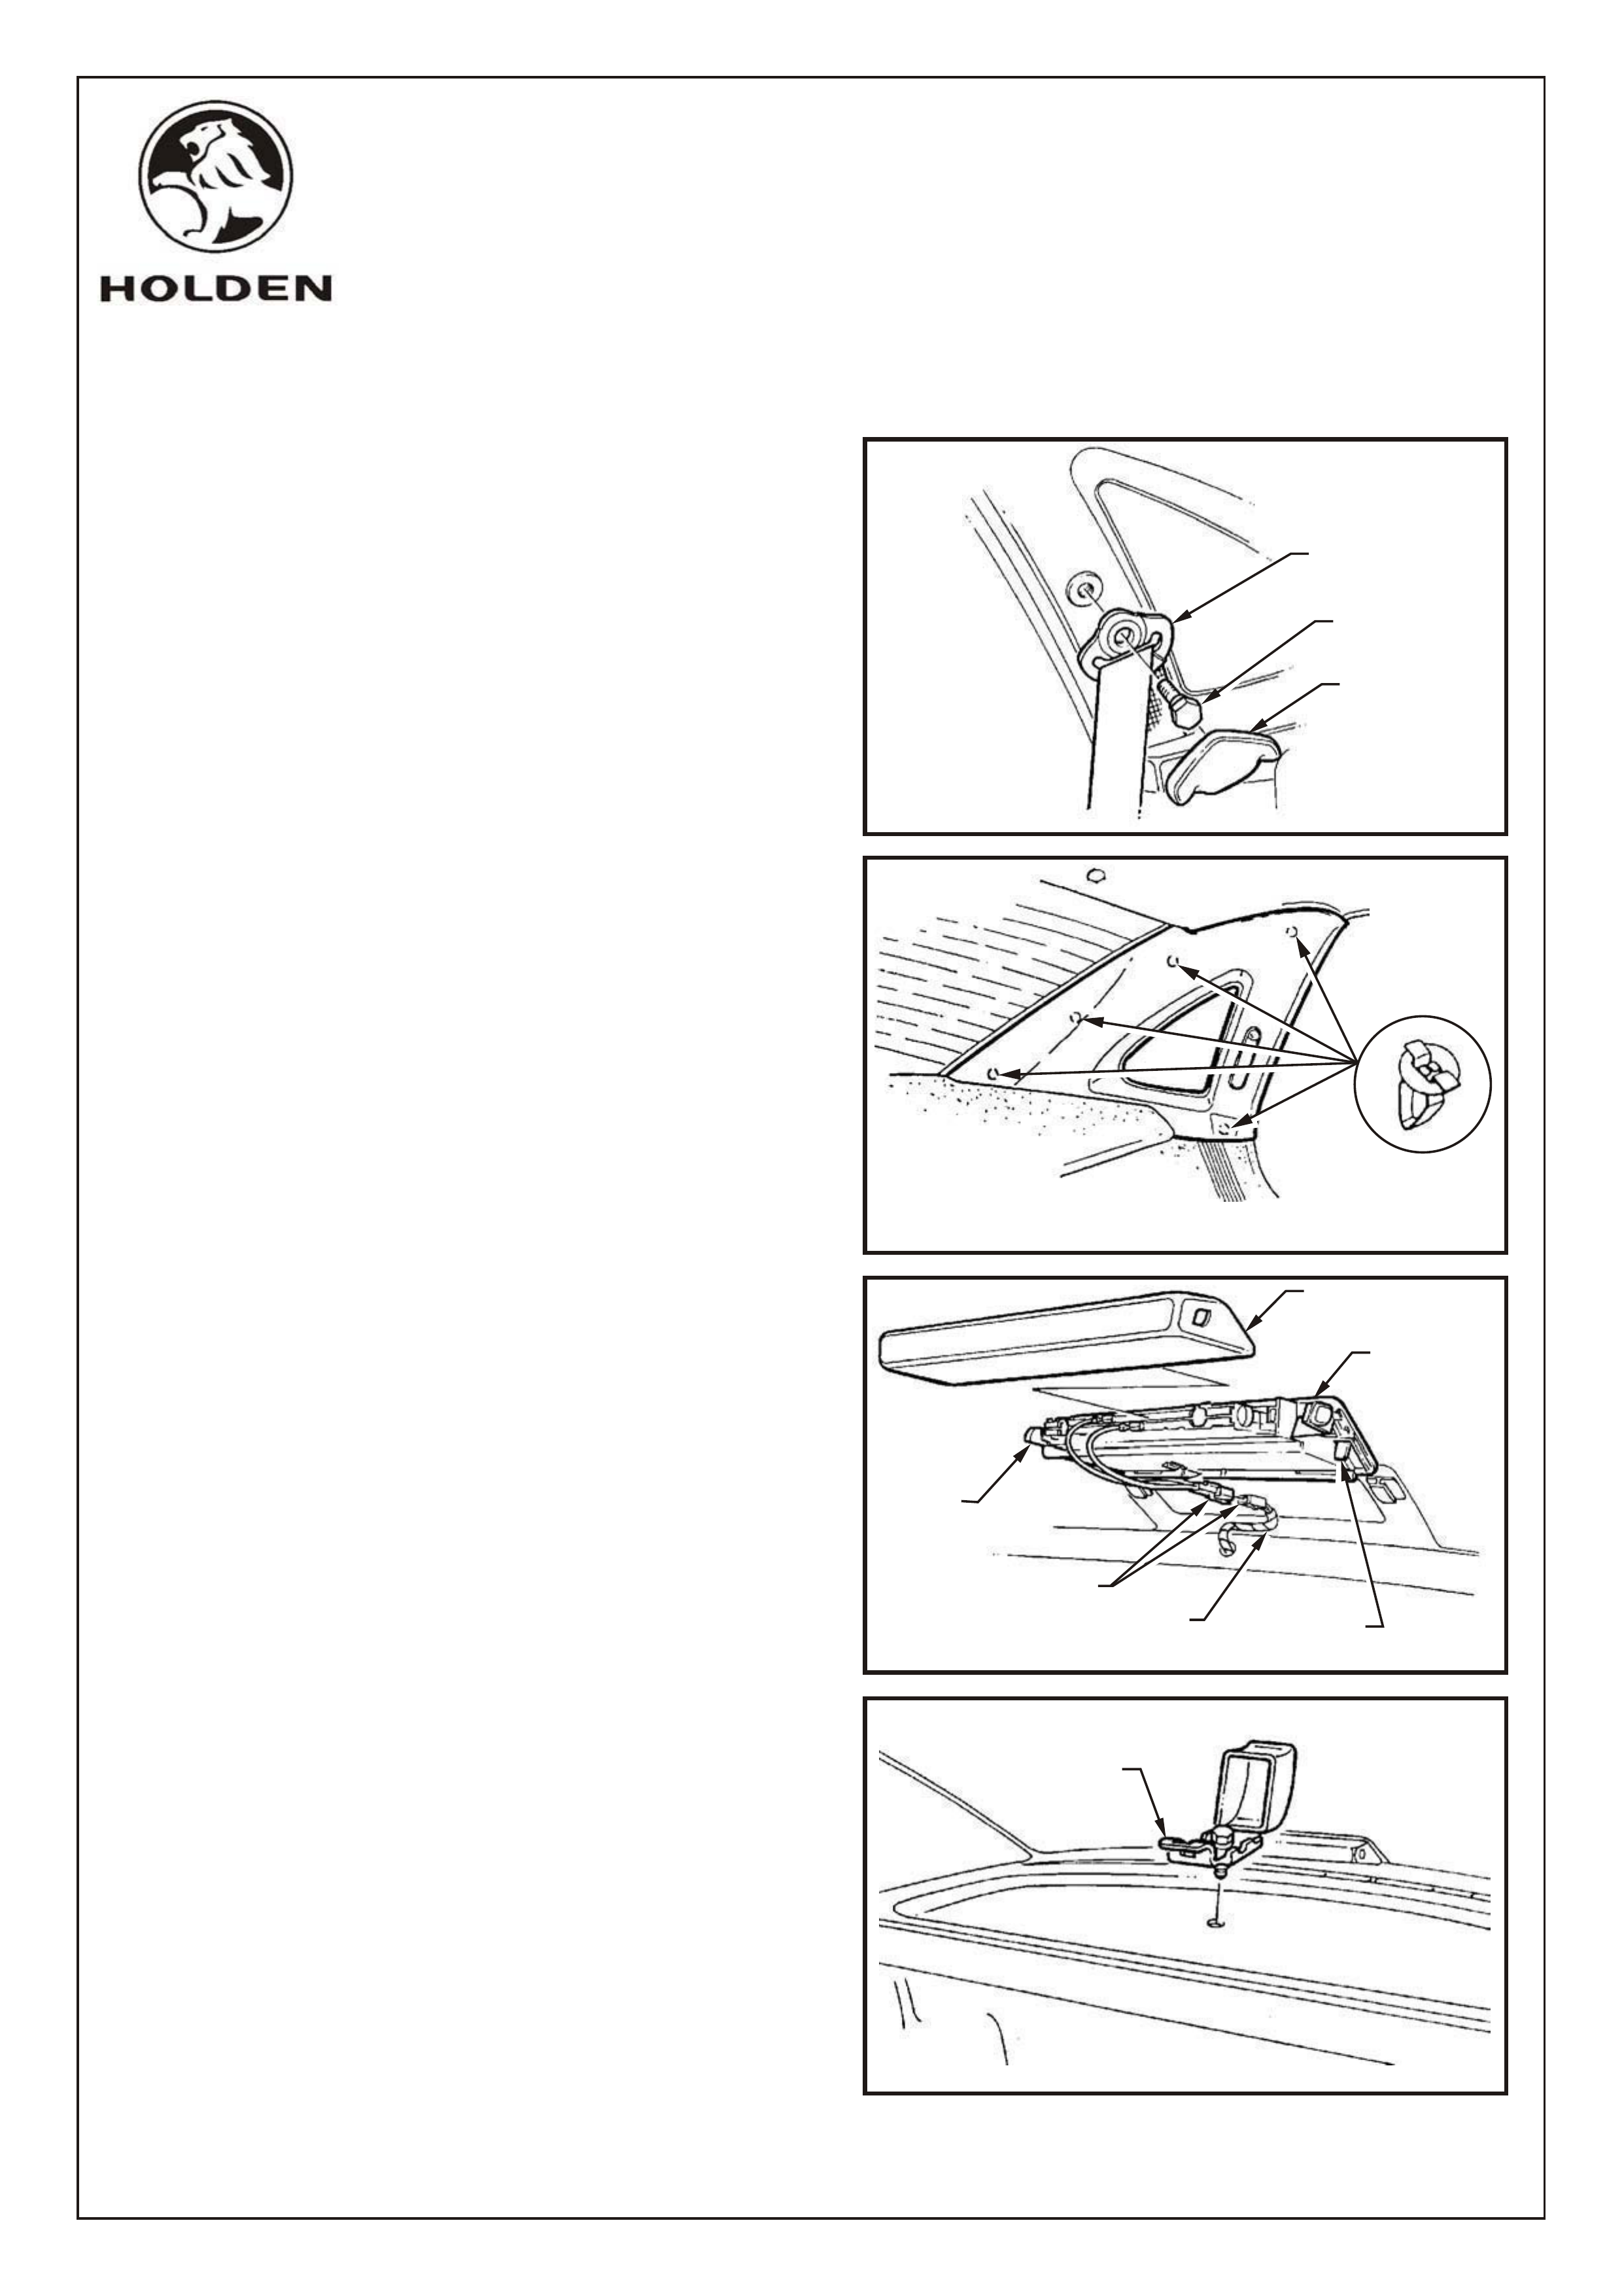
1. Remove seat belt anchor cover, seat belt anchor
bolt and seat belt anchor from LH and RH 'C' pillars.
2. Remove LHS upper C pillar trim by pulling trim
inboard to release 5 integral spring clips. Repeat
operation for RHS C pillar trim.
3. Depress 2 buttons on high mount stop lamp cover
and remove cover.
4. Release tabs on stop lamp and slide stop lamp off
brackets on rear window sufficiently to access wiring
connectors on underside of stop lamp.
5. Slide wiring connectors from stop lamp and
disconnect wiring connectors. Completely remove
high mount stop lamp.
6. Feed body wiring harness connector down through
rear parcel shelf.
7. Remove child restraint anchor from rear parcel
shelf.
FIGURE 3
FIGURE 2
FIGURE 1
FIGURE 4
SEAT BELT
ANCHOR
SEAT BELT
ANCHOR BOLT
SEAT BELT
ANCHOR
COVER
STOP LAMP
COVER
STOP LAMP
WIRING CONNECTORS
BODY WIRING HARNESS
CHILD
RESTRAINT
ANCHOR
COVER
RELEASE
BUTTON
(2 PLACES)
STOP LAMP
RELEASE TAB
(2 PLACES)
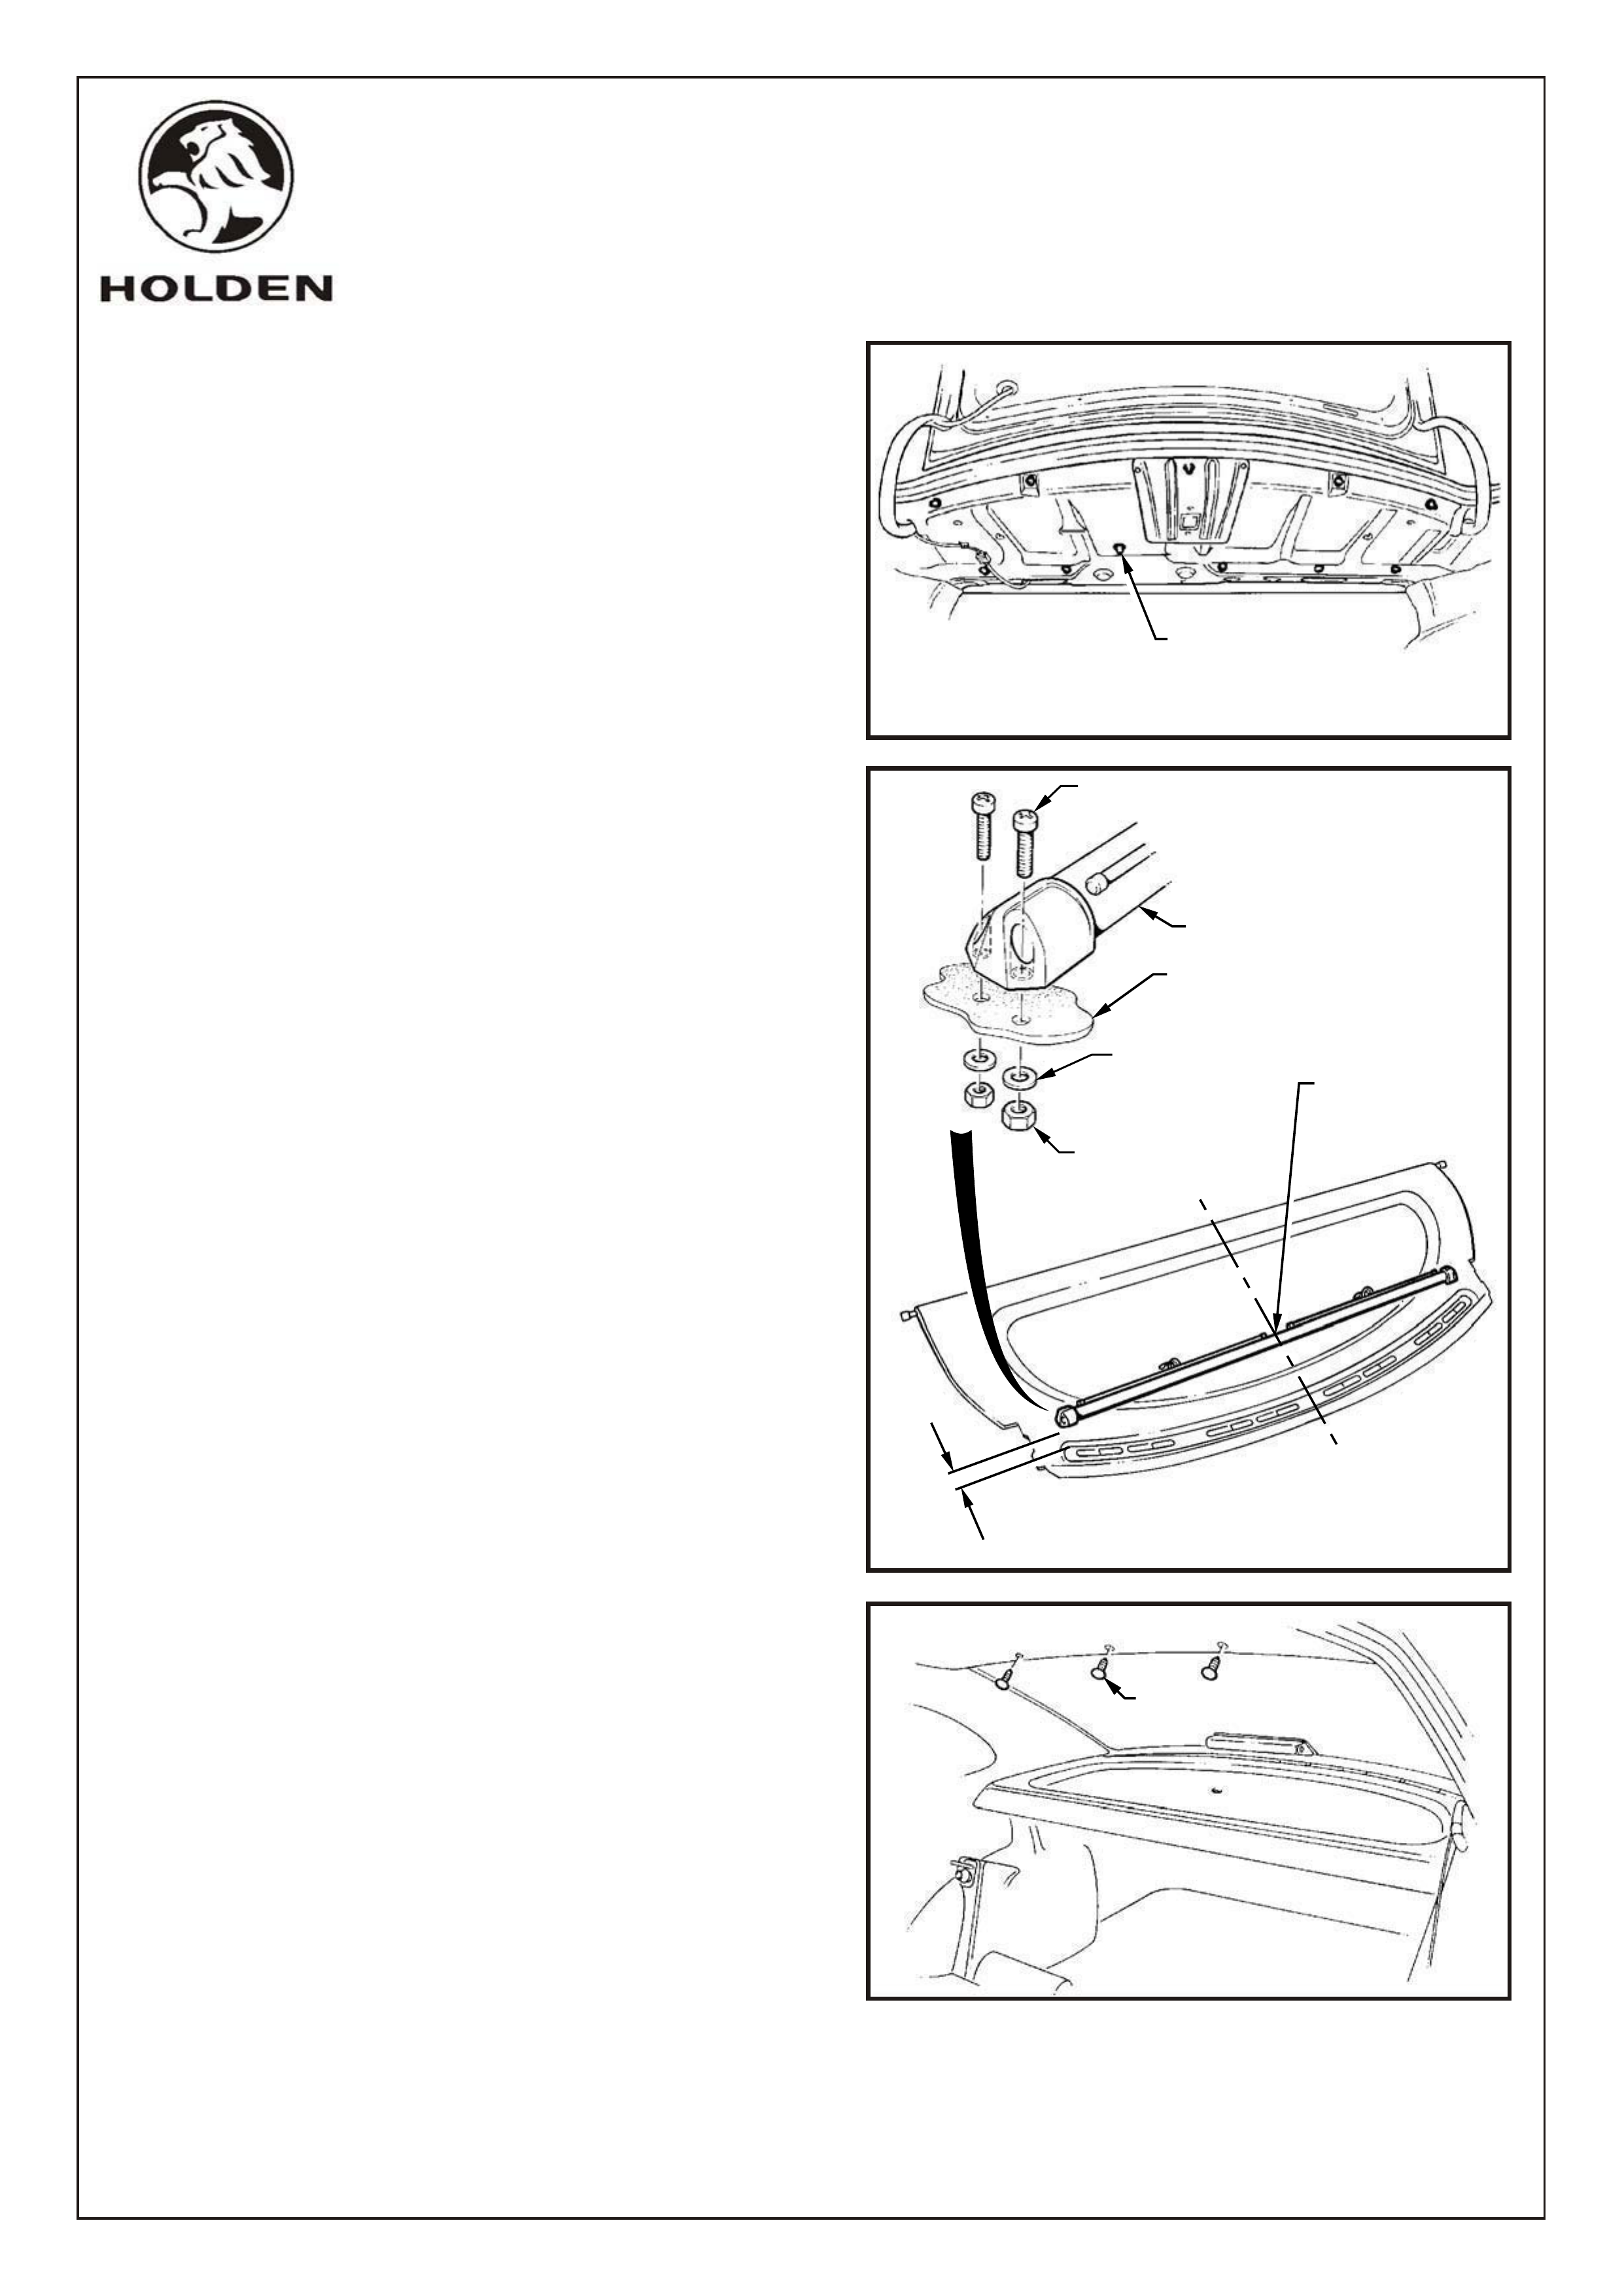
FIGURE 6
FD890
12OC98
G80-S3
Page 3 of 4
HOLDEN SERVICE PARTS OPERATIONS
Reproduction in whole or part
prohibited without written approval
Division of HOLDEN Ltd ACN 006 893 232
COPYRIGHT
8. Release rear seat backs and push forward.
9. From rear compartment press out 11 plastic
fasteners securing rear parcel shelf.
NOTE: Be sure to release fastener which is hidden by
sheet metal gusset.
10. From inside of vehicle pull rear parcel shelf forward
to remove.
11. Locate rear window blind centrally on rear edge of
parcel shelf, 20 5mm forward of plastic vent as
shown in Figure 6.
12. Use blind as a template to mark mounting hole
locations.
13. Remove blind and drill 4.0mm dia. holes, 4 places.
14. Attach blind to parcel shelf using screws, washers
and nuts supplied in package.
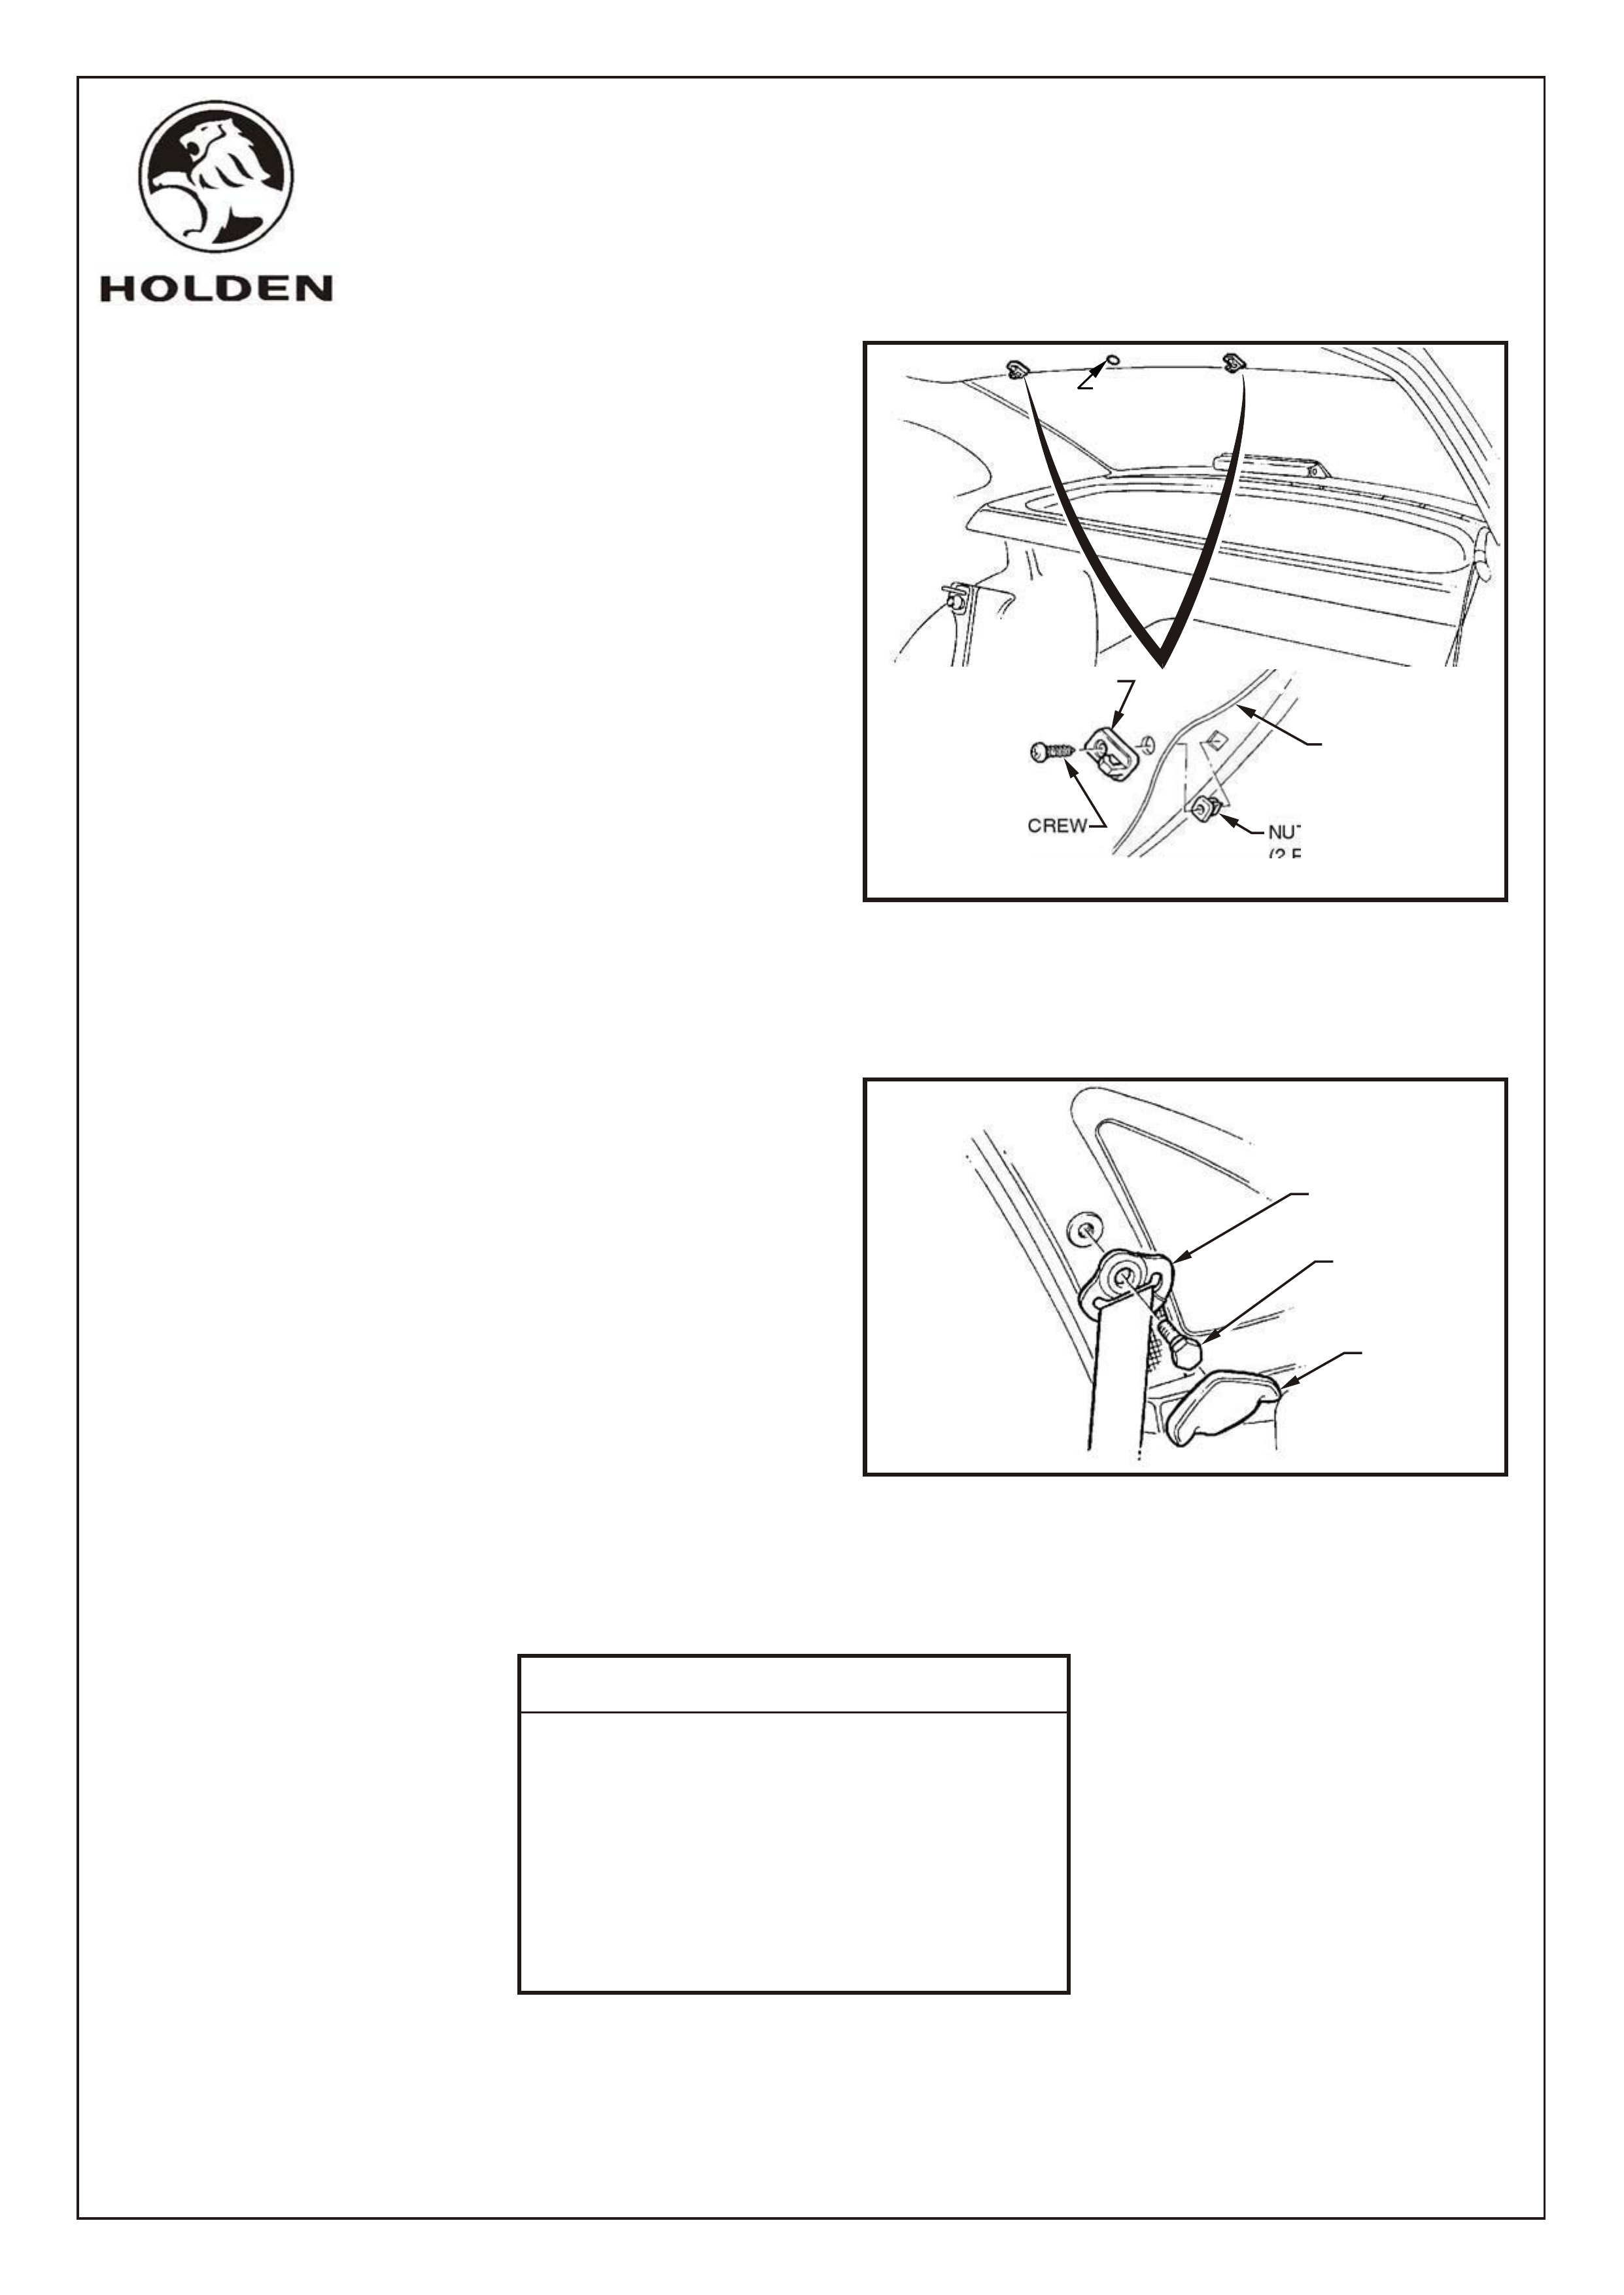
15. Remove 3 headlining trim fasteners from above rear
window.
FIGURE 5
20 5MM
C
L
ALIGN REAR BLIND
TO CENTRE OF
REAR PARCEL
SHELF
NUT
(2 PLACES
EACH SIDE)
WASHER
(2 PLACES
EACH SIDE)
SCREW
(2 PLACES EACH SIDE)
REAR WINDOW BLIND
REAR PARCEL SHELF
PRESS OUT PLASTIC
FASTENERS SECURING
REAR PARCEL SHELF
(11 PLACES)
FIGURE 7
REMOVE HEADLINING TRIM
FASTENER (3 PLACES)
+
_
+
_
FD890
25NO98
G80-S4
Page 4 of 4
HOLDEN SERVICE PARTS OPERATIONS
Reproduction in whole or part
prohibited without written approval
Division of HOLDEN Ltd ACN 006 893 232
COPYRIGHT
16. Pull rear edge of headlining away from roof to
enable nutserts to be installed. Insert plastic
nutserts to two outboard holes in sheet metal, where
headlining fasteners were removed.
IMPORTANT: Nutserts must be installed with slot
horizontal, so nutsert is firm in hole once installed.
17. Refit headlining trim fastener to centre hole.
18. Attach two hooks to nutsert locations using screws
supplied in package.
19. Refit parcel shelf, being sure to insert all eleven
fasteners to sheet metal.
20. Refit child restraint anchor.
21. Reconnect high mount stop lamp wiring connectors
and refit high mount stop lamp.
22. Refit both side C pillar trims.
23. Refit both side rear seat belt anchors, bolts and
covers. Torque bolts 34 - 36 Nm.
24. Check operation of high mount stop lamp.
PARTS LIST
DESCRIPTION QUANTITY
BLIND, REAR WINDOW 1
SCREW 4
WASHER 4
NUT 4
HOOK, REAR BLIND 2
SCREW, SELF TAPPING 2
NUTSERT, PLASTIC 2
FIGURE 9
SEAT BELT
ANCHOR
SEAT BELT
ANCHOR BOLT
34 - 36Nm
SEAT BELT
ANCHOR
COVER
NUTSERT
(2 PLACES)
SELF TAPPING SCREW
(2 PLACES)
PLASTIC HOOK
(2 PLACES)
HEADLINING TRIM
REFIT CENTRE
FASTENER
FIGURE 4