FITTING INSTRUCTIONS FOR
VY AND WK STATESMAN/CAPRICE
FRONT ASHTRAY/CIGAR LIGHTER PACKAGE
Part Number 92146373
COPYRIGHT
Page 1 of 6
G790
Reproduction in whole or part
prohibited without written approval
HOLDEN SERVICE PARTS OPERATIONS
Division of HOLDEN Ltd ACN 006 893 232
FD1077
11MA03
Page 2 of 6
COPYRIGHT
Reproduction in whole or part
prohibited without written approval
TOOLS REQUIRED:
Special Tool KM6067
Phillips Head Screwdriver
Flat-blade Type Screwdriver
FITTING INSTRUCTIONS:
1. Disconnect the battery.
CAUTION: This may impact or damage electrical
systems in the vehicle, Body Control Module,
Entertainment System, Electric Sun Roof, etc unless
correct instructions are followed. Please contact your
Holden Retailer for further information.
NOTE: To reinstate the audio system, the security
code will be required.
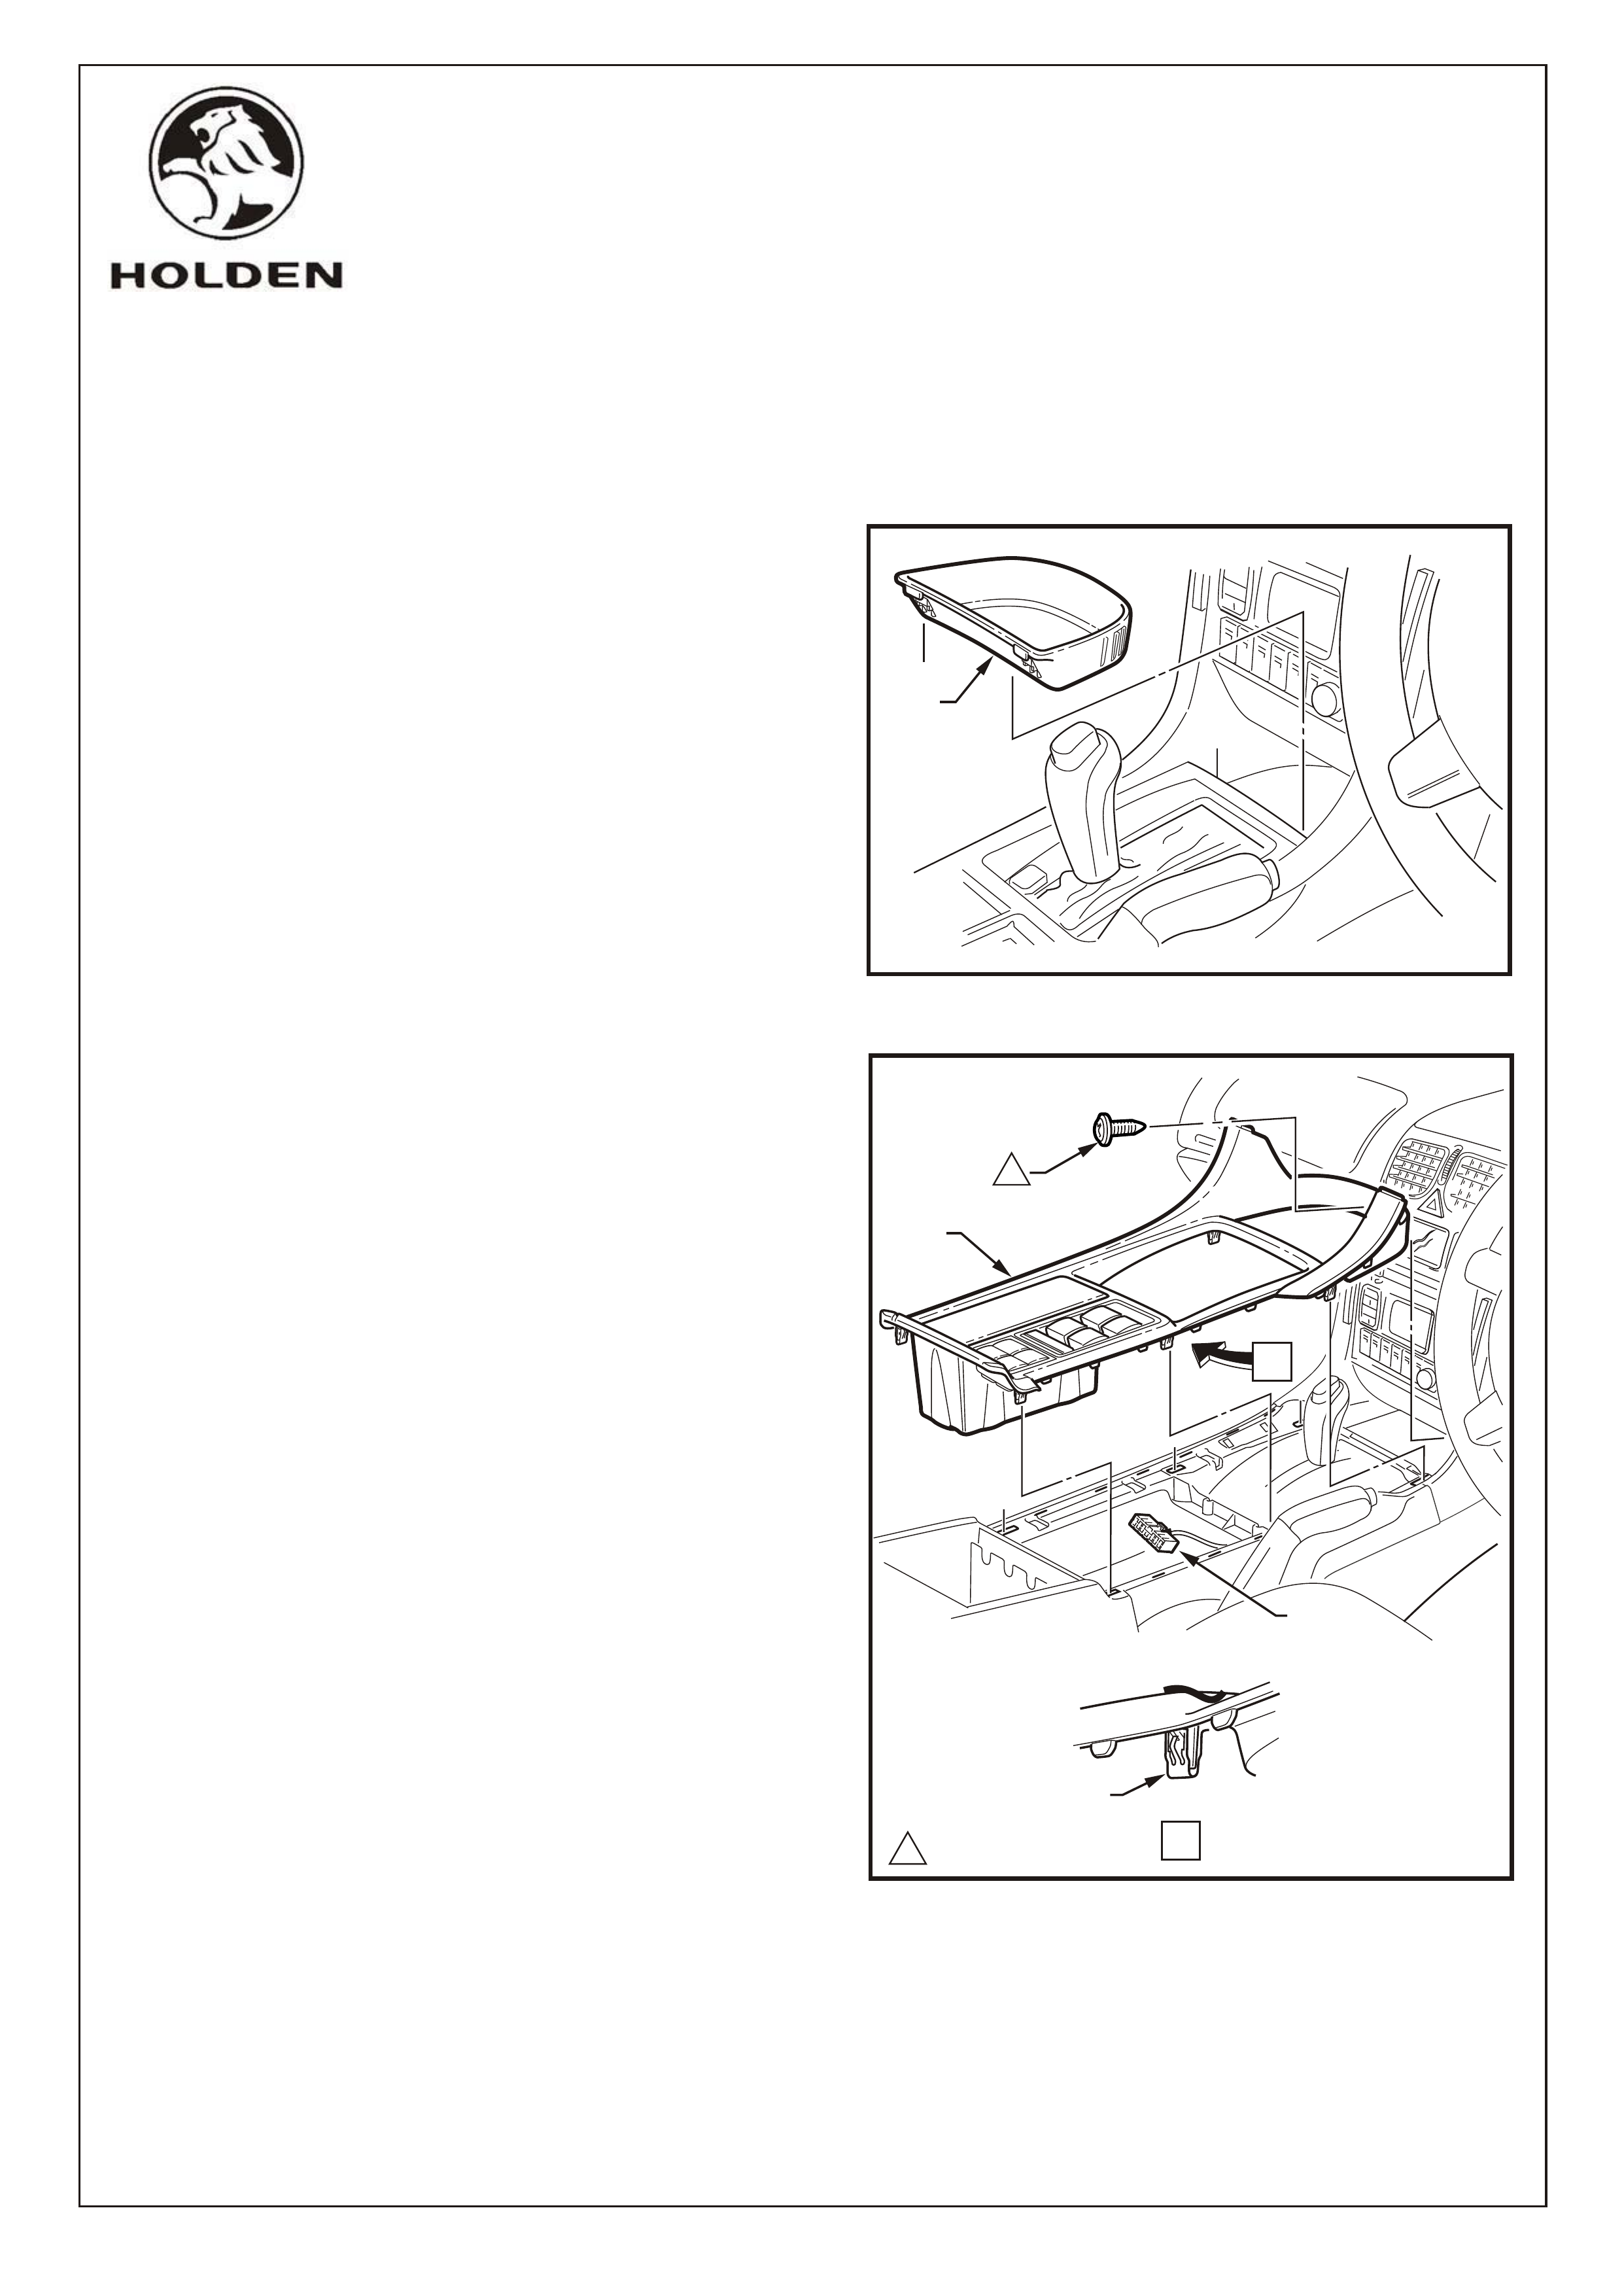
2. Remove the floor console front compartment liner
(1) by lifting upwards to disengage the retaining
lugs. Refer Figure 1.
3. Remove the screw (2) slightly to the right of centre
attaching the floor console cover assembly (3).
Refer Figure 2.
4. Prise the cover assembly (3) from the floor console,
clips, six places (4).
Lift the cover assembly up from the rear, disconnect
wiring connectors (5) from the side window switch and
hazard warning switch if fitted and remove the cover
assembly. Refer Figure 2.
FIGURE 1
FIGURE 2
1
2
5
1
11.0 - 3.0 Nm
A
A
3
4
HOLDEN SERVICE PARTS OPERATIONS
Division of HOLDEN Ltd ACN 006 893 232
G790
FITTING INSTRUCTIONS FOR
VY AND WK STATESMAN/CAPRICE
FRONT ASHTRAY/CIGAR LIGHTER PACKAGE
VY SHOWN
VY SHOWN
FD1077
11MA03

5. Remove the radio assembly as follows.
Refer Figure 3.
A. Insert Special Tools KM6067 (1) into the holes
on each side of the radio assembly.
B. While applying outwards pressure on the tools,
(towards each outer side of the radio), pull the
radio assembly out of the radio housing.
NOTE: The wiring connectors remain attached to
the radio housing and will disconnect on the
removal of the radio assembly.
6. VY ONLY
Carefully prise the front edge of the instrument
panel upper centre trim panel (1 ) and pull
upwards to disengage the retaining clips at each
corner from the centre trim assembly (2 ).
Refer Figure 4.
NOTE: A fine bladed screw driver may be used;
however take steps to ensure the trims are not
marked or damaged.
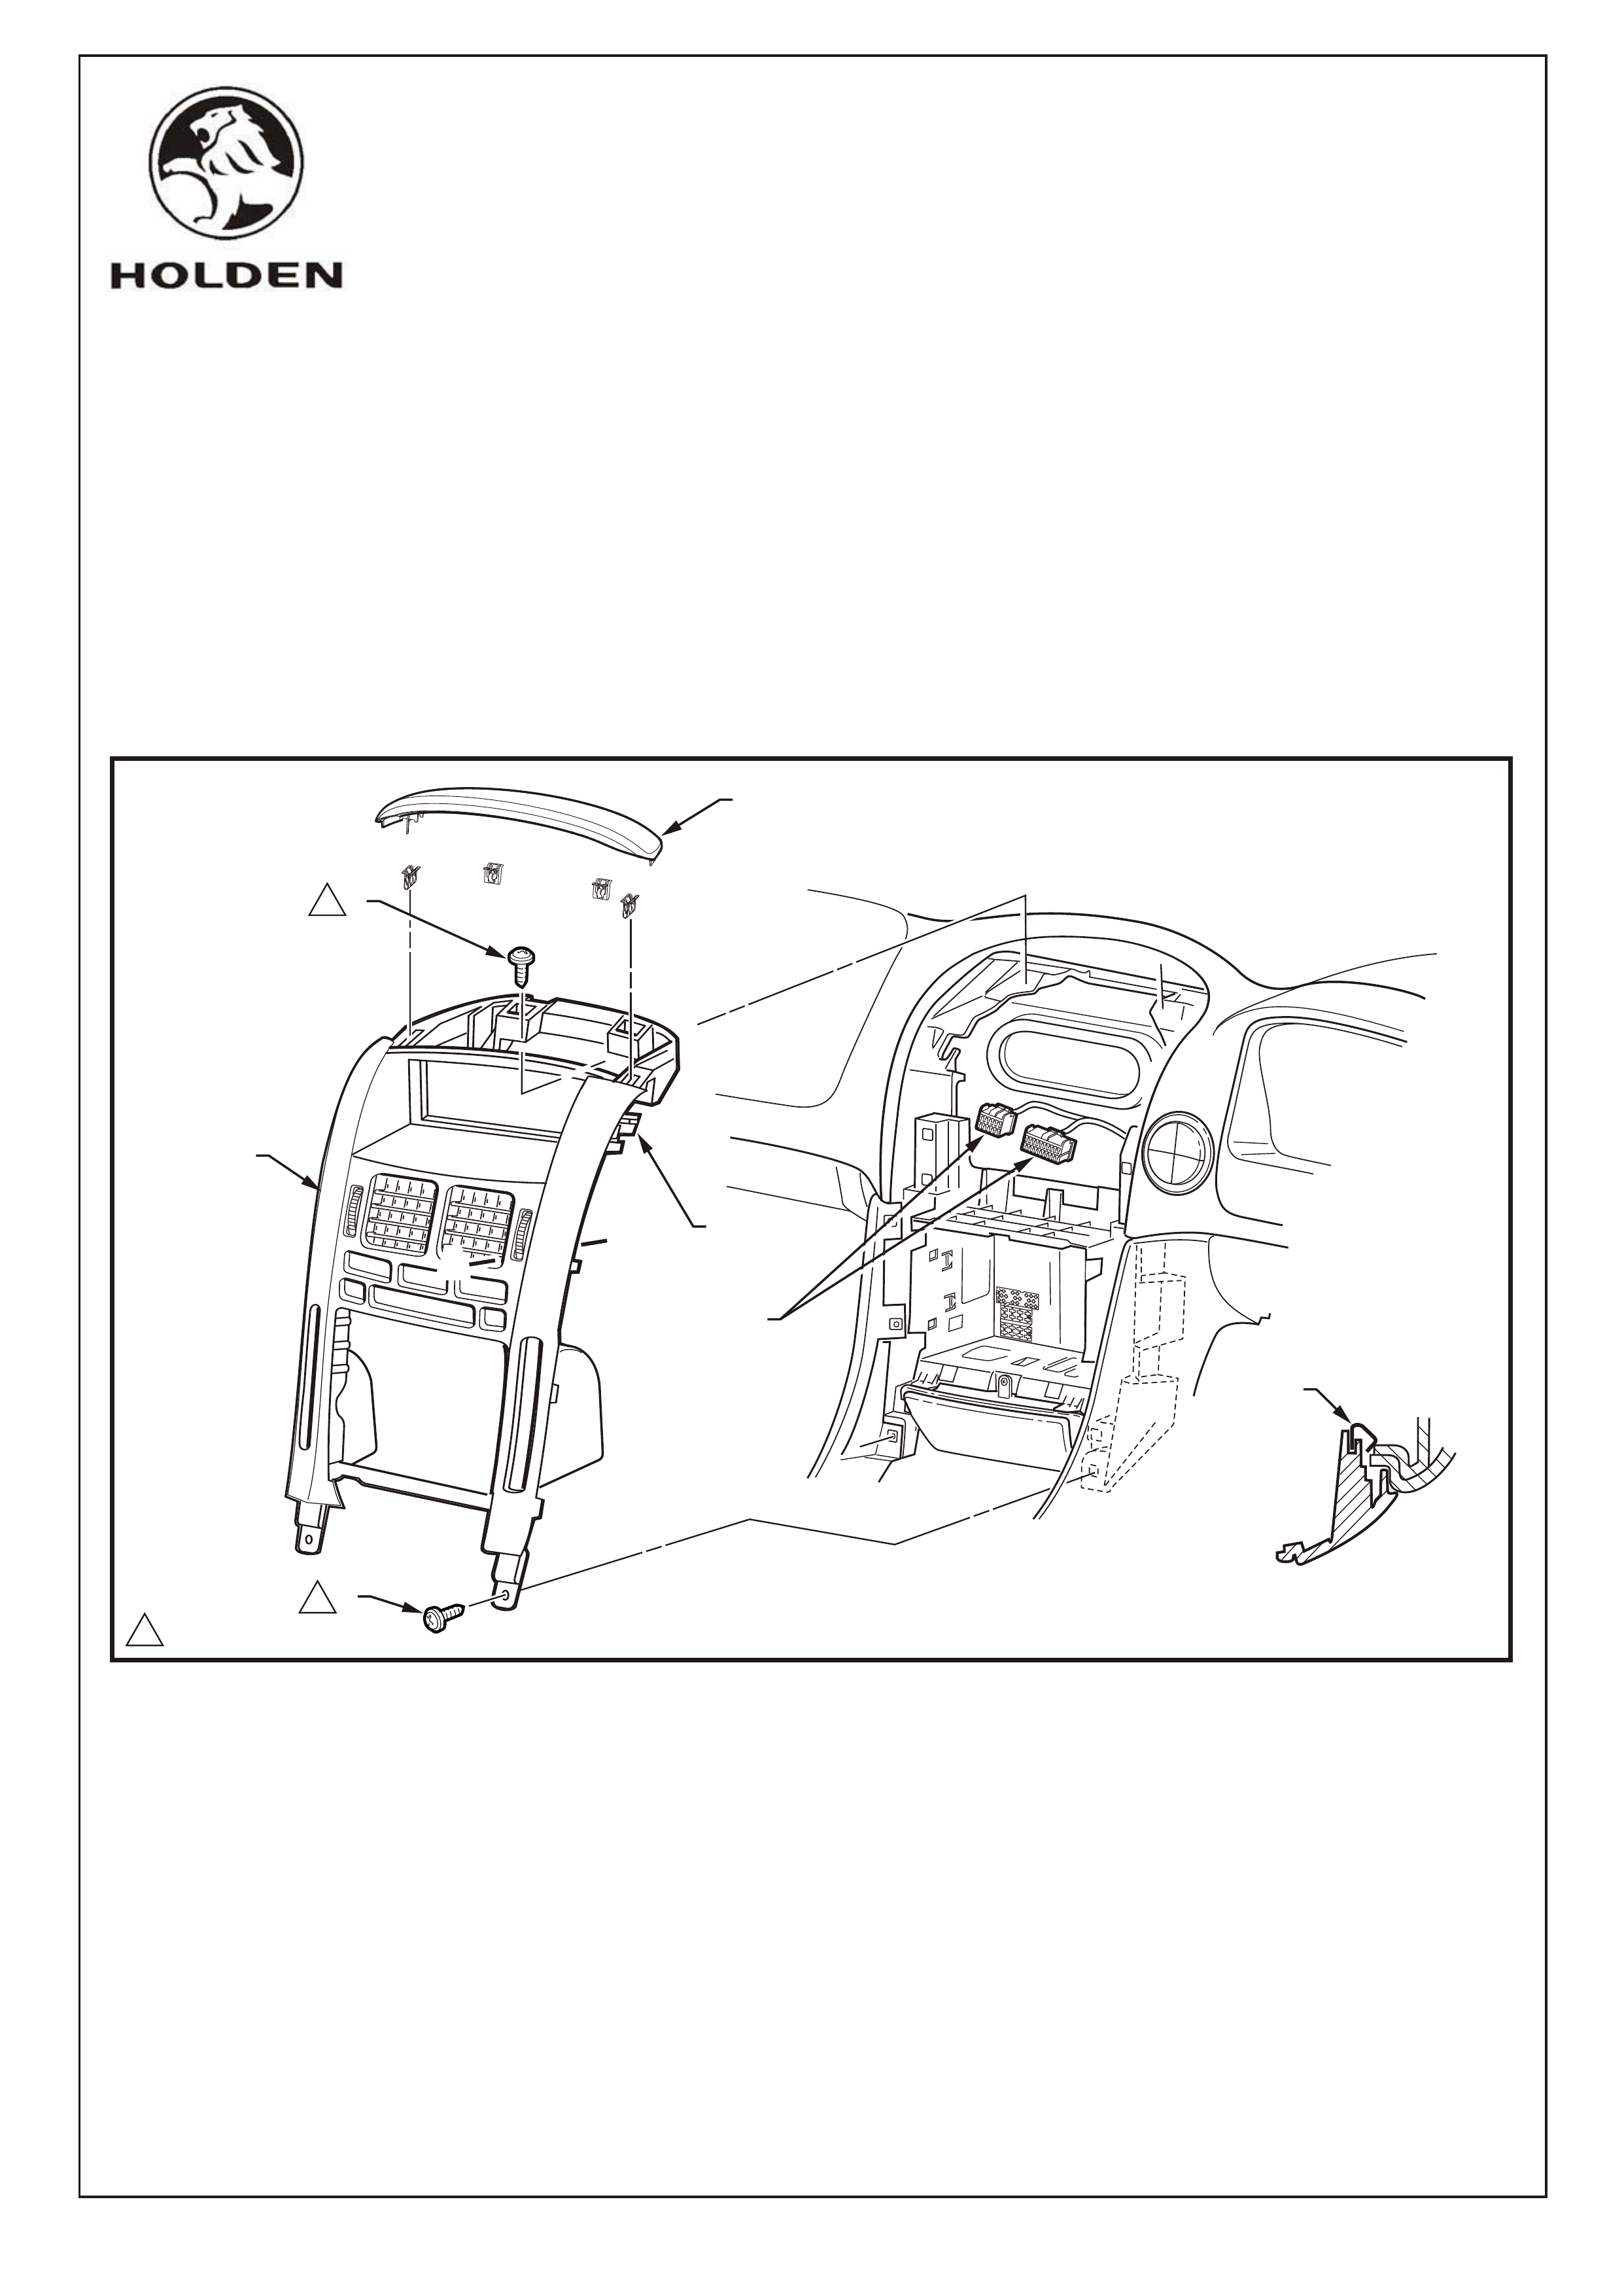
7. VY ONLY
Remove the upper and lower screws (3 ) - 6 places and remove the centre trim assembly (2), disengaging the
four clips (4), far enough to disconnect the wiring connectors from the rear hazard warning switch (5) where
fitted, the occupant climate control (OCC) module. Refer Figure 4.
NOTE: If Manual HVAC is fitted, the manual HVAC controller remains attached to the instrument panel.
1
Page 3 of 6
FIGURE 3
A
11.0 - 3.0 Nm
3
3
3
1
1
1
4
A-A
1
2
A
FIGURE 4
COPYRIGHT
Reproduction in whole or part
prohibited without written approval
4
5
G790
HOLDEN SERVICE PARTS OPERATIONS
Division of HOLDEN Ltd ACN 006 893 232
VY SHOWN
VY
FD1077
11MA03
Page 4 of 6
COPYRIGHT
Reproduction in whole or part
prohibited without written approval
G790
HOLDEN SERVICE PARTS OPERATIONS
Division of HOLDEN Ltd ACN 006 893 232
6. WK STATESMAN/CAPRICE
7. WK STATESMAN/CAPRICE
Carefully prise the front edge of the instrument panel upper centre trim panel (1) and pull upwards to
disengage the retaining clips at each corner from the centre trim assembly (2). Refer Figure 5.
NOTE: A fine bladed screw driver may be used; however take steps to ensure the trims are not marked or
damaged.
Remove the lower screws (3), 2 places, attaching the centre trim assembly to the instrument panel.
Remove the upper screws (4), 2 places, attaching the centre trim assembly to the instrument panel.
Remove the centre trim assembly, disengaging the four clips (5), far enough to disconnect the wiring
connectors (6) from the rear of the OCC control module.
Remove the centre trim assembly. Refer Figure 5.
11.0 - 3.0 Nm
5
5
A-A
2
A
4
3
1
1
1
A
FIGURE 5
WK
6
FD1077
11MA03
VIEW C
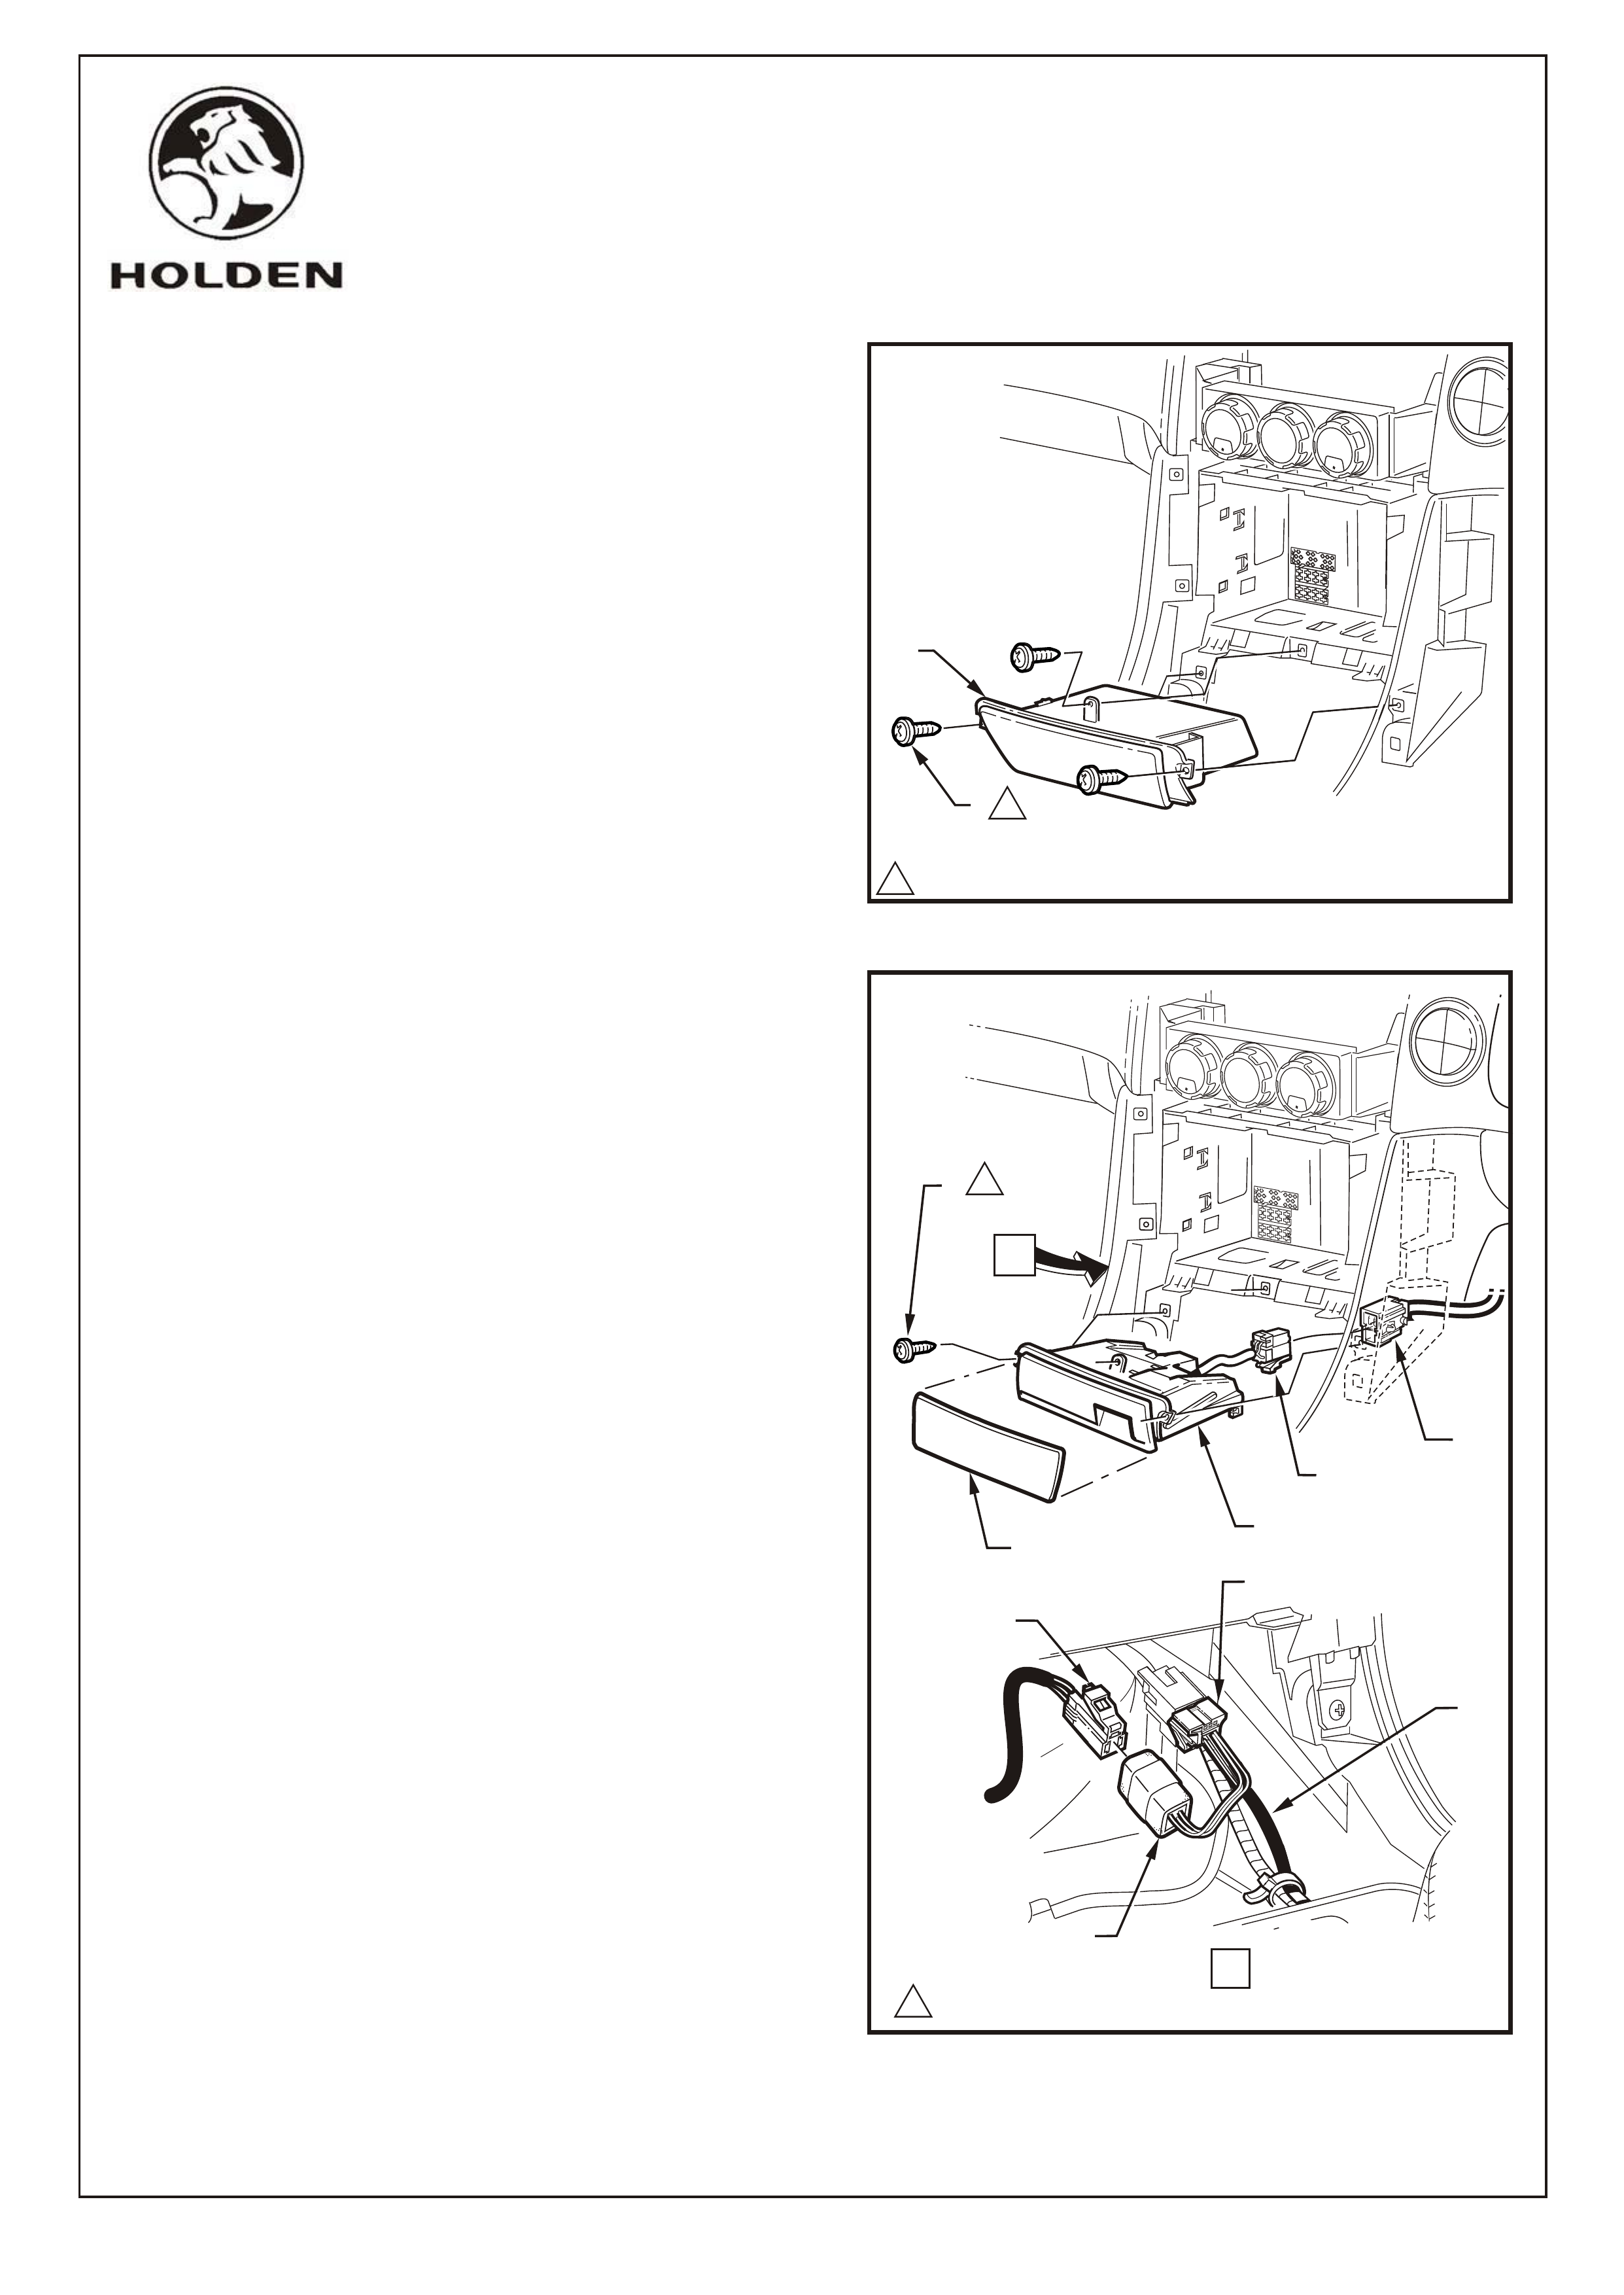
8. Remove the screw (1), attaching the instrument panel
lower compartment assembly, 3 places, (2) to the
instrument panel. Refer Figure 6.
9. Slide the compartment assembly outward to remove.
(Retain for possible later use).
11. Connect the ashtray assembly connector (3) to the
body harness connector (4) and slide the ashtray
inwards to install. Attach with the existing 3 screws (5).
Tighten to specified torque. Refer Figure 6.
NOTE: If a rear ashtray is fitted to the vehicle, untape
the unused connector (6) from the rear ashtray patch
harness (7) and plug into the front ashtray patch
harness connector (8). Leave the rear ashtray patch
harness (9) connected to the main wiring harness.
12. Reconnect battery and test the operation of the cigar
lighter. Reinstate the audio system by entering the
security code, refer to the owner’s manual.
13. Reinstall the centre trim assembly. Tighten the screws
to specified torque. Snap fit the upper centre trim
panel (1). Refer Figure 4, Page 3.
14. Reinstall the radio assembly. Refer Figure 3, Page 3.
15. Reinstall cover assembly (3) to the floor console,
ensuring all connectors are re-connected. Fix with
existing screw. Tighten to specified torque. Refer
Figure 2 , Page 2.
16. Reinstall the floor console front compartment liner (1).
Refer Figure 1, Page 2.
17. Place the fitting instructions in the vehicles glove
compartment.
10. Attach the front ashtray colour coded fascia (1) by
locating the top of the fascia on the ashtray (2) and
swinging the lower edge into position to achieve a
snap fit. Refer Figure 7.
NOTE: The ashtray fascia is not part of the package
and must be ordered as a separate part.
Page 5 of 6
COPYRIGHT
Reproduction in whole or part
prohibited without written approval
FIGURE 6
1.0 - 3.0 Nm
1
2
1
1
FIGURE 7
C
5
3
2
1
1.0 - 3.0 Nm
1
1
4
8
9
7
6
G790
HOLDEN SERVICE PARTS OPERATIONS
Division of HOLDEN Ltd ACN 006 893 232
VY SHOWN
VY SHOWN
FD1077
11MA03

VY AND WK STATESMAN/CAPRICE
FRONT ASHTRAY/CIGAR LIGHTER PACKAGE
Part Number 92146367
PART NUMBER DESCRIPTION QUANTITY
92146374 HOUSING ASM. - FRONT ASHTRAY 1
92146376 PLUNGER ASM. - CIGARETTE LIGHTER 1
92146377 RECEPTACLE - ASHTRAY 1
11062449 GLOBE - ASHTRAY LIGHTER 1
92146381 SOCKET & HARNESS ASM. - ASHTRAY 1
FD1077 FITTING INSTRUCTION BOOKLET 1
PARTS SUPPLIED SEPARATELY, NOT PART OF THE PACKAGE
VY
92146289 FASCIA ASHTRAY (CARRE MAPLE) 1
92146290 FASCIA ASHTRAY (DARK TEMPEST) 1
92146291 FASCIA ASHTRAY (CHARCOAL MAPLE) 1
92146292 FASCIA ASHTRAY (SS BLACK) 1
WK STATESMAN/CAPRICE
92146472 FASCIA ASHTRAY (GREY GOLD)) 1
PARTS LIST
Page 6 of 6
COPYRIGHT
Reproduction in whole or part
prohibited without written approval
G790
FD1077
11MA03
HOLDEN SERVICE PARTS OPERATIONS
Division of HOLDEN Ltd ACN 006 893 232