Division of HOLDEN Ltd ACN 006 893 232
FD1171
19MA04
COPYRIGHT
Reproduction in whole or part
prohibited w ithout written appr oval
FITTING IN STRUCTIONS FOR
AWD WAGON CARGO NET
Part No. 92169495
FITTING INSTRUCTIONS:
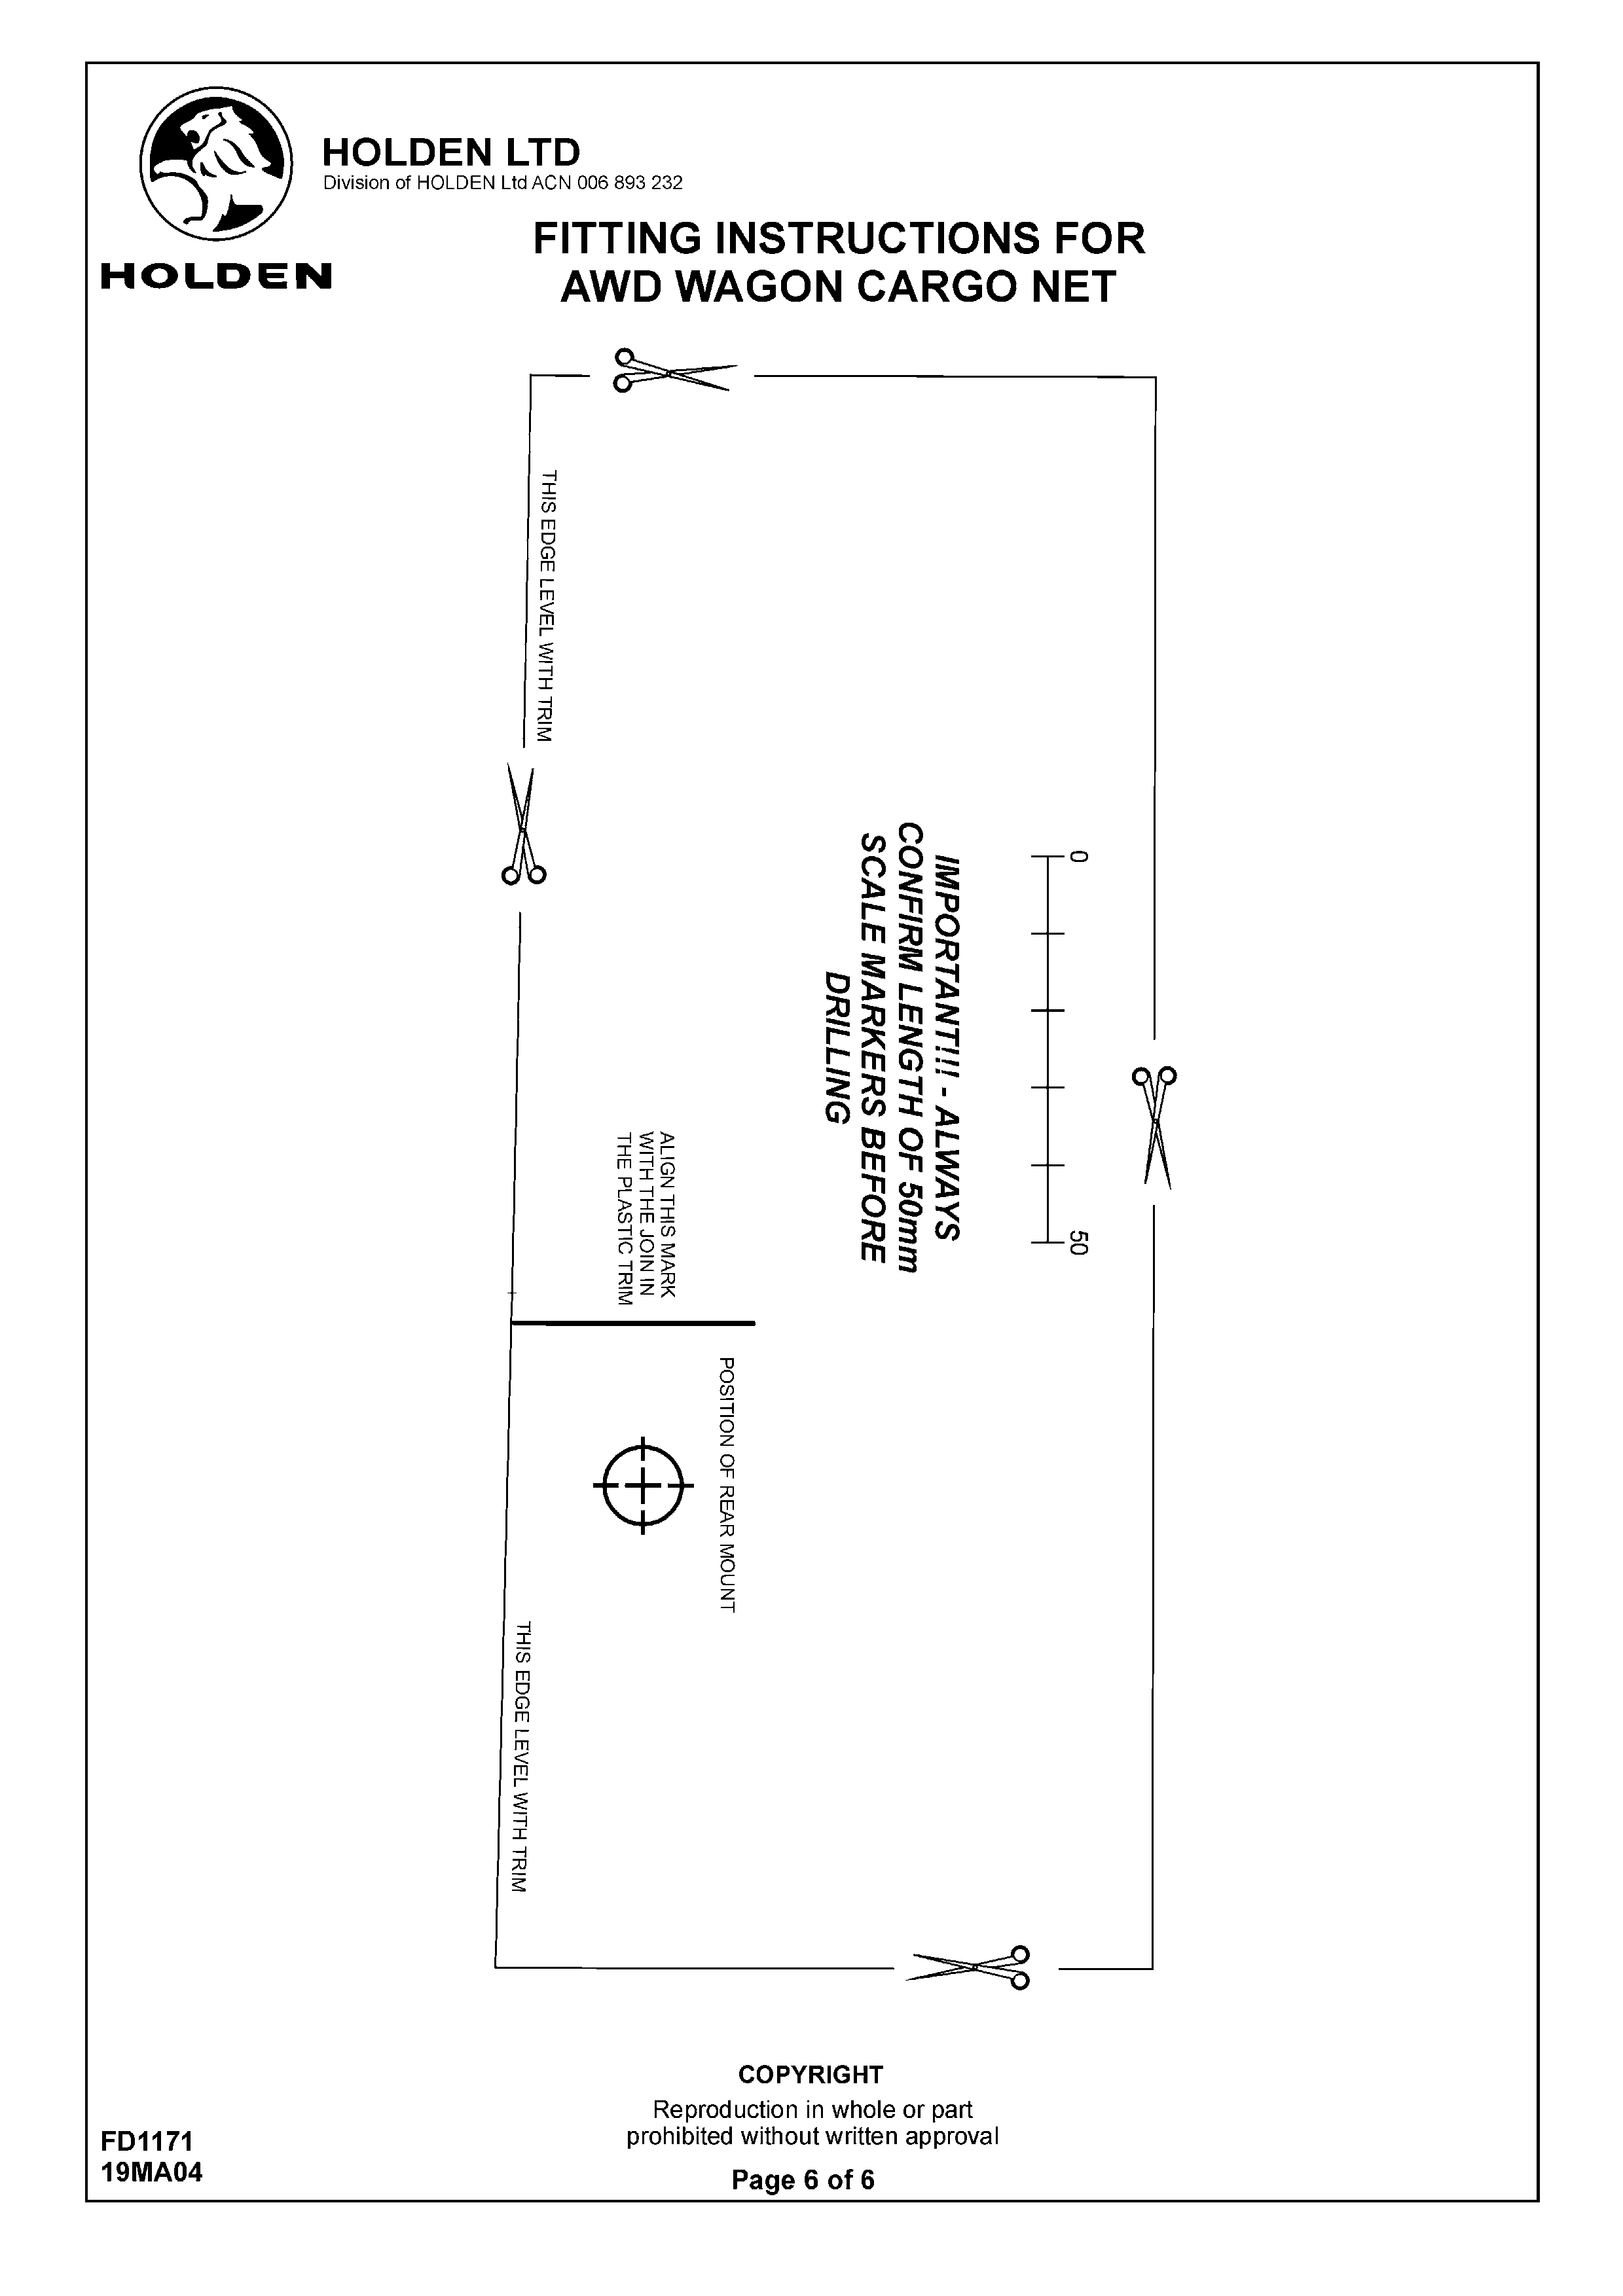
SCALE.
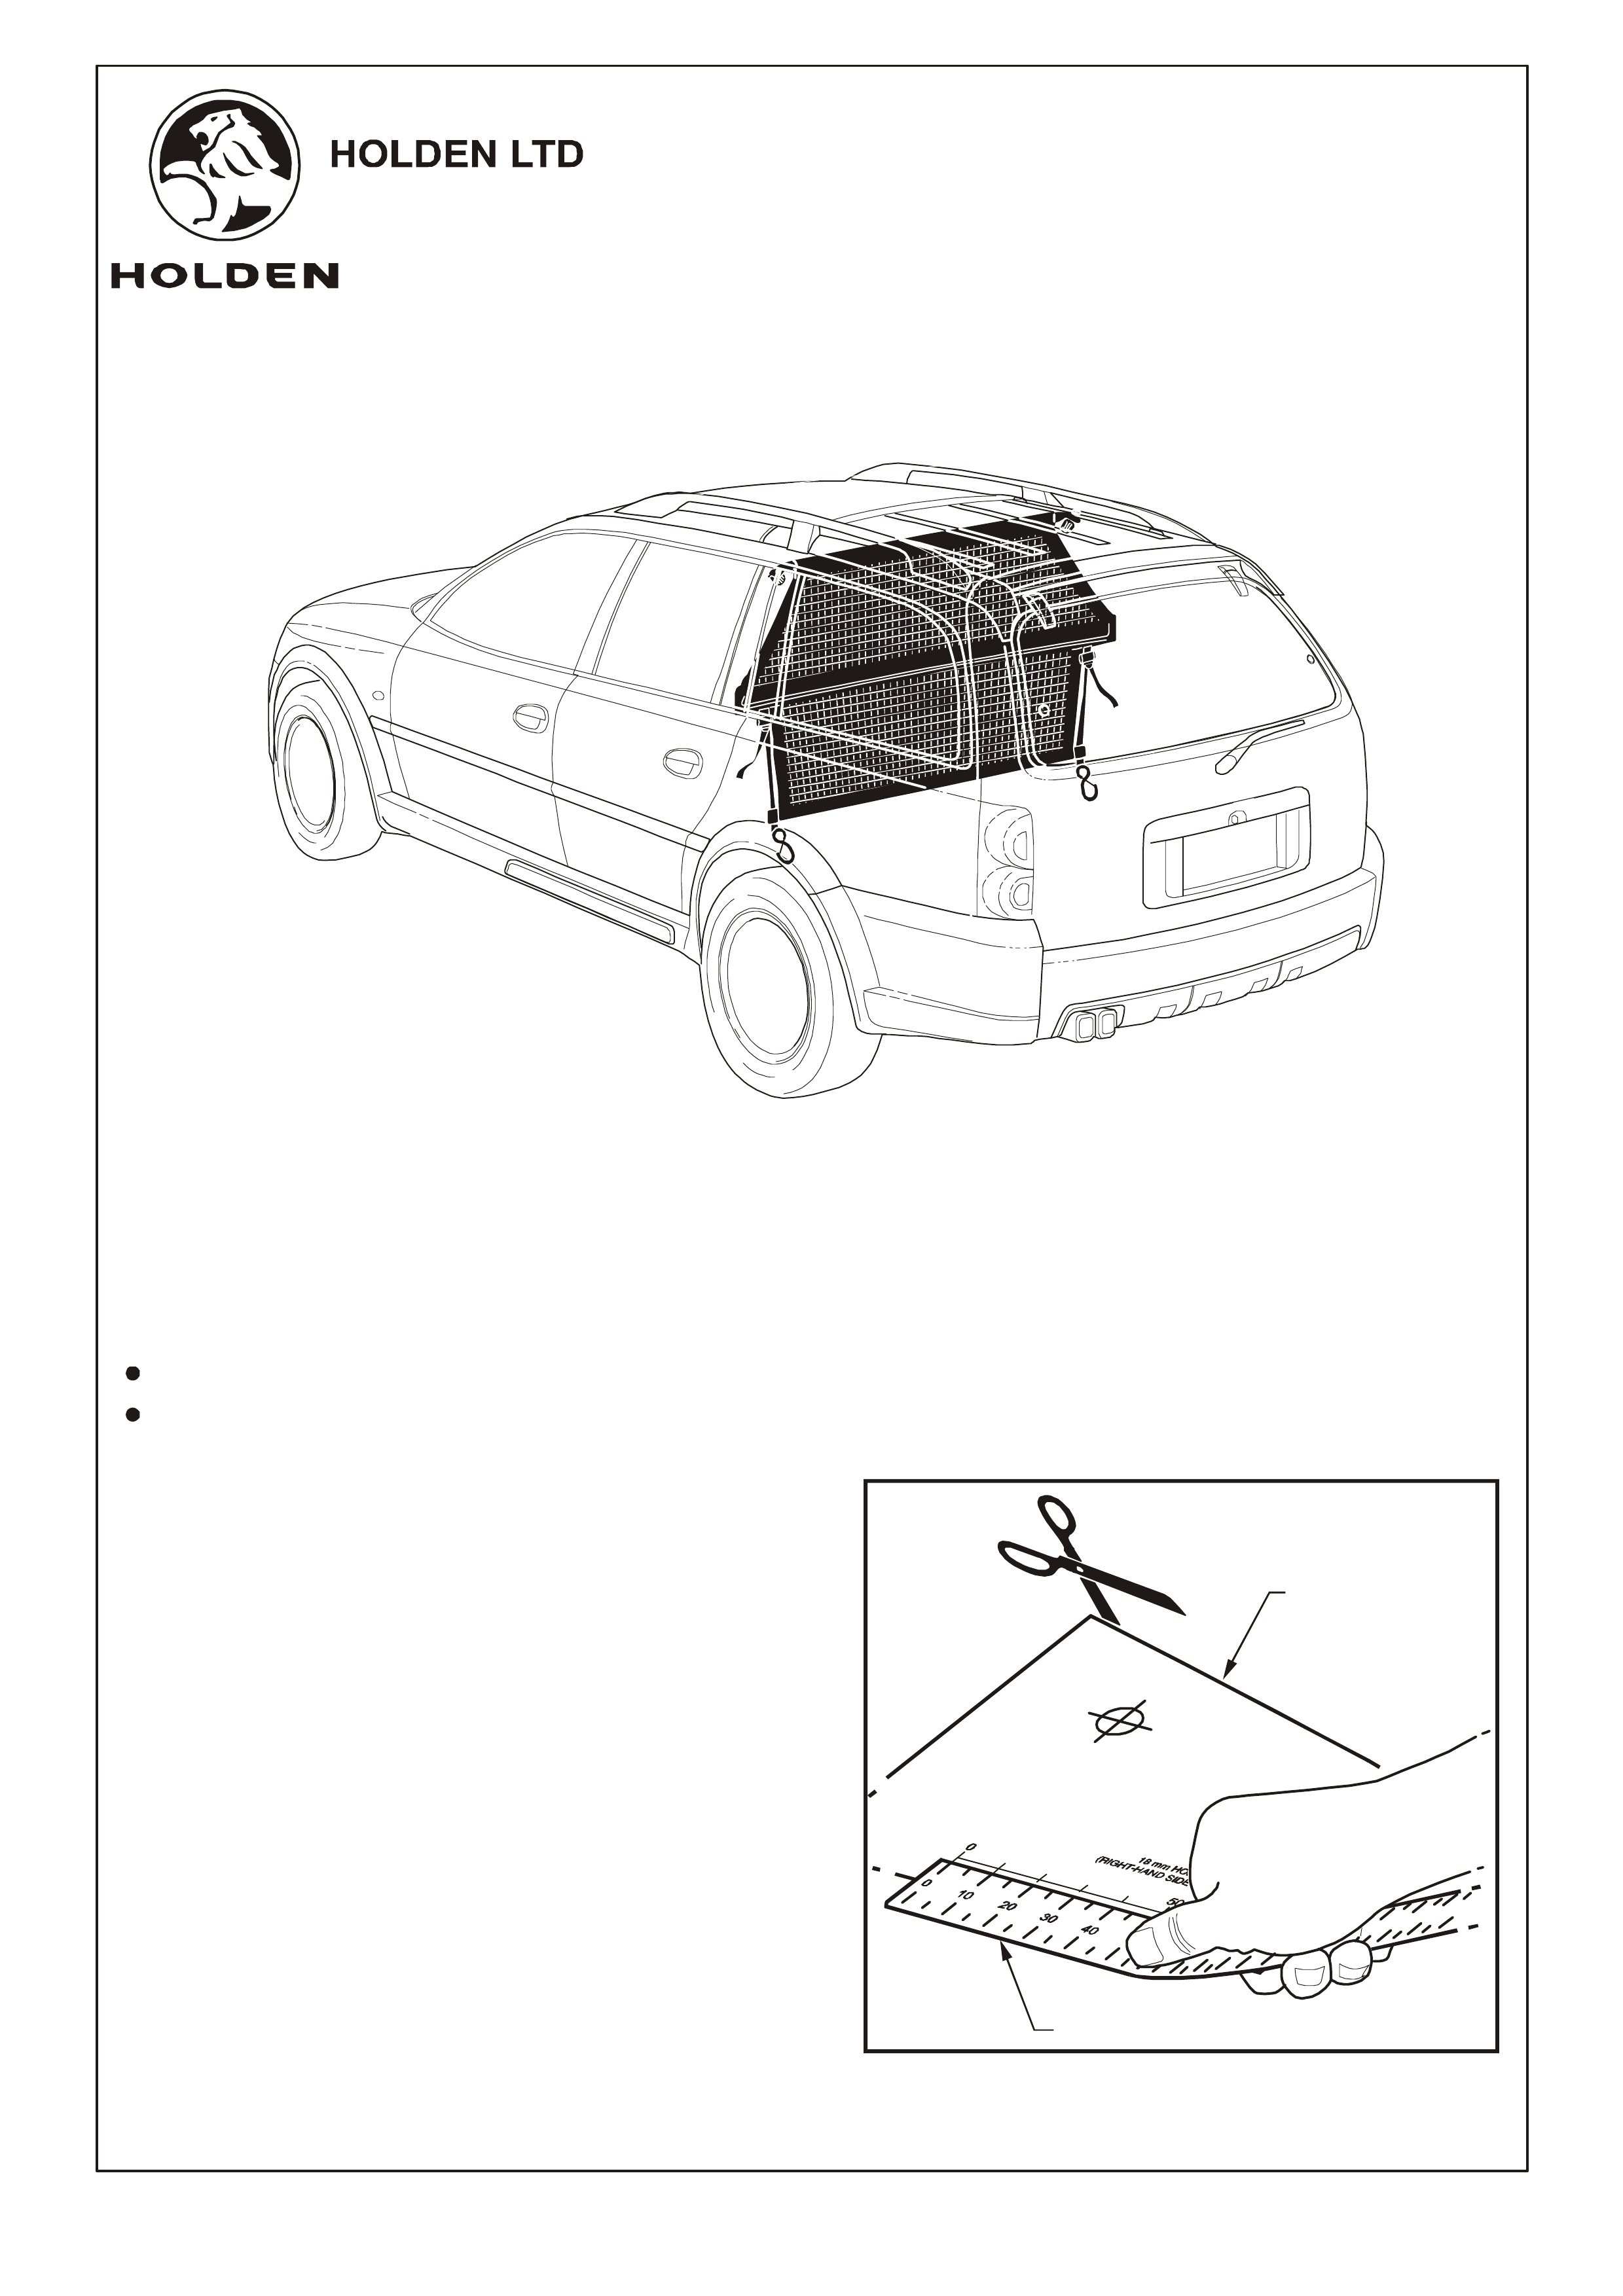
Refer to Figure 1.
1. Where the roof lining cover plugs are not installed above
the rear seats, use the following procedure to locate and
drill the necessary holes in the roof lining.
a. Cut out the drilling template on Page 6.
IMPORTANT: ENSURE THE TEMPLATE IS THE
CORRECT SIZE BY MEASURING THE
FIGURE 1
COPY & CUT
OUT TEMPLATES
CHECK SCALE
TOOLS REQUIRED:
Drill, Marker,10mm Drill Bit, 25mm Vinyl Cutting Tool, Sharp Knife.
WARNING:
The carg o net is desi gned to preve nt ligh t items from b eing toss ed around the cab in in the event of heavy
breaking or collision. For heavier loads it is recommended that a Holden approved cargo barrier is used.
IMPORTANT:
The cargo net is designed to be fitted behind the rear seat only and must not be fitted in any other position.
Do not use the cargo net when the rear seat is folded down.
Page 1 of 6
Division of HOLDEN Ltd ACN 006 893 232
FD1171
19MA04
COPYRIGHT
Reproduction in whole or part
prohibited w ithout written appr oval
FITTING IN STRUCTIONS FOR
AWD WAGON CARGO NET
Page 2 of 6
FITTING INSTRUCTIONS:
Continued...
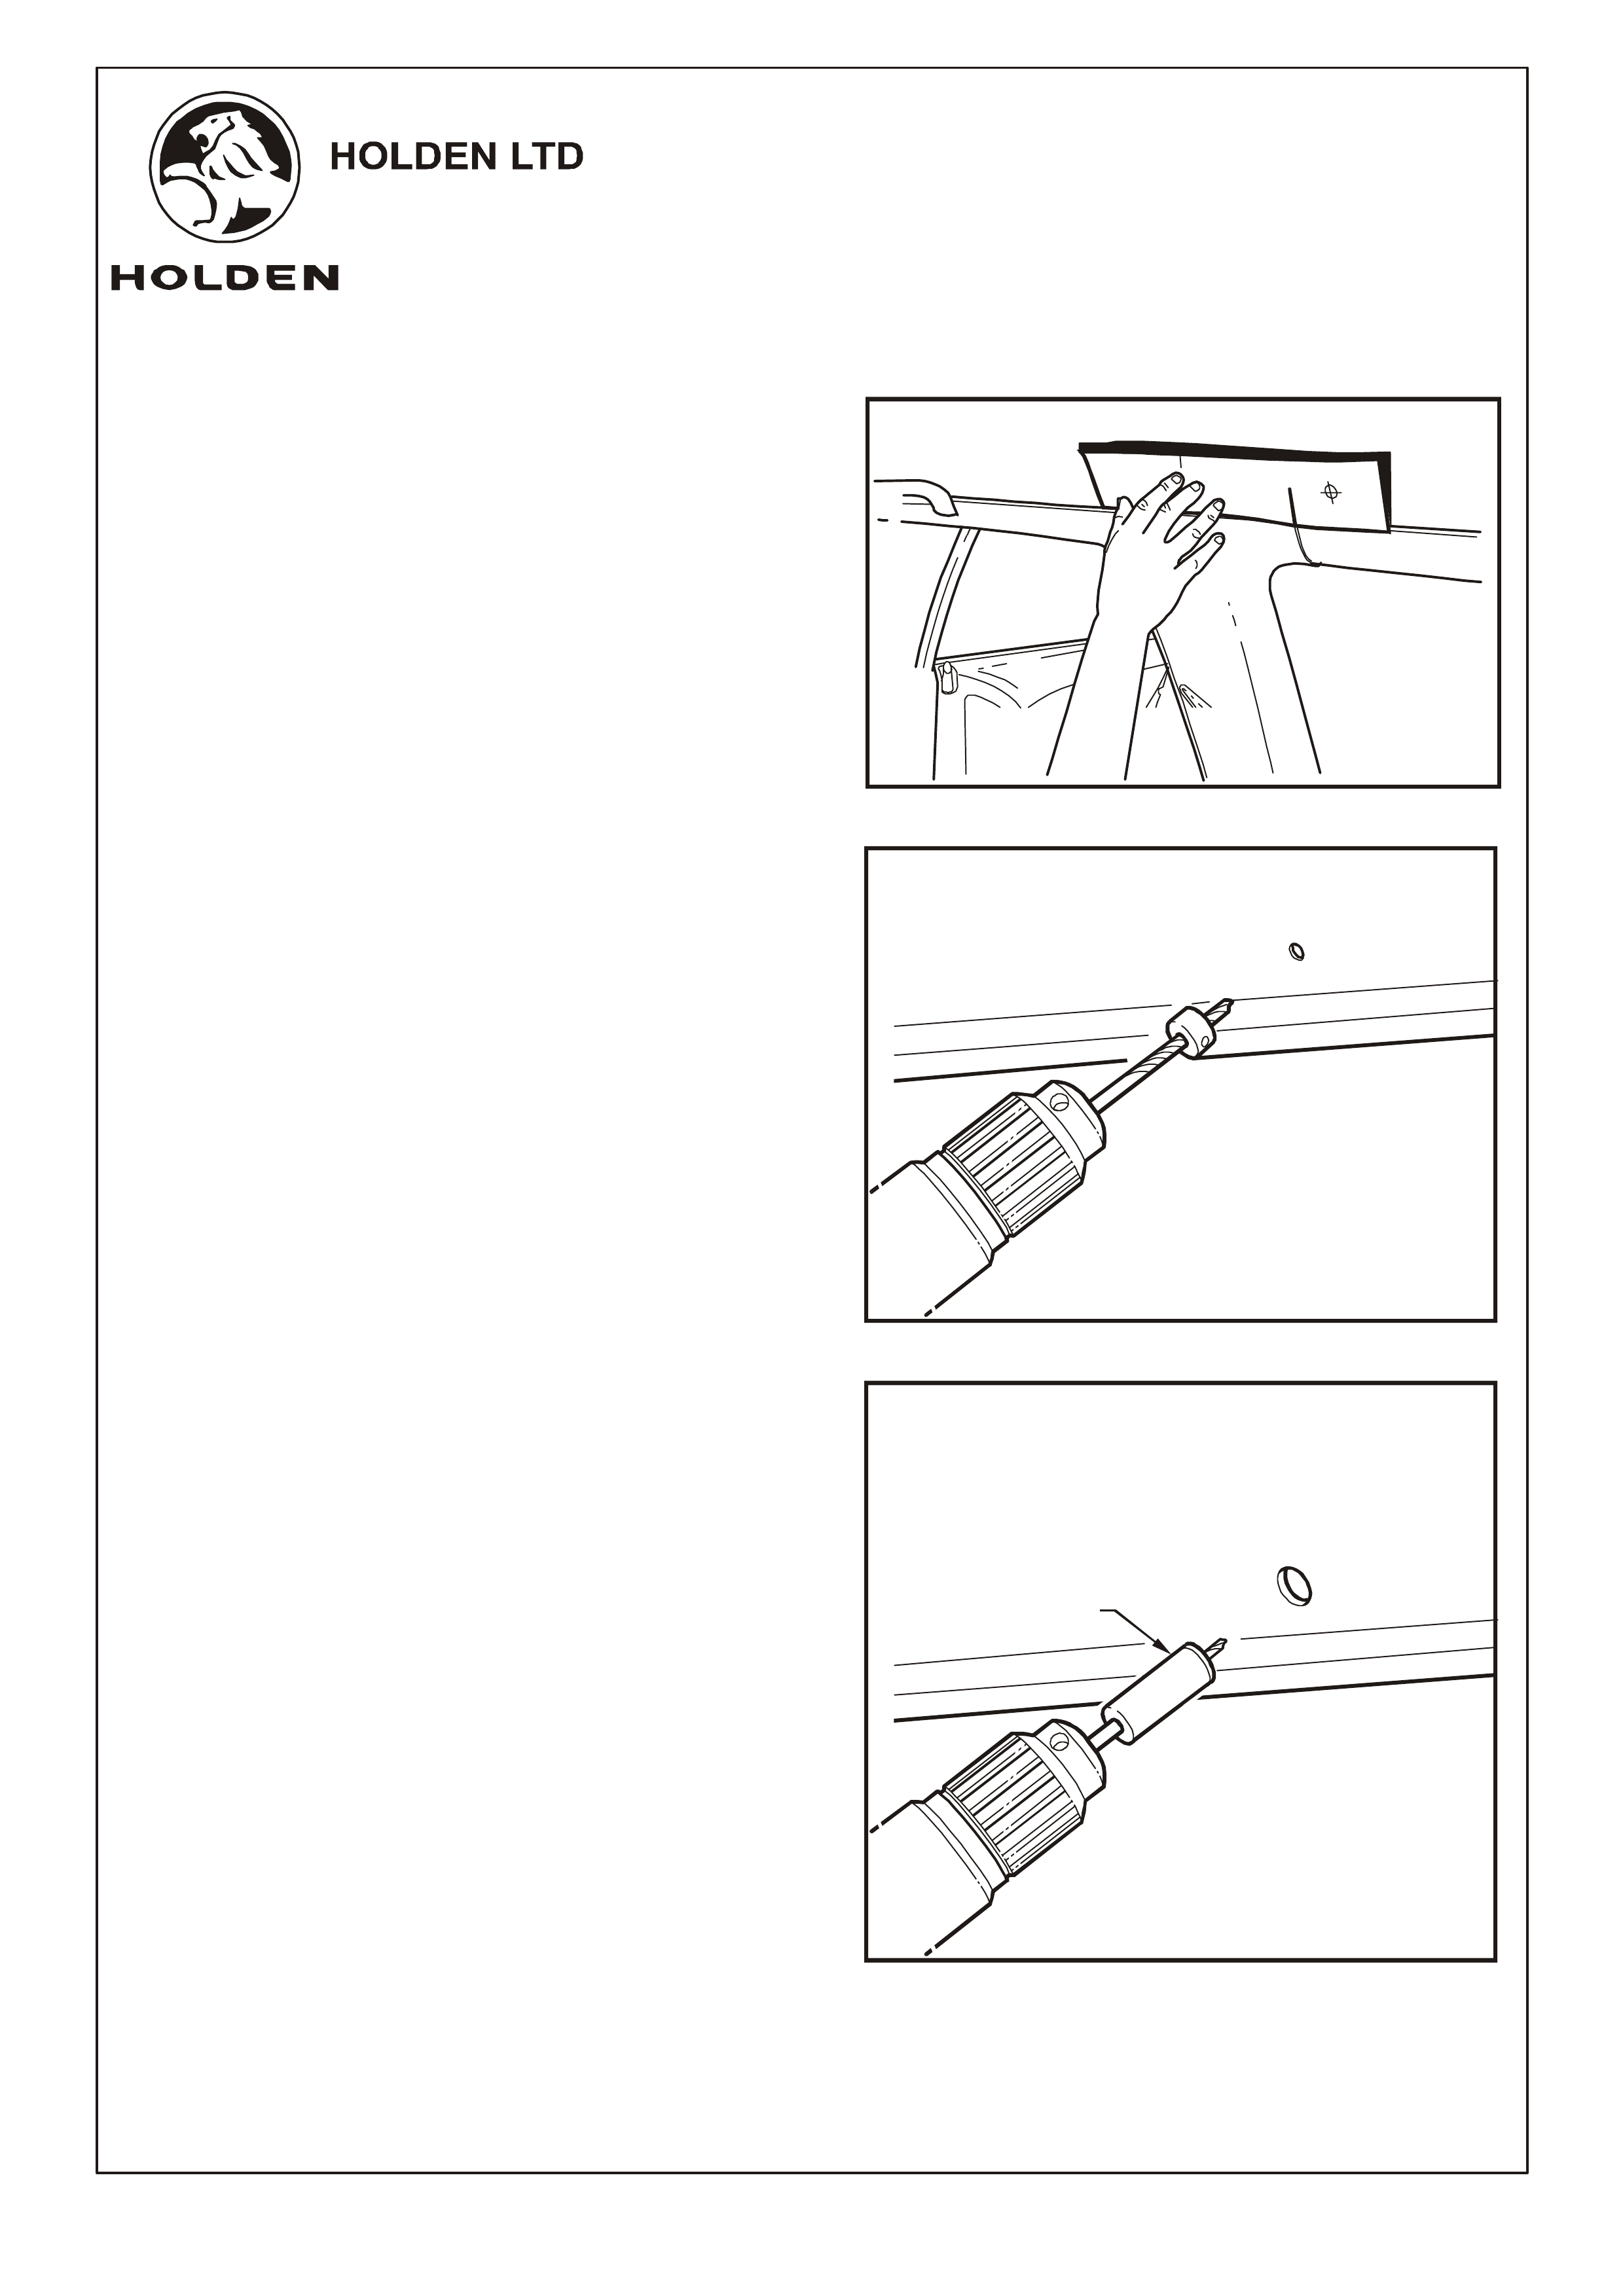
b. Use the markings on the roof lining drilling template
to place the te mplate in the correct positio n to locate
the required roof point on the right-hand side of the
ve h ic le. M a rk the ro o f m o u n t lo ca ti o n s w i th a fe l t ti p
pen. Use the flip-side of the template to repeat
marking on the other side of the vehicle. Refer to
Figure 2.
Using a 10mm drill bit (with the drill depth guide
set 10 mm back fr om th e end of th e dri l l bi t) ma ke a
hole in the roof lining at the loc ations marked out in
Step 3 t o prevent damage to the outer skin of the
vehicle when the drill bit cuts through the roof lining.
Refer to Figure 3.
: It is recommended that the drill bit be running
in reverse when making these holes.
d. Change t o a 25mm vin yl cut ti ng tool wi th mandrel
attached and drill out the roof lining mounting
locations on both sides of the vehicle. Refer to
Figure 4.
It may be necessary to remove the last bit of
roof lining from these holes with a sharp knife.
IMPORTANT:
NOTE
IMPORTANT:
NOTE:
Accurate alig nme nt of th e dr illi ng
template is critical to ensure that the roof mount
hole positions marked on the template align with
the pre-existing roof mount brackets behind the
vehicle roof trim.
c.
A Vinyl cutting tool should be used
for all soft material (i.e: roof lining, floor
covering, etc). A vinyl cutter can be made by
grinding the teeth from a hole-saw at an angle of
about 45 degrees.
FIGURE 2
FIGURE 3
ROOF LINING
SOFT TRIM
FIGURE 4
25mm VINYL
CUTTER WITH
MANDREL
ROOF LINING
SOFT TRIM
Division of HOLDEN Ltd ACN 006 893 232
FD1171
19MA04
COPYRIGHT
Reproduction in whole or part
prohibited w ithout written appr oval
FITTING IN STRUCTIONS FOR
AWD WAGON CARGO NET
FITTING INSTRUCTIONS:
Continued...
e. Fit the two (1) i nto the holes on each
side of the vehicle. Refer to Figure 5.
3. Remove cargo net assembly from carrier bag.
Refer to Figure 7 for the following:
roof mounts
2. If fitt ed, remov e the ti e-do wn rail cover s (1), from bot h
ti e-down rai ls (2 ) on each sid e of car go ar ea. Refe r to
Figure 6.
4. Align each cargo net quick release nut (1) with the roof
mounts (2), (2 places).
5. Push the pin on the quick release nut firmly into the roof
mounts and turn 90 degrees to engage. When the white
line on the nut is vertical, the nut is fully engaged.
6. Pull down on the top bar to ensure that it is secure.
FIGURE 7
1
2
FIGURE 6
1
2
1
FIGURE 5
Page 3 of 6
Page 4 of 6
Division of HOLDEN Ltd ACN 006 893 232
FD1171
19MA04
COPYRIGHT
Reproduction in whole or part
prohibited w ithout written appr oval
FITTING IN STRUCTIONS FOR
AWD WAGON CARGO NET
FITTING INSTRUCTIONS:
Continued...
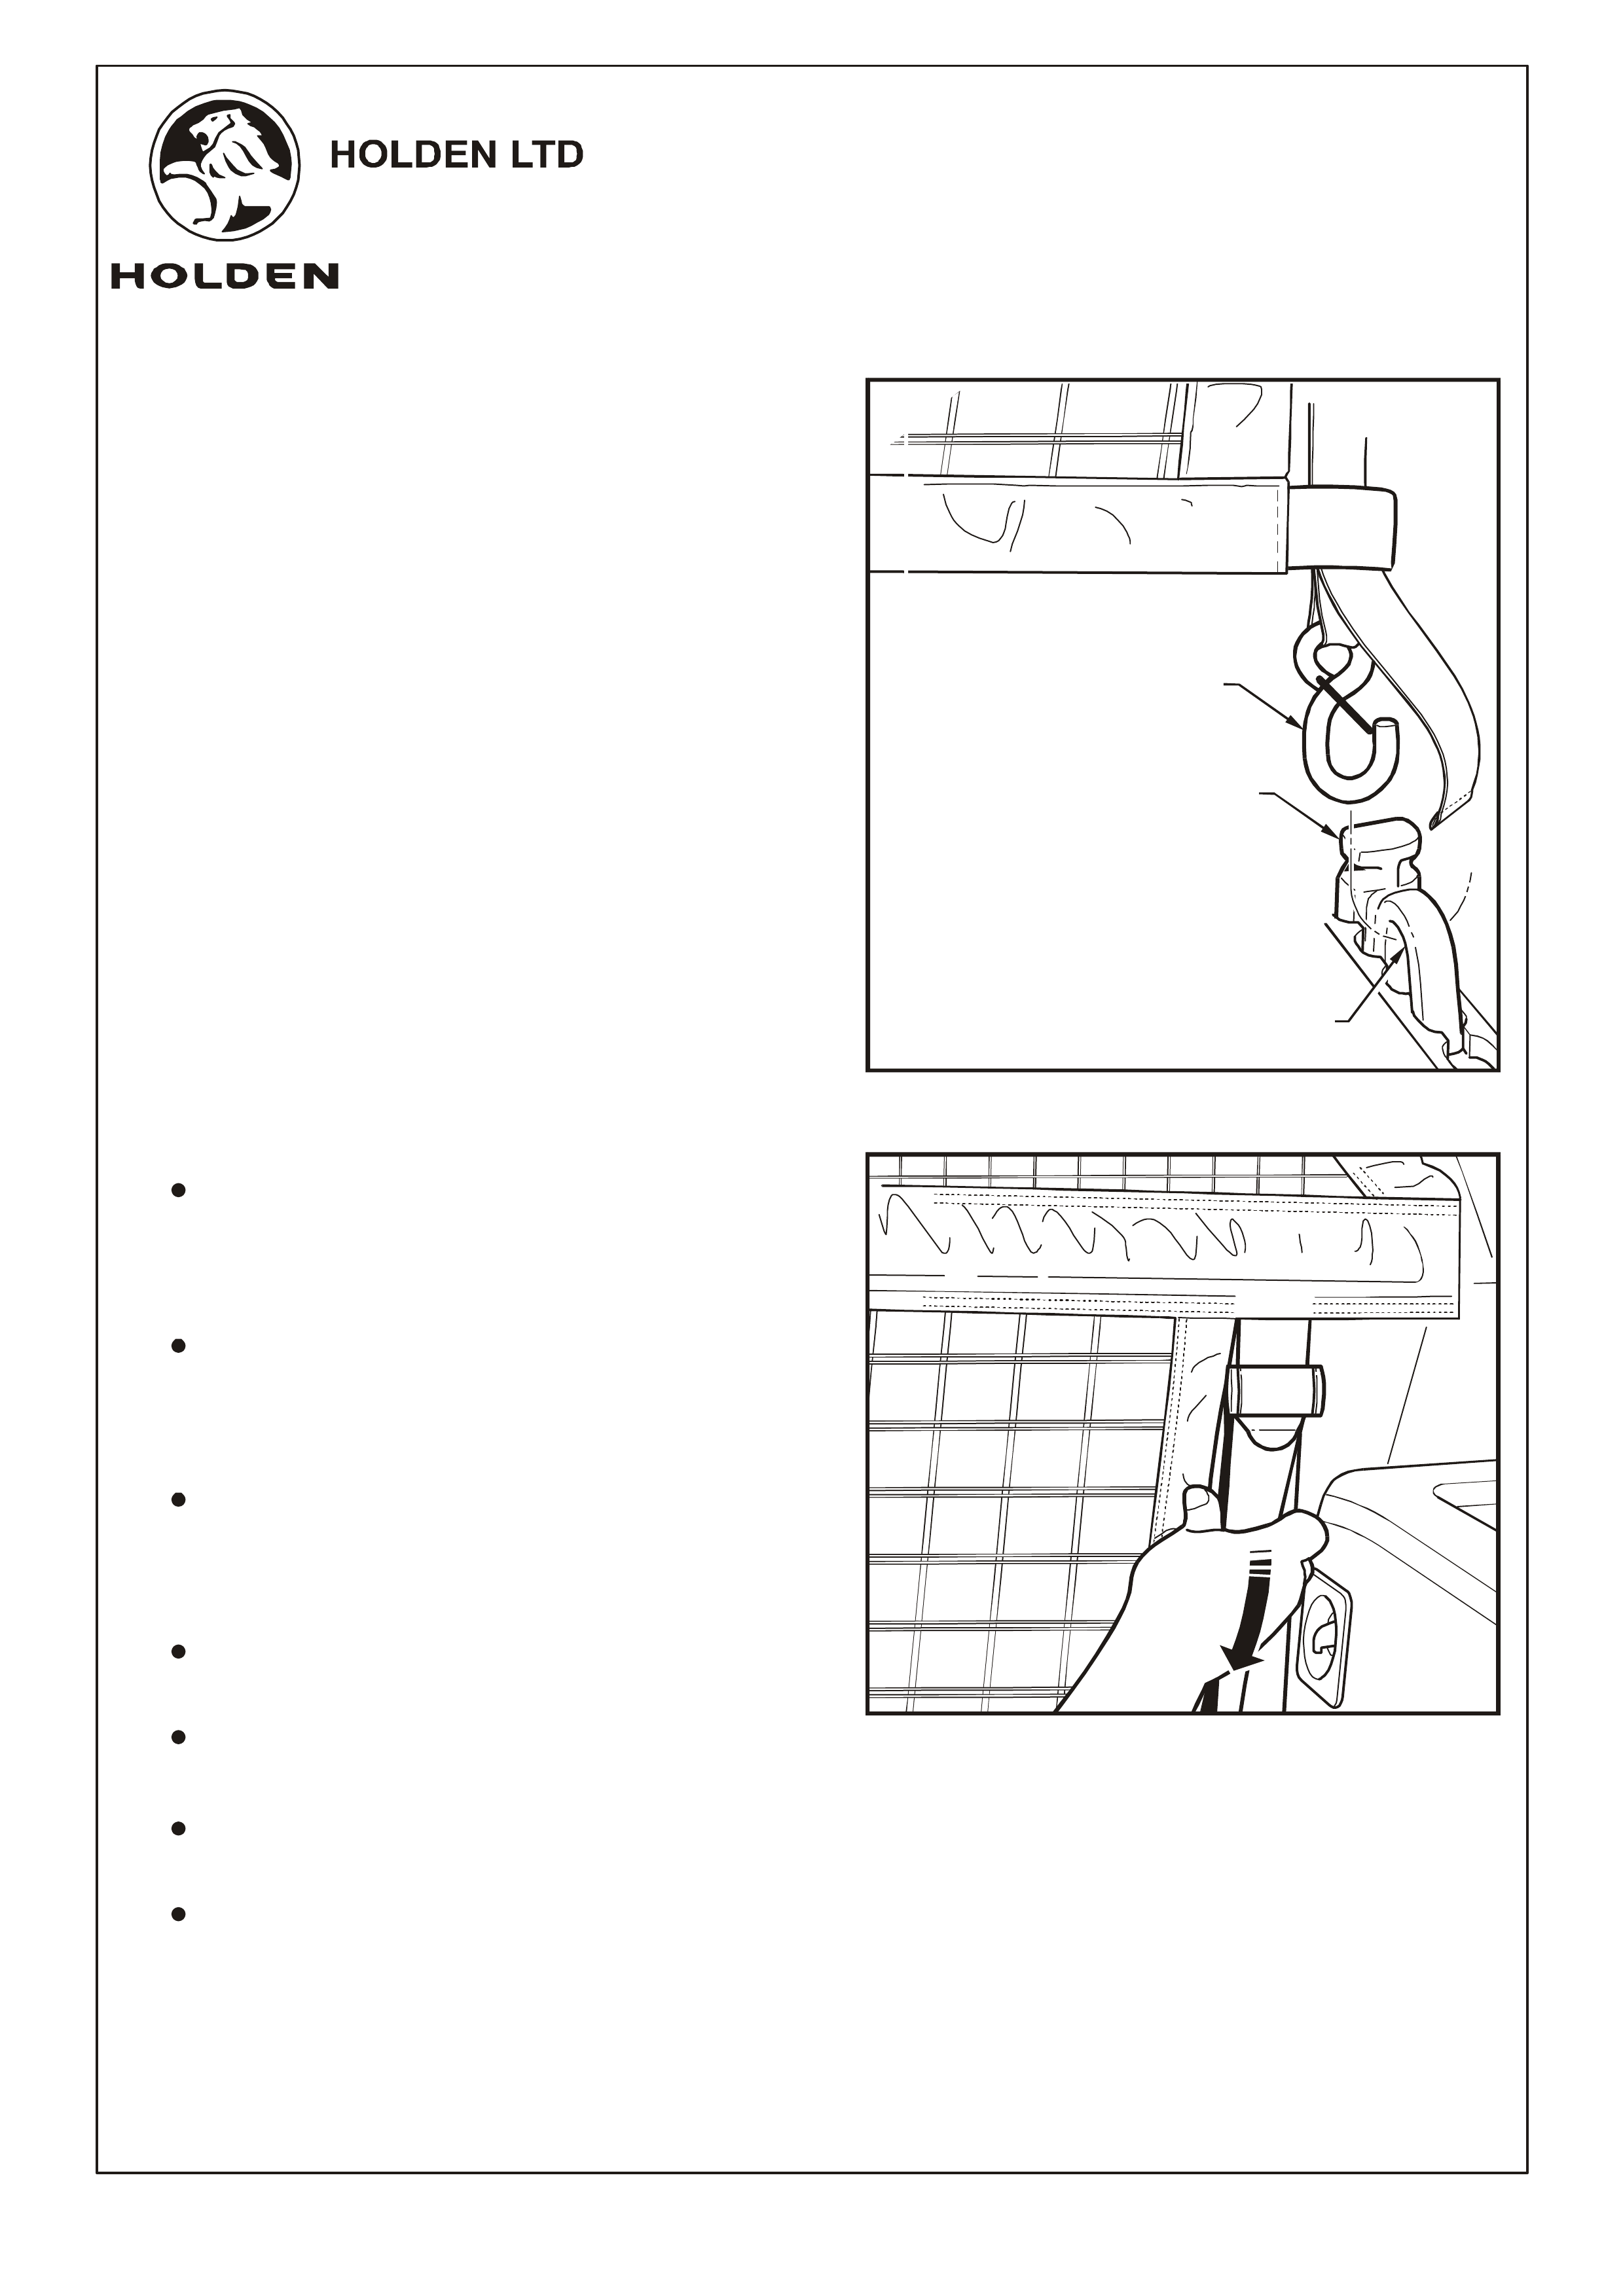
Refer to Figure 8 for the following:
7. Install anchor lock (not supplied) (1), directly below
cargo net on each tie-down rail (2 places). Lift the
anchor lock locking pin (2) to slide the anchor lock for
positioning as required.
Anchor locks are generally stored in the rear
drivers side compartment o f the vehicle.
8. Connect the cargo net tension strap hooks (3) onto the
anchor locks at both sides.
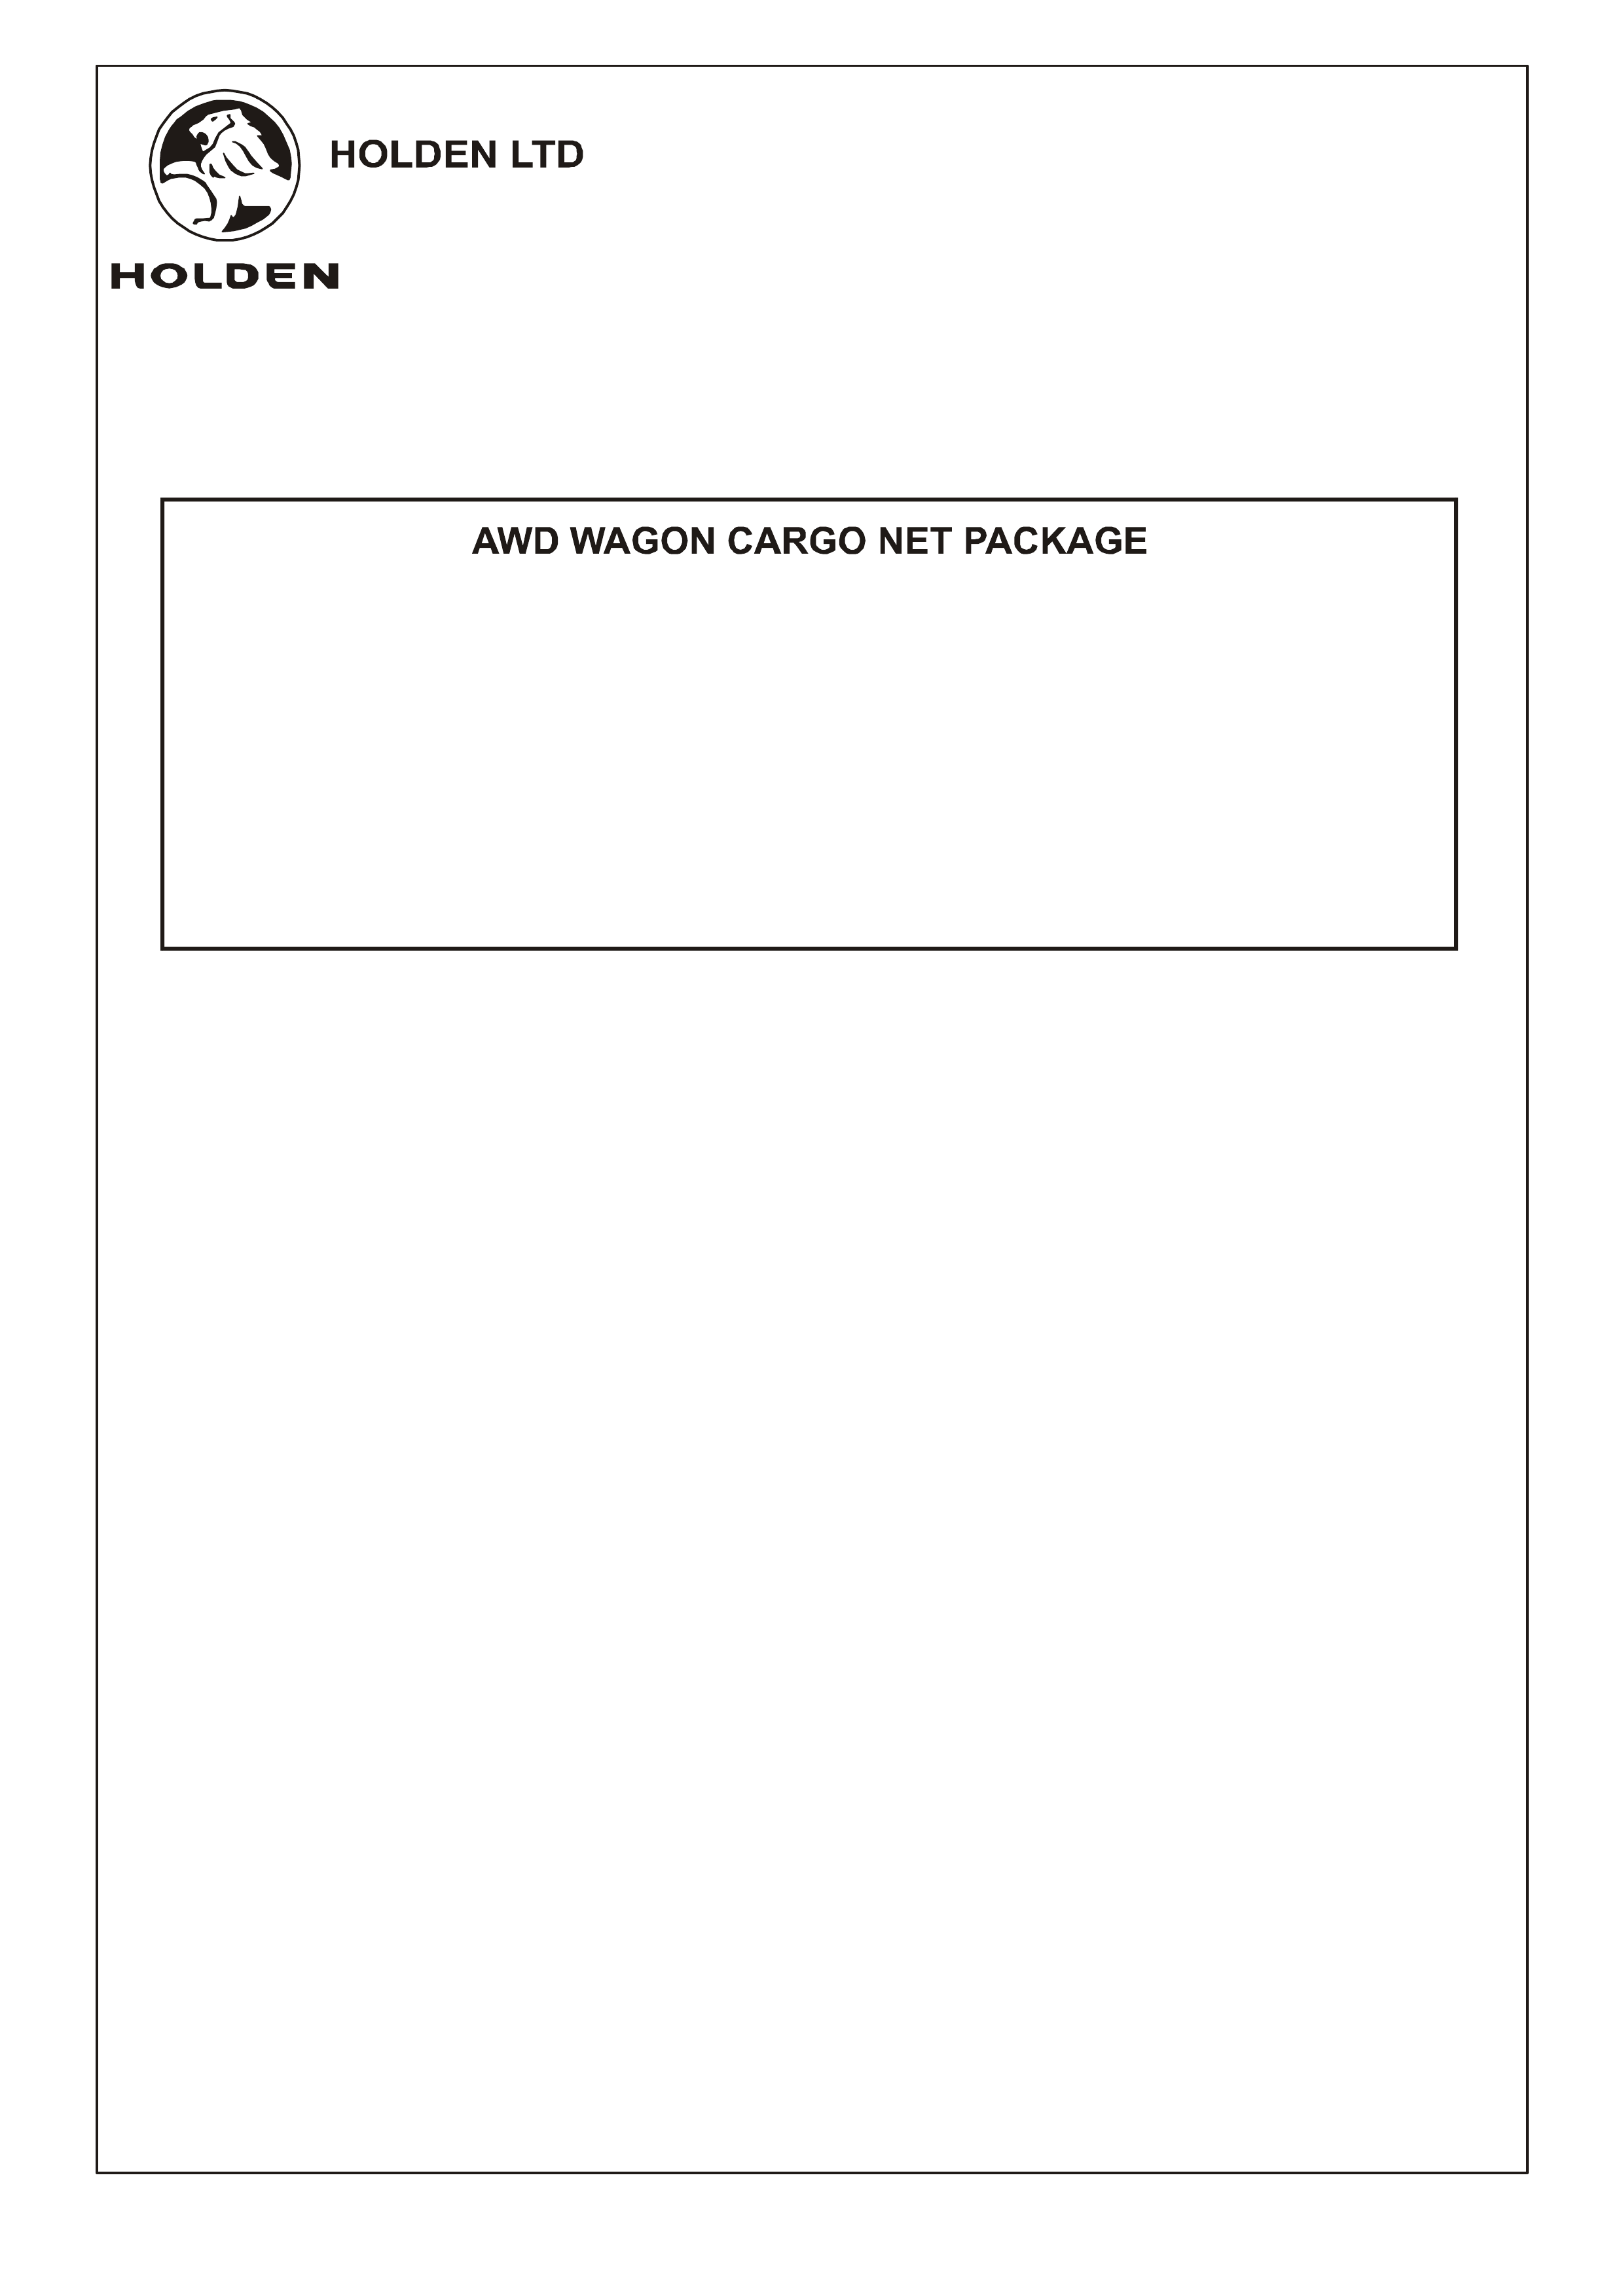
9. Tighten the tension straps on both sides by pulling down
on trailing ends, refer to Figure 9.
10. Place fitting instructions in vehicles glove box.
NOTE:
WARNING: SEAT, SEAT BELTS OR CHILD
RESTRAINT ANCHORAGES MUST NOT BE USED
TO SECURE THE CARGO NET .
WARNING:
IF THE LO AD H AS EDGES THAT COULD CAUSE
DAMAGE TO OR PROTRUDE THROUGH THE
NET, COVER THE LOAD WITH A THICK
MATERIAL.
PLACE LOADS DIRECTL Y AGAINST THE CARGO
NET LENGTH WAYS ACROSS THE VEHICLE TO
MINIMIZE THE RISK OF PENETRATION
THROUGH THE CARGO NET .
THE TAILGATE CANNOT BE OPENED FROM
INSIDE THE CARGO AREA. NEVER LEAVE
CHILDREN I N THE CARGO AREA UNATTENDED
IF CARGO NET IS FITTED.
DO NOT USE THE CARGO NET AS A MEANS FOR
ANCHORING , I.E. BY TYING TO.
DO NOT USE THE CARGO NET IN ANY OTHER
VEHICLE FOR WHICH IT IS NOT DESIGNED.
DO NOT USE CARGO NET IF THERE ARE VISIBLE
SIGNS OF DAMAGE.
IF INVOLVED IN AN ACCIDENT REPLACE THE
CARGO NET.
FIGURE 8
FIGURE 9
Division of HOLDEN Ltd ACN 006 893 232
FD1171
19MA04
COPYRIGHT
Reproduction in whole or part
prohibited w ithout written appr oval
FITTING IN STRUCTIONS FOR
AWD WAGON CARGO NET
PARTS LIST
PART NUMBER DESCRIPTION QUANTITY
92169495 CARGO NET PACKAGE 1
- CARGO NET ASSEMBLY 1
- CARGO NET CARRIER BAG 1
92088207
FD796 PROOF OF WARRANTY CARD 1
ROOF LINI NG COVER PLUG
FD1171 FITTIN G I N S TRUC TIONS 1
2
Page 5 of 6