DRAFTDRAFT
CCOPYRIGHT HOLDEN 2004
Reproduction in whole or part prohibited
without written approval of Holden LTD
ROOF MOUNTED DVD SYSTEM
Owner's Manual
FD1281 03AU04

DRAFTDRAFT
Contents
Components......................................................................................................3
Important Notice................................................................................................4
Care of DVD/CD ...............................................................................................4
DVD Player Memory .........................................................................................4
Switching on the DVD Player............................................................................5
Loading a Disc ..................................................................................................5
Playing and Scanning the Disc .........................................................................5
Browsing the Disc Menus .................................................................................6
Adjusting the DVD Image .................................................................................6
Adjusting the DVD or Audio CD Volume ...........................................................6
Infrared Headphones (Optional) .......................................................................7
FM Modulator (Optional)...................................................................................7
Displaying the Playing Times............................................................................7
Changing the Viewing Angle.............................................................................8
Changing the Subtitle Language ......................................................................8
Changing the Picture Zoom Factor...................................................................8
Defining a Section of the Disc to be Repeated .................................................8
Repeating a Title or a Chapter..........................................................................8
Modifying the Player Setup...............................................................................9
Playing a (S)VCD ............................................................................................11
Playing an Audio CD .......................................................................................11
MP3 Drive .......................................................................................................12
Servicing .........................................................................................................14
Troubleshooting ..............................................................................................14
Symbols Displayed on Screen........................................................................14
Playable Disc Types........................................................................................15
Technical Specifications..................................................................................15
Page 2 of 16
DRAFTDRAFT
Components
Page 3 of 16
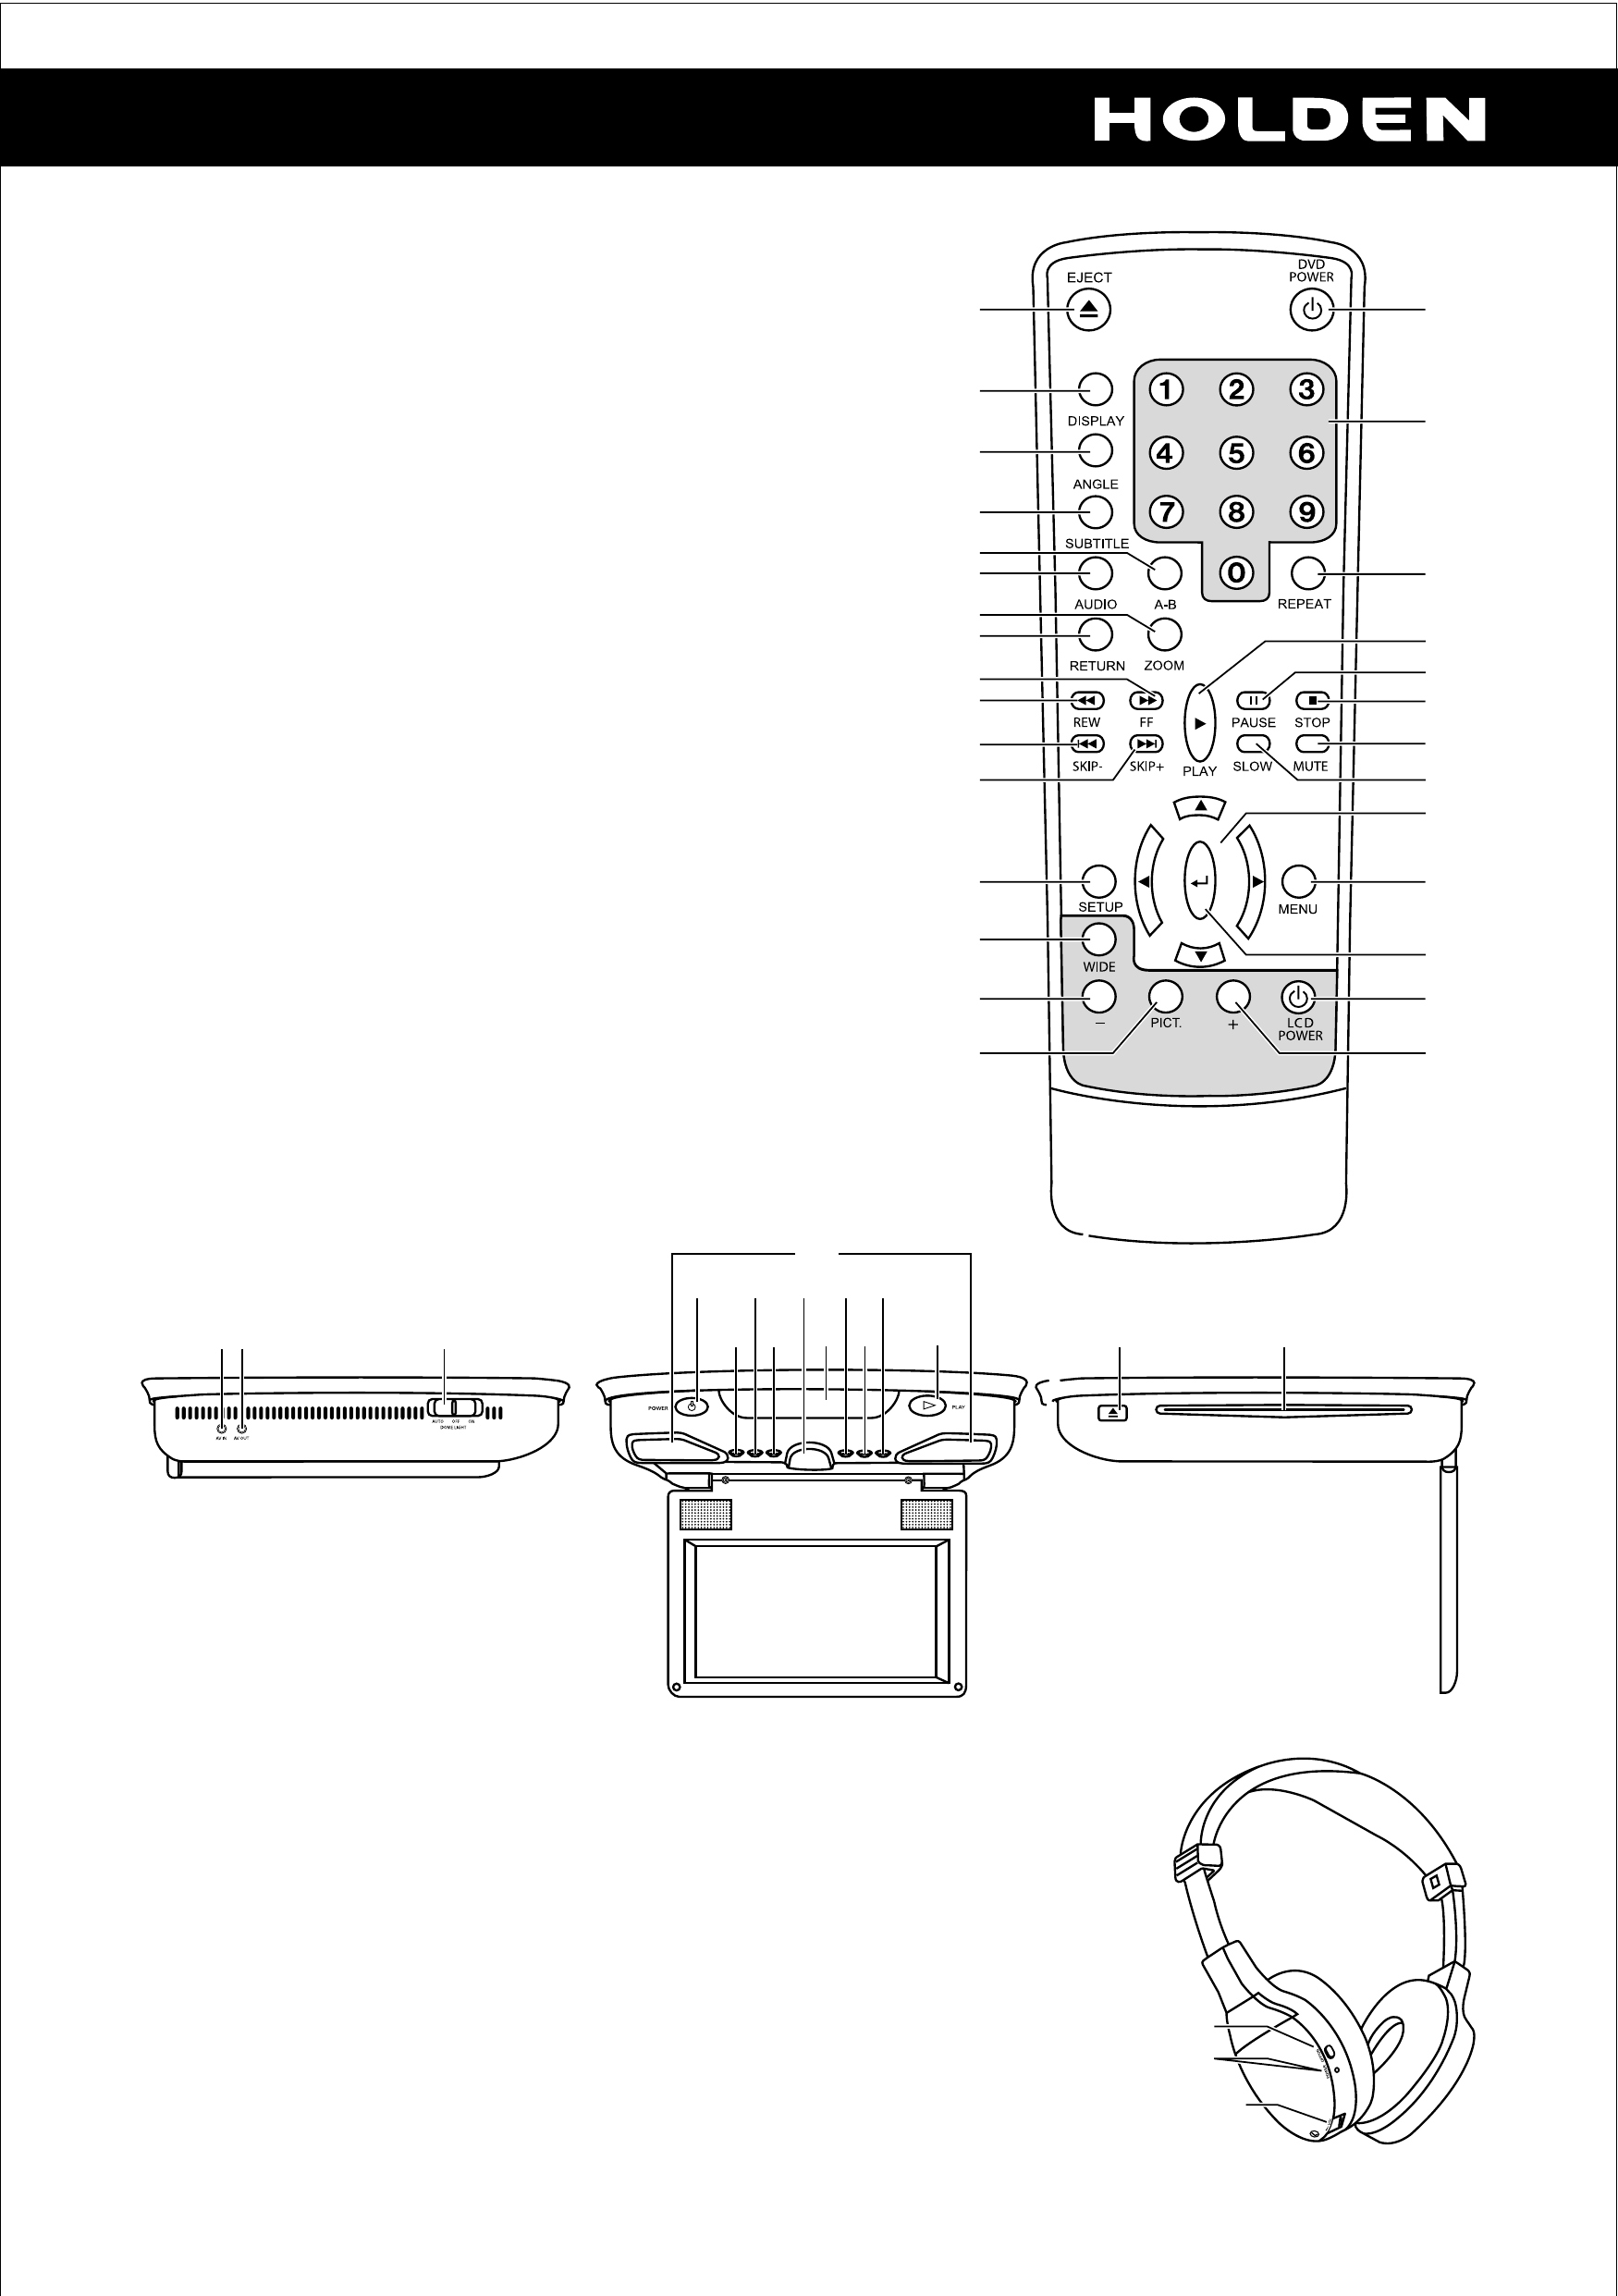
Remote
1) Eject button
2) Display button
3) Angle button
4) Subtitle button
5) A-B button
6) Audio button
7) Zoom button
8) Return button
9) Forward button
10) Rewind button
11) Skip- button
12) Skip+ button
13) Setup button
14) Wide button
15) Pict.- button
16) Picture quality button
17) Pict.+ button
18) LCD power button
19) Menu button
20) Up / Down / Left / Right
21) Slow button
22) Mute button
23) Stop button
24) Pause button
25) Play button
26) Enter button
27) Repeat button
28) Numeric keypad
29) DVD power
DVD Player
A) AV In
B) AV Out
C) Auto/Off/On (Dome Light)
G) Dome light
H) Power button
10) Rewind button
23) Stop button
9) Forward button
I) Monitor open button
J) IR Sensor
15) Pict.-
16) Picture quality button
17) Pict.+
25) Play button
1) Eject button
K) Slot for disc
Headphones (Optional)
1a) ON/OFF button
2a) POWER indicator
3a) Volume thumbwheel
A B C
H
10 9
23
G
I
J
1517
16 25 1 K
1a
2a
3a
1
2
3
4
5
6
7
8
9
10
11
12
13
14
15
16
29
28
27
25
24
23
22
21
20
19
26
18
17

DRAFTDRAFT
Important Notice
The disc player uses a laser beam. To avoid any risks of injury to the eyes or
electric shock, only qualified personnel are authorised to remove the cases and
carry out maintenance operations.
Do not push foreign objects into the unit through openings; do not spill or spray
liquid of any kind on or in the system (this may result in a fire or electric shock).
The DVD player is for rear seat passengers only. The driver cannot safely view
the video screen while driving and should not try to do so.
Prolonged use of the DVD player while the engine is not running can drain the
vehicle battery and may prevent the vehicle from starting.
Objects blocking the line of sight may also affect the function of the remote
control.
Do not store the remote control in heat or direct sunlight. This could damage the
remote control and may not be covered by the warranty.
Care of DVD/CD
For optimum use of DVD/CD discs, it is recommended that the disc is not
exposed to direct sunlight, heat, cold or excessive dampness (risk of damage).
Avoid touching the surface of the disc. Do not stick paper, tape or glue on the
disc. Do not use irregularly shaped discs (such as heart or star-shaped discs) as
they may cause the unit to malfunction. Do not use discs that show sign of
damage or distortion. When you have finished playing your disc, take it out of the
player and put it away in its case.
DVD Player Memory
Under severe vibration, the laser may not be able to maintain the precise focus
needed to read the tiny pits on the surface of the disc. When the laser focus is
temporarily lost, the data being read from the disc will also be temporarily
interrupted. Your DVD player is therefore fitted with a memory buffer that holds
approximately seven seconds of disc data, which is used to prevent interruption
over severely bumpy surfaces. Should the severe vibration last for longer than
seven seconds, the memory buffer may become empty and playback will be
interrupted or stop until the mechanism has time to refocus, read the disc and
refill the memory buffer. This situation should very rarely occur under normal
driving conditions.
Page 4 of 16

DRAFTDRAFT
Switching on the DVD Player
Press the POWER button (H) or the LCD POWER button (18) to switch on the
DVD player.
Loading a Disc
1. Place a disc into the slot with the disc label facing up.
2. Press the PLAY button (25) to start playing the disc.
3. Adjust the LCD screen to provide comfortable viewing.
Playing and Scanning the Disc
NOTE: Some DVDs will not allow you to fast forward or skip the copyright or
previews. Some DVDs will begin playing after the previews have finished.
Play: Press the PLAY button (25) to play the disc.
Pause: Press the PAUSE button (24) to freeze the picture (or stop the sound). To
resume playing from this position, press the PAUSE button (24) or PLAY button
(25).
Slow: Press the SLOW button (21) to obtain the required playing speed.
(SR: rewind x1/2, x1/4 or x1/8. SF: forward x1/2, x1/4 or x1/8). To resume normal
playing, press the PLAY button (25).
Stop: Press the STOP button (23) to stop playing the disc. At this point you can
resume at the position where playing stopped by pressing the PLAY button (25).
To stop playing and return to the start of the disc, press the STOP button (23)
twice.
Rewind: Press the REW button (10) to obtain the required rewind speed.
(Rewind DVD x2, x4, x6 or x8).
Forward: Press the FF button (9) to obtain the required fast forward speed.
(Forward DVD x2, x4, x6 or x8).
Previous: Press SKIP- button (11) to move directly to the previous chapter or
track.
Next: Press SKIP+ button (12) to move directly to the next chapter or track.
Page 5 of 16

DRAFTDRAFT
Browsing the Disc Menus
While the disc is playing, press the MENU button (19) to display the disc's main
menu screen. While menu screens are displayed, playing of the disc is paused
Select the required option using the arrow keys (20) and validate selections
using the ENTER button (26).
Press the MENU button (19) again to resume playing the disc.
Adjusting the DVD Image
Colour: Press PICT button (16) once to display the color adjustment menu. Use
the + button (17) or - button (15) to increase or decrease the color, until you obtain
the required setting. The menu disappears automatically after 6 seconds.
Brightness: Press PICT button (16) twice to display the brightness adjustment
menu. Use the + button (17) or - button (15) to increase or decrease the
brightness, until you obtain the required setting. The menu disappears
automatically after 6 seconds.
Contrast: Press PICT button (16) three times to display the contrast adjustment
menu. Use the + button (17) or - button (15) to increase or decrease the contrast,
until you obtain the required setting. The menu disappears automatically after 6
seconds.
Tint: Press PICT button (16) four times to display the tint adjustment menu. Use
the + button (17) or - button (15) to increase or decrease the tint, until you obtain
the required setting. The menu disappears automatically after 6 seconds.
Adjusting the DVD or Audio CD Volume
On the infrared headphones (optional), turn the volume thumbwheel (3a) to
obtain the required adjustment. To switch the sound on or off, press the ON/OFF
button (1a) .
NOTE: Before using headphones, adjust the headphone volume to a low level
and then adjust it to the preferred level.
NOTE: To save the batteries, the headphones are automatically switched off
when the DVD player has been inactive for 30 seconds.
Page 6 of 16

DRAFTDRAFT
Infrared Headphones (Optional)
Several pairs of infrared headphones can be used simultaneously. For further
details on available accessories, contact your Holden Dealer.
NOTE: Do not store the headphones in heat or direct sunlight. This could
damage the headphone and may not be covered by the warranty.
NOTE: If the headphones are to be stored for a long period of time, remove the
batteries and keep them in a cool, dry place.
FM Modulator (Optional)
An FM modulator allows sound signals from the DVD player to be picked up on
your radio's FM band. For further details on available accessories, contact your
Holden Dealer.
Displaying the Playing Times
Time Played of the Title: While the disc is playing, press the DISPLAY button (2)
to display the time that the title has been playing as well as information on the
number of titles and chapters on the disc. Example: TITLE 02/05 CHAPTER
03/21 00:06:46. In this example, the disc contains a total of 5 titles, title number 2
is currently playing, title 2 contains 21 chapters and chapter number 3 is currently
playing. The title has been playing for 06 minutes and 46 seconds. The header
disappears after about 2 seconds, leaving only the counter displayed.
Time Remaining for the Title: Press the DISPLAY button (2) a second time to
display the time remaining for the title. The header "TITLE REMAIN" disappears
after about 2 seconds, leaving only the counter displayed.
Time Played of the Chapter: Press the DISPLAY button (2) a third time to
display the time that the chapter has been playing. The header "CHAPTER
ELAPSED" disappears after about 2 seconds, leaving only the counter
displayed.
Time Remaining for the Chapter: Press the DISPLAY button (2) a fourth time to
display the time remaining for the chapter. The header "CHAPTER REMAIN"
disappears after about 2 seconds, leaving only the counter displayed.
To Remove Display of Playing Times: Press the DISPLAY button (2) a fifth
time.
Page 7 of 16

DRAFTDRAFT
Changing the Viewing Angle
Some DVDs offer the option of viewing the same scene from different angles. In
this case, you can select a particular angle. While the disc is playing, press the
ANGLE button (3) to display the current angle and the total number of angles
available. Press the ANGLE button (3) again to select a different angle. After
going through all the available angles, press the ANGLE button (3) to return to the
initial viewing angle.
Changing the Subtitle Language
While the disc is playing, press the SUBTITLE button (4) to display the language
currently used and the total number of languages available. Press the SUBTITLE
button (4) until the required subtitle language is selected. To turn subtitles off,
press the SUBTITLE (4) button until the subtitles are not displayed. This function
can be accessed on some DVDs.
Changing the Picture Zoom Factor
While the disc is playing, press the ZOOM button (7) to zoom in on the picture.
The next zoom factor in the following sequence is selected: 1.5, 2, 4 and off
(normal picture size). To move the zoom window, use the arrows (20).
Defining a Section of the Disc to be Repeated
While the disc is playing and at the required time, press the A-B button (5) to
define the starting point A. At the required time, press the A-B button (5) again to
define the end point B. The player then starts playing the section between point A
and point B again. To exit the menu, press the A-B button (5) a third time.
Repeating a Title or a Chapter
While the disc is playing, To automatically repeat the current chapter, press the
REPEAT button (27). "CHAPTER REPEAT ON" is displayed.
To automatically repeat the current title, press the REPEAT button (27) a second
time. "TITLE REPEAT ON" is displayed.
To cancel the repeat mode and return to normal playing, press the REPEAT
button (27) a third time. "REPEAT OFF" is displayed.
Page 8 of 16

DRAFTDRAFT
Modifying the DVD Player Setup
Browsing in the Setup Menus:
1. Press the SETUP button (13) to
access the setup menus.
2. Choose the required menu by
pressing the up and down arrows
(20). Press the ENTER button
(26) to confirm the selection.
The PREFERENCES menu can
not be selected while a disc is
being played.
3. To enter a sub-menu, select it by
pressing the up and down arrows
(20) then press the right arrow to
access the various options.
4. To choose an option, select it by
pressing the up and down arrows
(20) then validate it by pressing
the ENTER button (26).
To return to the list of sub-
menus, press the left arrow.
5. To return to the SETUP MENU
MAIN PAGE, press the down
arrow until the MAIN PAGE
menu item is highlighted, then
press the ENTER button (26).
6. To exit the SETUP MENU MAIN
PAGE, press the SETUP button
(13).
Page 9 of 16

DRAFTDRAFT
Modifying the DVD Player Setup - Cont.
Display Mode: Select GENERAL SETUP page then TV DISPLAY and choose
one of the following options:
NORMAL / PS: Full screen picture, with a portion that can be cut
automatically.
NORMAL / LB: Full screen picture, with a black strip at both the top and
bottom of the screen.
WIDE: Full screen picture.
Video Standard: Select GENERAL SETUP PAGE then TV TYPE and choose
one of the following options:
NTSC: The DVD player outputs NTSC signals.
PAL : The DVD player outputs PAL signals.
OSD Language: (On screen display language) Select GENERAL SETUP PAGE
then OSD LANG and choose one of the following options: English, French,
German and Spanish.
Angle Mark: Select GENERAL SETUP PAGE then ANGLE MARK and choose
one of the following options:
ON: A pictogram is displayed on screen when several viewing angles
are available.
OFF: Function deactivated.
Default Audio Language: When there is no disc in the player, select
PREFERENCES PAGE then AUDIO, and choose the default audio language.
This function can be accessed on some DVDs.
Default Subtitle Language: When there is no disc in the player, select
PREFERENCES PAGE then SUBTITLE, and choose the default subtitle
language. This function can be accessed on some DVDs.
Removing the Subtitles: When there is no disc in the player, select
PREFERENCES PAGE then SUBTITLE, and choose the OFF option. This
function can be accessed on some DVDs.
Page 10 of 16

DRAFTDRAFT
Modifying the DVD Player Setup - Cont.
Selection Menu Language: When there is no disc in the player, select
PREFERENCES then DISC MENU.
.
Parental Control: When there is no disc in the player, select PREFERENCES
PAGE then PARENTAL, and select the required parental level (from 1: child to 8:
adult). Press the ENTER button (26) to access the password verification page.
Enter the 4-digit password and press the ENTER button (26) to confirm the
parental level.
Password: When there is no disc in the player, select PREFERENCES PAGE
then PASSWORD, and select the CHANGE option. Press the ENTER button
(26) to access the change page. Enter the old password and then enter the new
password twice. Press the ENTER button (26) to confirm the change.
NOTE: The initial password of the player is 3308, and remains
operational in addition to the programmed password.
Default Setup: When there is no disc in the player, select PREFERENCES
PAGE then DEFAULTS, and select the RESET option. Press the ENTER button
(26) to reset the factory configuration.
Playing a (S)VCD
(S)VCDs are played in the same way as DVDs.
Playing an Audio CD
Audio CDs are played in the same way as DVDs.
Select the language that the DVD player will
search for on a DVD and use as the default language to display the DVD menus.
If the selected language is not present on a DVD disc, the DVD player will use the
DVD player's default language
Page 11 of 16
DRAFTDRAFT
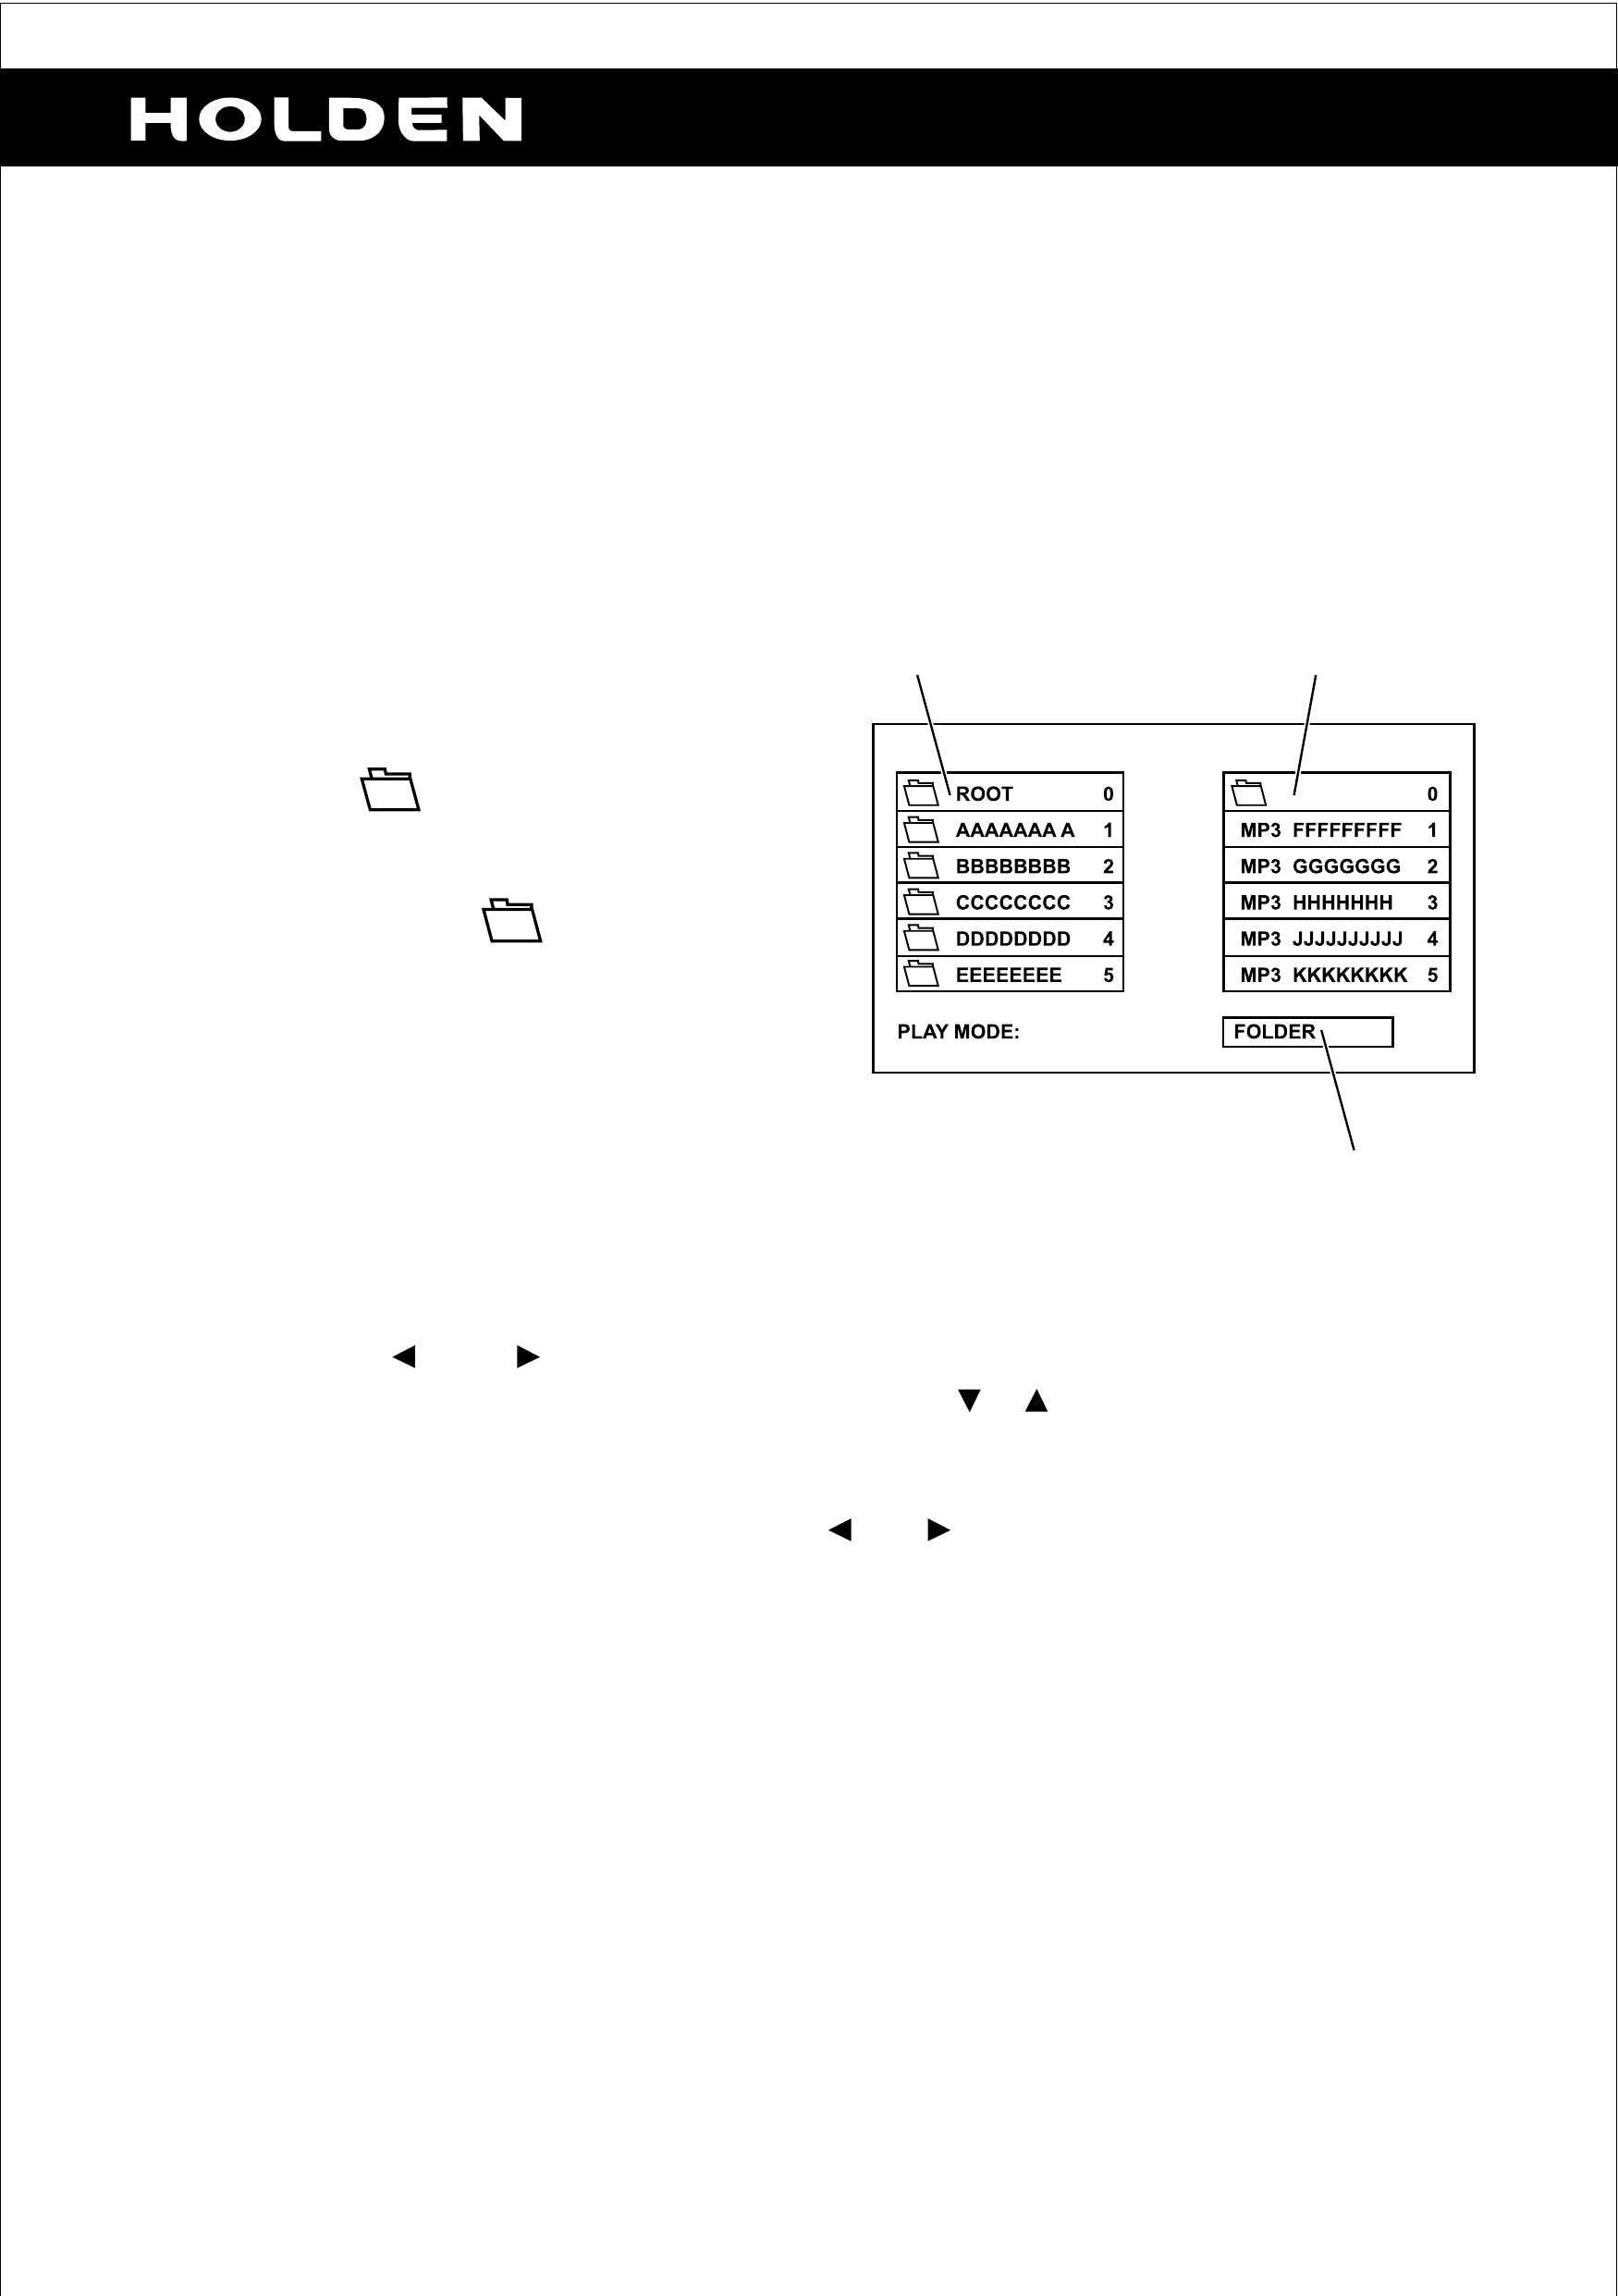
2. The menu has three areas:
a. The ROOT column on the left
indicates the names of the folders
on the disc.
b. The (folder) column on the
right indicates the names of the
sub-folders and/or music tracks.
The symbol opposite a name
means that it is a folder and not an
MP3 file. These files are identified
with MP3.
c. The PLAY MODE field. You
cannot access this field while
playing. The names of each
folder or music track is truncated
to 11 characters.
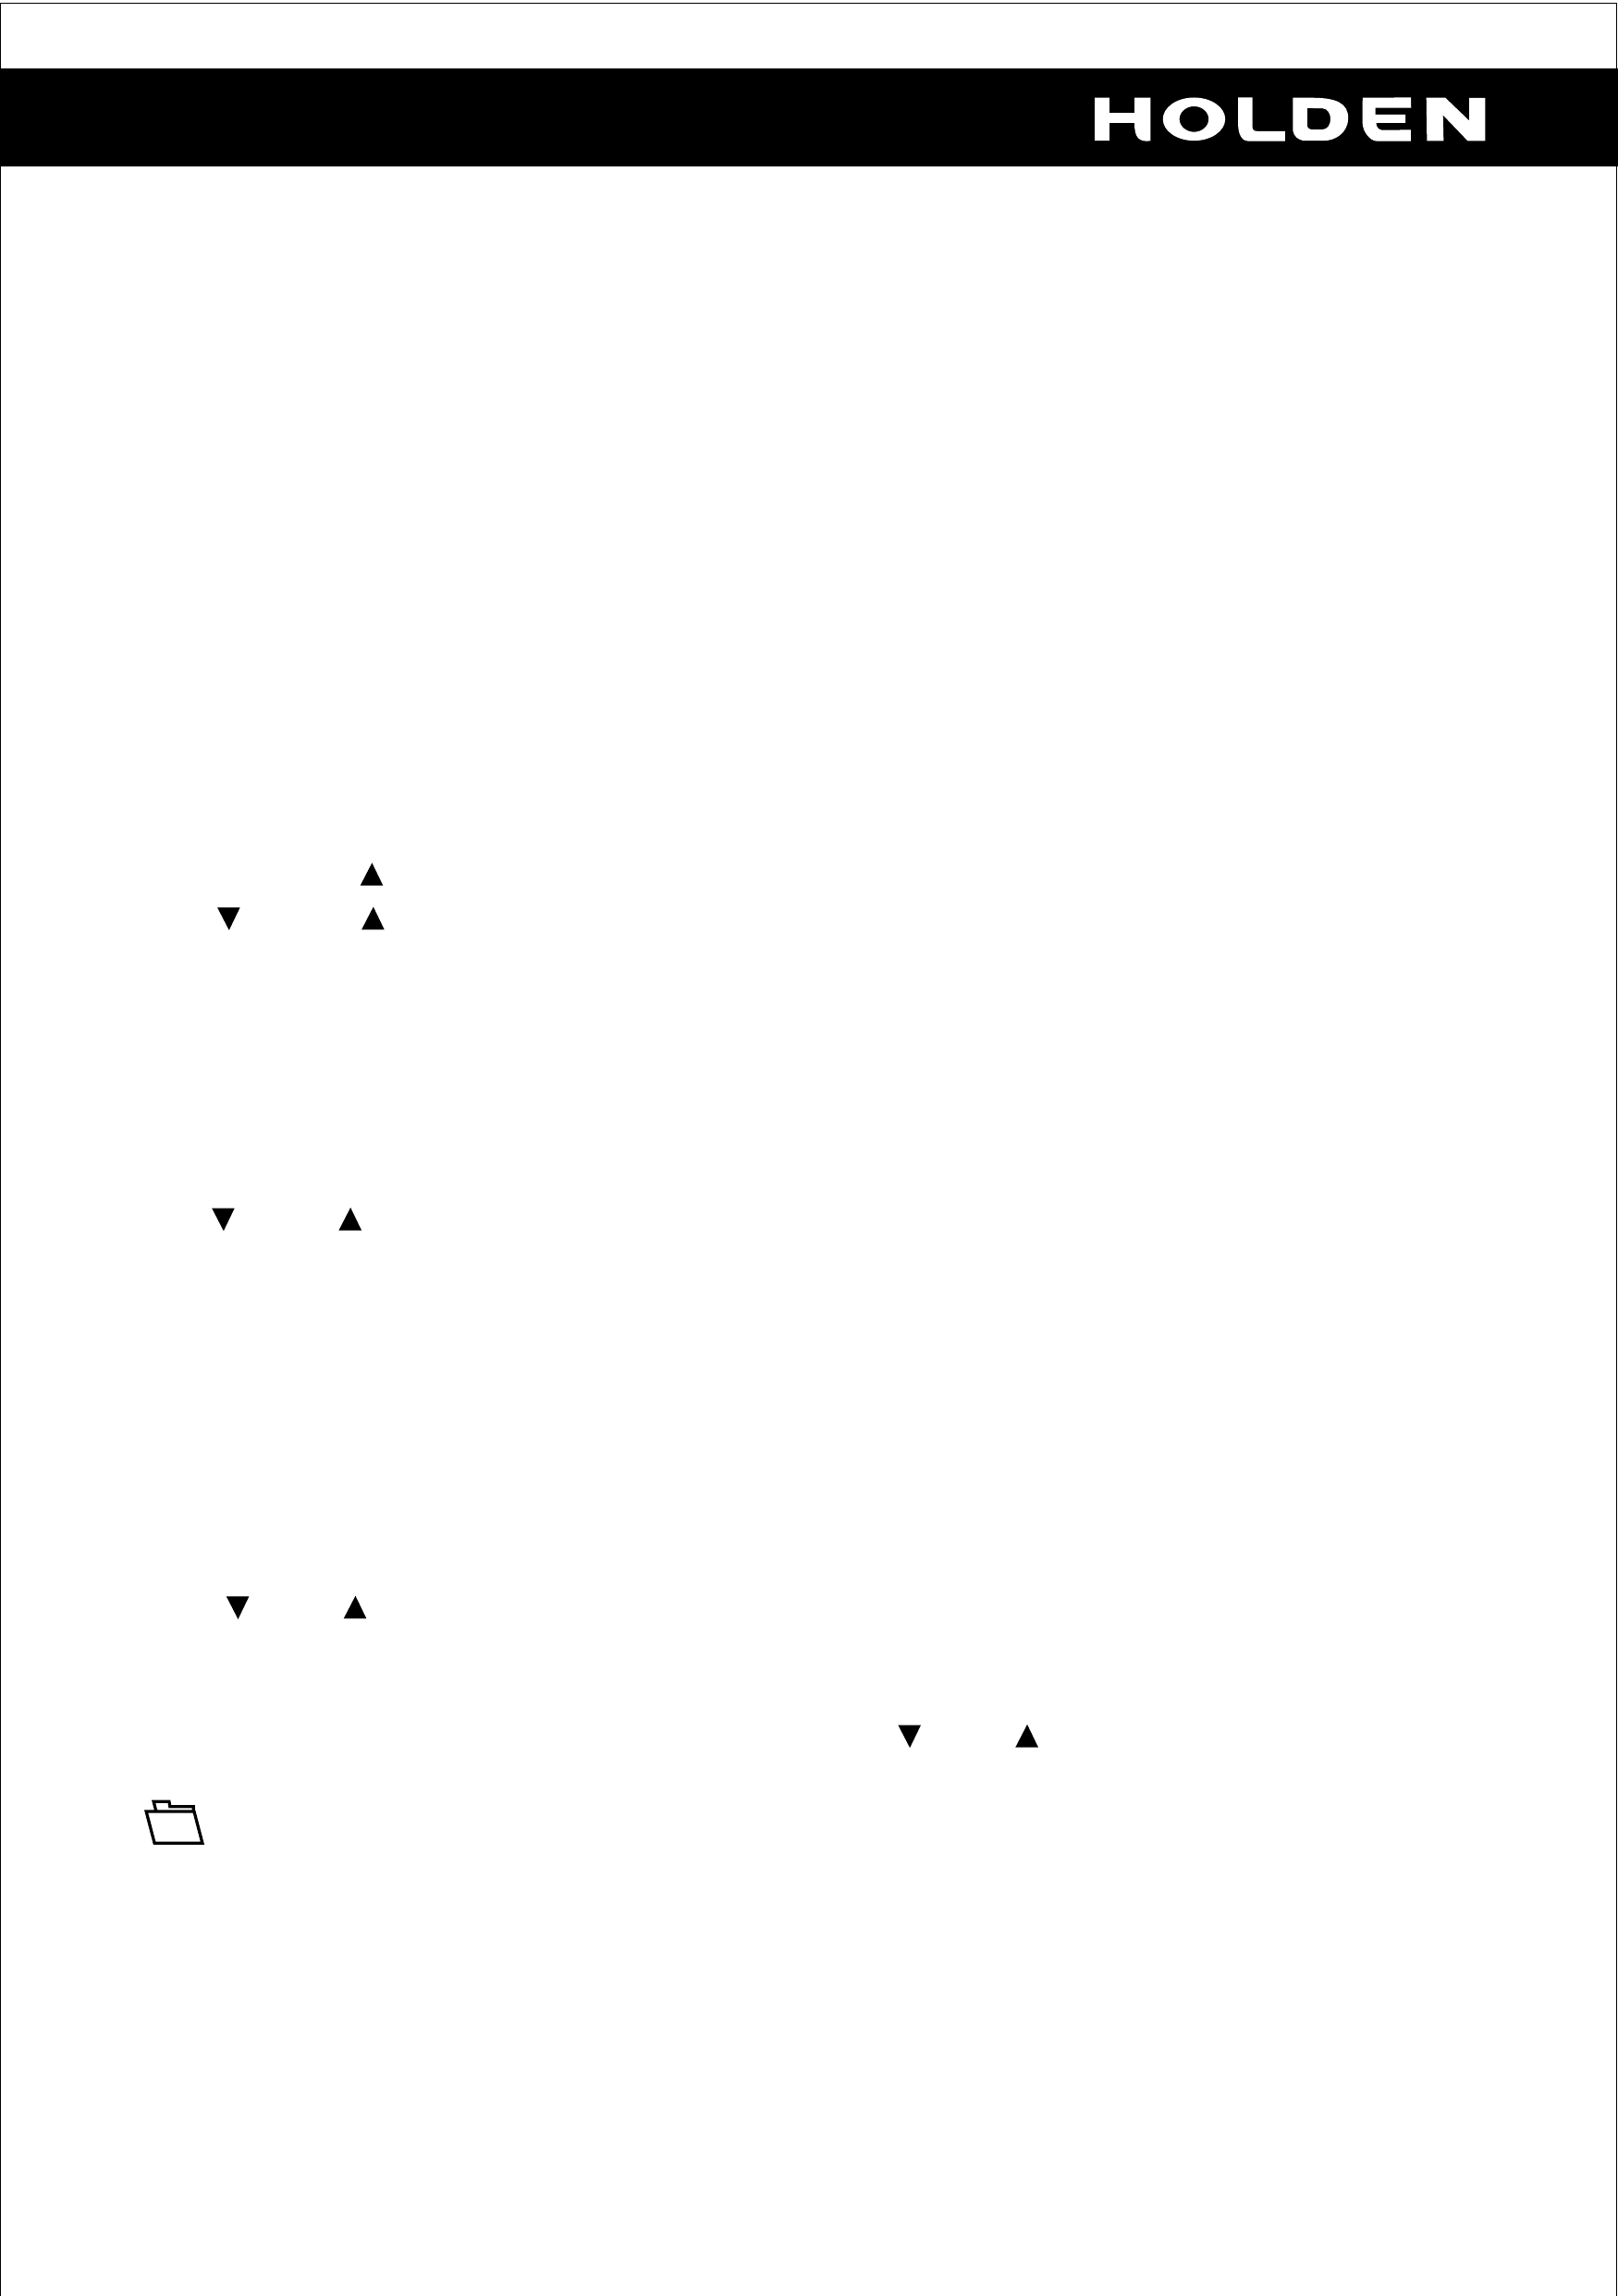
3. Press the or button to move from the ROOT column to the (folder)
column or to the PLAY MODE field. Press the or button to select a specific
folder in the (folder) column.
4. Select the PLAY MODE field with the or button.
a. SINGLE A particular music track is played once.
b. REP-ONE Repeated play of a particular music track.
c. FOLDER Normal play of a particular folder.
d. FOLDER REP Repeated play of a particular folder.
e. DISK SCAN Plays the first ten seconds of each song of the entire disc.
f. DISK Plays playback of the entire disc.
g. DISC REP Repeats playback of the entire disc.
h SHUFFLE ON Plays the songs in a randomised sequence.
i. PROG-END Plays the songs on the disc in the order you have
programmed. You must create a play list to set the order
of the tracks on the disc you want to play.
MP3 Drive
MP3 is an audio data compression format which can be used to store up to 600
minutes of music on one disc.
1. Insert the MP3 disc in the drive. The MP3 menu is displayed on screen.
Page 12 of 16
c
ba
MP3 MENU
DRAFTDRAFT
MP3 Drive - Cont.
Program Play
You must create a play list to use the Program Play option. The song list must
contain songs from within the same folder.
1. From the PLAY MODE, select the PROG-END option and then press the
ENTER button (26). The PLAY MODE field changes to PROGRAM P0 to
indicate that programming mode is enabled.
2. Use the cursor buttons to select the folder containing the songs you want to
program.
3. Use the button to access the song list of a folder and then use the
and buttons to select a song. Press the ENTER button to add the
selected song to the play list (the song and the number of songs chosen
appear at the top of the screen. For example PROGRAM P01:05 would
indicate that song number 5 within the folder is the first song you have
selected to the play list).
4. Continue to add songs to the play list from within the same folder. Use the
and buttons to select a song and then press the ENTER button (26) to
add the selected song to the play list.
5. When the list is complete press the STOP button (23) to end program mode.
The PLAY MODE field changes to PROG-END. Press the PLAY button (25)
to begin playing back the selected songs.
Playing an MP3
Use and buttons to choose a song then press the ENTER button (26) to play
the file. To return to the folder press the STOP button (23) and select the first
folder in the column concerned. Press the STOP button (23) to stop playing a file.
If the required files are stored in a folder, use and buttons to select a folder
then press the ENTER button (26) to open it. To exit a folder, select the first folder
in the column and press the ENTER button (26).
Page 13 of 16
DRAFTDRAFT
Servicing
Cleaning the Player: Switch off the DVD player before cleaning it. Use a soft
cloth slightly dampened with a mild detergent solution and wipe gently.
Cleaning the DVD Laser: Regularly use a cleaning disc to remove dust that can
build up on the DVD laser .
Cleaning the Discs: The discs must be clean, without scuff marks, to operate
correctly. Use a soft lint-free cloth to wipe the shiny surface of the disc in straight
lines, going from the centre to the outside of the disc.
Troubleshooting
Page 14 of 16
The player does not
recognize the disc.
Problem Cause and Solution
The message "Wrong
region" is displayed
when loading the DVD.
This message indicates that the DVD does not
have the same region code as the player. Contact
your Holden Dealer.
The remote control
does not operate
correctly.
The remote control is not correctly pointed
towards the monitor or is too far away. Make sure
that the remote control is pointed directly towards
the player, at a distance of less than 2 m.
The batteries in the remote control are low.
Replace the batteries (button battery CR2025).
Please dispose of used batteries appropriately.
Clean the DVD laser with a cleaning disc.
Symbols Displayed on Screen
Depending on the context, the following pictograms may be displayed on screen:
Pictogram Description
The instruction sent by the remote control is not valid in the
current player context.
Several viewing angles are available for this scene.
NOTE: The "angle mark" function must be activated for this
pictogram to be displayed.

DRAFTDRAFT
Page 15 of 16
Technical Specifications
Disc format CD / CD-R(W) / MP3 / JPEG / DVD-R(W)
Video standards accepted PAL/NTSC
Monitor size 7" (diagonal)
Frequency response 20Hz-20kHz±1dB
Video output 1 V p-p / 75 Ohm
Audio output 1.4 V p-p / 10 kOhm
Audio signal/noise ratio 60 dB
Dynamic range 85 dB
Power DC 12V 2.5A
Operating temperature -10 to +60°C
Storage temperature -20 to +70°C
Relative humidity 10 to 75%
Dimensions (l x d x h) 235 × 197 × 50 mm
Light globes 2 Watts each (must not exceed total of 4 Watts)
Playable Disc Types
The DVD player will play DVDs, audio CDs and MP3 CDs. Home recorded
CDs (CD-R or CD-RW formats) may play back, however this cannot be
guaranteed because of the disc characteristics or recording condition.
The DVD player will only play DVDs of the appropriate DVD zone/region code
for the country that the vehicle was sold in. The DVD zone/region is printed on
the jackets of most DVDs.
DVD Region Zone/Region
code (Zone)
1 United States, Canada
2 Japan, Europe, South Africa, and Middle East (including
Egypt)
3 South East Asia and East Asia (including Hong Kong)
4 Australia, New Zealand, Pacific Islands, Central America,
Mexico, South America, and the Caribbean
5 Eastern Europe (former Soviet Union), Indian subcontinent,
Africa, North Korea, and Mongolia
6 China
7 Reserved
8 Special international venues (aeroplanes, cruise ships, etc.)
DRAFTDRAFT
Refer to your Holden Dealer for further information.
Holden Ltd
ABN 84 006 983 232
241 Salmon Street Port Melbourne
Victoria 3207 Australia
Subsidiary of General Motors Corp
All correspondence to:
PO Box 1714 Melbourne
Victoria 3001 Australia
Telephone (03) 9647 1111
Facsimile (03) 9647 2550
Please note that all information, illustrations and specifications in this Handbook are based
on the latest production information available at the time of printing.
Holden reserves the right to make any changes at any time without notice and without incurring any obligation.