FITTING INSTRUCTIONS FOR
VT SEDAN, WAGON, 'SS' (EXCEPT CALAIS) & VU 'SS'
FRONT MUD FLAPS FLEXIBLE
Part Number 92143532
FD838
14JN00
COPYRIGHT
Page 1 of 3
fd838_1
HOLDEN SERVICE PARTS OPERATIONS
Reproduction in whole or part
prohibited without written approval
Division of HOLDEN Ltd ACN 006 893 232
PARTS LIST
DESCRIPTION QTY
Mudflap RH
Mudflap LH
Screw - Self Tapping
Screw - Machine
Washer
Bracket
Fitting Instructions (FD838)
Template
1
1
6
2
10
2
1
1
Please read instructions carefully before proceeding with the installation.
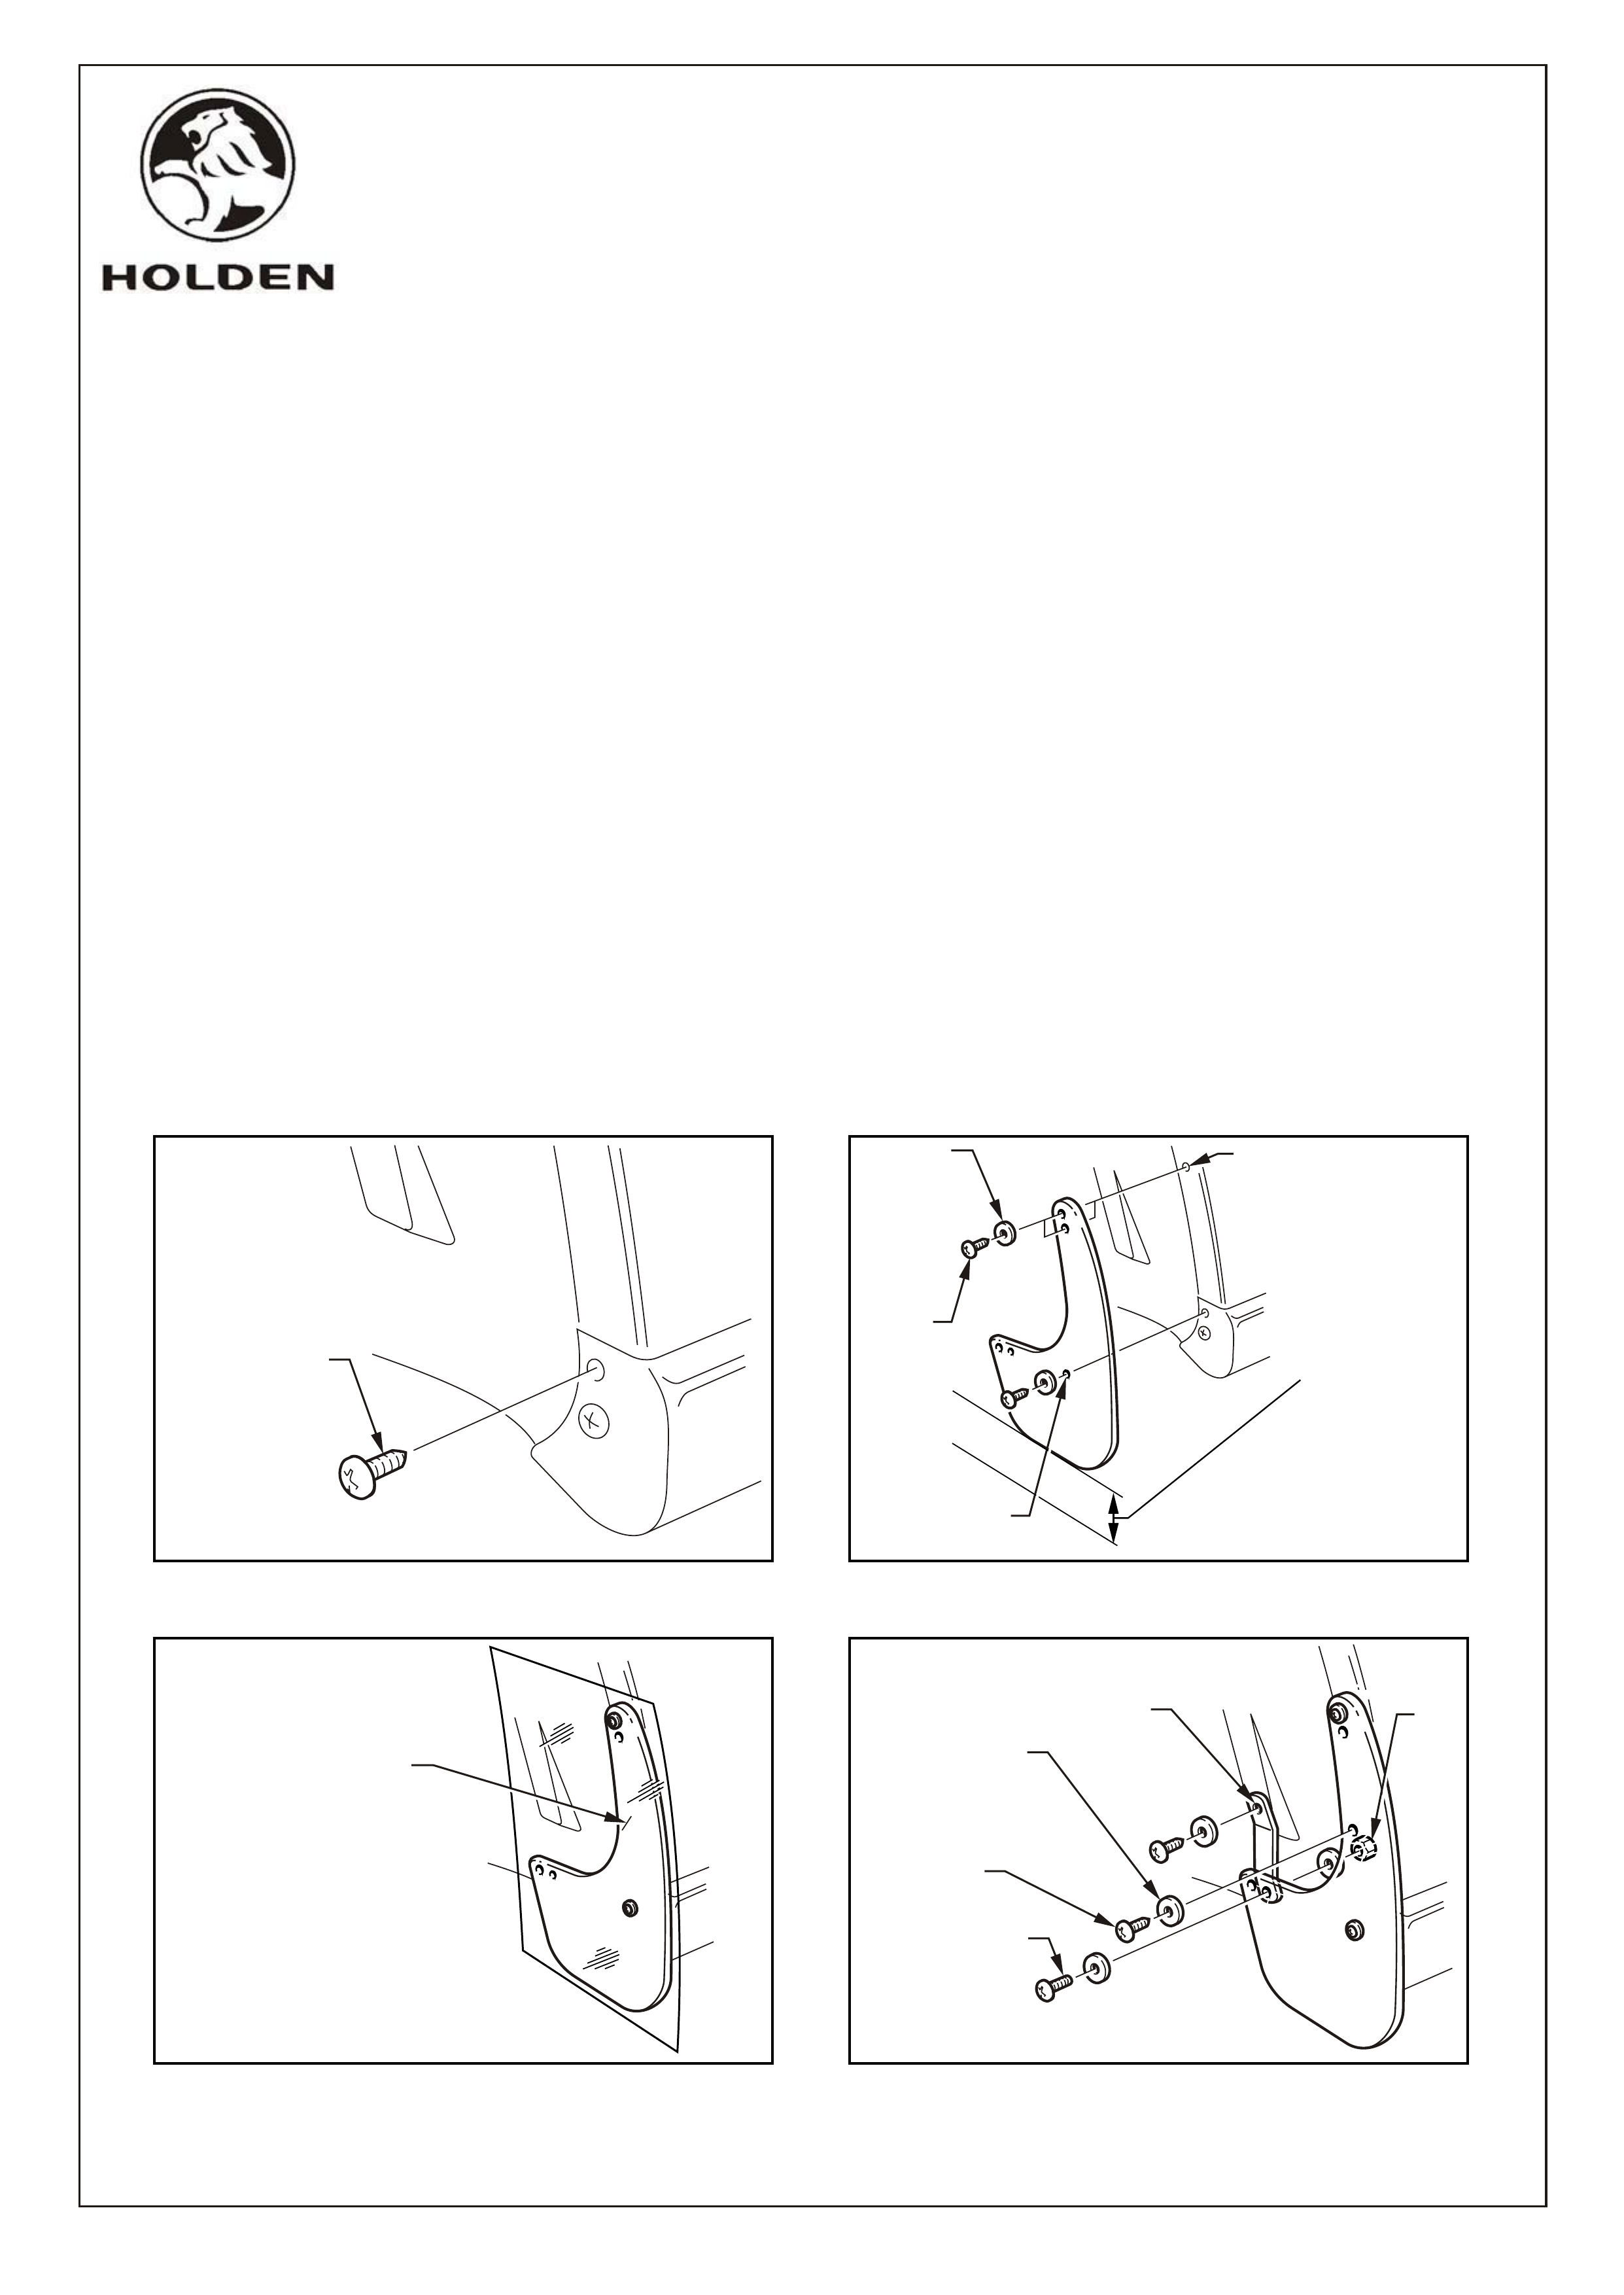
1. Remove front wheel.
2. Remove and discard the upper screw retaining the rocker panel to the front quarter pane, refer figure l.
3. Attach the mud flap to this hole using a self tapping screw and washer at hole No. 4 in mud flap, refer figure 2.
4. The lower edge of the mud flap must be parallel to the ground, and hole No. 1 or 2 (refer Model/Positions chart) must align with the
flat section of the front wheel arch flange, refer figure 2.
5. Use hole No. 1 or 2 on mud flap as a guide to drill 3.9mm dia. hole through the metal wheel arch flange. Apply zinc chromate around
hole. Attach self tapping screw and flat washer at this location.
6. Use template provided in package to mark No. 3 drilling location on mud flap, refer figure 3. Drill 3.9mm dia. hole through mud flap
and metal wheel arch flange. Apply zinc chromate around hole. Attach self tapping screw and flat washer, refer figure 4.
7. Assemble the 115mm long offset bracket, via smaller hole, to location 5 or 6 (refer Model/Positions chart) using a machine screw,
nut and washers provided. The bracket should be offset towards the rear of the vehicle when mud flap is assembled to the vehicle,
refer figure 4.
NOTE: Mud flap may require trimming at moulded line to avoid interference with side intrusion bar, refer mud flap.
8. Drill 3.9mm dia. hole into the inner splash guard using the bracket as a template. Attach bracket using self tapping screw and
washer provided, refer figure 4.
9. Refit front wheel.
FITTING INSTRUCTIONS FOR
VT SEDAN, WAGON, 'SS' (EXCEPT CALAIS) & VU 'SS'
FRONT FLEXIBLE MUD FLAPS
WASHER
(4 PLACES)
WASHER
(2 PLACES)
SELF
TAPPING
SCREW
(3 PLACES)
SELF
TAPPING
SCREW
(2 PLACES)
MACHINE SCREW
POSITION 5 OR 6
(REFER CHART
ON TEMPLATE)
DRILL 3.9 DIA. HOLE
THRU FENDER LINER
DRILL 3.9 DIA HOLE
APPLY ZINC CHROMATE
TO METAL FLANGE
HOLE No. 1 OR 2
(REFER CHART ON
TEMPLATE)
REMOVE EXISTING
UPPER RETAINING
SCREW FROM
ROCKER PANEL
NUT
MUD FLAP
LOWER EDGE
MUST BE
PARALLEL
TO GROUND
(110 - 120mm
CLEARANCE
ON 'SS' AT GVM)
FD838
14JN00
COPYRIGHT
Page 2 of 3
fd838_2
HOLDEN SERVICE PARTS OPERATIONS
Reproduction in whole or part
prohibited without written approval
Division of HOLDEN Ltd ACN 006 893 232
FRONT MUD FLAP DRILLING TEMPLATE
MARK HOLE No. 3 LOCATION
ONTO MUD FLAP.
REMOVE TEMPLATE, DRILL
3.9mm DIA HOLE THRU MUD FLAP
& WHEEL ARCH FLANGE
4
FIGURE 1 FIGURE 2
FIGURE 3 FIGURE 4
1
2
3
4
56
FD998
09NO00
COPYRIGHT
Page 1 of 1
FD998-1
HOLDEN SERVICE PARTS OPERATIONS
Reproduction in whole or part
prohibited without written approval
Division of HOLDEN Ltd ACN 006 893 232
FITTING INSTRUCTIONS FOR VU UTILITY
CENTRE ROOF REAR CAP REPAIR KIT
Part Number 92144235
FITTING INSTRUCTIONS
1. Remove each nutsert from the rear of the vehicle, 5 places, by inserting a flat blade screwdriver
between the upper edge of the nutsert and the panel.
NOTE: Take care not to damage the paint or bodywork.
2. Pressing downward on the screwdriver, ease the nutsert out of its location using a pair of pliers.
3. Insert the new nutserts. Ensure the seals are in their correct position and the nutserts are fully seated.
4. Remove the existing tape and clean off any remaining adhesive from the centre roof rear cap and the
vehicle.
5. Affix the new tape to the cap in the original position.
6. Prior to installing the cap, thoroughly clean the vehicle surface in the area of the tape.
7. Remove the backing paper from the tape.
8. Connect the high mount stop lamp connector if fitted.
9. Align the centre roof rear cap clips with their respective nutserts on the vehicle and push home,
ensuring the double sided tape does not contact until the part is fully seated.
10. Push-in each end to engage the snap-lock tabs; the part should be flush to the side caps.
11. Press down along the upper surface of the cap to ensure the tape adheres correctly.
PART NO. DESCRIPTION QUANTITY
92059470 NUTSERT, CENTRE ROOF REAR CAP 5
92144236 TAPE, ADHESIVE 1
FD998 CENTRE ROOF REAR CAP REPAIR KIT FITTING INSTRUCTIONS 1
PARTS LIST
A
A
TAPE
BACKING PAPER
CENTRE ROOF REAR CAP
SEAL
NUTSERT