Page 1 of 5
G602-1
FITTING INSTRUCTIONS FOR
TT ZAFIRA
TRAILER HARNESS PACKAGE (7 PIN FLAT)
Part Number 92145327
HOLDEN SERVICE PARTS OPERATIONS
Division of HOLDEN Ltd ACN 006 893 232
Reproduction in whole or part
prohibited without written approval
COPYRIGHT
FD1052
15MR02
Page 2 of 5
TOOLS REQUIRED:
Flat Bladed Screw Driver
T20 Torx Bit, Extension,
Power Driver or Ratchet Wrench
Spot Tape ( electrical tape )
FITTING INSTRUCTIONS
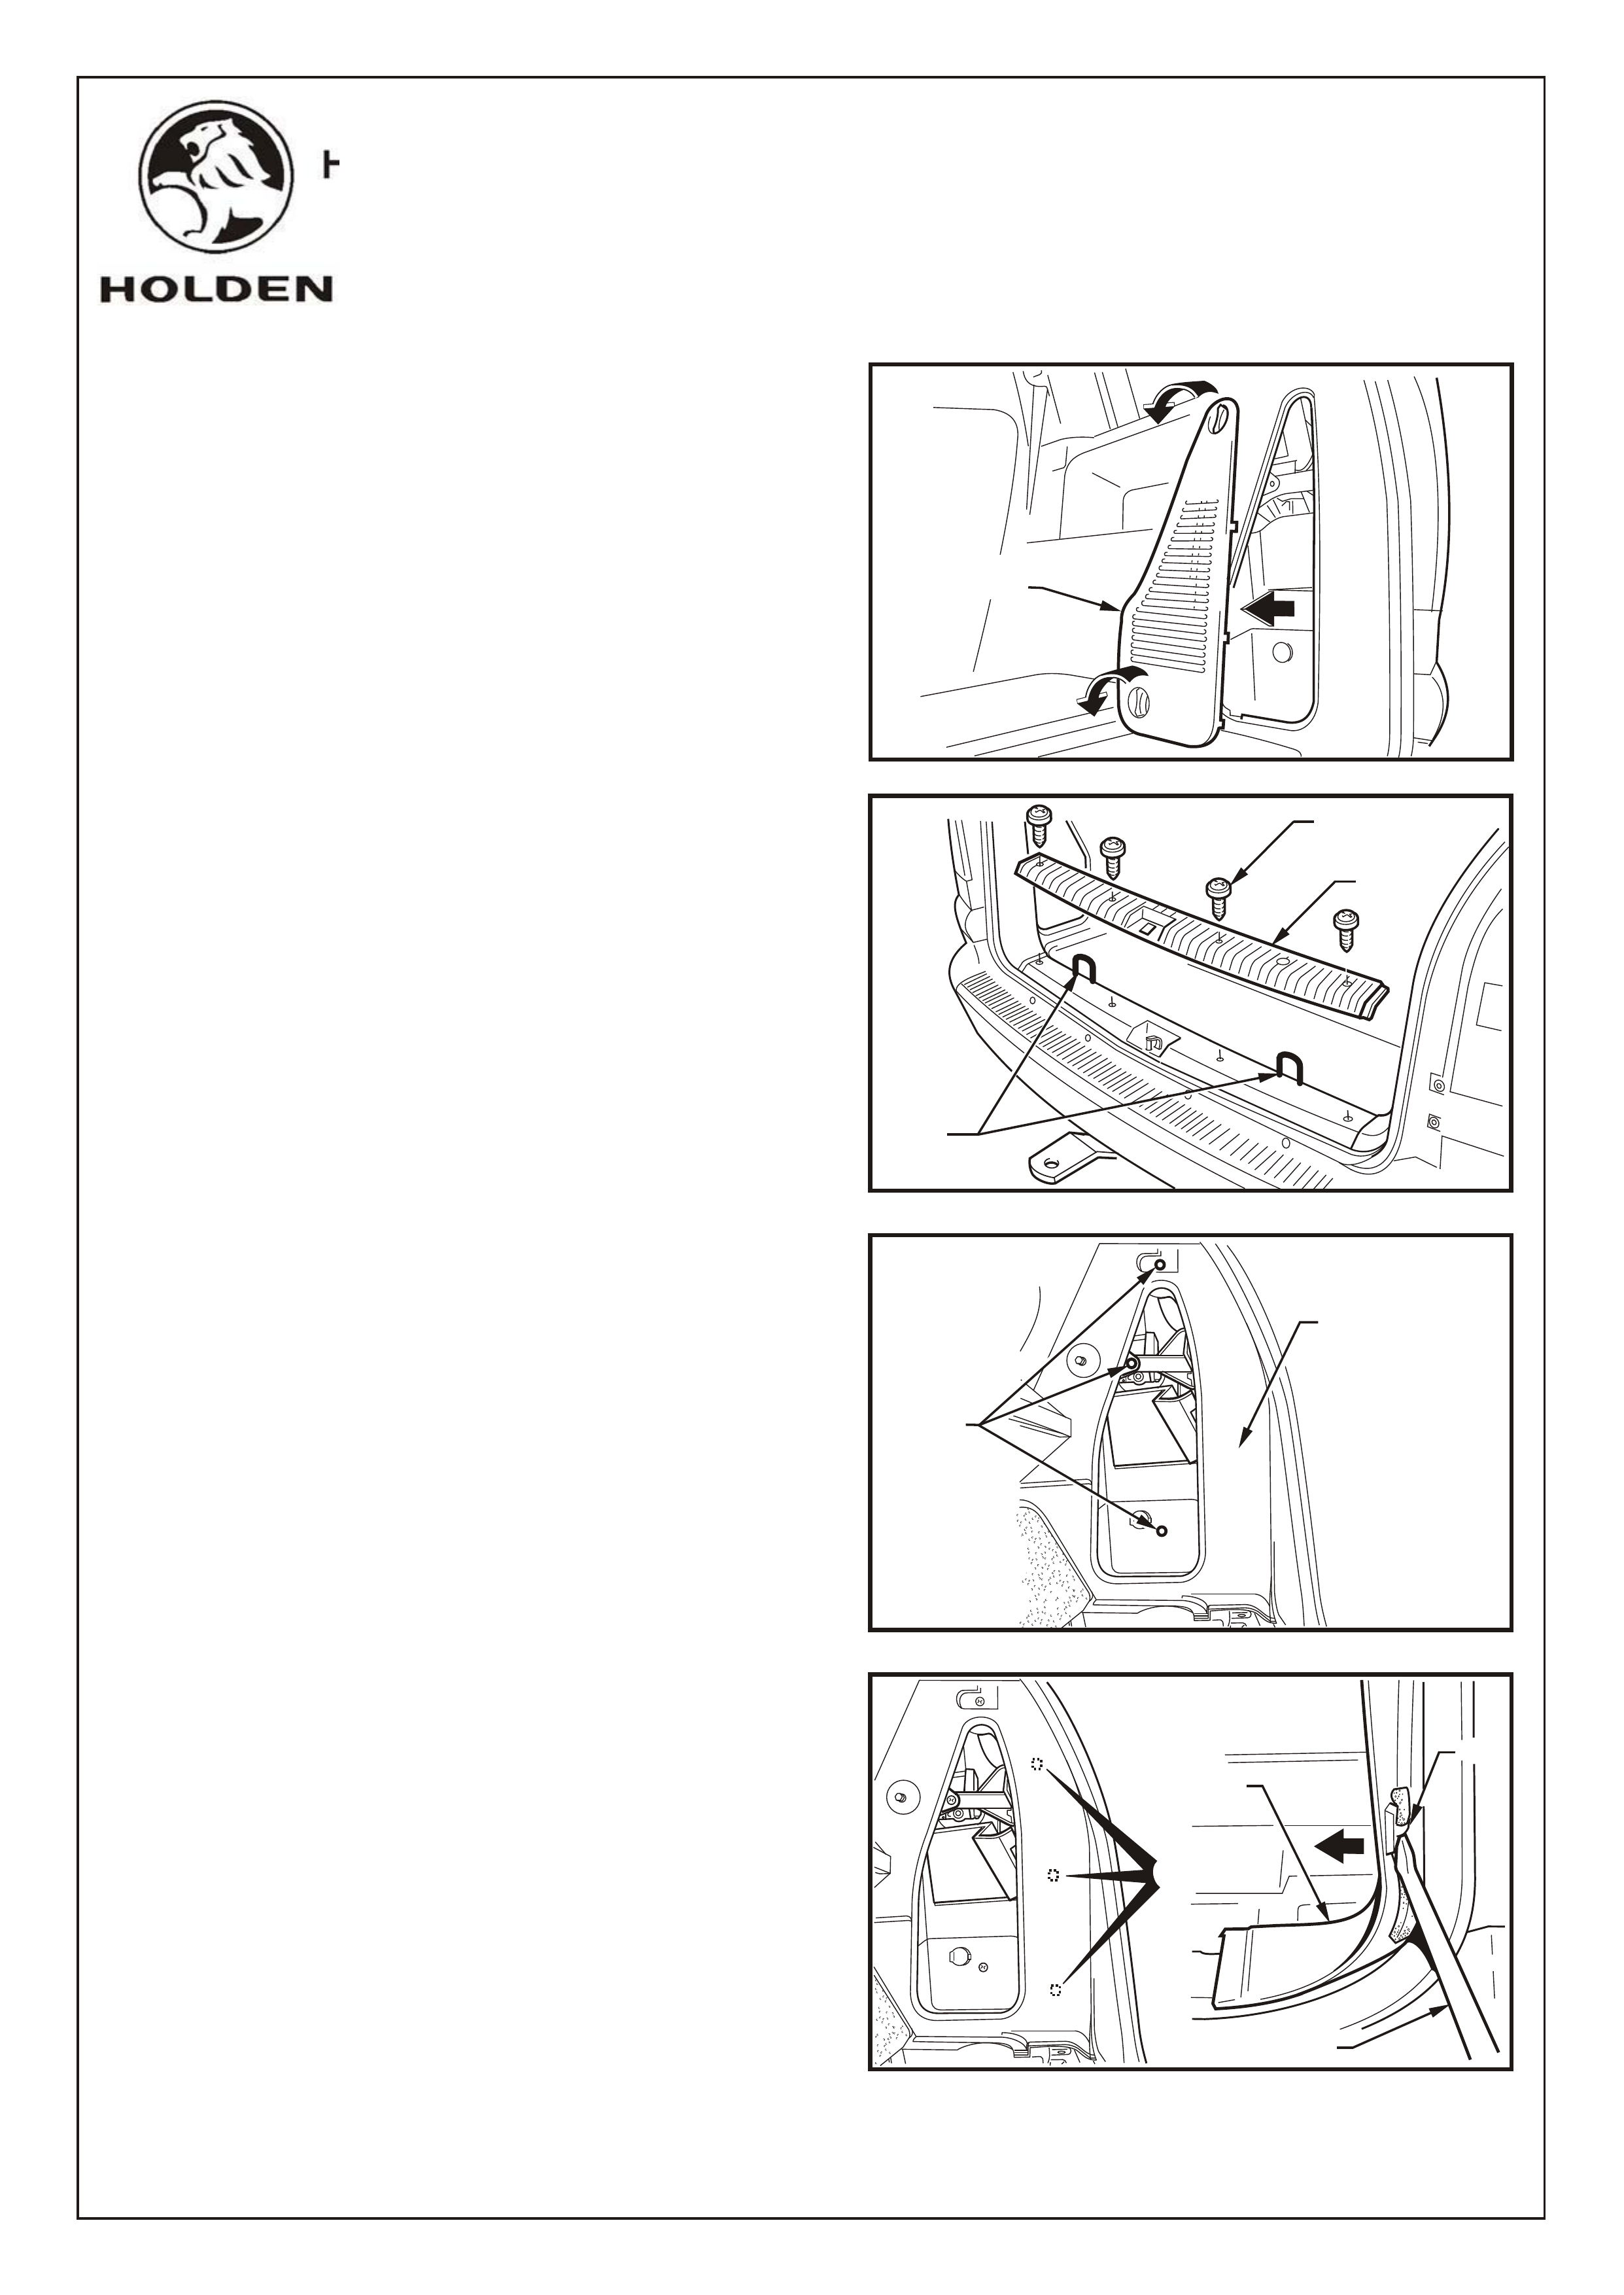
1. Remove the access trim panel on the RH & LH rear
"D" pillars. Refer Figure 1.
2. Lift up tie down clips and remove rear lower tailgate
opening trim. Refer Figure 2.
3. Remove the screws (3 places) retaining the quarter
side trim panel, R & LH sides. Refer Figure 3.
4. Prise away the quarter side trim( retained by clips)
with a flat bladed screw driver, 3 places as shown.
Refer Figure 4.
FIGURE 2
FIGURE 3
FIGURE 4
HOLDEN SERVICE PARTS OPERATIONS
Division of HOLDEN Ltd ACN 006 893 232
Reproduction in whole or part
prohibited without written approval
COPYRIGHT
G602-2
FIGURE 1
REMOVE ACCESS
TRIM PANEL
..
..
..
..
..
..
..
..
....
..
..
..
..
..
..
..
..
..
..
..
..
..
....
..
..
....
..
..
....
..
..
..
..
..
......
..
..
..
..
..
..
..
..
......
..
..
..
..
SCREW
TIE DOWN
CLIPS
SCREWS
QUARTER
SIDE TRIM
QUARTER
SIDE TRIM
TRIM
SCREW-
DRIVER
CLIP
FD1052
15MR02
Page 3 of 5
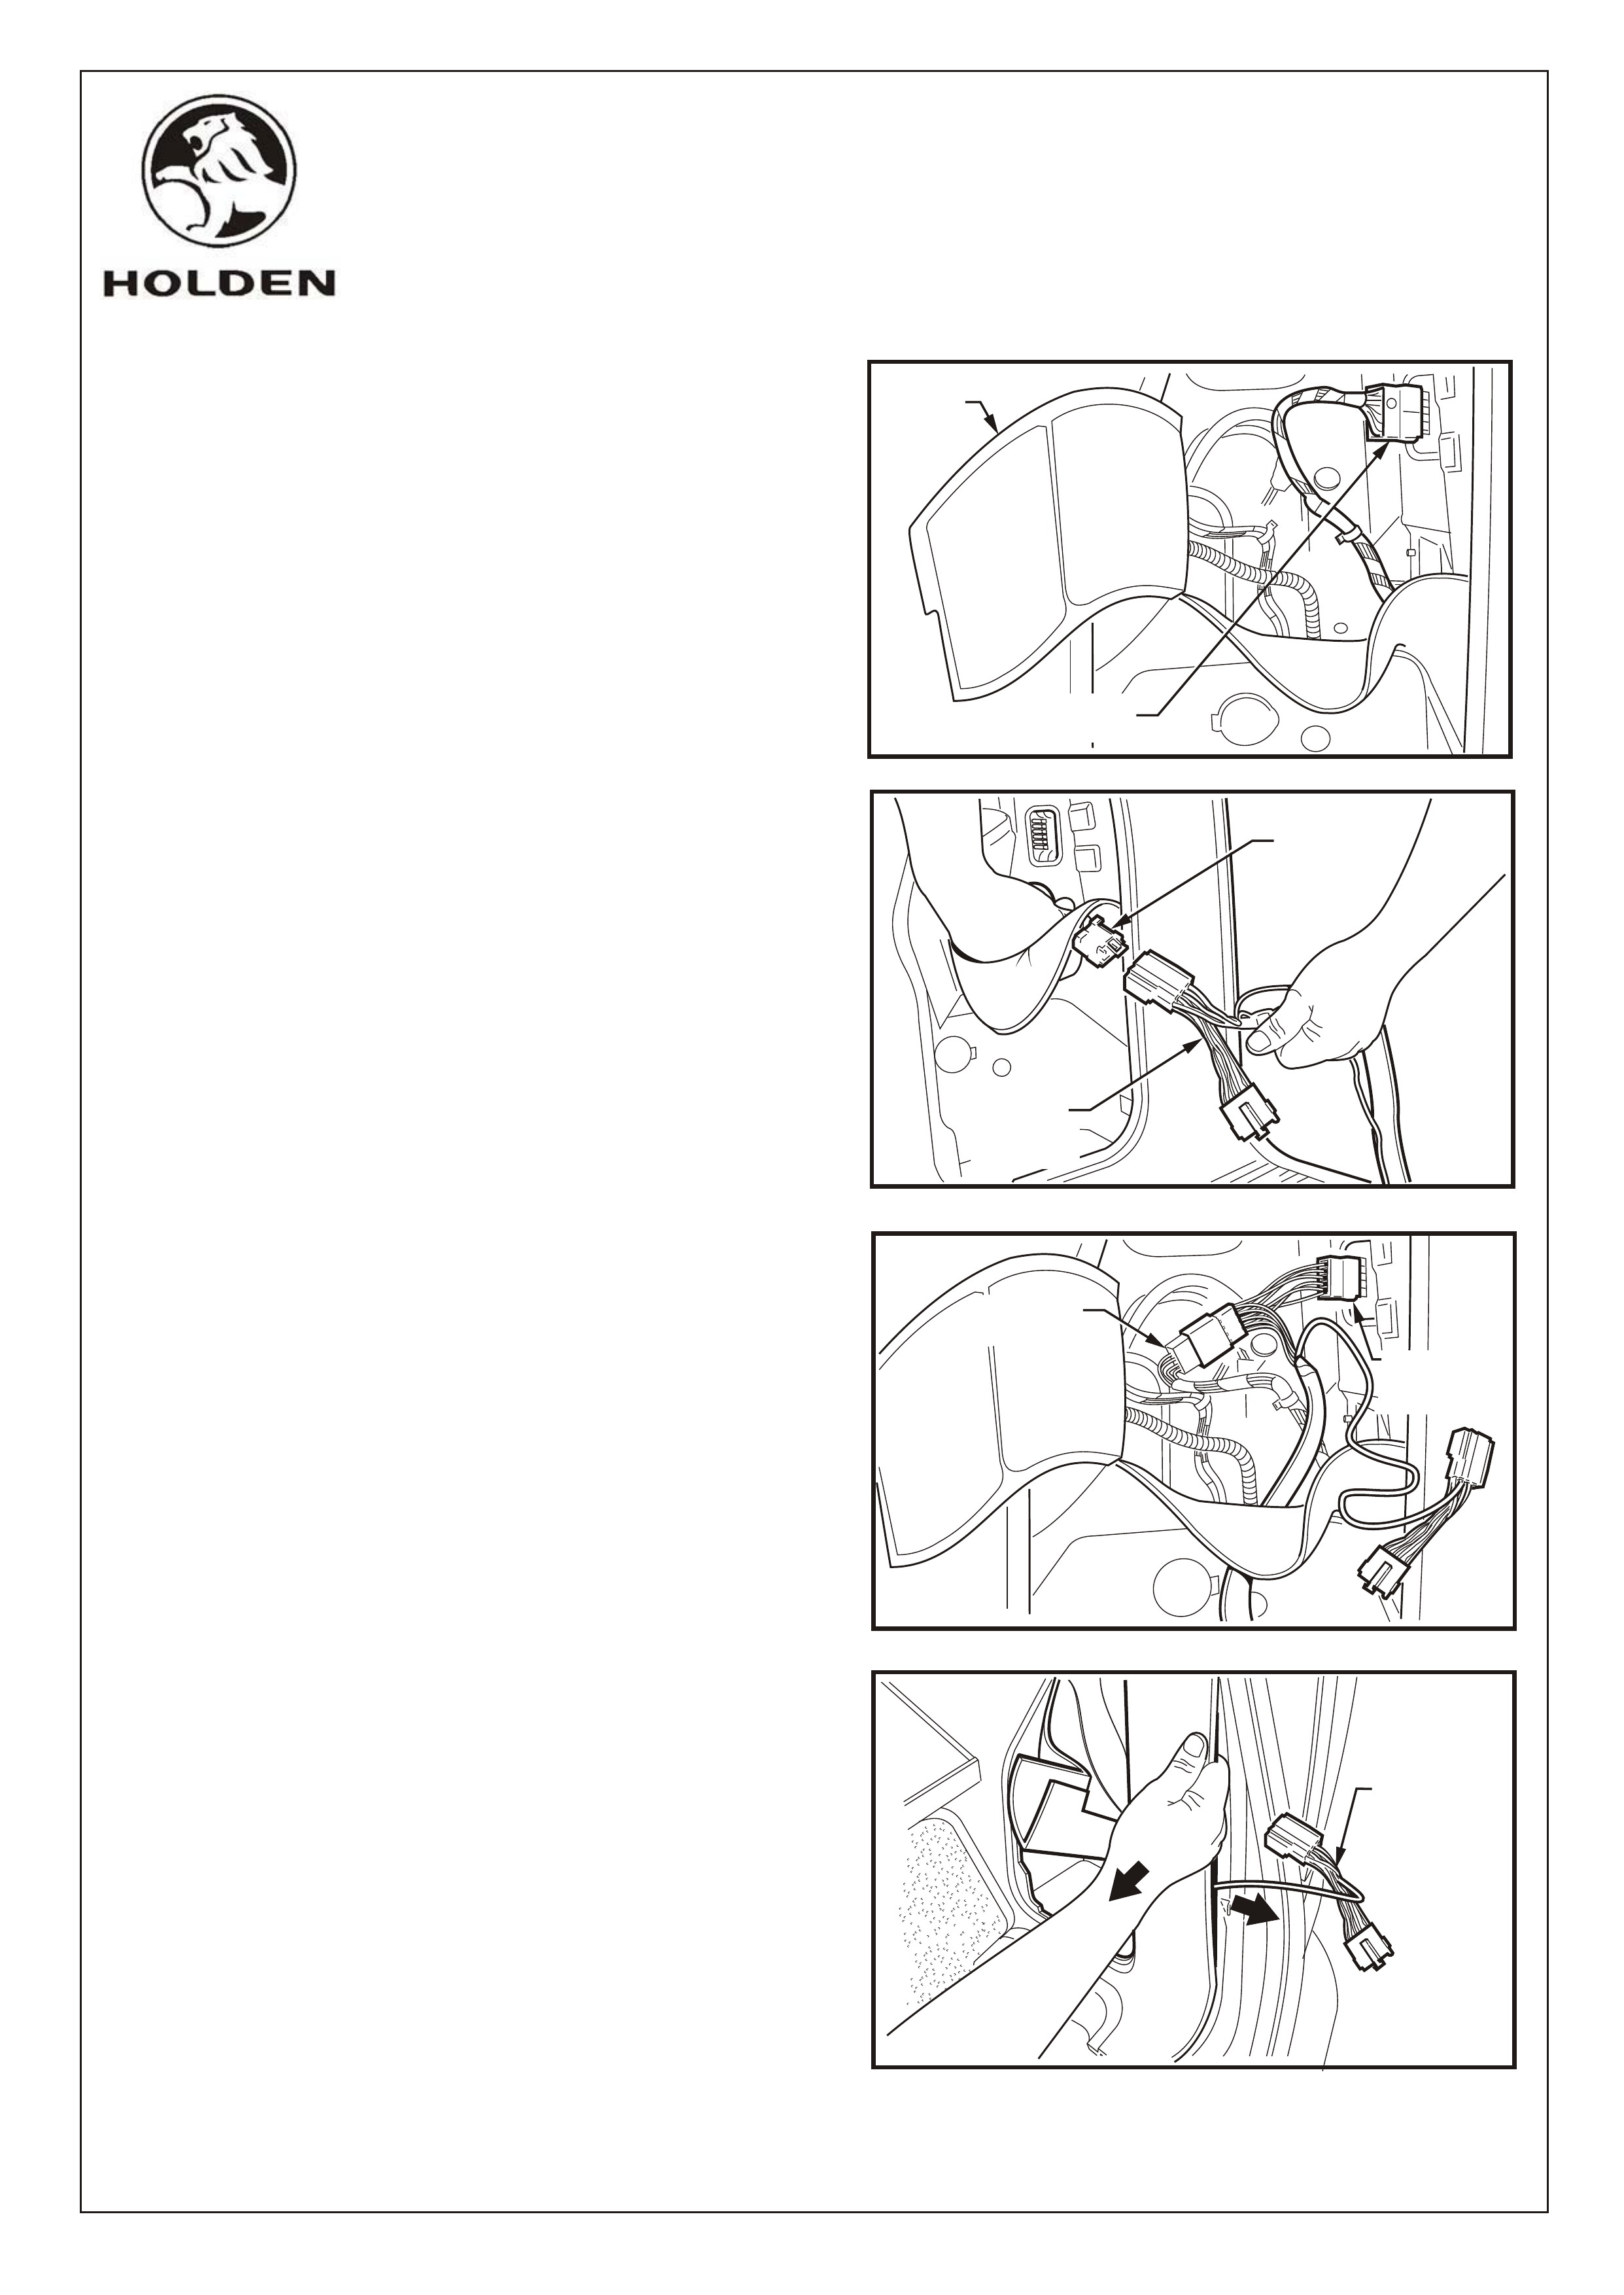
5. Pull away the soft cover (RH side first) to expose the
rear lamp connector. Refer Figure 5.
6. Remove the harness connector from the rear lamp
and feed it through the soft trim aperture into the
storage compartment. Plug it into the trailer wiring
harness, the larger of the two. Refer Figure 6
7. Feed both the trailer wiring harness connectors and
yellow lead up through the trim pocket and plug the
other RH connector into the rear lamp connector.
Refer Figure 7.
NOTE: Ensure that the connector on the trailer
wiring harness labeled“RIGHT SIDE” is installed on
the right hand side of the vehicle
8. Feed the LH harness connector and yellow lead
through the quarter trim panel. Refer Figure 8.
FIGURE 6
FIGURE 7
FIGURE 8
HOLDEN SERVICE PARTS OPERATIONS
Division of HOLDEN Ltd ACN 006 893 232
Reproduction in whole or part
prohibited without written approval
COPYRIGHT
HOLDEN SERVICE PARTS OPERATIONS
Division of HOLDEN Ltd ACN 006 893 232
G602-3
FIGURE 5
SOFT
COVER
REAR LAMP
CONNECTOR
REAR LAMP
CONNECTOR
TRAILER
WIRING
HARNESS
REAR LAMP
CONNECTOR
RIGHT SIDE
CONNECTOR
LABELED
“RIGHT SIDE“
LHS HARNESS
CONNECTOR
FD1052
15MR02
..
..
..
..
..
..
..
..
..
..
..
..
..
..
..
..
..
..
..
..
..
....
..
..
....
..
..
....
..
..
..
..
..
..
..
..
..
..
..
..
..
......
..
..
..
..
YELLOW
LEAD
SPOT TAPE
HOLDEN SERVICE PARTS OPERATIONS
COPYRIGHT
Reproduction in whole or part
prohibited without written approval
Division of HOLDEN Ltd ACN 006 893 232
Page 4 of 5
FIGURE 9
G602-4
FIGURE 12
FIGURE 11
FIGURE 10
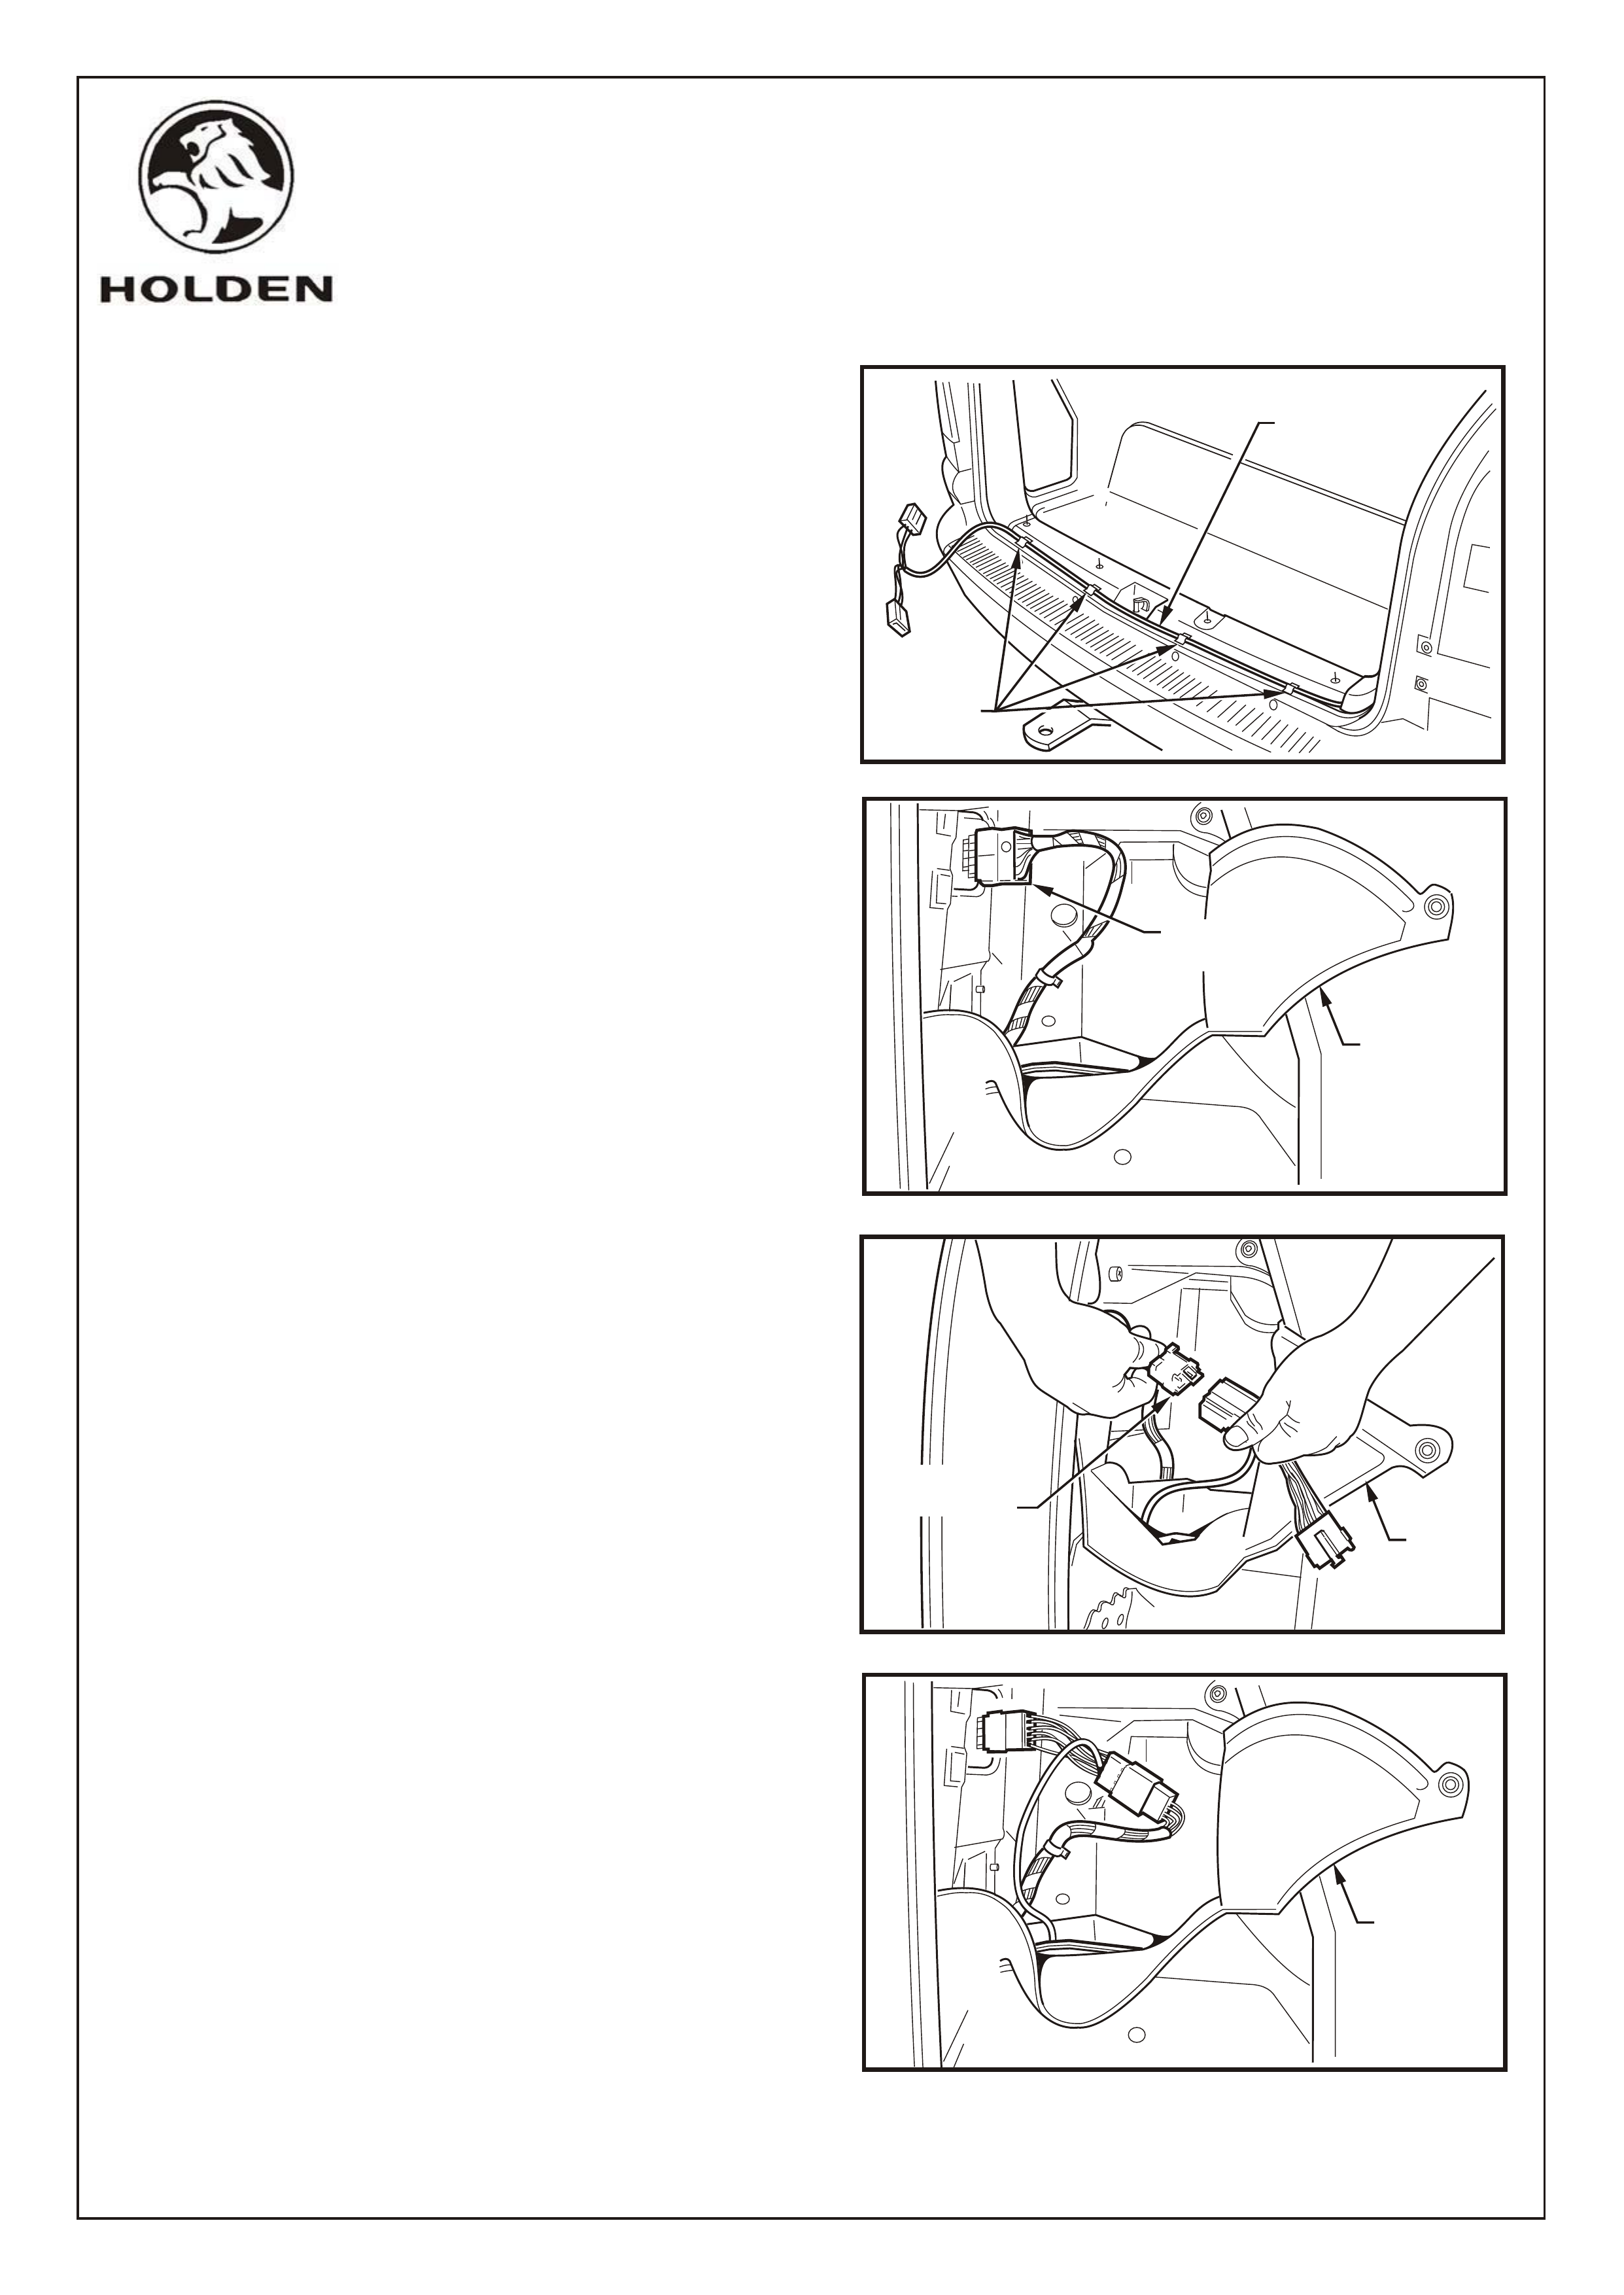
9. Route yellow lead of the trailer wiring harness
across the tailgate opening seal area and spot tape
4 places. Refer Figure 9.
10. Pull back the soft cover to access the rear lamp
connector. remove the reartail lamp connector.
Refer Figure 10.
11. Feed LH trailer harness connectors and the yellow
lead behind LH quarter trim panel and up behind
storage cavity compartment. Connect to the large
trailer wiring harness to the rear lamp connector
harness. Refer Figure 11.
12. Plug the other trailer wiring harness connector into
the rear lamp, Refer Figure 12.
Note: At this point check operation of the trailer
wiring harness prior to continuing the installation
procedure.
REAR LAMP
CONNECTOR
REAR LAMP
CONNECTOR
SOFT
COVER
SOFT
COVER
SOFT
COVER
FD1052
15MR02
G602-5
92145327 TRAILER WIRING HARNESS 1
FD1052 FITTING INSTRUCTION BOOKLET 1
COPYRIGHT
Reproduction in whole or part
prohibited without written approval
ITEM DESCRIPTION QUANTITY
PARTS LIST
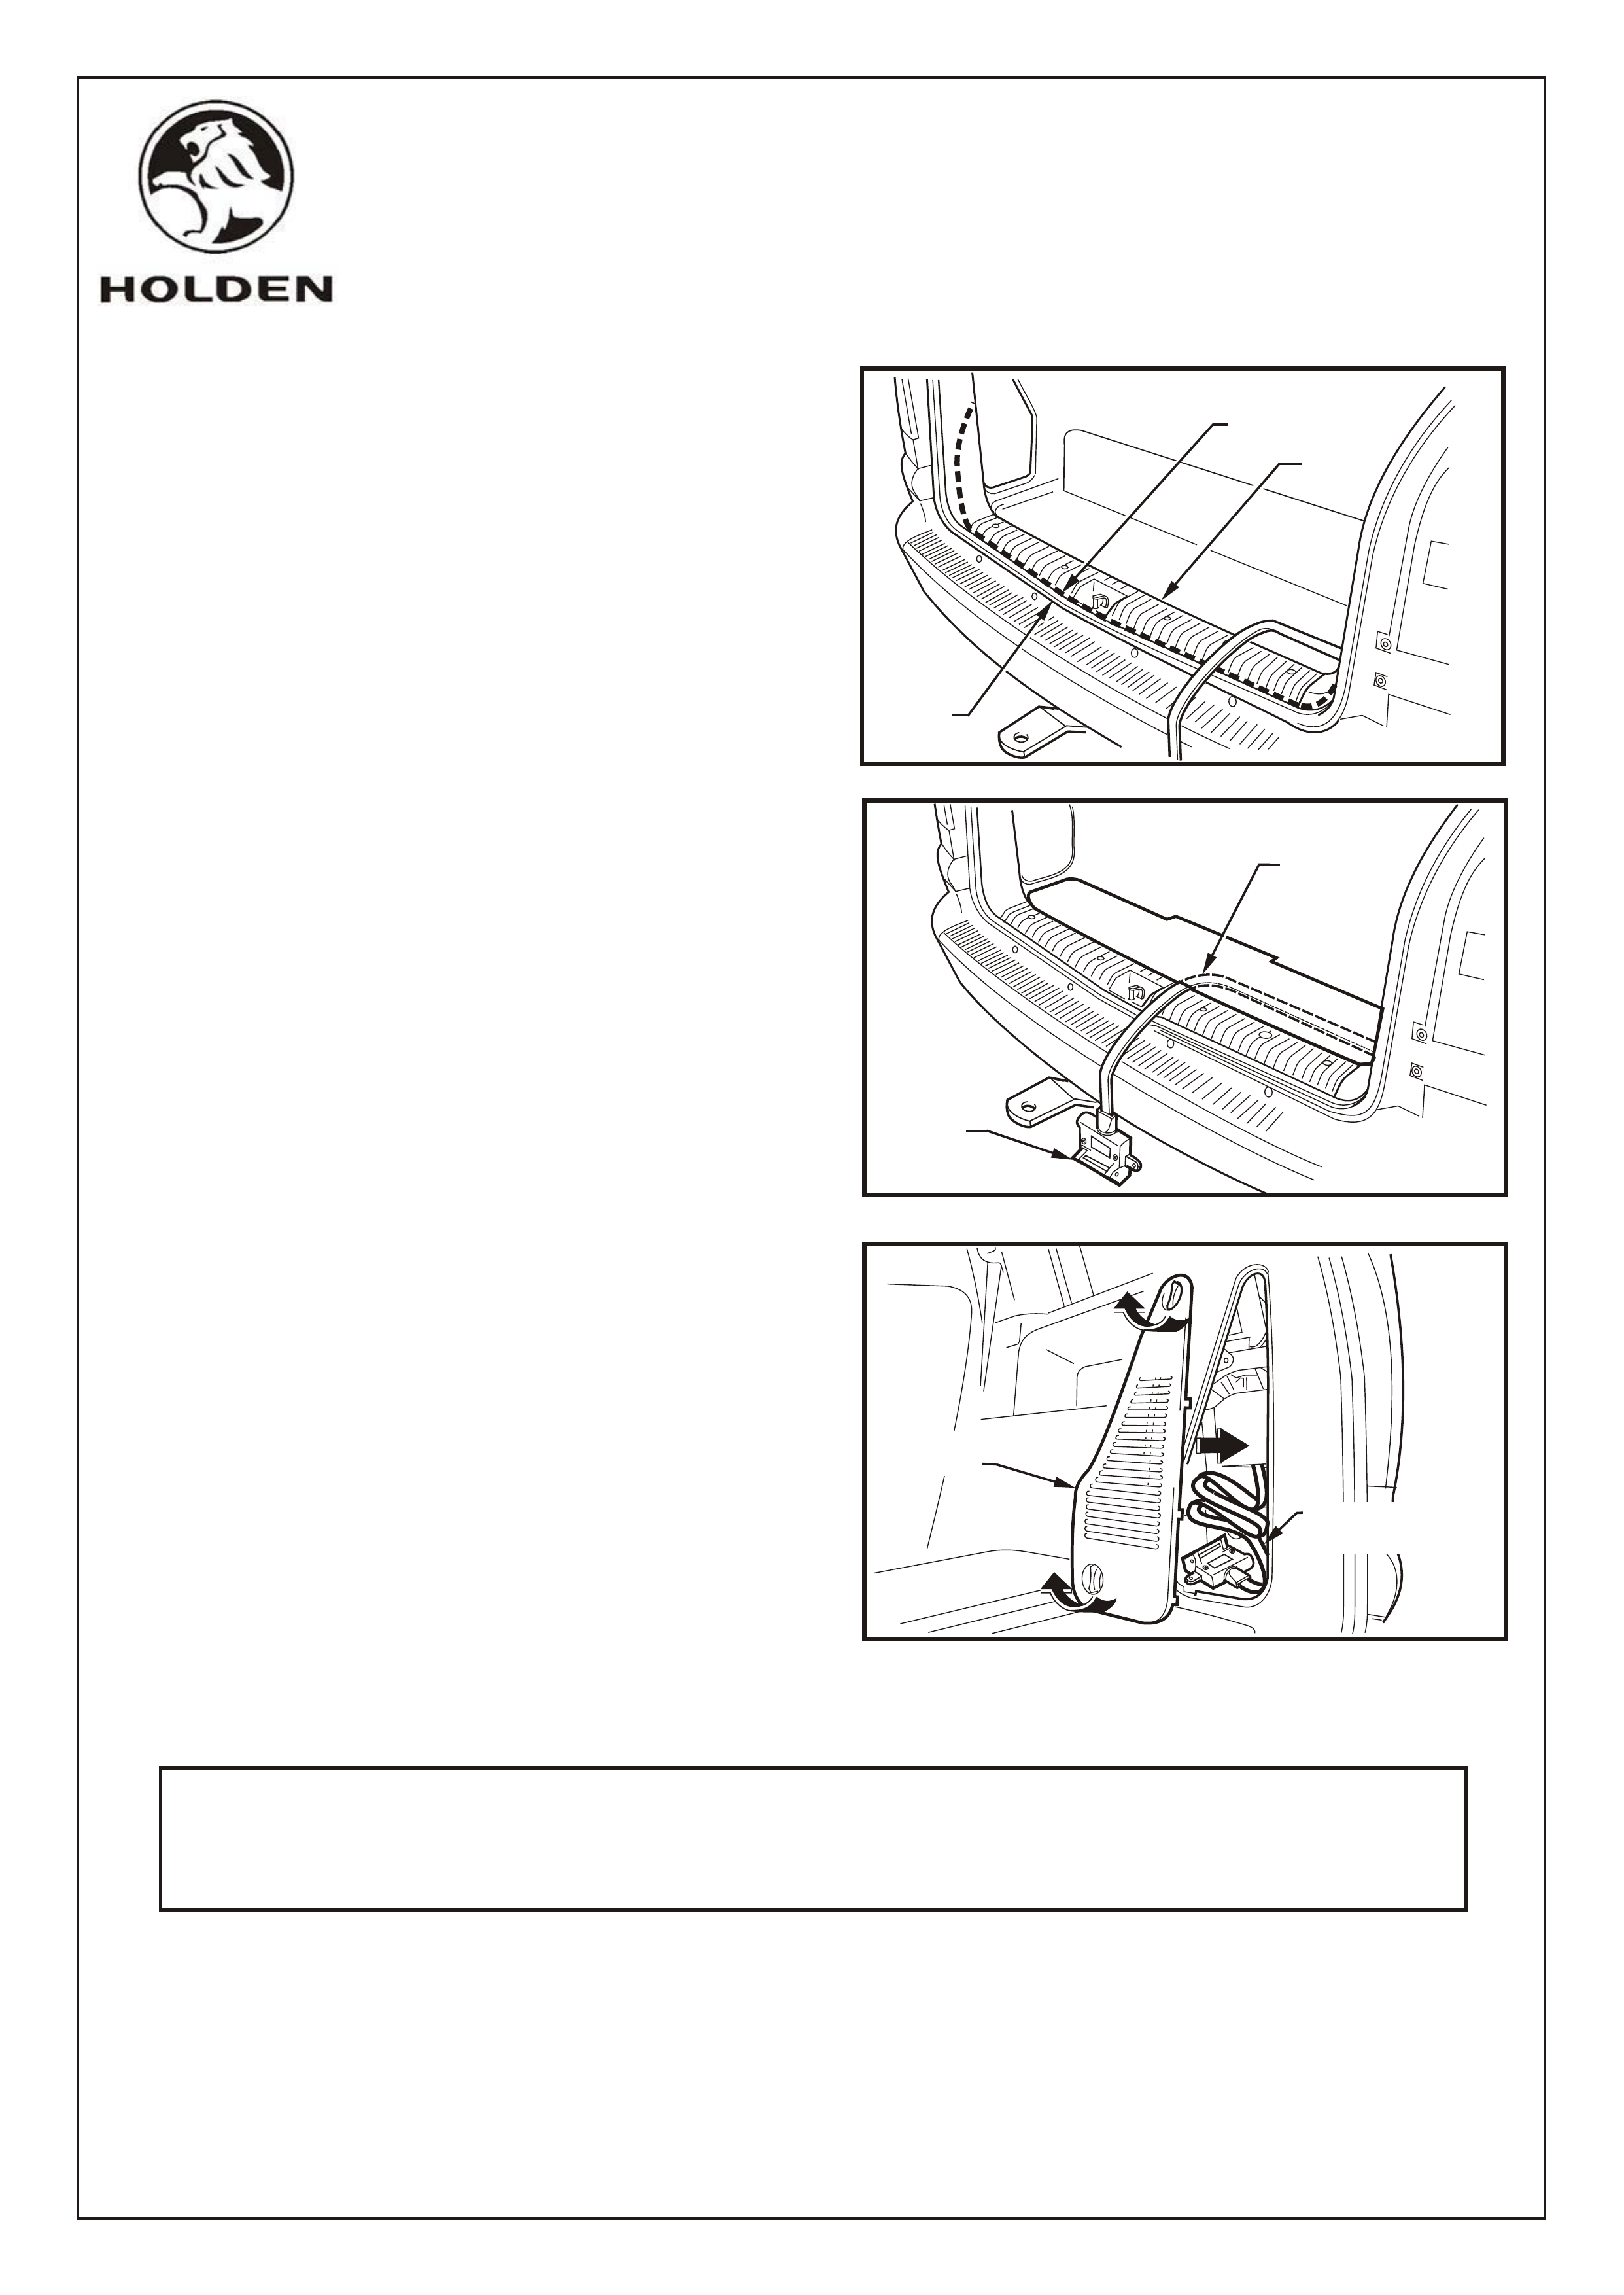
13. Install the rear lower door opening trim, making sure
that the tailgate opening seal is fitted over the rear
edge of the trim and covers the yellow lead of the
trailer wiring harness. Refer Figure13.
14. Re-install the soft covers in the storage
compartment both sides of the vehicle.
15. If the trailer harness is to be used, route the harness
across the rear compartment as shown and cover
with the rear carpet. Refer Figure 14. Close the
liftgate to secure the trialer wiring harness while in
use.
16. Reinstall the access trim panels. When the trailer
harness is not in use, it may be stored in the access
compartment as shown. Refer Figure 15.
17. Place fitting instructions in the vehicles glove box.
FIGURE 13
REPLACE ACCESS
TRIM PANEL
STORE HARNESS
WHEN NOT IN USE
FIGURE 14
FIGURE 15
..
..
..
..
..
..
....
..
..
..
..
..
..
....
..
..
..
..
..
..
....
..
..
..
....
..
..
..
..
..
..
..
....
..
..
..
..
..
..
..
..
..
....
..
..
....
....
..
..
..
..
..
..
..
..
....
..
..
..
..
..
..
....
..
..
..
..
..
..
....
..
..
..
....
..
..
TRAILER
WIRING
HARNESS
ROUTE
HARNESS
UNDER
CARPET
HOLDEN SERVICE PARTS OPERATIONS
Division of HOLDEN Ltd ACN 006 893 232
Page 5 of 5
..
..
..
..
..
..
..
..
....
..
..
..
..
..
..
..
..
..
..
..
..
..
....
..
..
....
..
..
....
..
..
..
..
..
......
..
..
..
..
..
..
..
..
....
..
..
..
..
YELLOW
HARNESS
TRIM
SEAL
FD1052
15MR02