FITTING INSTRUCTIONS FOR
VY & VZ COMMODORE SEDAN
SOUND SYSTEM UPGRADE
FD1283
27AU04
COPYRIGHT
Reproduction in whole or part
prohibited without written approval
HOLDEN LTD
Division of HOLDEN Ltd ACN 006 893 232
Page 1 of 24
TOOLS REQUIRED:
Phillips Head Screwdriver, Trim Removal Tool (recommended), Side Cutters, 10mm, 13mm and 19mm Socket,
Wrench, Small Jewellers Flat Bladed Screwdriver, Side Cutters, Small Flat Head Driver, T24 Torx Head Driver,
Window Winder Removal Tool (some models), Corrosion Protection Paint.
NOTE: To ensure that all components are refitted with their correct fixings, keep all screws removed with their relevant
components.
Part No. 92177446 AUDIO UPGRADE
92177447 SUBWOOFER (OPTIONAL)
FITTING INSTRUCTIONS FOR
VY & VZ COMMODORE SEDAN
SOUND SYSTEM UPGRADE
FD1283
27AU04
COPYRIGHT
Reproduction in whole or part
prohibited without written approval
HOLDEN LTD
Division of HOLDEN Ltd ACN 006 893 232
FIGURE 3
1
FITTING INSTRUCTIONS:
NOTE: Be sure there is enough room to fully open all the
door of the vehicle.
1. Turn the ignition to the “OFF” position.
2. Disconnect the vehicle's battery.
3. Pull off both lower “B” pillar trim panels (1).
Refer to Figure 1.
4. Pull the release handles (2 place) under the rear seat
base and remove the seat base. Refer to Figure 2
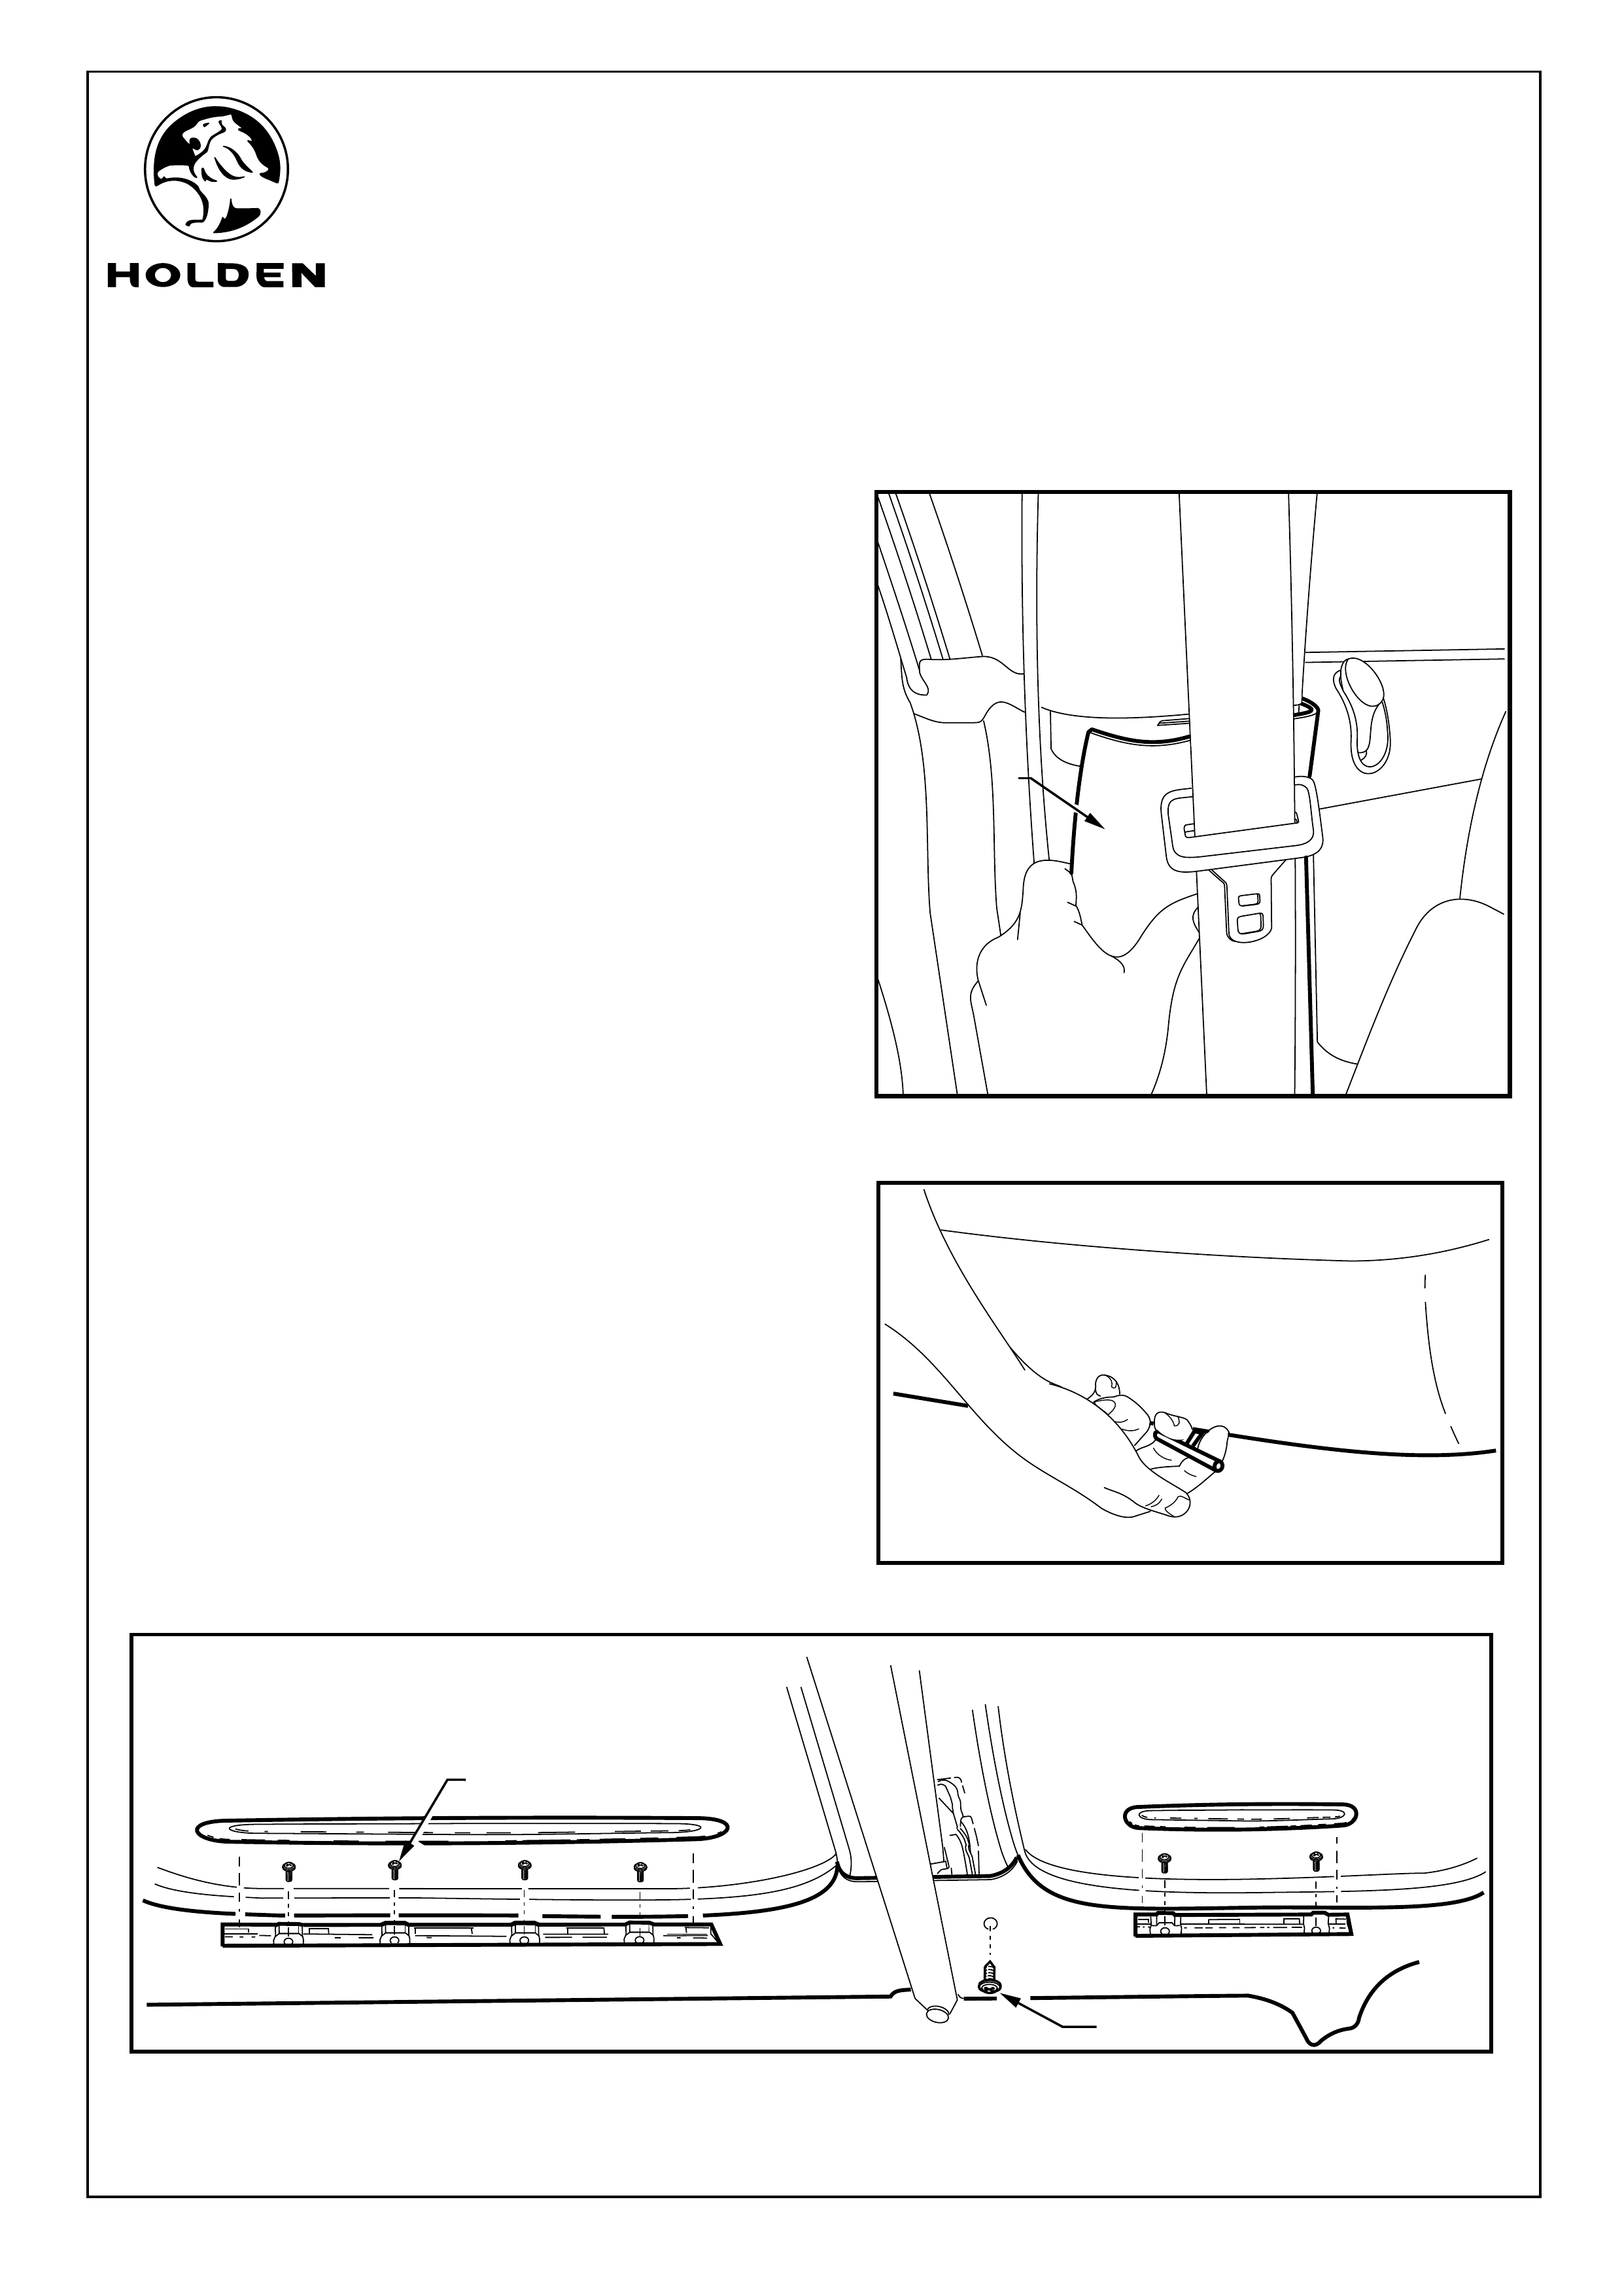
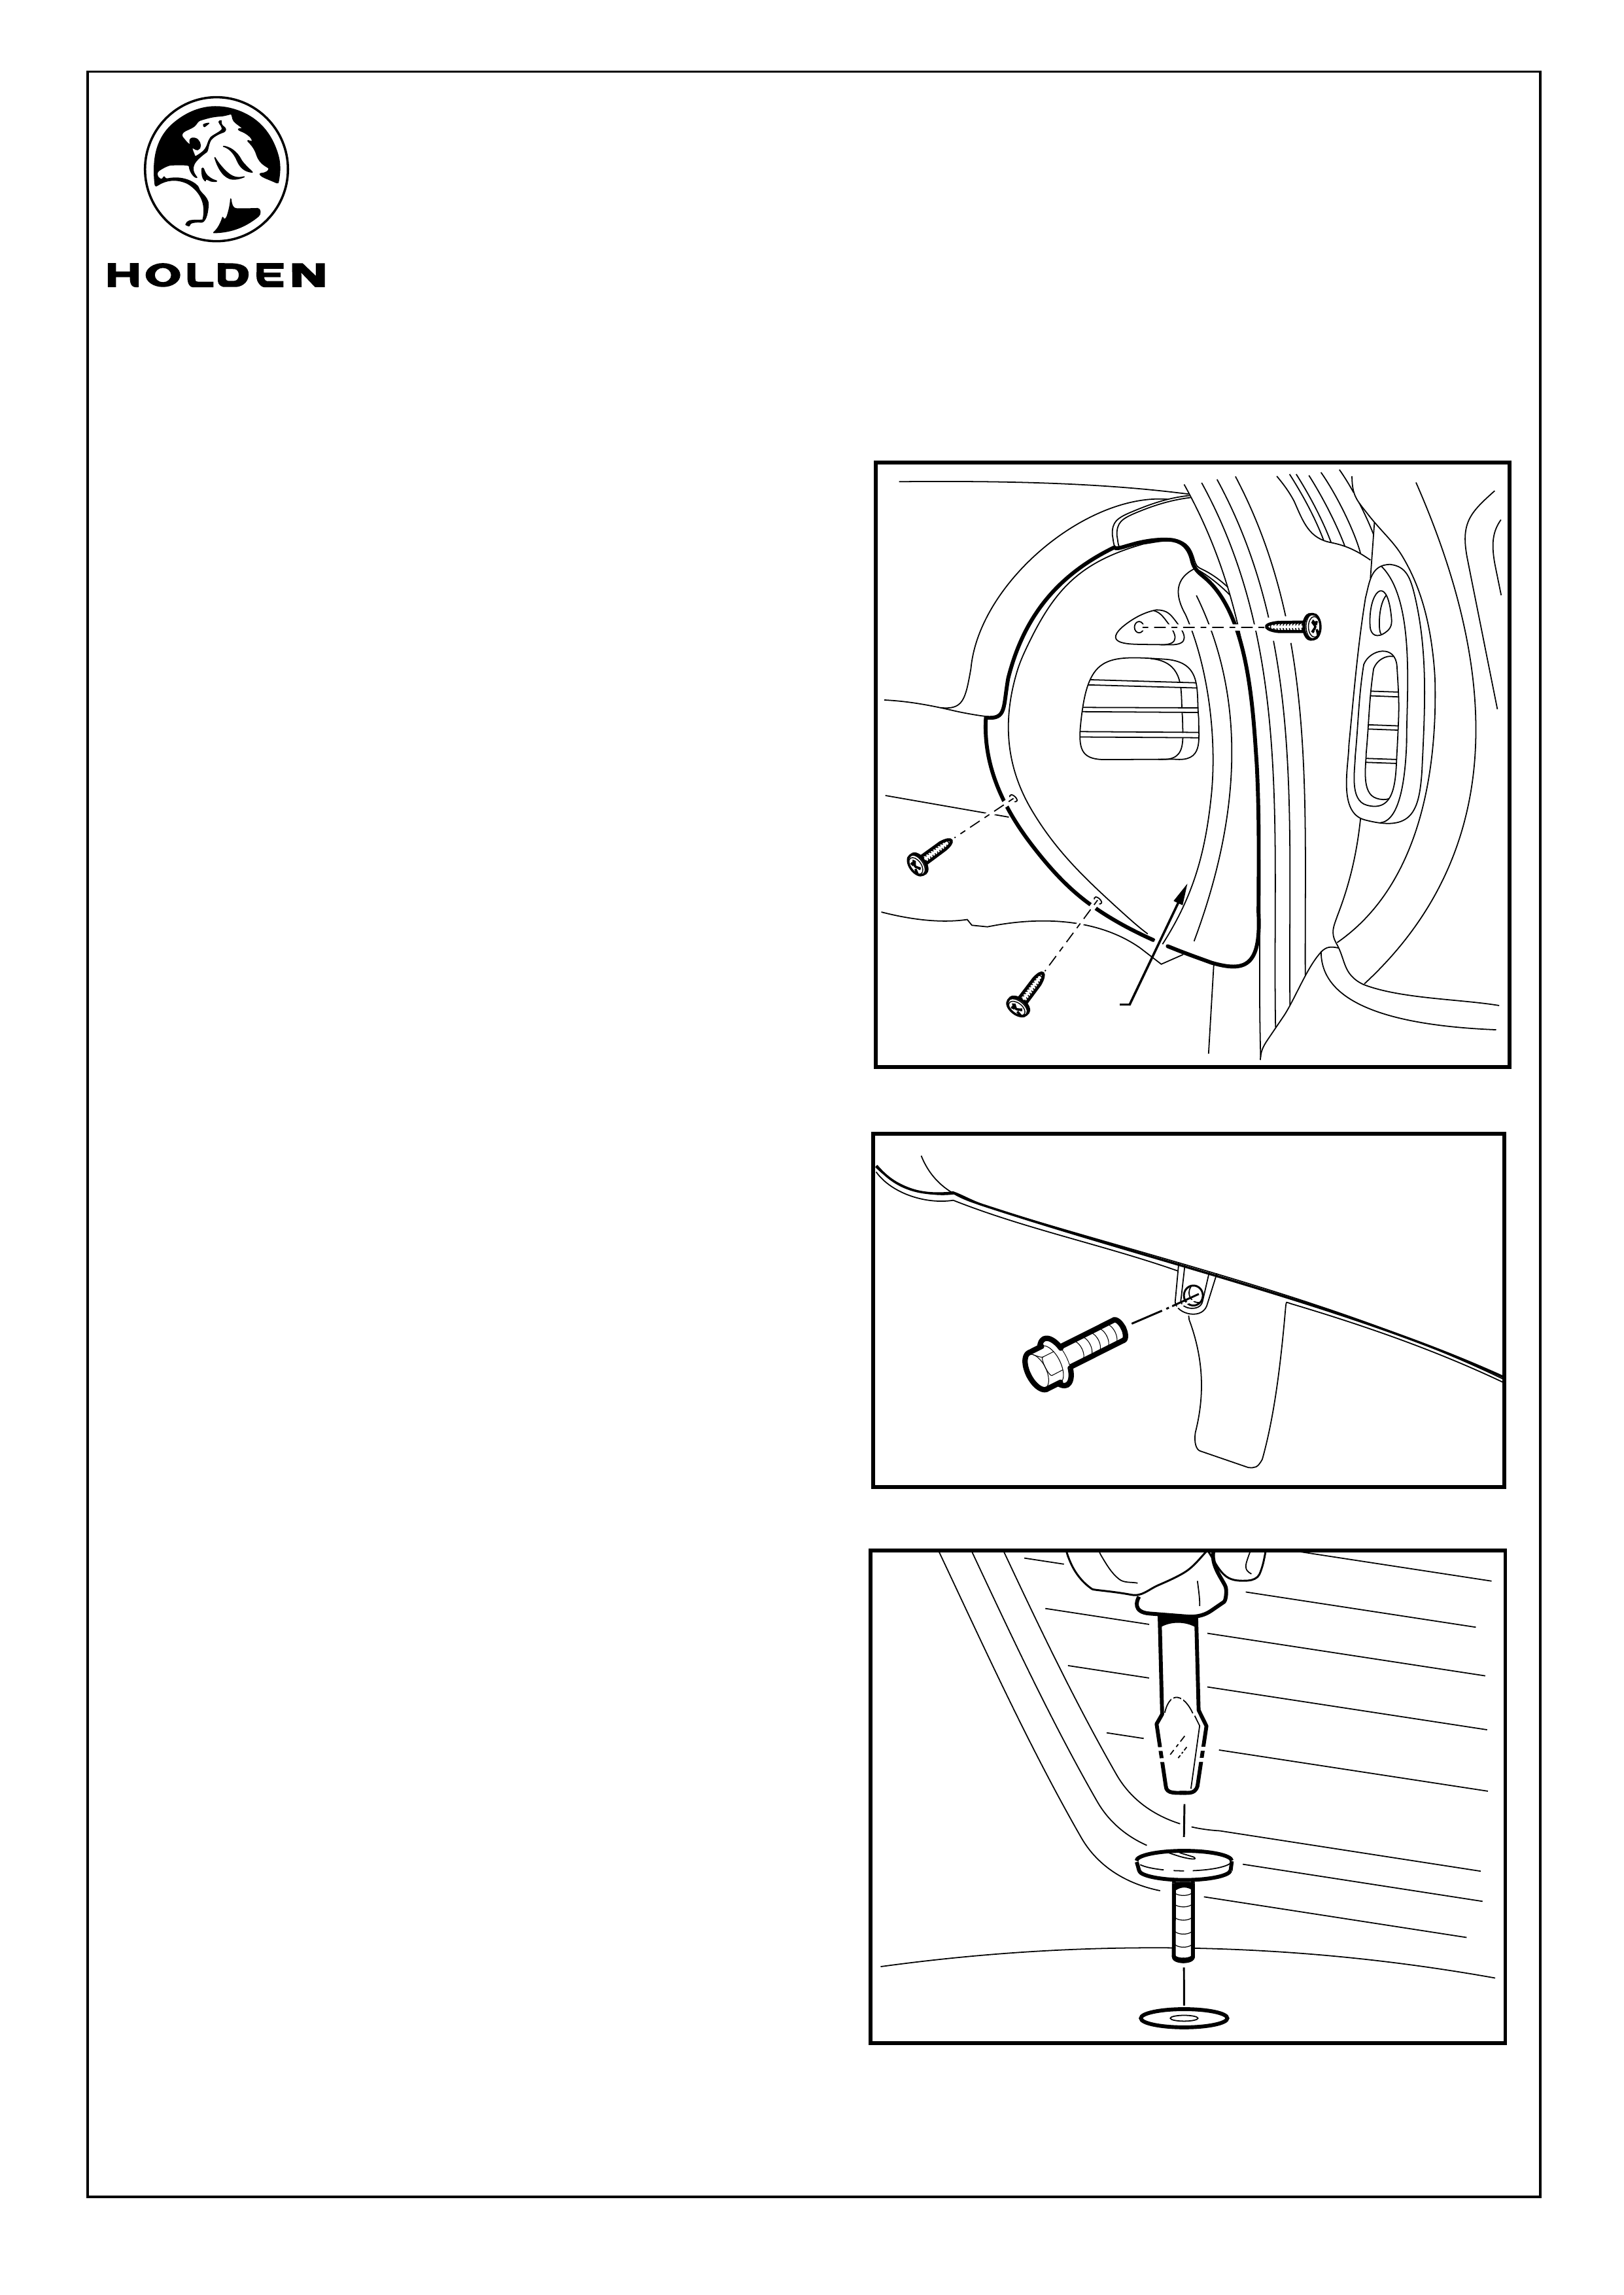
Refer to Figure 3 for the following:
5. Remove the screw covers from the sill trim in the front
and back door aperture.
6. Remove the Torx screws (1) (6 places) and the Torx
screw (2) on the side of the sill trim at the “B” pillar.
Remove the sill trim from vehicle, repeat on other side of
vehicle.
FIGURE 1
Page 2 of 24
2
1
FIGURE 2
FITTING INSTRUCTIONS FOR
VY & VZ COMMODORE SEDAN
SOUND SYSTEM UPGRADE
FD1283
27AU04
COPYRIGHT
Reproduction in whole or part
prohibited without written approval
HOLDEN LTD
Division of HOLDEN Ltd ACN 006 893 232
FITTING INSTRUCTIONS: - continued...
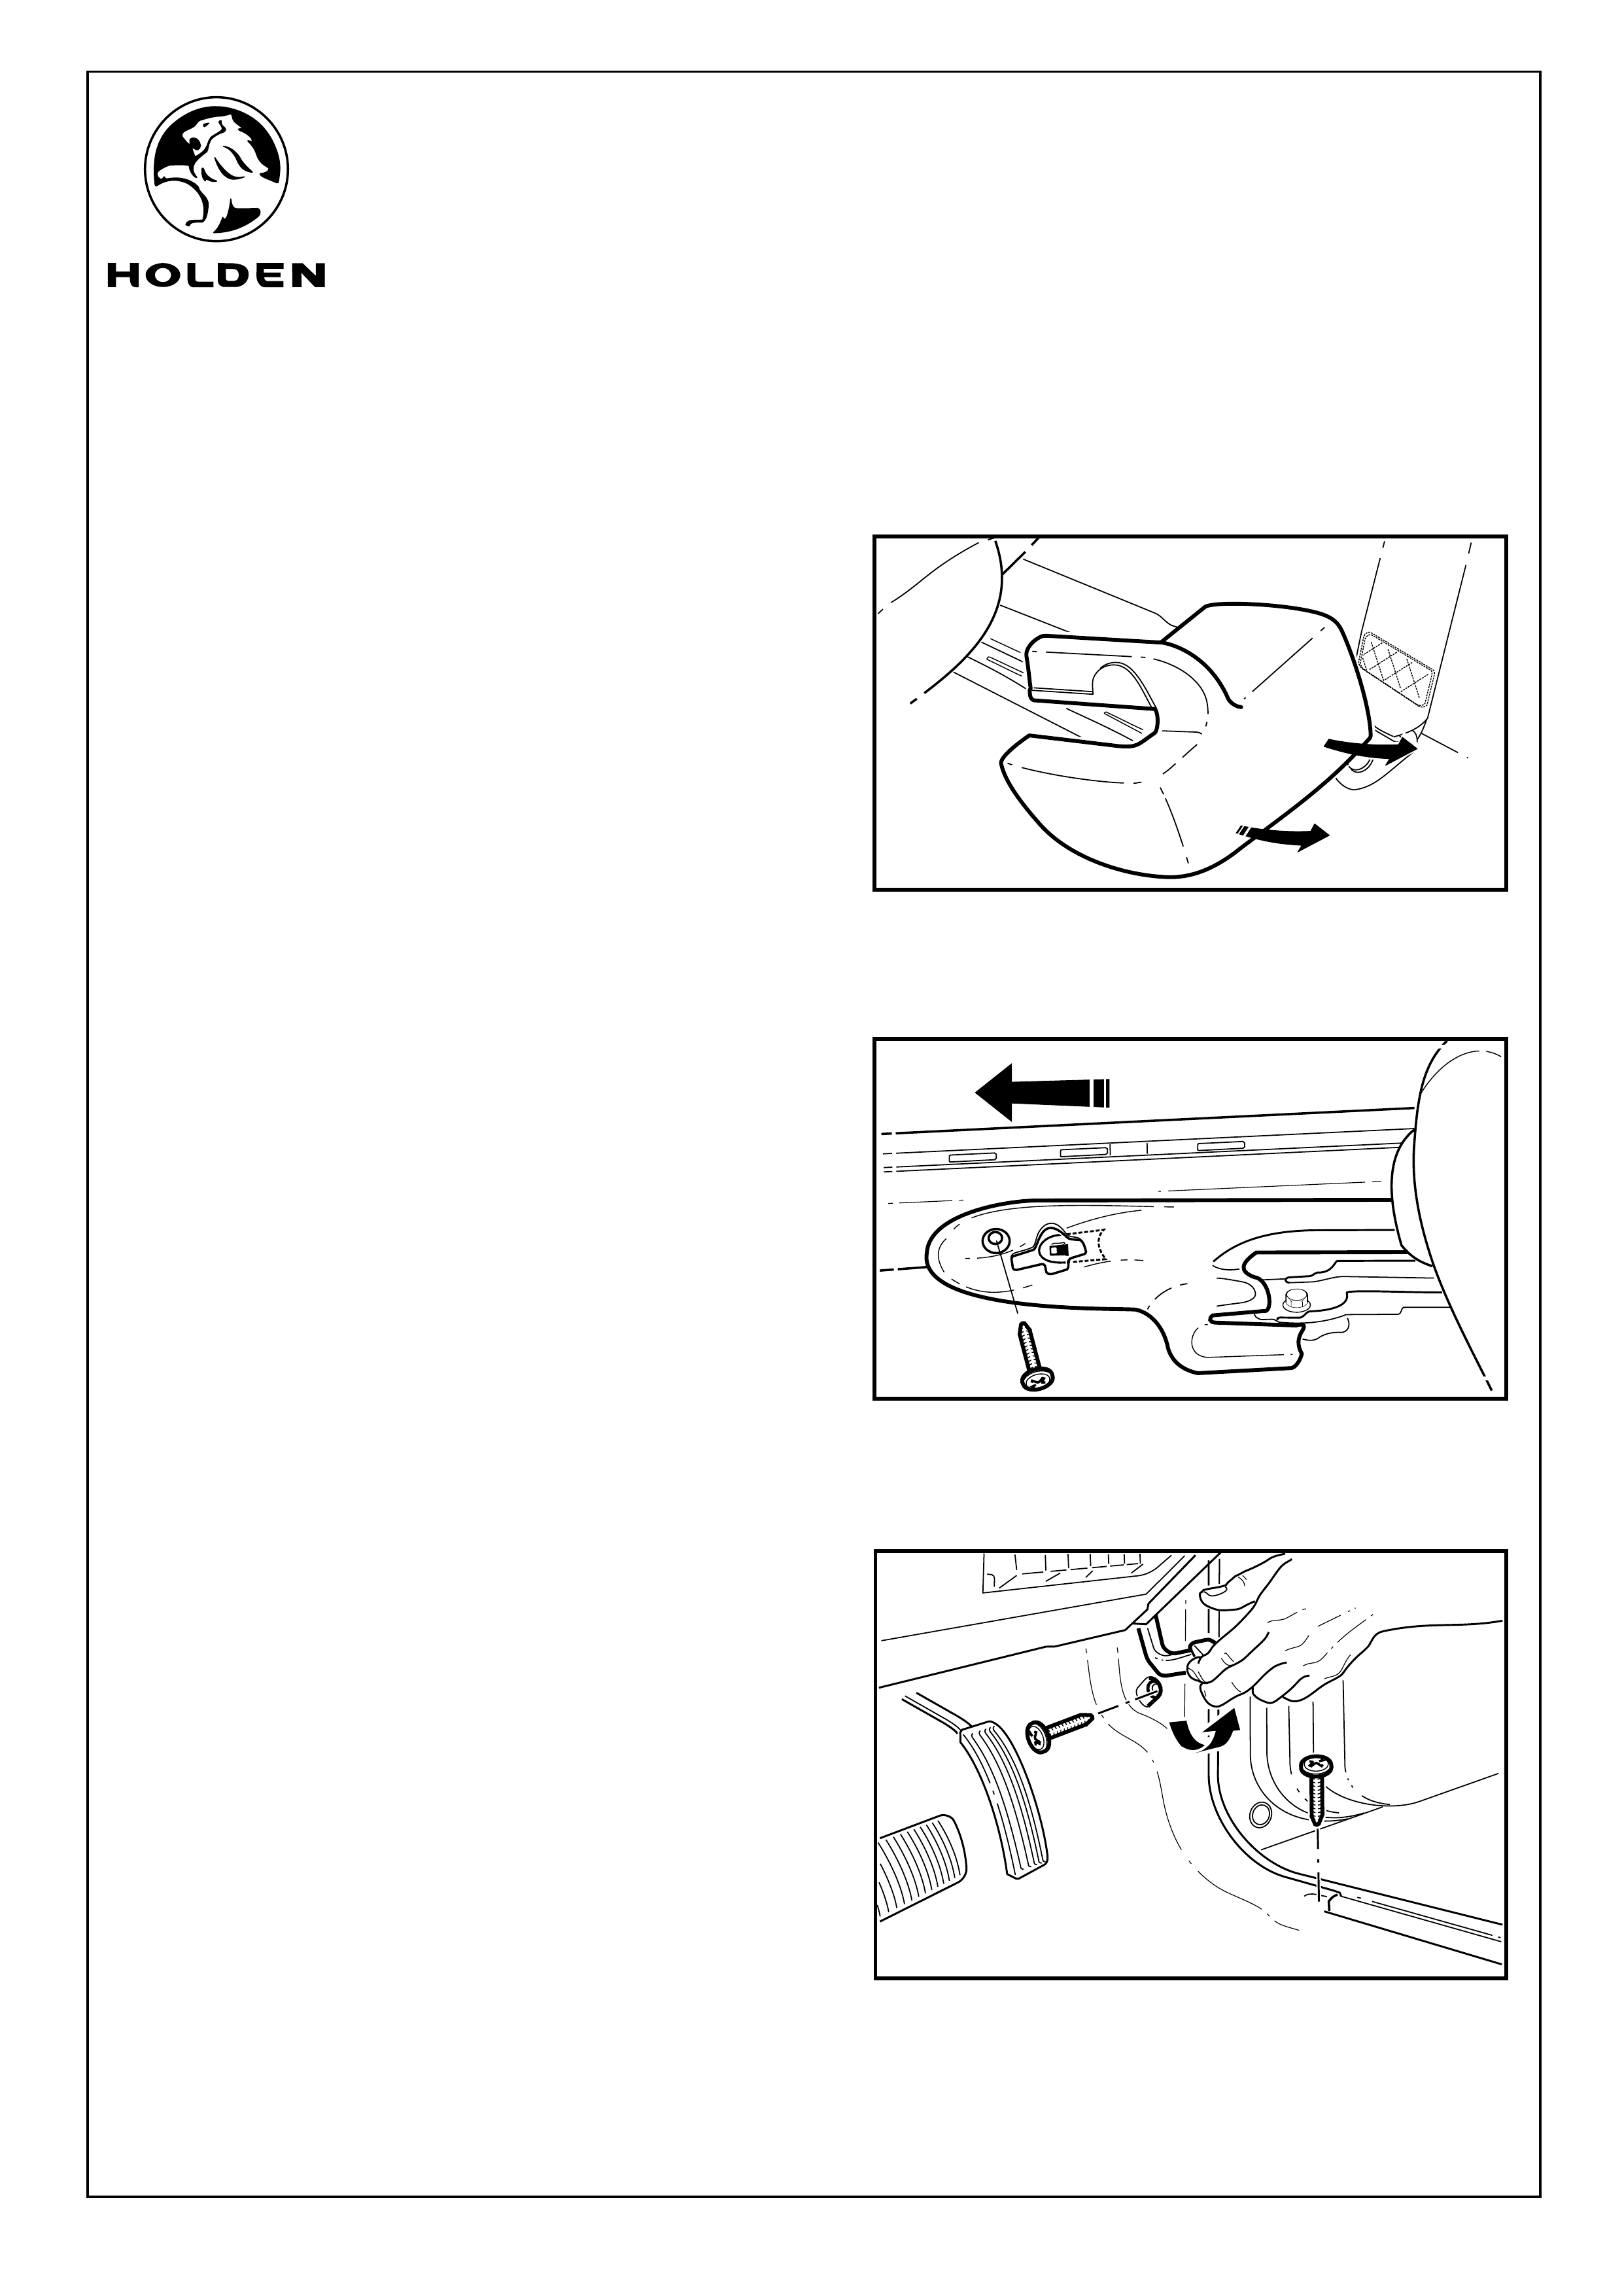
7. Unclip the rear section of the front seat rail cover (both
sides) by pushing down on the join between the front
and rear covers and pull the rear cover back and up to
remove. Refer to Figure 4.
8. Remove screw from behind fuel release lever (drivers
side only). Slide the front section of the front seat rail
cover out towards the front of the vehicle. Repeat on
passenger side front seat rail cover. Refer to Figure 5.
Refer to Figure 6 for the following:
9. Remove the screws (2 places) holding the front side kick
panel in position and pull back on the front side kick plate
to release the two clips. Remove the side kick panel.
Repeat on other side of the vehicle.
NOTE: The bonnet release handle will need to be pulled
back to expose the screw head of one of the screws on
the drivers side.
FIGURE 6
FIGURE 4
Page 3 of 24
FIGURE 5
FITTING INSTRUCTIONS FOR
VY & VZ COMMODORE SEDAN
SOUND SYSTEM UPGRADE
FD1283
27AU04
COPYRIGHT
Reproduction in whole or part
prohibited without written approval
HOLDEN LTD
Division of HOLDEN Ltd ACN 006 893 232
FITTING INSTRUCTIONS: - continued...
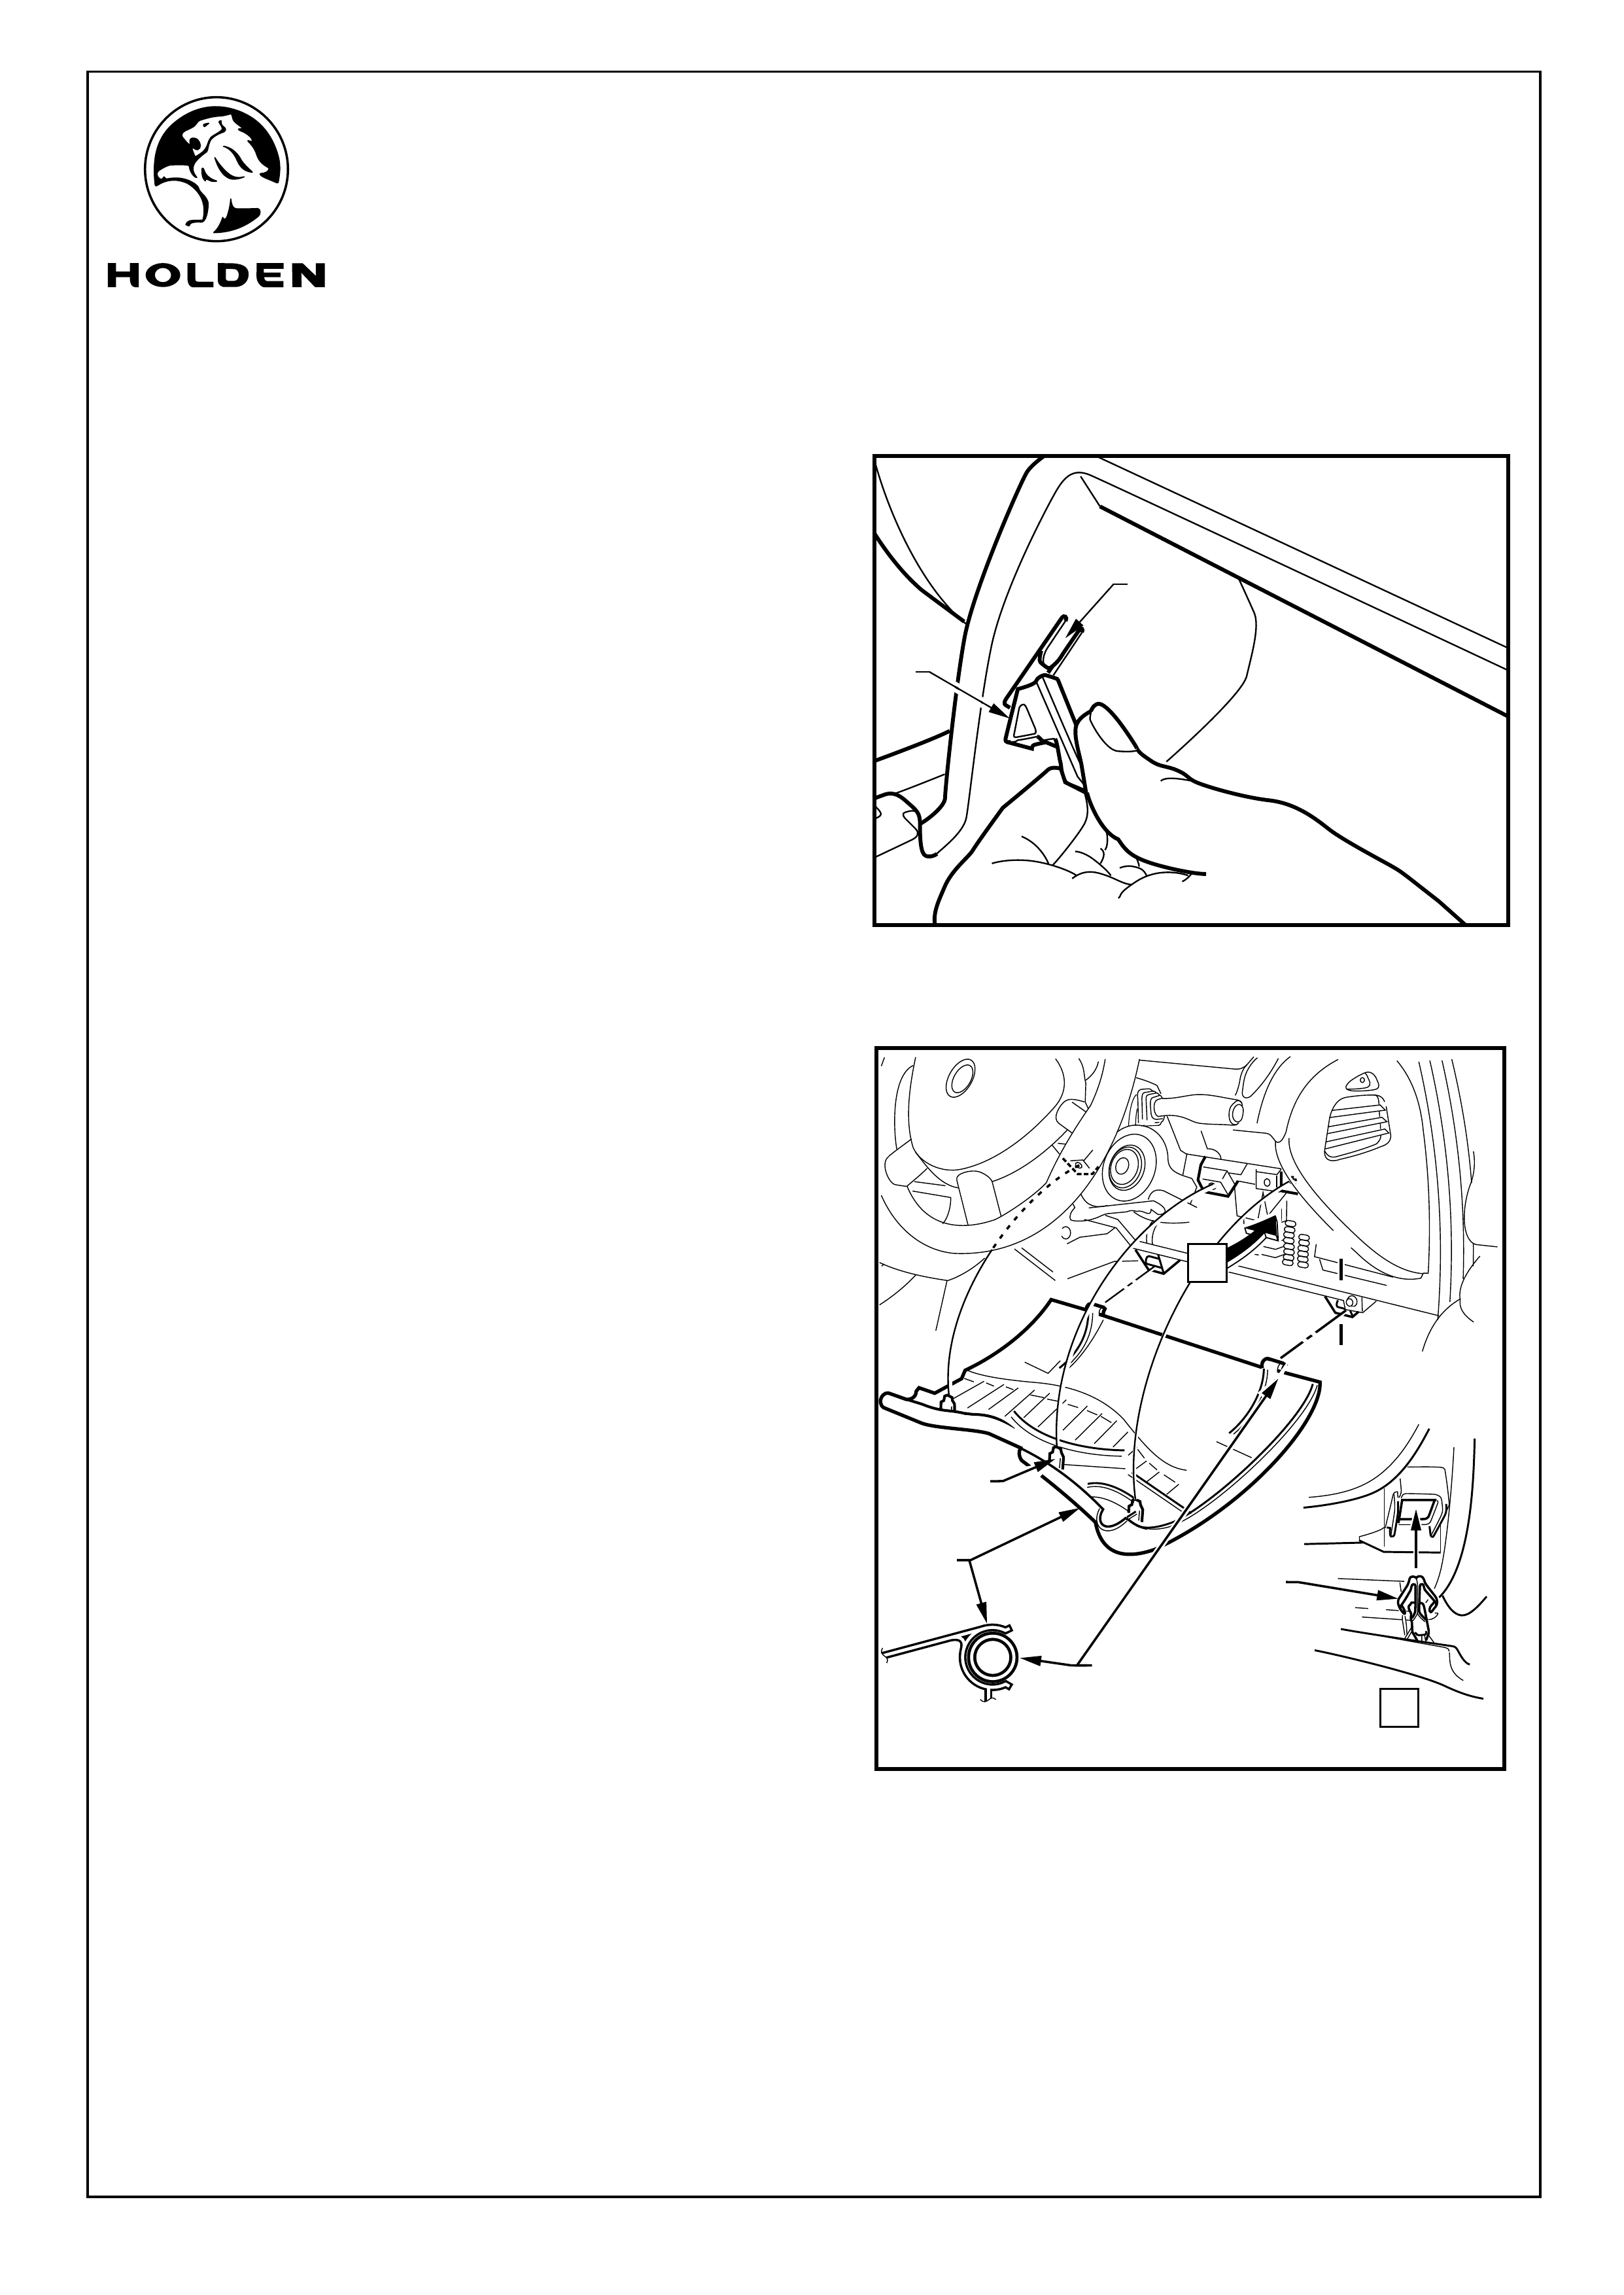
Refer to Figure 7 for the following:
10. Open the glovebox and remove the two travel limiting
lugs (1). This is done by carefully raising the rubber tabs
on the limiting lugs and pulling them rearwards. Once
pulled rearwards, gently pull the rubber tabs towards the
center of the glovebox. To release the glovebox, pull
glovebox towards the rear of the vehicle.
NOTE: Care must be taken not to break the tongues (2)
off during travel limiting lug removal.
11. Refit travel limiting lugs and place glovebox to one side.
Refer to Figure 8 for the following:
12. Remove the lower instrument trim panel (1) assembly
as follows:
a. Adjust the steering wheel to upper-most position.
b. Grasp the top edge of the lower instrument trim
panel assembly and pull outwards to disengage the
three retaining clips (2).
c. Swing the panel assembly open.
d. Holding each side of the panel assembly pull
rearwards to disengage it from the instrument panel
lower trim panel retainer (3) (2 places).
FIGURE 7
1
2
1
A-A
A
A
A
A
2
2
(3 PLACES)
3
(2 PLACES)
FIGURE 8
Page 4 of 24
FITTING INSTRUCTIONS FOR
VY & VZ COMMODORE SEDAN
SOUND SYSTEM UPGRADE
FD1283
27AU04
COPYRIGHT
Reproduction in whole or part
prohibited without written approval
HOLDEN LTD
Division of HOLDEN Ltd ACN 006 893 232
FITTING INSTRUCTIONS: - continued...
13. Remove the screws (3 places) retaining the drivers side
dashboard end cover (1) and remove the cover. Repeat
on the other side of vehicle. Refer to Figure 9.
Back seat removal
14. Use a socket to remove the two bolts securing the two
seat backs. Lift the seat backs up to release them and
remove both seat backs. Refer to Figure 10.
NOTE: The centre seat back is not removed.
15. Unscrew the tree clips (2 places) in the top of the parcel
shelf. Refer to Figure 11.
FIGURE 9
1
Page 5 of 24
FIGURE 11
FIGURE 8
FIGURE 10
FITTING INSTRUCTIONS FOR
VY & VZ COMMODORE SEDAN
SOUND SYSTEM UPGRADE
FD1283
27AU04
COPYRIGHT
Reproduction in whole or part
prohibited without written approval
HOLDEN LTD
Division of HOLDEN Ltd ACN 006 893 232
FITTING INSTRUCTIONS: - continued...
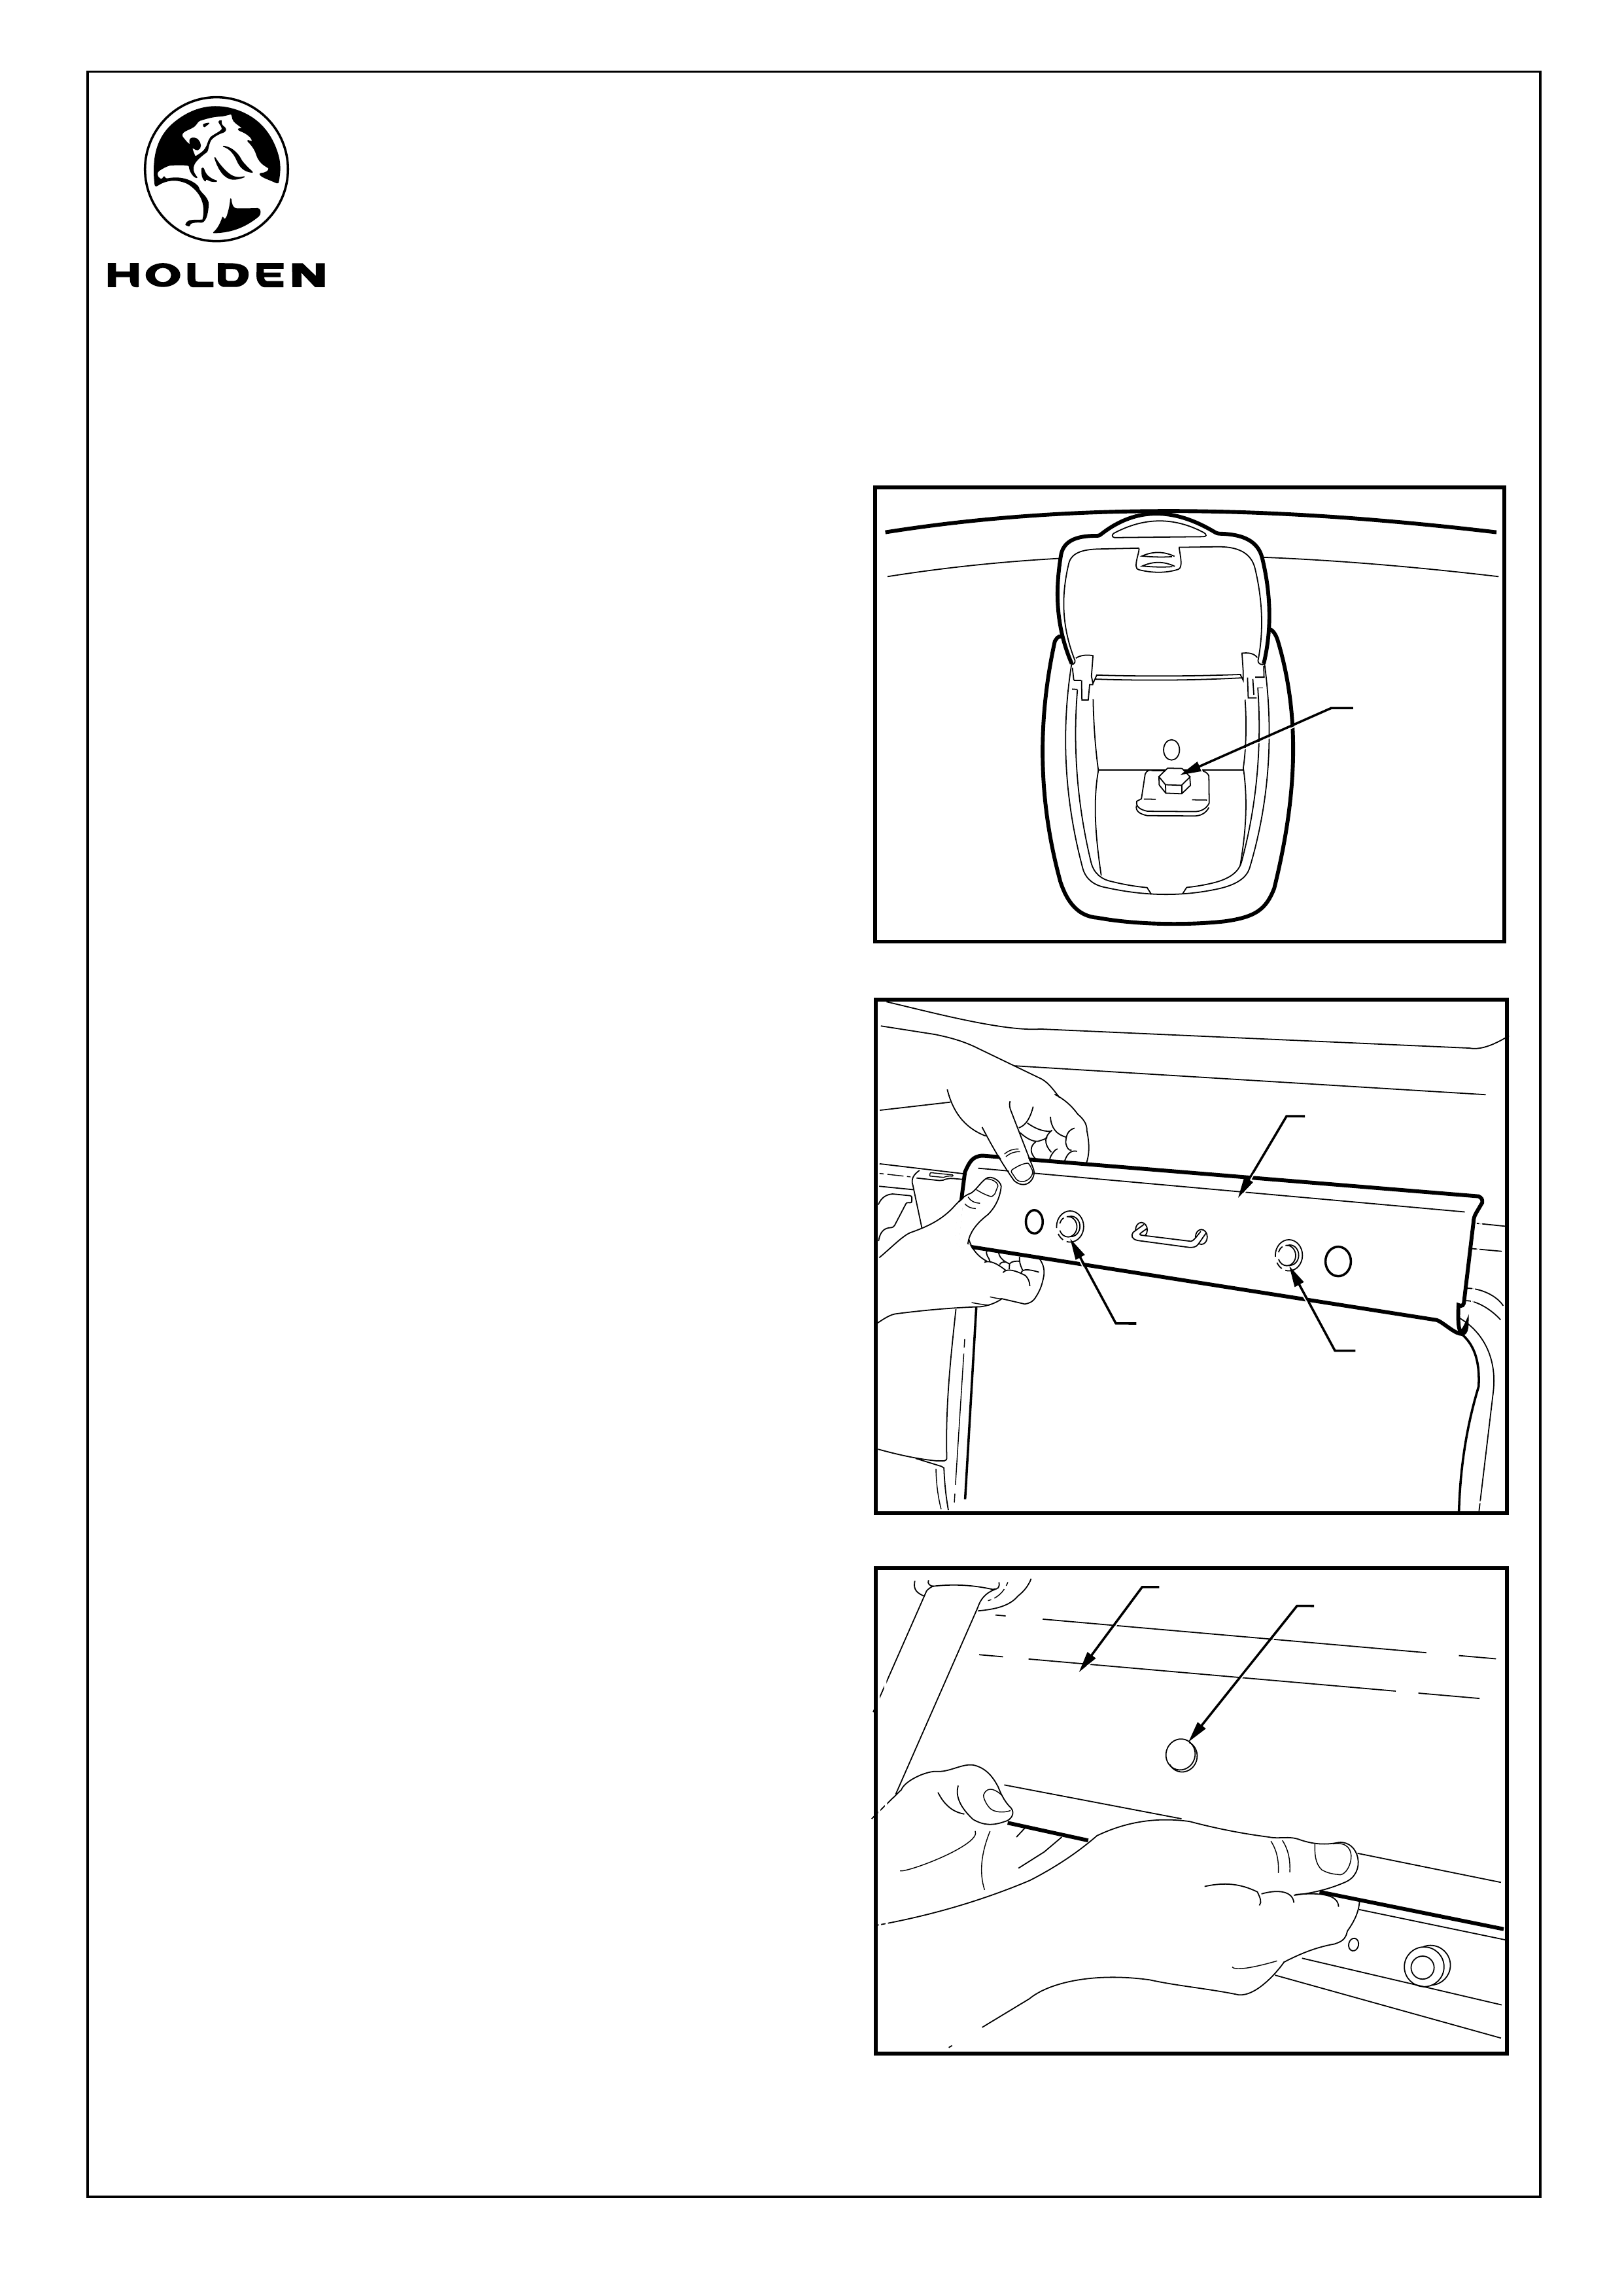
16. Remove the bolt (1) from the child restraint fixing. Refer
to Figure 12.
IMPORTANT: Do not loosen or remove any seat belt
fixings.
NOTE: Ensure the child harness fixings are kept
together.
17. Pull on the cover over the top of the boot access
aperture (1) to release two fur tree clips (2) retaining it
and remove the cover. Refer to Figure 13.
18. Pull out the three fur tree clips (1) across the front of the
parcel shelf cover (2) by pulling from behind the cover.
Refer to Figure 14.
19. Remove rear parcel shelf with the centre seat belt still
travelling through the part and place in rear seat foot
well area.
FIGURE 13
FIGURE 12
FIGURE 14
Page 6 of 24
2
1
2
1
2
1
FITTING INSTRUCTIONS FOR
VY & VZ COMMODORE SEDAN
SOUND SYSTEM UPGRADE
FD1283
27AU04
COPYRIGHT
Reproduction in whole or part
prohibited without written approval
HOLDEN LTD
Division of HOLDEN Ltd ACN 006 893 232
FITTING INSTRUCTIONS: - continued...
Removal of passenger side boot trim
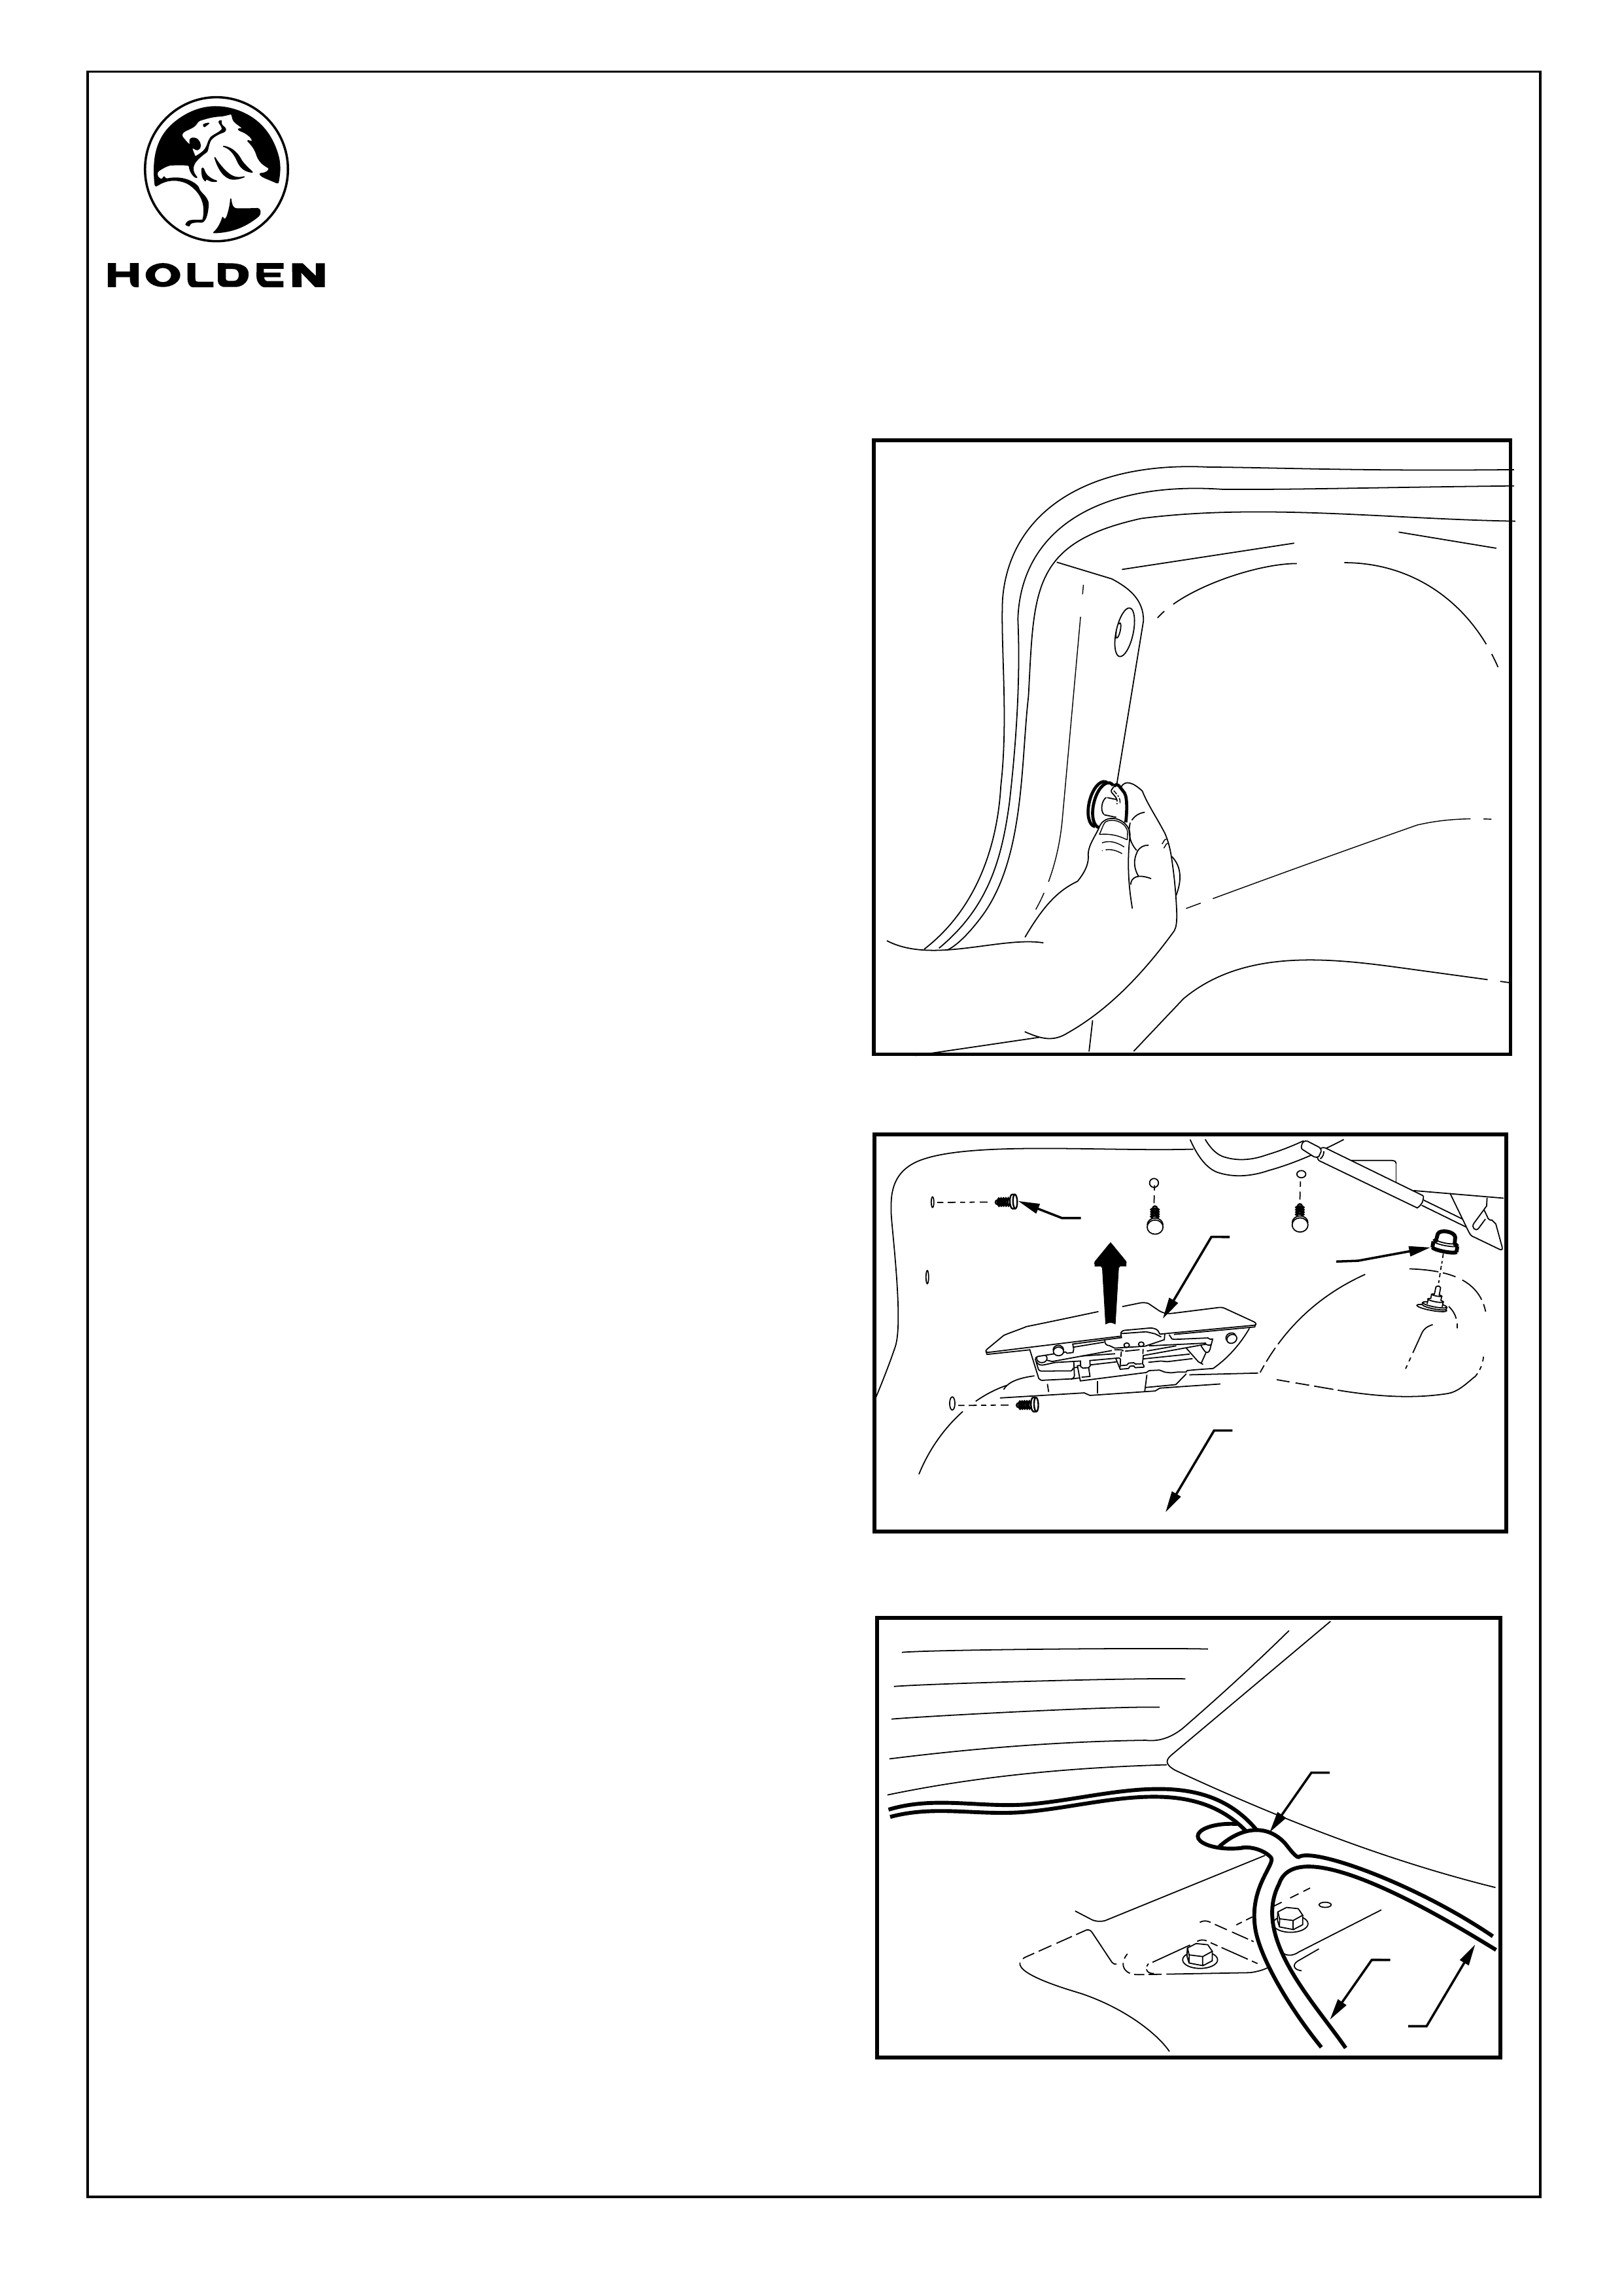
20. Disconnect the rear boot net (if fitted). Unscrew and
remove the passenger side boot net fitting. Refer to
Figure 15.
Refer to Figure 16 for the following:
21. Remove the rubber cap (1) covering the suspension
shock absorber fixing.
22. Remove the spare wheel cover (2) from the boot.
23. Remove the vehicle jack stowage container (3).
24. Use a trim-removing tool to remove the fur tree clips (4)
(4 places) retaining the passenger boot side trim and
remove the trim.
25. Unravel the main speaker harness (1). Identify and hold
the harness by the four and the six way connectors. The
harness splits into a thinner harness (2) and a thicker
harness (3). Run the thinner harness down the
passenger side and the thicker harness over the rear
parcel shelf and down the drivers side.
26. Pass the four and six way connectors of the main
speaker harness through the same hole leading to the
boot as the vehicle body harness on the passenger's
side of the rear parcel shelf. Continue feeding the
harness through until the point where the speaker
harness splits in two. Refer to Figure 17.
FIGURE 16
FIGURE 15
FIGURE 17
Page 7 of 24
2
1
3
4
2
3
1
FITTING INSTRUCTIONS FOR
VY & VZ COMMODORE SEDAN
SOUND SYSTEM UPGRADE
FD1283
27AU04
COPYRIGHT
Reproduction in whole or part
prohibited without written approval
HOLDEN LTD
Division of HOLDEN Ltd ACN 006 893 232
FITTING INSTRUCTIONS: - continued...
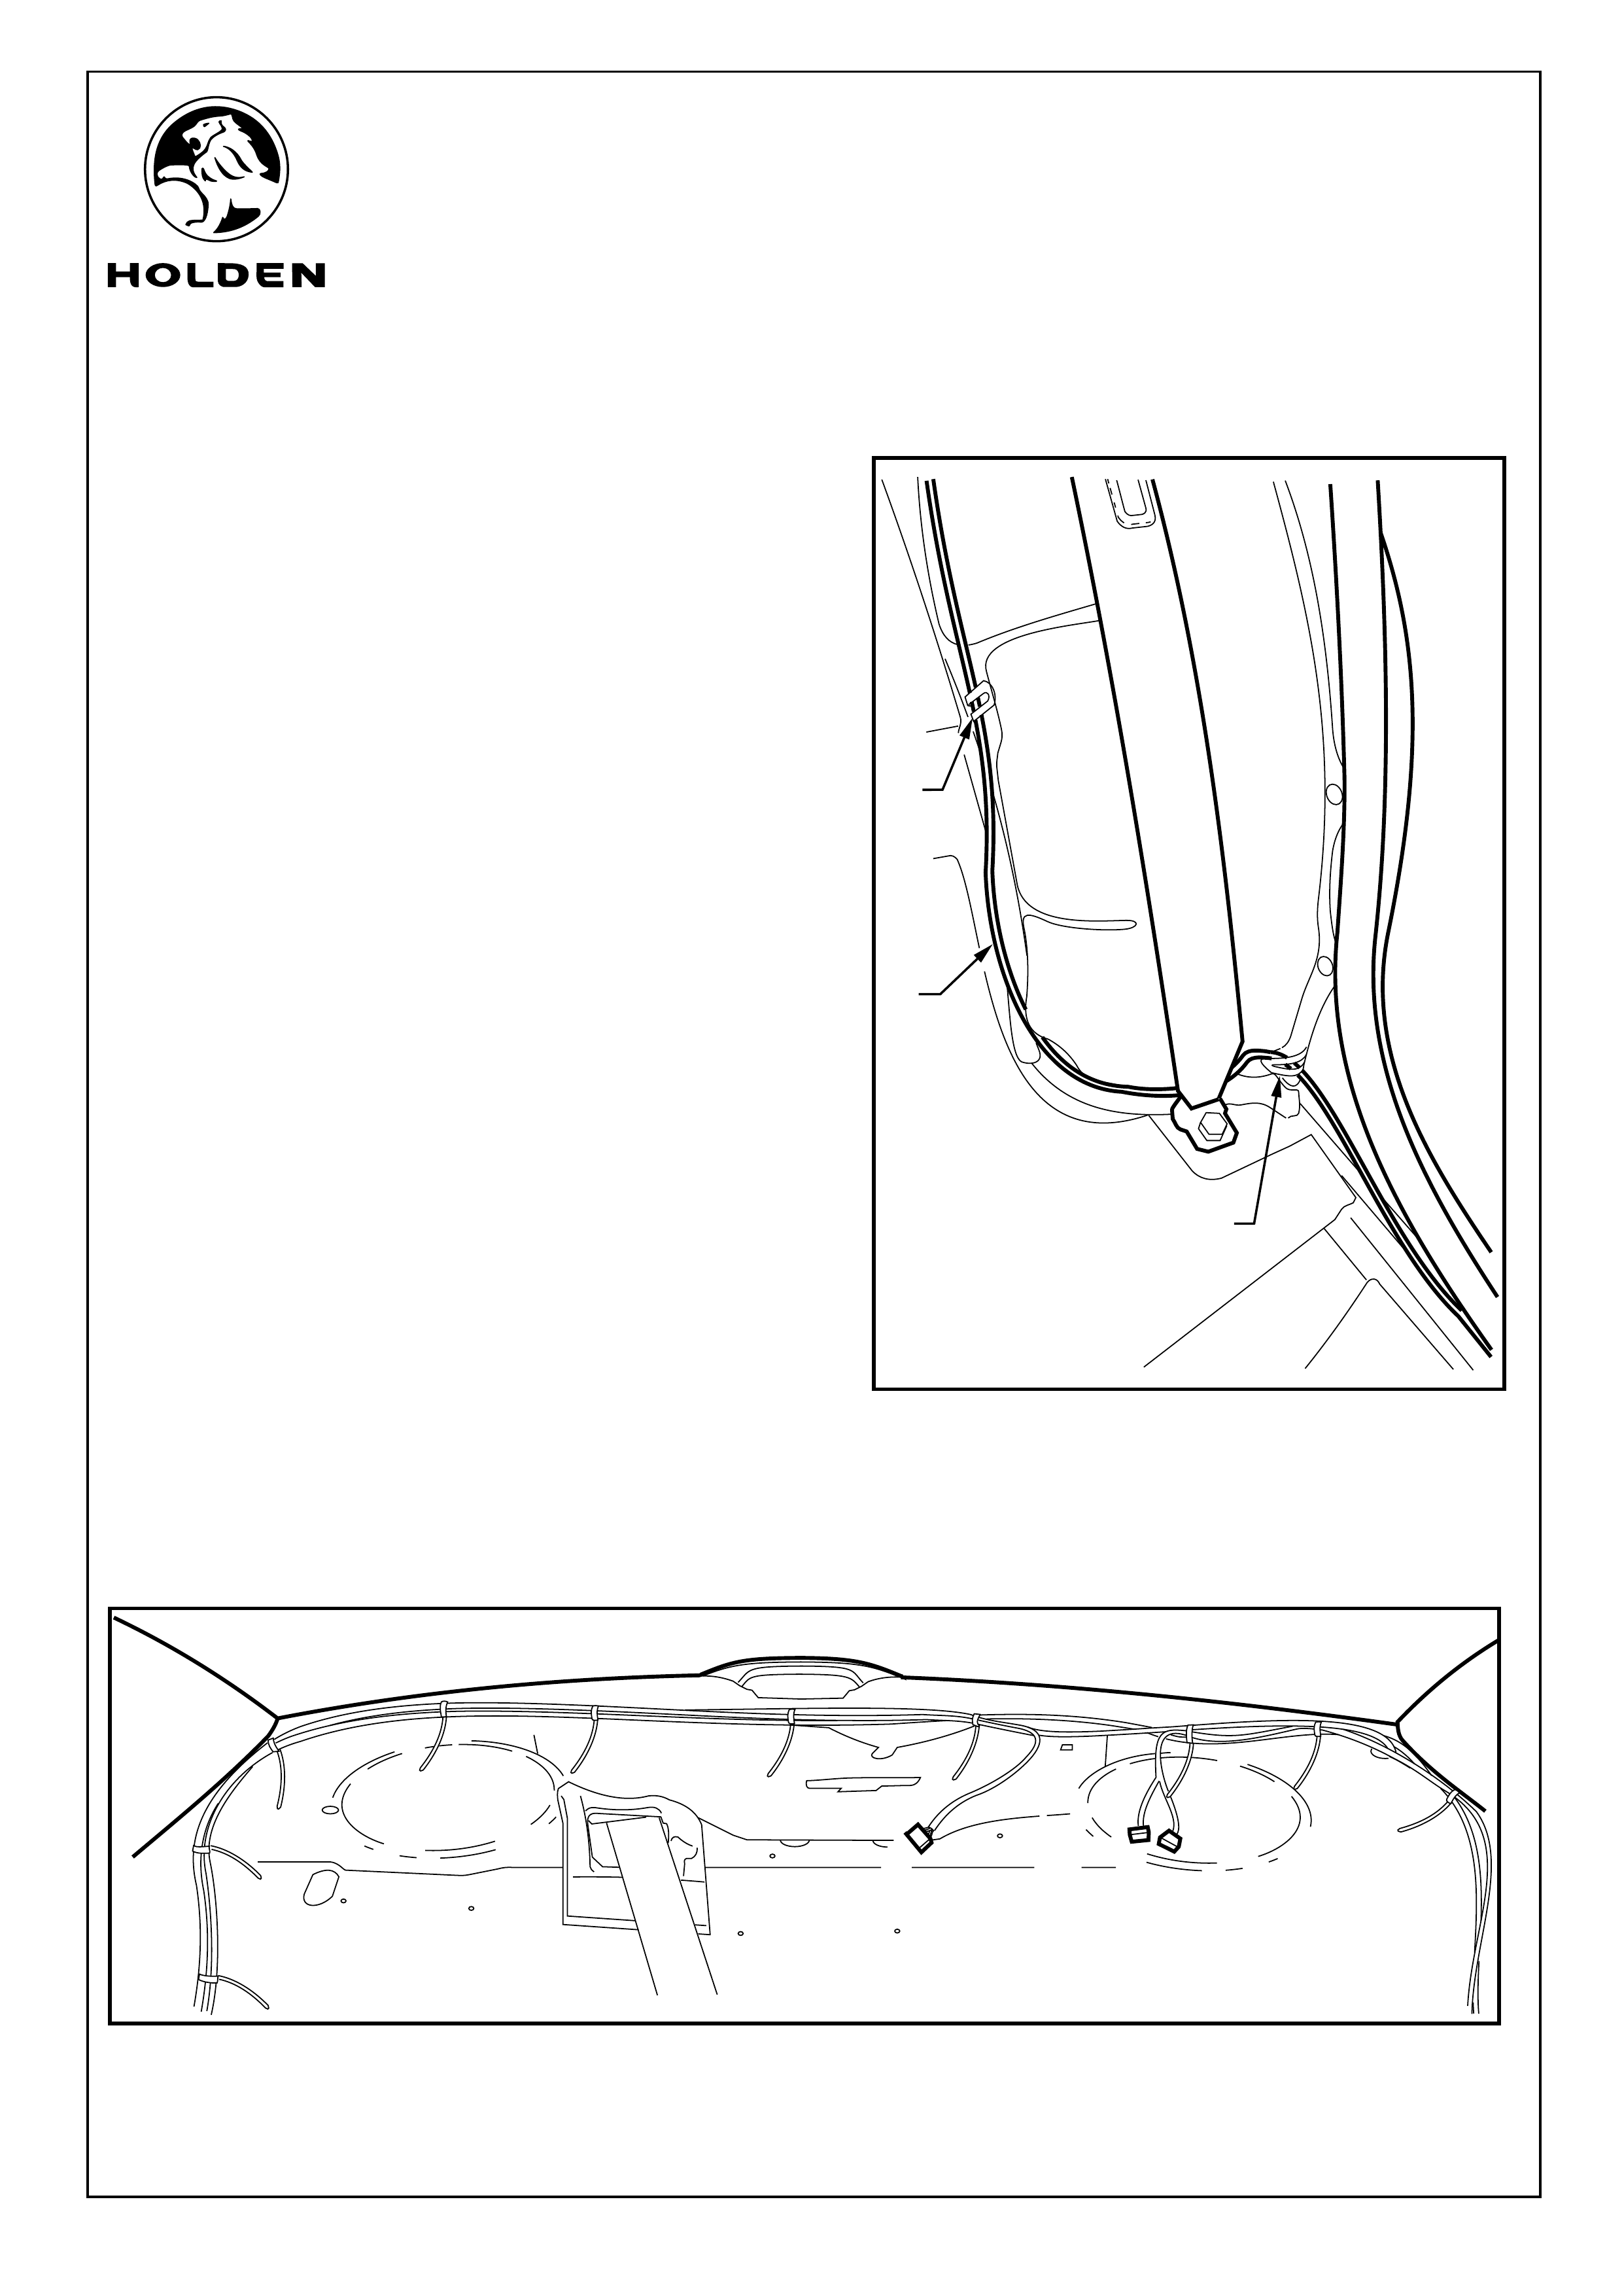
27. Run the thinner speaker harness (1) down the
passenger side rear wheel arch using the body harness
fixings (2) to retain in position. Continue to run the
speaker harness along the inner vehicle sill passing
under the side impact sensor through to the front foot
well. Clip the lead into the additional harness clips if
available. Refer to Figure 18.
Refer to Figure 19 for the following:
28. Run the thick harness across the rear parcel shelf and
down the driver side rear wheel arch using the body
harness fixings to retain in position. Continue to run the
harness along to the front of the vehicle in the same
manner as the other side of the vehicle.
29. Cable tie the thick harness to the body harness across
the rear parcel shelf at the same location as the body
harness tie positions (10 places), trim cable ties.
FIGURE 18
FIGURE 19
Page 8 of 24
2
2
1
FITTING INSTRUCTIONS FOR
VY & VZ COMMODORE SEDAN
SOUND SYSTEM UPGRADE
FD1283
27AU04
COPYRIGHT
Reproduction in whole or part
prohibited without written approval
HOLDEN LTD
Division of HOLDEN Ltd ACN 006 893 232
FITTING INSTRUCTIONS: - continued...
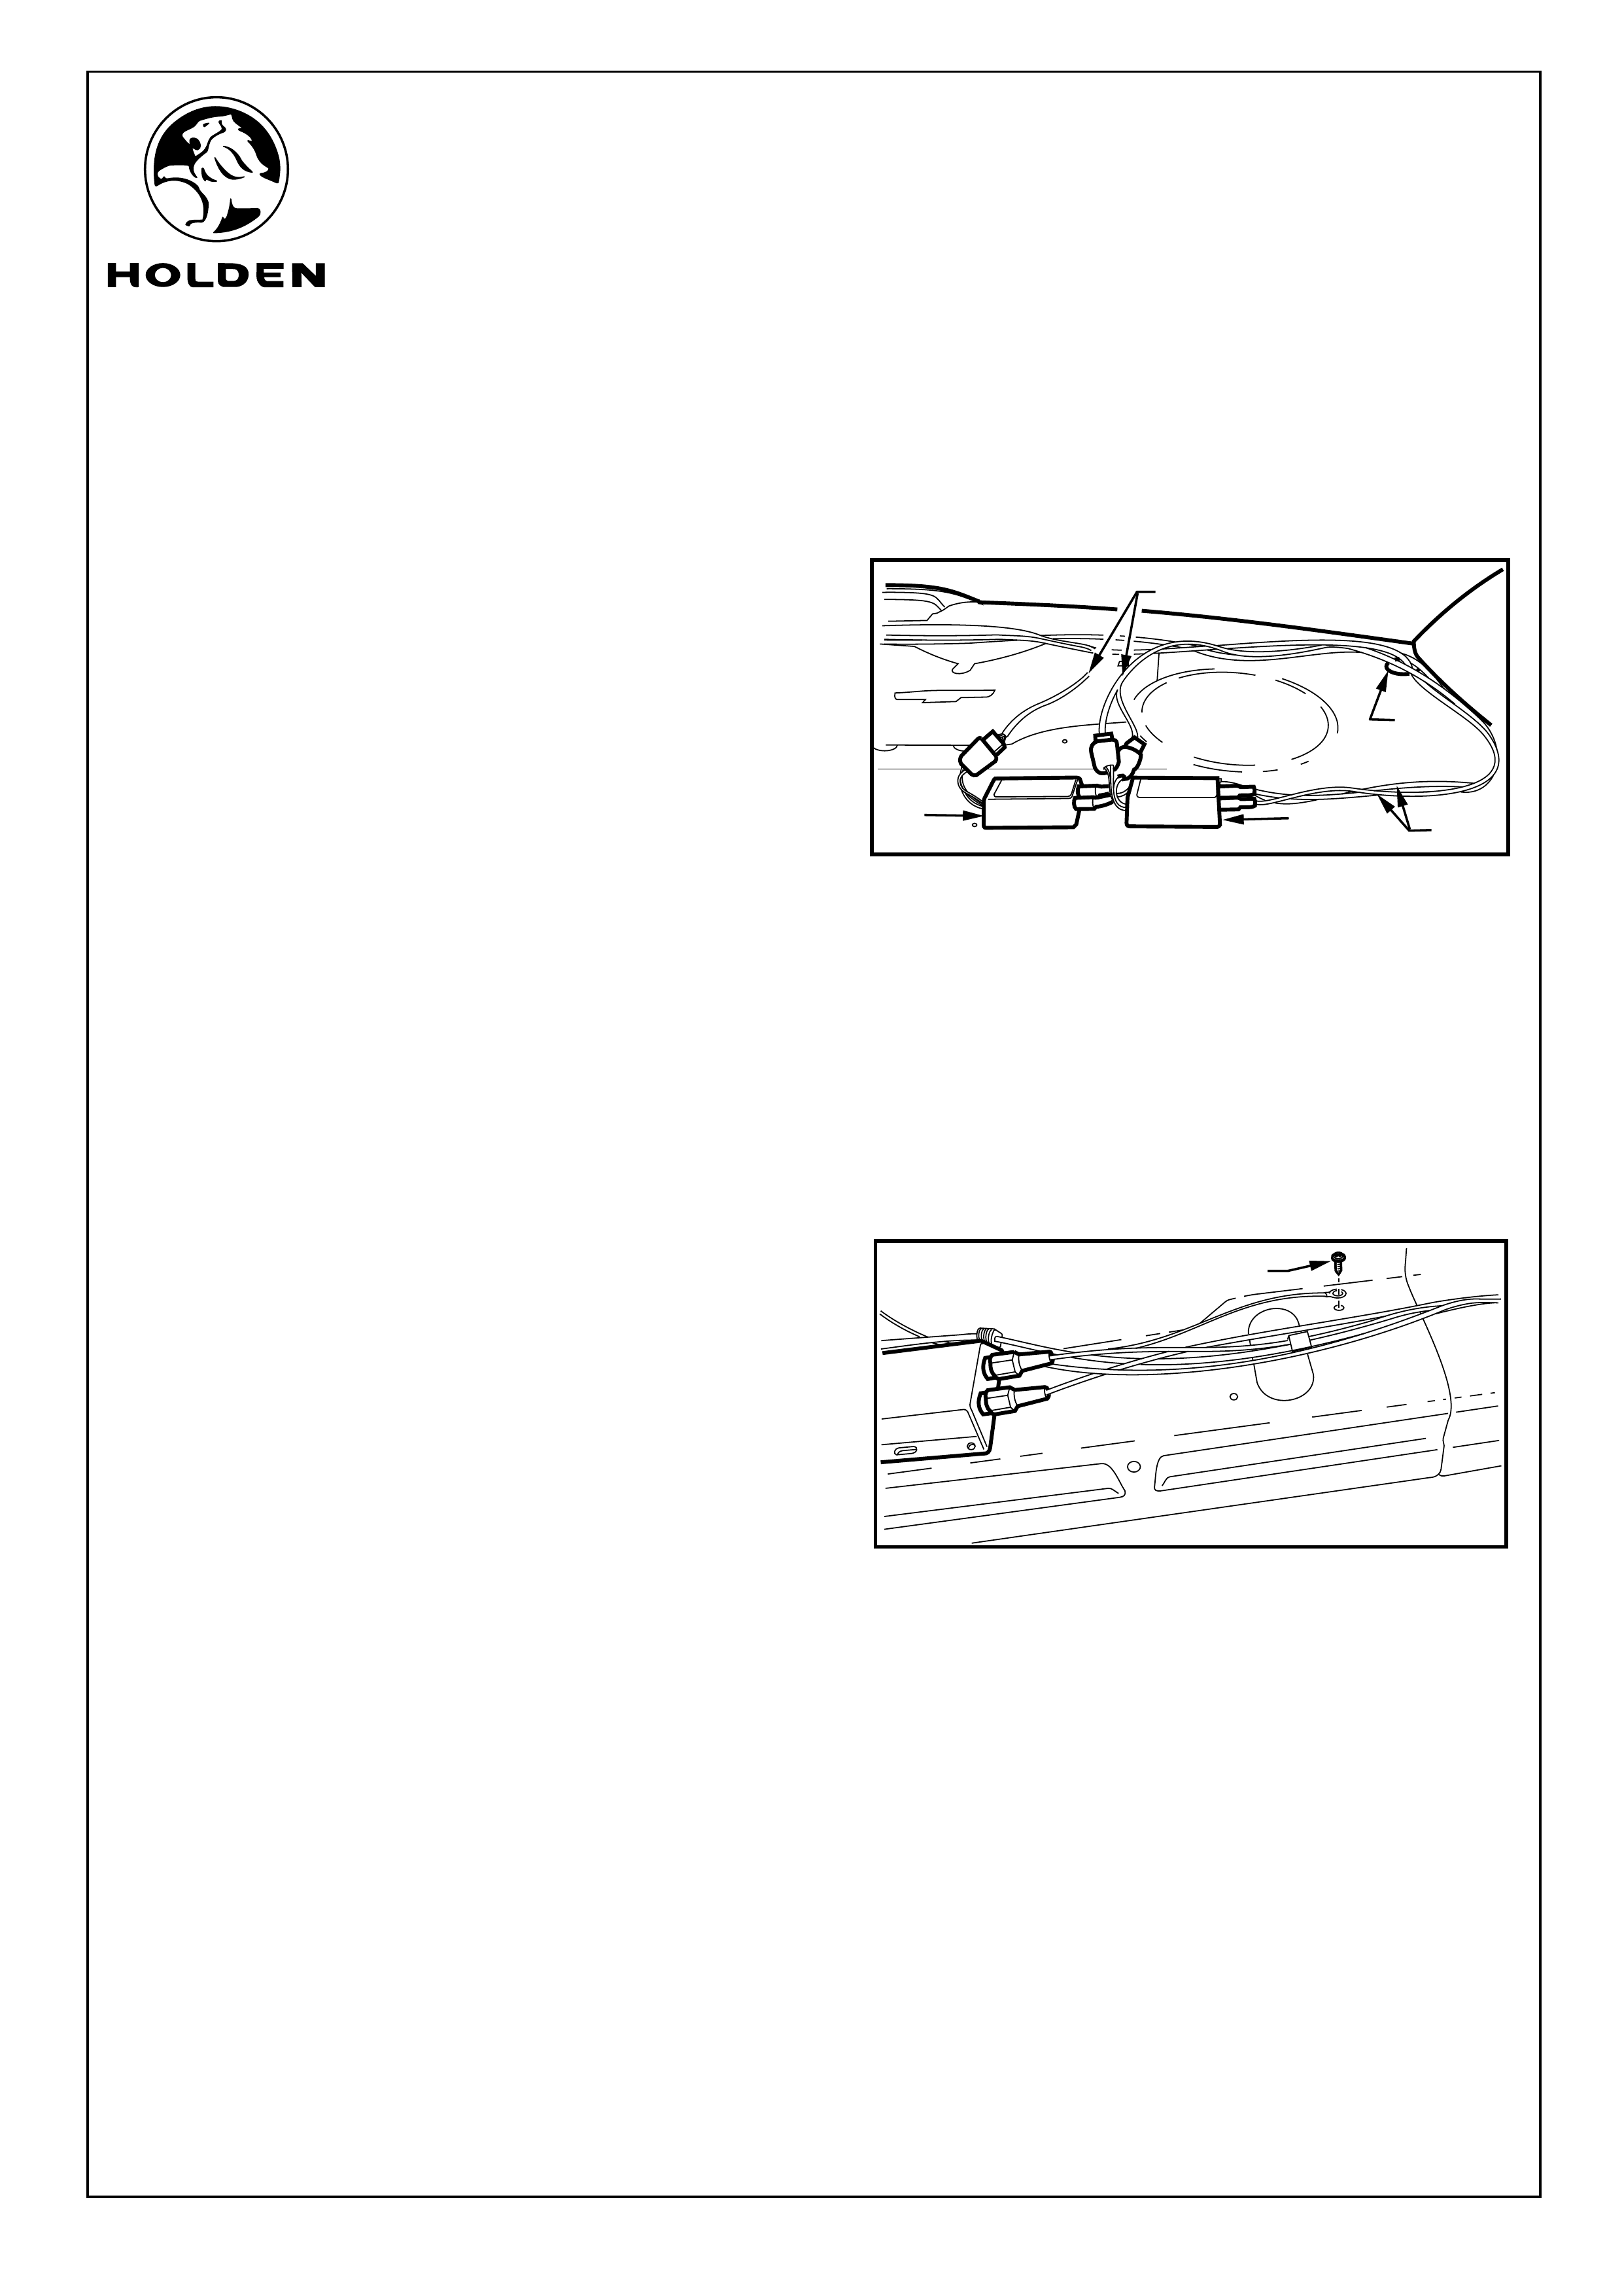
Refer to Figure 20 for the following:
30. Take the two harness branching out from the thicker
harness (1) where the harness crosses the parcel shelf
and bring them forward to the indent in the front edge of
the parcel shelf and connect the two level converters.
One converter box (2) has a single four-way connector,
the other converter box (3) has a three-way and a four-
way connector.
31. Connect the two audio RCA leads (4) to the level
converter boxes, connect channel 1 to the audio lead
connector marked channel 1 and so on until all
connectors are fitted.
32. Run the two audio RCA leads to the back of the parcel
shelf and through the same hole (5) on the passenger
side of the vehicle and into the boot with the other
harnesses.
Refer to Figure 21 the following:
33. Screw the converter earth lead to the vehicle using the
thick screw provided in the small parts kit (1).
34. Identify where the level converters will sit, in the indent
on the rear parcel shelf.
NOTE: The convertor positions should be under the
foam padding on the underside of the parcel shelf cover.
NOTE: Ensure that wiring is not tight when installed.
a. Once the position has been identified, use the
cleaning pad supplied, clean the area, peel the
backing tape from the double sided tape on the base
of the converters and firmly push down in position.
Ensure that all wiring is clear from standard and child
restraint seatbelt securing points
FIGURE 20
FIGURE 21
Page 9 of 24
1
23
5
4
1
FITTING INSTRUCTIONS FOR
VY & VZ COMMODORE SEDAN
SOUND SYSTEM UPGRADE
FD1283
27AU04
COPYRIGHT
Reproduction in whole or part
prohibited without written approval
HOLDEN LTD
Division of HOLDEN Ltd ACN 006 893 232
FITTING INSTRUCTIONS: - continued...
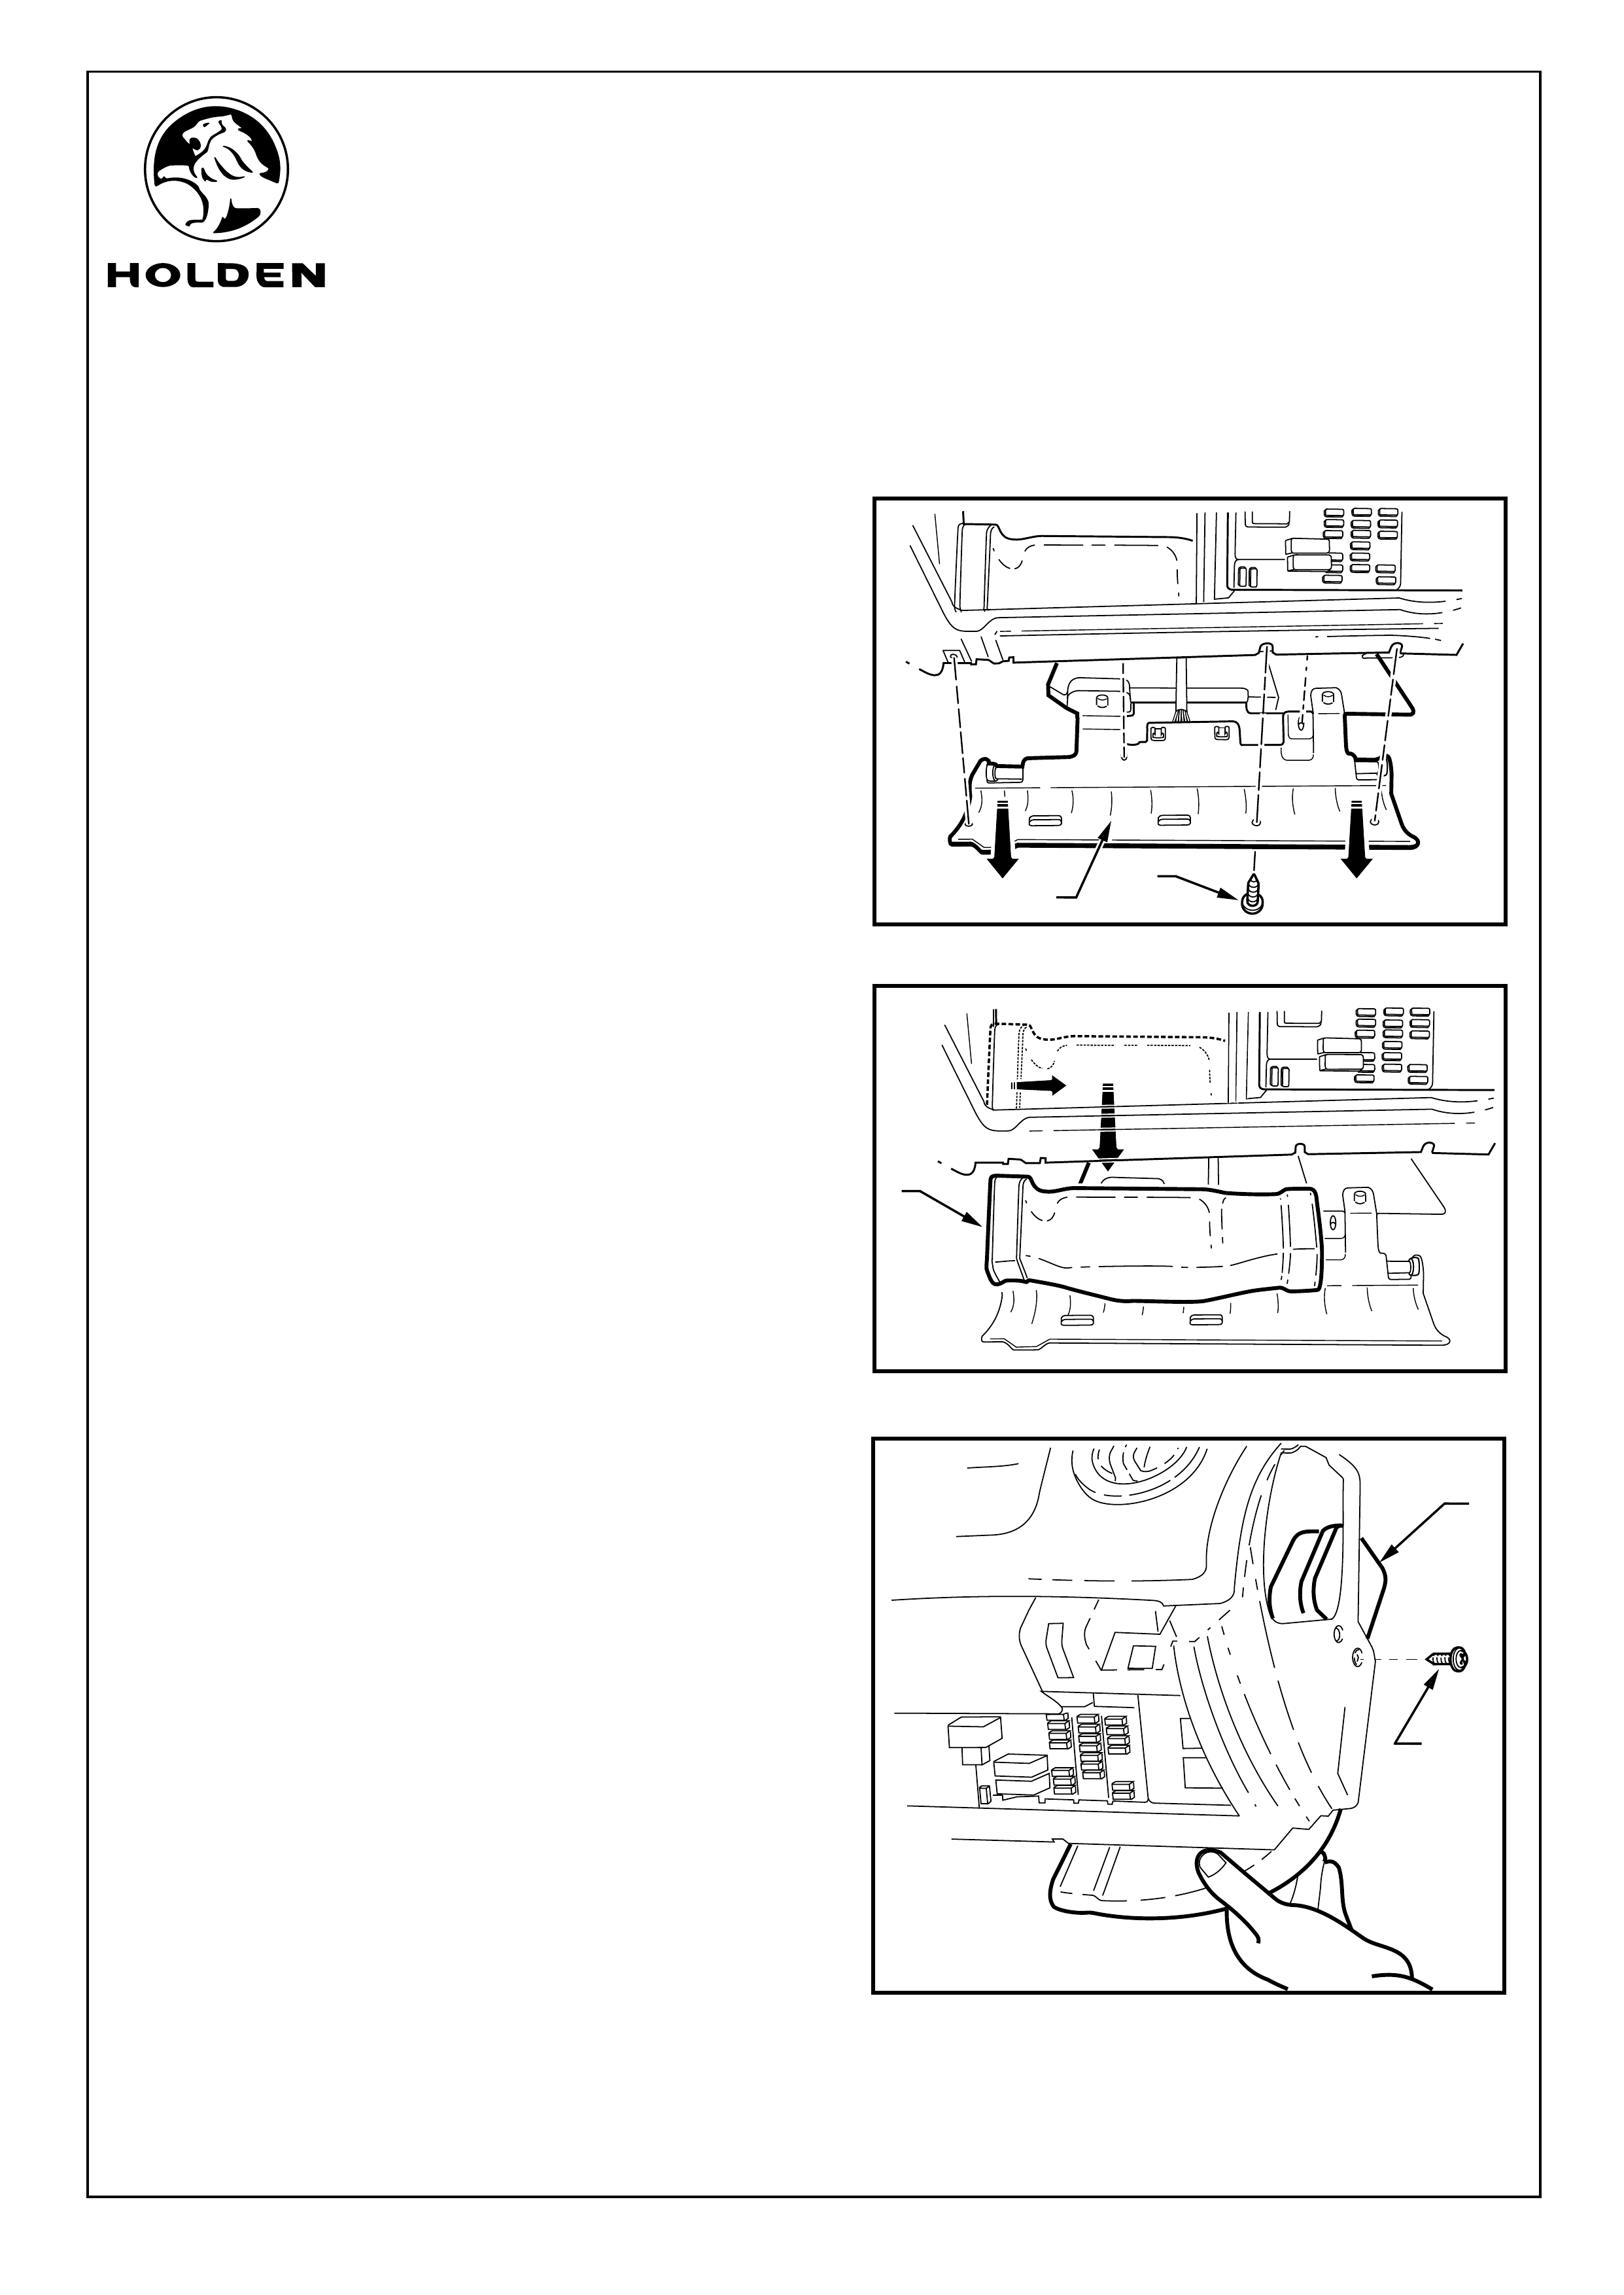
35. On the driver's side, remove the screws (1) (5 places)
holding the hush panel (2). Slide the panel downward
and rearward to remove and allow it to hang down.
Refer to Figure 22.
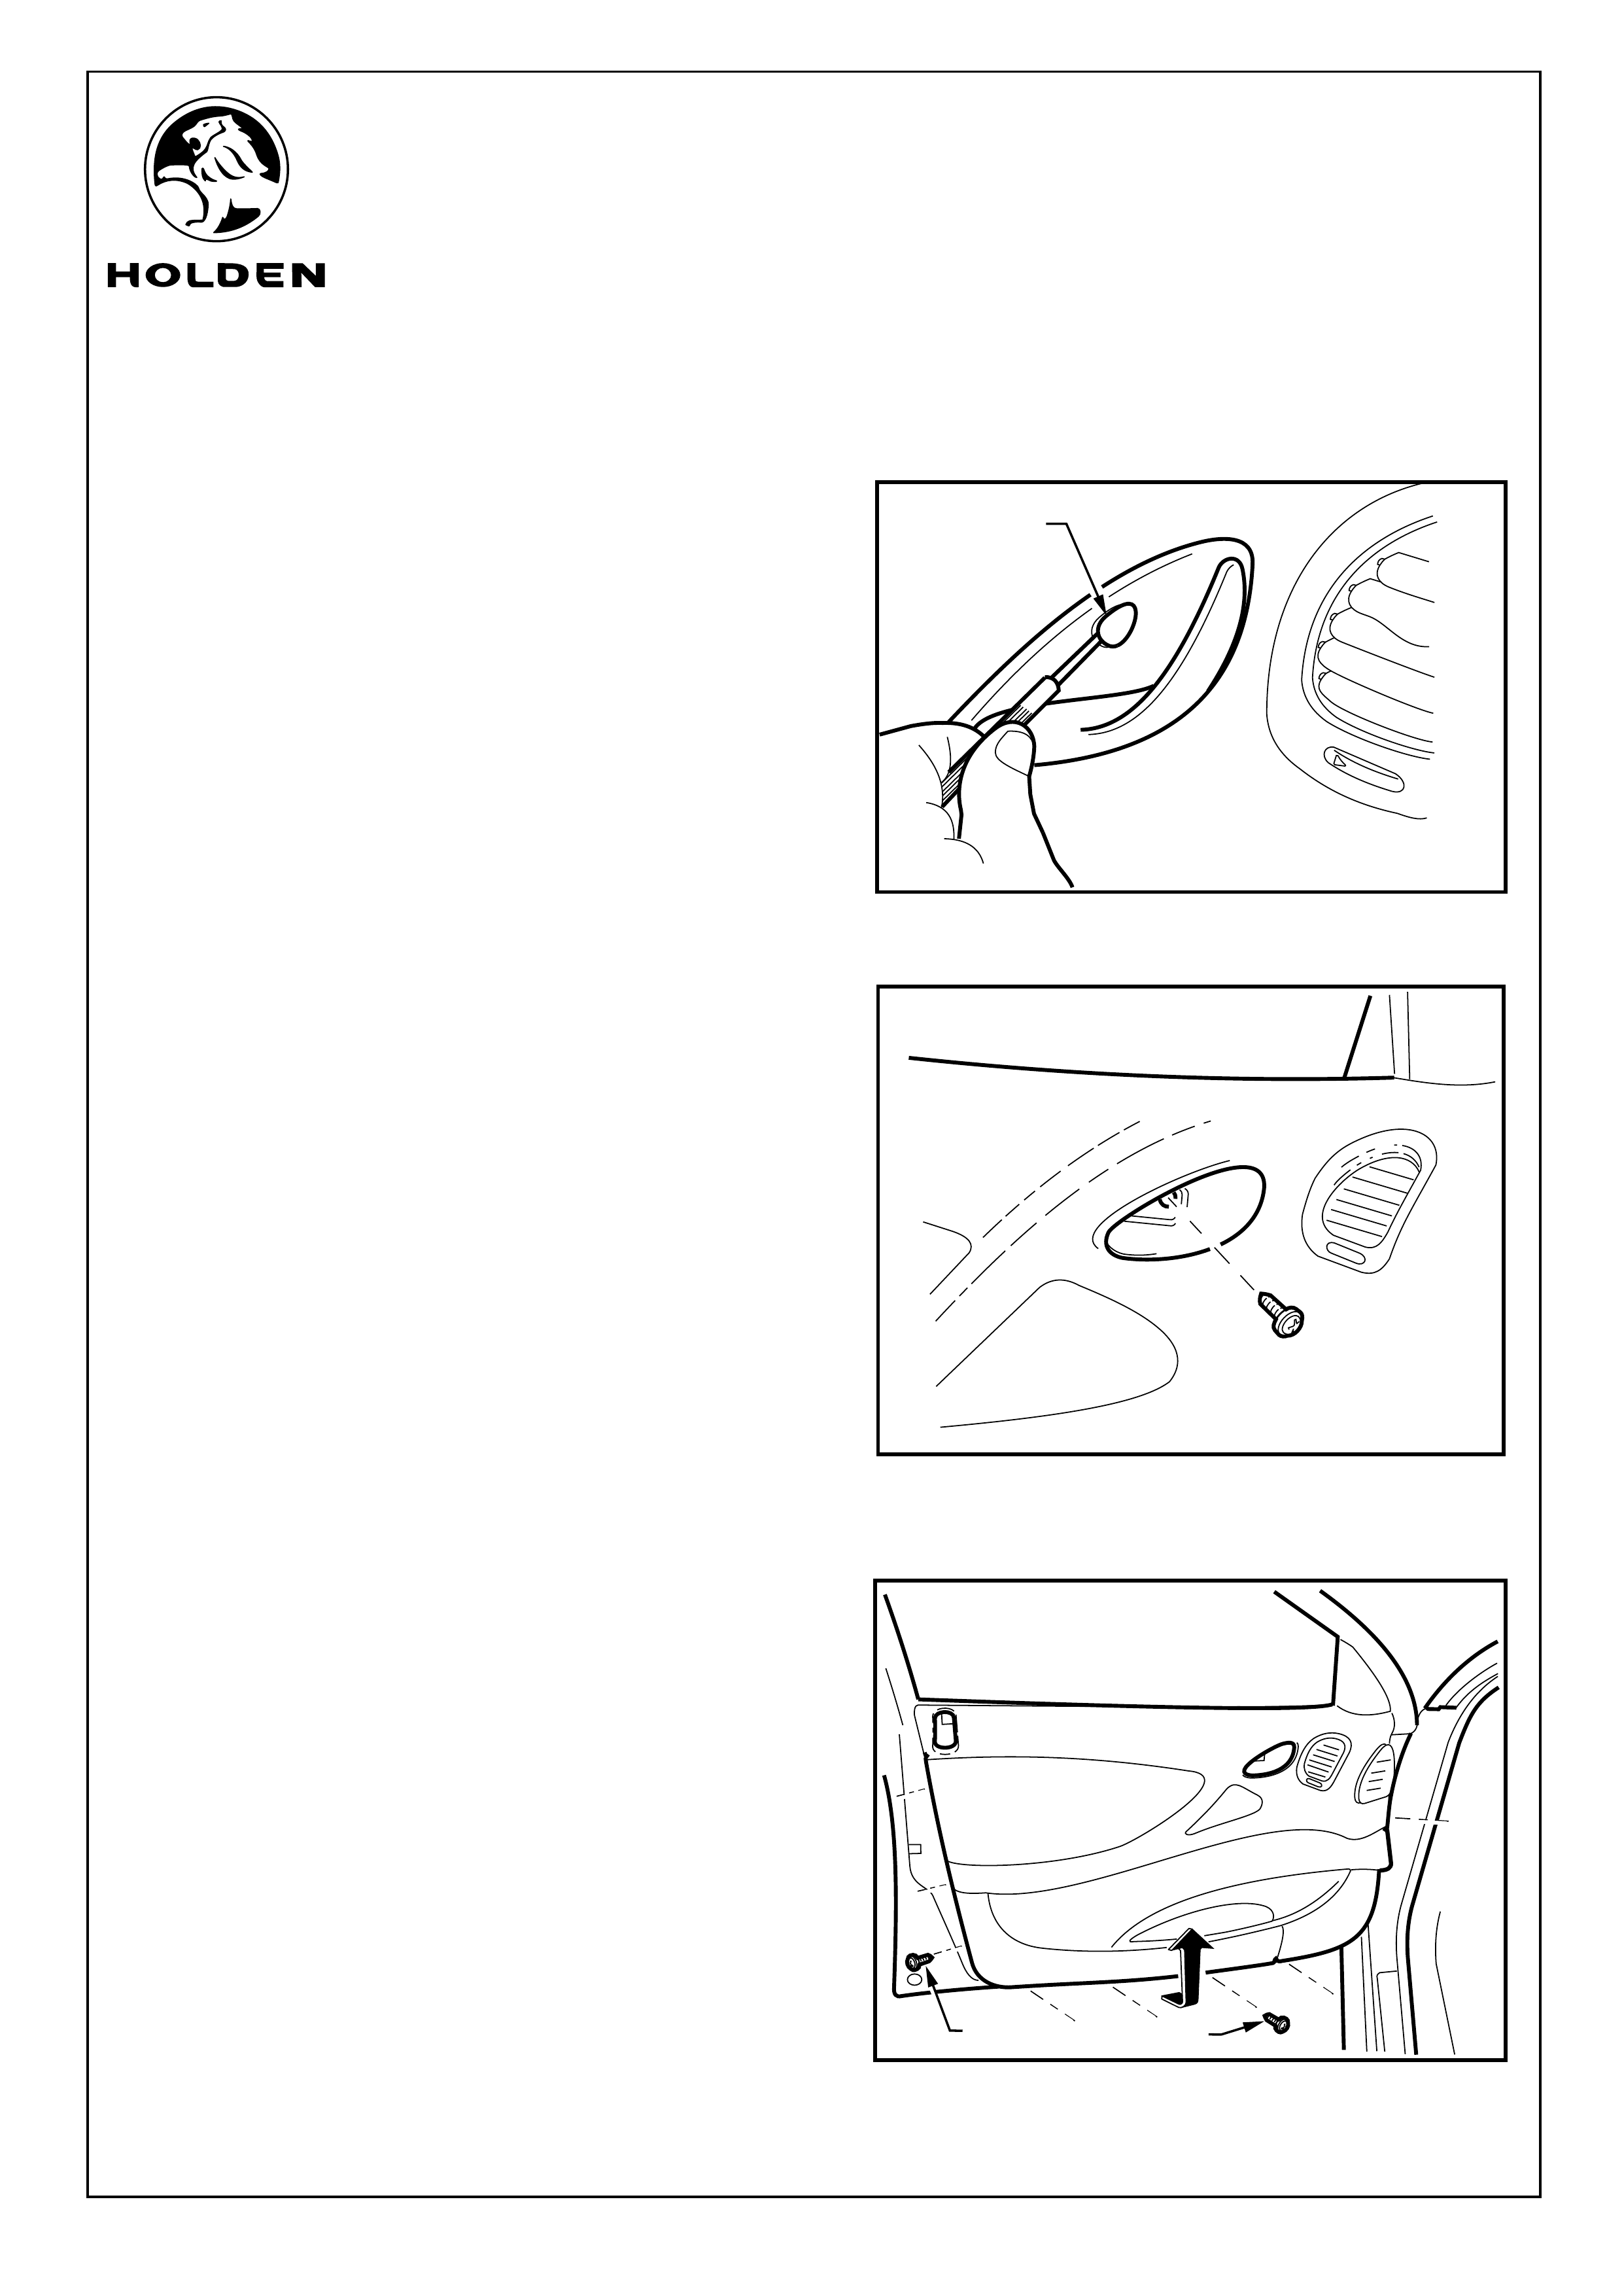
36. On the driver's side, remove the lower air duct (1) by
pushing outboard and pulling down. Refer to Figure 23.
Refer to Figure 24 for the following: (drivers side only).
37. Remove the screw (1) holding the air duct in position,
38. Push the duct (2) into the dash and rotate the duct
towards the front of the vehicle whilst pulling the duct
down and out from the dashboard.
FIGURE 22
FIGURE 23
Page 10 of 24
1
FIGURE 24
2
1
1
2
FITTING INSTRUCTIONS FOR
VY & VZ COMMODORE SEDAN
SOUND SYSTEM UPGRADE
FD1283
27AU04
COPYRIGHT
Reproduction in whole or part
prohibited without written approval
HOLDEN LTD
Division of HOLDEN Ltd ACN 006 893 232
FITTING INSTRUCTIONS: - continued...
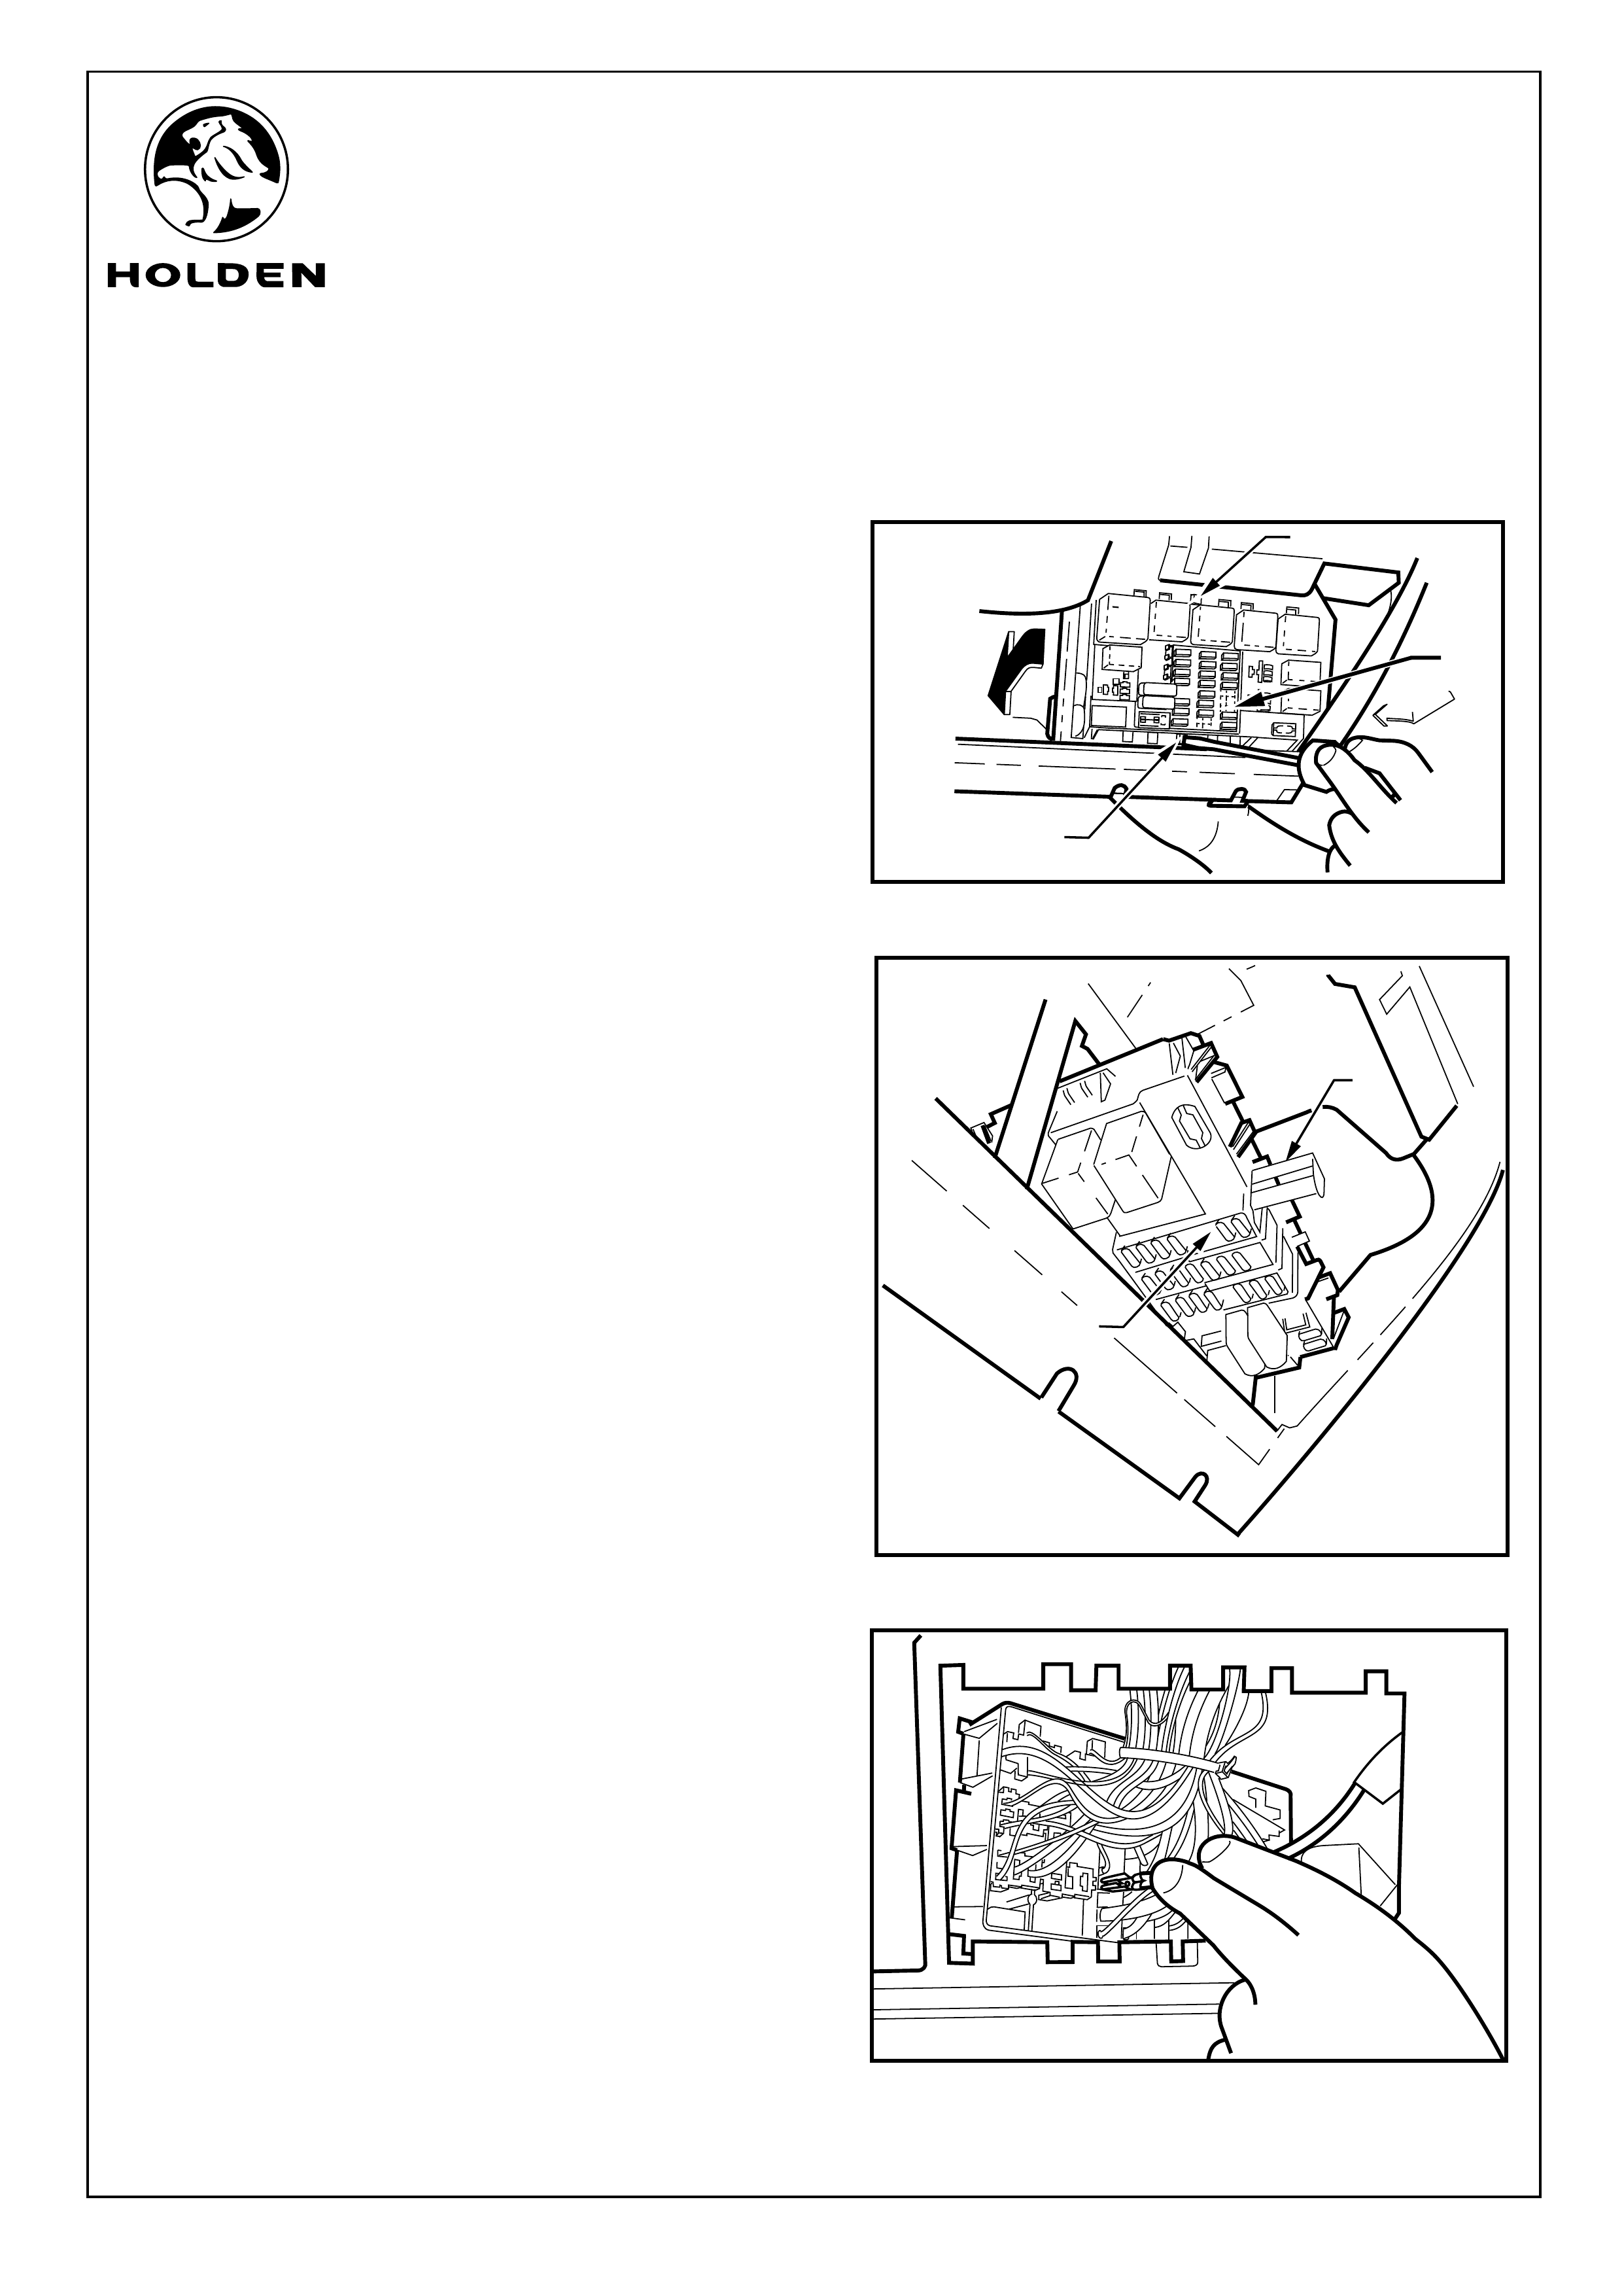
Refer to Figure 25 for the following:
39. Identify fuse position 24 (1) (sub-woofer/amplifier).
(refer to legend on inner surface of lower instrument
panel cover).
40. Release the main fuse and relay panel by pushing in the
top and bottom locking tabs (2) using a small flat bladed
screw driver, slide the fuse panel to the left and push the
panel towards the front of the vehicle
Refer to Figure 26 for the following:
41. Push the fuse and relay panel into the dash and remove
the back-out protector (1) for the column that houses
fuse 24 (2).
Refer to Figure 27 for the following:
42. Run the red main power lead for the amplifier up the side
of the vehicle behind the bonnet release cable and
across into the dashboard to the fuse panel. Insert the
terminal into position 24 (the fourth position from the
bottom) and refit the back-out protector.
NOTE: A click will be heard when the terminal is locked
into place correctly.
43. Reinsert the back-out protector.
44. Turn the fuse panel around and refit into the fuse panel
carrier and slide across to the lock position.
45. Refit the A/C ducts in reverse order, refit the hush panel.
SIEMENS
SIEMENS
GM GM
TYCO
TYCO
IN 0313
IN 0313
TYCO TYCO
IN 0313
IN 0313
TYCO
TYCO
IN 0313 IN 0313
TYCO TYCO
IN 0313
IN 0313
-10- -10-
-15- -15-
-10- -10-
-15- -15-
-15- -15-
-15- -15- -15- -15-
-15- -15-
-15- -15-
-10- -10-
-10- -10-
-20- -20-
-7.5- -7.5-
-7.5- -7.5-
-7.5- -7.5-
-7.5- -7.5-
-20- -20-
-20- -20-
-20- -20-
-10- -10-
FIGURE 25
Page 11 of 24
2
1
2
FIGURE 26
1
FIGURE 27
2
FITTING INSTRUCTIONS FOR
VY & VZ COMMODORE SEDAN
SOUND SYSTEM UPGRADE
FD1283
27AU04
COPYRIGHT
Reproduction in whole or part
prohibited without written approval
HOLDEN LTD
Division of HOLDEN Ltd ACN 006 893 232
FITTING INSTRUCTIONS: - continued...
Speaker wire connections
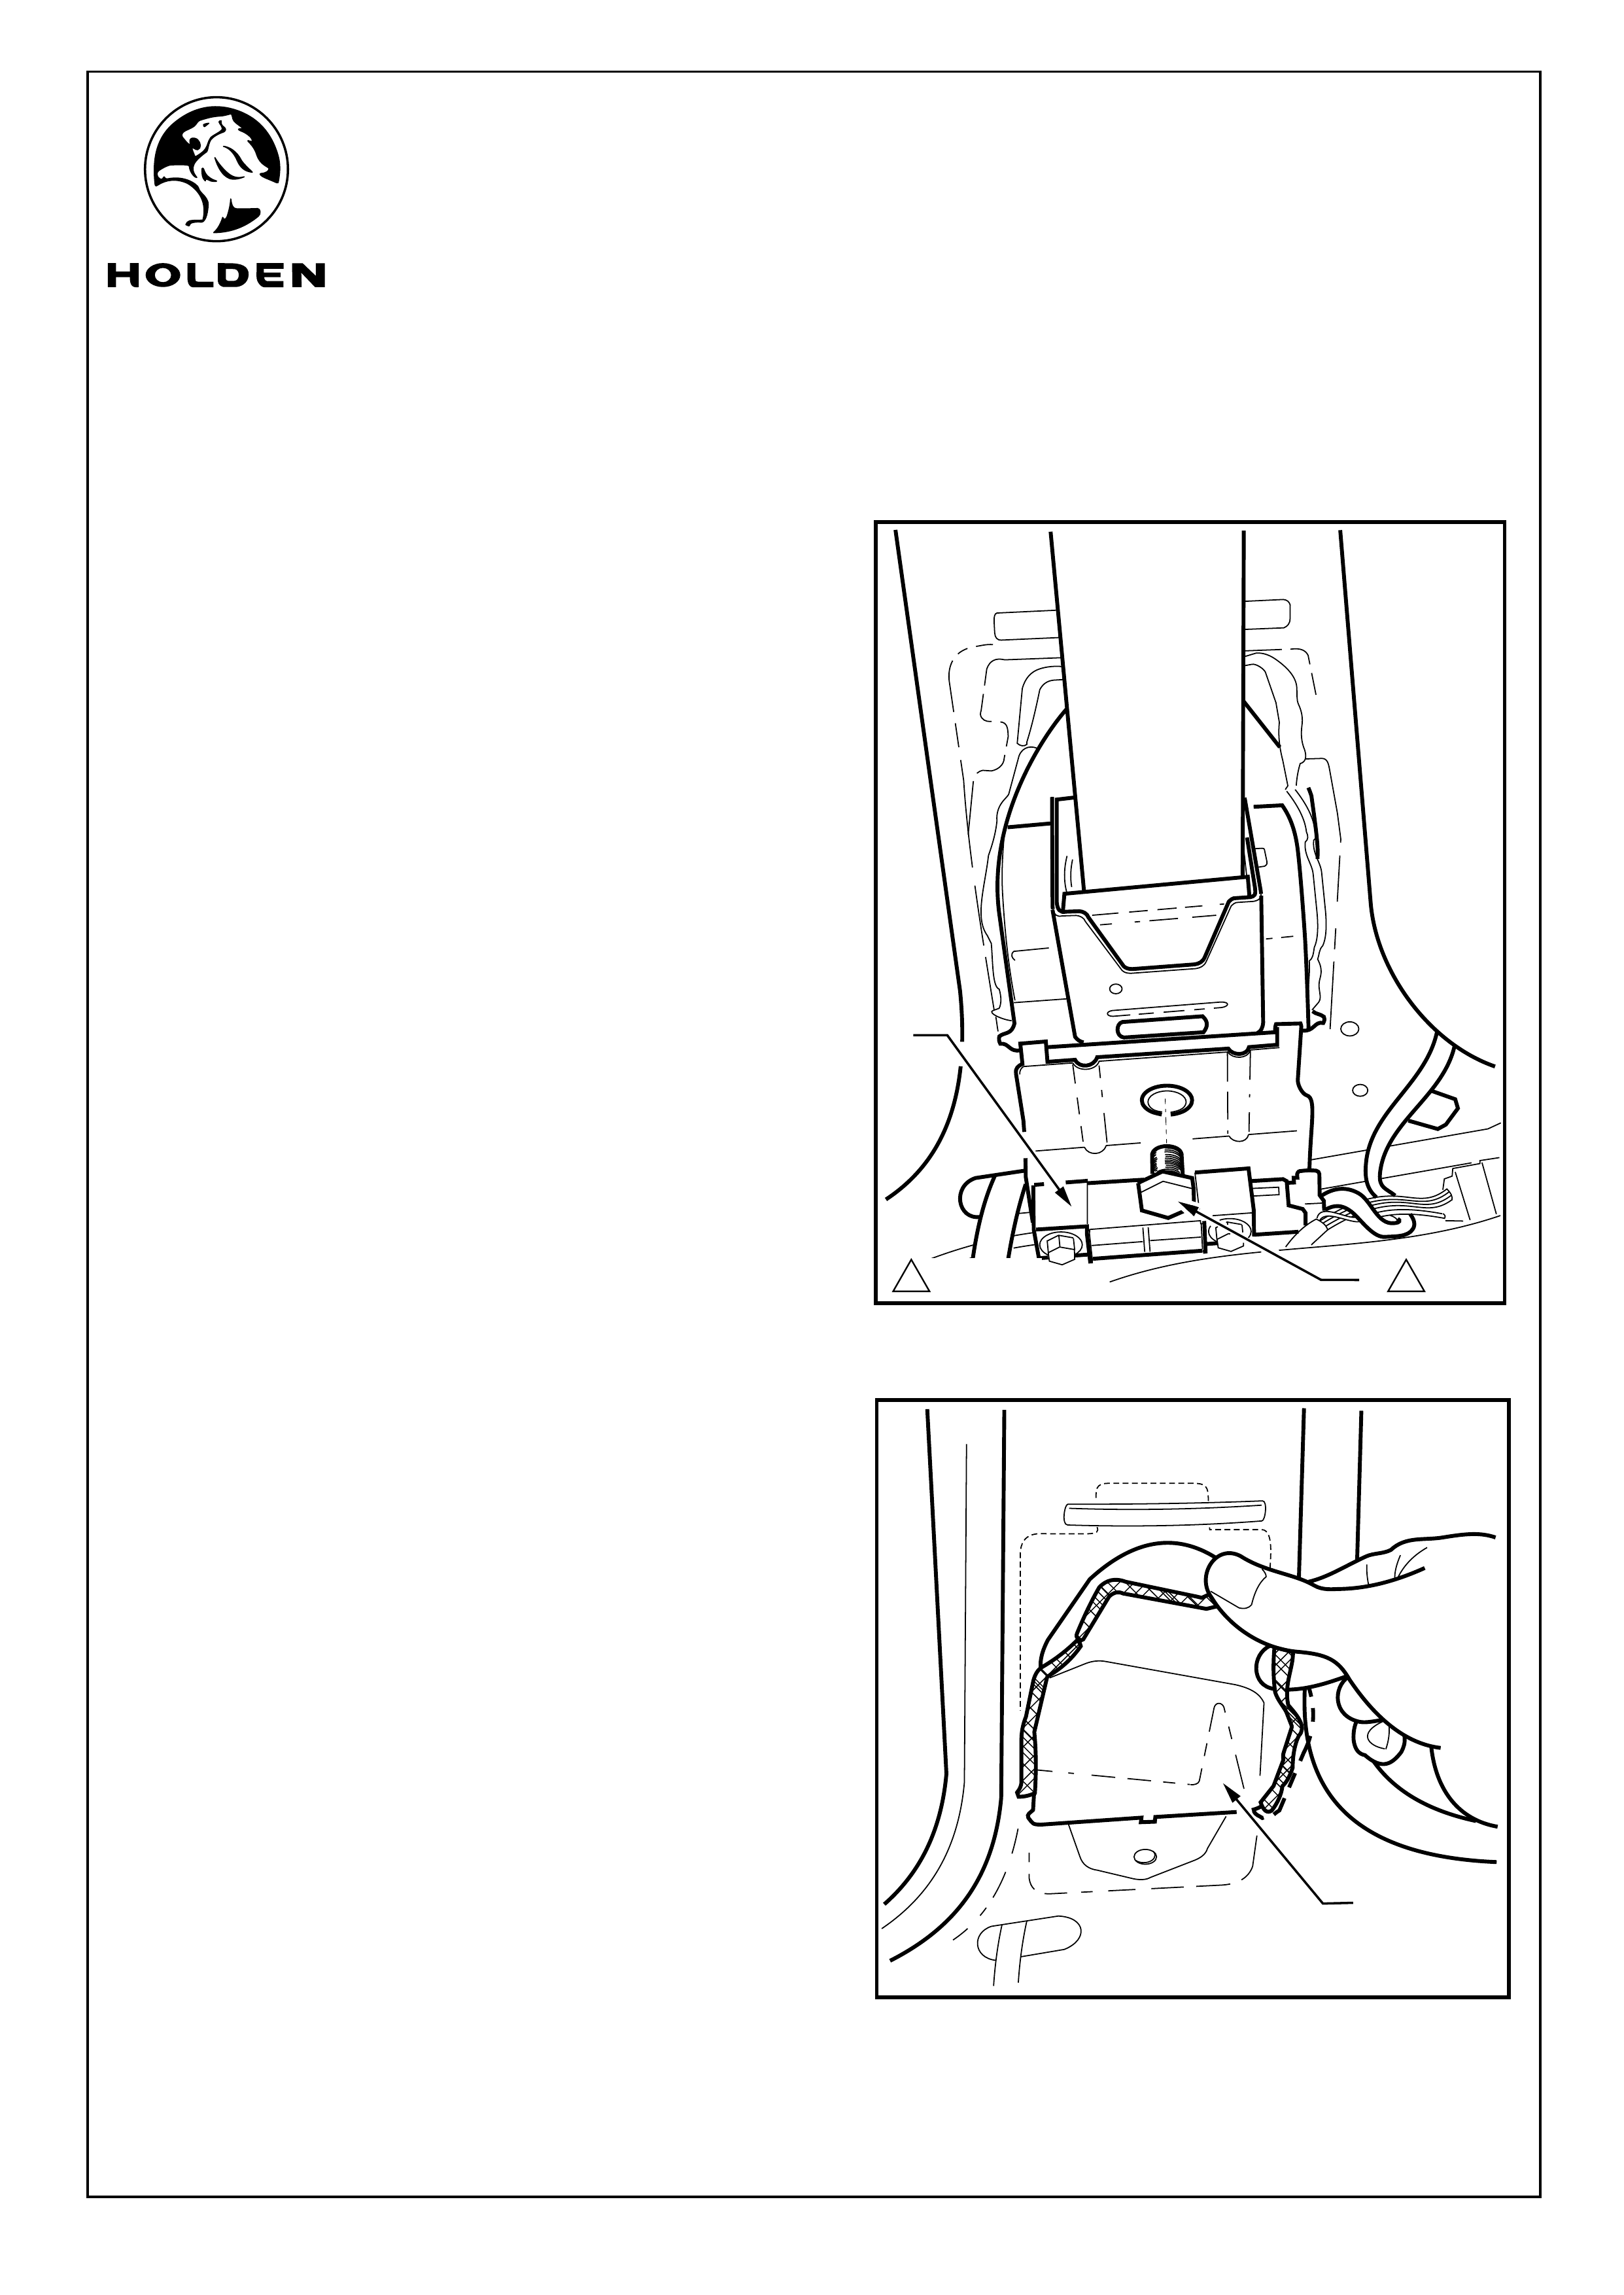
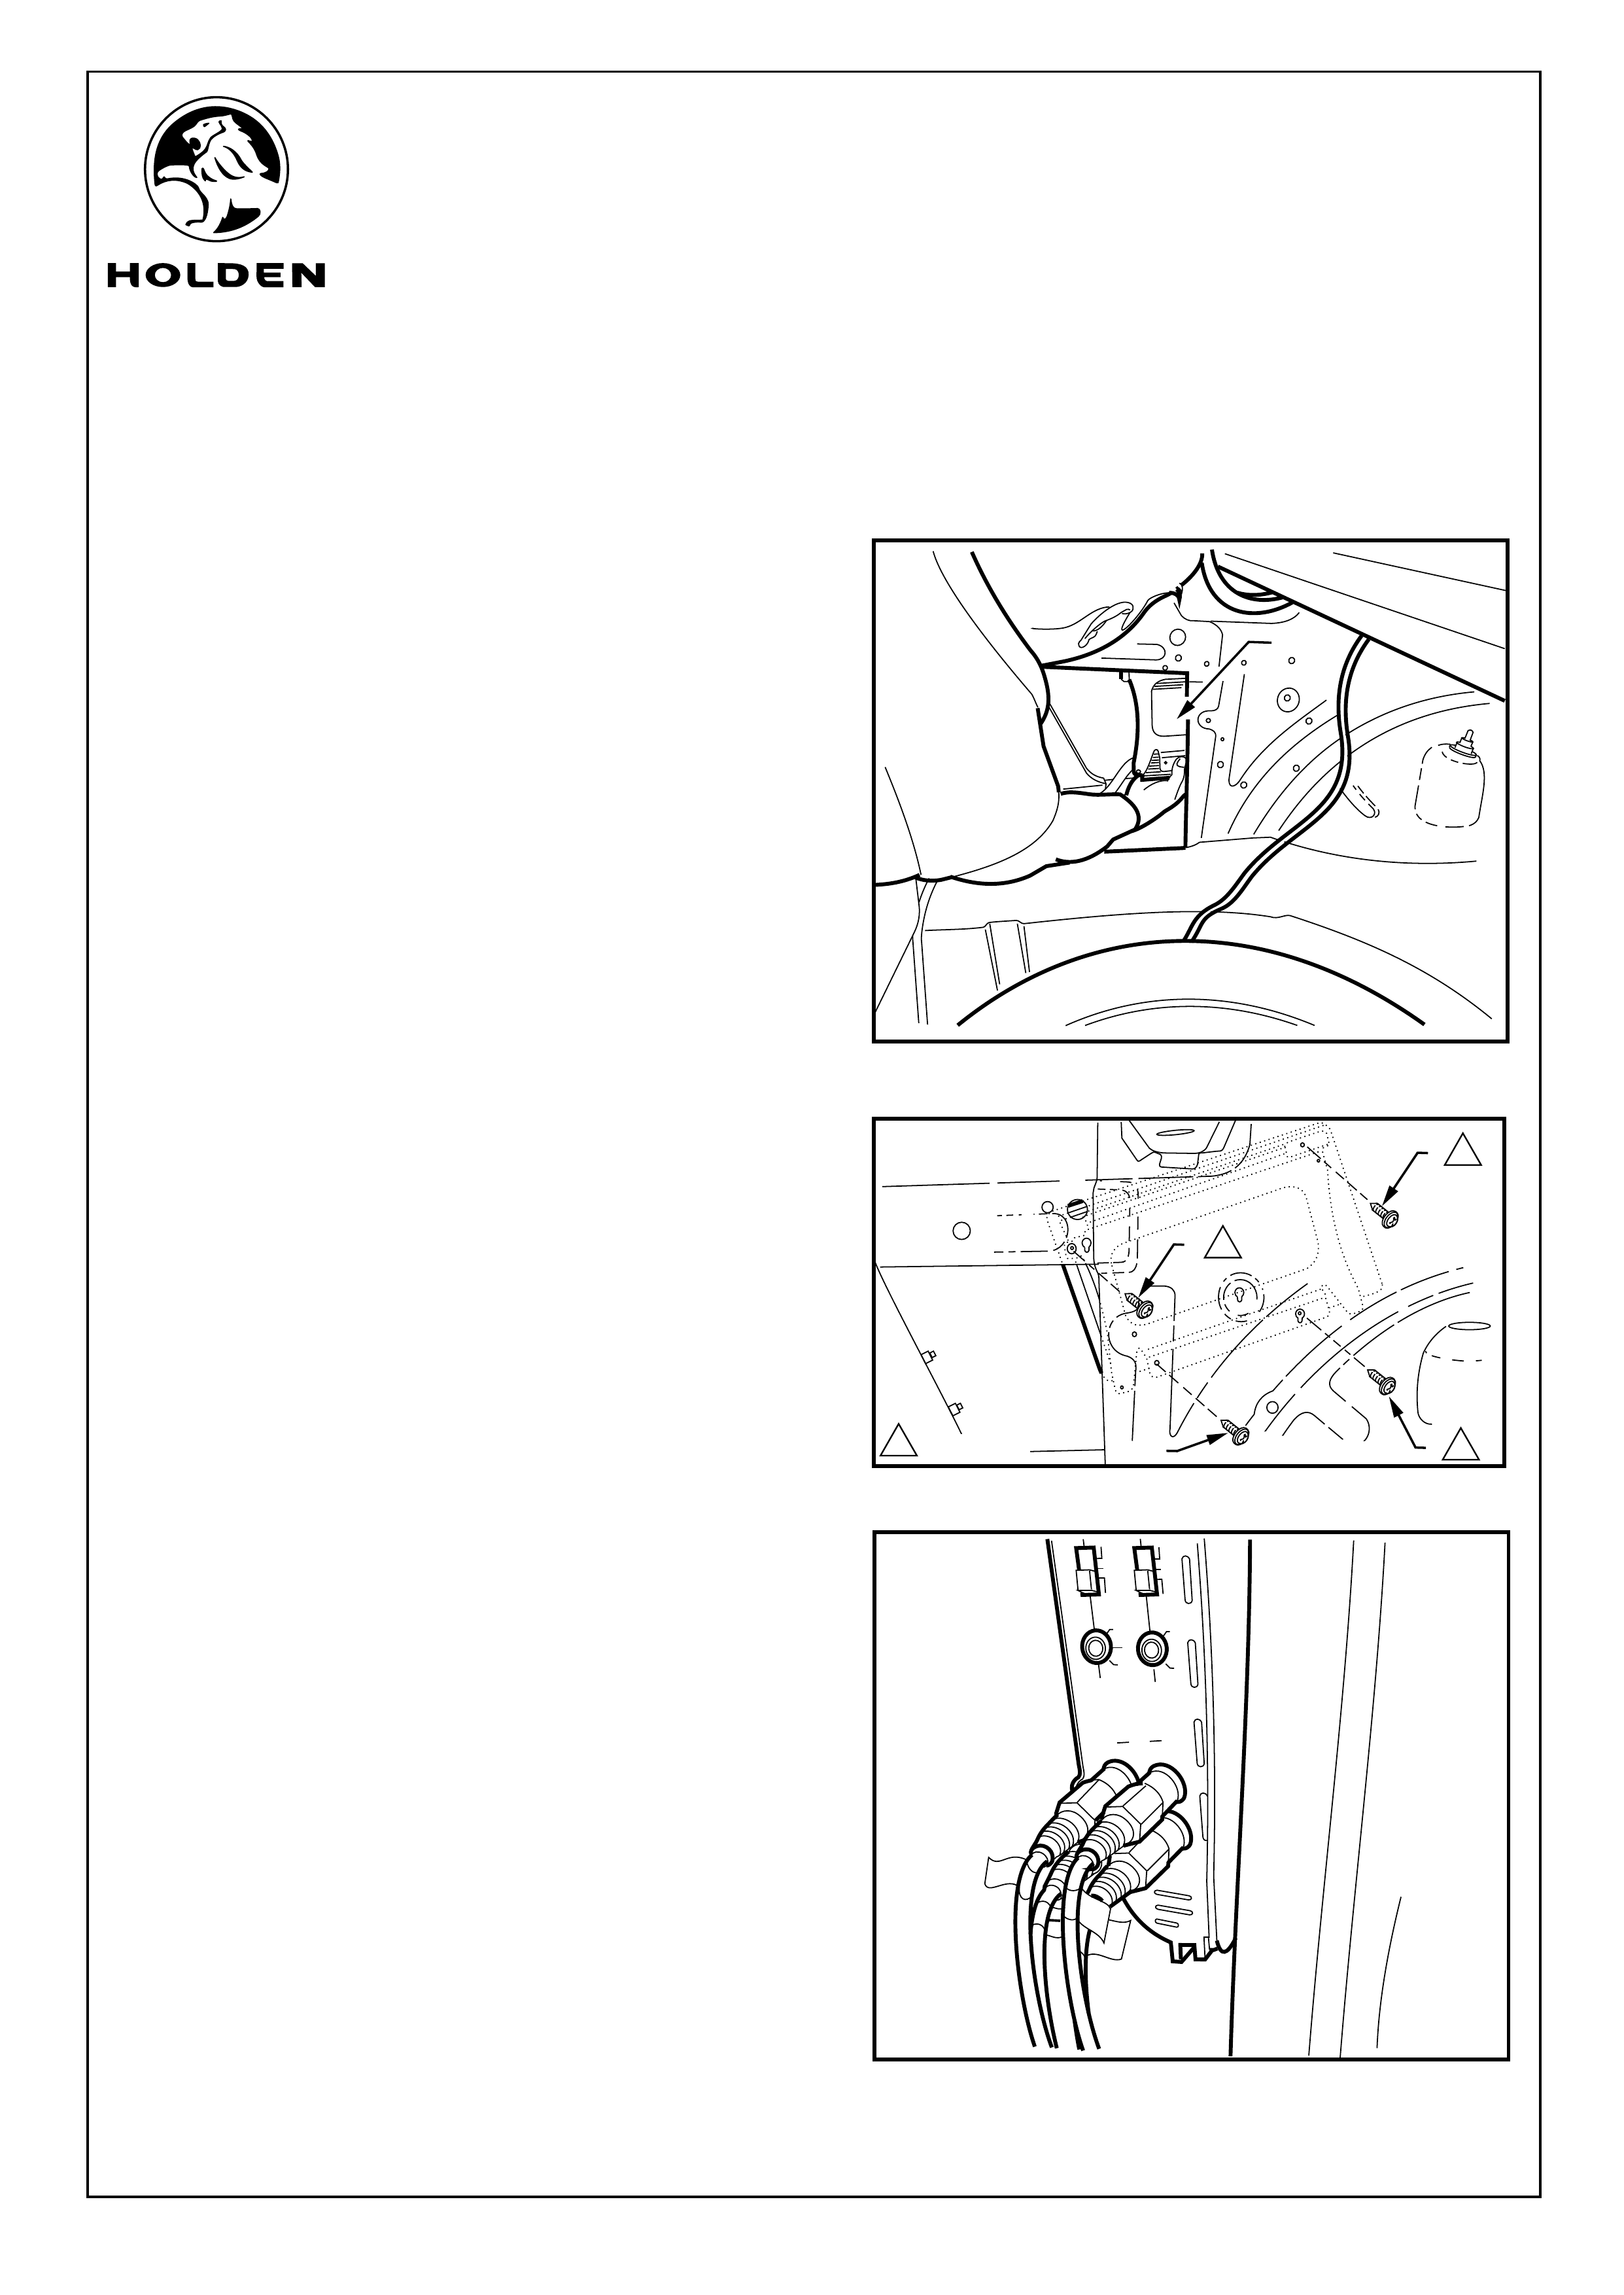
Refer to Figure 28 for the following:
46. The door harness connector blocks are located inside of
the front foot well sidewalls and in the base of both “B”
pillars. To access the connectors in the “B” pillar it is
necessary to remove the side impact sensor (1) and the
seatbelt from each “B” pillar.
47. Use a socket to remove the bolt (2) holding the side
impact sensor, and the seatbelt to the “B” pillar. Let the
side impact sensor rest on the floor.
48. Make some slack in the seat belt and allow the belt
tensioner to hang down outside of the vehicle.
49. Remove the plastic seat belt cup (1). Refer to Figure 29
Page 12 of 24
FIGURE 28
1
2
FIGURE 29
9205586692055866
92055866
92055866
1
35.0 - 50.0 Nm
1 1
FITTING INSTRUCTIONS FOR
VY & VZ COMMODORE SEDAN
SOUND SYSTEM UPGRADE
FD1283
27AU04
COPYRIGHT
Reproduction in whole or part
prohibited without written approval
HOLDEN LTD
Division of HOLDEN Ltd ACN 006 893 232
FITTING INSTRUCTIONS: - continued...
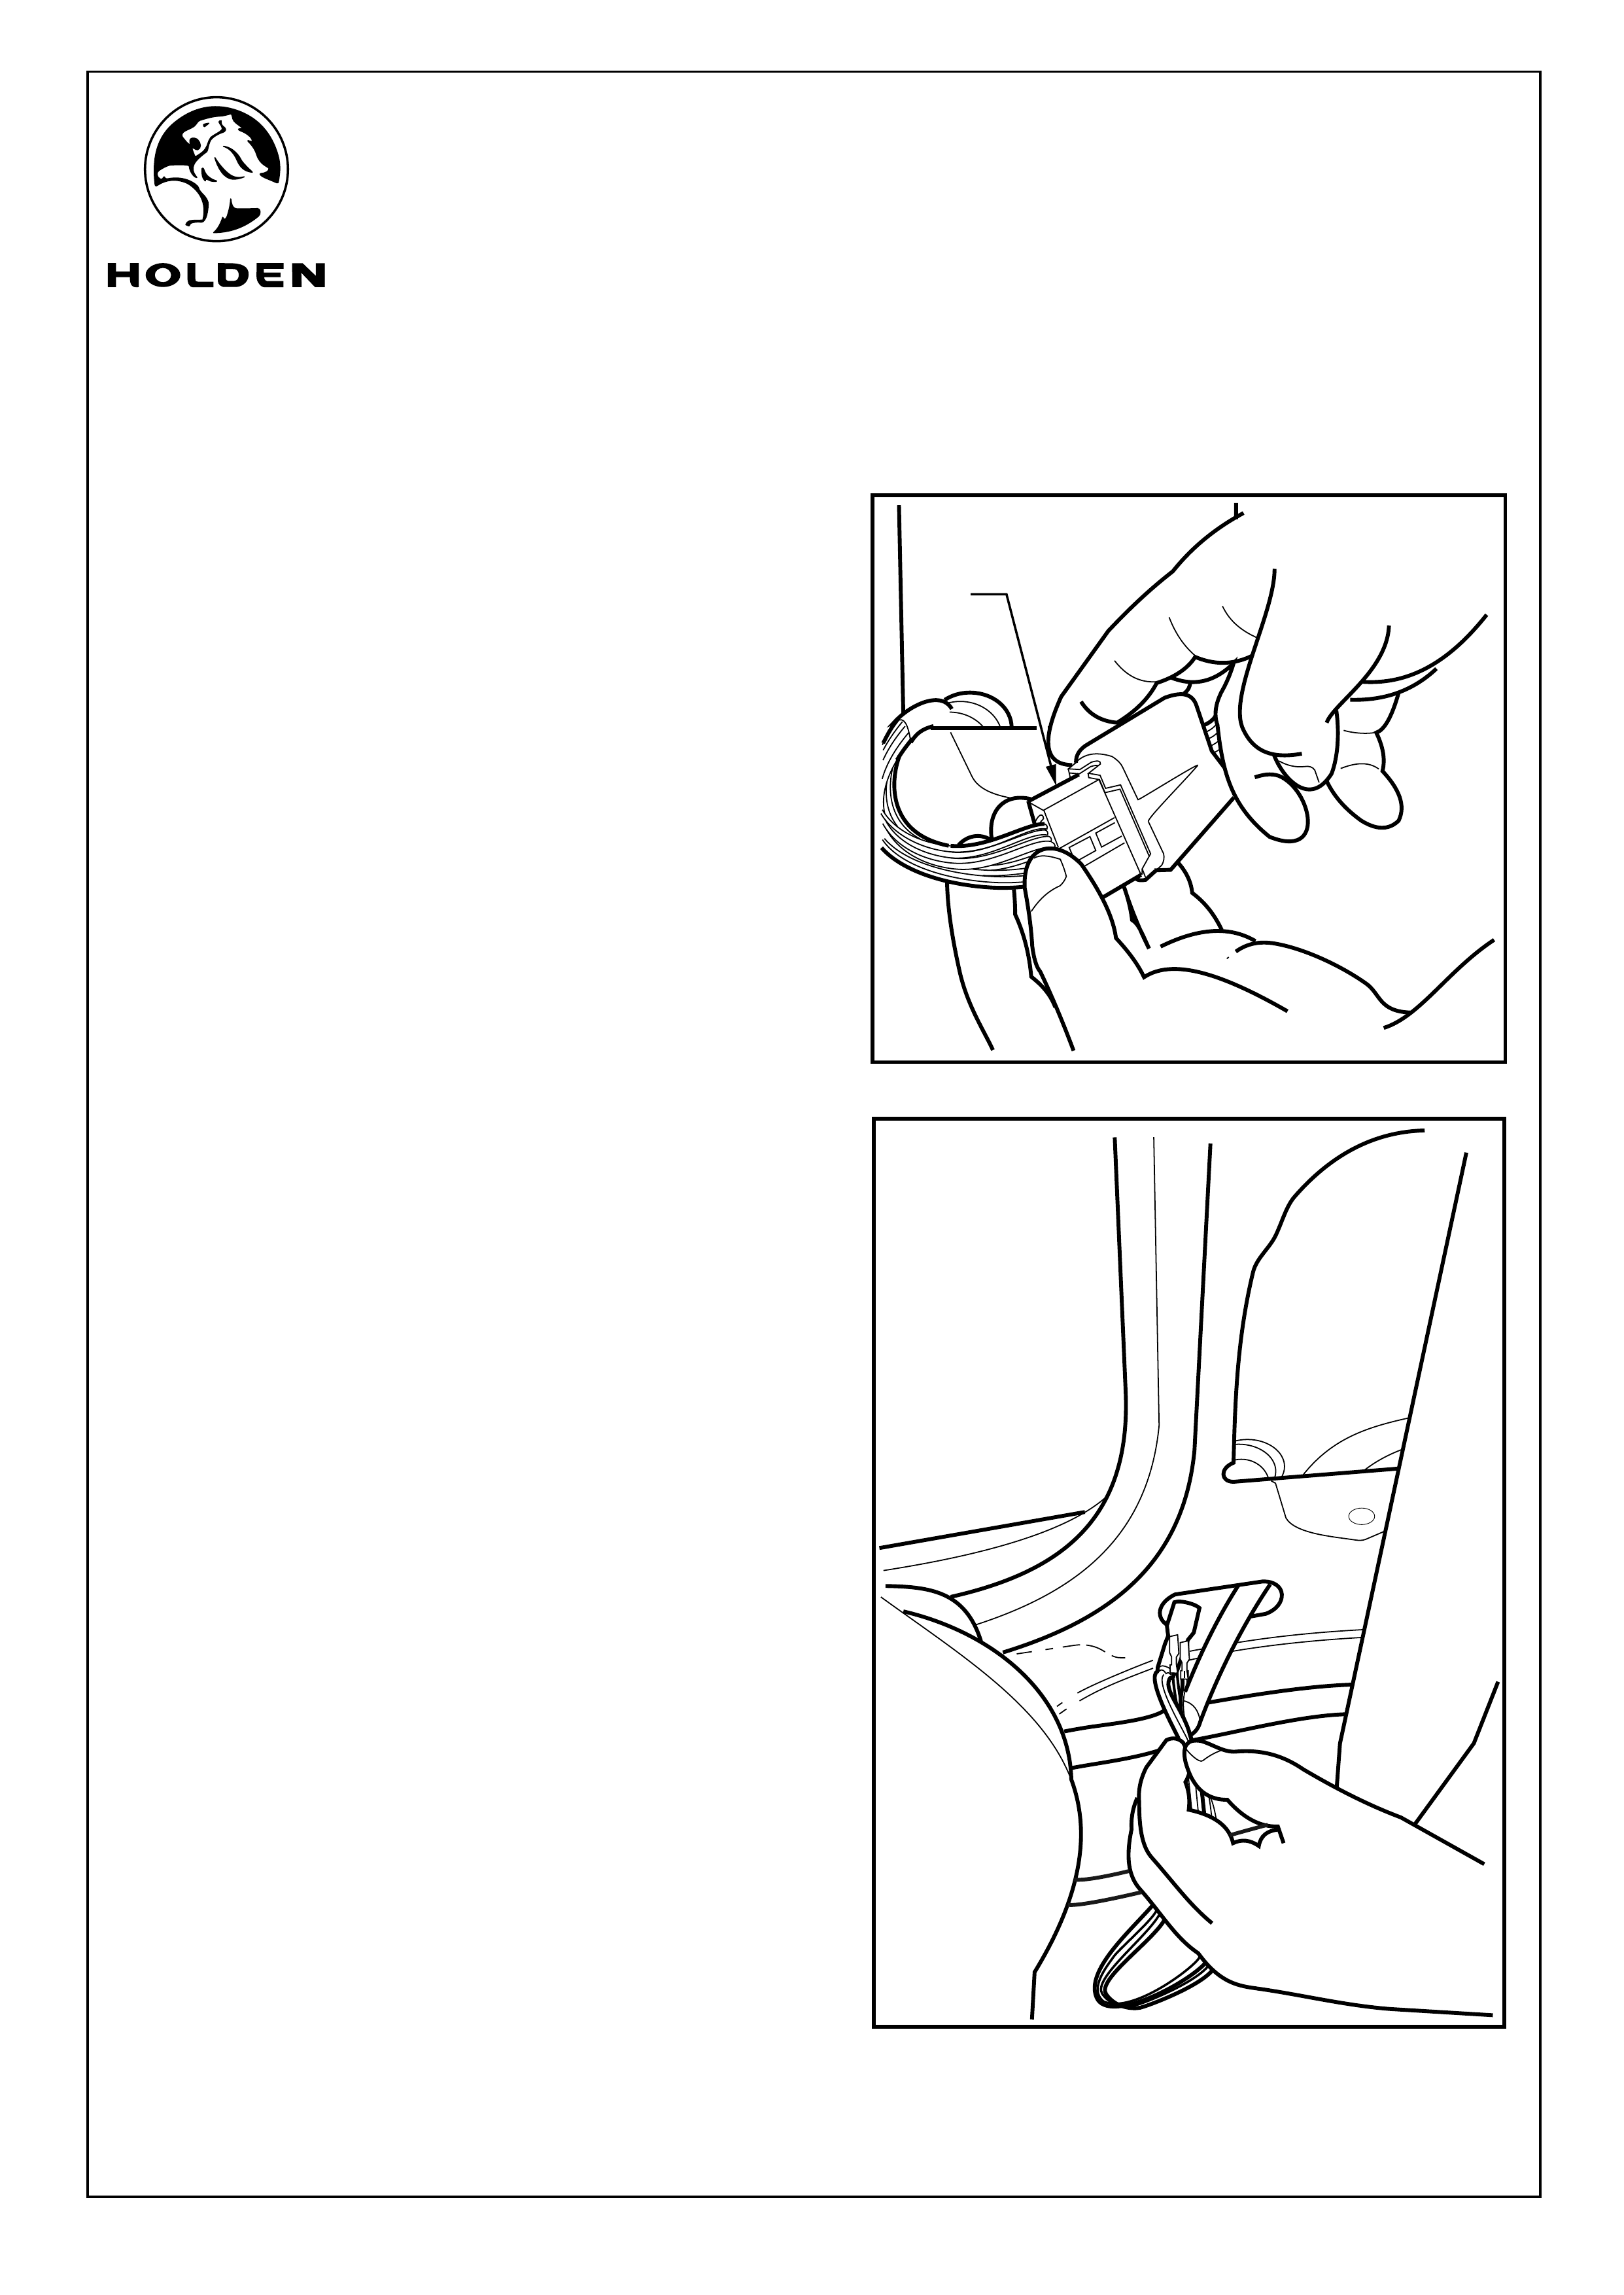
50. Remove the body to door harness connector (1) from
the cavity and separate the two halves. Refer to
Figure 30.
51. Pass the speaker wires from the main speaker wiring
harness through the hole into the “B” pillar and up to the
seat belt aperture. Refer to Figure 31.
Page 13 of 24
FIGURE 30
1
FIGURE 31
FITTING INSTRUCTIONS FOR
VY & VZ COMMODORE SEDAN
SOUND SYSTEM UPGRADE
FD1283
27AU04
COPYRIGHT
Reproduction in whole or part
prohibited without written approval
HOLDEN LTD
Division of HOLDEN Ltd ACN 006 893 232
FITTING INSTRUCTIONS: - continued...
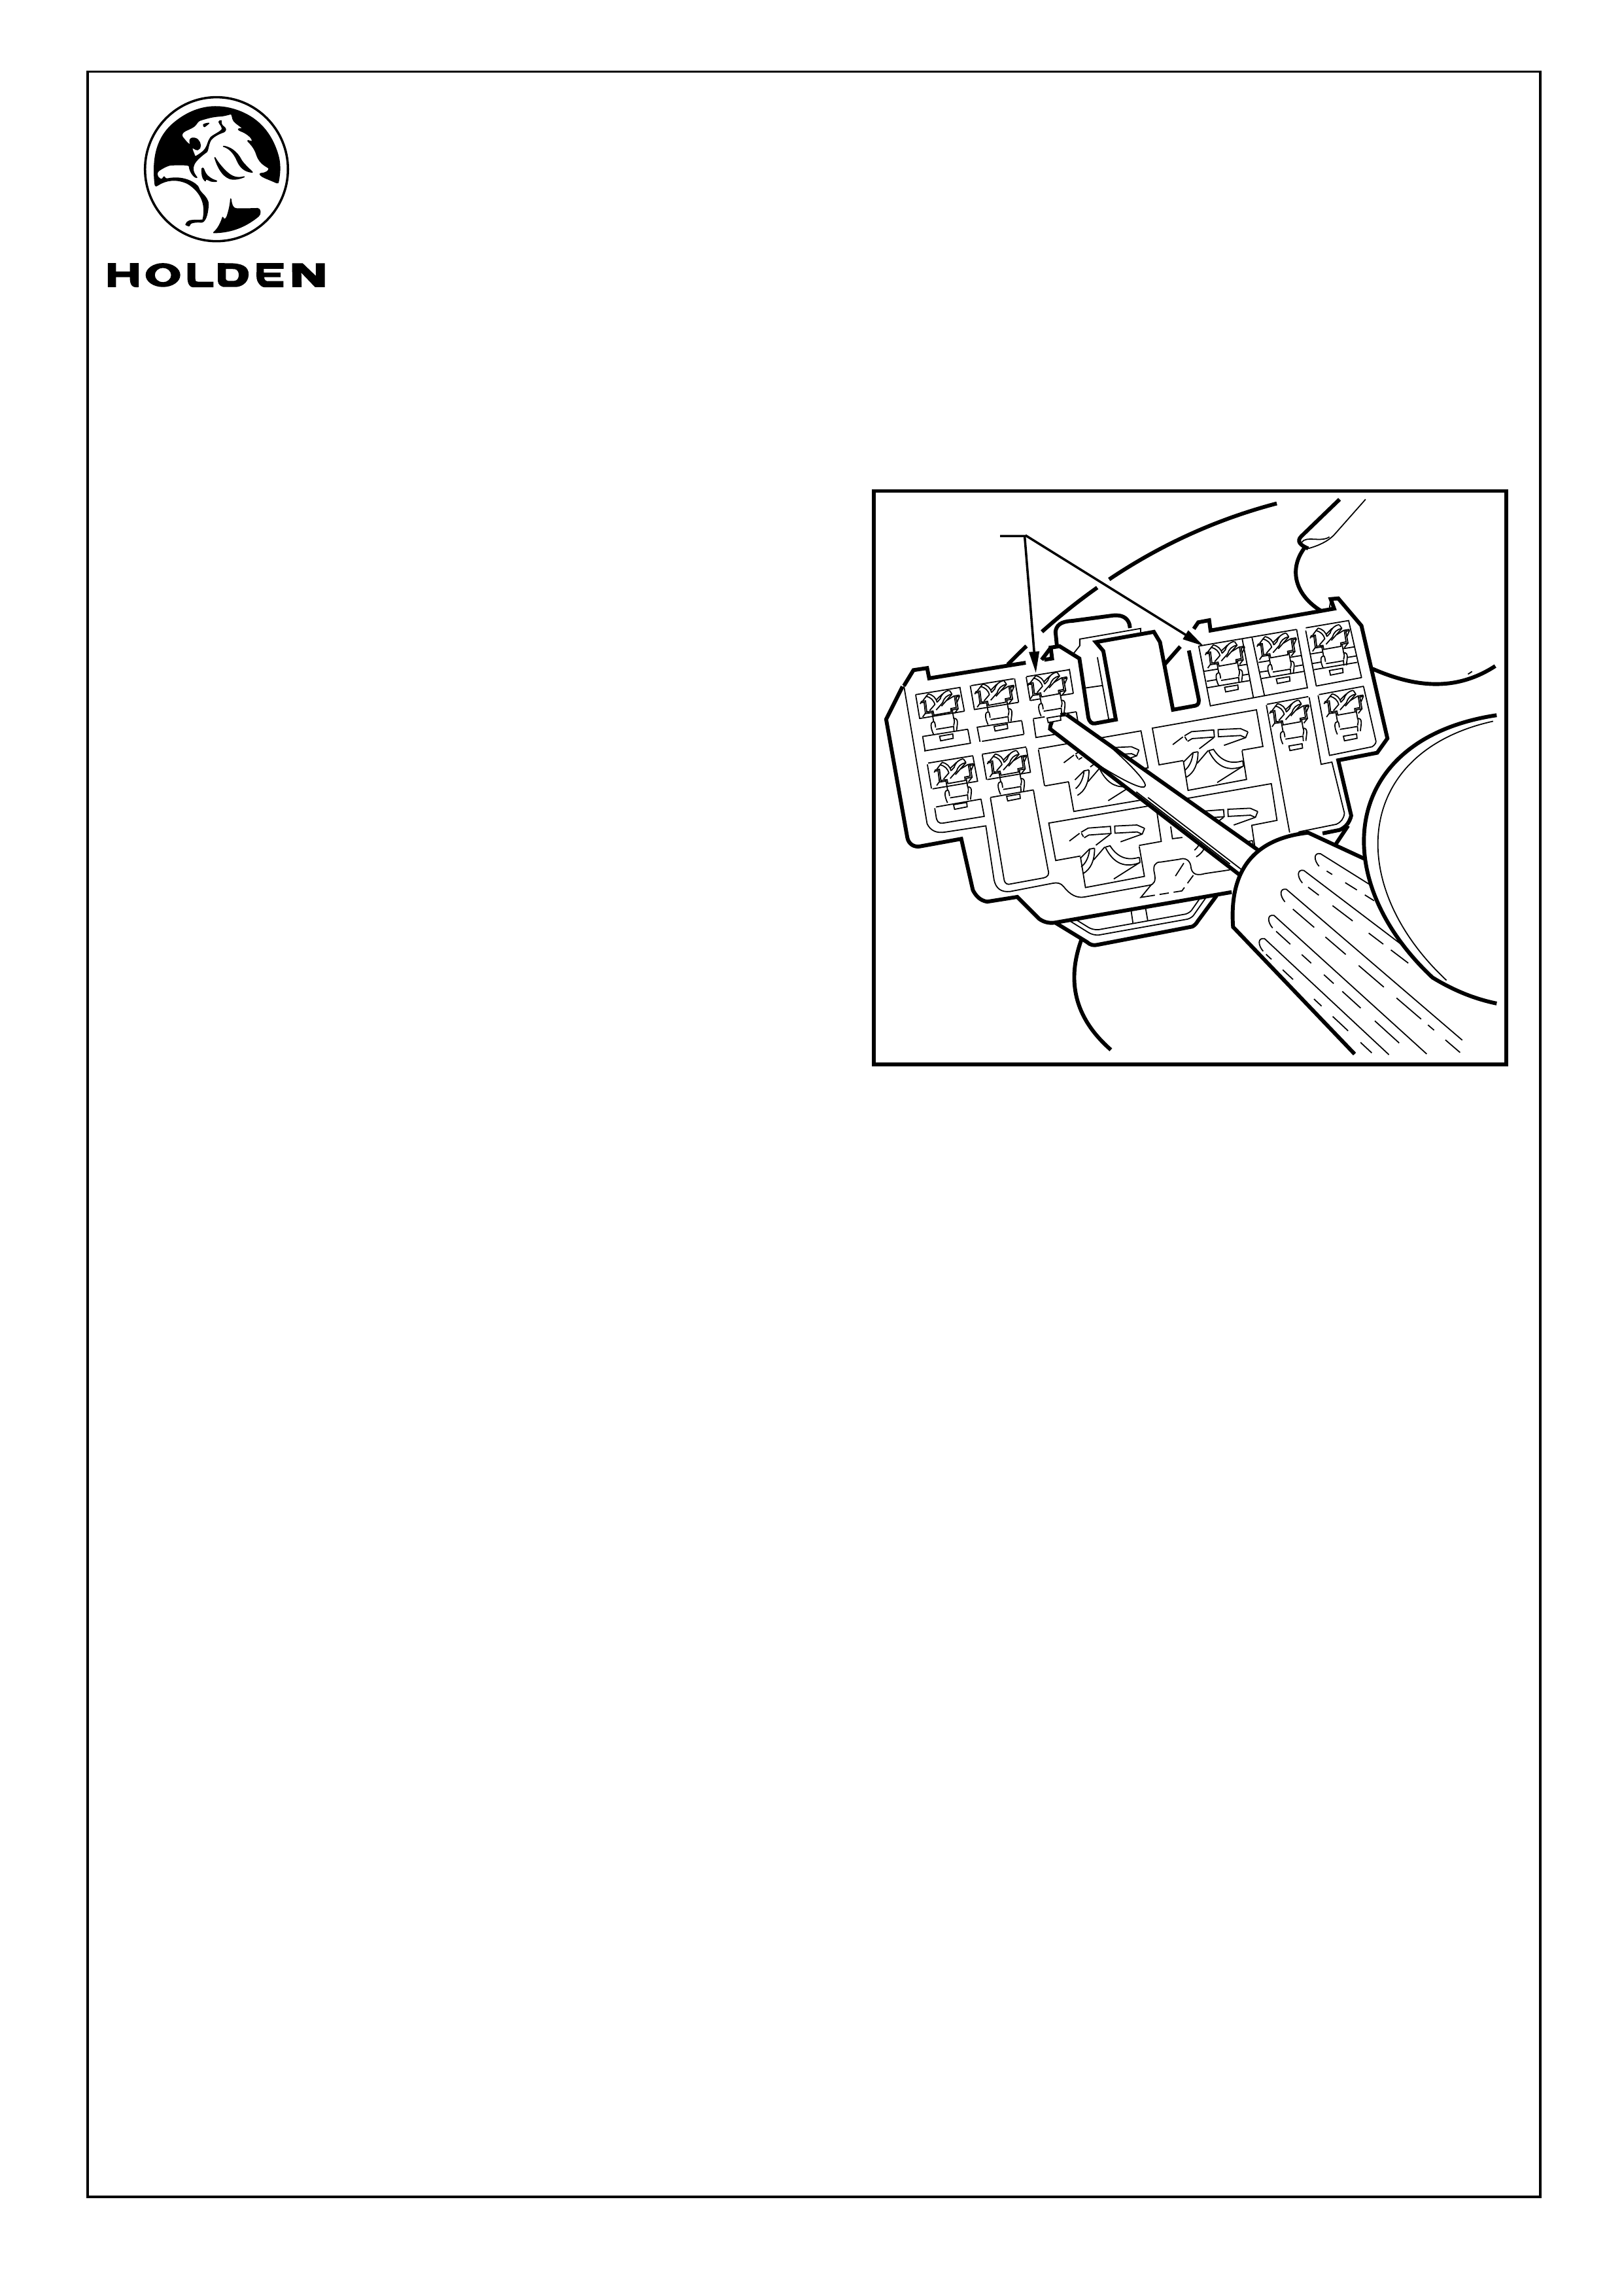
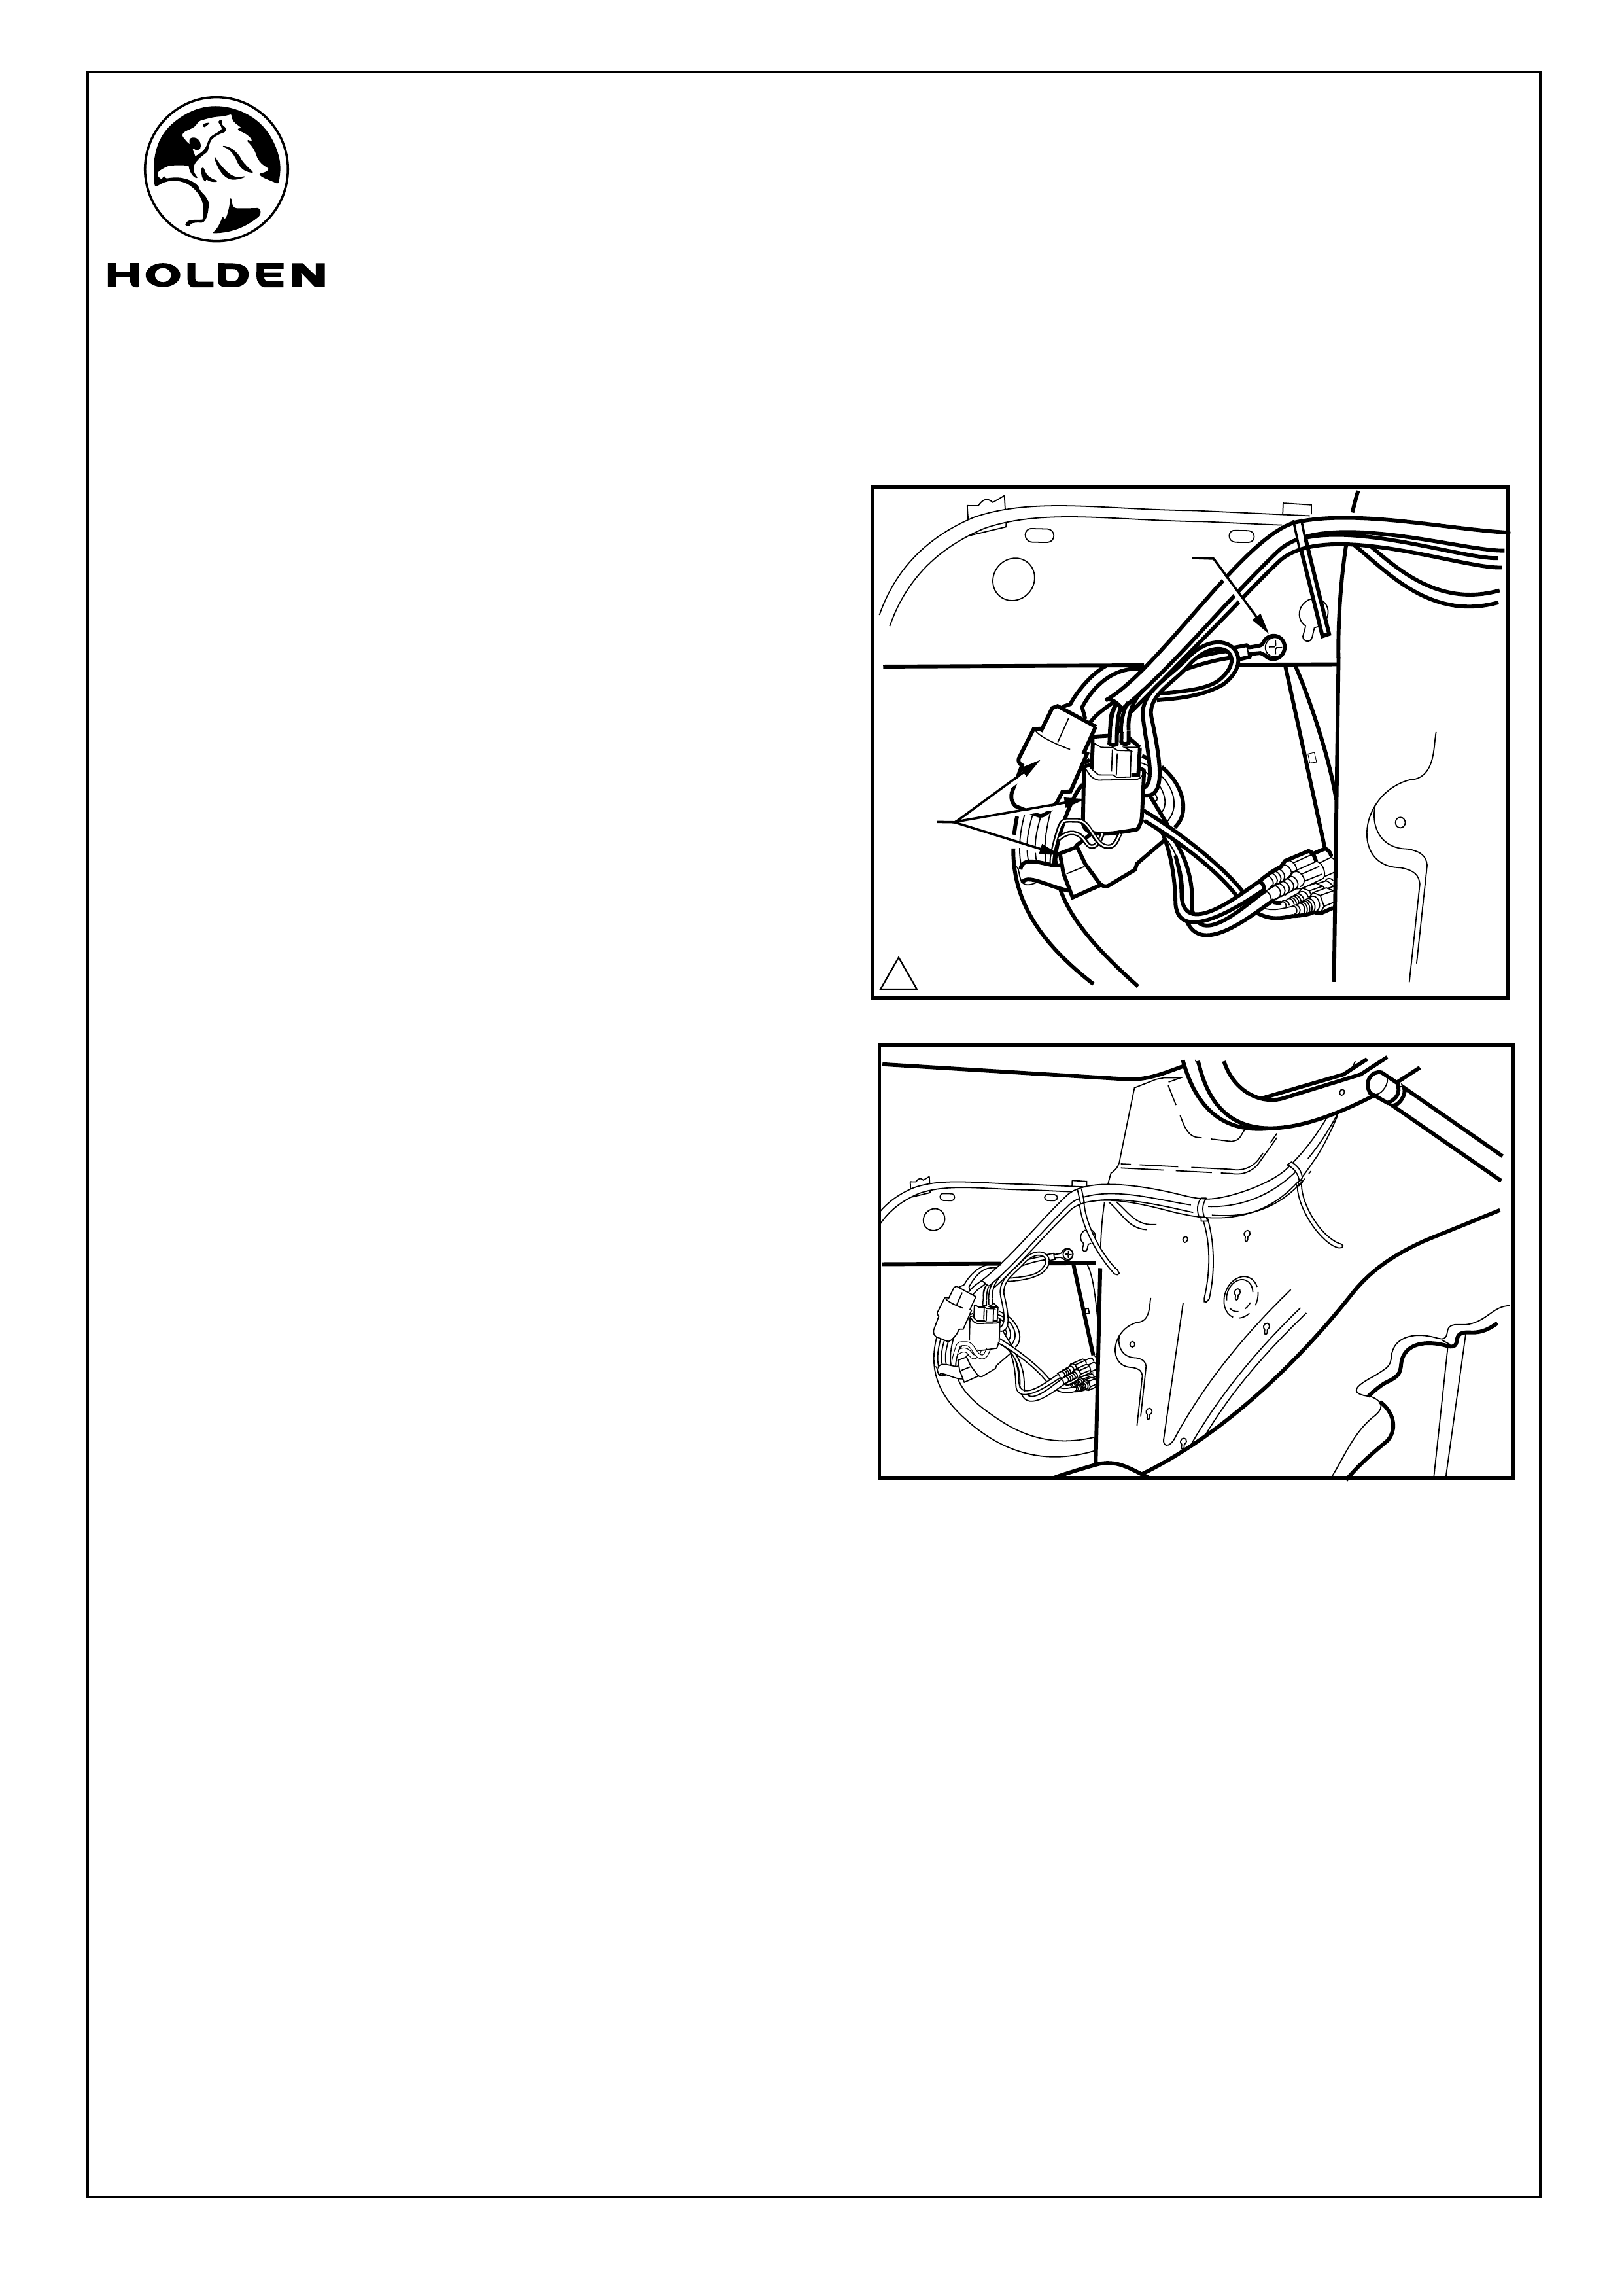
Refer to Figure 32 for the following:
52. To connect the speaker harness to the door speaker
harness:
a. Use a small jewellers screwdriver to push between the
terminal and the plastic terminal lock to release the first
of the terminals next to the body harness connector
lock.
NOTE: When the terminal lock is released the terminal
will slide out without significant force.
b. Gently remove the terminal and connect it into the
corresponding colour in the main speaker twin wiring
harness connector.
c. Take the loose terminal with the corresponding wire
colour on the main speaker wiring harness and fit it into
the now vacant position in the body harness connector.
d. Repeat the process on the second terminal next to the
body harness connector lock.
NOTE: When the terminals are in the connector block
properly they will lock into position and not come back
out. A small pull on the wires is a good check for
positive locks. Ensure all terminals are be completely
covered by the connector block.
LHS "A" pillar
Vehicle wiring Main Speaker harness
Grey Grey
Brown Brown
LHS "B" pillar
Vehicle wiring Main Speaker harness
Yellow/Black Yellow
Brown/Black Brown
RHS "A" pillar
Vehicle wiring Main Speaker harness
Light Green Light Green
Dark Green Dark Green
RHS "B" pillar
Vehicle wiring Main Speaker harness
Blue/Orange Orange
Blue/Black Blue
53. Reconnect the body harness and tuck it back onto cavity.
NOTE: Steps 52 to 53 should be repeated on the other
three body harness door connectors.(2 at the base of the
"B" pillars and 2 at the sides of the dash board).
54. Refit the plastic cup, the seat belt tensioner and the side
impact sensor. Ensure seatbelt tensioner notch aligns
with the corresponding notch in the body. Tighten to
specified torque. Refer to Figure 28.
Page 14 of 24
FIGURE 32
1
FITTING INSTRUCTIONS FOR
VY & VZ COMMODORE SEDAN
SOUND SYSTEM UPGRADE
FD1283
27AU04
COPYRIGHT
Reproduction in whole or part
prohibited without written approval
HOLDEN LTD
Division of HOLDEN Ltd ACN 006 893 232
FITTING INSTRUCTIONS: - continued...
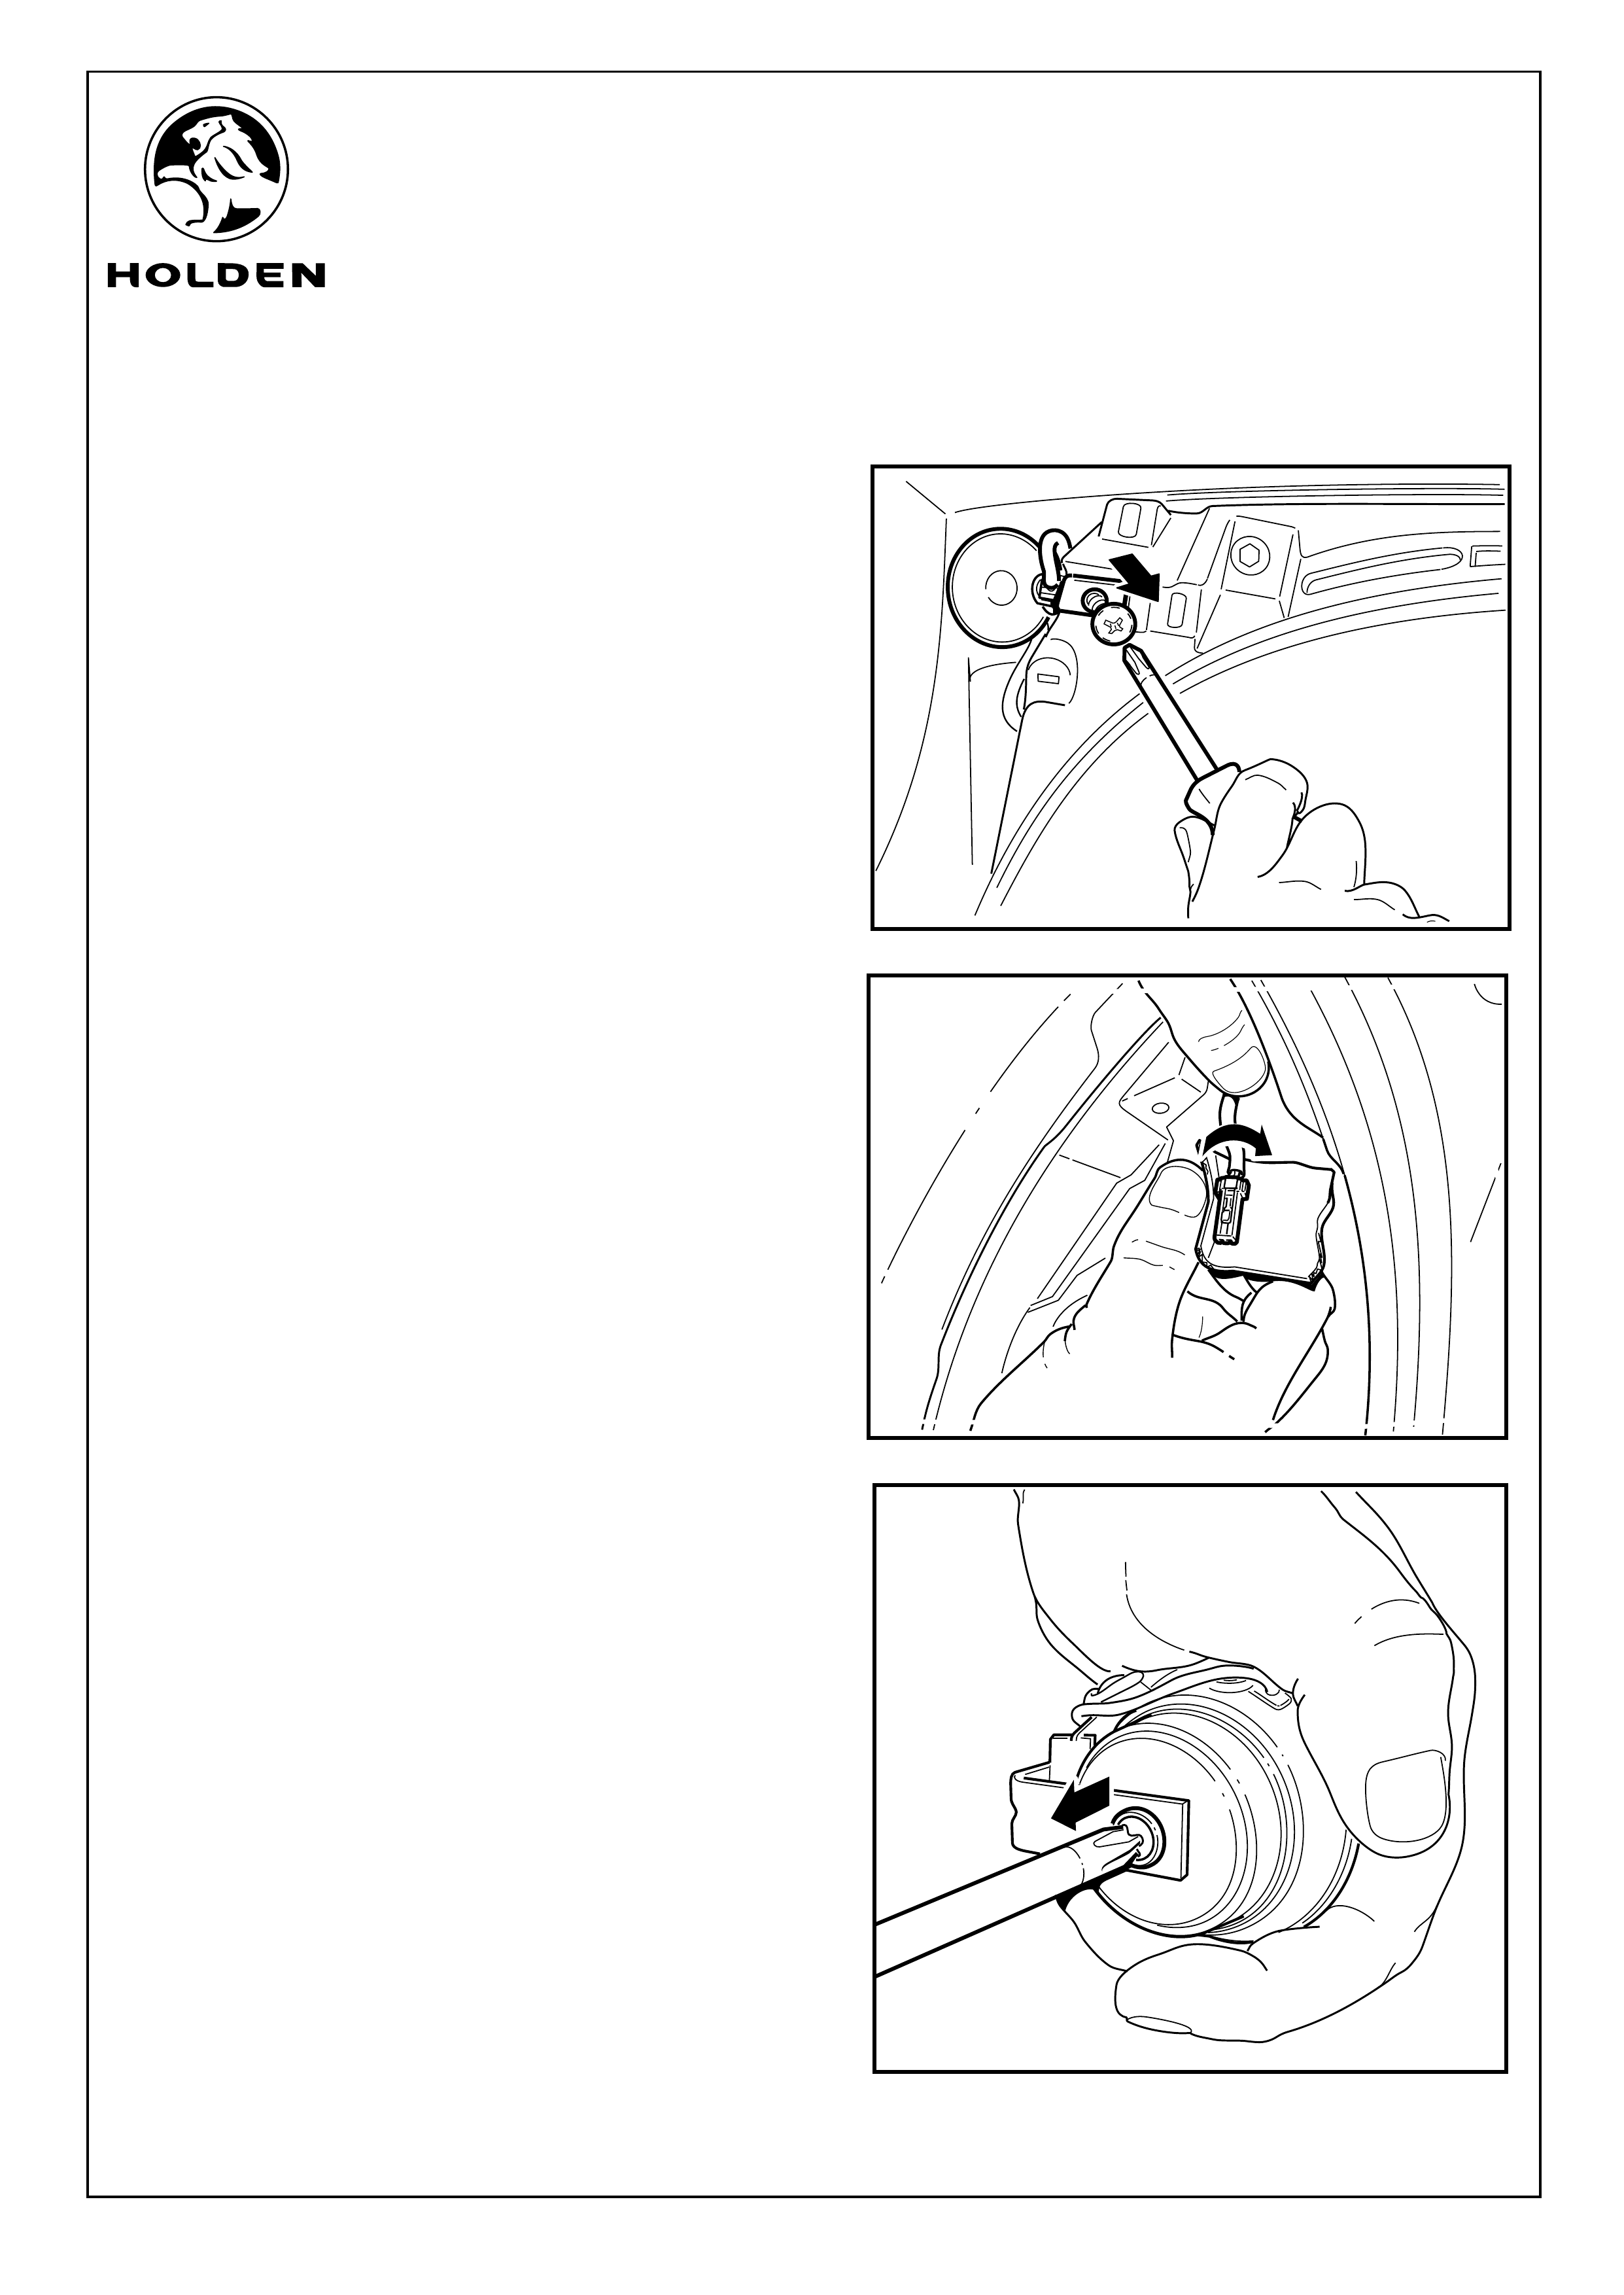
Changing the Door Speakers.
Refer to Figure 33 for the following:
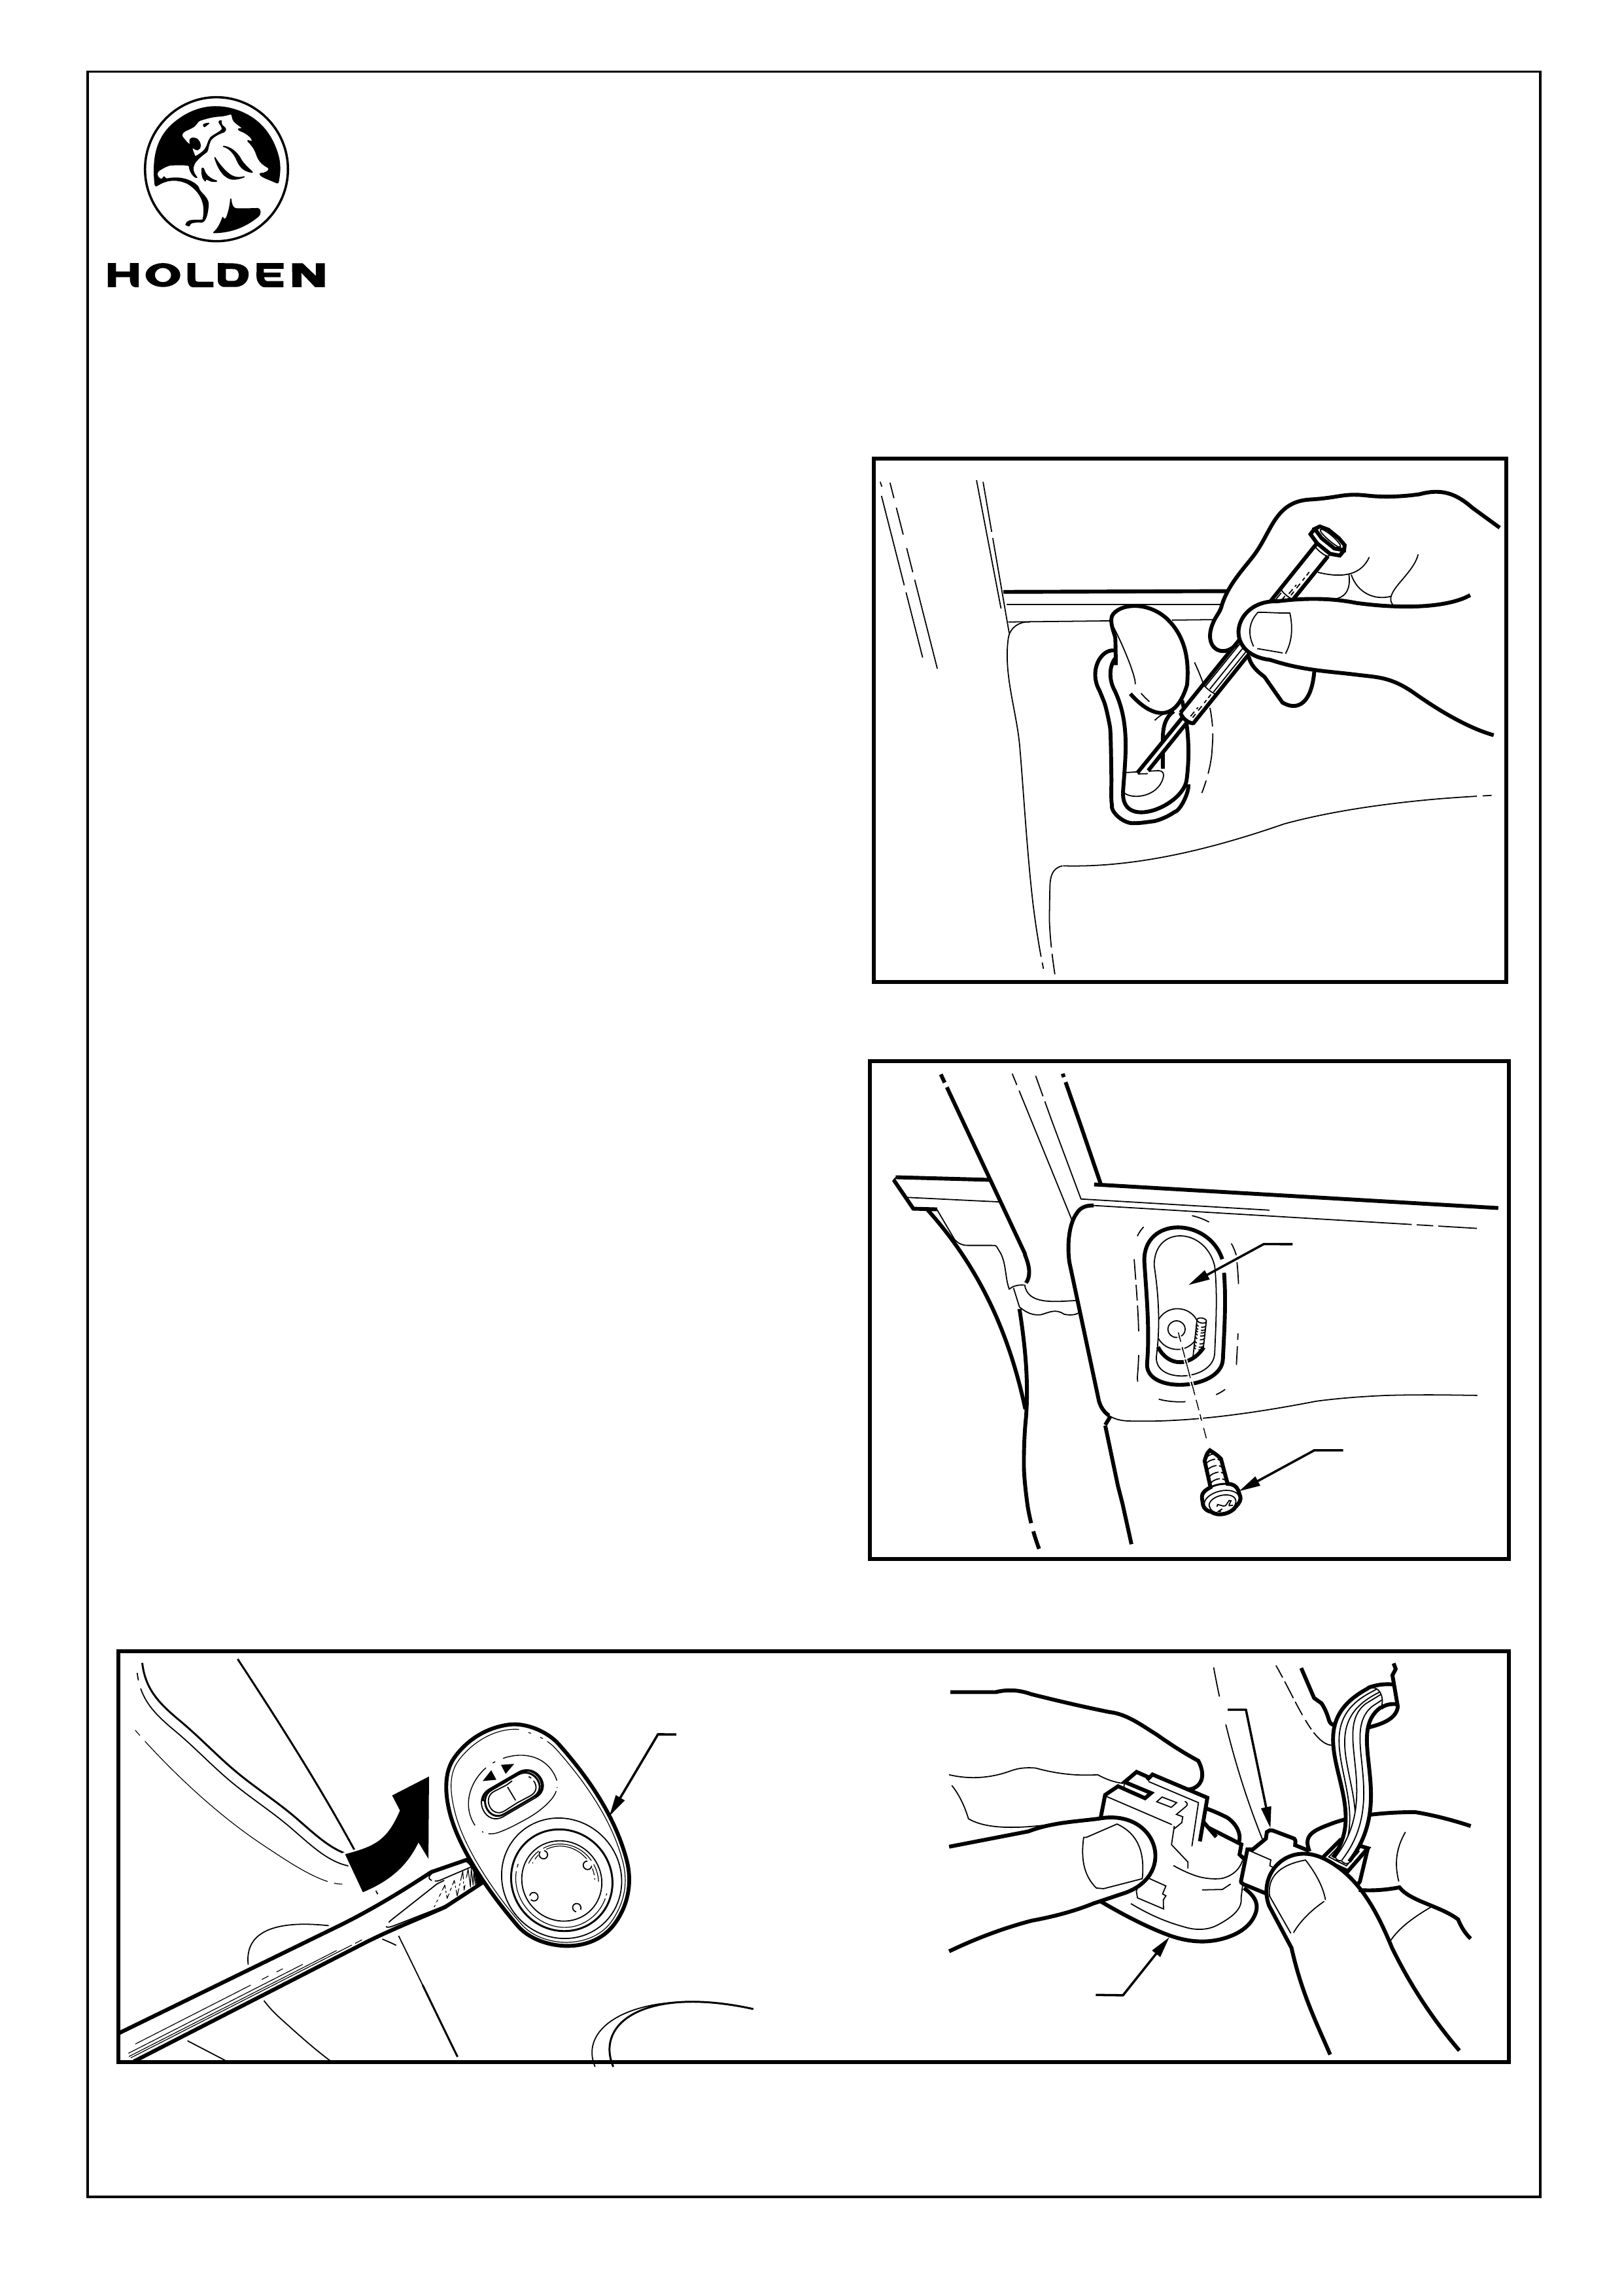
55. Fully open the door, using a small jewellers screwdriver,
release the red indicator tag from the interior door-
locking knob. The knob can now be removed.
56. Remove the screw (1) holding the knob housing (2) in
position and remove the housing from the door. Refer to
Figure 34.
On Drivers Door Only
57. Use a small flat bladed screwdriver to lever up and
release the electronic mirror control switch (1) from the
door trim and disconnect the mirror harness (2) from the
switch. Refer to Figure 35.
FIGURE 33
FIGURE 34
FIGURE 35
Page 15 of 24
2
1
1
1
1
2
FITTING INSTRUCTIONS FOR
VY & VZ COMMODORE SEDAN
SOUND SYSTEM UPGRADE
FD1283
27AU04
COPYRIGHT
Reproduction in whole or part
prohibited without written approval
HOLDEN LTD
Division of HOLDEN Ltd ACN 006 893 232
FITTING INSTRUCTIONS: - continued...
(On manual window vehicles only)
(On power window vehicles only)
(On front doors only)
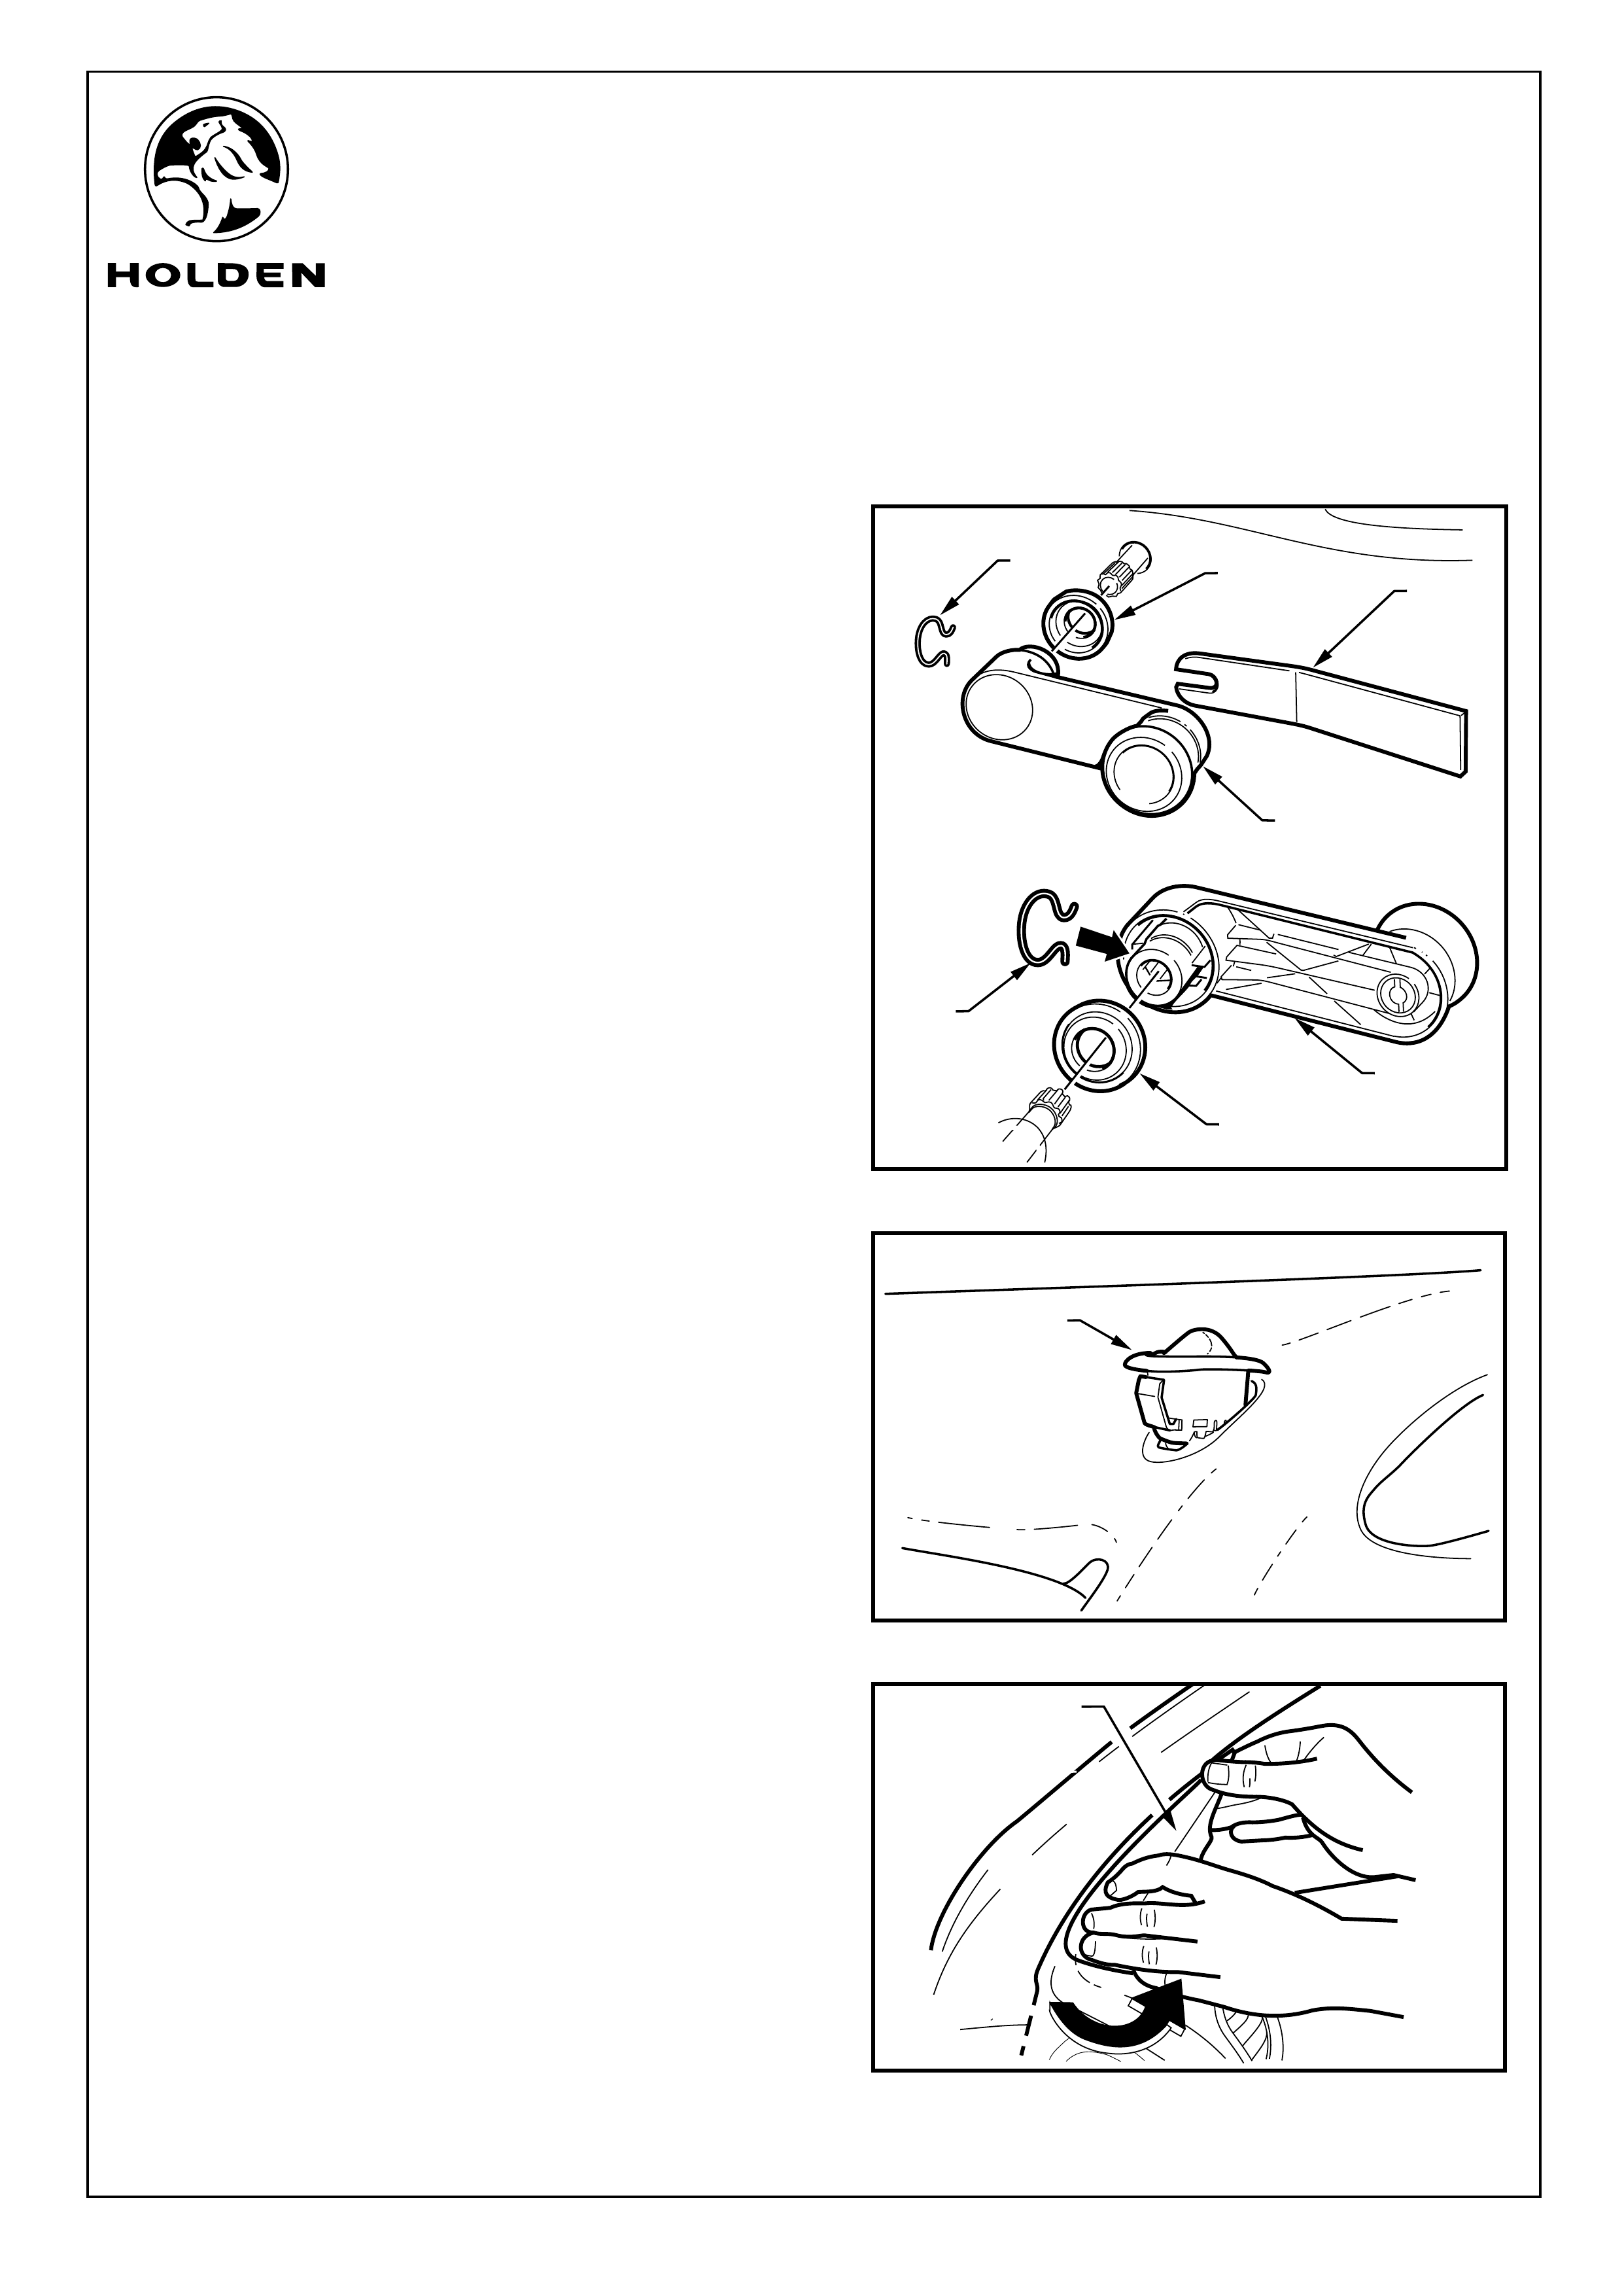
58. For vehicles fitted with manual window winders,
Remove the C-clip (1) retaining the winder handle (use a
commercially available window winder removal tool) (2)
and remove the winder (3) and spacer (4). Refit C-clip
into window winder handle ready for reinstallation. Refer
to Figure 36.
Refer to Figure 37 for the following:
59. If the rear doors of the vehicles have electric windows
remove the switch by pushing a flat-bladed screw driver
under the edge of the switch at the lower end of the
switch to release the locking clip and levering up the
switch.
60. Disconnect the body harness from the switch.
61. Remove the door demister vent (1) by pulling the front
edge of the vent outwards and rotate the top of the vent
to the rear of the door, put to one side. Refer to
Figure 38.
1
3
4
2
4
3
FIGURE 36
FIGURE 38
Page 16 of 24
1
1
FIGURE 37
1
FITTING INSTRUCTIONS FOR
VY & VZ COMMODORE SEDAN
SOUND SYSTEM UPGRADE
FD1283
27AU04
COPYRIGHT
Reproduction in whole or part
prohibited without written approval
HOLDEN LTD
Division of HOLDEN Ltd ACN 006 893 232
FIGURE 40
FITTING INSTRUCTIONS: - continued...
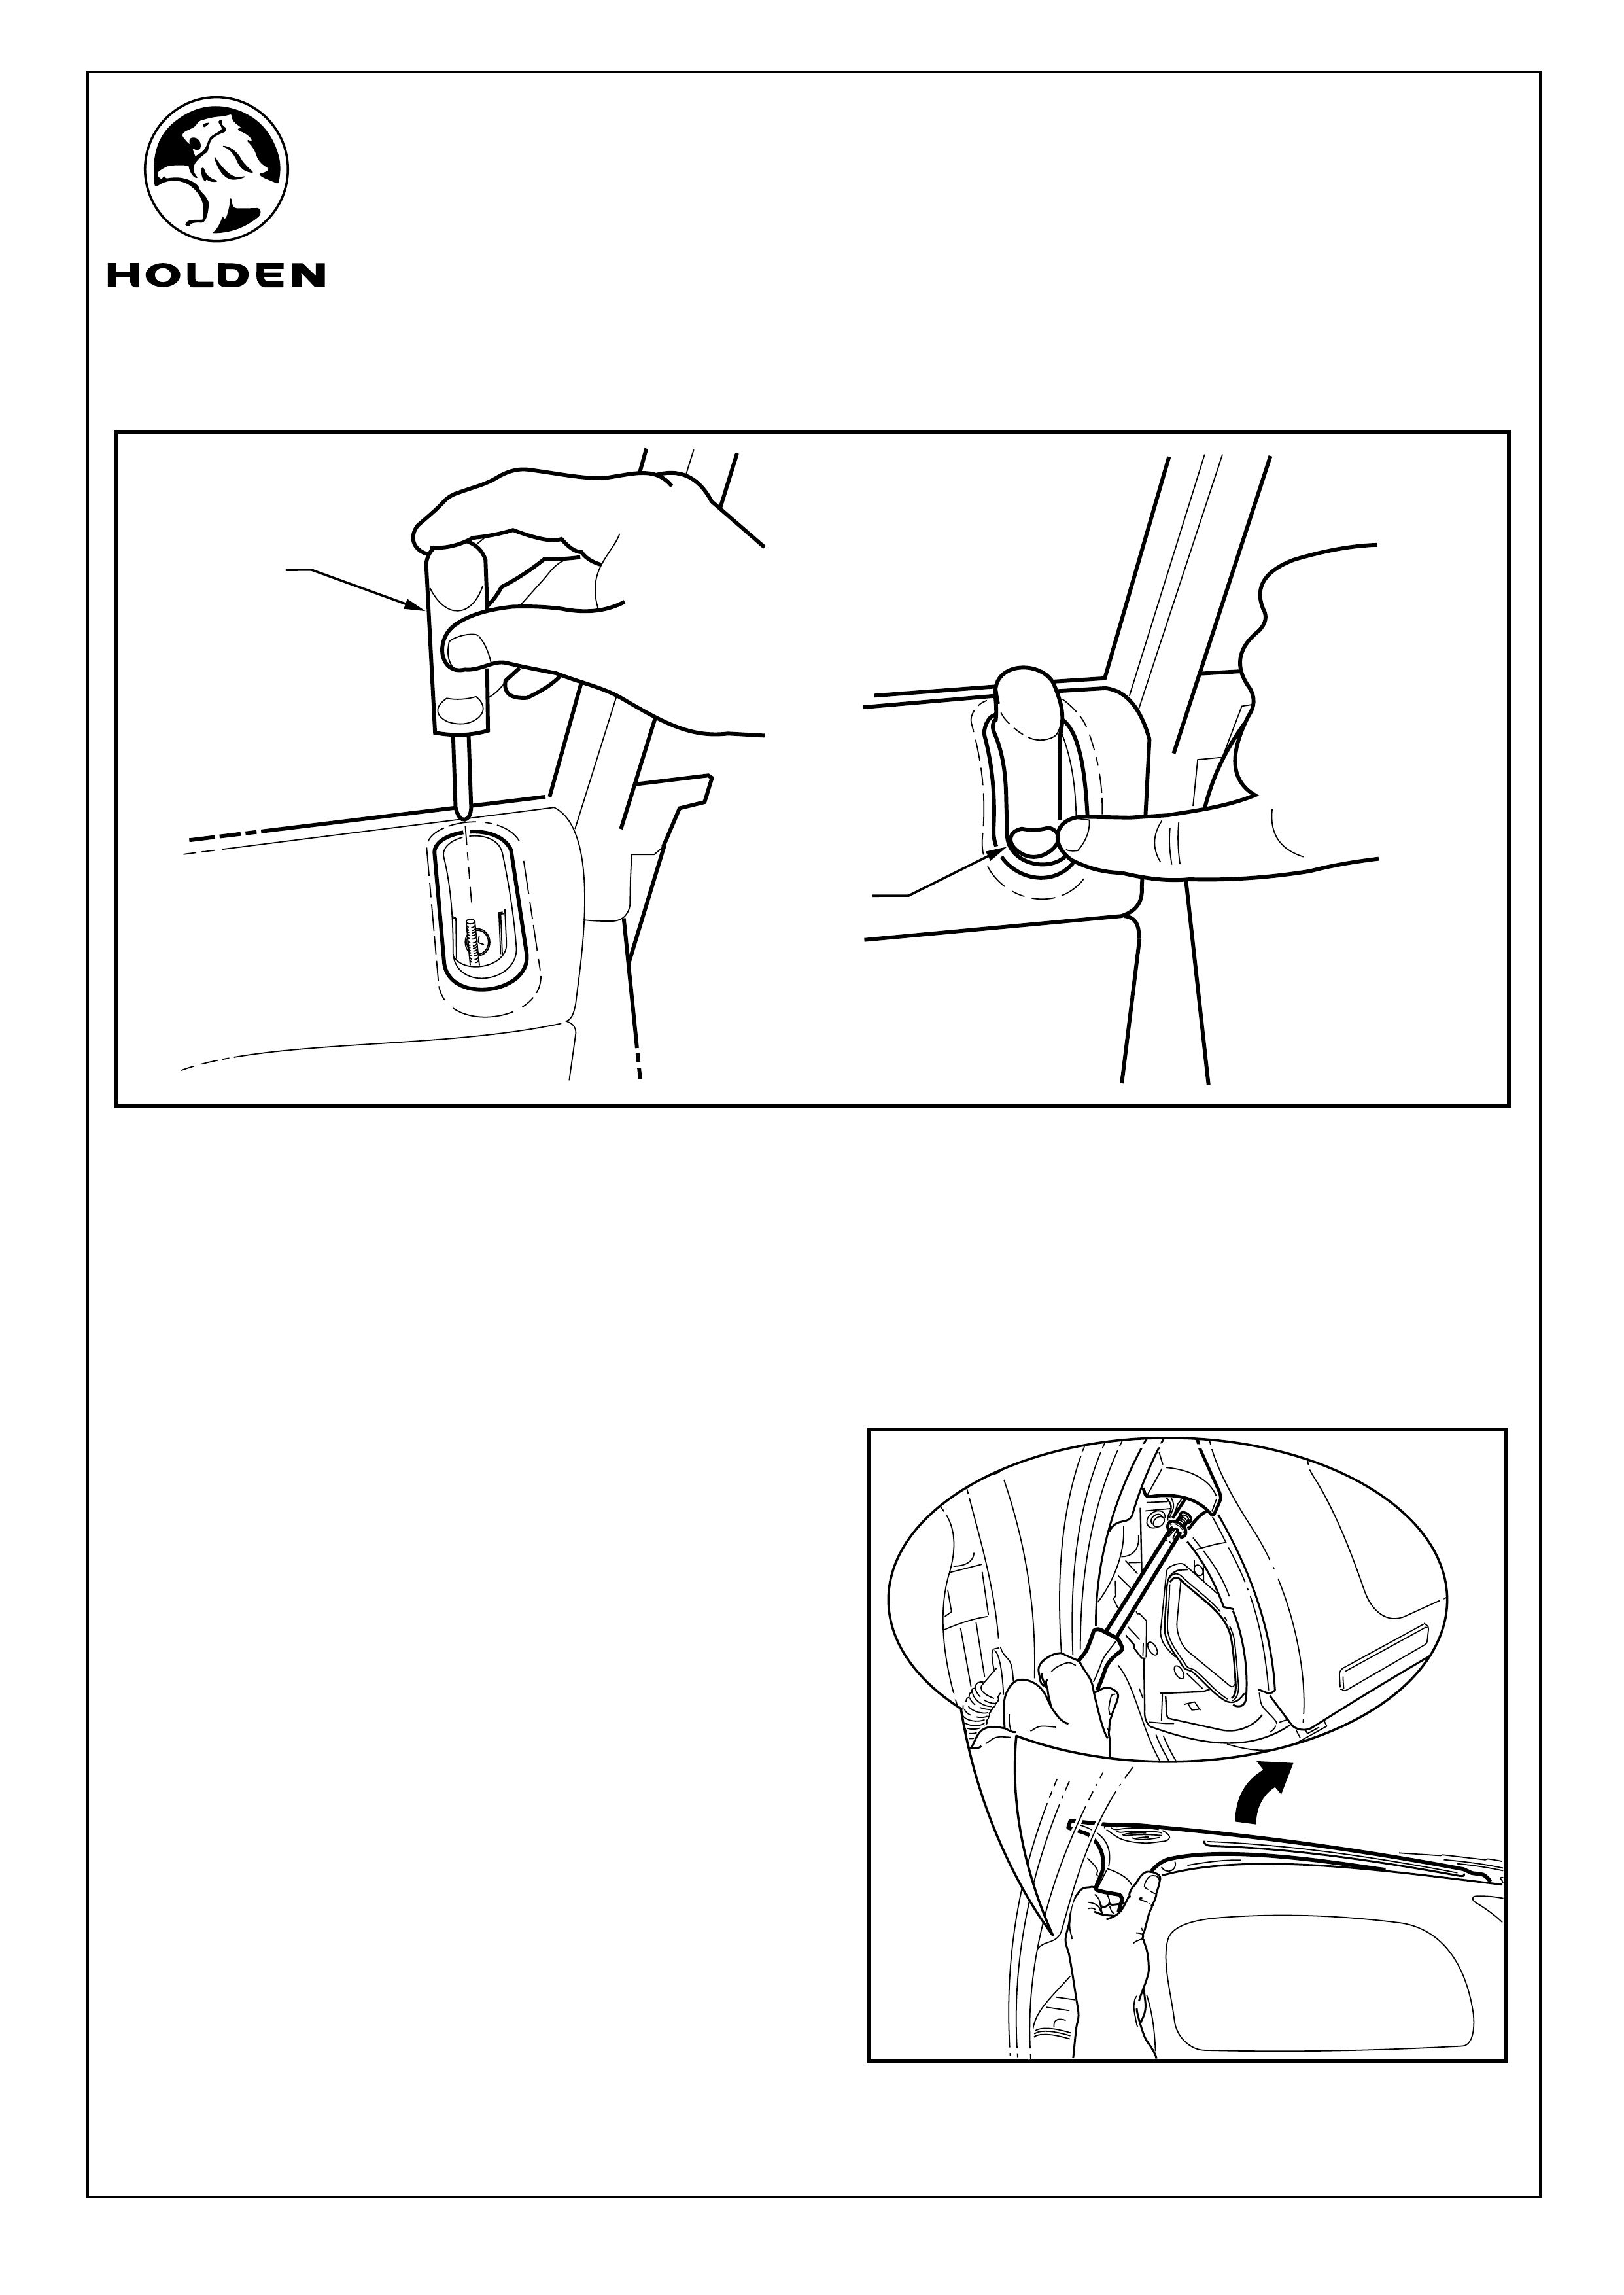
(On front doors only)
62. Remove the cap (1) covering the screw that holds the
door release handle assembly. Remove the screw and
remove the door release handle assembly. Refer to
Figure 39.
63. Remove the door trim retaining screw inside the door
handle cavity. Refer to Figure 40.
Refer to Figure 41 for the following:
64. Remove the screws (1) around the edge of the front
door trim (7 places ).
NOTE: When reassembling the front door, the four
screws (2) along the bottom edges of the door trim are
flanged headed screws.
65. Apply an outward and upward pressure to lift the front
door trim clear of the door.
FIGURE 39
1
FIGURE41
12
Page 17 of 24
FITTING INSTRUCTIONS FOR
VY & VZ COMMODORE SEDAN
SOUND SYSTEM UPGRADE
FD1283
27AU04
COPYRIGHT
Reproduction in whole or part
prohibited without written approval
HOLDEN LTD
Division of HOLDEN Ltd ACN 006 893 232
FITTING INSTRUCTIONS: - continued...
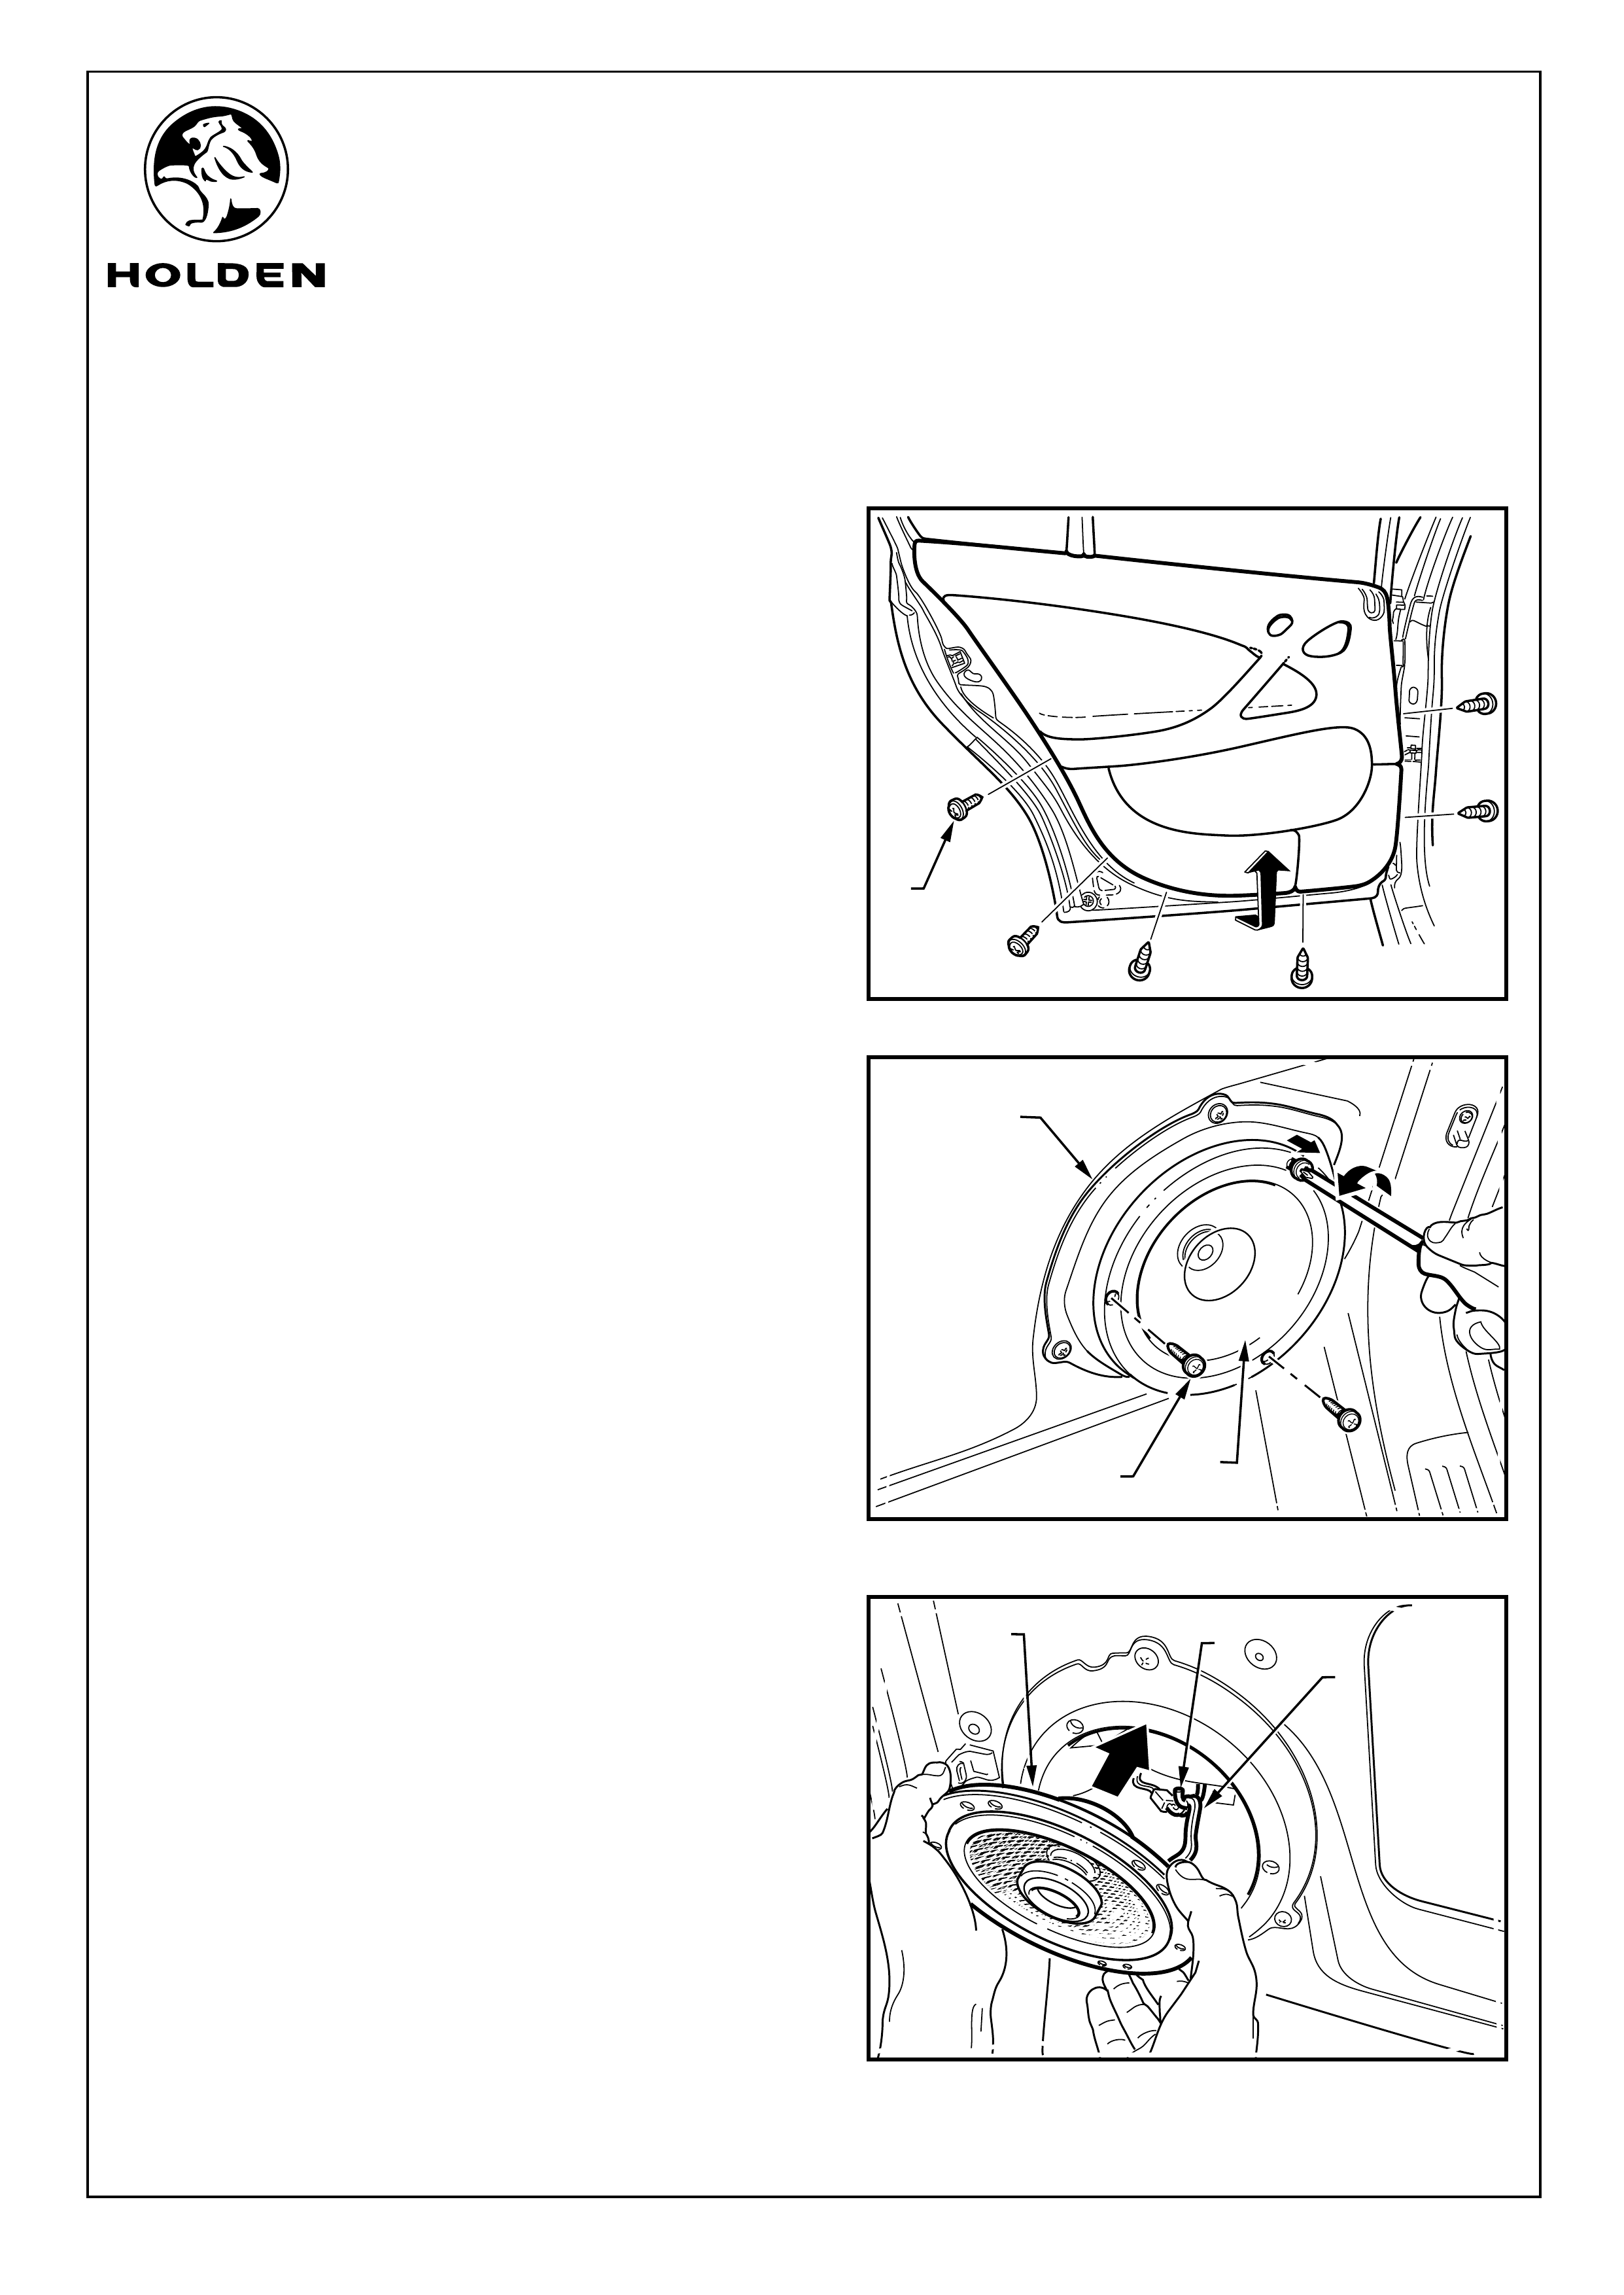
(On rear doors only)
Refer to Figure 42 for the following:
66. Remove the screws (1) around the edge of the rear door
trim (6 places ).
67. Apply an outward and upward pressure to lift the rear
door trim clear of the door.
68. Remove the screws (1) (3 places) holding the speaker
(2) to the vehicle speaker mount (3), release the
speaker wires from the retaining hook, disconnect the
speaker connector and discard the speaker. Refer to
Figure 43.
NOTE: There are two packs of door speakers, select the
correct speaker for the door you are working on. The
speakers without the built in tweeter are for the front
doors. The speakers with the built tweeter are for the
rear doors.
Refer to Figure 44 for the following:
69. Connect the replacement speaker to the door speaker
harness and hook the speaker wire of the replacement
speaker on to the hook at the back of the speaker
mount.
70. Align the speaker screw holes to the screw holes in the
speaker mount and screw into position. Tighten the
screws and back them off until the rubber surround on
the speaker shows no sign of distortion.
CAUTION: Ensure the screwdriver has a good fit in
the screw head and care is taken to minimise the
potential of the screwdriver slipping and damaging
the speaker.
FIGURE 43
Page 18 of 24
3
12
FIGURE 42
12
3
FIGURE 44
1
FITTING INSTRUCTIONS FOR
VY & VZ COMMODORE SEDAN
SOUND SYSTEM UPGRADE
FD1283
27AU04
COPYRIGHT
Reproduction in whole or part
prohibited without written approval
HOLDEN LTD
Division of HOLDEN Ltd ACN 006 893 232
FIGURE 45
Page 19 of 24
FITTING INSTRUCTIONS: - continued...
71. When refitting the door trim, ensure that the central
support bracket on the back of the door panel is located
in the bracket housing on the doors inner skin.
72. Refit all parts in reverse order, take care not to apply
force to the door speaker grilles during reinstallation.
73. To refit door-locking knob (1), position the knob onto the
threaded locking rod, allow the red indicator to sit on the
knob housing and press the red indicator tab (2). Refer
to Figure 45.
74. Repeat procedure on all doors.
75. Remove the screw fixing the windscreen to dash filler
trim in position. Lift the trim up and out from the door to
the centre of the car to remove. Repeat on the other side
of the vehicle. Refer to Figure 46.
FIGURE 46
1
2
FITTING INSTRUCTIONS FOR
VY & VZ COMMODORE SEDAN
SOUND SYSTEM UPGRADE
FD1283
27AU04
COPYRIGHT
Reproduction in whole or part
prohibited without written approval
HOLDEN LTD
Division of HOLDEN Ltd ACN 006 893 232
FITTING INSTRUCTIONS: - continued...
76. Remove the screw holding the tweeter speaker in
position. Lift out the speaker and disconnect the
speaker wire. Refer to Figure 47.
77. The vehicle tweeter harness is not use and must be
covered with foam backed tape. Remove the backing
paper from the foam-backed tape and wrap the tape
around the harness connector and tuck out of the way.
Refer to Figure 48.
Refer to Figure 49 for the following:
78. Cut the cable tie holding the speaker wire to the bracket,
remove the screw securing the speaker to the bracket.
Discard the speaker and screw.
79. Fit the replacement tweeter speaker to the bracket using
the new screw provided, align the speaker wire so that
the speaker wires are pointing straight down (the blue
dot on the face of the speaker will be at the bottom of the
speaker).
80. Fit the tweeter speakers into the vehicle. Run the
tweeter harnesses out and down towards the foot well.
81. Refit the windscreen to dashboard trim. Repeat on the
other side of the vehicle.
82. Run the tweeter speaker wire up the side of vehicle and
connect the mating tweeter connectors. Repeat on the
other side of vehicle.
FIGURE 47
FIGURE 48
Page 20 of 24
FIGURE 49
FITTING INSTRUCTIONS FOR
VY & VZ COMMODORE SEDAN
SOUND SYSTEM UPGRADE
FD1283
27AU04
COPYRIGHT
Reproduction in whole or part
prohibited without written approval
HOLDEN LTD
Division of HOLDEN Ltd ACN 006 893 232
FIGURE 50
FIGURE 51
Page 21 of 24
1
FITTING INSTRUCTIONS: - continued...
Mounting The Amplifier
83. Position the amplifier (1) so that the fuses on the unit
face the front of the vehicle and the mounting bracket is
facing towards the centre of the vehicle. Lay the
amplifier harness along the top of the amplifier to the
rear of the vehicle. Refer to Figure 50.
Refer to Figure 51 for the following:
84. Release the body harness retaining clip from the hole
the top front amplifier screw will occupy (1).
85. Pass the amplifier into the rear LHS cavity in the boot
and secure in position with the screw (2). Adjust the
angle of the amplifier until the other existing holes (3
places) align with the holes in the amplifier bracket and
fit screws (1 & 3). Do not fit the top rear screw (4) at this
stage. Tighten to the specified torque.
86. Connect the audio leads to their respective RCA
connectors on the amplifier; Channel 1 lead to Channel
1 amplifier connector and so on for all four leads. Refer
to Figure 52.
FIGURE 52
REAR
REAR
FRONT
FRONT
LEVEL
LEVEL
CROSSOVER
SELECTOR
CROSSOVER
SELECTOR
HP
HP
FLA T
FLA T LPLP
HP
HP
FLA TFLA T LPLP
100mV
100mV
100mV
100mV
8V8V
8V8V
11
44
3
3
Ch3Ch3
Ch4
Ch4
REAR
REAR
Ch1
Ch1
1
2
3.0 - 4.0 Nm
11
3
41
1
FITTING INSTRUCTIONS FOR
VY & VZ COMMODORE SEDAN
SOUND SYSTEM UPGRADE
FD1283
27AU04
COPYRIGHT
Reproduction in whole or part
prohibited without written approval
HOLDEN LTD
Division of HOLDEN Ltd ACN 006 893 232
FITTING INSTRUCTIONS: - continued...
Refer to Figure 53 for the following:
87. Connect the speaker and power connector to their
respective connectors (1) coming from the amplifier.
Push together until a click is heard.
88. Connect the earth lead to the vehicle using the top rear
amplifier fixing screw (2). Tighten to the specified
torque. This also retains the amplifier bracket.
Refer to Figure 54 for the following:
89. Gather any extra cable and cable tie together.
90. Cable tie the harnesses to the body harness (3 places).
Clip excess from cable ties.
91. Reinstall all removed components remaining in reverse
order.
92. Reconnect the battery.
93. Insert the 30 Amp fuse supplied in the kit into position
24.
94. By changing the balance and fade, ensure that all
speakers are operational.
95. Place fitting instructions in the glovebox.
FIGURE 53
FIGURE 54
Page 22 of 24
1
3.0 - 4.0 Nm
1
2
FITTING INSTRUCTIONS FOR
VY & VZ COMMODORE SEDAN
SOUND SYSTEM UPGRADE
FD1283
27AU04
COPYRIGHT
Reproduction in whole or part
prohibited without written approval
HOLDEN LTD
Division of HOLDEN Ltd ACN 006 893 232
FIGURE 55
BLAUPUNKT
BLAUPUNKT
PHASEPHASE CROSSOVERCROSSOVER GAINGAIN
Odsb 8000AOdsb 8000A
140 W140 W
Active Class D
Subwoofer-System
Active Class D
Subwoofer-System
FIGURE 56
FIGURE 57
Page 23 of 24
REAR
REAR
FRONT
FRONT
LEVEL
LEVEL
CROSSOVER
SELECTOR
CROSSOVER
SELECTOR
HPHP
FLA TFLA T LPLP
HPHP
FLA TFLA T LPLP
100mV 100mV
100mV
100mV
8V
8V
8V
8V
2
3
4
4
3
Ch3
Ch3
Ch4
Ch4
REAR
REAR
FITTING INSTRUCTIONS:
Fitting of Optional Subwoofer
NOTE: The subwoofer settings are not set at the factory and
will need to be set upon completion of the installation. Refer
to the Owners Manual for setup procedure.
Refer to Figure 55 for the following:
96. Ensure that the audio system is swiched off.
97. Remove the tree clips (4 places) holding the passenger
side boot trim. Do not remove the trim. Refer to Step 20
through 24.
98. Place the subwoofer in the boot with the tapered edge
facing towards the front of the vehicle and push it up
against the back of the seat back panel.
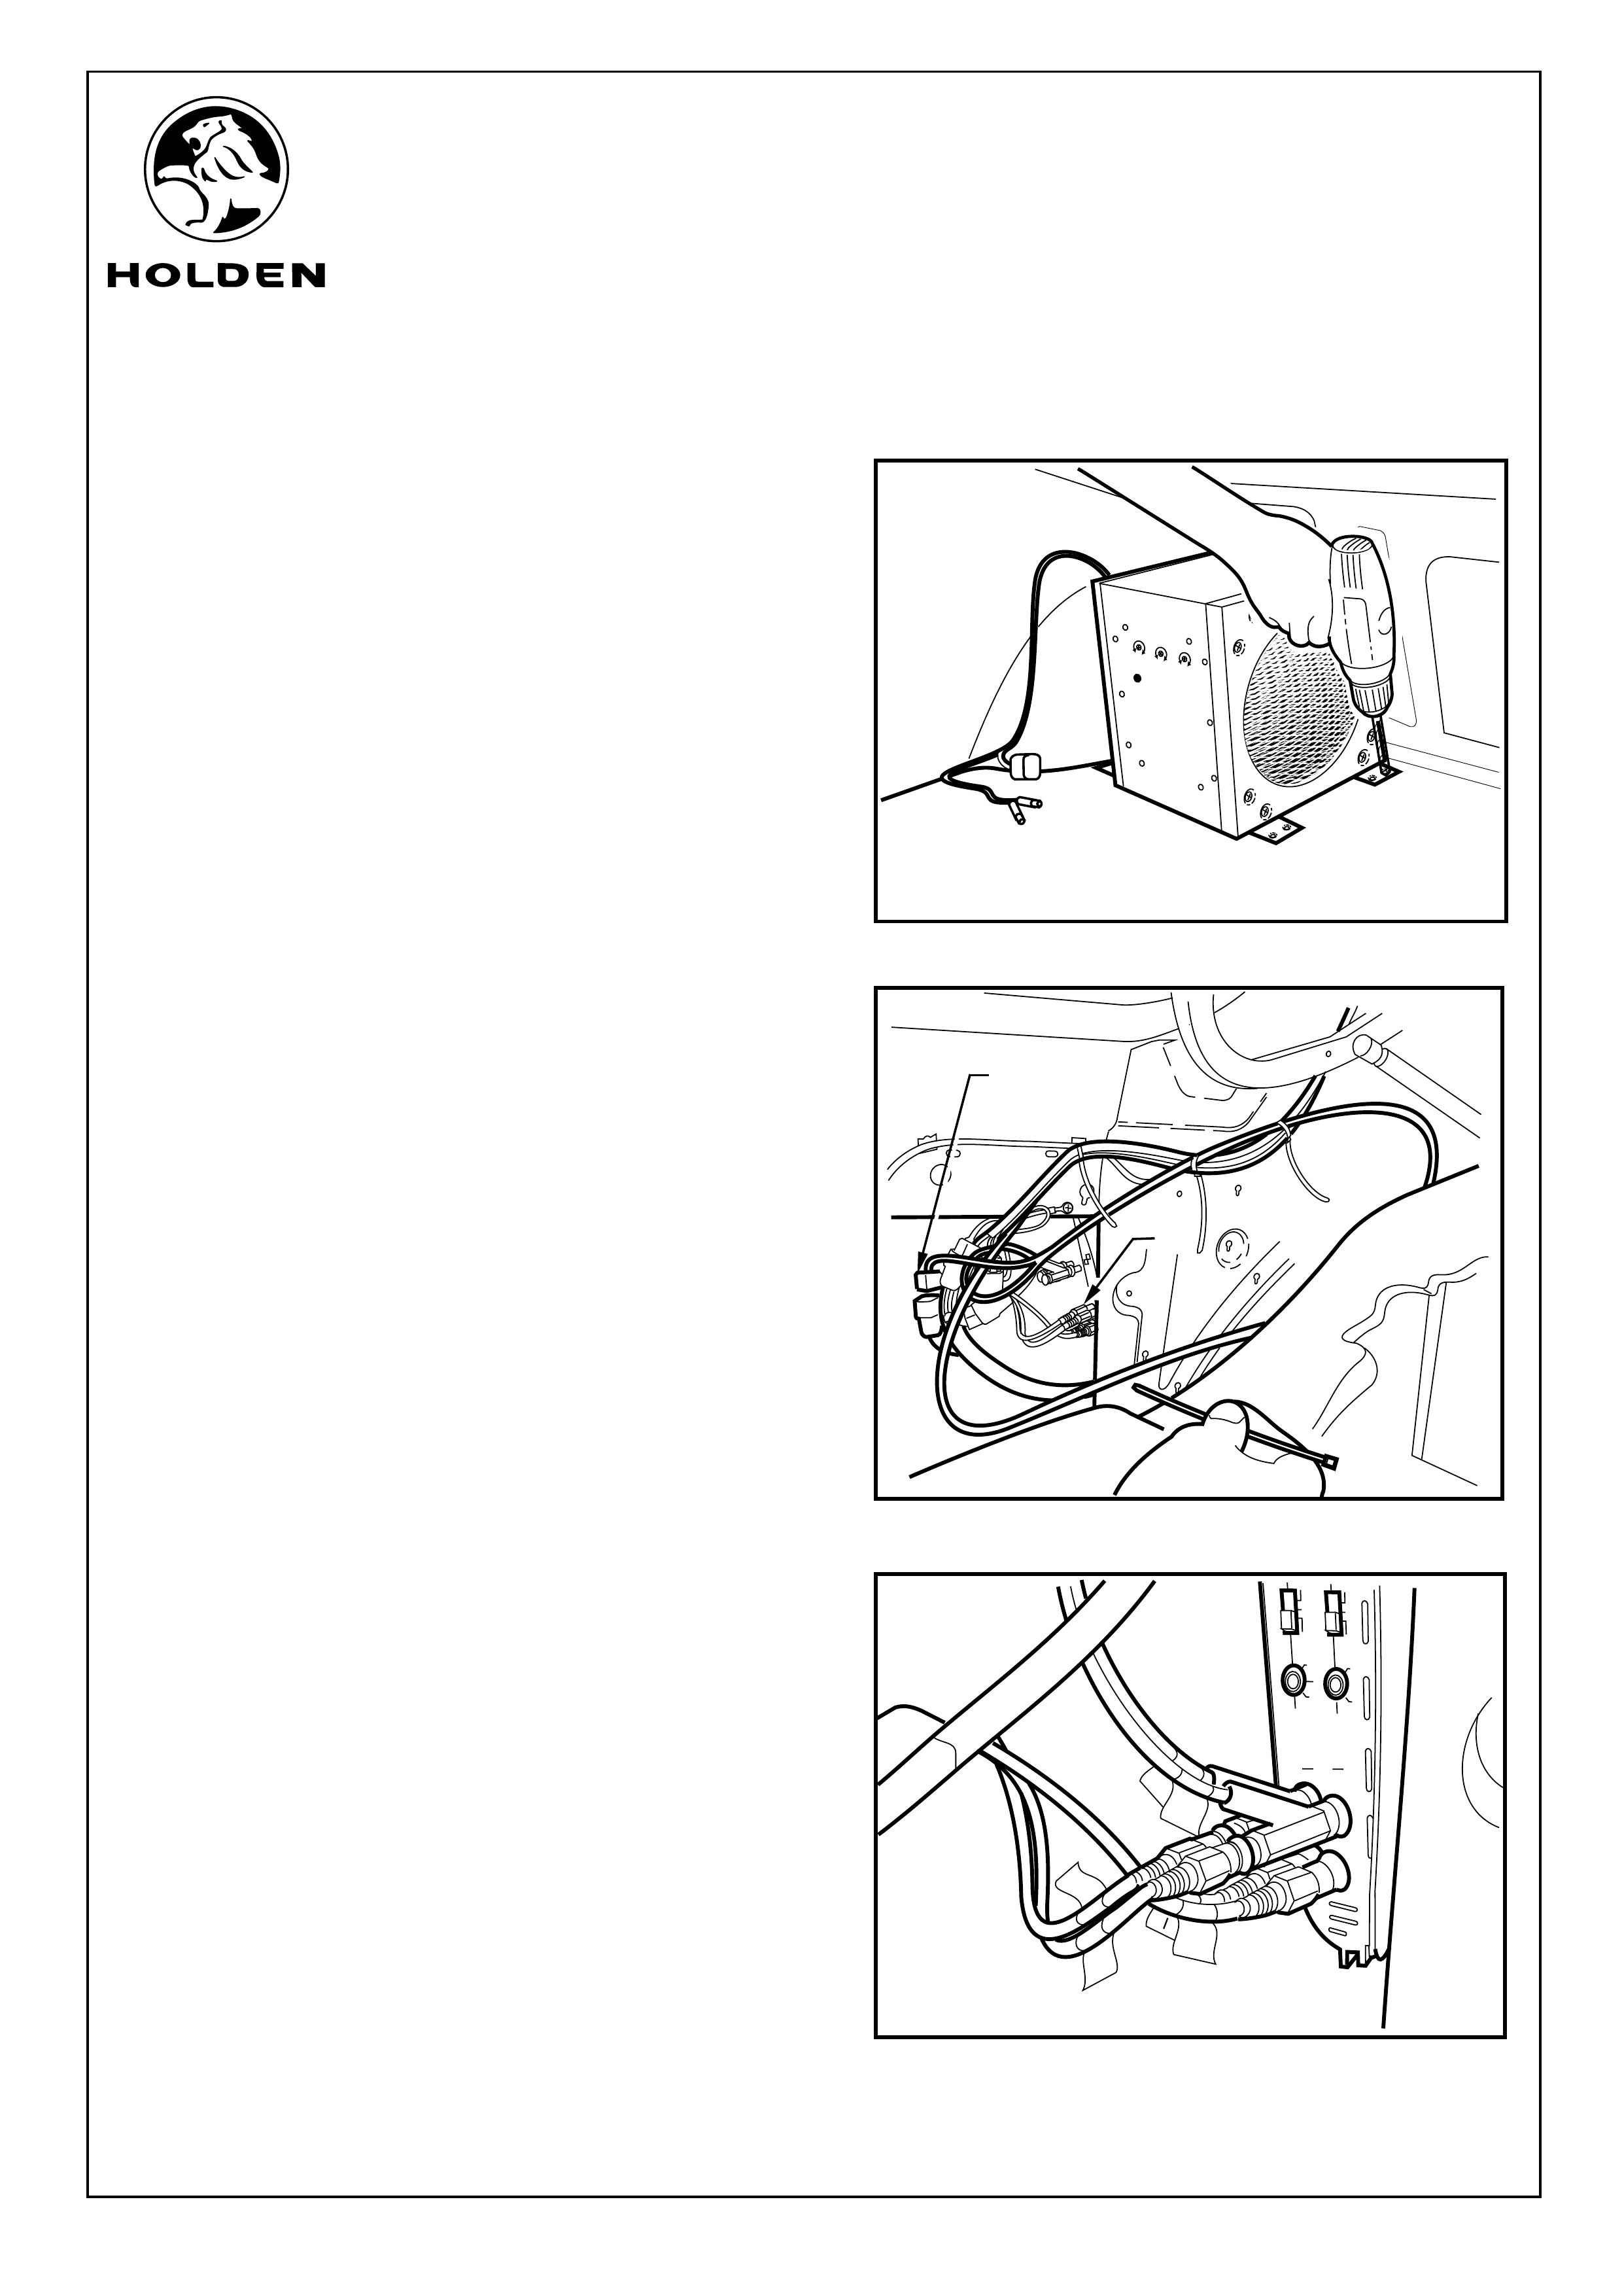
99. Use self-drilling screws to fix the subwoofer to the floor
of the boot.
100. From underneath the vehicle, apply corrosion
protection to the screw threads and to the holes made.
Refer to Figure 56 for the following:
101. Run the harness behind the loose pasenger side trim
and cable tie to the body harness.
102. Connect the subwoofer three-way connector to the
amplifier subwoofer connector.
103. Remove channel 3 and channel 4 audio leads from the
amplifier. Fit the piggyback connectors of the
subwoofer into the respective channel. Fit the audio
connectors into the back of the respective piggyback
connector. Refer to Figure 57.
104. Refit all parts removed in reverse order.
105. Turn on the audio system. Using audio controls,
maximise base and open the boot of the vehicle to
ensure that the subwoofer is fully operational. Reset
audio settings for satisfactory operation.
106. Place fitting instructions in the glovebox.
1
2

FITTING INSTRUCTIONS FOR
VY & VZ COMMODORE SEDAN
SOUND SYSTEM UPGRADE
FD1283
27AU04
COPYRIGHT
Reproduction in whole or part
prohibited without written approval
HOLDEN LTD
Division of HOLDEN Ltd ACN 006 893 232
PARTS LIST
PART NUMBER DESCRIPTION QUANTITY
92177446 SOUND SYSTEM UPGRADE 1
FD796 PROOF OF WARRANTY CARD 1
NOT PROVIDED IN KIT BUT AVAILABLE SEPARATELY
92171327 FRONT DOOR SPEAKER 2
92171328 REAR DOOR SPEAKER 2
FRONT TWEETER SPEAKERS 2
92171330 AMPLIFIER 1
92171331 WIRING HARNESS 1
NS CONVERTER BOX 2
92148974 SMALL PARTS KIT 1
SCREW - SELF TAPPING 8Gx12mm 4
SCREW - SELF TAPPING 10Gx16mm 1
BOLT - PAN HEAD 2
CABLE TIES 20
30 AMP FUSE 1
CLEANING PAD 1
FCA LEAD 1.5m 2
FOAM TAPE - 60mm 2
FOAM TAPE - 200mm 1
FD1283 FITTING INSTRUCTIONS 1
FD1282 OWNERS MANUAL 1
91277447 SUBWOOFER KIT 1
92171329 SUBWOOFER 1
NS SMALL PARTS KIT 1
SCREWS - 10Gx30 BLACK SELF DRILLING 6
CABLE TIES - 100mm 5
Page 24 of 24