FD1209
01DEC04
COPYRIGHT
Reproduction in whole or part
prohibited without written approval
HOLDEN LTD
Division of HOLDEN Ltd ACN 006 893 232
FITTING INSTRUCTIONS FOR
XC BARINA ROOF BARS
Page 1 of 4
IMPORTANT:
The behaviour and response of the vehicle will be influenced when roof bars are fitted and a load is being carried.
Adjust driving to suit the load carried and the current driving conditions.
Do not exceed the maximum permitted roof load and the maximum load of the roof bars (70 kg).
Periodically check that the roof bars are securely attached to the vehicle and that the load is securely attached to the
roof bars.
Do not damage the rear antenna.
Use straps or ropes to secure the load. Do not use elastic cords.
Secure long loads at the front and rear of the vehicle.
Stack items to minimize the lifting effect.
Evenly distribute the load on the roof bars.
Keep the load within the width of the bars.
Keep the load and its centre of gravity as low as practicable.
Remove loose/removeable items from the load.
Remove the roof bars if they are not being used for an extended period of time. Store all components together.
Part No. 92147908
FD1209
01DEC04
COPYRIGHT
Reproduction in whole or part
prohibited without written approval
HOLDEN LTD
Division of HOLDEN Ltd ACN 006 893 232
FITTING INSTRUCTIONS FOR
XC BARINA ROOF BARS
TOOLS REQUIRED:
Phillips Head Screwdriver, Security Allen Key (included).
FITTING INSTRUCTIONS:
Refer to Figure 1 for the following:
1. Remove the roof bar mounting point cover (1) (4 places)
and place in the glovebox.
2. Ensure that the roof bar mounting points are free from
debris.
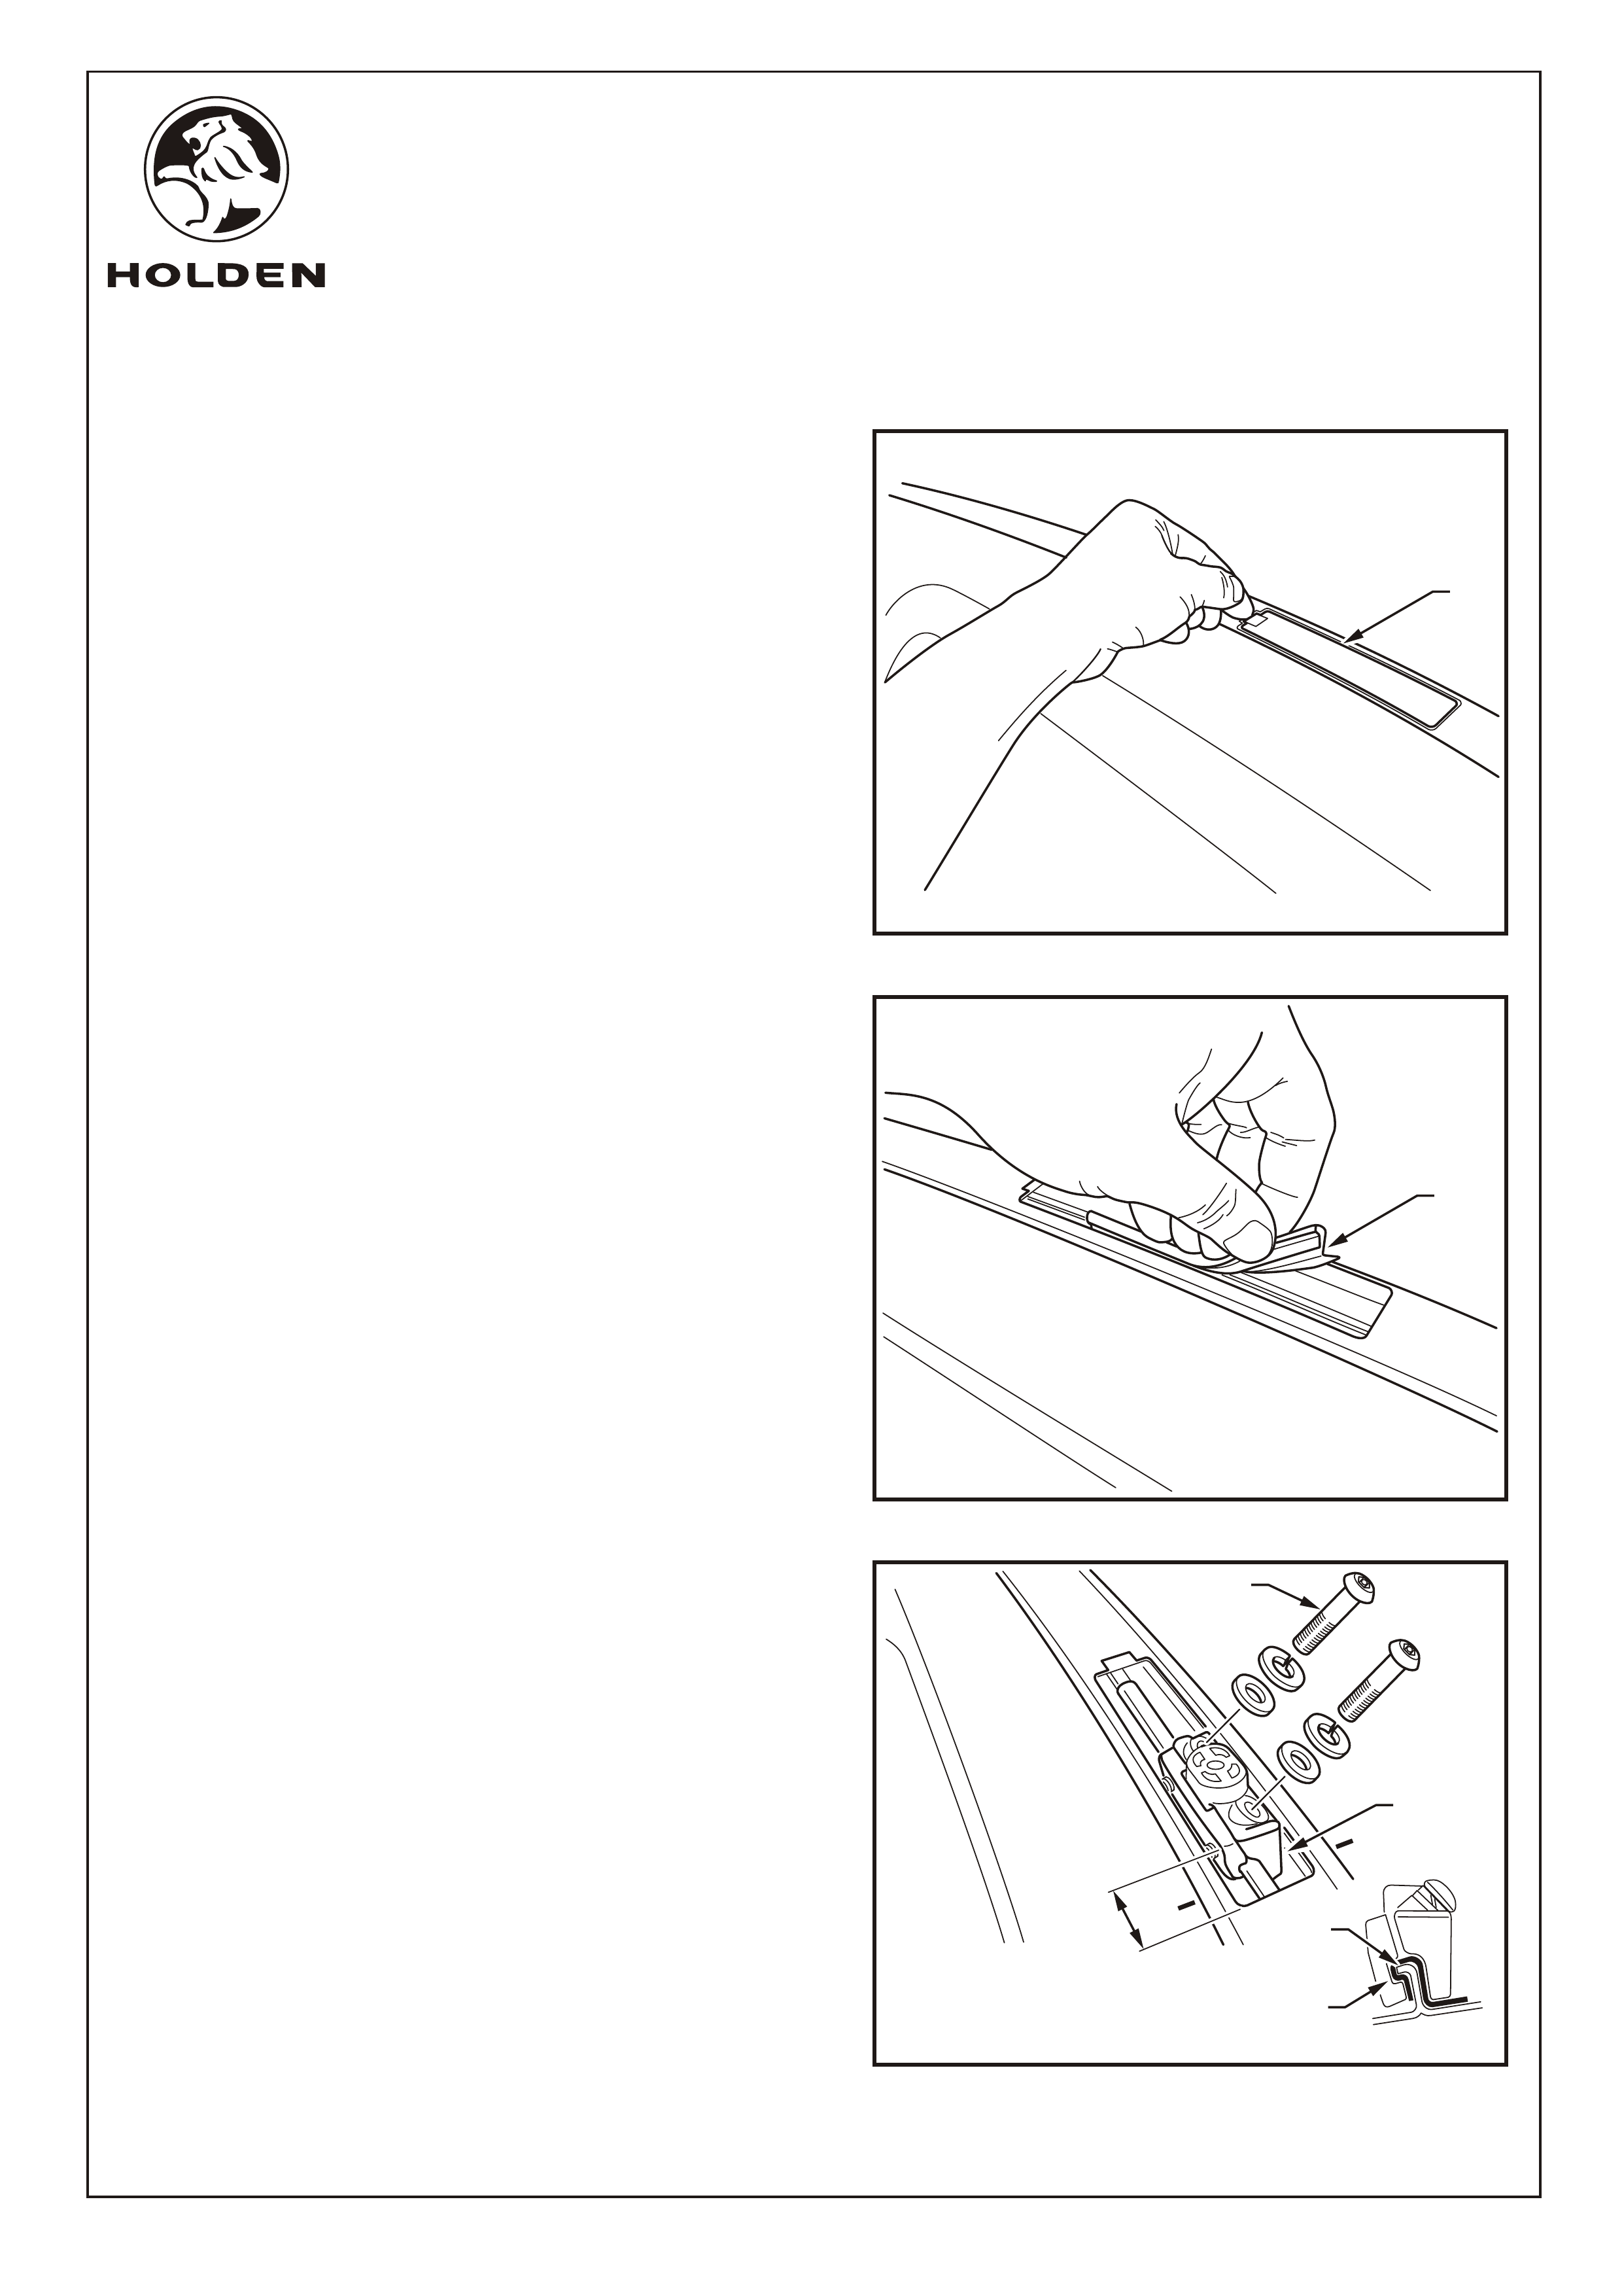
Refer to Figure 2 for the following:
3. Place the rubber strip on the roof ridge (4 places).
Refer to Figure 3 for the following:
4. Position the roof bar mounting blocks (1) (4 places) onto
the body seam so that the two side screws (2) are on the
side towards the centre of the vehicle.
5. Ensure that the mounting block is 20mm from the end of
the roof bar mounting hole.
6. Ensure that the recess in the outer mounting block (3) is
seated on the lip of the body seam (4).
7. Securely tighten the screws.
FIGURE 3
FIGURE 2
FIGURE 1
2
20mm
1
A
A
A-A
SECTION
4
3
1
1
Page 2 of 4
FD1209
01DEC04
COPYRIGHT
Reproduction in whole or part
prohibited without written approval
HOLDEN LTD
Division of HOLDEN Ltd ACN 006 893 232
FITTING INSTRUCTIONS FOR
XC BARINA ROOF BARS
FIGURE 6
FITTING INSTRUCTIONS: - continued...
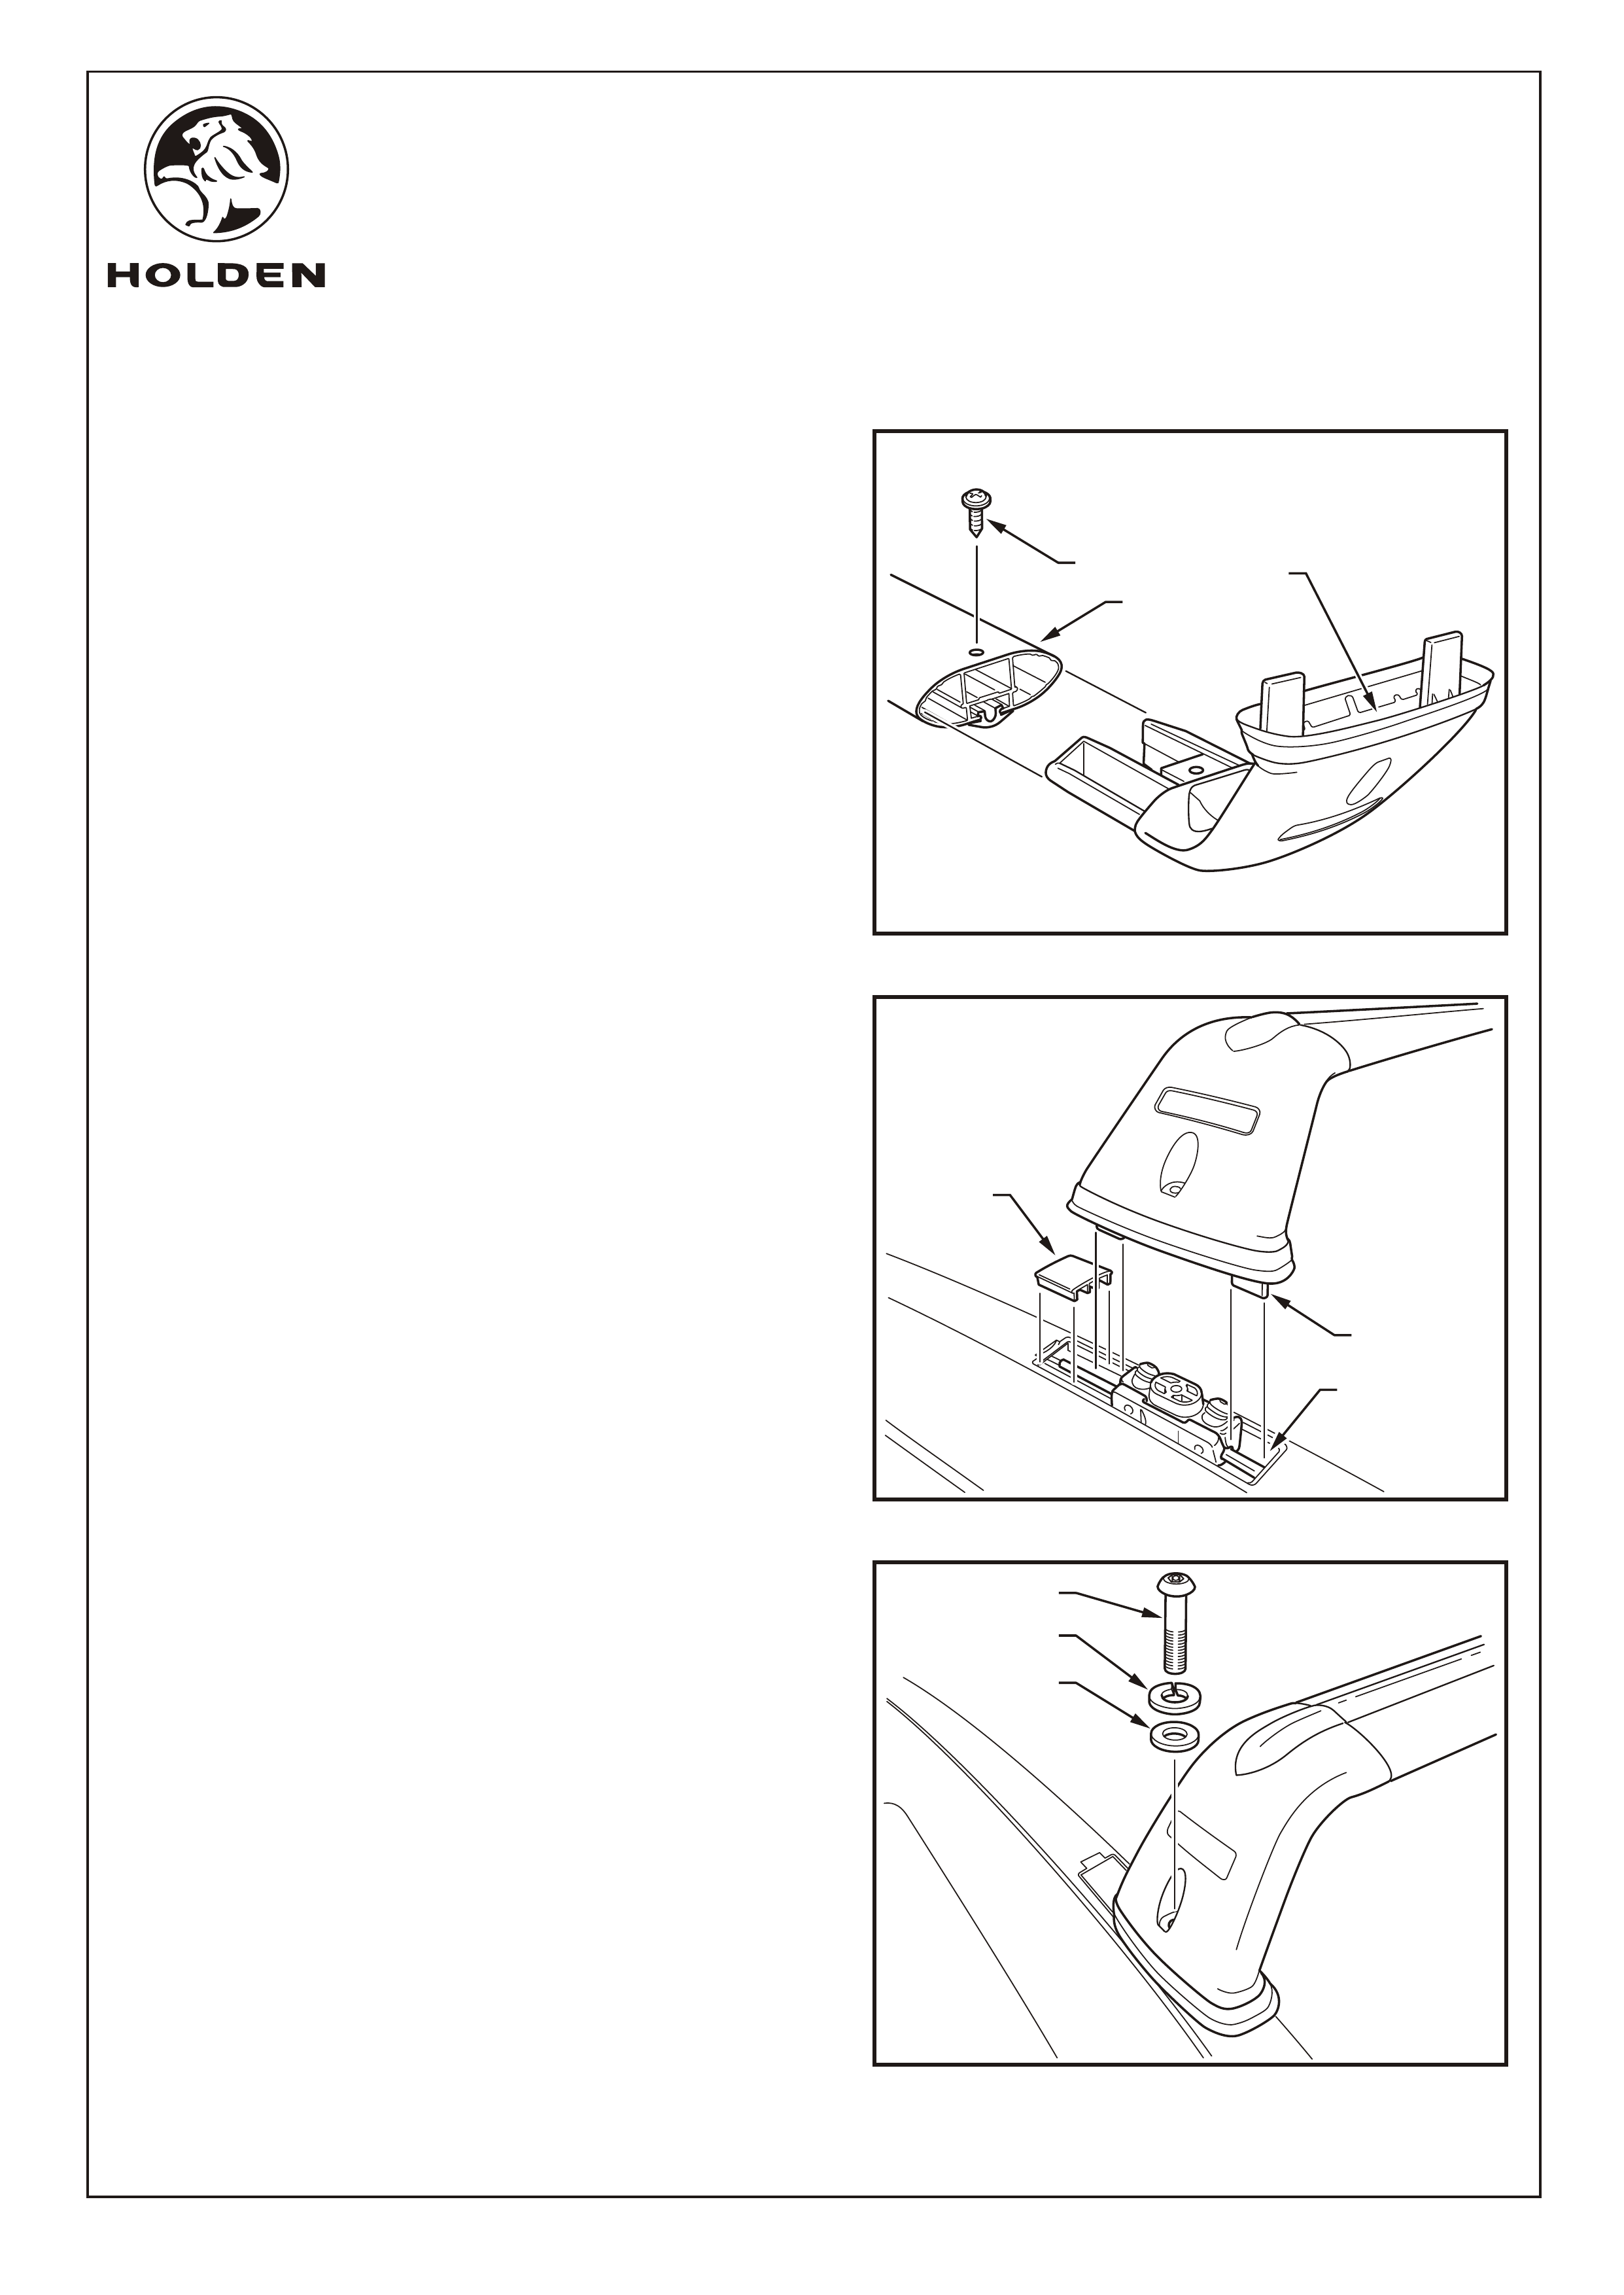
Refer to Figure 4 for the following:
NOTE: The number identifying the mounting foot is
located within the cavity underneath (1).
8. Insert a mounting foot labelled "1" and a mounting foot
labelled "2" in each of the roof bars (2) (2 places).
9. Securely tighten the self-tapping screw (3) (4 places).
Refer to Figure 5 for the following:
NOTE: The front bar and rear bar are different lengths.
10. Place the cover (1) at the end of the roof bar mounting
hole (4 places).
11. Position the front roof bar on its mounting blocks. Ensure
that the mounting foot labelled "1" is at the front left
mounting block.
12. Locate the rear roof bar on its mounting blocks. Ensure
that the mounting foot labelled "1" is at the rear left
mounting block.
13. Ensure that both tabs (2) on each mounting foot are
inside the body seam (3) (4 places).
Refer to Figure 6 for the following:
14. Insert the flat washer (1), spring washer (2) and security
screw (3) into the hole in the roof bar support. Securely
tighten the roof bar mounting screw.
15. Place the security allen key and the fitting instructions in
the glovebox.
FIGURE 5
FIGURE 4
3
2
1
3
2
1
1
2
3
Page 3 of 4
FD1209
01DEC04
COPYRIGHT
Reproduction in whole or part
prohibited without written approval
HOLDEN LTD
Division of HOLDEN Ltd ACN 006 893 232
FITTING INSTRUCTIONS FOR
XC BARINA ROOF BARS
Page 4 of 4
PARTS LIST
PART NUMBER DESCRIPTION QUANTITY
92147908 ROOF BAR KIT - XC BARINA 1
FD1209 FITTING INSTRUCTION 1
FD796 PROOF OF WARRANTY CARD. 1
NS ROOF BAR (INCLUDING RUBBER STRIP) 2
NS MOUNTING FOOT "1" (INCLUDING BASE SEAL) 2
NS MOUNTING FOOT "2" (INCLUDING BASE SEAL) 2
NS MOUNTING BLOCK - INNER 4
NS MOUNTING BLOCK - OUTER 4
NS MOUNTING HOLE COVER 4
NS RUBBER STRIP 4
NS SECURITY SCREW M6 12
NS FLAT WASHER M6 12
NS SPRING WASHER M6 12
NS SECURITY ALLEN KEY 1
FITTING INSTRUCTIONS: - continued...
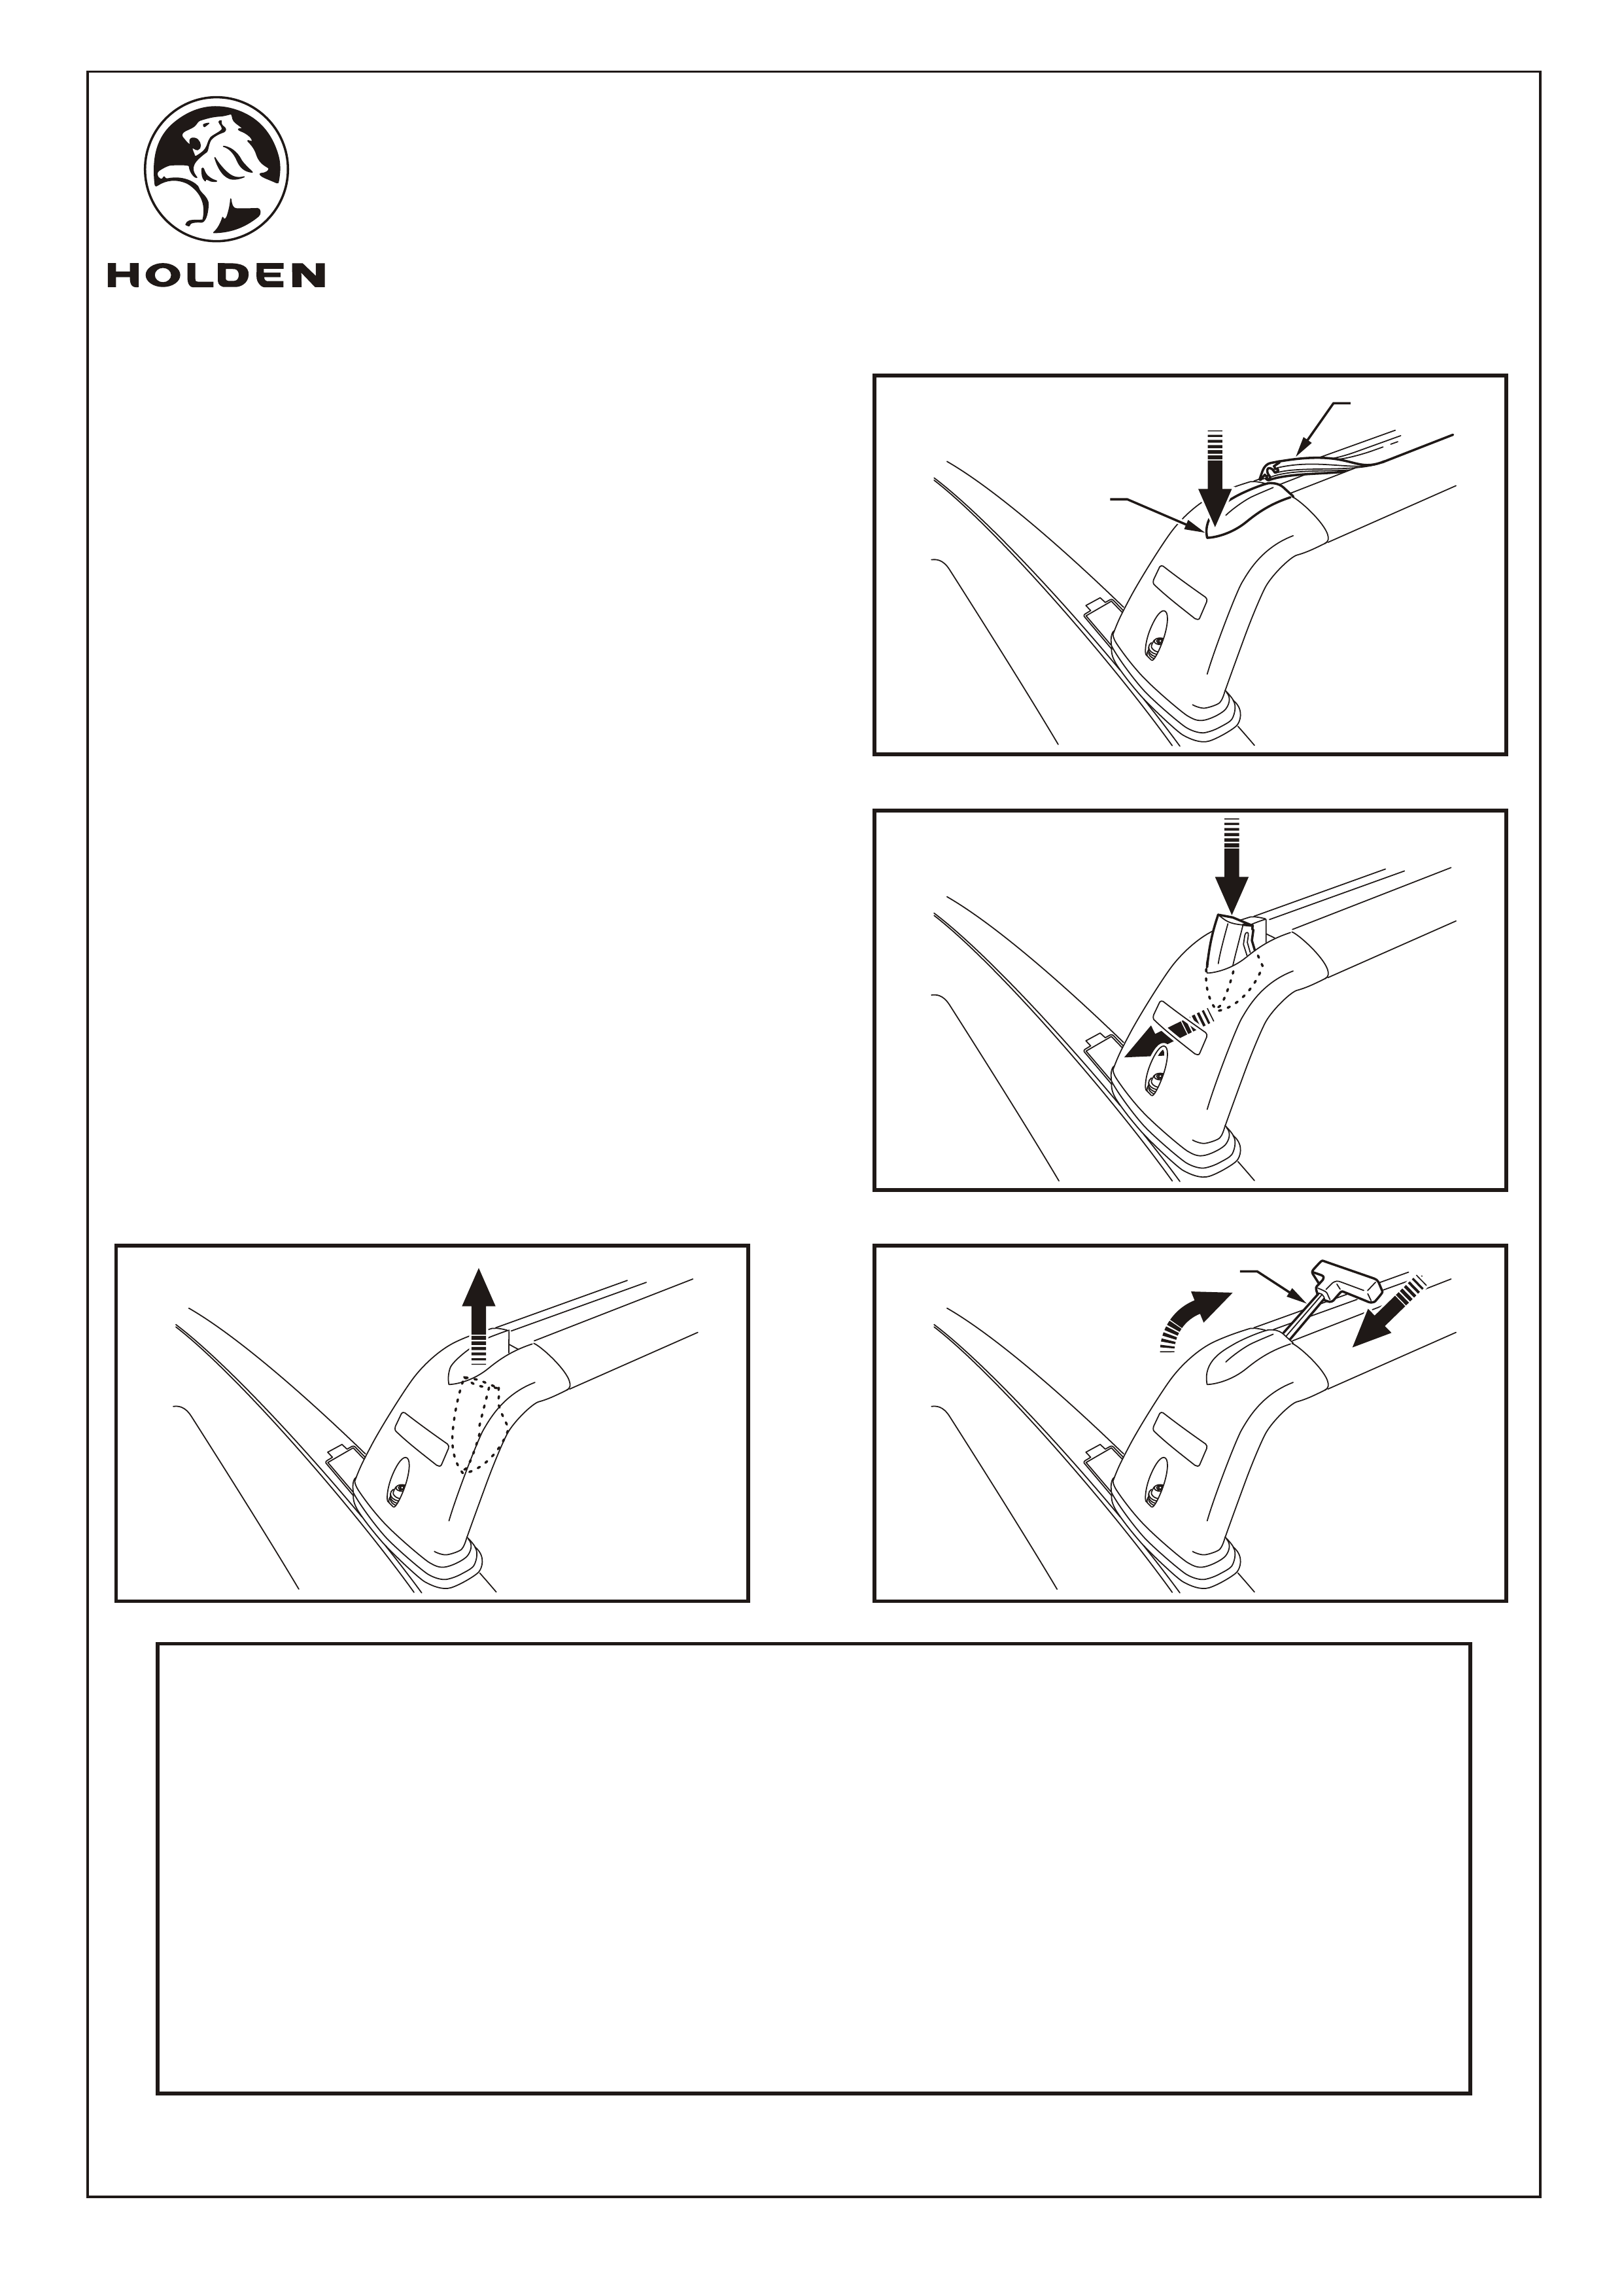
To Fit Accessories to the Roof Bar Slots:
Refer to Figure 7 for the following:
17. Peel back the rubber top strip (1).
NOTE: To fit accessories, remove the rubber top strip
from the roof bars. If required, cut the rubber top strip to
length to fill the visible slots.
18. Press down on the outer edge (2) of the roof bar cap and
rotate outwards.
Refer to Figure 8 for the following:
20. From underneath the roof bar support, pull the roof bar
cap towards the outside of the vehicle whilst pressing
downwards on the roof bar cap until it snaps out of
position.
21. Fit the accessories as required.
Refer to Figure 9 for the following:
22. Lift the roof bar cap until it snaps into position.
Refer to Figure 10 for the following:
23. Rotate the roof bar cap towards the roof bar.
24. Using the security Allen key (1), press on the tang to
snap the roof bar cap into the closed position.
25. Refit the rubber top strip. FIGURE 8
FIGURE 7
FIGURE 10FIGURE 9
1
1
2