Page 1 of 8
G682
FITTING INSTRUCTIONS FOR
XC COMBO, TRAILER HARNESS PACKAGE
Part No. 92146212
HOLDEN SERVICE PARTS OPERATIONS
Division of HOLDEN Ltd ACN 006 893 232
Reproduction in whole or part
prohibited without written approval
COPYRIGHT
FD1099
19SE02
Page 2 of 8
TOOLS REQUIRED:
Flat Bladed Screw Driver, T25 Torx Bit, Phillips Head
Screwdriver, 7mm Socket/Spanner.
FITTING INSTRUCTIONS:
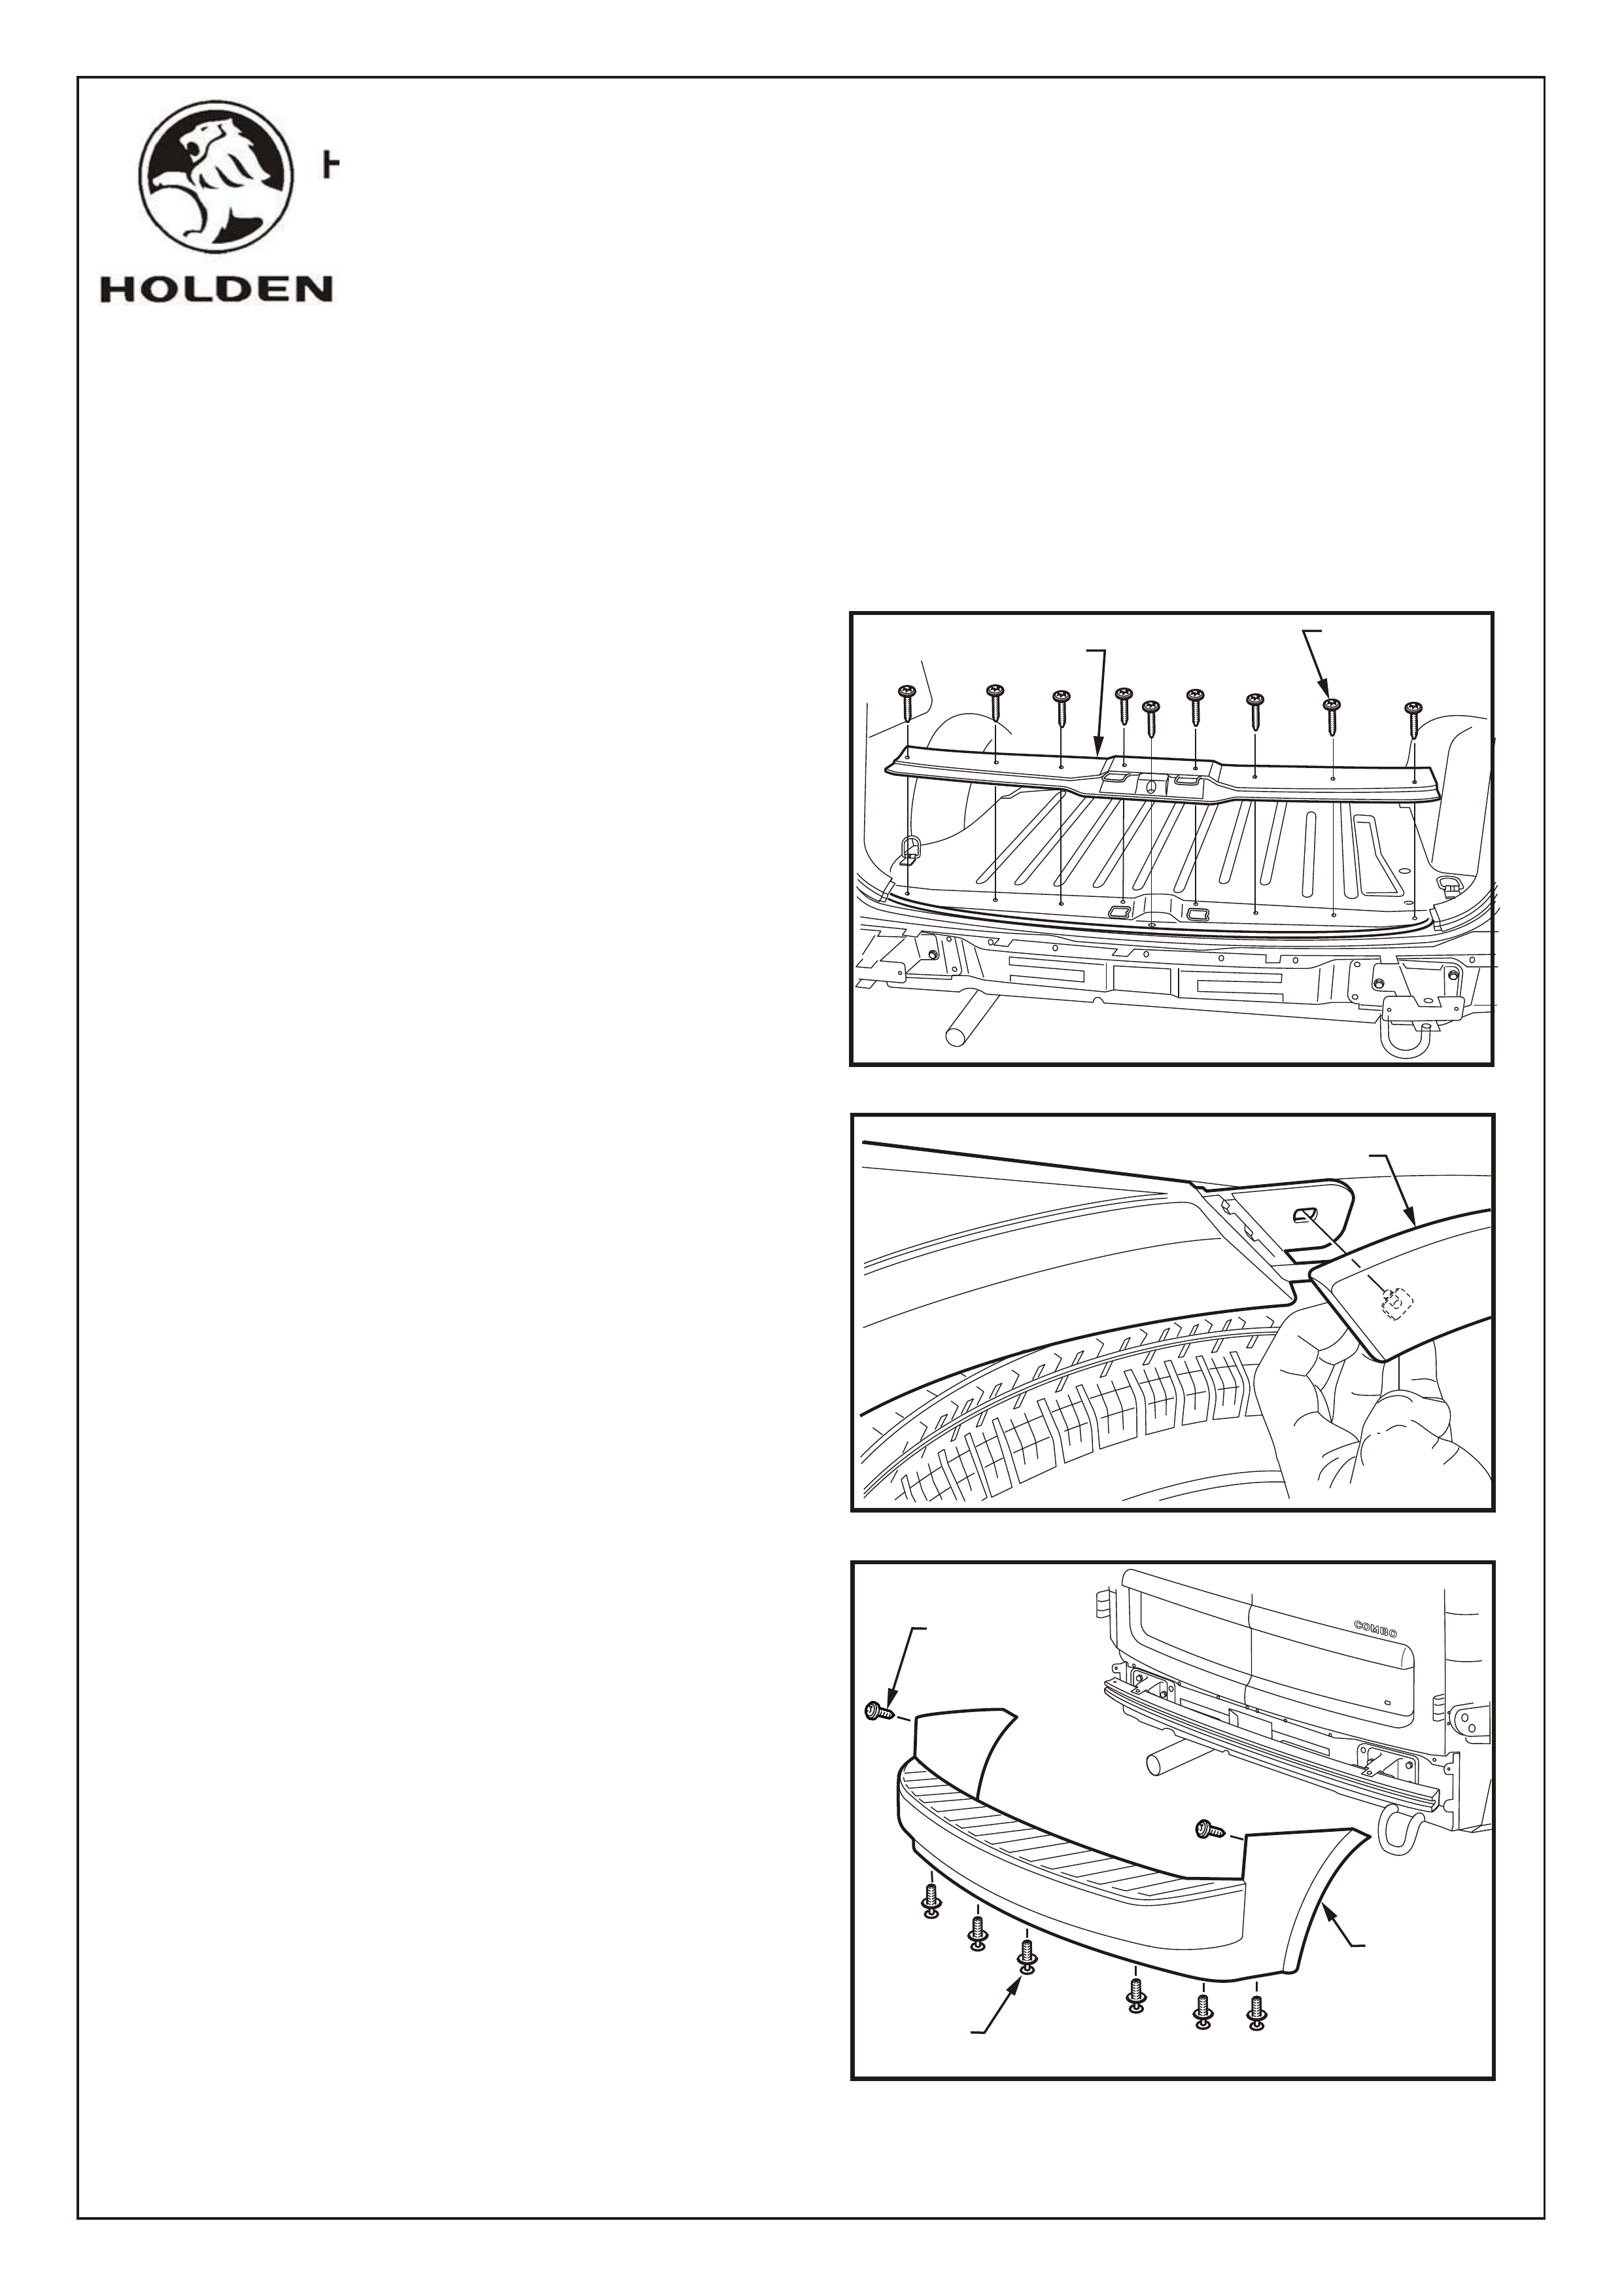
1. Open the rear cargo doors and remove the lower end
rear trim panel T25 Torx head screws (9 places).
Refer Figure 1.
2. Fold back the rear cargo floor carpet
3. Unclip the rear wheel arch opening trim.
Refer Figure 2.
4. Remove the rear bumper fascia, 2 screws and 6
scrivets. Refer Figure 3.
FIGURE 2
FIGURE 3
HOLDEN SERVICE PARTS OPERATIONS
Division of HOLDEN Ltd ACN 006 893 232
Reproduction in whole or part
prohibited without written approval
COPYRIGHT
FIGURE 1
G682
FITTING INSTRUCTIONS FOR
XC COMBO, TRAILER HARNESS PACKAGE
Part No. 92146212
REAR WHEEL ARCH
OPENING TRIM
SCREWS
9 PLACES
REAR END
TRIM PANEL
SCREW
2 PLACES
SCRIVET
6 PLACES
REAR
BUMPER
FASCIA
FD1099
19SE02
Page 3 of 8
HOLDEN SERVICE PARTS OPERATIONS
Division of HOLDEN Ltd ACN 006 893 232
Reproduction in whole or part
prohibited without written approval
COPYRIGHT
HOLDEN SERVICE PARTS OPERATIONS
Division of HOLDEN Ltd ACN 006 893 232
G682
PUSH
BACK
PUSH
BACK
FITTING INSTRUCTIONS: - continued
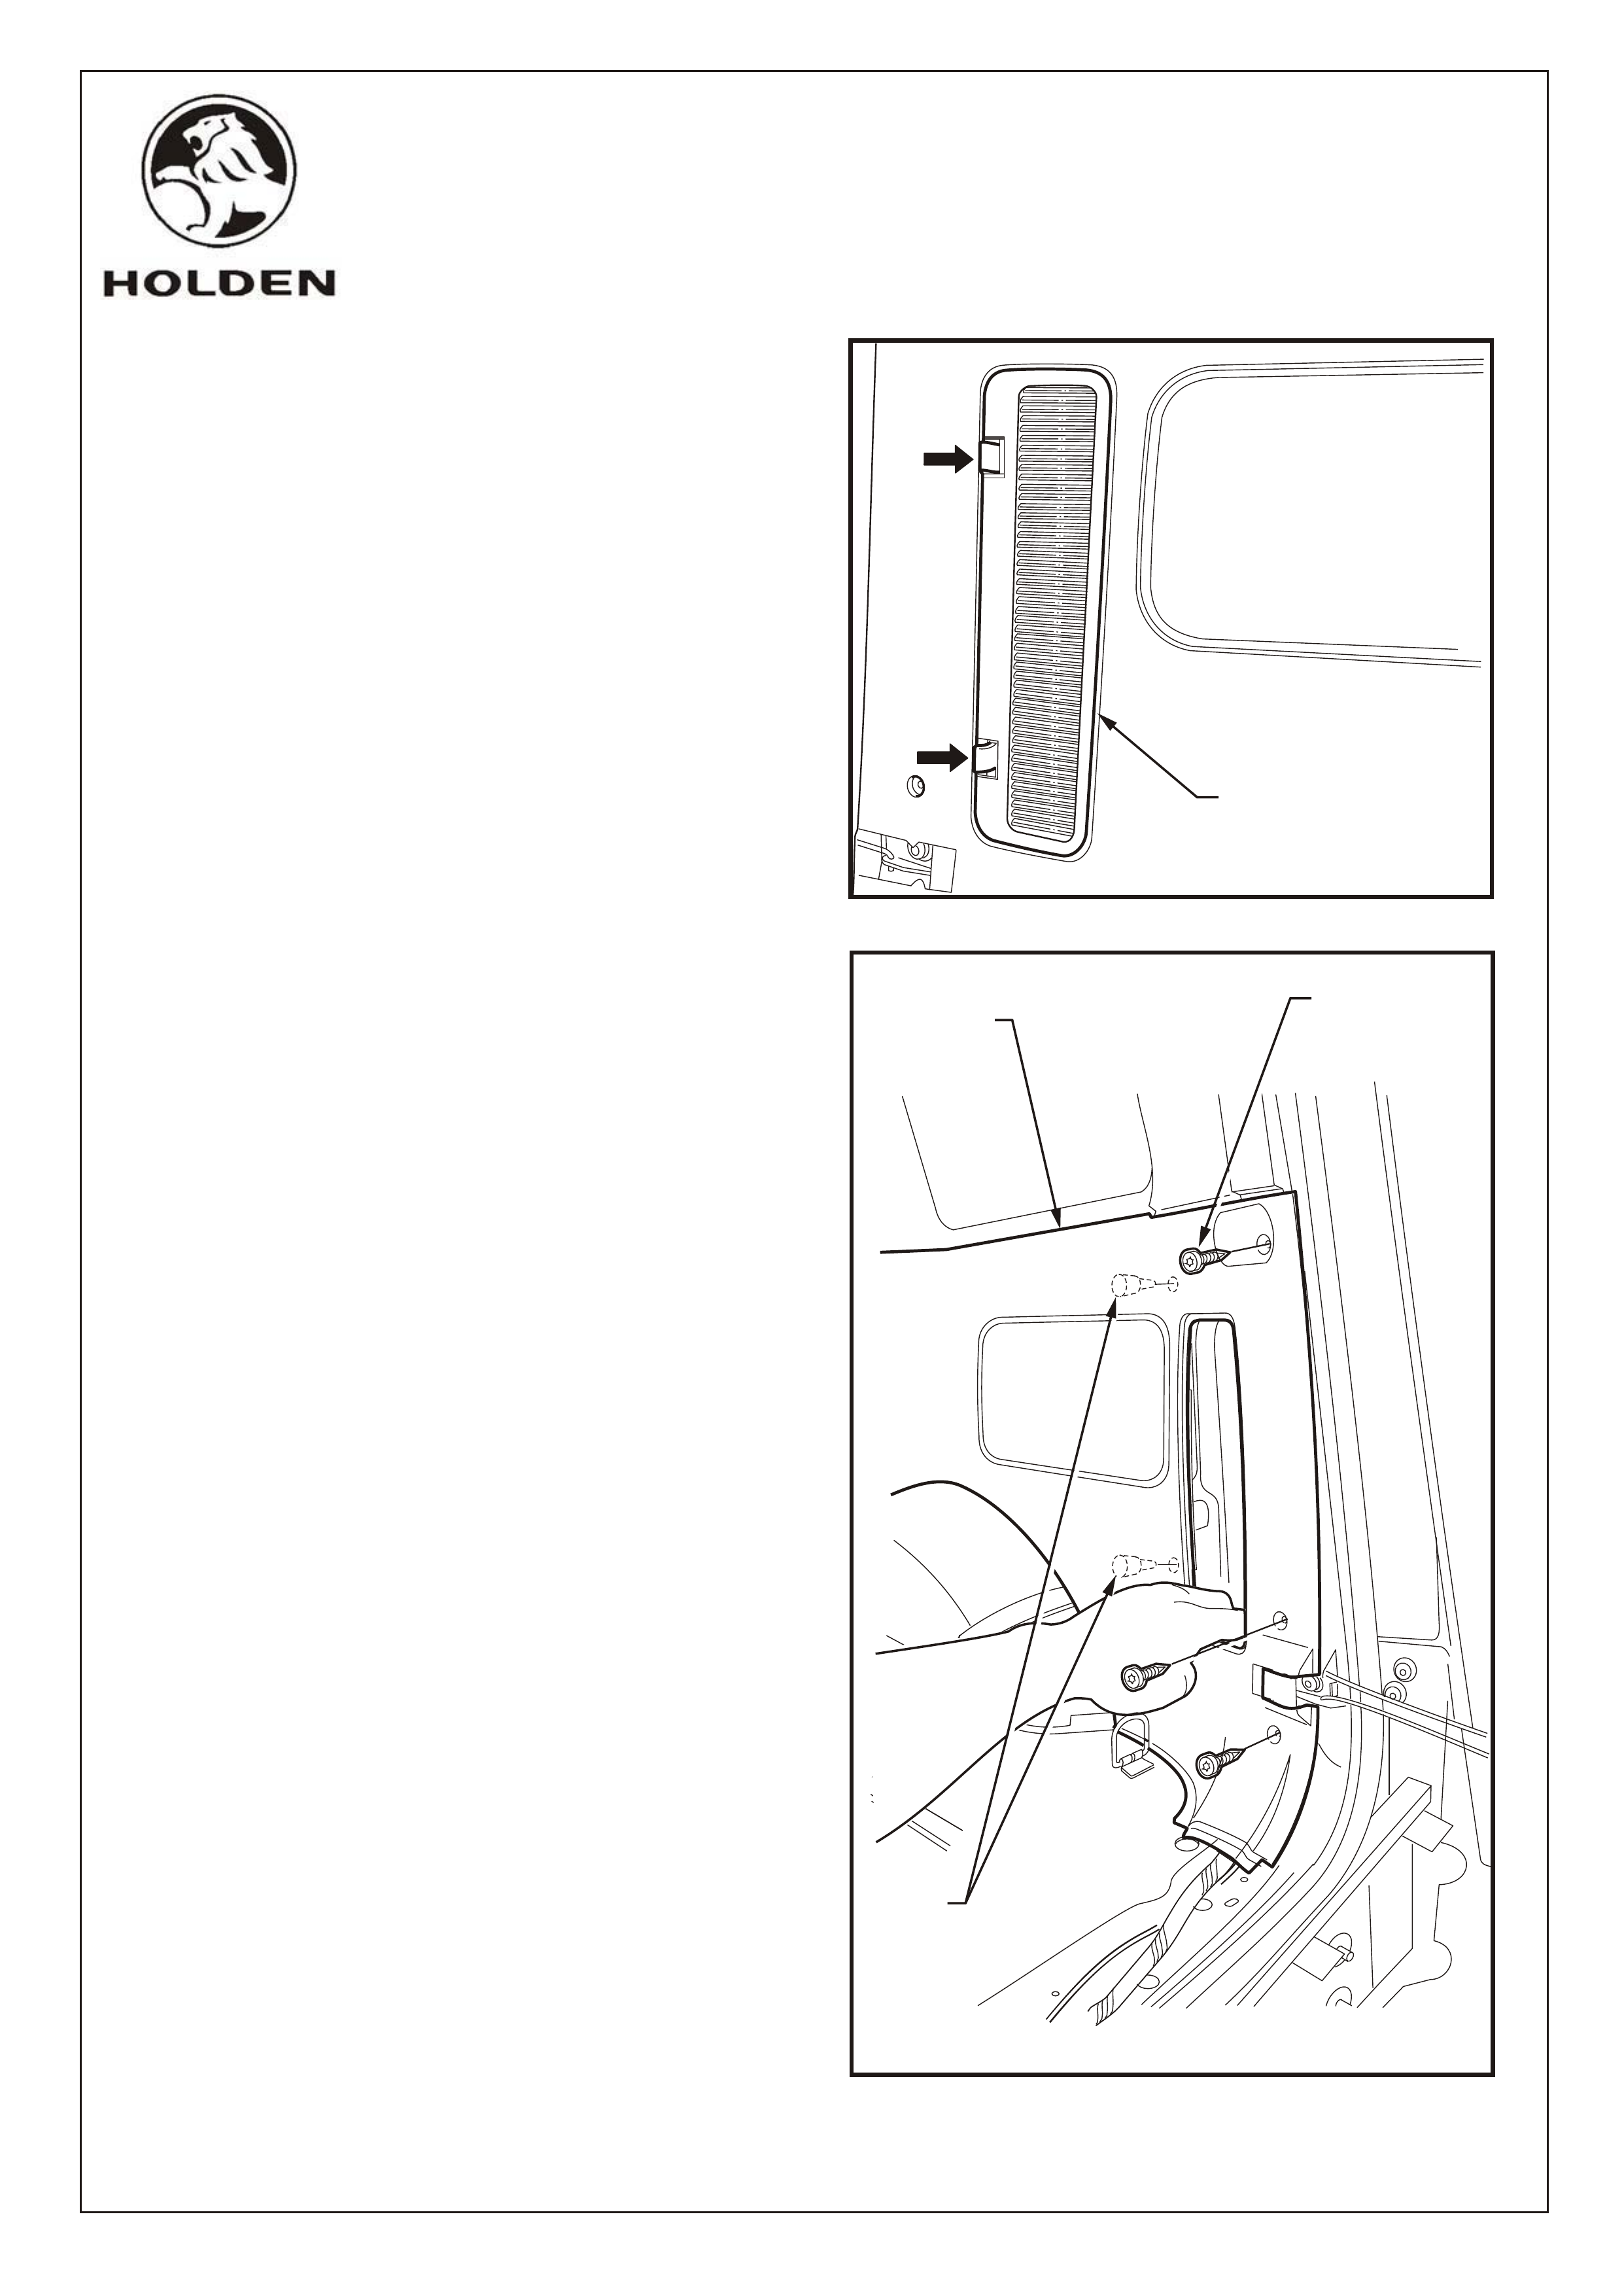
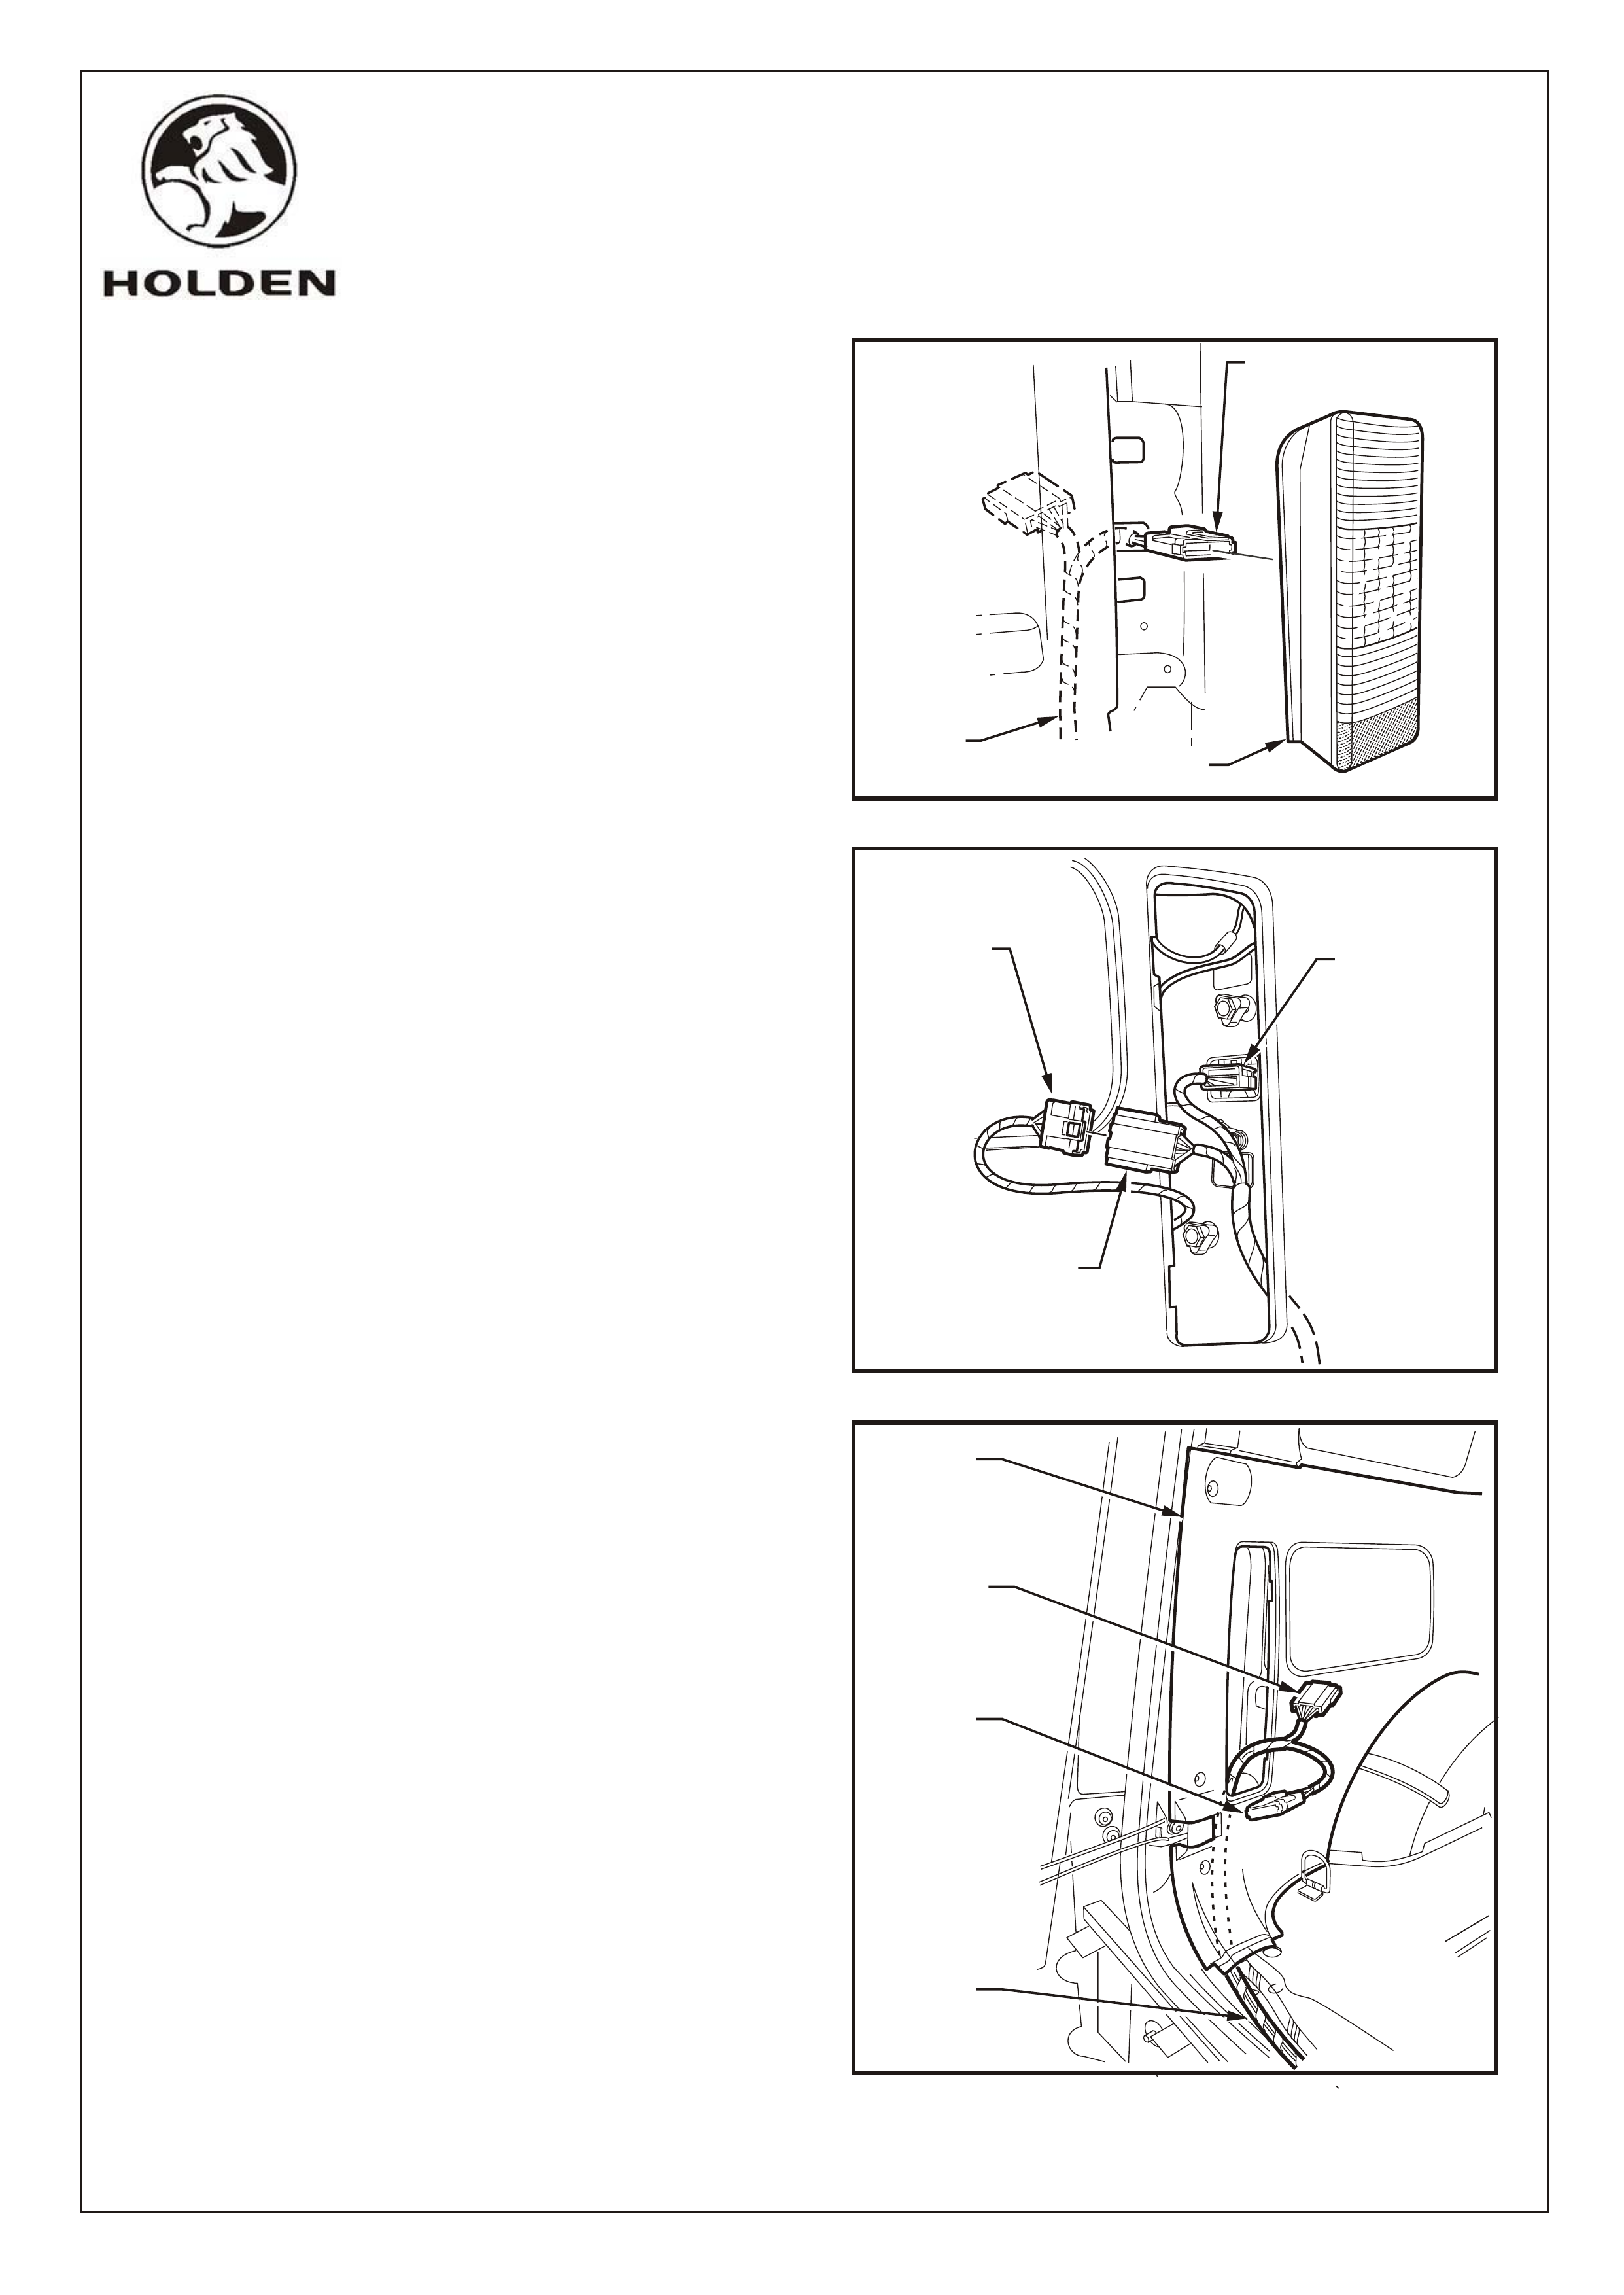
5. Remove the tail lamp access panel (left and right-
hand side). Refer Figure 4.
6. Remove the screws from the rear quarter trim panel
and prise open 2 clips (left and right-hand side).
Refer Figure 5.
FIGURE 5
FIGURE 4
Reproduction in whole or part
prohibited without written approval
COPYRIGHT
TAIL LAMP
ACCESS PANEL
REAR QUARTER
TRIM PANEL
SCREWS
(3 PLACES)
CLIPS
(2 PLACES)
FD1099
19SE02
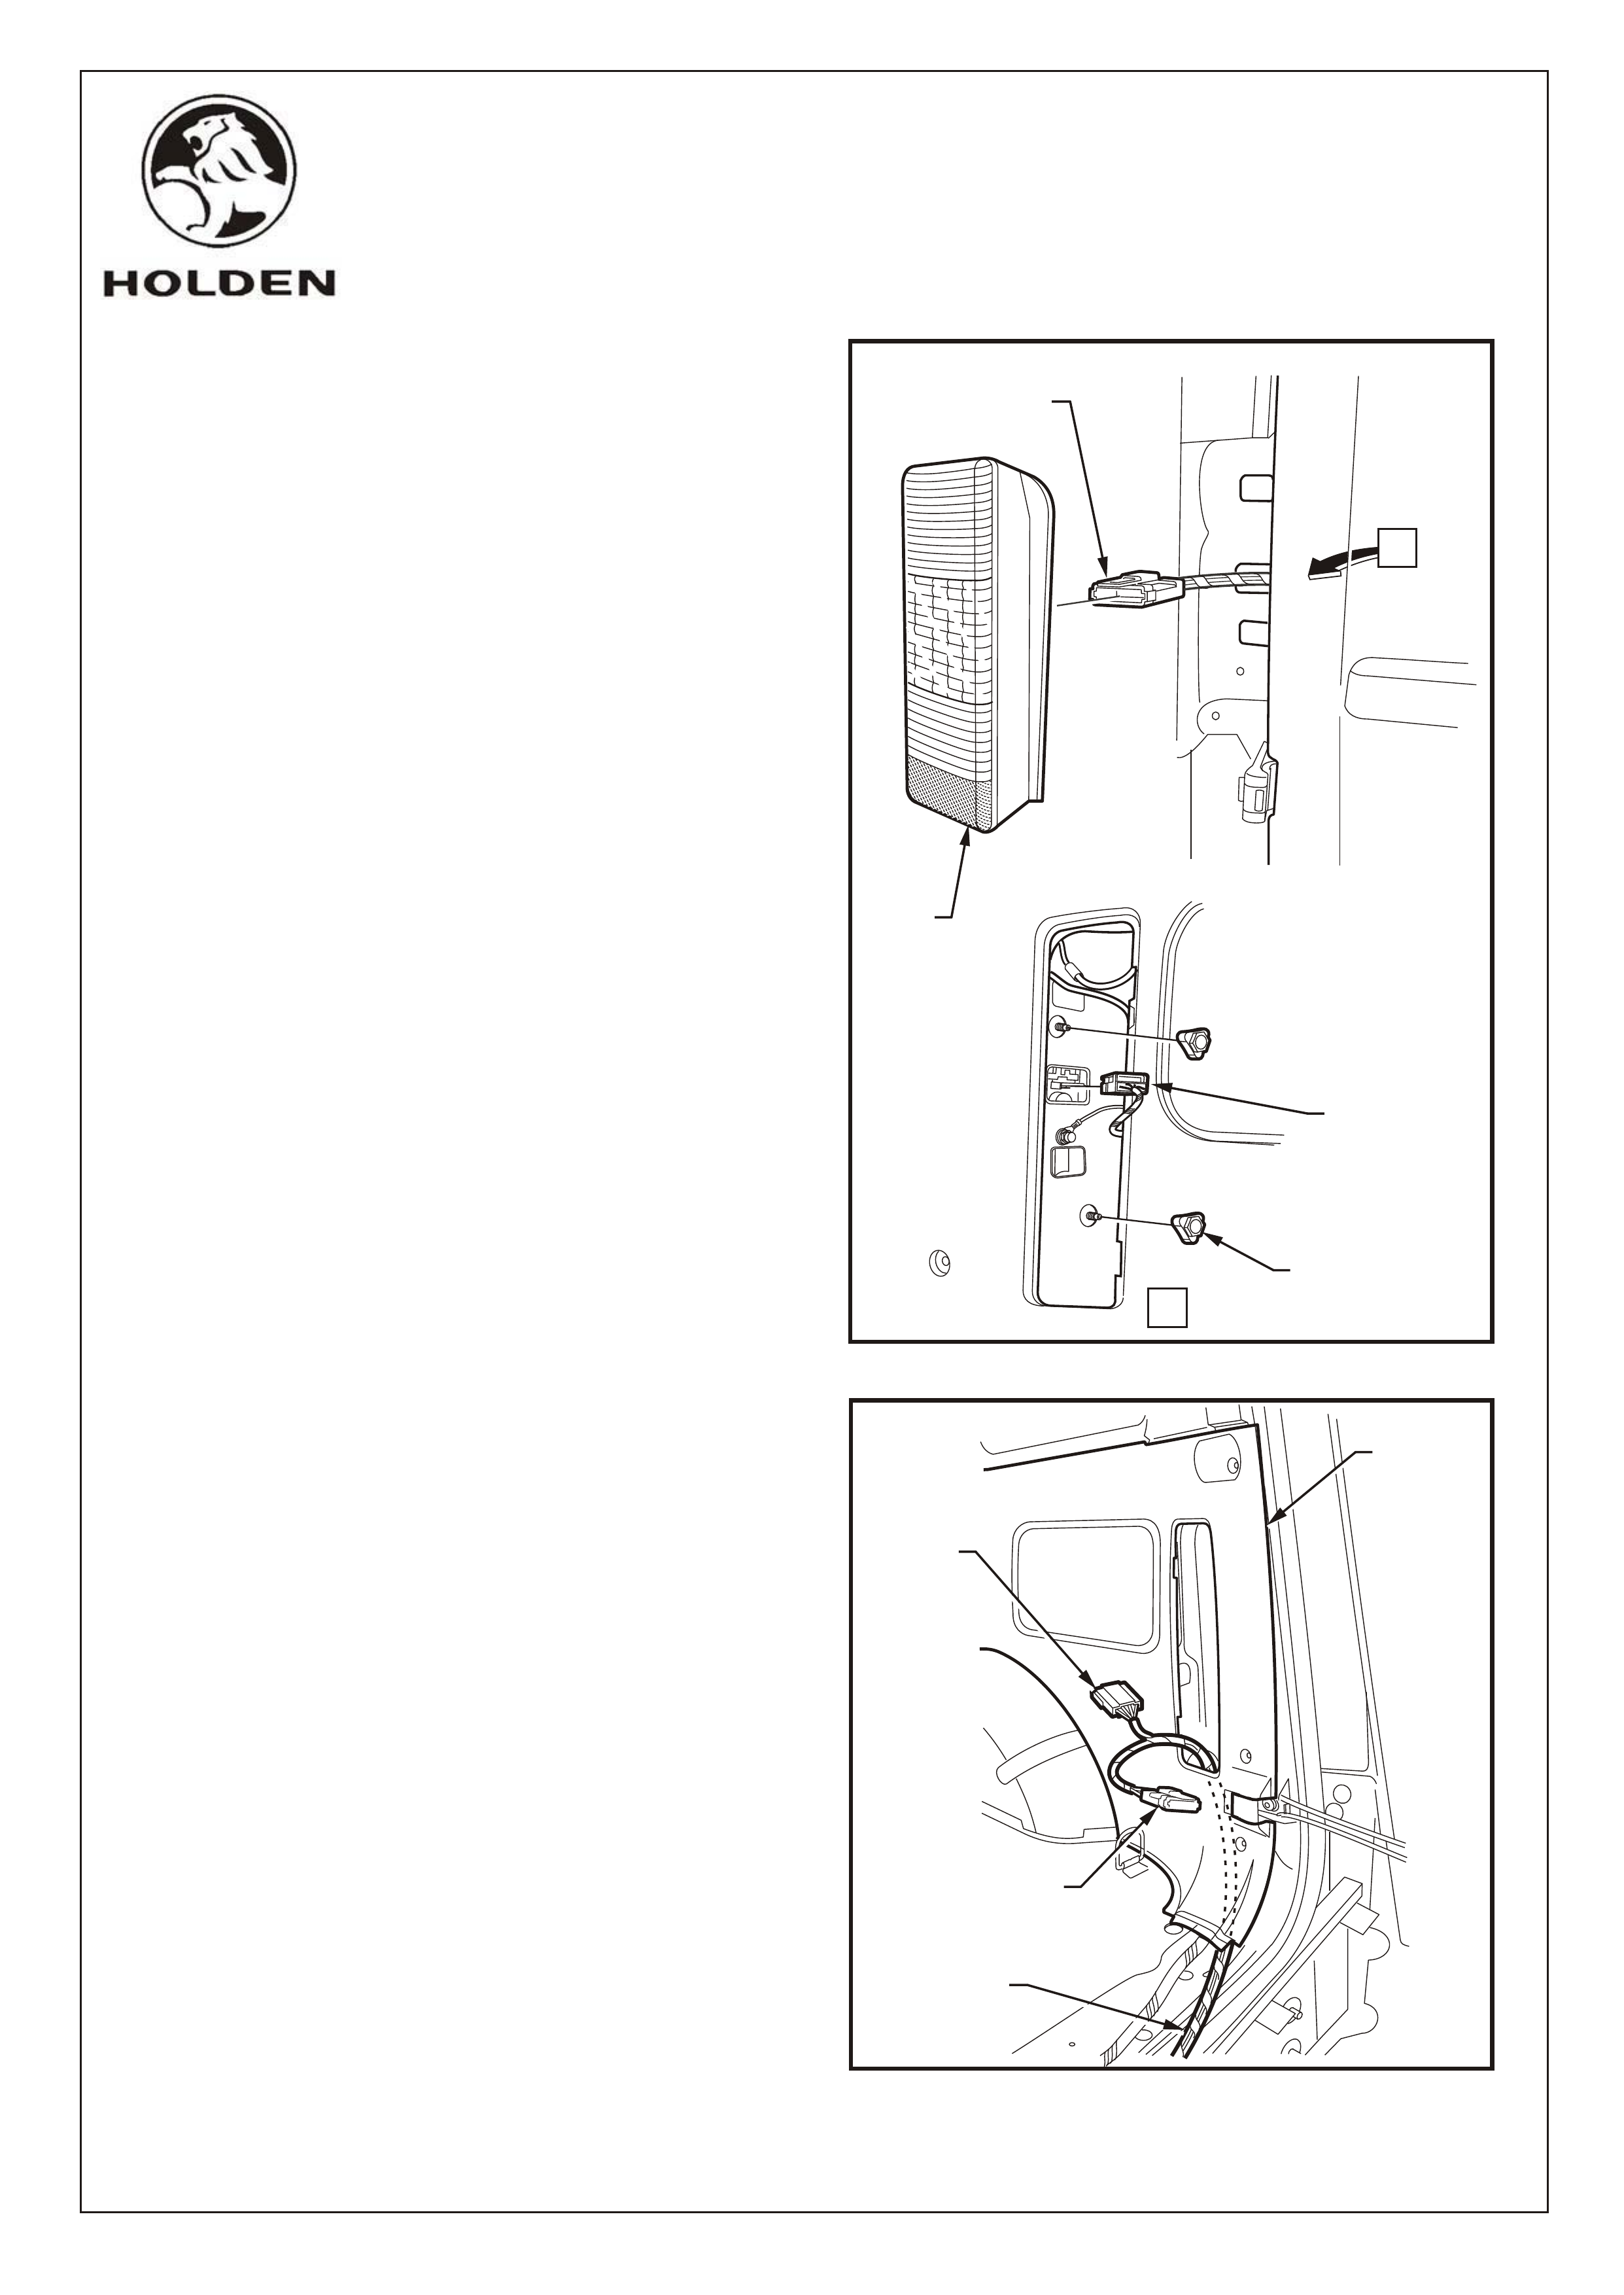
FIGURE 6
FIGURE 7
Page 4 of 8
HOLDEN SERVICE PARTS OPERATIONS
Division of HOLDEN Ltd ACN 006 893 232
Reproduction in whole or part
prohibited without written approval
COPYRIGHT
HOLDEN SERVICE PARTS OPERATIONS
Division of HOLDEN Ltd ACN 006 893 232
G682
FITTING INSTRUCTIONS: - continued
7. Access the nuts securing the tail lamp. Disconnect
the body harness and remove the tail lamp (left and
right-hand side). Refer Figure 6.
8. Route the trailer harness behind the right-hand side
rear quarter trim panel. Refer Figure 7.
Reproduction in whole or part
prohibited without written approval
COPYRIGHT
TAIL
LAMP
NUTS
(2 PLACES)
TAIL LAMP
CONNECTOR
A
A
TAIL LAMP
CONNECTOR
TRAILER HARNESS
TAIL LAMP
CONNECTOR
REAR
QUARTER
TRIM
PANEL
TRAILER
HARNESS
BODY
CONNECTOR
TRAILER
HARNESS
FD1099
19SE02
Page 5 of 8
HOLDEN SERVICE PARTS OPERATIONS
Division of HOLDEN Ltd ACN 006 893 232
Reproduction in whole or part
prohibited without written approval
COPYRIGHT
HOLDEN SERVICE PARTS OPERATIONS
Division of HOLDEN Ltd ACN 006 893 232
G682
Reproduction in whole or part
prohibited without written approval
COPYRIGHT
FITTING INSTRUCTIONS: - continued
9. Connect the right-hand side trailer harness lamp
connector to the tail lamp and reinstall the tail lamp
and nuts (2 places). Refer Figure 8.
10. Connect the right-hand side trailer harness body
connector to the original vehicle tail lamp connector.
Position the connectors neatly behind the rear
quarter trim panel. Refer Figure 9.
11. Route the trailer harness across the lower rear floor to
the left hand-side tail light.
12. Route the trailer harness behind the rear quarter trim
panel. Refer Figure 10.
13. Connect the left-hand side trailer harness lamp
connector to the tail lamp and reinstall the tail lamp
and nut (2 places). Refer Figure 8 (right-hand side).
14. Connect the left-hand side trailer harness body
connector to the original vehicle tail lamp connector.
Position the connectors neatly behind the rear
quarter trim panel. Refer Figure 10 (left-hand side).
FIGURE 8
TAIL LAMP
TRAILER HARNESS
TAIL LAMP CONNECTOR
TRAILER
HARNESS
FIGURE 9
TRAILER
HARNESS
ORIGINAL
VEHICLE
TAIL LAMP
CONNECTOR
TRAILER HARNESS
BODY CONNECTOR
TRAILER
HARNESS
TAIL LAMP
CONNECTOR
TRAILER
HARNESS
TAIL LAMP
CONNECTOR
REAR
QUARTER
TRIM
PANEL
TRAILER
HARNESS
BODY
CONNECTOR
TRAILER
HARNESS
FIGURE 10
FD1099
19SE02
HOLDEN SERVICE PARTS OPERATIONS
COPYRIGHT
Reproduction in whole or part
prohibited without written approval
Division of HOLDEN Ltd ACN 006 893 232
Page 6 of 8
G682
FITTING INSTRUCTIONS: - continued
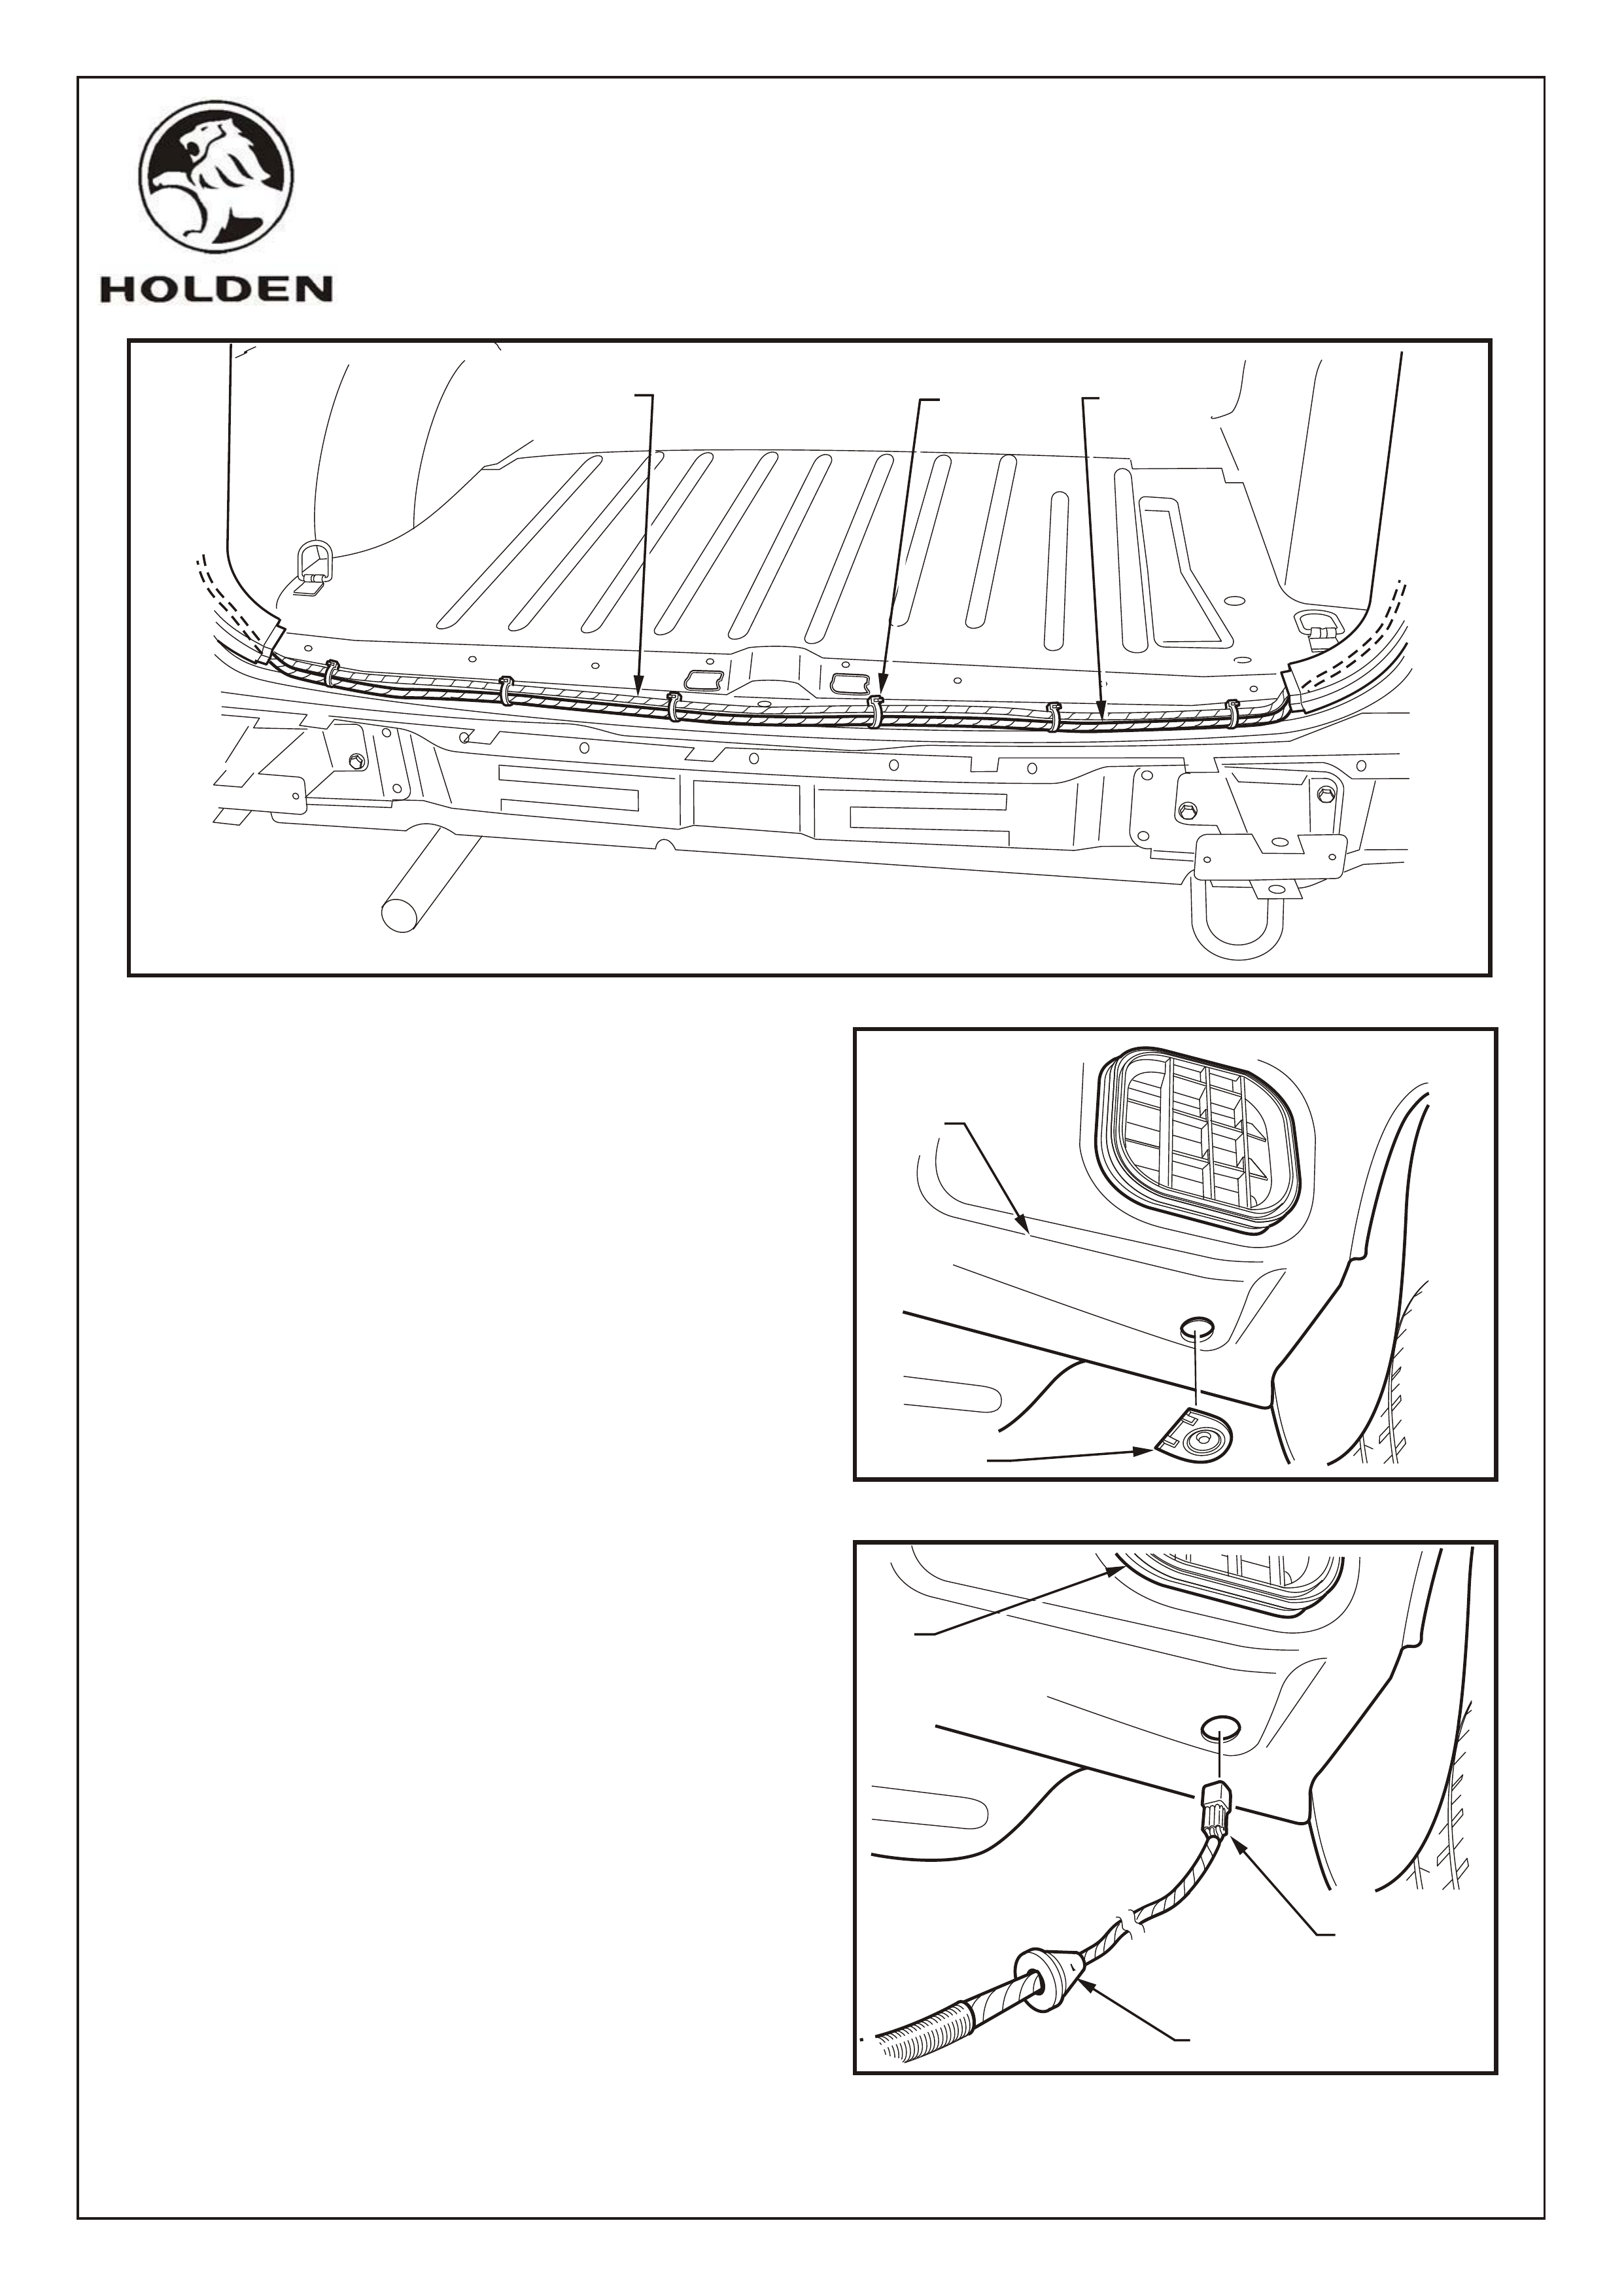
15. Tie strap the trailer harness to the body harness
across the rear floor (6 places). Refer Figure 11.
16. Remove the grommet from the right-hand side rear
quarter panel. Refer Figure 12.
17. Route the trailer plug harness through the grommet
hole, ensuring routing is to the rear of the vehicle
around the air extraction vents.
Ensure the trailer plug harness grommet fits securely
in the hole.
Refer Figure 13.
FIGURE 13
FIGURE 11
FIGURE 12
TRAILER
HARNESS
BODY
HARNESS TIE STRAP
(6 PLACES)
GROMMET
RIGHT-HAND SIDE
REAR QUARTER
PANEL
GROMMET
TRAILER PLUG
HARNESS
CONNECTOR
AIR
EXTRACTION
VENTS
FD1099
19SE02
HOLDEN SERVICE PARTS OPERATIONS
COPYRIGHT
Reproduction in whole or part
prohibited without written approval
Division of HOLDEN Ltd ACN 006 893 232
Page 7 of 8
G682
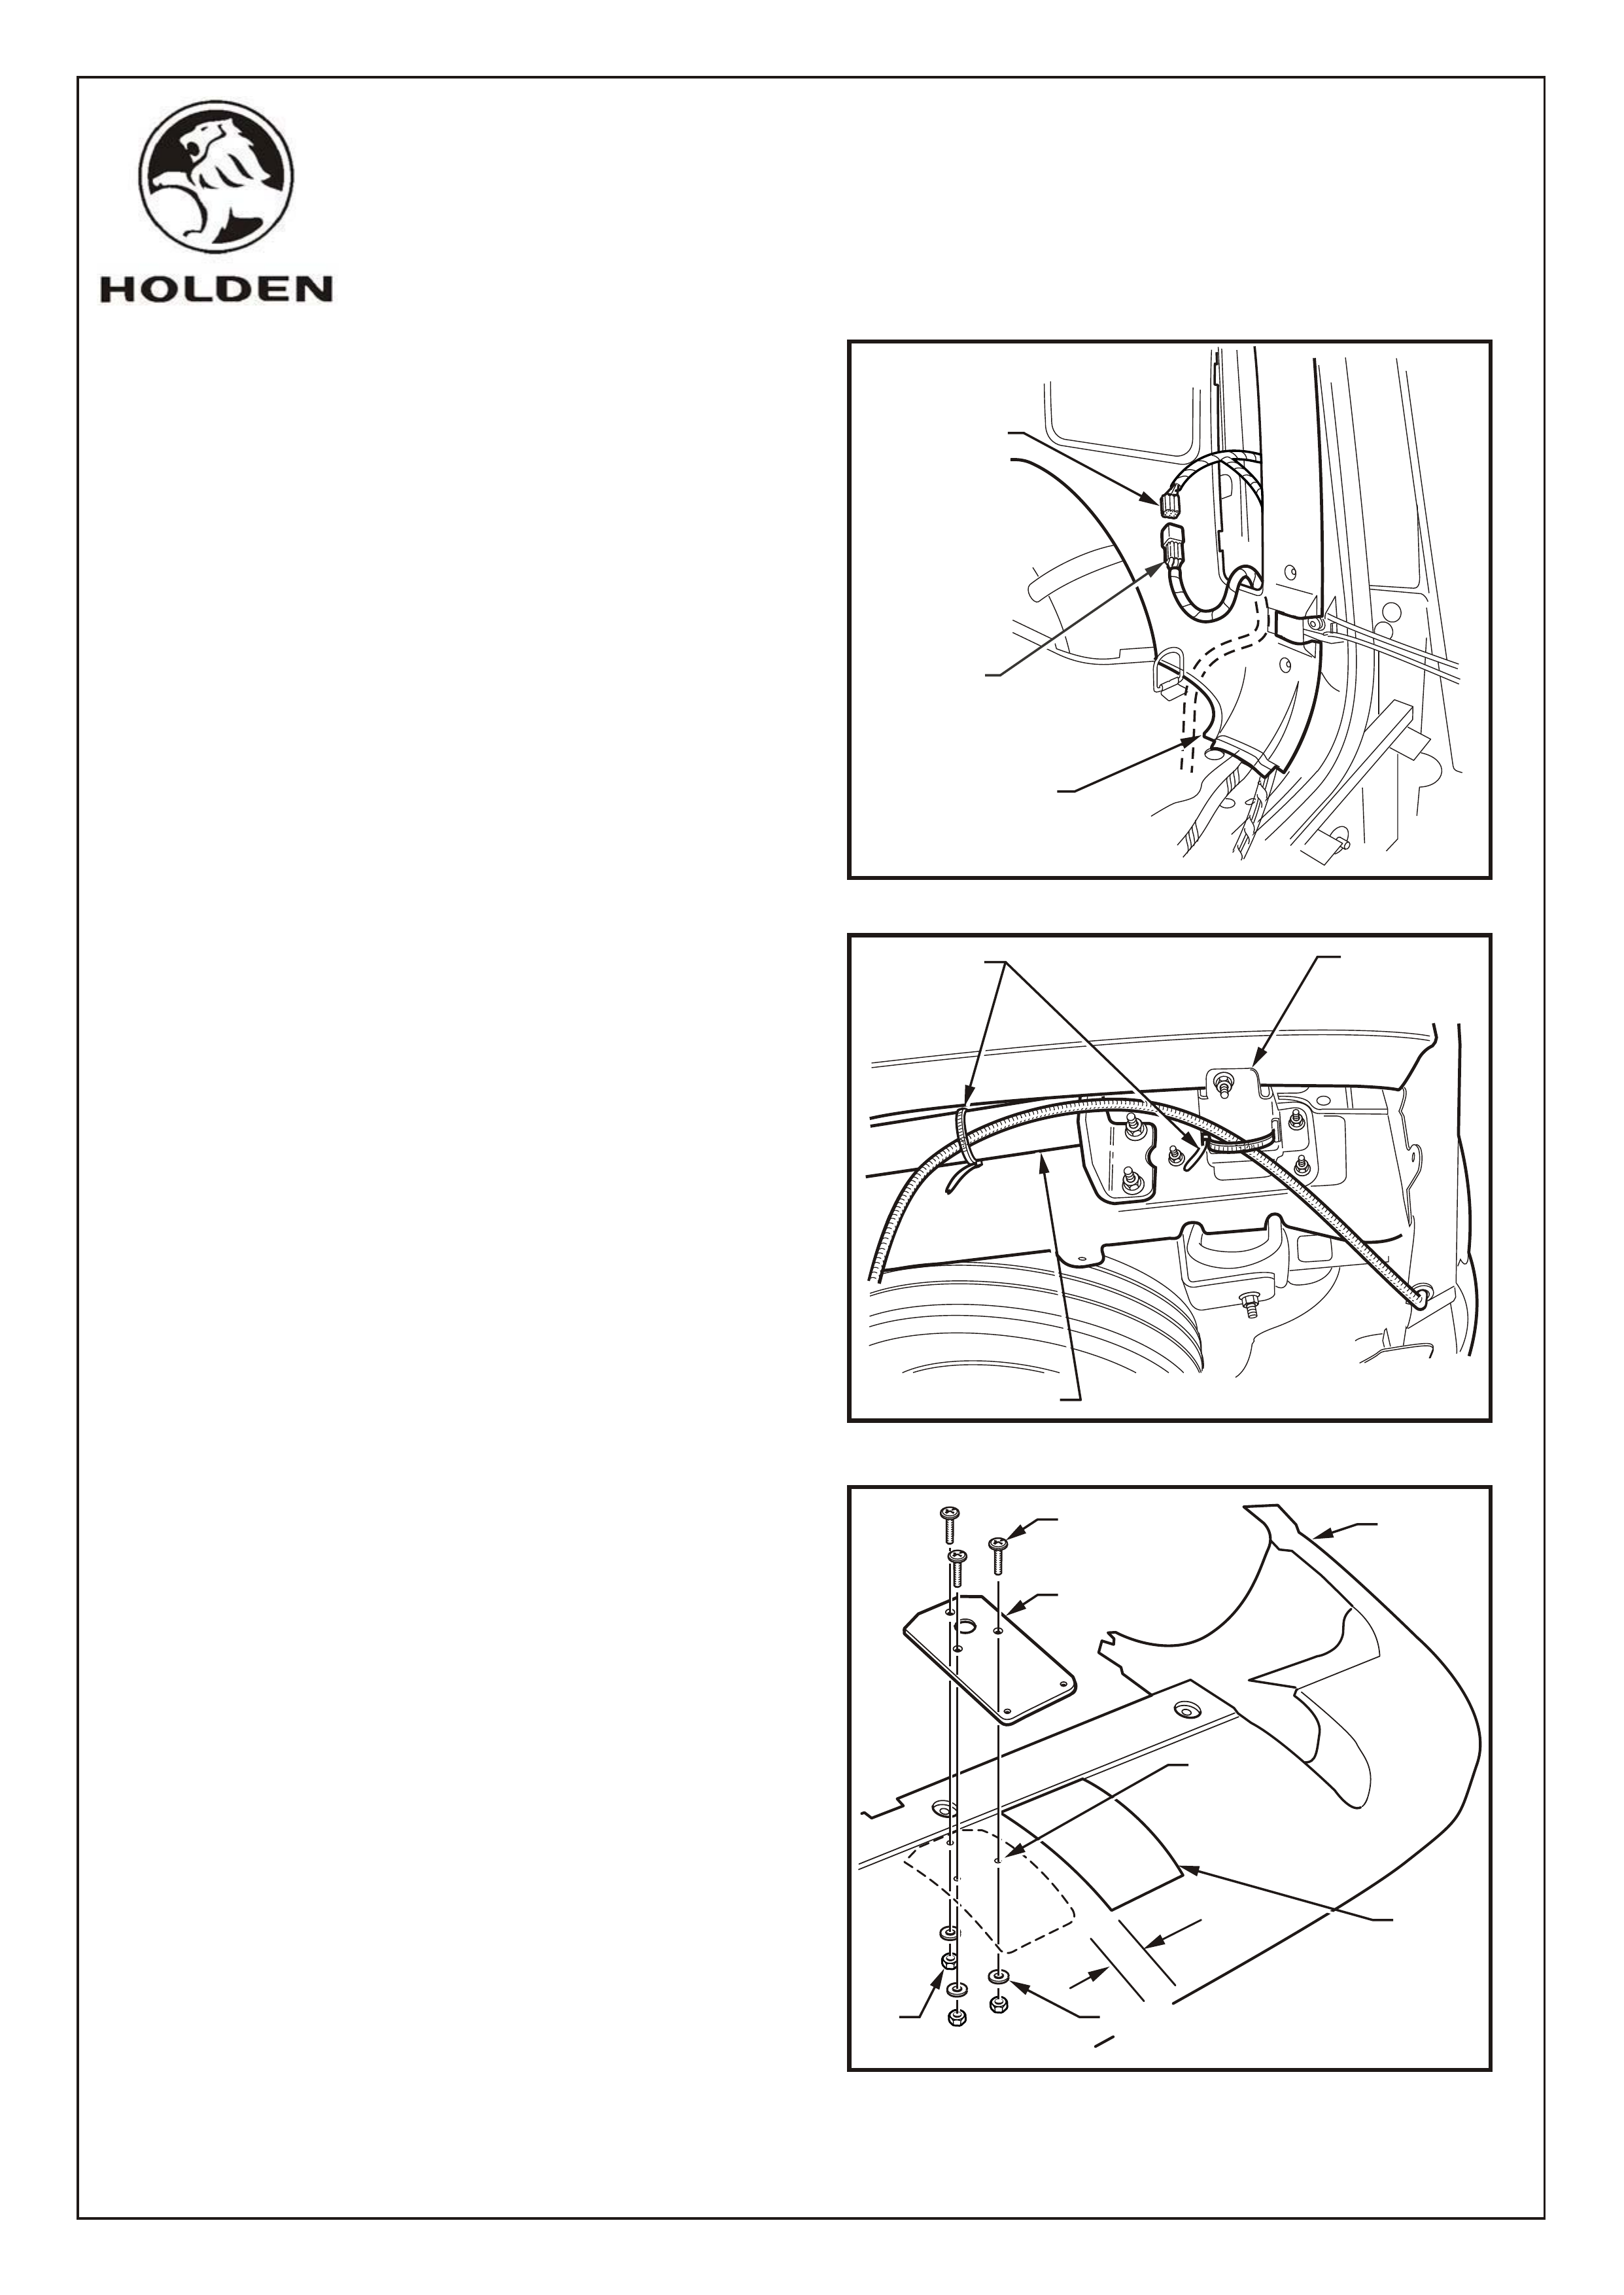
FITTING INSTRUCTIONS: - continued
18. Connect the trailer plug harness to the trailer harness
and locate behind the rear quarter panel trim. Refer
Figure 14.
19. Test harness and rear lamps for correct operation.
20. Cable tie (2 places) the trailer plug harness to the
towbar and impact absorber bracket as indicated.
Refer Figure 15.
21. Mark out on the bumper fascia the mounting location
for the trailer plug connector mounting plate and drill
4mm holes (3 places) using the mounting plate as a
template
Refer Figure 16.
22. Attach the trailer plug connector mounting plate with
the screw, washer and nut supplied (3 places). Refer
Figure 16. Tighten to specified torque.
23. Reinstall the bumper fascia and all trim panels and
carpet.
FIGURE 15
FIGURE 14
FIGURE 16
TRAILER
PLUG HARNESS
CONNECTOR
TRAILER
HARNESS
CONNECTOR
REAR QUARTER
TRIM PANEL
IMPACT
ABSORBER
BRACKET
CABLE
TIE
35mm TOW BAR
CUTOUT
DRILL
4mm DIA
HOLES
3 PLACES
BUMPER
FASCIA
SCREW
3 PLACES
MOUNTING
PLATE
NUT
3 PLACES
WASHER - 3 PLACES
TOWBAR ASSEMBLY
FD1099
19SE02
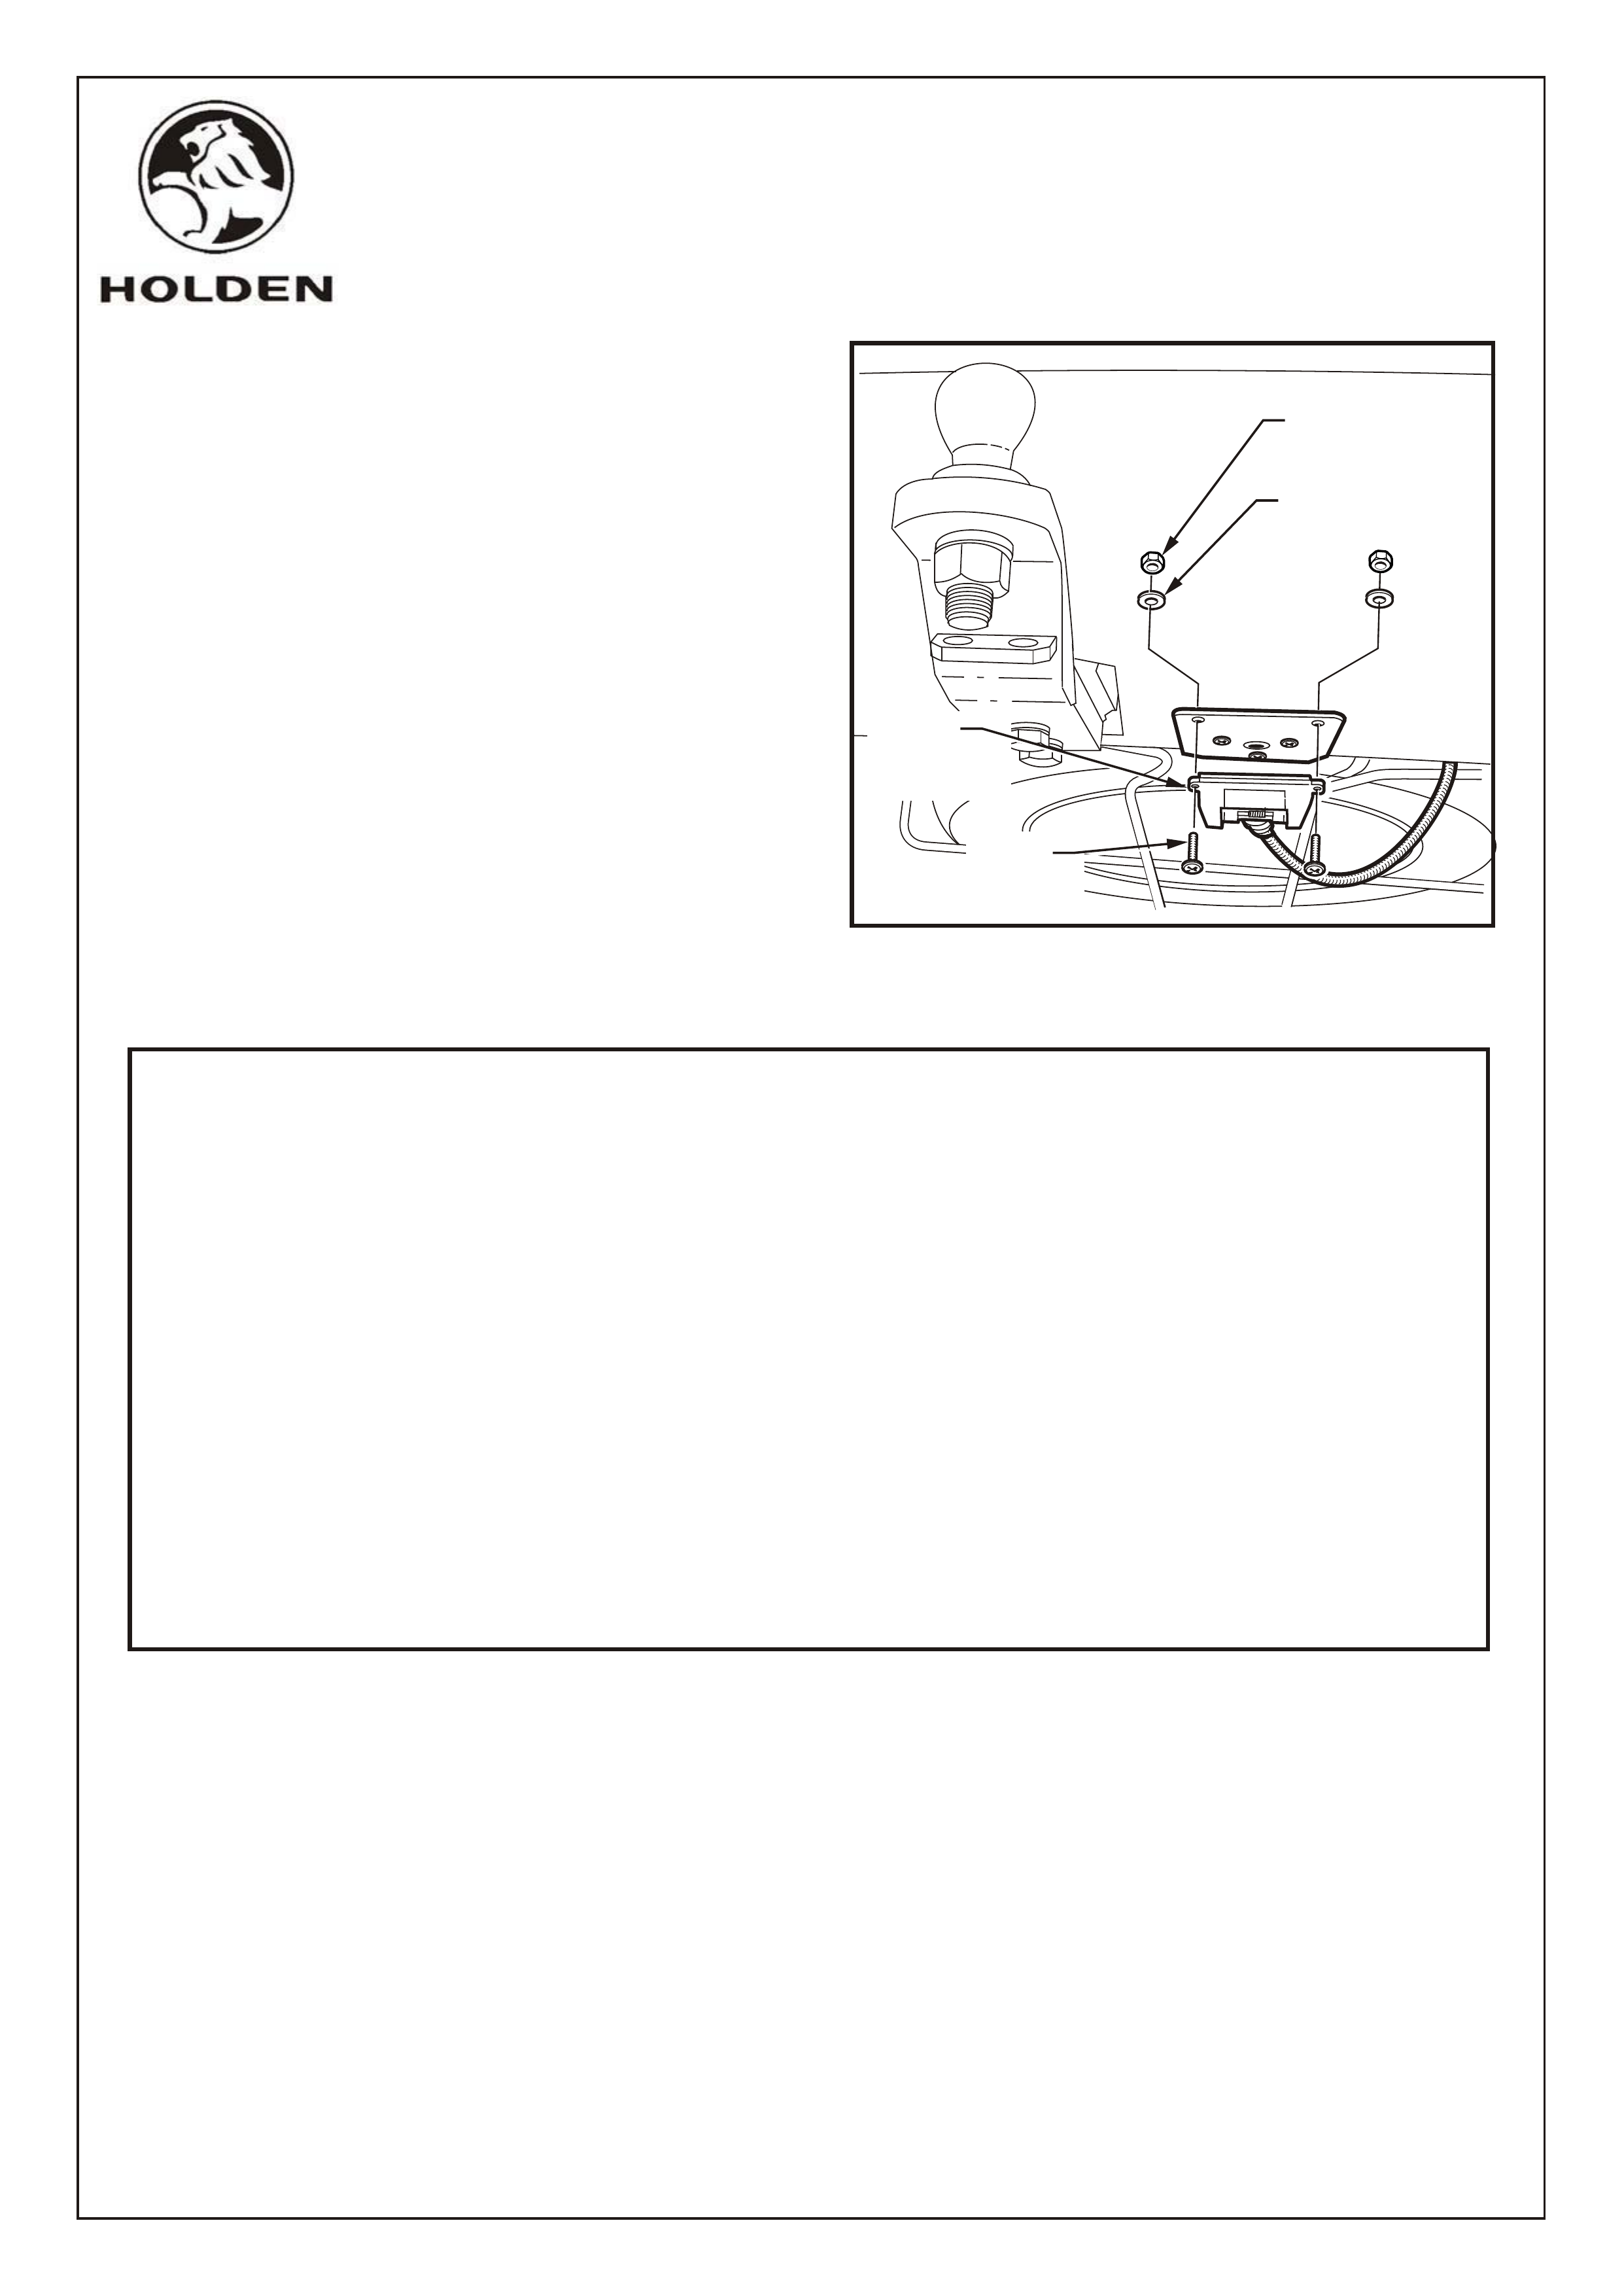
FIGURE 17
COPYRIGHT
Reproduction in whole or part
prohibited without written approval
HOLDEN SERVICE PARTS OPERATIONS
Division of HOLDEN Ltd ACN 006 893 232
Page 8 of 8
G682
XC COMBO
TRAILER HARNESS PACKAGE (92146212)
PARTS LIST
PART NUMBER DESCRIPTION QUANTITY
92146212 TRAILER HARNESS 1
TRAILER PLUG HARNESS 1
MOUNTING PLATE - PLUG 1
SCREW 5
WASHER 5
NUT 5
CABLE TIE 150mm 6
CABLE TIE 350mm 2
FD1099 FITTING INSTRUCTIONS 1
FITTING INSTRUCTIONS: - continued
24. Attach the trailer plug to the mounting plate with the
screw, washer and nut provided, 2 places.
NOTE: Flex down the trailer plug mounting plate to
facilitate fastener access. Refer Figure 17.
25. Place the fitting instructions in the vehicles glove
compartment.
LUMENLUMEN
TRAILER
HARNESS
CONNECTER
NUT
2 PLACES
WASHER
2 PLACES
SCREW
2 PLACES
FD1099
19SE02