
IMMOBILISER SYSTEM “RESET” & “PROGRAMMING” PROCEDURE
REFERENCE GUIDE
This reference guide is intended as a supplement to the information contained in the LCRV SIP - Section 11 –
Immobiliser System for the relevant vehicle. This guide will be integrated into the relevant sections of LCRV SIP,
commencing September 2003.
The following reset and programming procedures are applicable to:
• MY1998 – 2003 UBS Jackaroo
• MY2001 – 2002 UES Frontera
• MY2001 – 2002 TF Rodeo 6VD1, C22SE, 4JB1-T (see NOTE below) & 4JH-1TC
• MY2003 RA Rodeo 6VE1, C24SE & 4JH1-TC
NOTE:
The MY2001 TF Rodeo 4JB1-T engine requires that the DDS-1 Immobiliser Module mounted on the fuel injector
pump is initialised during system programming. Refer to LCRV SIP – TF Rodeo Section 11B – Immobiliser
System, for the correct DDS-1 Programming Procedure.
Case Related to Condition/Status What you should do Refer to Note
1
Customer requests additional
Transponder Key(s). Program additional Transponder
Key(s). "Transponder Key Programming". Maximum five transponder keys can
be provided by additional
programming.
2
Customer lost Transponder Key(s). Once erase all Transponder Key(s)
information and re-program the
remaining key(s).
1. "Erase Transponder Key".
2. "Transponder Key Programming". If a transponder key is lost, all
transponder keys in the immobiliser
control system must be erased due to
safety reason.
3
Transponder Key replacement was
determined by diagnostic checking
procedure.
Replace Transponder Key(s) and
program Transponder Key(s). 1. "Erase Transponder Key".
2. "Transponder Key Programming".
4
Replace ICU. "Brand-new" ICU is
available. "ICU Programming".
5
Replace ICU. Temporally use "Re-
used" ICU, because "Brand-new" ICU
is NOT available.
1. "Reset ICU" at ORIGINAL vehicle.
2. "ICU Programming". "Re-used" ICU must be reset using
with ORIGINAL vehicle.
6
Replace ECM/PCM. "Brand-new"
ECM/PCM is available. "ECM/PCM Programming". The replacement ECM/PCM must be
programmed engine control
calibration data. Refer to section of
the Service Programming System
(SPS).
7
Replace ECM/PCM. Temporally use
"Re-used" ECM/PCM, because
"Brand-new" ECM/PCM is NOT
available.
1. "Reset ECM/PCM" at ORIGINAL
vehicle.
2. "ECM/PCM Programming".
"Re-used" ECM/PCM must be reset
using with ORIGINAL vehicle.
8
Replace ICU & ECM/PCM. "Brand-
new" ICU & ECM/PCM are available. "ICU & ECM/PCM Programming".
9
Replace ICU & ECM/PCM.
Temporally use "Re-used" ICU and/or
ECM/PCM, because "Brand-new" ICU
and/or ECM/PCM is NOT available.
1. "Reset ICU" at ORIGINAL vehicle.
and/or
1. "Reset ECM/PCM" at ORIGINAL
vehicle.
2. "ICU & ECM/PCM Programming".
ICU replacement was determined by
diagnostic checking procedure.
ECM/PCM replacement was
determined by diagnostic checking
procedure.
ICU & ECM/PCM replacement were
determined by diagnostic checking
procedure.
IMMOBILISER SYSTEM "RESET" & " PROGRAMMING" PROCEDURE REFERENCE GUIDE
1. If ICU & ECM/PCM replacement
were determined at the same time,
Transponder Key(s) must be
replaced, too.
2. The replacement ECM/PCM must
be programmed engine control
calibration data. Refer to section of
the Service Programming System
(SPS).
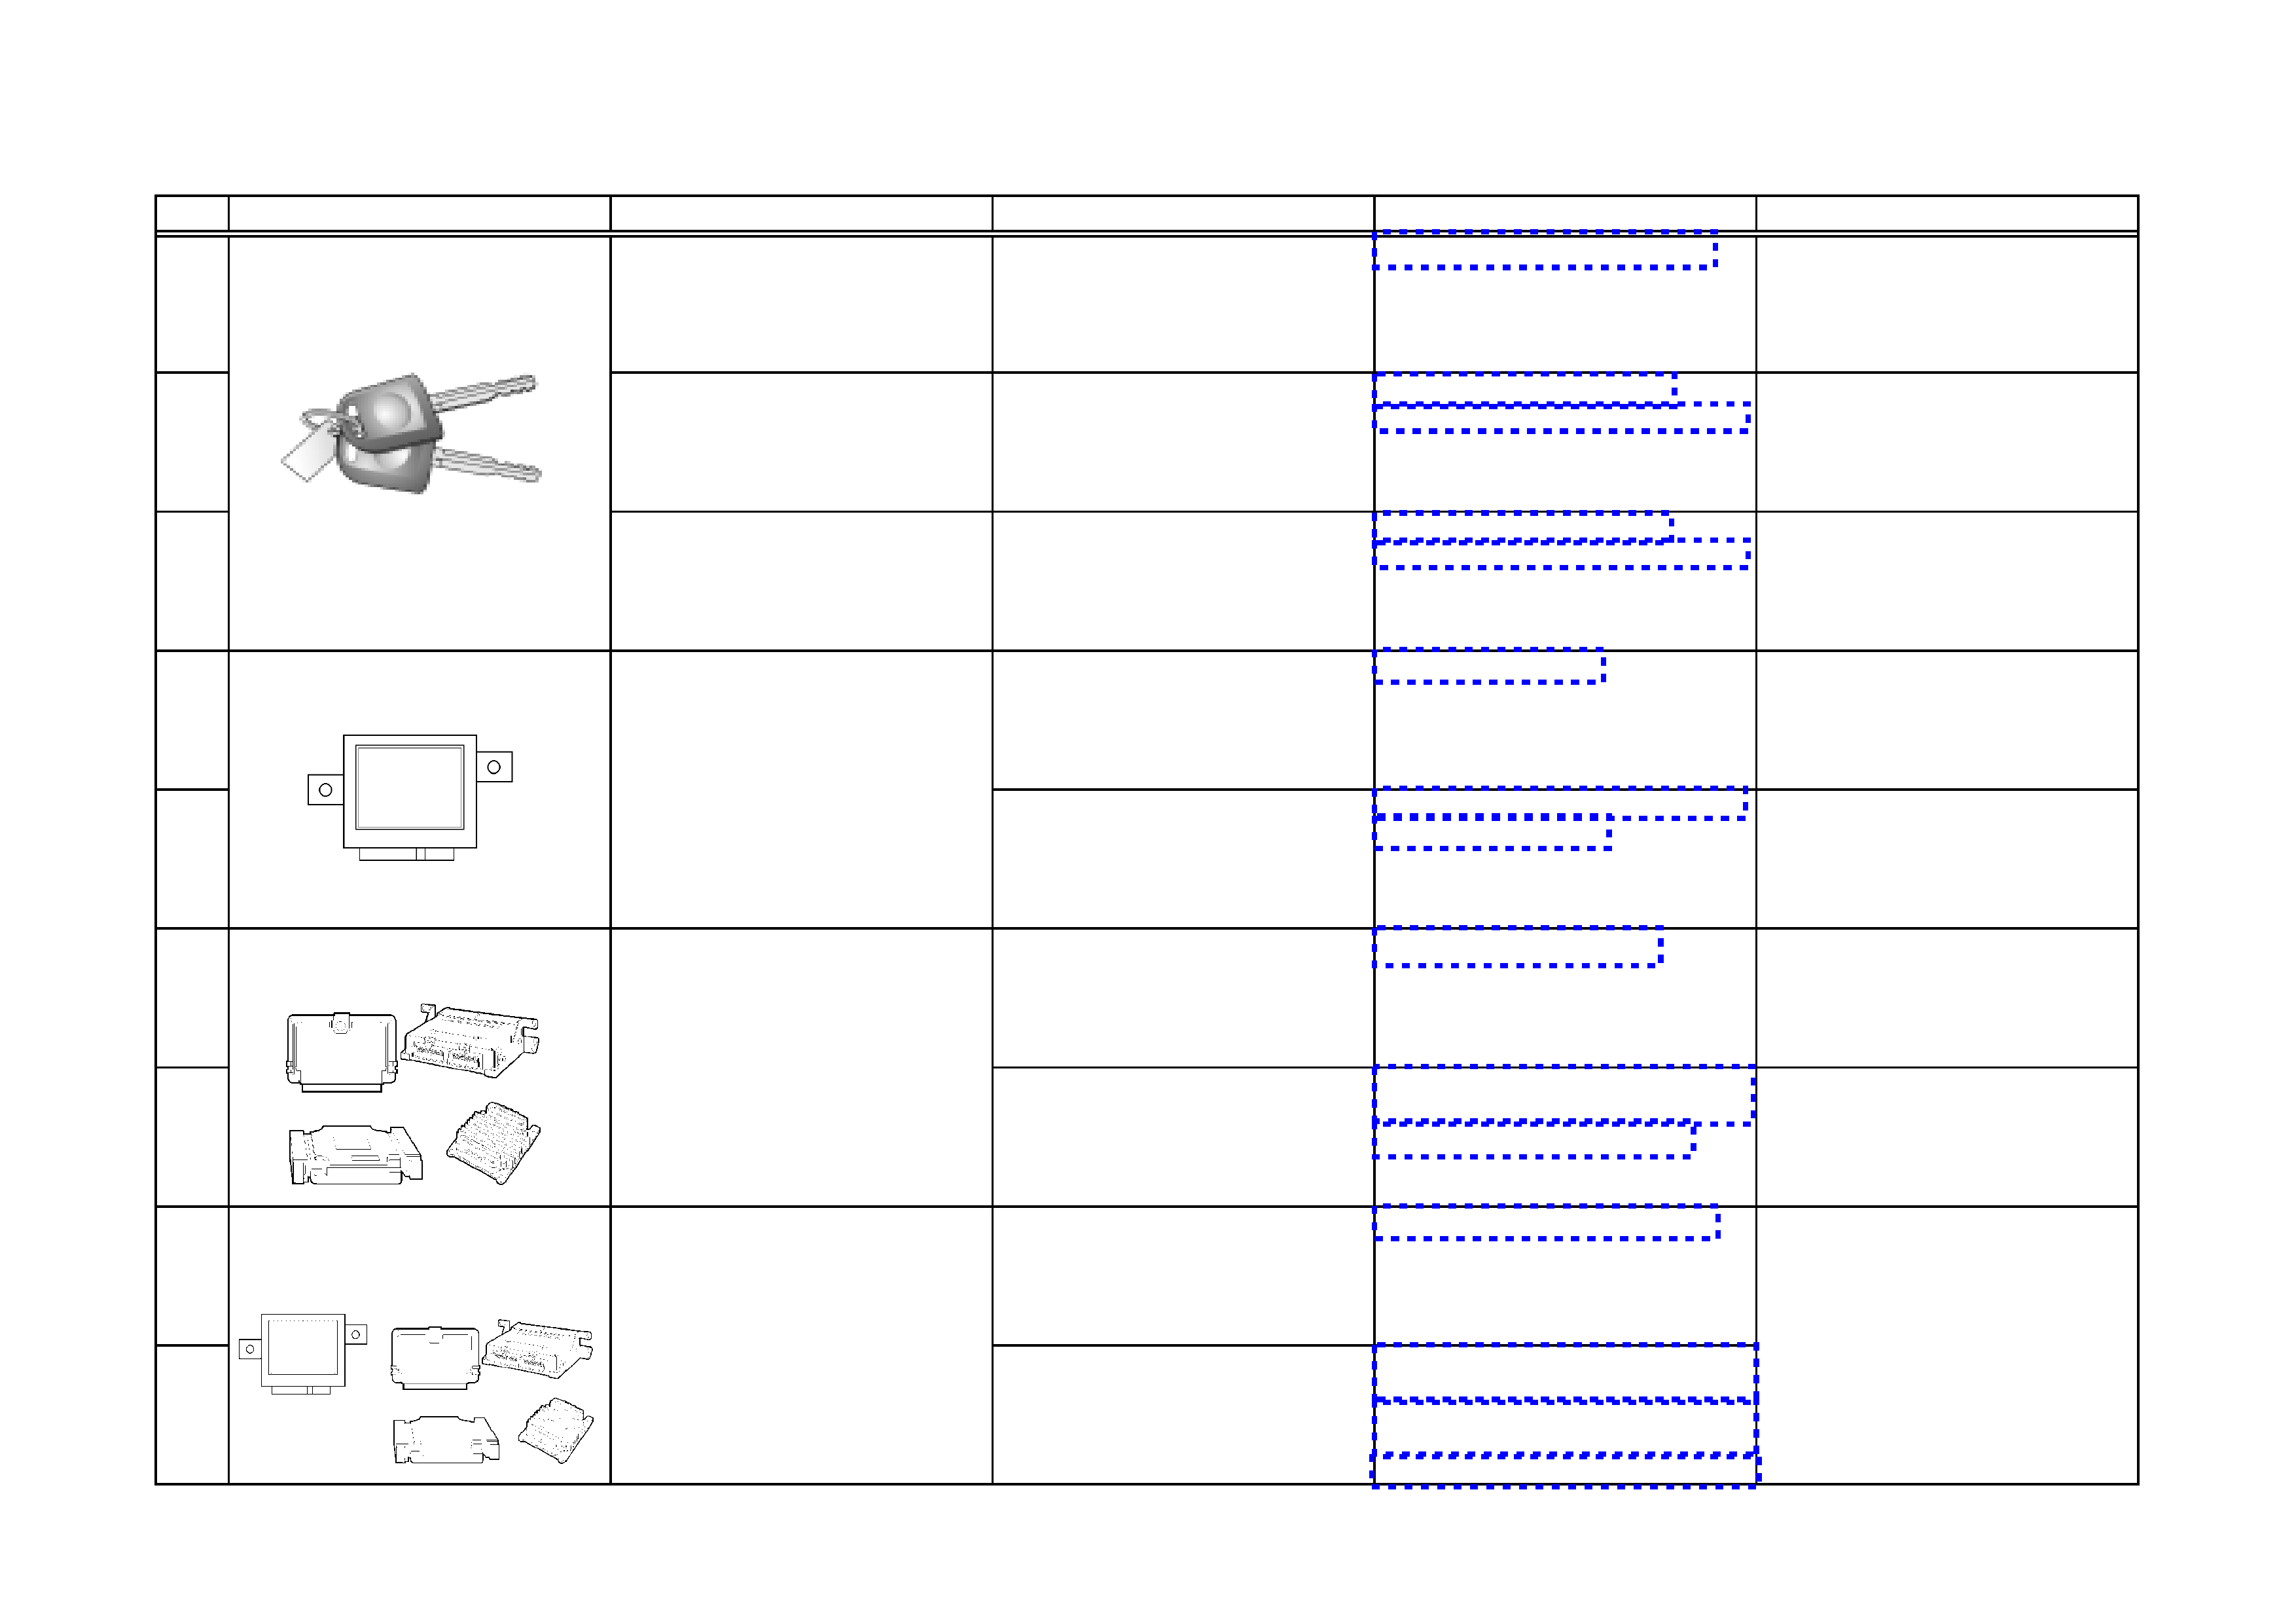
ICU (Immobiliser Control Unit) &
ECM/PCM (Engine Control
Module/Powertrain Control Module)
ECM/PCM (Engine Control
Module/Powertrain Control Module)
ICU (Immobiliser Control Unit)
Transponder Key
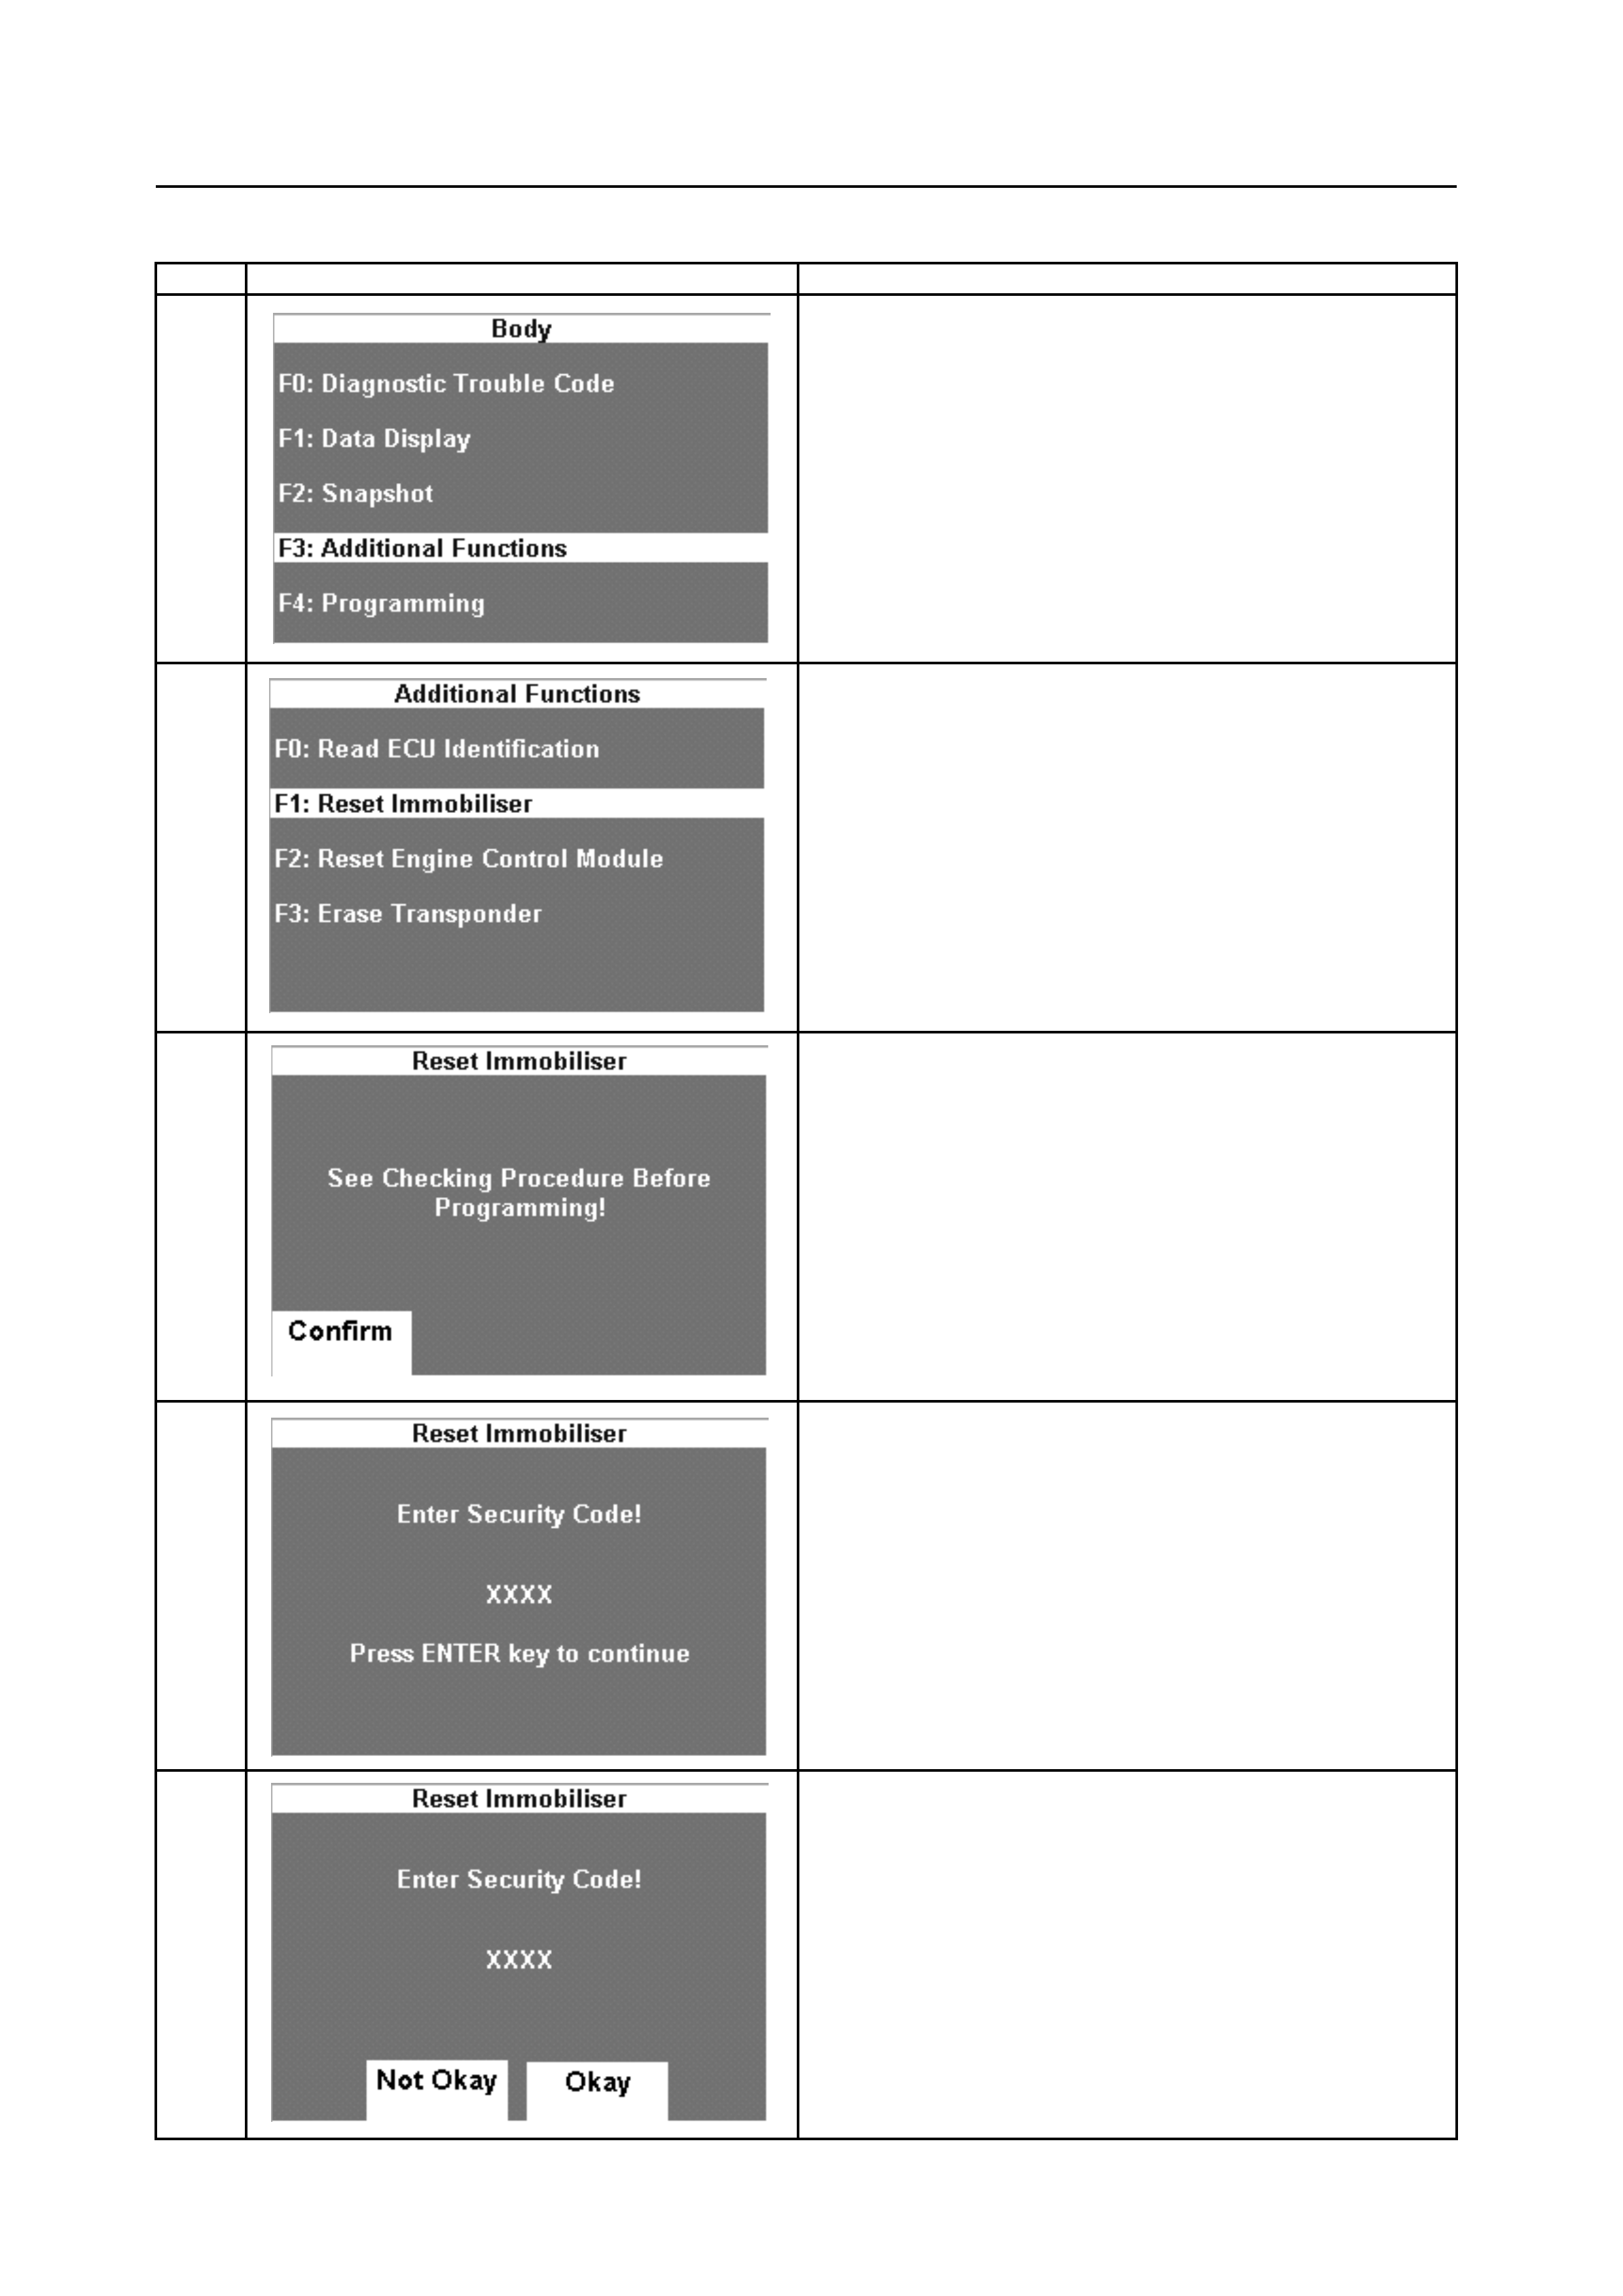
Reset ICU-Page 1 of 2
"Reset ICU": To initialize the Immobiliser Function of the ICU.
Ste
p
Tech 2/TIS 2000 Screen Action
1
Select "F3: Additional Functions".
2
Select "F1: Reset Immobliser".
3
Press the "Confirm" soft-key.
4
1. Enter the correct "Security Code".
2. Press the "Enter" Key.
5
1. Press the "Okay" soft-key, if entered "Security
Code" is correct.
2. Press the "Not Okay" soft-key, if the entered
"Security Code" is incorrect.
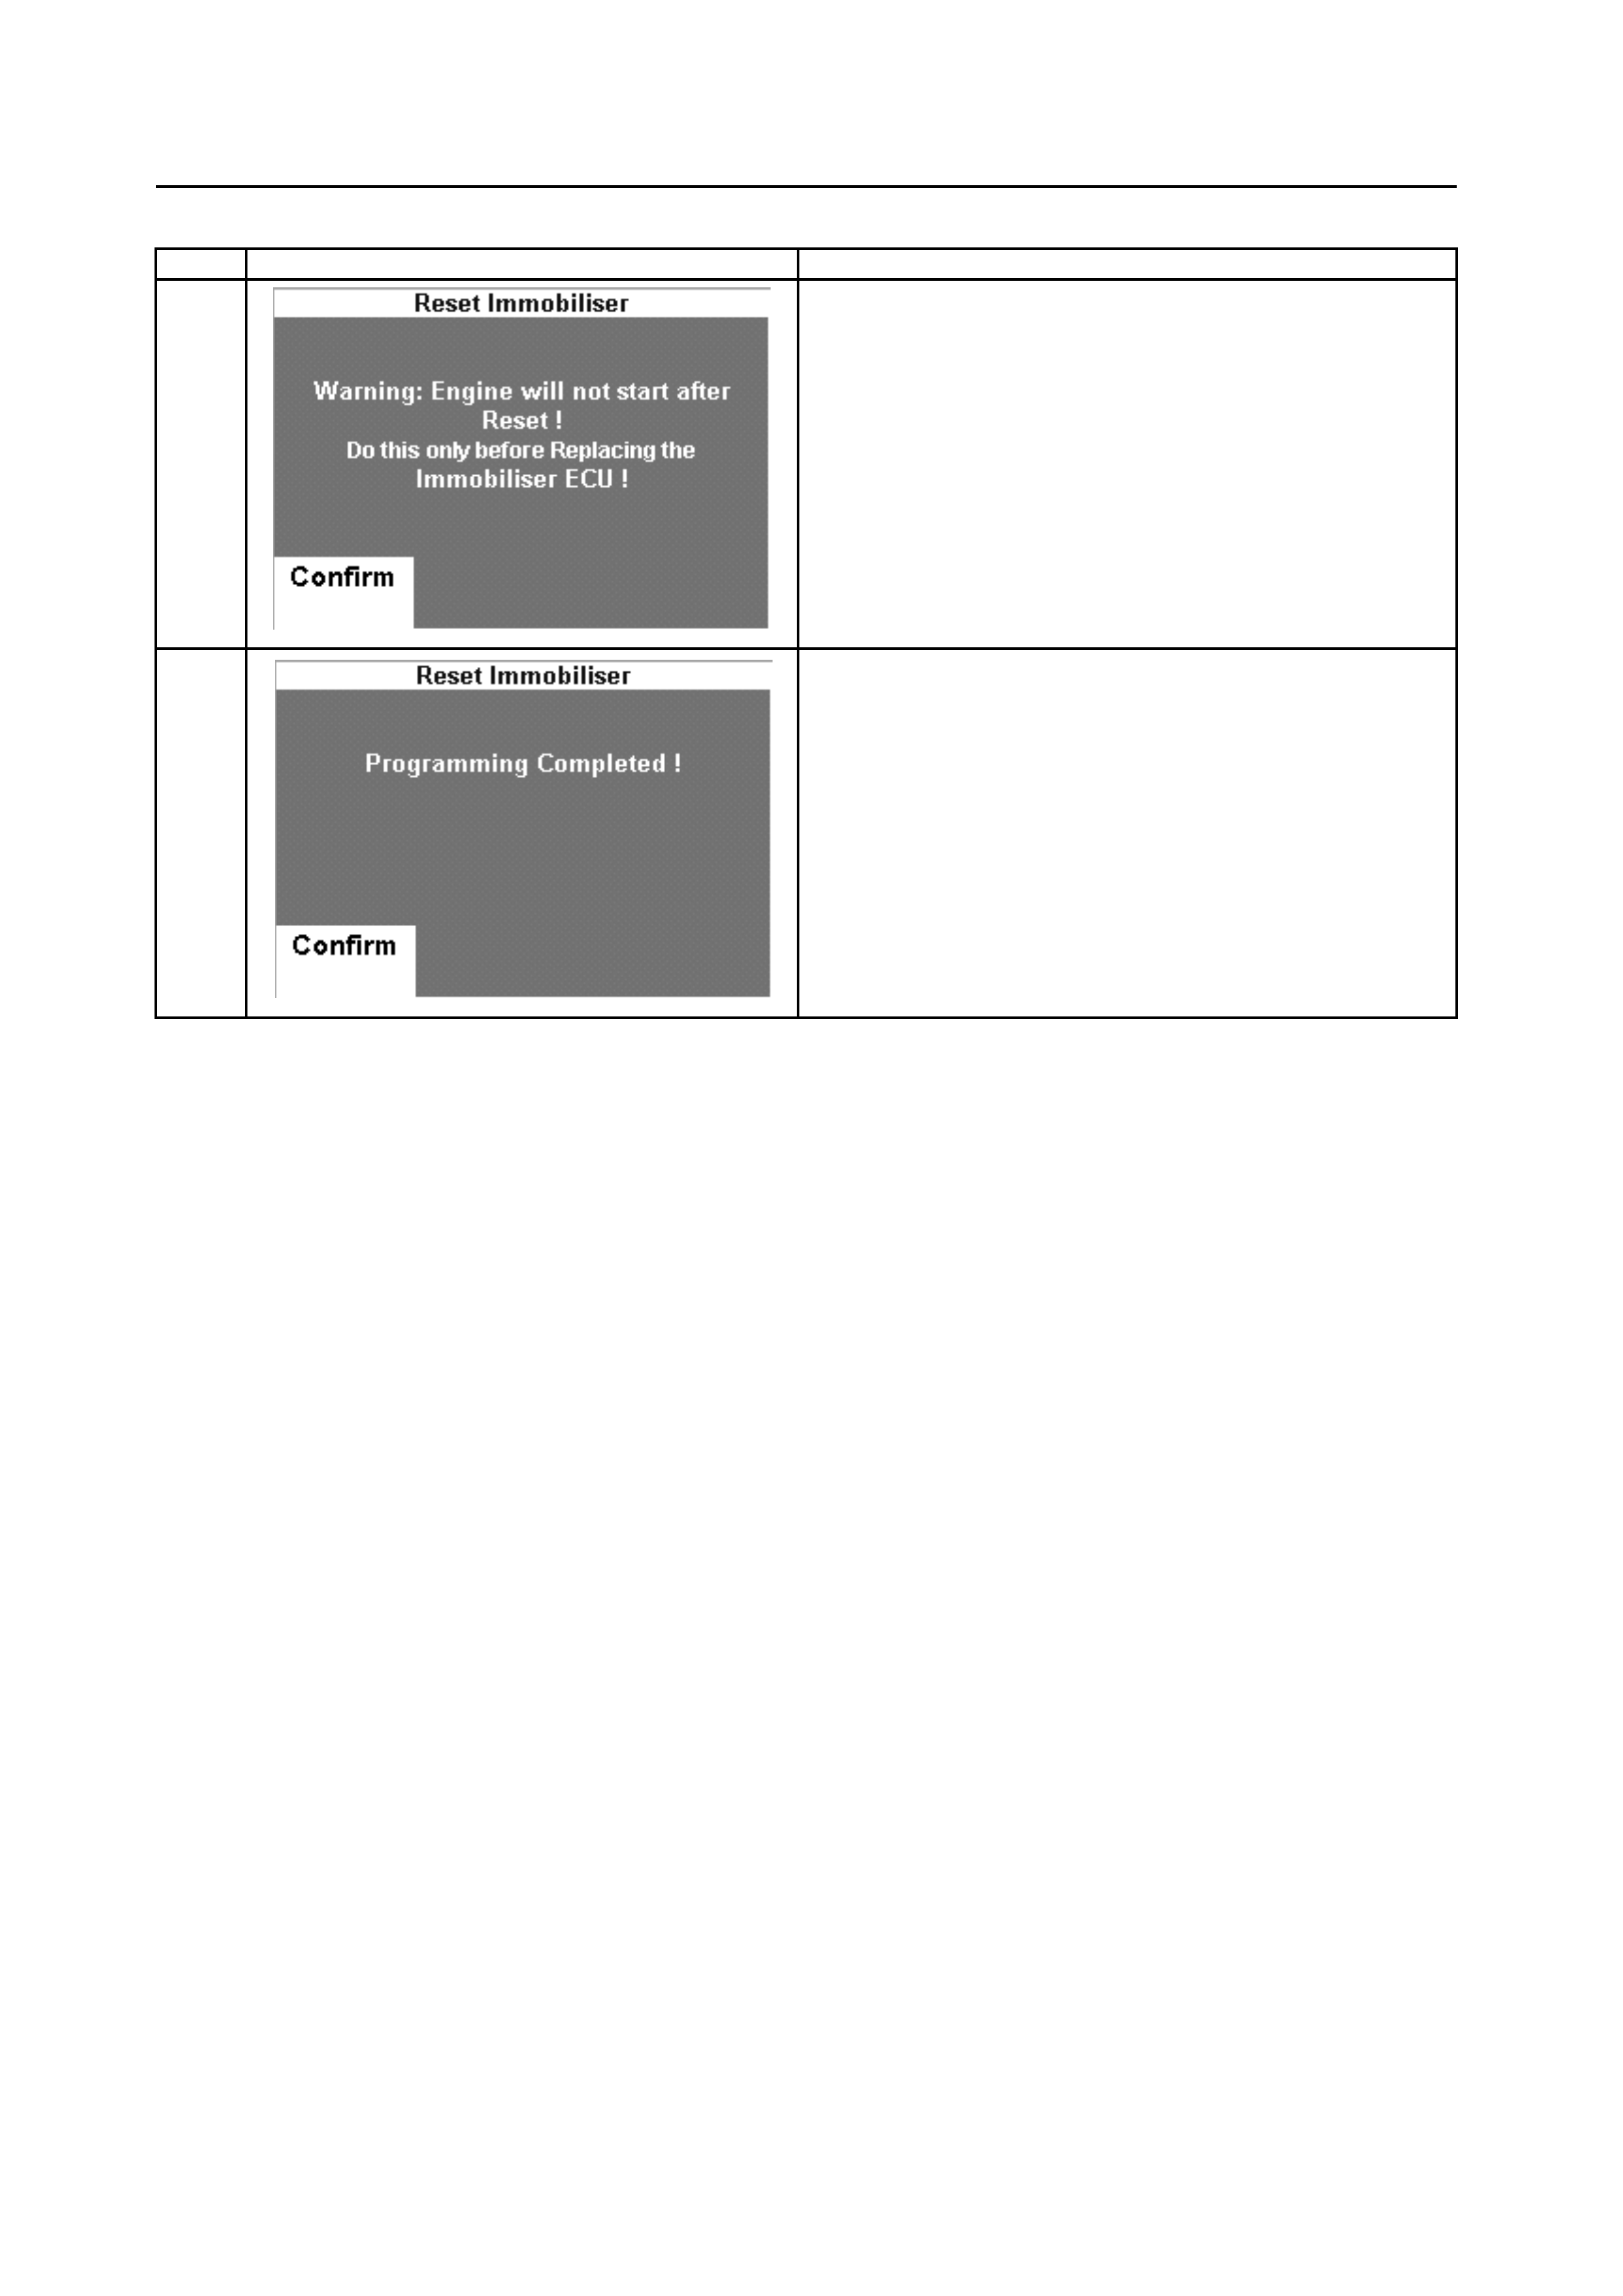
Reset ICU-Page 2 of 2
Ste
p
Tech 2/TIS 2000 Screen Action
6
Press the "Confirm" soft-key.
7
ICU Reset is complete. Press the "Confirm" soft-key.
Important: Turn the Ignition Switch "OFF" for
at least 40 seconds.
Attempt to start the engine and verify the engine
will NOT start.

ICU Programming-Page 1 of 5
"ICU Pro
g
rammin
g
": To
p
ro
g
ram immobiliser function into the ICU.
Ste
p
Tech 2/TIS 2000 Screen Action
1
Select "F4: Programming".
2
Select "F0: Program Immobliser Function".
3
Press "Confirm" key and get approval from TIS. If
there is already approval by TIS, "Step 9" menu
appears on the Tech 2 display.
4
1. Connect a "Hardware Key" to the PC to confirm
your authorisation.
2. Connect "RS 232" cable to the PC and Tech 2.
3. Power ON Tech 2 and wait for Tech 2 title screen.
4. Select "Security Access" in the TIS 2000 screen.
5
1. Click "Tech 2" and "Next".
2. TIS 2000 starts to communicate with Tech 2.
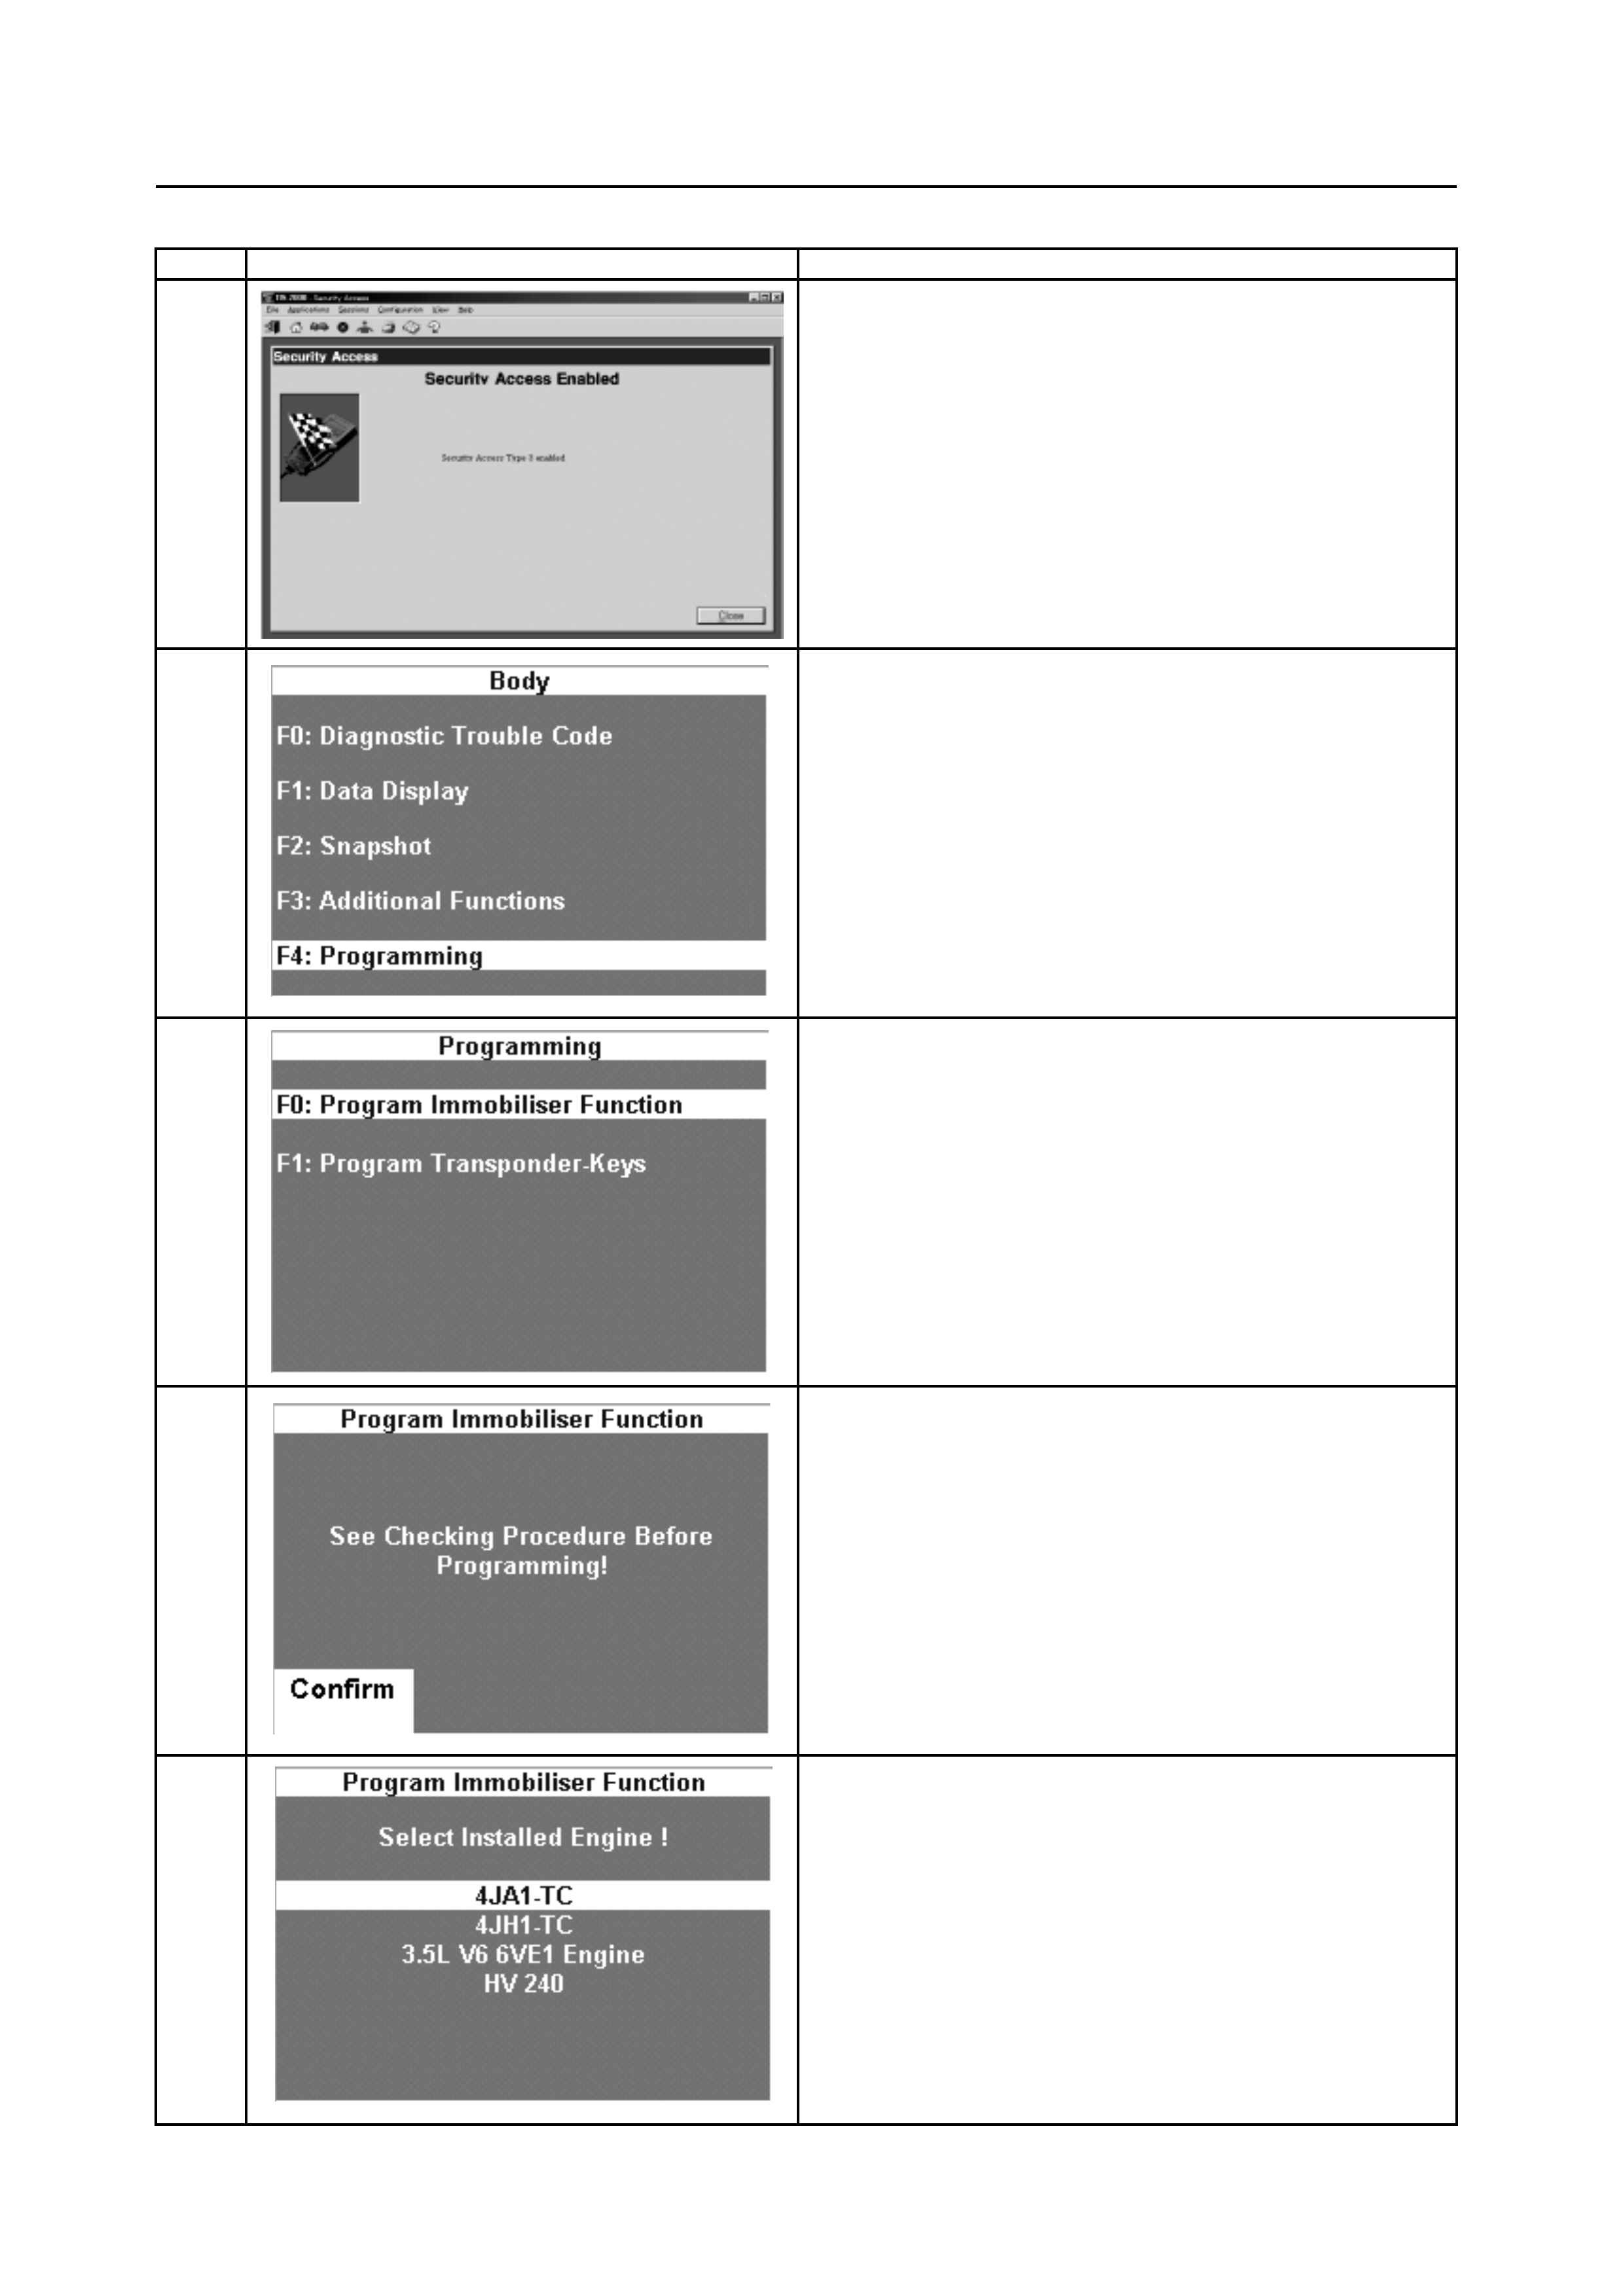
ICU Programming-Page 2 of 5
Ste
p
Tech 2/TIS 2000 Screen Action
6
1. Now, security access is enabled (approved).
2. Click "Close" to finish.
7
Select "F4: Programming".
8
Select "F0: Program Immobliser Function".
9
Press the "Confirm" soft-key.
10
Select the correct "Installed Engine"
This screen has various types depending on the
vehicle model or model year.

ICU Programming-Page 3 of 5
Ste
p
Tech 2/TIS 2000 Screen Action
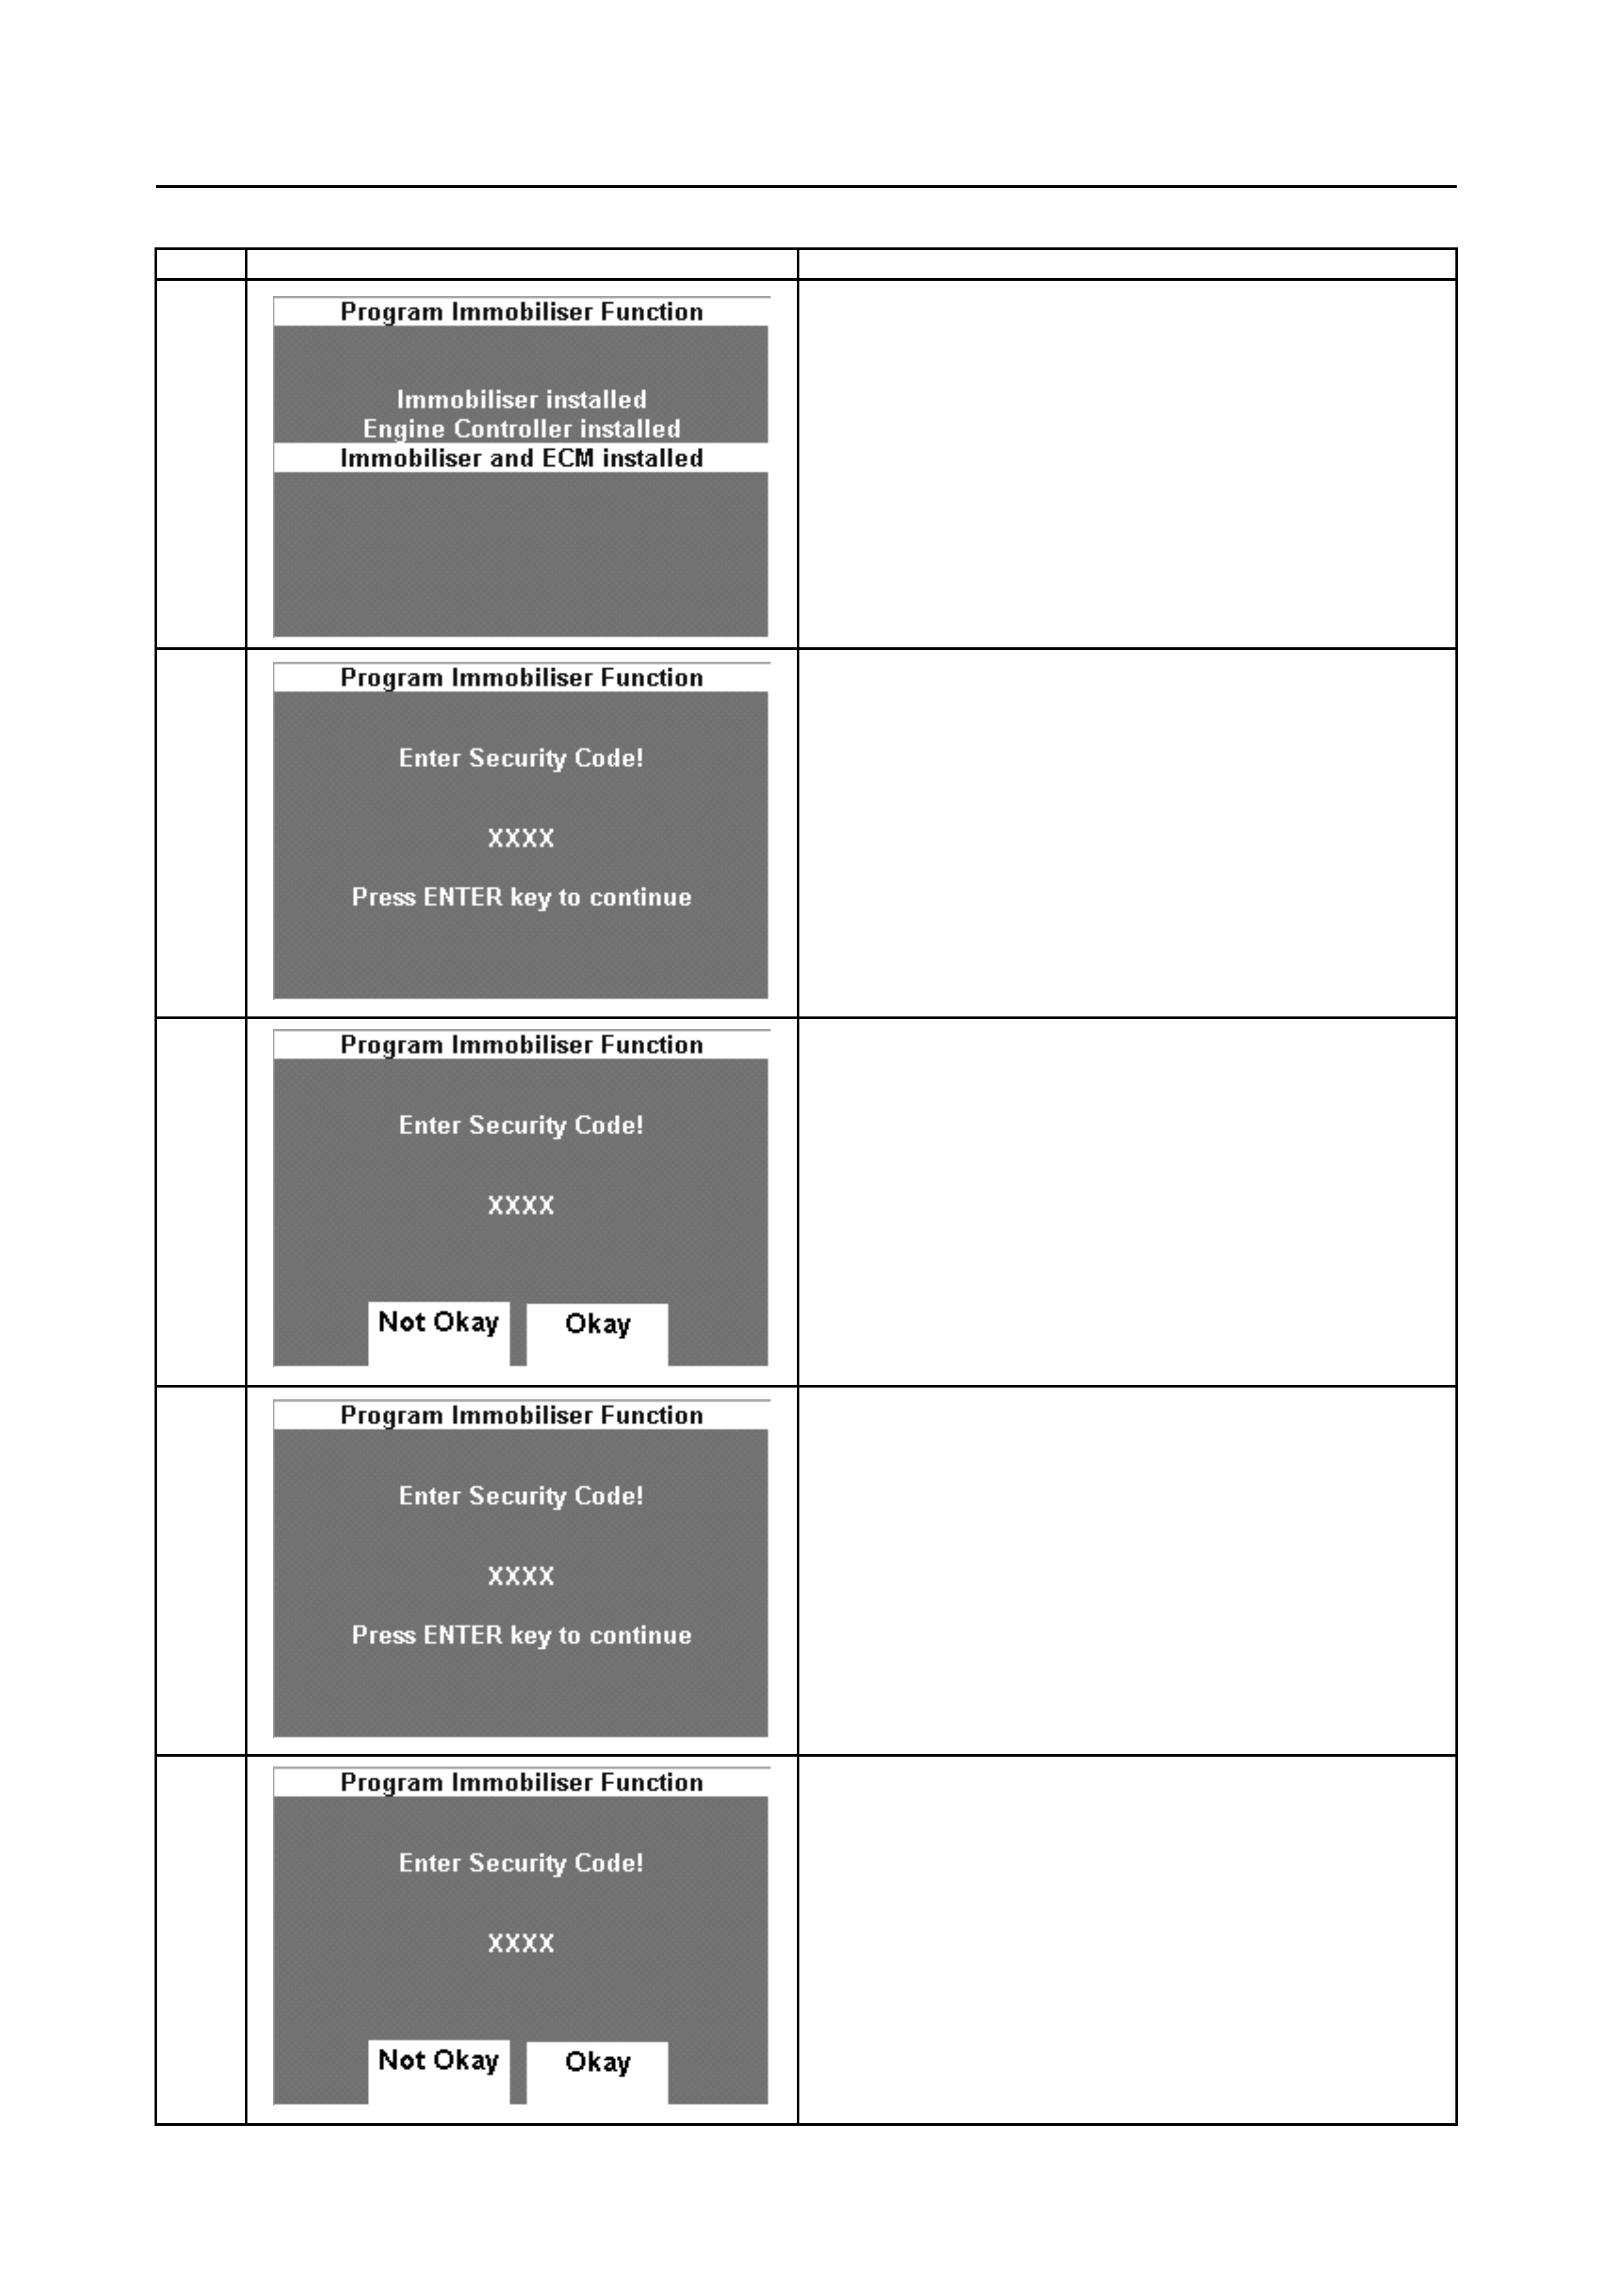
11
Select "Immobiliser installed".
12
1. Enter correct "Security Code".
2. Press the "Enter" Key.
13
1. Press the"Okay" soft-key, if the entered "Security
Code" is correct.
2. Press the "Not Okay" soft-key, if the entered
"Security Code" is incorrect.
14
1. Enter the correct "Vehicle Identification Number
(VIN)".
2. Press the "Enter" Key.
15
Turn the "Ignition Switch" to the "OFF" position.

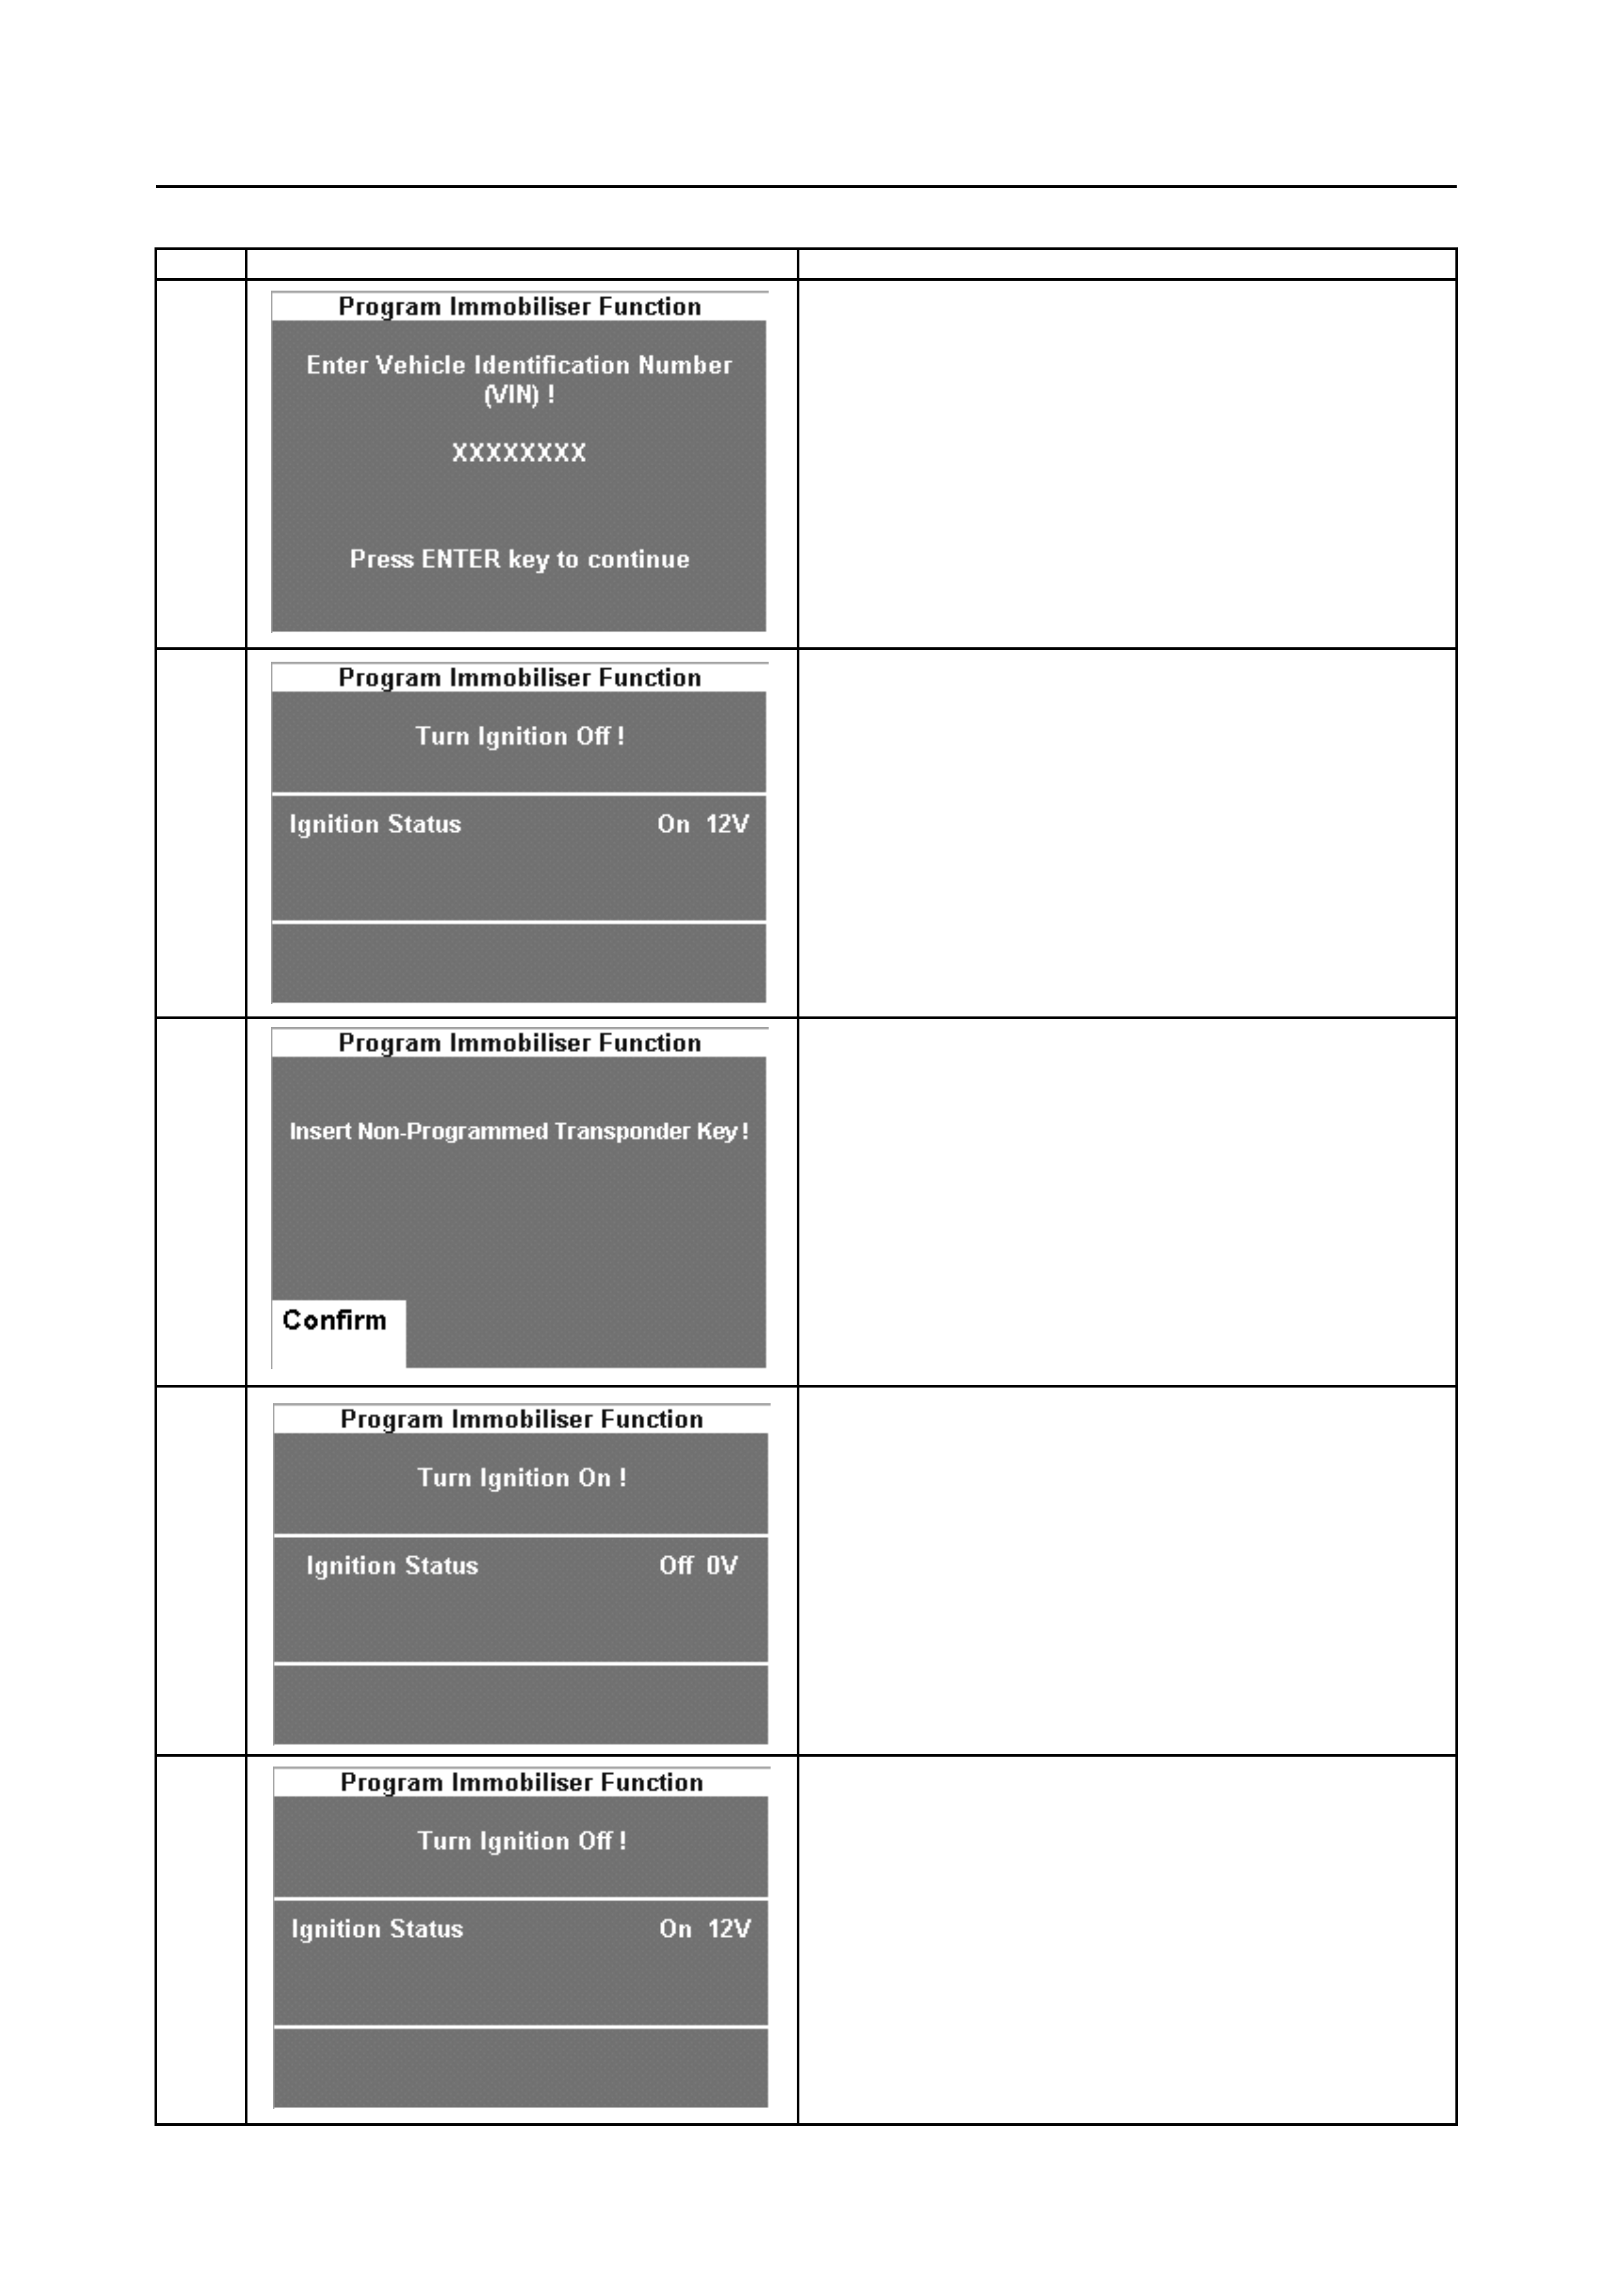
ICU Programming-Page 4 of 5
Ste
p
Tech 2/TIS 2000 Screen Action
16
Press the "Confirm" soft-key.
17
Turn the "Ignition Switch" ON.
18
Turn the "Ignition Switch" OFF.
19
Turn the "Ignition Switch" ON.
20
Turn the "Ignition Switch"
OFF.
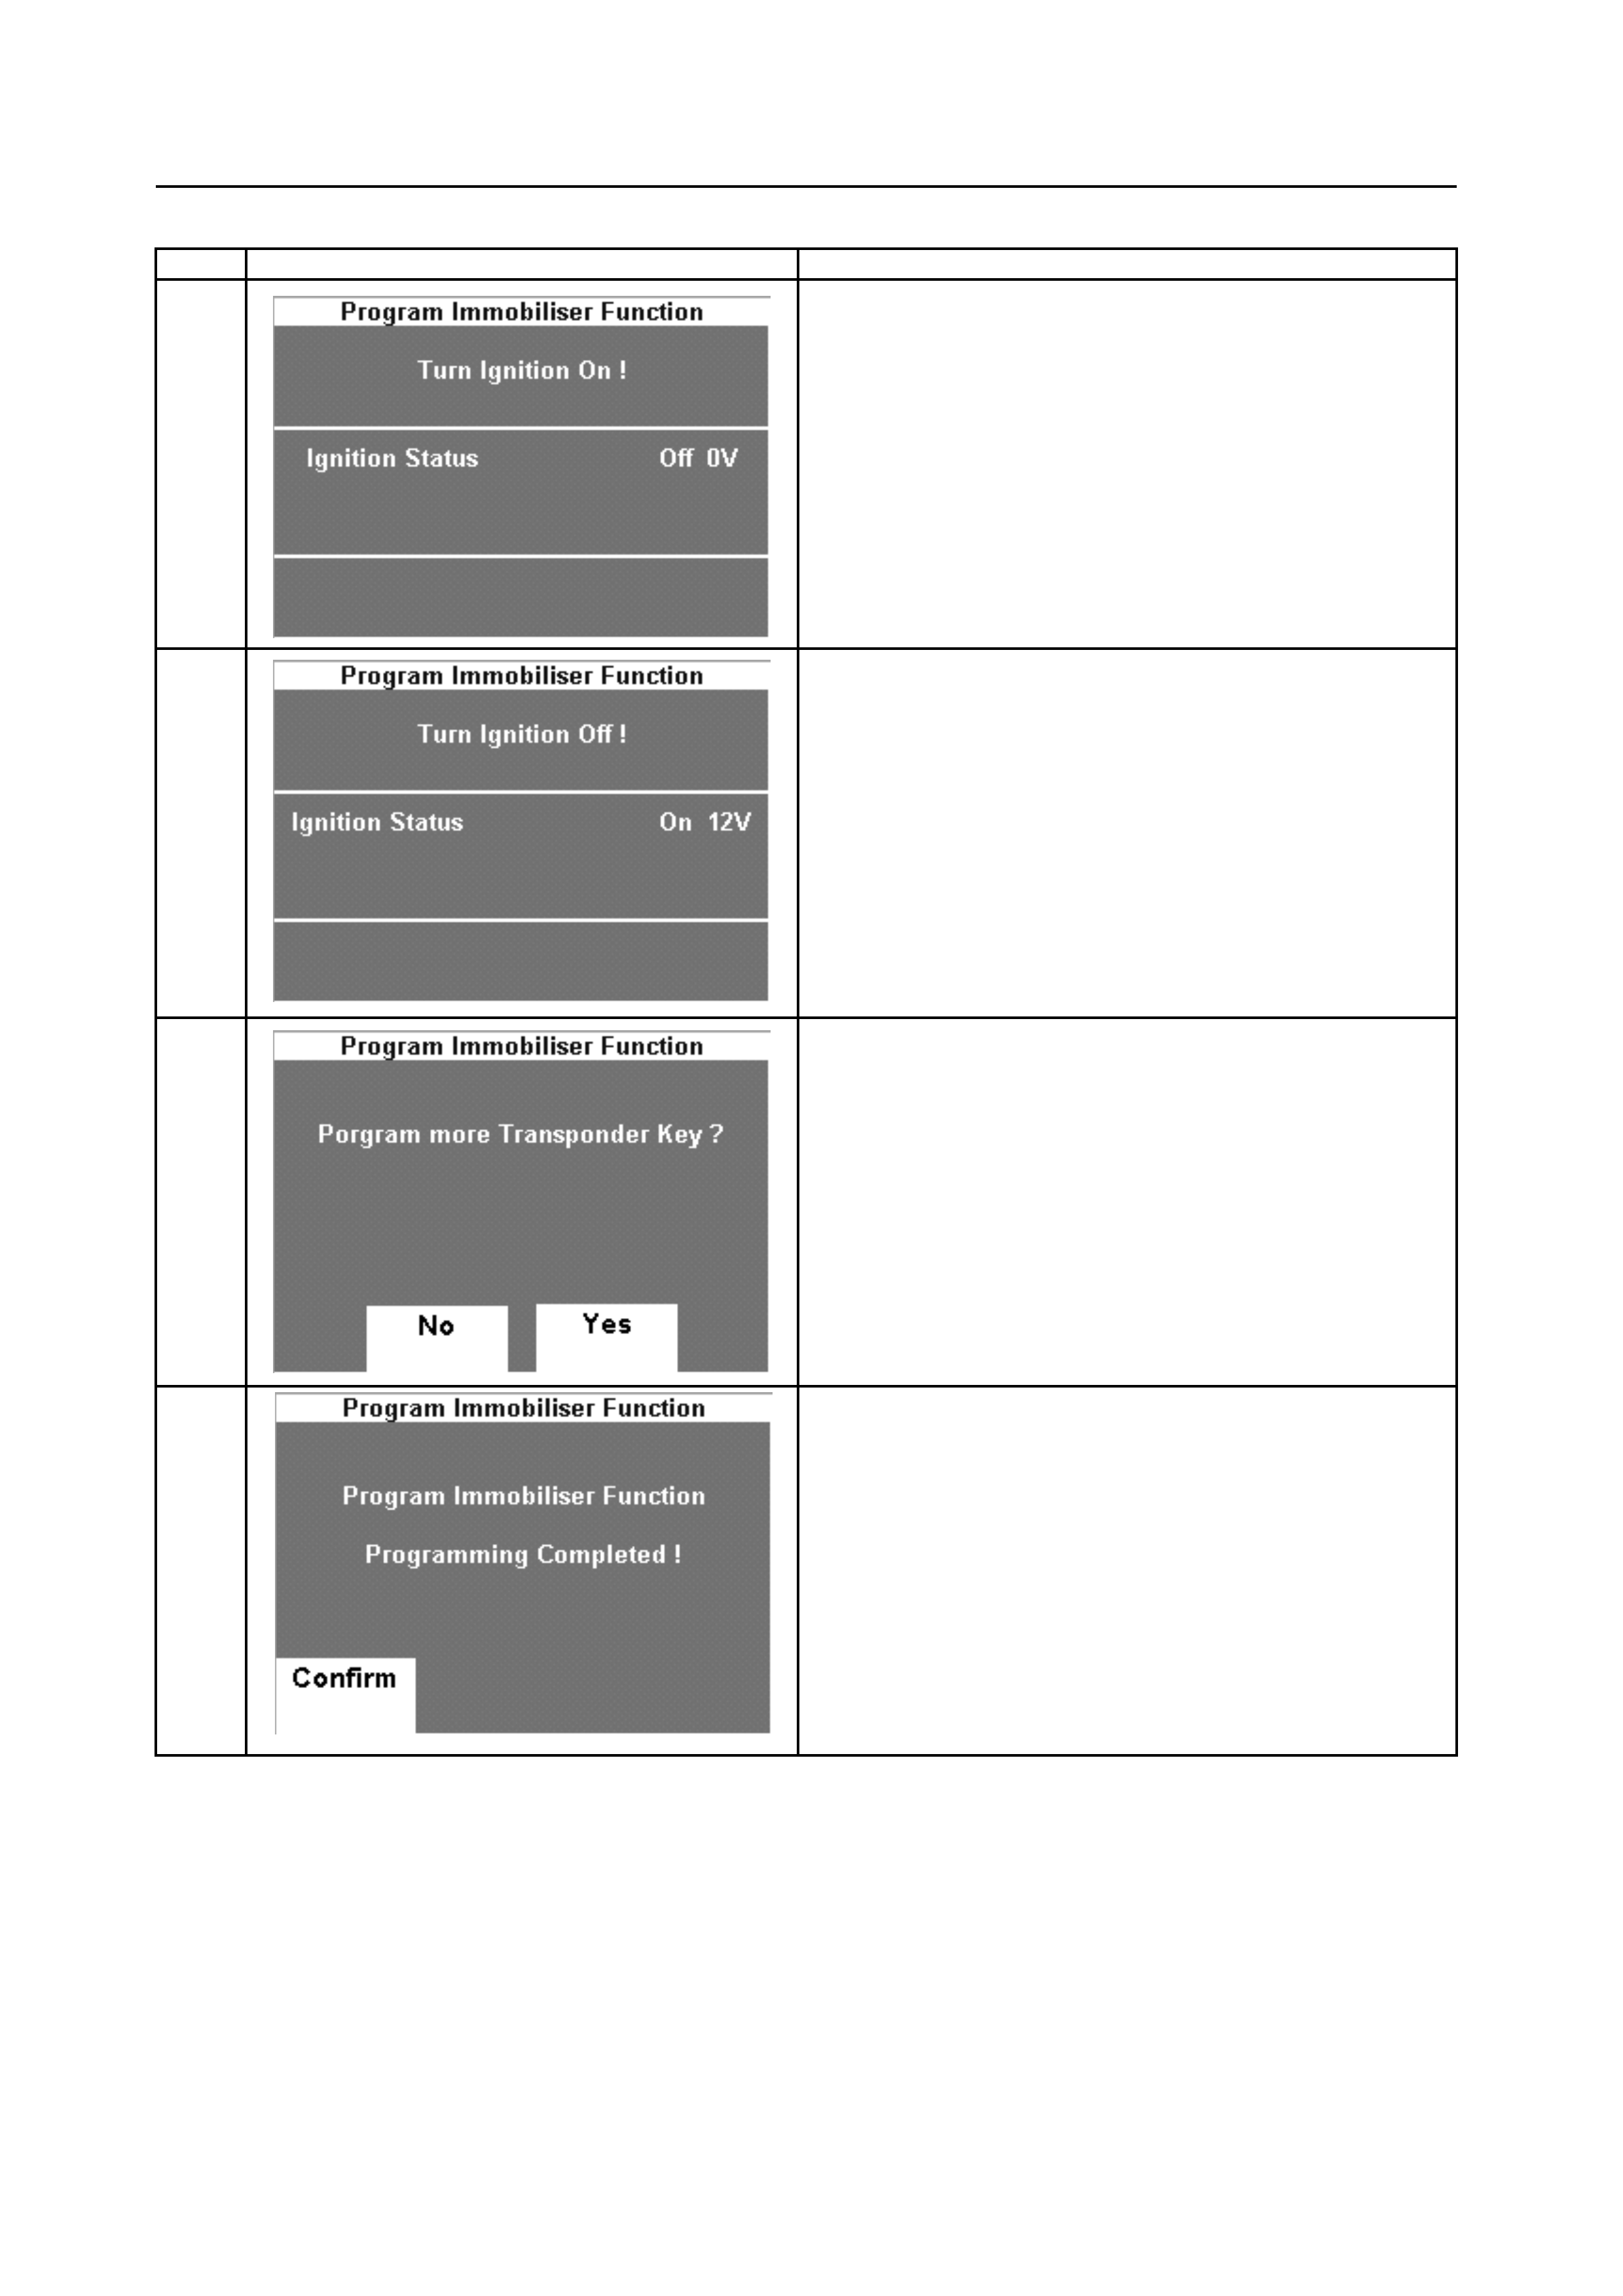
ICU Programming-Page 5 of 5
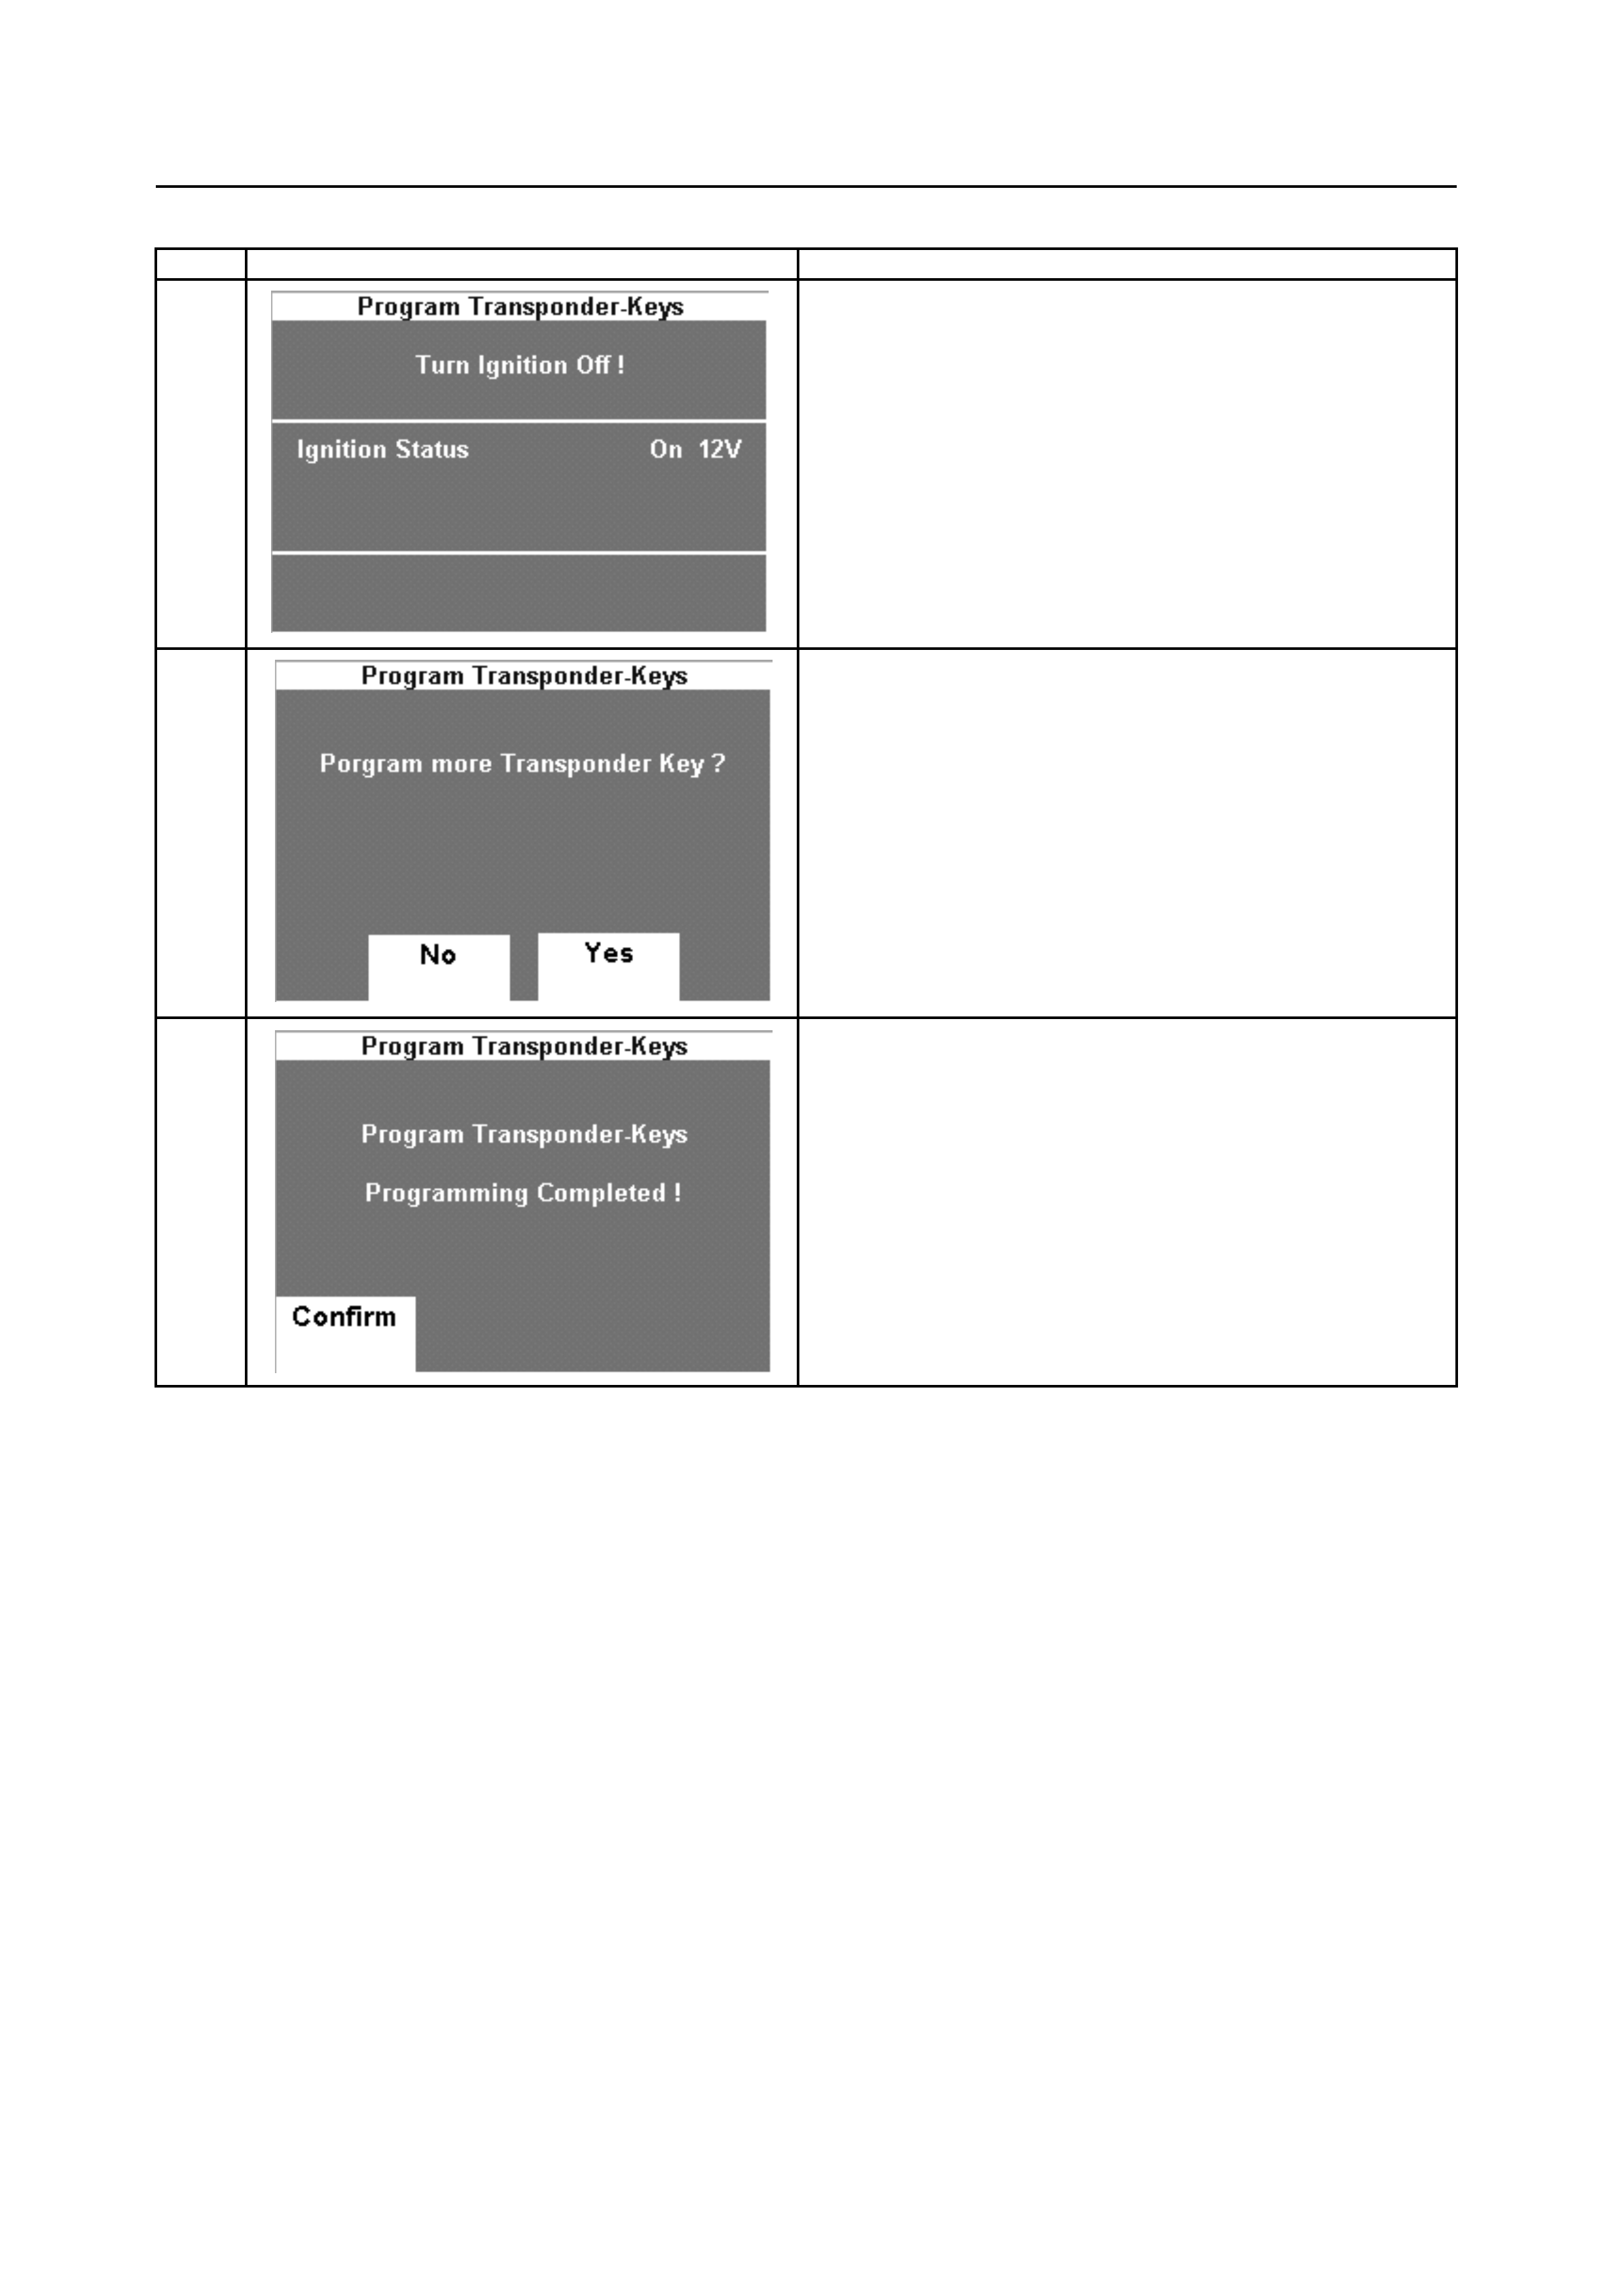
Ste
p
Tech 2/TIS 2000 Screen Action
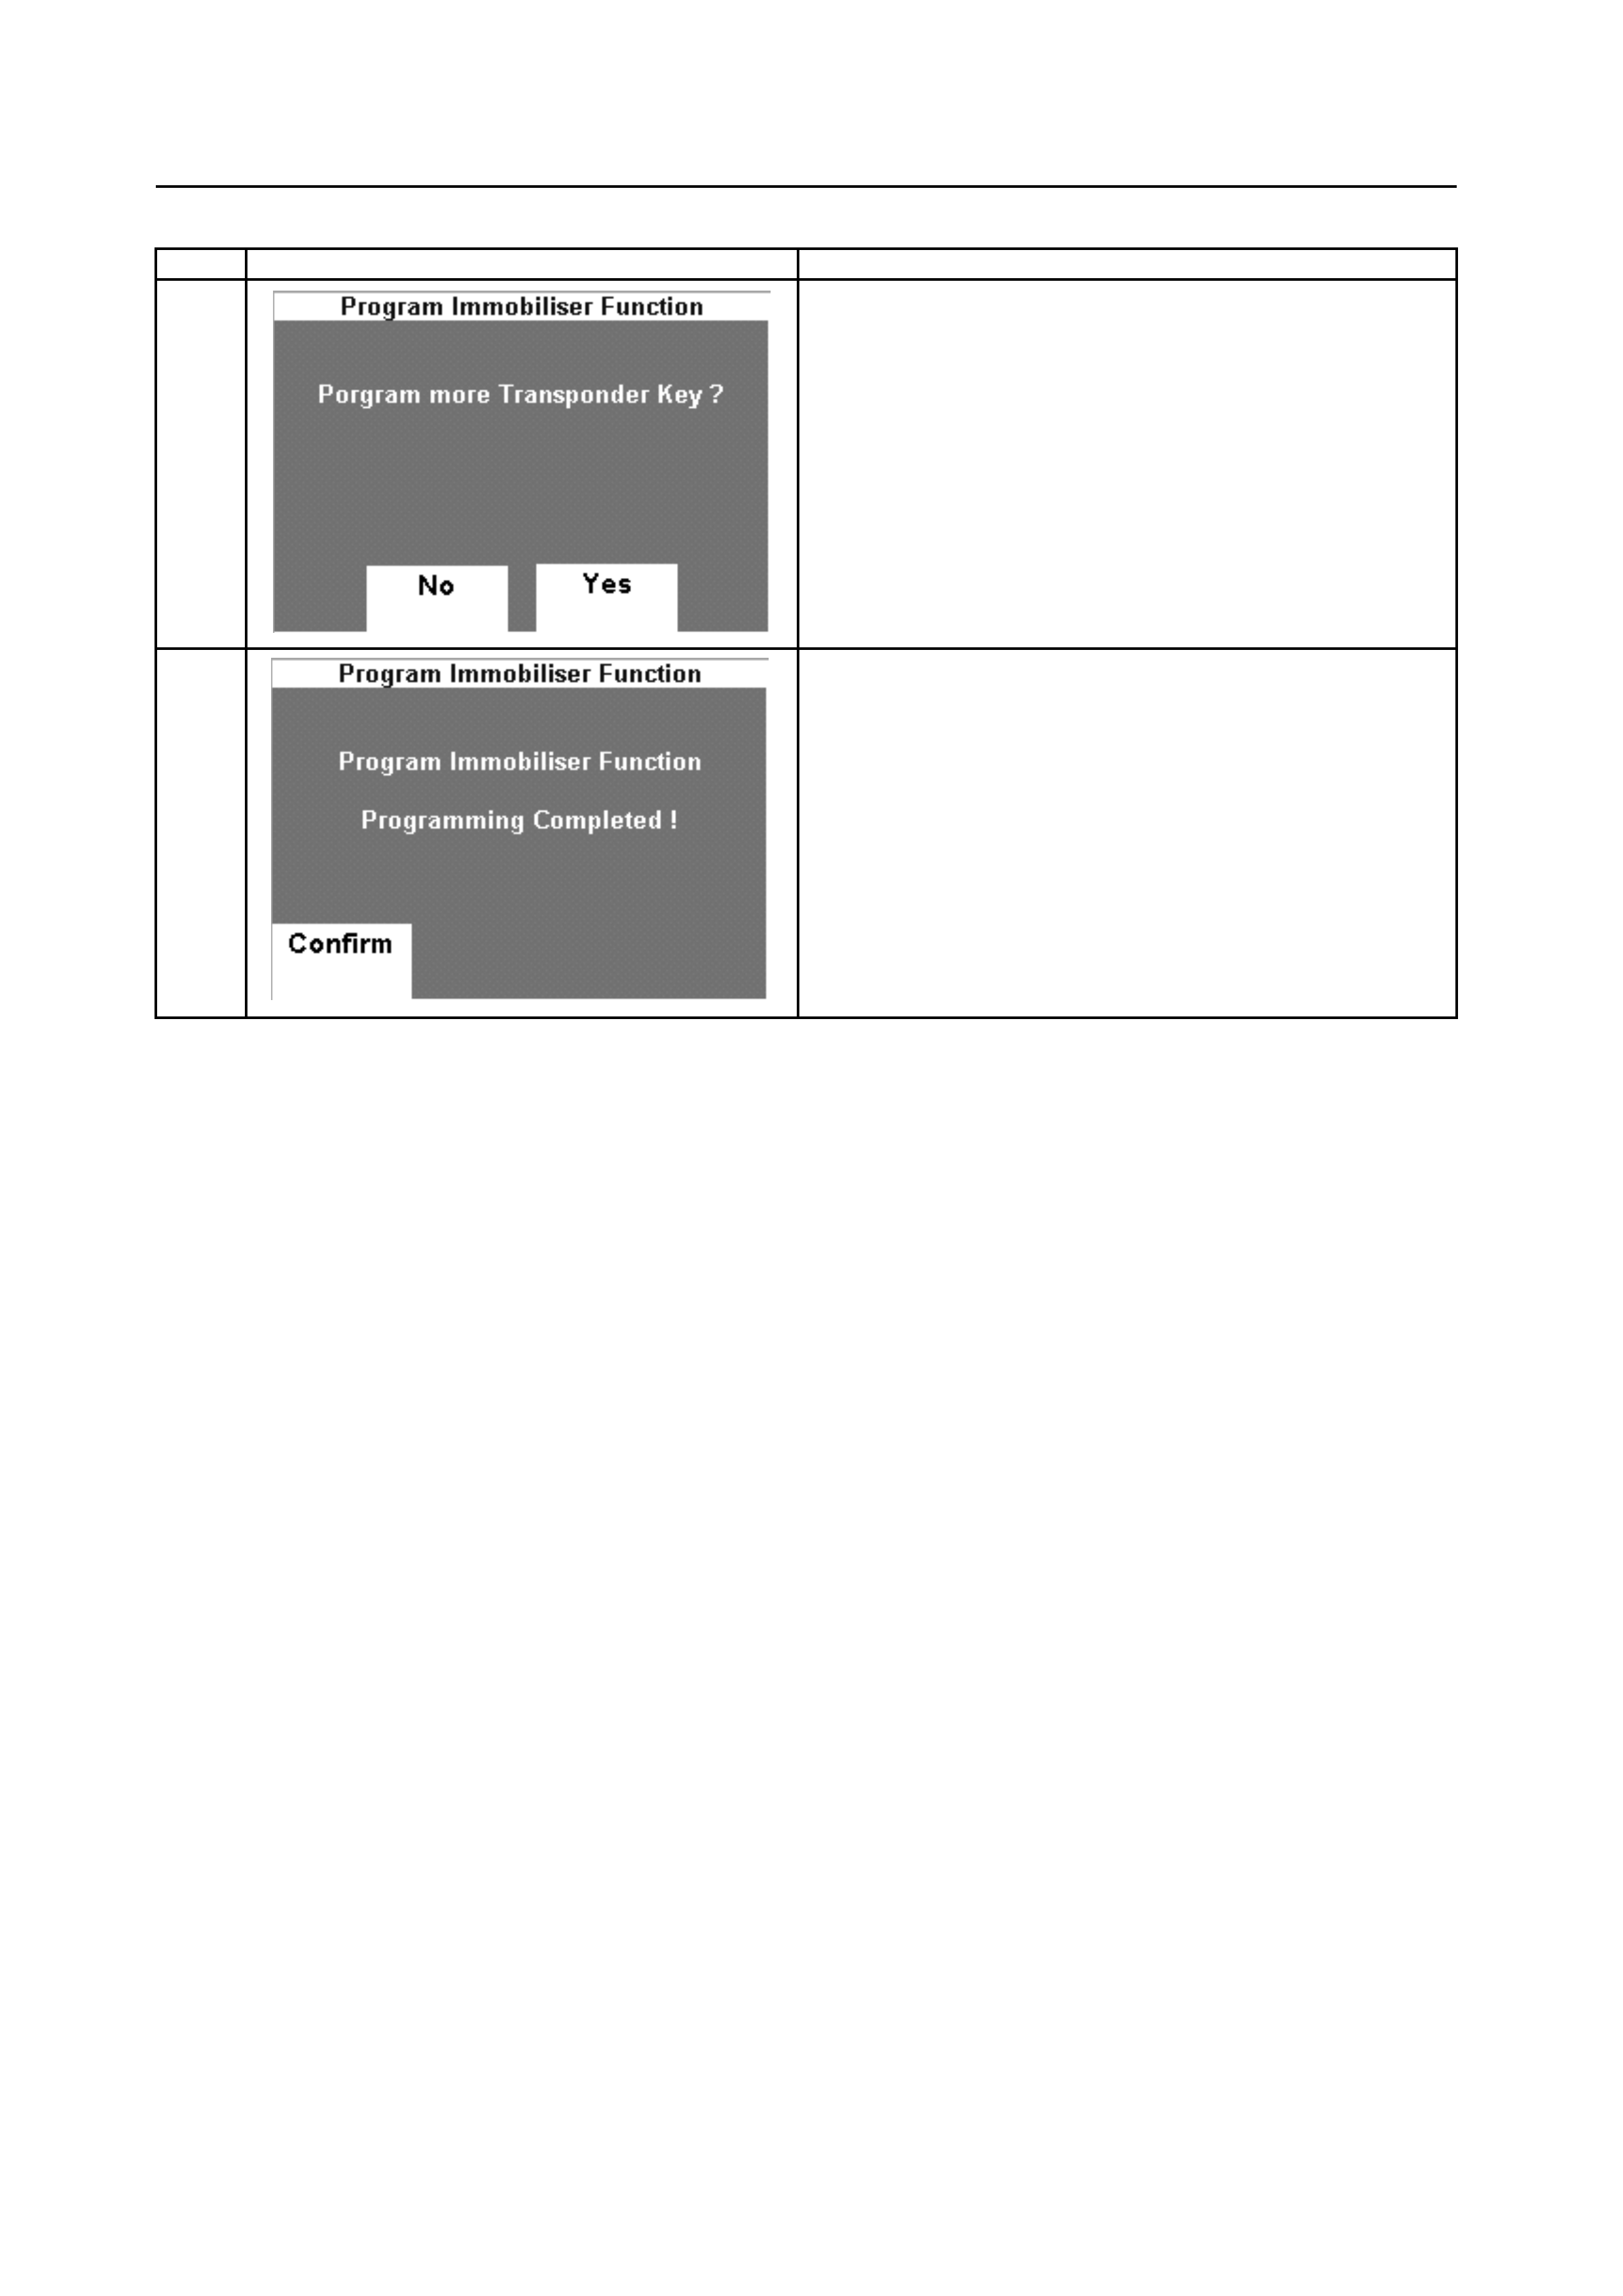
21
1. Press the "No" soft-key, if all transponder keys are
programmed.
2. Press the"Yes" soft-key, if more transponder keys
are to be to programmed. Repeat programming
steps from 16 to 21.
22
ICU programming is completed. Press the "Confirm"
soft-key.
Important: Turn the Ignition Switch "OFF" for
at least 40 seconds .
Attempt to start the engine and verify the engine
WILL start using with all key(s).
Reset ECM/PCM-Page 1 of 2
"Reset ECM/PCM": To initialize immobiliser function in the ECM/PCM.
Ste
p
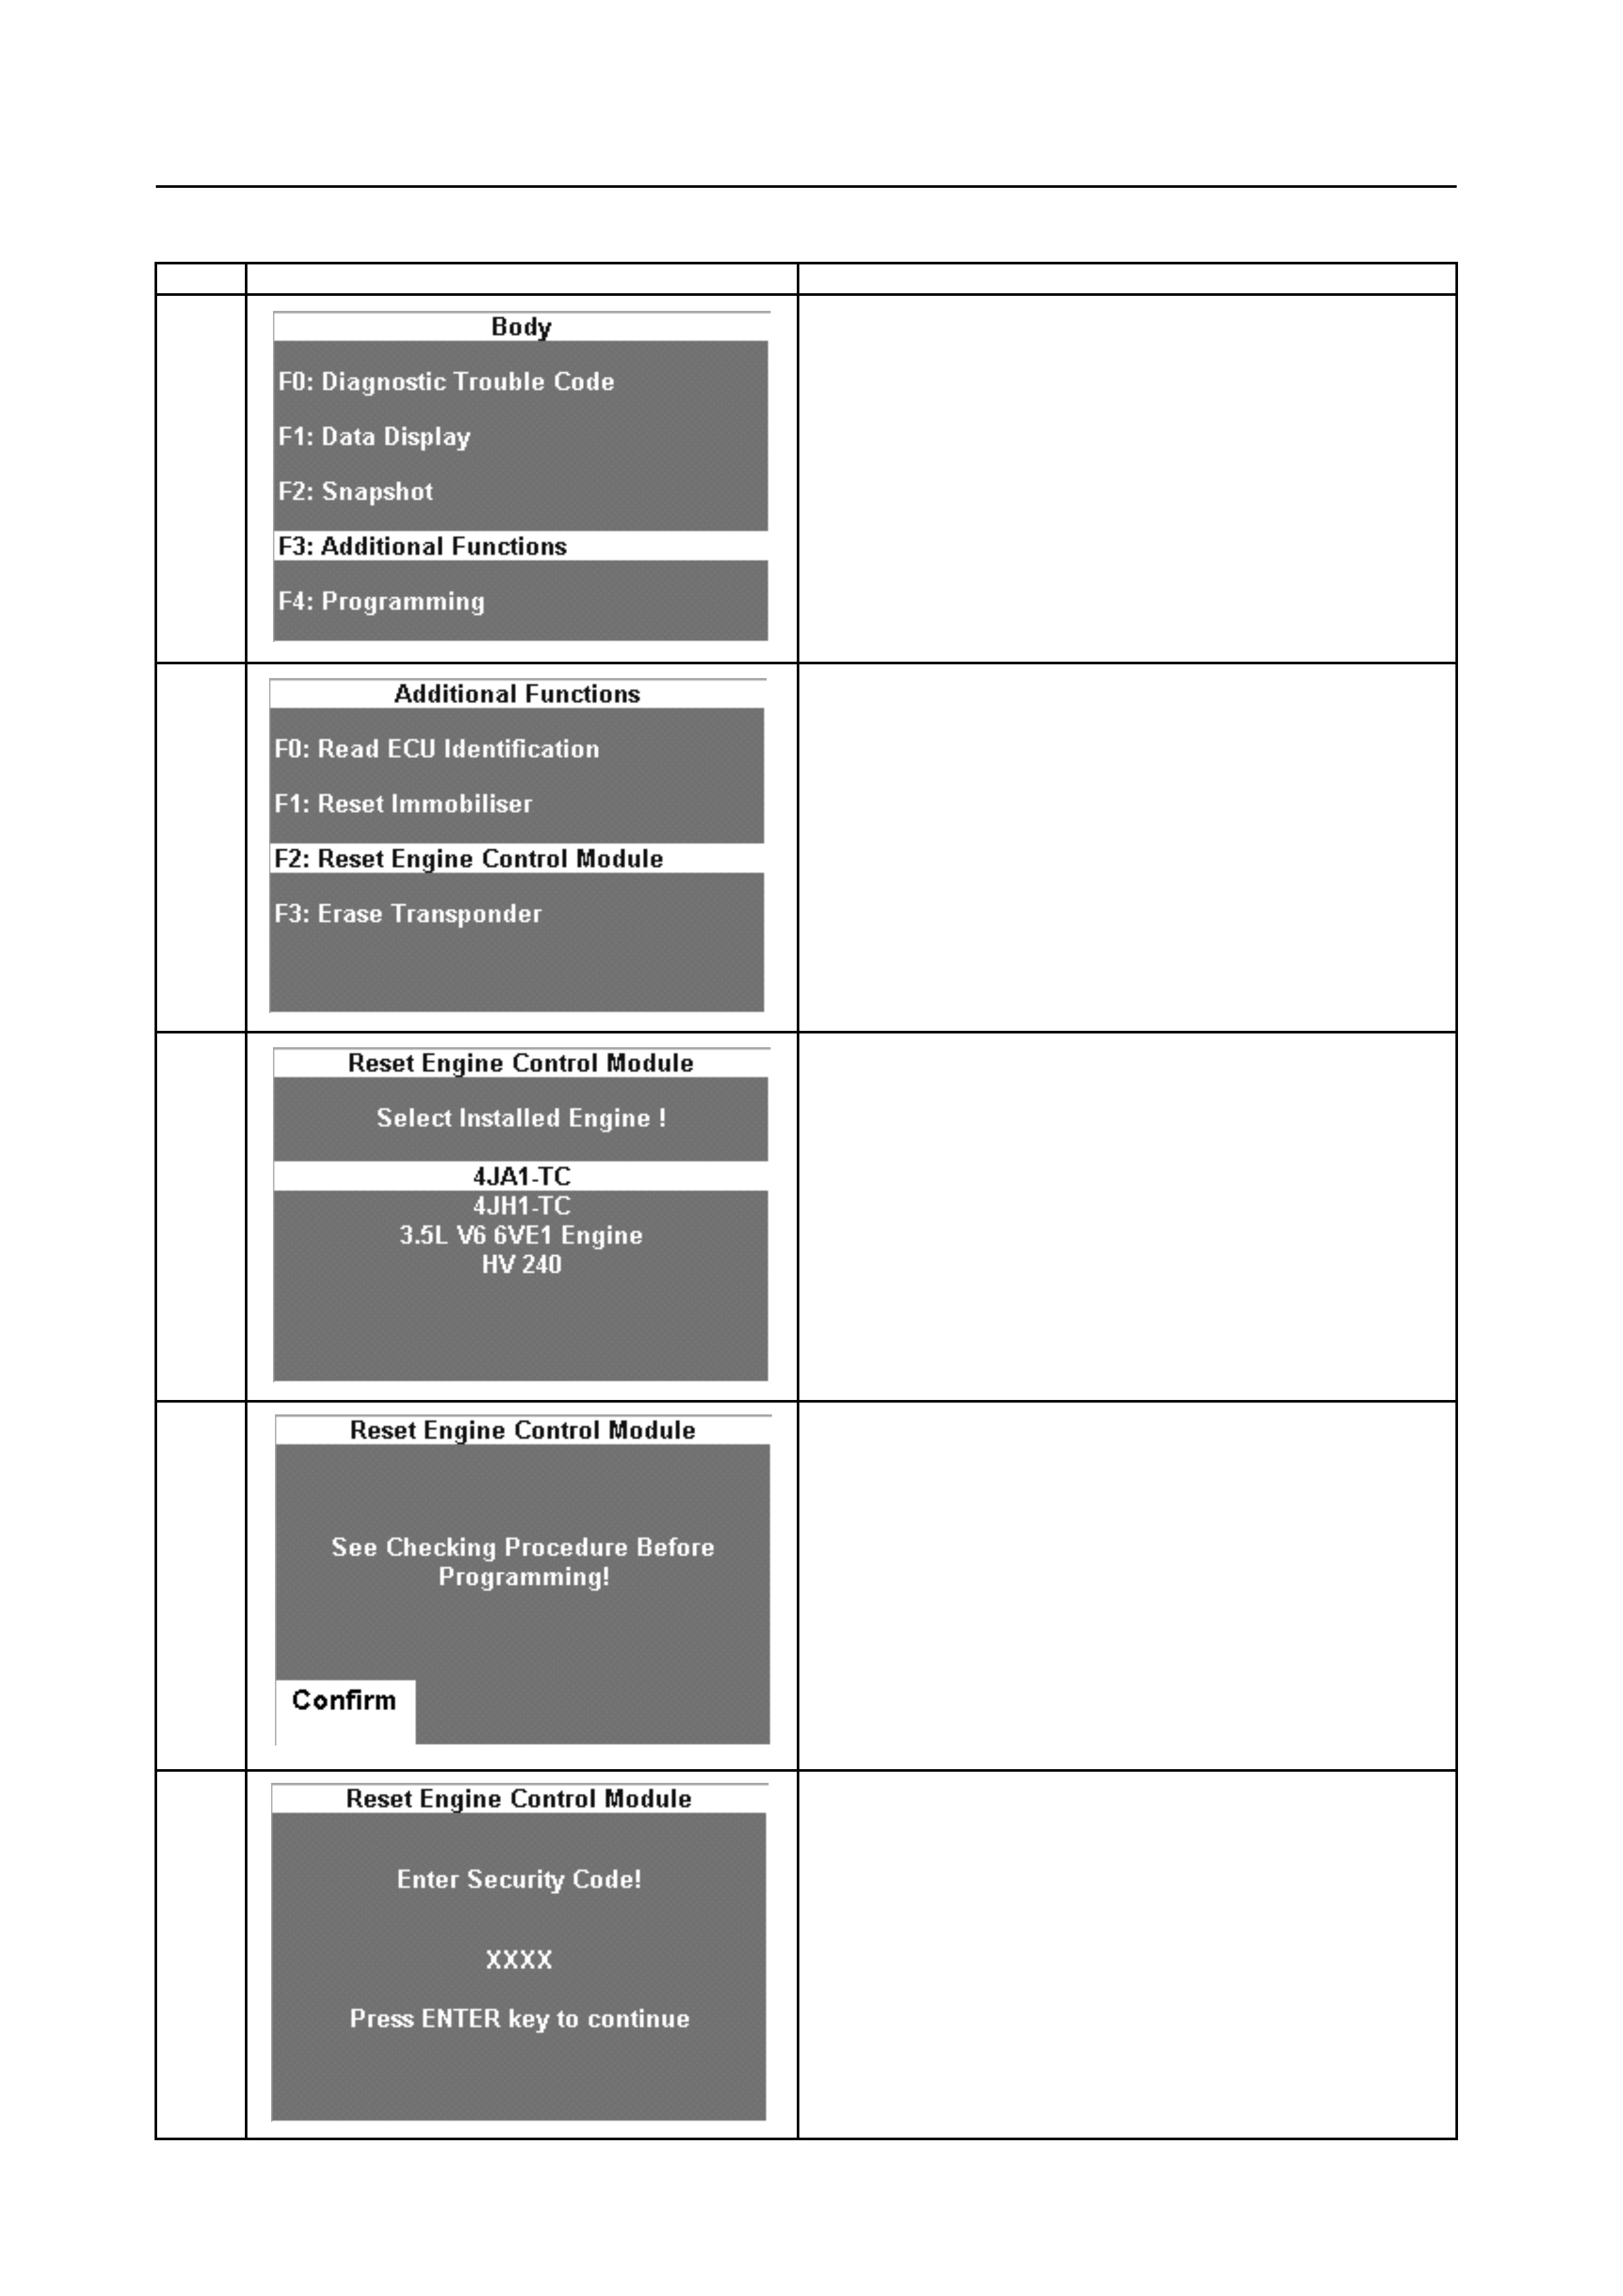
Tech 2/TIS 2000 Screen Action
1
Select "F3: Additional Functions".
2
Select "F2: Reset Engine Control Module".
3
Select the correct "Installed Engine".
This screen has various types depending on the
vehicle model or model year.
4
Press the "Confirm" soft-key.
5
1. Enter the correct "Security Code".
2. Press "Enter" Key.
Reset ECM/PCM-Page 2 of 2
Ste
p
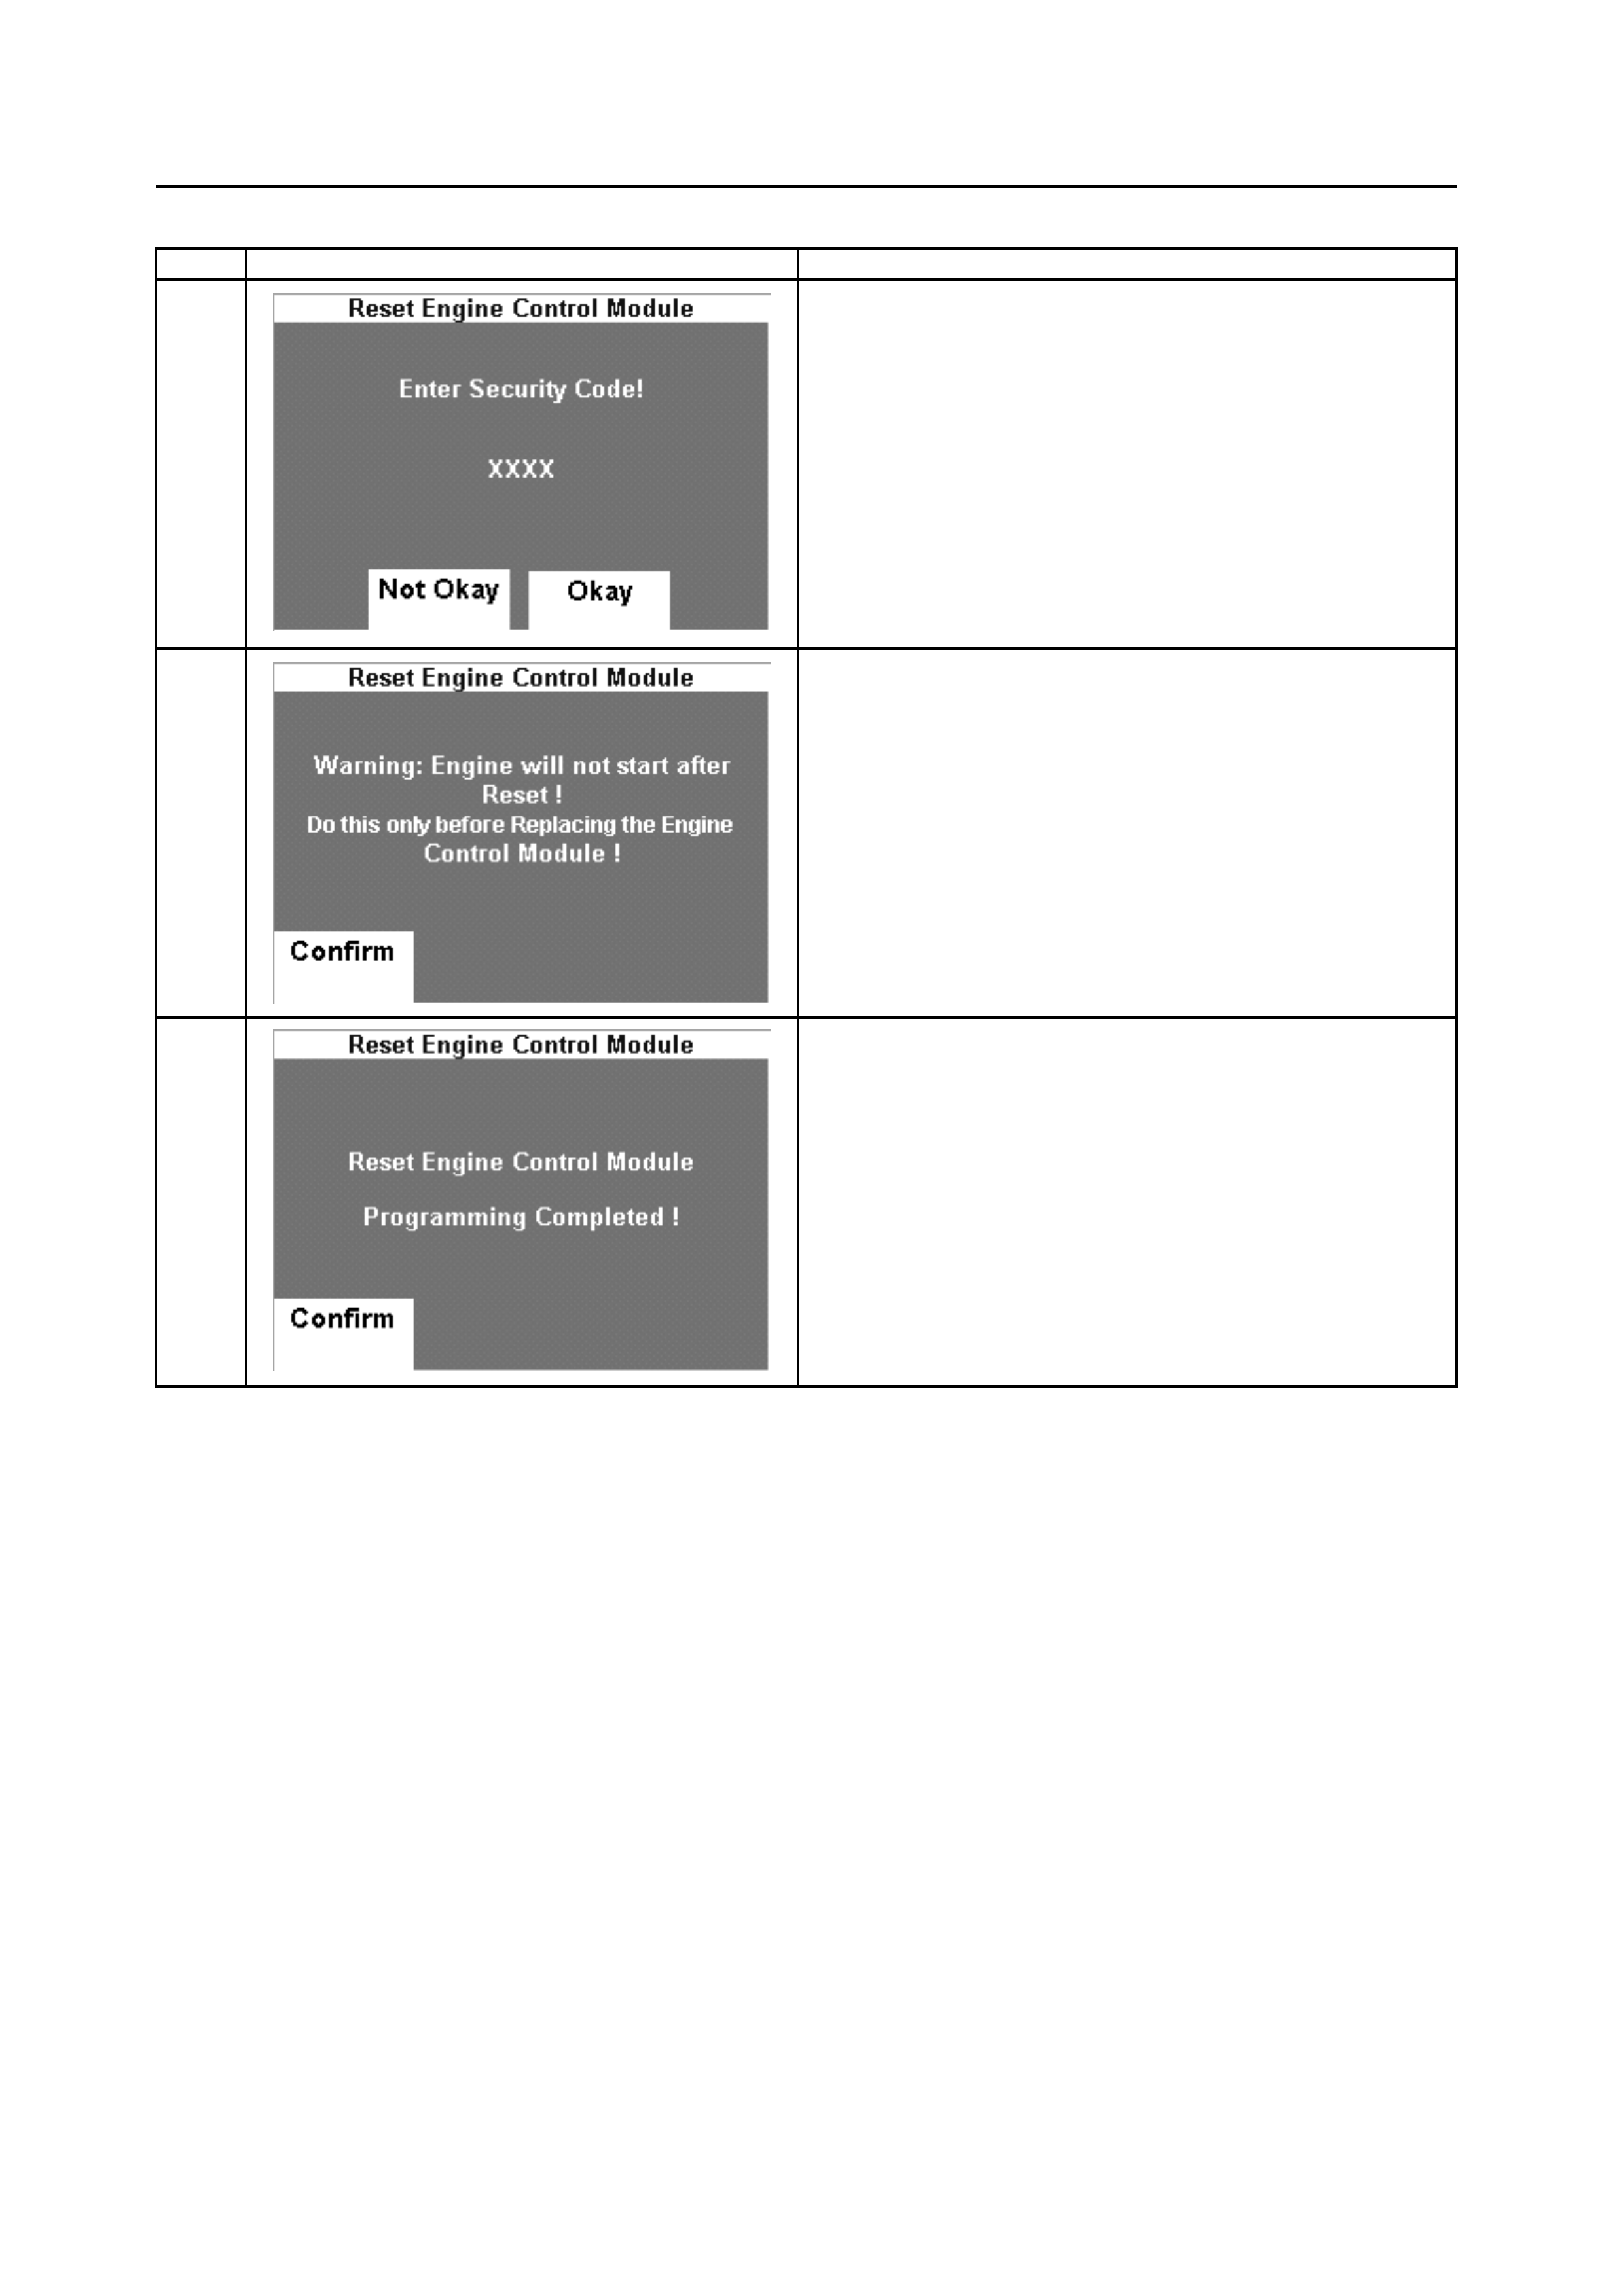
Tech 2/TIS 2000 Screen Action
6
1. Press the "Okay" soft-key, if the entered "Security
Code" is correct.
2. Press the "Not Okay" soft-key, if the entered
"Security Code" is incorrect.
7
Press the "Confirm" soft-key.
8
ECM/ICU Reset completed. Press "Confirm" soft-key.
Important: Turn the Ignition Switch "OFF" for
at least 40 seconds.
Attempt to start the engine and verify the engine
will NOTstart.

ECM/PCM Programming-Page 1 of 3
"ECM/PCM Pro
g
rammin
g
": To
p
ro
g
ram immobiliser function into the ECM/PCM.
Ste
p
Tech 2/TIS 2000 Screen Action
1
Select "F4: Programming".
2
Select "F0: Program Immobliser Function".
3
Press "Confirm" key and get approval from TIS. If
there is already approval by TIS, the "Step 9" menu
appears on the Tech 2 display.
4
1. Connect a "Hardware Key" to the PC to confirm
your authorisation.
2. Connect "RS 232" cable to the PC and Tech 2.
3. Power ON Tech 2 and wait for Tech 2 title screen.
4. Select "Security Access" in the TIS 2000 screen.
5
1. Click "Tech 2" and "Next".
2. TIS 2000 starts to communicate with Tech 2.
ECM/PCM Programming-Page 2 of 3
Ste
p
Tech 2/TIS 2000 Screen Action
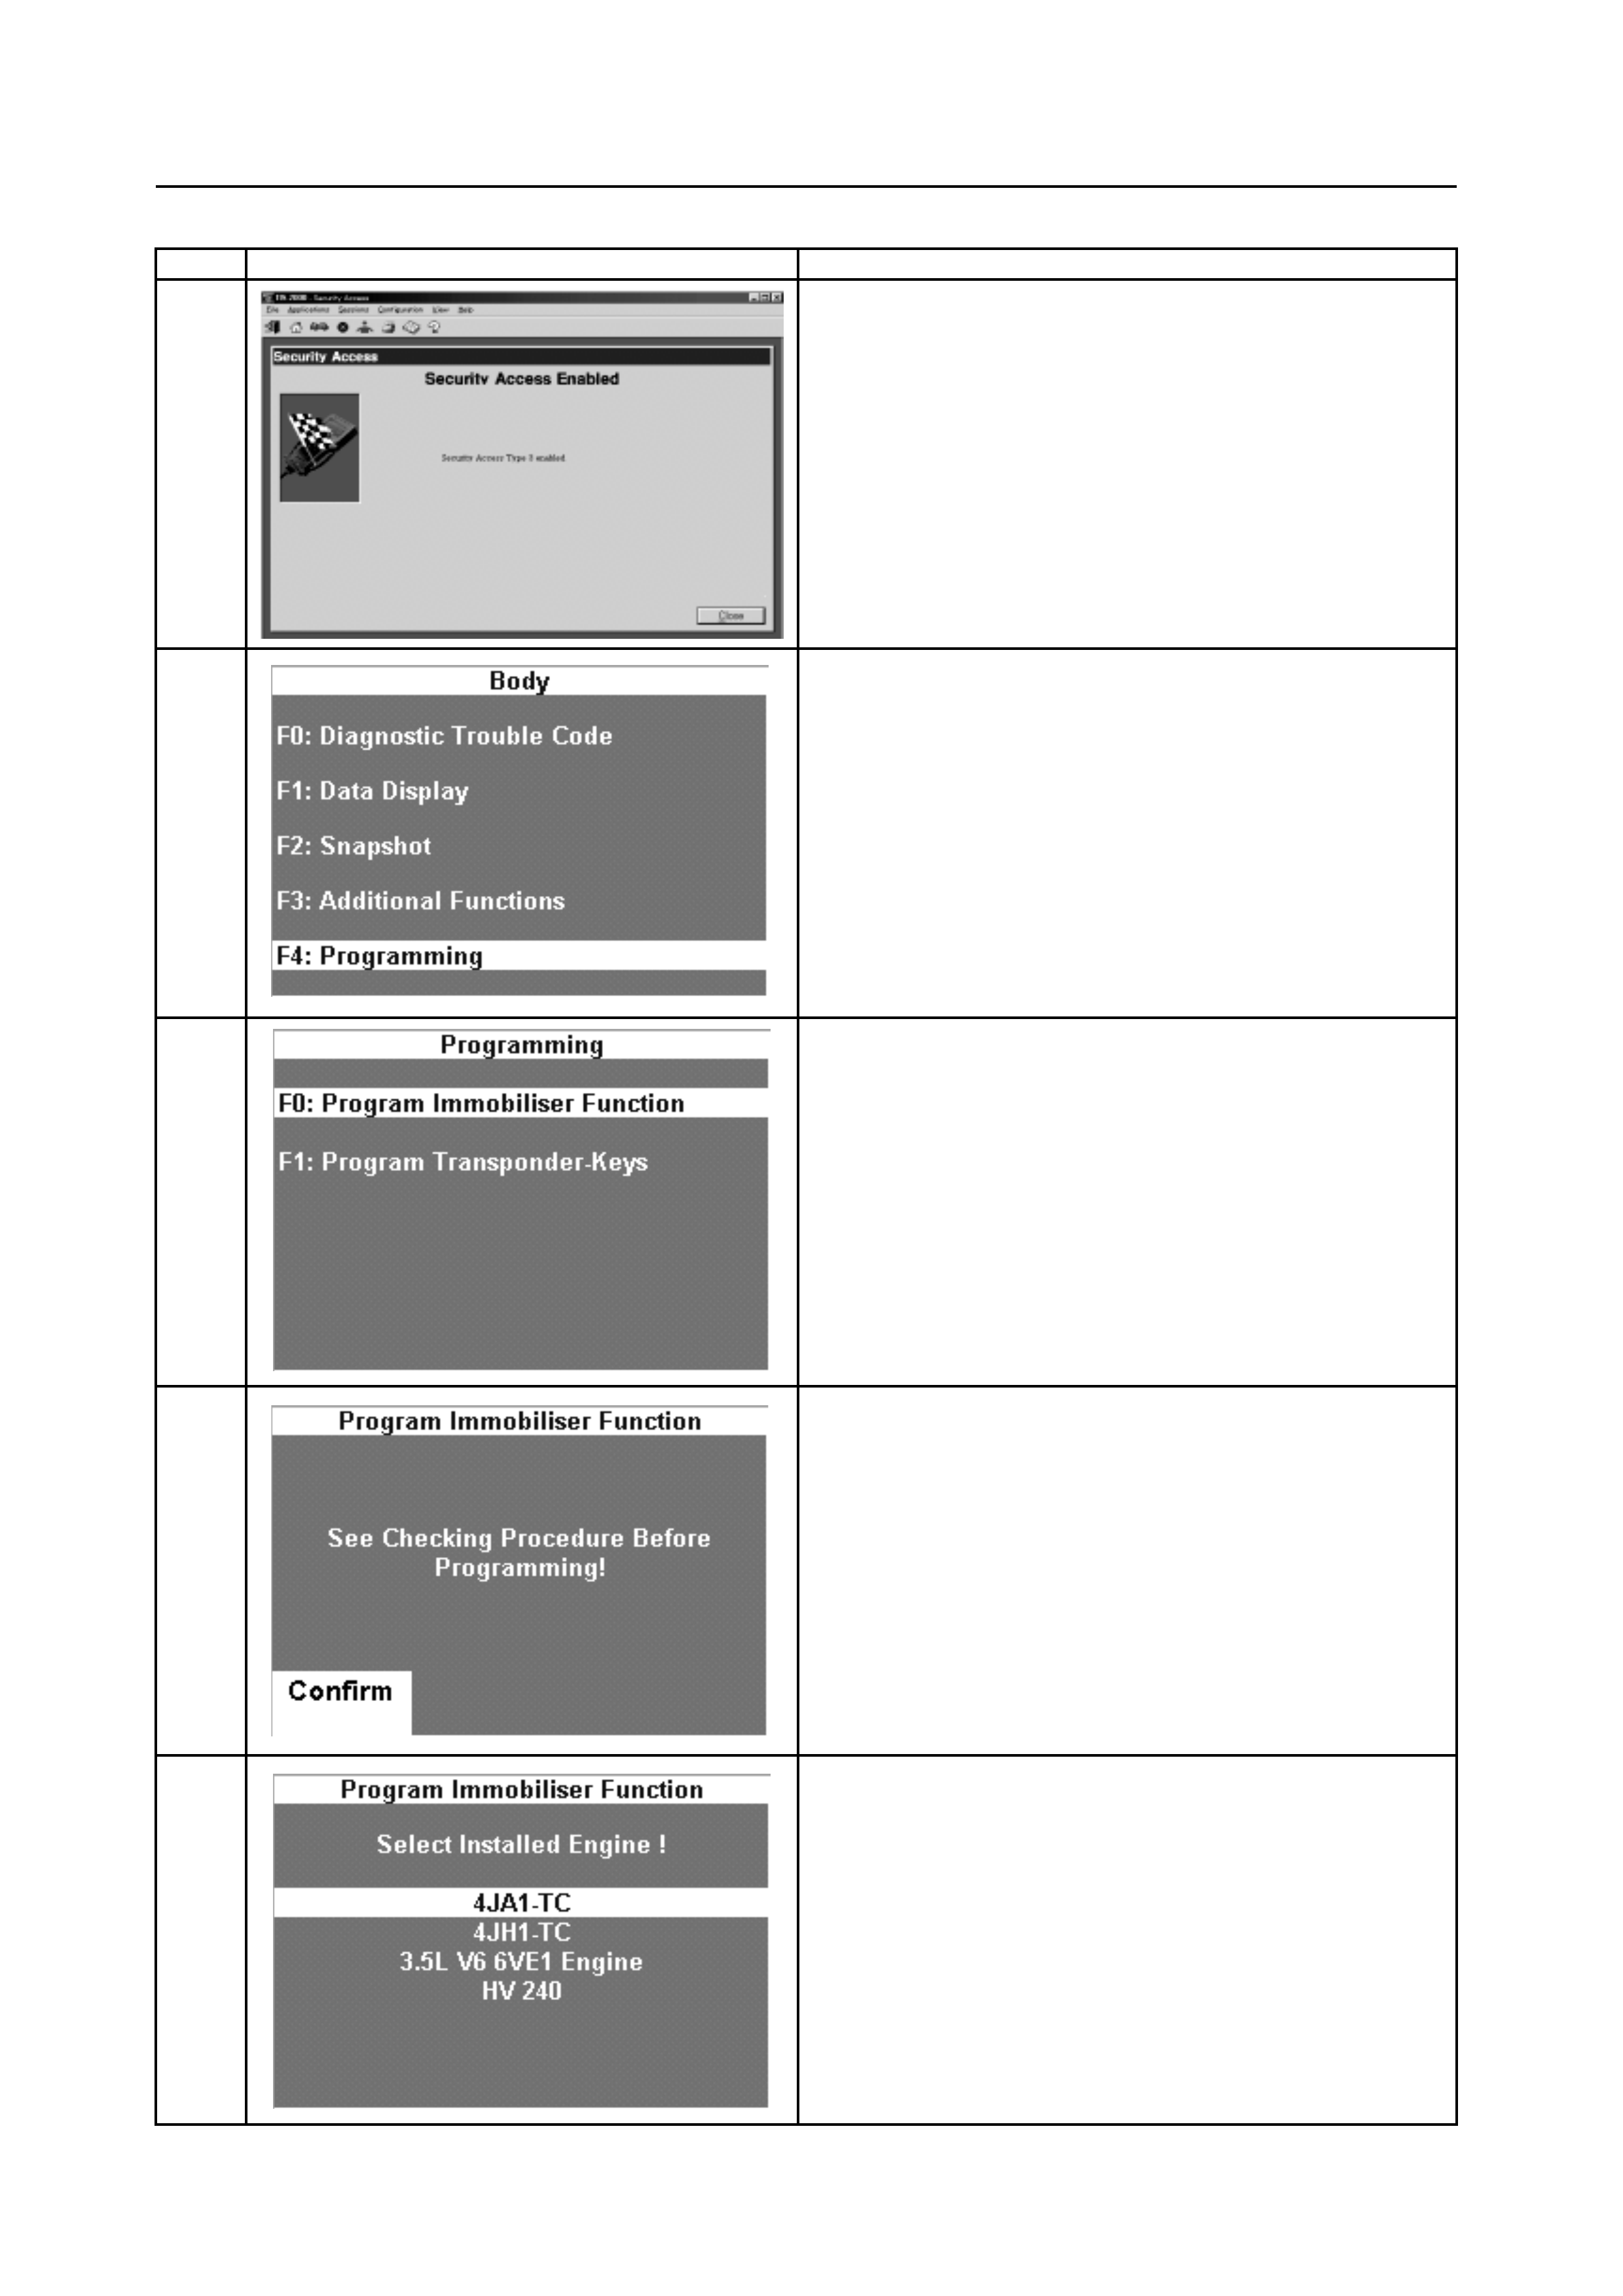
6
1. Security access is enabled (approved).
2. Click "Close" to finish.
7
Select "F4: Programming".
8
Select "F0: Program Immobliser Function".
9
Press "Confirm" key.
10
Select the correct "Installed Engine"
This screen has various types depending on the
vehicle model or model year.

ECM/PCM Programming-Page 3 of 3
Ste
p
Tech 2/TIS 2000 Screen Action
11
Select "Engine Controller installed".
12
1. Enter the correct "Security Code".
2. Press the "Enter" Key.
13
1. Press the "Okay" soft-key, if the entered "Security
Code" is correct.
2. Press the "Not Okay" soft-key, if the entered
"Security Code" is incorrect.
14
ECM/PCM programming is complete. Press the
"Confirm" soft-key.
Important: Turn the ignition switc "OFF" for
at least 40 seconds.
Attempt to start the engine and verify the engine
WILL start using all key(s) .

ICU & ECM/PCM Programming-Page 1 of 5
"ICU & ECM/PCM Pro
g
rammin
g
": To
p
ro
g
ram immobiliser function into the ICU & ECM/PCM.
Ste
p
Tech 2/TIS 2000 Screen Action
1
Select "F4: Programming".
2
Select "F0: Program Immobliser Function".
3
Press "Confirm" key and get approval from TIS. If
there is already approval by TIS, the "Step 9" menu
appears on the Tech 2 display.
4
1. Connect a "Hardware Key" to the PC to confirm
your authorisation.
2. Connect "RS 232" cable to the PC and Tech 2.
3. Power ON Tech 2 and wait for Tech 2 title screen.
4. Select "Security Access" in the TIS 2000 screen.
5
1. Click "Tech 2" and "Next".
2. TIS 2000 starts to communicate with Tech 2.

ICU & ECM/PCM Programming-Page 2 of 5
Ste
p
Tech 2/TIS 2000 Screen Action
6
1. Security access is enabled (approved).
2. Click "Close" to finish.
7
Select "F4: Programming".
8
Select "F0: Program Immobliser Function".
9
Press "Confirm" key.
10
Select the correct "Installed Engine"
This screen has various types depending on the
vehicle model or model year.
ICU & ECM/PCM Programming-Page 3 of 5
Ste
p
Tech 2/TIS 2000 Screen Action
11
Select "Immobiliser & ECM installed".
12
1. Enter correct "Security Code".
2. Press the "Enter" Key.
13
1. Press the "Okay" soft-key, if the entered "Security
Code" is correct.
2. Press the "Not Okay" soft-key, if the entered
"Security Code" is incorrect.
14
1. Enter the correct "Security Code".
2. Press the "Enter" Key.
15
1. Press the "Okay" soft-key, if the entered "Security
Code" is correct.
2. Press the "Not Okay" soft-key, if the entered
"Security Code" is incorrect.
ICU & ECM/PCM Programming-Page 4 of 5
Ste
p
Tech 2/TIS 2000 Screen Action
16
1. Enter the correct "Vehicle Identification Number
(VIN)".
2. Press the "Enter" Key.
17
Turn the Ignition Switch "OFF".
18
Press the "Confirm" soft-key.
19
Turn the Ignition Switch "ON".
20
Turn the Ignition Switch "OFF".
ICU & ECM/PCM Programming-Page 5 of 5
Ste
p
Tech 2/TIS 2000 Screen Action
21
Turn the Ignition Switch "ON".
22
Turn the Ignition Switch "OFF".
23
1. Press the "No" soft-key, if all transponder keys
are programmed.
2. Press the "Yes" soft-key, if more transponder keys
are to be programmed. Repeat the programming
Steps 18 to 23.
24
ICU & ECM/PCM programming is complete. Press
the "Confirm" soft-key.
Important: Turn the Ignition Switch "OFF" for
at least 40 seconds.
Attempt ot start the engine and verify the engine
WILL start using all keys.
Erase Transponder Key-Page 1 of 2
"Erase Trans
p
onder Ke
y
": To erase trans
p
onder ke
y
information in the ICU.
Ste
p
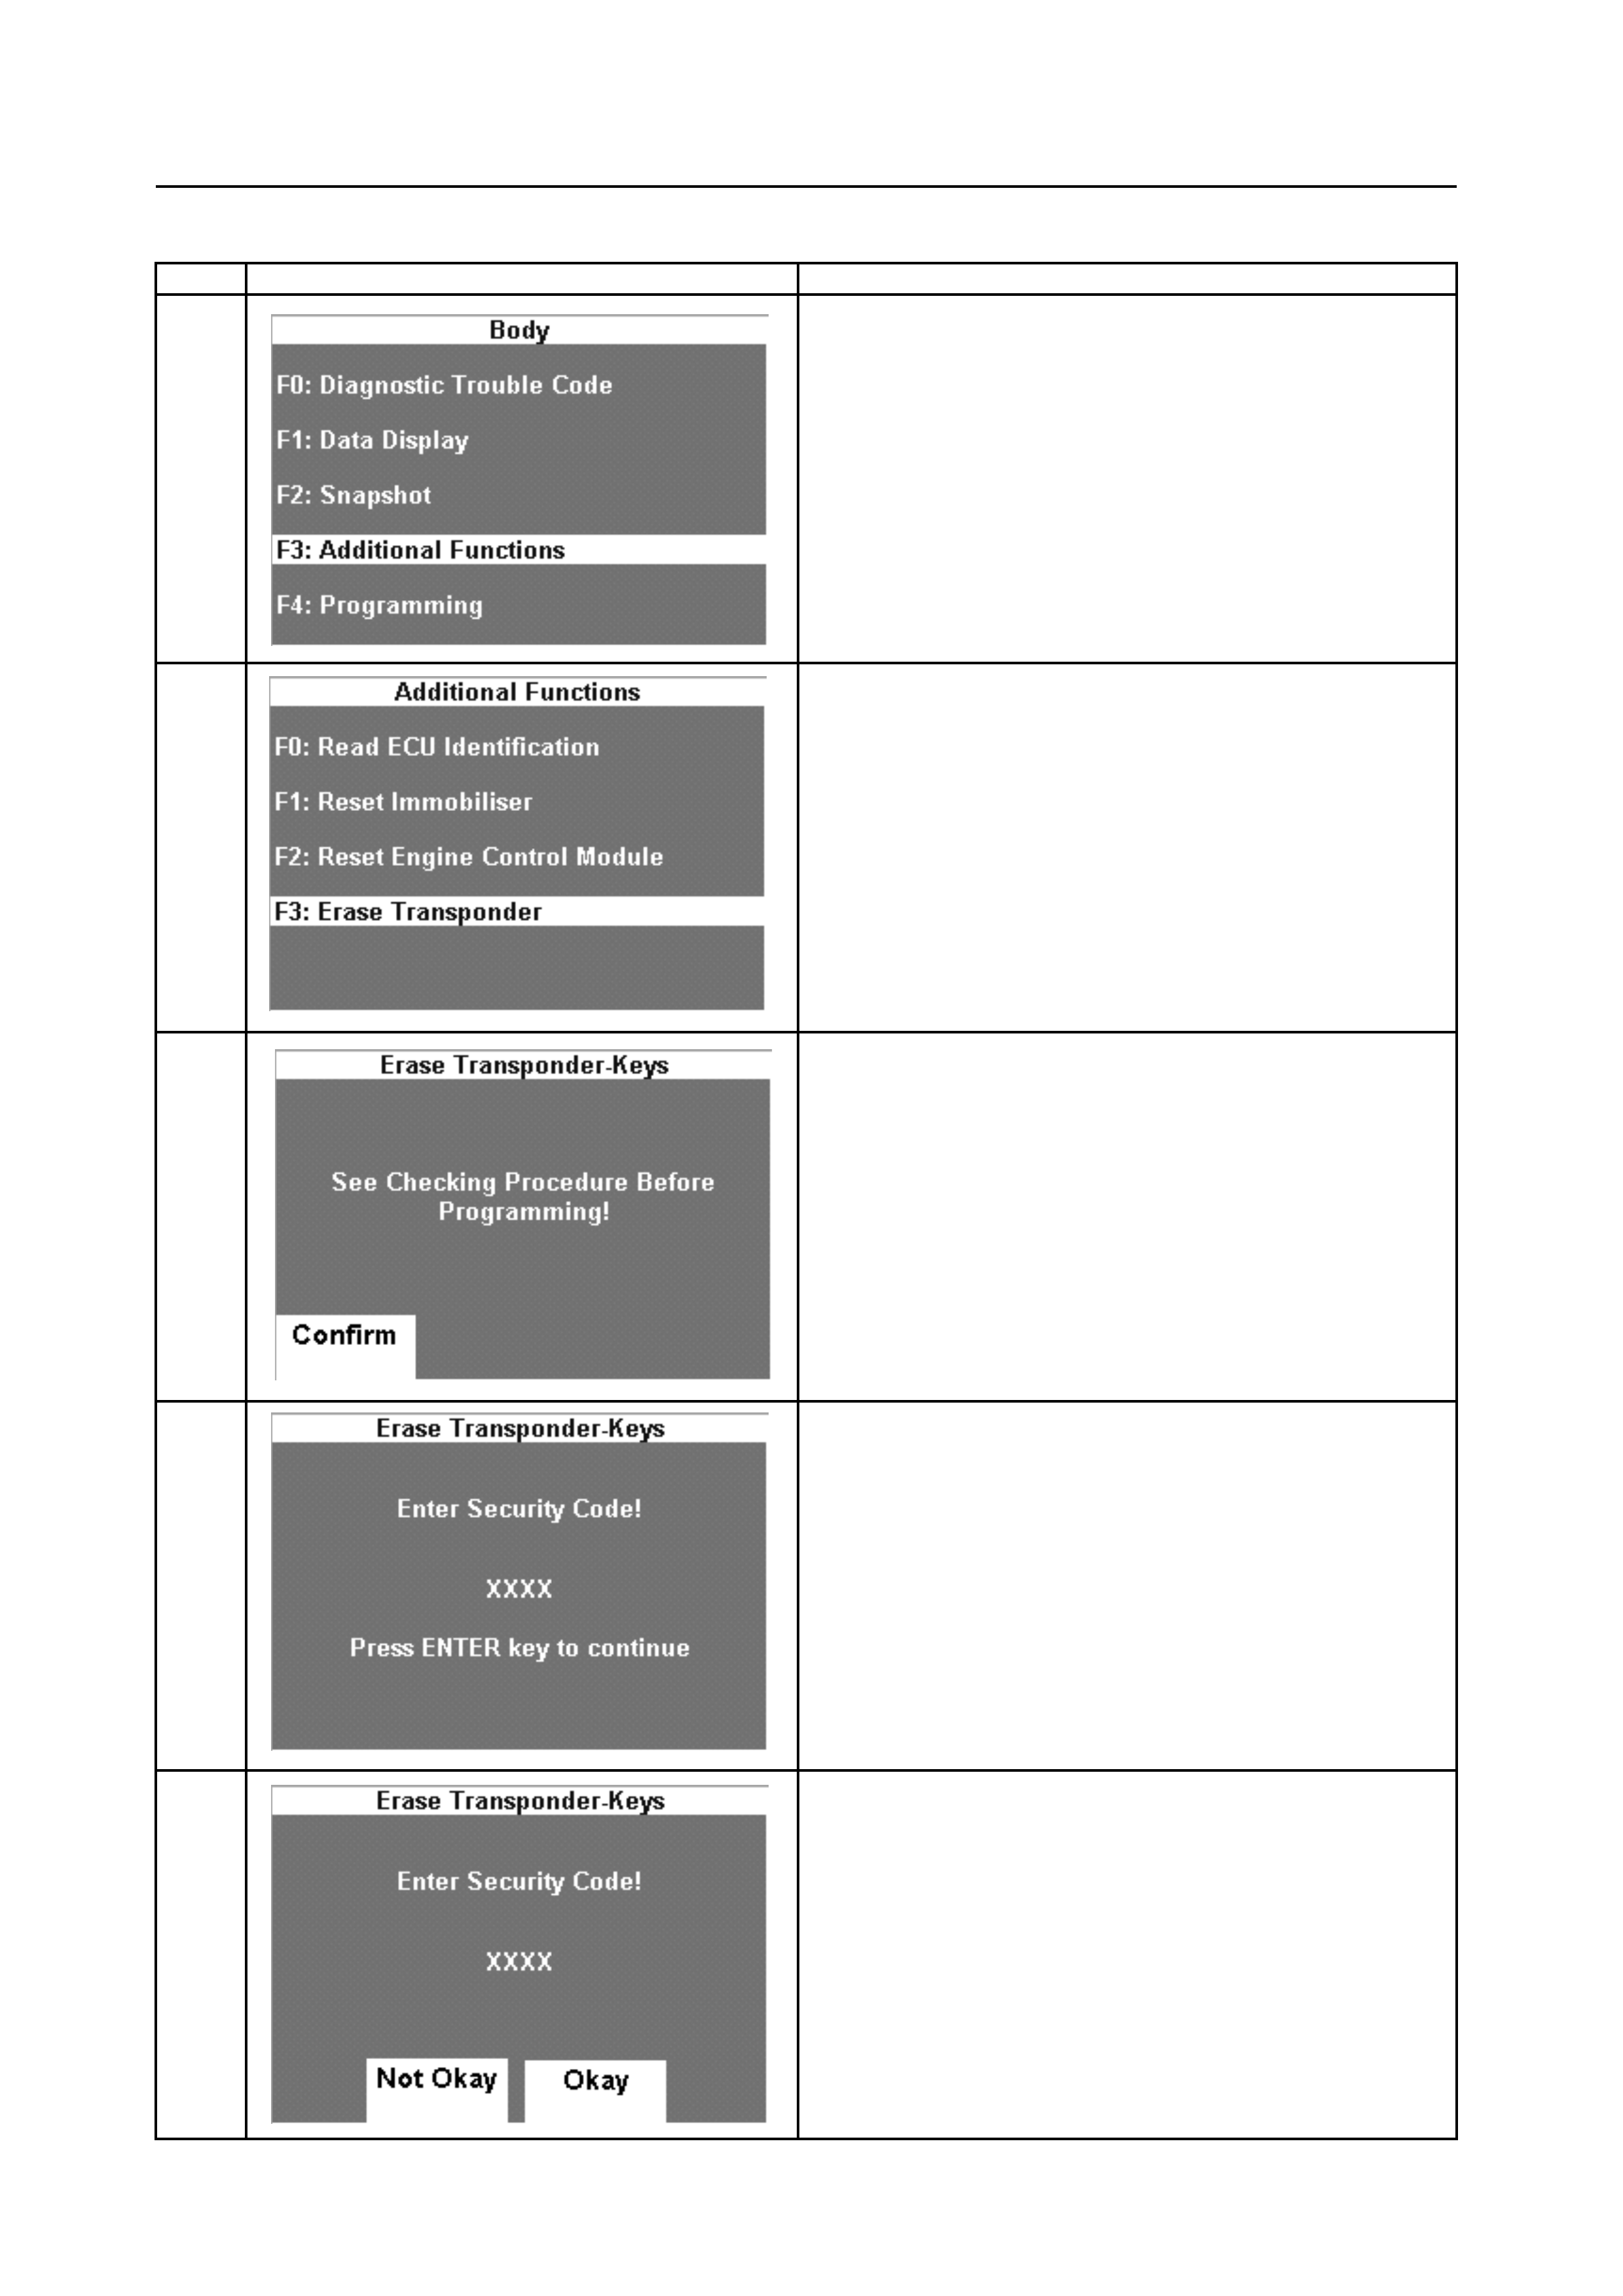
Tech 2/TIS 2000 Screen Action
1
Select "F3: Additional Functions".
2
Select "F3: Erase Transponder".
3
Press the "Confirm" soft-key.
4
1. Enter the correct "Security Code".
2. Press the "Enter" Key.
5
1. Press the "Okay" soft-key, if the entered "Security
Code" is correct.
2. Press the "Not Okay" soft-key, if the entered
"Security Code" is incorrect.
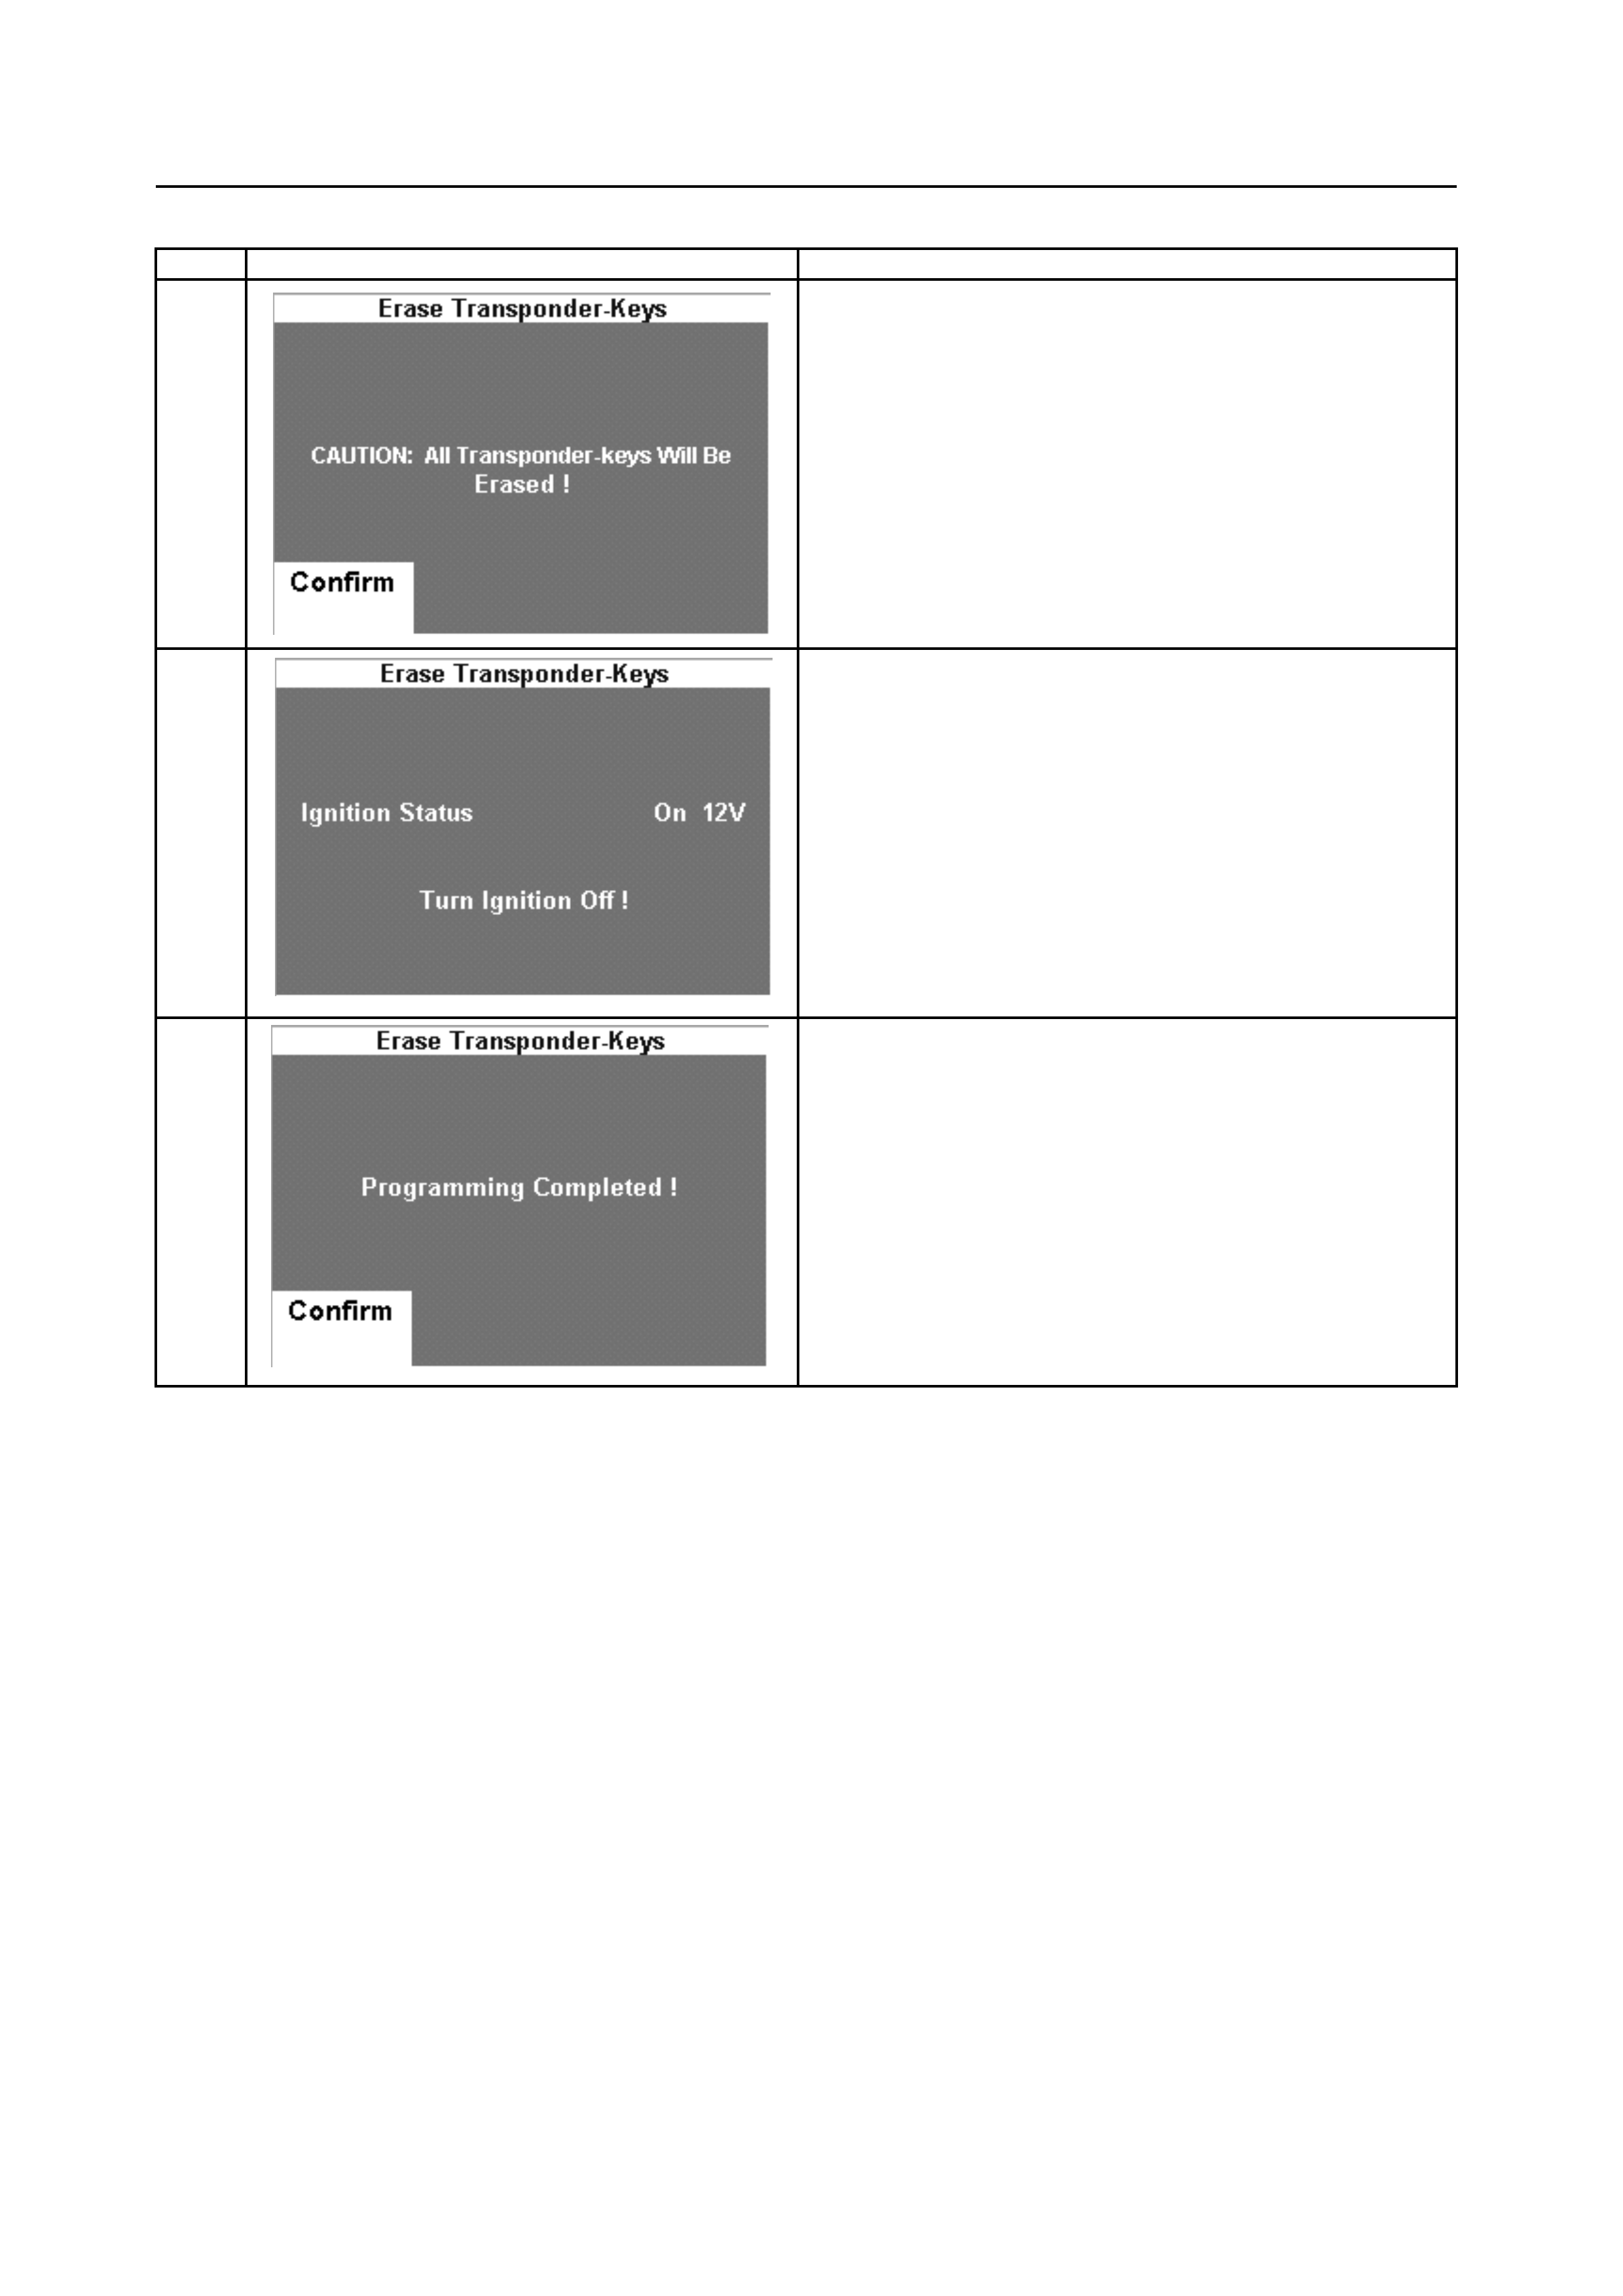
Erase Transponder Key-Page 2 of 2
Ste
p
Tech 2/TIS 2000 Screen Action
6
Press the "Confirm" soft-key.
7
Turn the Ignition Switch "OFF".
8
Erase Transponder Key is complete. Press the
"Confirm" soft-key.
Important: Turn the Ignition Switch "OFF"
for
at least 40 seconds.
Attempt to start the engine and verify the engine
will NOT start with any key .
Transponder Key Programming-Page 1 of 4
"Trans
p
onder Ke
y
Pro
g
rammin
g
": To
p
ro
g
ram trans
p
onder ke
y
information into the ICU.
Ste
p
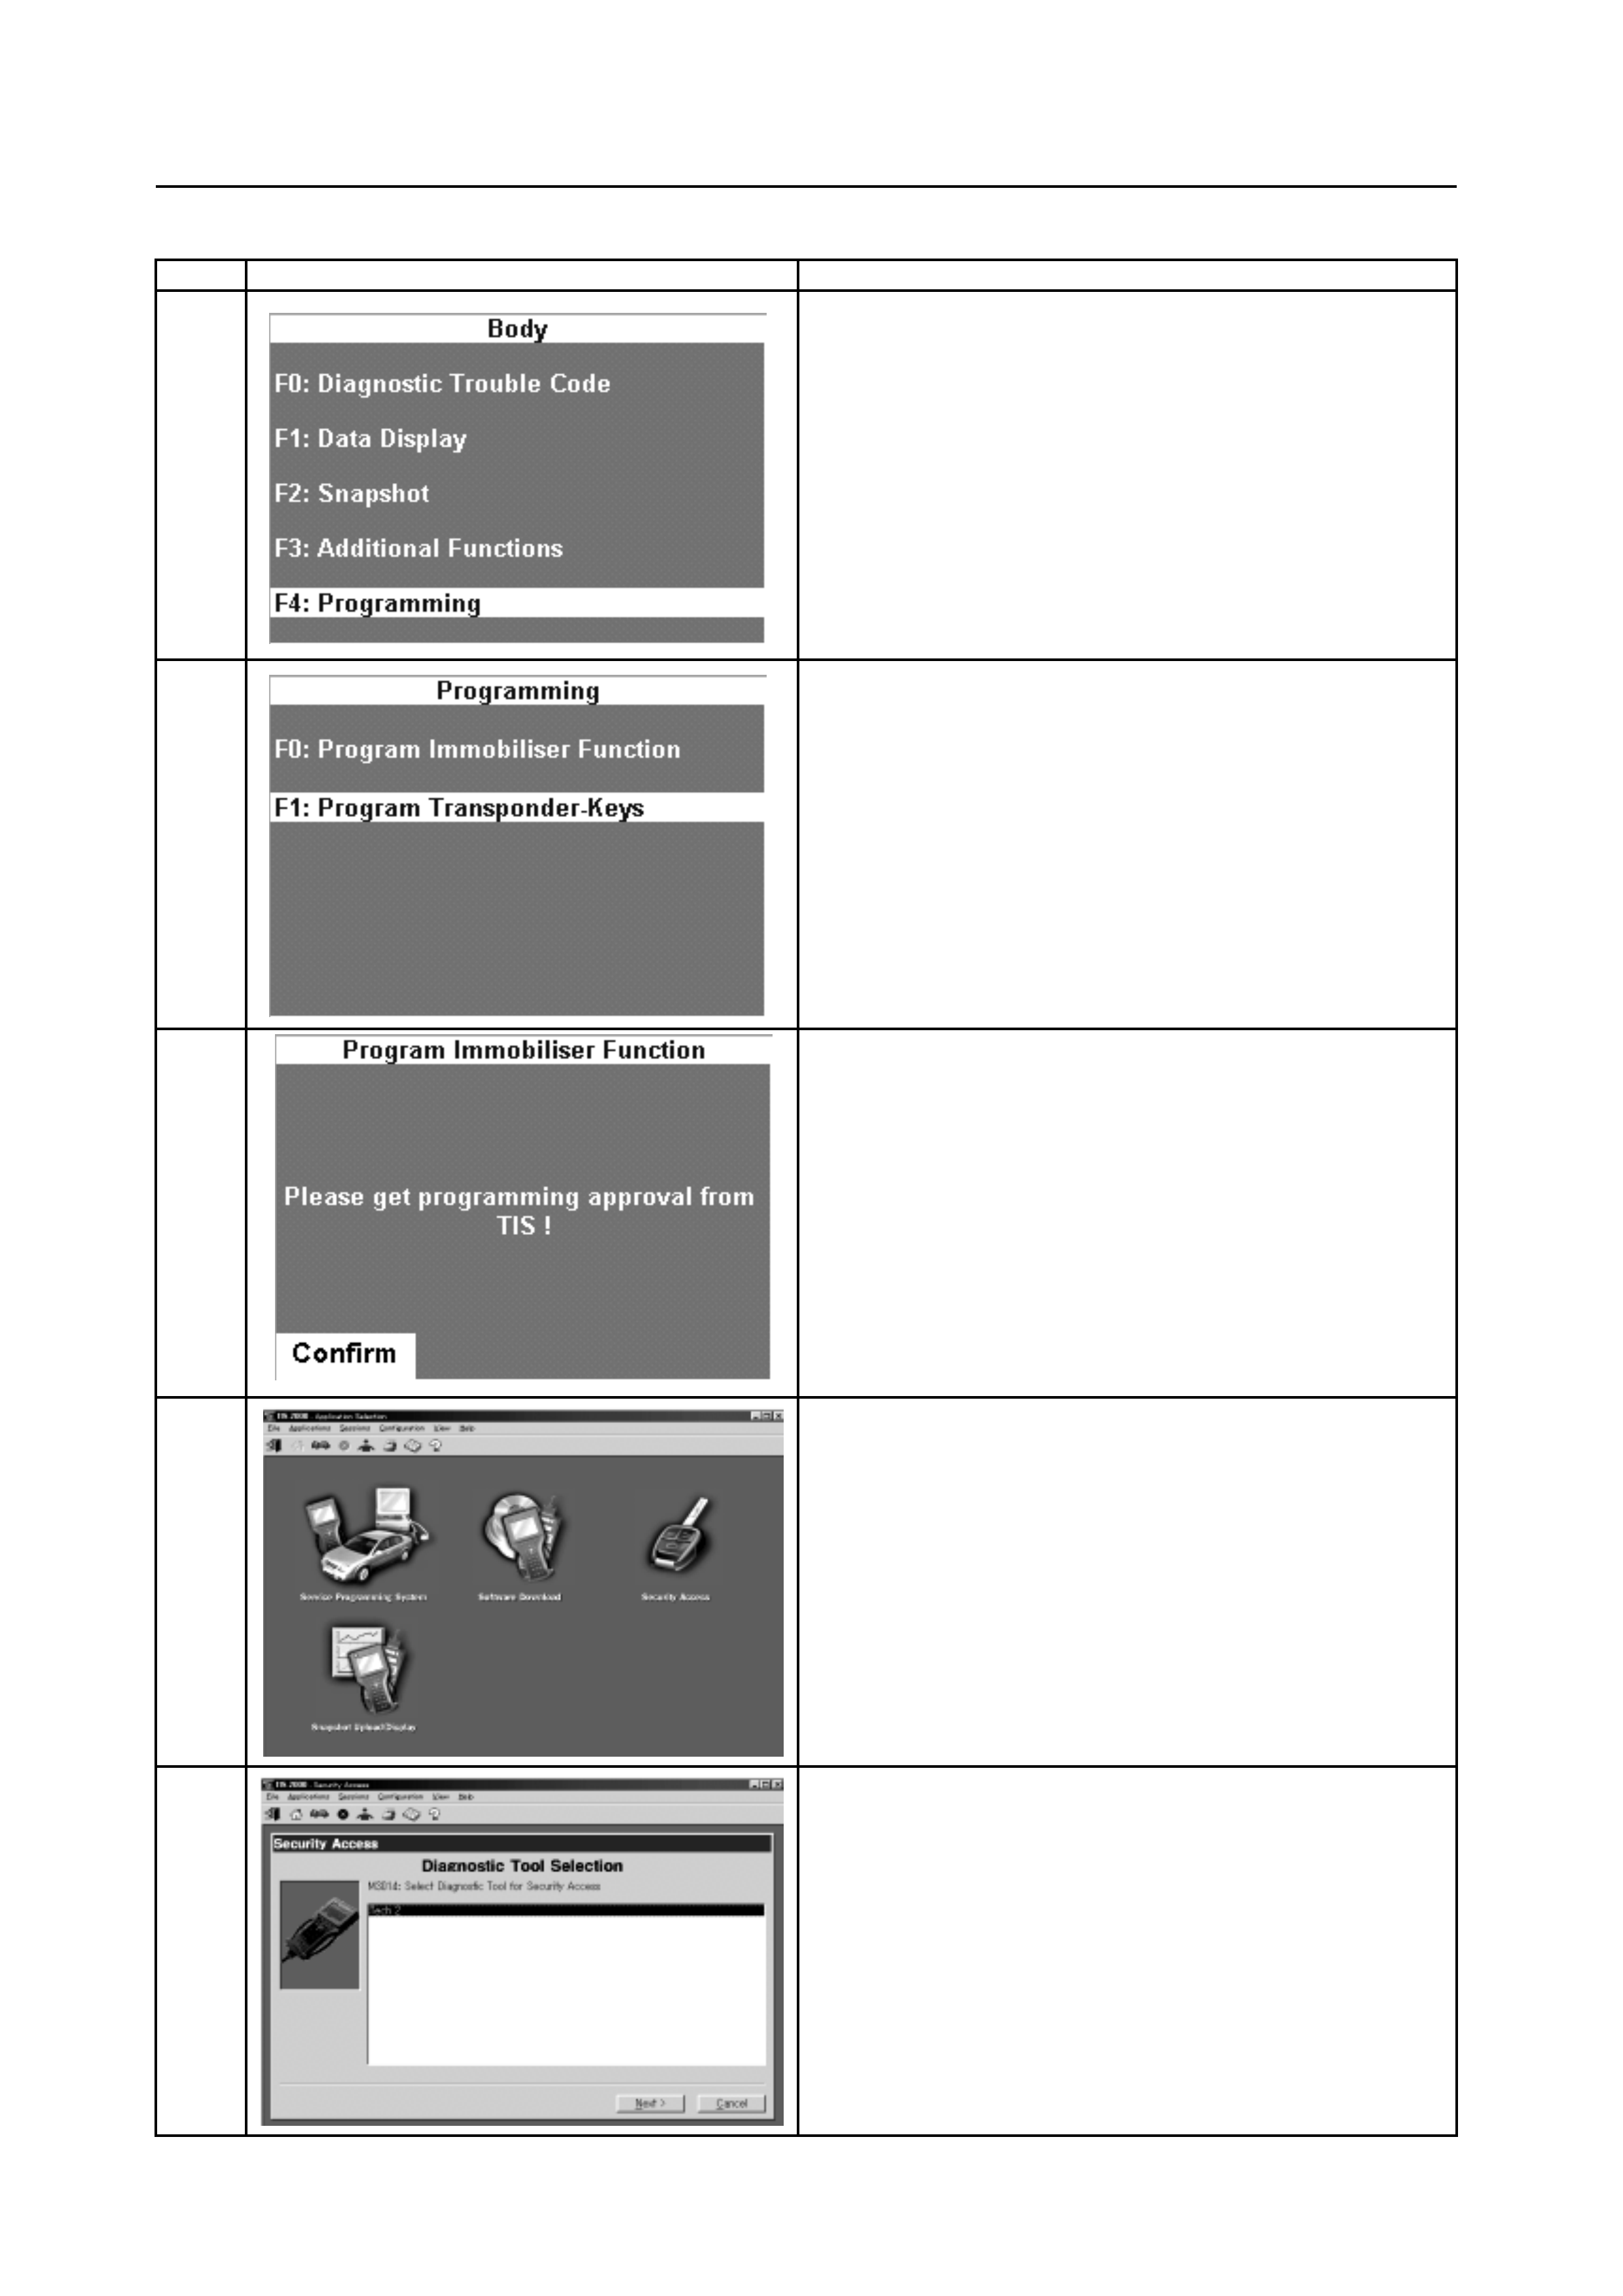
Tech 2/TIS 2000 Screen Action
1
Select "F4: Programming".
2
Select "F1: Program Transponder-Keys".
3
Press the "Confirm" key and get approval from TIS. If
there is already approval by TIS, the "Step 9" menu
appears on the Tech 2 display.
4
1. Connect a "Hardware Key" to the PC to confirm
your authorisation.
2. Connect "RS 232" cable to the PC and Tech 2.
3. Power ON Tech 2 and wait for Tech 2 title screen.
4. Select "Security Access" in the TIS 2000 screen.
5
1. Click "Tech 2" and "Next".
2. TIS 2000 starts to communicate with Tech 2.
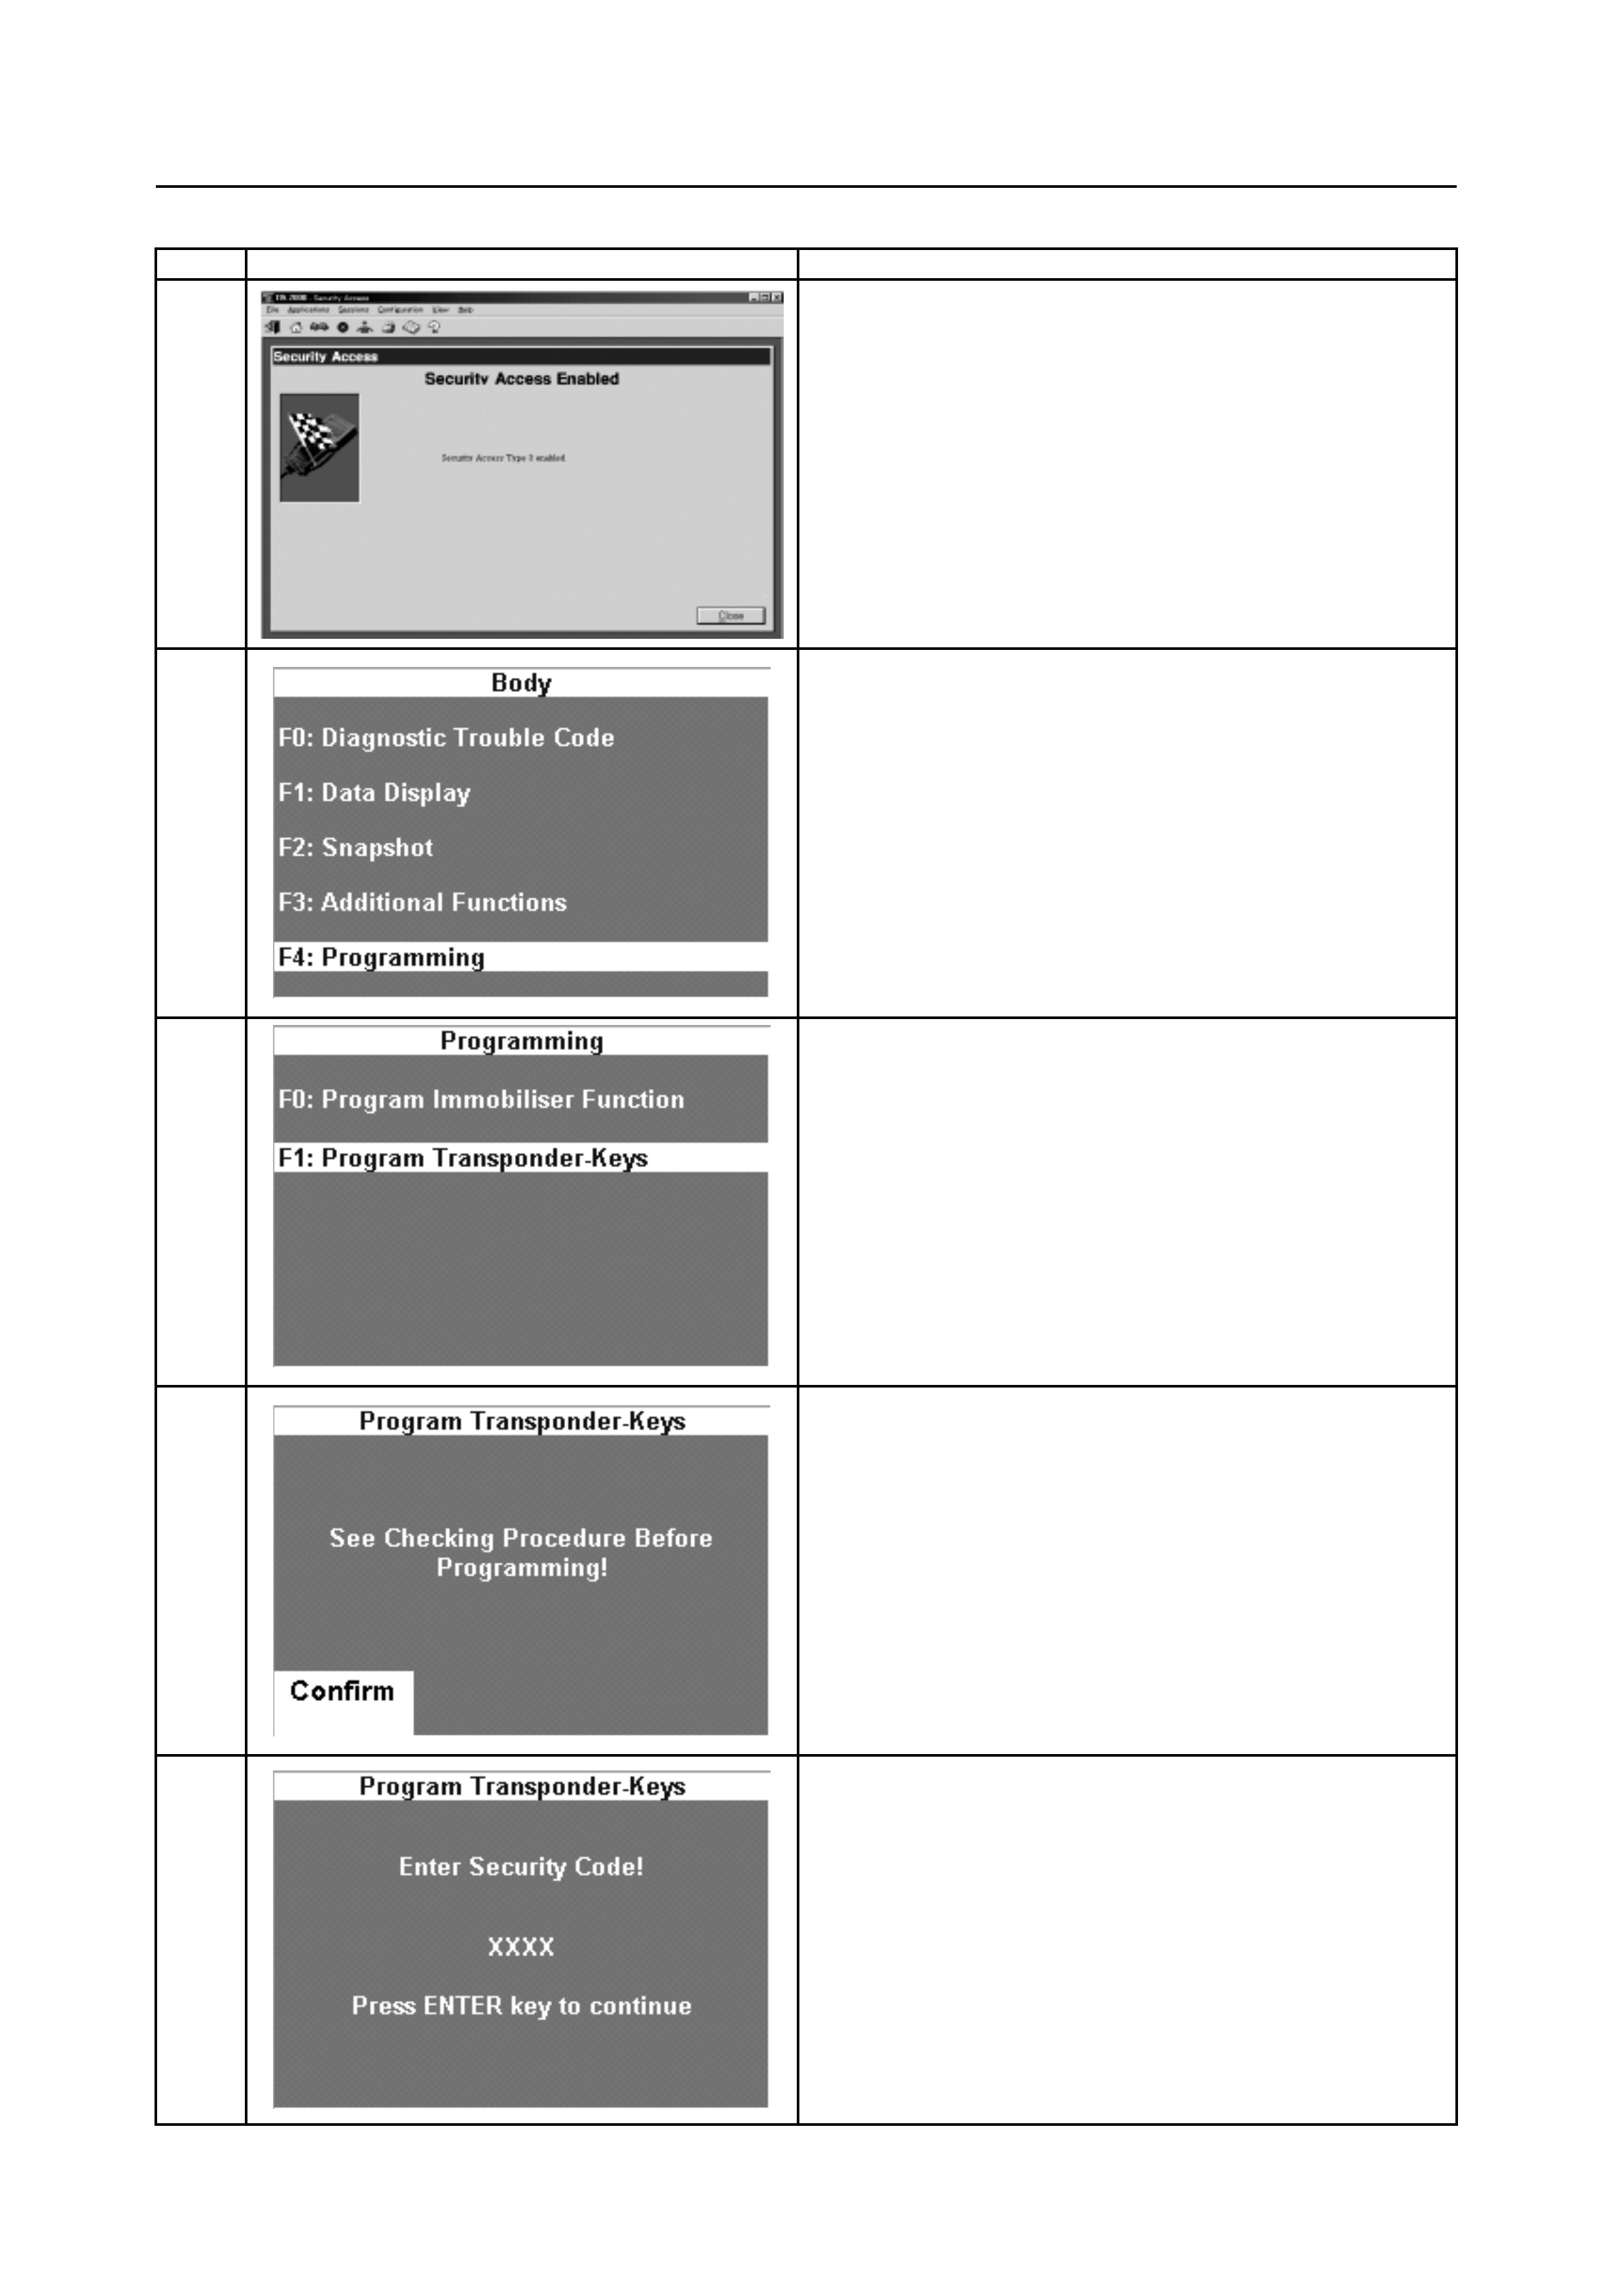
Transponder Key Programming-Page 2 of 4
Ste
p
Tech 2/TIS 2000 Screen Action
6
1. Security access is enabled (approved).
2. Click "Close" to finish.
7
Select "F4: Programming".
8
Select "F1: Program Transponder-Keys".
9
Press the "Confirm" soft-key.
10
1. Enter the correct "Security Code".
2. Press the "Enter" Key.
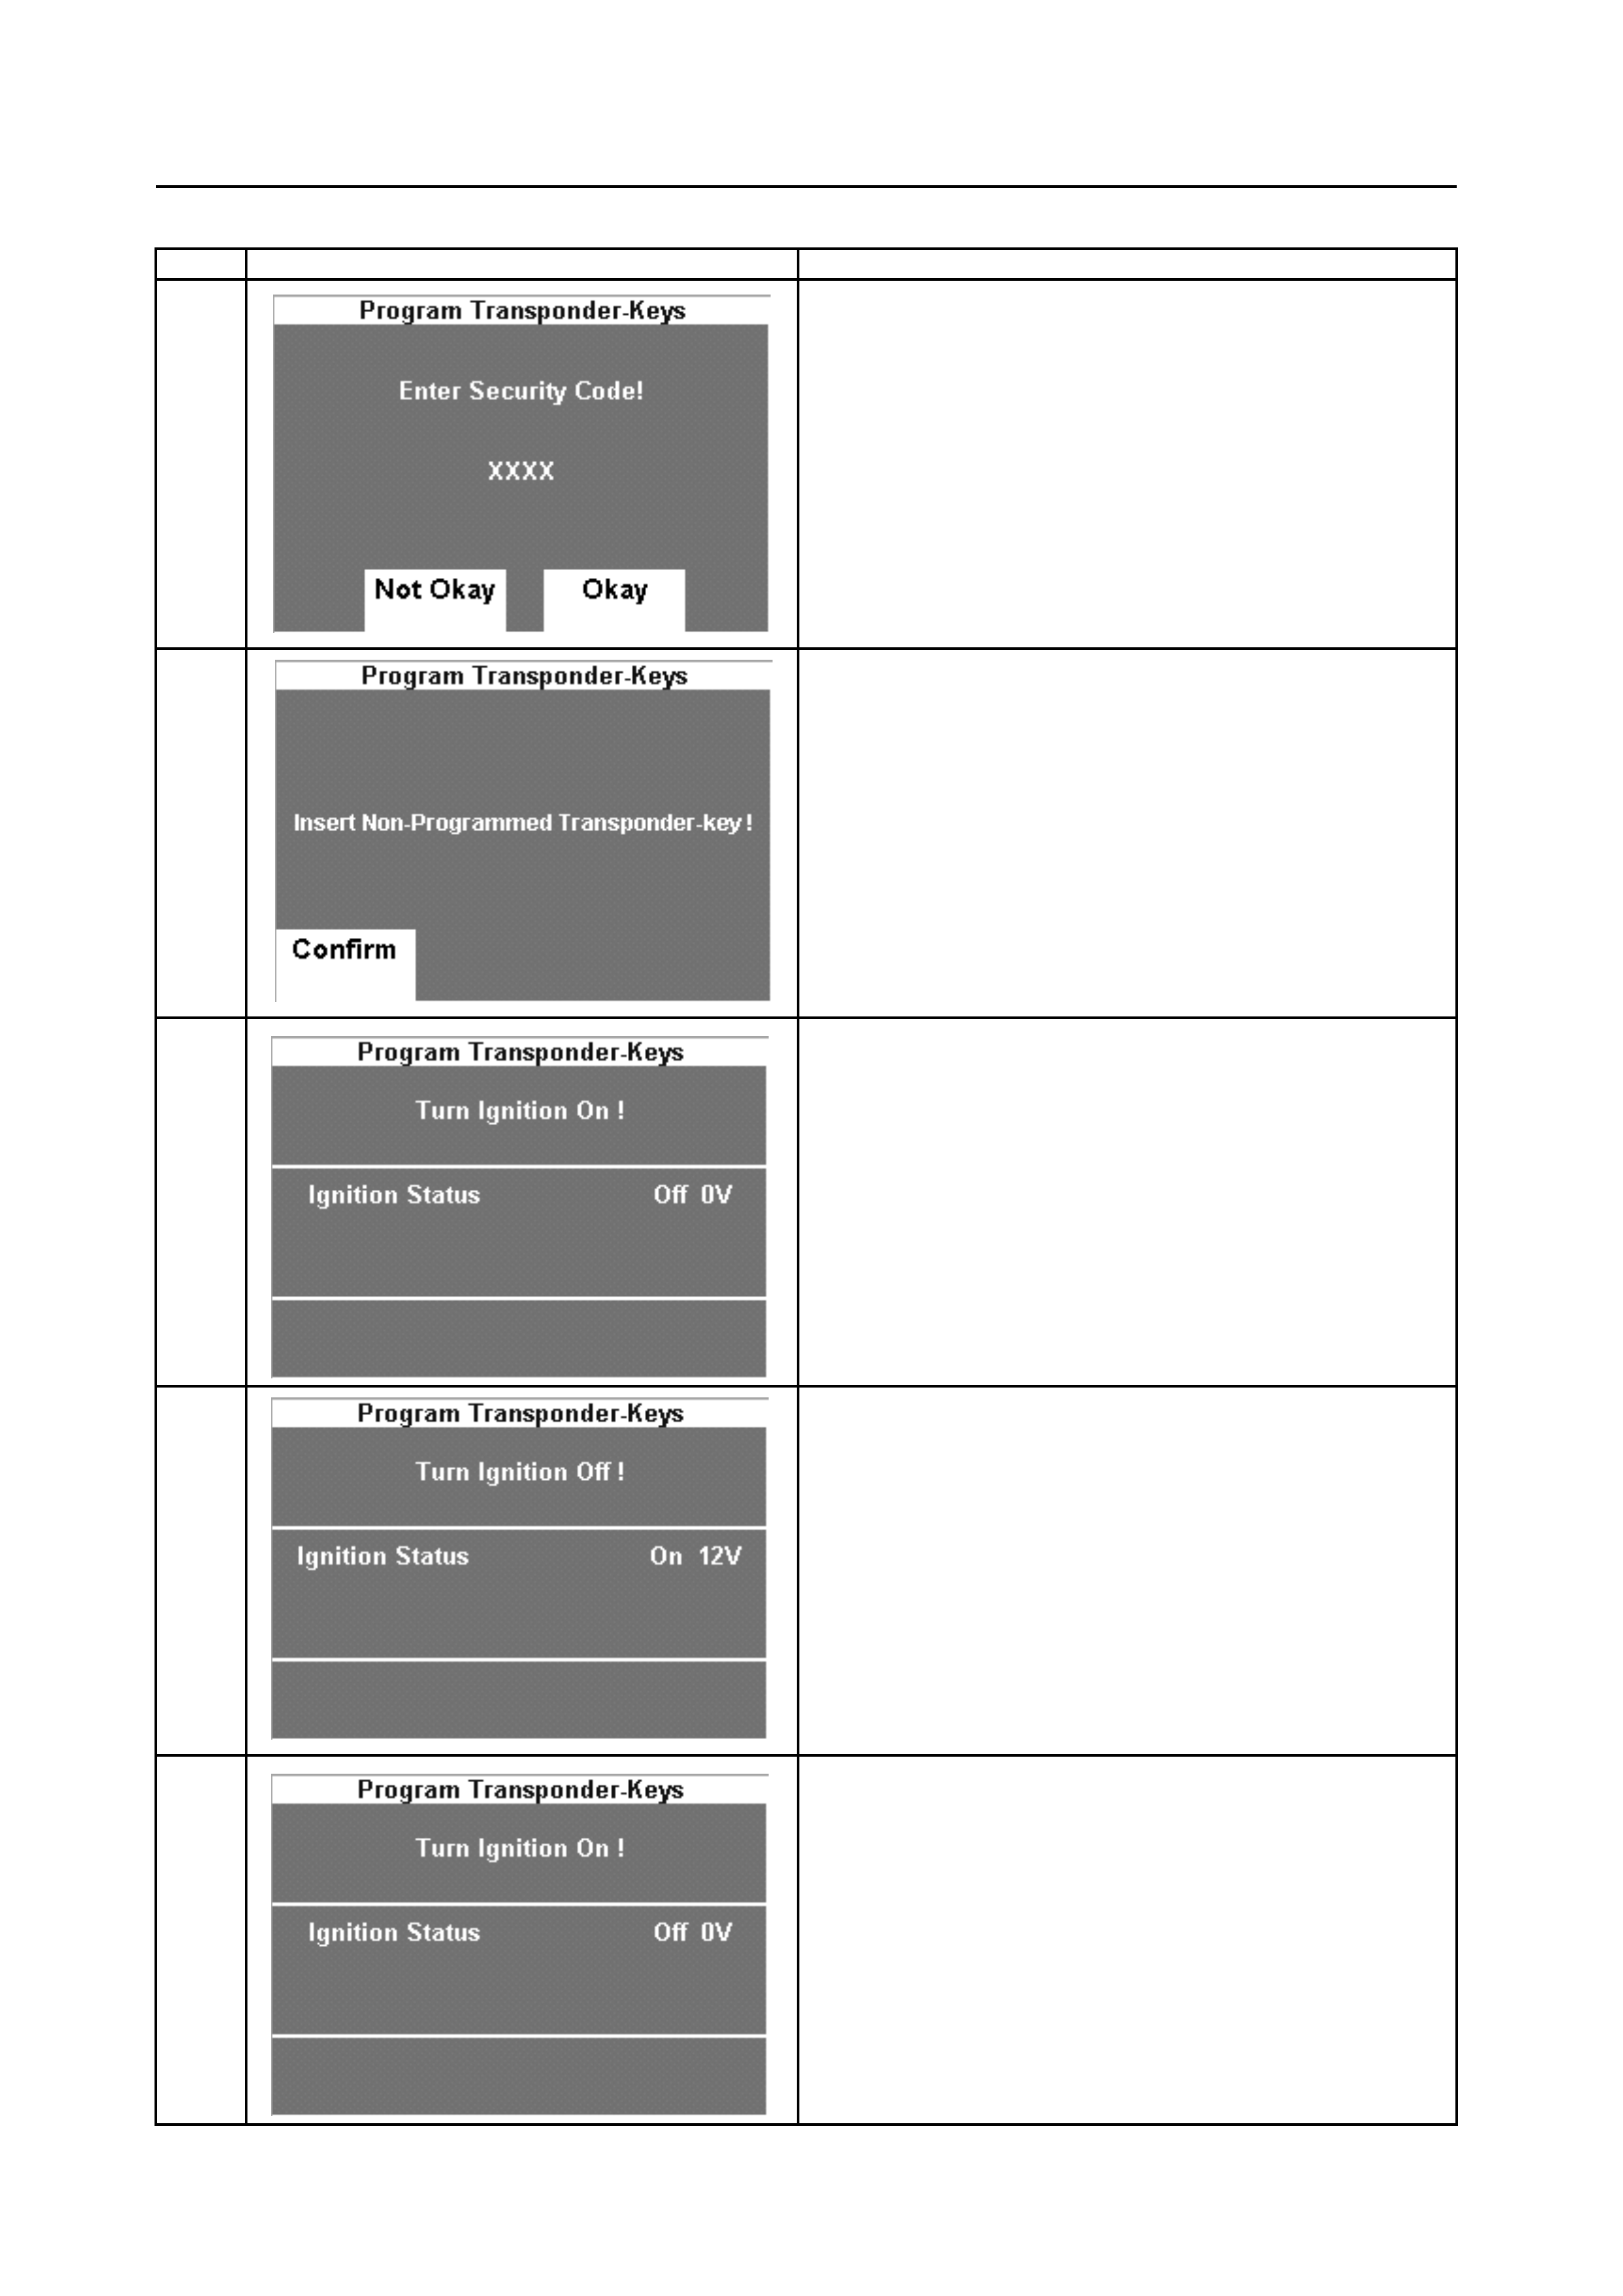
Transponder Key Programming-Page 3 of 4
Ste
p
Tech 2/TIS 2000 Screen Action
11
1. Press the "Okay" soft-key, if the entered "Security
Code" is correct.
2. Press the "Not Okay" soft-key, if the entered
"Security Code" is incorrect.
12
Press the "Confirm" soft-key.
13
Turn the Ignition Switch "ON".
14
Turn the Ignition Switch "OFF".
15
Turn the Ignition Switch "ON".
Transponder Key Programming-Page 4 of 4
Ste
p
Tech 2/TIS 2000 Screen Action
16
Turn the Ignition Switch "OFF".
17
1. Press the "No" soft-key, if all transponder keys
are programmed.
2. Press the "Yes" key, if more transponder keys
are to be programmed. Repeat the programming
Steps 12 to 17.
18
Transponder Key programming is completed. Press
the "Confirm" soft-key.
Important: Turn the Ignition Switch "OFF" for
at least 40 seconds.
Attempt to start the engine and verify the engine
WILL start using with all keys.
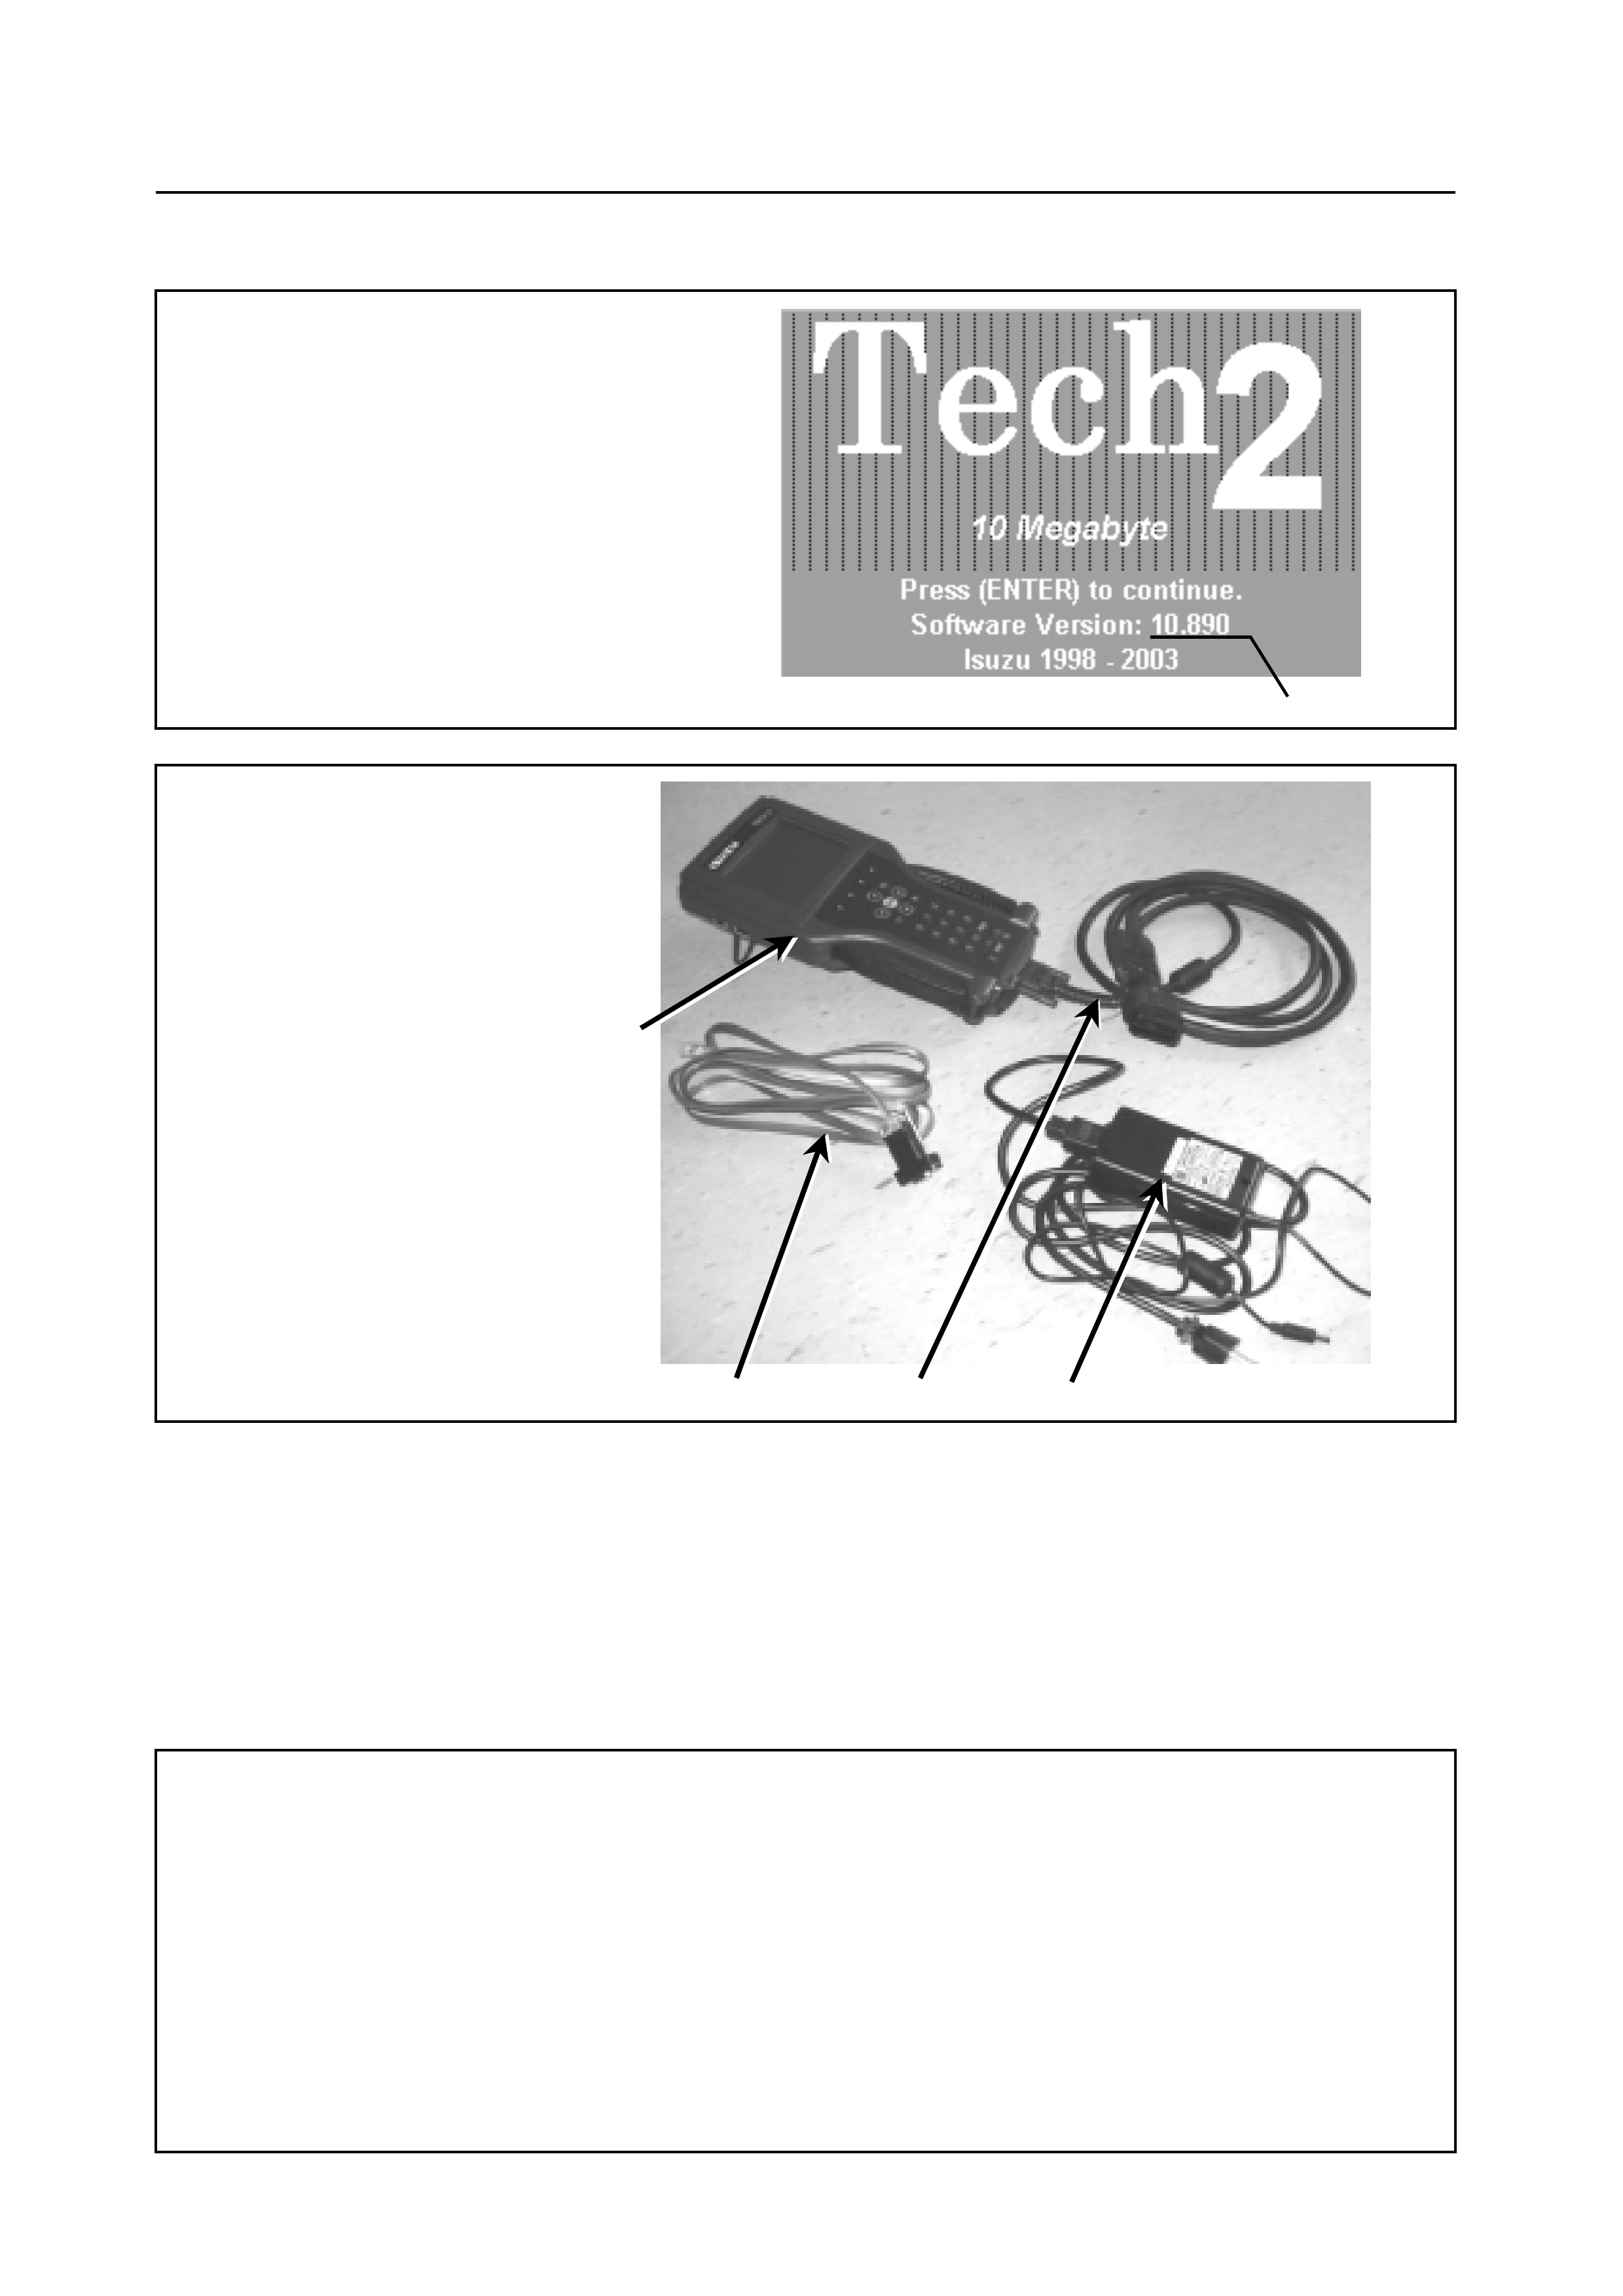
TECH 2
4. AC Adopter
F0: Diagnostic Trouble Code F3: Additional Functions
F0: Read DTC Info Ordered By Priority F0: Read ECU Identification
F1: Read DTC Infor As Stored By ECU F1: Reset Immobiliser
F2: Clear DTC Information F2: Reset Engine Control Module
F3: Erase Transponder Key
F1: Data Display F4: Programming
F2: Snapshot F0: Program Immobiliser Function
F1: Program Transponder Key
3. DLC Cable With SAE 16/19 Connector
Select "Immobiliser" in Vehicle Identification menu. The following menus and sub-menus are
available.
Tech 2 Display
Tool Preperation-Page 1 of 7
TECH 2 & PC PREPARATION
To perform reset or program imobiliser, latest Tech 2 software must be installed to the Tech 2
PCMCIA card. And, prepare the RS-232 cable (2), AC adopter (4) and data link connector cable with
SAE 16/19 connector (3).
2. RS-232 Cable
1. Tech 2 With PCMCIA Card
1. Tech 2 Software Version Number
1
2 3 4
1
PC
2. Release Month
Hardware key Inserted to LPT1 Port
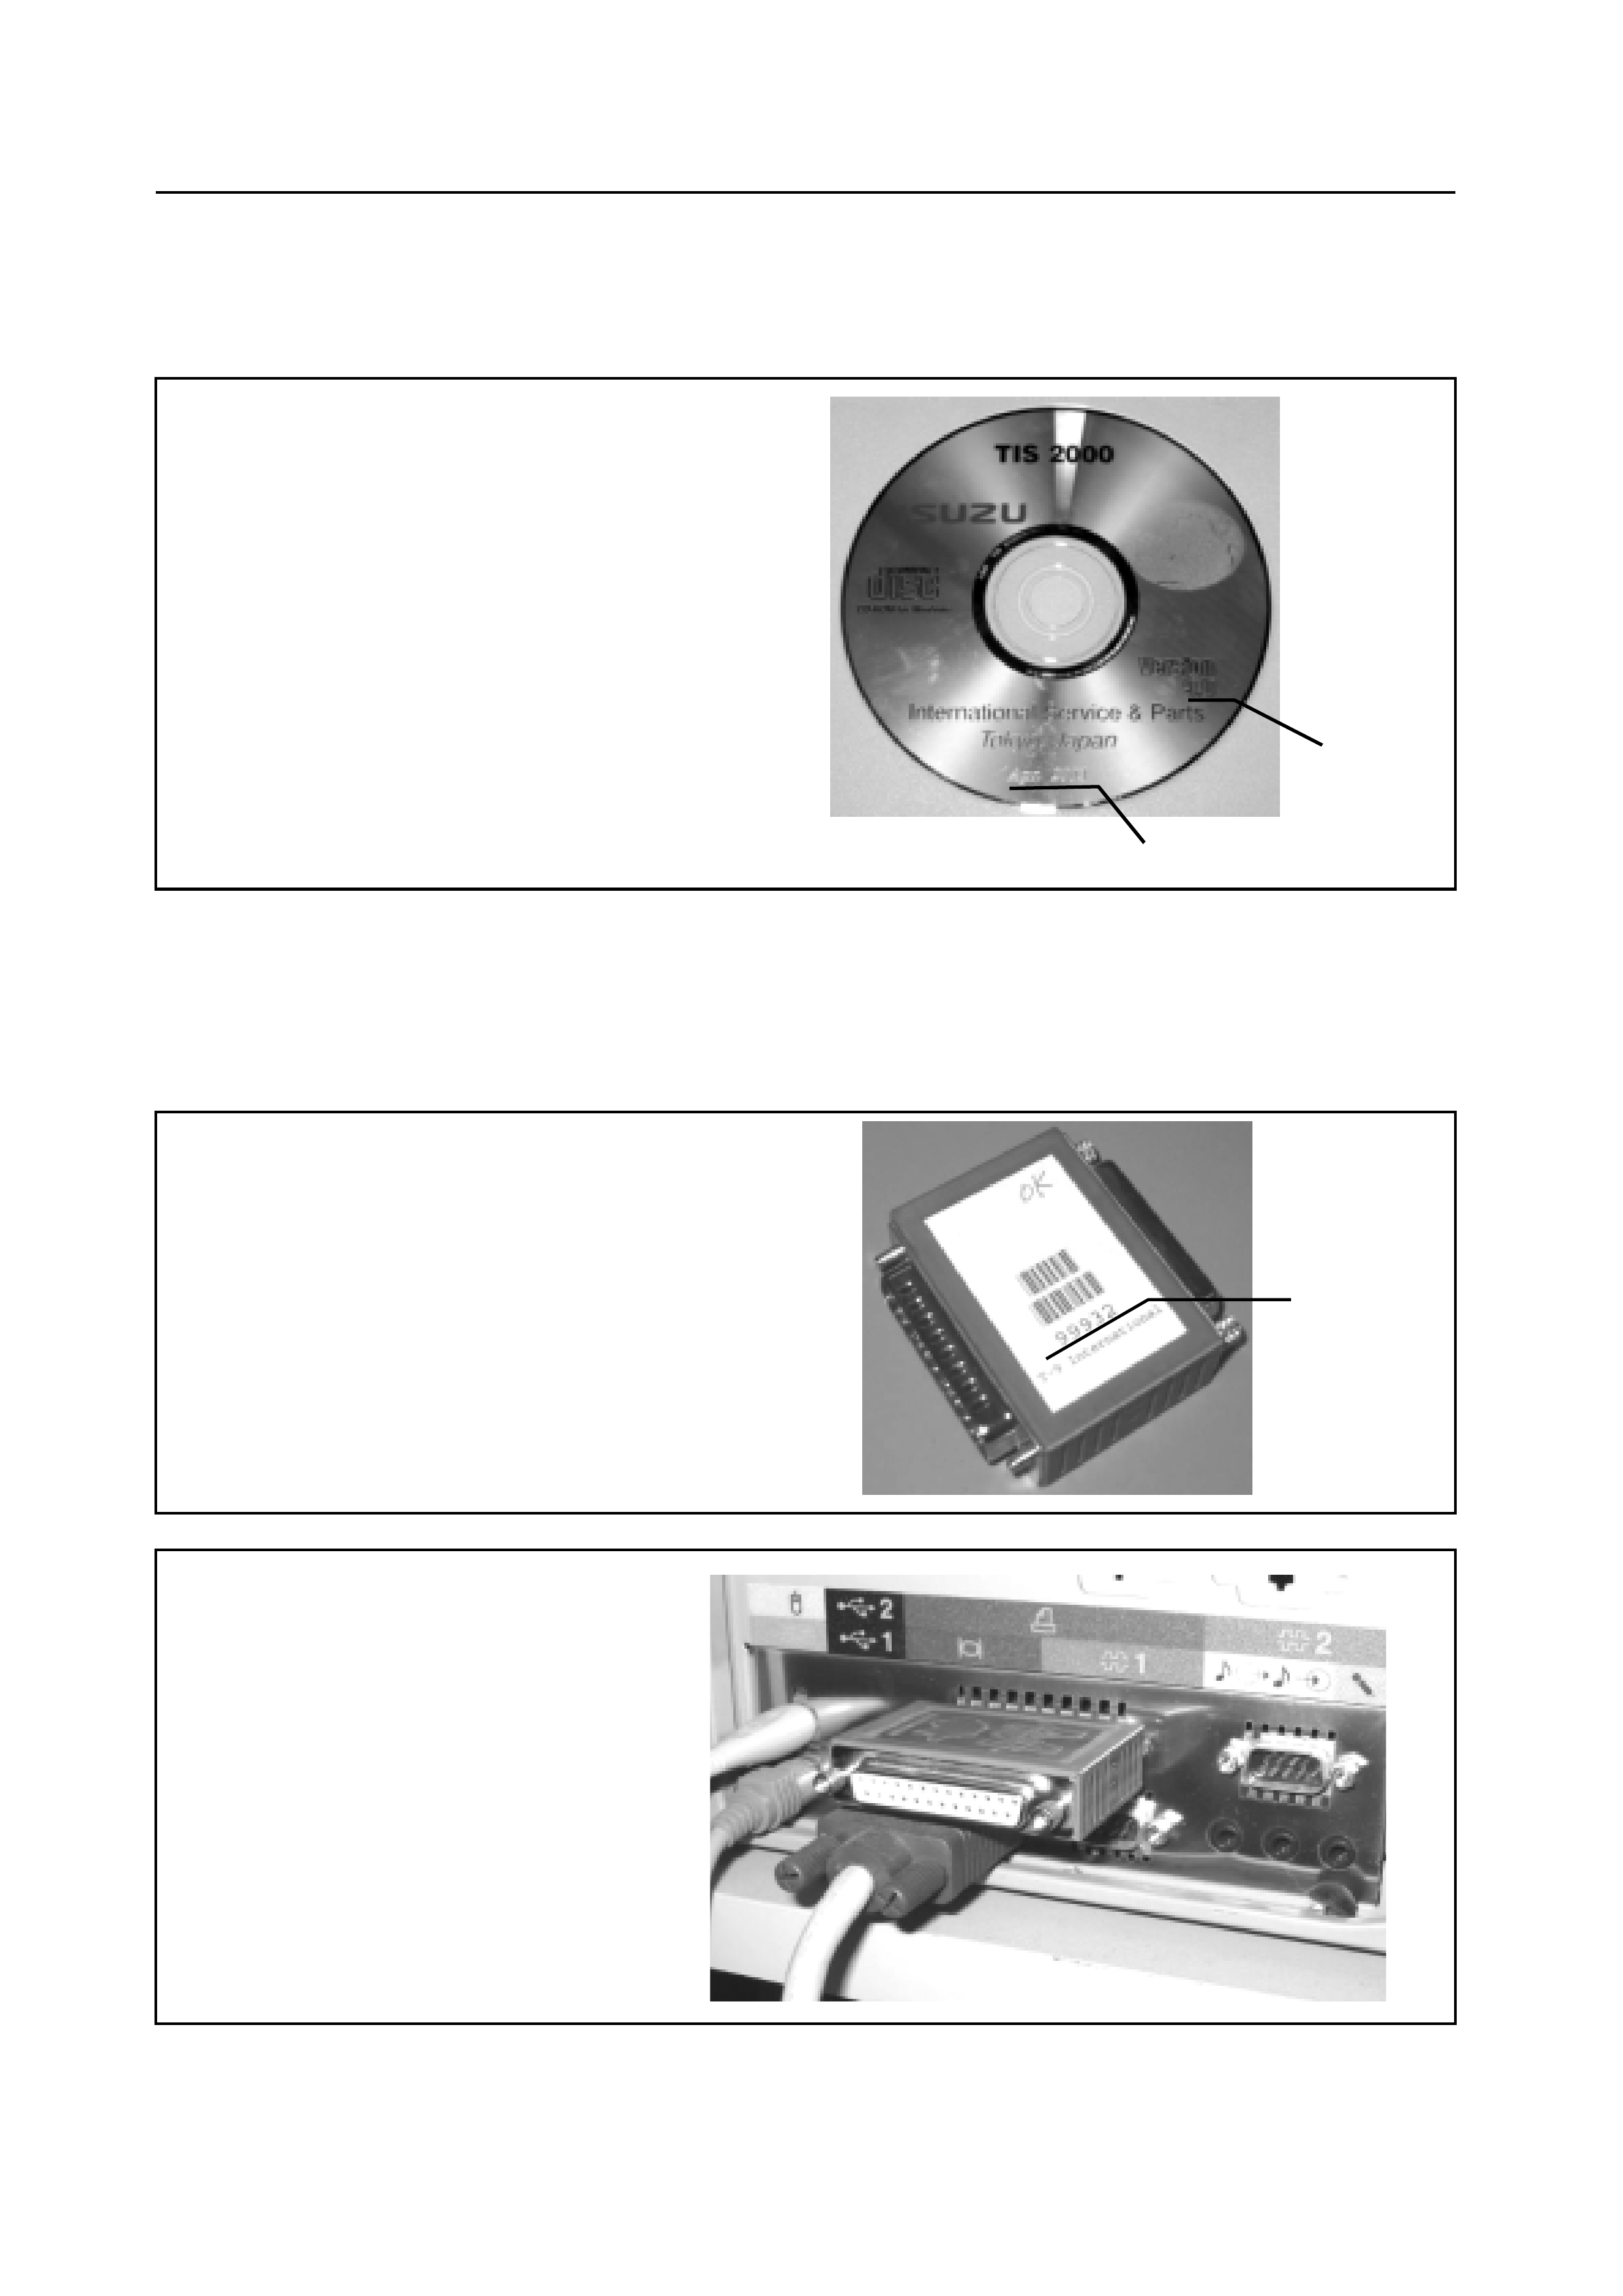
HARDWARE KEY
1. Registration Number
Tool Preperation-Page 2 of 7
In order to perform Security Access, SPS or Tech 2 software downloading, latest TIS 2000 must be
installed to the PC. Correct installation must be followed by TIS 2000 installation manual.
The Isuzu TIS 2000 CD-ROM will be released four times per year. This CD-ROM includes Tech 2
software and calibration software.
1. Isuzu TIS 2000 Version Number
Isuzu registered hardware key must be inserted to LPT1 port on PC. And, it is necessary to configure
into the TIS 2000 by following way.
1
2
1
Step 1:
Step 2:
Step 3:
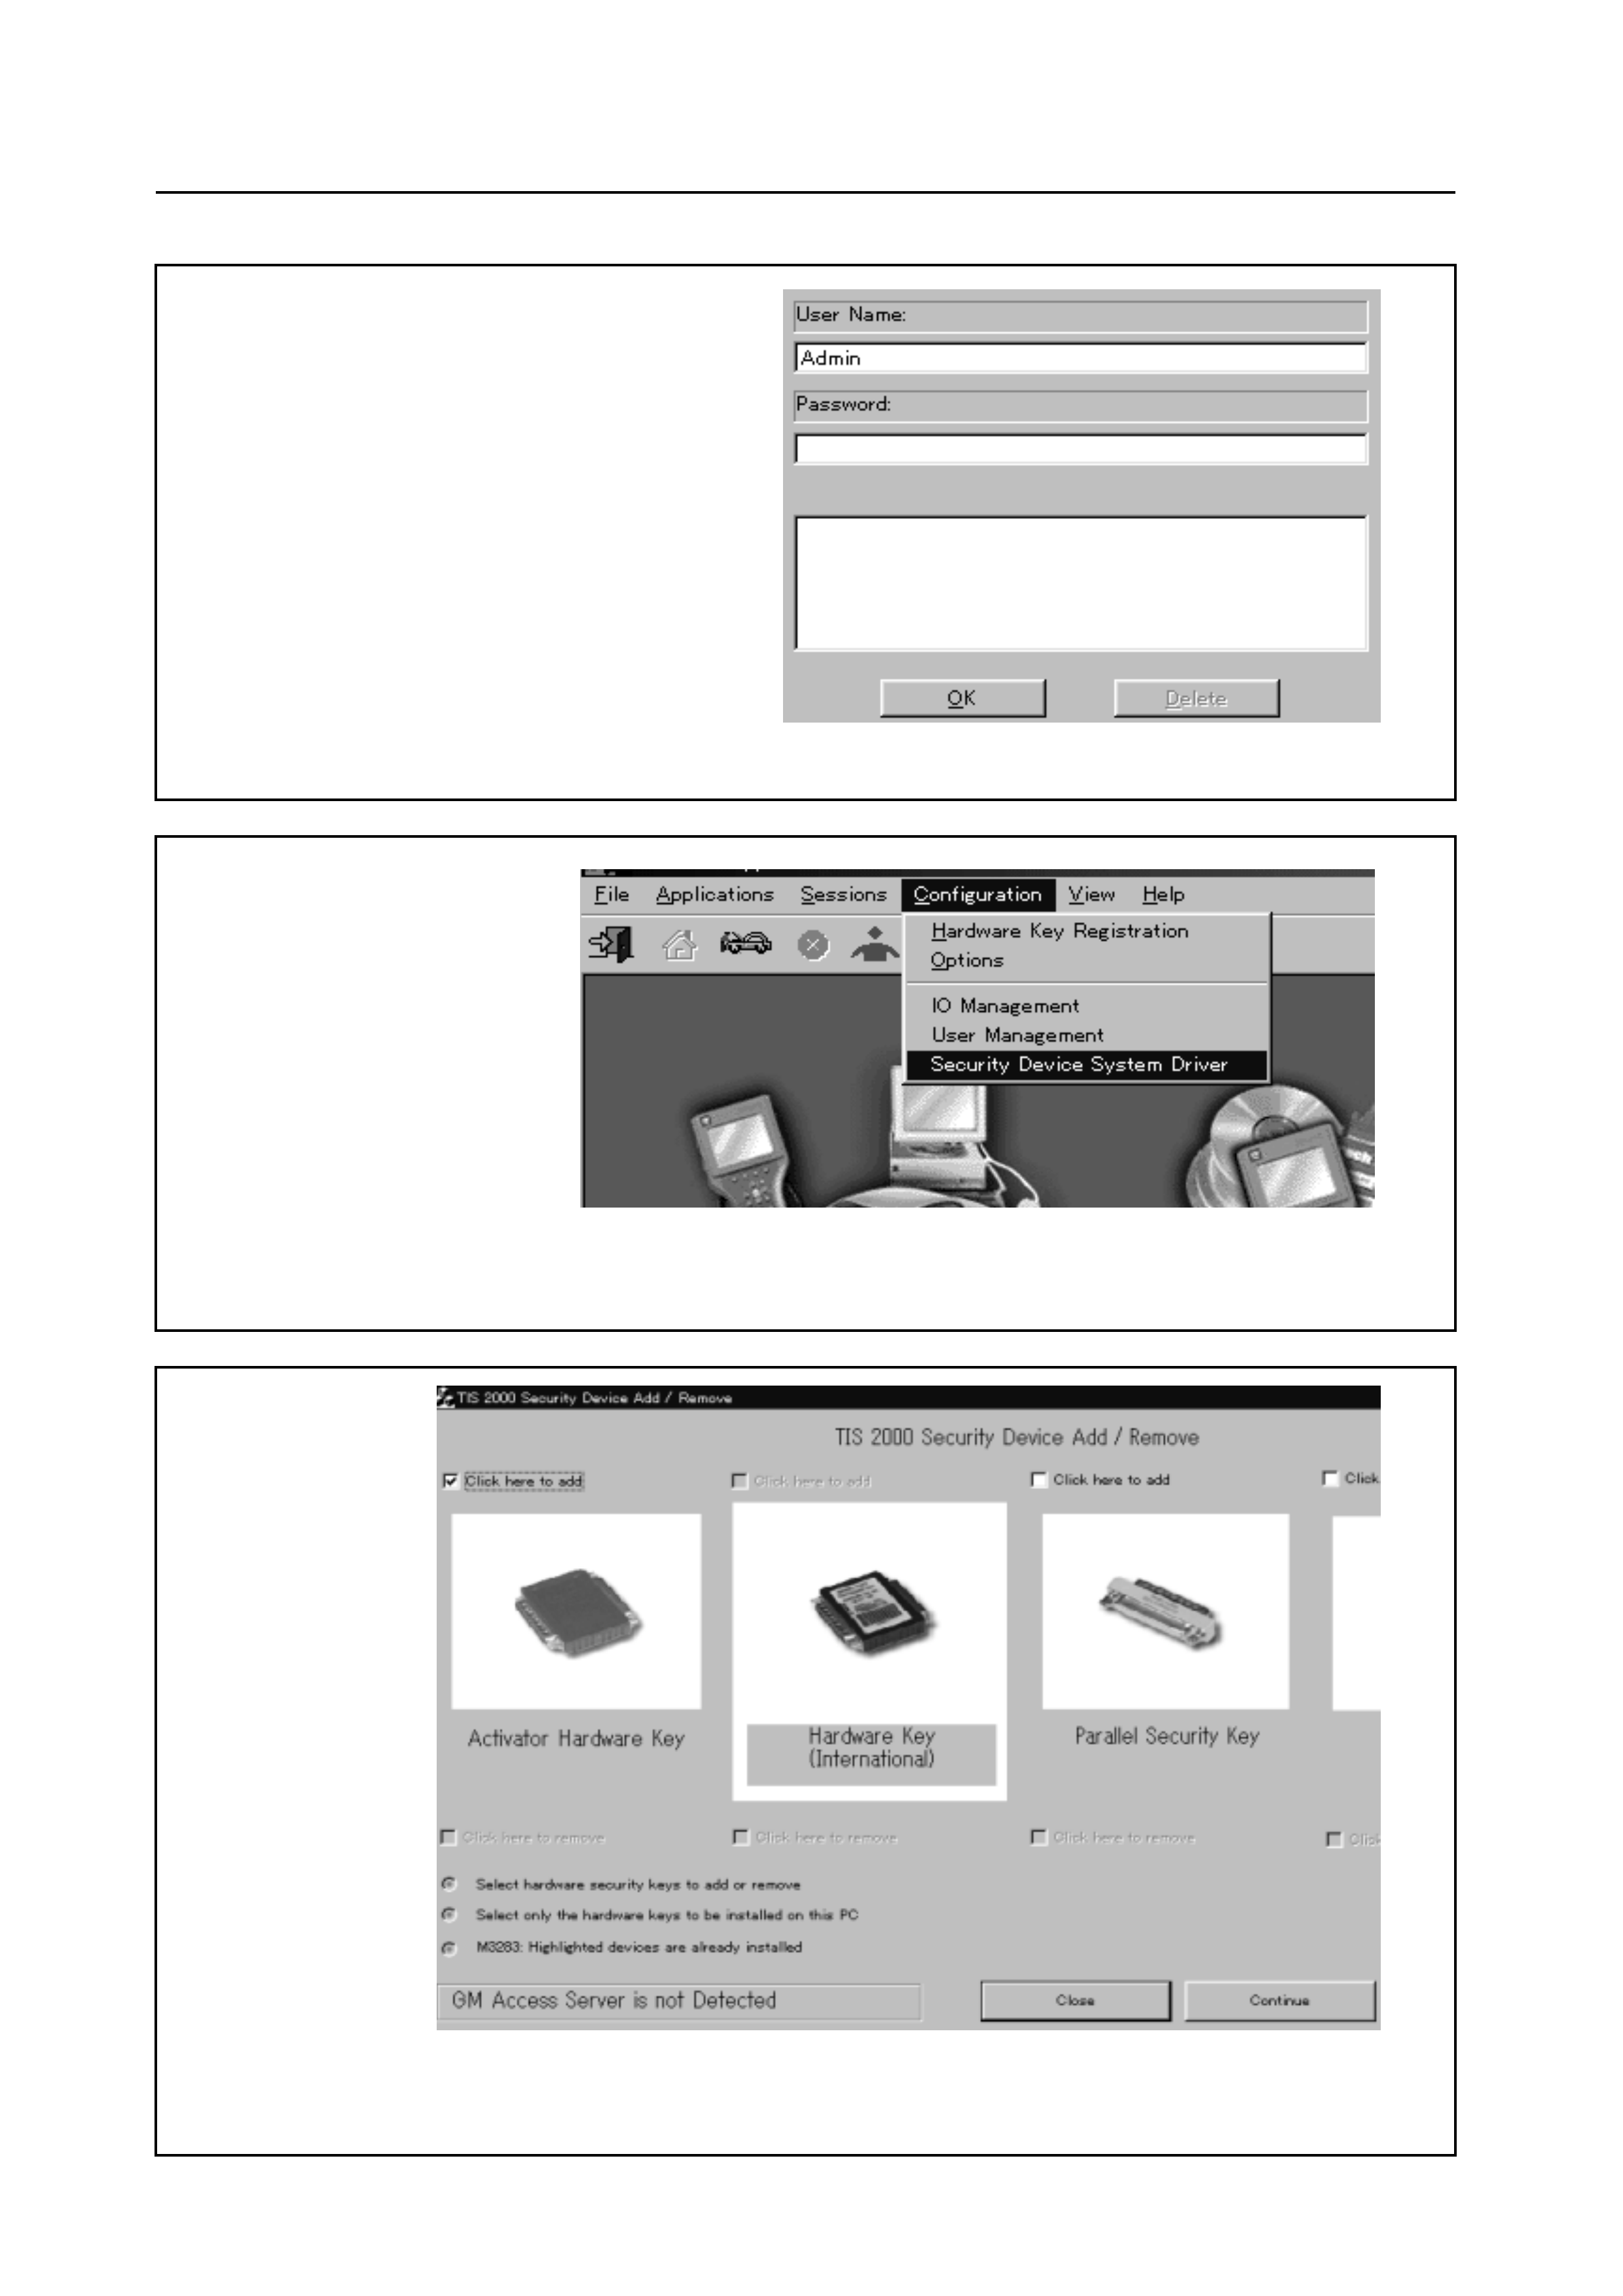
After TIS 2000 is started, input "Admin" to User Name column.
Tool Preperation-Page 3 of 7
How To Configure The Hardware Key
In the TIS 2000 menu bar, select the "Configuration" and "Security Device System Driver". This entry is
only active when TIS 2000 was opened with the user name "Admin".
Four type of different hardware key will be appeared. Click the check box which is corresponding to the
correct "Hardware Key". After that, click the "Continue".
Step 4:
Step 5:
Note:
Step 1:
If the TIS 2000 does not communicate with Tech 2 when Security Access, SPS or a Tech 2 software
download is performed, the RS-232 cable connection port is may be incorrectly configured. Perform
the following configuration procedure after checking the COM port and Tech 2 connections.l
After TIS 2000 is started, input "Admin" to User Name column.
The hardware key is now active until its software is removed again.
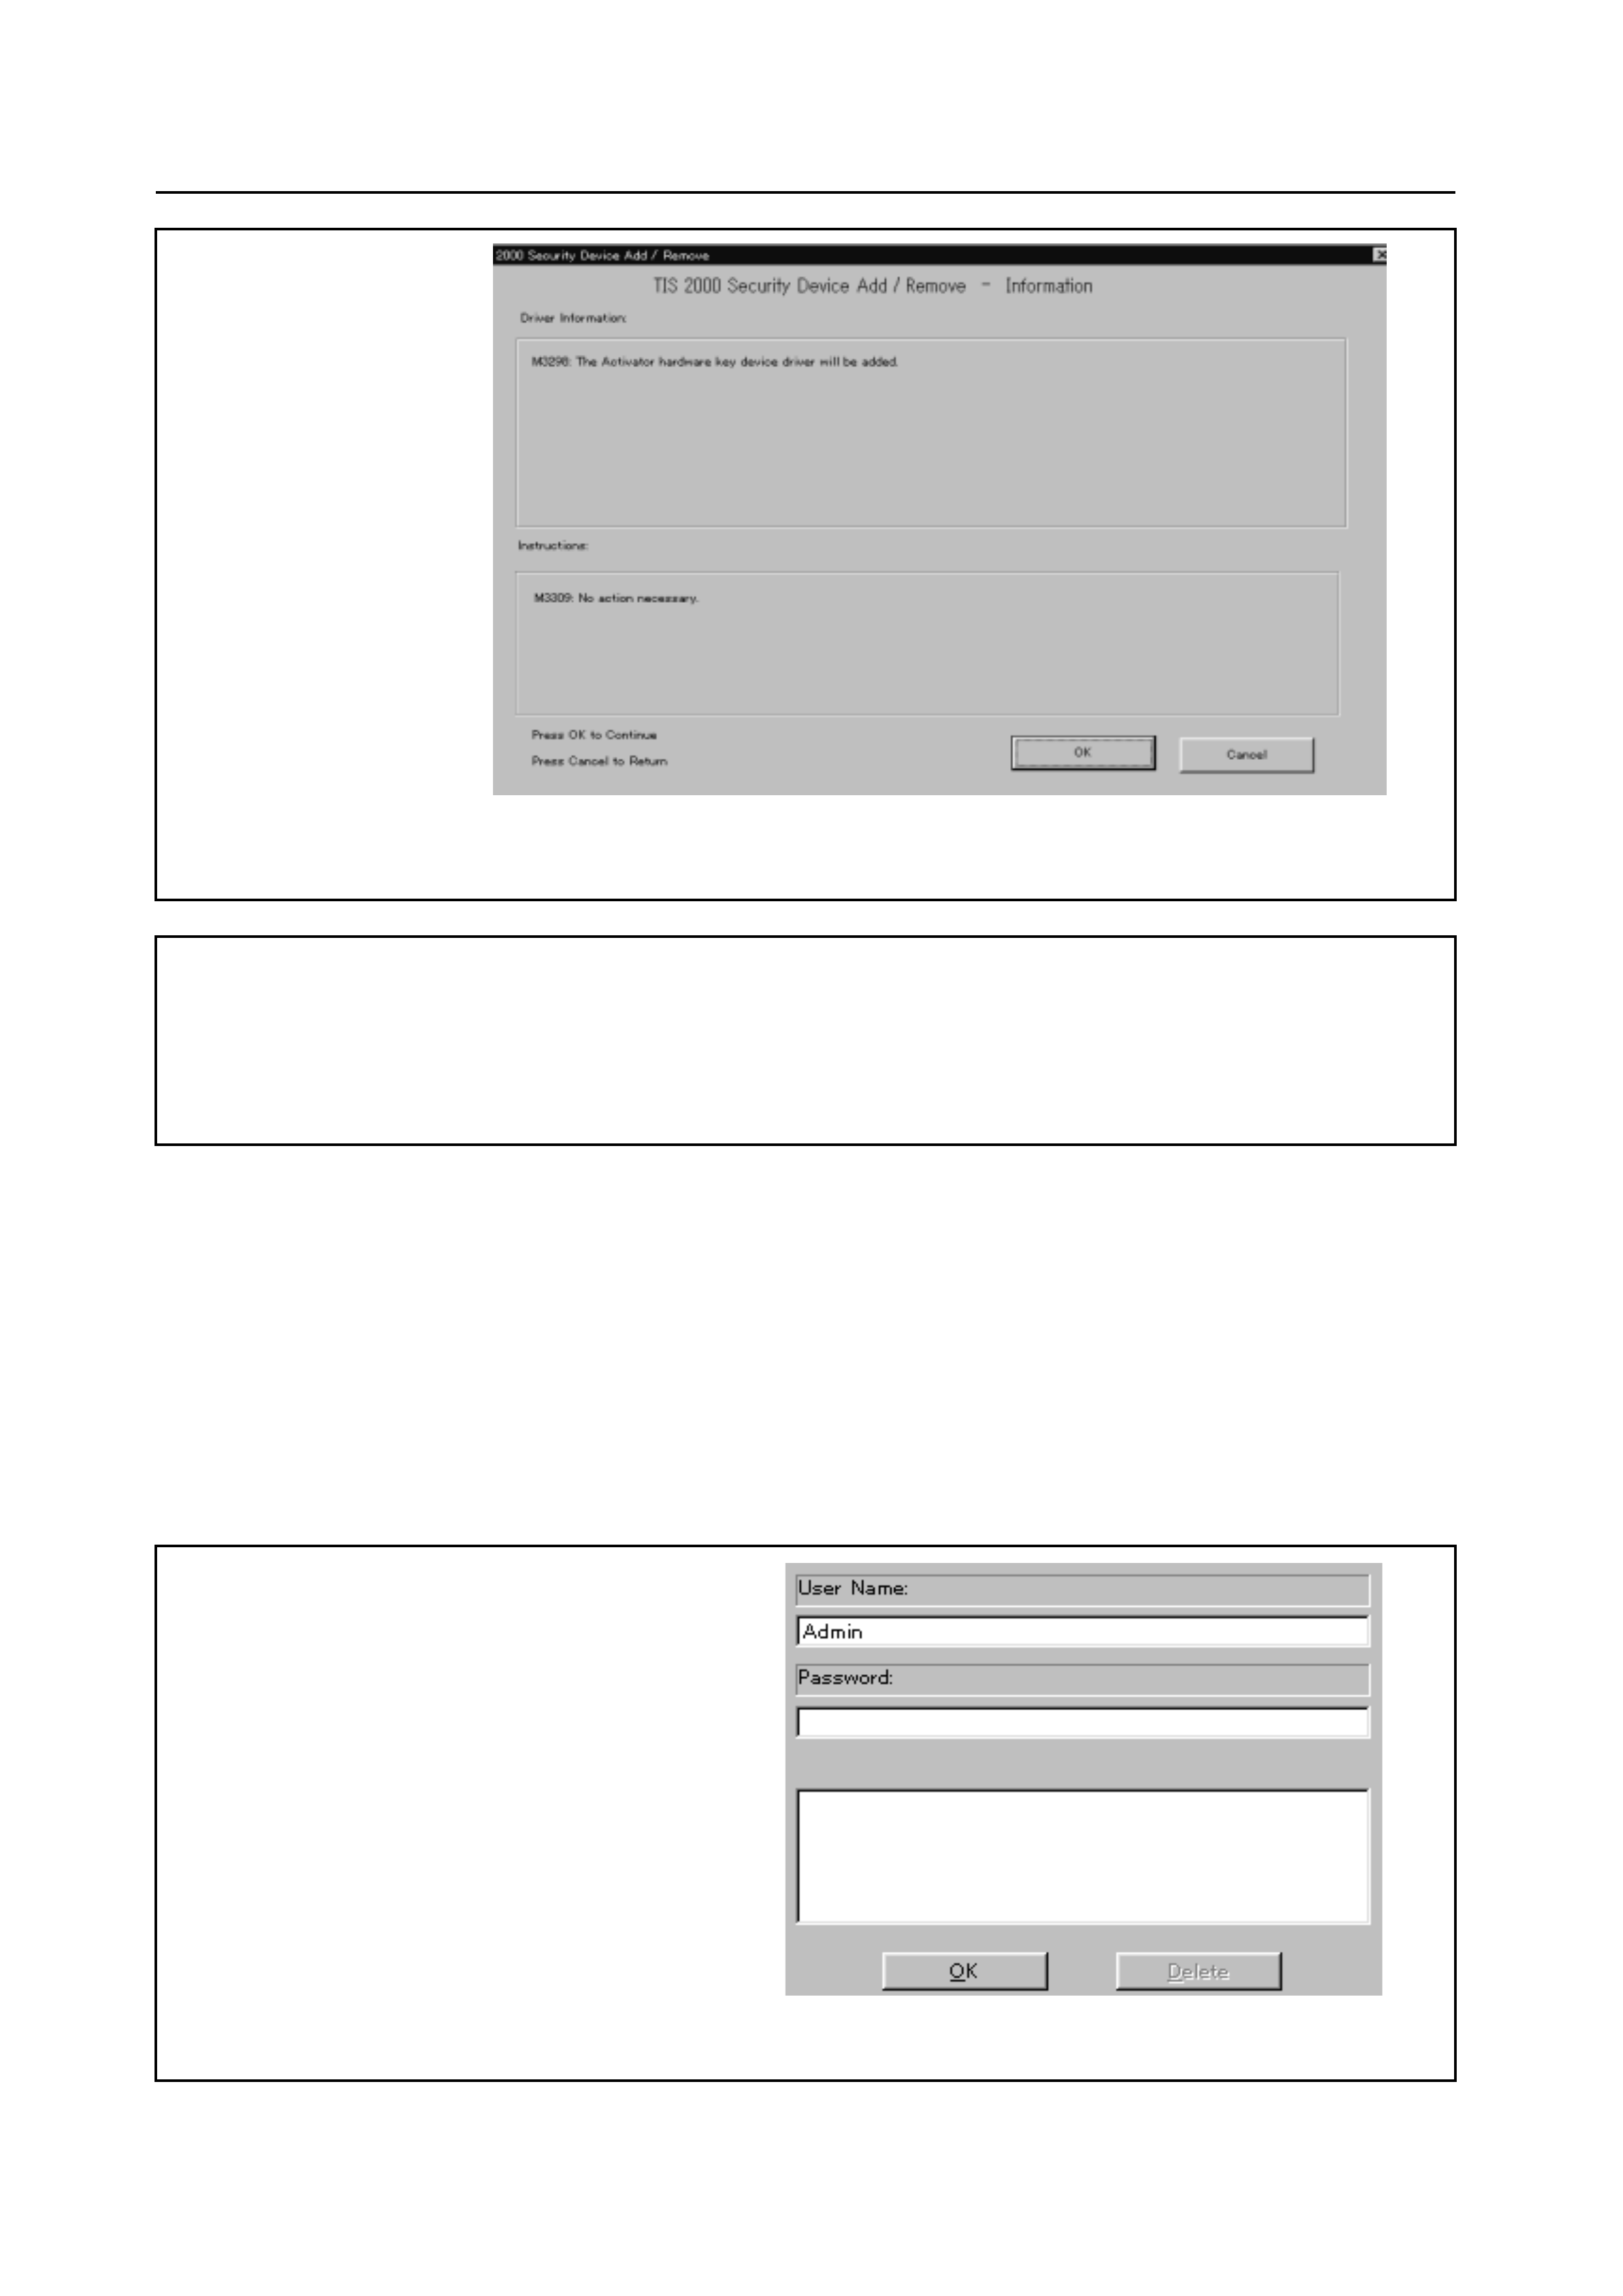
If the Step 3 is correctly finished, "The hardware key device driver will be added." will be
appeared in the "Driver Information". After confirmation, click the "OK".
Tool Preperation-Page 4 of 7
For Windows NT & Windows 2000, restart TIS 2000 and open with the user name "TIS".
For Windows 95/98 & Windows ME, restart the PC.
Step 2:
Step 3:
Step 4:
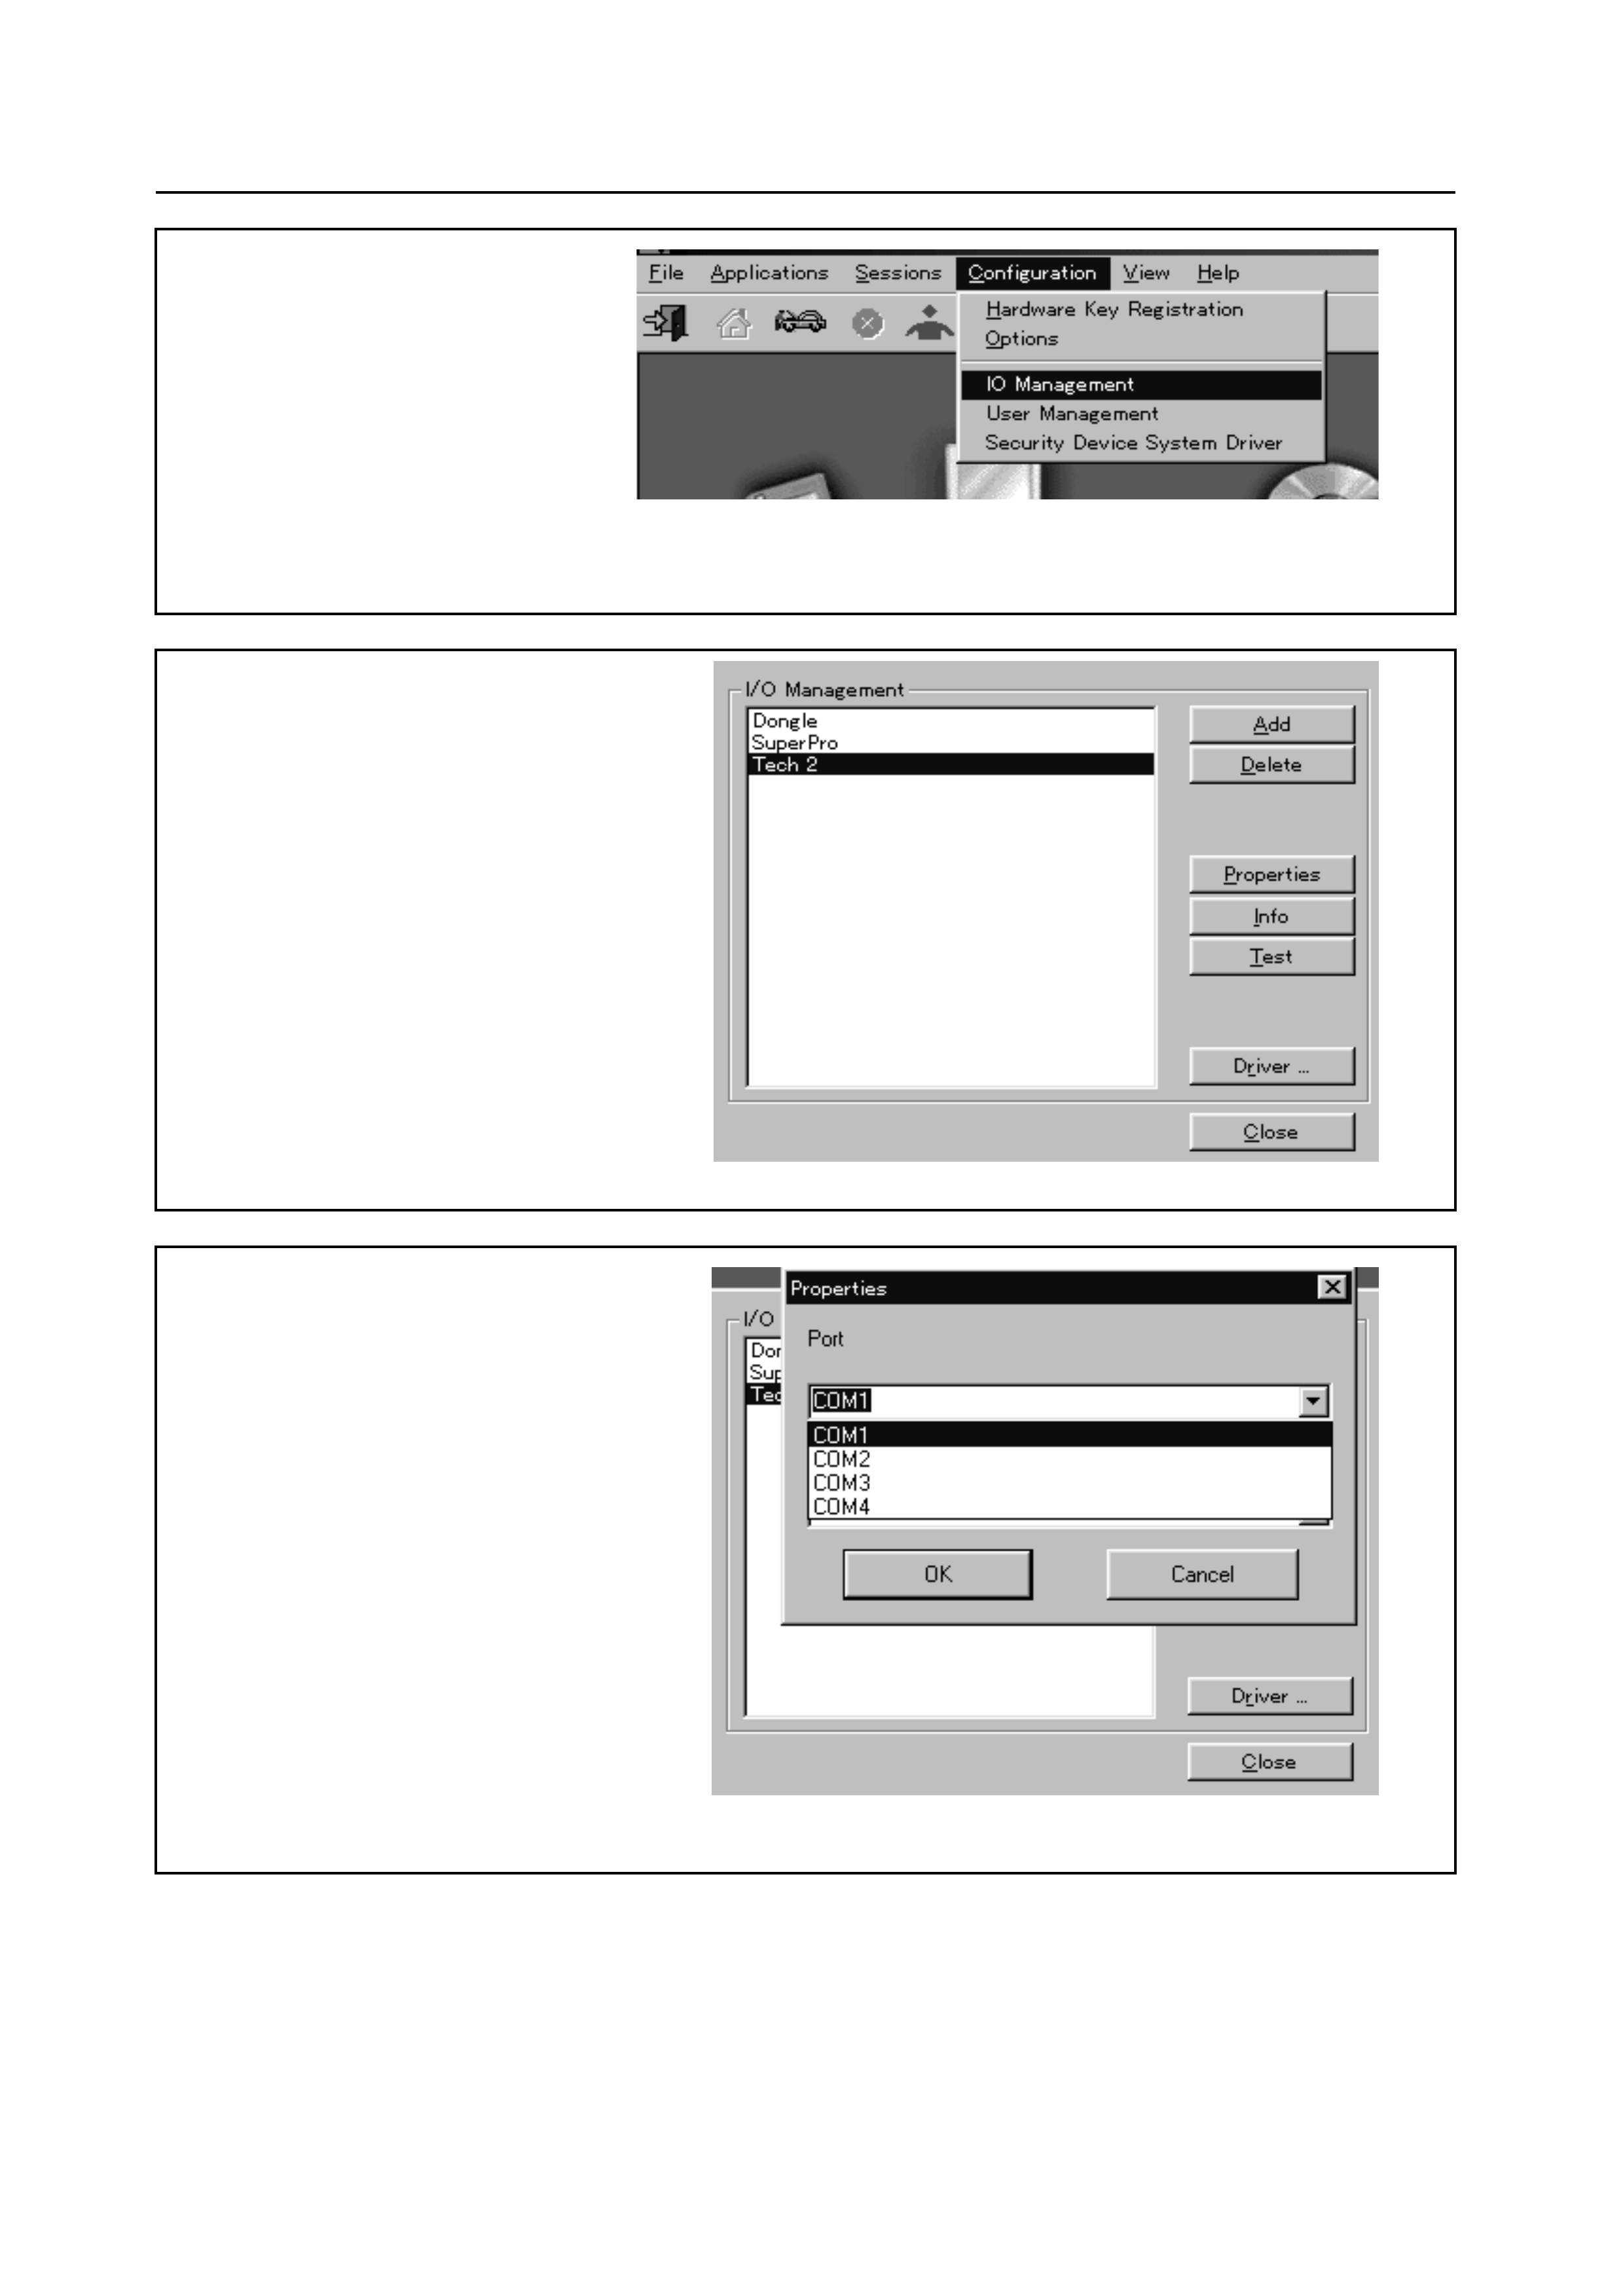
In the TIS 2000 menu bar, select the "Configuration" and "IO Management". This entry is only active
when TIS 2000 was opened with the user name "Admin".
Select "Tech 2" and click the "Properties".
Select applicable COM port and click "OK". Then click "Close".
Tool Preperation-Page 5 of 7
Note:
Step 1:
Step 2:
Step 3:
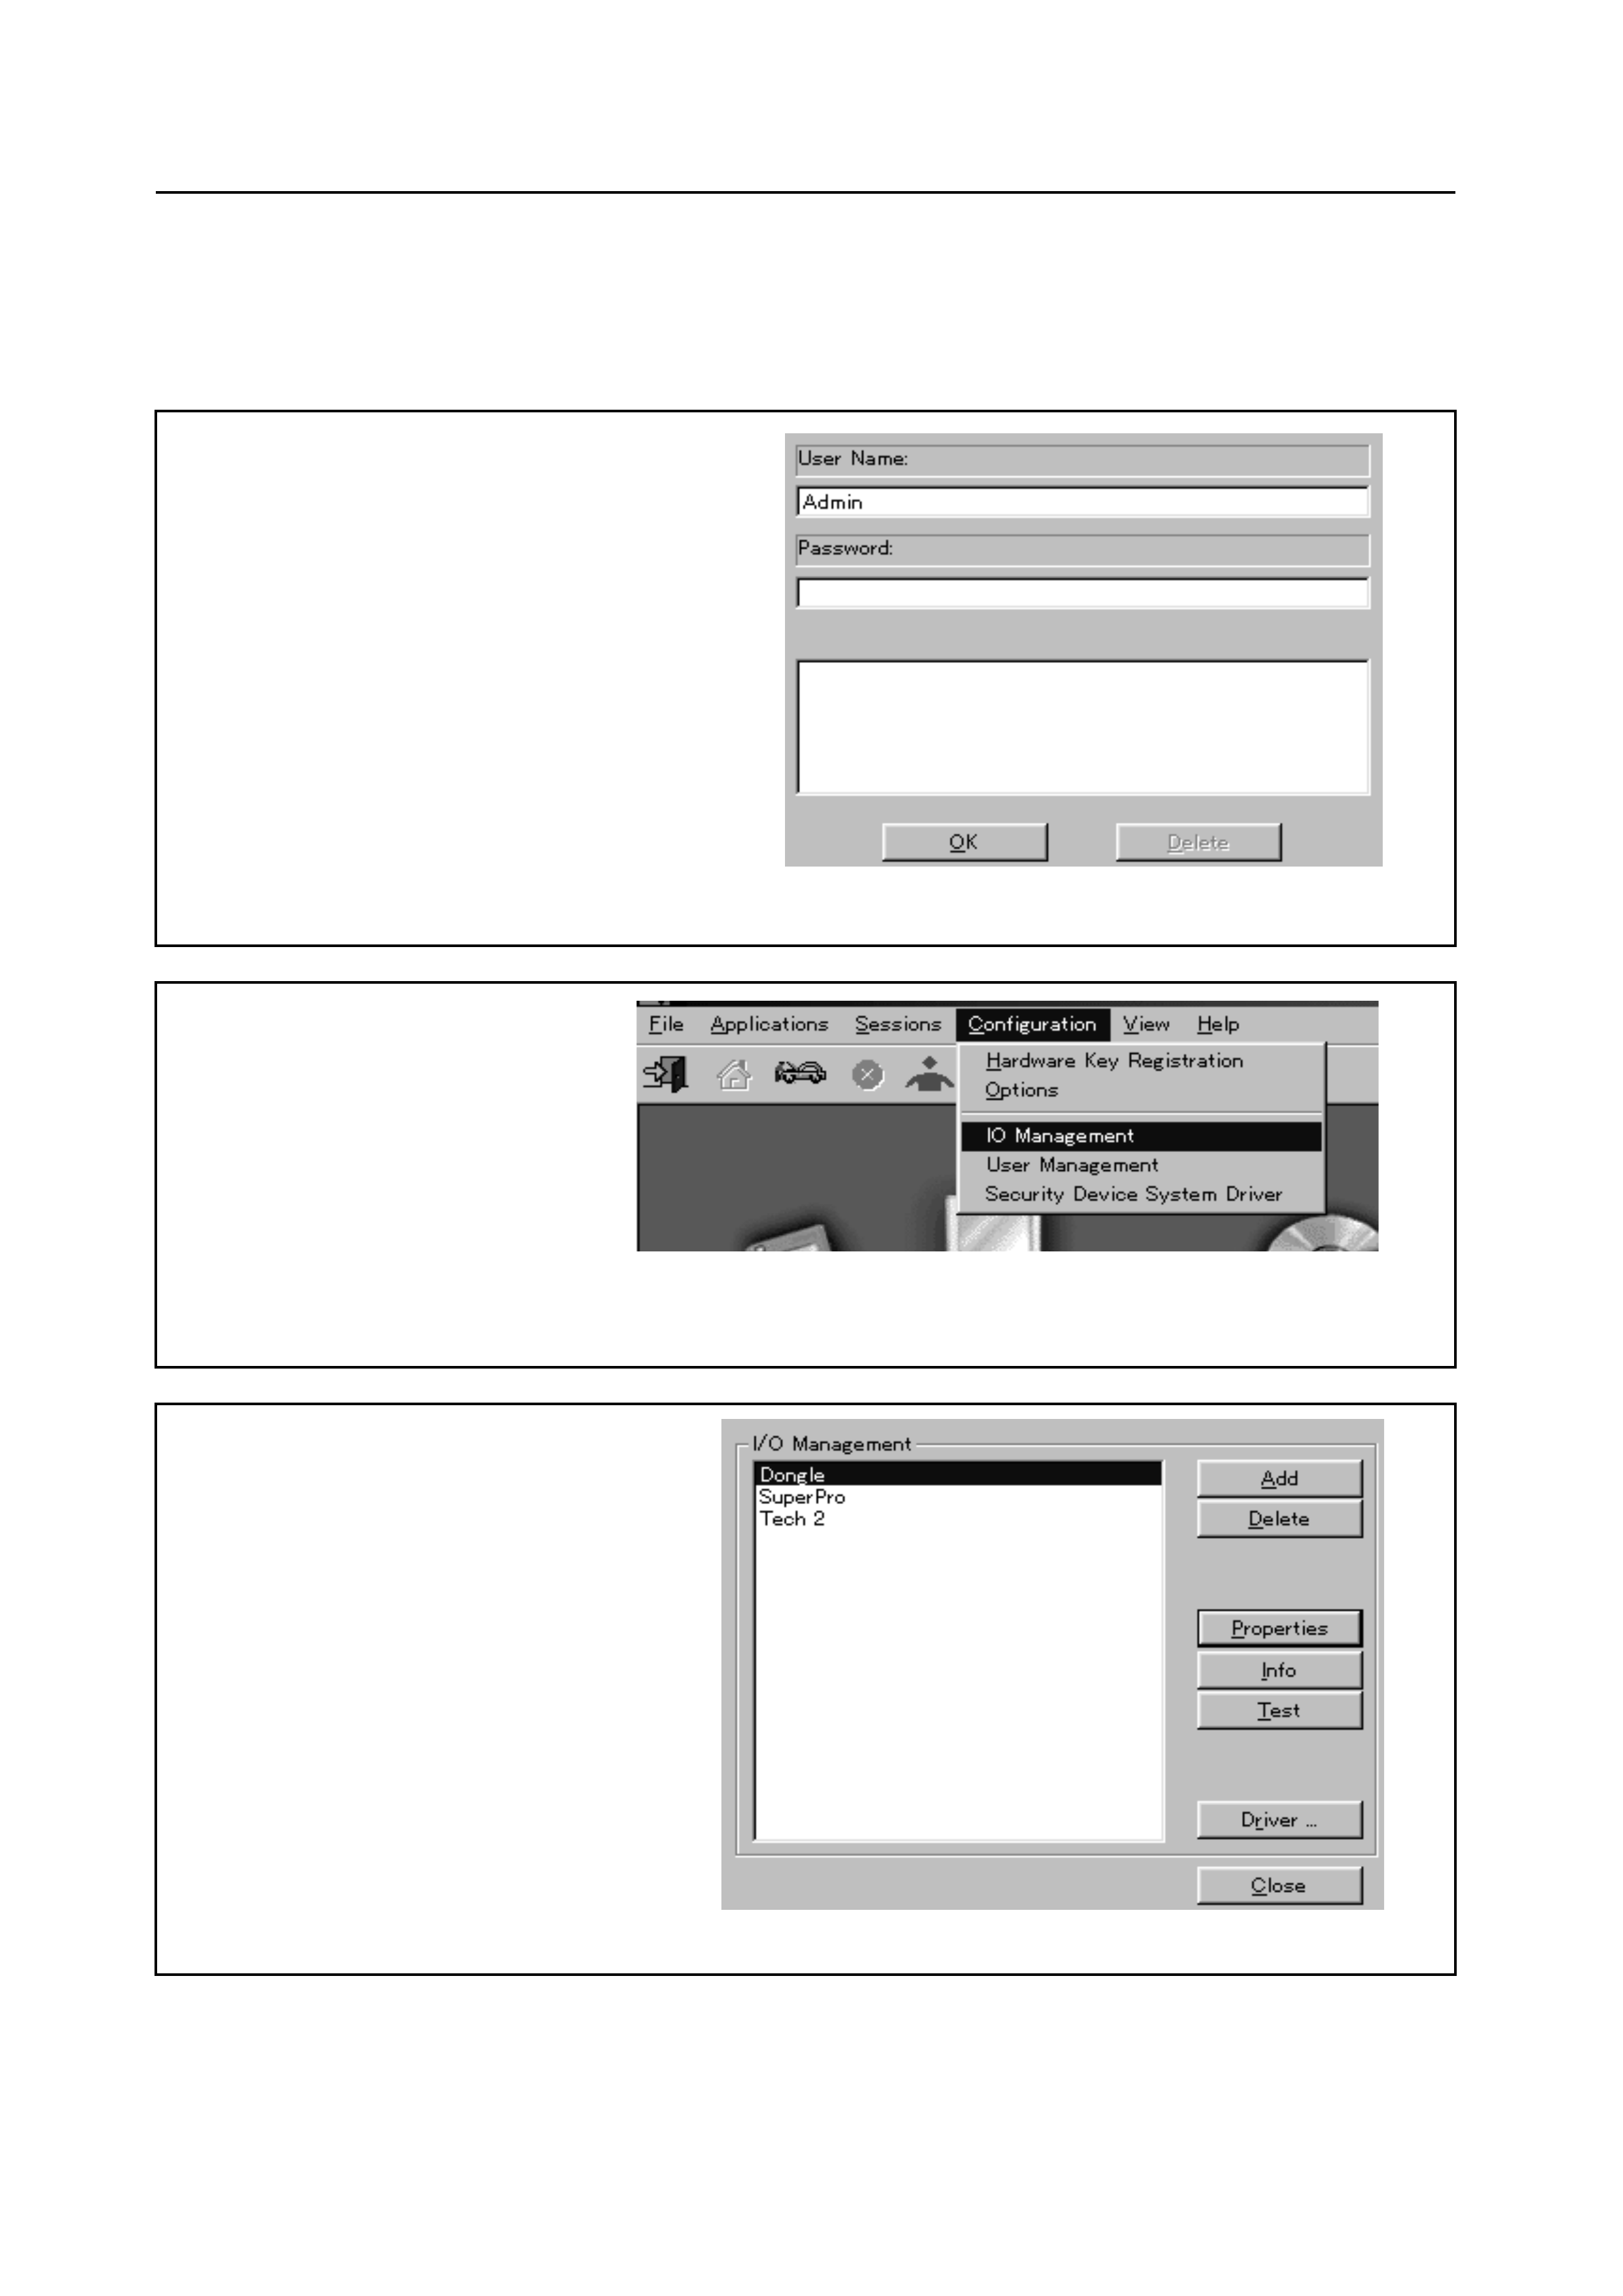
After TIS 2000 is started, input "Admin" to User Name column.
In the TIS 2000 menu bar, select the "Configuration" and "IO Management". This entry is only active
when TIS 2000 was opened with the user name "Admin".
Select "Dongle" and click the "Properties".
If the TIS 2000 is not recognised when Security Access or SPS was performed, the hardware key
connection port is may be incorrectly configured. In this case, perform the following way for correction
after verifying the LTP1 connection.
Tool Preperation-Page 6 of 7
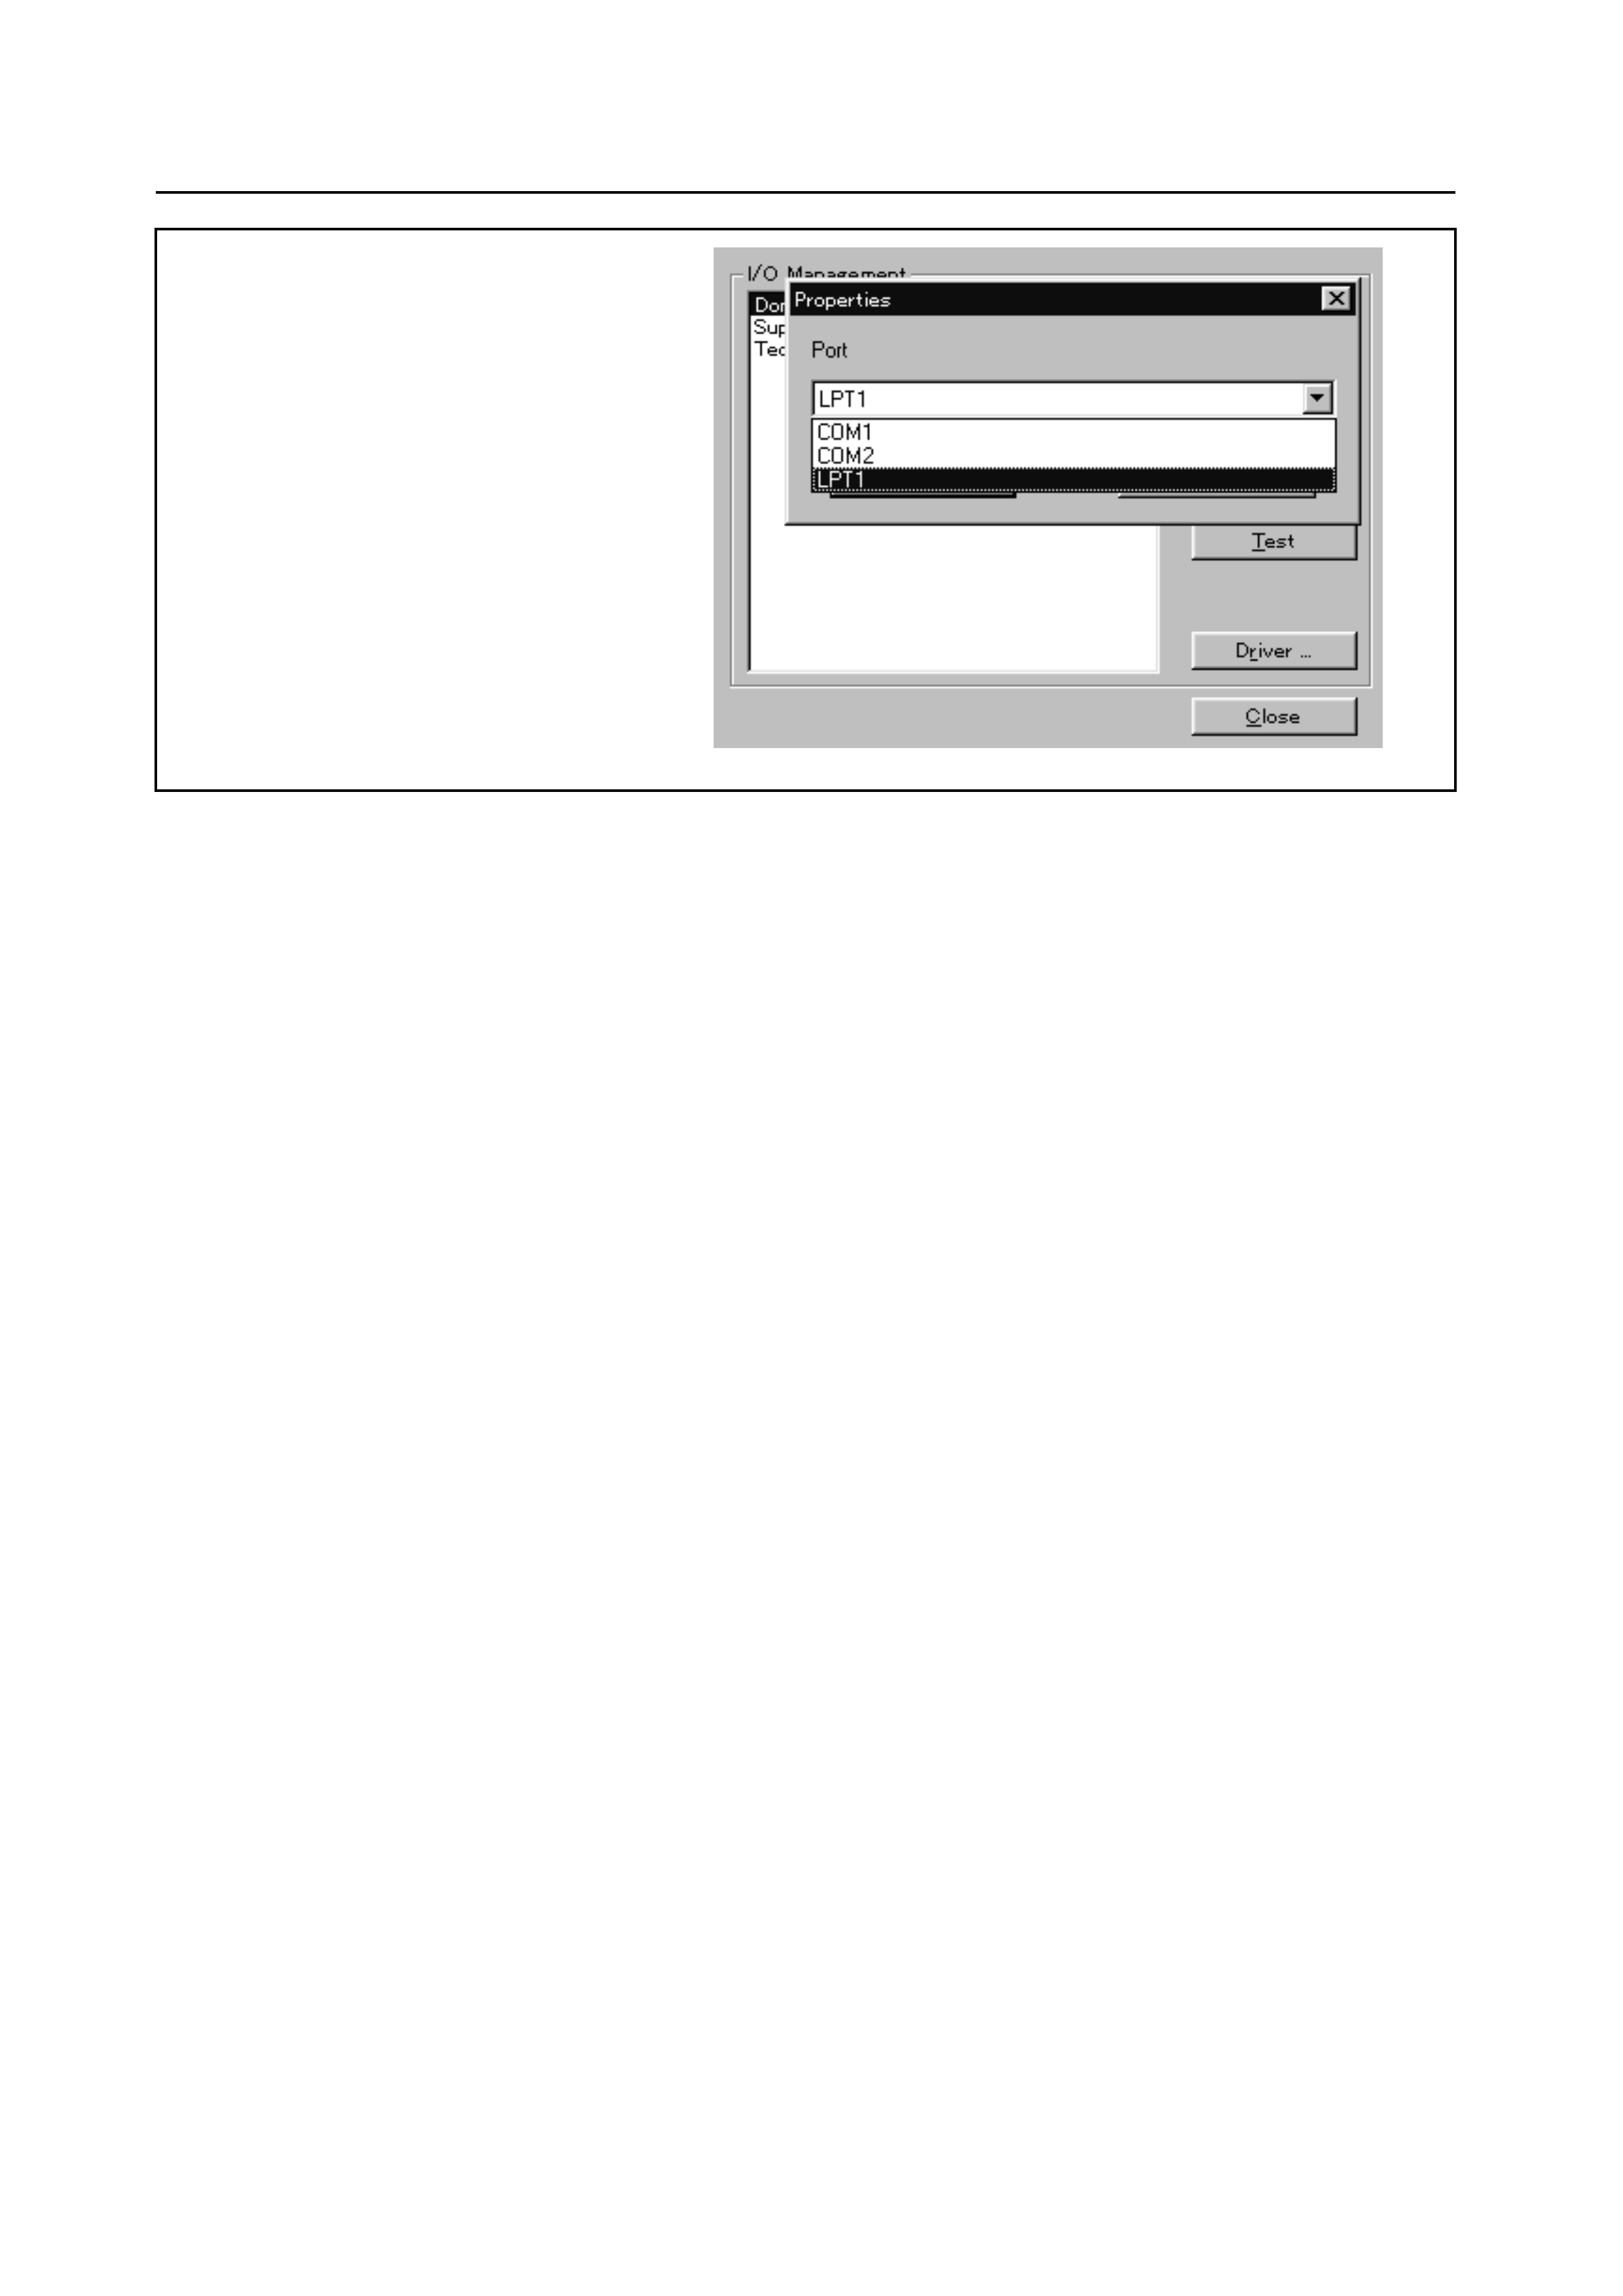
Step 4:
Select "LTP1" port and click "Close".
Tool Preperation-Page 7 of 7