
SECTION 7B - TRANSMISSION & TRANSFER CASE - MUA 5C
Service Precaution
General Description
Diagnosis (MUA)
Transmission (MUA)
Disassembled View
Removal
Installation
Transmission Case and Transfer Case
Major Components (MUA)
Disassembly
Reassembly
Intermediate Plate with Gear Assembly,
Detent, Shift Arm, and Interlock Pin (MUA)
Disassembled View
Disassembly
Inspection and Repair
Reassembly
Reverse Gear and 5th Gear (MUA)
Disassembled View
Disassembly
Inspection and Repair
Reassembly
Top Gear Shaft, Main Gear Shaft, and
Counter Gear Shaft (MUA)
Disassembled View
Disassembly
Inspection and Repair
Reassembly
Main Data and Specifications
Special Tools (MUA)
SERVICE PRECAUTION
WARNING: THIS VEHICLE HAS A SUPPLEMENTAL
RESTRAINT SYSTEM (SRS). REFER TO THE SRS
COMPONENT AND WIRING LOCATION VIEW IN
ORDER TO DETERMINE WHETHER YOU ARE
PERFORMING SERVICE ON OR NEAR THE SRS
COMPONENTS OR THE SRS WIRING. WHEN YOU
ARE PERFORMING SERVICE ON OR NEAR THE
SRS COMPONENTS OR THE SRS WIRING, REFER
TO THE SRS SERVICE INFORMATION. FAILURE TO
FOLLOW WARNINGS COULD RESULT IN POSSIBLE
AIR BAG DEPLOYMENT, PERSONAL INJURY, OR
OTHERWISE UNNEEDED SRS SYSTEM REPAIRS.
CAUTION: Always use the correct fastener in the
proper location. When you replace a fastener, use
ONLY the exact part number for that application.
HOLDEN will call out those fasteners that require a
replacement after removal. HOLDEN will also call
out the fasteners that require thread lockers or
thread sealant. UNLESS OTHERWISE SPECIFIED,
do not use supplemental coatings (Paints, greases,
or other corrosion inhibitors) on threaded fasteners
or fastener joint interfaces. Generally, such
coatings adversely affect the fastener torque and
the joint clamping force, and may damage the
fastener. When you install fasteners, use the correct
tightening sequence and specifications.
Following these instructions can help you avoid
damage to parts and systems.
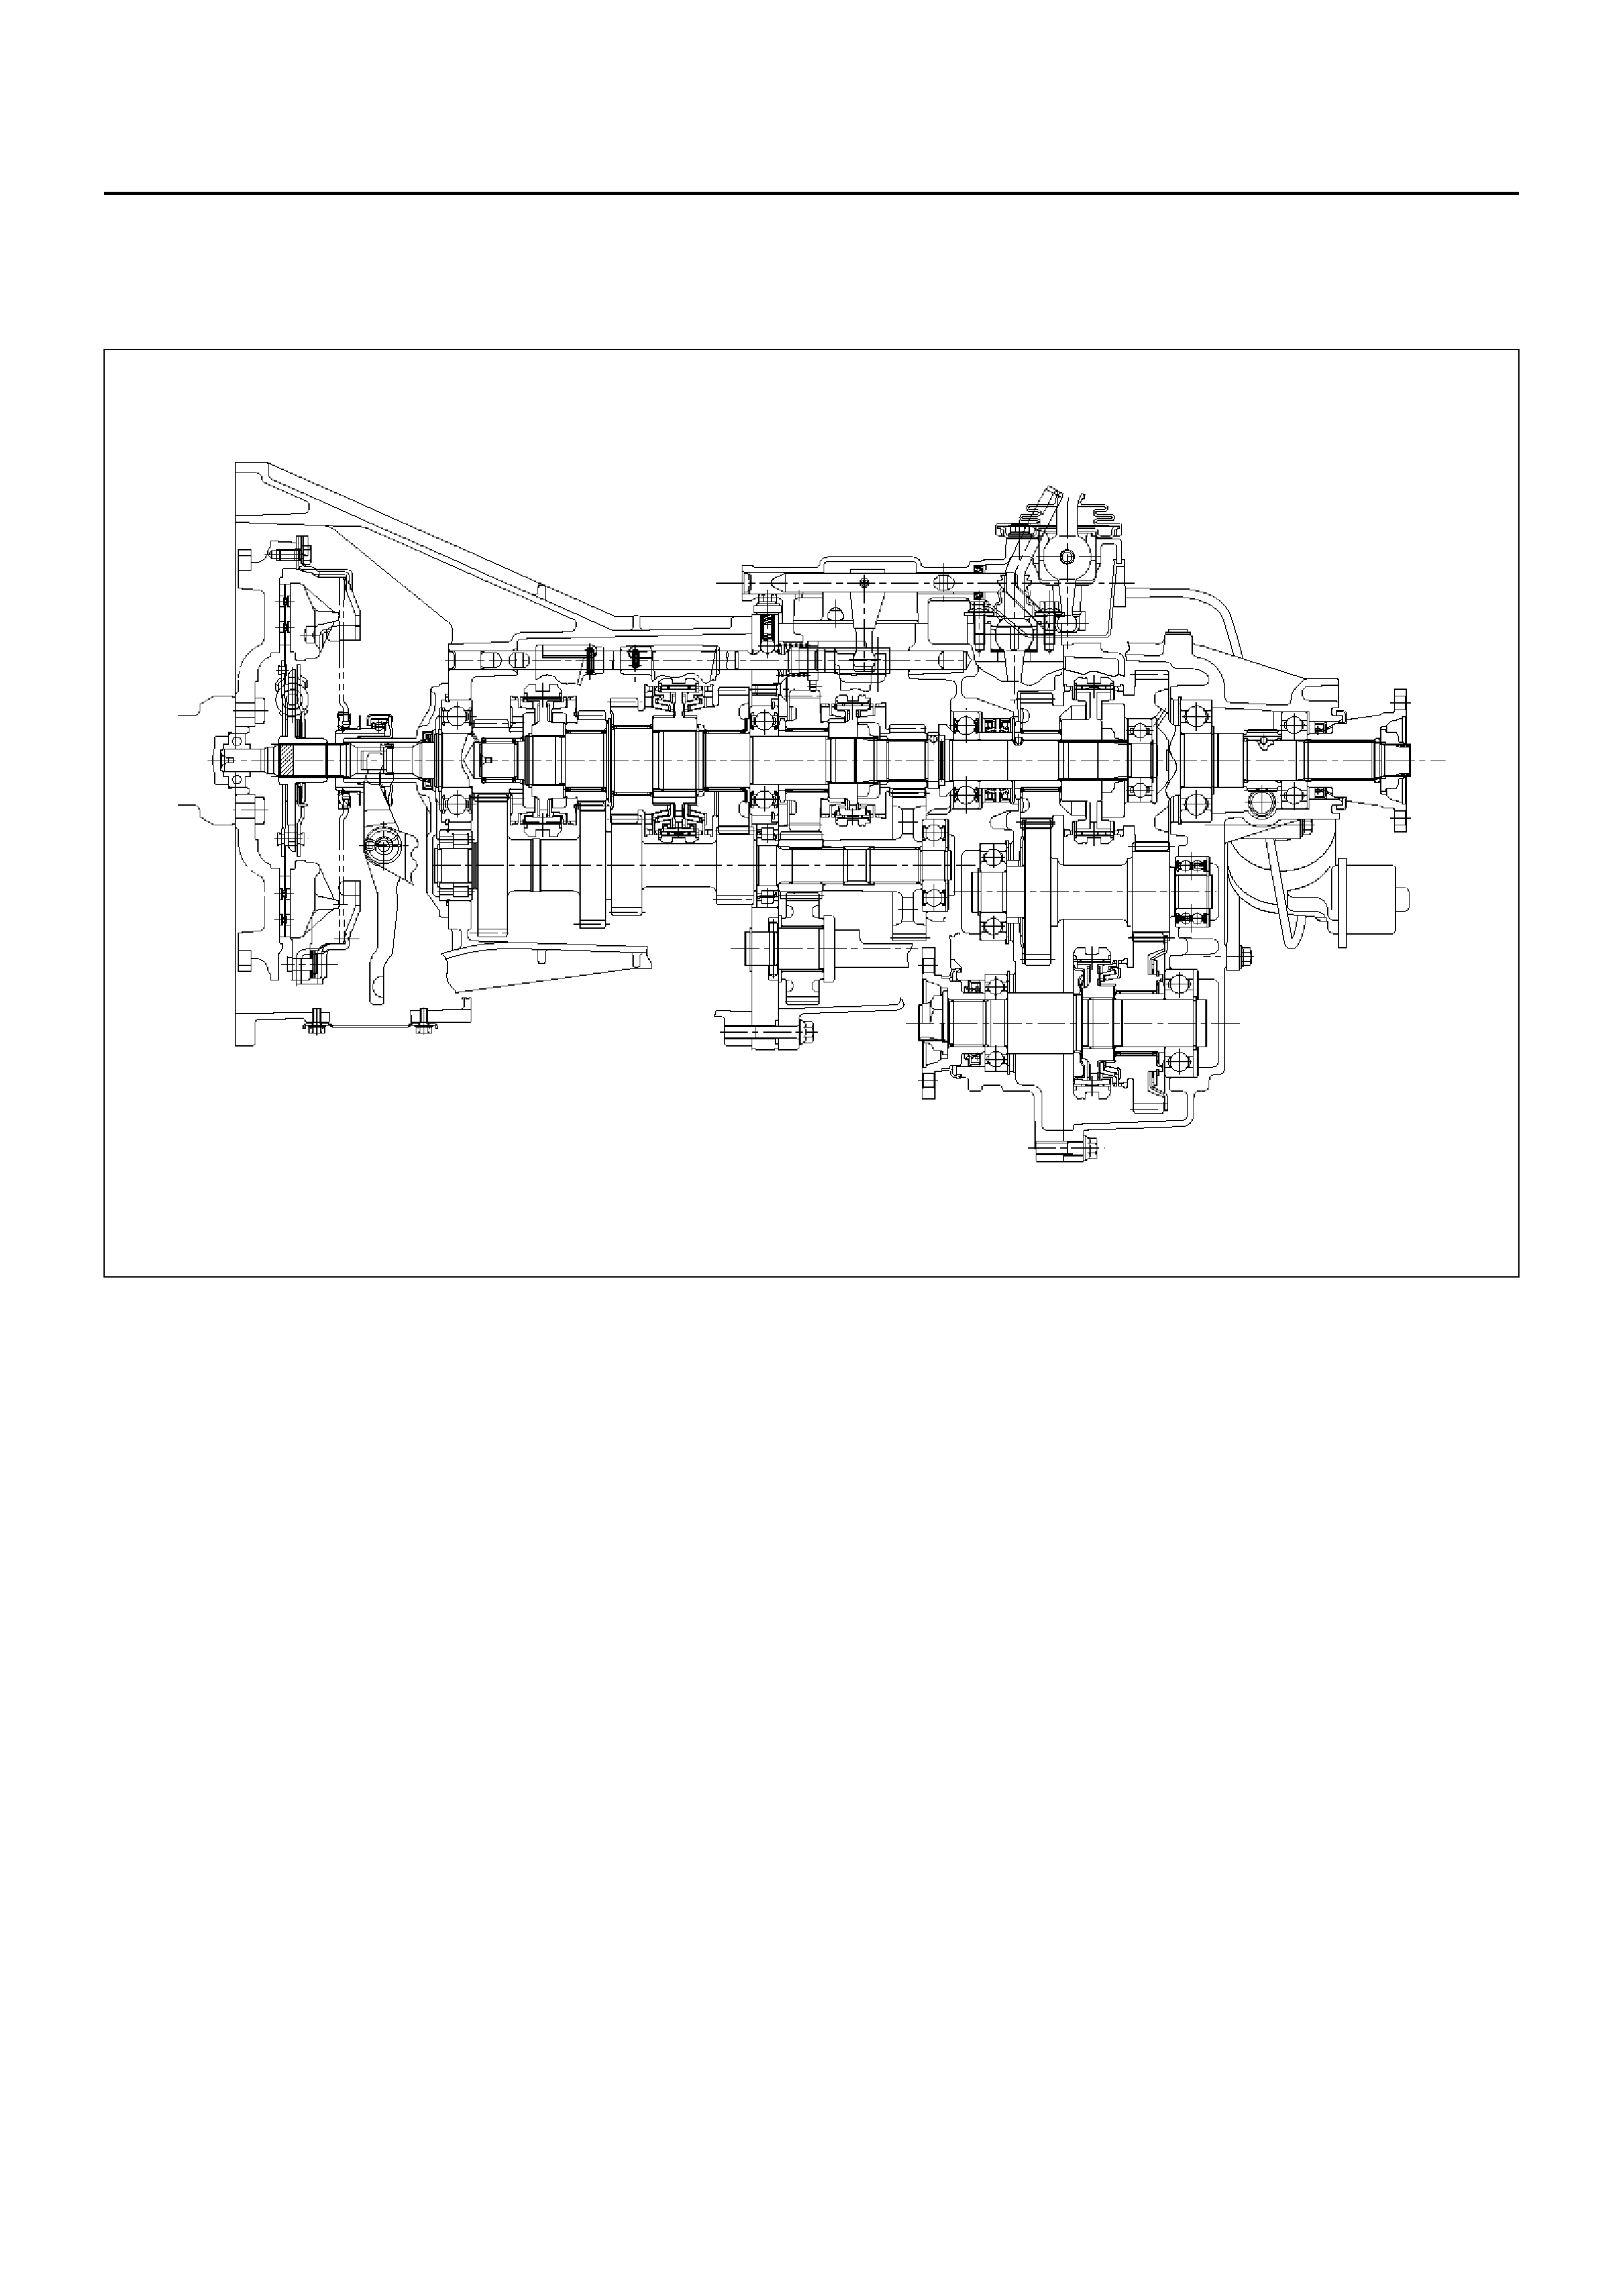
GENERAL DESCRIPTION
MUA5C Transmission
A07RX005
The MUA5C is a constant mesh transmission,
synchronized in all speeds. The transmission is
designed for reduced shift effort and quiet operation.
Principle parts of the transmission are the integral clutch
housing, intermediate plate, the transfer case, the rear
cover, and the gear set.
The transmission control housing and transfer control
housing are built into the transmission and transfer
case.

DIAGNOSIS (MUA)
Condition Possible cause Correcti on
Abnormal noise Flywheel pilot bearing worn Replace
Bearings worn or broken (Mainshaft,
counter shaft, and transfer shaft) Replace
Gear tooth contact surfaces worn or
scuffed (Mainsh aft, counte r shaft,
reverse idler gear and transfer
gears)
Replace
Splines worn (Mainsha ft,
sync hr onizer clutch hub) Replace
Gear or bearing thrust face seized Replace
Lack of backlash between meshing
gears Replace
Hard Shifting Improper clutch pedal free play Readjust
Change lever sliding portions worn Repair or replace Regrease
Shift block, shift rod and/or control
box sliding faces worn Replace
Shift arm and synchronizer sleeve
groove worn Replace worn parts
Thrust washer, collar, and/or gear
thrust faces worn (Mainshaft and
counter shaft thrust play)
Replace worn parts
Synchronizer parts worn Replace
Walking or Jumping out of gear Detent ball worn Replace
Detent spring weakened or broken Replace
Shift rod and/or control box sliding
faces wor n Replace
Shift arm and synchronizer sleeve
groove worn Replace worn parts
Thrust washer, collar, and/or gear
thrust faces worn (Mainshaft and
counter shaft thrust play)
Replace worn parts
Bearings worn or broken Replace
Splines worn (Mainsha ft,
sync hroni ze r hub ) Replace
Synchronizer spring weakened or
broken Replace
Oil leaks Loose drain plug(s) and/or filler
plug(s) Tighten Replenish oil
Defective or improperly installed
gasket(s) Replace
Oil seal worn or scratched Replace
TRANSMISSION (MUA)
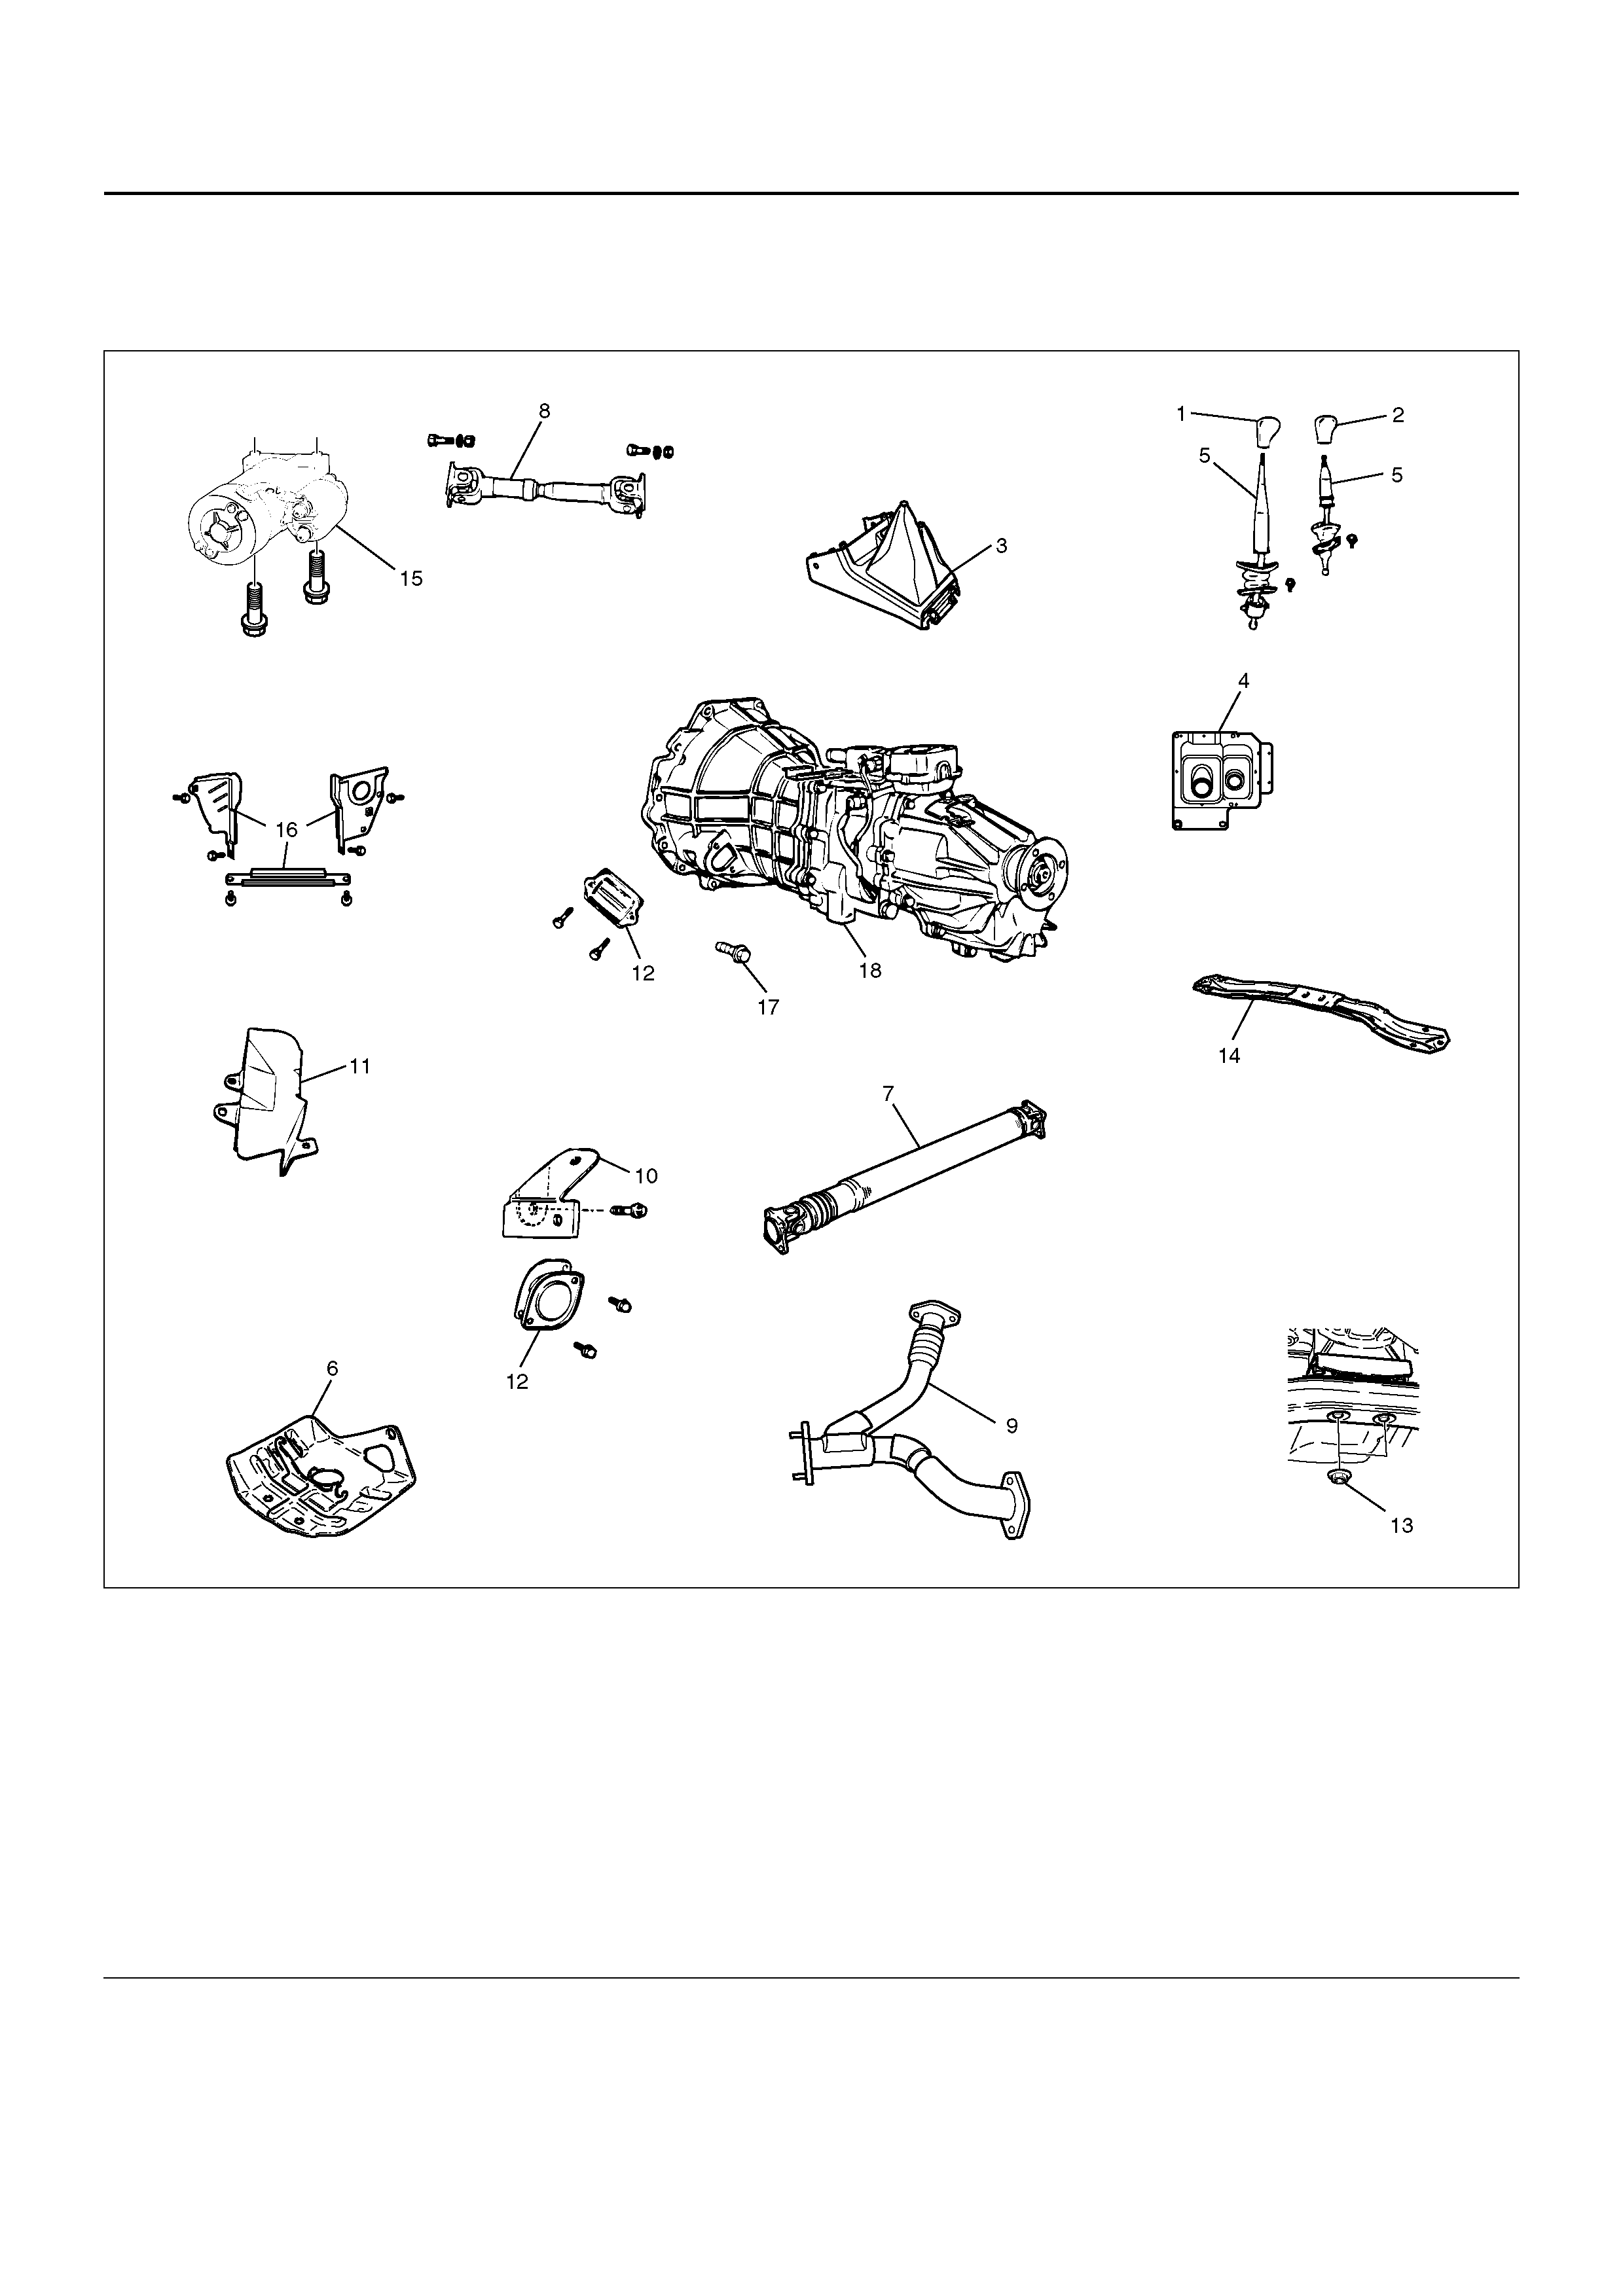
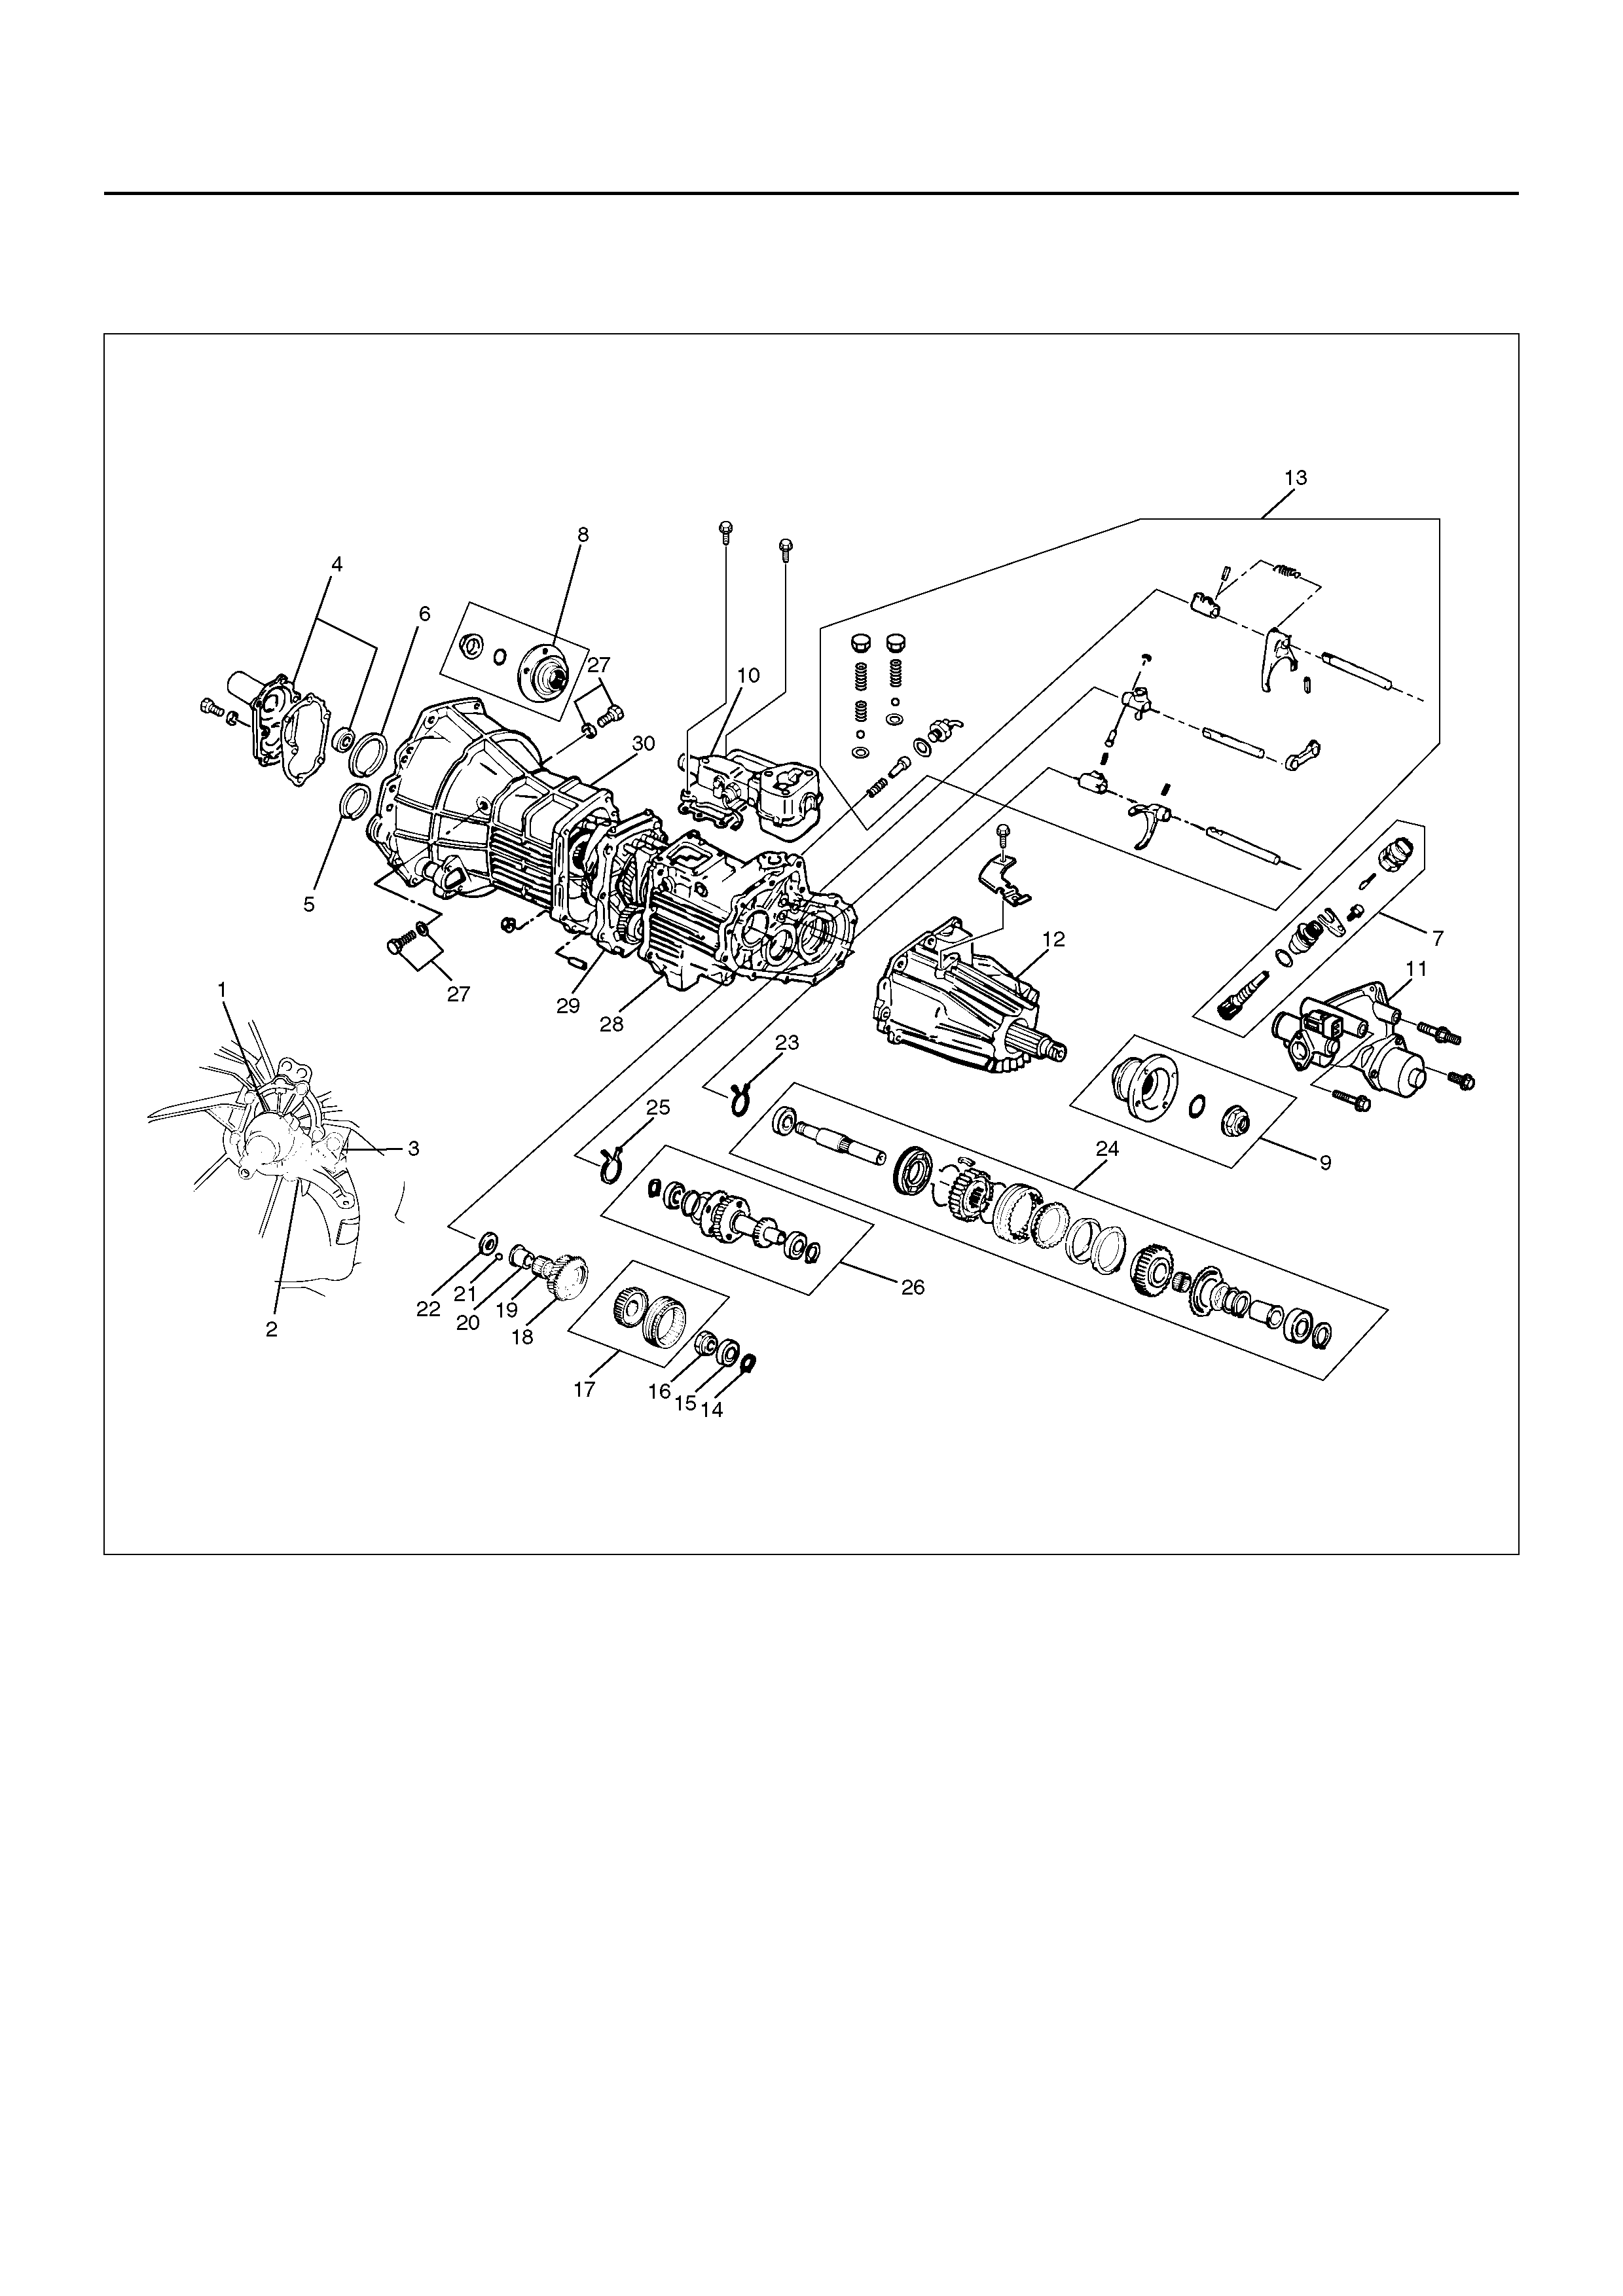
DISASSEMBLED VIEW
220R100002
EndOFCallout
REMOVAL
NOTE: Before removing transmission assembly from
vehicle, change the transfer mode to 2WD using the
4WD push button on dash panel.
1. Disconnect battery ground cable.
2. Remove gear control lever knob(1).
Legend
(1) Gear Control Leve r Kno b
(2) Transfer Control Lever Knob
(3) centre Co nsole
(4) Grommet Assembly
(5) Gear Control Lever and Transfer Control Lever
(6) Transfer Case Guard
(7) Rear Propeller Shaft
(8) Front Propeller Shaft
(9) centre Exhaust Pipe
(10) Harness Clamp
(11) Harness Heat Shield
(12) Dust Cover
(13) Rear Mount Nut
(14) Third Crossmember
(15) Starter
(16) Flywheel Undercover
(17) Transmission Retaining Nut and Bolt
(18) Transmission
3. Remove transfer control lever knob(2).
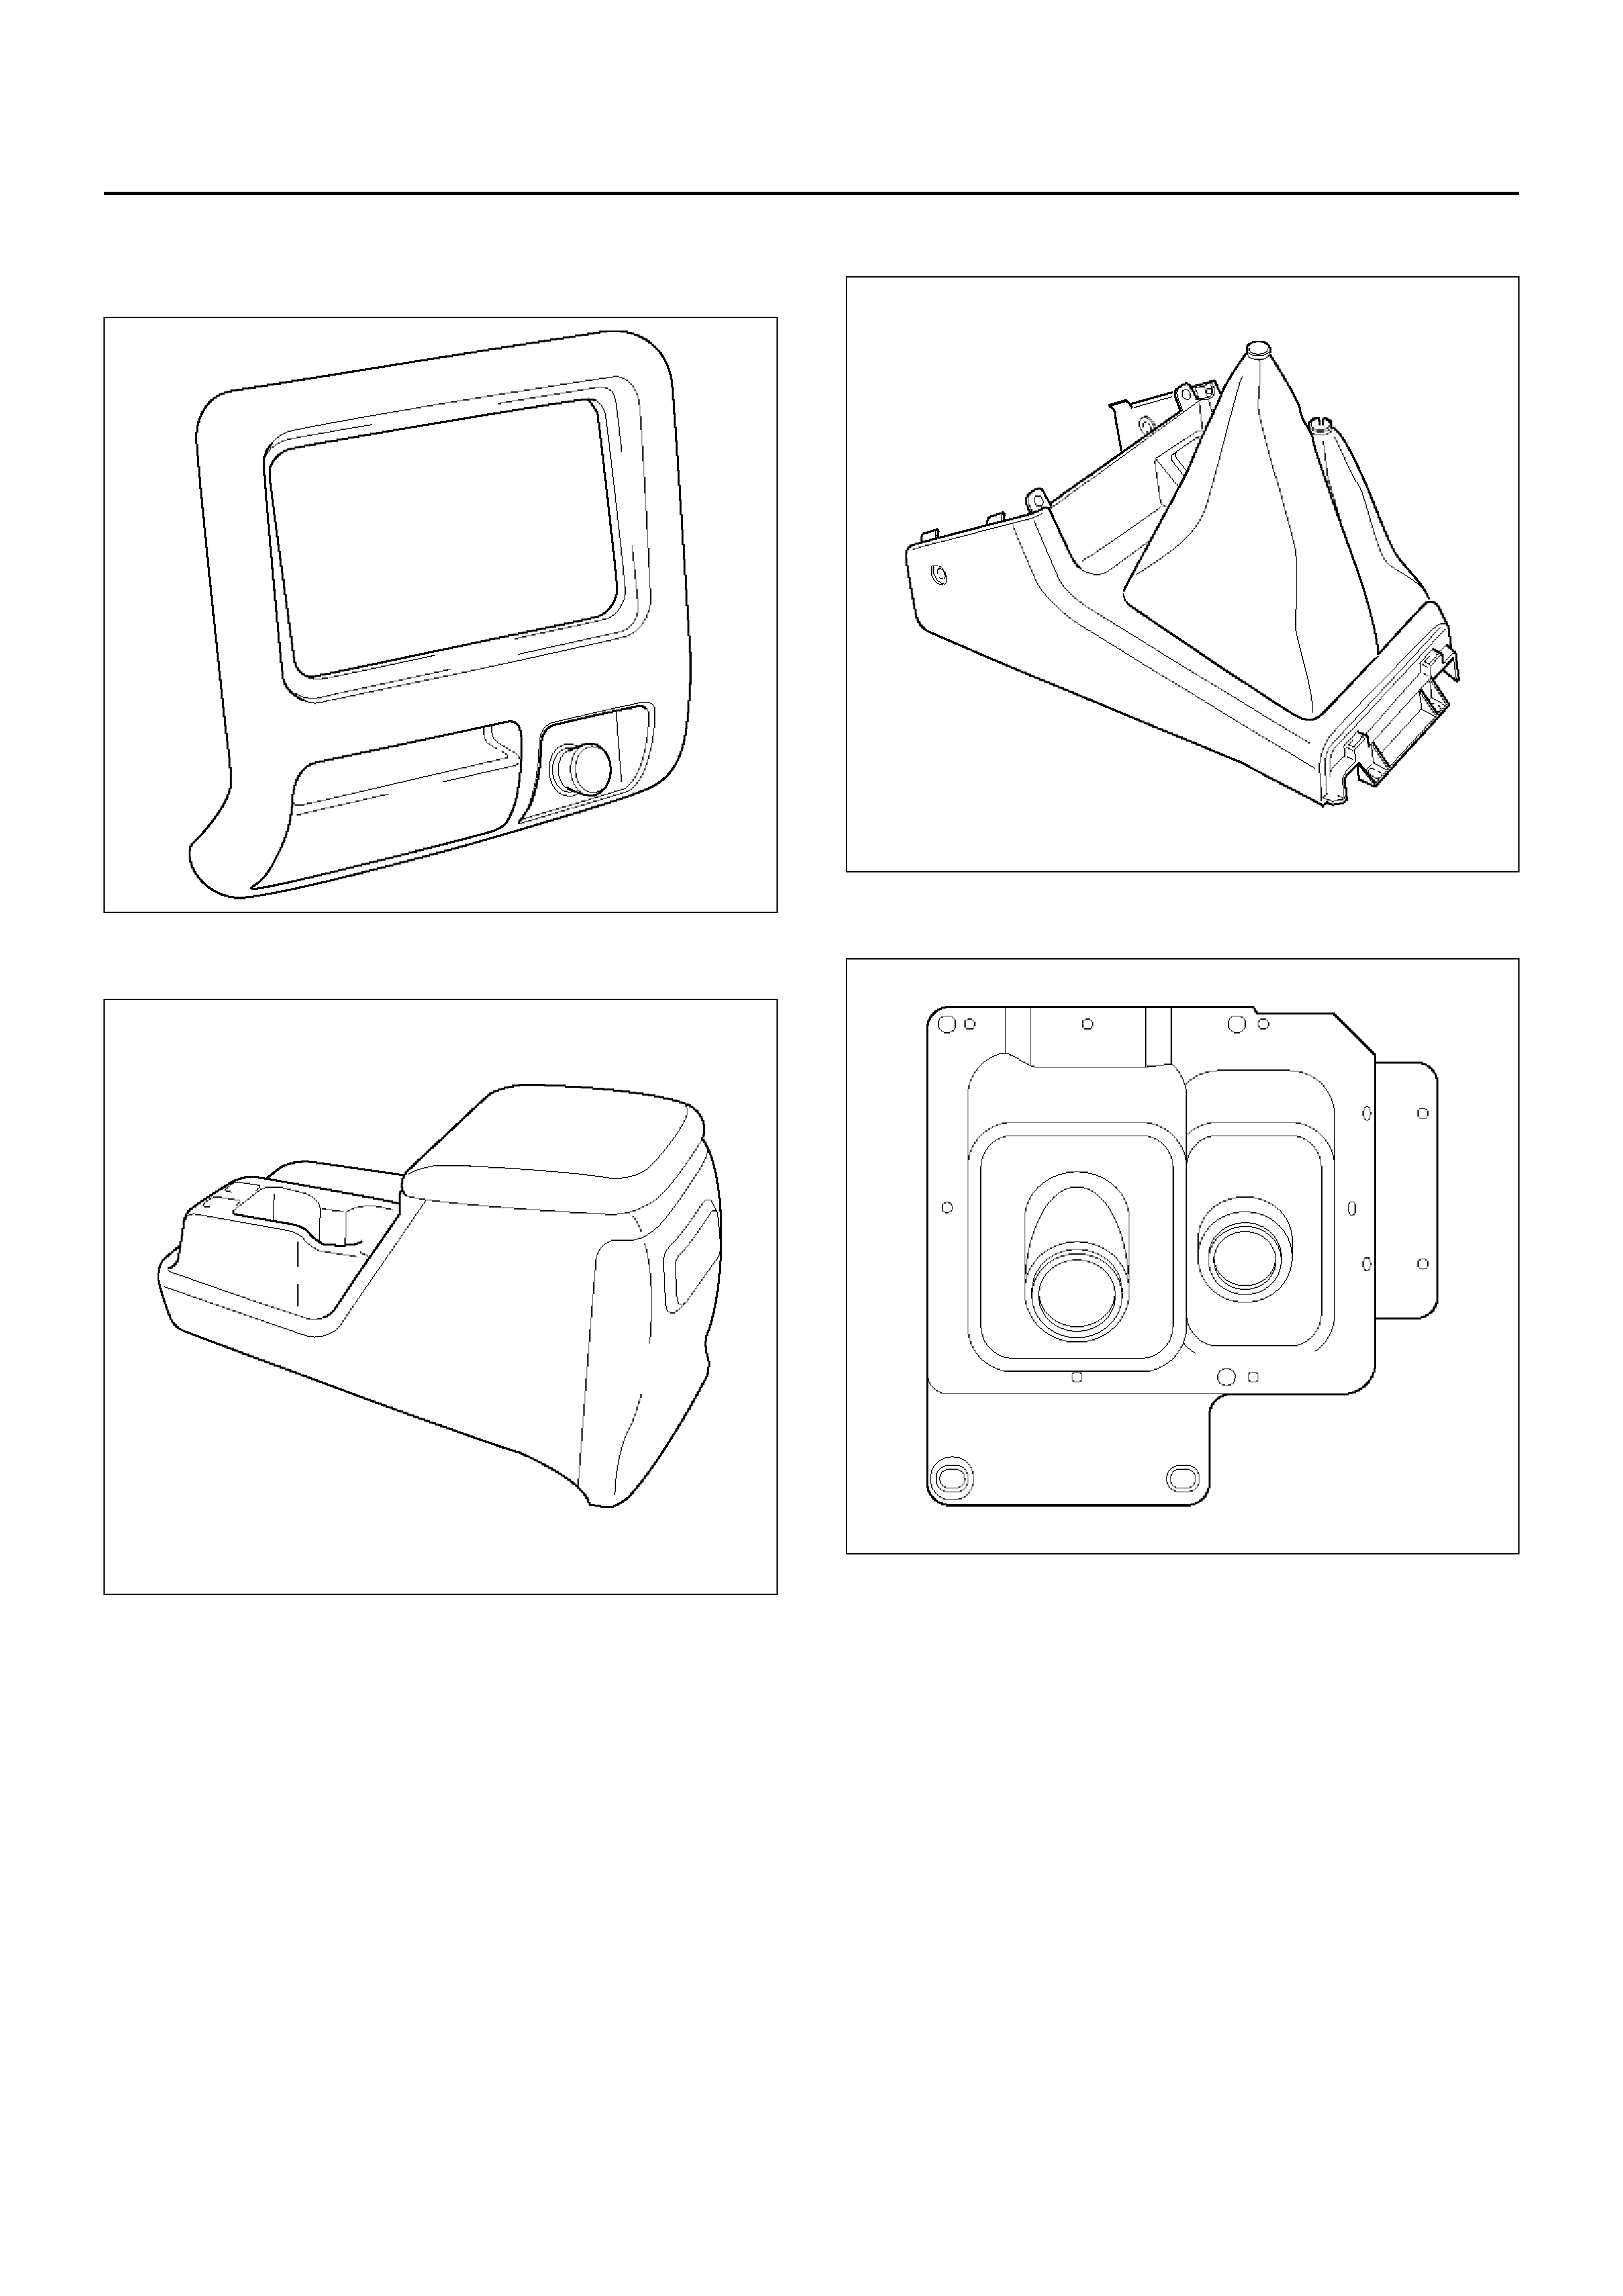
4. Remove lower cluster assembly.
740RW021
5. Remo ve rear consol e.
256RW045
6. Remove centre console(3).
F07RW018
7. Remove grommet assembly(4).
F07RW016
8. Remove gear control lever(5) and transfer control
lever(5).
9. Raise and support vehicle with suitable stands.
Remove transfer case guard(6).
150RX010
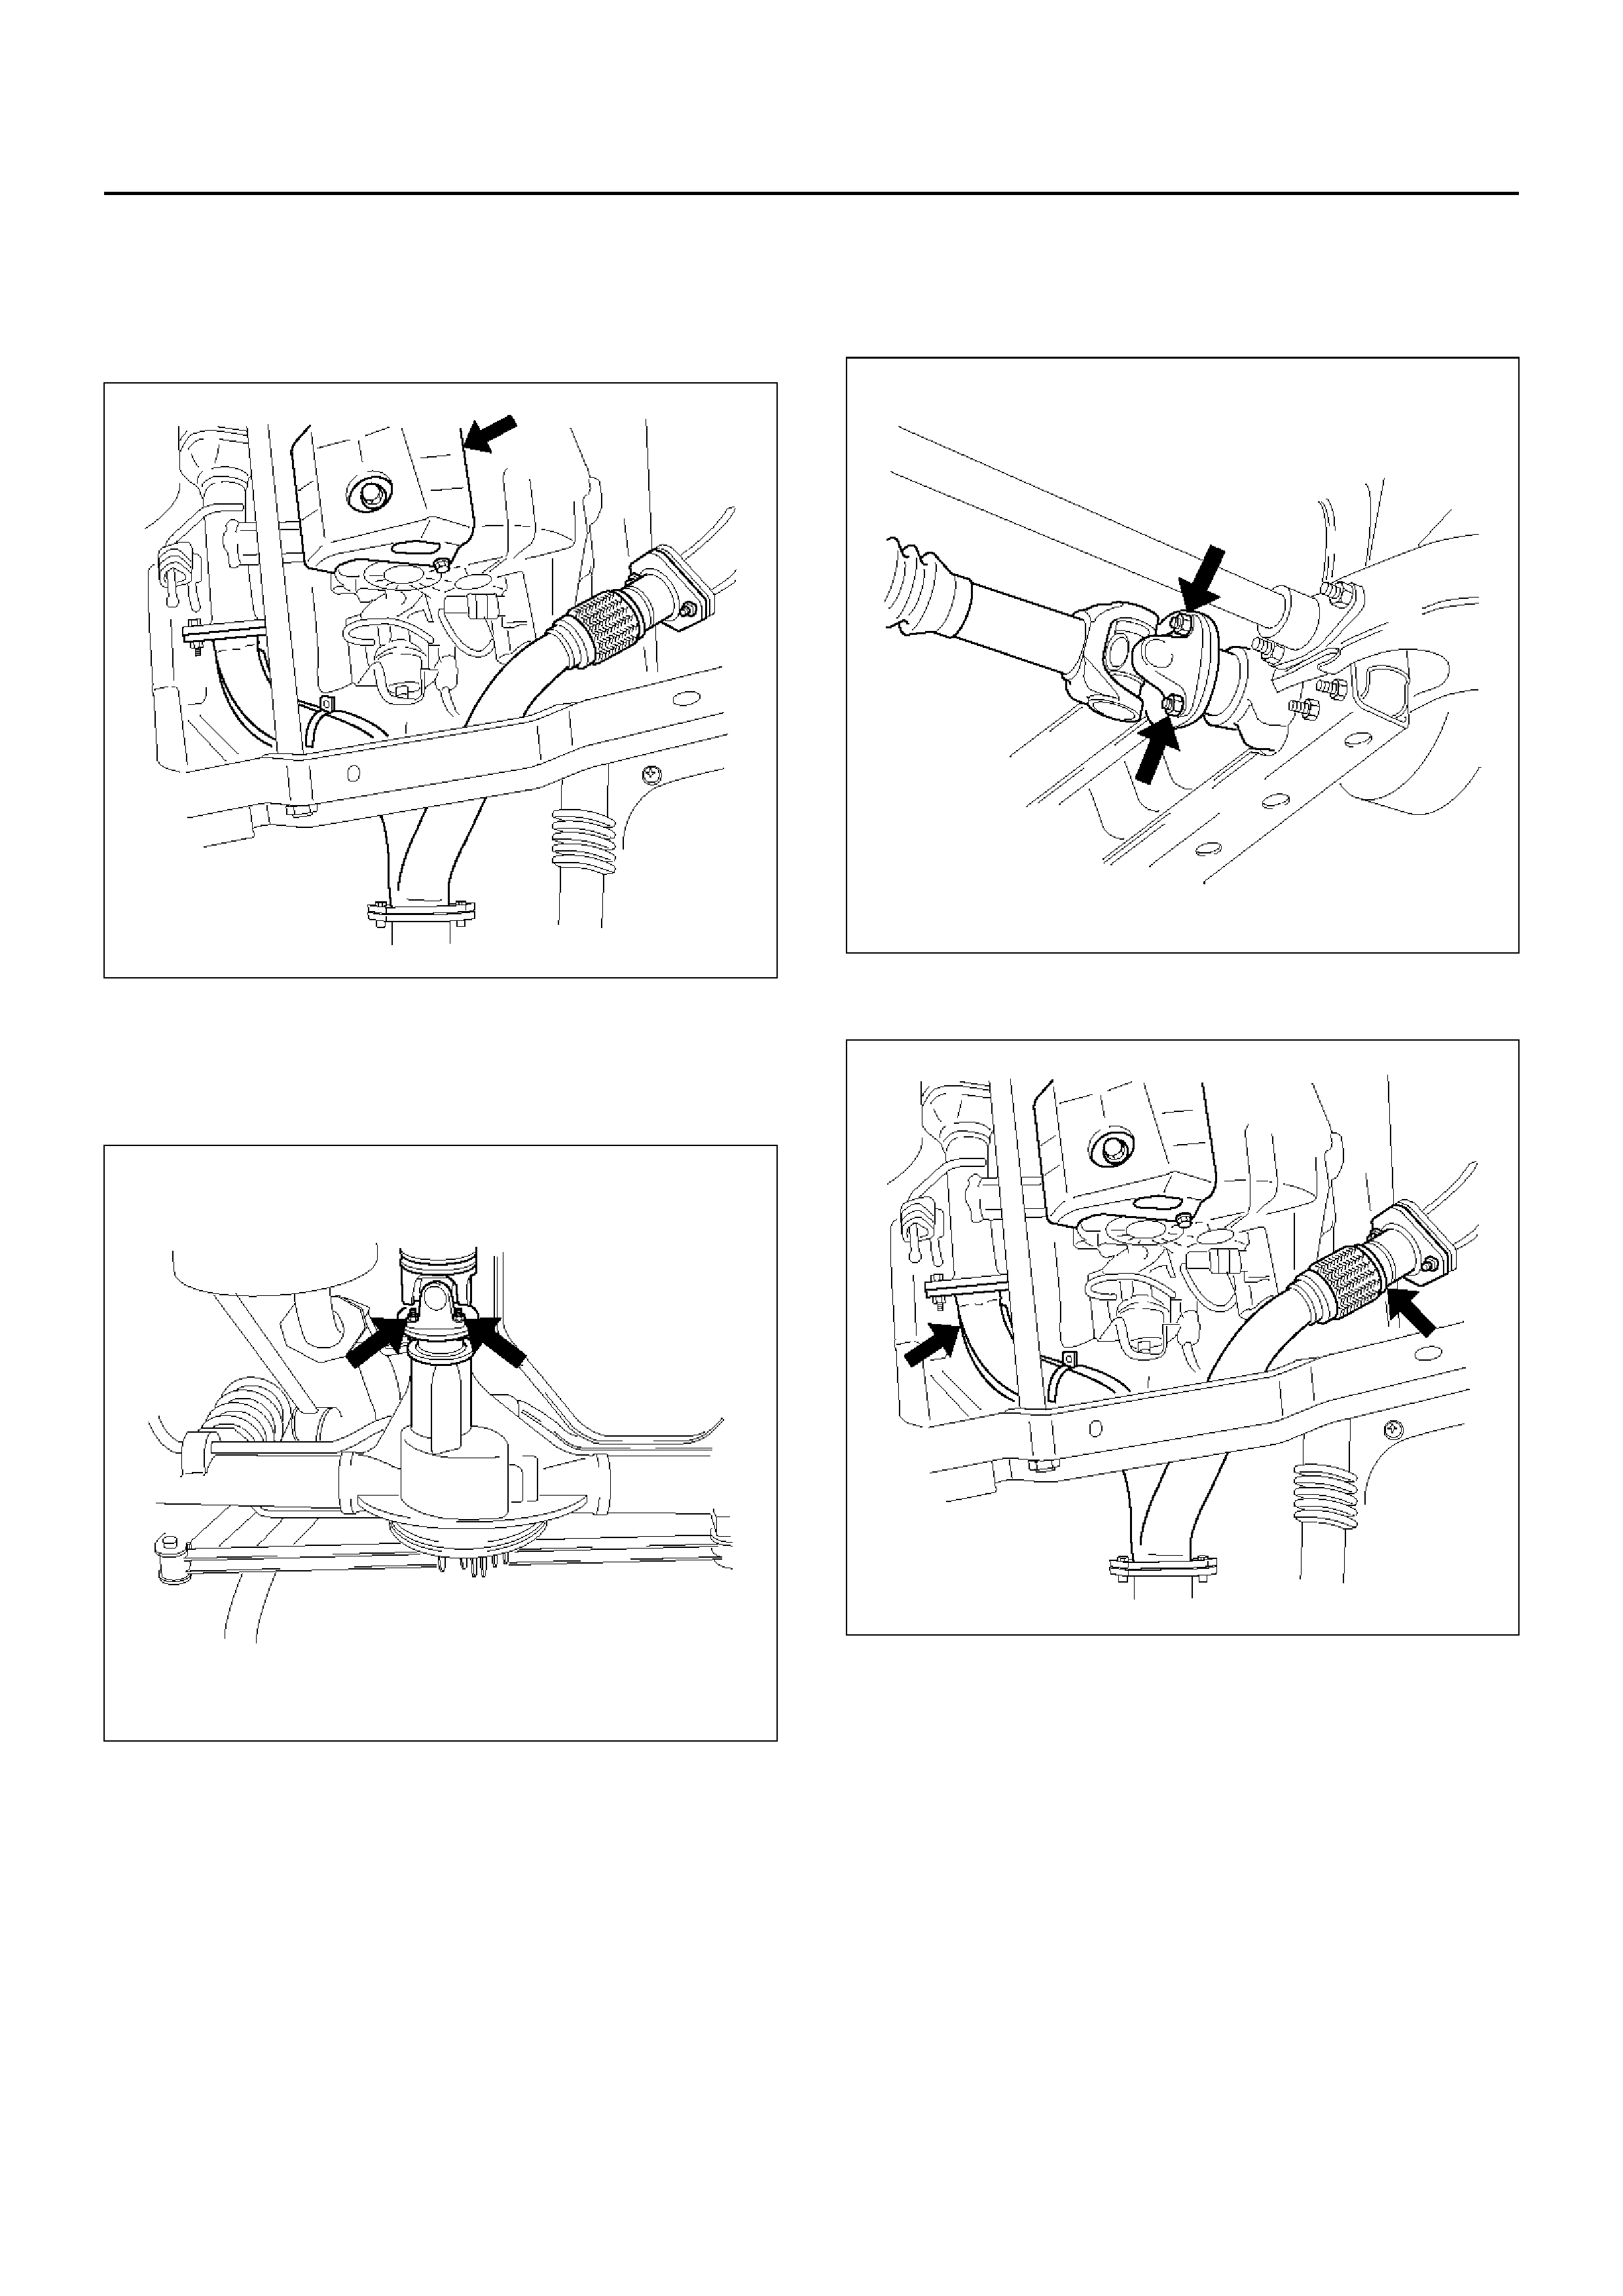
10. Remove rear propeller shaft(7).
NOTE: Apply alignment marks on the flange at both
front and rear sides.
401RW008
11. Remove front propeller shaft(8).
NOTE: Apply alignment marks on the flange at both
front and rear sides.
401RW007
12. Remove centre exhaust pipe(9).
150RX009
13. Disconnect transmission harness connectors and
clip.
Connectors: Transfer switch, 2–4 actuator, speed
sensor, back up switch.
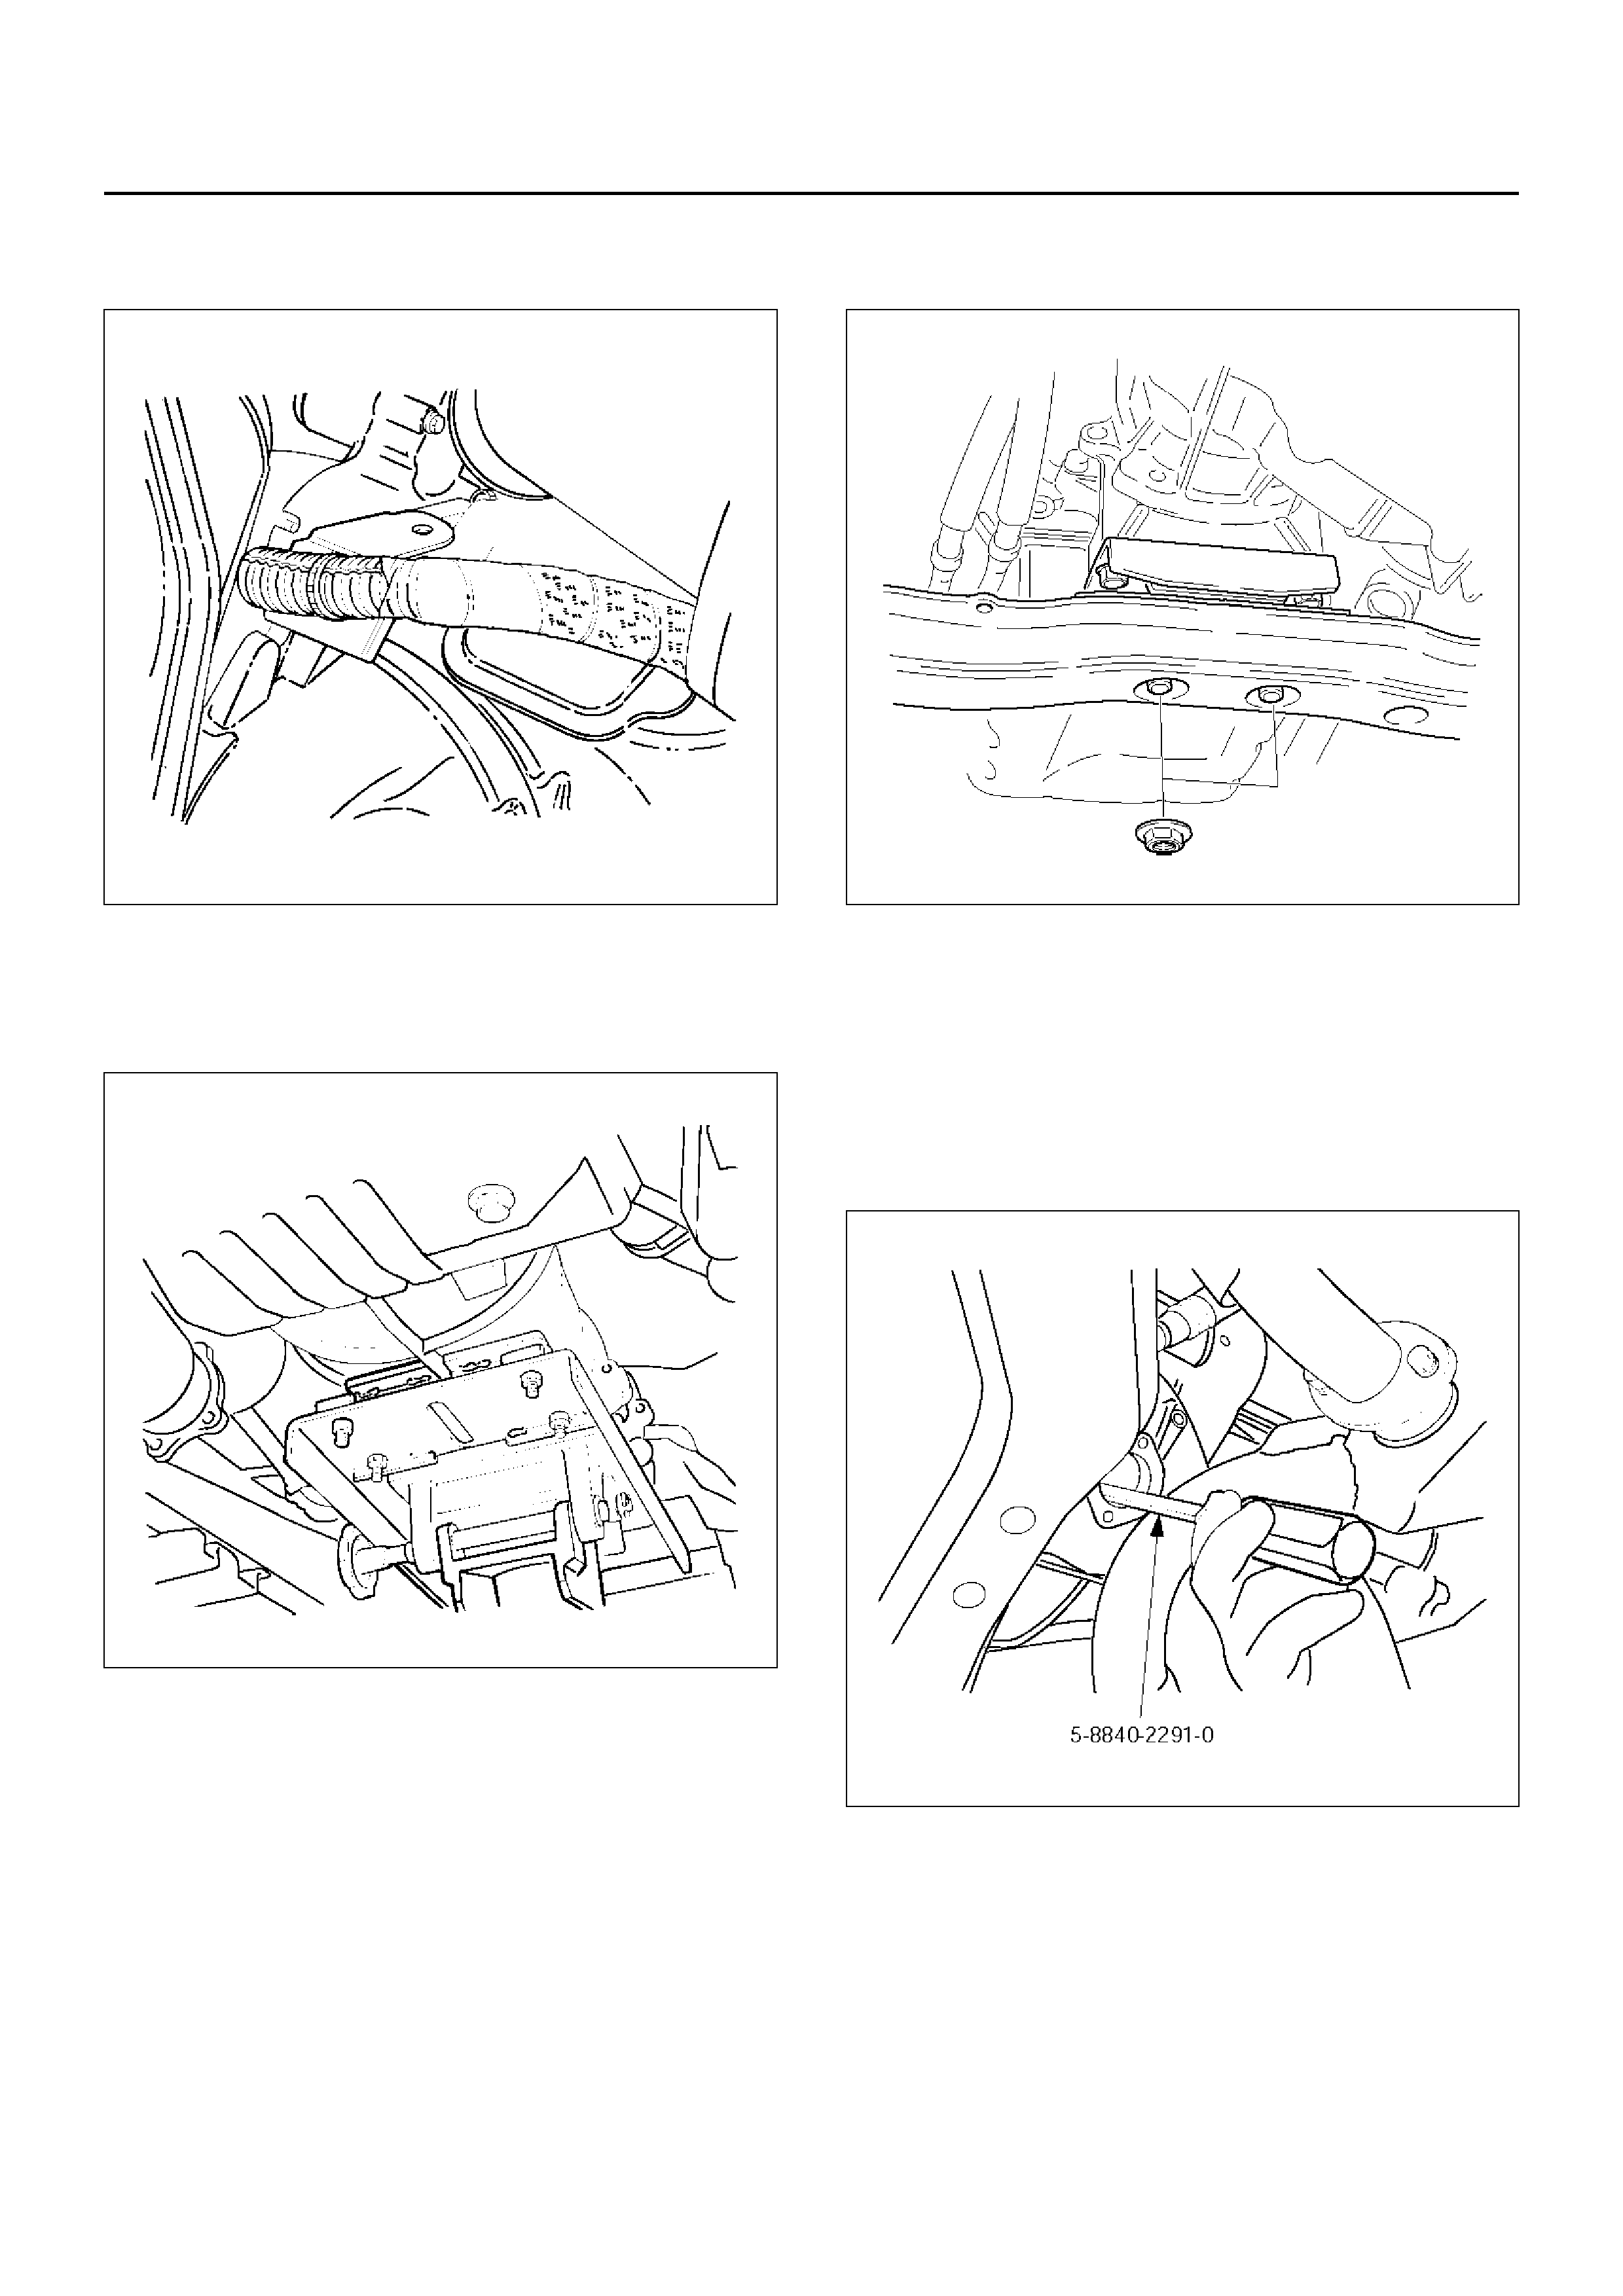
14. Remo ve transmis sion harne ss clamps(10) from the
transmission case and bracket.
220RS028
15. Remove harness heat shield(11).
16. Remo ve dust cover s(1 2).
17. Support transmission with a transmission jack.
220RS001
18. Remove engine rear mount nuts(13) from third
crossmember.
F07RW008
19. Remove third crossmember(14) by removing six
fixing bolts.
20. Remove starter(15).
21. Remove flywheel under cover(16).
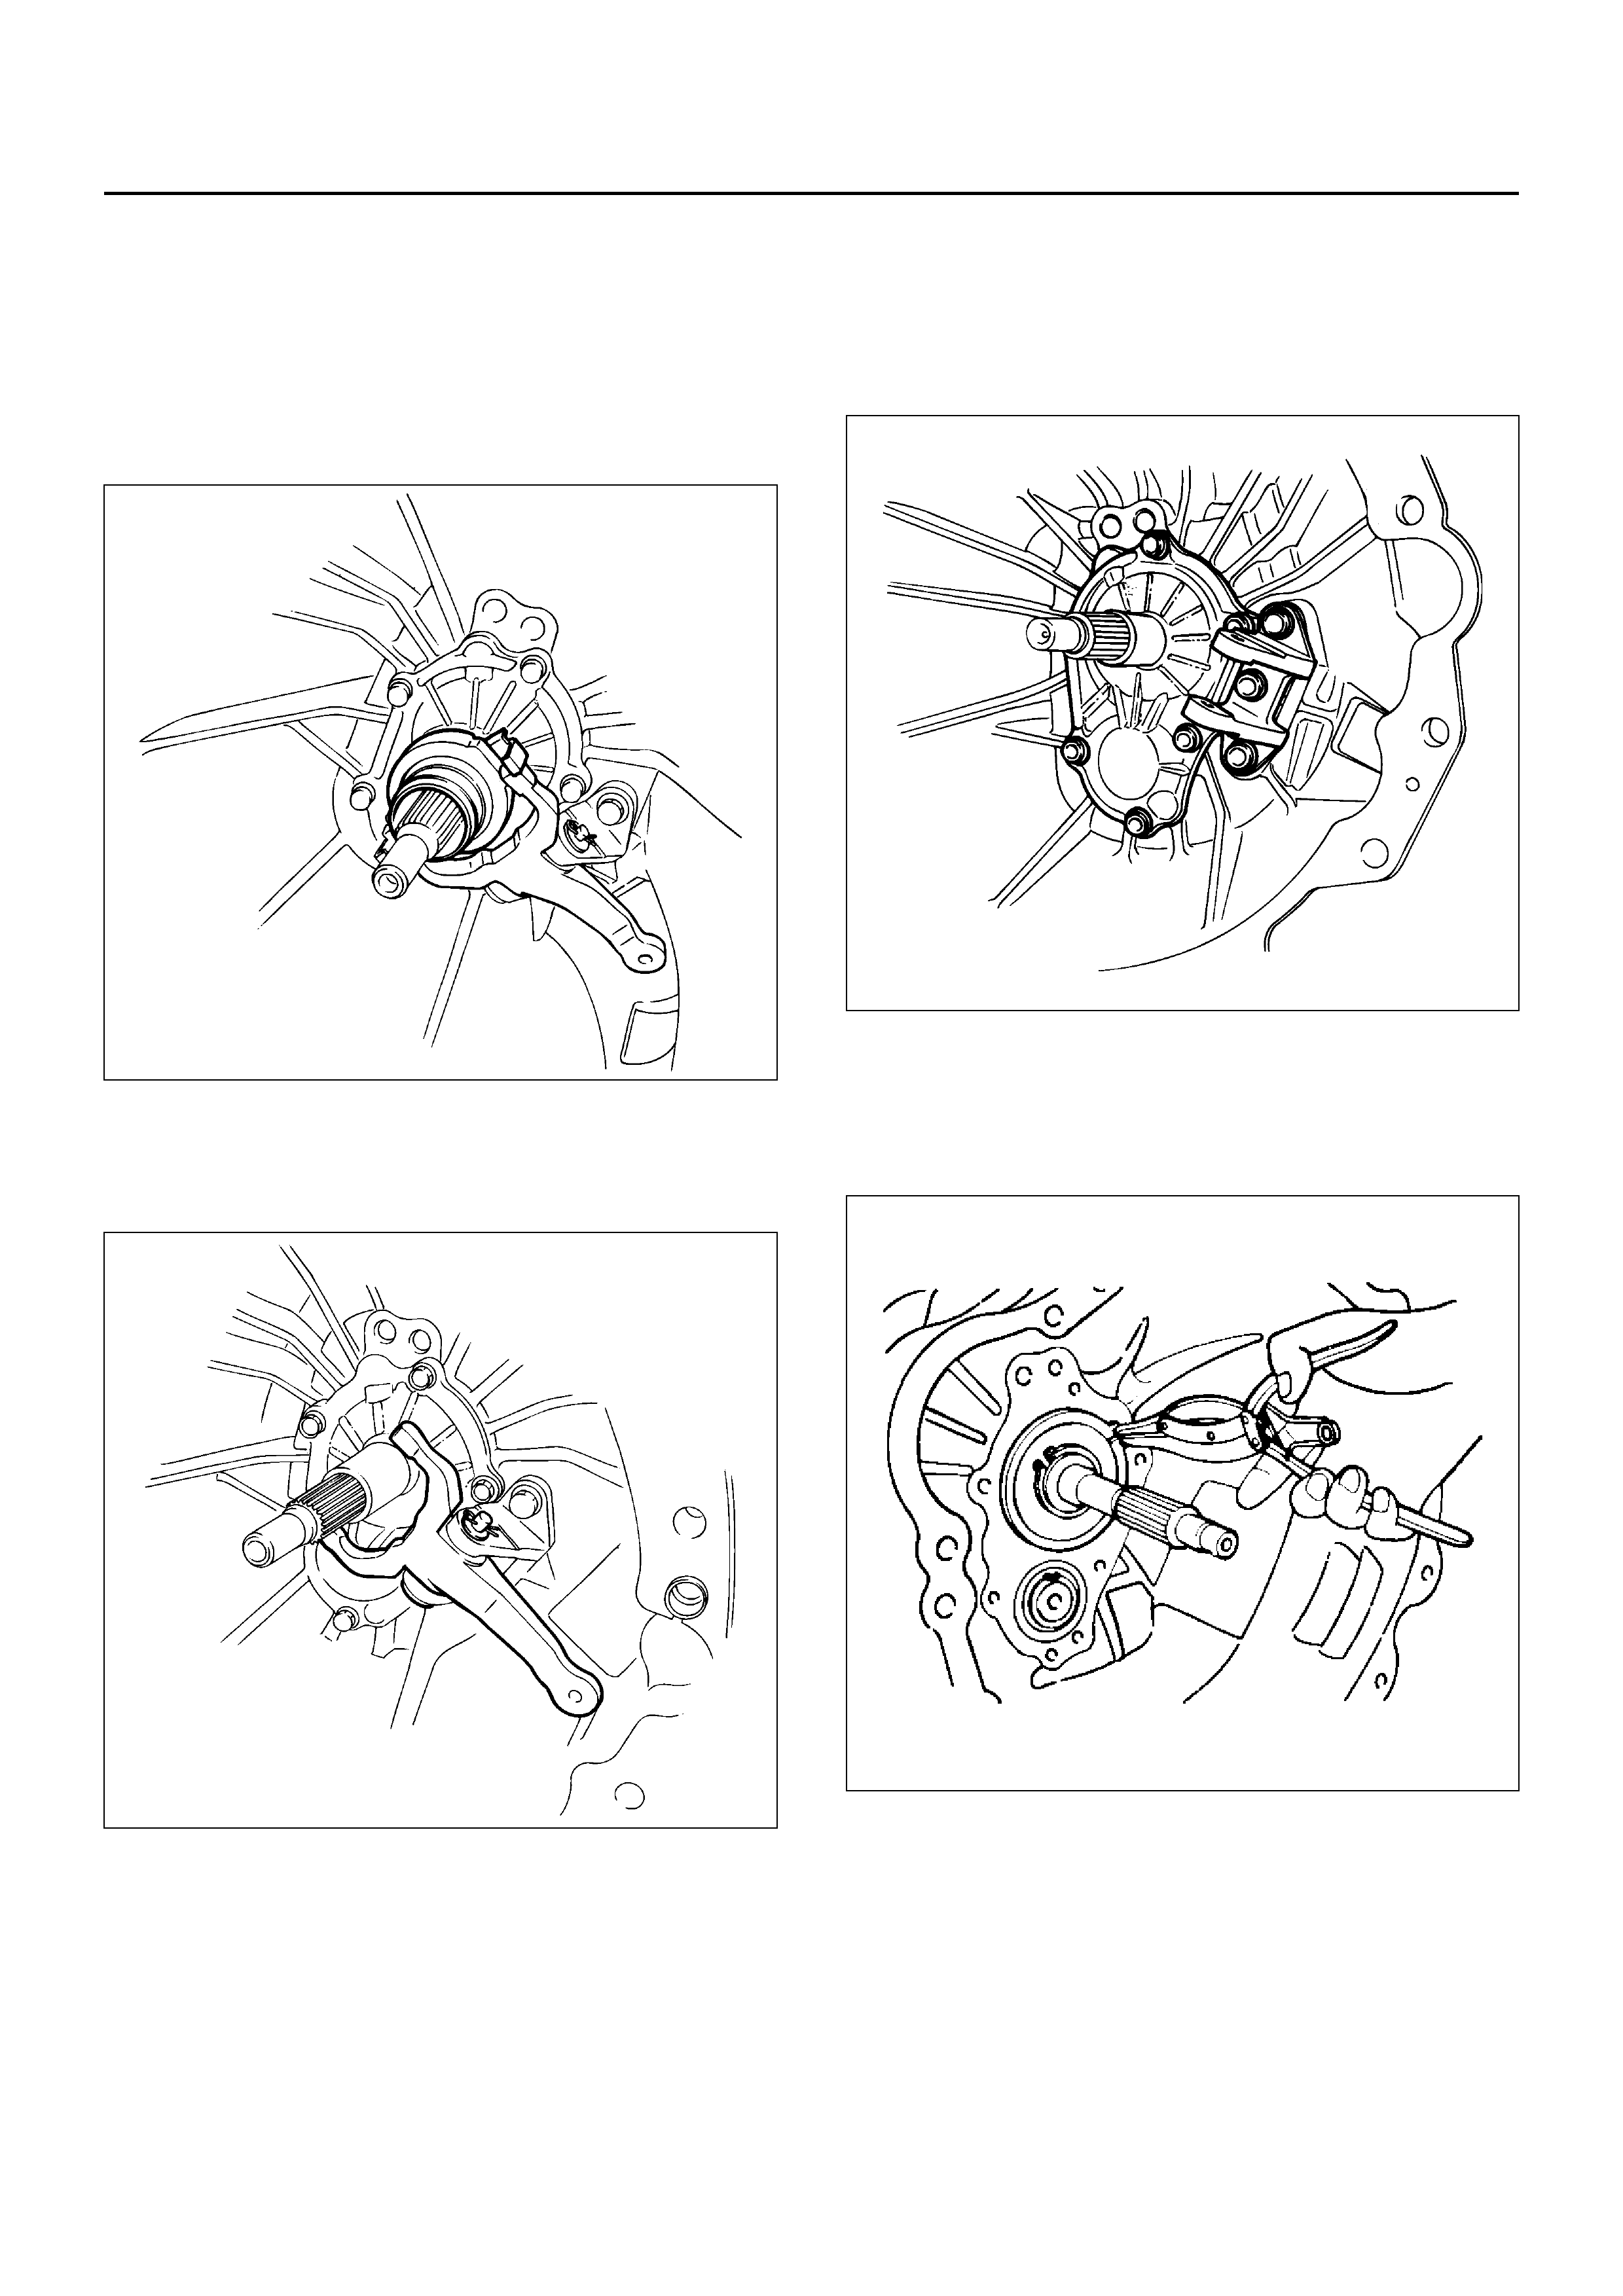
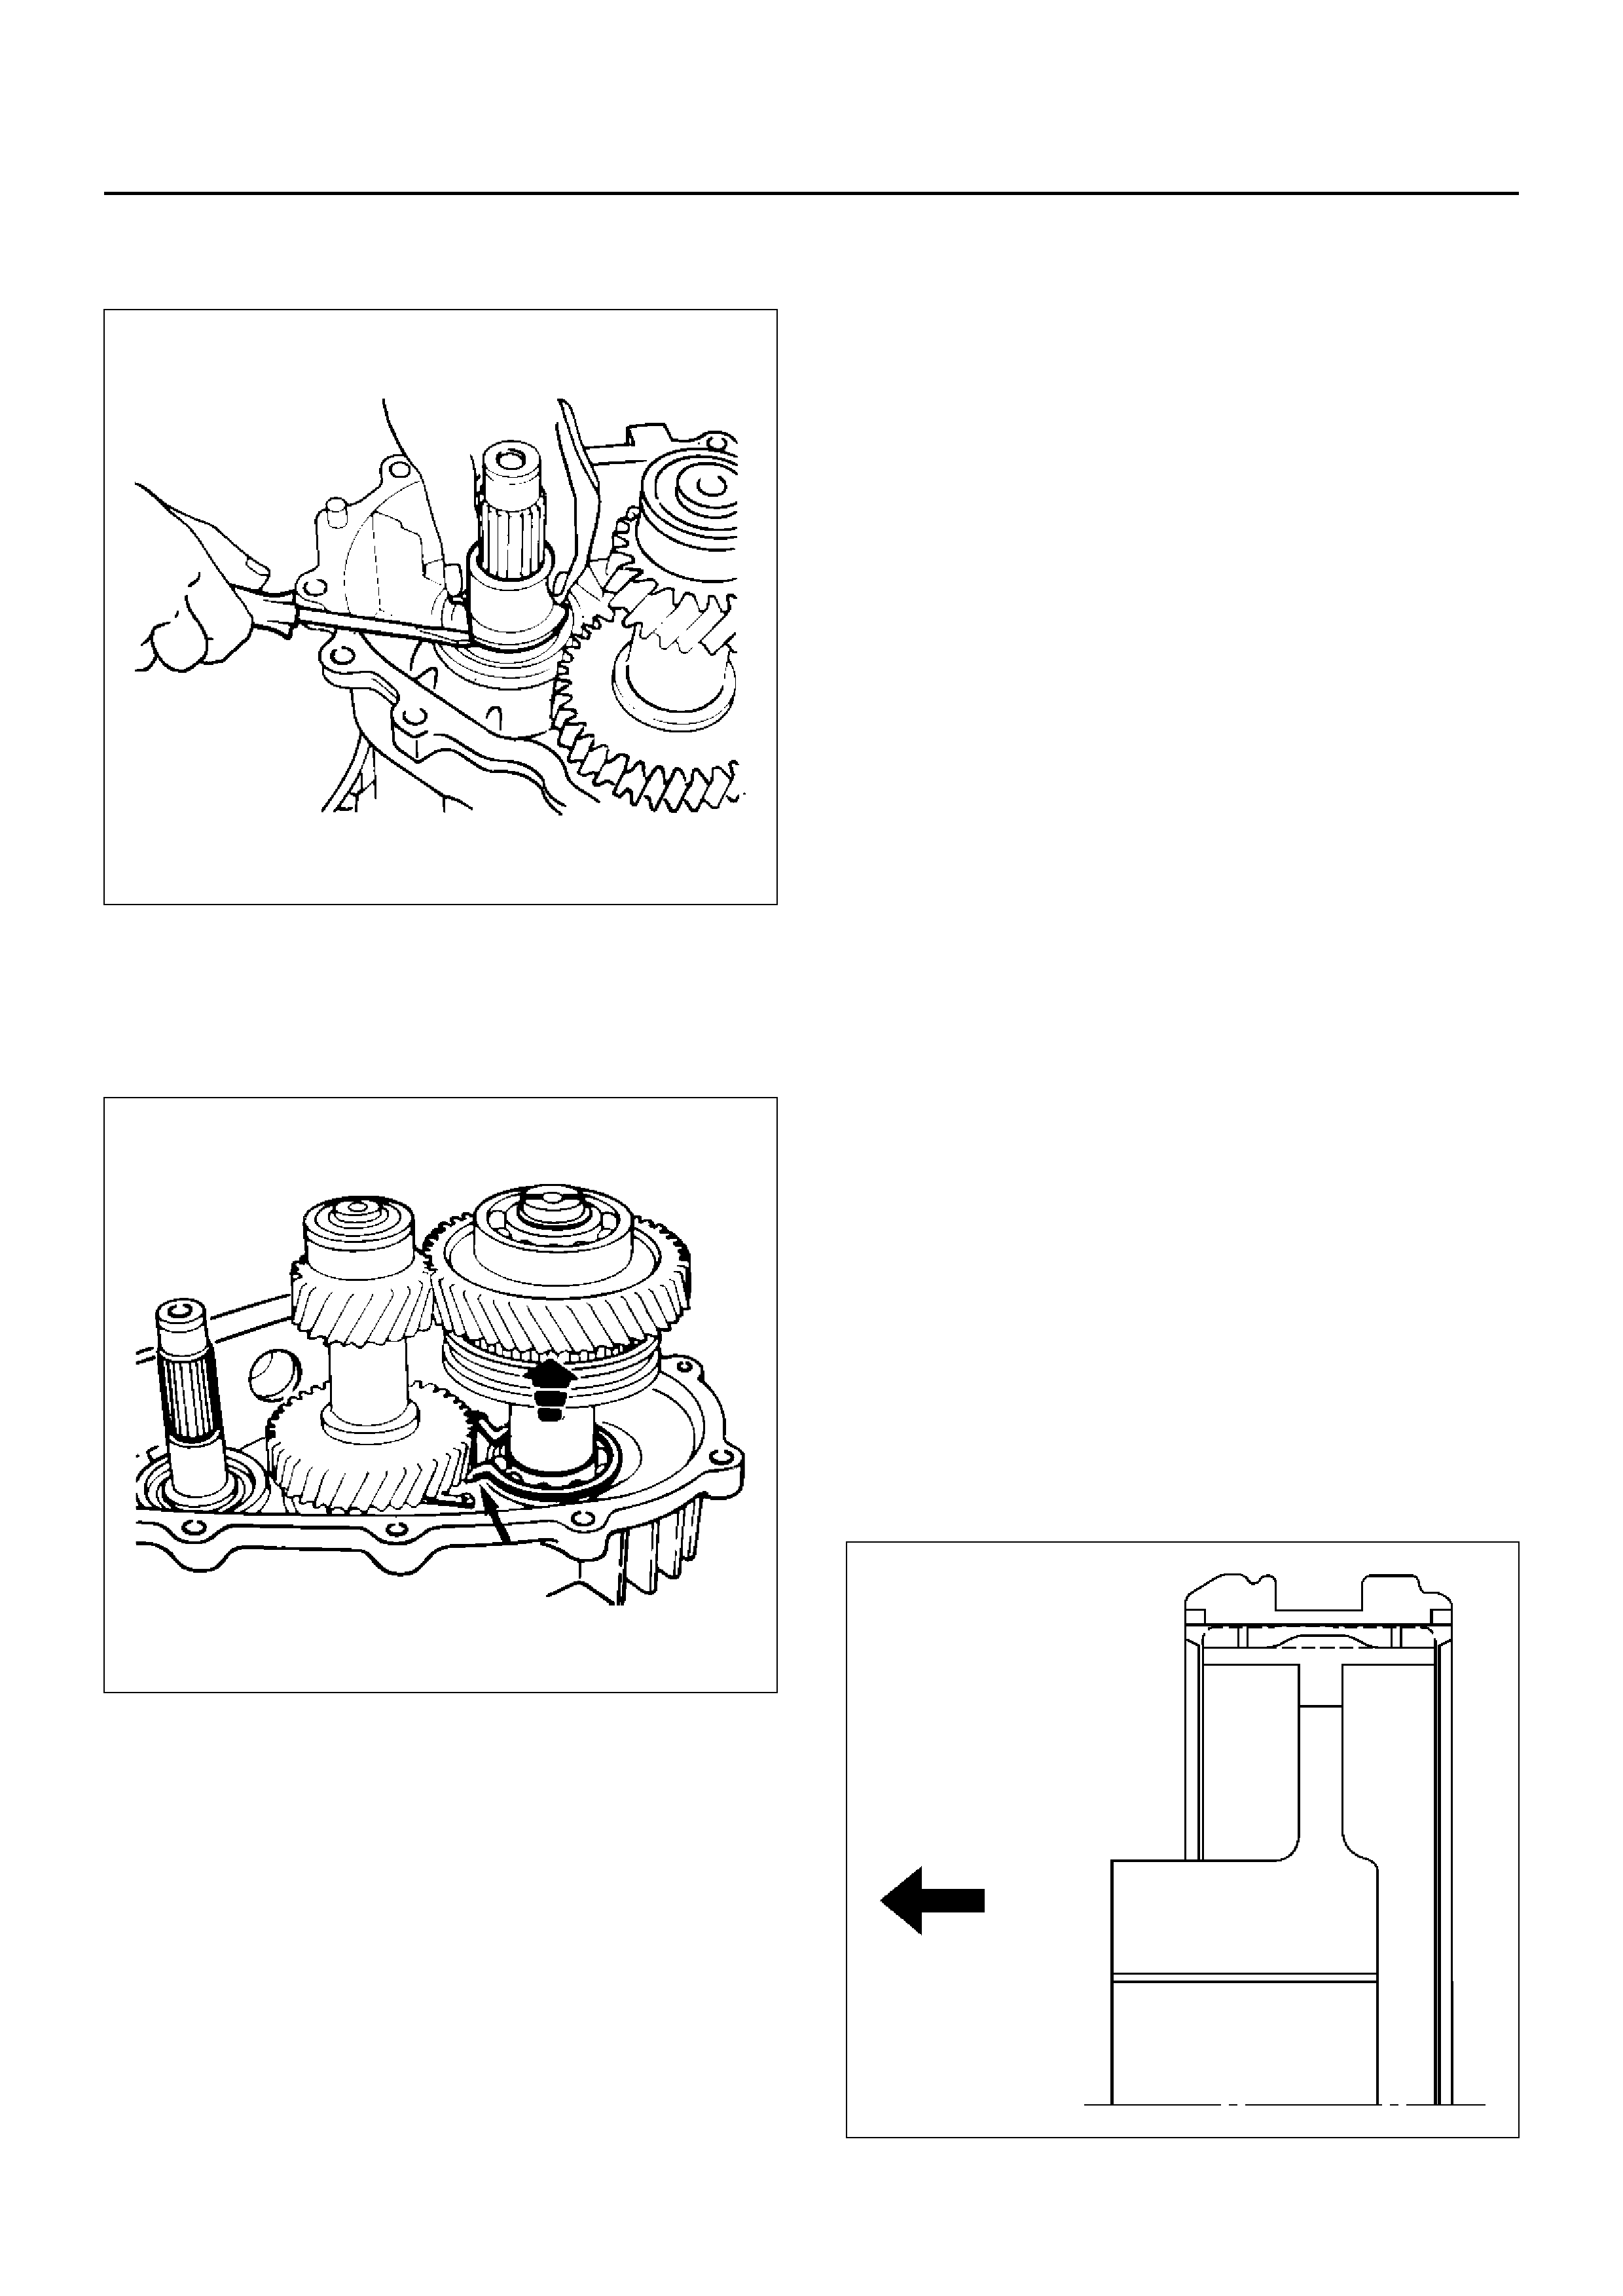
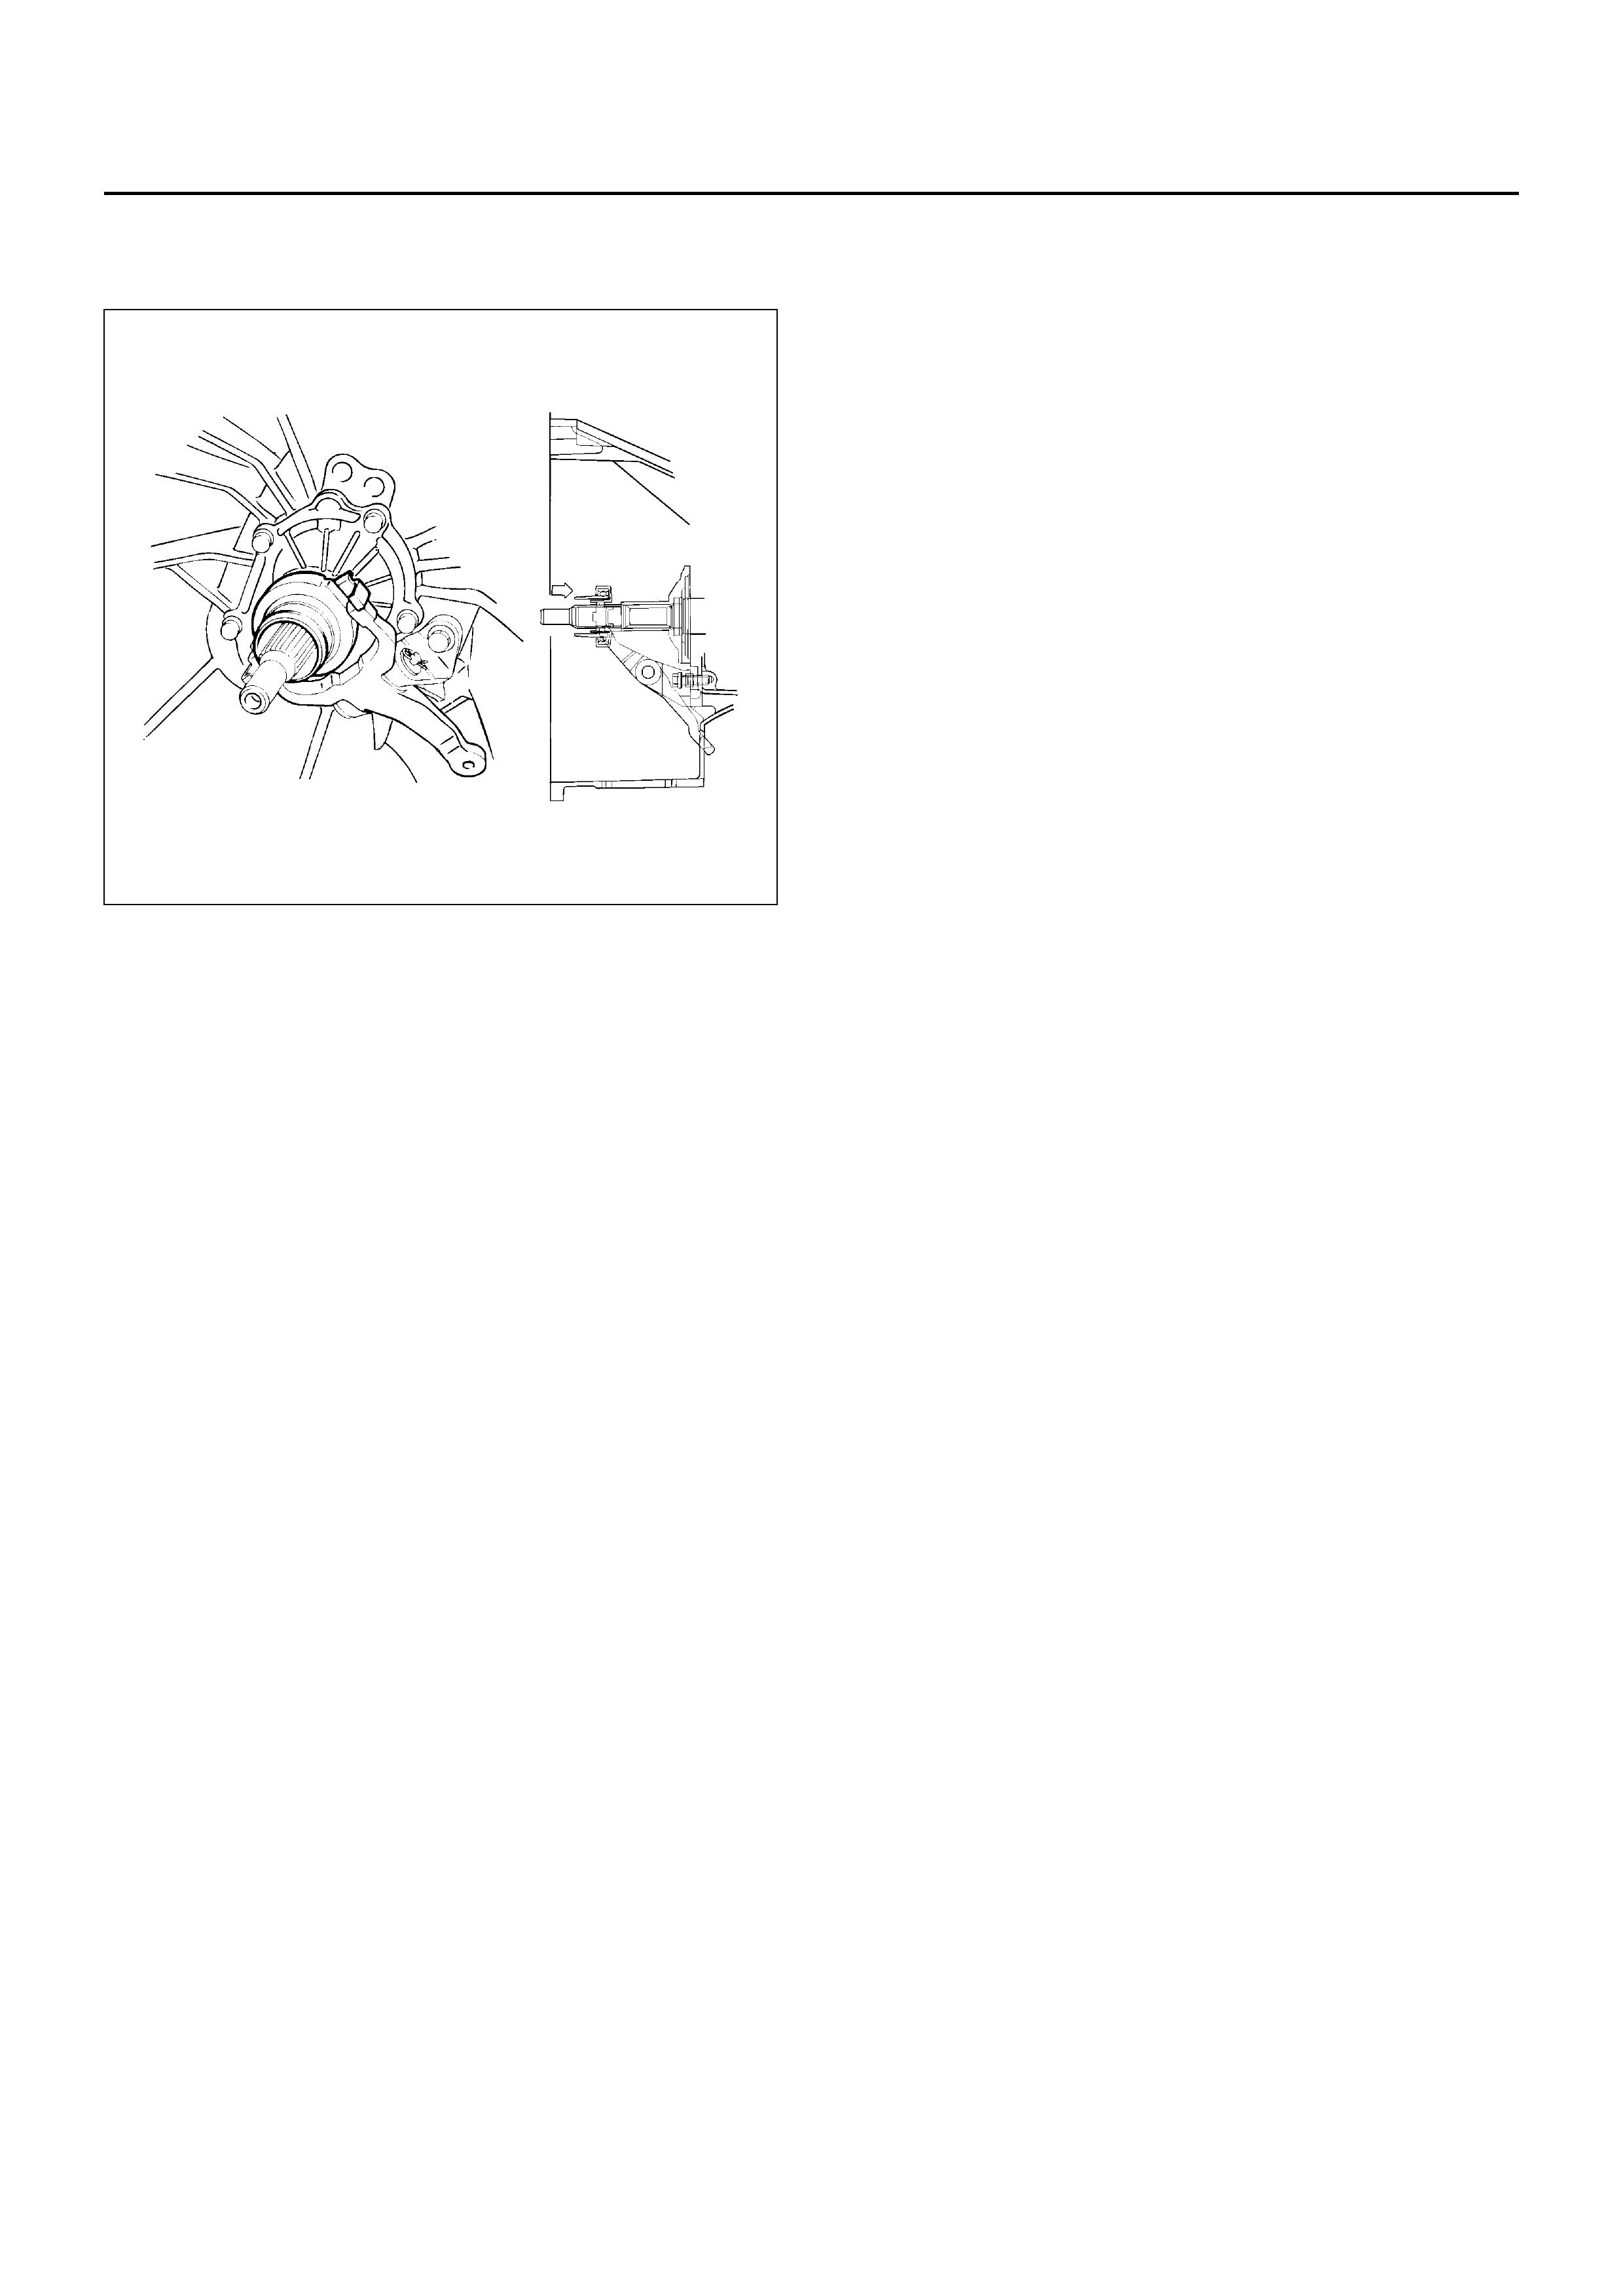
22. Use clutc h release beari ng remover 5– 8840–2291–
0 to disconnect the clutch release bearing from
the clutch pressure plate.
220RW109
23. Pull the shift fork toward the transmission to press
the clutch release bearing against the clutch
pressure plate.
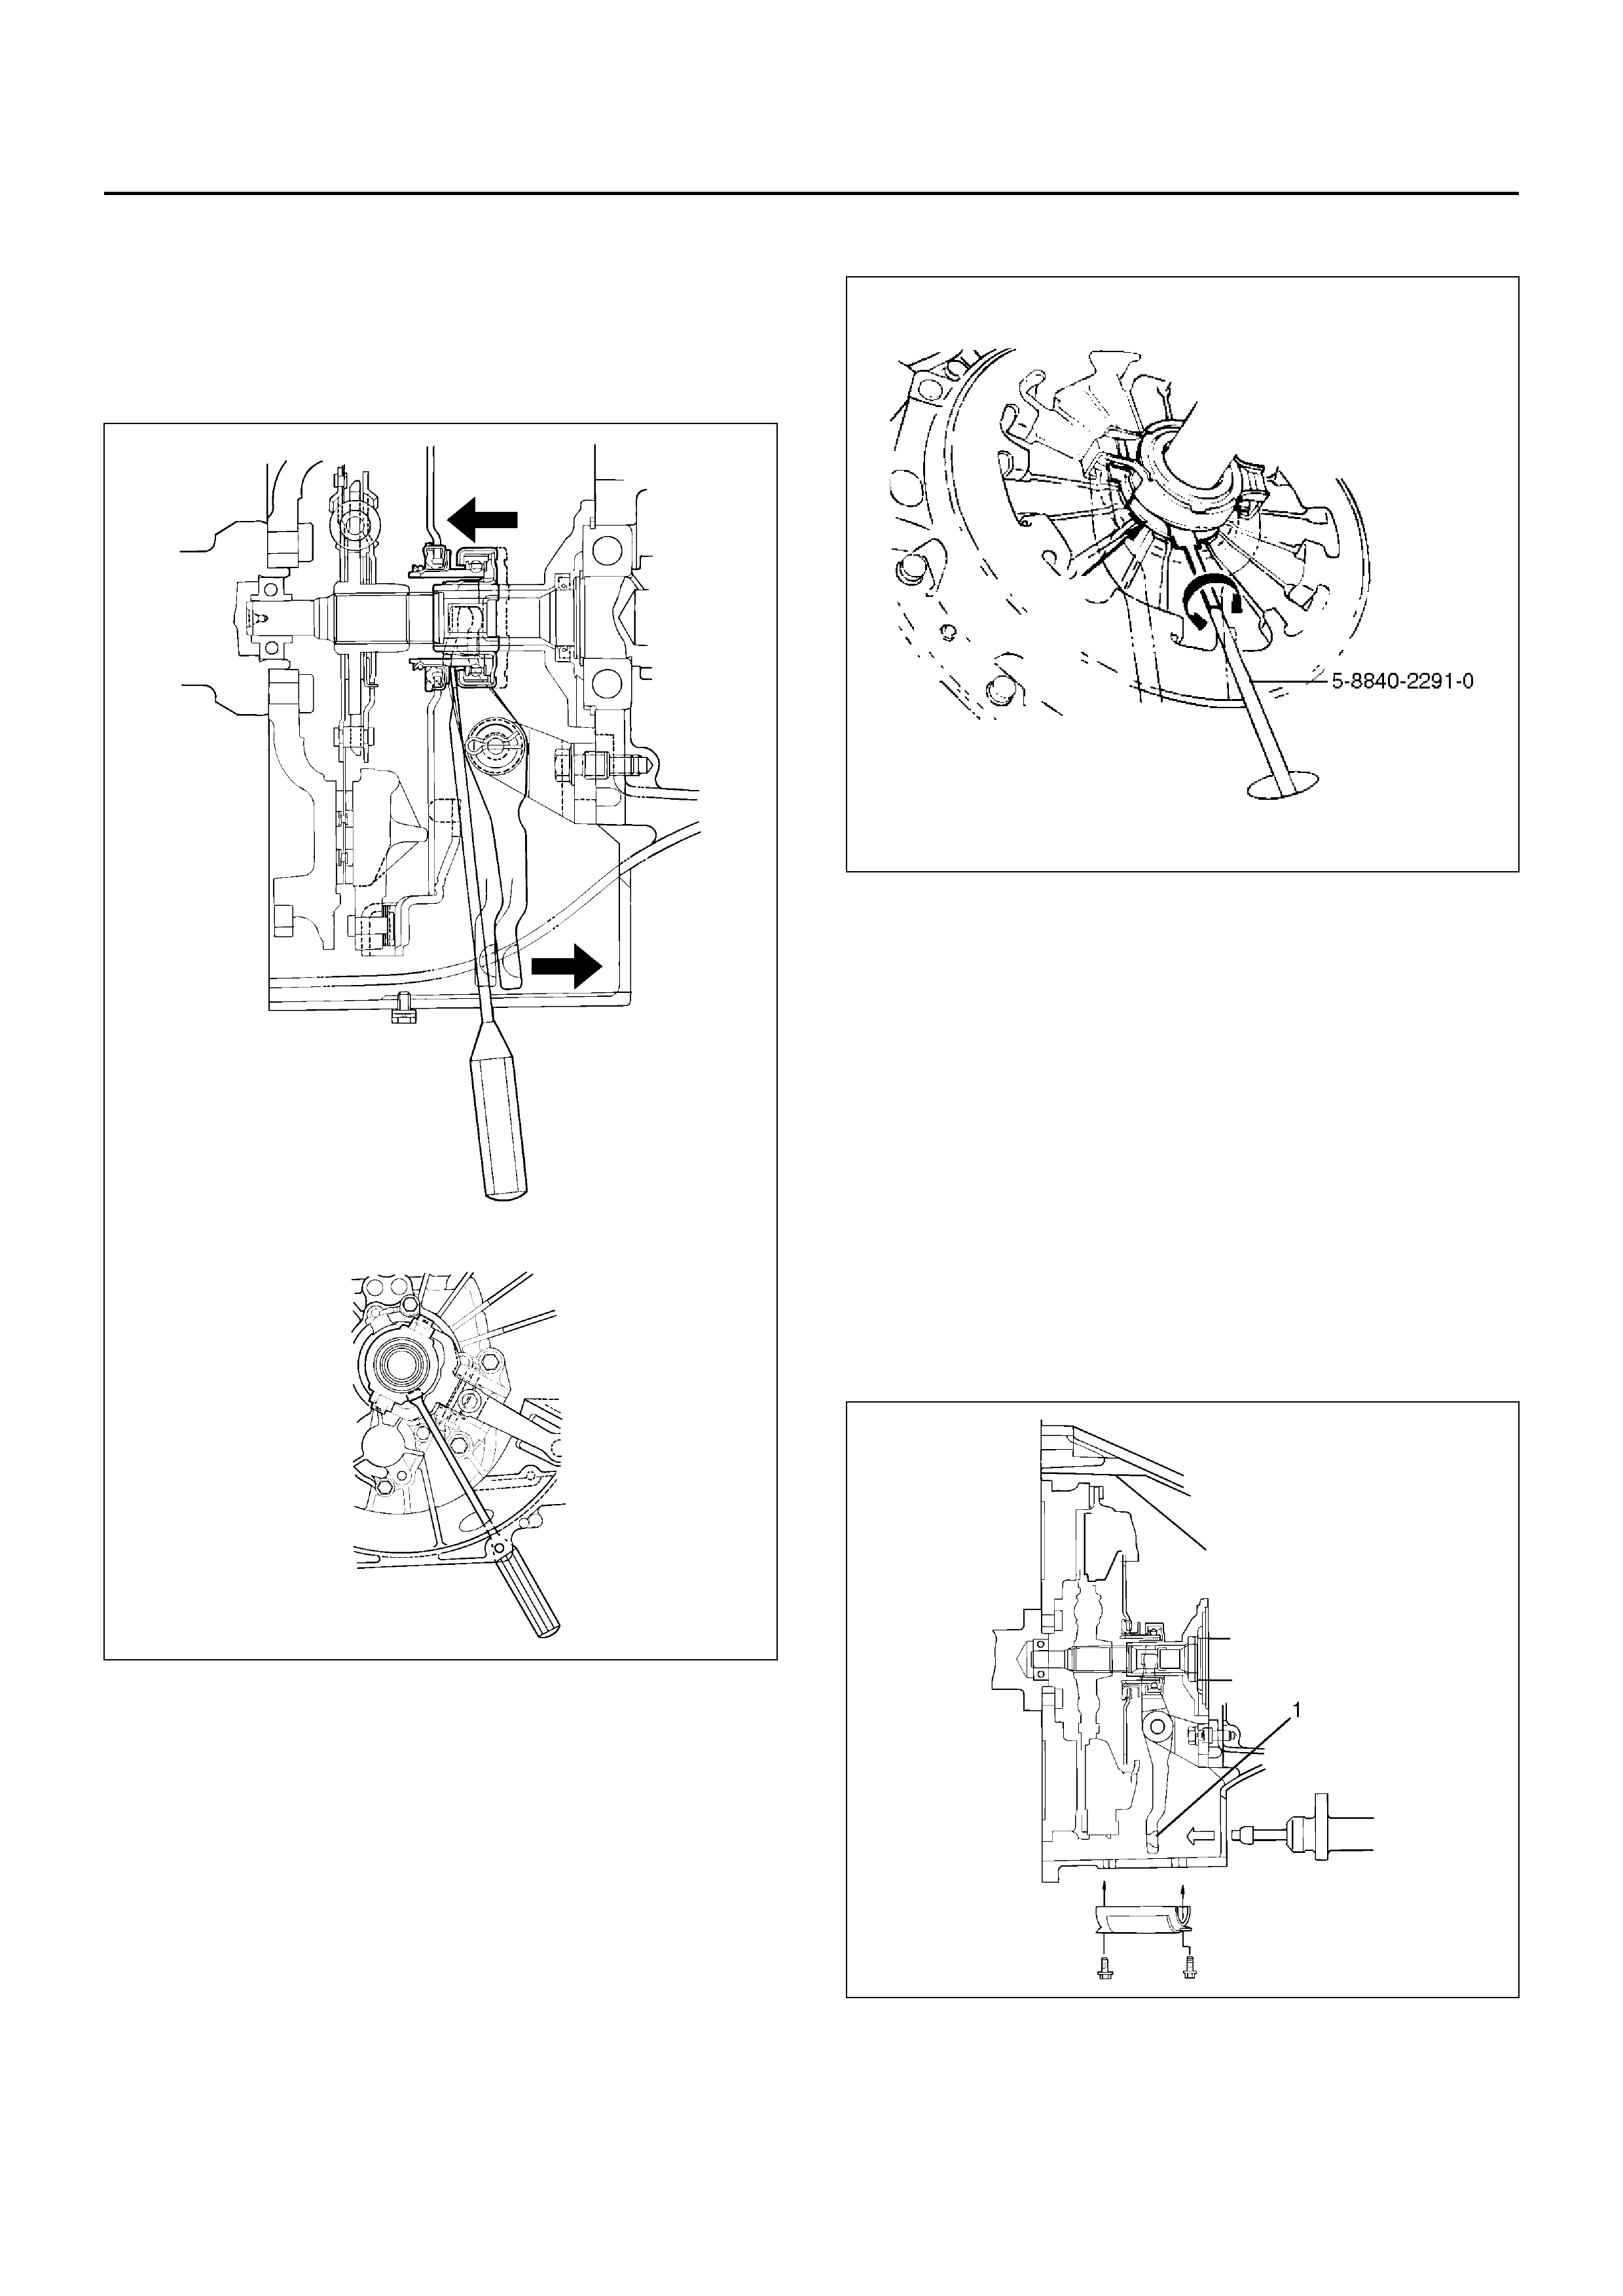
24. Insert the clutch release bearing remover 5–8840–
2291–0 between the wedge collar and the release
bearing.
NOTE: Be sure not to insert the remover between the
wedge collar and the clutch.
220RS003
25. Turn the remover to separate the release bearing.
220RX007
26. Remove transmission retaining nut and bolts(17).
Remove transmission(18) from the vehicle.
INSTALLATION
1. Apply a thi n co at of mol ybdenum dis ulf ide gr ease to
the top gear shaft spline.
2. Slowly operate the transmission jack until the front
of transmission is aligned with the rear of the
engine.
The slope of the engine and the transmission must
be the same.
3. Align th e top gear s haft splin e with the clutch dr iven
plate spline.
220RS007
4. Install the transmission to the engine.

5. Tighten the transmission nut and bolts as shown in
the figure.
225RX004
Nm (kg/m,lb/ft)
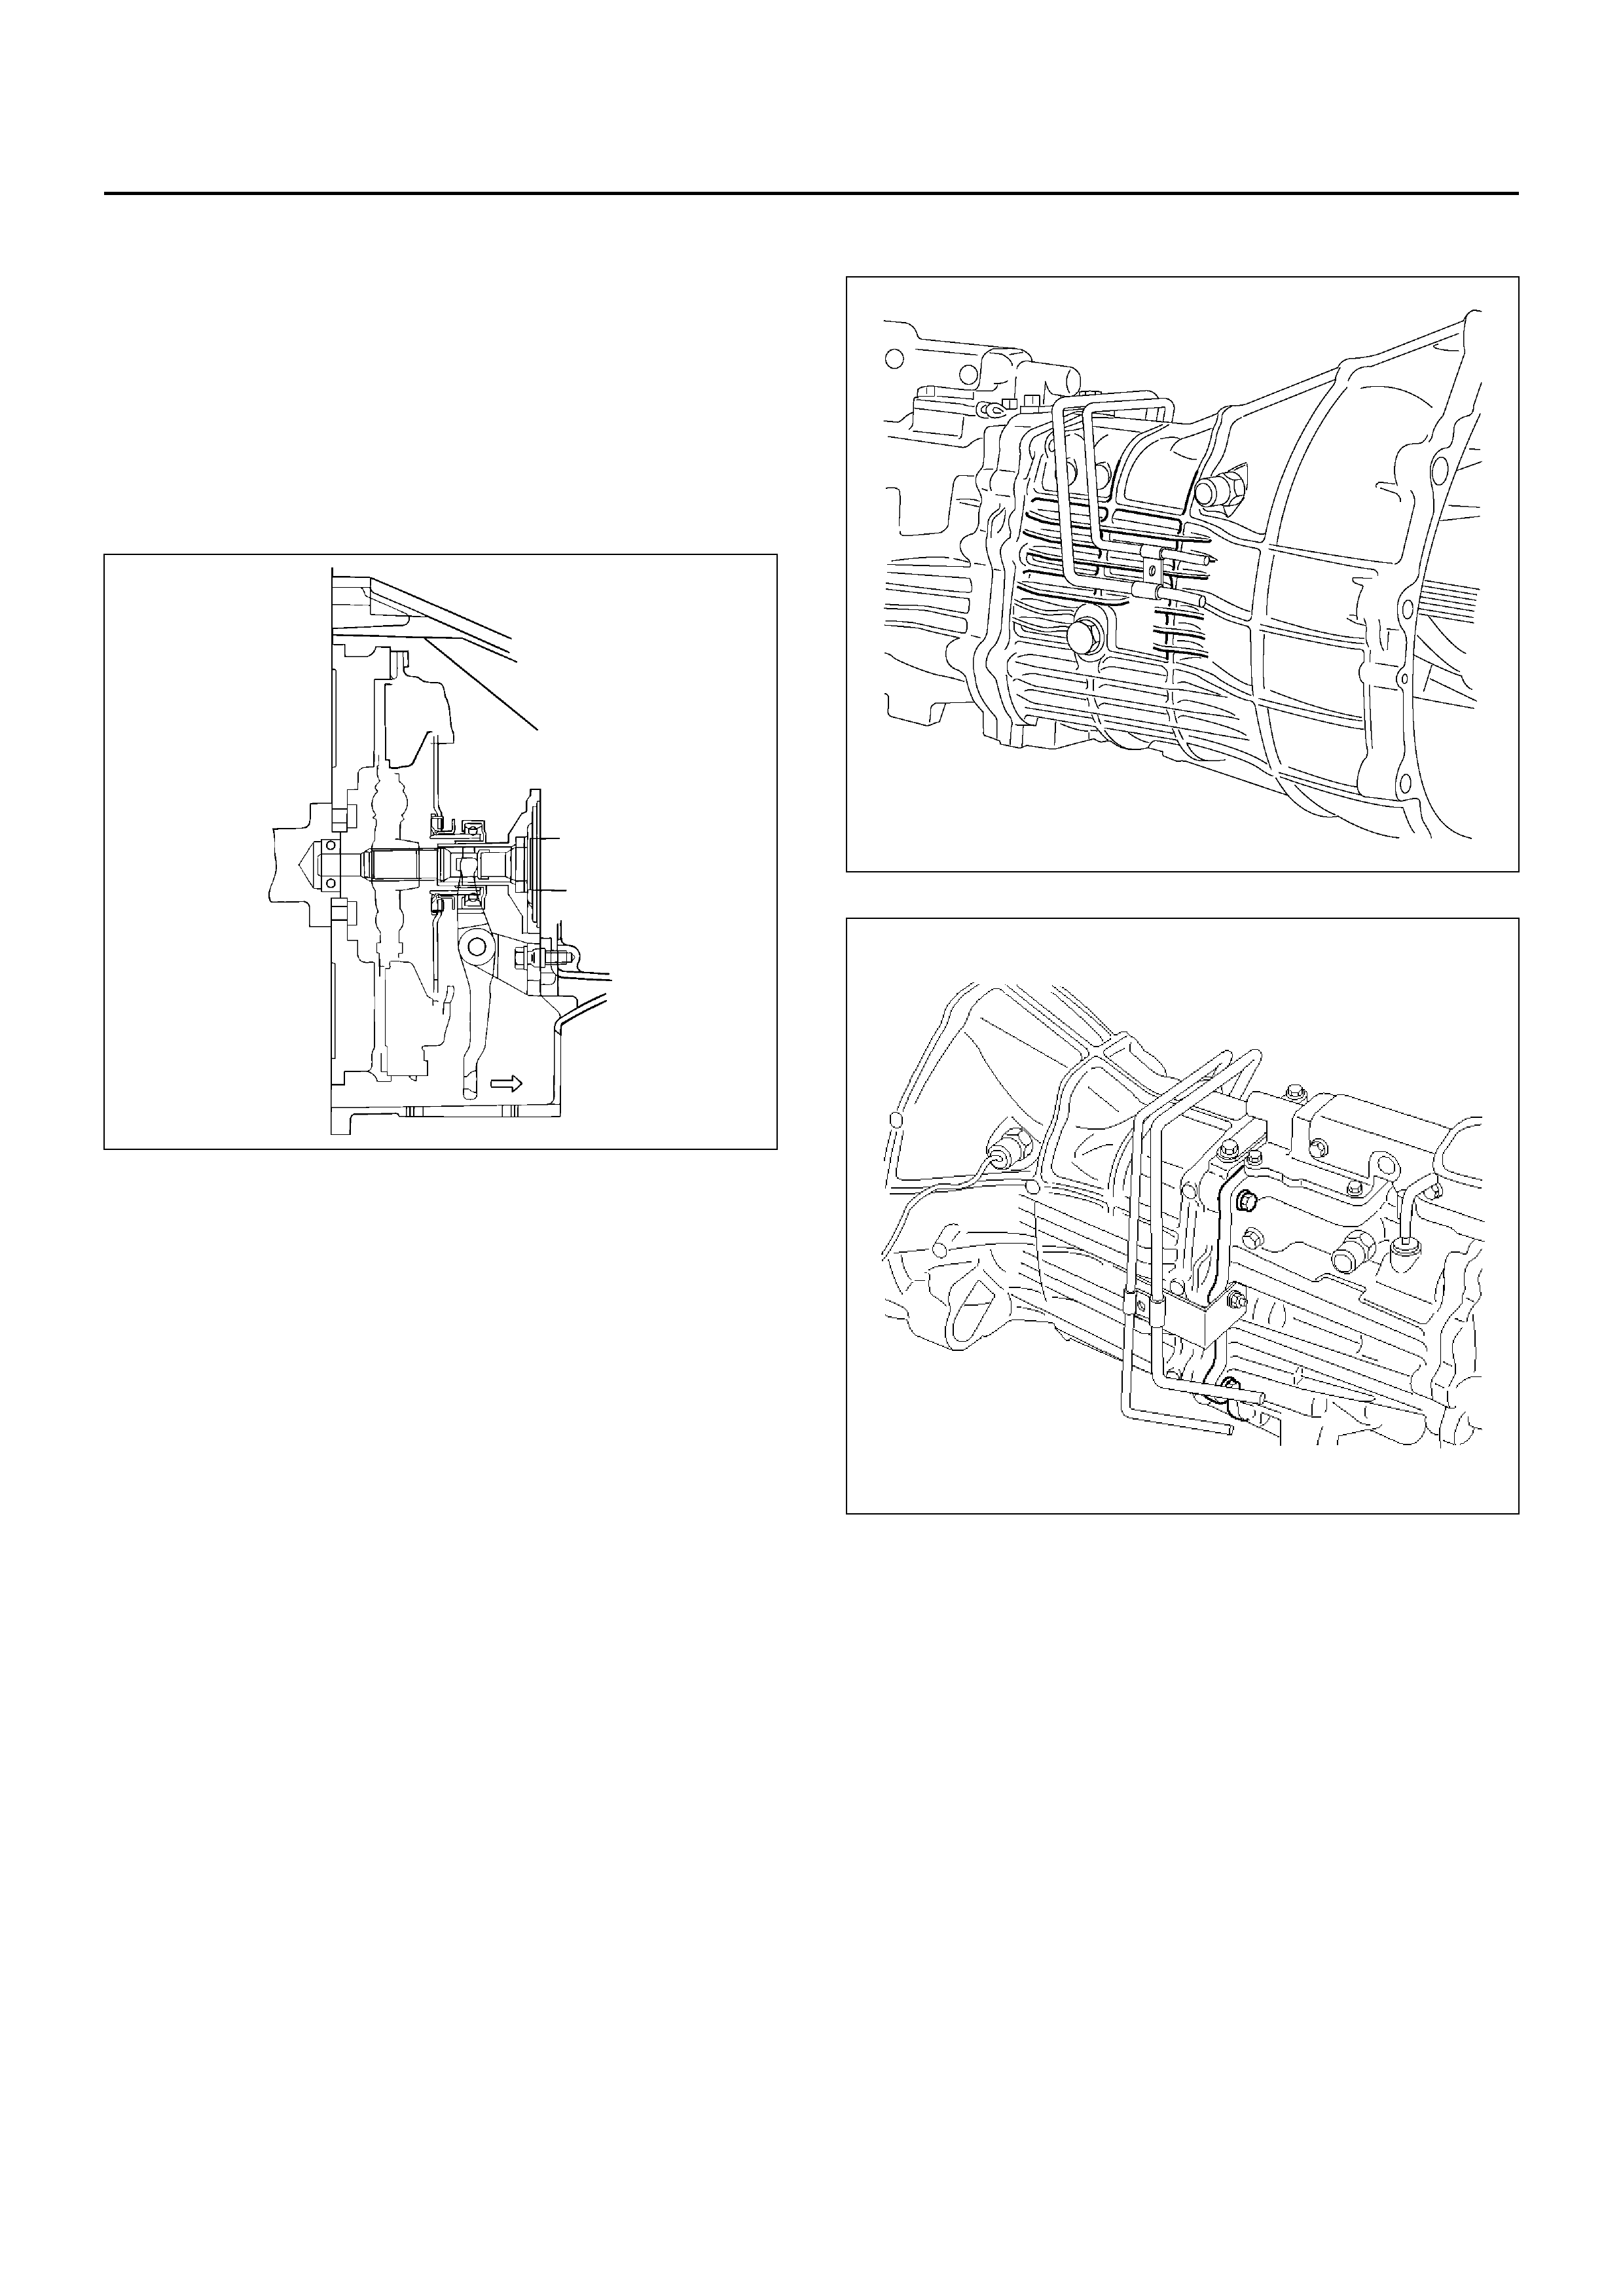
6. Apply a force of 59–78N to the tip of the shift fork in
the direction of the transmission to engage the
clutch pressure plate and release bearing.
NOTE: A click sound is heard when the release bearing
and the tip of the diaphragm spring engage each other.
Check to see if they are securely engaged by pushing
the tip of the shift fork toward the engine side while
applying a force of about 25N If the shift fork will not
move, then they are securely engaged.
220RS006
7. Install flywheel under cover(16).
Torque: 8N·m
8. Install starter(15).
Torque: 40N·m
9. Install third crossmember(14).
Torque: 50N·m
10. Install engine rear mount nuts(13).
Torque: 40N·m
Remove the transmission jack from transmission
side.
11. Install clutch dust covers(12) to clutch housing.
Torque: 6N·m
12. Connect transmission harness connectors and clip.
Connector: transfer switch, 2–4 actuator, car speed
sensor.
13. Install bracket and transmission harness clamps(10)
to the transmission case.
14. Install harness heat shield(11).
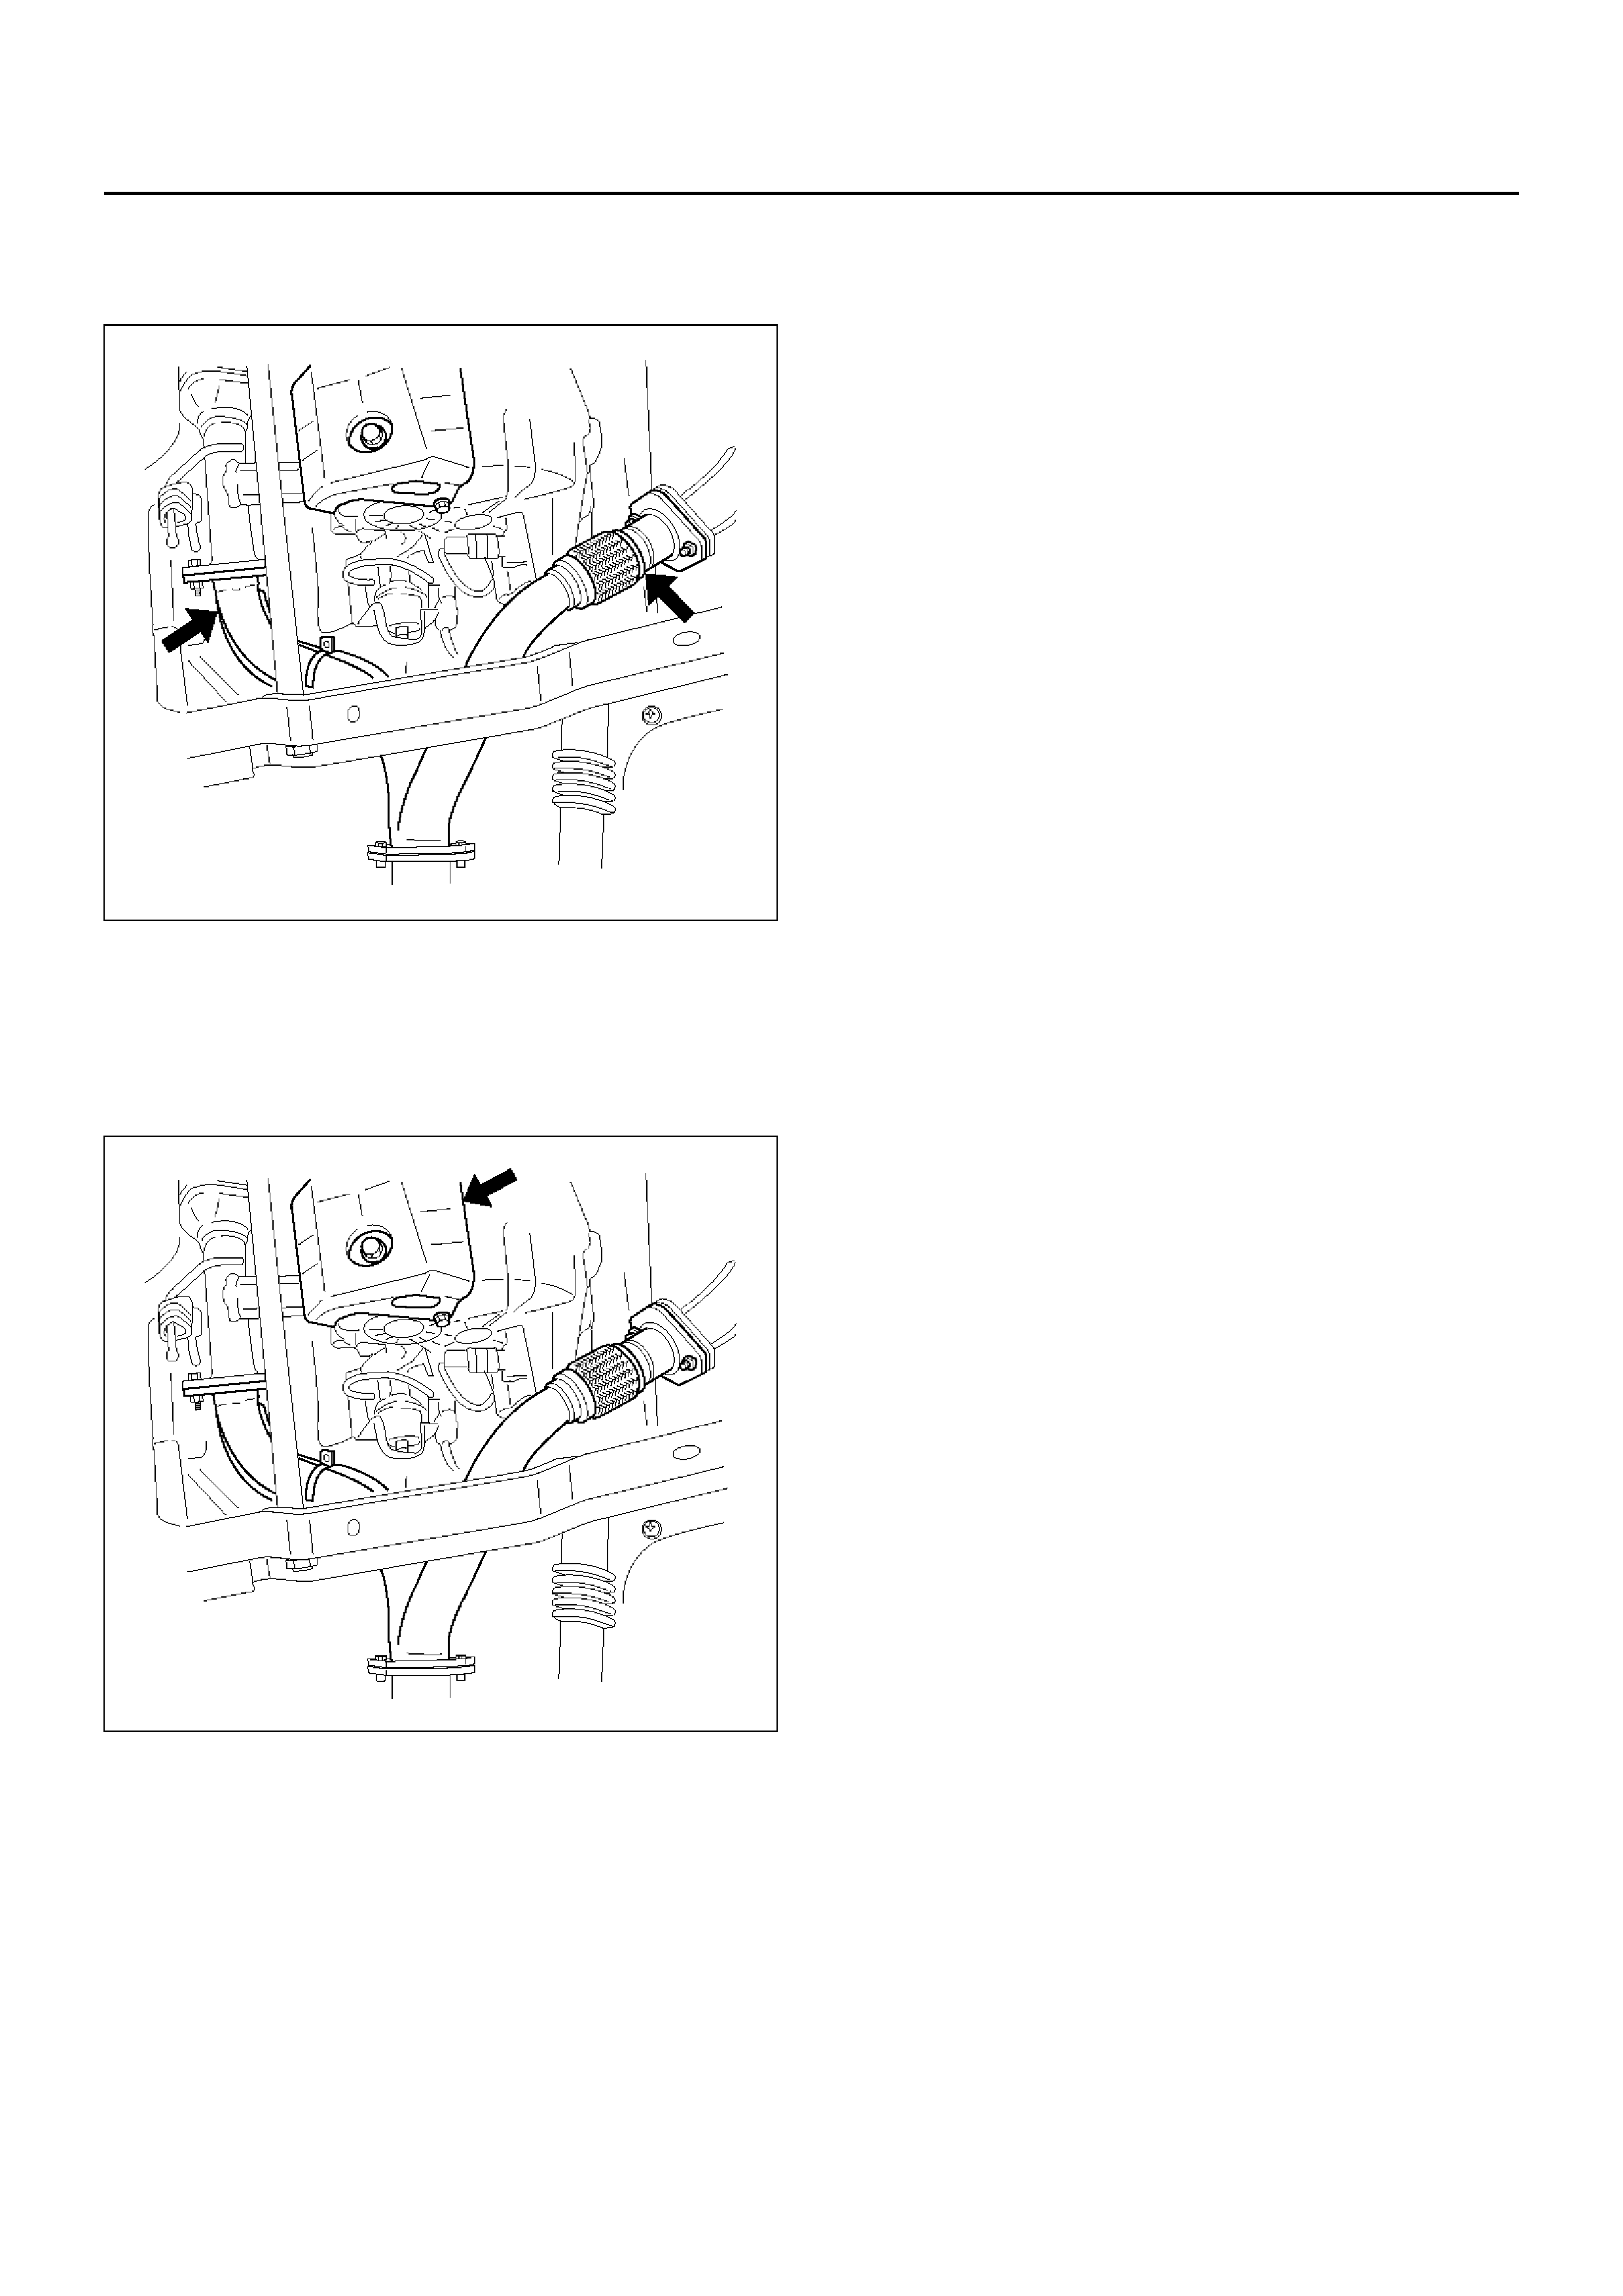
15. Connect fuel pipe to transmission side.
220RW046
220RW047
16. Install centre exhaust pipe(9).
Torque: 43N·m
150RX009
17. Install front(8) and rear propeller shaft(7).
Torque: 63N·m
18. Install transfer guard(6).
Lower the vehicle.
150RX010
19. Install gear control lever(5) and transfer control
lever(5).
20. Install grommet assembly(4).
21. Install centre console(3), rear console and lower
cluster assembly.
22. Install transfer control lever knob(2) and gear control
lever knob(1).
23. Connect battery ground cable.
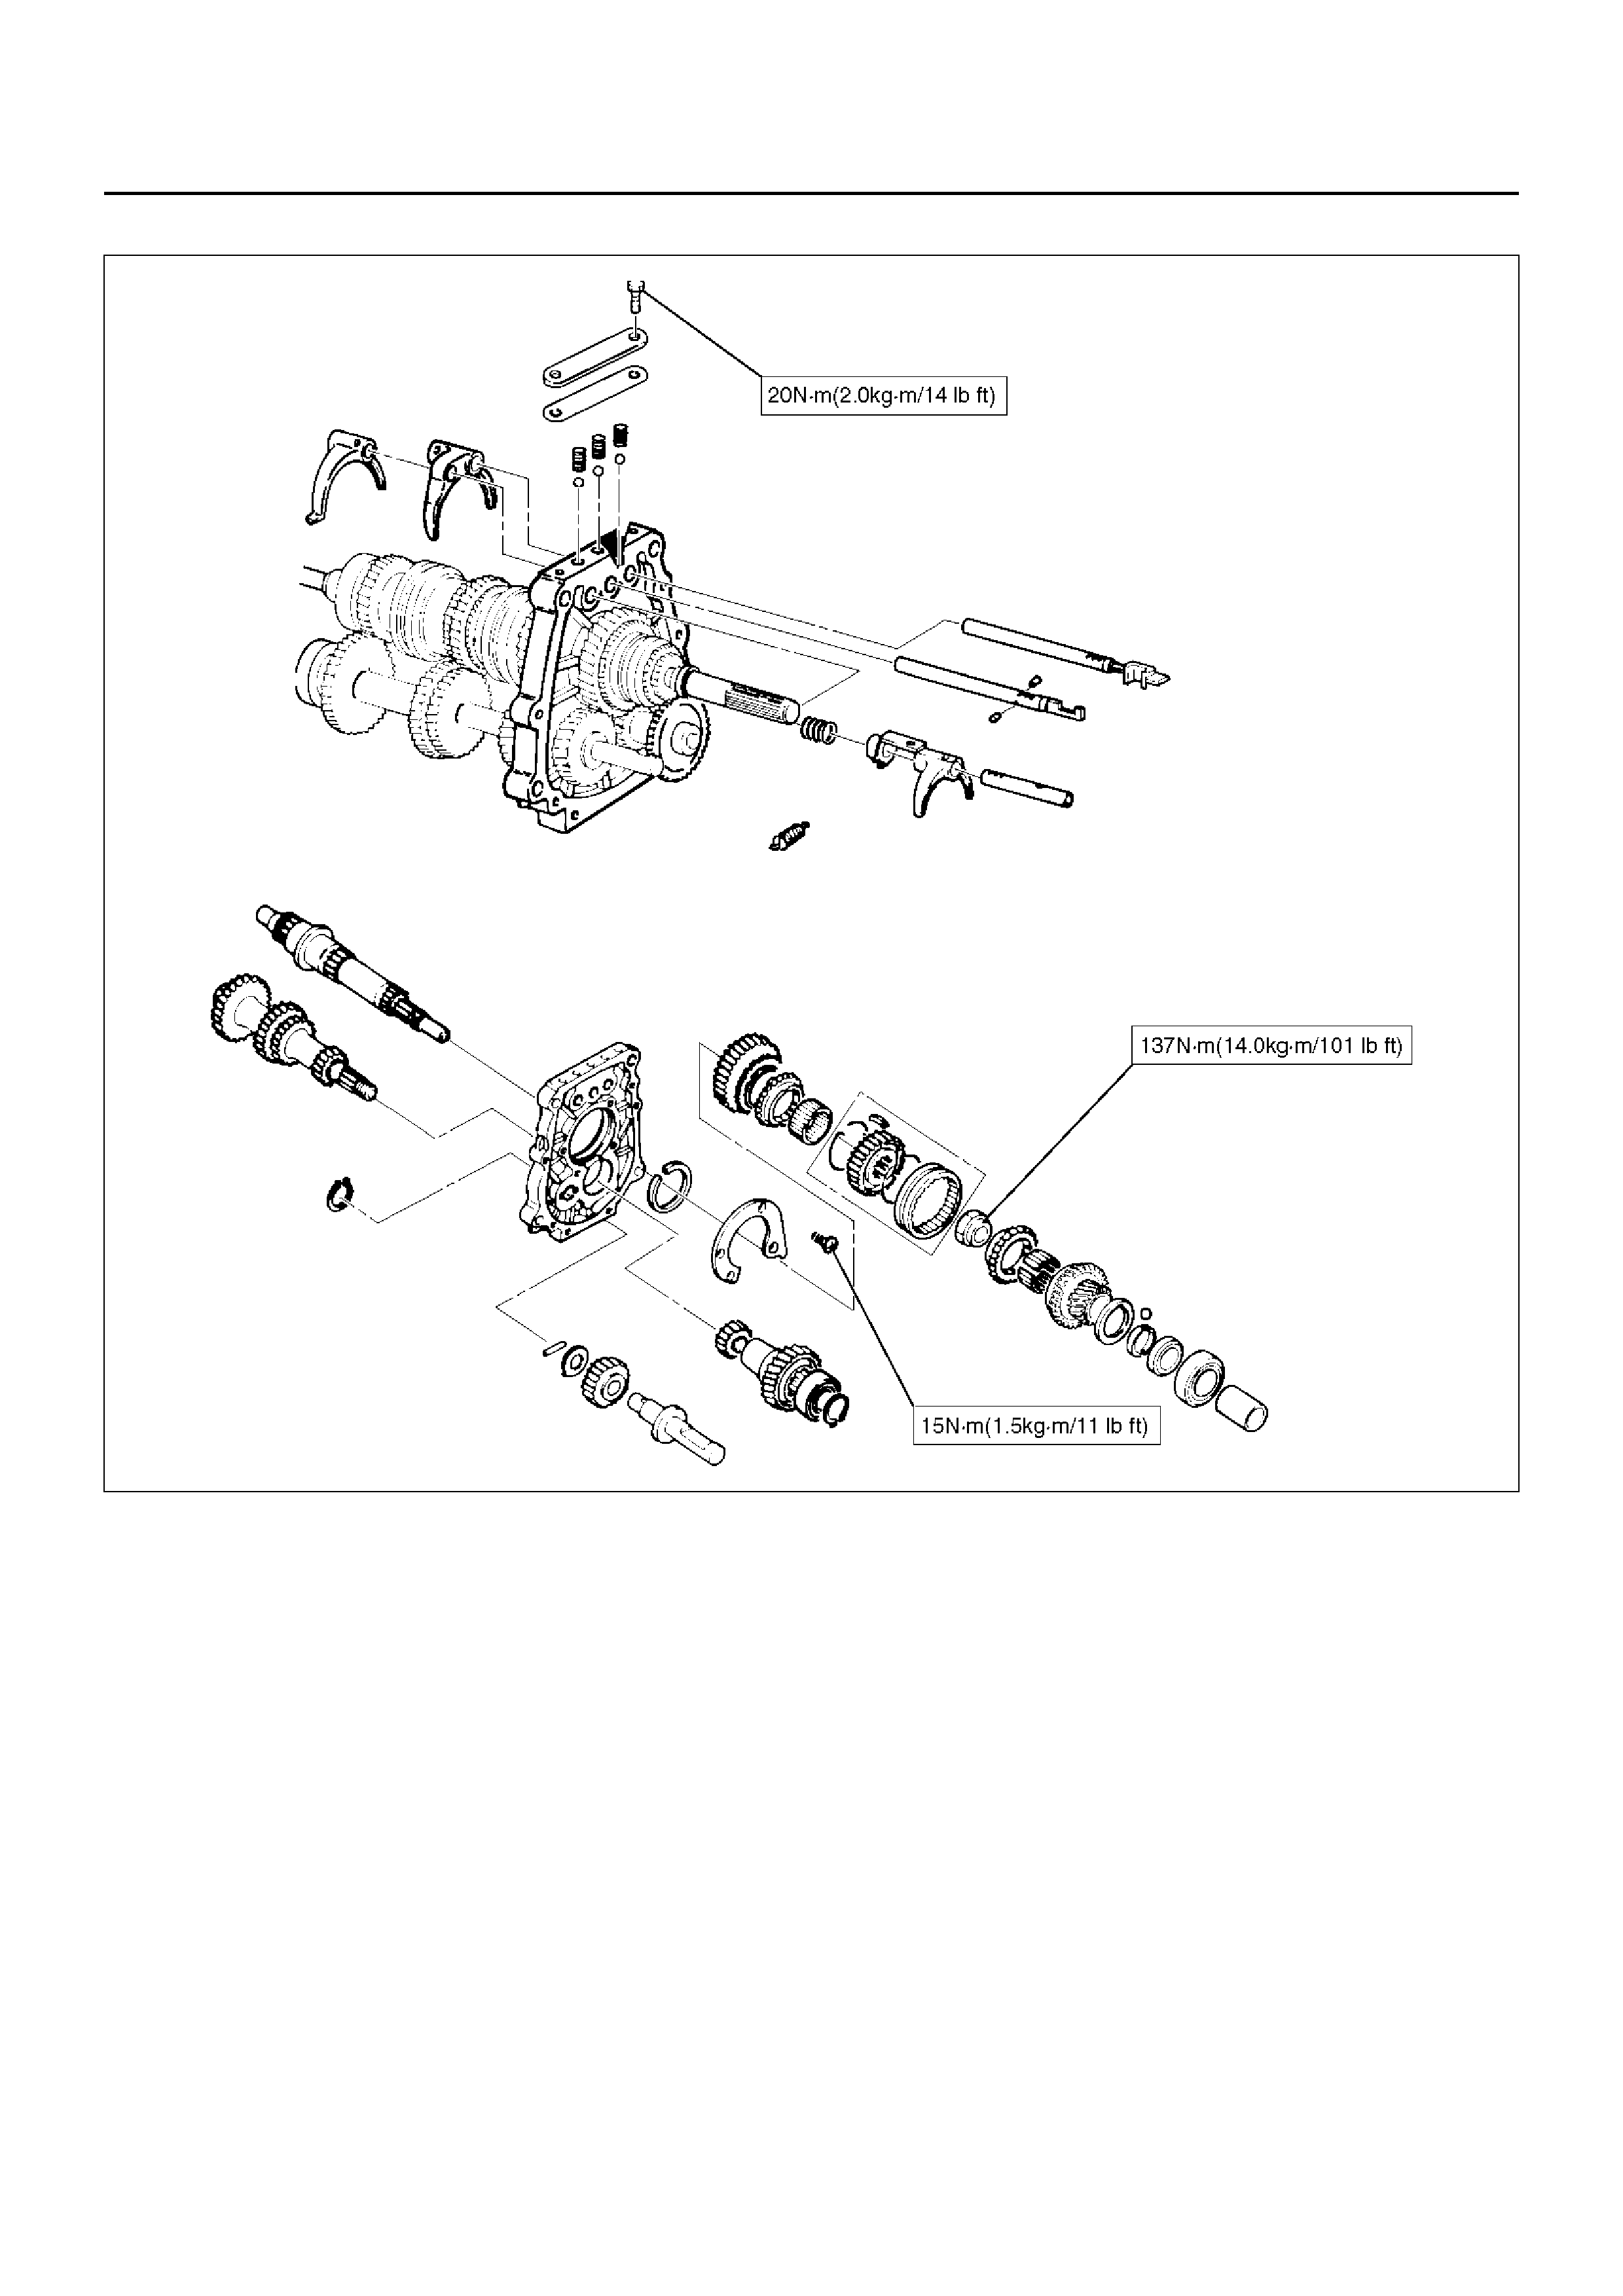
TRANSMISSION CASE AND TRANSFER CASE
MAJOR COMPONENTS (MUA)
220R100003
Legend
(1) Clutch Release Bearing
(2) Shift Fork
(3) Fulcr um Bridge
(4) Front Cover (with Oil Seal)
(5) Counter Front Bearing Snap Ring
(6) Top Gear Bearing Snap Ring
(7) Speedometer Sensor and Speedometer Driven
Gear
(8) Front Companion Flange
(9) Rear Companion Flange
(10) Gear Control Box Assembly
(11) 2WD-4WD Actuator Assembly
(12) Transfer Rear Case Assembly
(13) Detent, Shift Arm, and Interlock Pin
(14) Bearing Snap Ring
(15) Ball Bearing
(16) Lock Nut
(17) High-Low Clutch Hub and Sleeve
(18) Transfer Input Gear
(19) Need le Bearing
(20) Bearing Collar
(21) Ball
(22) Plate
(23) Bearing Snap Ring
(24) Front Output Gear Assembly
(25) Bearing Snap Ring
(26) Counter Gear Assembly
(27) Plug and Gasket
(28) Transfer Case Assembly
(29) Intermediate Plate with Gear Assembly
(30) Transmission Case
DISASSEMBLY
1. Clean the exterior of the unit with solvent.
2. Remove the drain plug from the transmission case
and transfer case and drain the lubricant.
3. Remove the clutch release bearing(1) from the
transmission case.
201RS020
4. Remo ve the sn ap pin.
Remove the shift fork pin and shift fork(2) from the
fulcrum bridge(3).
201RS021
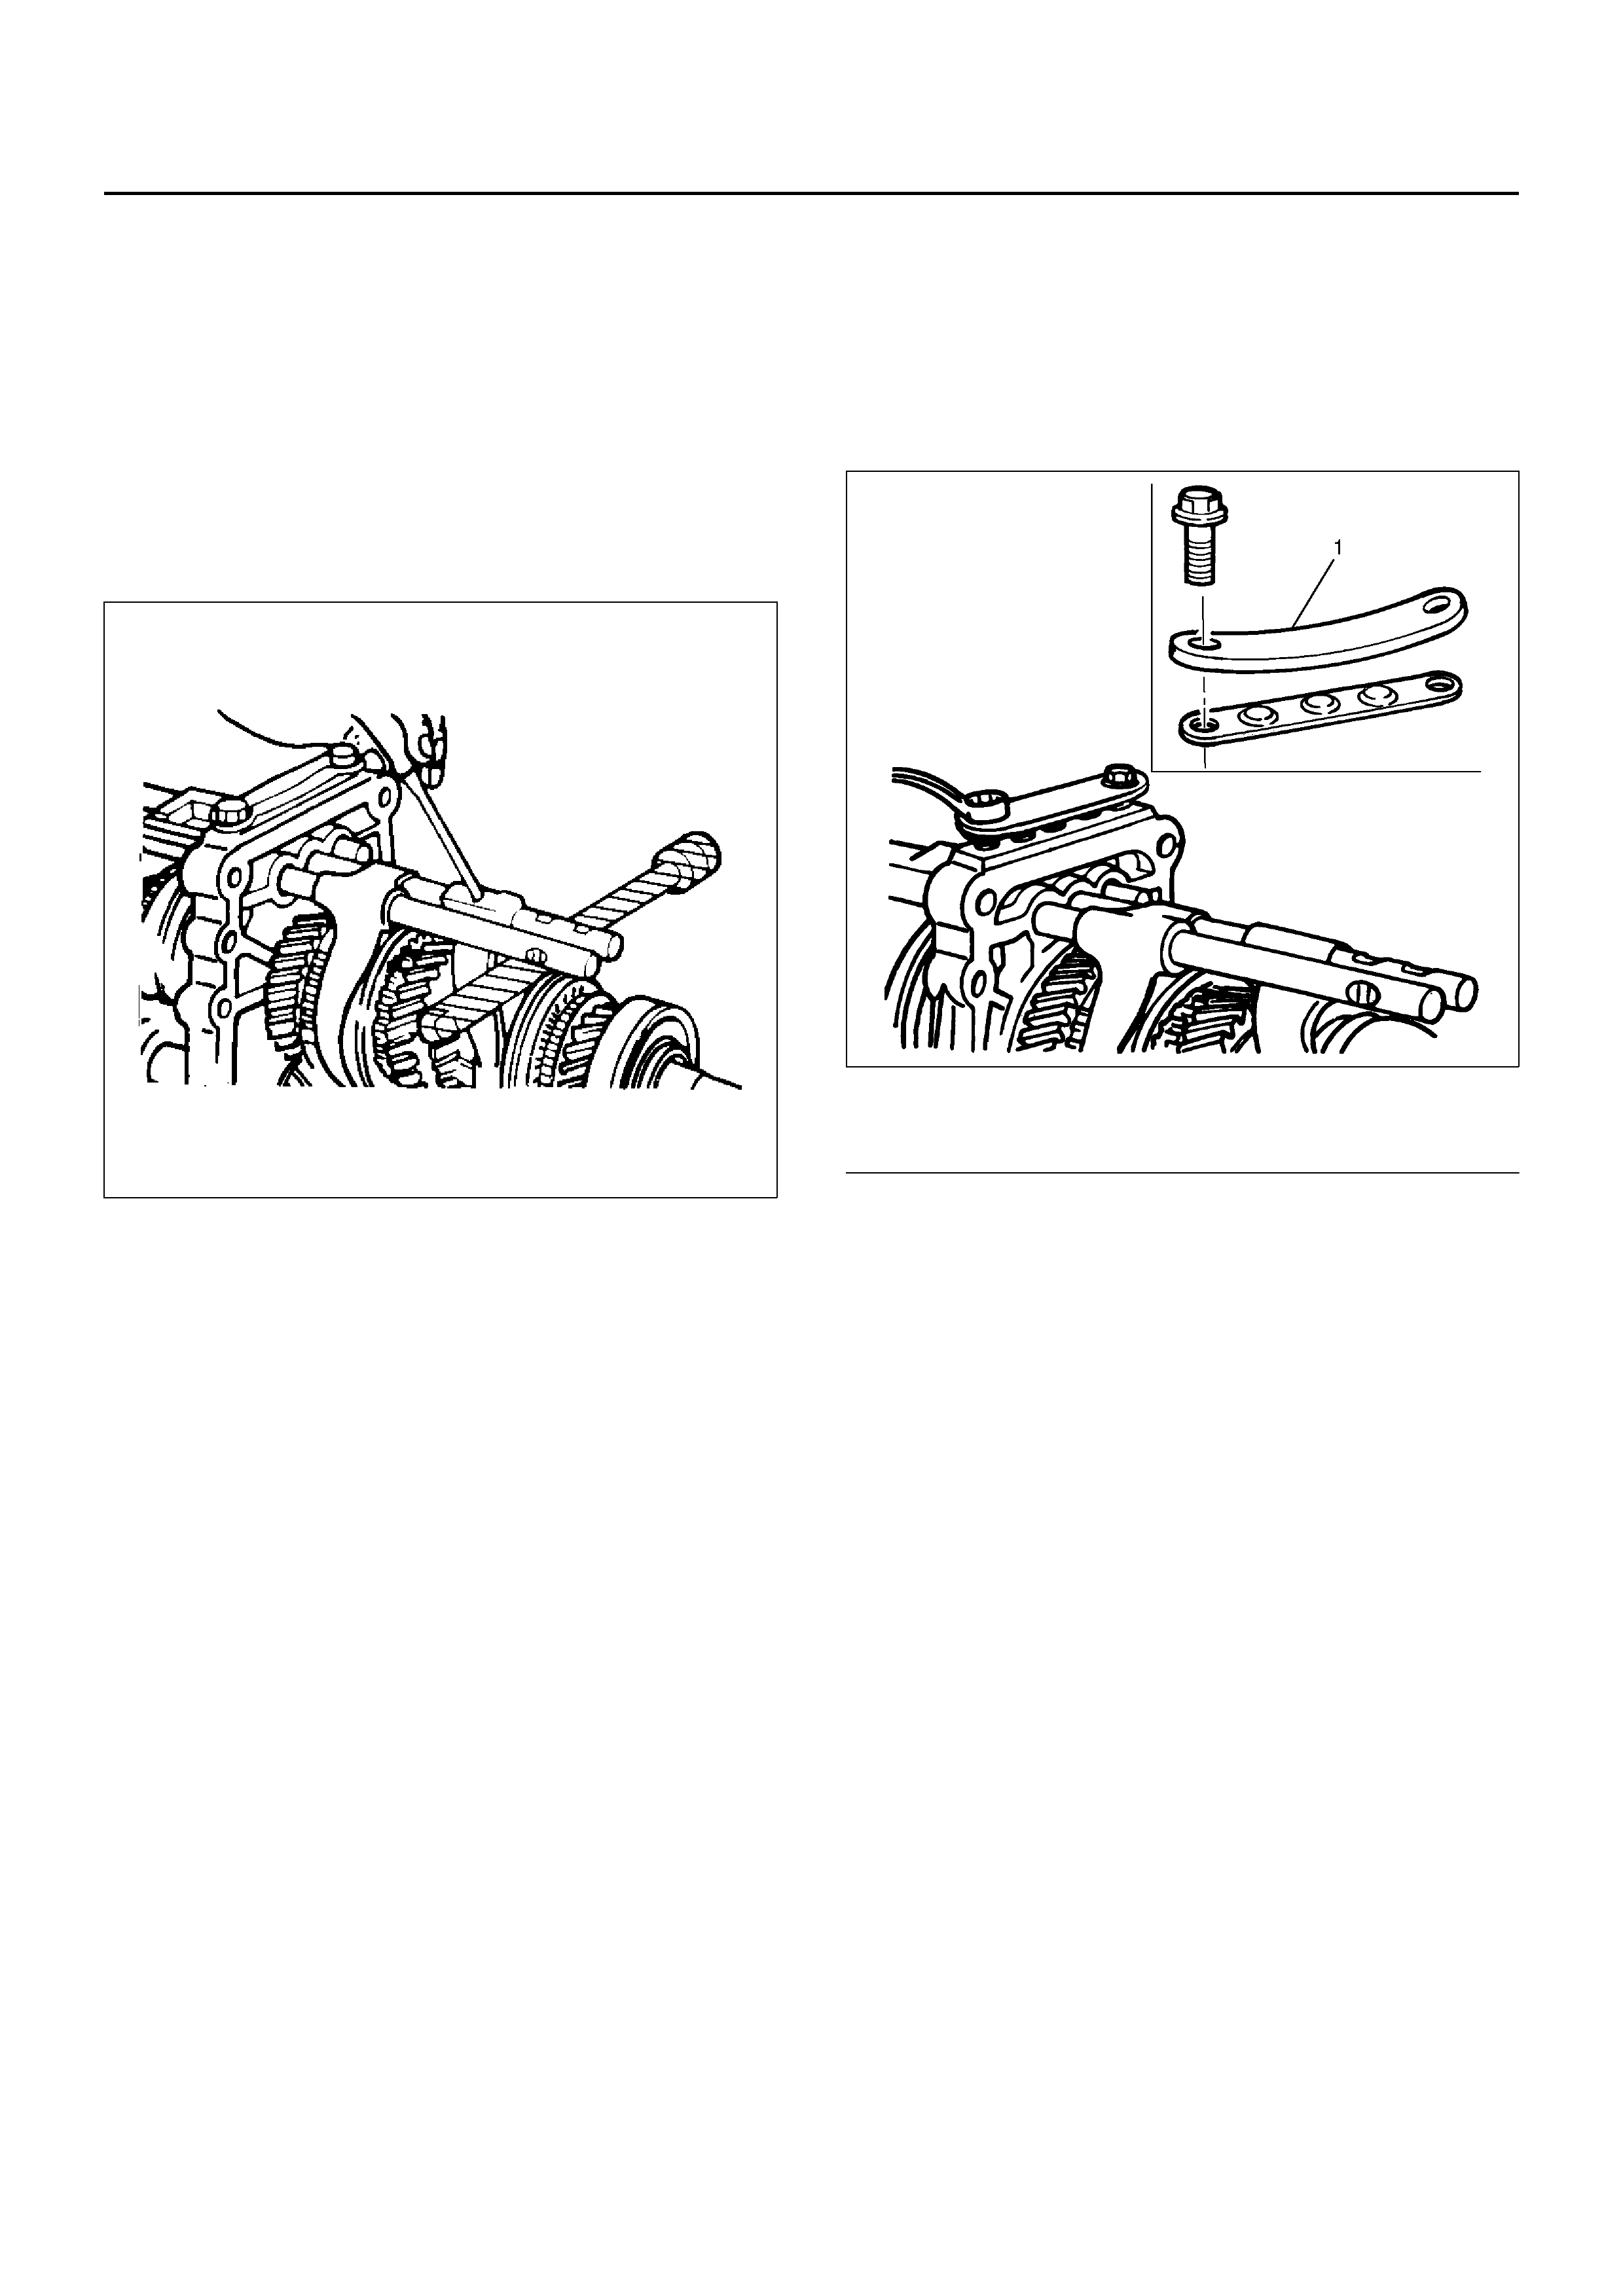
5. Remove the fulcrum bridge bolts.
• Remove the fulcrum bridge(3) from the
transmission case.
Remove the front cover(4) and gasket from the
transmission case.
201RS022
6. Remove counter front bearing snap ring(5) and top
gear bearing snap ring(6).
Use a pair of snap ring pliers to remove the snap
ring.
226RS001
7. Remove the speedometer sensor(7).
Remove the plate(7).
Remove the driven gear bushing and driven
gear(7).
NOTE: Apply a reference mark to the driven gear
bushing before removal.
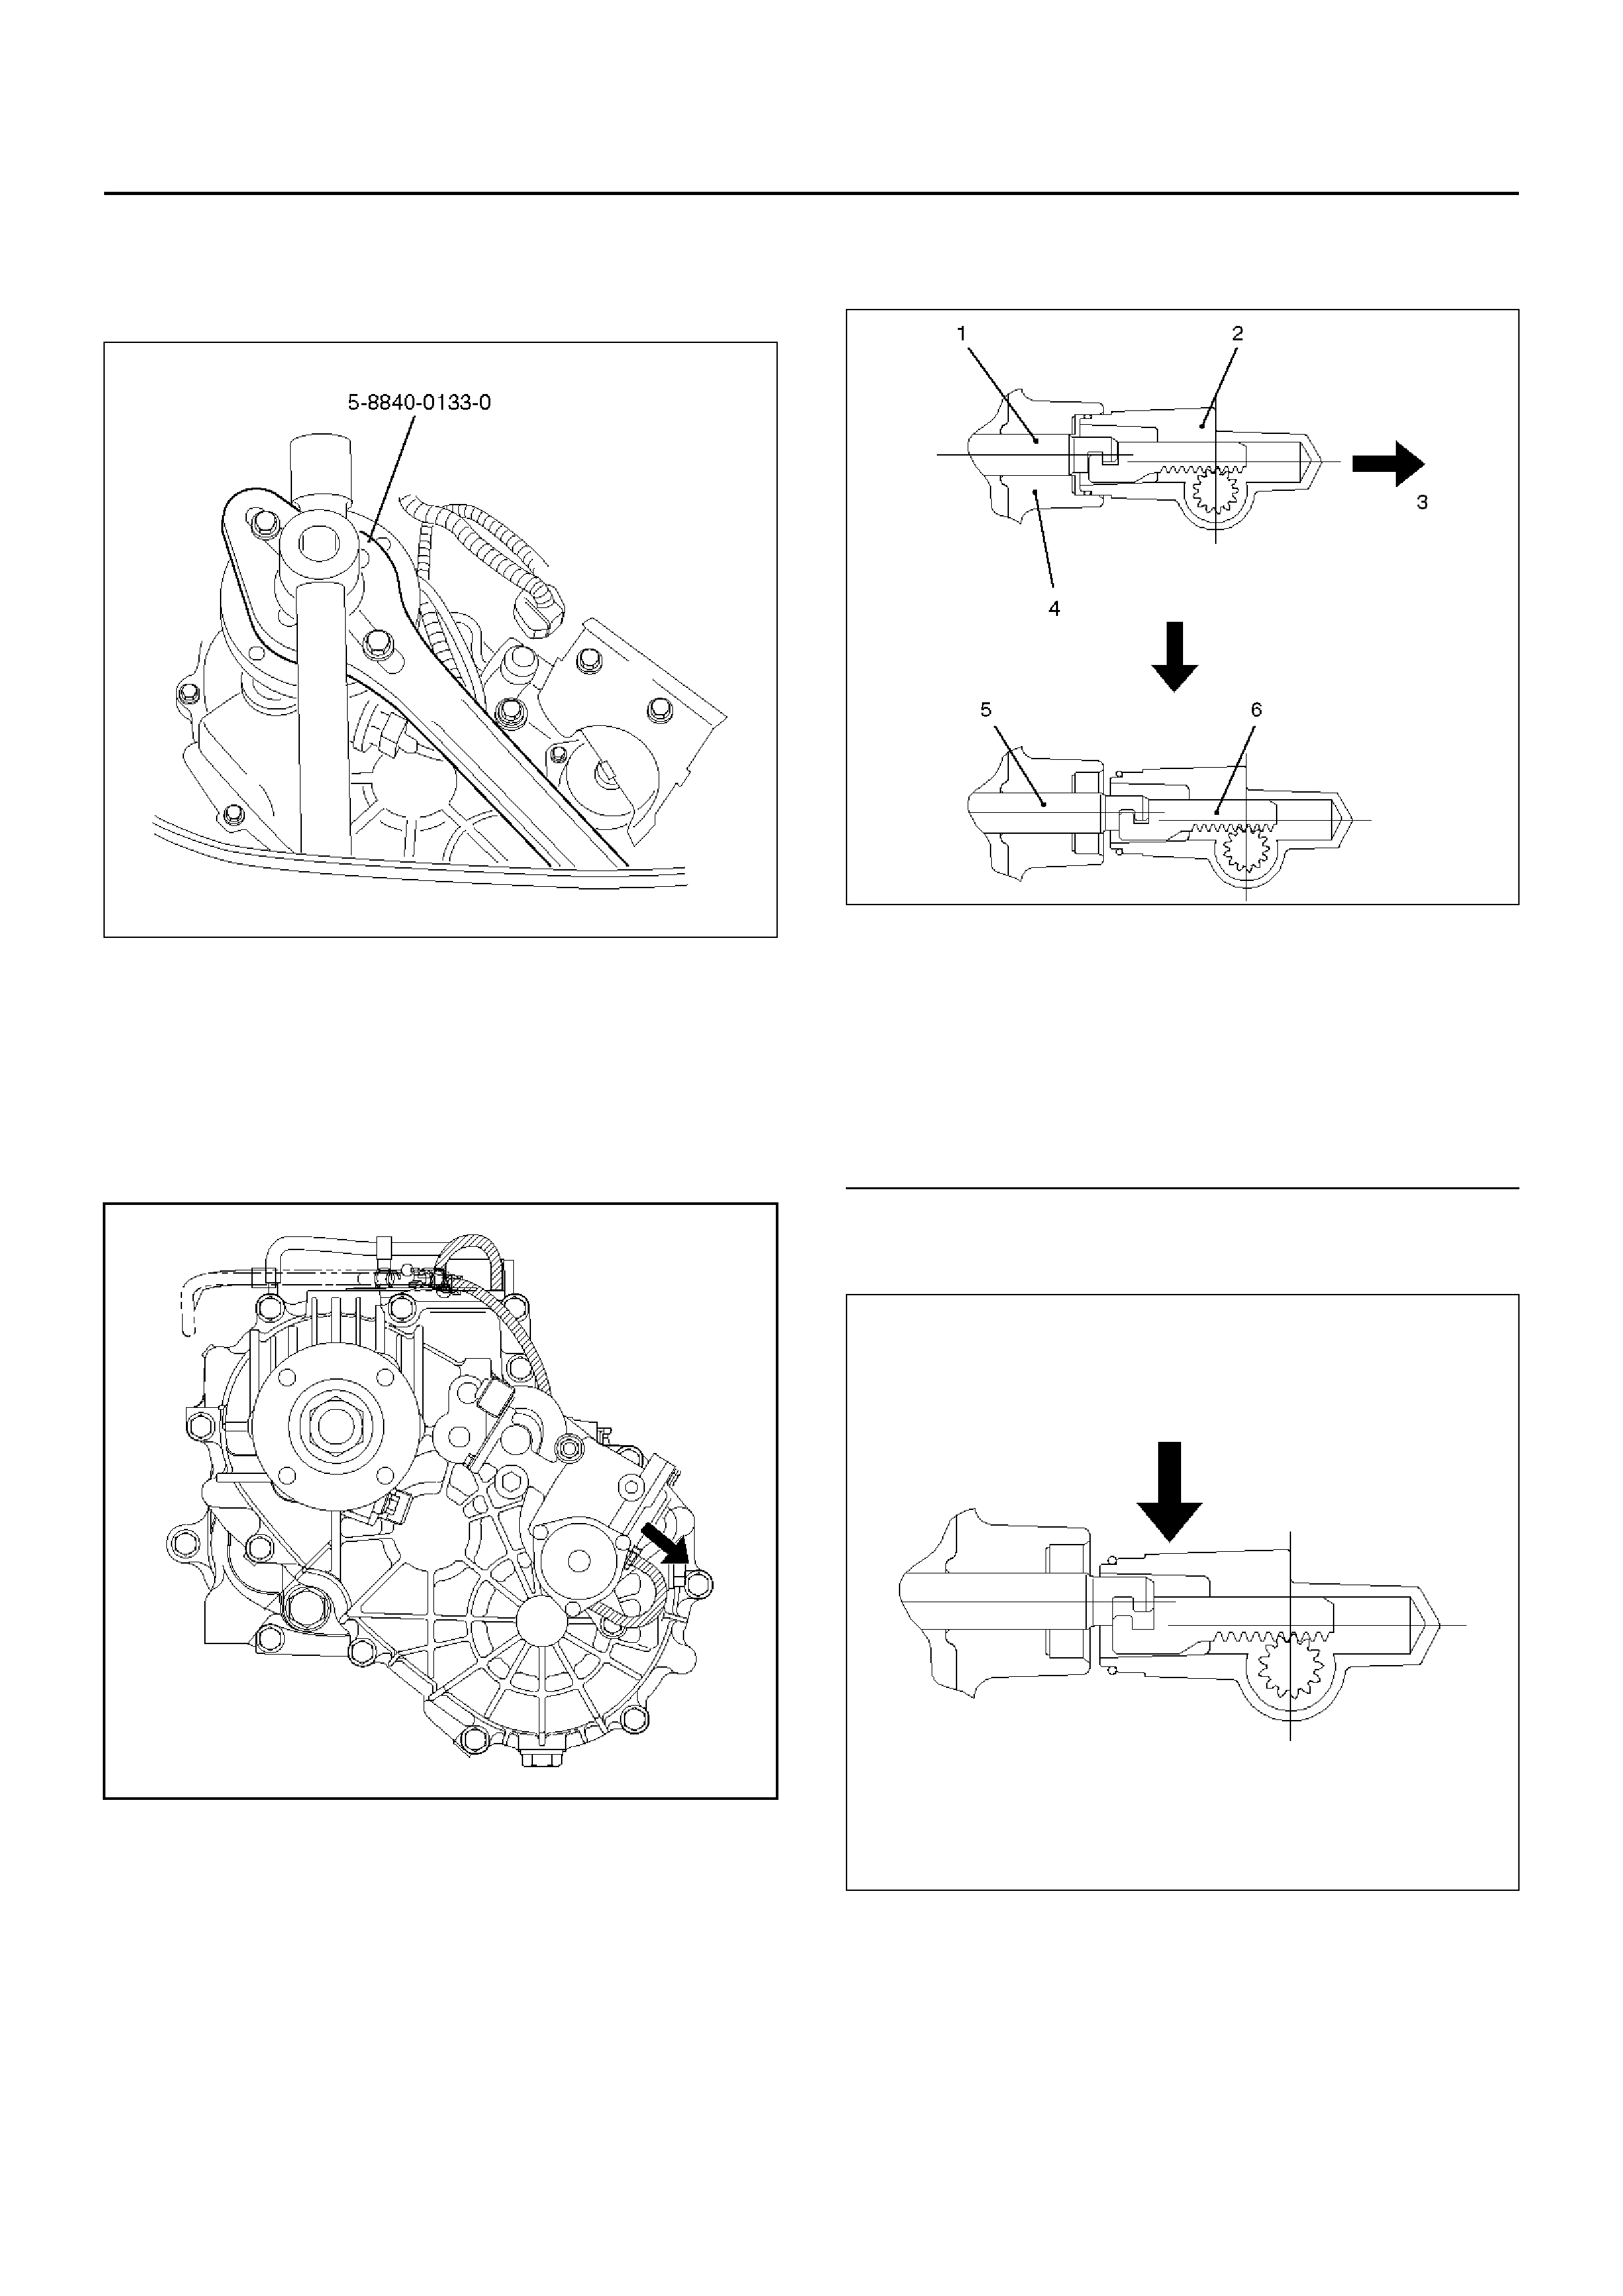
8. Remove front companion flange(8) and rear
companion flange(9) using the flange holder
5–8840–0133–0 to remove the end nut.
266RW026
9. Disconnect breather hose from transmission and
remove gear control box assembly(10).
10. Remove 2WD–4WD actuator assembly(11) by
perfor ming the foll owi ng steps:
1. Disconnect the actuator breather hose from
2WD–4WD actuator assembly(11).
220RW085-1
2. Remove the 2WD–4WD actuator assembly
bolts.
3. Pull the 2WD–4WD actuator assembly with
2WD–4WD shift rod.
220RW027
EndOFCallout
4. Offset the actuator assembly.
220RW028
Legend
(1) Shift Rod: 2WD–4WD (Position: 2WD)
(2) 2WD –4 WD Ac tua tor Ass em bly
(3) Pull
(4) Rear Case Assembly
(5) Pos iti on: 4WD
(6) Pos iti on: 2WD
5. Remove the actuator assembly.
220RW029
EndOFCallout
NOTE: Before removing the transmission and transfer
assembly from vehicle, change the transfer mode to
2WD using the 4WD push button switch on dash panel.
11. Remove the transfer rear cover assembly(12) from
the transfer case(28).
12. Regarding detent, shift arm, and interlock pin(13)
disassembly, refer to Detent, Shift Arm, and
Interlock Pin in Drive Line/Axle section.
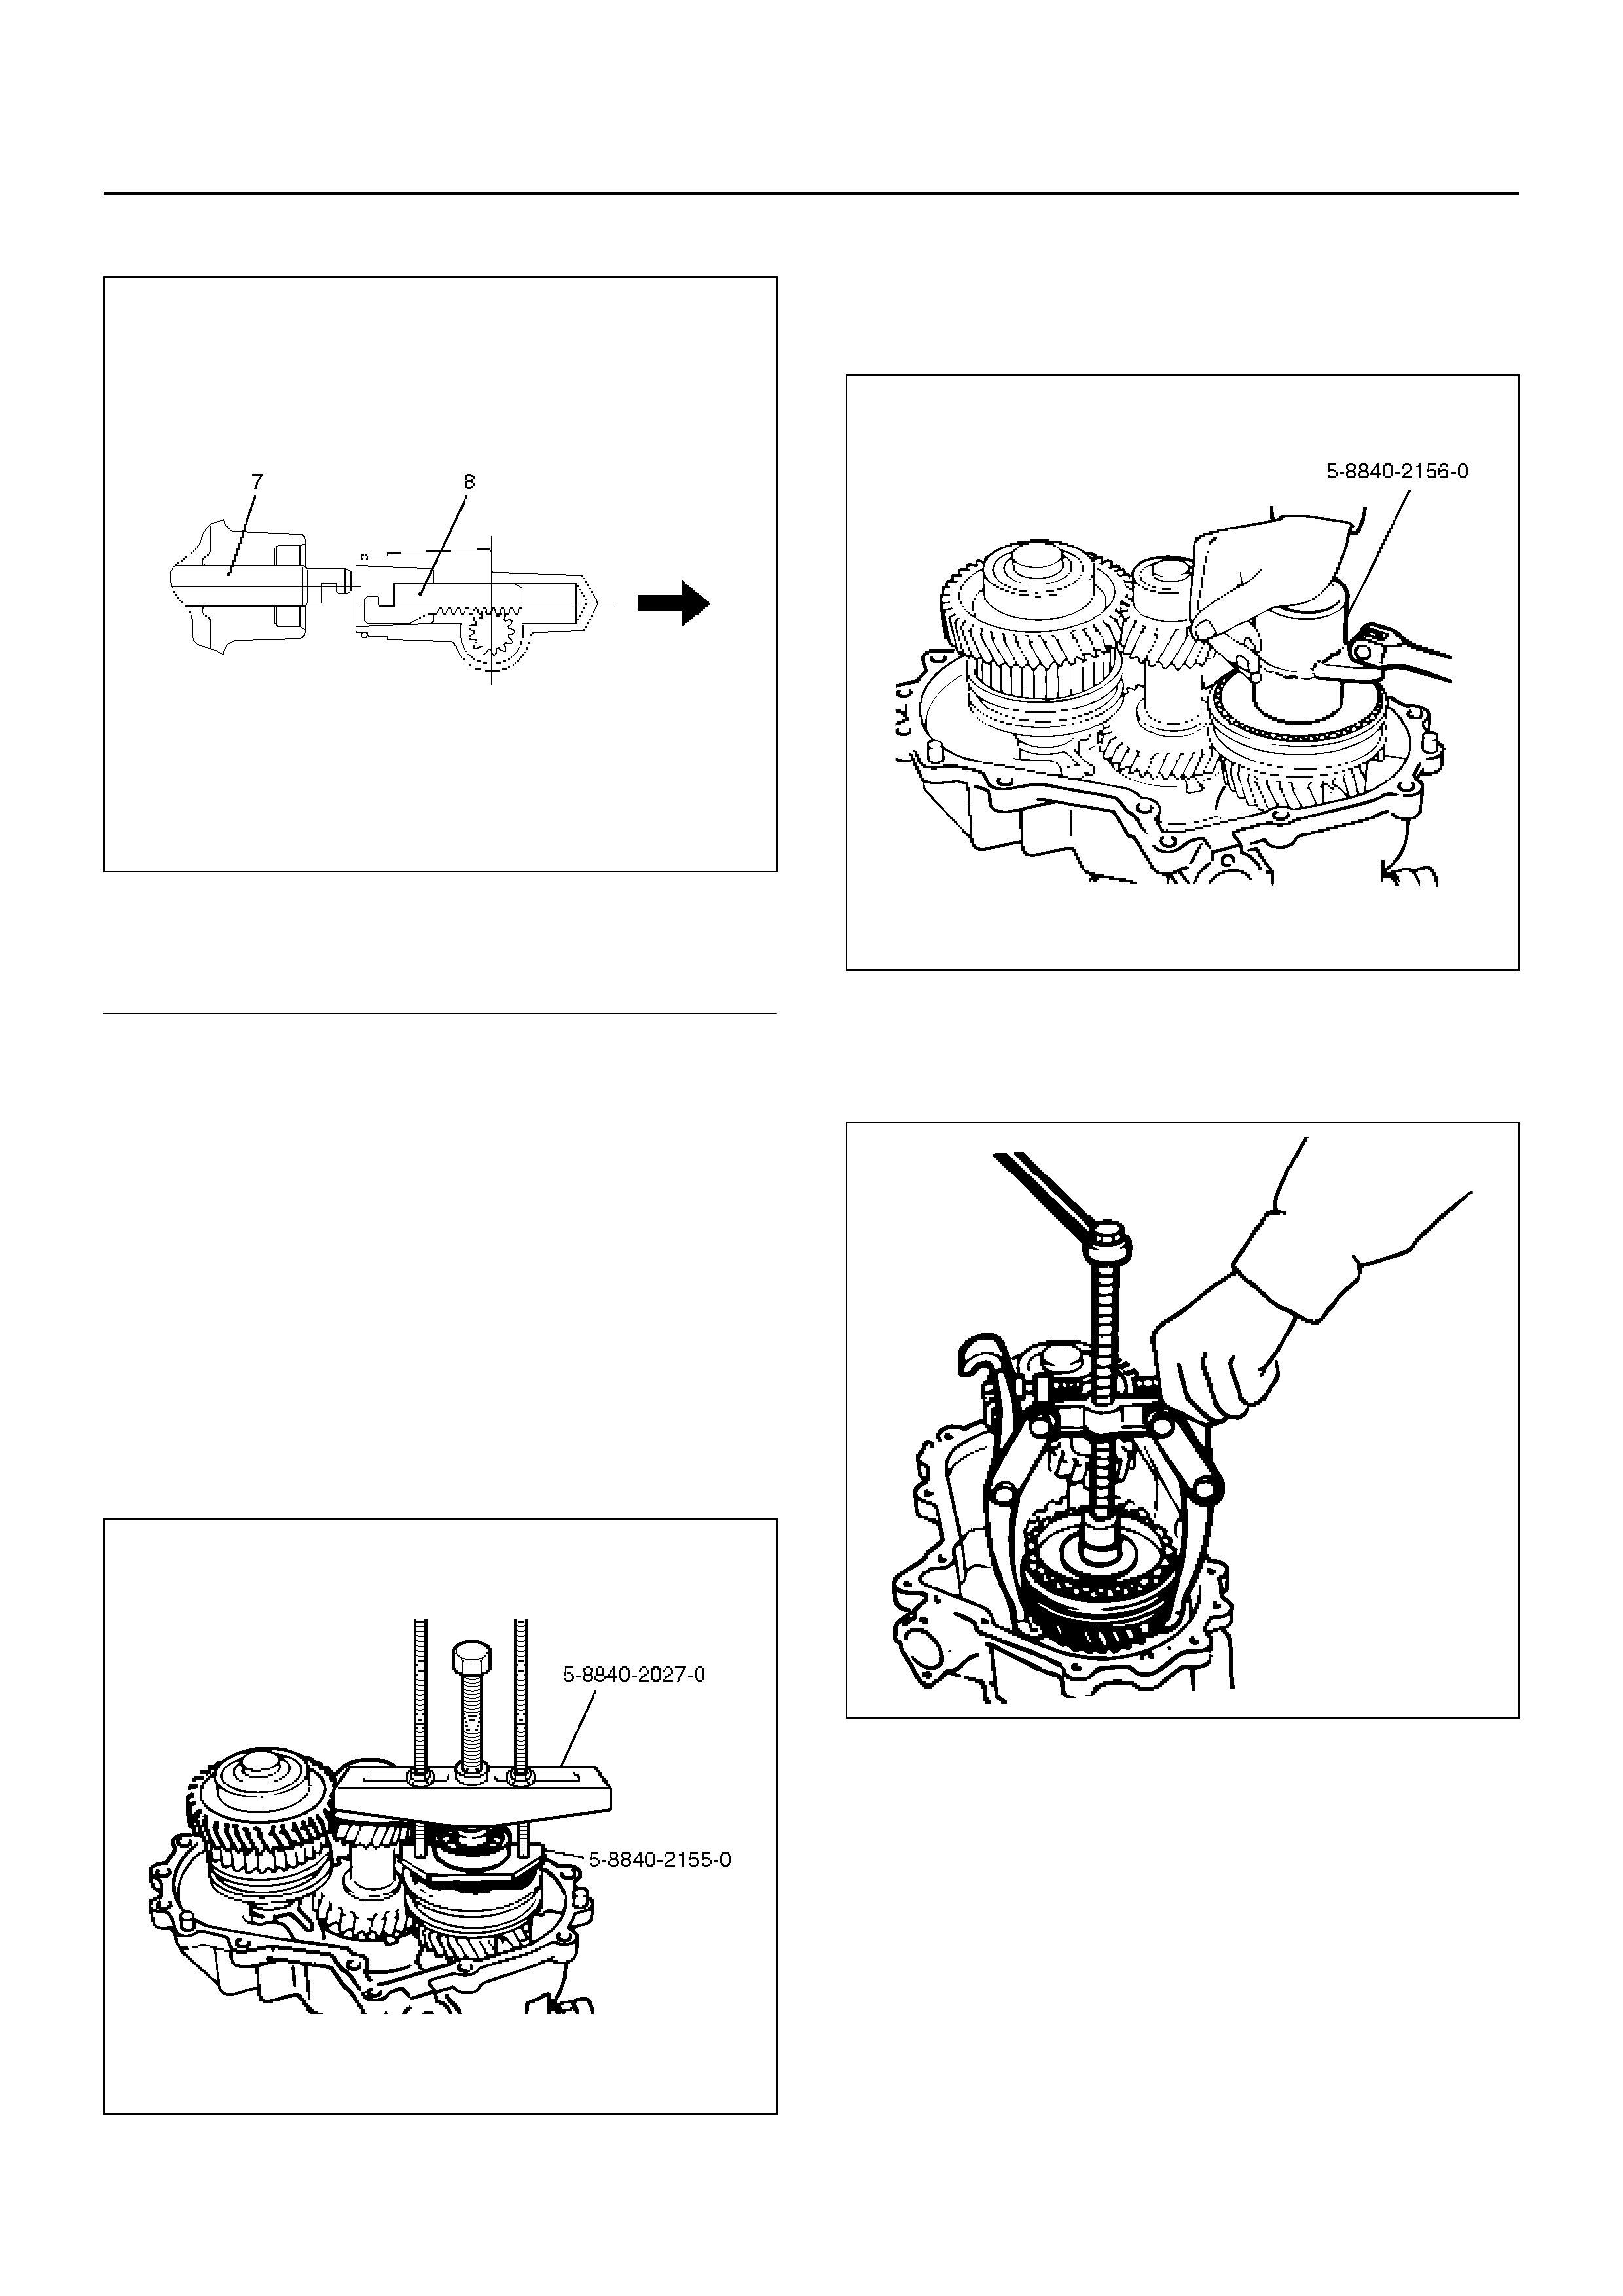
13. Use a pair o f snap ring pl iers to remo ve the bear ing
snap r ing(14).
14. Use a bearing remover 5–8840–2155–0 and puller
5–8840–2027–0 to remove the ball bearing(15).
262RW069
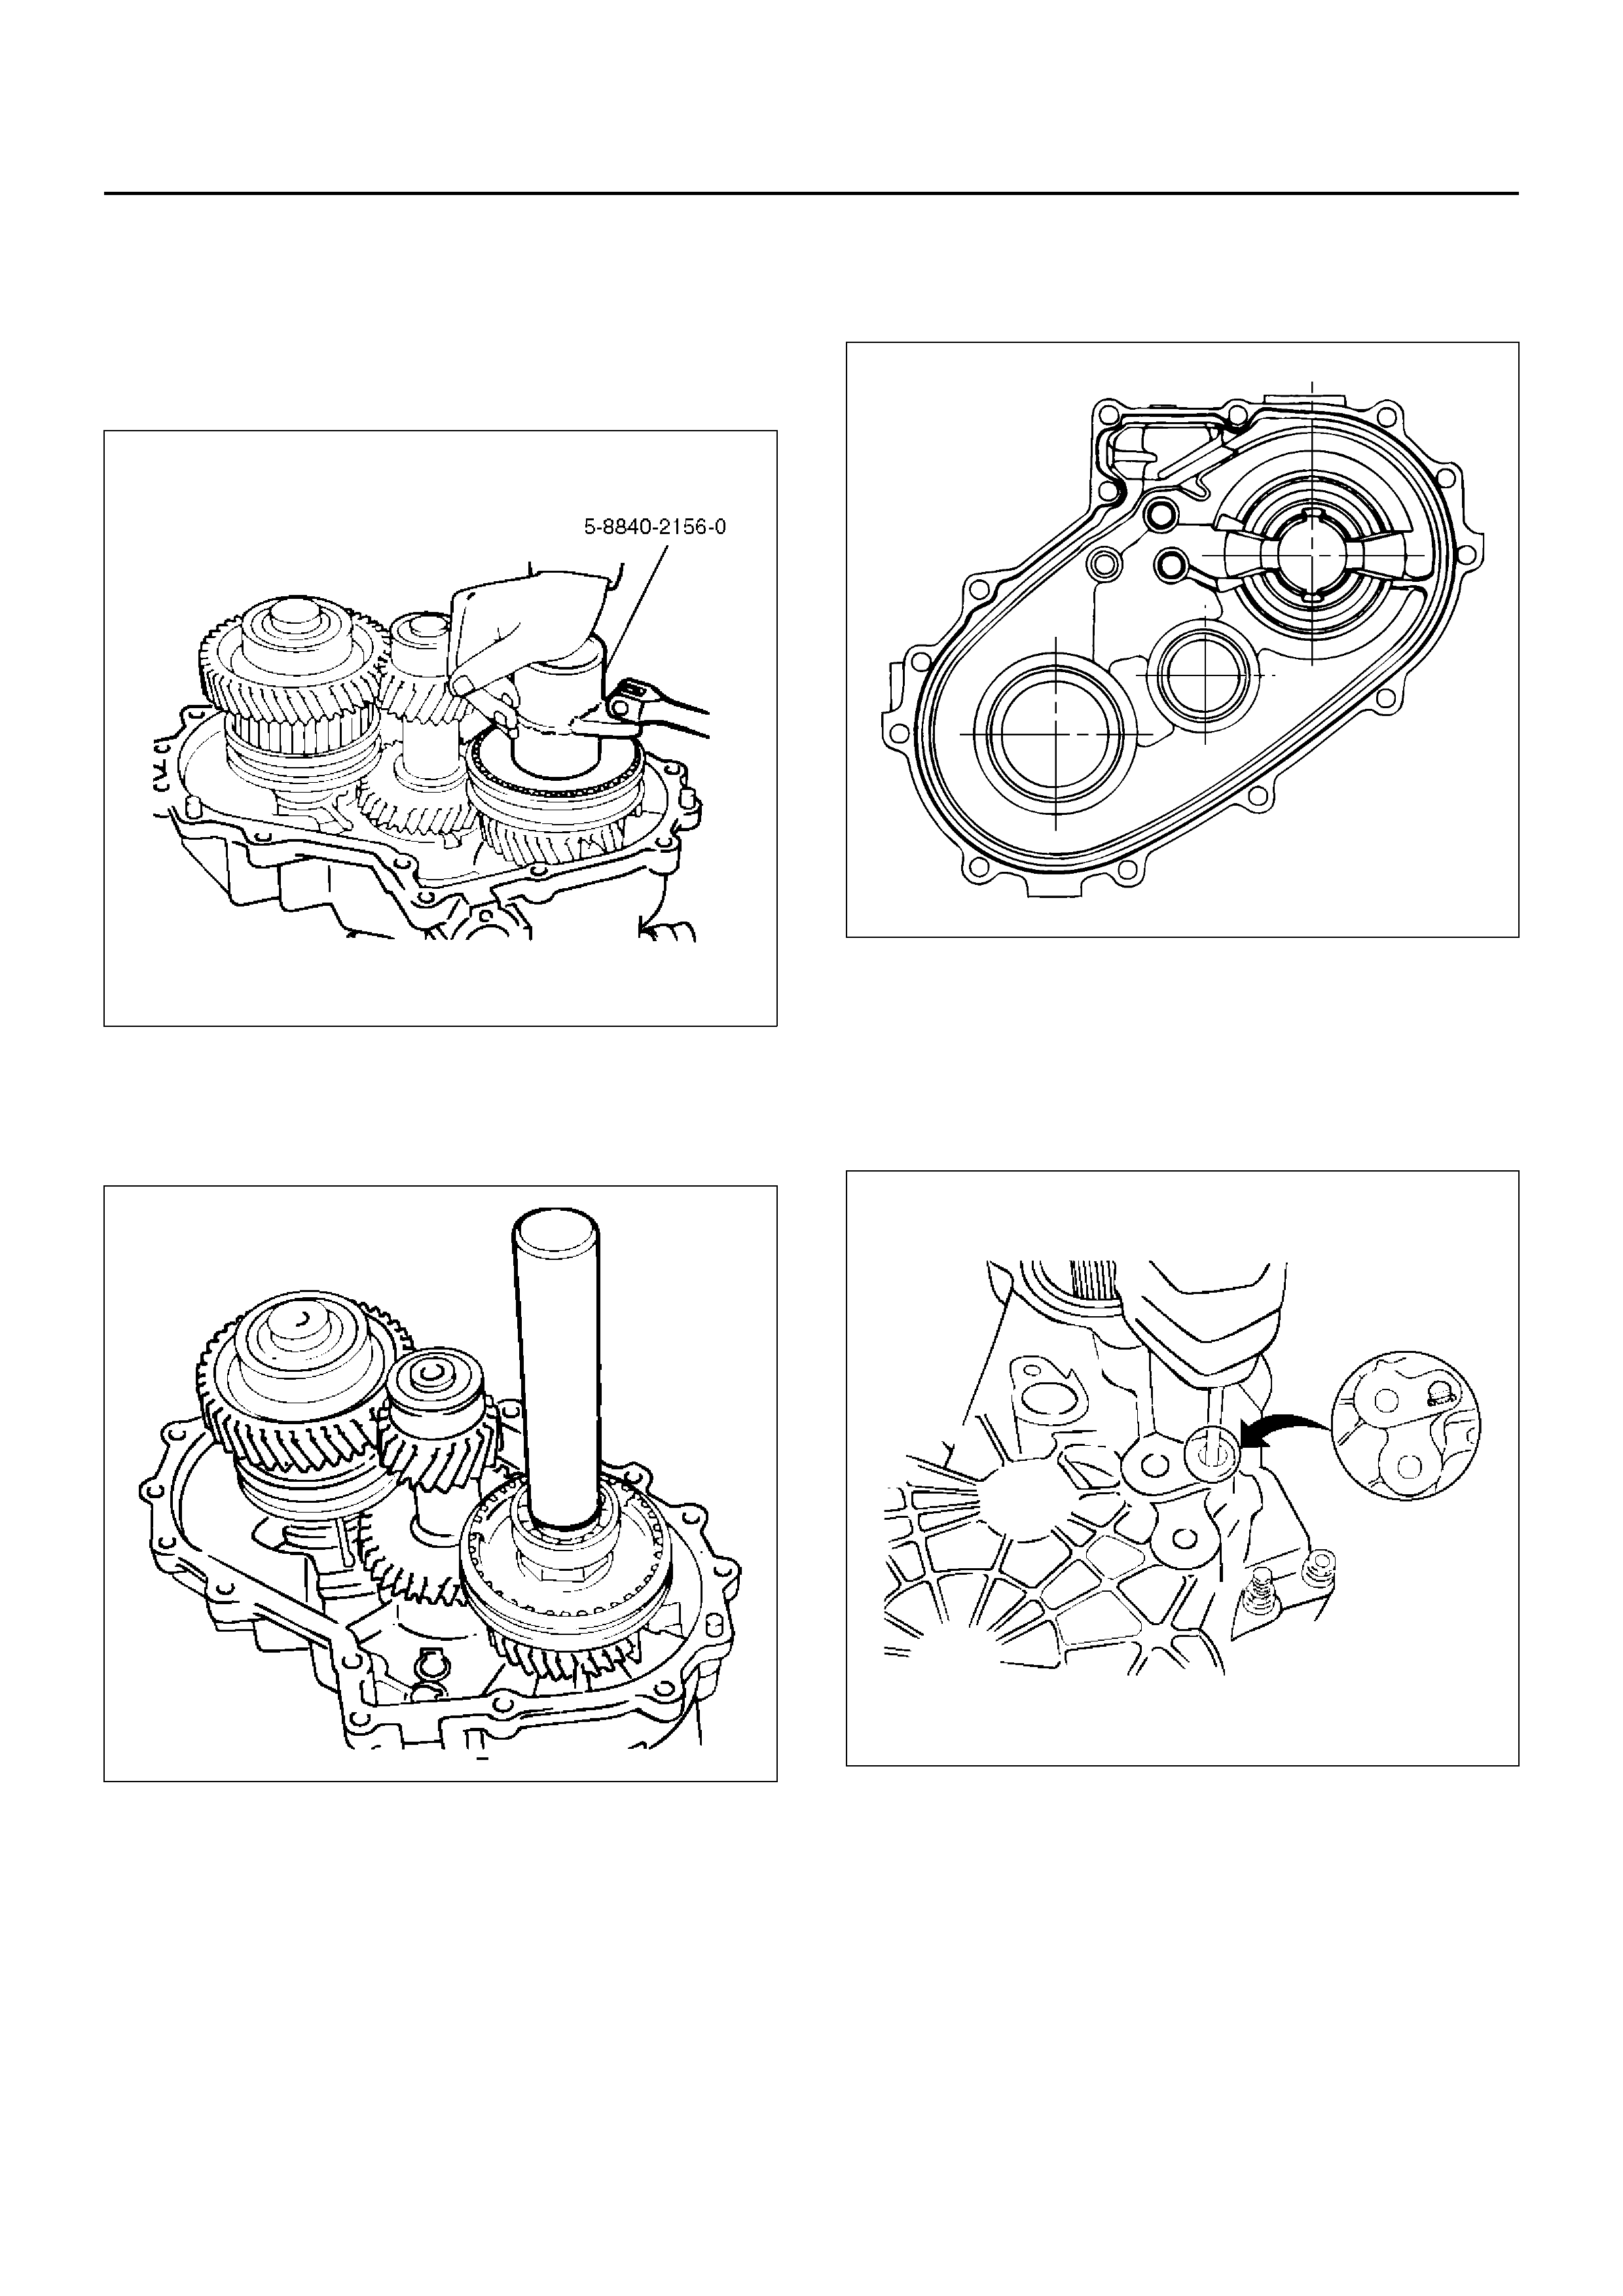
15. Install the front companion flange temporarily.
Use the flan ge holder 5–8840–01 33–0 and lock nut
wrench 5–8840–2156–0 to remove the lock nut(16).
Remove the front companion flange.
226RW190
16. Remove high-low clutch sleeve(17).
Use the universal puller to remove the high-low
clutch hub(17) and transfer input gear(18).
226RS070
Legend
(7) Position: 4WD
(8) Mode: 2WD
17. Remove needle bearing(19), bearing collar(20),
ball(21), and plate(22).
226RS071
18. Use a pair of snap ring pliers to remove the bearing
snap ring(23).
19. Use a plastic hammer to tap the front output gear
assembly(24) free.
262RS009
20. Remove bearing snap ring(25) by using a pair of
snap ring pliers.
21. Remove the counter gear assembly(26) from the
transfer case(28).
22. Remove the transfer case assembly(28) from the
transmission case.
•Refer to Transfer Case Assembly in Drive Line/
Axle section for repair of transfer case assembly.
23. Pull out intermediate plate with gear assembly(29)
from transmission case.
REASSEMBLY
1. Apply recommended liquid gasket (LOCTITE
17430) or its equivalent to the transmission
case(30), intermediate plate(29) and transfer
case(28) fitting surfaces.
2. Install the intermediate plate with gear assembly(29)
to the transmission case(30).
Pull out the top gear shaft until the ball bearing snap
ring groove protrudes from the transmission case
front cover fitting face.
Avoid subjecting the mainshaft to sudden shock or
stress.
3. Install the transfer case assembly(28) to the
intermediate plate with gear assembly.
Tighten the eight transmission-transfer case bolts to
the specified torque.
Torque: 37N·m (3.8kg·m/27lbft)
Refer to Transfer Rear Case Assembly in Drive
Line/Axle section for oil seal rep lacement.
4. Install the co unter gea r assembly(26 ) to th e tr a nsf er
case(28).
5. Use a pair of snap ring pliers to install the snap
ring(25) to the transfer case(28).
NOTE: The snap ring must be fully inserted into the
transfer case snap ring groove.
6. Install front output gear assembly(24).
7. Use a pair of snap r ing p liers to i nstall the s nap r ing
(23) to the transfer case(28).
NOTE: The snap ring must be fully inserted into the
transfer case snap ring groove.
8. Install plate(22), ball(21), bearing collar(20), needle
bearing(19), and transfer input gear(18).
9. Install High-low clutch hub and sleeve(17).
The clutch hub face (with the heavy boss) must be
facing the tra ns fer input gear side.
226RW152
10. Install the front companion flange temporarily.
• Use the flange holder 5–8840–0133–0 and lock
nut wrench 5–8840–2156–0 to install the lock
nut(16).
Torque: 137N·m
226RW190
11. Use the punch to stake the lock nut at one spot.
12. Use a suitable drift and hammer to install the ball
bearing(15).
226RS079
13. Use a pair of snap ring pliers to install the bearing
snap ring(14).
14. Regarding detent, shift arm, and interlock pin(13)
assembly, refer to Detent, Shift Arm, and Interlock
Pin in Drive Line/Axle section.
15. Apply recommended liquid gasket (LOCTITE
17430) or its equivalent to the transfer rear case
fitting faces.
220RS017
16. Perform the following steps before fitting the transfer
rear cove r(11):
1. Shift the High-Low shift rod to the 4H side.
2. The cut-away portion of select rod head should
align with the rear case hole's stopper.
230RS002
17. Tighten the eleven transfer rear case bolts to the
specified torque.
Torque: 37N·m

18. Install 2WD–4WD actuator assembly(11) by
perfor ming the foll owi ng steps.
1. Shift the 2WD–4WD shift rod to the 4WD side.
2. Join the rod grooves of 2WD–4WD actuator
assembly and shift rod.
220RW030
EndOFCallout
3. Push the 2WD–4WD actuator assembly with
2WD–4WD shift rod till the sh ift rod reaches th e
2WD position.
220RW031
EndOFCallout
4. Tighten the 2WD–4WD actuator bolts to the
specified torque.
Torque: 19N·m
5. Connect the actuator breather hose to actuator.
19. Install a new packing and gear control box
assembly(10).
Install the harness clips and brackets and then
tighten four new gear control box bolts to the
specified torque.
Torque: 20N·m (2.0kg·m/14lbft)
261RW043
Legend
(11) Shift Rod: 2WD–4WD (Position: 4WD)
(12) 2WD–4WD Actuator Assembly (Mode: 2WD)
(13) Rear Case Assembly
Legend
(14) Position: 2WD
(15) Mode: 2WD
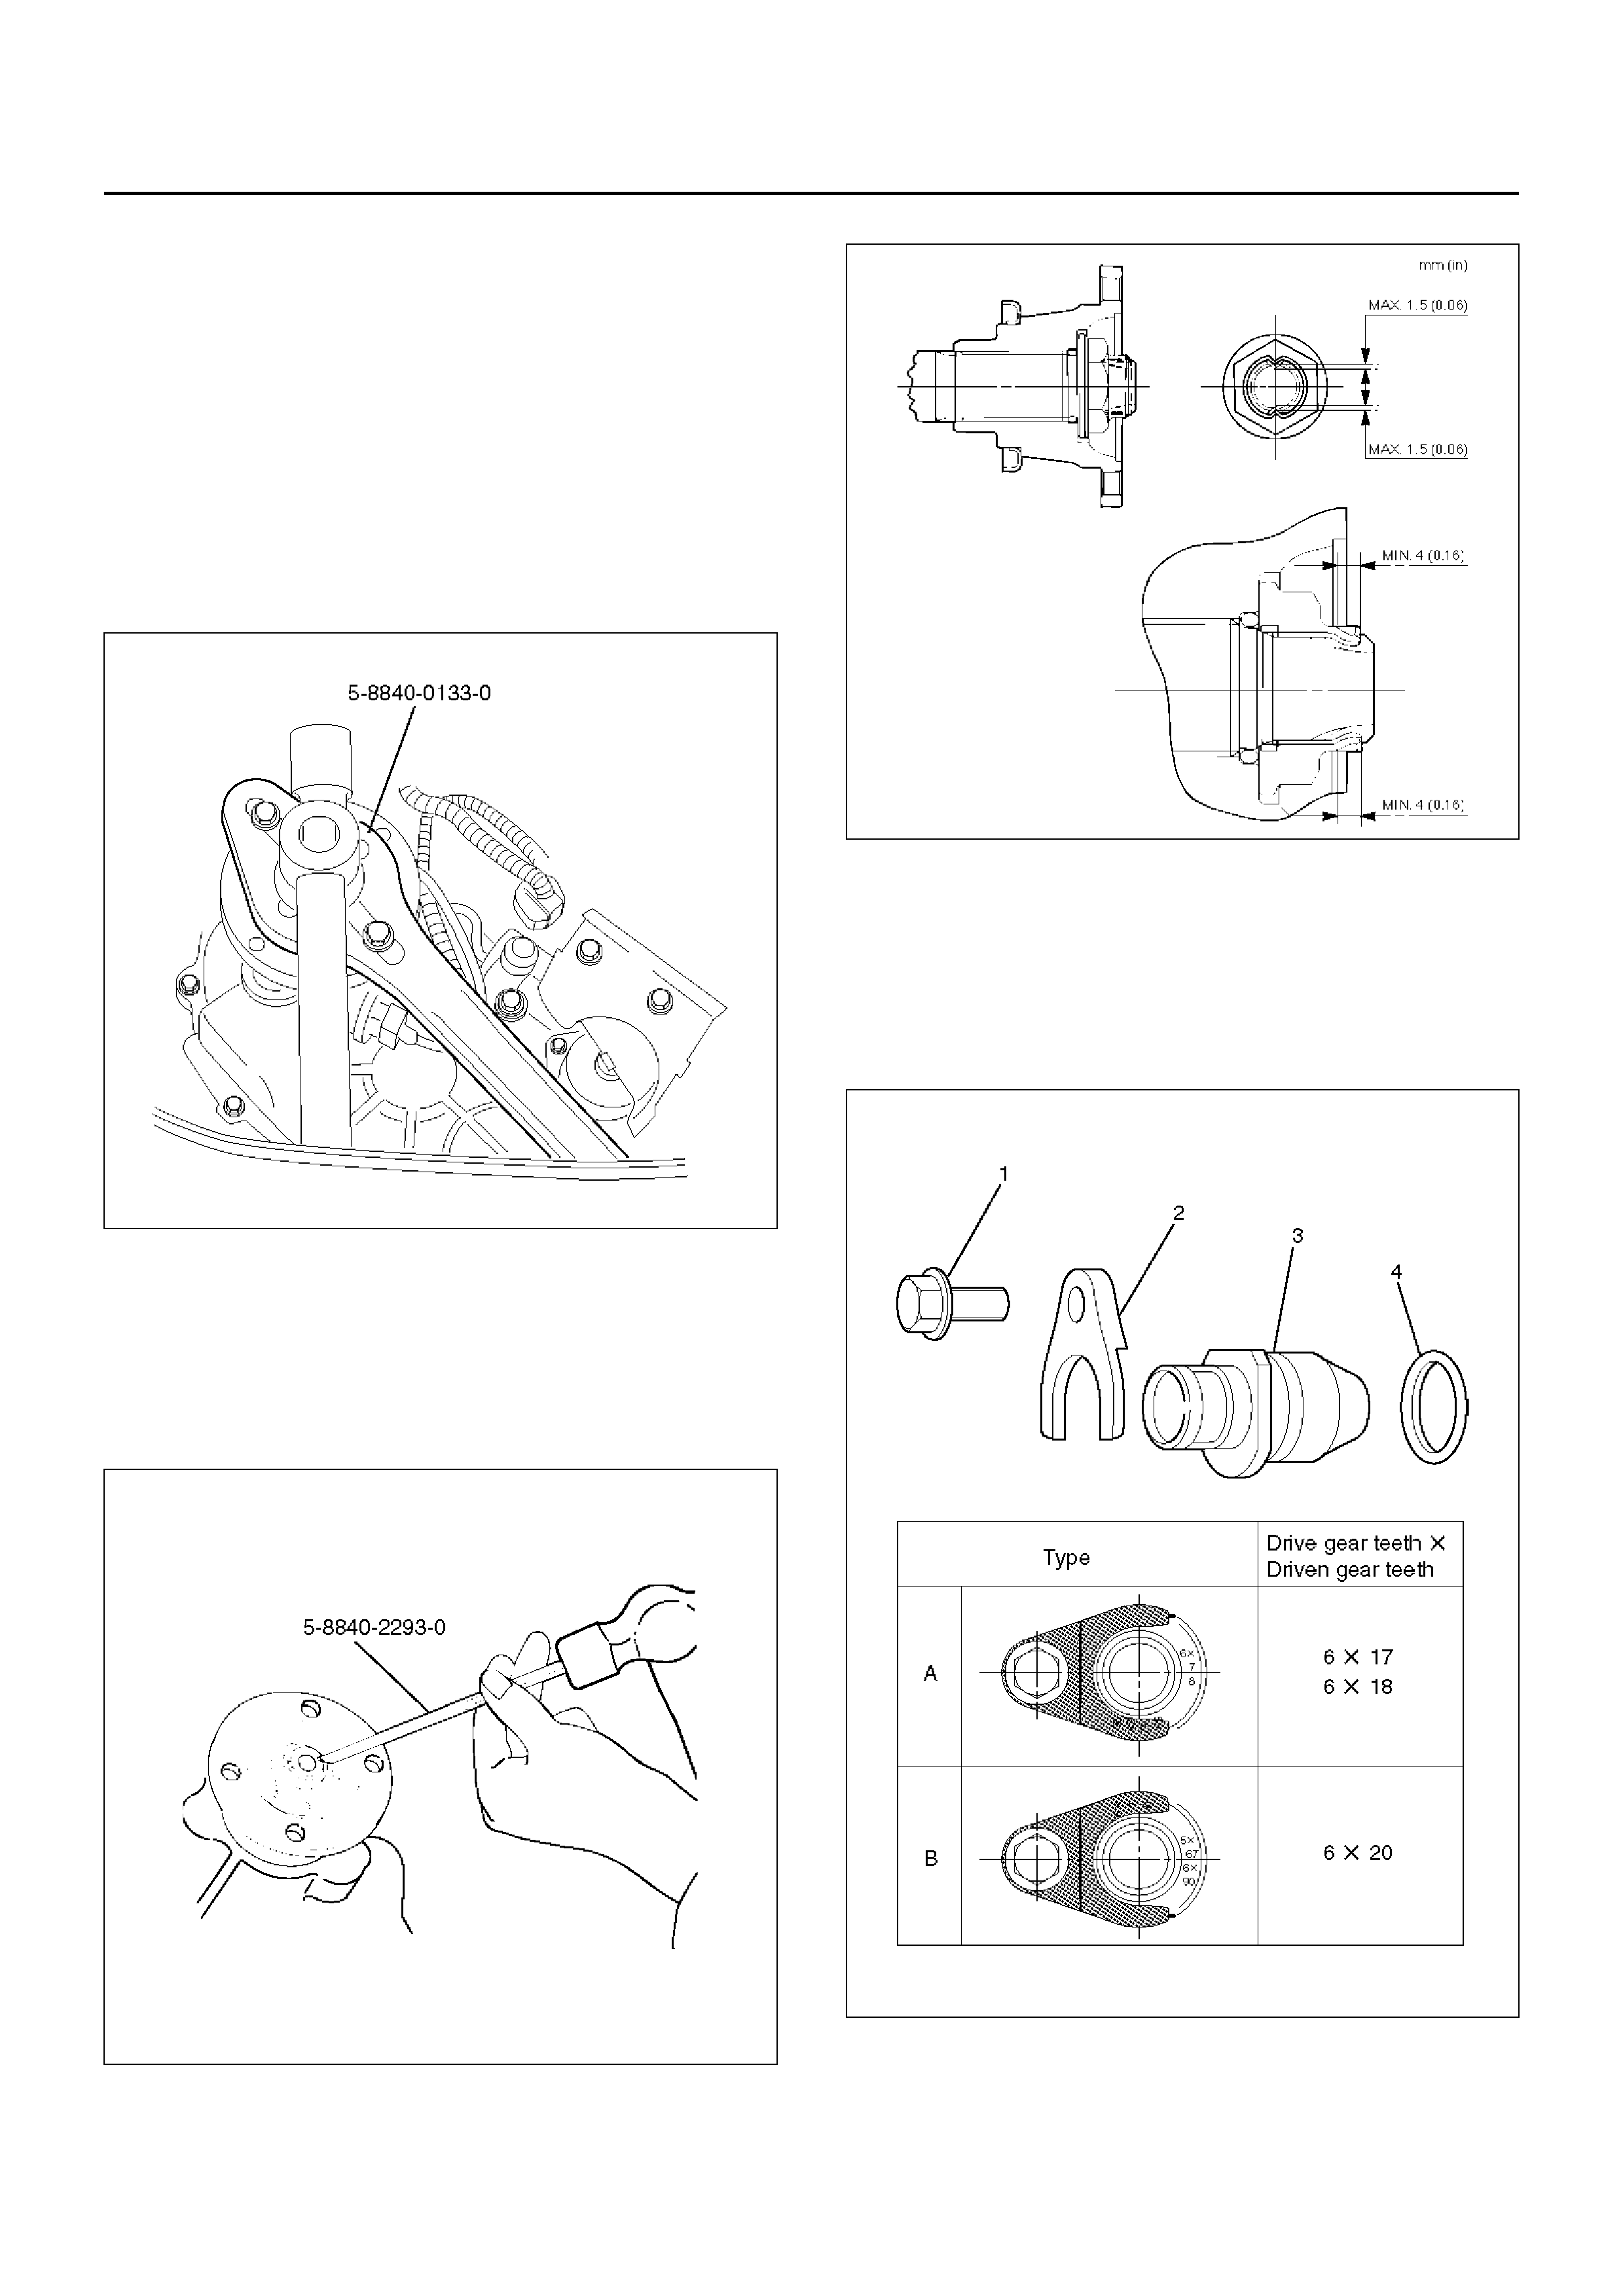
20. Install the rear and front companion flange(9) (8).
Install the O-ring(9).
Use the flange holder J–8614–11 to tighten the
flange nuts(9) (8) to the transfer case.
Tighten new transfer flange nuts(9) (8) to the
specified torque.
Rear Companion Flange
Torque: 167N·m
Front Companion Flange
Torque: 137N·m
266RW026
21. Use the punch 5–8840–2293–0 to stake the rear
companion flange nut at two spots.
• Stake the front companion flange nut at one spot.
NOTE: Be sure to confirm that there is no crack at th e
staked portion of the flange nut after staking.
266RW027
266RS003
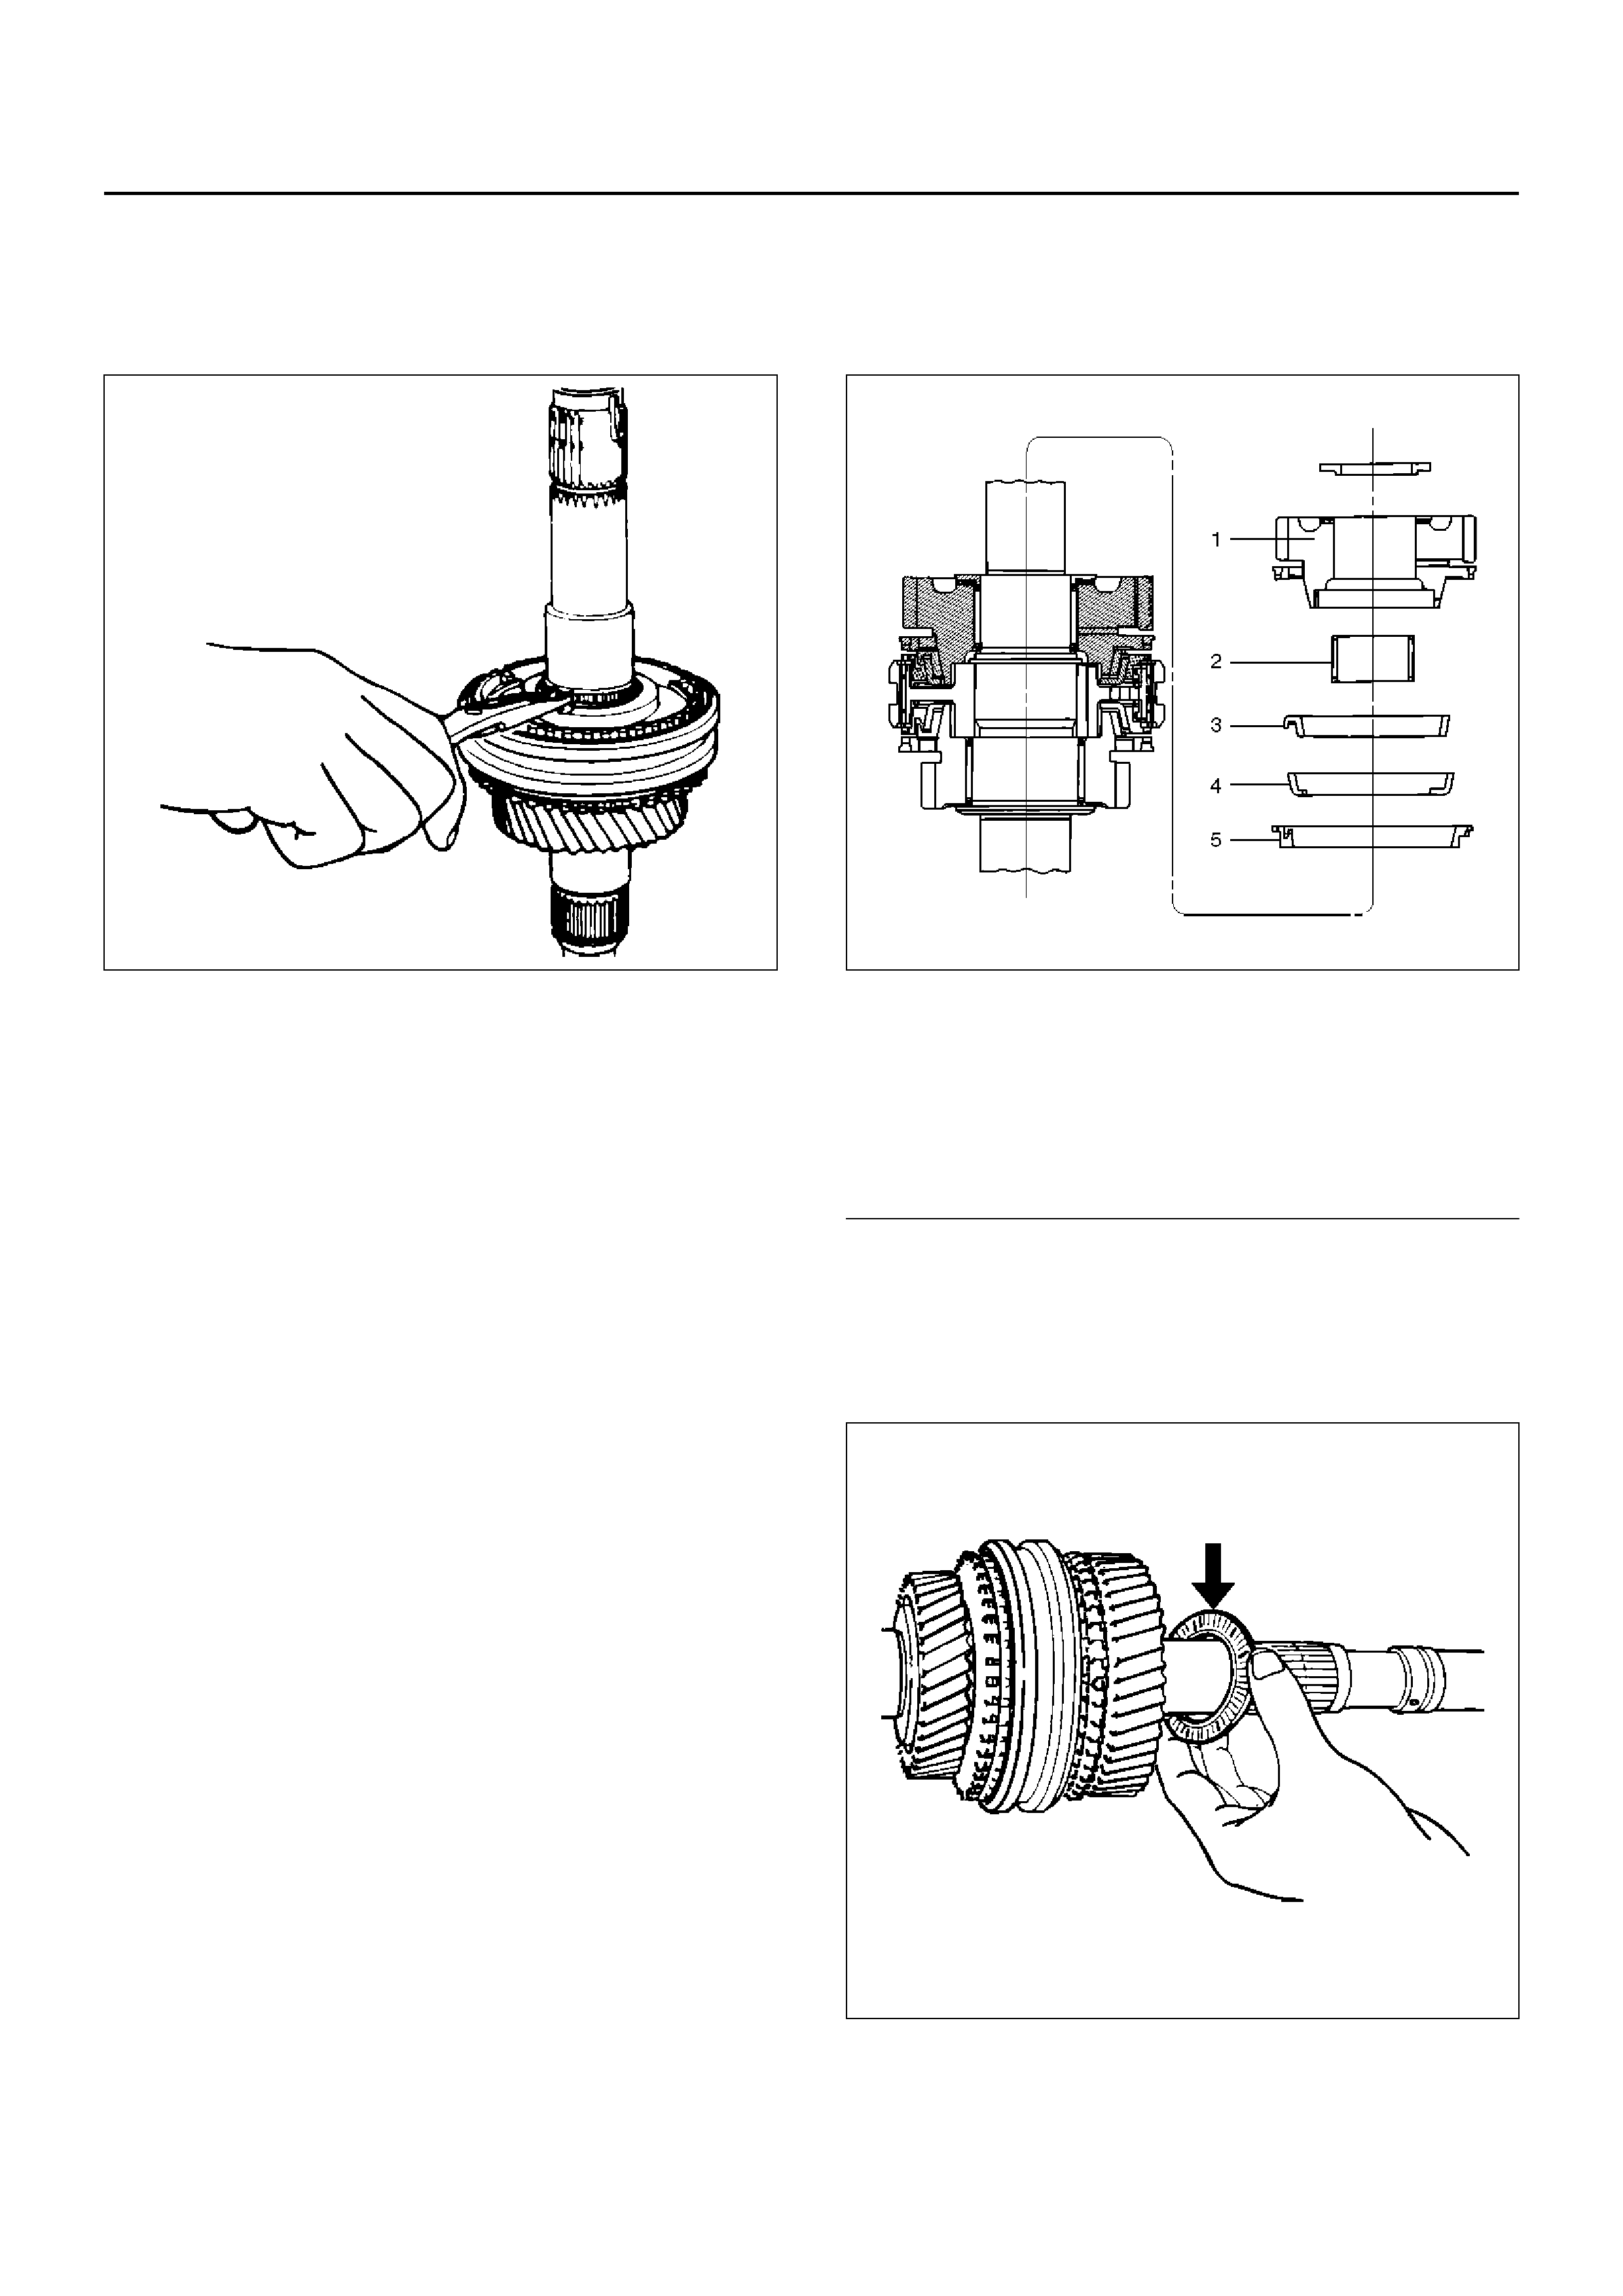
22. Install the O-ring (4) to the speedometer driven gear
bushing(3).
Install the driven gear to the speedometer driven
gear bushing(3).
Install the speedometer driven gear assembly(7) to
the transfer rear cover.
225RW008
23. Install the plate to the transfer rear cover.
Torque: 15N·m
24. Install the speedometer sensor.
Torque: 27N·m
25. Install top gear bearing snap ring(6) and counter
front bearing snap ring(5).
Use a pair of snap ring pliers to install the snap rings
to the mainshaft and countershaft.
The snap rings must be fully inserted into the
bearing snap ring groove.
26. Install a new packing and front cover (with oil seal)
(4) to the transmission case.
NOTE: Take care not to damage the oil seal.
Notes When Tightening the Bolt:
• After cleaning the bolt hole, dry it thoroughly with air .
• After cleaning the screw face of a removed bolt or
new one, dry it thoroughly. Apply recommended
liquid gasket (LOCTITE 242) or its equivalent before
tightening it.
Tighten six new front cover bolts to the specified
torque.
Torque: 25N·m
27. Install the fulcrum bridge(3) to the transmission
case.
Tighten three fulcrum bridge bolts to the specified
torque.
Torque: 38N·m
220RS009
28. Apply grease to the pin hole inner circumferences
and thrust surfaces.
Attach the shift fork(2) to the fulcrum bridge(3) by
inserting the shift fork pin from the bottom side of
the fulcrum bridge.
Install the washer and snap pin.
201RS018
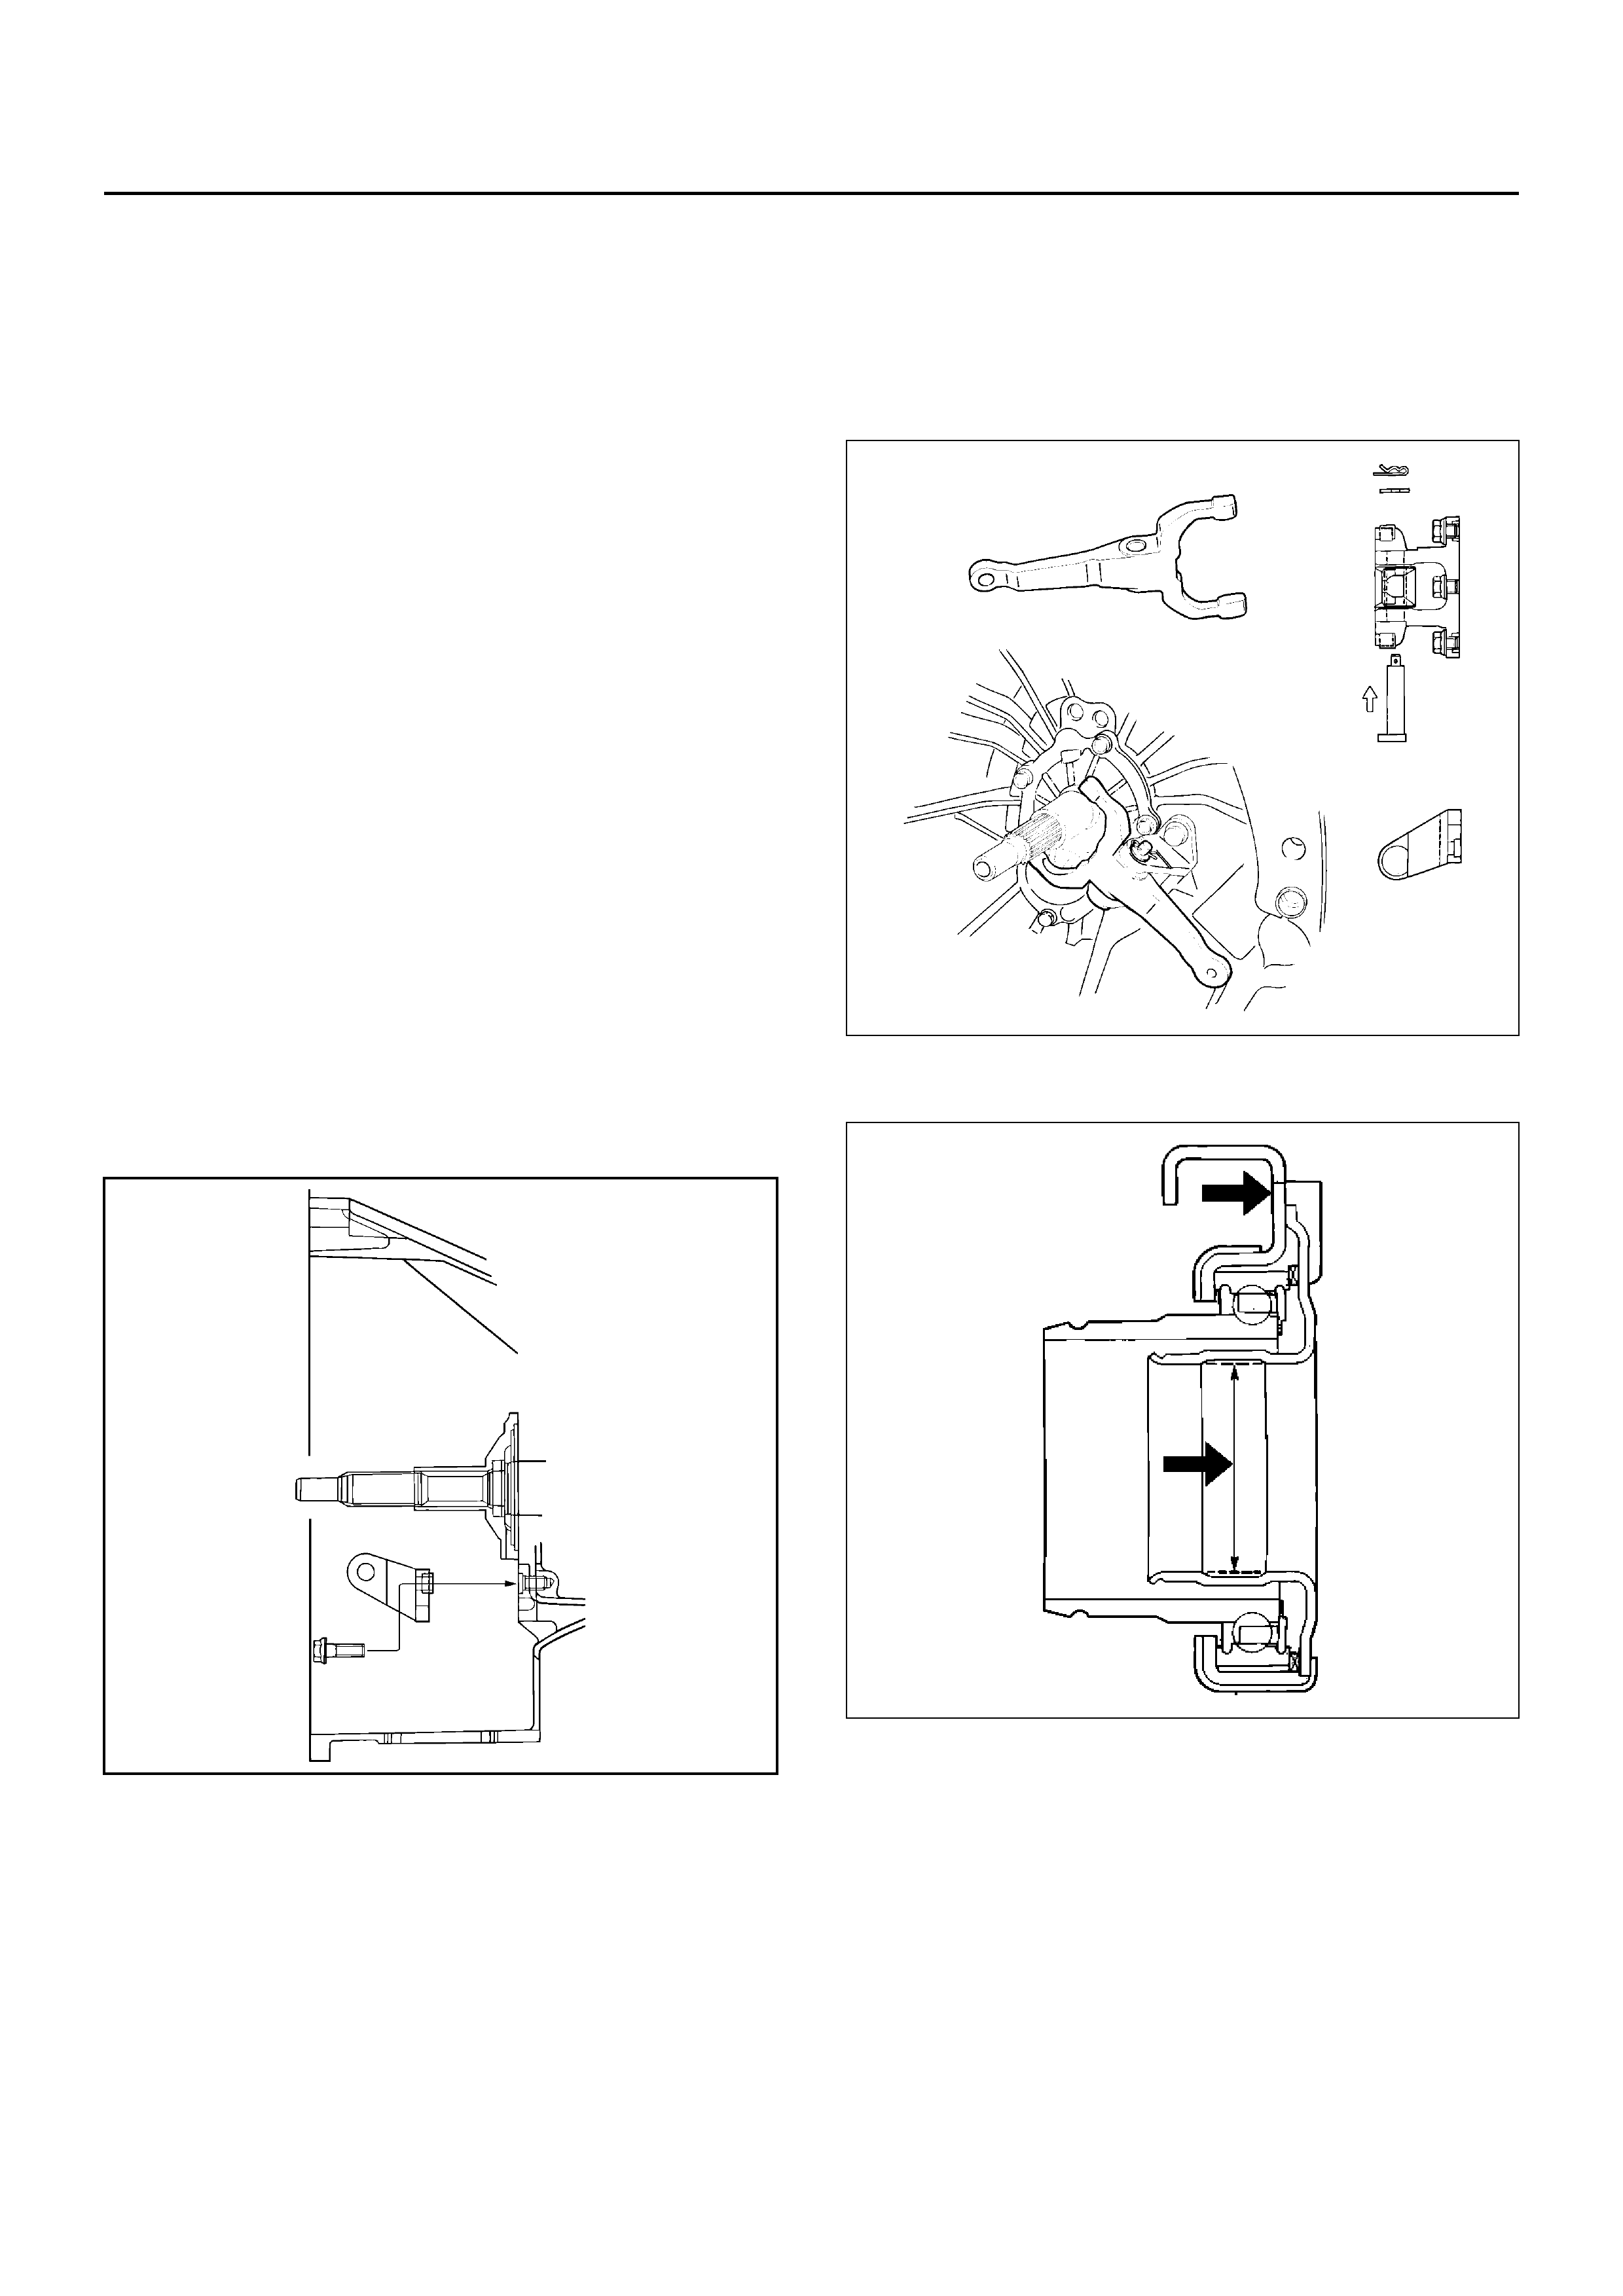
29. Apply grease to the areas shown in the figure.
201RW017
Install the release bearing(1) to the shift fork(2) in
the proper direction.
NOTE: Ensure release bearing is properly positioned
during installation, as shown in the figure.
201RS019
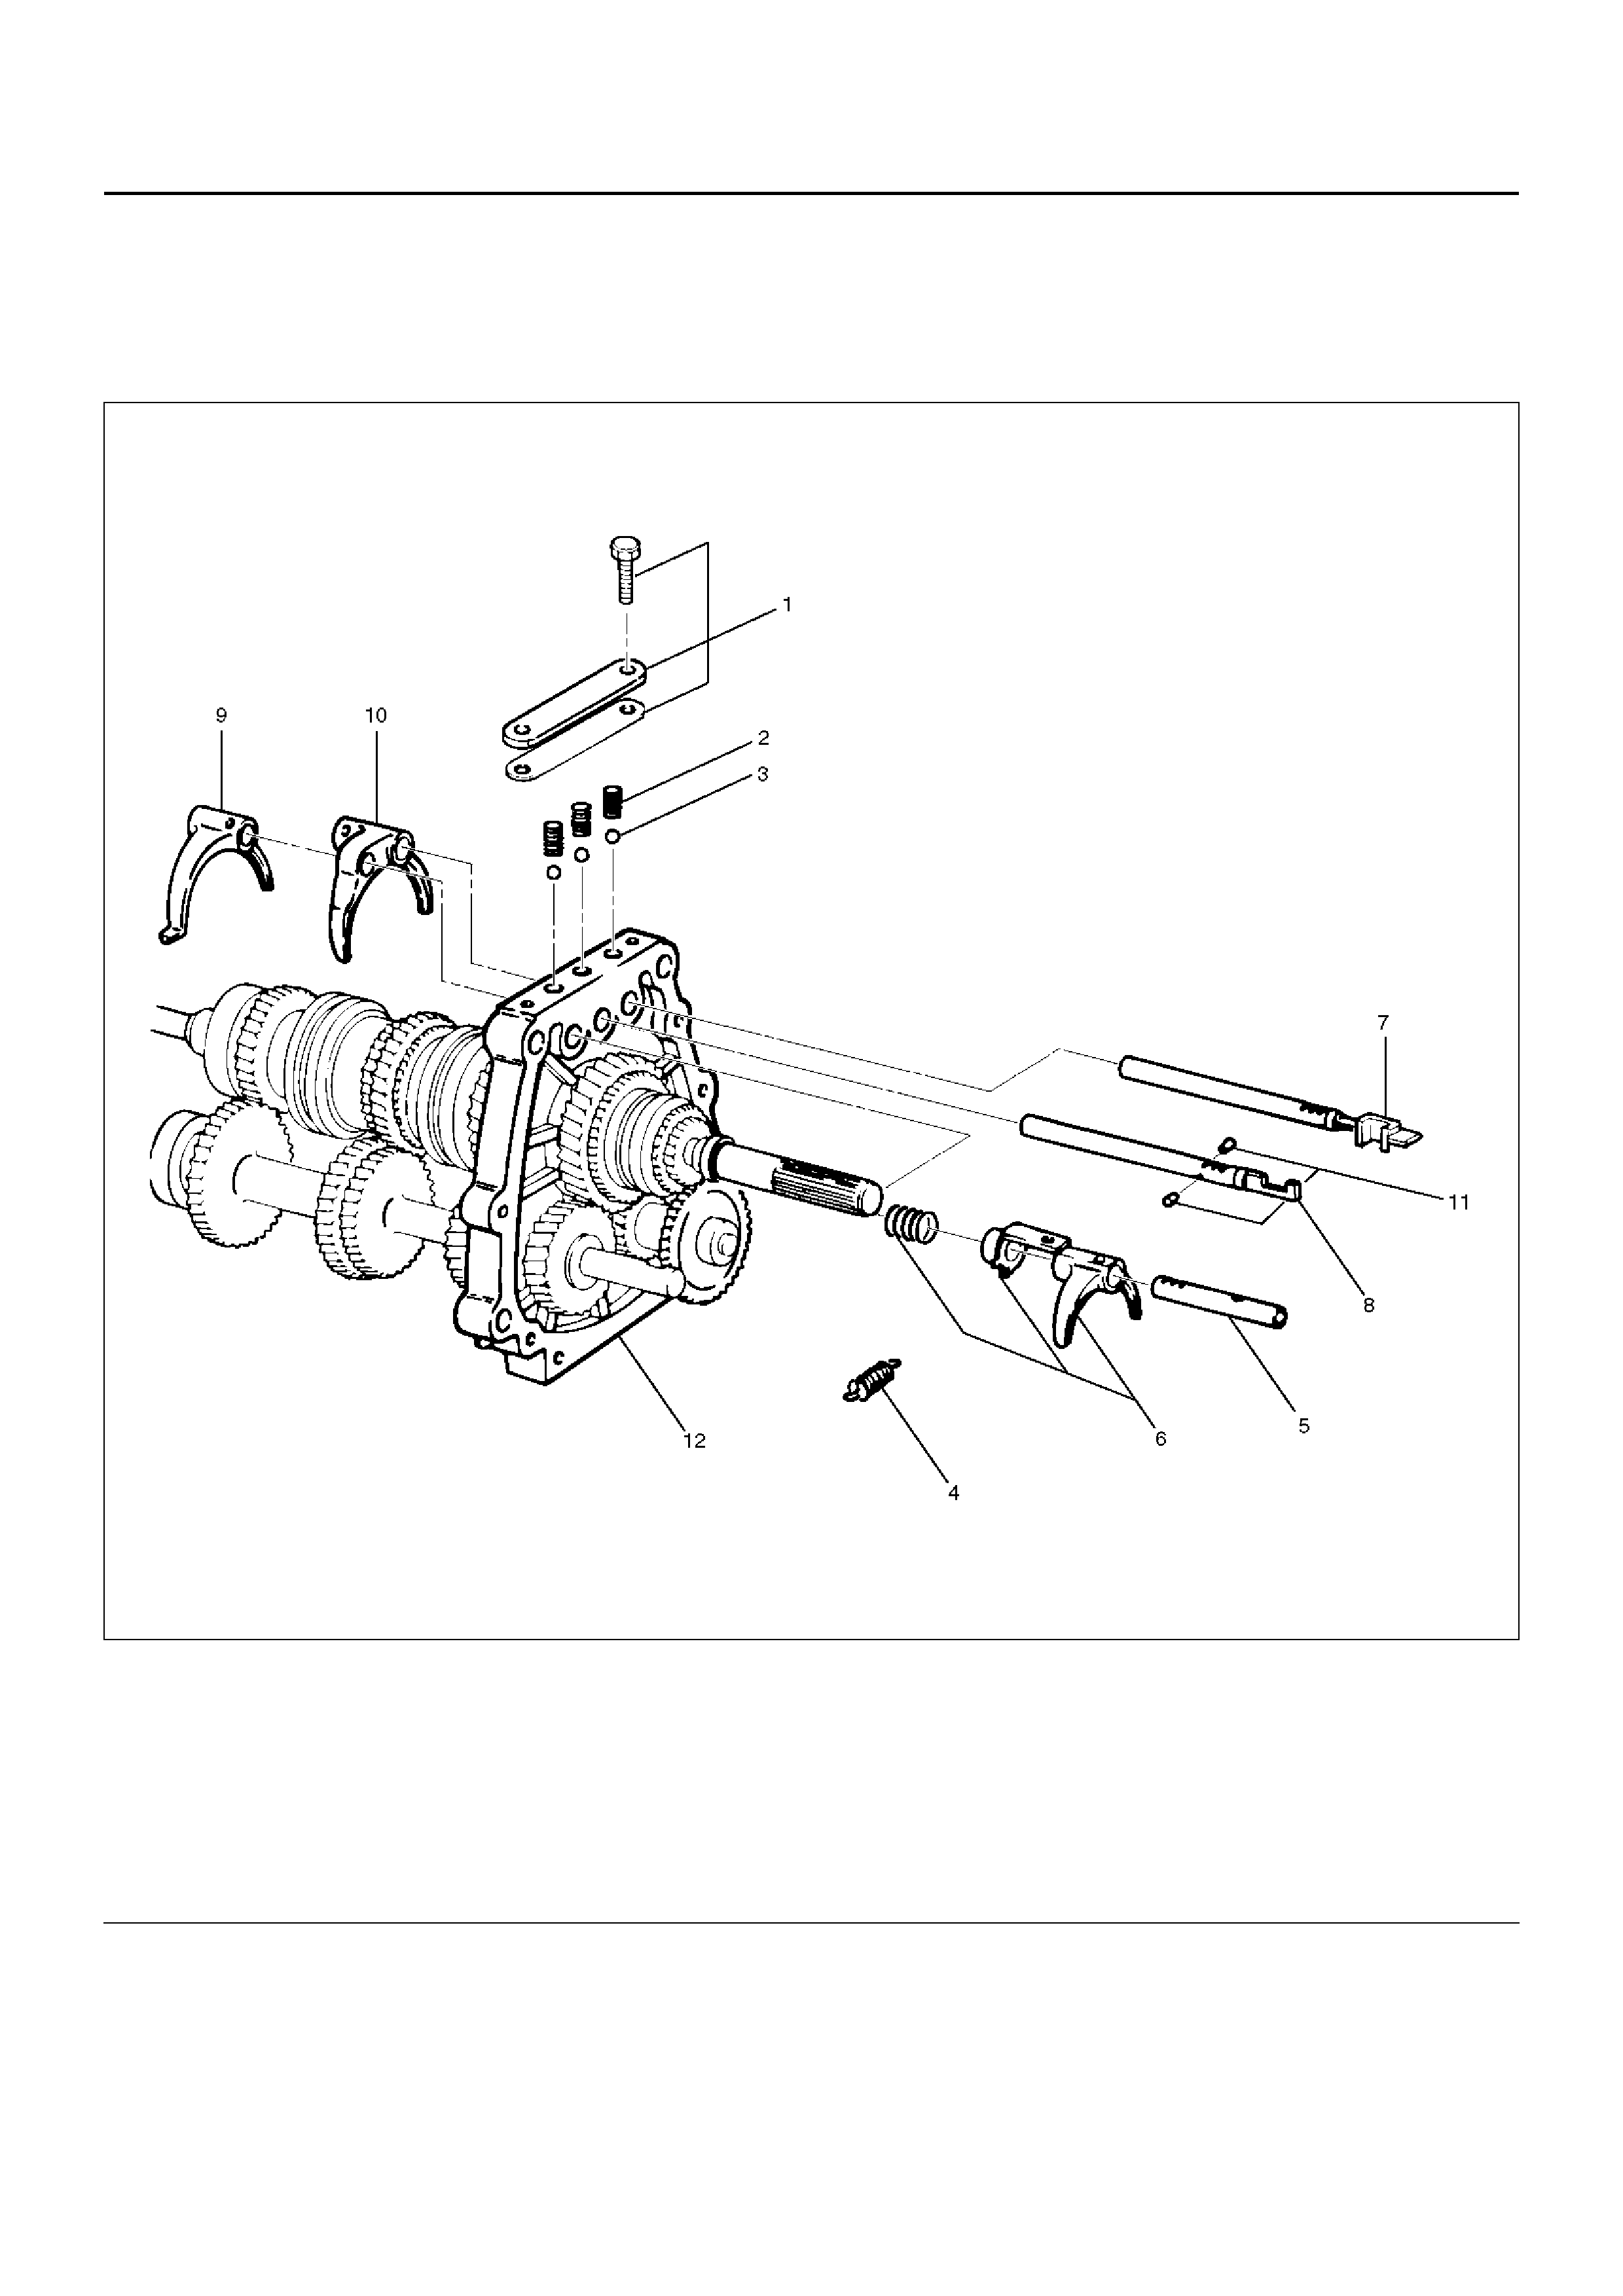
INTERMEDIATE PLATE WITH GEAR ASSEMBLY, DETENT, SHIFT
ARM, AND INTERLOCK PIN (MUA)
DISASSEMBLED VIEW
220RS010
EndOFCallout
Legend
(1) Detent Spri ng Pl ate and Gask et
(2) Detent Spring
(3) Detent Ball
(4) Spring
(5) Rev–5th Shift Rod
(6) Rev–5th Shift Arm and Reverse Inhibitor
(7) 1st–2 nd Shift Rod
(8) 3rd–4th Shift R od
(9) 3rd–4th Shift Ar m
(10) 1st–2 nd Shi ft Arm
(11) Interlock Pin
(12) Intermediate Plate and Gear Assembly
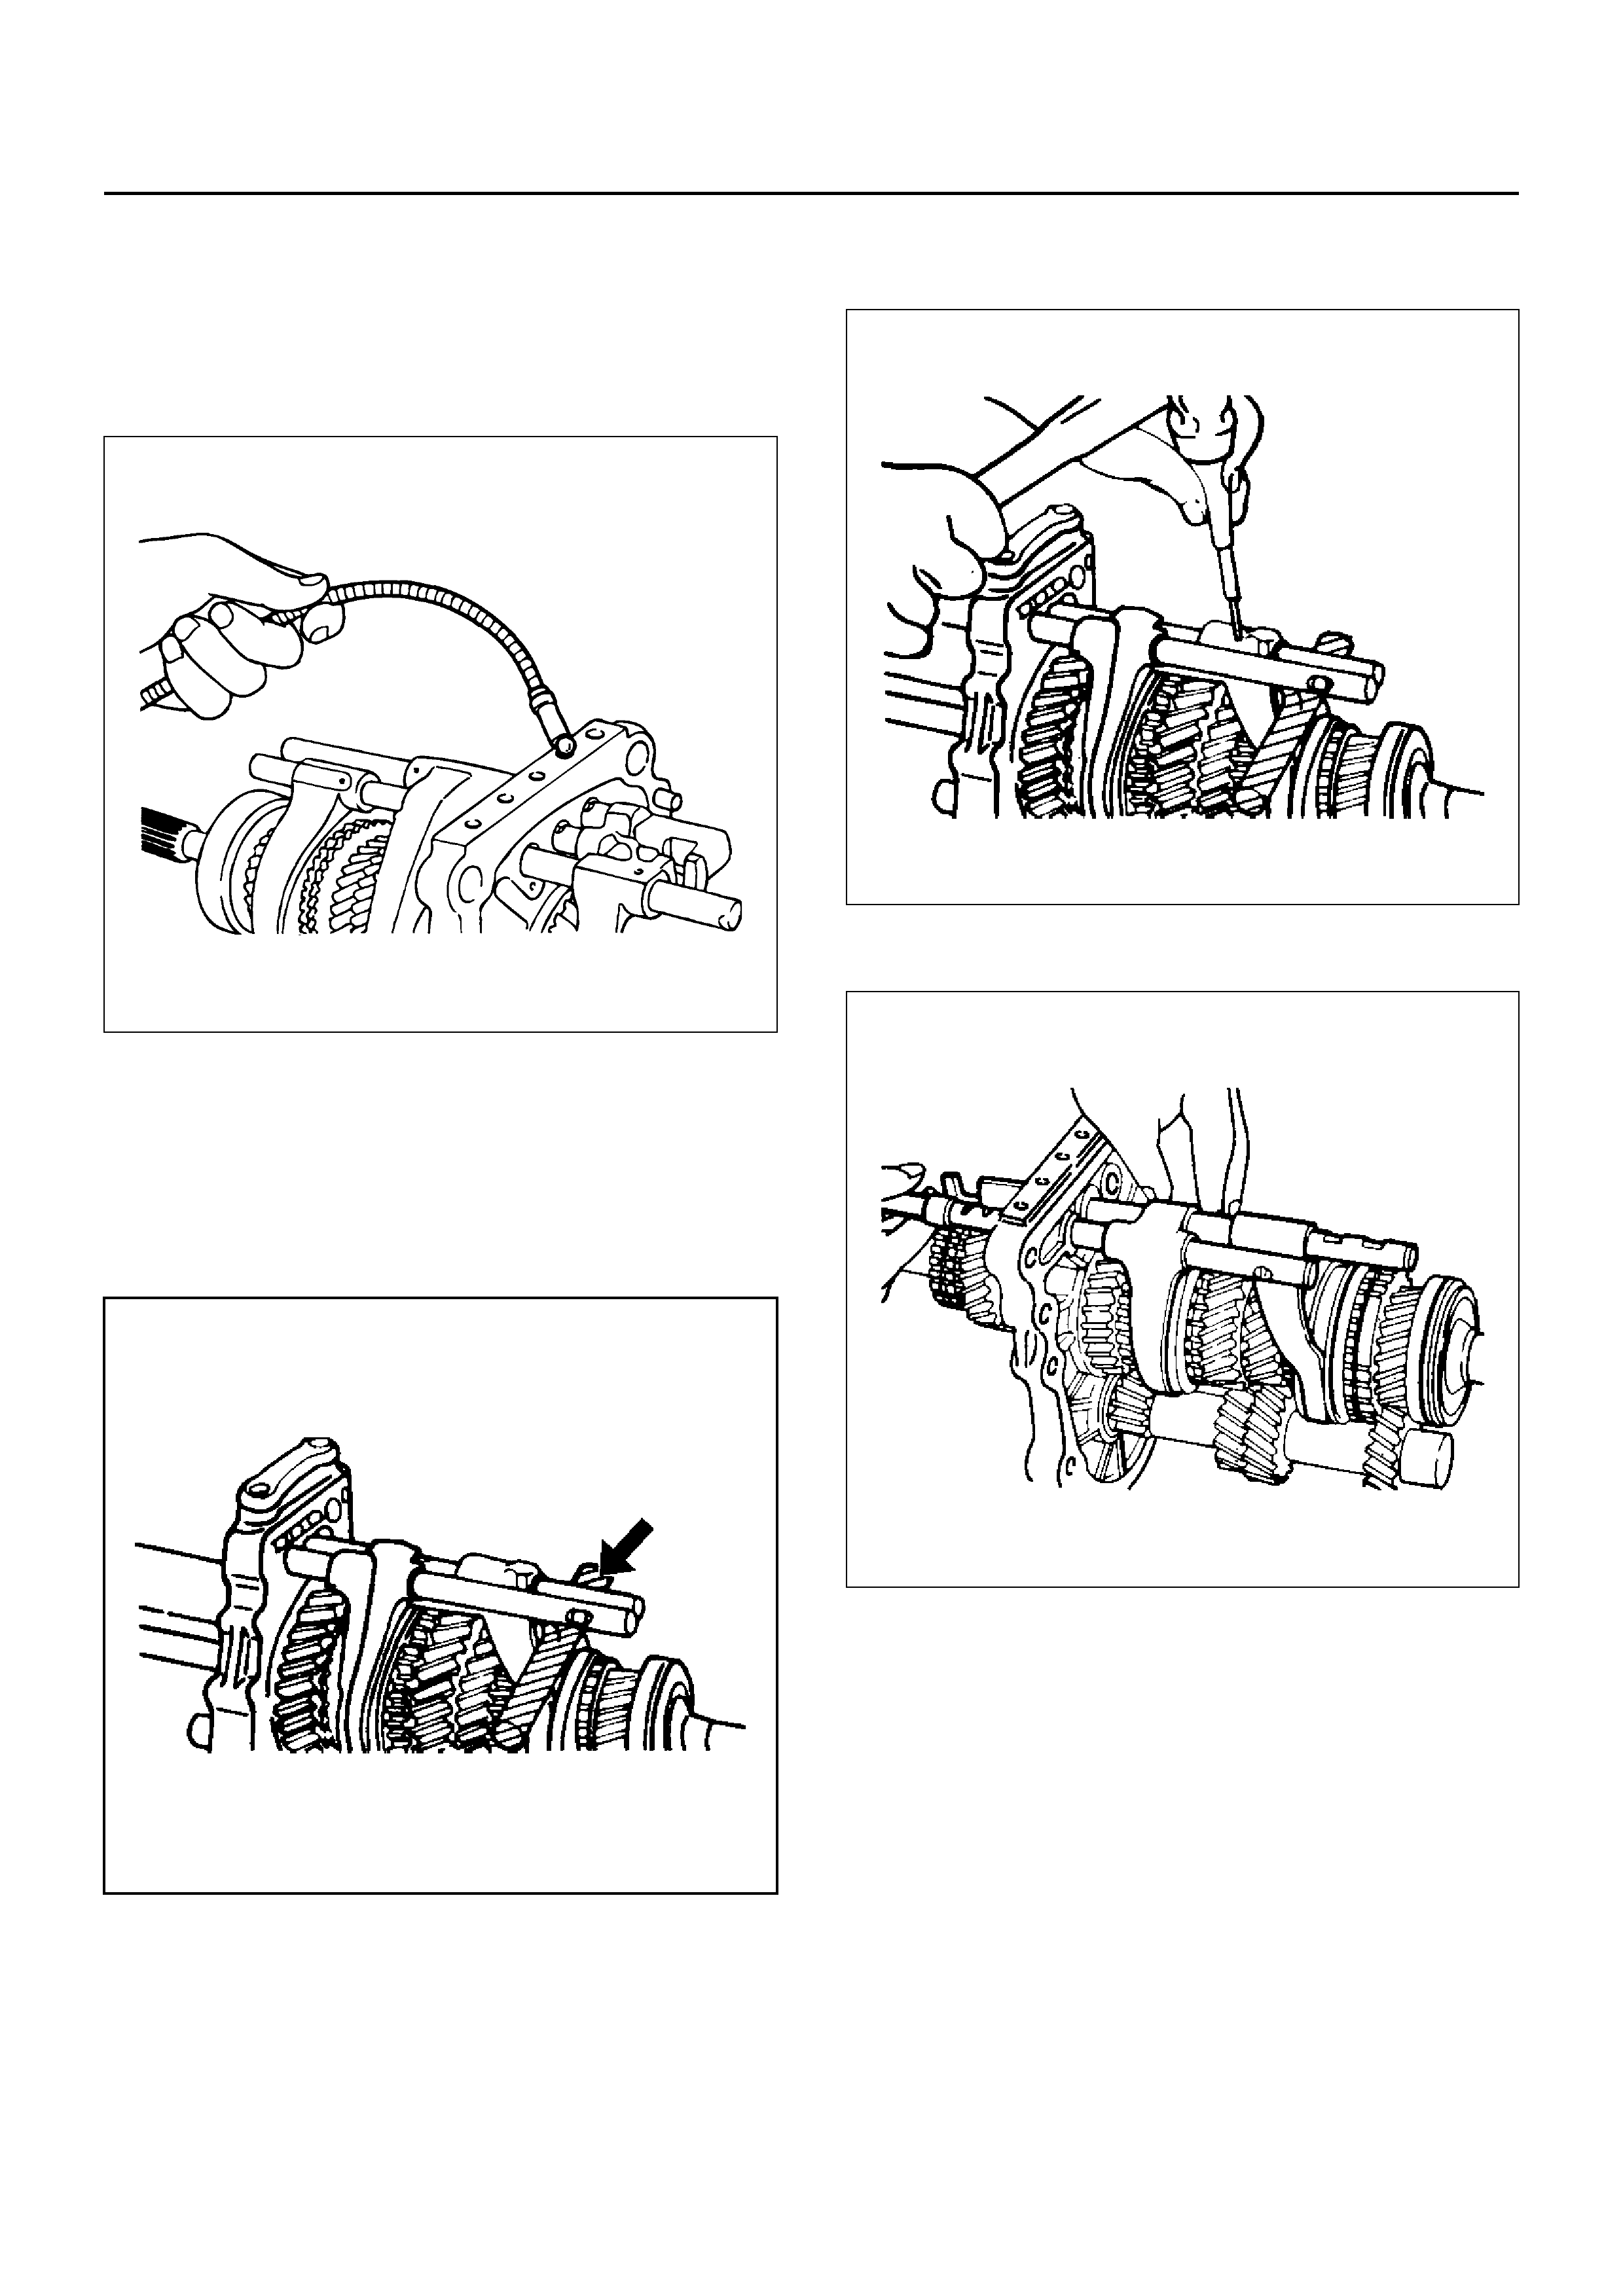
DISASSEMBLY
1. Remove detent spring plate and gasket(1), detent
spring(2) and detent ball(3).
Use a magnetic hand to remove the detent balls
from the intermediate plate.
220RS011
2. Remove spring(4).
3. Remove rev–5th shift rod(5), and rev-5th shift arm
and reverse inhibitor(6).
Remove 1st–2nd shift rod(7), 3rd–4th shift rod(8),
3rd–4th shift arm(9), and 1st–2nd shift arm (10).
• Hold a round bar against the shift rod end.
230RS003
• Use a spring pin remover to remove the shift arm
spring pins from the shift arms and the shift rods.
230RS004
• Move the 3rd–4th shift rod forward.
230RS005
• Remove the rev–5th, 1st–2nd and 3rd–4th shifter
rods carefully. Interlock pins are located
between the shifter rods in the intermediate plate.
4. Remove interlock pin(11) from intermediate plate
and gear assembly(12).
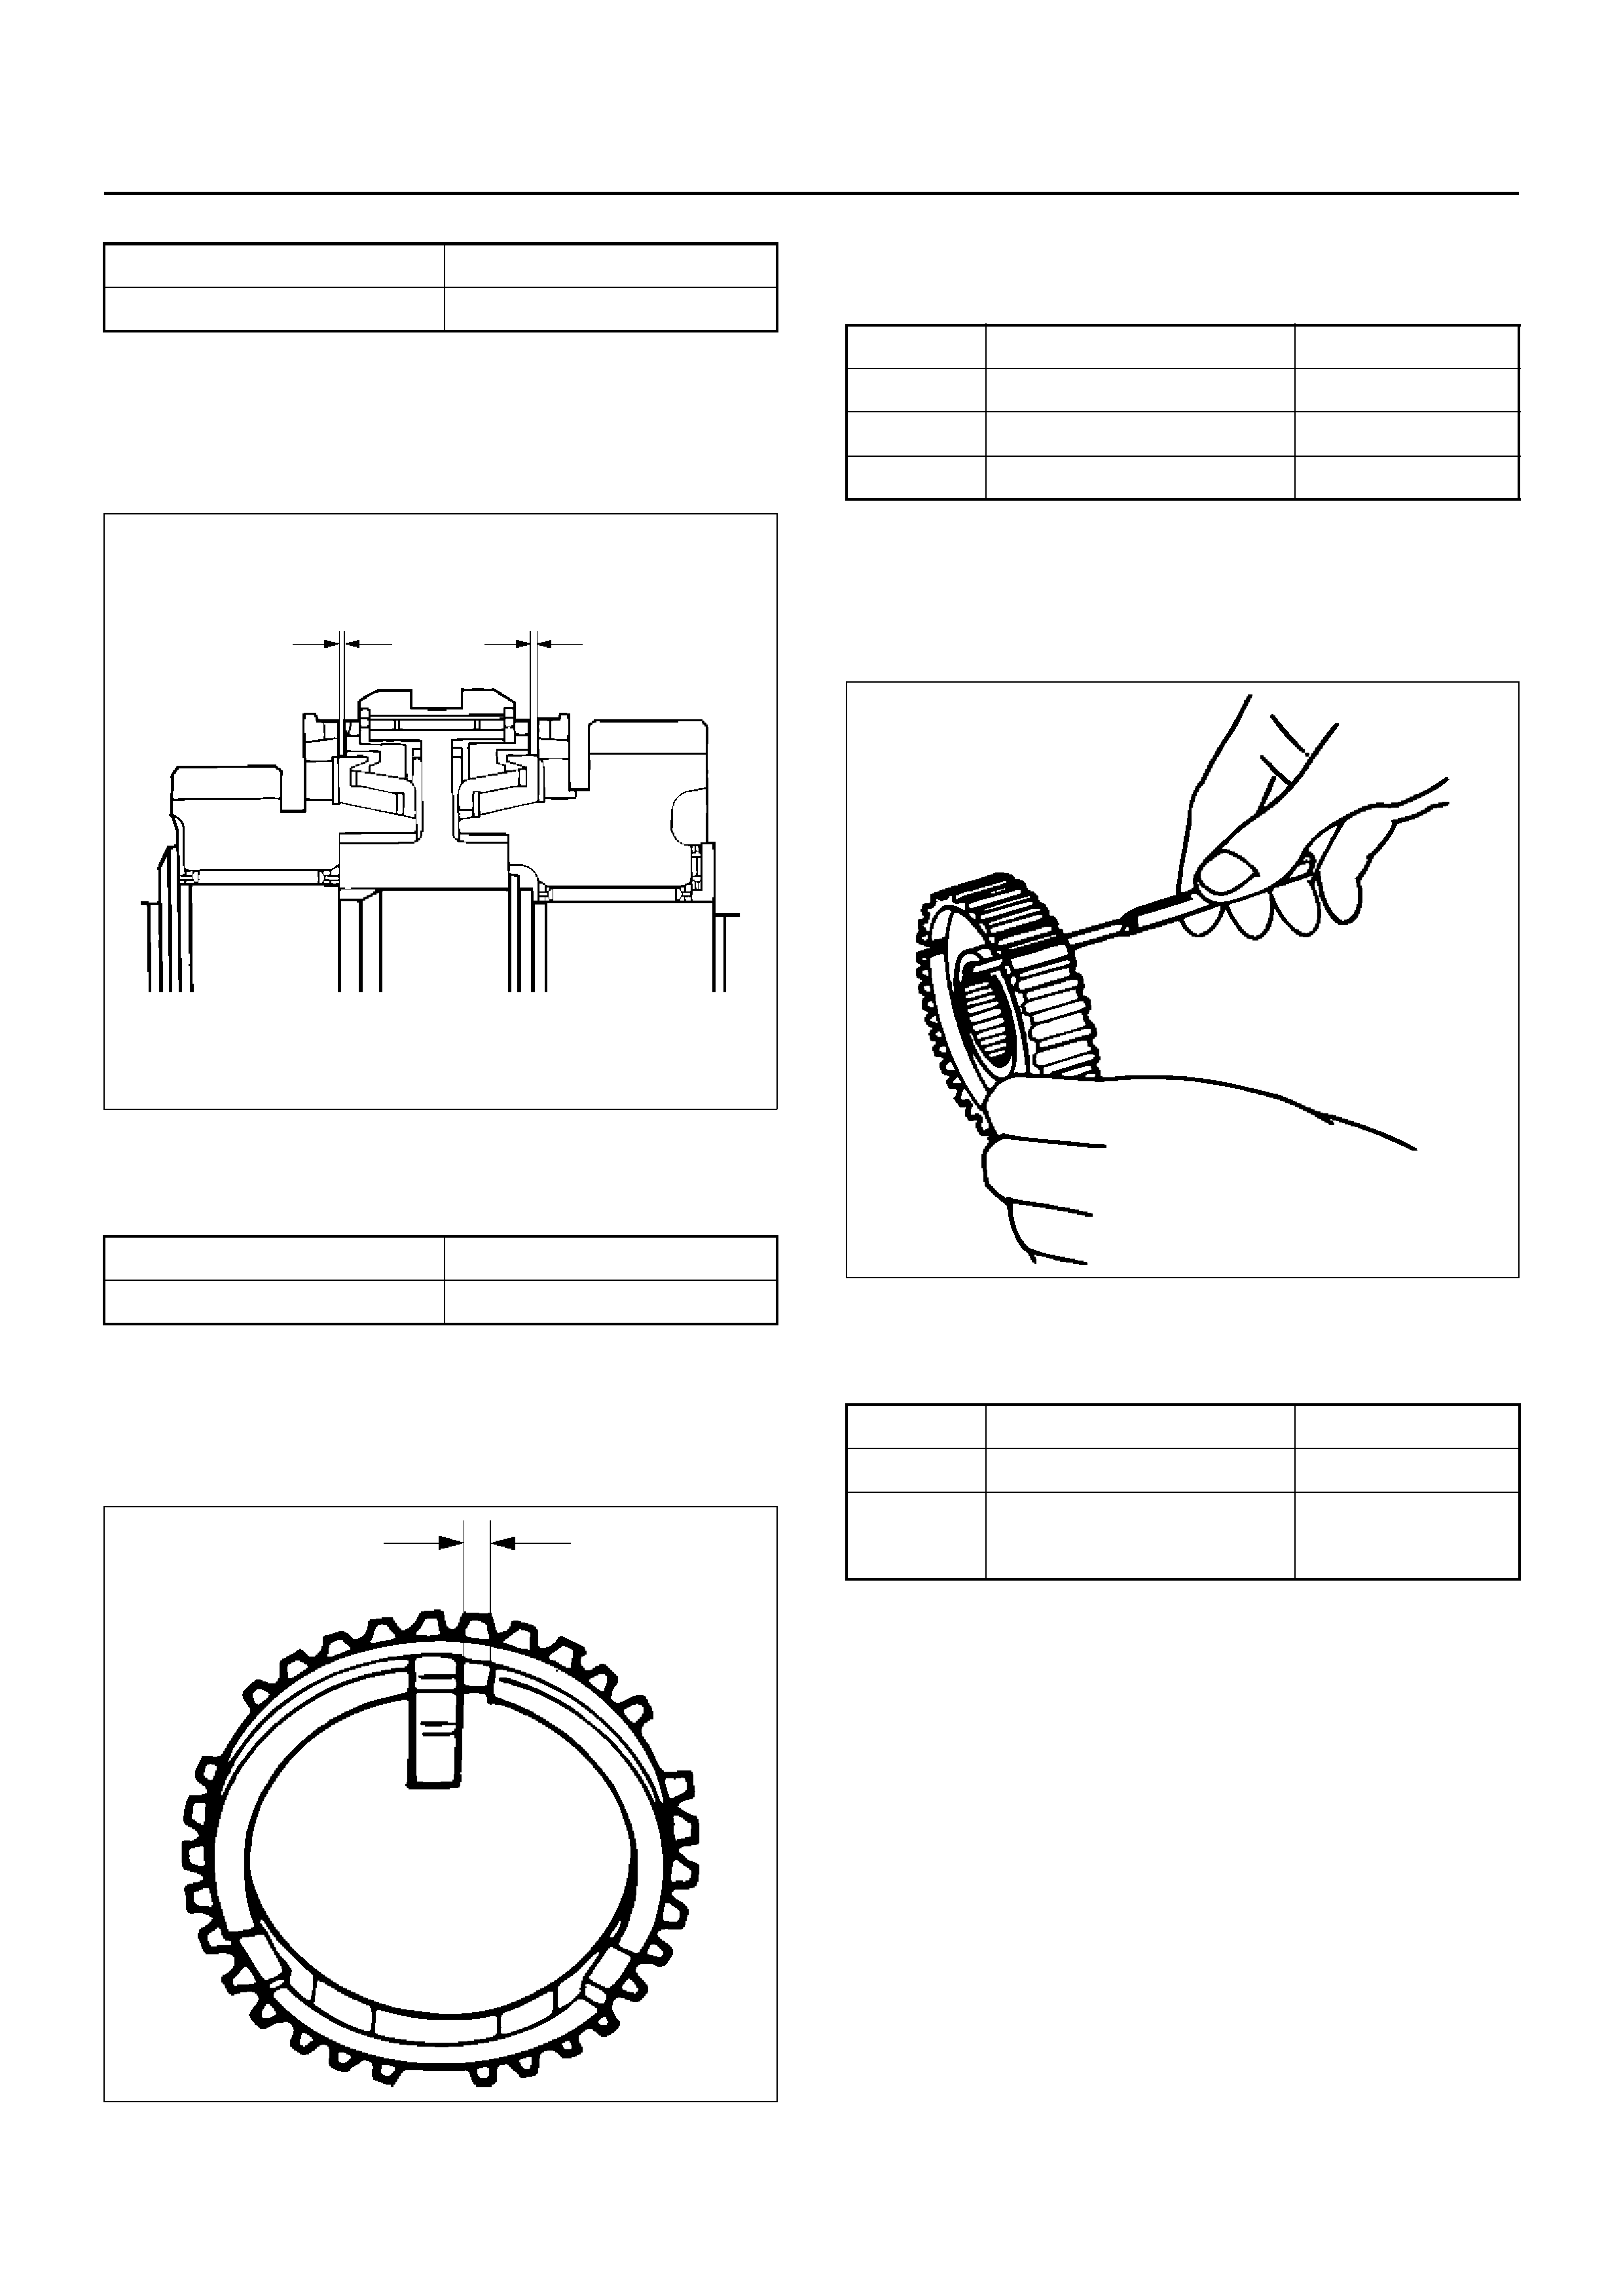
INSPECTION AND REPAIR
Make the necessary adjustments, and part
replacements if excessive wear or damage is
discovered during inspection.
Shift Arm Thickness
• Use a micrometer to measure the shift arm thickness.
If the m easured value is less than the specified limit,
the shift arm must be replaced.
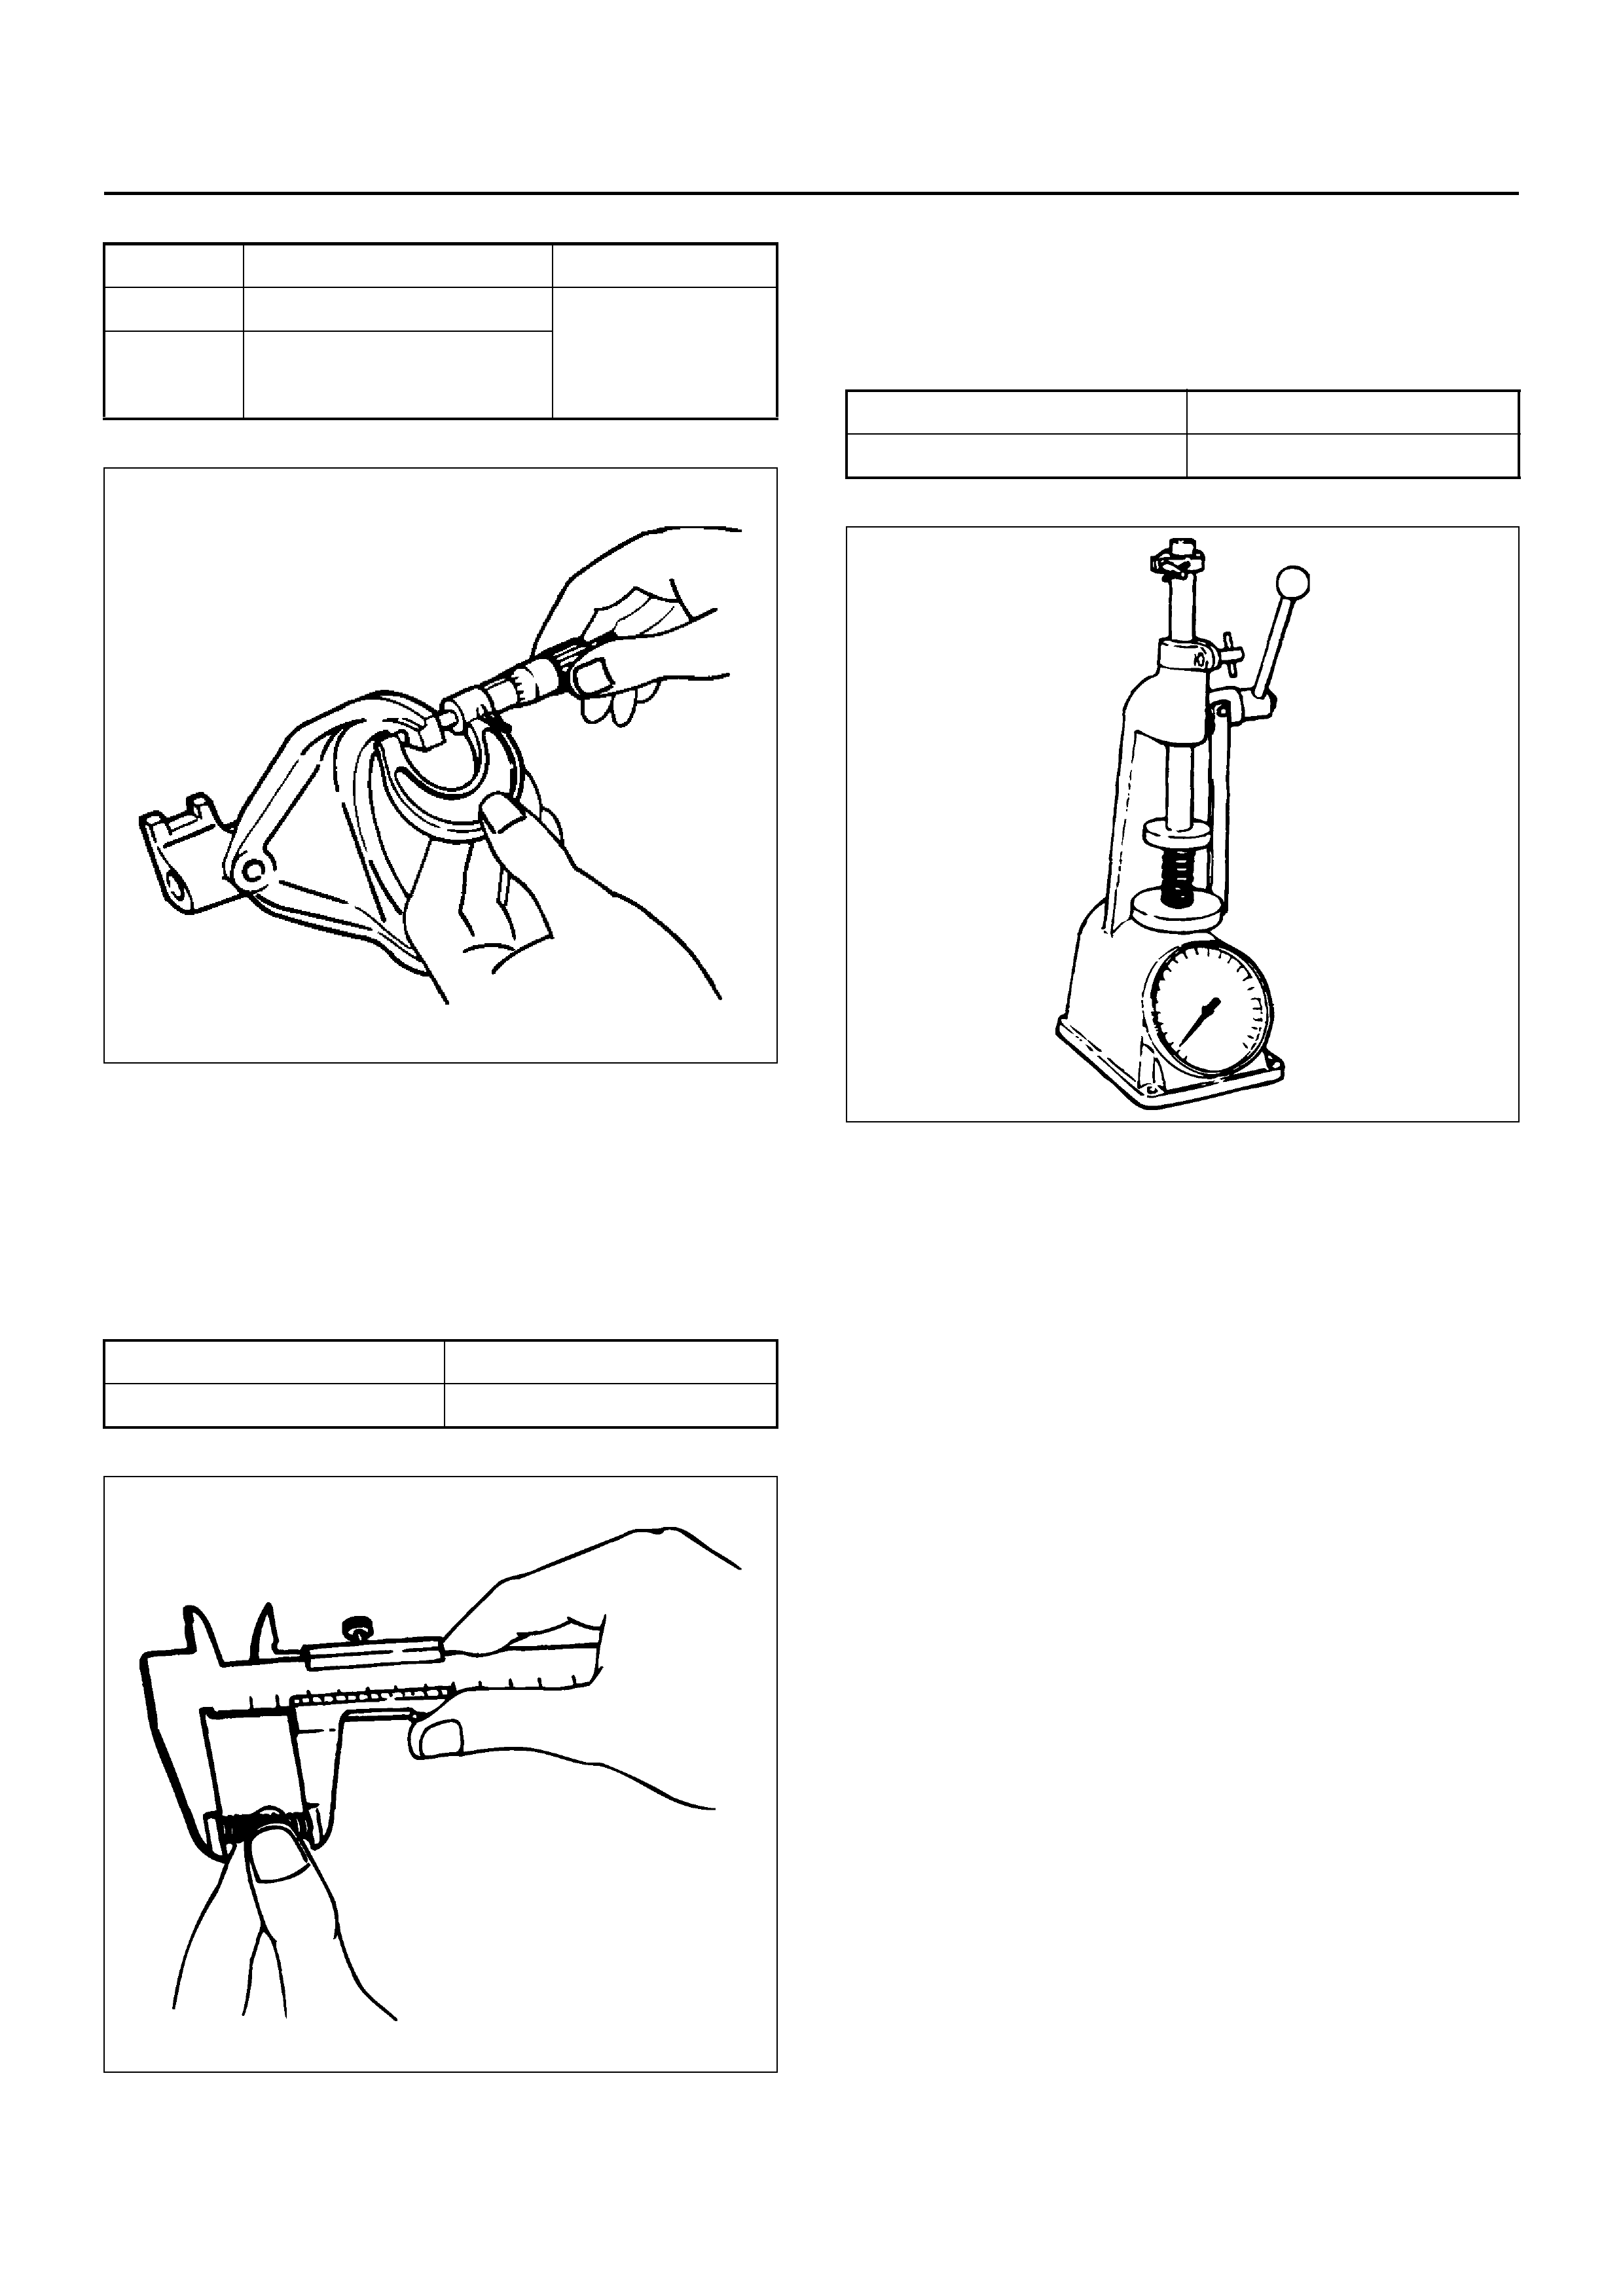
Shift Arm Thickness
230RS006
Detent Spring Free Length
• Use a vernier caliper to measure the detent spring
free length.
If the measured value is less than the specified limit,
the detent spring must be replaced.
Detent Spring Free Length
220RS012
Detent Spring Tension
• Use a spring tester to measure the valve spring
tension.
If the measured value is less than the specified limit,
the detent spring must be replaced.
Detent Spring Tension
220RS013
REASSEMBLY
1. Install 1st–2nd shift arm(10) and 3rd–4th shift
arm(9) to intermediate plate and gear assembly(12).
Standard Limit
1st–2nd 9.60–9.85mm 9.0mm 3rd–4th 9.60–9.80mm
Rev.5th
Standard Limit
26.8mm 26.2mm
Compressed height Standard
20mm 87.2–97.1N
2. Install 3rd–4th shift rod(8) and 1st–2nd shift rod(7).
• Install the interlock pin(11) to the shift rod.
• Install the shift rod together with the interlo ck pin
to the intermediate plate.
Do not allo w the interloc k pin to fall from the shift
rod.
• Hold a round bar against the shift rod end lower
face to protect it against damage.
• Install a new spring pin.
Never reinstall the used spring pin.
230RS007
3. Install rev– 5th shi ft arm and r everse inhib itor(6) an d
rev–5th shift rod(5).
• Apply oil to the reverse inhibitor inner surface.
• Install the interlock pin(11) to the shift rod.
• Install the shift rod together with the interlo ck pin
to the intermediate plate.
Do not allo w the interloc k pin to fall from the shift
rod.
• Hold a round bar against the shift rod end lower
face to protect it against damage.
• Install a new spring pin.
Never reinstall the used spring pin.
4. Install spring(4).
5. Put detent balls(3) in the intermediate plate holes.
• Apply oil to the detent balls.
6. Install de tent s prings (2) and deten t spr ing plate and
gasket(1).
• Install a new gasket and the detent spring plate.
• Tighten the detent spring plate bolts to the
specifi ed tor que .
Torque: 20N·m
220RS030
EndOFCallout
Legend
(1) Warped
REVERSE GEAR AND 5TH GEAR (MUA)
DISASSEMBLED VIEW
226RW213
EndOFCallout
Legend
(1) Oil Seal Collar
(2) Ball Bearing
(3) Retainer
(4) Thrust Plate
(5) Thrust Washer and Lock Ball
(6) Reverse Idler Gear Snap Ring
(7) Reverse Idler Gear Assembly
(8) Idle Shaft Pin
(9) Thrust Washer
(10) Reverse Idler Gear
(11) Reverse Idler Shaft
(12) Bearing Snap Ring
(13) Ball Bearing
(14) Counter 5th Gear
(15) Counter Reverse Gear
(16) 5th Gear
(17) 5th Block Ring
(18) Need le Bearing
(19) Mainshaf t Nut
(20) Rev–5th Synchronizer Assembly
(21) Reverse Block Ring
(22) Reverse Gear
(23) Needle Baring
(24) Bearing Plate and Screw
(25) Bearing Snap Ring
(26) Intermediate Plate
DISASSEMBLY
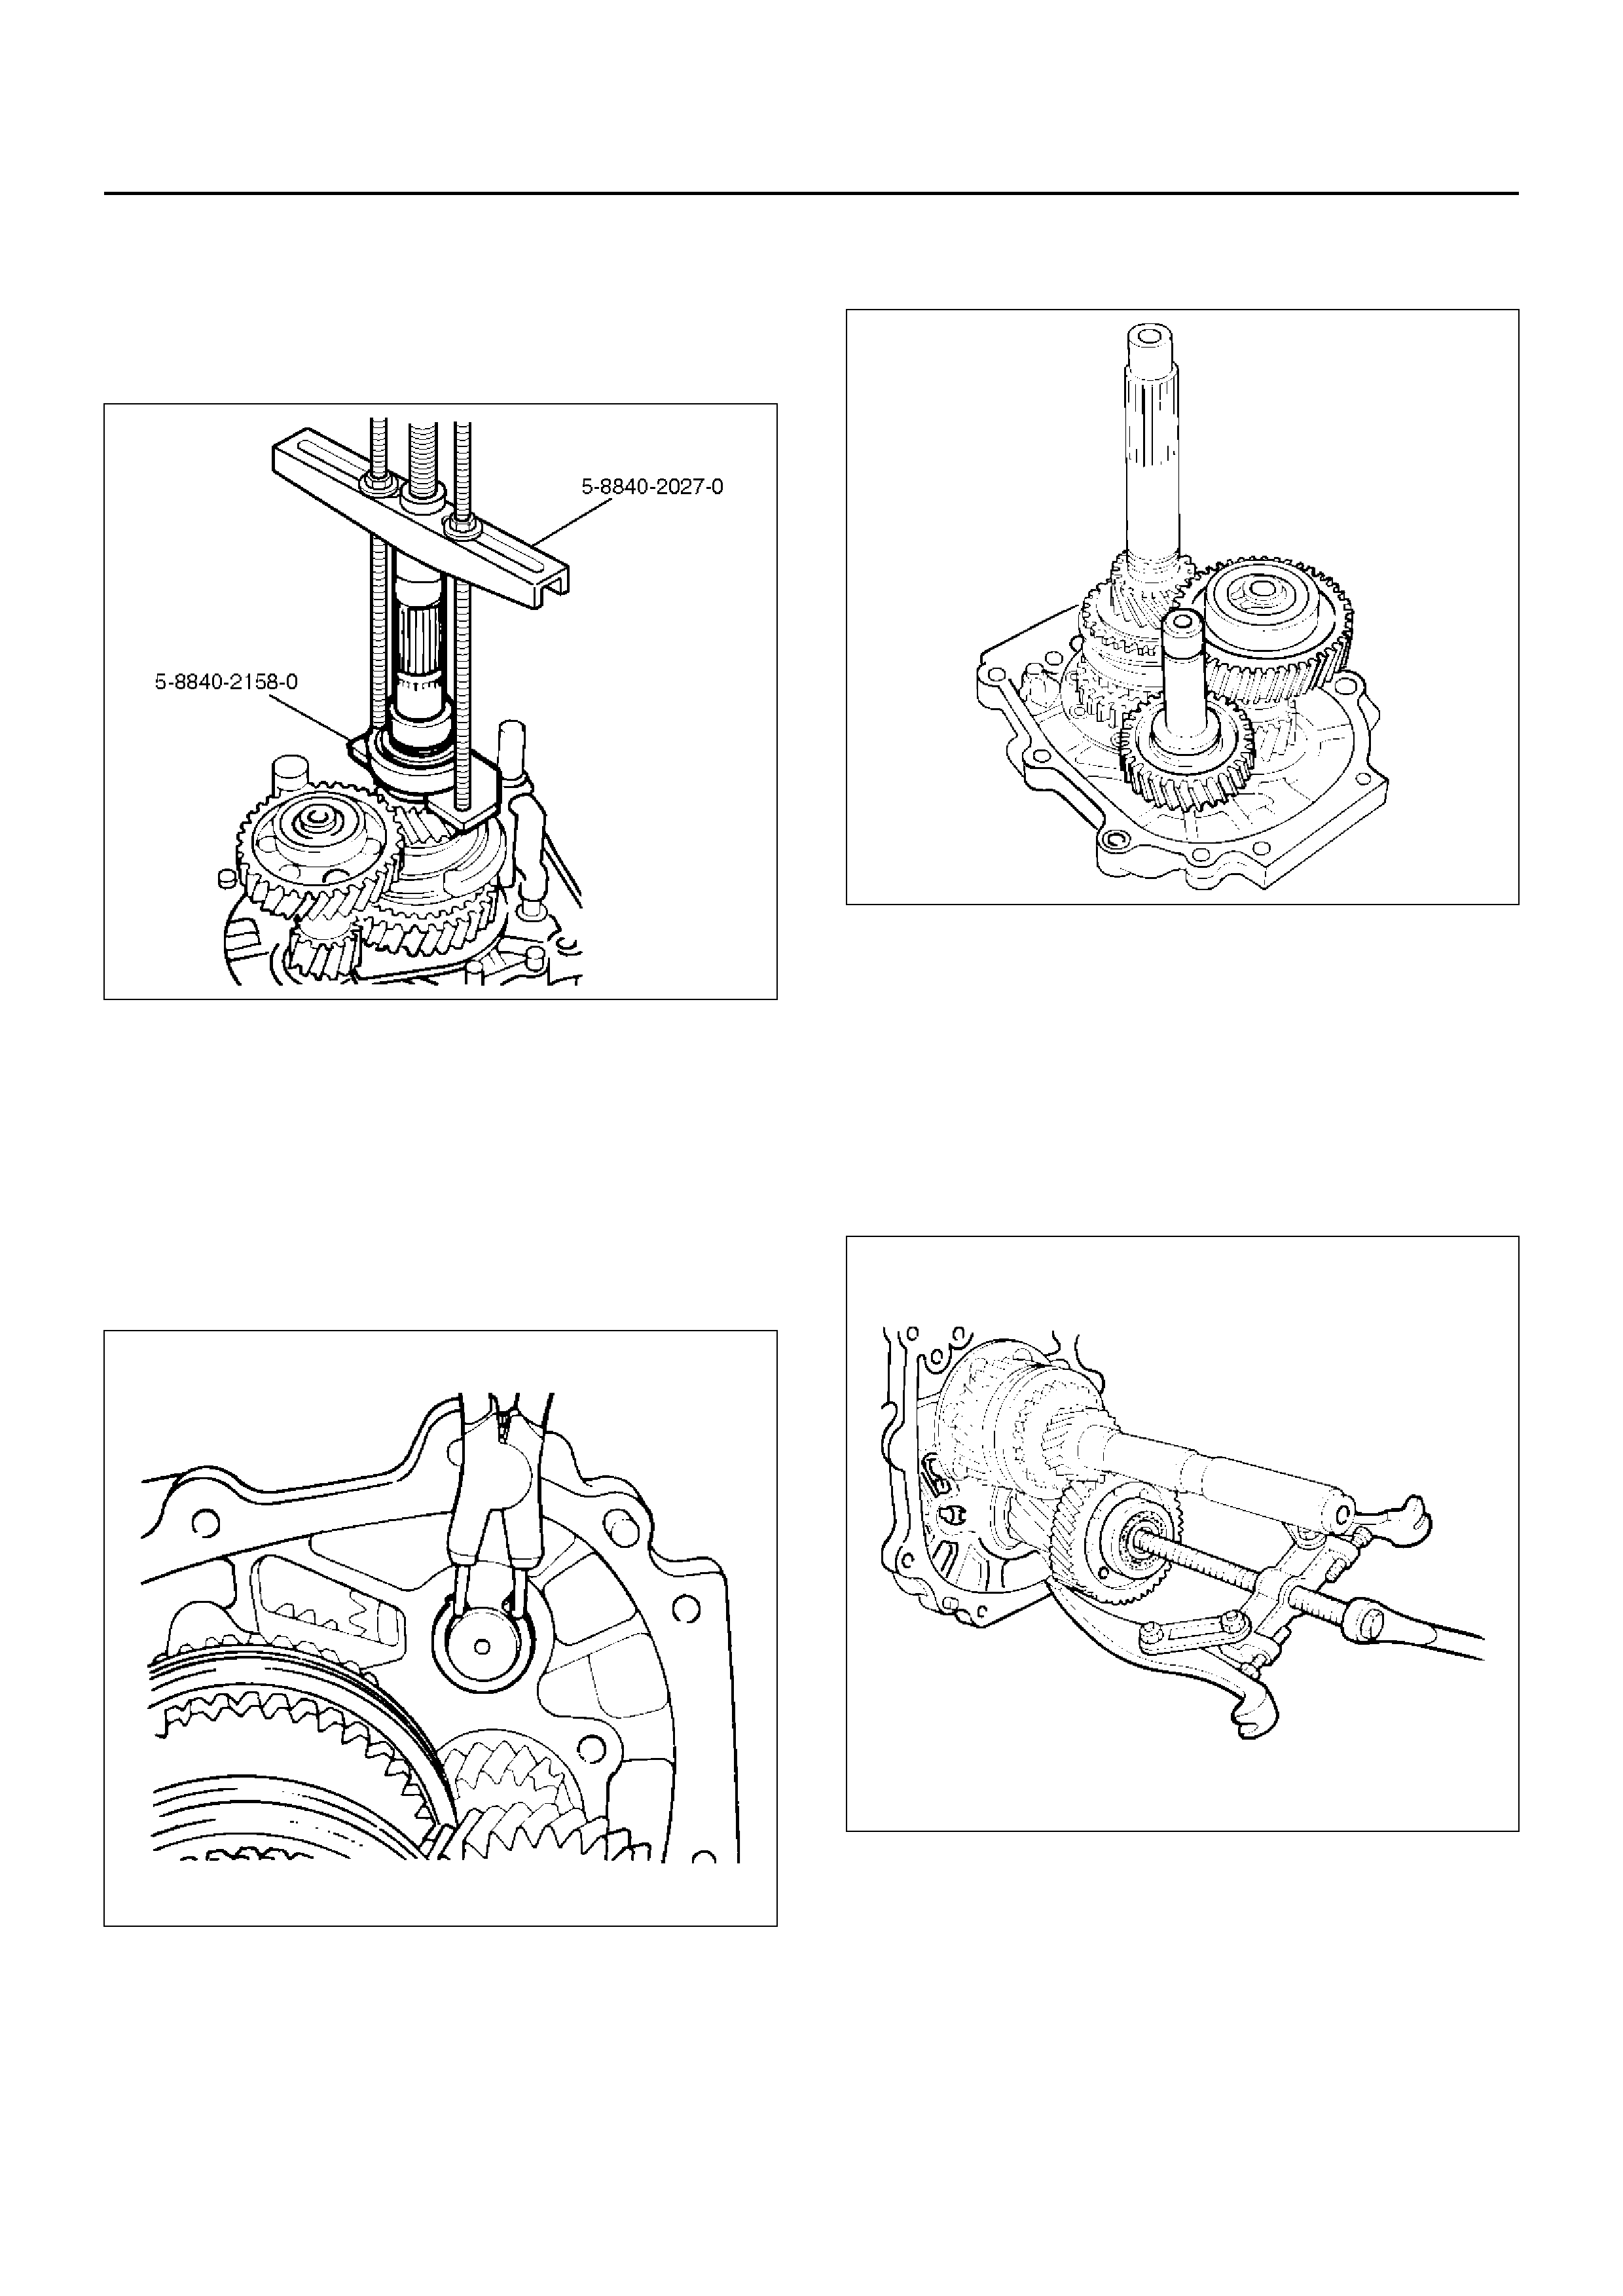
1. Set the retaining ring remover 5–8840–2158–0 and
puller 5–8840–2027–0 to the retainer(3) and the
mains haft end .
262RW079
2. Remo ve the retainer(3) together with the bearin g(2)
and the oil seal collar(1).
The universal puller may be used in place of the
retaining ring remover.
3. Remove thrust plate(4) and thrust washer and lock
ball(5).
4. Use a pair of snap ring pliers to remove reverse idler
gear snap ring(6).
226RS004
5. Remove the reverse idler gear assembly(7) from the
interm ediate plate(26 ).
226RS005
6. Remove idle shaft pin(8), thrust washer(9), reverse
idler gear(10), and reverse idler shaft(11).
7. Use a pair of snap ring pliers to remove the snap
ring(12).
8. Attach the bearing remover to the counter gear
shaft.
Use the bearing remover to remove the ball
bearing(13) and the counter 5th gear(14).
226RS006
9. Remove counter reverse gear(15).
10. Remove 5th gear(16), 5th block ring(17), and
needle bearing (2 piece type) (18).
226RS007
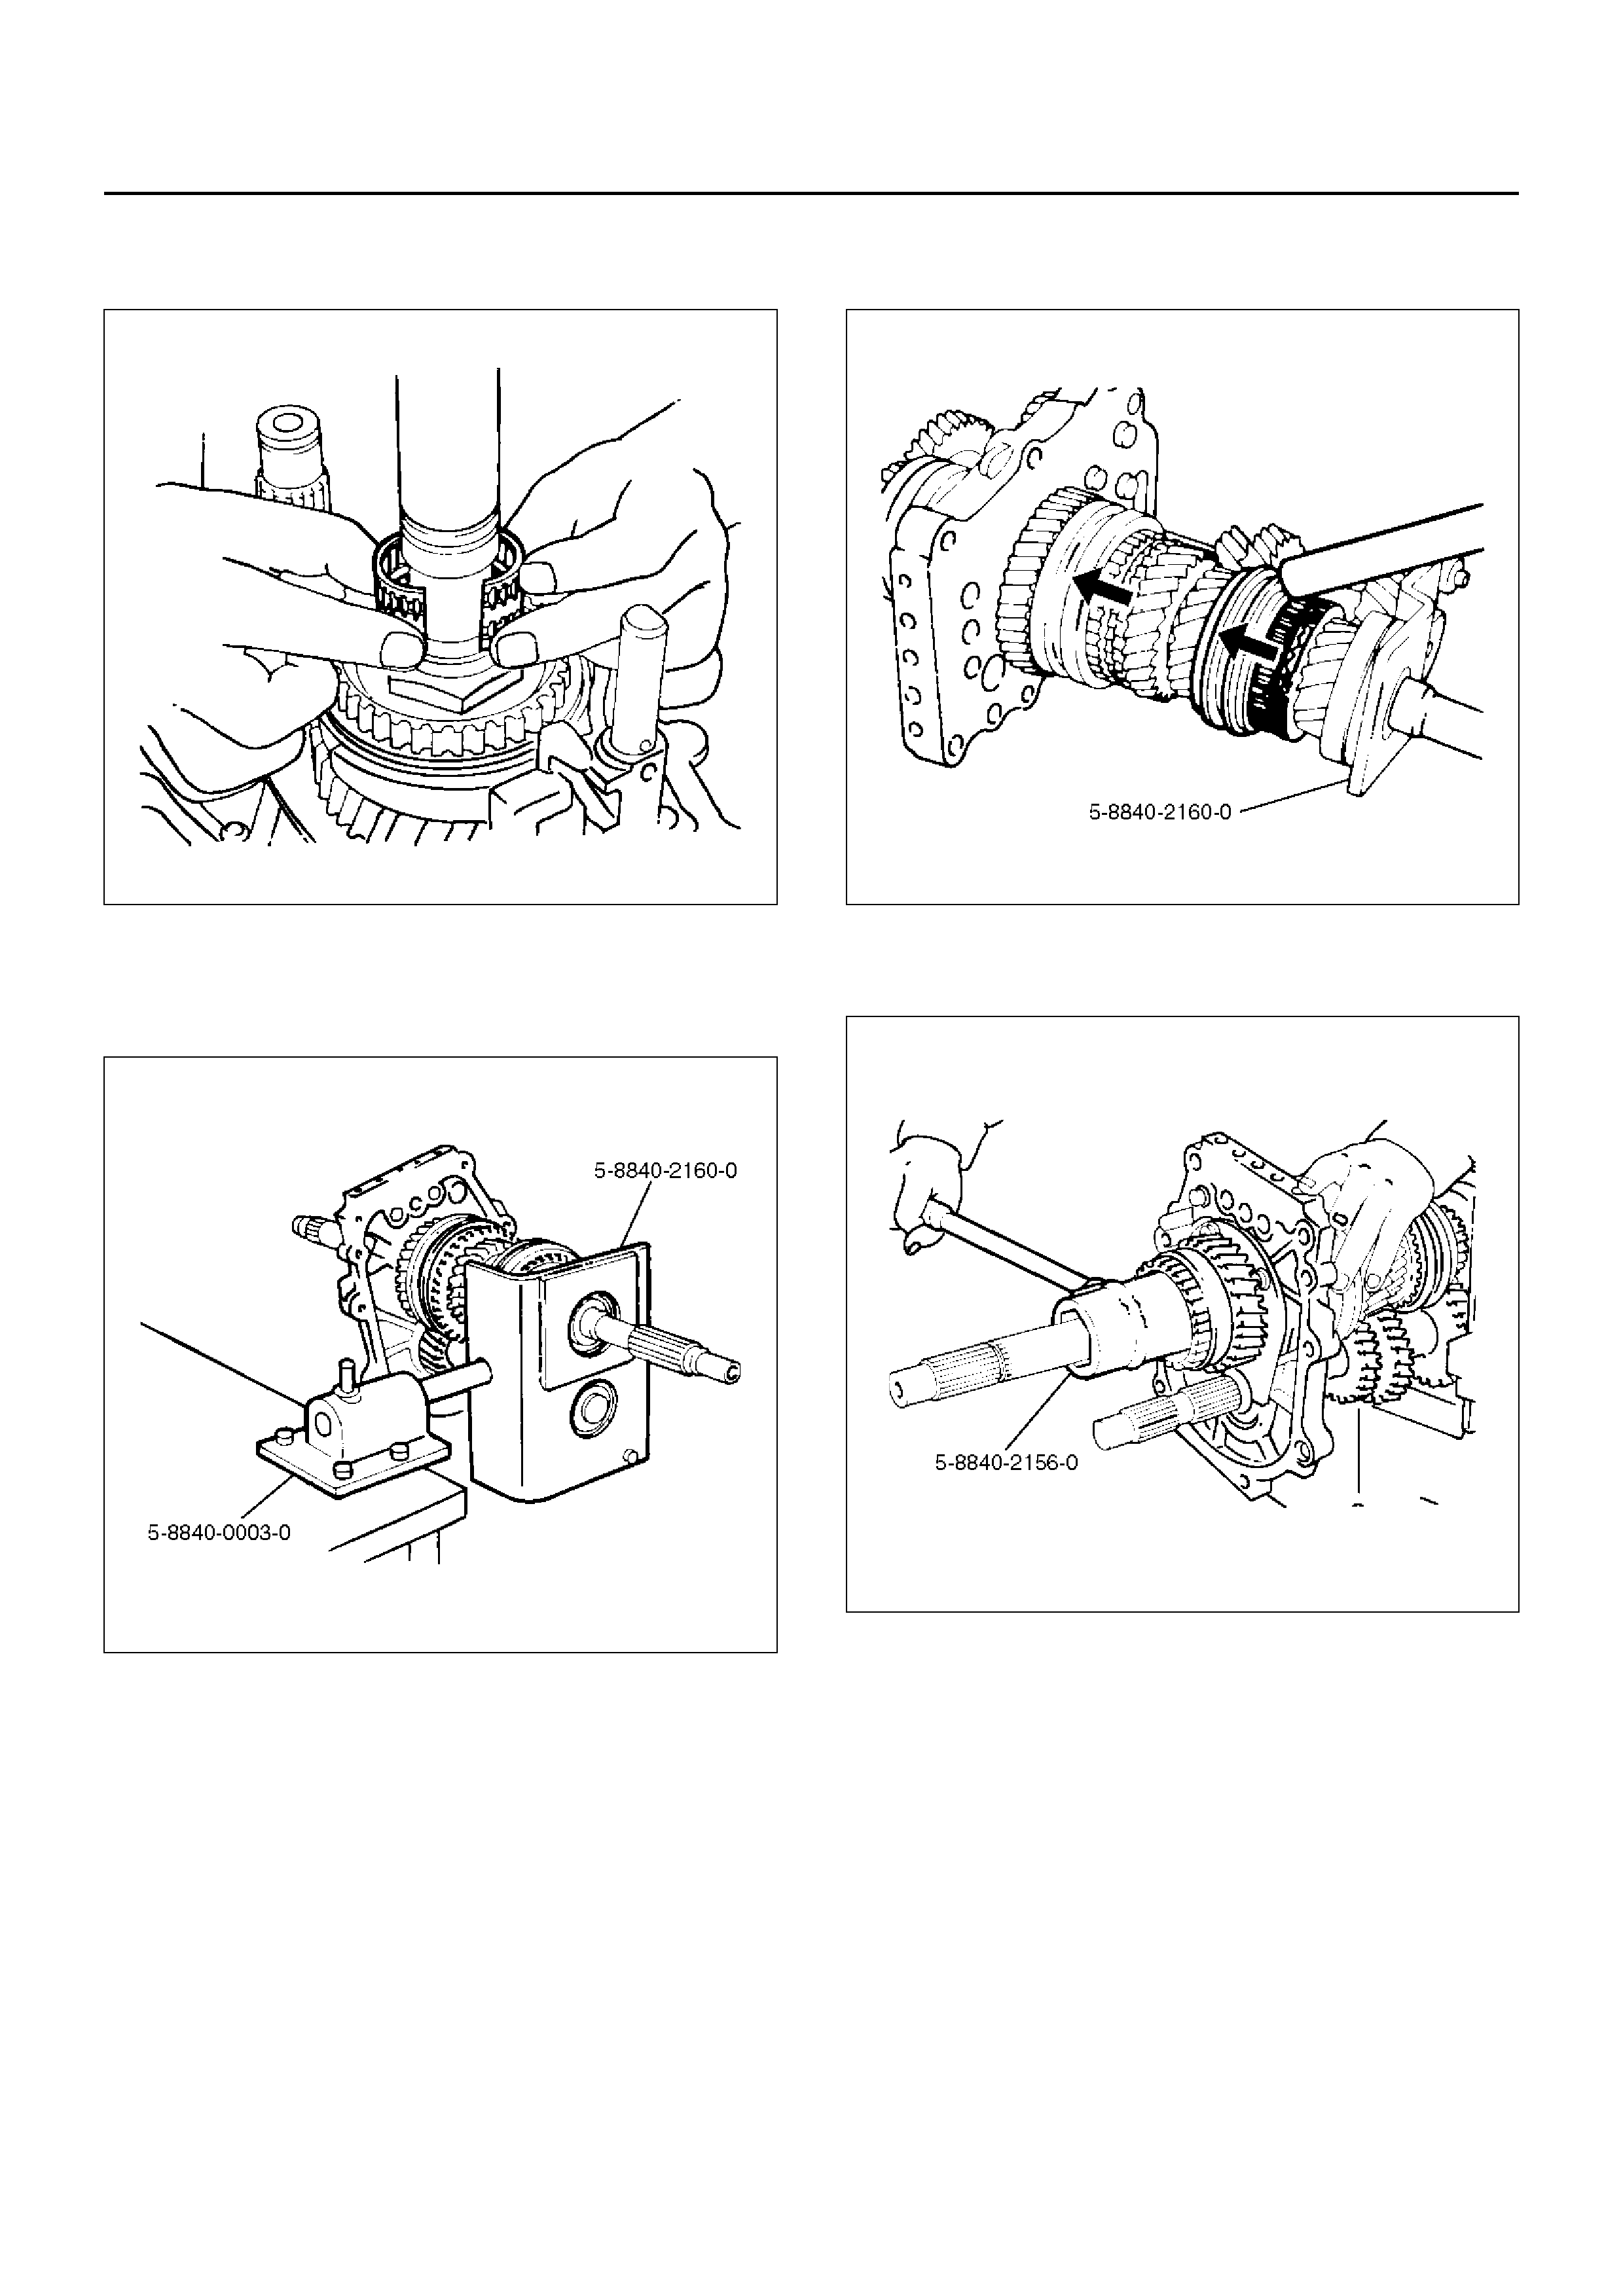
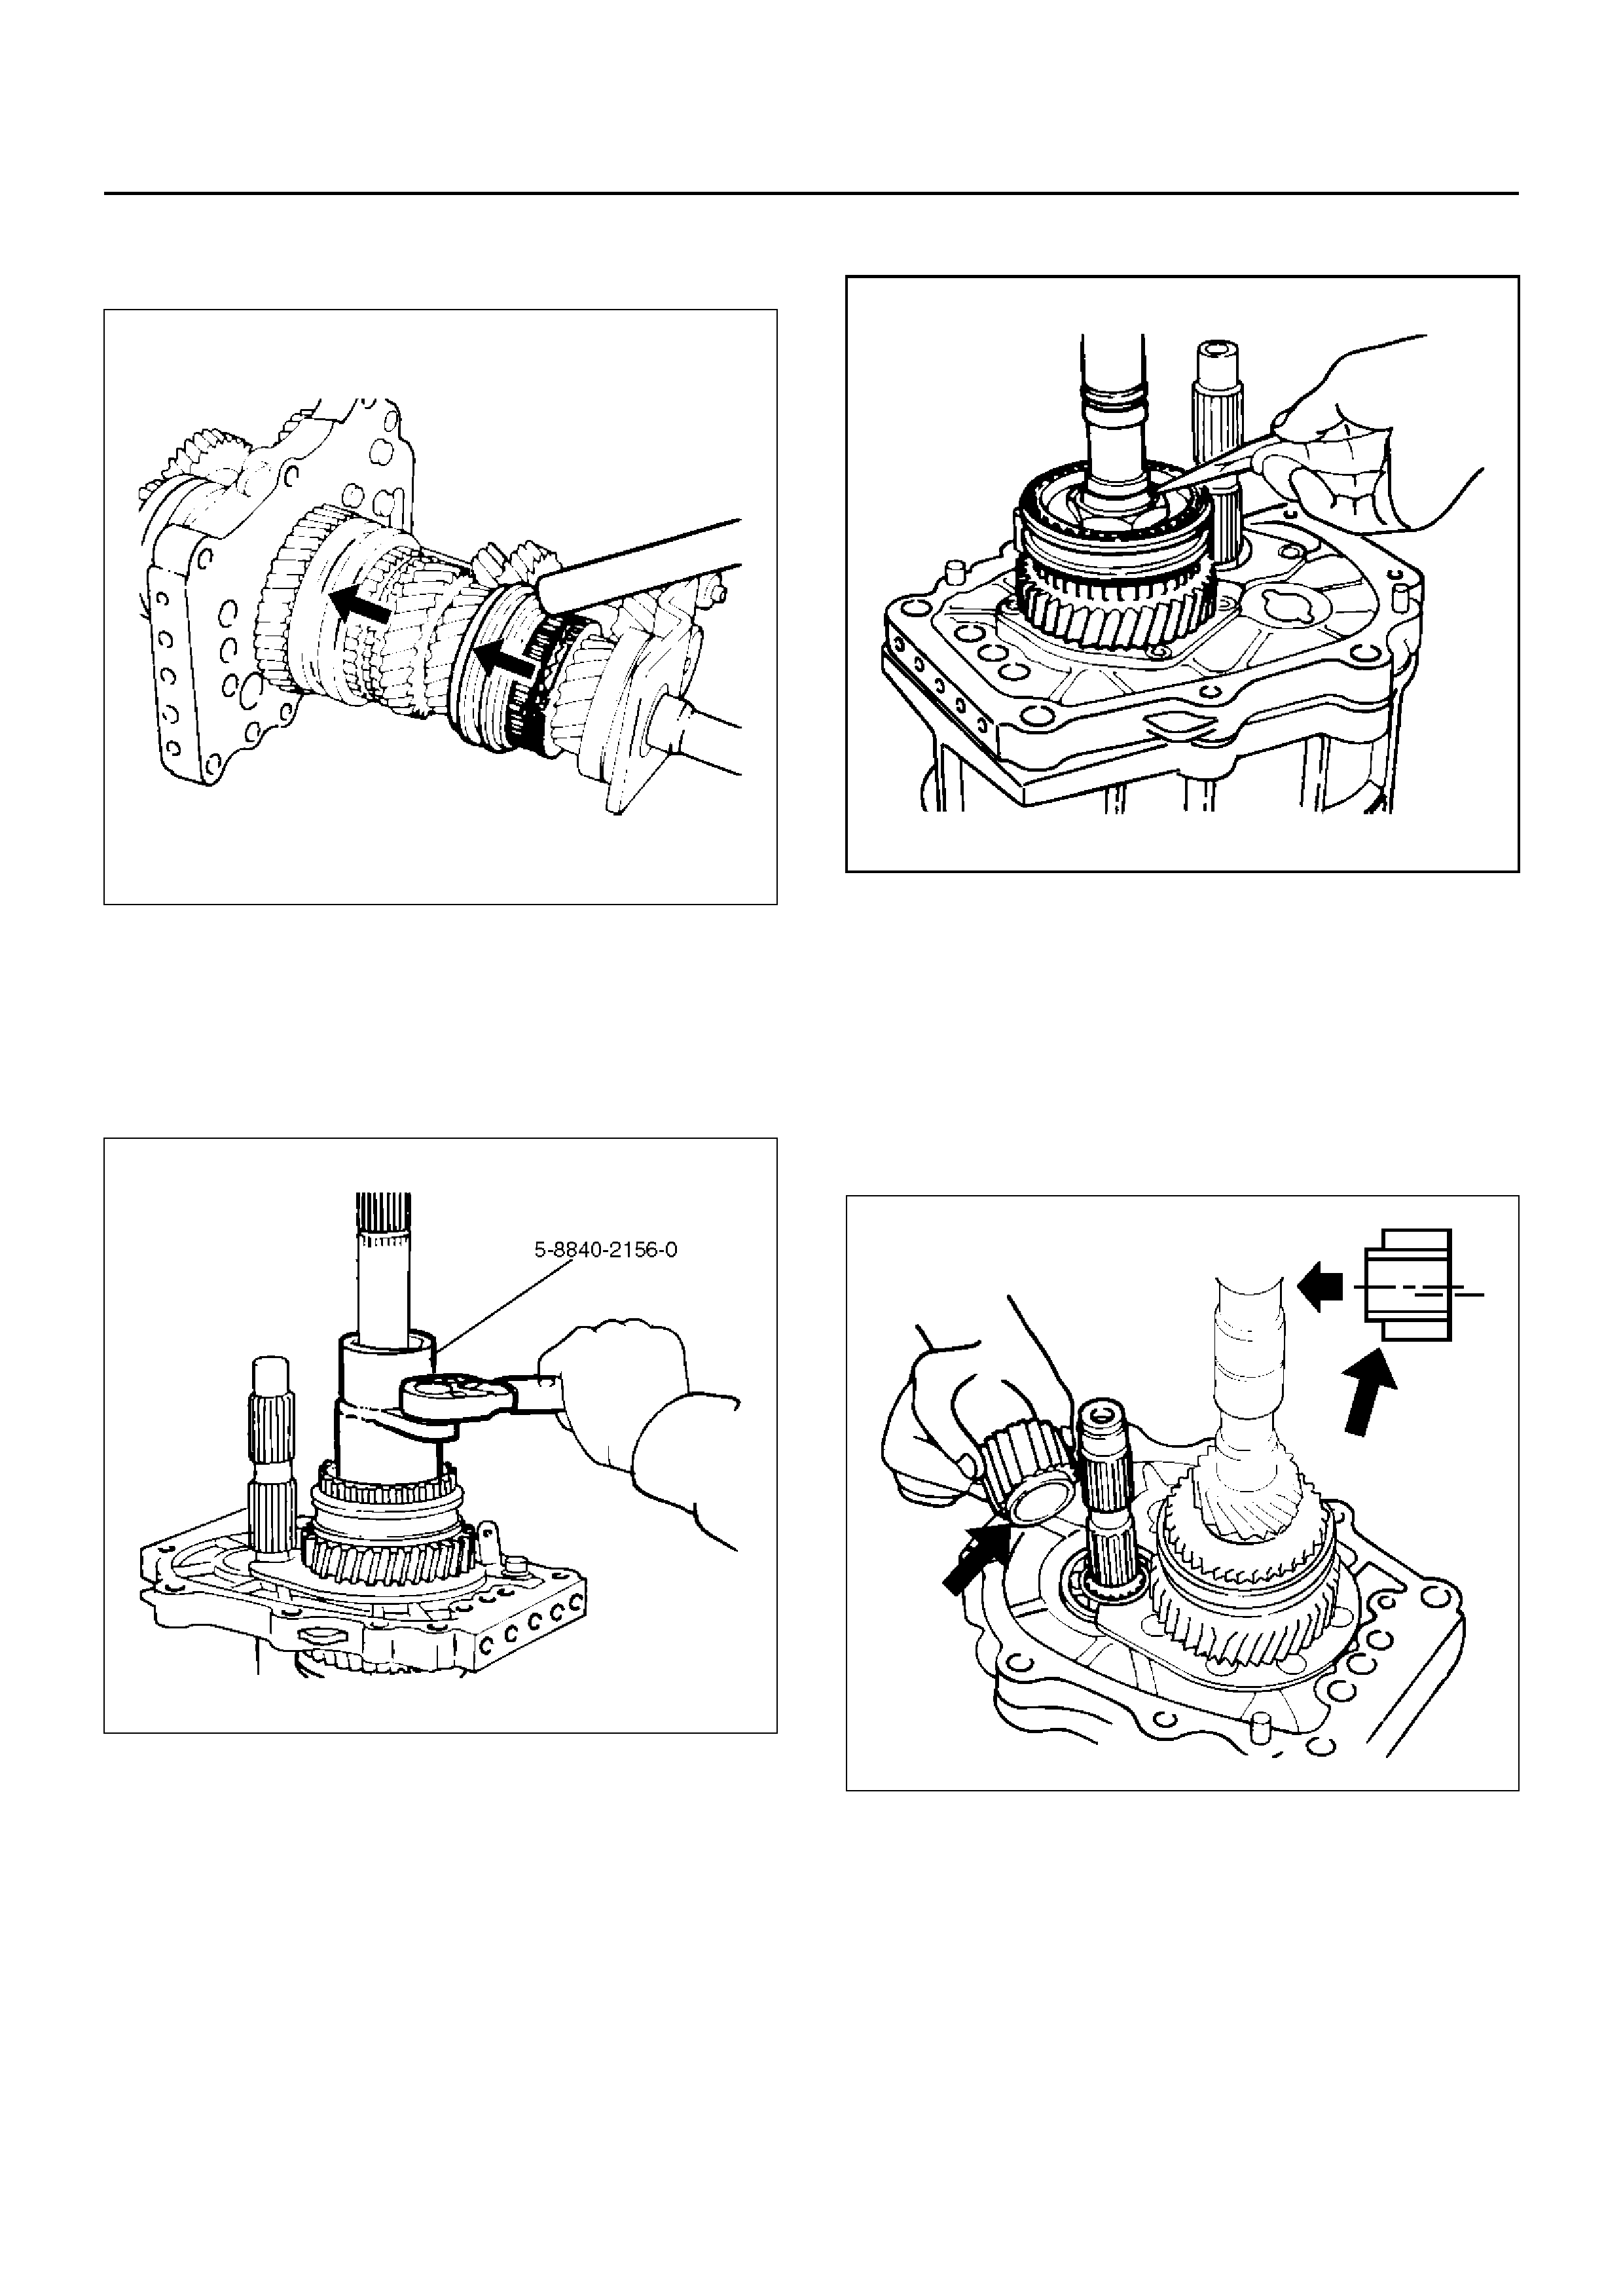
11. Attach the holding fix ture 5–8 840–216 0–0 and base
5–8840–0003–0 to the mainshaft and the counter
gear.
226RW212
12. Engage the 3rd–4th synchronizer with the 3rd gear.
Engage the 1st–2nd synchronizer with the 1st gear.
226RW210
Use the mainshaft nut wrench 5–8840–2156–0 to
remove the mainshaft nut(19).
226RW211
13. Use pry bars between the reverse gear(22) and
bearing plate(24) to remove the Rev–5th
synchronizer assembly(20) together with reverse
block ring(21) and reverse gear(22).
226RS010
14. Remove needle bearing(23).
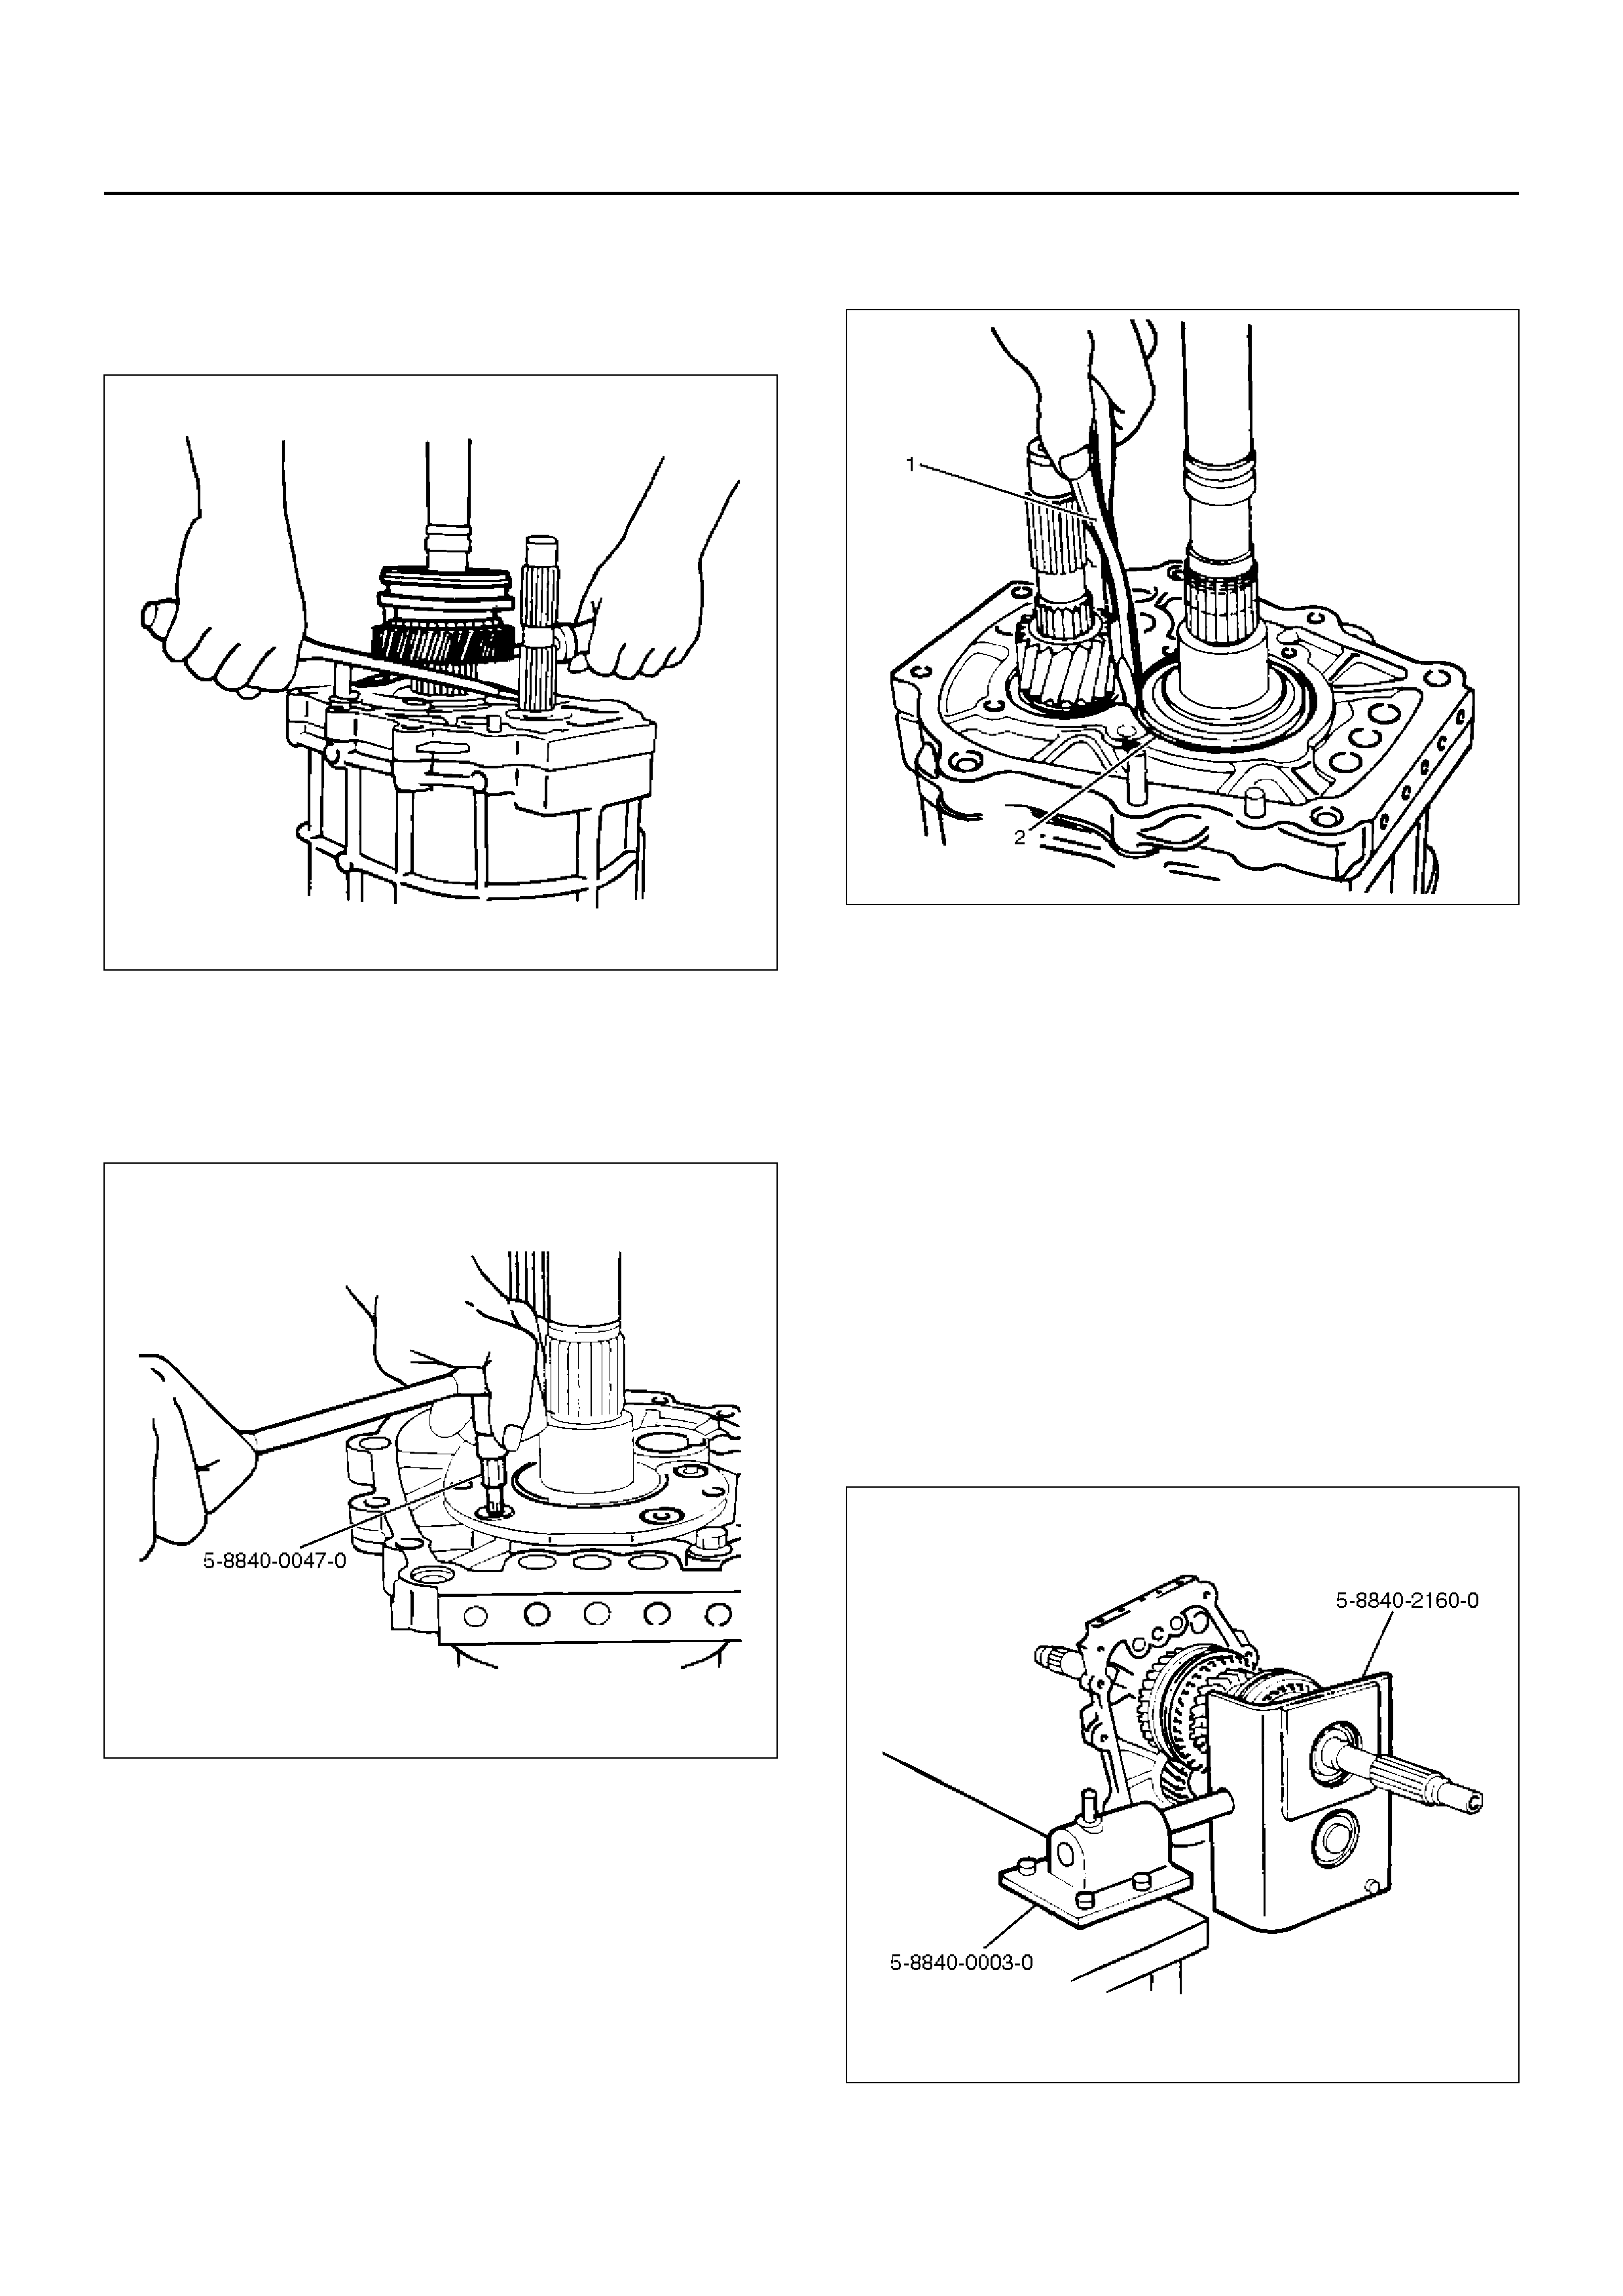
15. Use the torx bit wrench 5–8840–0047–0(T45) to
remove the bearing plate and screw(24) from the
intermediate plate.
220RW137
16. Use the snap ring pliers(1) to remove the mainshaft
bearing snap ring(29).
226RS011
17. Hold the snap ring open with the pliers.
Push the intermediate plate(26) toward the rear of
the transmission to remove it.
The bearing snap ring(25) will come free.
INSPECTION AND REPAIR
Refer to Top Gear Shaft, Main Gear Shaft, and Counter
Gear in this section for inspection and repair.
REASSEMBLY
1. Mesh the counter gear with the mainshaft assembly.
Install the holding fi xture 5–88 40–2160–0 and base
5–8840–0003–0 to the mainshaft and the counter
gear.
226RW212
2. Place the holding fixture (with the mainshaft and the
counter shaft) in a vise.
Install the i ntermediate plate(26).
3. Install bearing snap ring(25).
4. Apply recommended thread locking agents
(LOCTITE 242) or its equivalent to each of the
bearing plate screw threads.
Install bearing plate and screw(24).
Tighten the screws to the specified torq ue by using
torx bit wrench 5–8840–0047–0.
Torque: 15N·m
220RW137
5. Install needle bearing(23), reverse gear(22), and
reverse block ring(21).
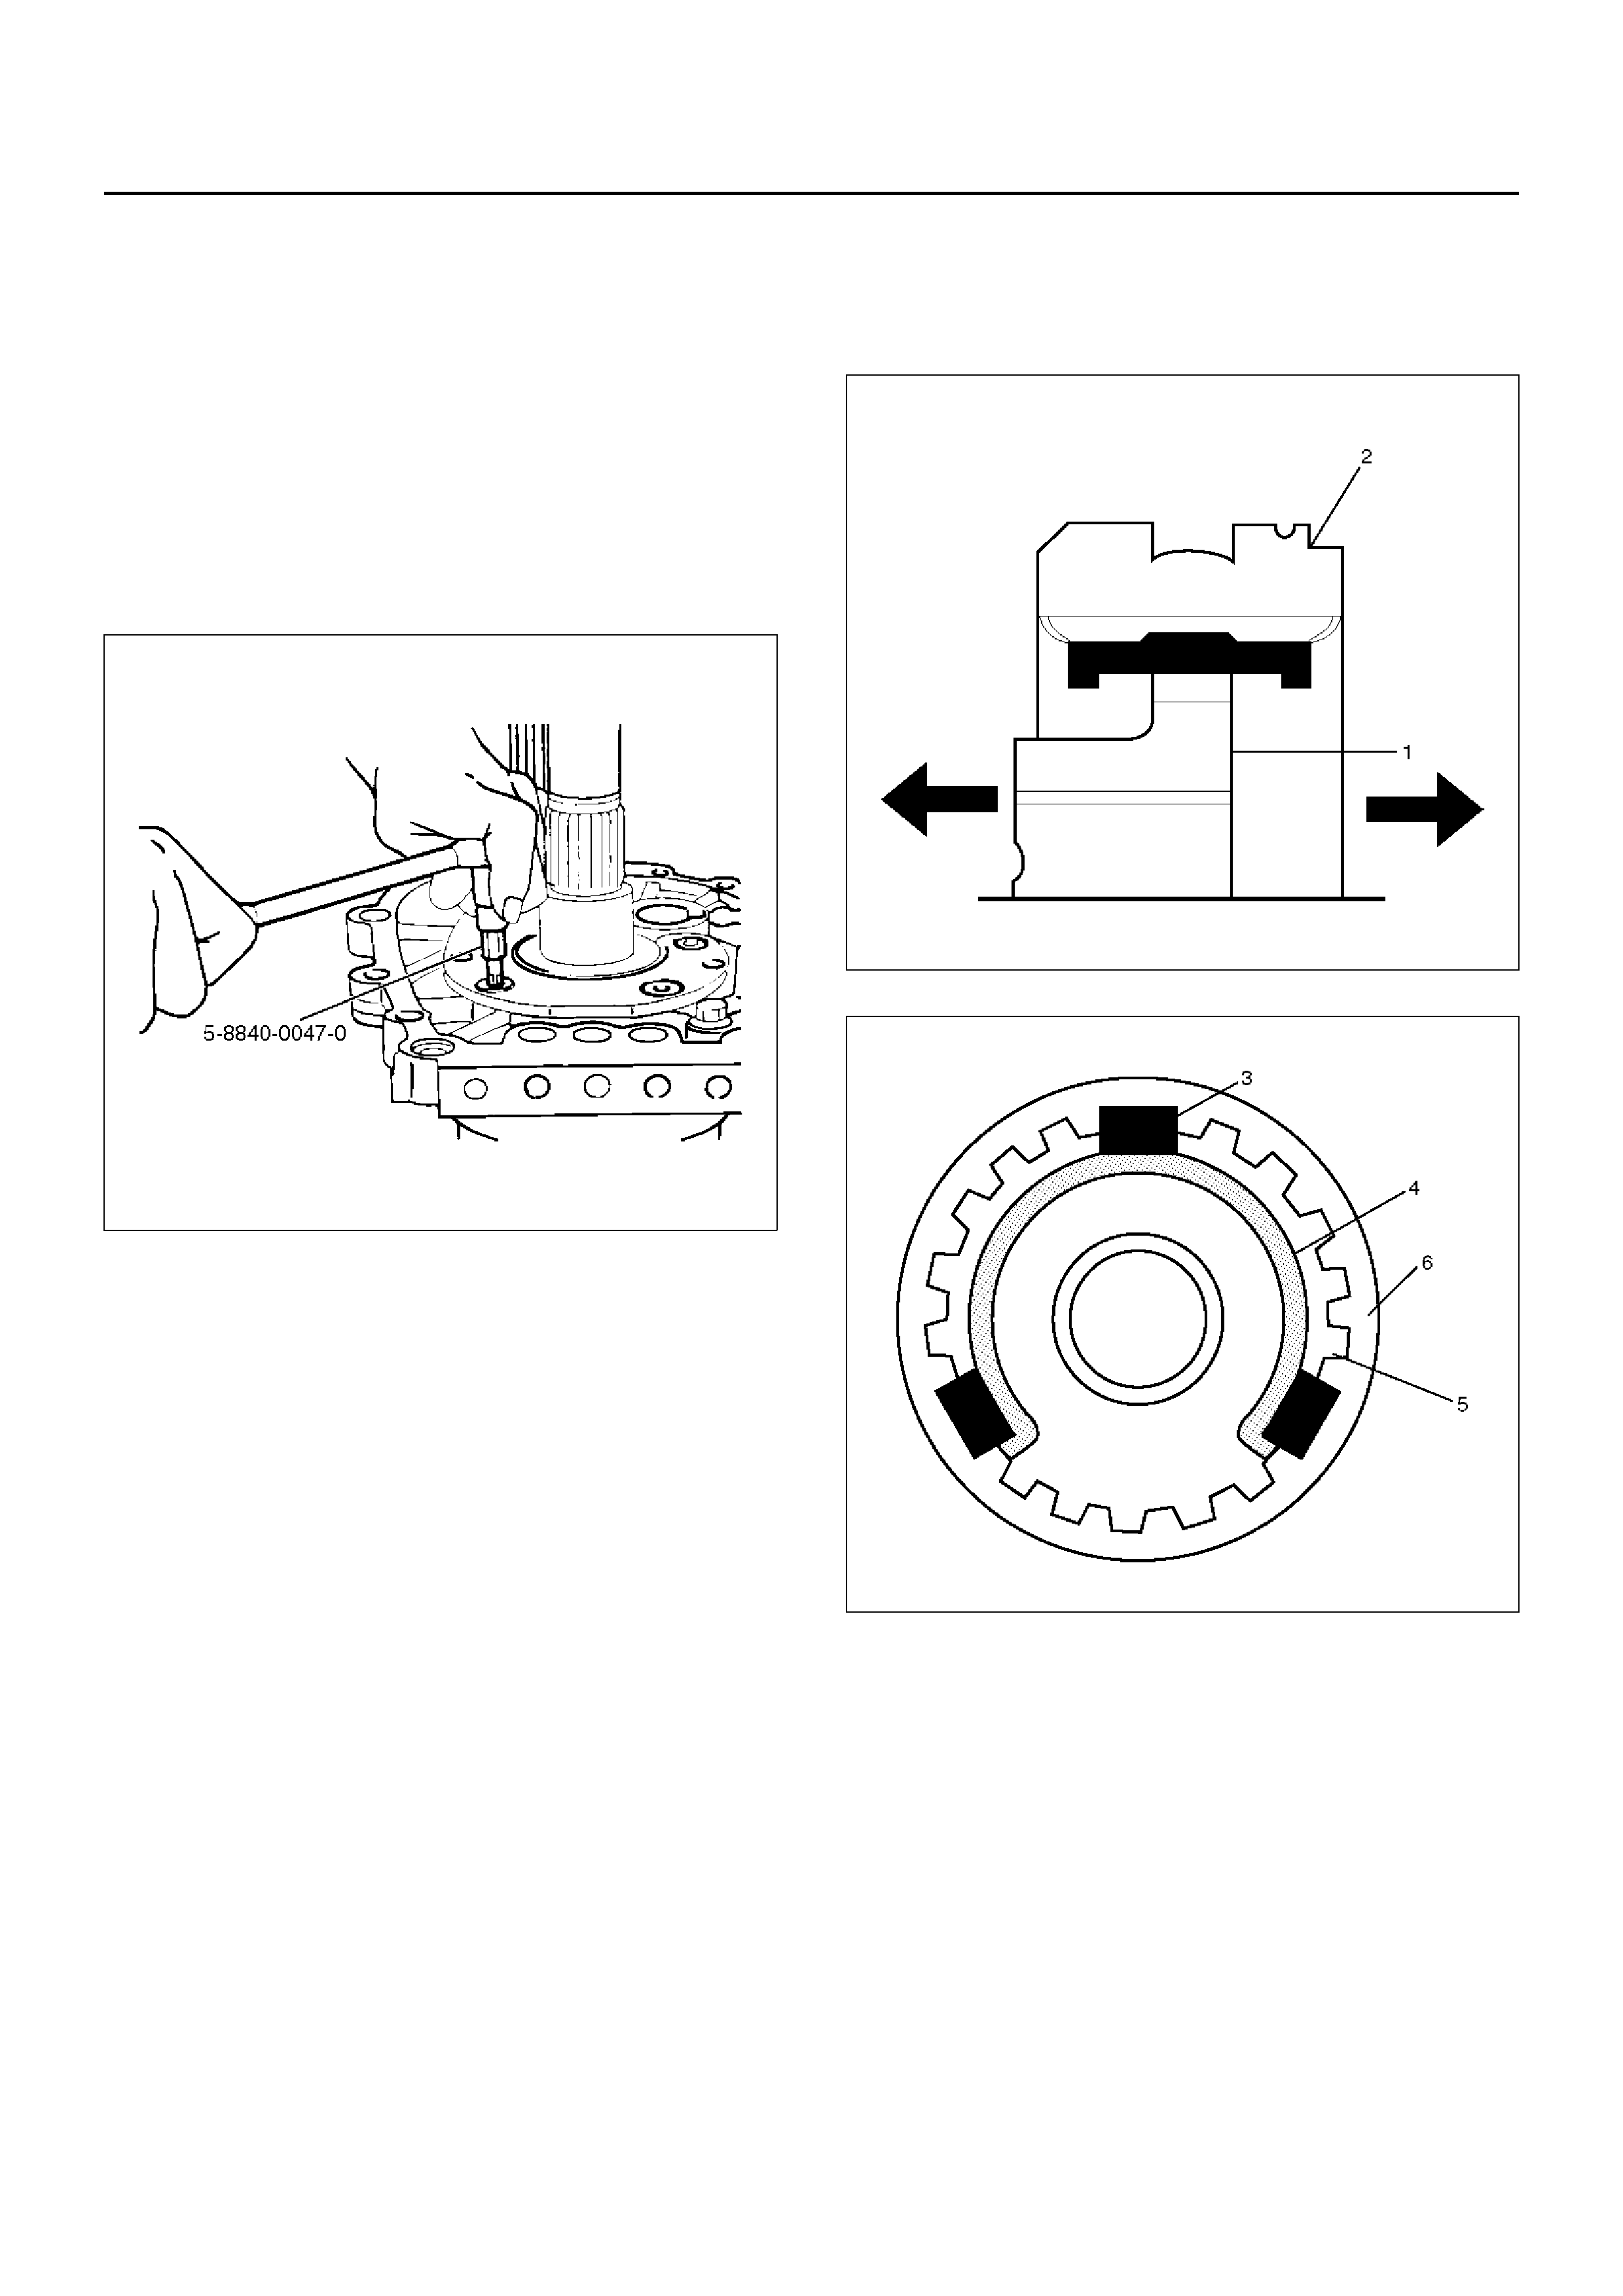
6. Assemble rev–5th synchronizer assembly(20) by
perfor ming the foll owi ng steps.
1. Turn the clutch hub face(1) toward the sleeve
groove(2) (rear side) on the outer
circumference.
2. Check that the inserts(3) fit snugly into the block
ring insert grooves.
3. Check that the inserts springs(4) are fitted to the
inserts as s hown in the illustration.
4. Check that the clutch hub(5) and the sleeve(6)
slide sm ooth ly.
5. Install the synchronizer assembly(20) to the
mainshaft.
The clutc h hub face (wi th the heavy b oss) must
be facing the reverse gear(22) side.
226RS013
226RS049
7. Mesh the 1st–2nd and 3rd–4th synchronizers with
both the 1st and 3rd gears (double engagement).
226RS015
This will prev ent the mains haft from tur nin g.
8. Install the new mainshaft hub nut(19).
Use the mainshaft nut wrench 5–8840–2156–0 to
tighten the mainshaft nut(19) to the specified torque.
Torque: 137N·m
226RW214
9. Use a punch to stake the mainshaft nut at one spot.
226RW153
10. Install needle bearing(18), 5th block ring(17), and
5th gear(16).
11. Apply engine oil to the counter reverse gear(15) and
the reverse gear(22).
Install the counter reverse gear(15) to the counter
shaft.
The reverse gear projection must be facing the
interm ediate plate.
226RW151
12. Install the counter 5th gear(14) to the transmission.
226RS019
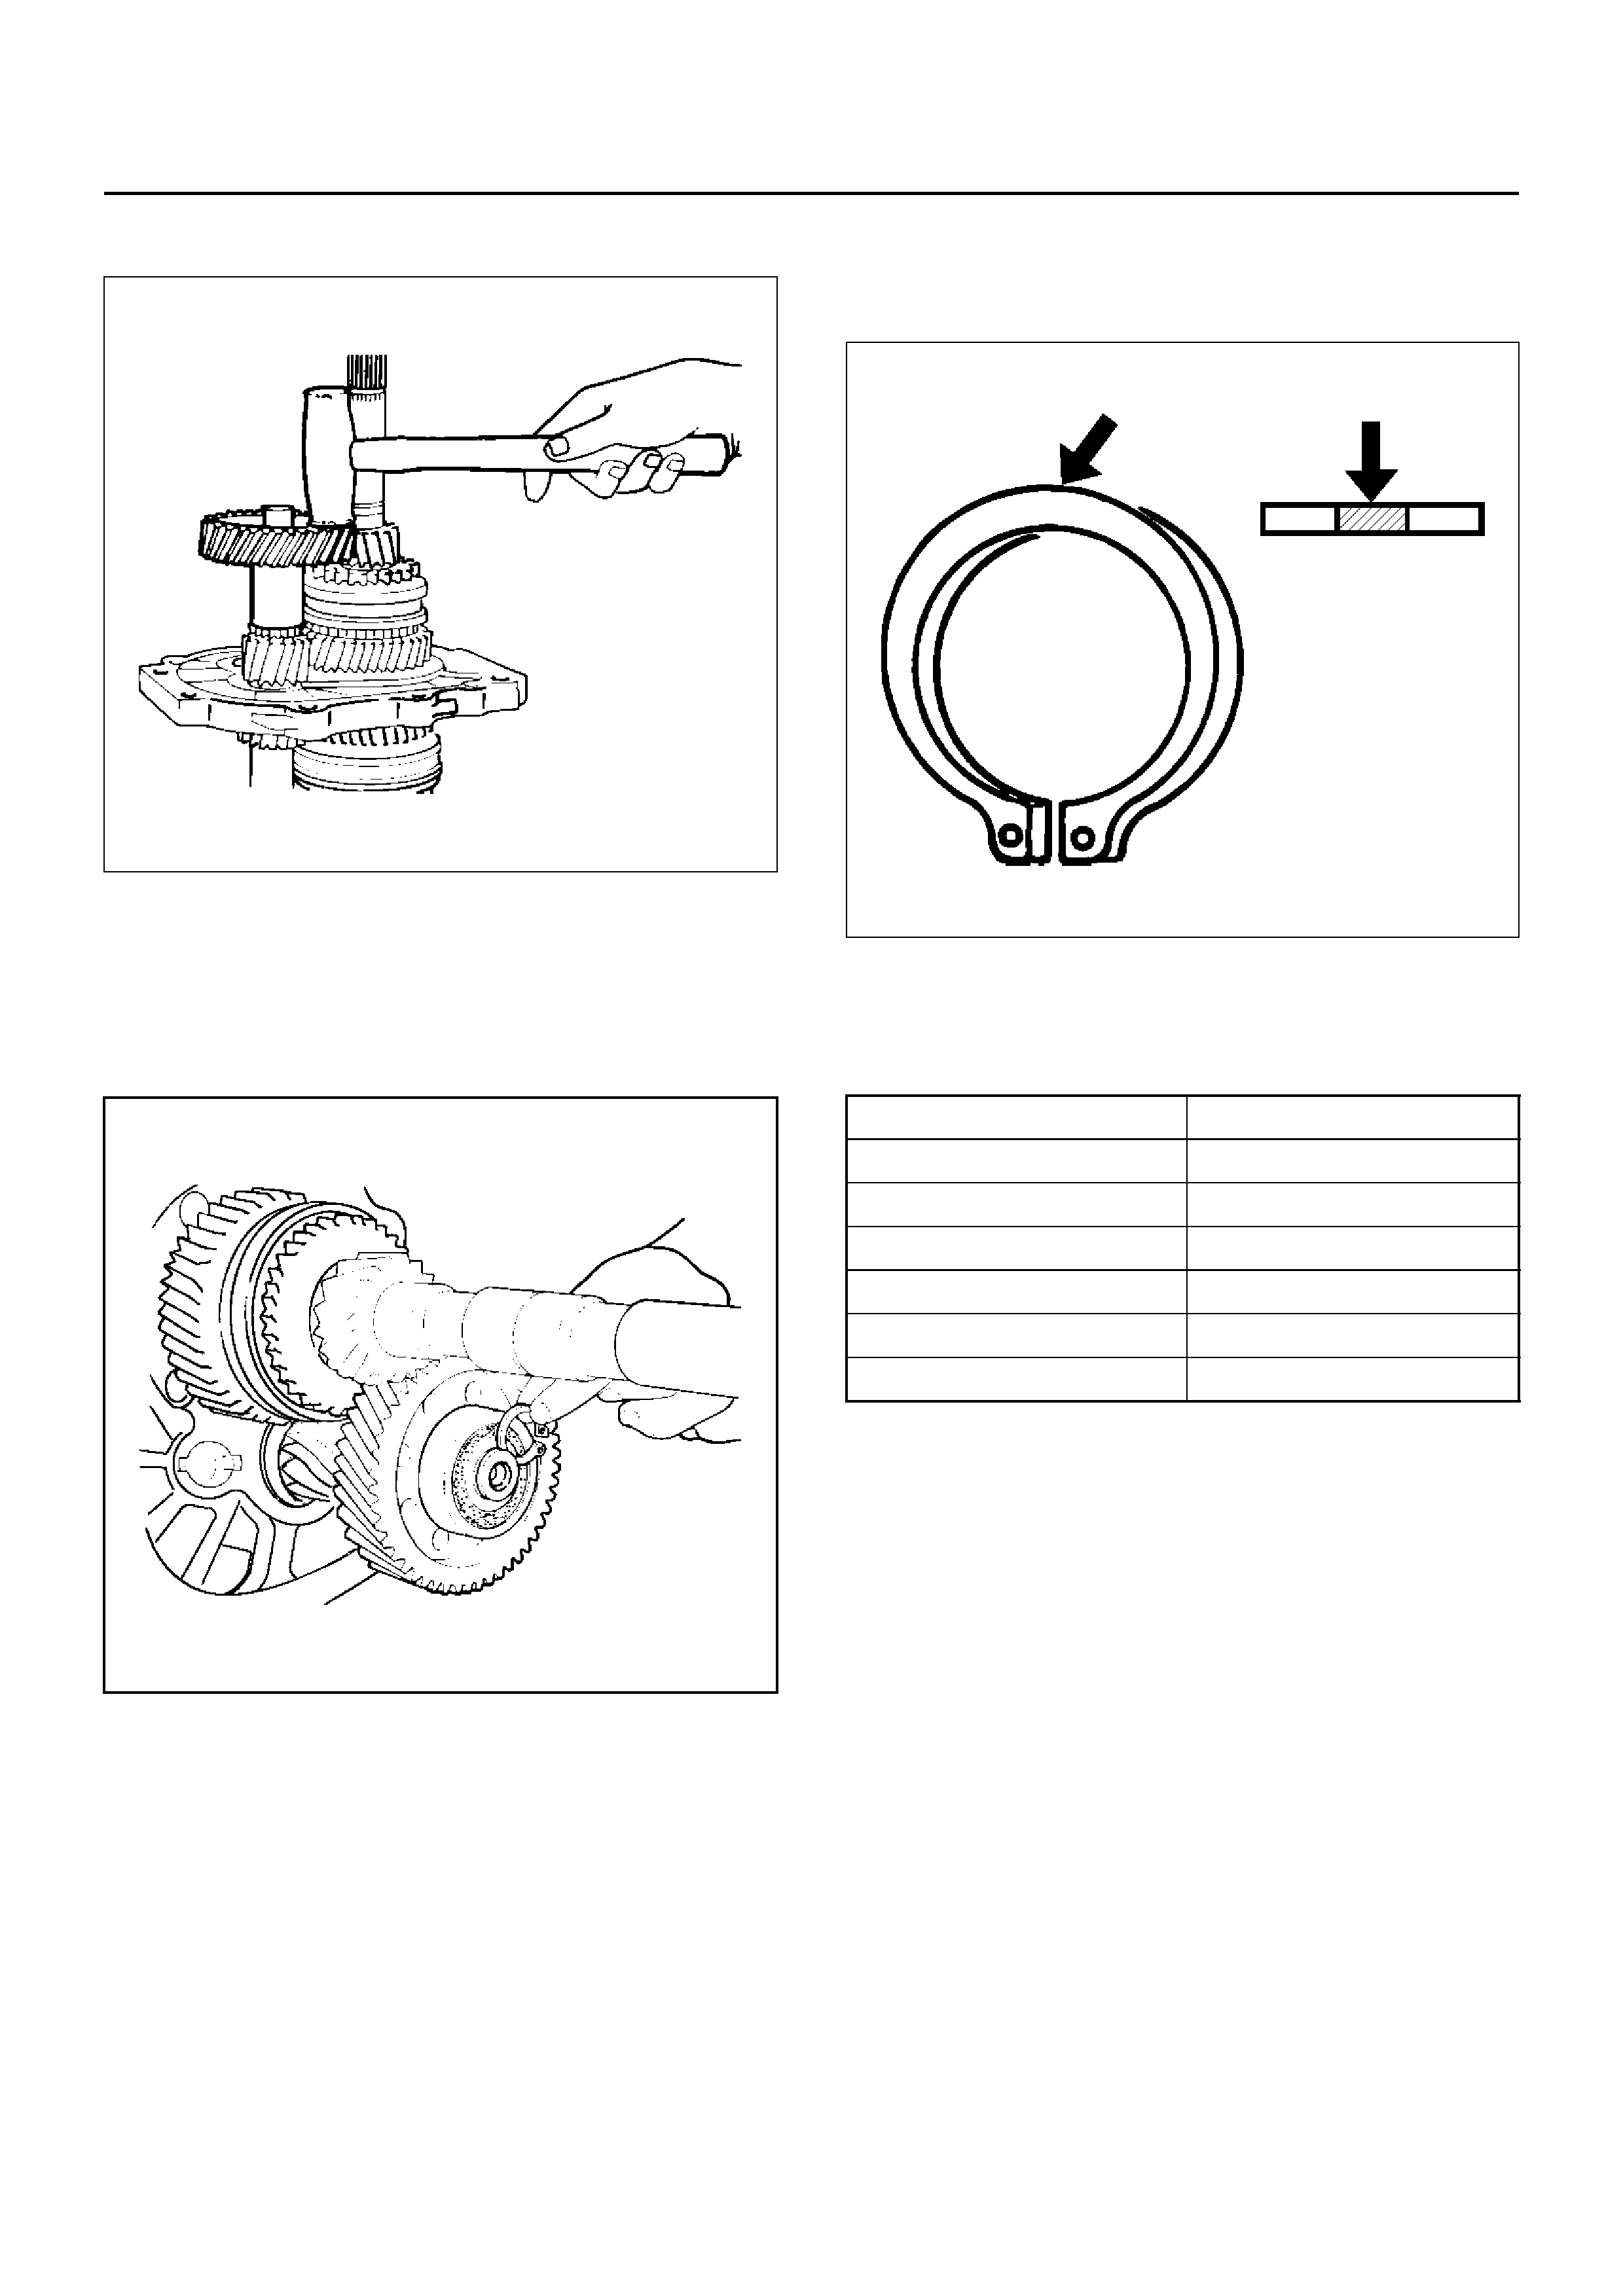
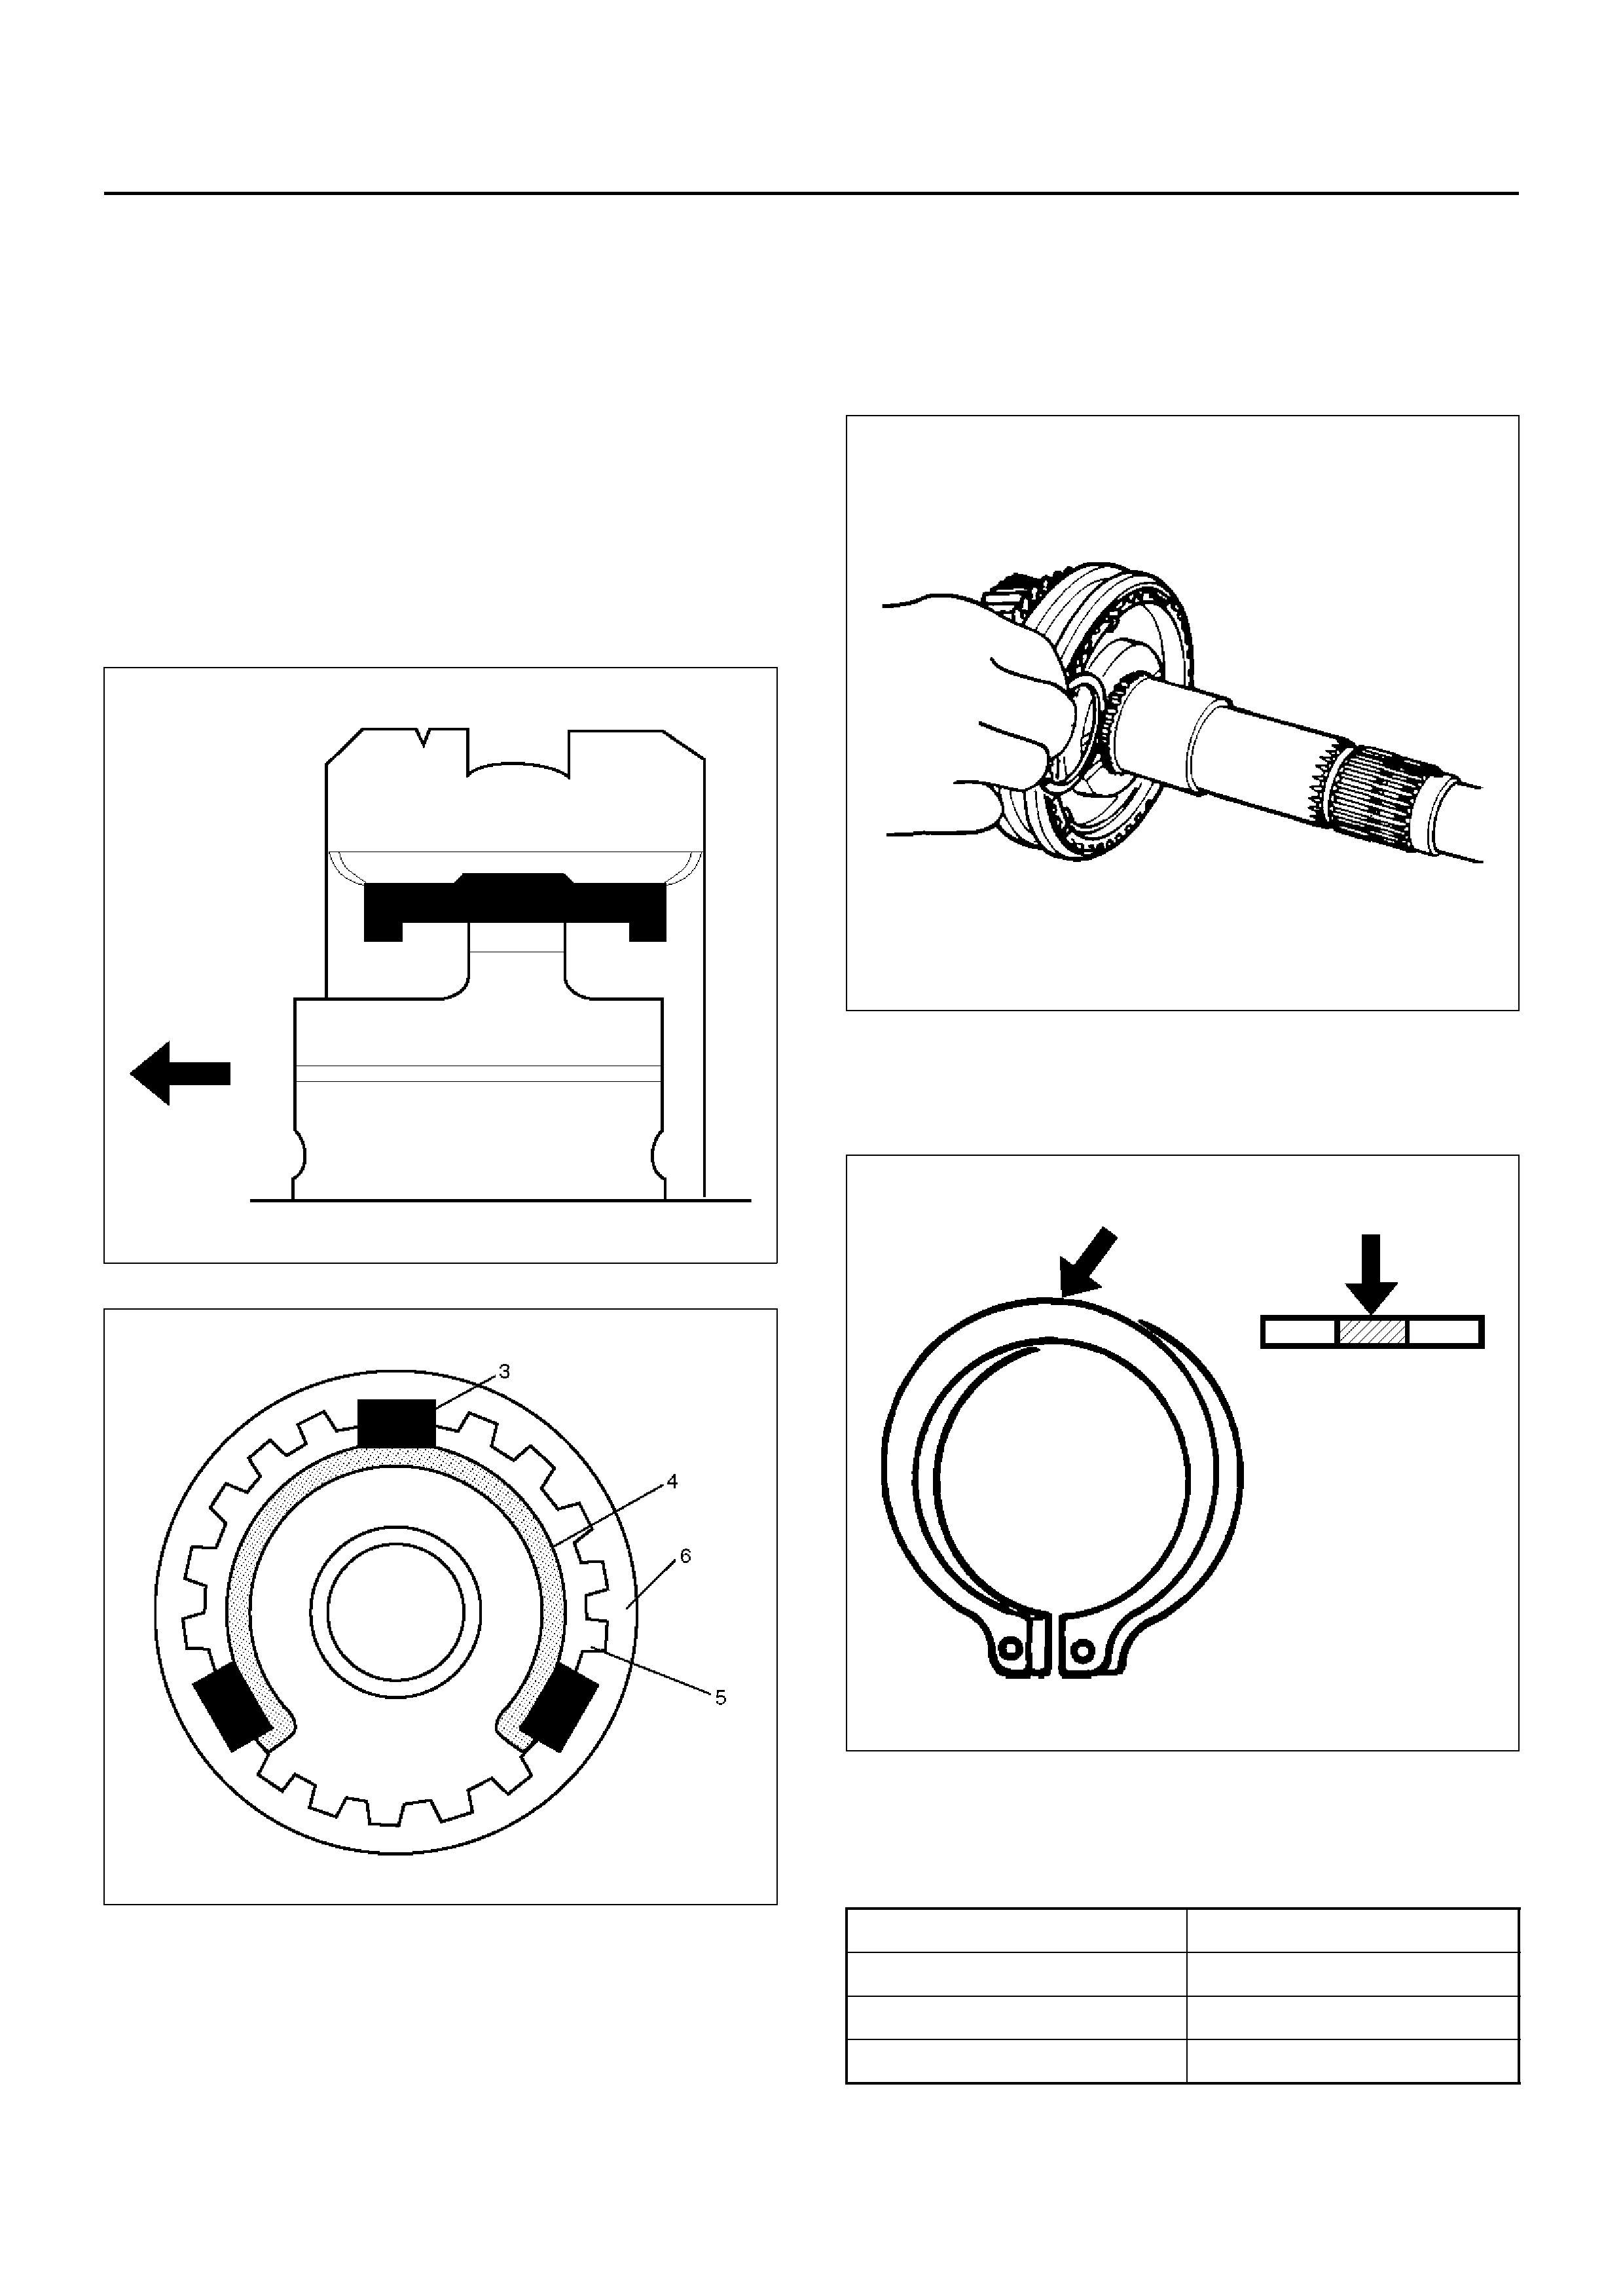
13. Install ball bearing(13) and bearing snap ring by
perfor ming the foll owi ng steps:
• Select the snap ring(12) which will provide the
minimum cl earance between the bal l b ear in g an d
the snap ring.
226RS020
• There are six snap ring sizes available.
The snap rings are color-coded to indicate their
thickness.
226RS021
Ball Bearing and Snap Ring Clearance
Standard: 0–0.15mm
Snap Ring A vailability
• Use a pair of snap ring pliers to install the snap
ring(12) to the counter gear shaft.
The snap ring must be fully inserted into the
counter gear shaft snap ring groove.
14. Assemble reverse idler shaft(11), reverse idler
gear(10), thrust washer(9), and idle shaft pin(8) into
reverse idler gear assembly(7).
Thickness Color Coding
1.1mm White
1.2mm Yellow
1.3mm Blue
1.4mm Pink
1.5mm Green
1.6mm Brown
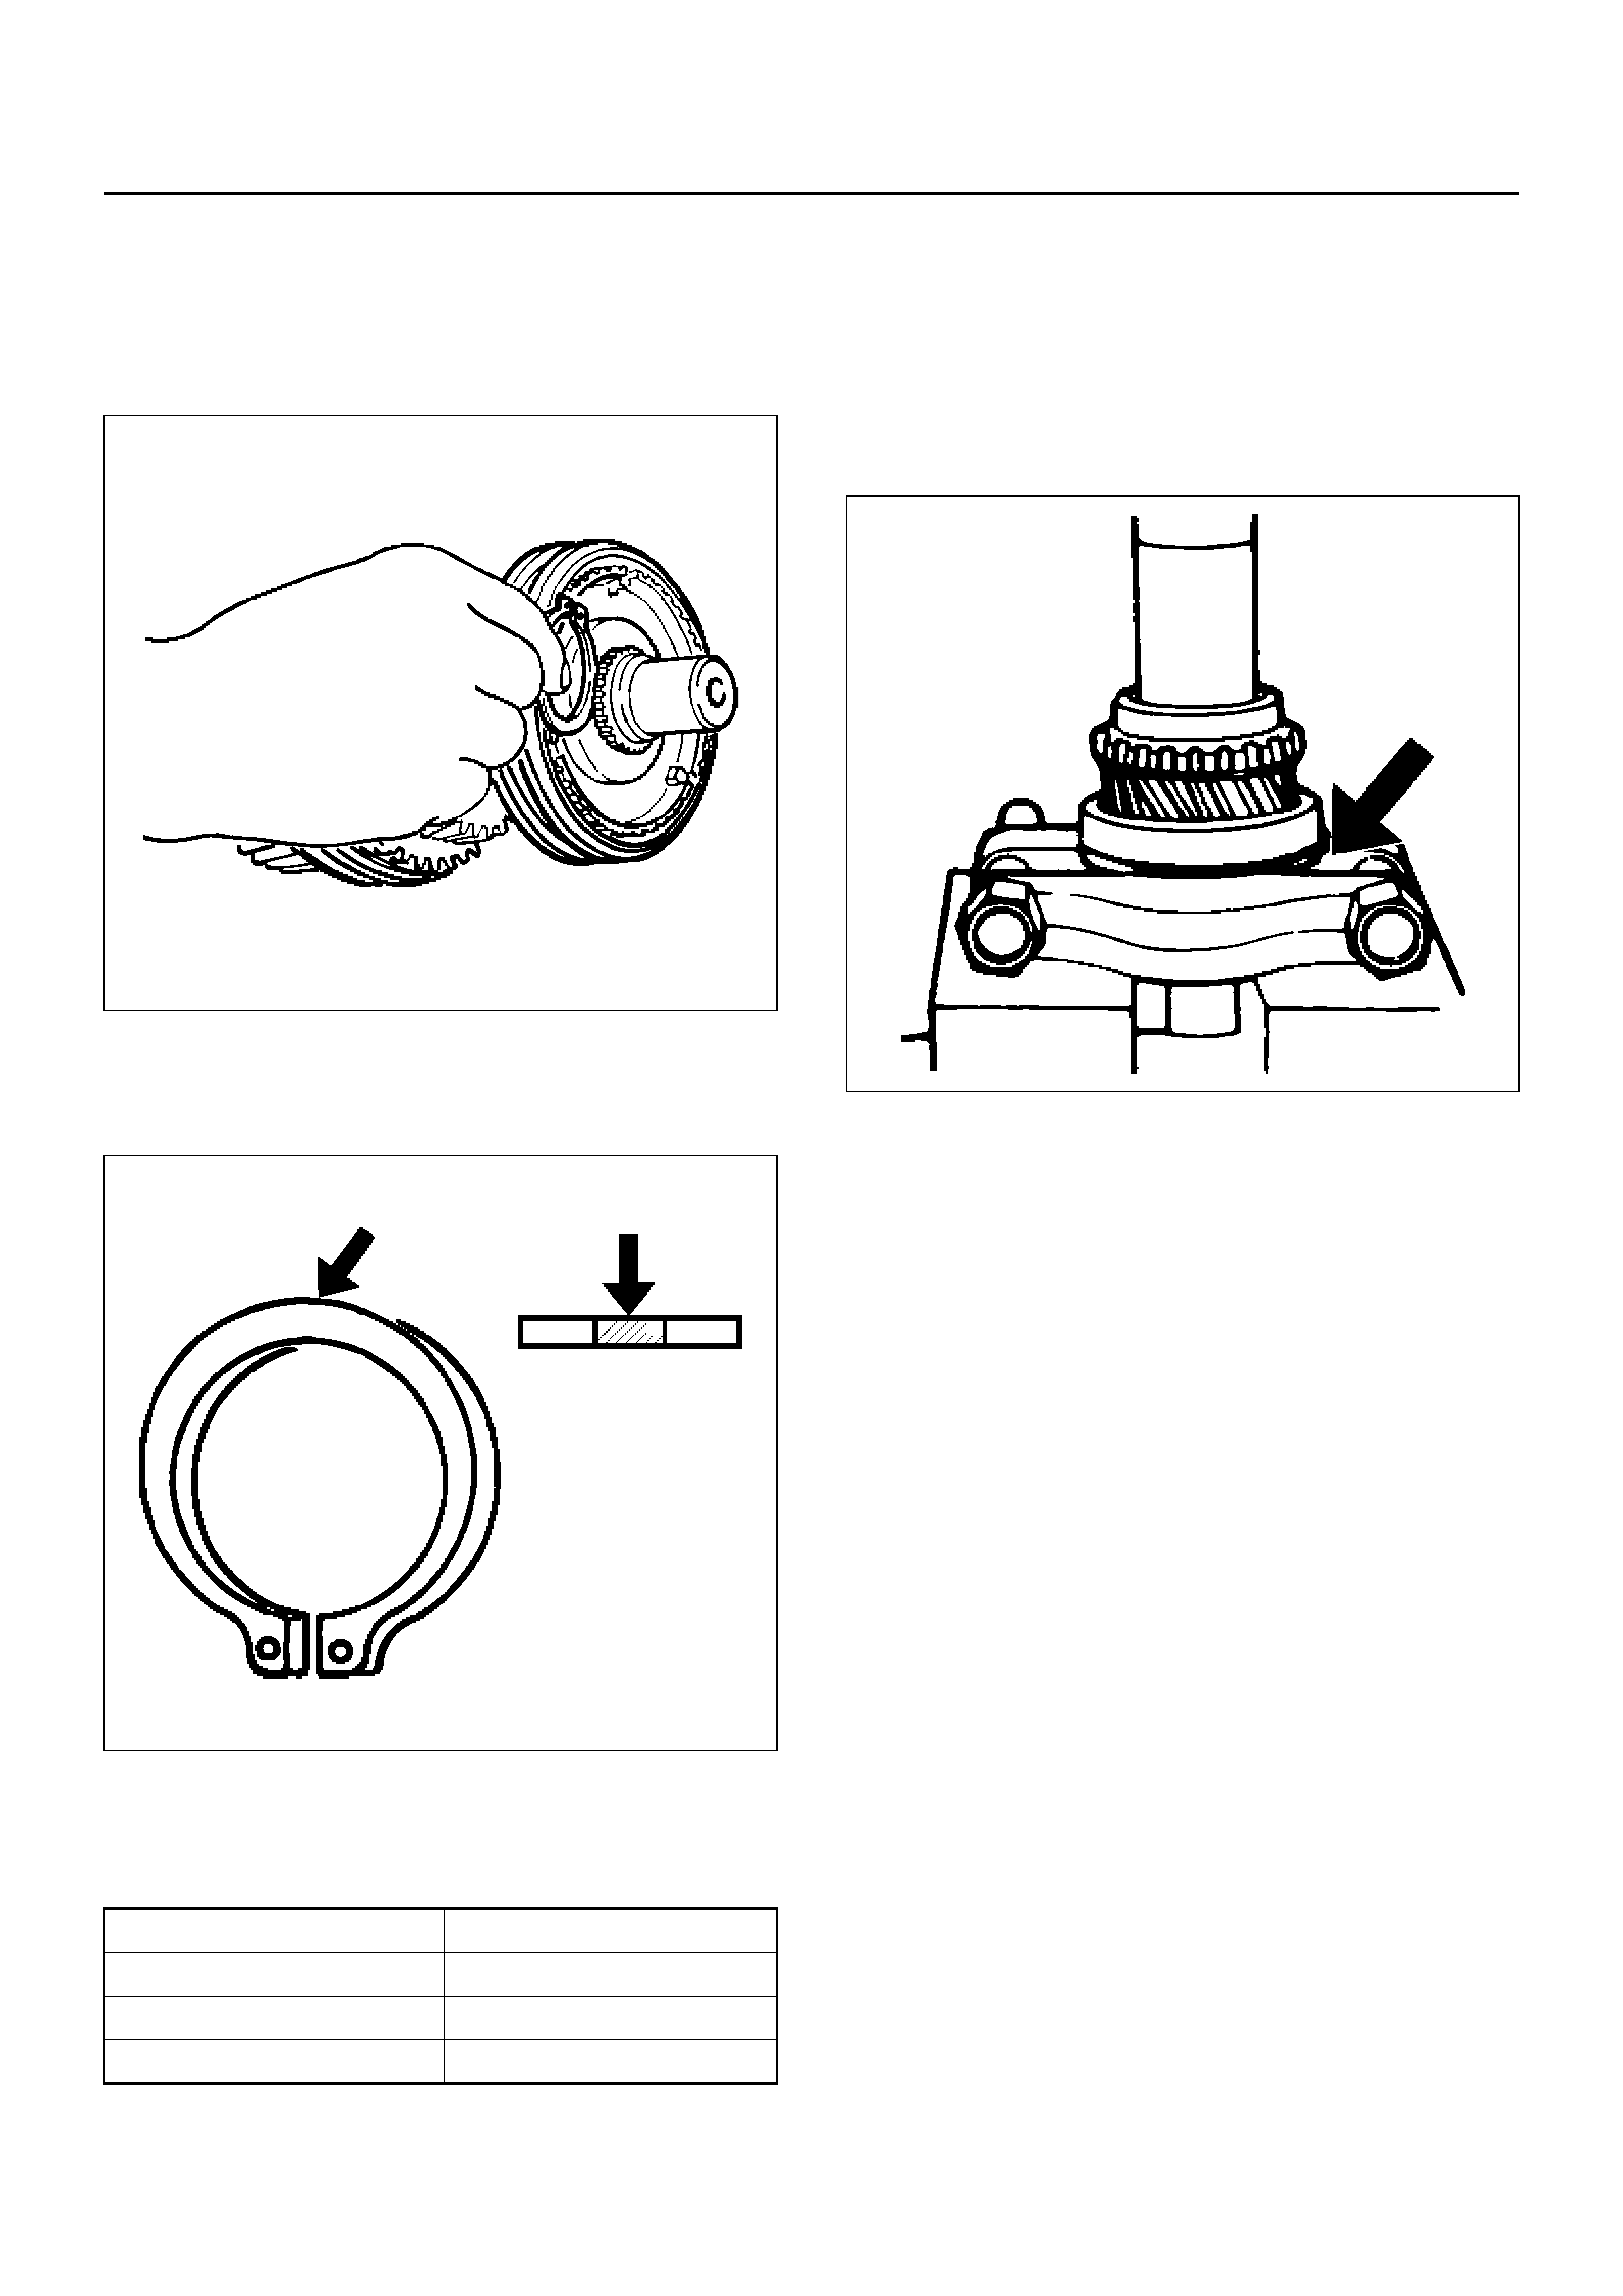
15. Select reverse idler gear snap ring(6) which will
provide the minimum clearance between the
intermediate plate(26) and the snap ring(6).
226RS022
• There are three snap ring sizes available.
The snap rings are color-coded to indicate their
thickness.
Intermediate Plate and Snap Ring Clearance
Standard: 0–0.15mm
Snap Ring Availability
226RS021
• Use a pair of snap ring pliers to install the snap
ring to the reverse idler shaft.
The snap ring must be fully inserted into the
reverse idler shaft snap ring groove.
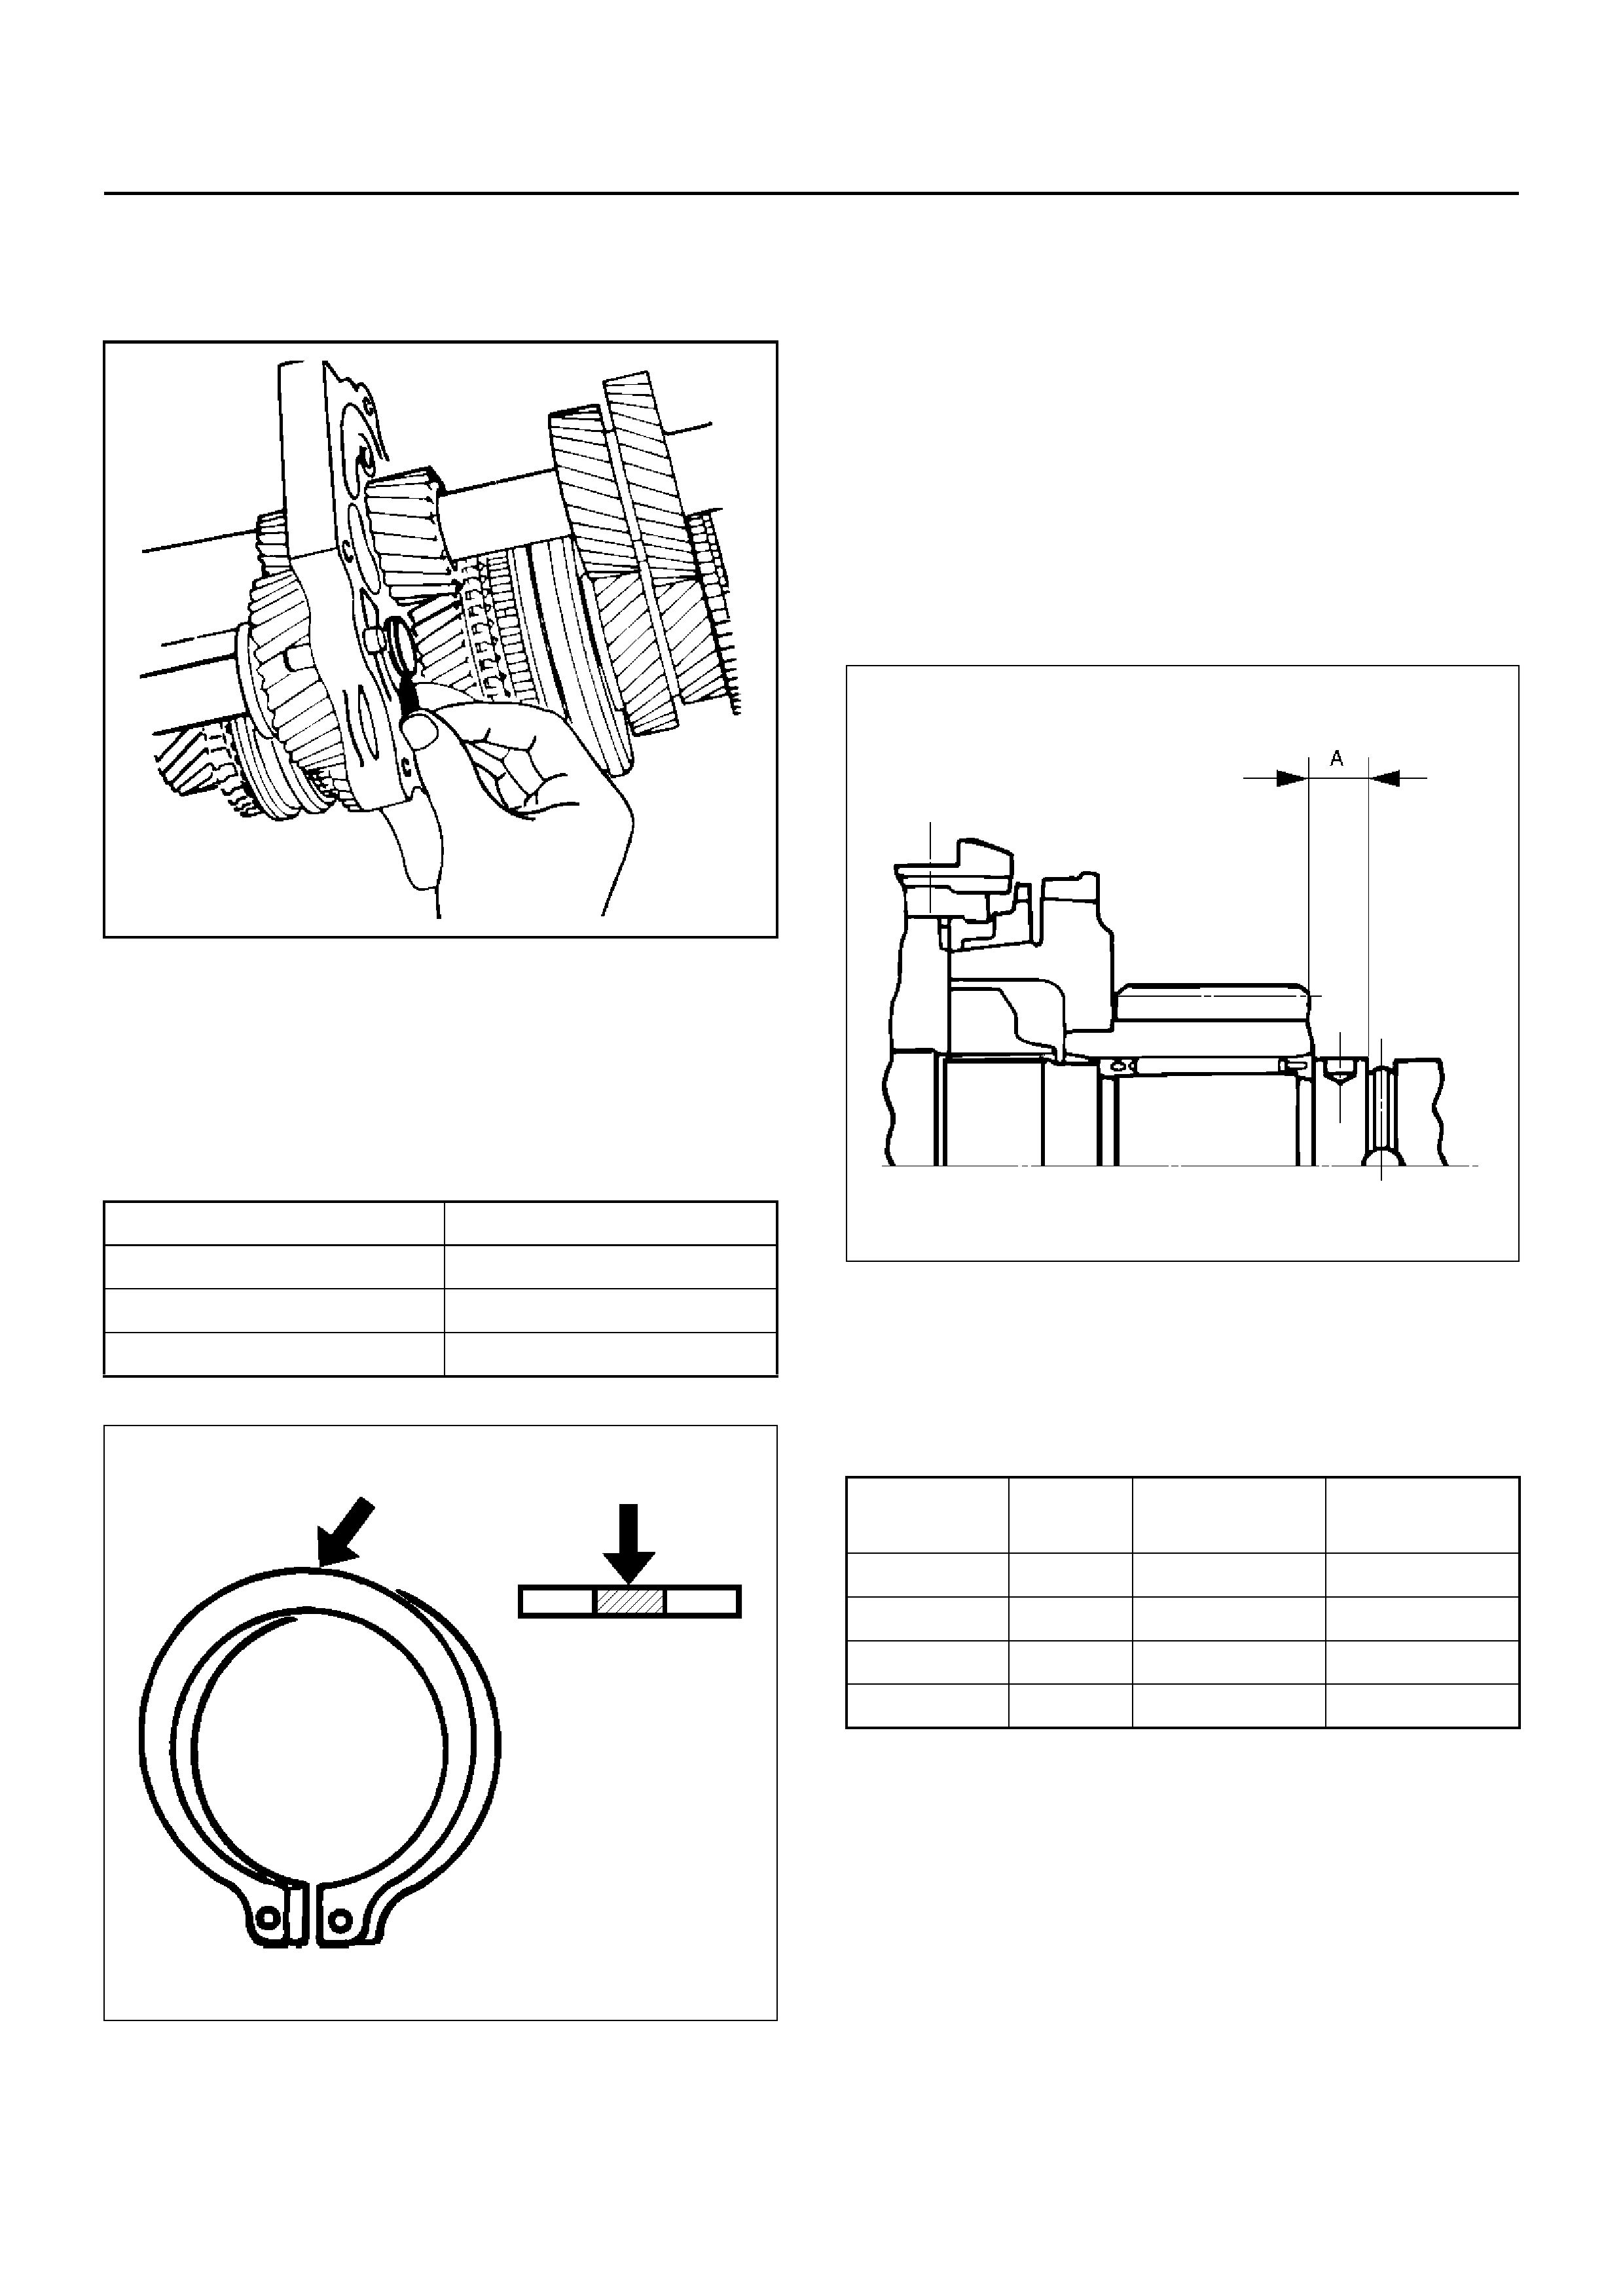
16. Install thrust washer and lock ball(5) by performing
the following steps:
• Use a thic kness g auge to measu re the clear ance
between the 5th gear and the thrust washer.
5th Gear and Thrust Washer Clearance
Standard: 0.10–0.25mm
• Measure clearance “A" as shown in the figure.
226RS023
• Select appropriate thrust washer from chart.
• There are four thrust washer sizes available.
• The thrust washers are color coded to indicate
their thickness.
Thrust Washer Availability
Thickness Color Coding
1.2mm White
1.3mm Yellow
1.4mm Blue
Thickness
mm Color
Coding A mm Clearance
mm
7.9 White 8.05–8.1 0.15–0.25
8.0 Yellow 8.1–8.2 0.1–0.25
8.1 Green 8.2–8.3 0.1–0.25
8.2 Bluen 8.3–8.36 0.1–0.21 )
226RS024
• Apply grease to the thrust washer and the lock
ball.
• Install the thrust washer and the lock ball.
17. Install thrust plate(4) and retainer(3).
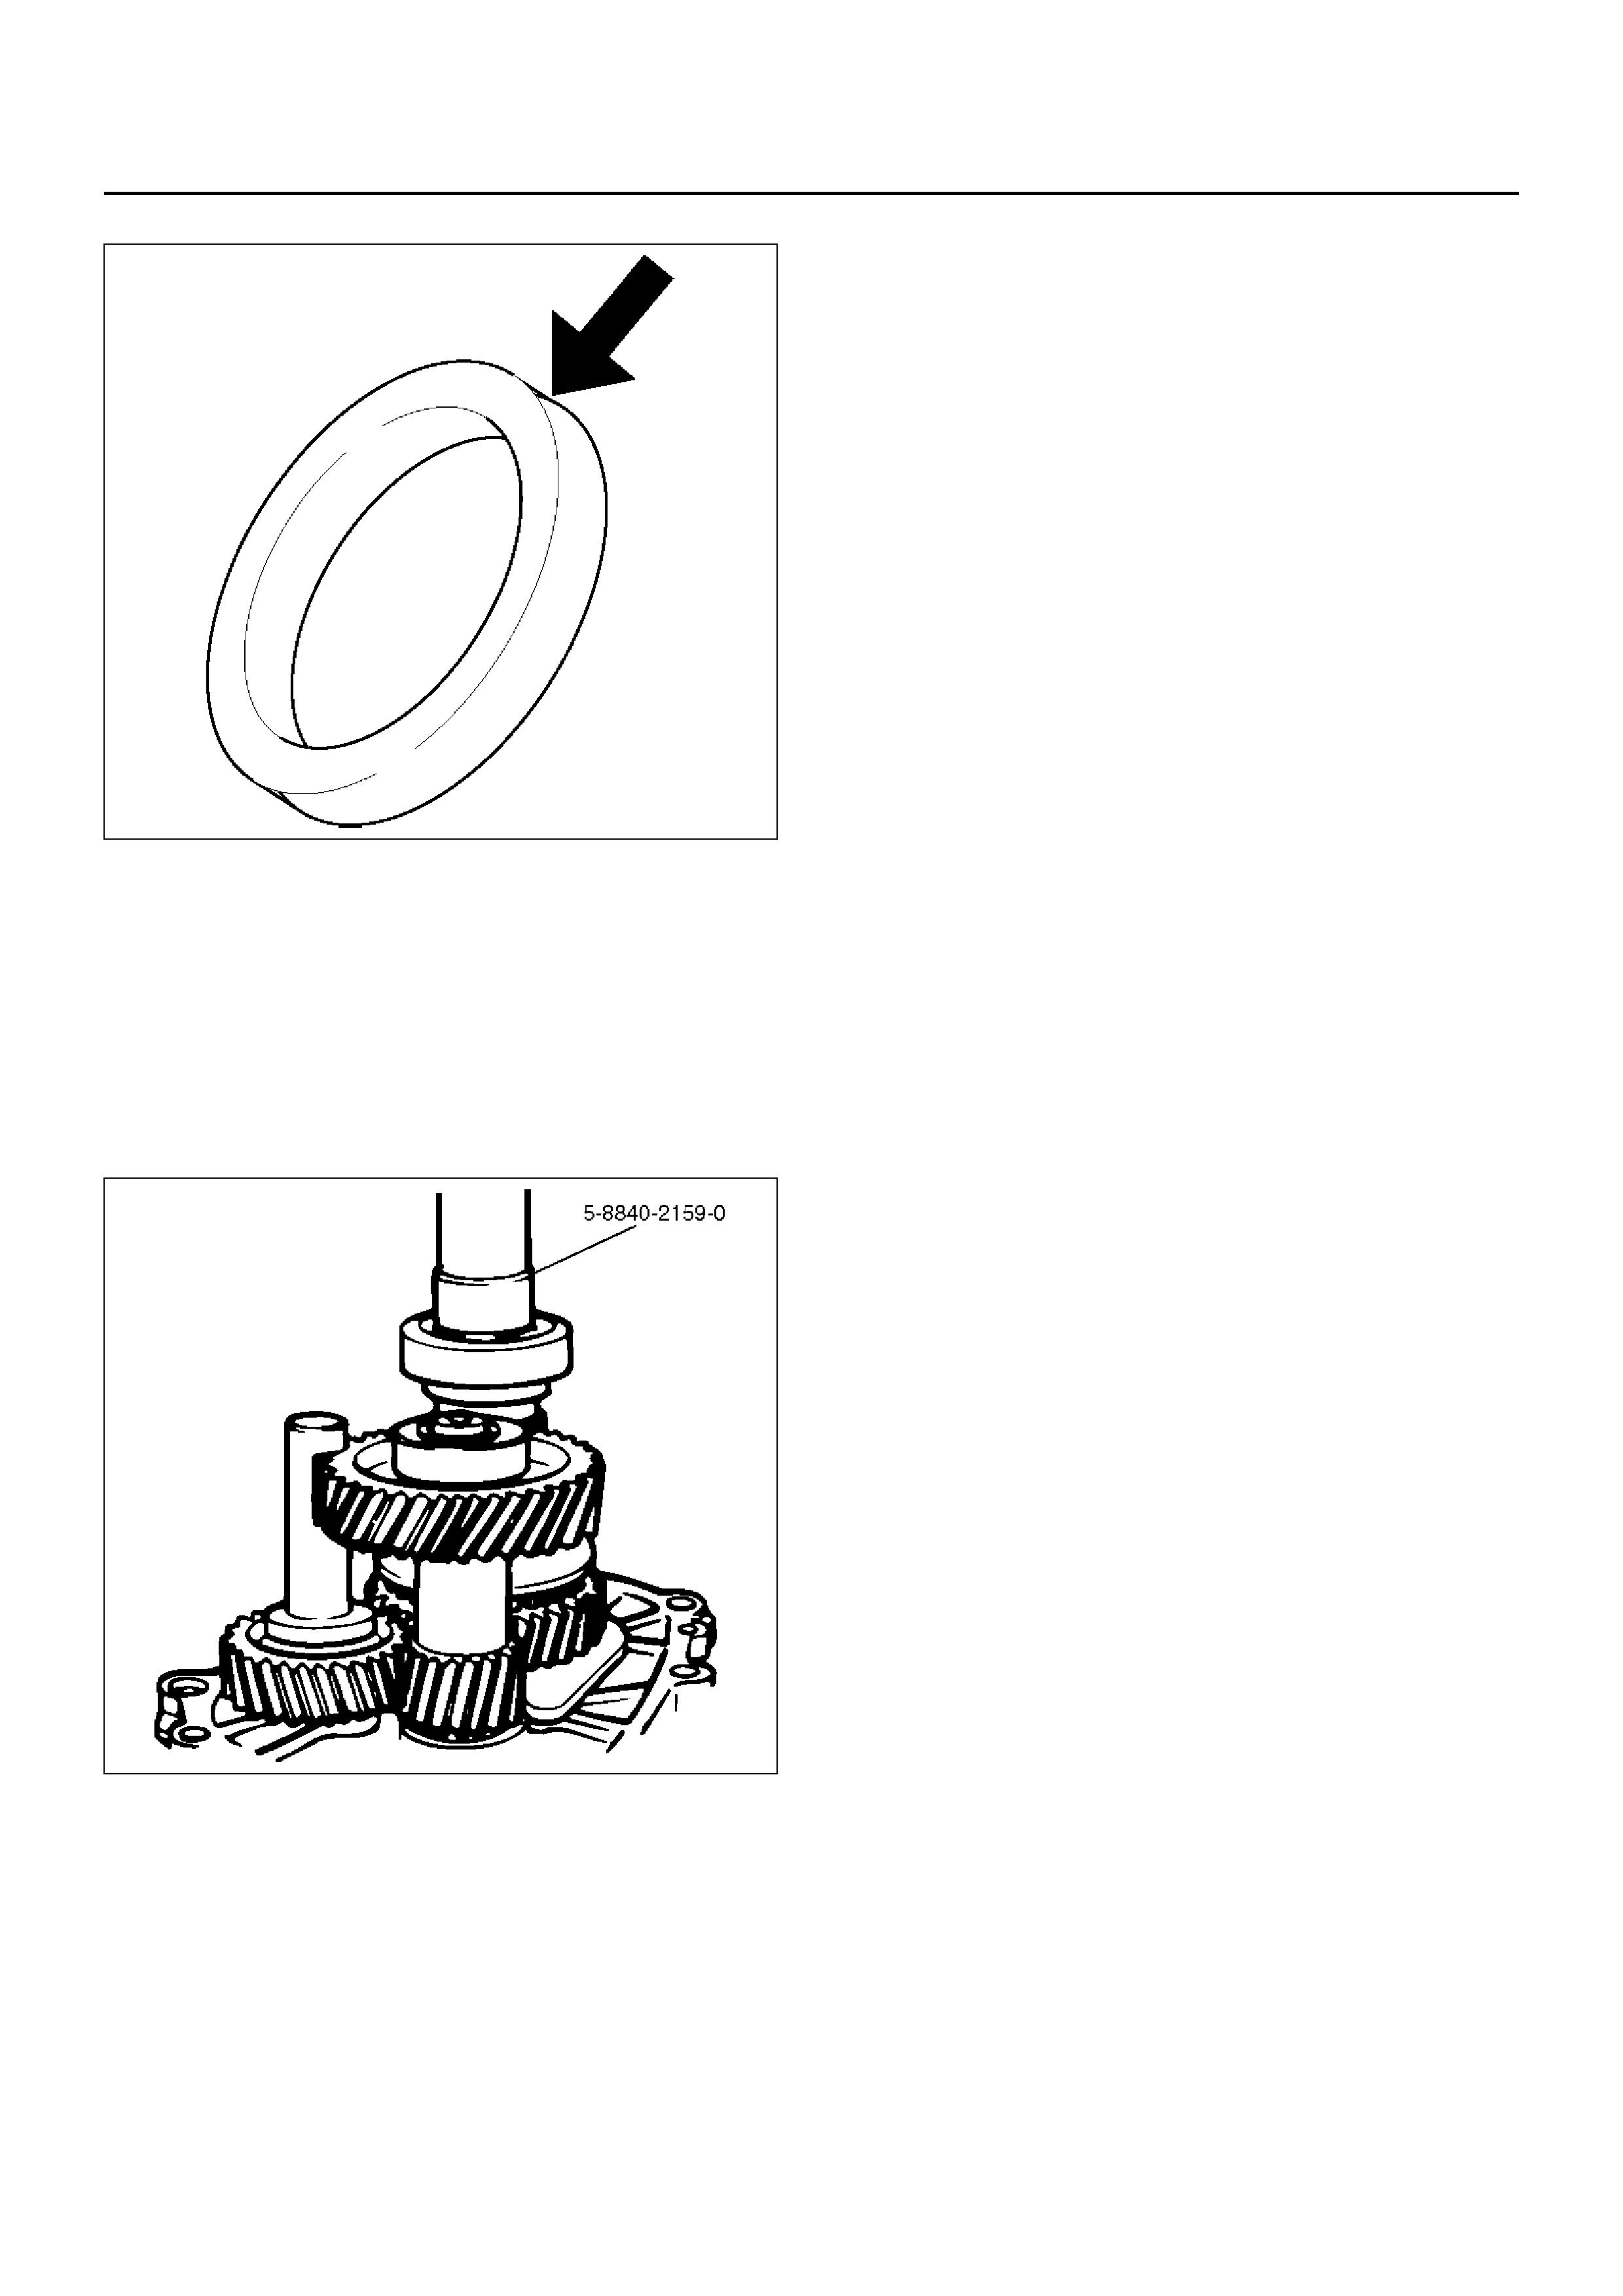
18. Apply engine oil to the bearing inner and outer
circumference.
Use the installer 5–8840–2159–0 to install the ball
bearing(2) to the mainshaft in proper direction.
226RW215
19. Install oil seal collar(1).
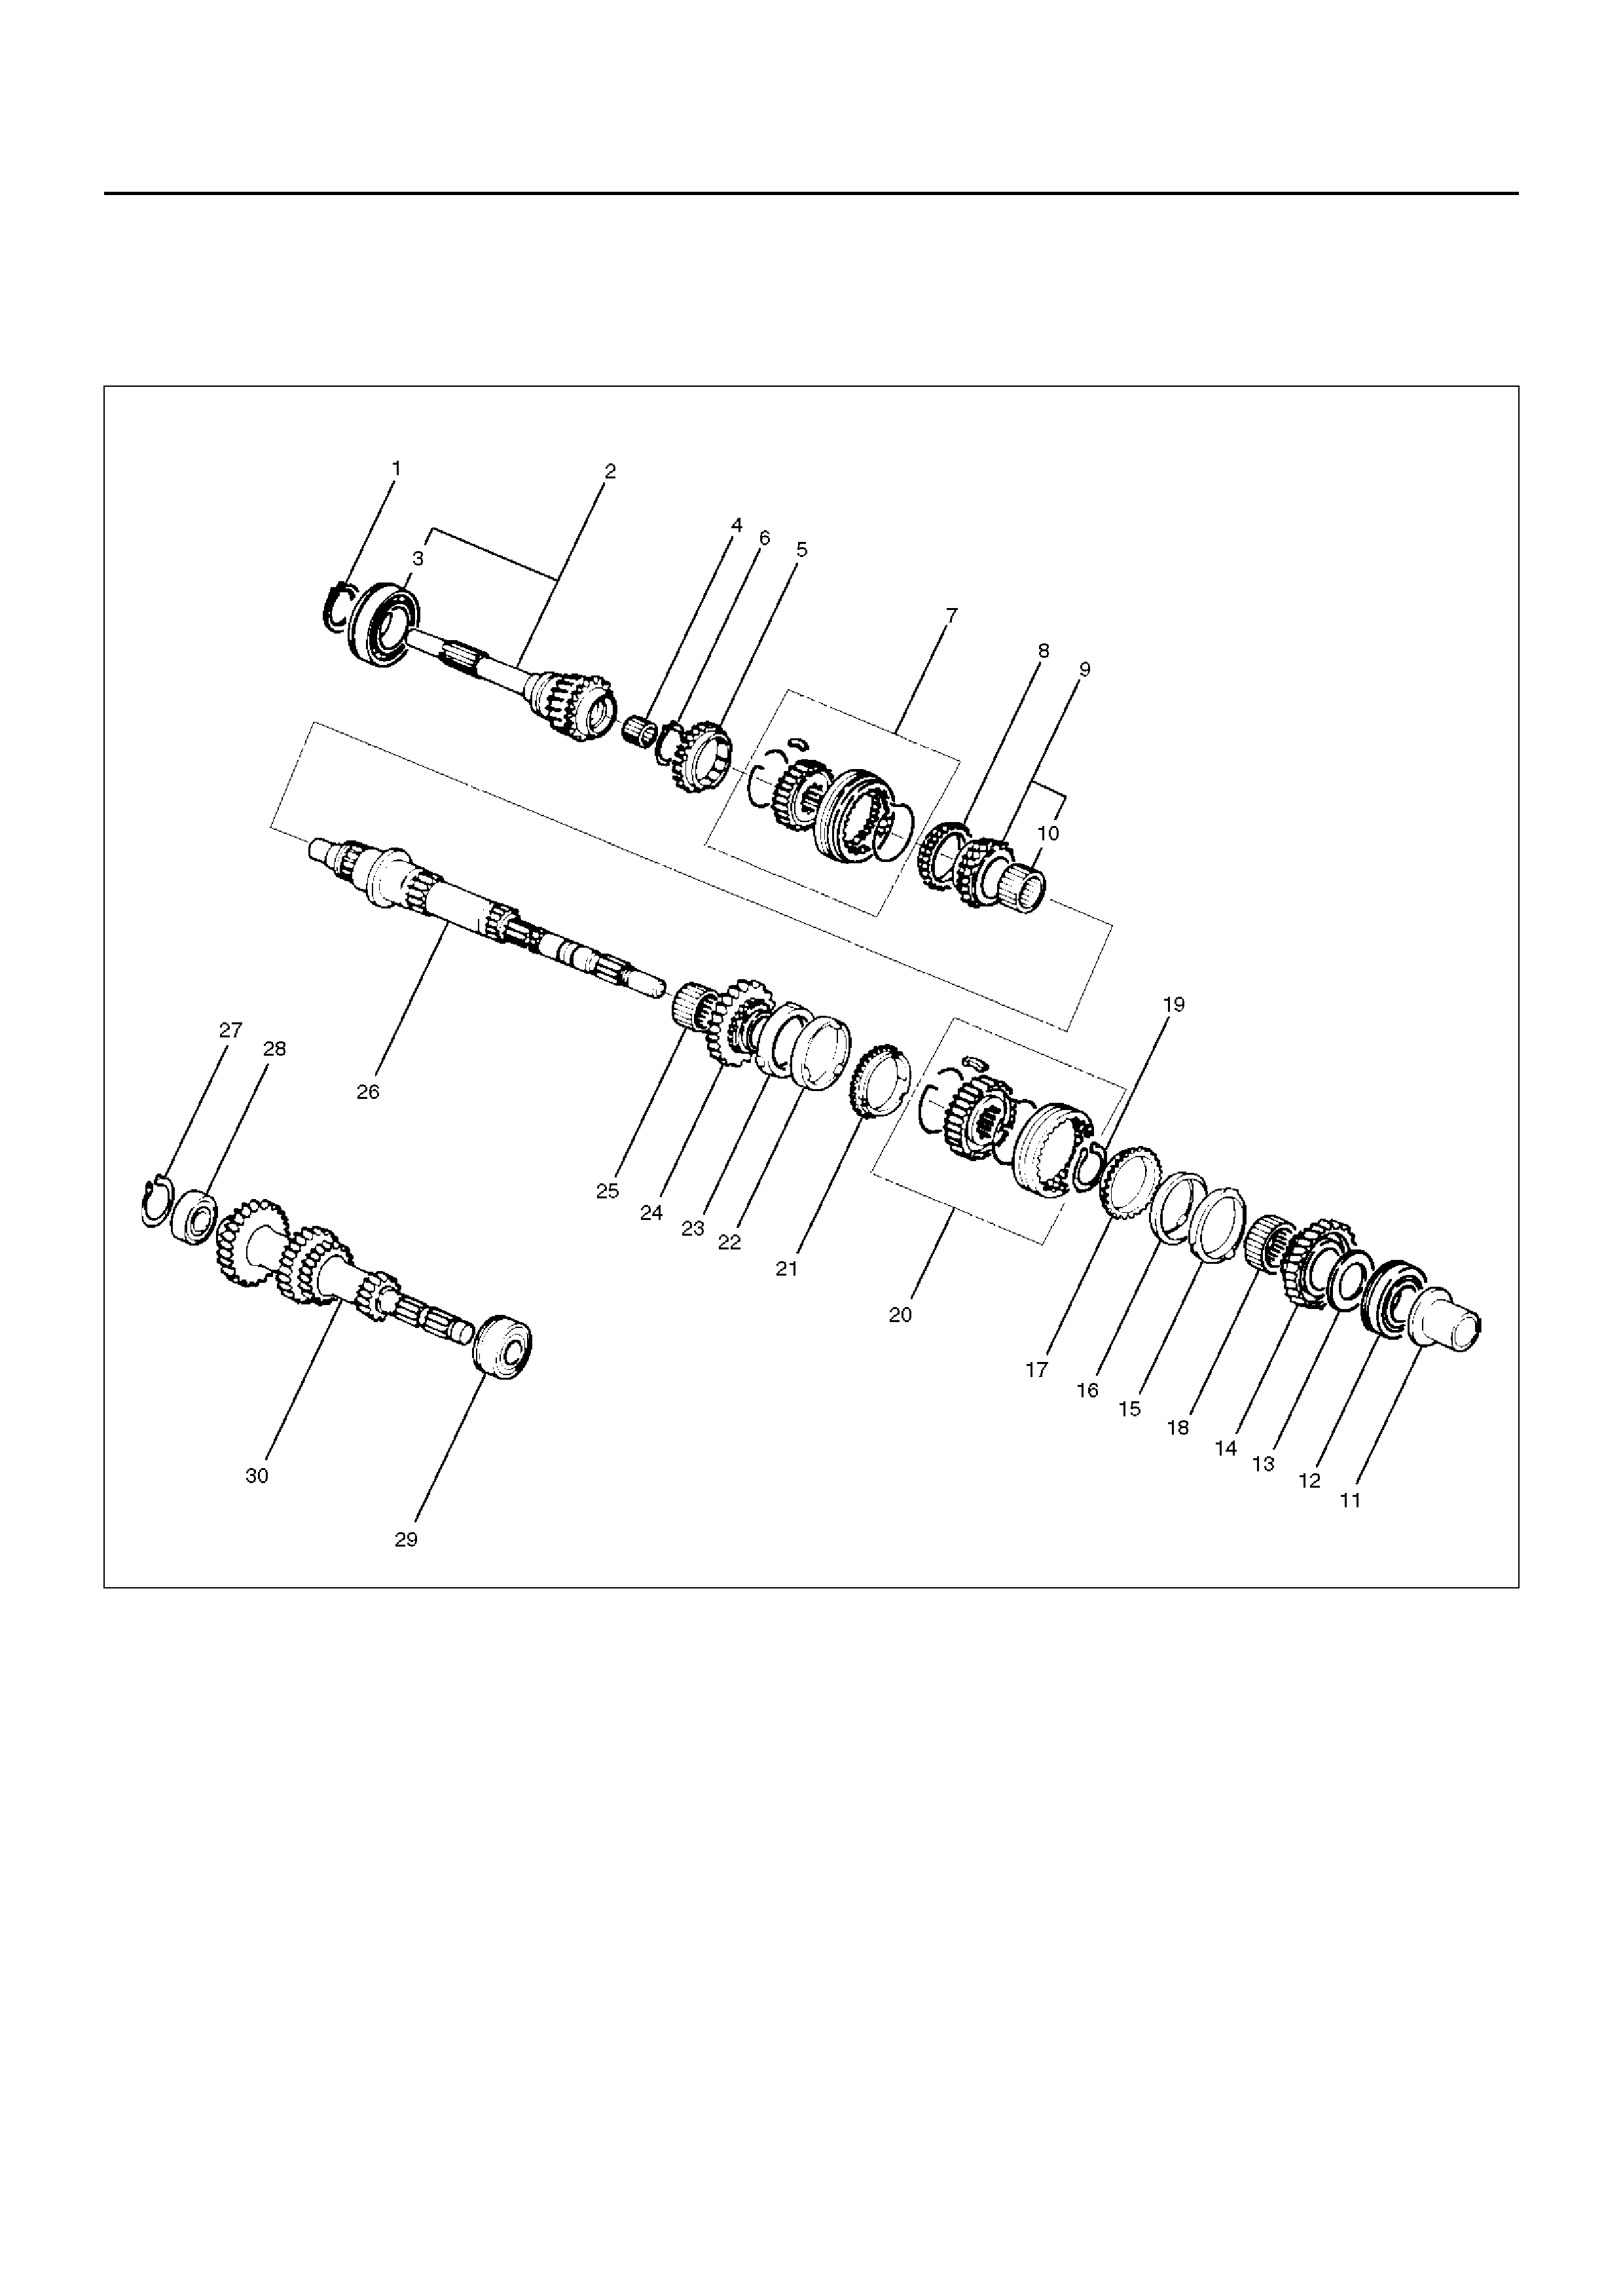
TOP GEAR SHAFT, MAIN GEAR SHAFT, AND COUNTER GEAR
SHAFT (MUA)
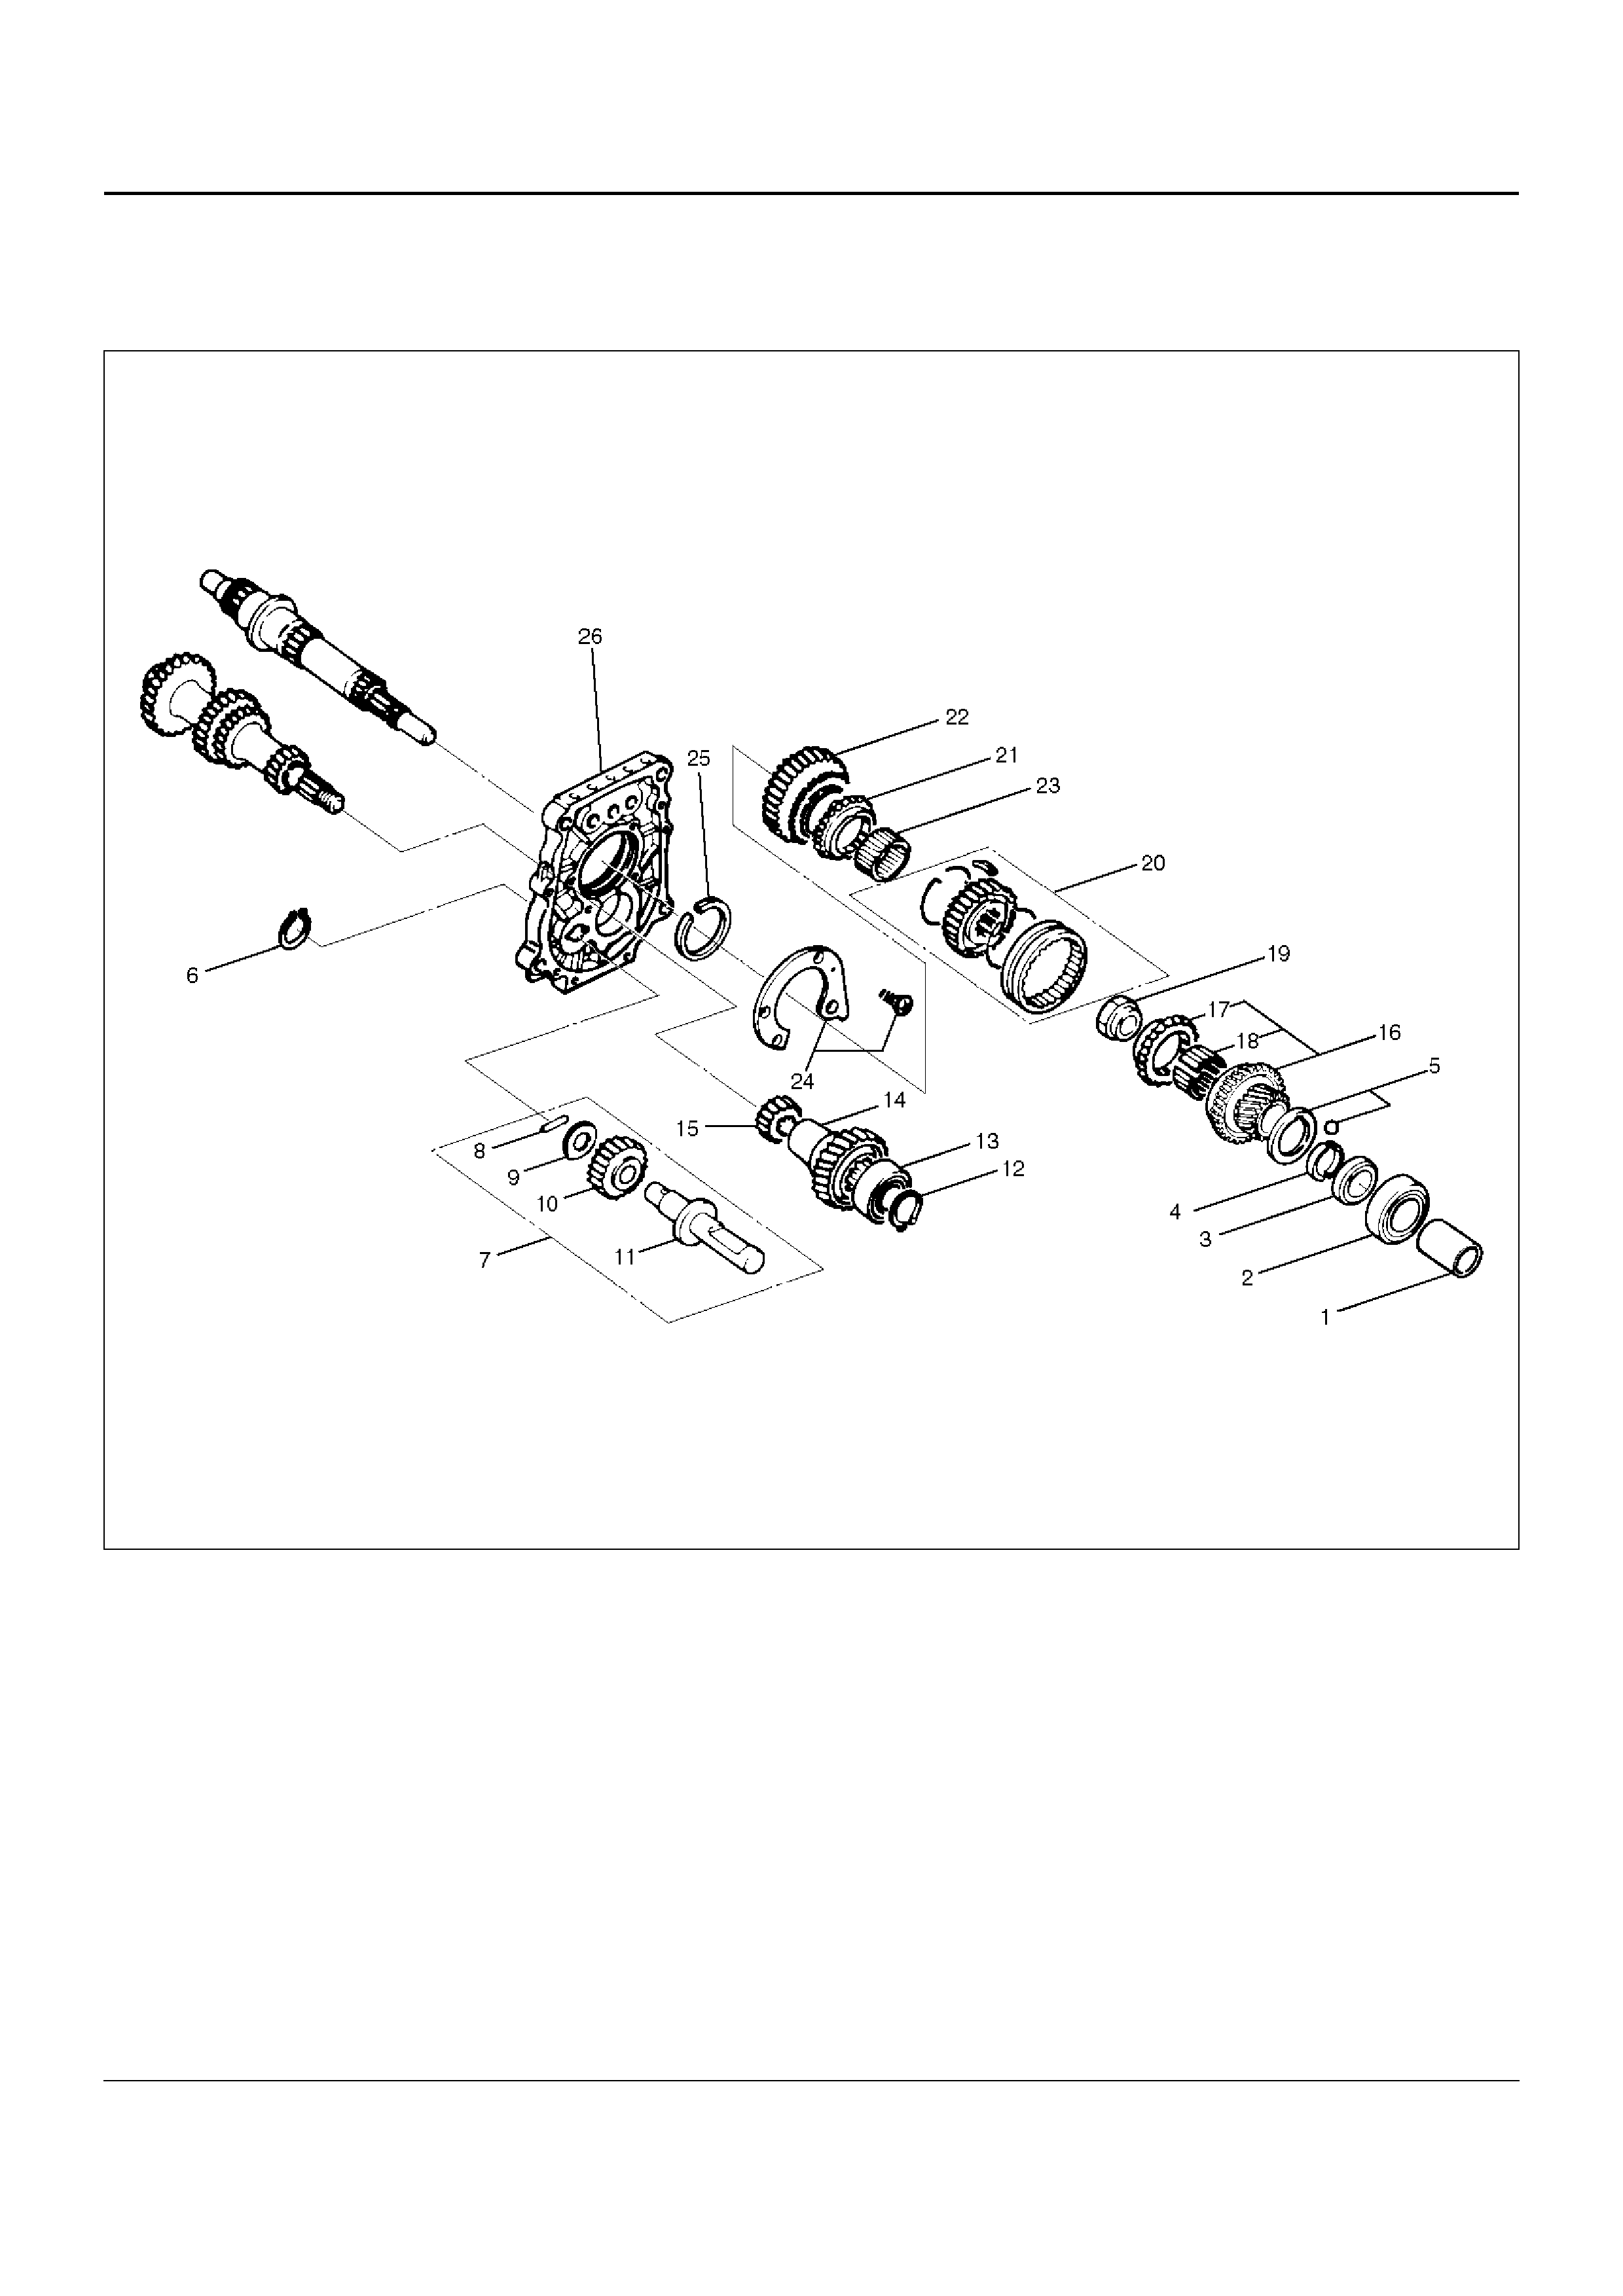
DISASSEMBLED VIEW
226RS026
Legend
(1) Top Gear Shaft Snap Ring
(2) Top Gear Shaft
(3) Ball Bearing
(4) Needle Bearing
(5) Top Block Ring
(6) Mainshaft Snap Ring
(7) 3rd–4th Synchronizer Assembly
(8) 3rd Block Ring
(9) 3rd Gear
(10) Needle Bearing
(11) Needle Bearing Collar
(12) Mainshaft Ball Bearing
(13) 1st Gear Thrust Bearing
(14) 1st Gear
(15) 1st Inside Ring
(16) 1st Outside Ring
(17) 1st Block Ring
(18) Need le Bearing
(19) Clutch Hub Snap Ring
(20) 1st–2 nd Sy nc hr onizer Assembly
(21) 2nd Block Ring
(22) 2nd Outside Ring
(23) 2nd Inside Ring
(24) 2nd Gear
(25) Need le Bearing
(26) Mainshaft
(27) Bearing Snap Ring
(28) Front Rol lar Beari ng
(29) centre Rol ler Beari ng
(30) Counter Gea r Shaft
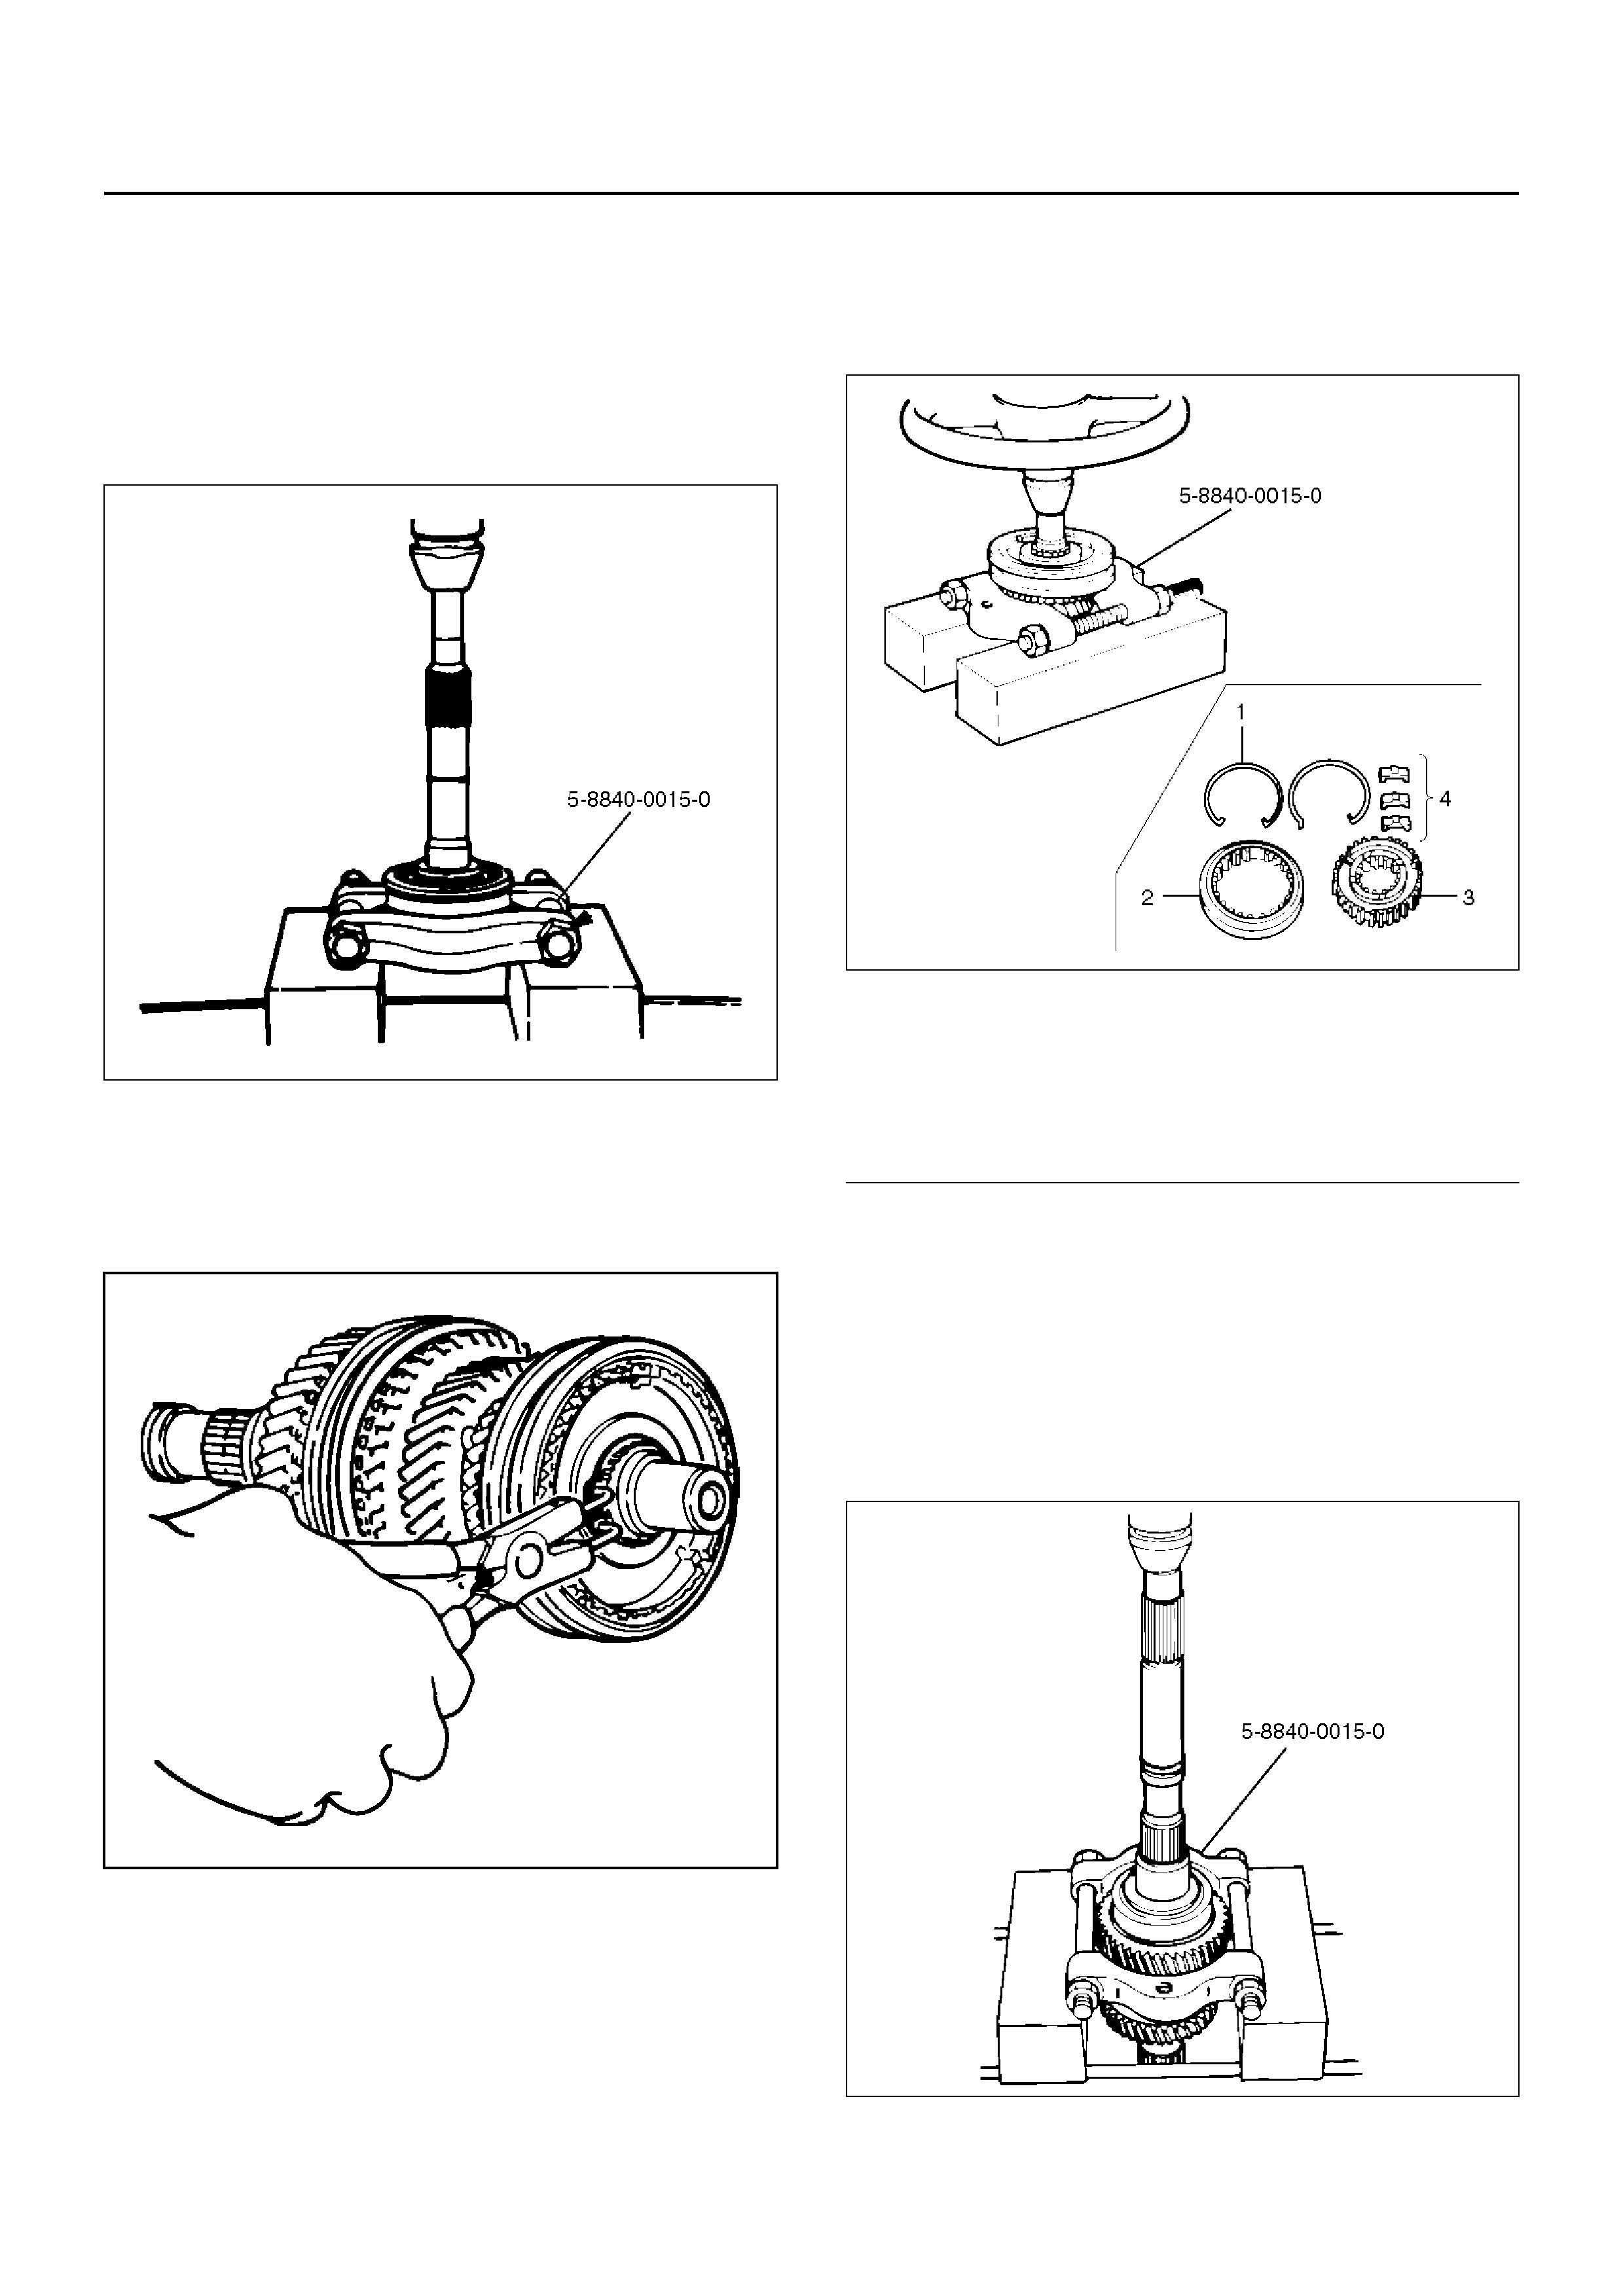
DISASSEMBLY
1. Use a pair of snap ring pliers to remove the top gear
shaft snap ring(1).
2. Remove top gear shaft(2) with ball bearing(3).
3. Use a bench press and the bearing remover
5–8840–0015–0 to remove the ball bearing(3).
226RW216
4. Remove needle bearing(4) and top block ring(5),
mains haft sn ap ring.
5. Use a pair of snap ring pliers to remove the
mains haft sn ap ring( 6).
226RS028
6. Use a bench press and the bearing remover 5–
8840–0015–0 to remove the 3rd–4th synchronizer
assembly (7) as a set.
Disassemble the synchronizer assembly.
226RW217
EndOFCallout
7. Remove 3rd block ring(8), 3rd gear(9), and needle
bearing(10).
8. Remove need le bea ri ng co ll ar(11 ).
9. Use a bench press and the bearing remover 5–
8840–0015–0 to remove the 1st gear(14) together
with the mainshaft ball bearing(12) and 1st gear
thrust bearing(13).
226RW218
Legend
(1) Springs
(2) Sleeve
(3) Clutch Hub
(4) Inserts

10. Disassemble 1st inside ring(15), 1st outside
ring(16), and 1st block ring(17).
11. Remove needle bearing(18).
12. Use a pair of snap ring pliers to remove the clutch
hub snap ring(19).
226RS031
13. Use a bench press and the bearing remover 5–
8840–0015–0 to remove the 2nd gear(24) together
with 1st–2nd synchronizer assembly(20), 2nd block
ring(21), 2nd outside ring(22), and 2nd inside
ring(23).
Disassemble the synchronizer assembly.
226RW220
EndOFCallout
14. Remove needle bearing(25) from mainshaft(26).
15. Remove bearing snap ring(27)
16. Use a bench press and the bearing remover 5–
8840–0015–0 to remove the front roller bearing(28).
226RW219
17. Remove centre roller bearing(29) from counter gear
shaft(30).
INSPECTION AND REPAIR
Make the necessary adjustments, repairs, and part
replacements if excessive wear or damage is
discovered during inspection.
Block Ring and Dog Teeth Clearance
• Use a thickness gauge to measure the clearance
between the block ring and the dog teeth.
226RS035
If the measured value exceeds the specified limit, the
block ring mus t be replac ed.
Legend
(1) Springs
(2) Sleeve
(3) Clutch Hub
(4) Inserts
Block Ring and Dog Teeth Clearance
1st–2nd Synchronizer (3–CONE)
• Use a thickness gauge to measure the clearance
between the block ring and the dog teeth.
226RS036
If the meas ured value exceeds the specified li mit,the
1st–2nd synchronizer assembly must be replaced.
Block Ring and Dog Teeth Clearance
Block Ring and Insert Clearance
• Use a vernier caliper or thickness gau ge to measure
the clearance between the block ring and the insert.
226RS037
If the measured value exceeds the specified limit, the
block ring and the ins ert m ust be repl aced.
Block and Insert Clearance
Clutch Hub and Insert Clearance
• Use a thickness gauge to measure the clearance
between the clutch hub and the insert.
226RS038
If the measured value exceeds the specified limit, the
clutch hub and the insert must be replaced.
Clutch Hub and Insert Clearance
Standard Limit
1.5mm 0.8mm
Standard Limit
1.5mm 0.8mm
Standard Limit
3rd–4th 3.46–3.74mm 4.0mm
1st–2nd 4.34–4.66mm 4.9mm
Rev–5th 3.59–3.91mm 4.1mm
Standard Limit
3rd–4th 0.01–0.19mm 0.3mm
1st–2nd 0.09–0.31mm 0.4mm
Rev–5th
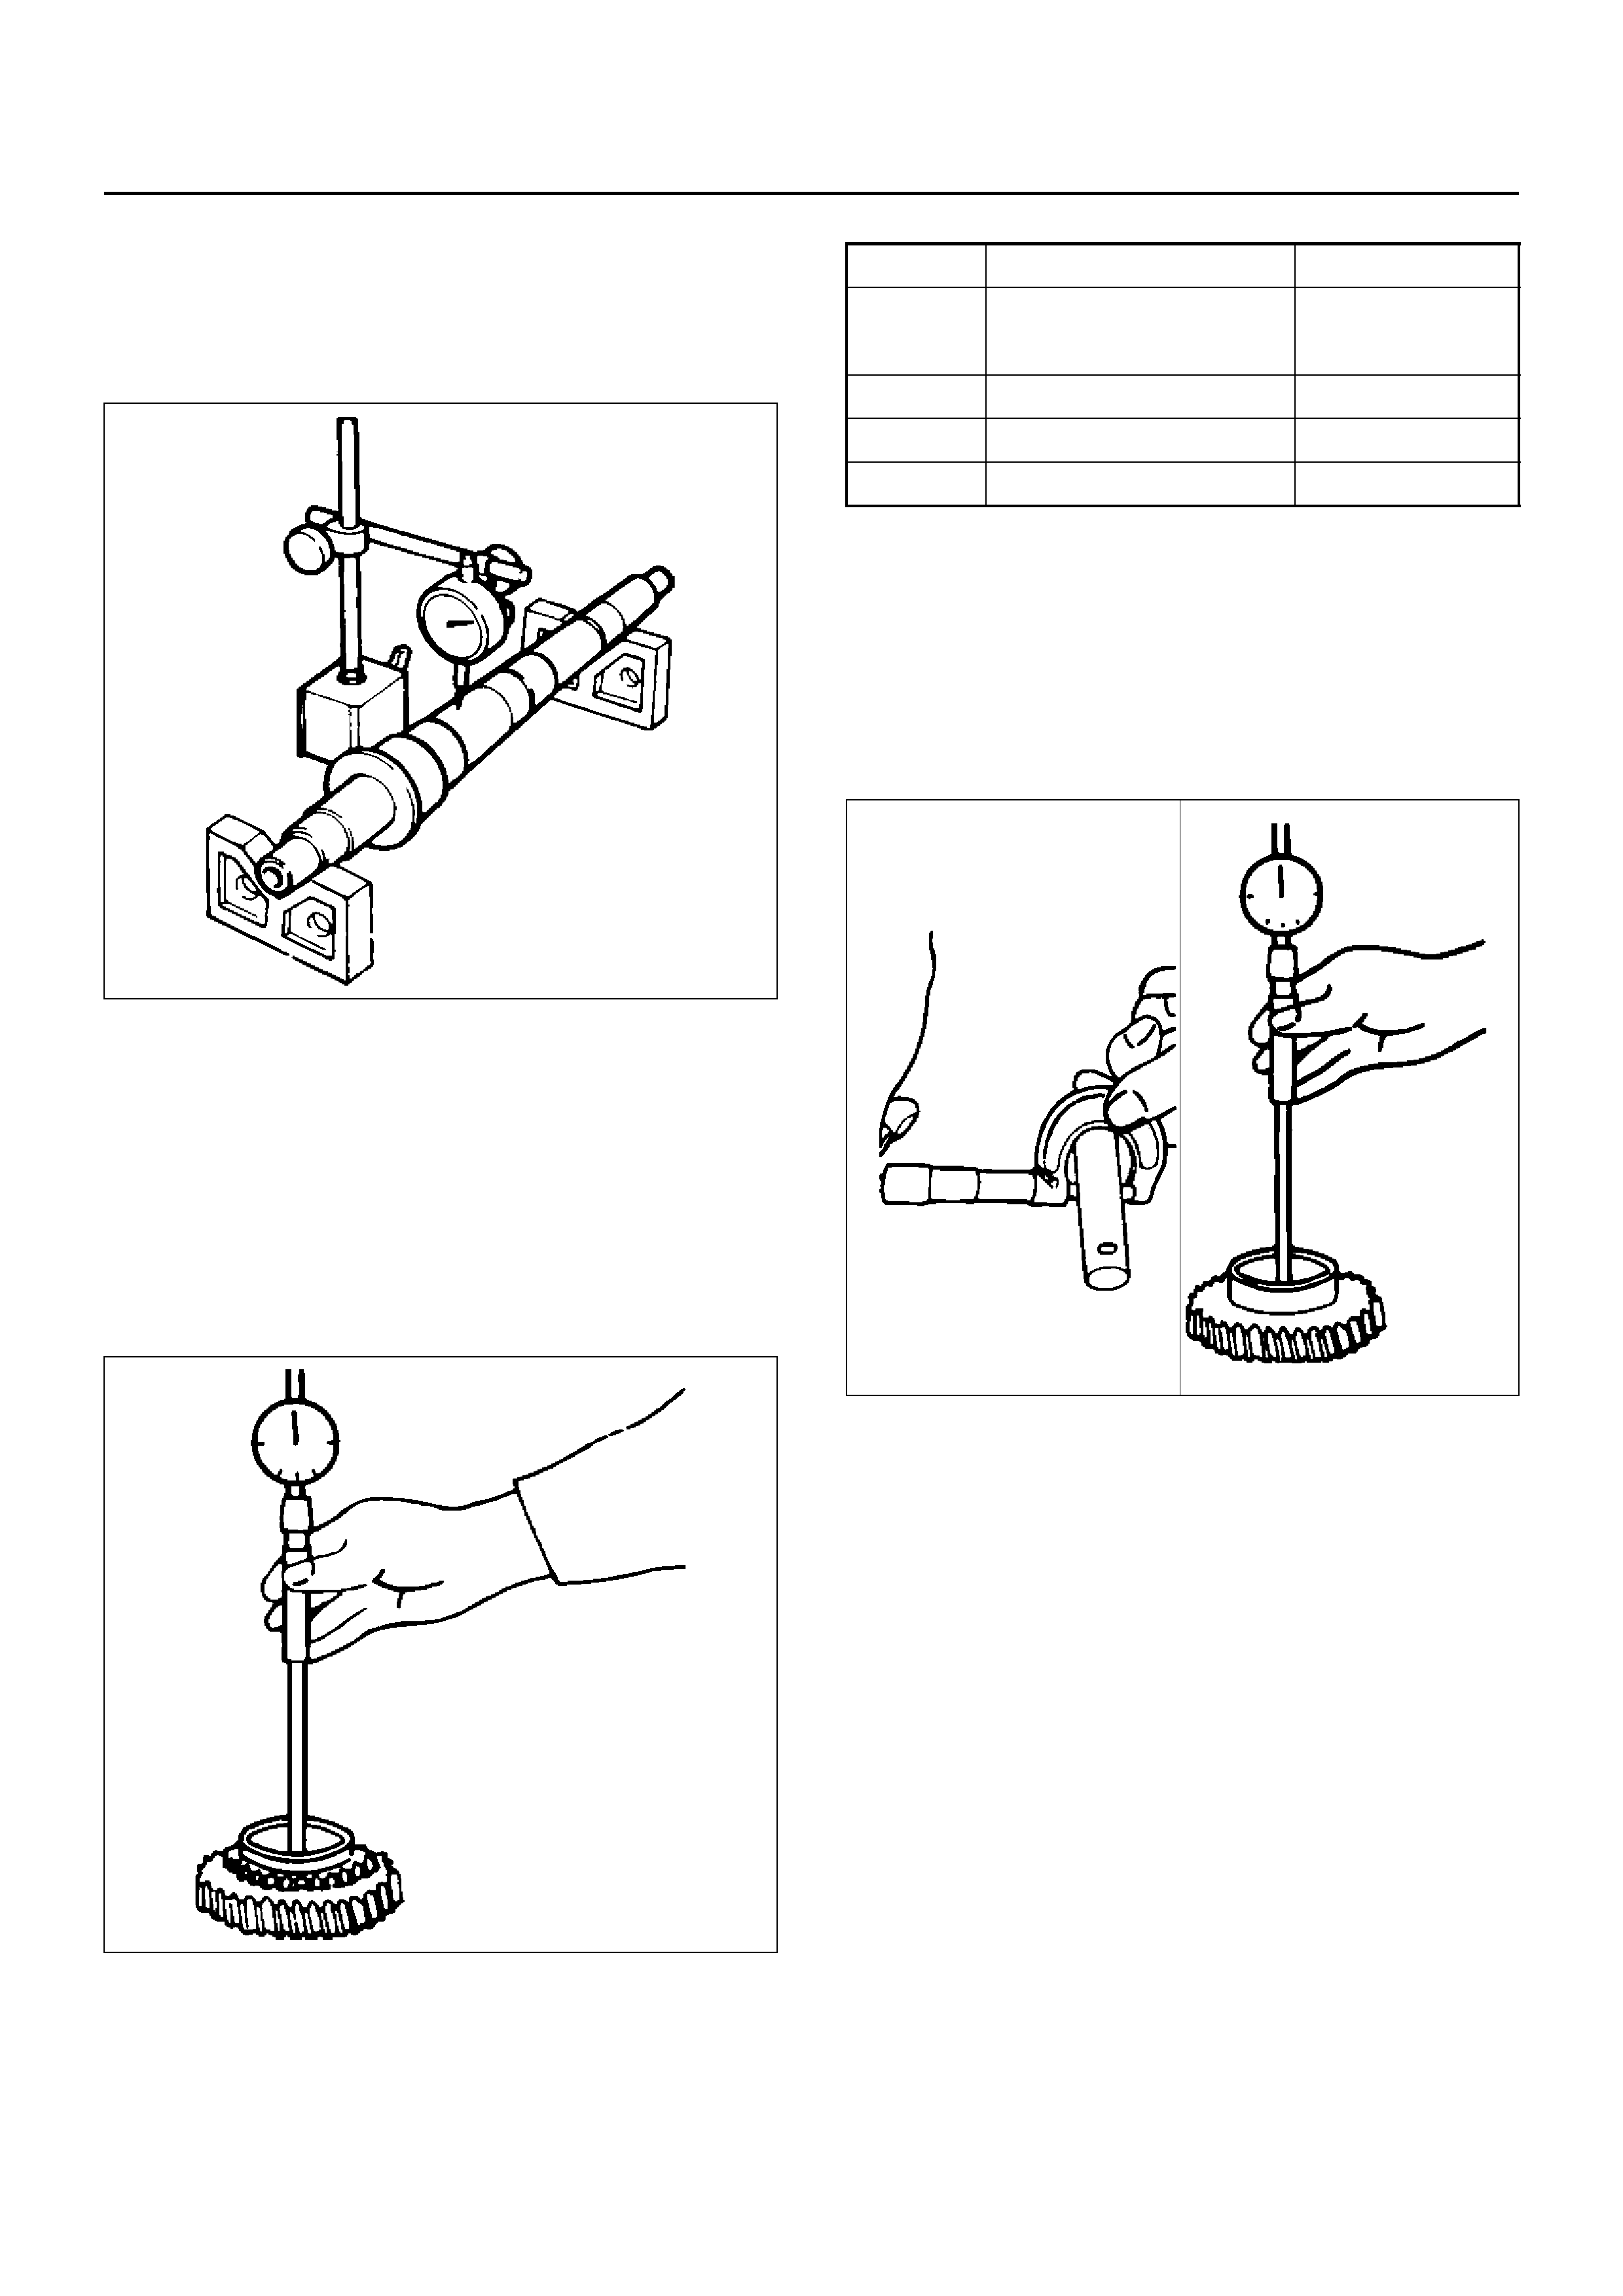
Mainsha ft Run-out
• Install the mainshaft to V-blocks.
• U se a di al in dicato r to meas ure the mains haft c entral
portion run-out.
226RS039
If the measured mainshaft run-out exceeds the
specified limit, the mainshaft must be replaced.
Mainshaft Run–out
Limit: 0.05mm
Gear Inside Diameter
• Use an inside dial indicator to measure the gear
inside diameter.
226RS040
If the m easured value is less th an the specif ied limit,
the gear must be replace.
Gear Inside Diameter
Reverse Idler Gear and Idler Gear Shaft
Clearance
• Use a micrometer to measure the idler gear shaft
diameter.
• Use an insi de dial in dicato r to me asure the idler gear
inside diameter.
226RS041
• Calculate the idler gear and idler gear shaft
clearance.
Idler g ear insi de diamet er-idler g ear shaft diameter =
idle gear and idler gear shaft clearance.
If the measured value exceeds the specified limit, the
idle gear and/or the idler gear shaft must be replaced.
Idler Gear and Idler Gear Shaft Clearance
Standard: 0.041–0.074mm
Limit: 0.150mm
Standard Limit
1st 45.000–45.013mm 45.100mm
3rd
2nd 52.000–52.013mm 52.100mm
Rev. 48.000–48.013mm 48.100mm
5th 32.000–32.013mm 32.100mm
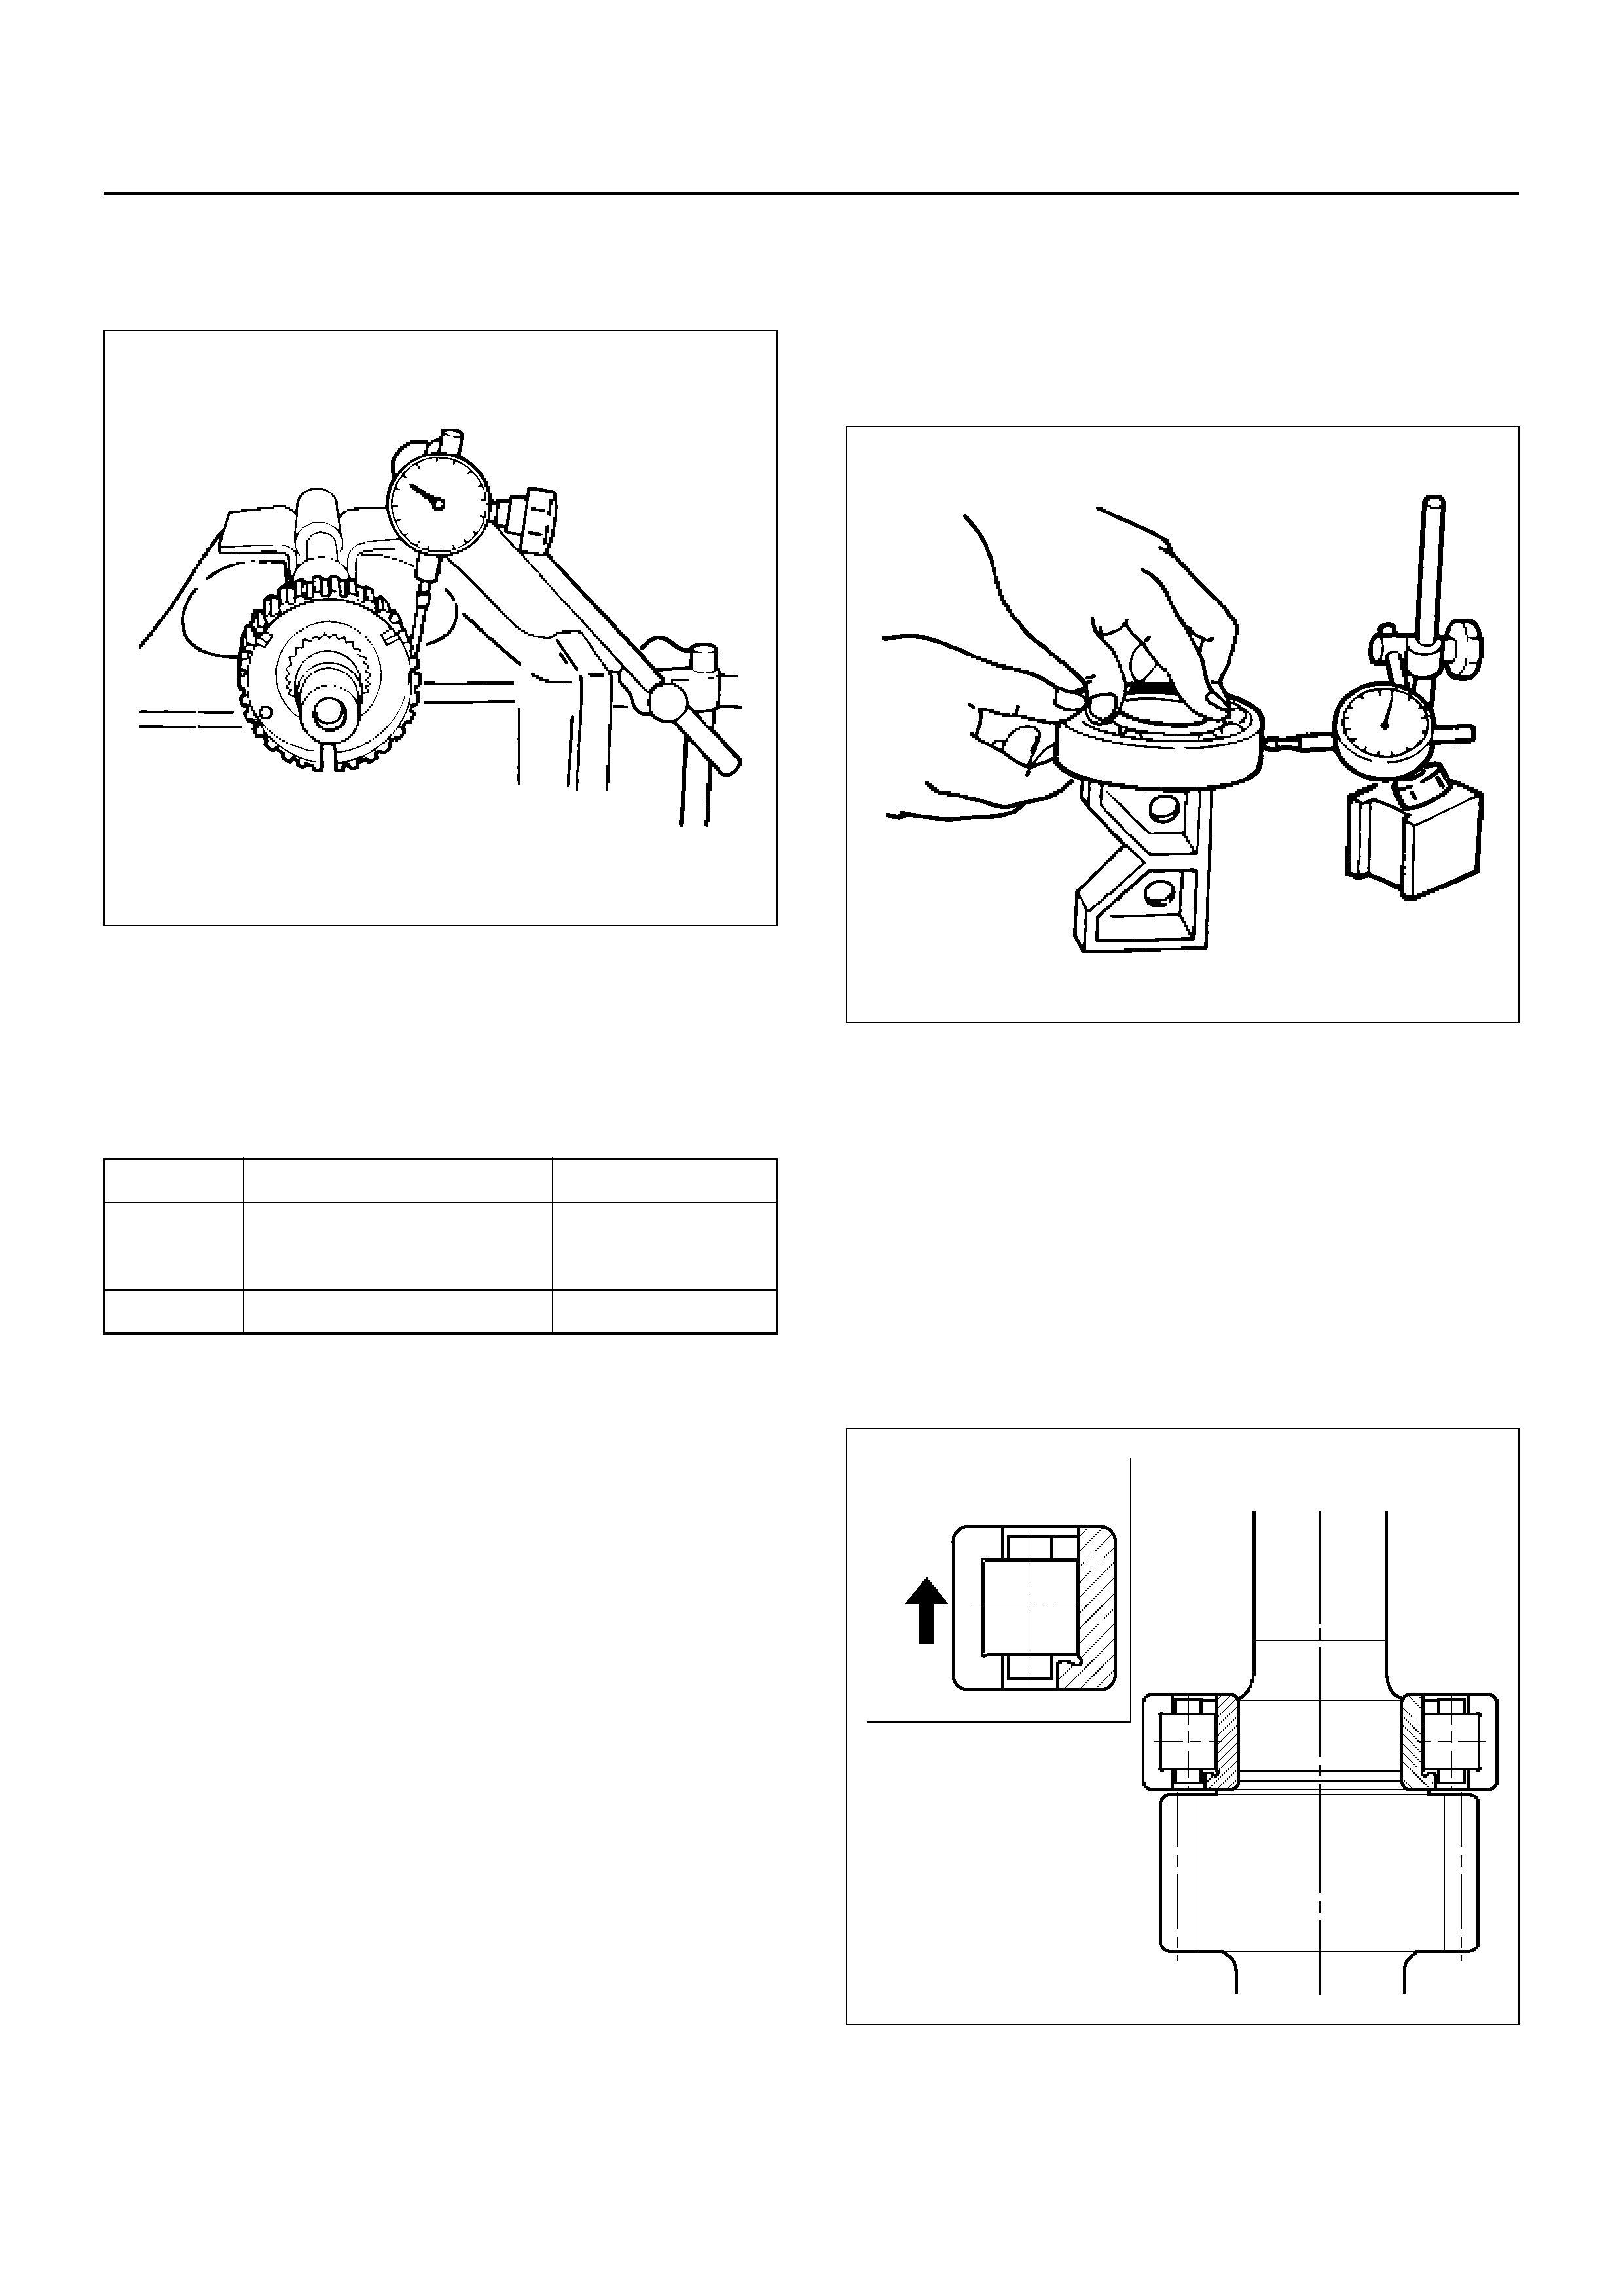
Clutch Hub Spline Play
• Set a dial indicator to the clutch hub to be measured.
226RS042
• Move the clutch hub as far as possible to both the
right and the left.
Note the dial indicator reading.
If the measured value exceeds the specified limit, the
clutch hub must be replaced.
Clutch Hub Spline Play
Ball Bearing Play
• Use a dial indicator to measure the ball bearing play.
Ball Bearing Play
Limit: 0.2mm
226RS043
REASSEMBLY
1. Install centre roller bearing(29) to counter gear
shaft(30).
• Apply engine oil to the bearing inner and outer
circumferences.
• Install the roller bearing in the proper direction.
NOTE: Check that outer race moves only in the
direction of arrow.
226RS044
Standard Limit
1st–2nd 0–0.1mm 0.2mm
3rd–4th
Rev. 5th 0–0.2mm 0.3mm
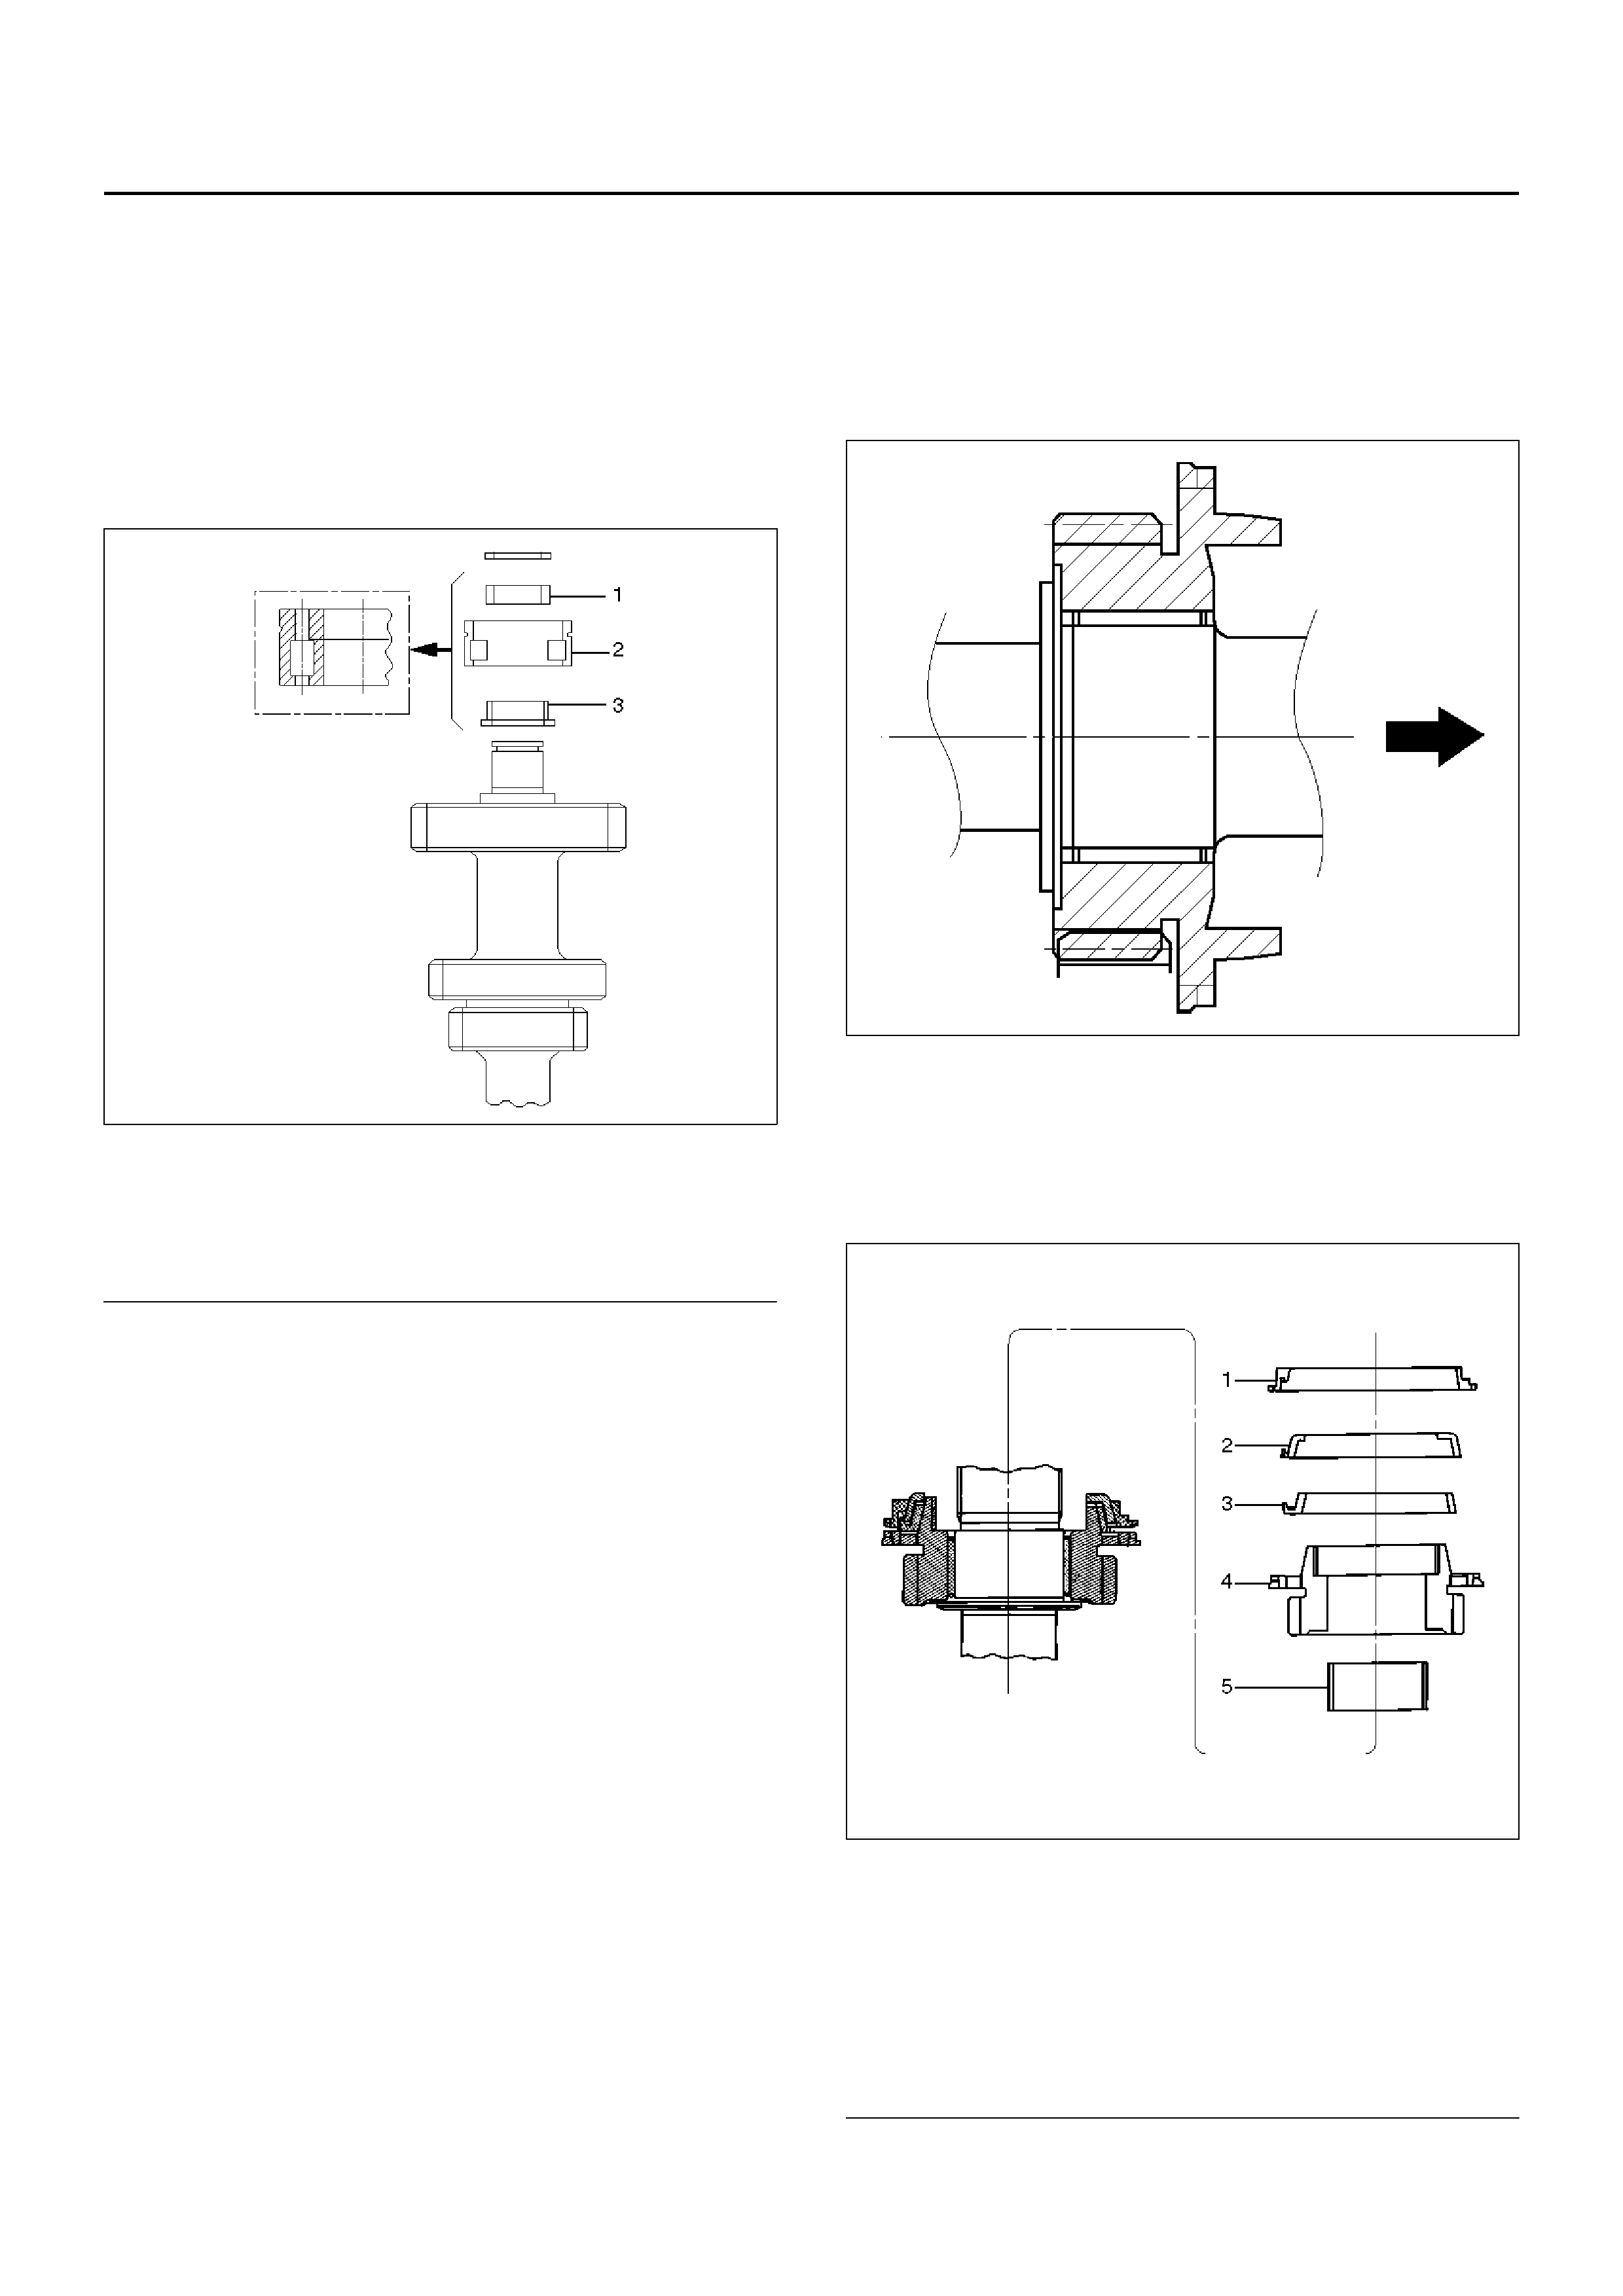
2. Install front roller bearing(28) by performing the
foll owing steps.
• Use bearing installer to install the front roller
bearing inner race to the counter gear shaft.
• Install the outer race and roller assembly.
The snap ring groove must be facing the
transmission front side.
• Use bearing installer J–35283 to install the ring.
226RS045
EndOFCallout
3. Install bearing snap ring(27) to mainshaft(26).
4. Apply engine oil to the needle bearing(25) and the
2nd gear thrust surfaces.
Install the needle bearing(25) and the 2nd gear(24)
to the mainshaft.
The 2nd gear dog teeth must be facing the
transmission rear side.
226RS046
5. Assemble 2nd inside ring(23), 2nd outside ring(22),
and 2nd block ring(21).
• Apply engine oil to the synchronizer ring friction
surfaces.
226RS047
EndOFCallout
Legend
(1) Ring
(2) Outer Race and Roller Assembly
(3) Inner Race
Legend
(1) Block Ring
(2) Outside Ring
(3) Inside Ring
(4) 2nd Gear
(5) Needle Bearing
6. Assemble 1st–2nd synchronizer assembly by
perfor ming the foll owi ng steps:
1. Check that the inserts(3) fit snugly into the block
ring insert grooves.
2. Check that the inserts springs(4) are fitted to the
inserts as s hown in the illustration.
3. Check that the clutch hub(5) and the sleeve(6)
slide sm ooth ly.
4. Install the synchronizer assembly to the
mainshaft.
The cl utch hub face (with the heav y boss) must
be facing the 2nd gear side.
226RS048
226RS049
7. Install clutch hub snap ring(19) by performing the
following steps:
• Select the snap ring which will provide the
minimum clearance between the 1st–2nd clutch
hub and the snap ring.
226RS050
There are three snap ring sizes available.
The snap rings are color coded to indicate their
thickness.
226RS021
Clutch Hub and Snap Ring Clearance
Standard: 0–0.1mm
Snap Ring A vailability
Thickness Color Coding
1.80mm White
1.85mm Yellow
1.90mm Blue
• Use a pair of snap ring pliers to install the snap
ring to the mainshaft.
The snap ring must be fully inserted into the
mainshaft snap ring groove.
226RS031
8. Install needle bearing(18), 1st block ring(17), 1st
outside ring(16), 1st inside ring(15), and 1st
gear(14).
• Apply engine oil to the needle bearing, 1st gear
thrust surfaces and synchronizer ring friction
surfaces.
• I nstall the needle bear ing and the 1st gear to the
mainshaft.
The 1st gear dog teeth must be facing the
transmission front side.
226RS053
EndOFCallout
9. Install the 1st gear thrust bearing and the race(13)
to the main shaft.
The thrust bearing side must be facing the
transmission front side.
226RS054
Legend
(1) 1st Gear
(2) Needle Bearing
(3) Inside Ring
(4) Outside Ring
(5) Block Ring

10. Apply engine oil to the mainshaft ball bearing(12)
and the mainshaft(26).
Install the ball bearing(12) and needle bearing
collar(11) to the mainshaft(26).
The ball bearing snap ring groove must be facing
the transmission rear side.
Use a bench press and installer J–6133–01 to
slowly fo rce the col lar int o place.
226RS055
11. Apply engine oil to the needle bearing and the 3rd
gear thrust surfaces.
Install the nee dle bea ring (1 0) and the 3 r d ge ar (9) t o
the mainshaft.
The 3rd gear dog teeth must be facing the
transmission front side.
226RS056
12. Install 3rd block ring(8).
13. Chec k an d in stall 3rd –4th sy nc hroni z er ass em bly ( 7)
by the followi ng ste ps:
1. Check that the inserts(3) fit snugly into the block
ring insert grooves.
2. Check that the insert springs(4) are fitted to the
inserts as shown in the illustration.
3. Check that the clutch hub(5) and the sleeve(6)
slide smoothly.
4. Install the synchronizer assembly to the
mainshaft.
The clutc h hub face (wi th the heavy b oss) must
be facing the 3rd gear side.
226RW221-1
226RS049
14. Select and install mainshaft snap ring(6) in the
followi ng way :
• Select the snap ring which will provide the
minimum clearance between the 3rd–4th clutch
hub and the snap ring.
226RS058
There are three snap ring sizes available.
The snap rings are color coded to indicate their
thickness.
226RS021
Clutch Hub and Snap Ring Clearance
Standard: 0–0.1mm
Snap Ring Availability
• Use a pair of snap ring pliers to install the snap
ring to the mainshaft.
The snap ring must be fully inserted into the
mainshaf t snap ring groov e.
15. Install top bloc k ring(5).
16. Apply grease to the bearing inner and outer
circumferences and install needle bearing(4).
17. Use a bench press to install the top gear shaft ball
bearing(3) to the top gear shaft(2).
226RS059
The snap ring groove must be facing the
transmission front side.
18. Use a pair of snap ring pliers to install the top gear
shaft snap ring(1) to the bearing.
Thickness Color Coding
1.80mm White
1.85mm Yellow
1.90mm Blue

MAIN DATA AND SPECIFICATIONS
General Specifications
MUA 5C Manual Transmission 5 Speed
4X4
Transmission type Fully synchronized forward and reverse gears
T ransfer case Synchronized type gears shifting between the 2– and 4–wheel
drive mode.
Constant mesh type gears between “low" and “high"
Control method Remote control with the gear shift lever on the floor.
Gear ratio: Transmission 1st 3.767
2nd 2.248
3rd 1.404
4th 1.000
5th 0.809
Rev. 3.873
Gear ratio: Transfer High 1.000
Low 2.050
Transmission oil capacity 2.95lit.
Transfer oil capacity 1.45lit.
Type of lubricant Engine oil: Refer to the chart in “SECTION 0"
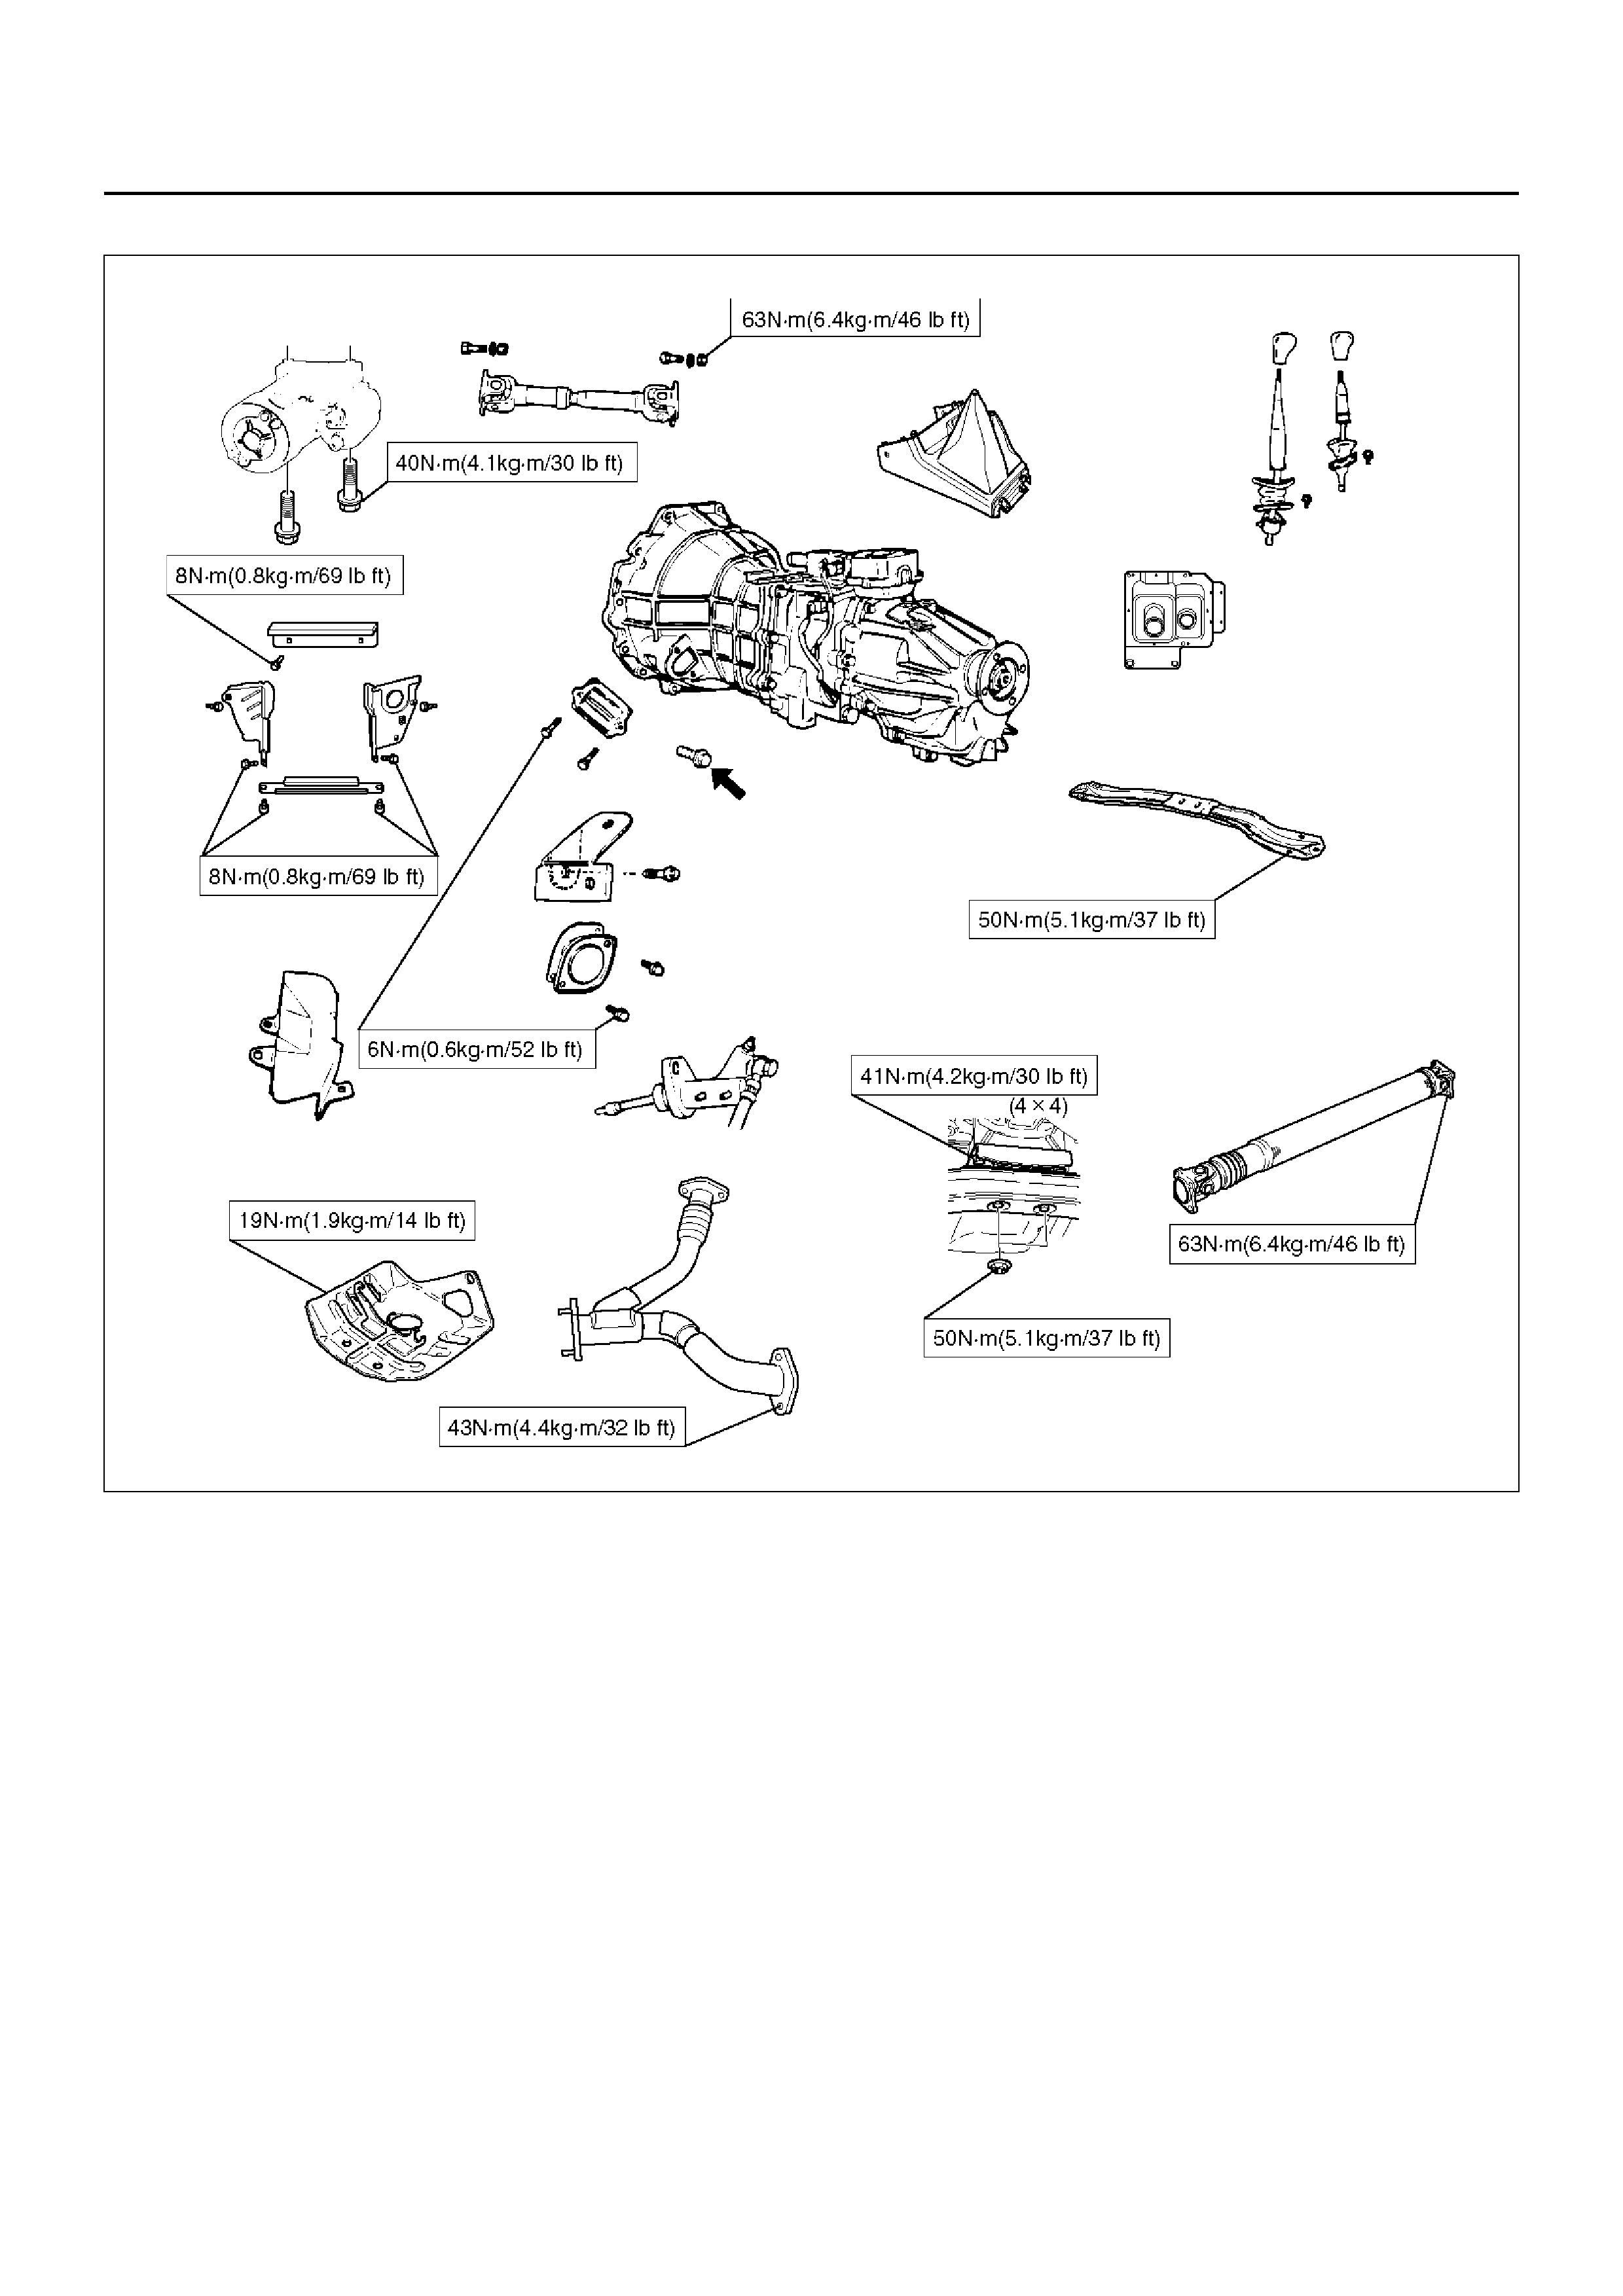

Torque Specifications (Cont'd)
220R100004
Torque Specifications (Cont'd)
E07RX013
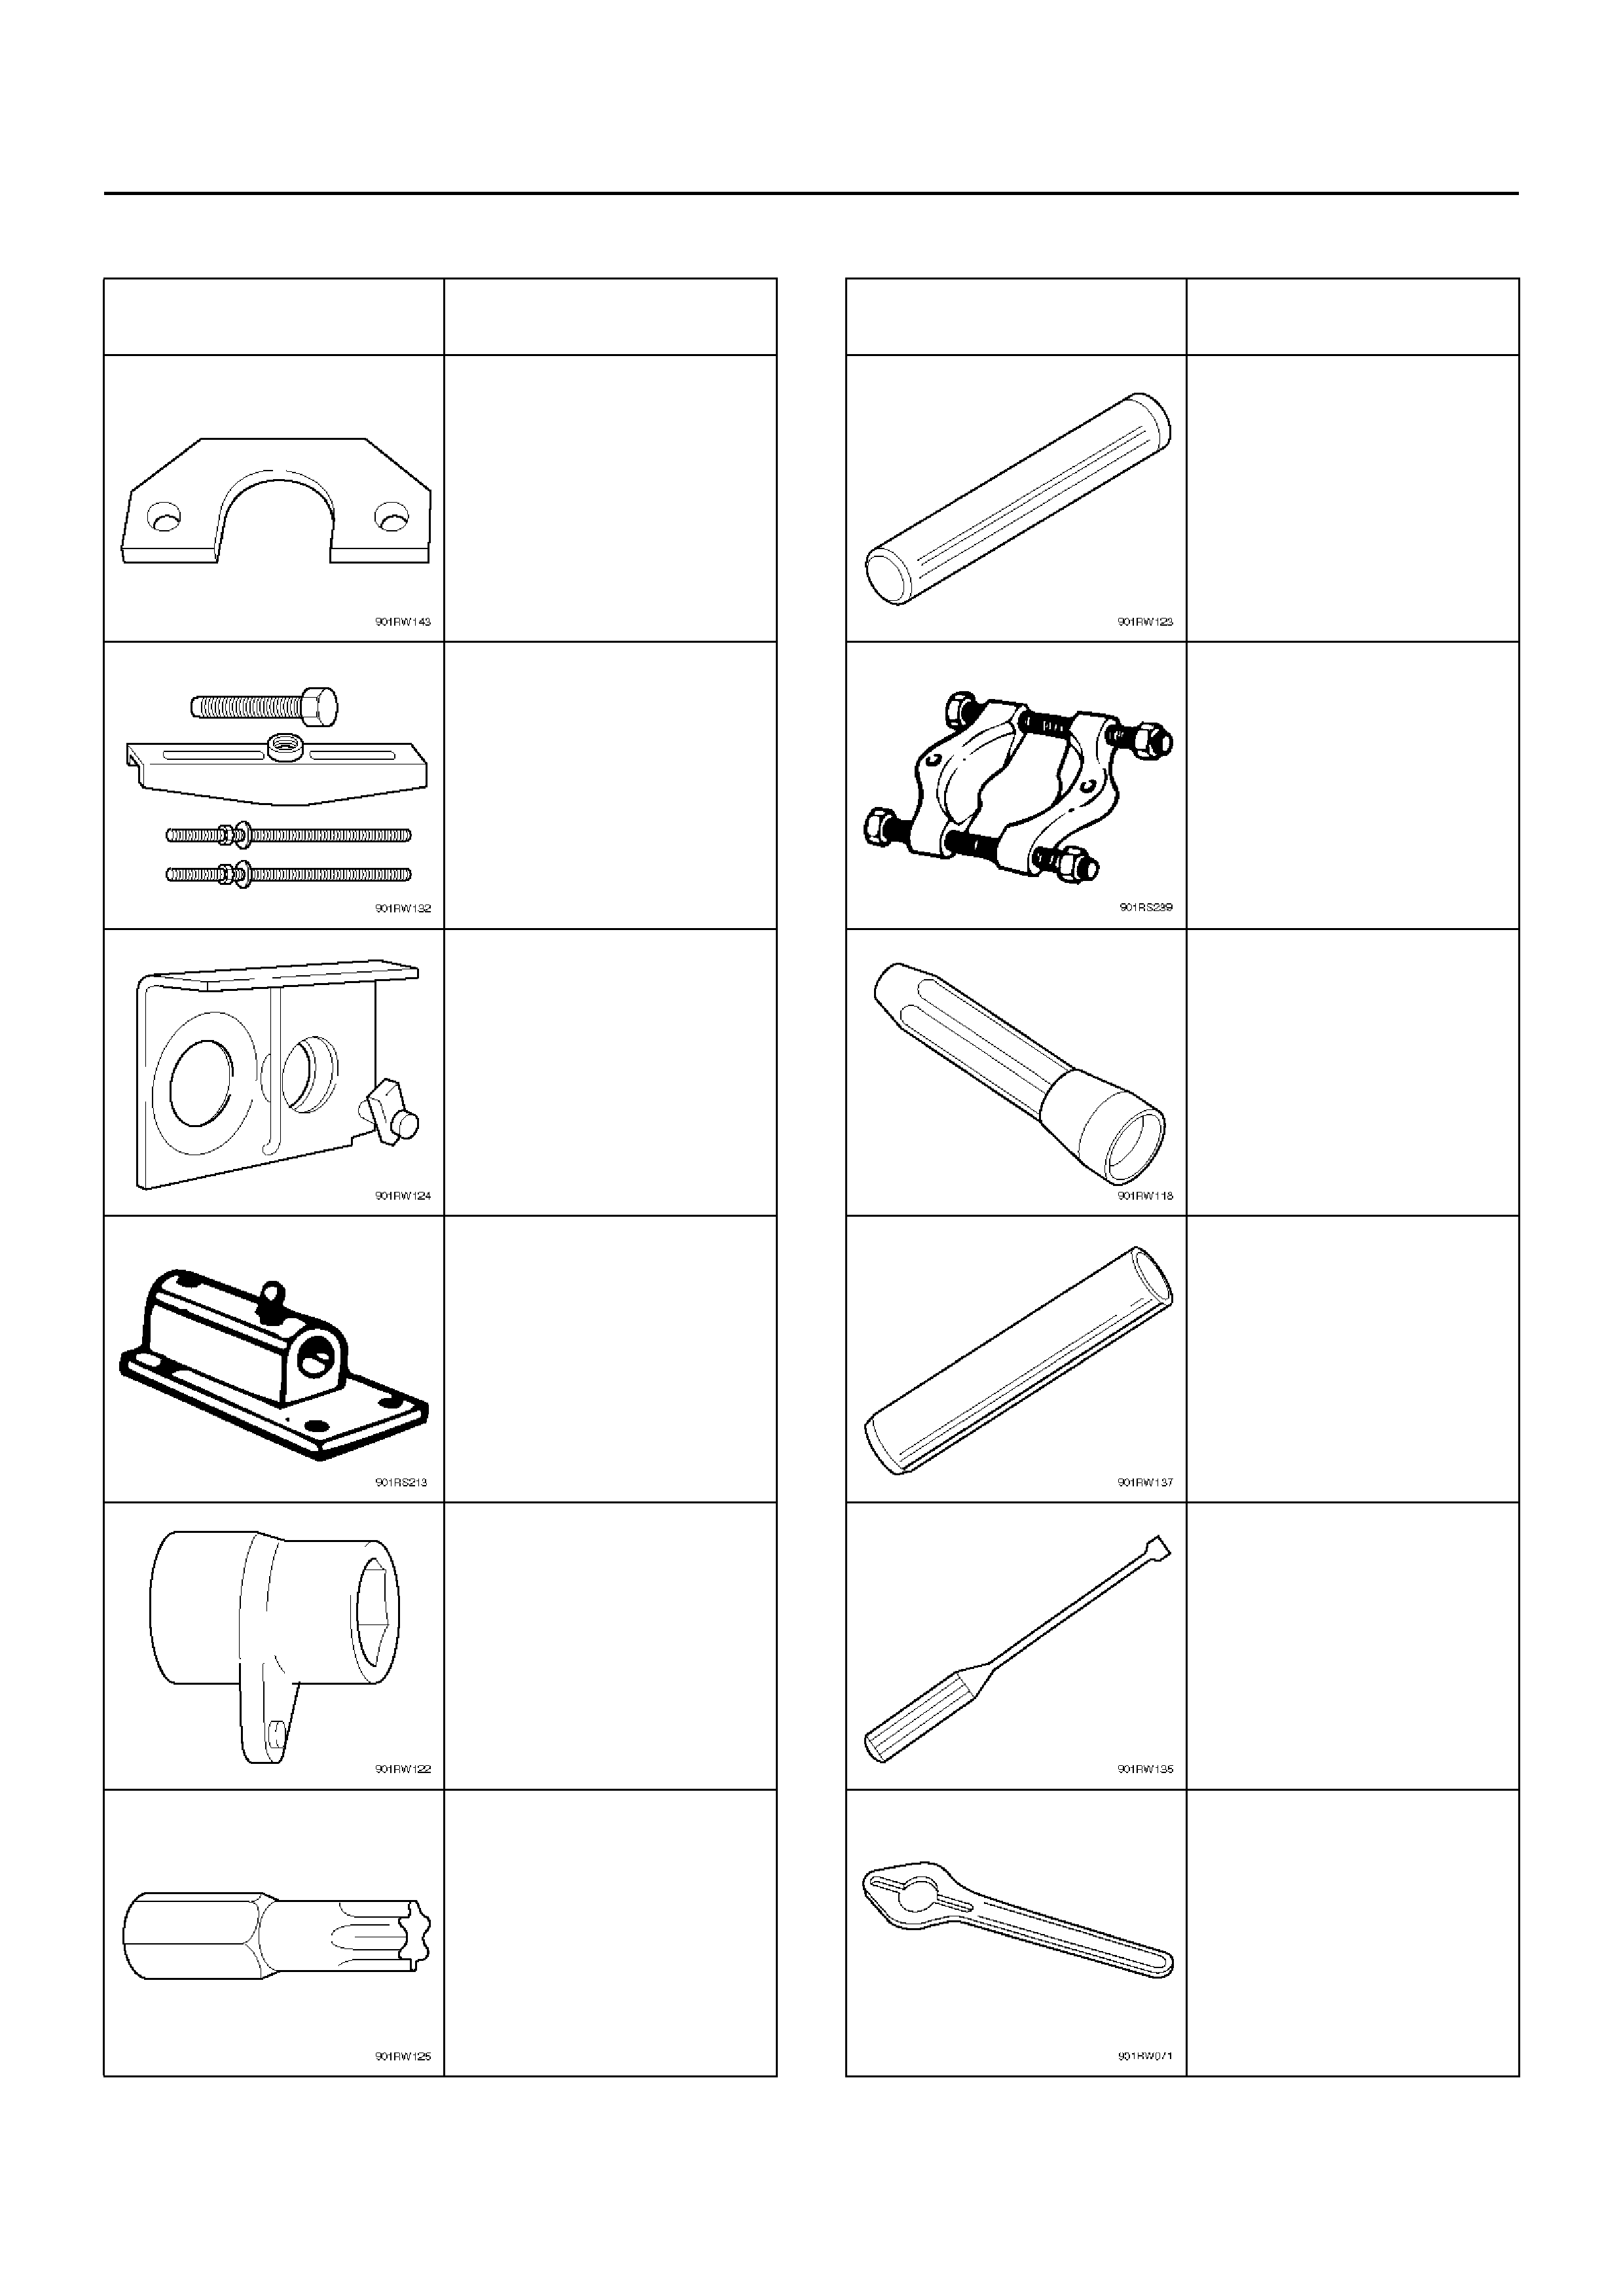
SPECIAL TOOLS (MUA)
ILLUSTRATION TOOL NO.
TOOL NAME
5–8840–2158–0
Mainshaft collar remover
5–8840–2027–0
Puller
5–8840–2160–0
Holding fixture
5–8840–0003–0
Holding fixture base
5–8840–2156–0
Wrench
5–8840–0047–0
Tork bit wrench
(T–45)
5–8840–2159–0
Mainshaft end bearing
installer
5–8840–0015–0
Bearing remover/installer
5–8840–0026–0
Front cover oil seal
installer
9–8522–1165–0
Mainshaft collar installer
5–8840–2291–0
Remover; Clutch release
bearing
5–8840–0133–0
Flange holder
ILLUSTRATION TOOL NO.
TOOL NAME
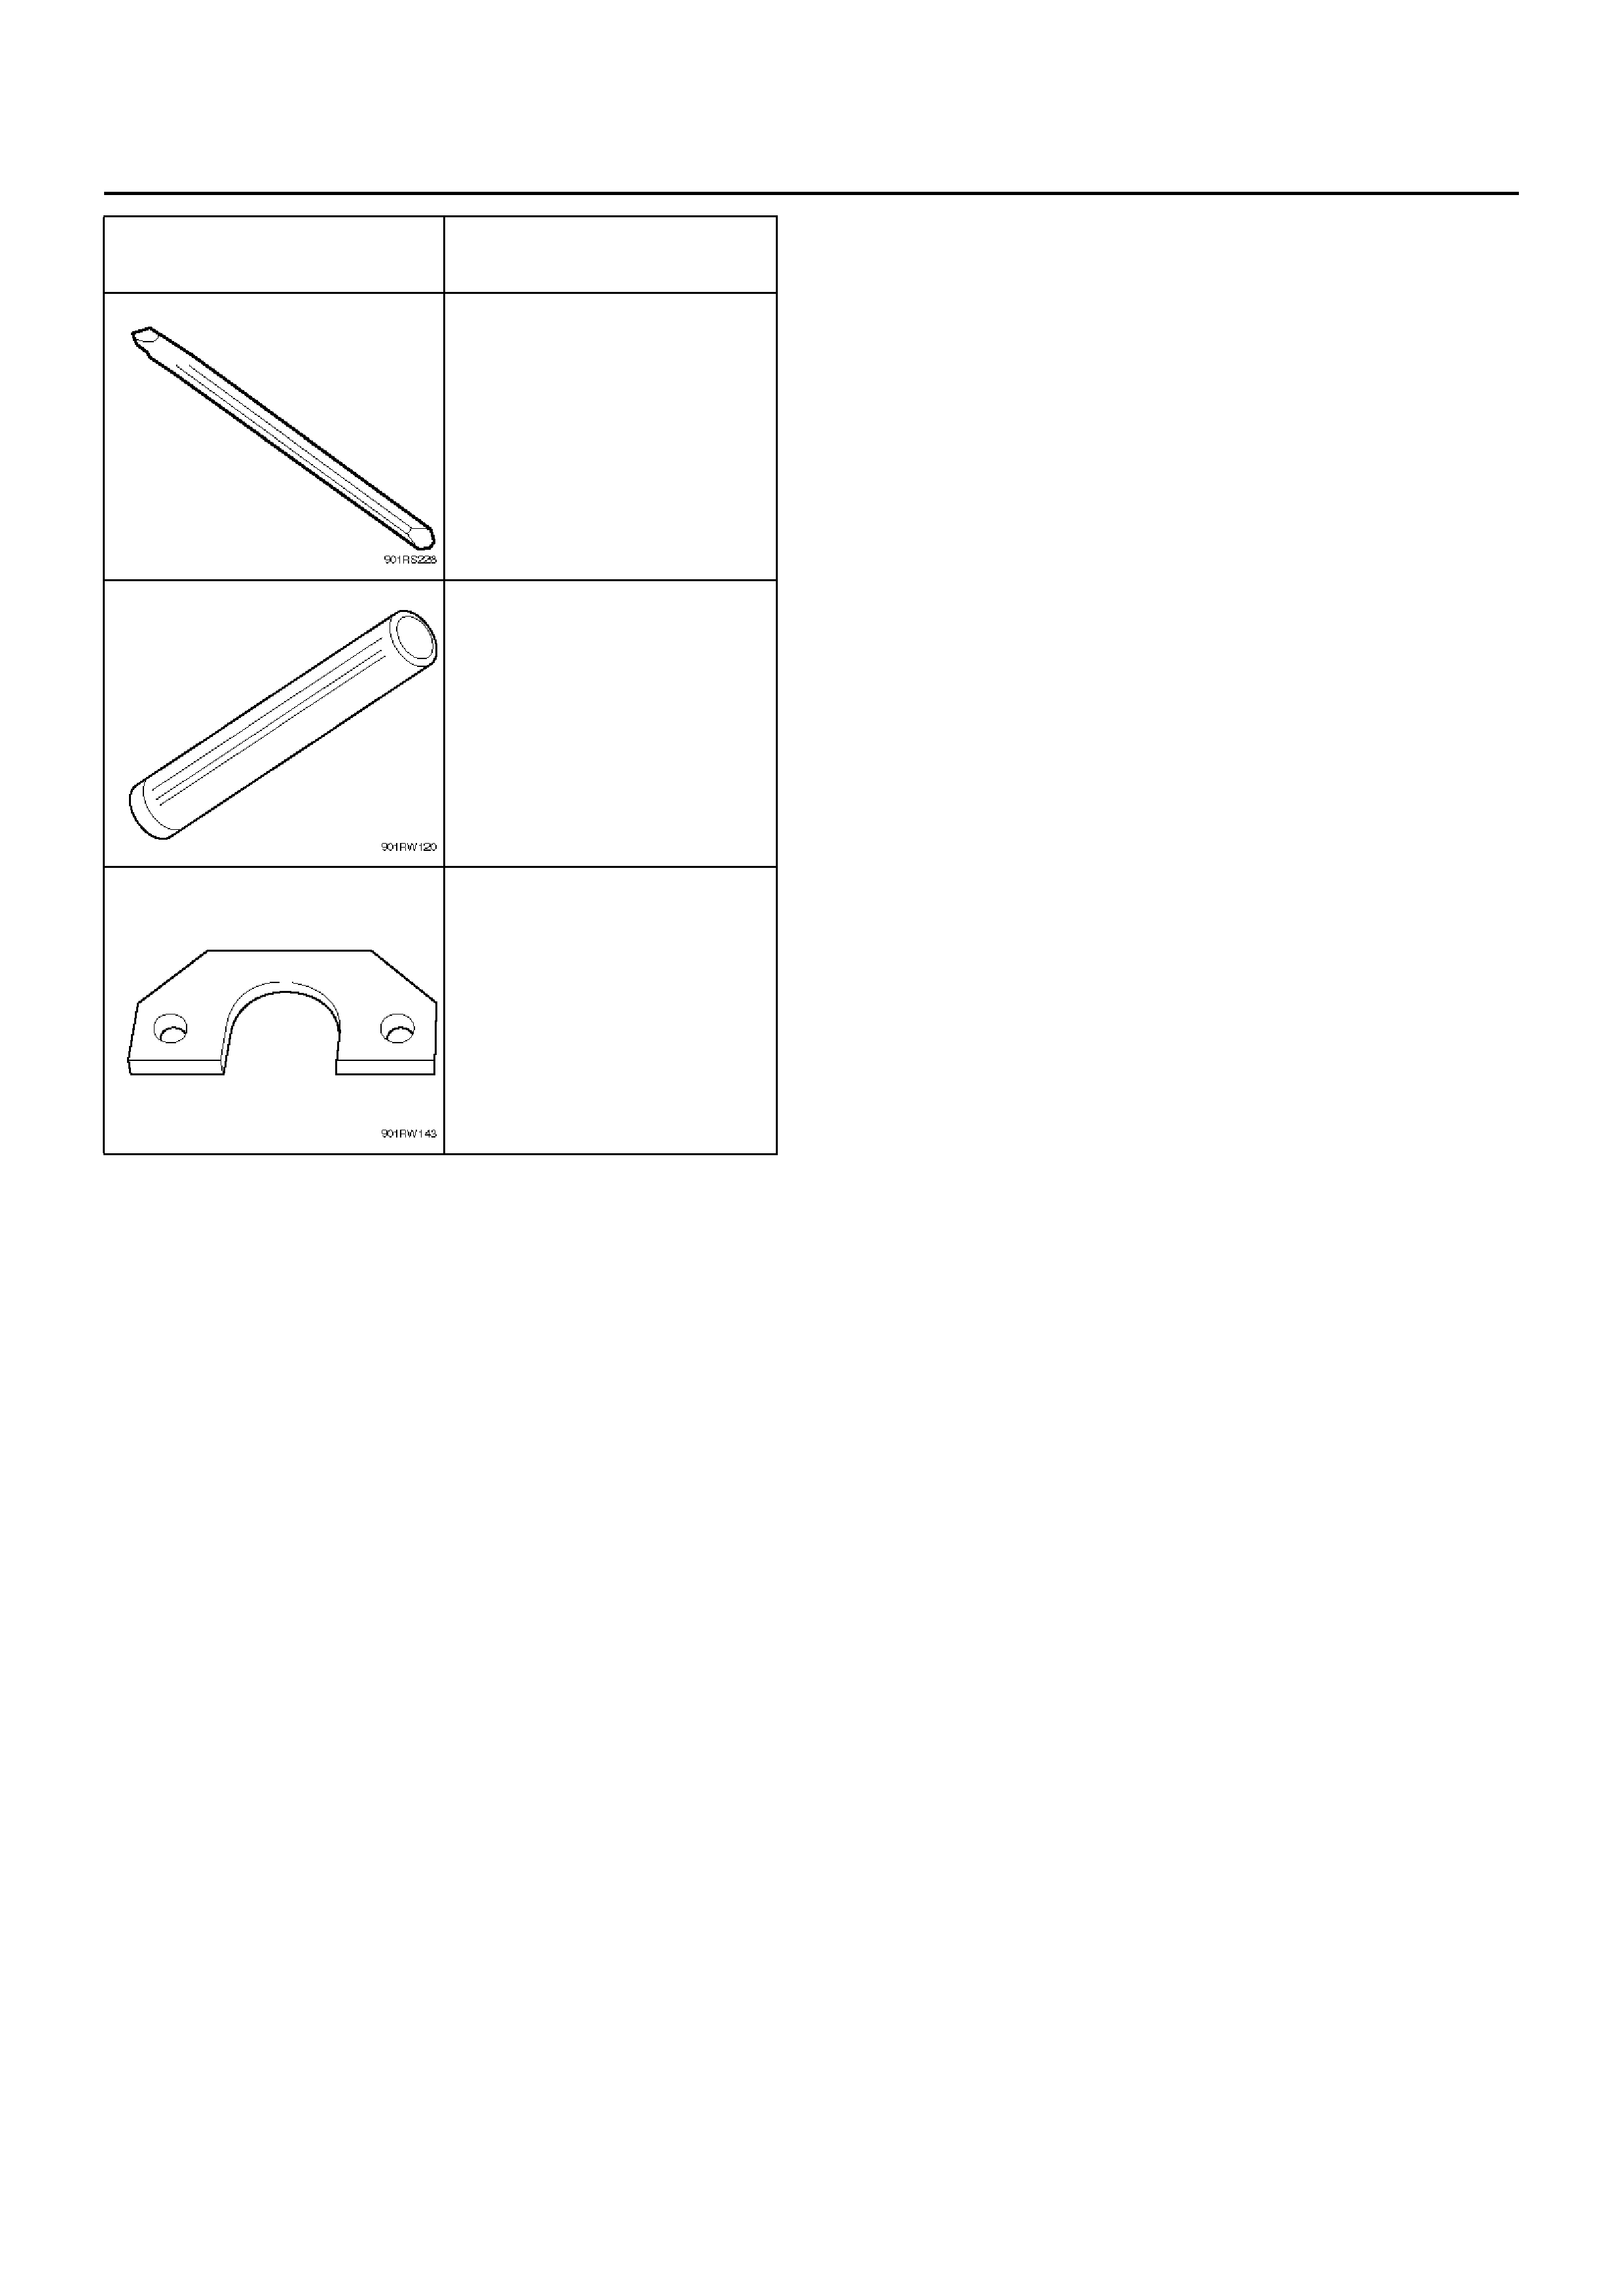
5–8840–2293–0
Punch; end nut
5–8840–2194–0
Counter shaft bearing
installer
5–8840–2155–0
Bearing remover
ILLUSTRATION TOOL NO.
TOOL NAME