
SECTION 4L - PHILIPS CARIN 520 AND 522
IMPORTANT:
Before performing any Service Operation or other procedure described in this Section, refer to Section 00
CAUTIONS AND NOTES for correct workshop practices with regard to safety and/or property damage.
GENERAL INFORMATI O N
This section has been reproduced from the original CARiN 520 User Manual. The CARiN 522 also utilises this
manual, as there are only minor physical differences between the two systems.
The symbols and layout of this section are in keeping with the original paper version of the manual. The paper
version of the manual should have been supplied upon delivery of the SATNAV system.
References to the RDS Traffic Message Channel (TMC) have been omitted due to the system not operational in
this region.

CONTROLS
REMOTE CONTROL
The CARiN 520 is controlled by an infrared remote control.
1. Press the release keys at both sides of the holder to remove the remote control.
2. Before driving off, slide the remote control back into the holder until it clicks into position.
The keys on the remote control have the following functions:
ALT-R Plan an alternate route.
REP Repeat current acoustical guidance advice.
Cursor key upwards; select options.
Cursor key left; select options.
Cursor key right; select options.
Cursor key down; select options.
ENTER Enter key; confirm a selection.
– Decrease voice volume of guidance advice.
+ Increase voice volume of guidance advice.
MENU Show Main Menu,
• Only highlighted options can be selected with the cursor key.
• If you use your remote control in it’s holder, the internal batteries are not used.
When the batteries are discharged the icon lights up in the status line of the display.
1. Slide the remote control into its holder top resume normal operations.
2. Replace the batteries.

KEYBOARD ILLUMINATION
The keyboard of the remote control is illuminated when you press one the keys. The illumination is switched off
automatically after a while. When inserted in the holder the keyboard is illuminated permanently as long as the
ignition is switched on.
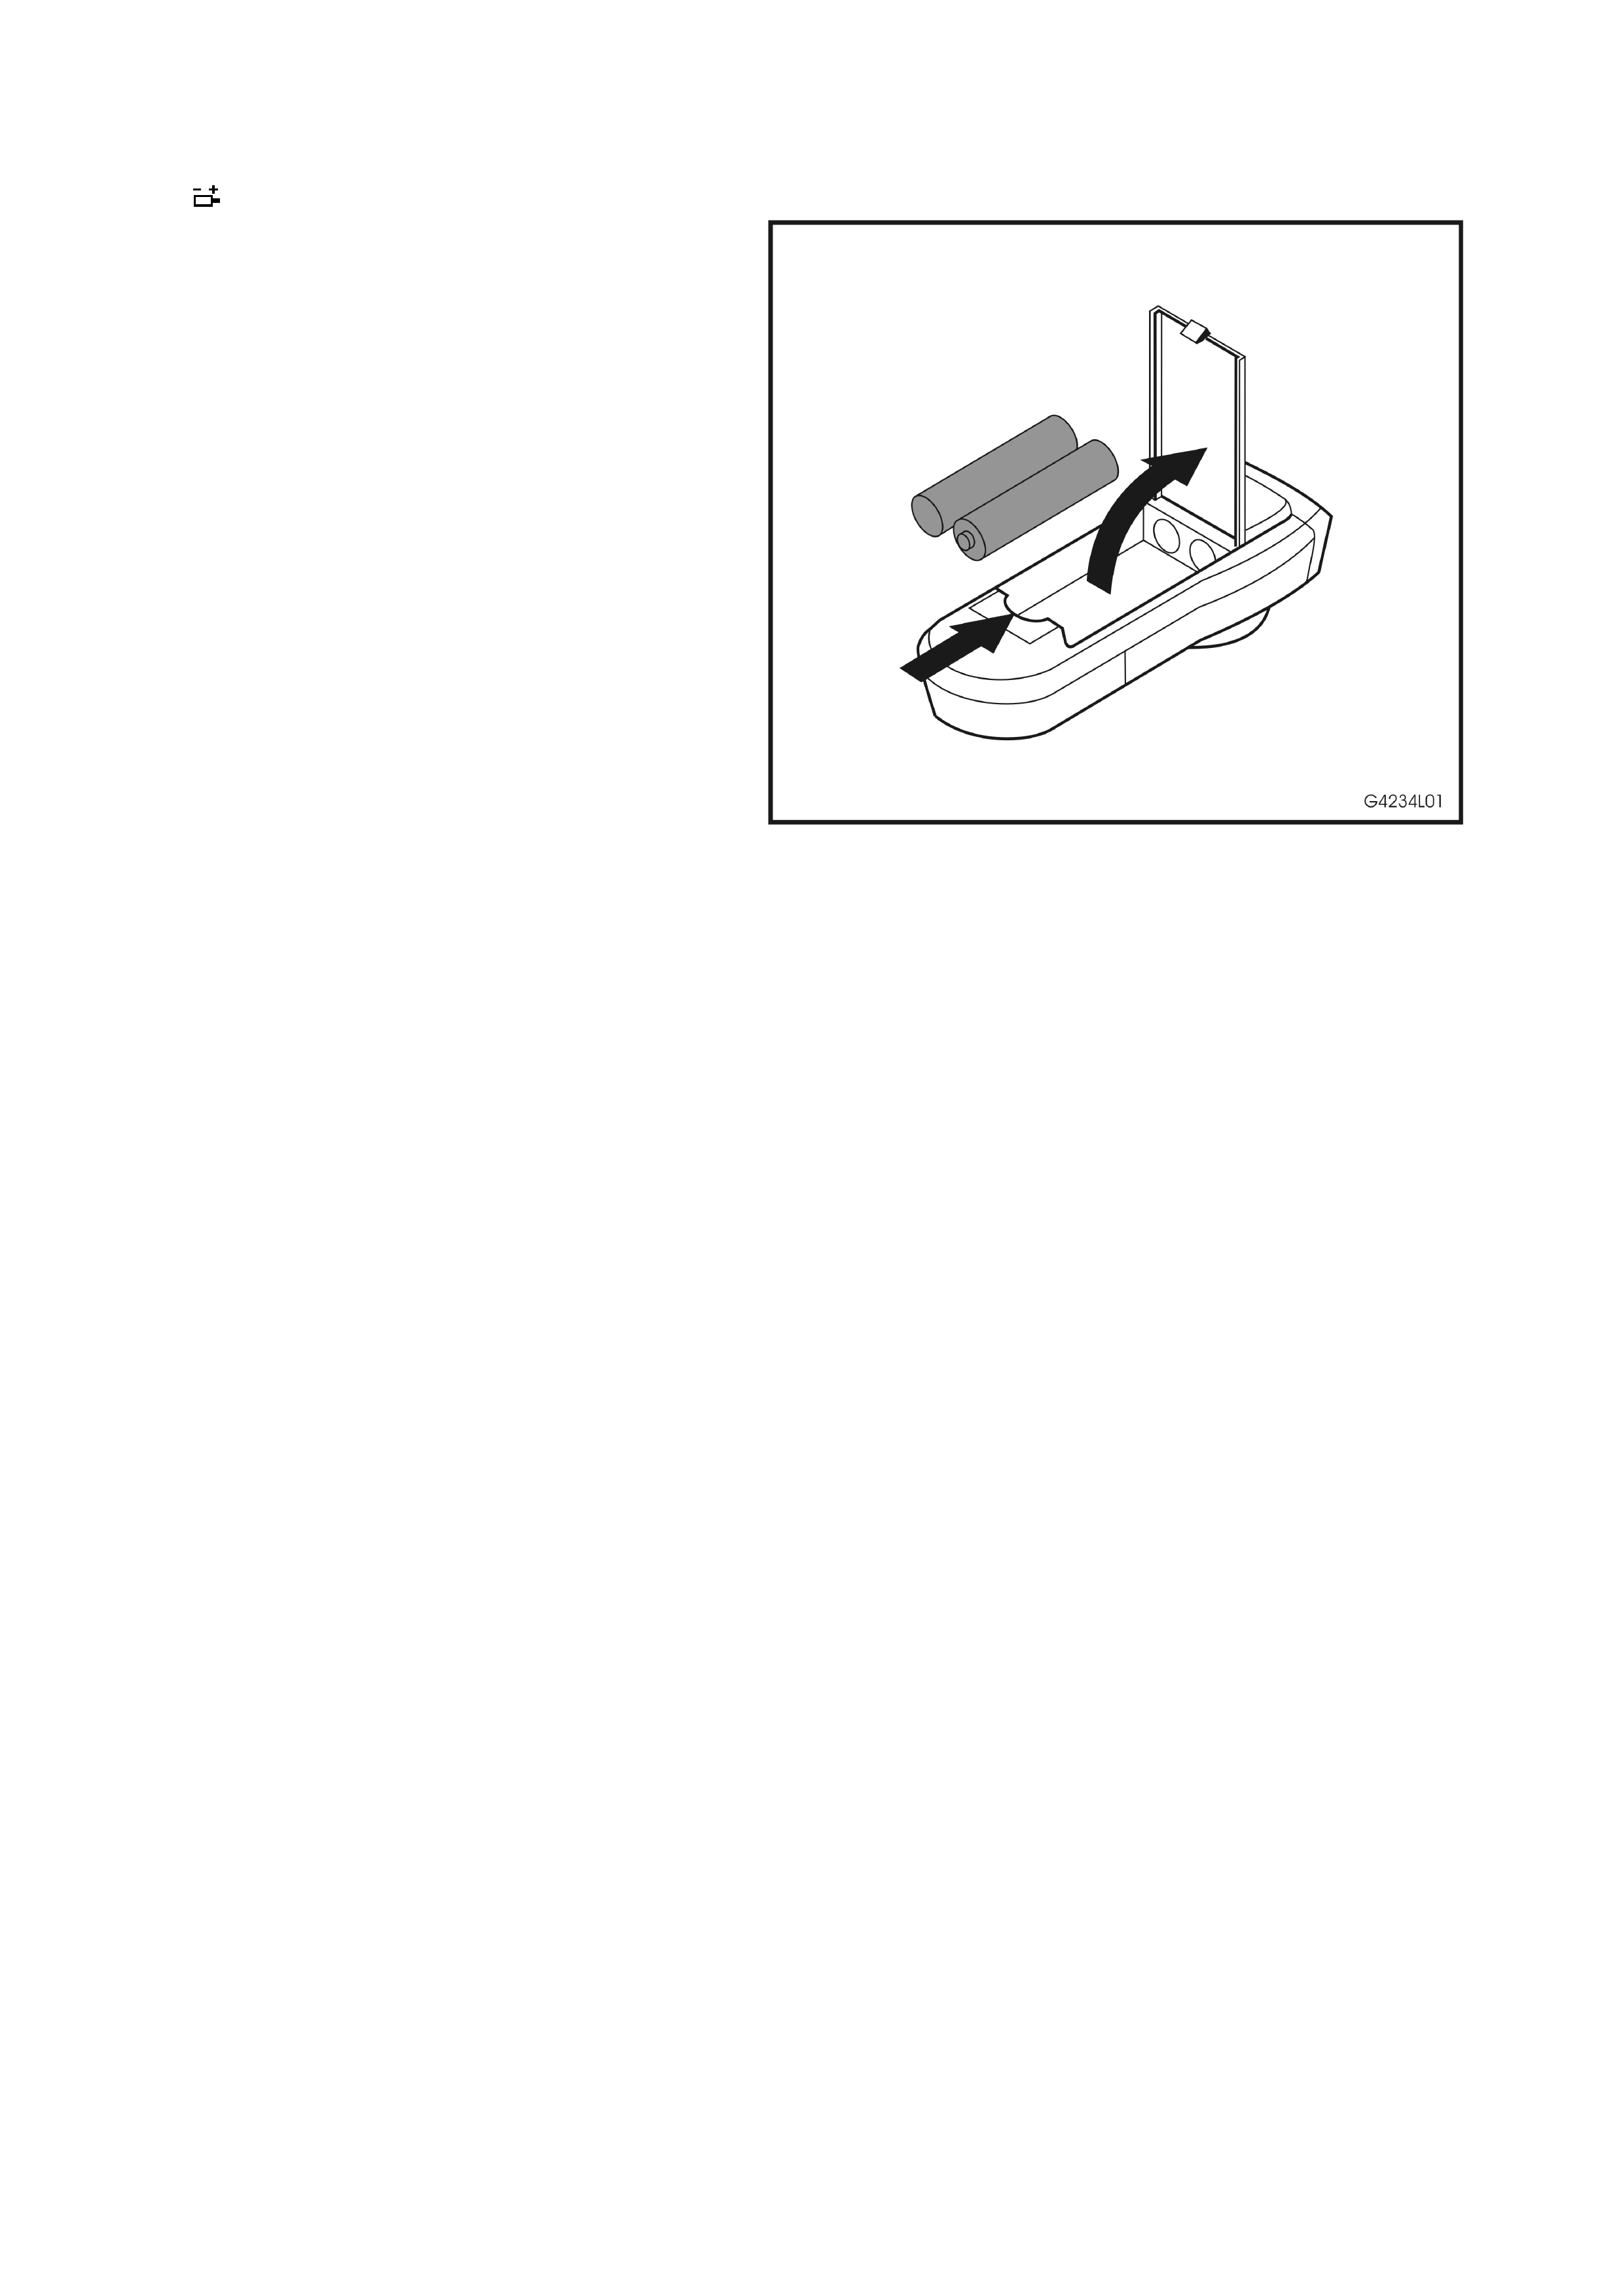
REPLACING BATTERIES
You have to replace the batteries of the remote control when the navigation system does not respond to a key press
or the icon lights up in the status line of the CARiN display.
1. Open the battery compartment on the back of
the remote control.
2. Remove the discharged batteries.
3. Insert two new LR6 type (Size AA) batteries.
Pay attention to the correct polarity (marked in
the compartment).
4. Close the battery compartment.
Figure 4L-1
NOTE 1: In many countries exhausted batteries may not be disposed of with your household waste. Please
determine how to dispose of exhausted batteries according to local regulations.
NOTE 2: Only use leak-proof batteries. Battery leakage can cause damage to the remote control or to your car.
NOTE 3: Never ex pose the rem ote control to direct sunlight or ex trem e heat. The batteries ar e discharged and the
risk of leakage is increased.
NOTE 4: If you permanently use you remote control in it’s holder, we recommend that you remove the batteries
from the remote control.

SWITCHING ON / OFF
The system is switched on and off together with the ignition.
• The display first shows a safety notification for usage of the system.
1. Confirm this notification by pressing the ENTER key.
• The Main Menu appears.
• After some seconds the system is initialised and you can select the navigation functions (options in
highlighted letters).

STAND-BY MODE
If you are disturbed by the brightness if the disp lay screen (f or ex ample by night or in tunnels) you can switch off the
display.
1. Select ‘Stand-by’ in the main menu.
• The display is switched off.
• If the external loudspeaker is connected to you system (optional), you will still hear the guidance advice.
2. Press one of the cursor keys , , , , the ENTER key or the MENU key on the remote control to switch on
the display again.
• If the navigation system was switched off in the stand-by mode, it restarts in the stand-by mode when
switching the ignition on again.

VOLUME ADJUSTMENT
1. Press + or – key on the remote control to adjust the voice volume of the guidance advice.
• You hear “Louder” or “Softer” with the current volume settings.
• The volume adjustment influences both the volume level; of an external speaker (if installed) and the
volume of the built-in speaker (in the display unit).

DISPLAY
The navigation system provides a colour display.
1. For adjustment of the screen brightness use the ‘BRIGHT’ thumb wheel on top of the display.
2. For volume adjustment of he built-in speaker use the ‘VOL ’ thumb wheel.
• W e r ecom m end to adjus t the ‘VOL ’ thum b wheel on the monitor to its mid position to minimise dis tortion
of the built-in speaker.
• The thumb wheels ‘COLOUR’ and ‘TINT’ have no function.

THE CARIN MENU SCREEN
The CARiN Navigation System menus are based on the following screen layout:
Figure 4L-2
1 Information window
2 Menu title
3 Country code of the inserted map CD.
4 Destination address
5 Input window
6 Menu option. Highlighted options can be selected. Options which are currently not available are skipped
automatically.
7 Status line. The following information is available to be displayed on the left or right of the status line:
- Clock;
- Date;
- Estimated time of arrival (for example “✷ 9:28”);
- Remaining travel time (for example “->✷ 0:46h”)
Further information that is always displayed by the system:
- : the batteries in the remote control are discharged;
- : command is received from the remote control;
- : hour-glass (system is calculating; for example during route planning);
- : audible info (voice messages) disabled;
- : route planning criteria;
8 Cursor. Move with the cursor keys , , and , on the remote control. Press ENTER key to confirm selection.
9 Info icon. Travel guide data on s pecial destination ( hotels, res taurants , tourist attractions, etc.) is available on the
inserted map CD.
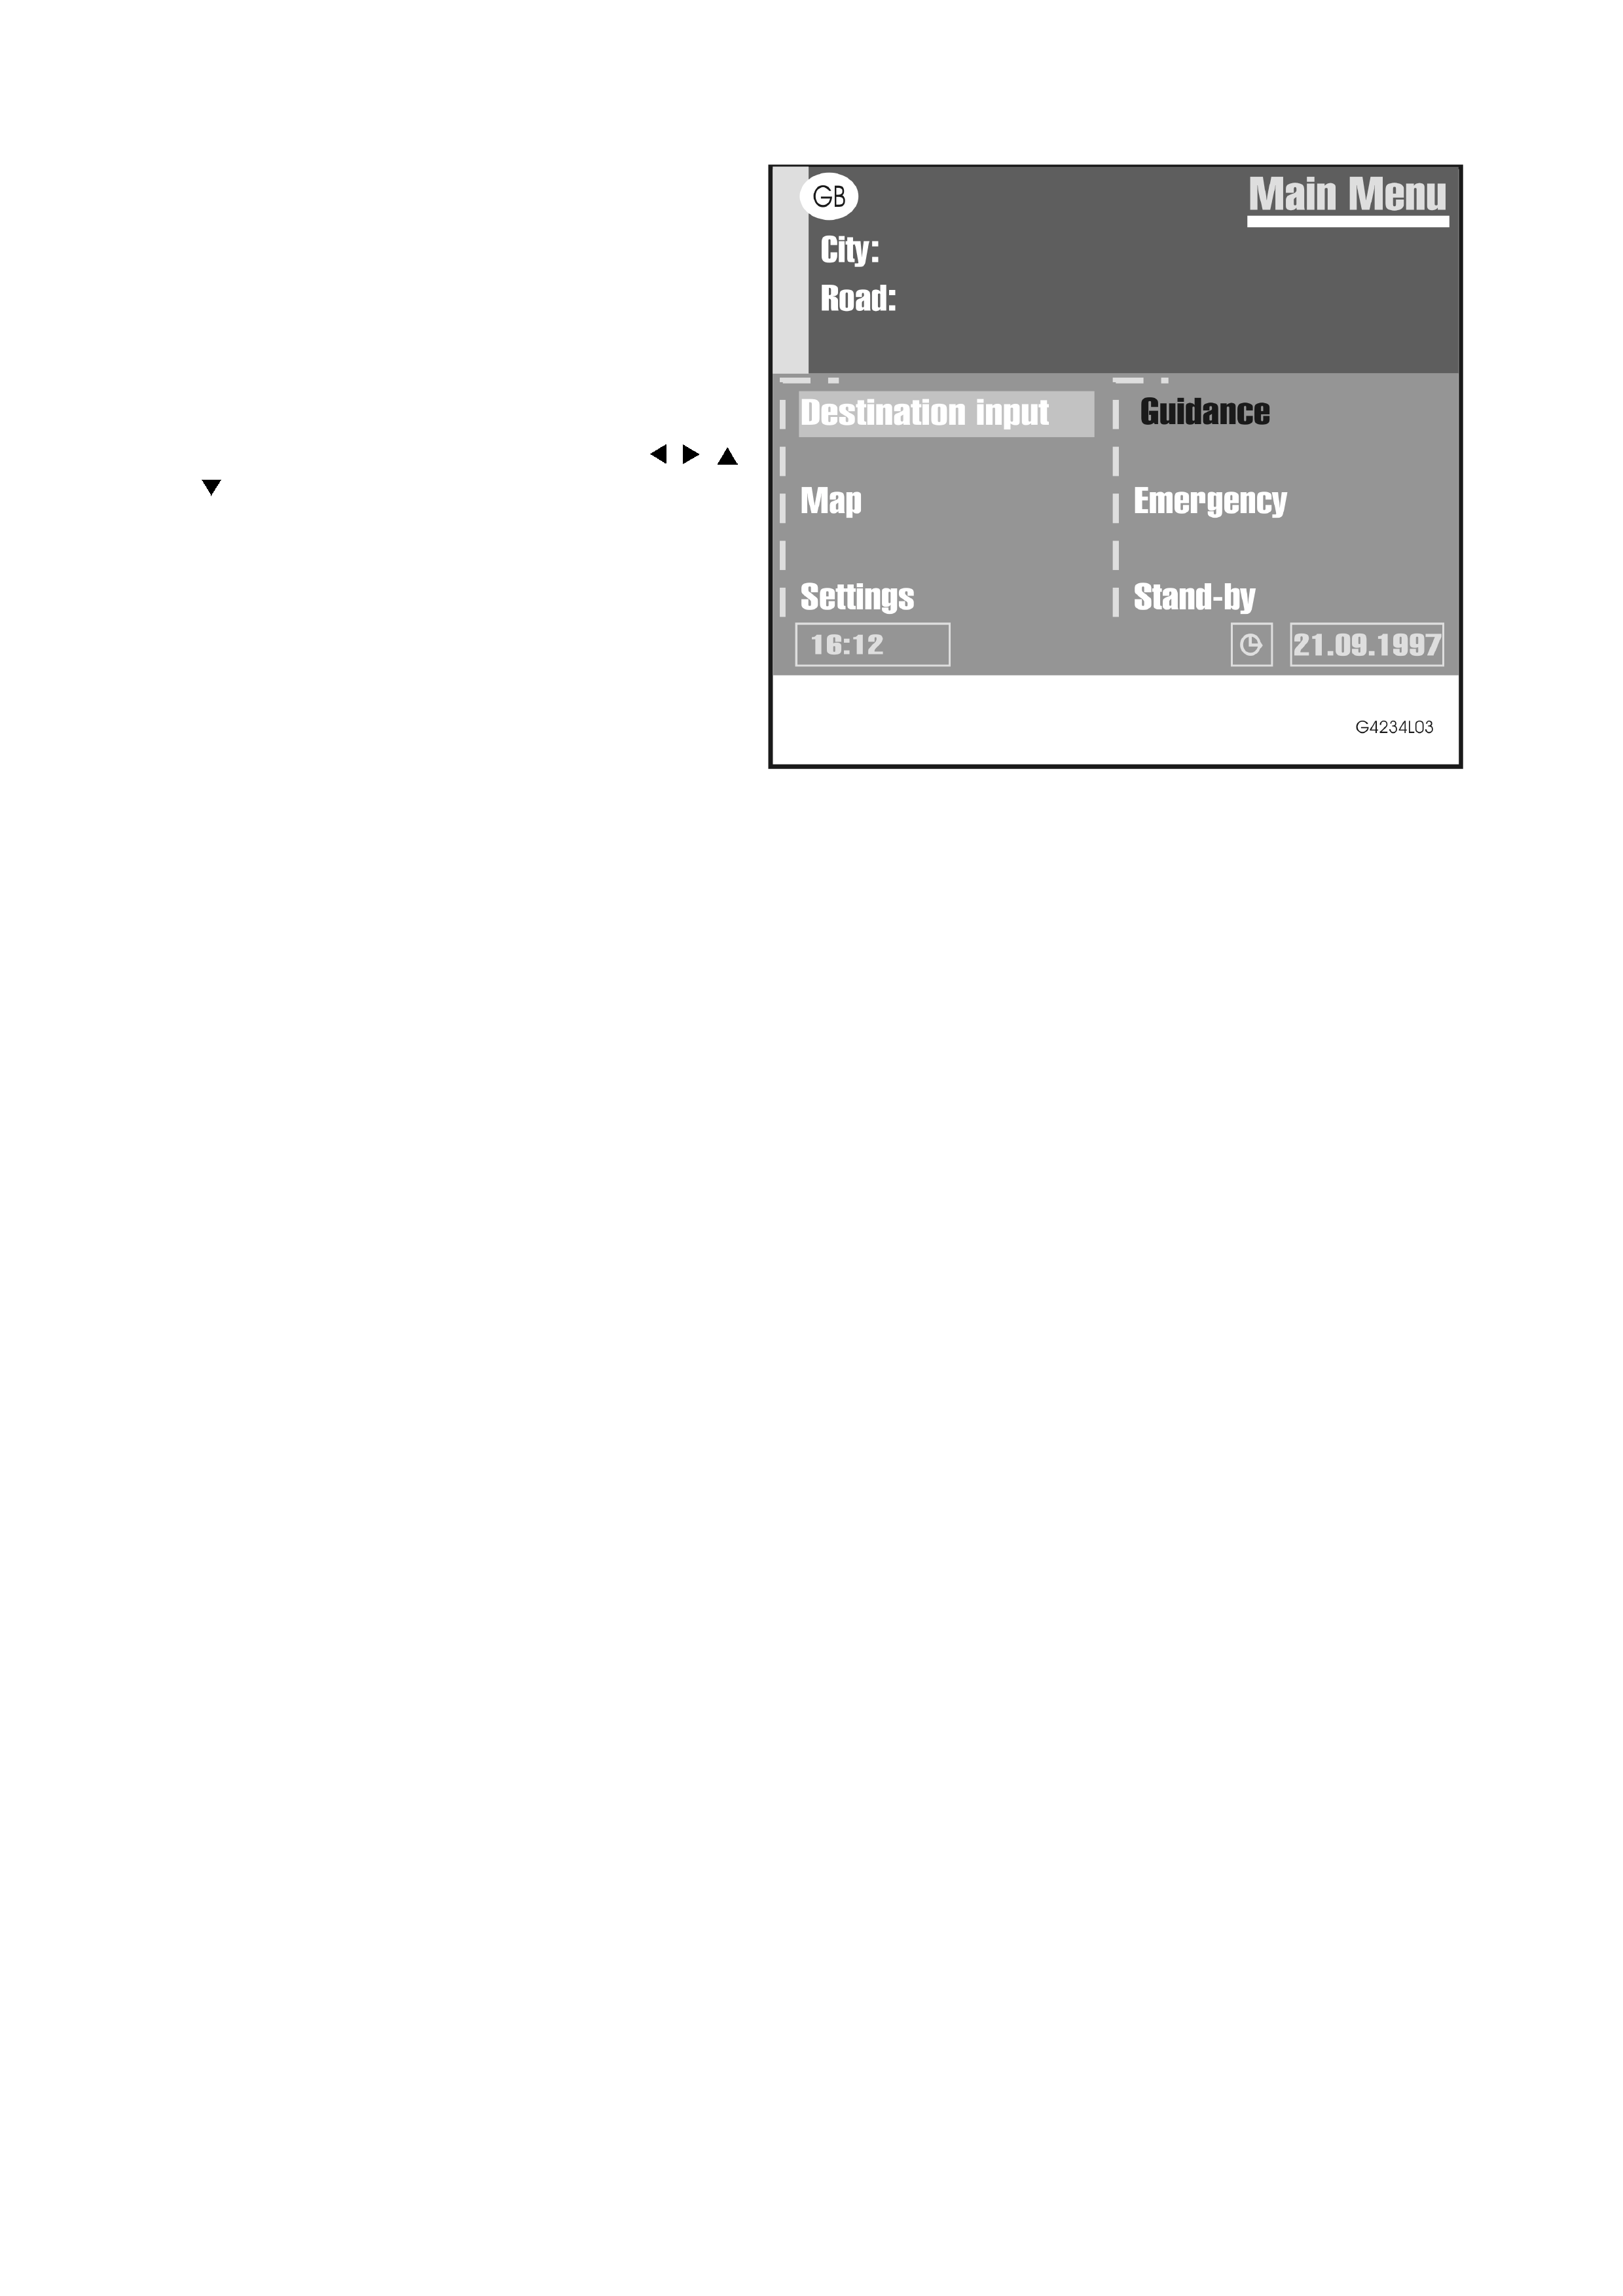
MAIN MENU
After switching on the ignition and confirming the
safety notification the Main Menu appears.
Acquaint yourself with the CARiN functions by just
selecting menu options and watch the reaction of
the system. Don’t be afraid, you can’t damage the
system that way.
1. Press the MENU key brings you back directly
to the Main Menu from any other menu.
2. Move the cursor (highlighted field) with , ,
or to the desired menu option and confirm
with the ENTER key.
• The cursor automatically skips options
which are not available (for exam ple, if you
did not specify a destination address).
Figure 4L-3
You can select the following menu options in the Main Menu:
Destination input: Enters the Destination Input menu. Select this option to enter the city, road, junction or the
special facility of the destination y ou want to travel to.
Map: Offers you a map with the area around the current car position.
Settings: Enters the System Setting menu. Select this option to set your own preferences.
Guidance: Enters the guidance screen and activates the guidance function (only if a destination address is
entered).
Emergency: Enters the Emergency menu to show you the current car position and the emergency phone number.
Stand-by: Switches off the display screen.
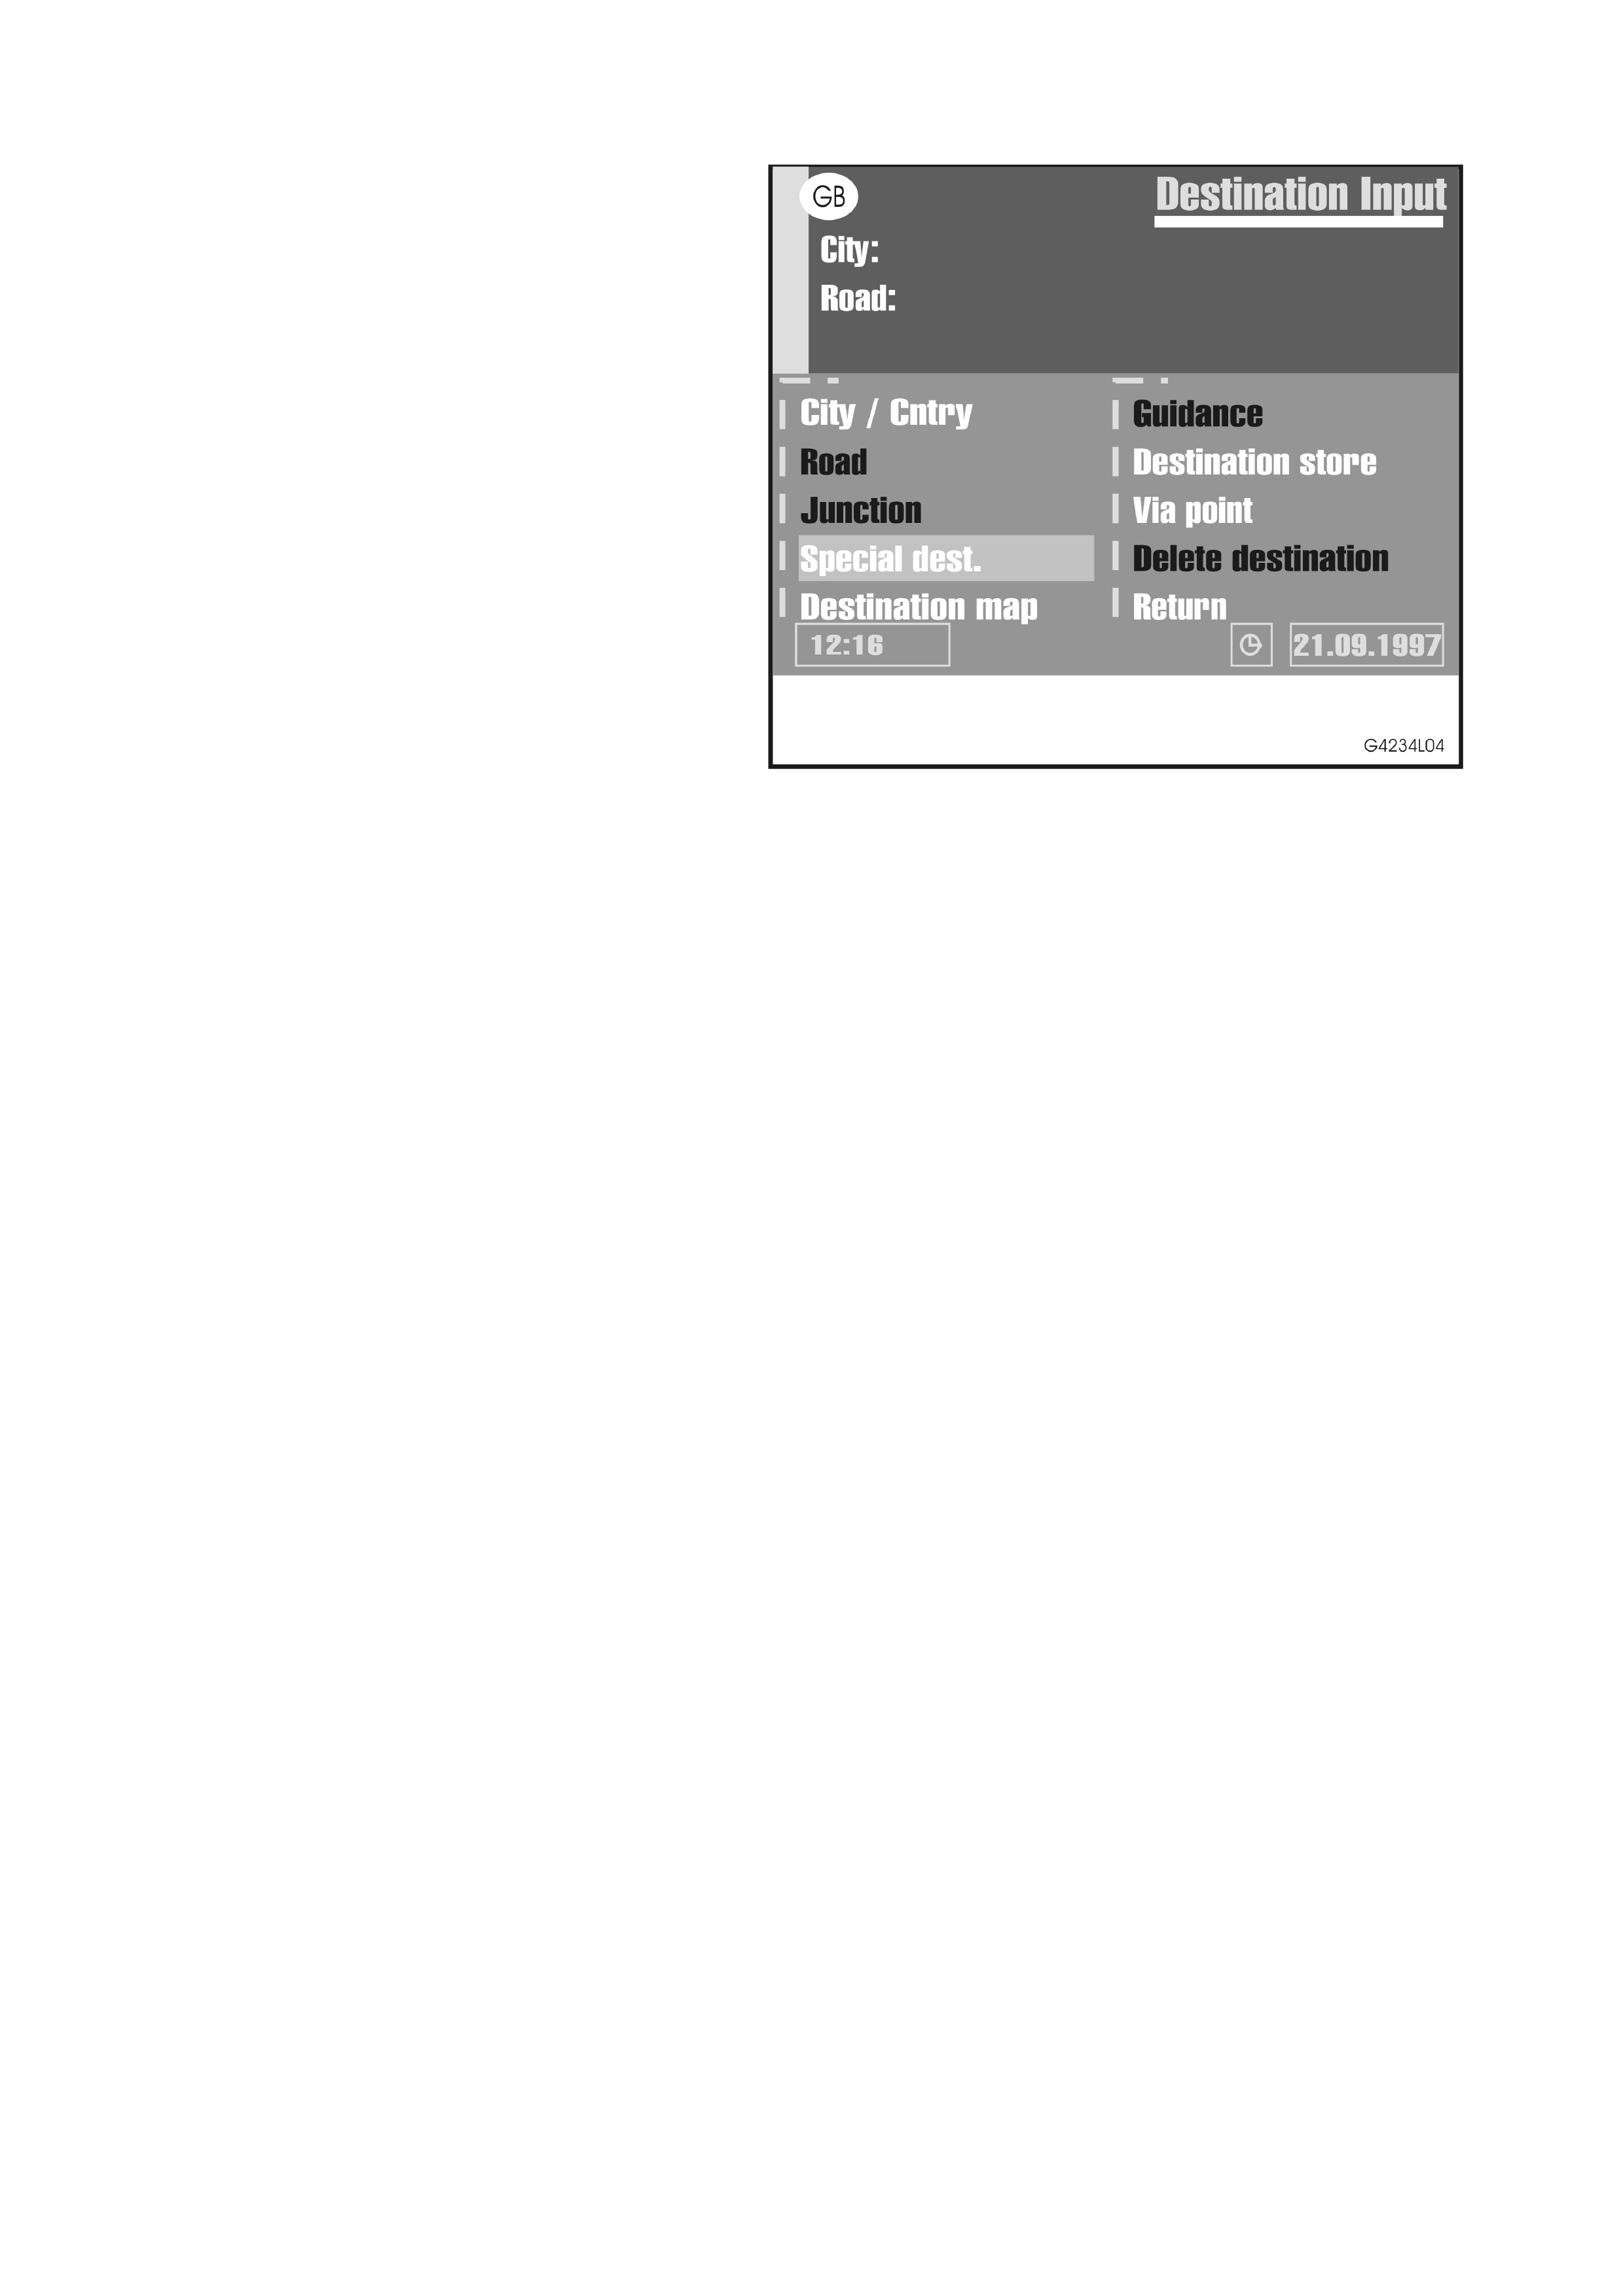
DESTINATION INPUT
1. Select ‘Destination input’ from the Main Menu.
• The Destination Input menu is presented.
Figure 4L-4
The following option are available:
City / Cntry: Entry the city name of the destination address.
Road: Enter the road name (optional).
Junction: Enter a junction for more precise distinction selection (optional).
Special dest.: Select a destination address from a list of facilities of general interest (airports, hotels, restaurants,
filling stations, etc.).
Guidance: Goes to the guidance screen and activates the guidance function.
Destination store: Store destination addresses in the address book and recall the last used destination addresses.
Waypoint: Enter via points (so called way points) on the way to the current destination address.
Delete destination: delete the last entered destination address.
Return: Back to the Main Menu.
You can enter the destination address in different ways:
1. Letter-by-letter by means of a ‘typewriter’;
2. Select a list entry from the database of the map CD;
3. Select a special destination (hotels, filling stations, etc.) from the map CD;
4. Input by means of a map and crosshairs.
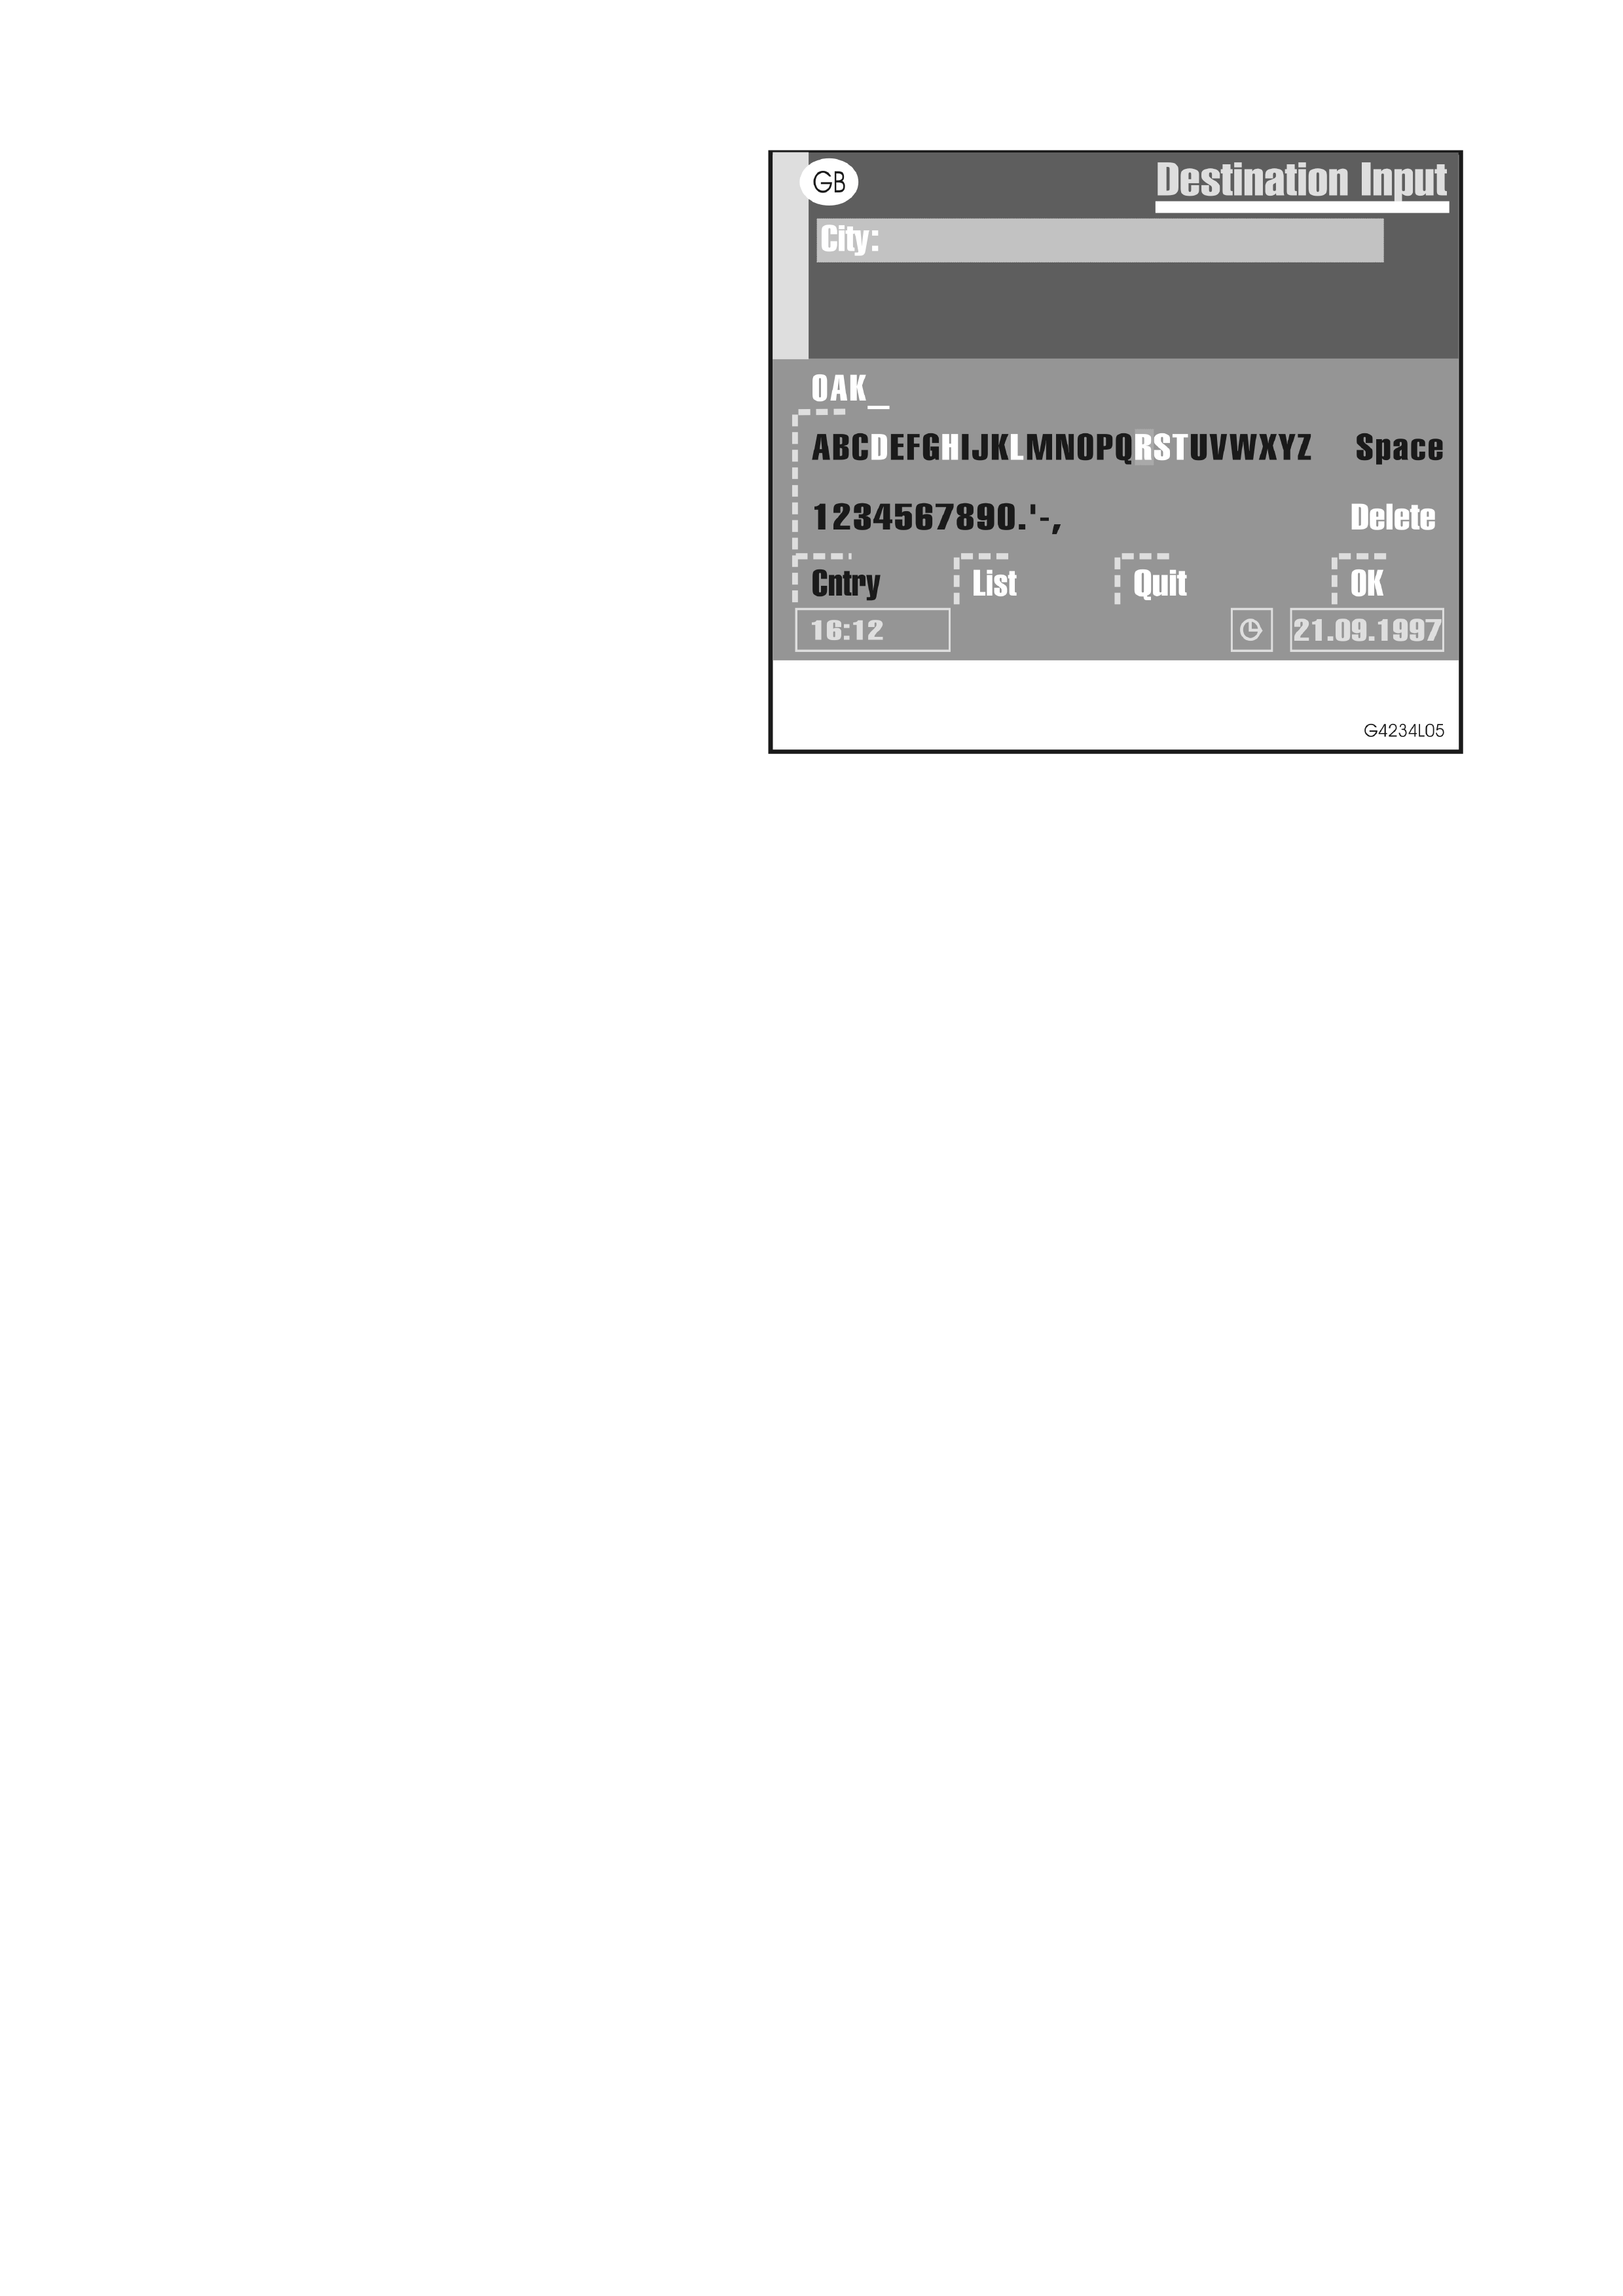
1. DIRECT ENTRY OF THE DESTINATION ADDRESS
With the ‘typewriter’ you can enter the city, the road
and the junction of the destination address letter by
letter.
Figure 4L-5
1. Select ‘Destination Input’ in the Main Menu.
• The Destination input menu appears.
2. Select ‘City / Cntry’.
• The typewriter window is opened.
3. Enter the city name.
• To delete characters previously entered, select ‘Delete’ and confirm by pressing ENTER.
• To enter a space, select ‘Space’.
4. If you now the destination address exactly, enter the road and junction the same way. For this use options
‘Road’ and ‘Junction’ in the Destination input menu.
• It is sufficient, if you only enter the city name. The navigation system then guides you to the city boundary.
5. Select ‘Guidance’.
• The guidance screen appears.
• The system plans a route to the entered destination address.
FEATURES OF THE DATA BASE
• If you use the ‘typewriter’ the previously entered characters are compared with all database entries. You
can select valid characters (highlighted) now. If there is a unique entry in the database, the system
completes the name automatically.
• If there is more that one database entry with the same name, the cursor is automatically placed on ‘List’.
Select the desired entr y from the lis t. If the number of the data entries is large, s etting up the lis t may take a
few seconds.
• Database entries which are not unique are distinguished by additional information. If for example a road
name is not unique in the city entered before, a list of all district names referring to this road is presented.
• For several roads house numbers are available on the database. W hen entering the road name with the
typewriter you can enter the desired house number.

2. SELECTING THE DESTINATION FROM DATABASE ENTRIES
Select the city, road and junction directly from the list of database entries.
1. Select ‘City/ Cntry’, ‘Road’ or ‘Junction’ from the Destination Input menu.
2. Enter the initial letters of the desired city, road or junction with the ‘typewriter’.
3. Select ‘List’ from the typewriter window.
• A list of entries beginning with the characters entered is displayed.
• Without entering an initial letter the lists starts with the first alphabetical sorted database entry.
4. Select the desired list entry.
5. To abort the data entry select ‘Quit’ from the list.
3. SPECIAL DESTINATIONS
Select a special facility (airports, hotels, filling
stations, garages, etc.) as your destination
address. Special destinations are stored on the
map CD.
Figure 4L-6
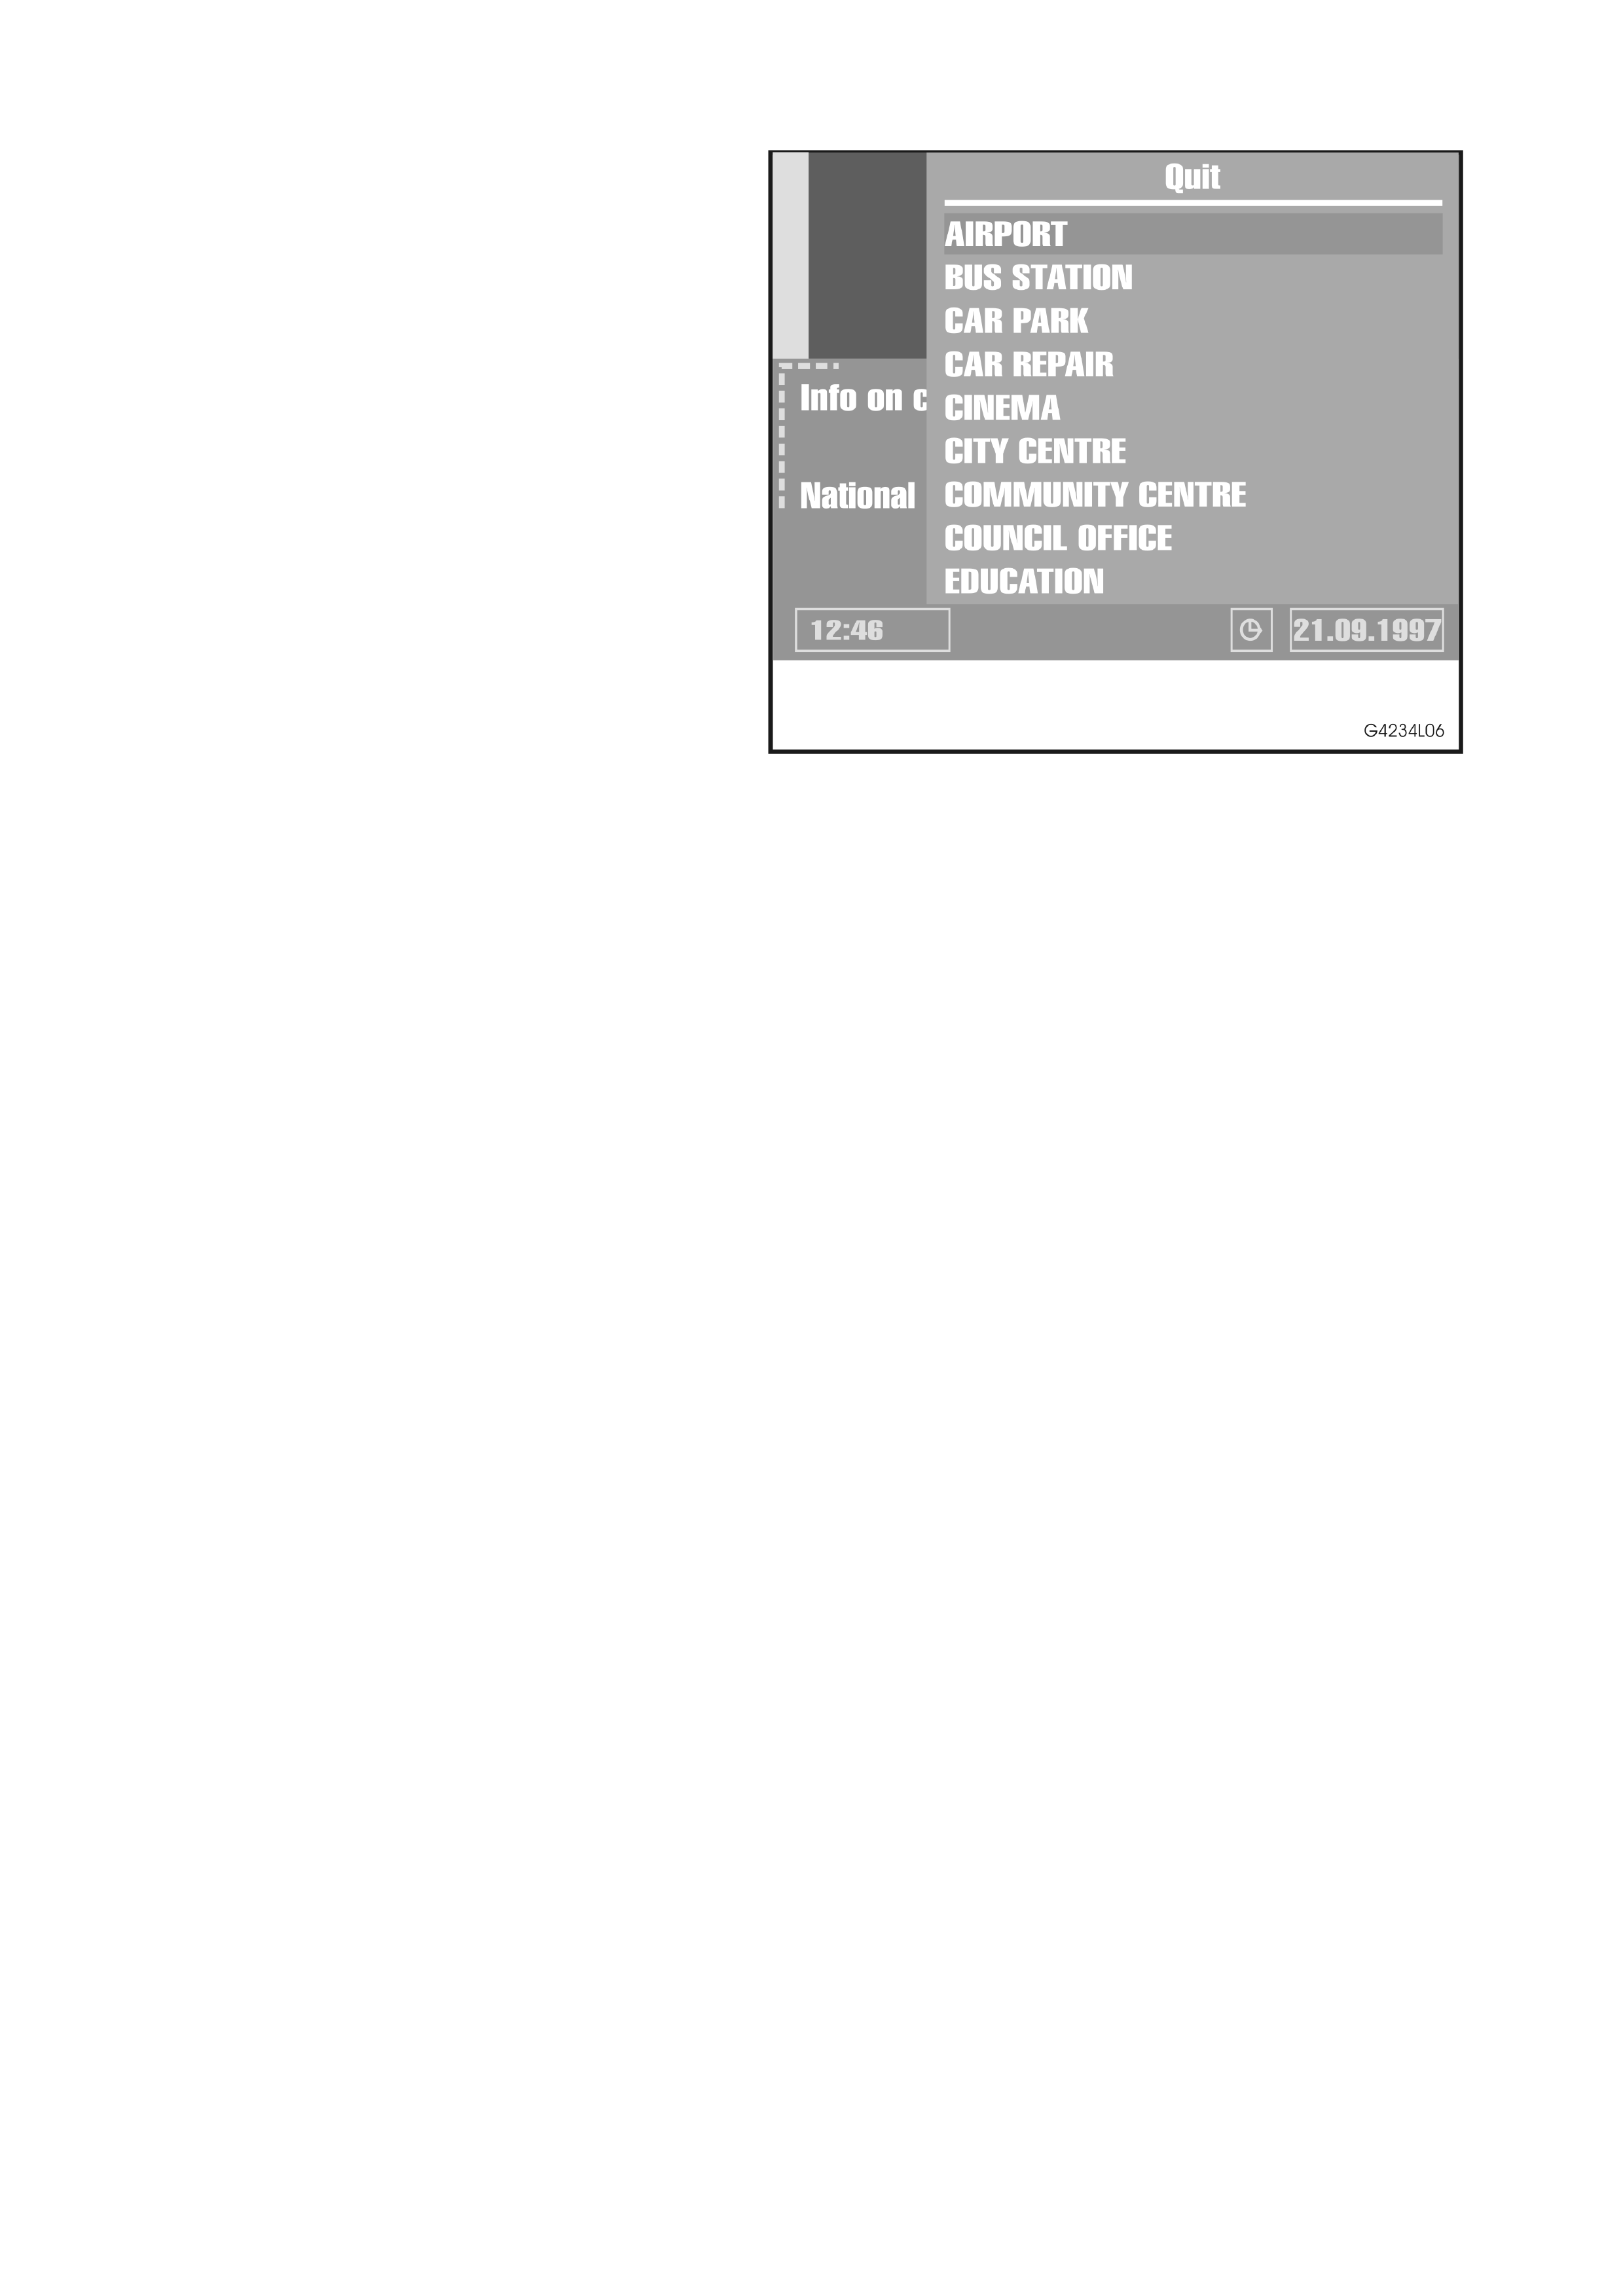
SPECIAL DESTINATIONS RELATED TO THE DESTINATION ADDRESS
If you are looking for special destinations situated near your destination address:
1. Select ‘Special dest.’ From the Destination Input menu.
2. Select ‘Info on dest.’.
• A list of categories specifying the special facilities is presented.
• For small cities and villages usually only the option ‘CITY CENTRE’ is available. If you choose this option,
you will be guided to the centre of the city or the village.
3. Select the desired category (for example HOTEL, PETROL STATION, …)
• If a larger number of facilities are available in the database, the typewriter is shown.
4. Enter the name of the desired facility or select ‘List’.
5. Select the desired facility from the list.
• If travel guide infor mation on special des tinations is stored on the m ap CD, the inf o ic on is displayed in the
information window of the Main and Designation Input menu. In this case, a special screen with additional
information is shown. For further details, read the following section ‘Map CDs with travel guide information’.
FACILITIES OF NATIONAL IMPORTANCE
If you are searching for facilities of national importance (for example AIRPORT, FERRY, etc):
1. Select ‘Special dest.’ from the Destination Input men.
2. Select ‘Nation. Importance’.
3. Proceed as described previously.
FACILITIES LOCATED AROUND THE CURRENT CAR POSITION
If you are searching for facilities in the vicinity of the current car position:
1. Select ‘Special dest.’ from the Destination Input menu.
2. Select ‘Info on car pos.’
• A list of categories specifyi ng the special facilities located around the current car position is presented
3. Proceed as describe previously.
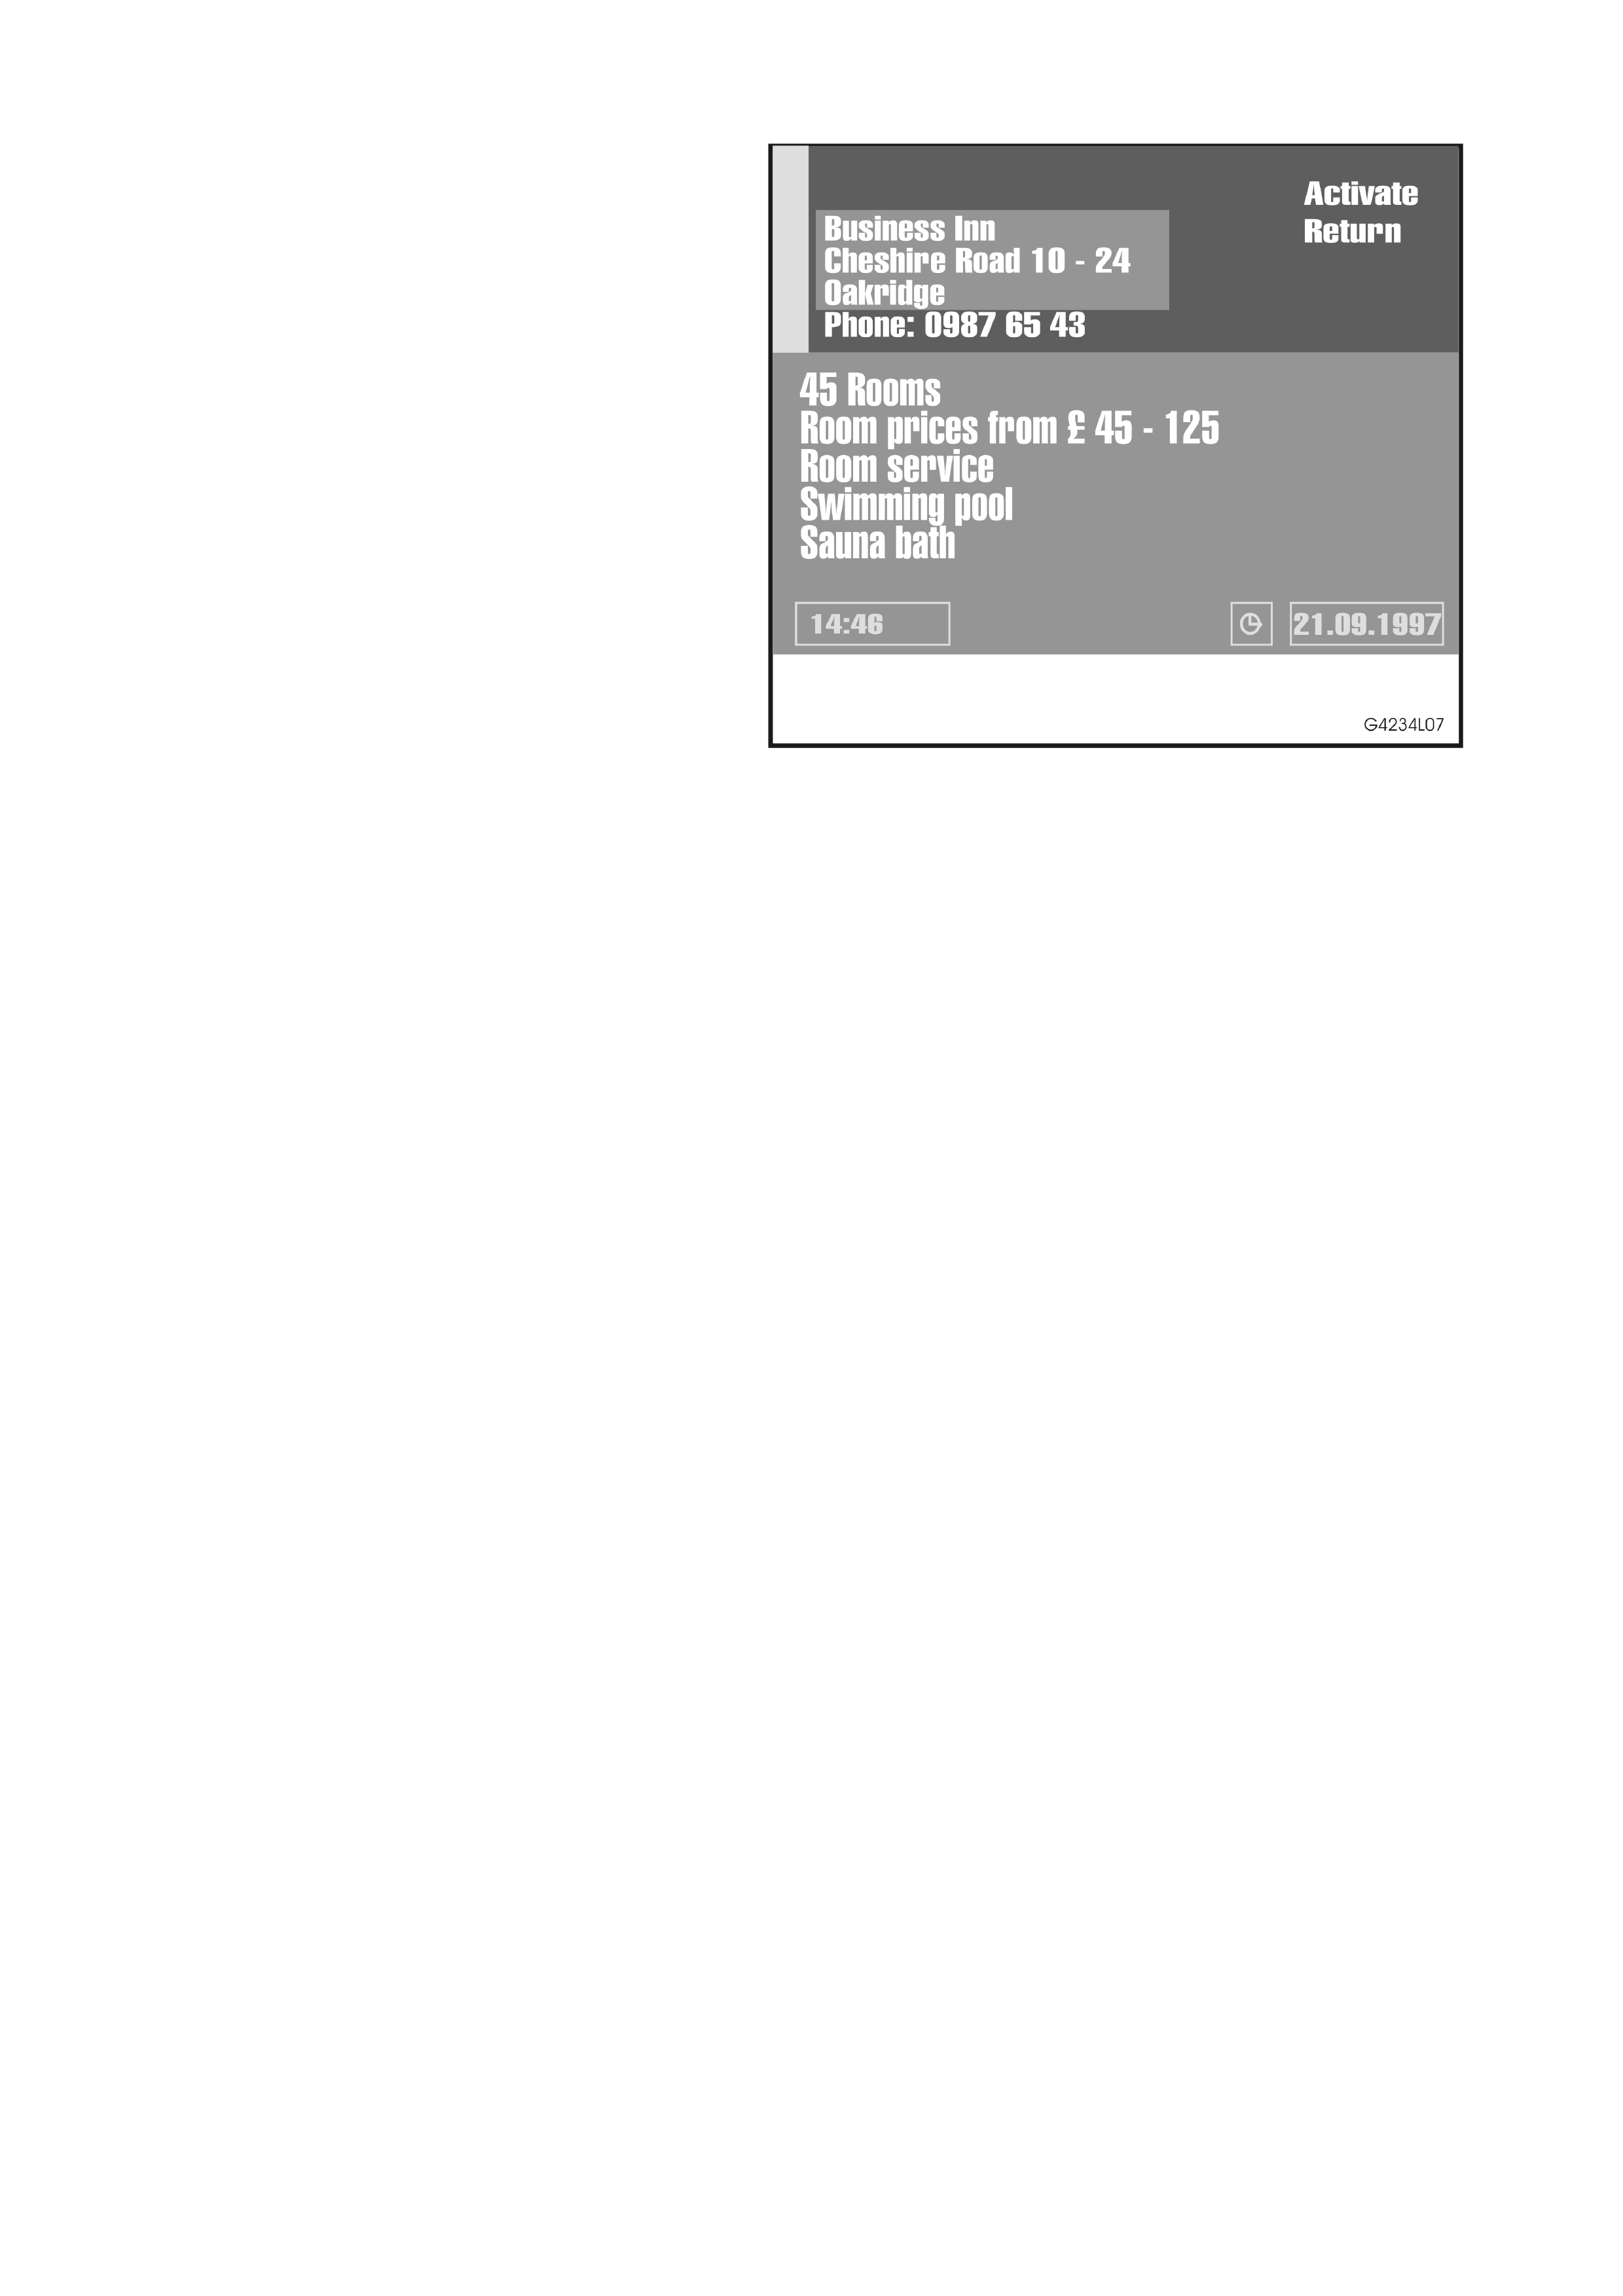
MAP CD’S WITH TRAVEL GUIDE INFORMATION
You can recognise map CDs containing travel
guide inform ation by the info icon in the inform ation
window. If you have inserted such a map CD, you
can get additional information on many of the
stored special facilities.
You can for example find out the room rate when
looking for a hotel and recall the phone num ber for
reservation.
Figure 4L-7
If you wish to take over the selected facility into guidance:
1. Move the cursor onto the address.
2. Press ENTER.
3. Then select ‘Activate’.
• The selected facility is stored as the new destination address for guidance.
4. Select ‘Return’ if you do not wish to store the selected facility as the destination address.
• The display again shows the list of special destinations
W hen us ing the map CDs with the travel guide inform ation, additional screen ic ons may appear in the map display.
You can find a description of these icons in the documentation supplied with the map CD.
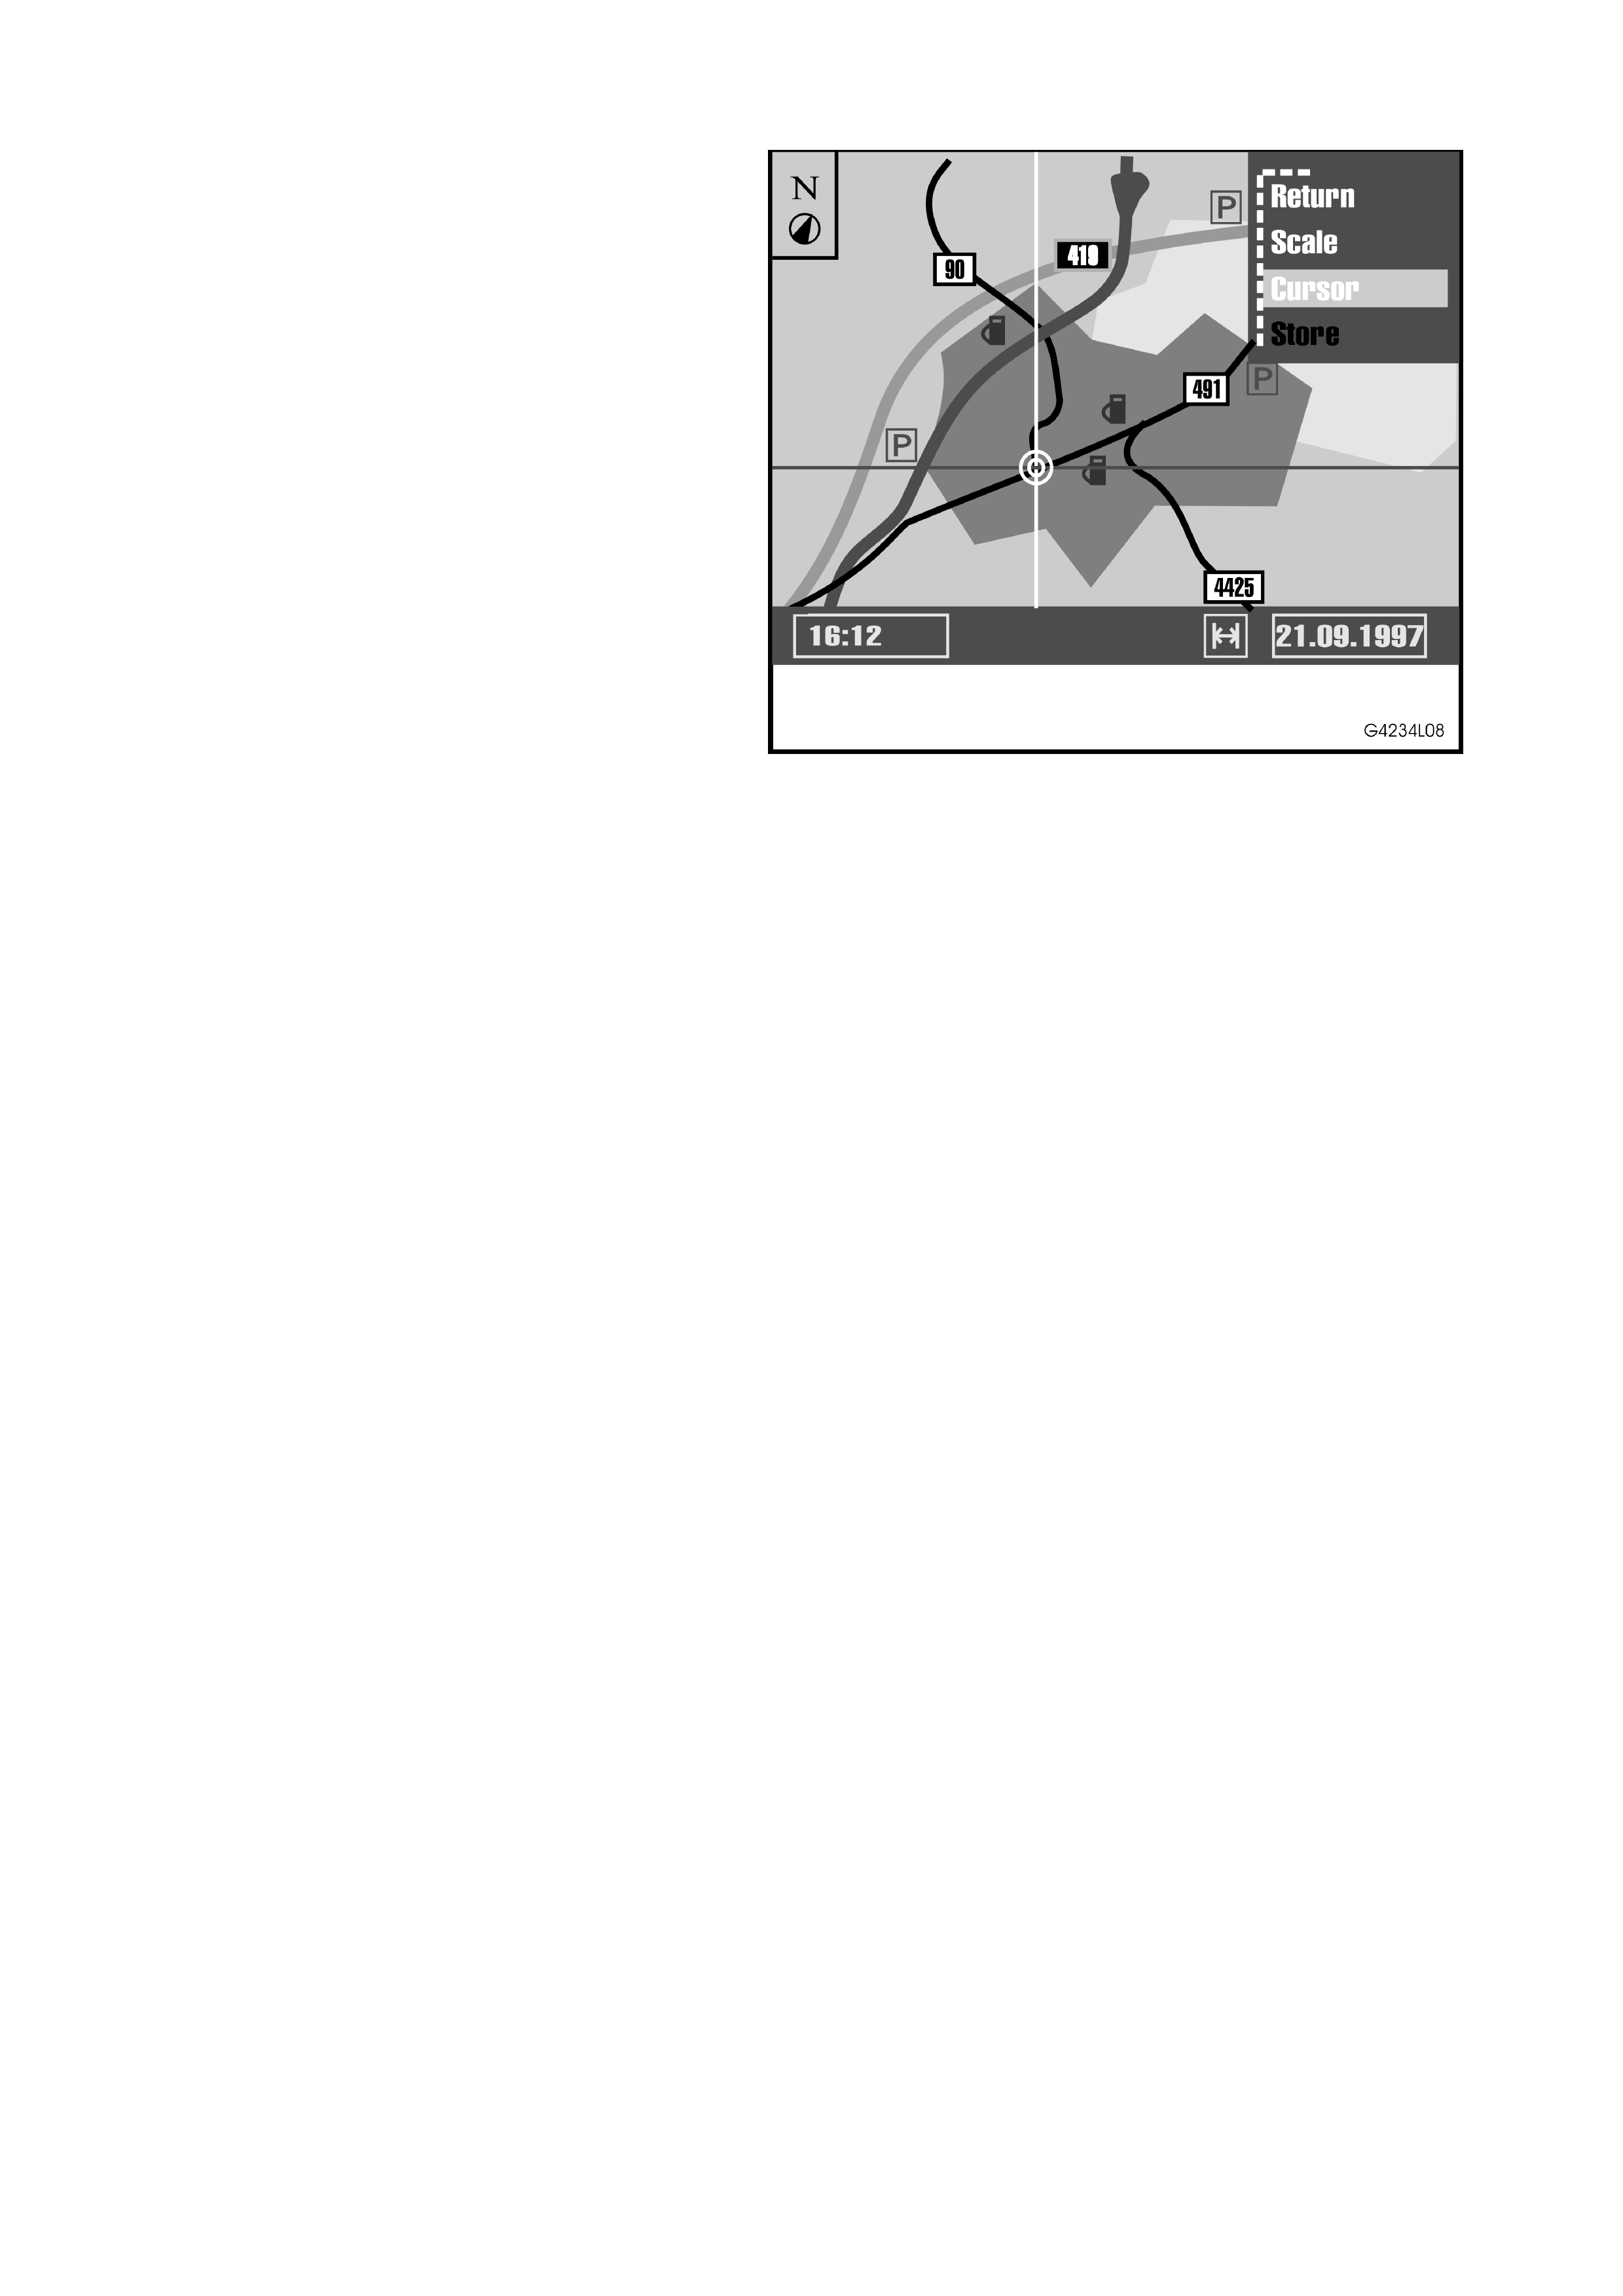
4. DESTINATION INPUT BY MAP
Select the destination address by means of a map.
Destination input by map is only possible when the
car speed does not exceed 30 km/h.
Figure 4L-8
1. Select ‘Destination map’ from the Destination Input menu.
2. A map with the area around the spec if ied des tination addres s is s hown. Of no destination was entered bef or e, a
map with the area around the current car position is displayed.
3. Press one of the cursor keys or the ENTER key.
• A menu with the following options is shown on the display:
- Return: Return to the Destination Input menu.
- Scale: To change the map scale.
- Cursor: To activate the movement of the horizontal and vertical line of the crosshair.
- Store: To store the selection as the new destination address.
• If you don’t press a key within three seconds the menu closes automatically.
4. Activate the crosshair cursors by selecting ‘Cursor’.
5. Move the crosshair with cursor to the desired position.
• The map is automatically shifted, if you move one of the crosshair lines to the edge of the screen.
6. To store the selected location as the destination address, press ENTER and then select ‘Store’ from the menu.
• Storing a destination address from the destination m ap is only possible with the map scales 100 m , 200 m,
500 m and 1 km.
TIP: Firs t s elect a large map s ca le f or a coars e s pec if ication of the destination. T hen c hoos e a s maller sc ale f o r the
exact determination and storage of your destination.
Special facilities are displayed as icons in the destination map. The number of displayed facilities depends on the
map scale and on the availability of these facilities in the database. You can find the explanation of these screen
icons in the table at the end of these instructions.
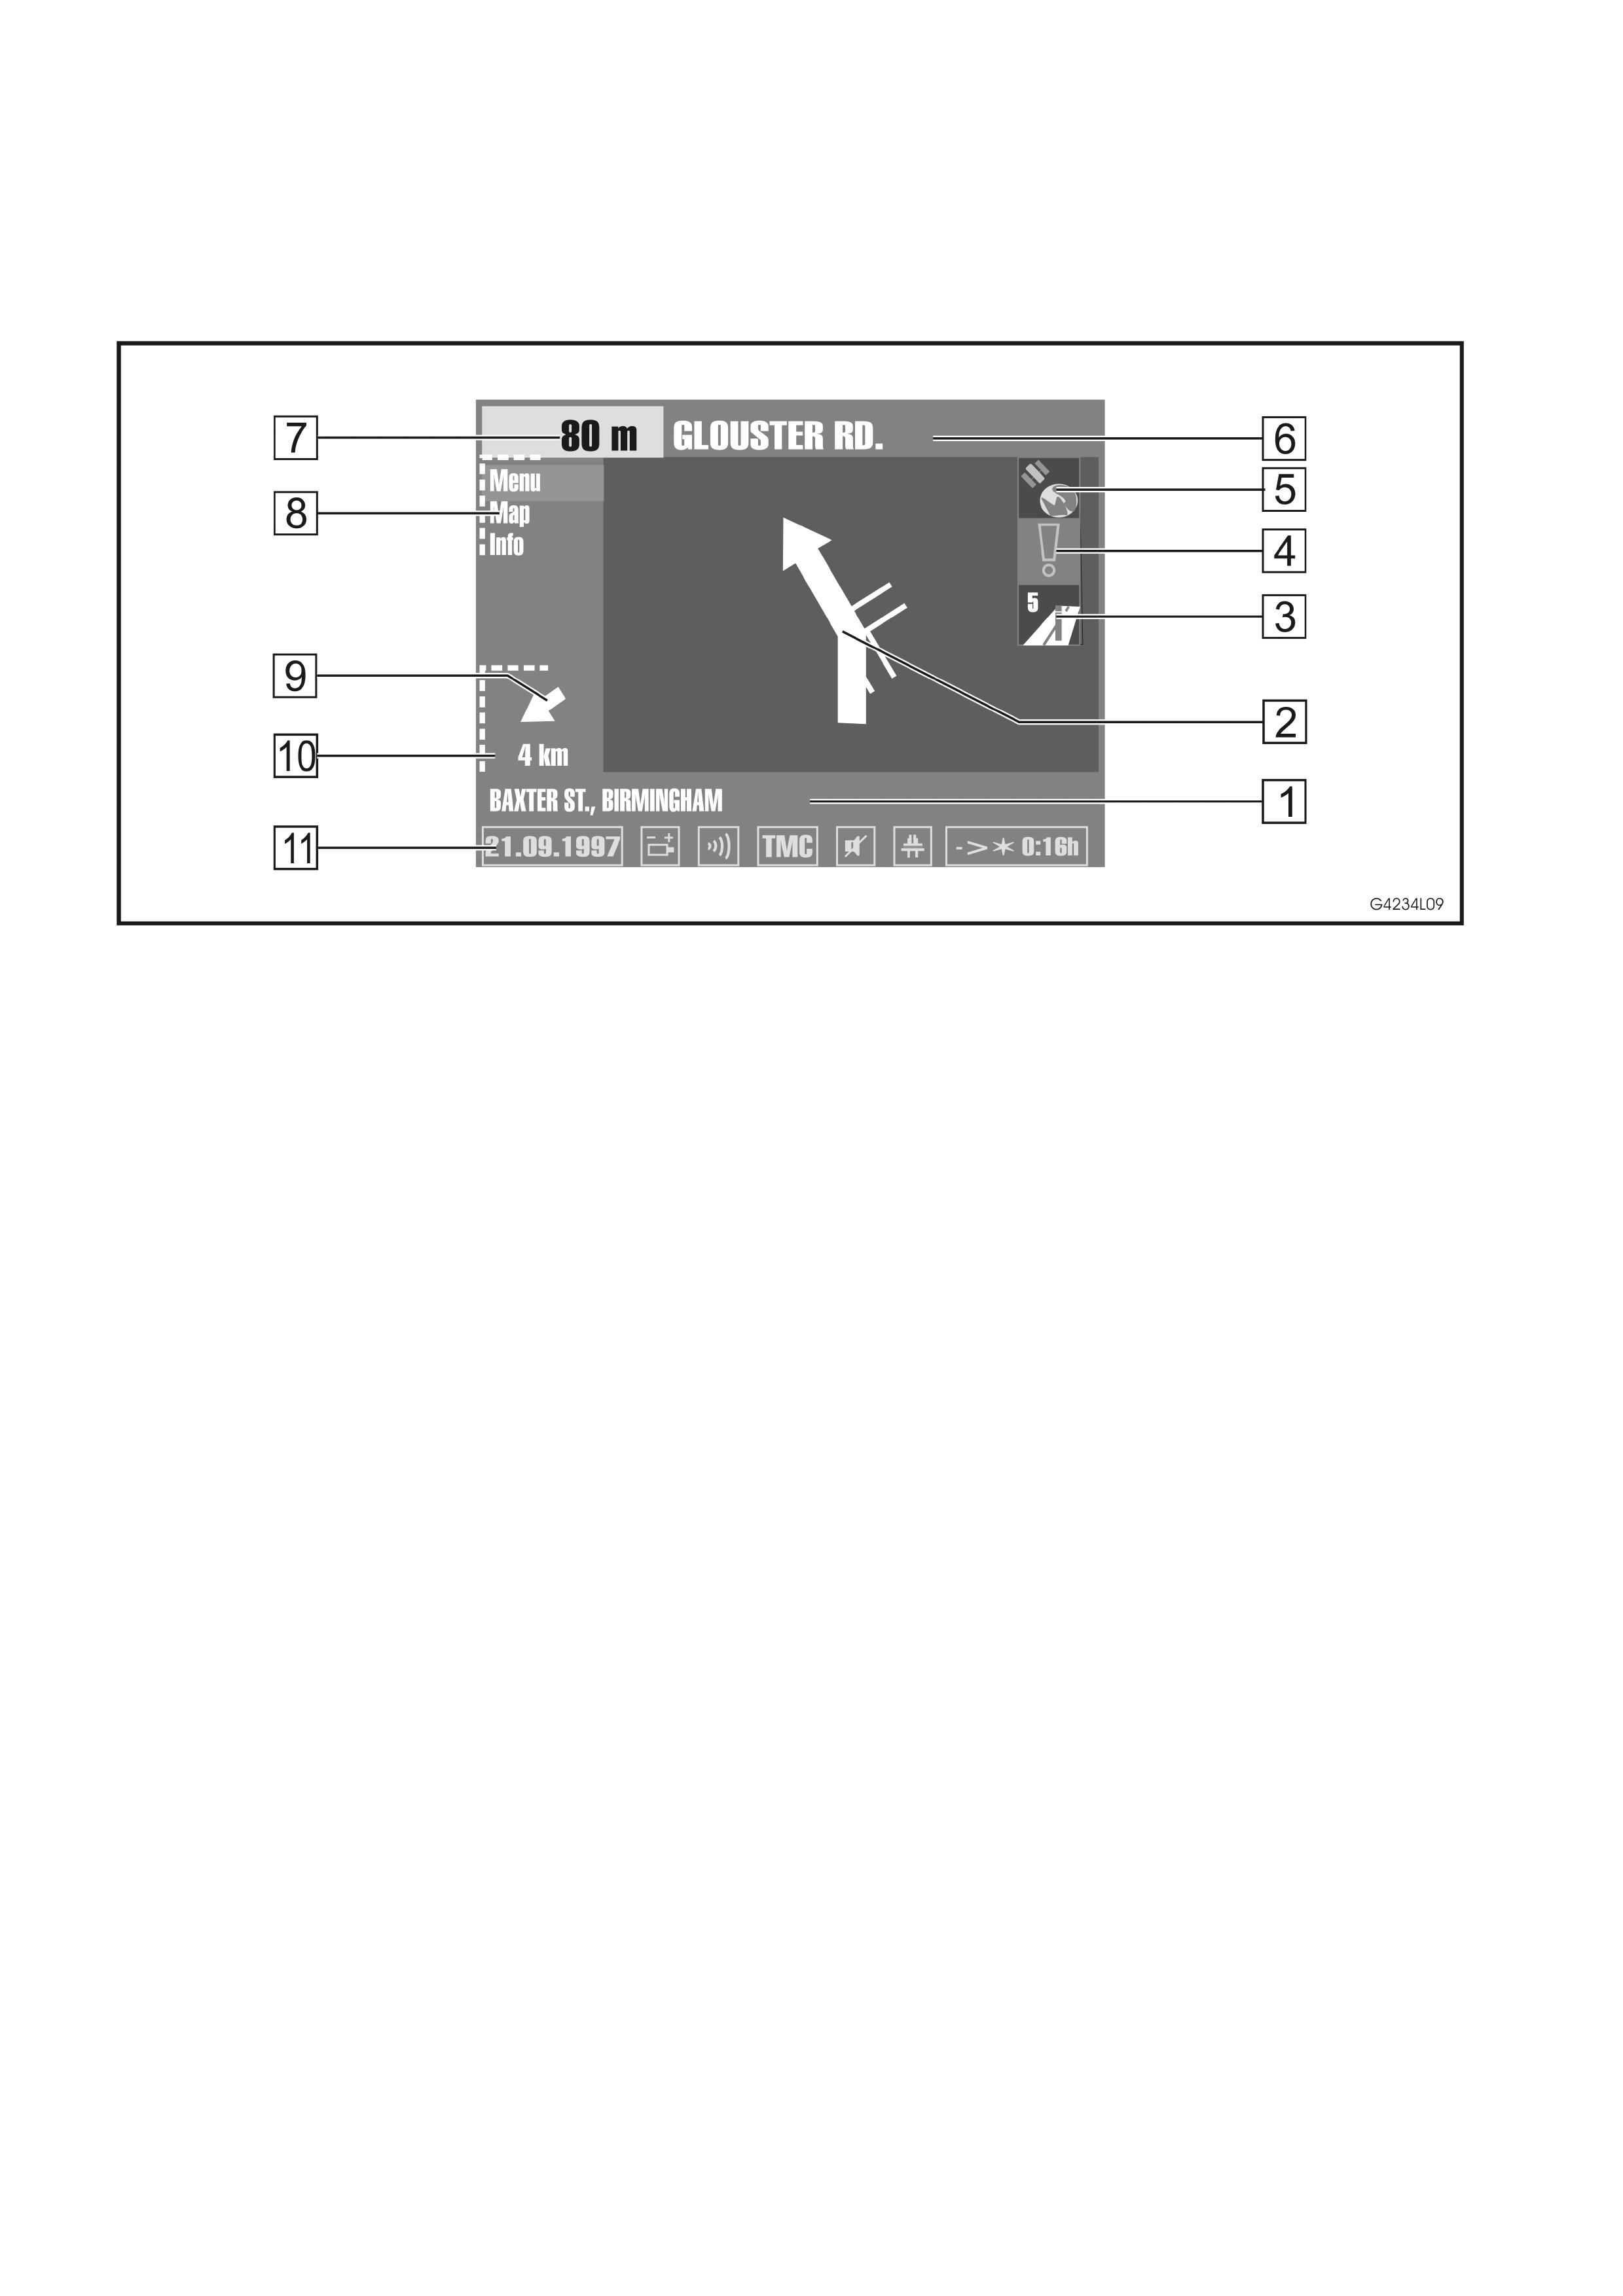
GUIDANCE
GUIDANCE SCREEN
Once you s elect ‘Guidance’ the guidanc e screen appears . If you enter a new destination address it m ay tak e som e
time before the first guidance advice is shown. The navigation system plans the route. During route planning the
sand clock spears in the status line.
The following information is shown in the guidance screen:
Figure 4L-9
1 Current car position. Road name, city name and village name if stored in the database.
2 Visual guidan ce advice. Diagr am of the nex t junction or turning. In addition direc tion changes are announced by
voice messages.
3 TM C status. Shows the num ber of valid TMC announcem ents in the vic inity of the c ur=rent car position (only if a
RDS TMC radio is connected).
4 Warning note. You are in an area with limited road information.
5 GPS reception status. As soon as valid position data is received by the GPS receiver the colour of the satellite
icon is green.
6 Turning into a street. Road you have to turn into next.
7 Distance to the next direction change *.
8 Options menu: ‘Menu’ (goes to the Main Menu) or ‘Map’ (shows the route map) or ‘Info’ opens the Route
Information menu).
9 Target direction arrow. Shows the airline direction to the selected destination.
10 Distance to the destination* (real driving distance as soon as the route is planned).
11 Status line.
* the measuring units are dependent on the system settings.
VOICE MESSAGES
As soon as you activate the guidance function CARiN will give you acoustic guidance advice in addition to the
diagrams in the guidance screen.
You didn’t hear one of the voice messages?
1. Press the REP key on the remote control.
• The current guidance advice is repeated as long as it is valid.
ROUTE INFORMATION
Select ‘Info’ from the guidance screen to open the Route Information menu.
The following menu options are available:
Route list: Shows a list of all selections of the planned route. (only if you are on a digitised road.)
Next via point: Shows the next via point and gives you the opportunity to delete this via point.
Route selection: To select the rote planning criteria
Return: Back to the guidance screen.
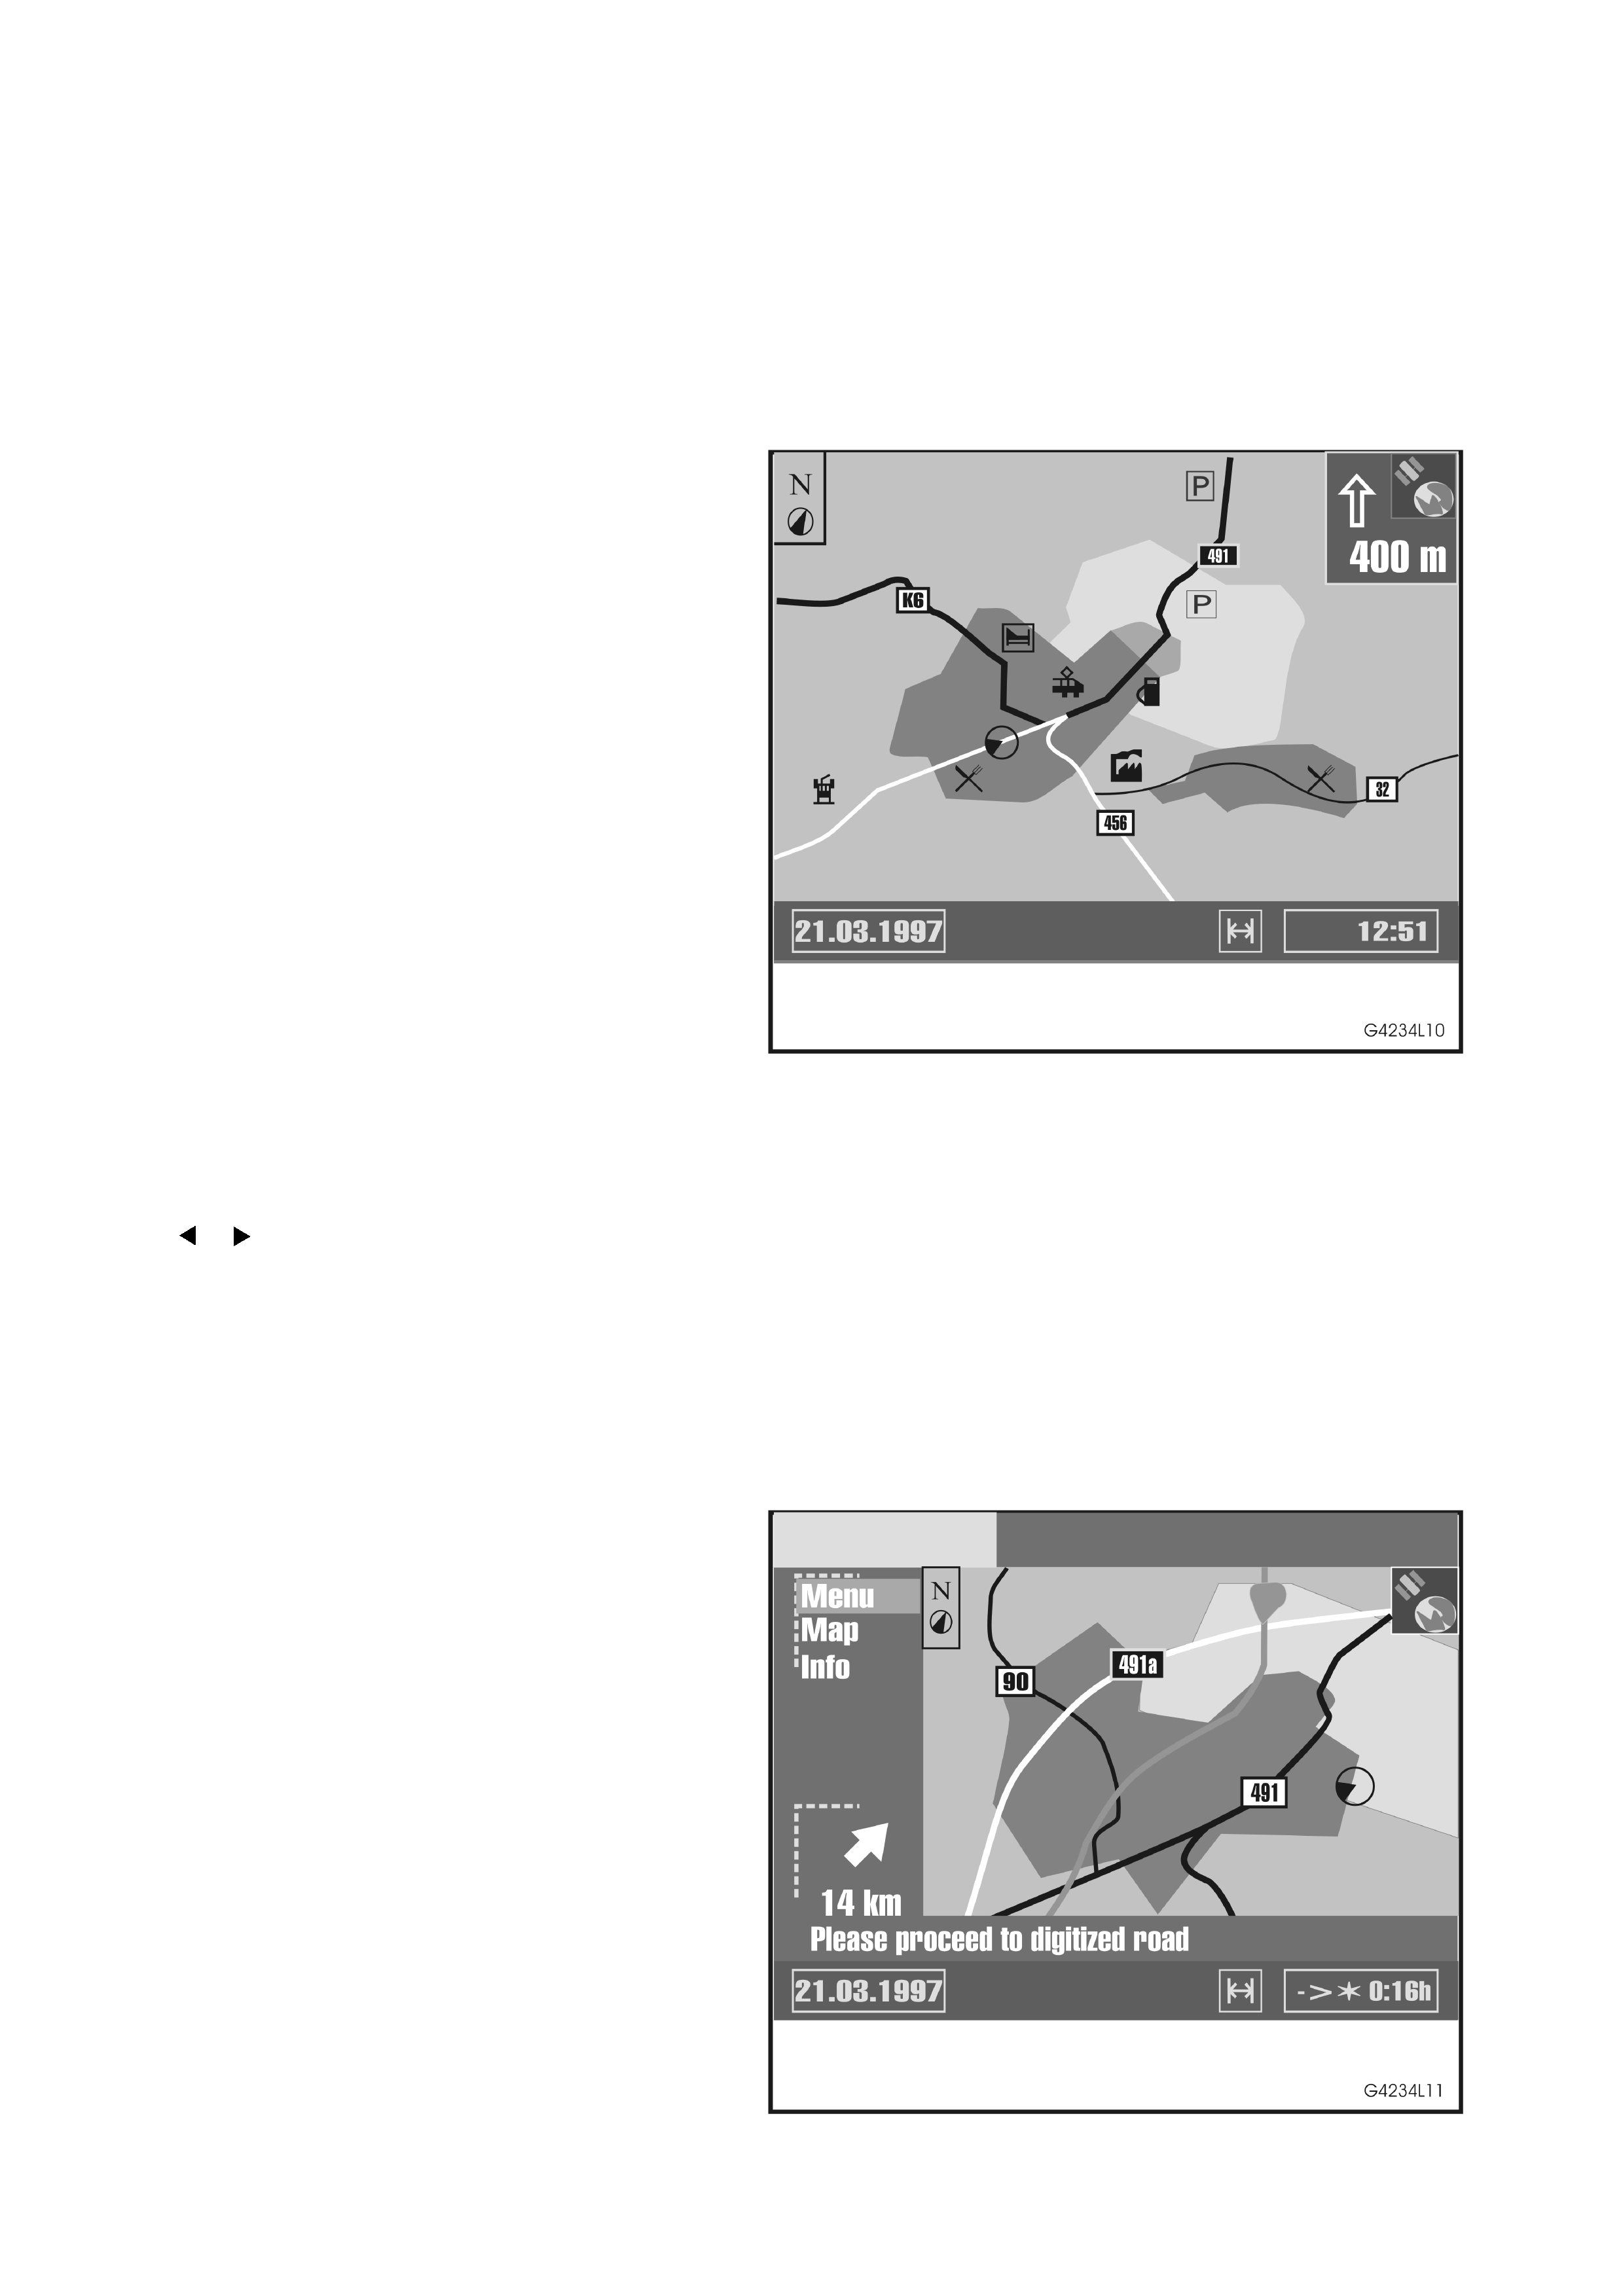
GUIDANCE WITH ROUTE MAP
If you choose the option ‘Map’ in the guidance
screen, the route map appears on the display. The
car position is shown as a circle with a directional
arrow. The planned route is shown white.
In addition a simplified plotting of guidance advice
and the distance to the next advice are shown in
the upper right corner of the screen.
Figure 4L-10
1. Press one of the cursor keys or the ENTER key to open a menu with the following options:
Return: back to the guidance screen.
Scale: Changes the scale of the map. Confirm ‘Scale’ with the ENTER key and change the scale with the cursor
keys or . Confirm the new scale with the ENTER key.
Positioning: Selects the orientation of the map (‘Northwards’ or ‘Steer dir.’). The map is displayed in ‘Steer dir.’
mode only if the map scale is 100 m, 200 m, 500 m or 1 km.
TMC info: Selects the kind of TMC announcements which is displayed on the map (only if a RDS TMC radio is
connected).
• Approx. after 3 seconds, the menu is automatically closed, if you don’t press a key.
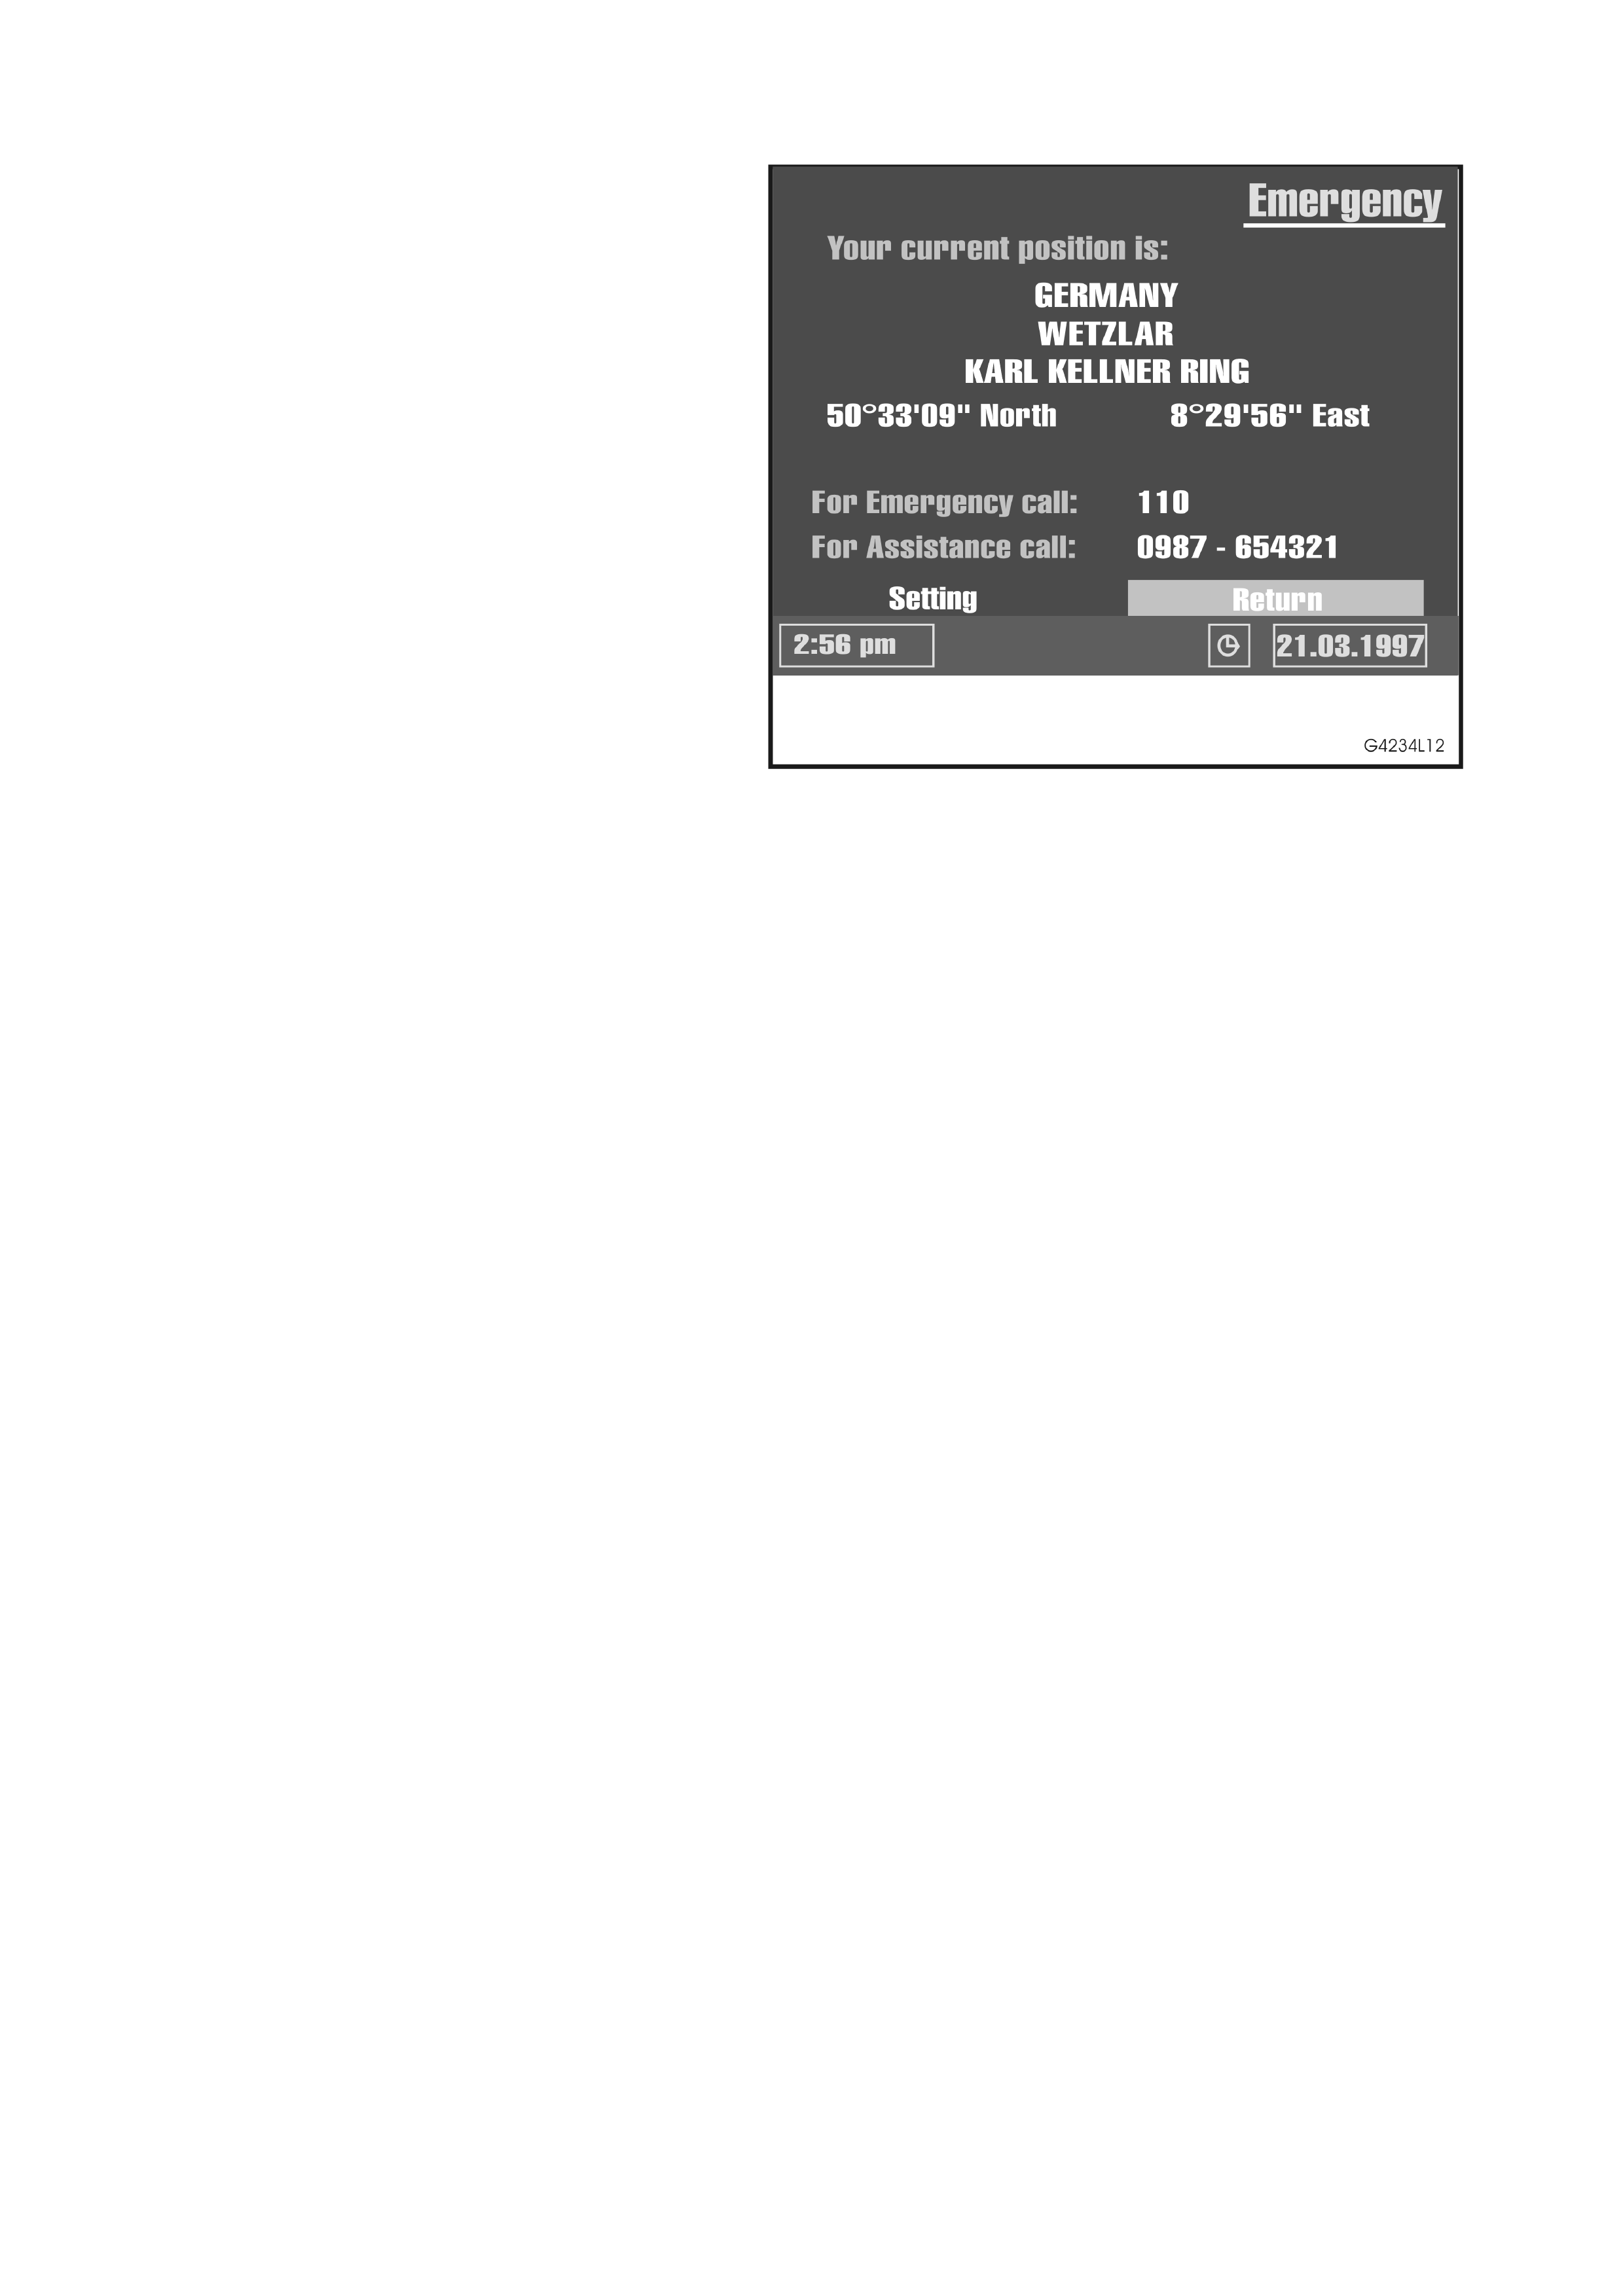
GUIDANCE IN PARTLY DIGITISED AREAS
In rur al areas and small c ities it is possible that not
every road is digitised (stored on the map CD).
When you leave a digitised road, the system
automatic ally switches f rom the guidance scr een to
map display with ‘500 scale’.
Figure 4L-11

1. In this case drive in direction of the calculated route or the digitised road.
• As soon as you reach a digitised road the system switches back to guidance and plans a new route.
AREAS WITH LIMITED ROAD ATTRIBUTES
In som e areas not all attributes of a road are available on the m ap CD. For exam ple the driving direction of a one-
way s treet or the inform ation about the prohibition of entr y of a pedestr ian precinct m ay be mis sing. If you entering
this kind of area the navigation system will show a warning. The local traffic regulations always have priority over the
advice given by the navigation system. Always obey road signs and traffic regulations.
AUTOMATIC RE-ROUTING
The system automatically plans a new route within a few seconds if you don’t wish to follow the guidance advice,
you missed and advice or it is not possible to follow it due to traffic.
ADJUSTMENT OF THE AVERAGE SPEED SETTING
For calculation of the remaining travel time and the estimated time of arrival, the navigation system uses the
average speed of a car by default. Should the displayed times (time of arrival or remaining travel time) deviate
badly from reality you can adjust the average speed. This may be necessary if you want to use your navigation
system in a lorry.
For more information please read section ‘System information’ in chapter ‘System Settings’.
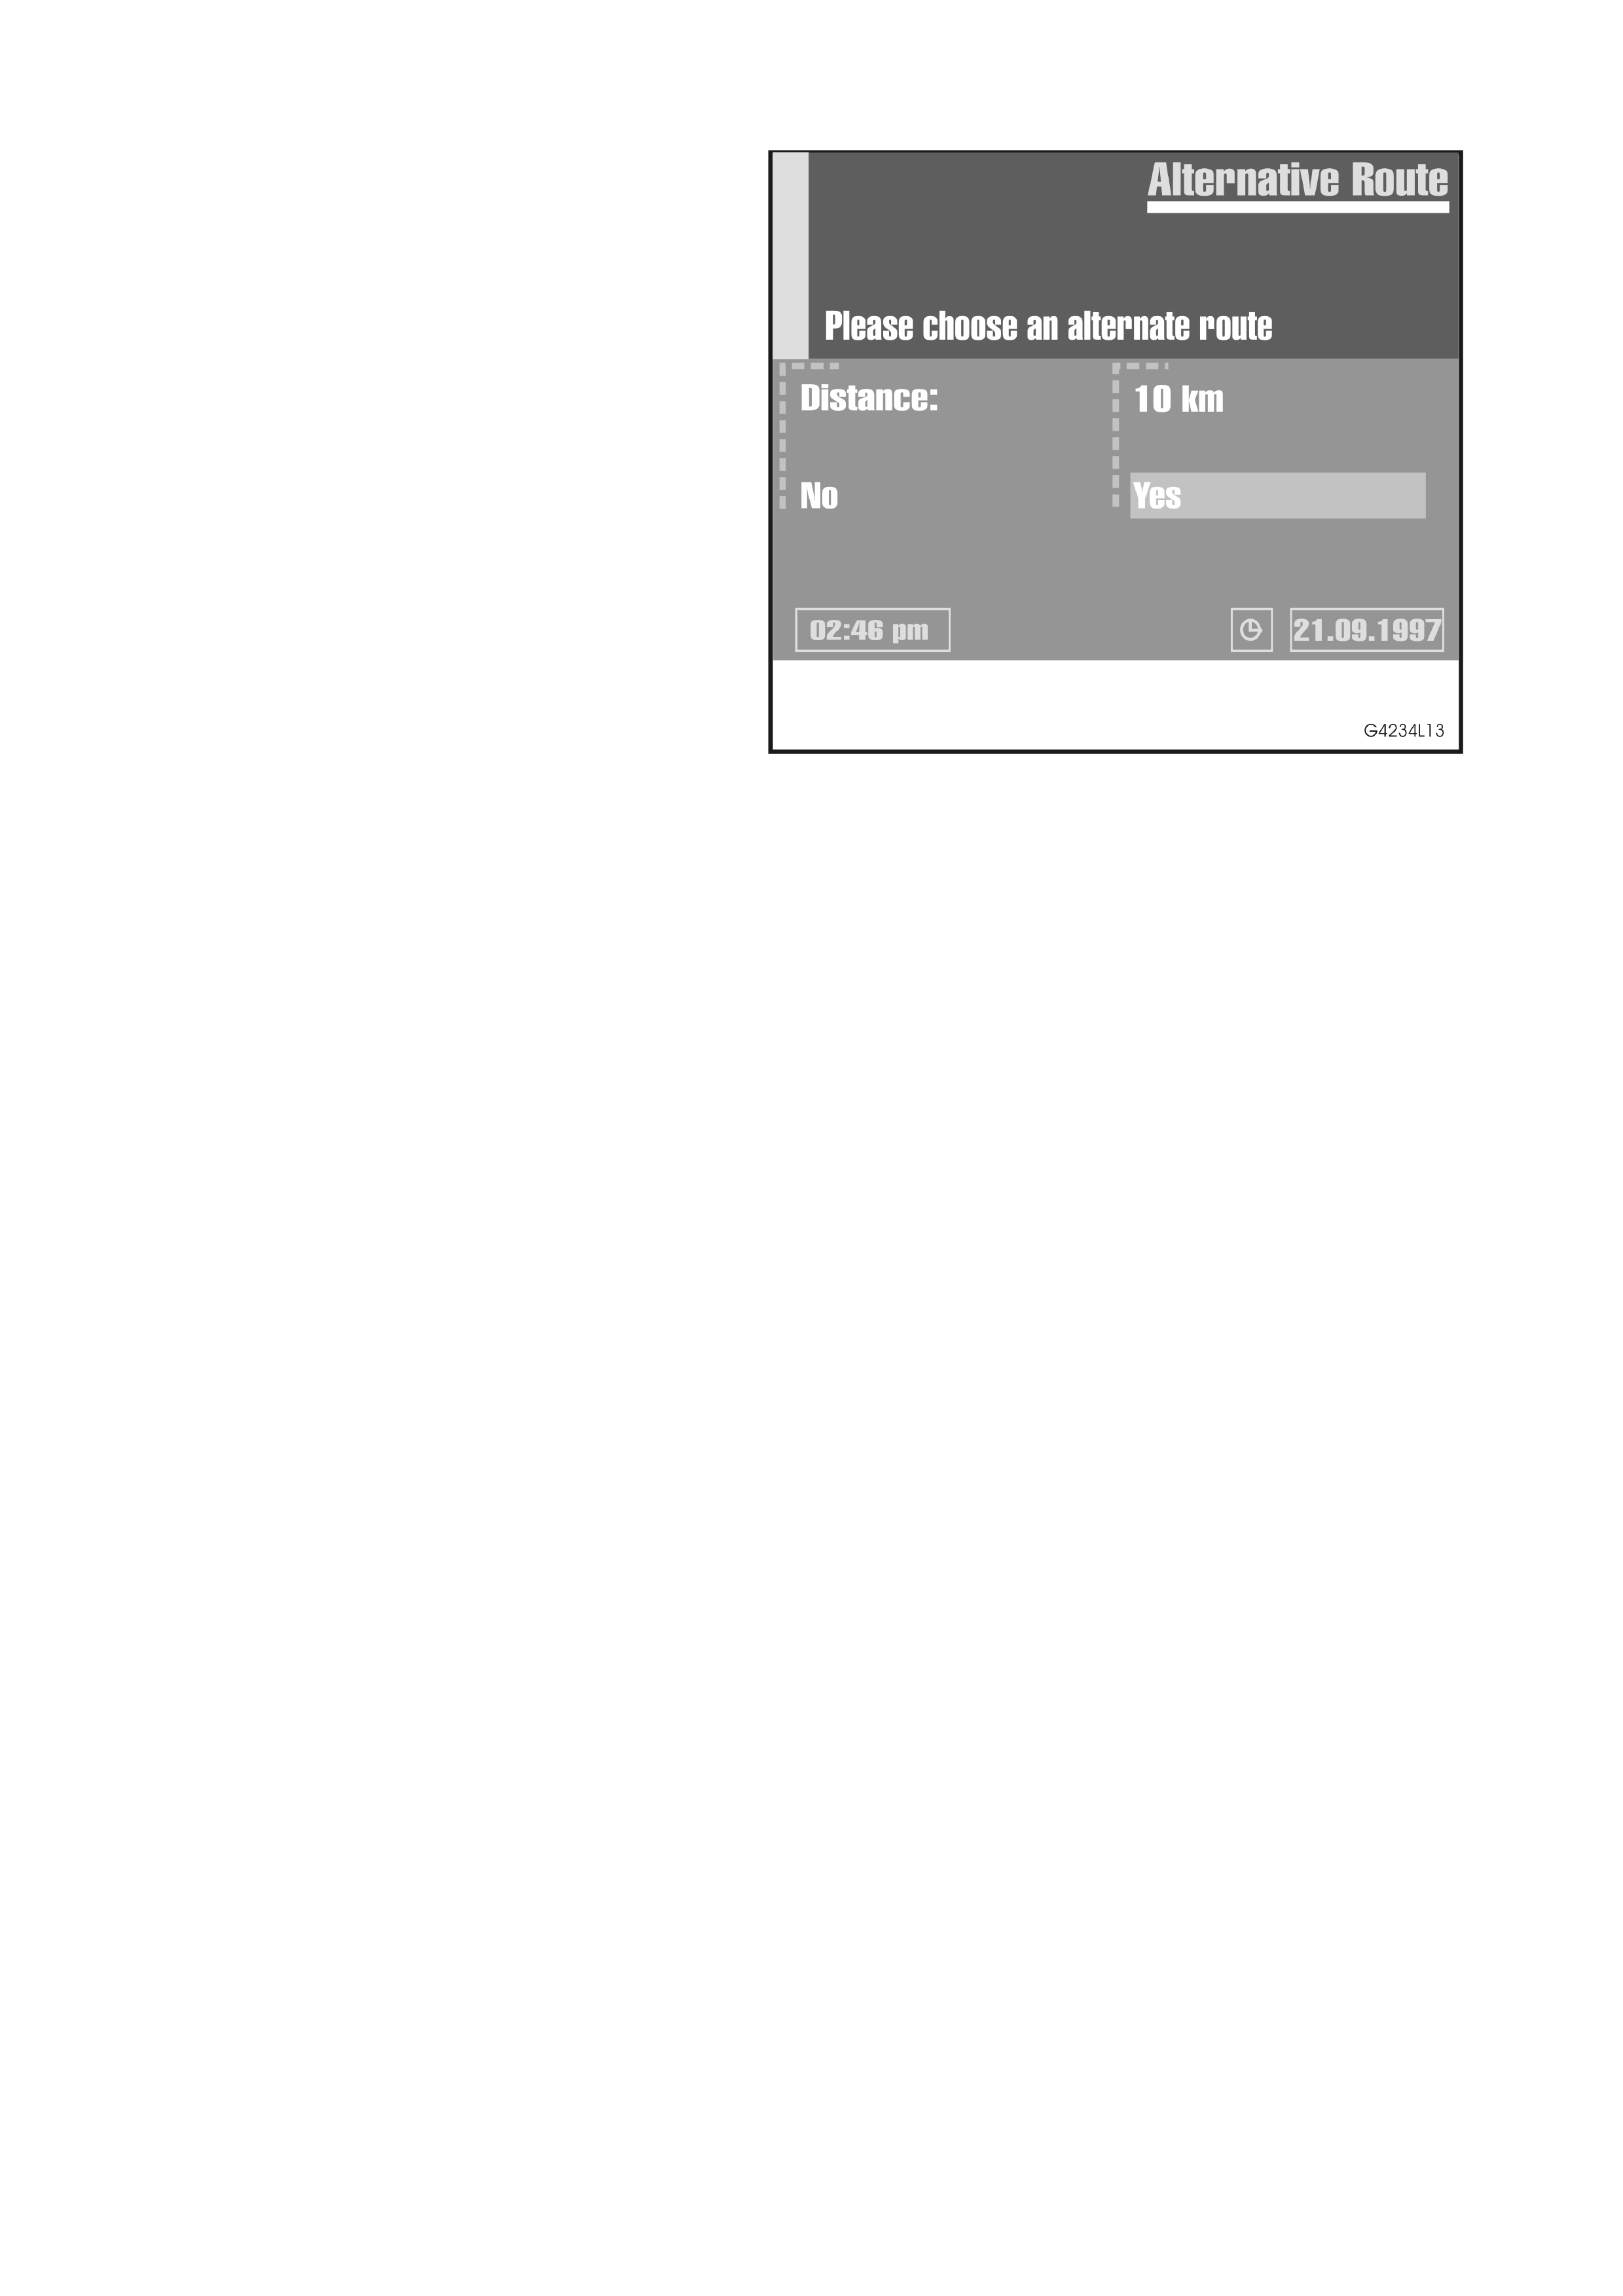
EMERGENCY
Select ‘Emergency’ from the main menu to enter
the Emergency menu.
Figure 4L-12
The Emergency menu shows you the following information:
• The current car position with country, city, road and the longitude and latitude position;
• The country-specific emergency phone number;
• A user-programmable Assistance phone number.
The Emergency function determines the car position with an accuracy of approx. 30 m.
NOTE 1: The country, city and street name are only displayed if you travel within the boundaries of the map CD
currently loaded. If no CD or the incor rect CD is loaded, only your current longitude and latitude coordinates will be
displayed, as long as the Global Positioning System is operating properly.
NOTE 2: T he country-specific Emer gency phone num ber is only displayed if you travel within the boundar ies of the
currently loaded map CD.
STORING AN ASSISTANCE NUMBE R
You can s tore a telephone num ber fr ee of choic e in the Em ergency menu, f or ex am ple the num ber of a br eak down
service, automobile club, etc.
1. Select ‘Setting’ from the Emergency menu.
• The typewriter window is opened.
2. Enter the telephone number you want to store for assistance.
3. Select ‘OK’ from the typewriter window to confirm your entry.
• The stored number appears in the Emergency menu.
4. To leave the Emergency menu, select ‘Return’ or press the MENU key on the remote control.
ALTERNATIVE ROUTE
You can have the navigation system to calculate an
alternative route during guidance for an adjustable
distance.
Use this function for example to get around traffic
jams or if you don’t agree with the current route
planning.
The alternative route is calculated from the current
car position for the selected distance.
Figure 4L-13
1. Briefly press the ALT-R key.
• The Alternative Route menu is shown, the cursor is placed on ‘Yes’.
2. If you agree with the displayed distance, simply confirm with the ENTER key.
3. If you want to change the distance, move the cursor to the distance data and confirm with the ENTER key.
4. Select the desired minimum distance key with the cursor between 1 and 10 km for the alternative route.
5. Confirm the selected distance by pressing the ENTER key.
6. Confirm the procedure by selecting the option ‘Yes’.
• Within a few seconds an alternative route is calculated for the chosen distance.
7. If you want to cancel the procedure, select ‘No’ or press the MENU key.
Even with out the alternative route function the navigation system also plans a new route automatically when you
leave the advised route.
8. Simply leave the advis ed r oute to bypass traf f ic j ams or to dr ive a route of your choice. CARiN will autom atically
calculate a new route within a few seconds.
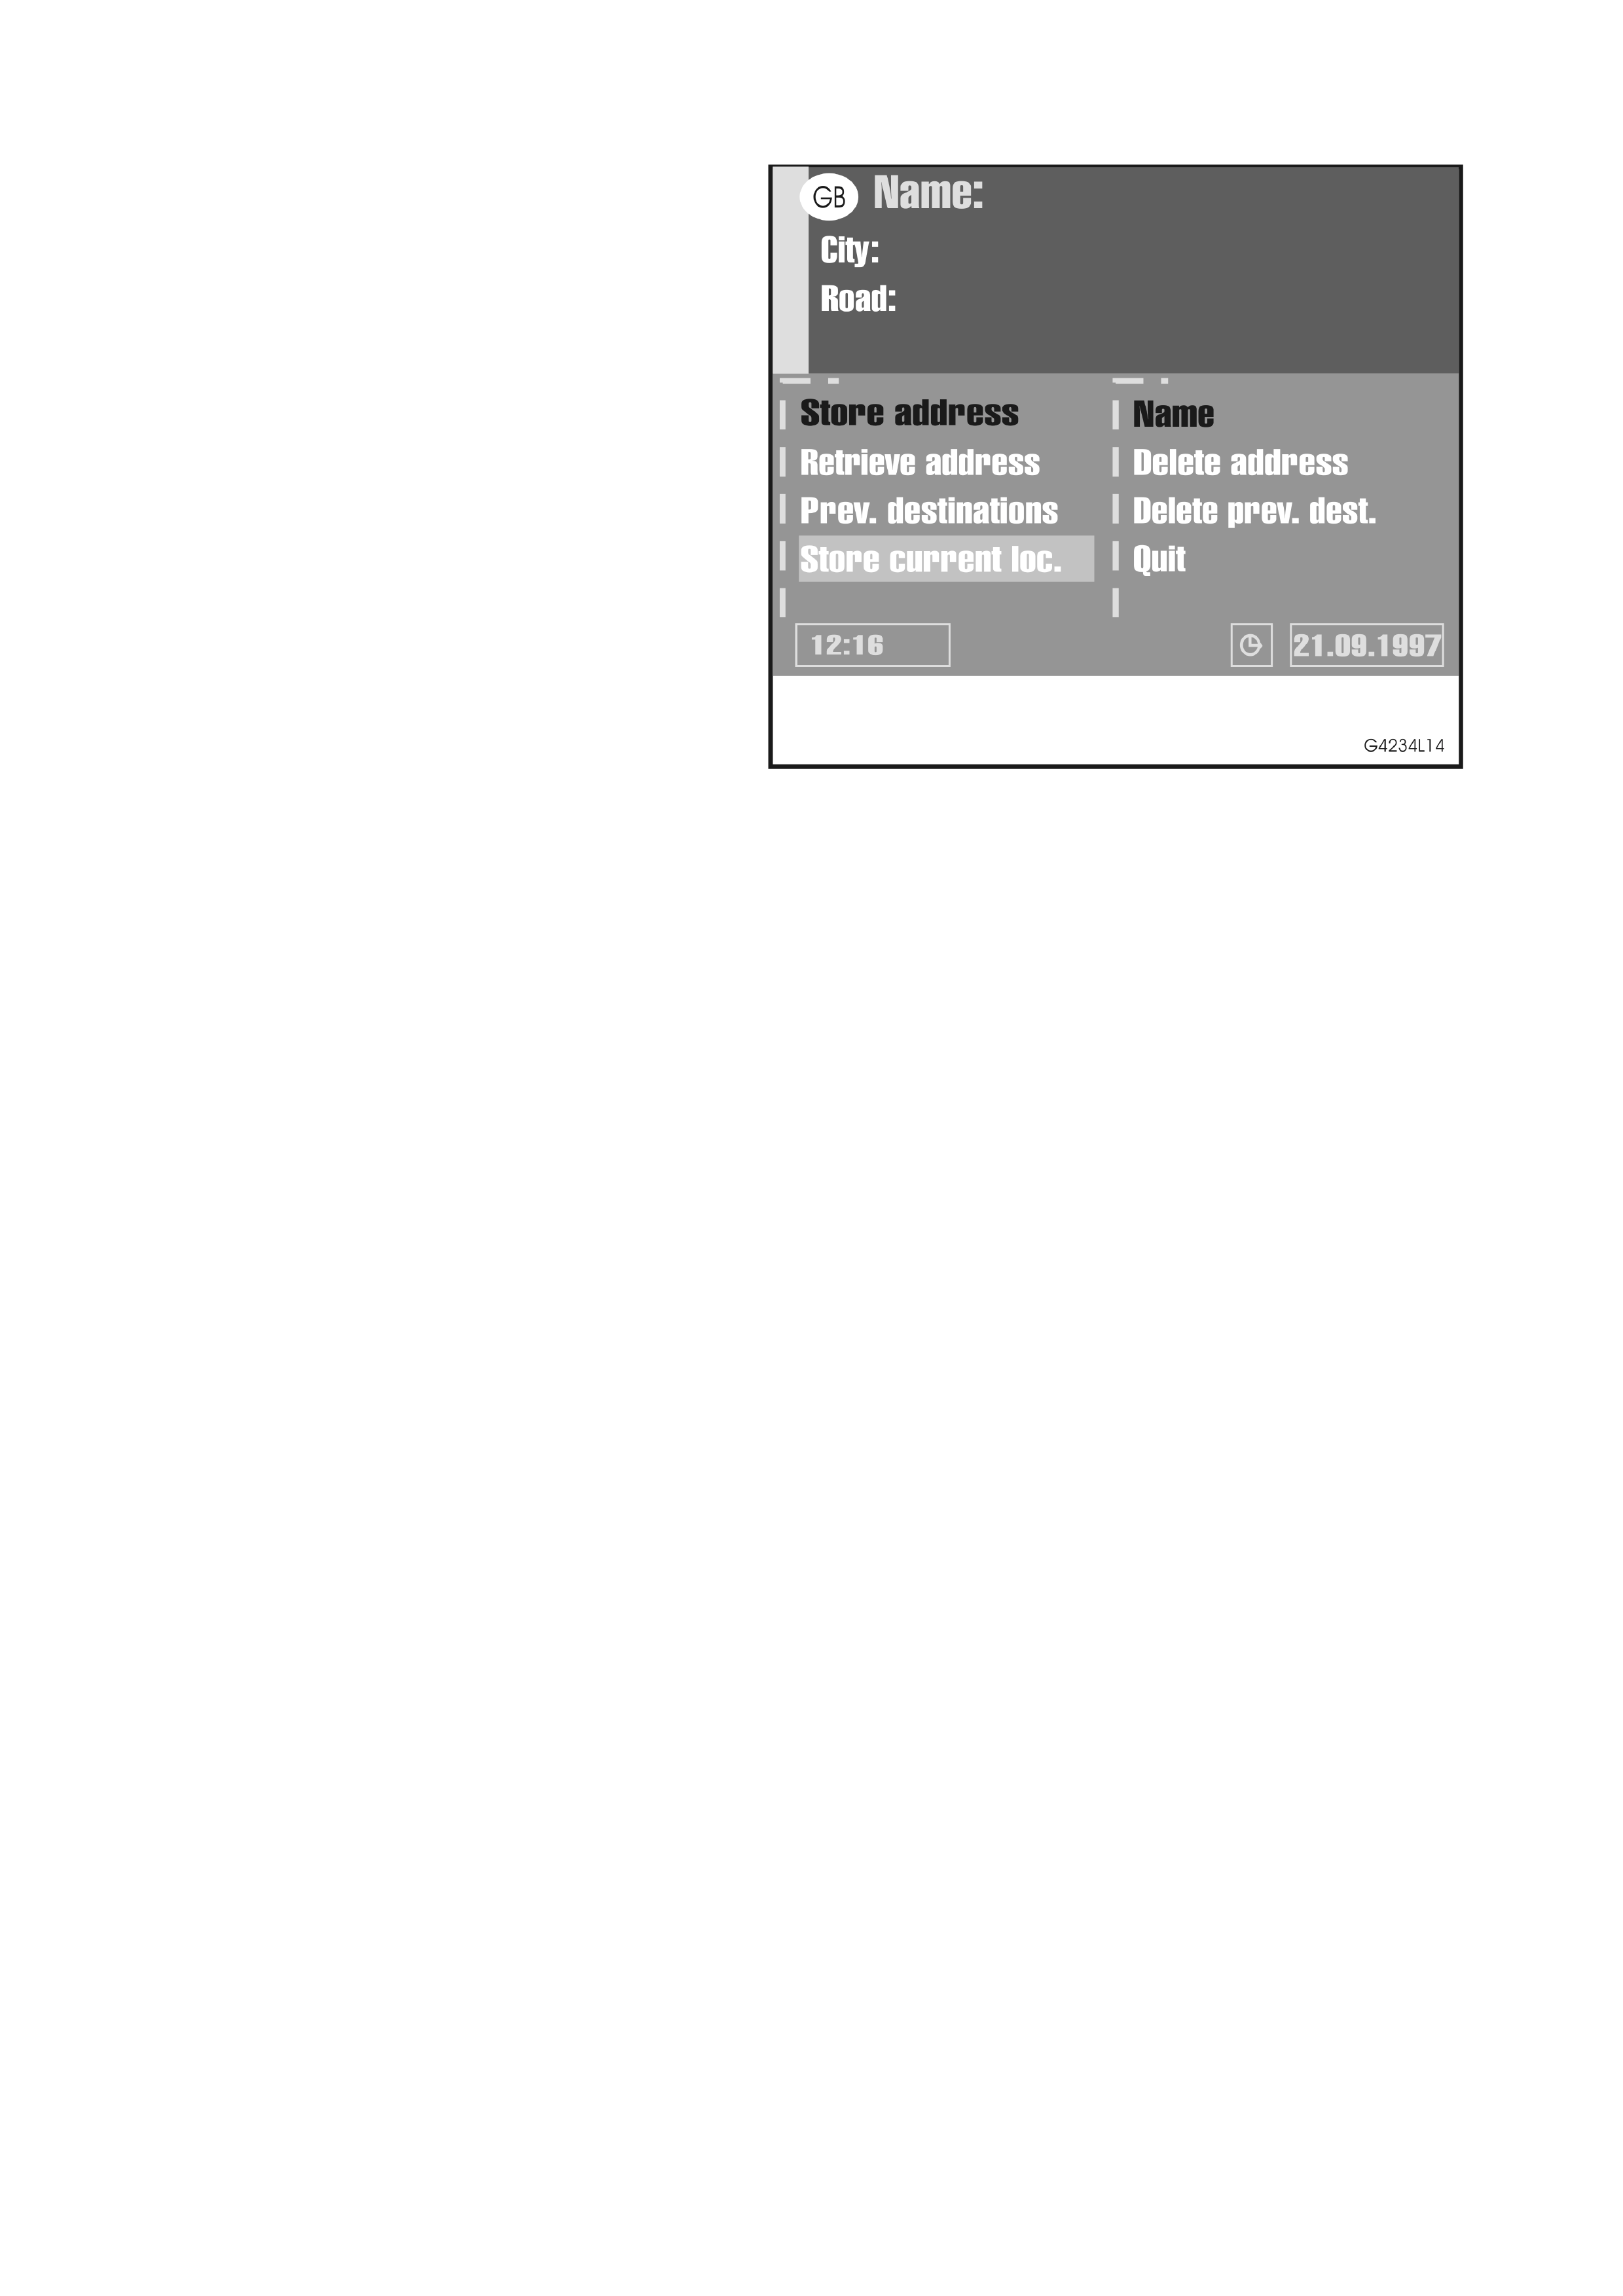
DESTINATION STORE
The CARiN Navigation System allows you to store
30 destination addresses in a personal address
book. Therefore the system has a non-volatile
memory. This is useful for address you frequently
use.
Furthermore the destination store offers you
several more useful utilities.
Figure 4L-14
1. Select ‘A destination store’ from the Destination Input menu.
• The destination store menu is shown.
The following menu options are available:
Store address: Store a destination address in the personal address book.
Retrieve address: Recall a destination address previously stored in the personal address book.
Prev. destination: Load one of the 10 destinations last used for guidance.
Store current loc.: Store the current car position in the address book.
Name: Enter a name for the destination address (consisting of a max. 10 characters).
Delete address: Delete an entry from the personal address book.
Delete prev. dest.: Delete the 10 destination addresses last entered.
Quit: Leave the destination store menu.
Notes:
• The num ber of 30 entries is the guaranteed minim um f or the pers onal address book . The num ber of entries
can increase up to 100 dependent on the kind of information stored (with or without name, etc.).
• If no address is stored in the address book, the ‘Retrieve address’ option cannot be selected.
• If the memory is full, the ‘Store address’ option can no longer be selected.
STORE ADDRESS IN THE ADDRESS BOOK
If you have not entered a destination address yet:
1. Enter the desired data (city, road, junction or special facility) of the desired destination address in the
Destination Input menu.
2. Select ‘Destination store’ from the Destination input menu.
3. If you like you can enter a name for the destination address. Select ‘Name’ and enter any character string of
max. 10 characters.
• The entered name is now shown as the new menu title.
4. Select ‘Store address’.
• The address is now stored in the address book under this name.
• The menu title now changes back to ‘Name:’.

RETRIEVE ADDRESSES FROM THE ADDRESS BOOK
1. Select ‘Retrieve address’ from the destination store menu.
• The list of all addresses already stored in the address book is shown.
• The list is sorted in alphabetical order.
2. Select the desired address from the list
• The selected address is taken over as the new destination address.
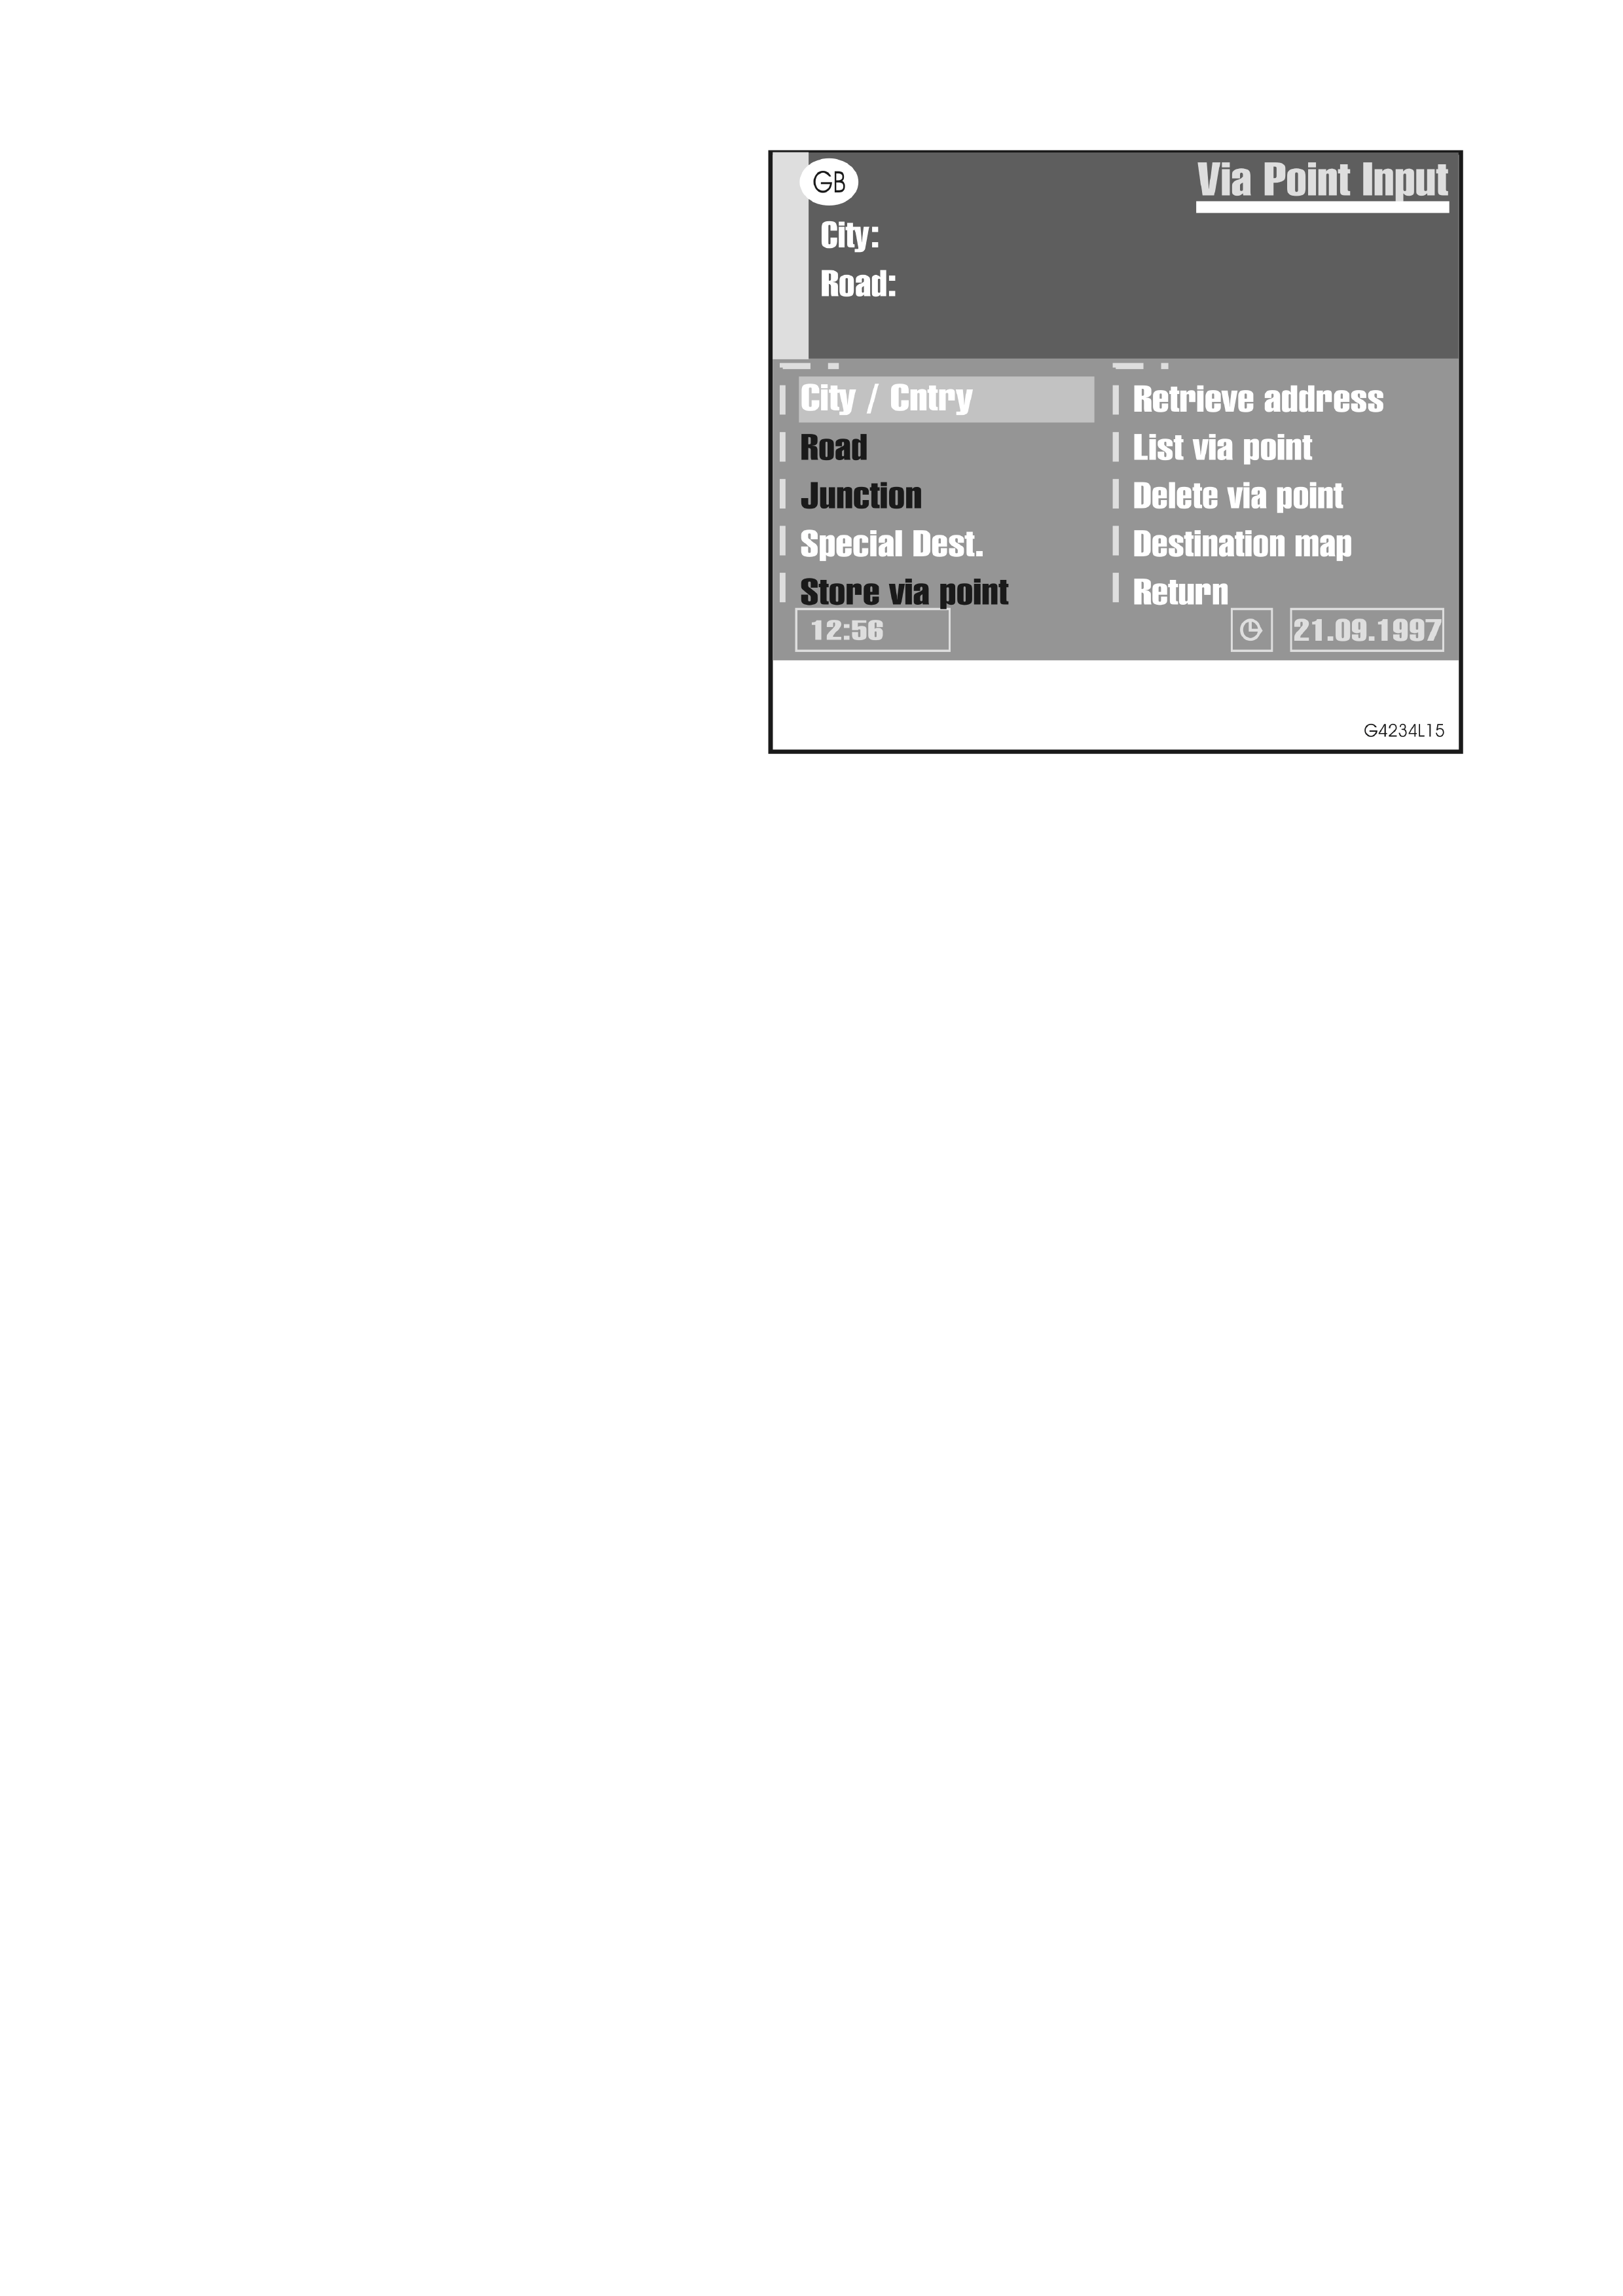
VIA POINTS
If you like to pass further via points on the way to
your destination address, you can store these via
points. The navigation system then calculates the
route in a way that the via points are passed in the
stored order before reaching the destination
address.
Figure 4L-15
1. Select ‘Via Point’ from the Destination Input menu.
• The Via Point menu is shown.
The following options are available:
City / Cntry: To enter the city name (and the country) of the via point.
Road: To enter the road name. Don’t enter a road name, if you only want to travel through the desired city.
Junction: To enter a junction for more precise distinction selection (optional).
Special dest: To select a via point from the list of facilities of general interest (airports, hotel, restaurants, filling
stations, etc.).
Store via point: To store the enters via point in the memory.
Retrieve address: To load an address from the address book as a via point.
List via point: To show the list of stored via points.
Delete via point: To delete a via point from the memory.
Destination map: To enter a via point by means of a map.
Return: To return to the Destination Input menu.
Notes:
• The maximum number of stored via points is limited to 25.
• The via points are reached in the order of entry.
• You can enter new via points at any time on the way to your destination address.
• When you have passed a certain via point, it is deleted from the list of via points.
• If you delete a destination address, CARiN asks you if you also like to delete the list of via points. If you
answer ‘No, the stored via points are kept for the new destination address.

STORE VIA POINTS
1. Select ‘Via Point’ from the Destination Input menu.
• The Via Point Input menu is shown.
2. You can enter the via point the same way as the destination address. Or select a special destination, load an
address from the address book or take the destination map for help.
3. The select ‘Store via point’.

LIST VIA POINTS
1. Select ‘List via point’.
• The list of stored via points is shown.

DELETE VIA POINTS
1. Select ‘Delete via points’.
• The list of stored via points is shown.
2. Select the via point you want to delete.
• A security check prevents you from deleting via points by mistake.
• If you select ‘Yes’, the selected via point is deleted from the memory.
TIP: Delete all via points without deleting the current destination address.
If you already have stored the current destination address in the address book, skip he first point.
1. Store the current destination address in the address book, skip the first point.
2. Select ‘Delete destination’ from the Destination input menu.
3. Confirm the security check ‘delete via points?’ with ‘Yes’.
• All via point and the destination address are deleted.
4. Load the last used destination address with ‘Retrieve address’ from the destination store menu.

BYPASSING VIA POINT
During guidance you can decide whether you want to reach the nex t via point or to bypas s it. If you want to bypass
the next via point:
1. Select ‘Info’ from the guidance screen.
2. Then select ‘Next via point’.
• The menu ‘Next via point’ is shown.
3. Select ‘No’.
• The displayed via point is bypassed and deleted from the list of via points.
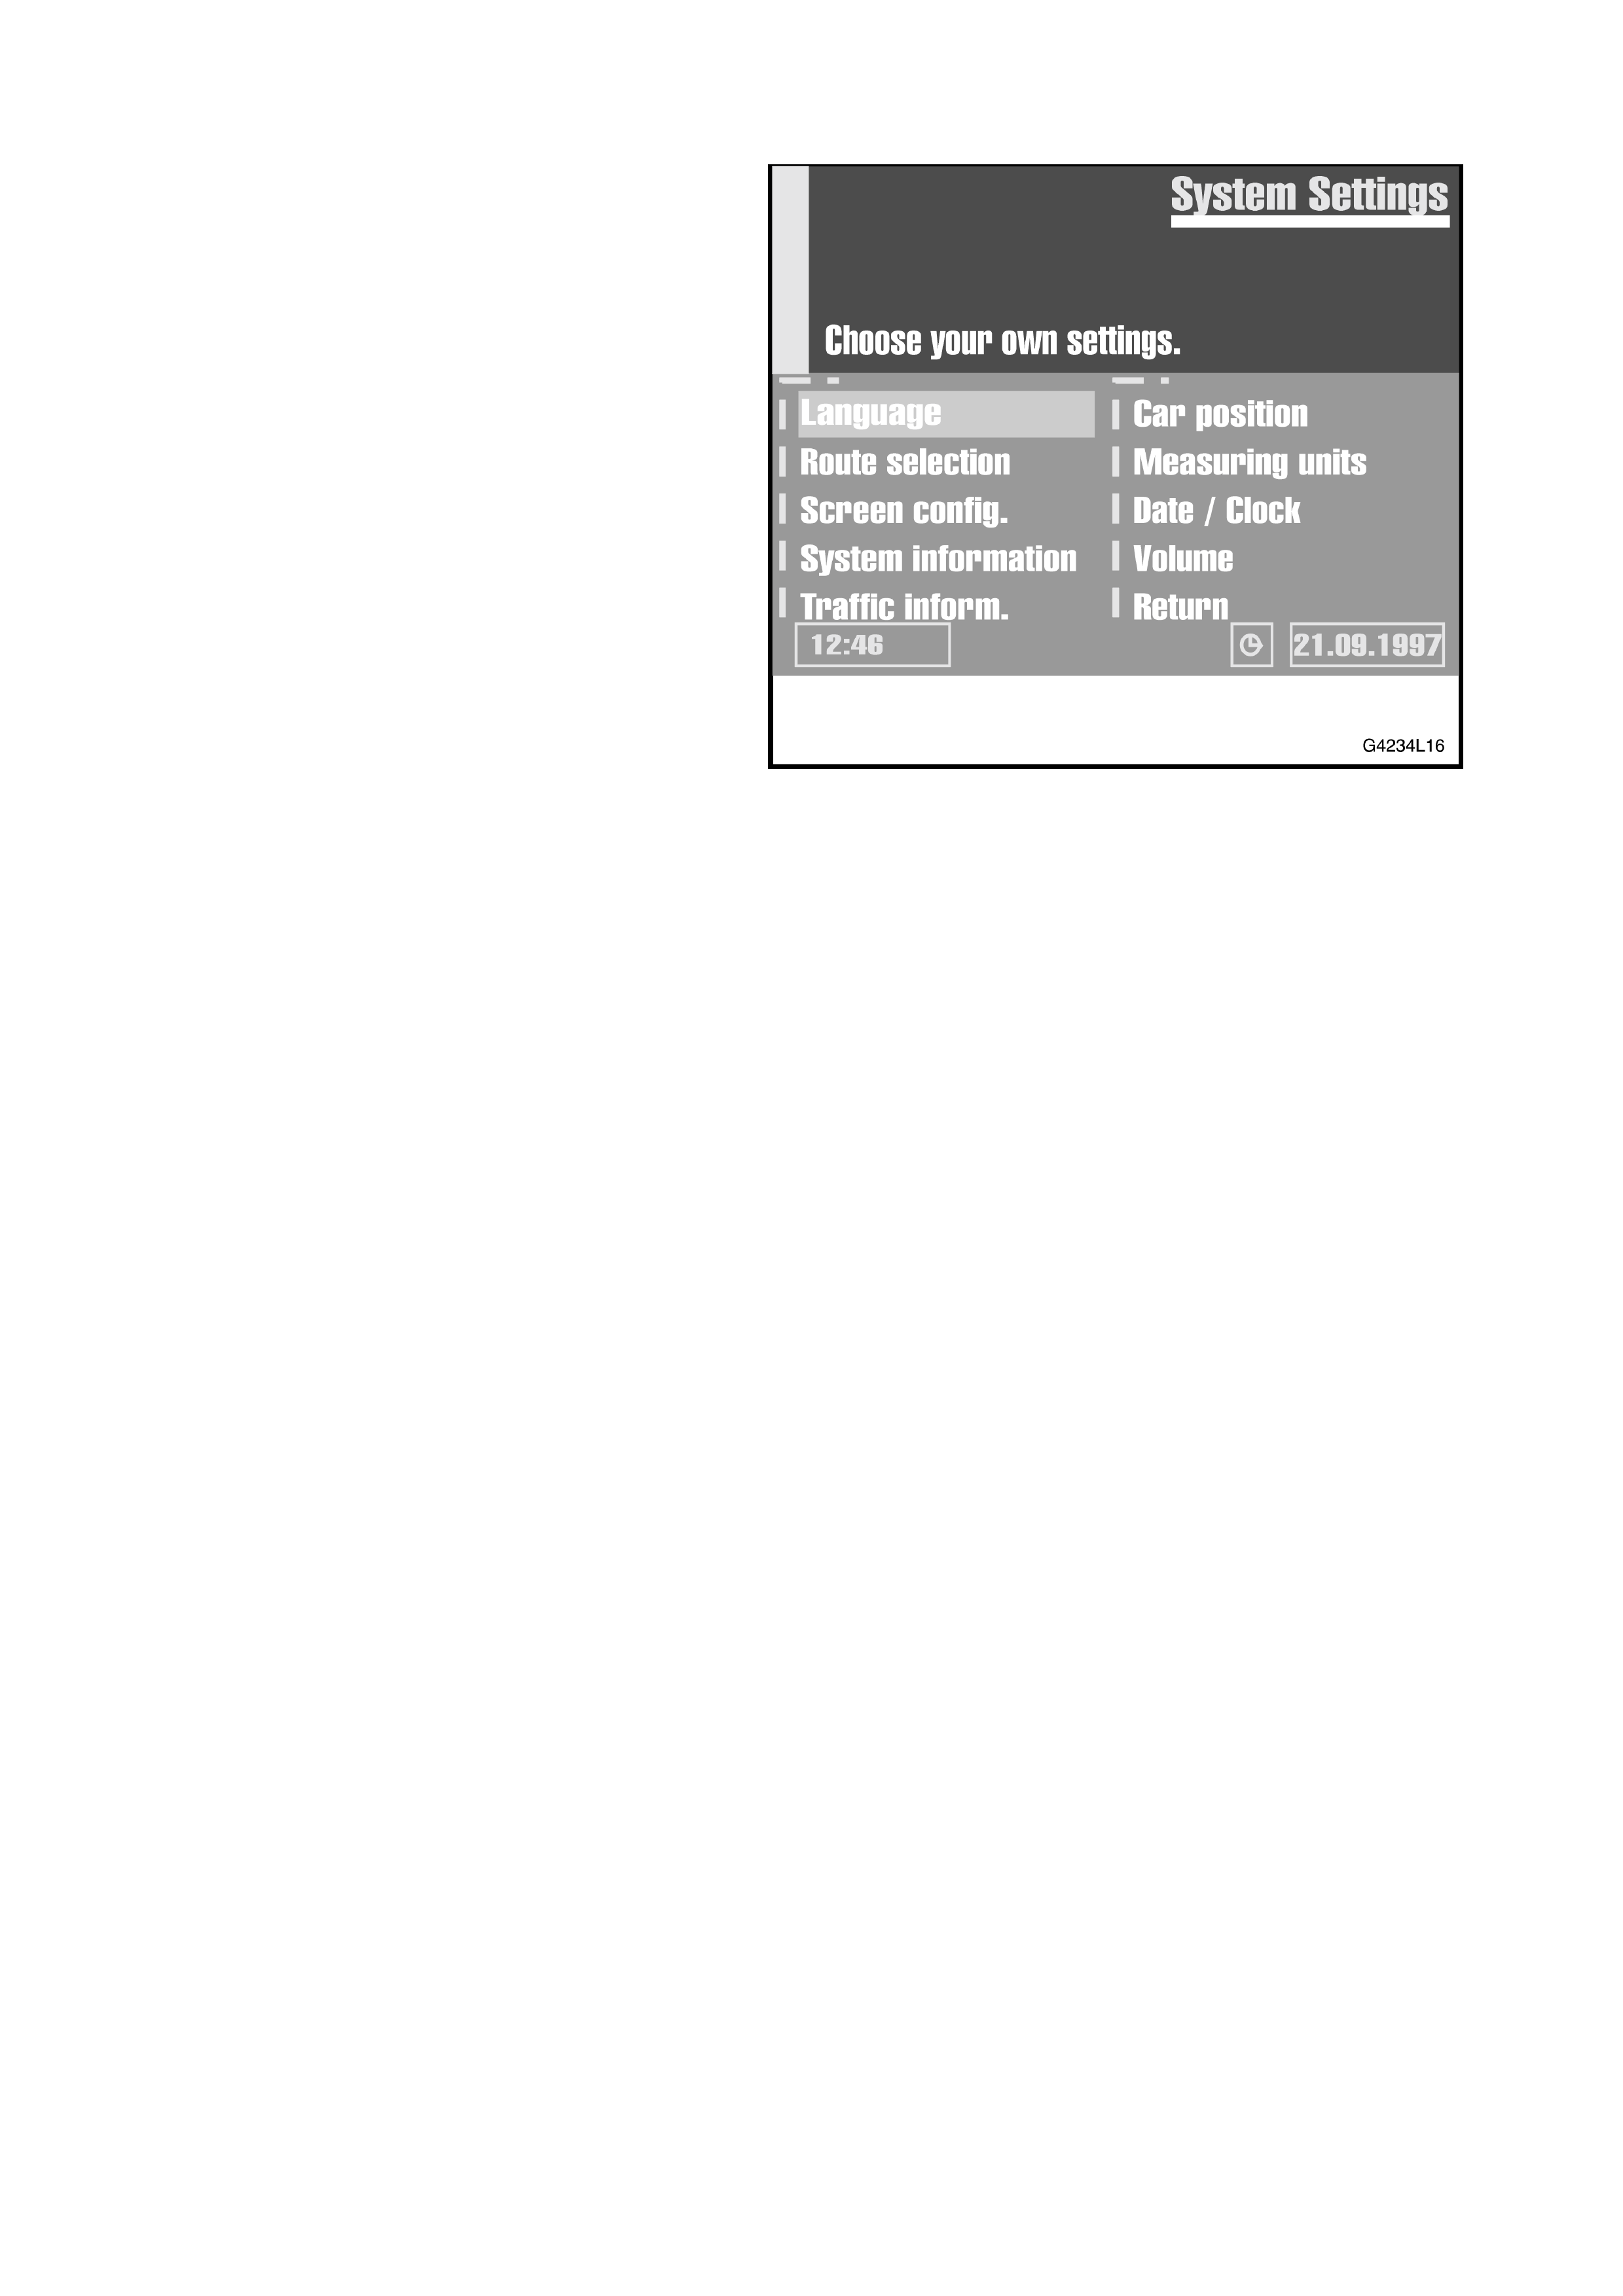
SYSTEM SETTINGS
To adjust the navigation systems to your own
preference you can modify many settings.
1 Select ‘Settings’ from the Main Menu.
• The System Settings menu is shown.
Figure 4L-16
The following options are available:
LANGUAGE
To select the language for acoustical advice and menu text on the display. Languages can be loaded from the
supplied language CD.
1. Select ‘Language’ from the System Settings menu.
2. Follow the instructions on the screen.
The following languages are currently available on the language CD:
• British English
• American English
• French
• German
• Dutch
• Italian
• Spanish

ROUTE SELECTION
To select the criteria which influence the route planning. You can select between these four criteria:
- Optimised for travel time
(good compromise for any situation)
- Optimised for travel distance
(recommended for routed within a city)
- A s much as possible along main roads
(recommended, if travelling on main roads is preferred)
- A s little as possible along main roads
(recommended, if travelling on main roads is not preferred)
You can also modify the route planning during guidance. For that purpose select ‘Info’ from the guidance screen.

SCREEN CONFIGURATION
In this menu you can select a variety of colour combinations for screen display and the information shown in the
status line of the screen.
The Screen Settings menu offers you the following options:
DAY COLOUR
Select one out of the six colour combinations for the daytime display.
• Optimised contrast is guaranteed by the options Blue, Green and Red.
This setting is active when the headlights are turned off.
STATUS LINE LEFT
Select the kind of information shown in the lower left corner of the screen.
• None: Status line left switched off.
• Clock: Time display.
• Remaining travel time: Time rem aining until you arrive at the next via point or the destination address (if
no via points were entered) calculated by CARiN.
• Estimated time of arrival: Time you will arrive at the next via point or destination calculated by CARiN.
Note: For calculating the estimated time of arrival and remaining travel time the system uses an average travel
speed. You can adjust this speed to your real average speed by selecting the ‘System information / Speed
correction’ option.
NIGHT COLOUR
Select one out of six colour combination for the night time display.
• Optimised contrast is guaranteed by the options Dark blue, Dark green and Dark red.
This setting is active when the headlights are turned on.
STATUS LINE RIGHT
Select the kind of information shown in the lower right corner of the screen. See ‘Status line left’ for available
options.

SYSTEM INFORMATION
The System Information menu offers the following options:
• Diagnosis: To analyse soft- and hardware problems (code protected).
• Default setting: to reset all user specific settings (status line, screen colours, etc.) to their factory settings.
• Configuration: Information on soft- and hardware versions of the system (for service purposes).
• Speed correction: To adjust the average speed setting. Influences the calculation of the remaining travel
time and the estimated time of arrival.
NOTE: The ‘Diagnosis’ option should only be performed by an authorised service centre for service purposes.

CAR POSI TION
The Car Position Input menu allows you to enter a new car position manually (for example for demo purposes).

MEASURING UNITS
To select the measuring units for distance display. The following measuring obits are available:
• Metric: Display in kilometres and metres;
• Anglo: Display in miles and yards;
• American: Display in miles, tenth of miles and feet.

DATE / CLOCK
The Date/clock Configuration menu allows you to set the time and date format as well as the time zone.
• Time format: Select between 12 hour and format and 24 hour format.
• Set time zone: Adjust the difference between your local time and Universal Time Coordinated (time
received by CARiN via GPS) with the cursor keys and .
Time: Standard Daylight Saving
Central European Time + 1.0 + 2.0
Greenwich Mean Time 0.0 + 1.0
• Date format: Select between ‘day.month.year’ and ‘month/day/year’.

VOLUME
If you select ‘Volume’ the Volume Control menu with the following options is shown:
• SDVC: Select one of the SDVC curves for Speed Dependent Volume Control. This is top com pensate the
surrounding noise by increasing the volume level depending on the car speed. Find a suitable
compensation by trying out the different curves.
• Audible info (Voice on/off): To activate / deactivate the ac oustical guidance advic e. The appears in the
status line if the voice option is set to ‘off’.
• Volume: to adjust the volume level of acoustical advice. Place the cursor on option ‘Volume’ and confirm by
pressing the ENTER k ey. A volum e slider is shown. Adjust the desir ed volume with the cur sor key and .
Press the ENTER key again and stored this setting.

MAP CD’S
The CARiN Navigation System is based on a database stored in a special format on a CD. It is recommended
always to use the latest update of this map CD.
If you travel to different countries or you wish to have more detailed information on a special area ask your dealer
for a suitable map CD.
• Only use genuine CARiN map CD’s. The Navigation System will only work properly with CARiN map CDs.
• The CD player of the navigation system does not play any other CDs (i.e. Audio CDs).
• Always store map CDs in their protective cases.
• CARiN map CDs are exclusively designed for use with the CARiN system and they are only readable by
CARiN Navigation System.
CHANGING THE MAP CD
1. Press the key on the navigation computer once, if the red power LED is on (normally when the ignition is
switched on).
2. Press the key twice, if the red LED is not on.
• The CD is ejected.
3. Take out the CD and gently insert the new CARiN map CD with the label facing up until it is retracted.
• The system needs a few seconds for initialisation after changing the map CD.
IMPORTANT: If the last entered destination address is not (or only partly) on the m ap CD you inserted, the whole
address (or only the not existing part) is deleted.

MAINTENANCE
CLEANING THE REMOTE CONTROL AND THE DISPLAY
Do not use lighter fluid, methyl alcohol or other solvents for cleaning. Only use a damp cloth.

SCREEN ICONS
In the m ap display diff erent scr een icons are shown depending on the amount of data base entries and depending
on which category of special location you selected in the destination input menu. These icons have the following
meaning:
Icon Meaning Icon Meaning
Airport Hire car company
Amusement park Hospital
Auto. Teller machine Hotel
Automobile club Industrial estate
Bank Library
Bus station Marina
Car park Military base
Car repair Monument
Chemist Museum
Church Park
Cinema Park and ride
City centre Petrol station
Civic centre Police
Clinic Post office
Council office Railway station
Court house Restaurant
Destination Services
Education Shopping centre
Embassy Sports centre
Entertainment Theatre
Ferry Tourist attraction
Fire station Tourist information
Golf course