
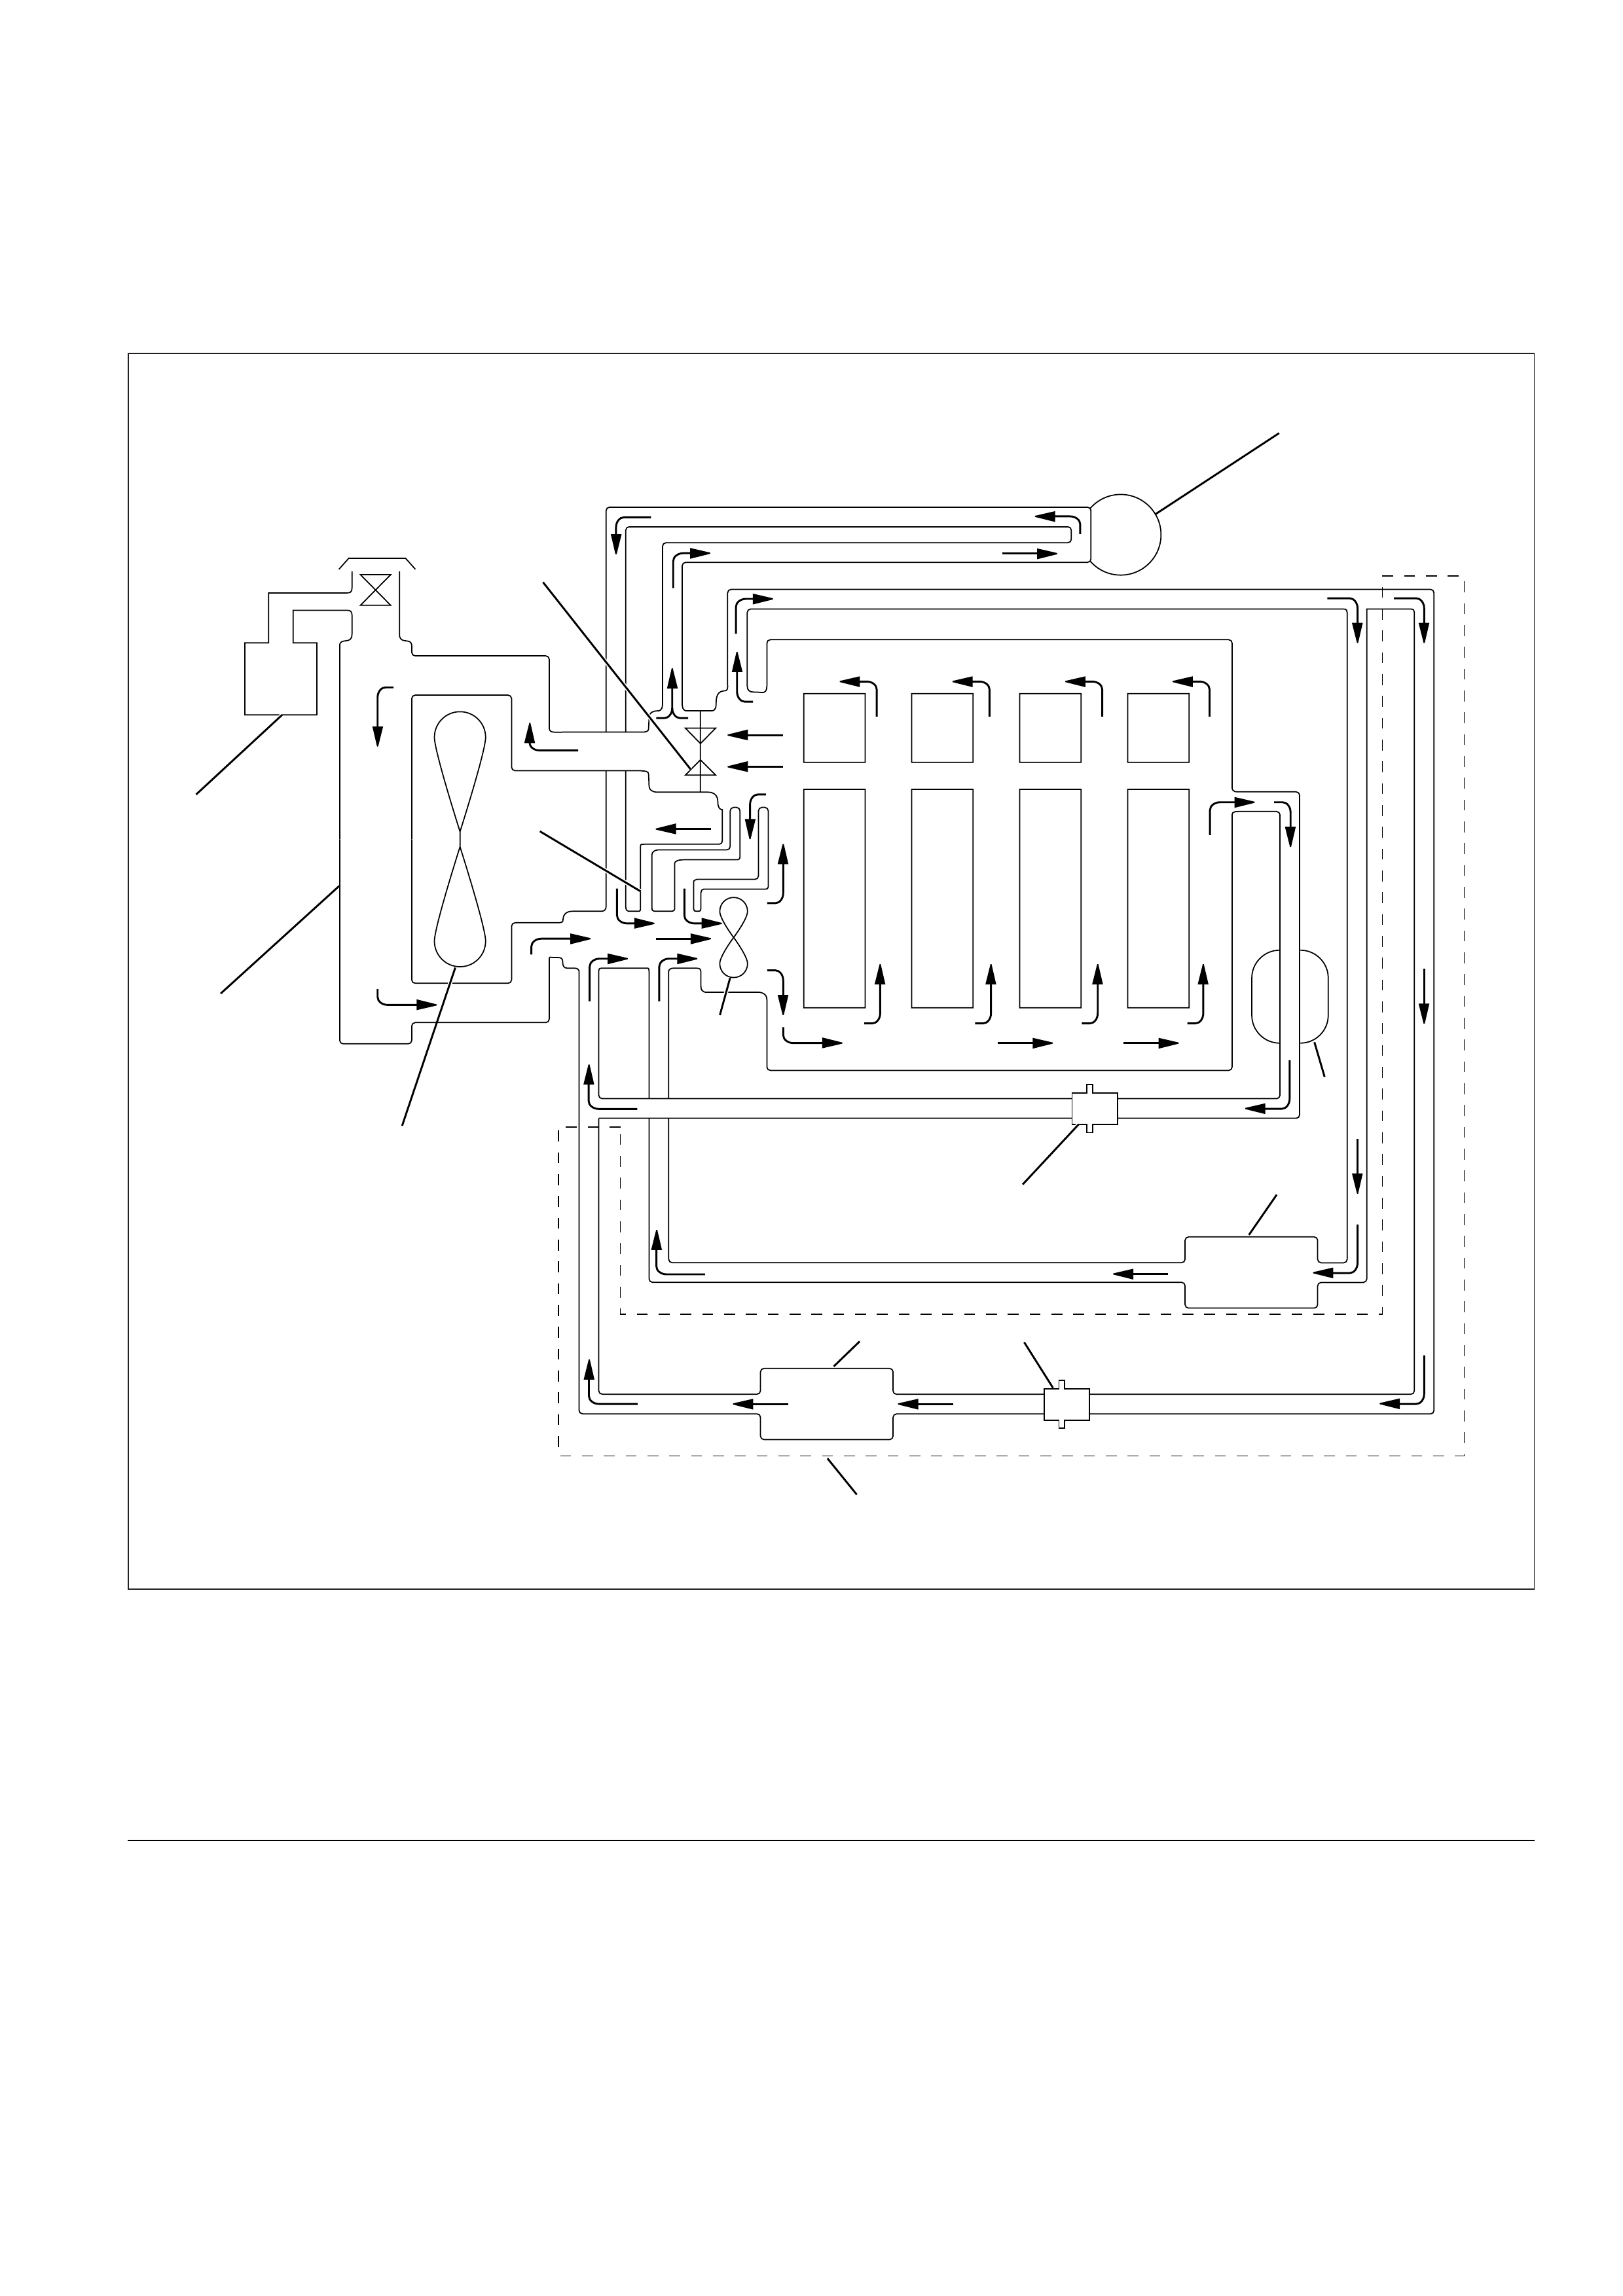
GENERAL DESCRIPTION
COOLANT FLOW
Legend
(1) Turbocharger
(2) Thermostat
(3) Reservoir Tank
(4) Radiator
(5) Bypass
(6) Oil Cooler
(7) Cooling fan
(8) Water Pump
(9) Thermo Valve
(10) Car Heater
(11) EGR Cooler
1
6
9
9
MY2003 Euro-3
10
8
4
3
2
5
7
11
032R200001
The cooling system is a pressurized coolant forced
circulation type which consists of water pump,
thermostat, cooling fan, radiator and other components.
The circulating coolant cools the lubricating oil in the oil
cooler and turbocharger.
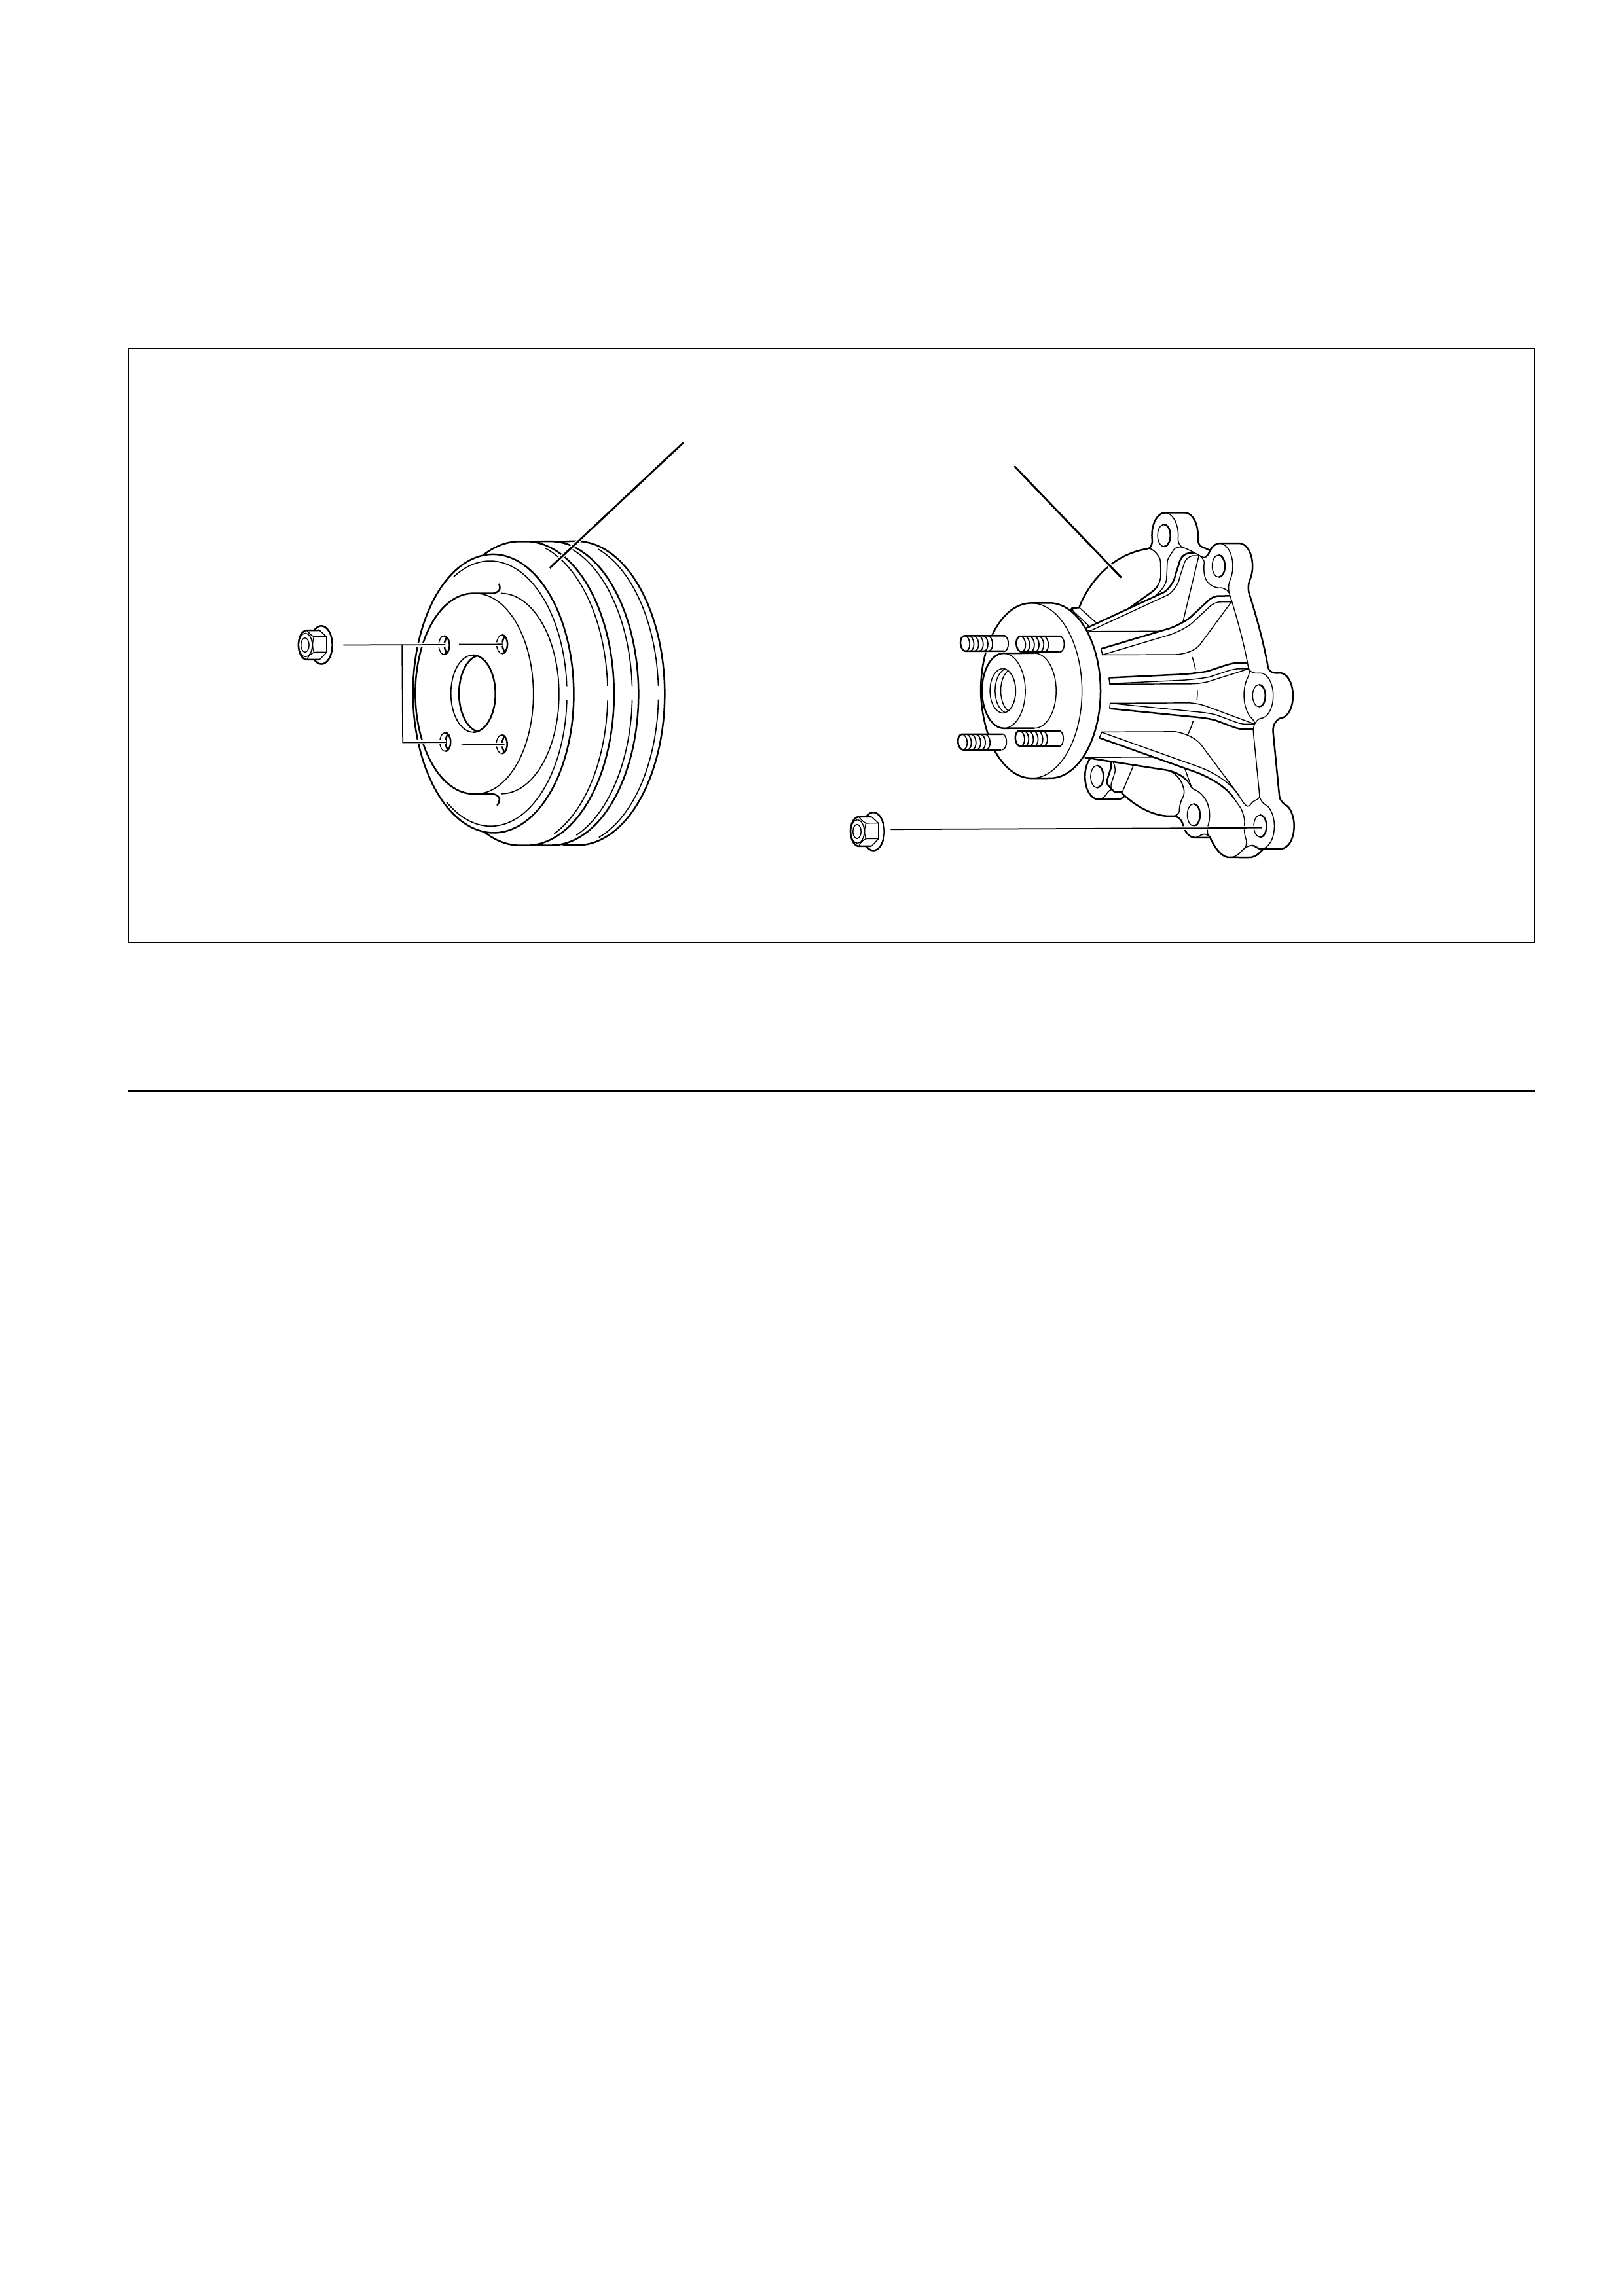
WATER PUMP
The coolant pump is a centrifugal impeller type and is
driven by V type drive belt.
Legend
(1) Roller Bearing
(2) Ball Bearing
(3) Seal Unit
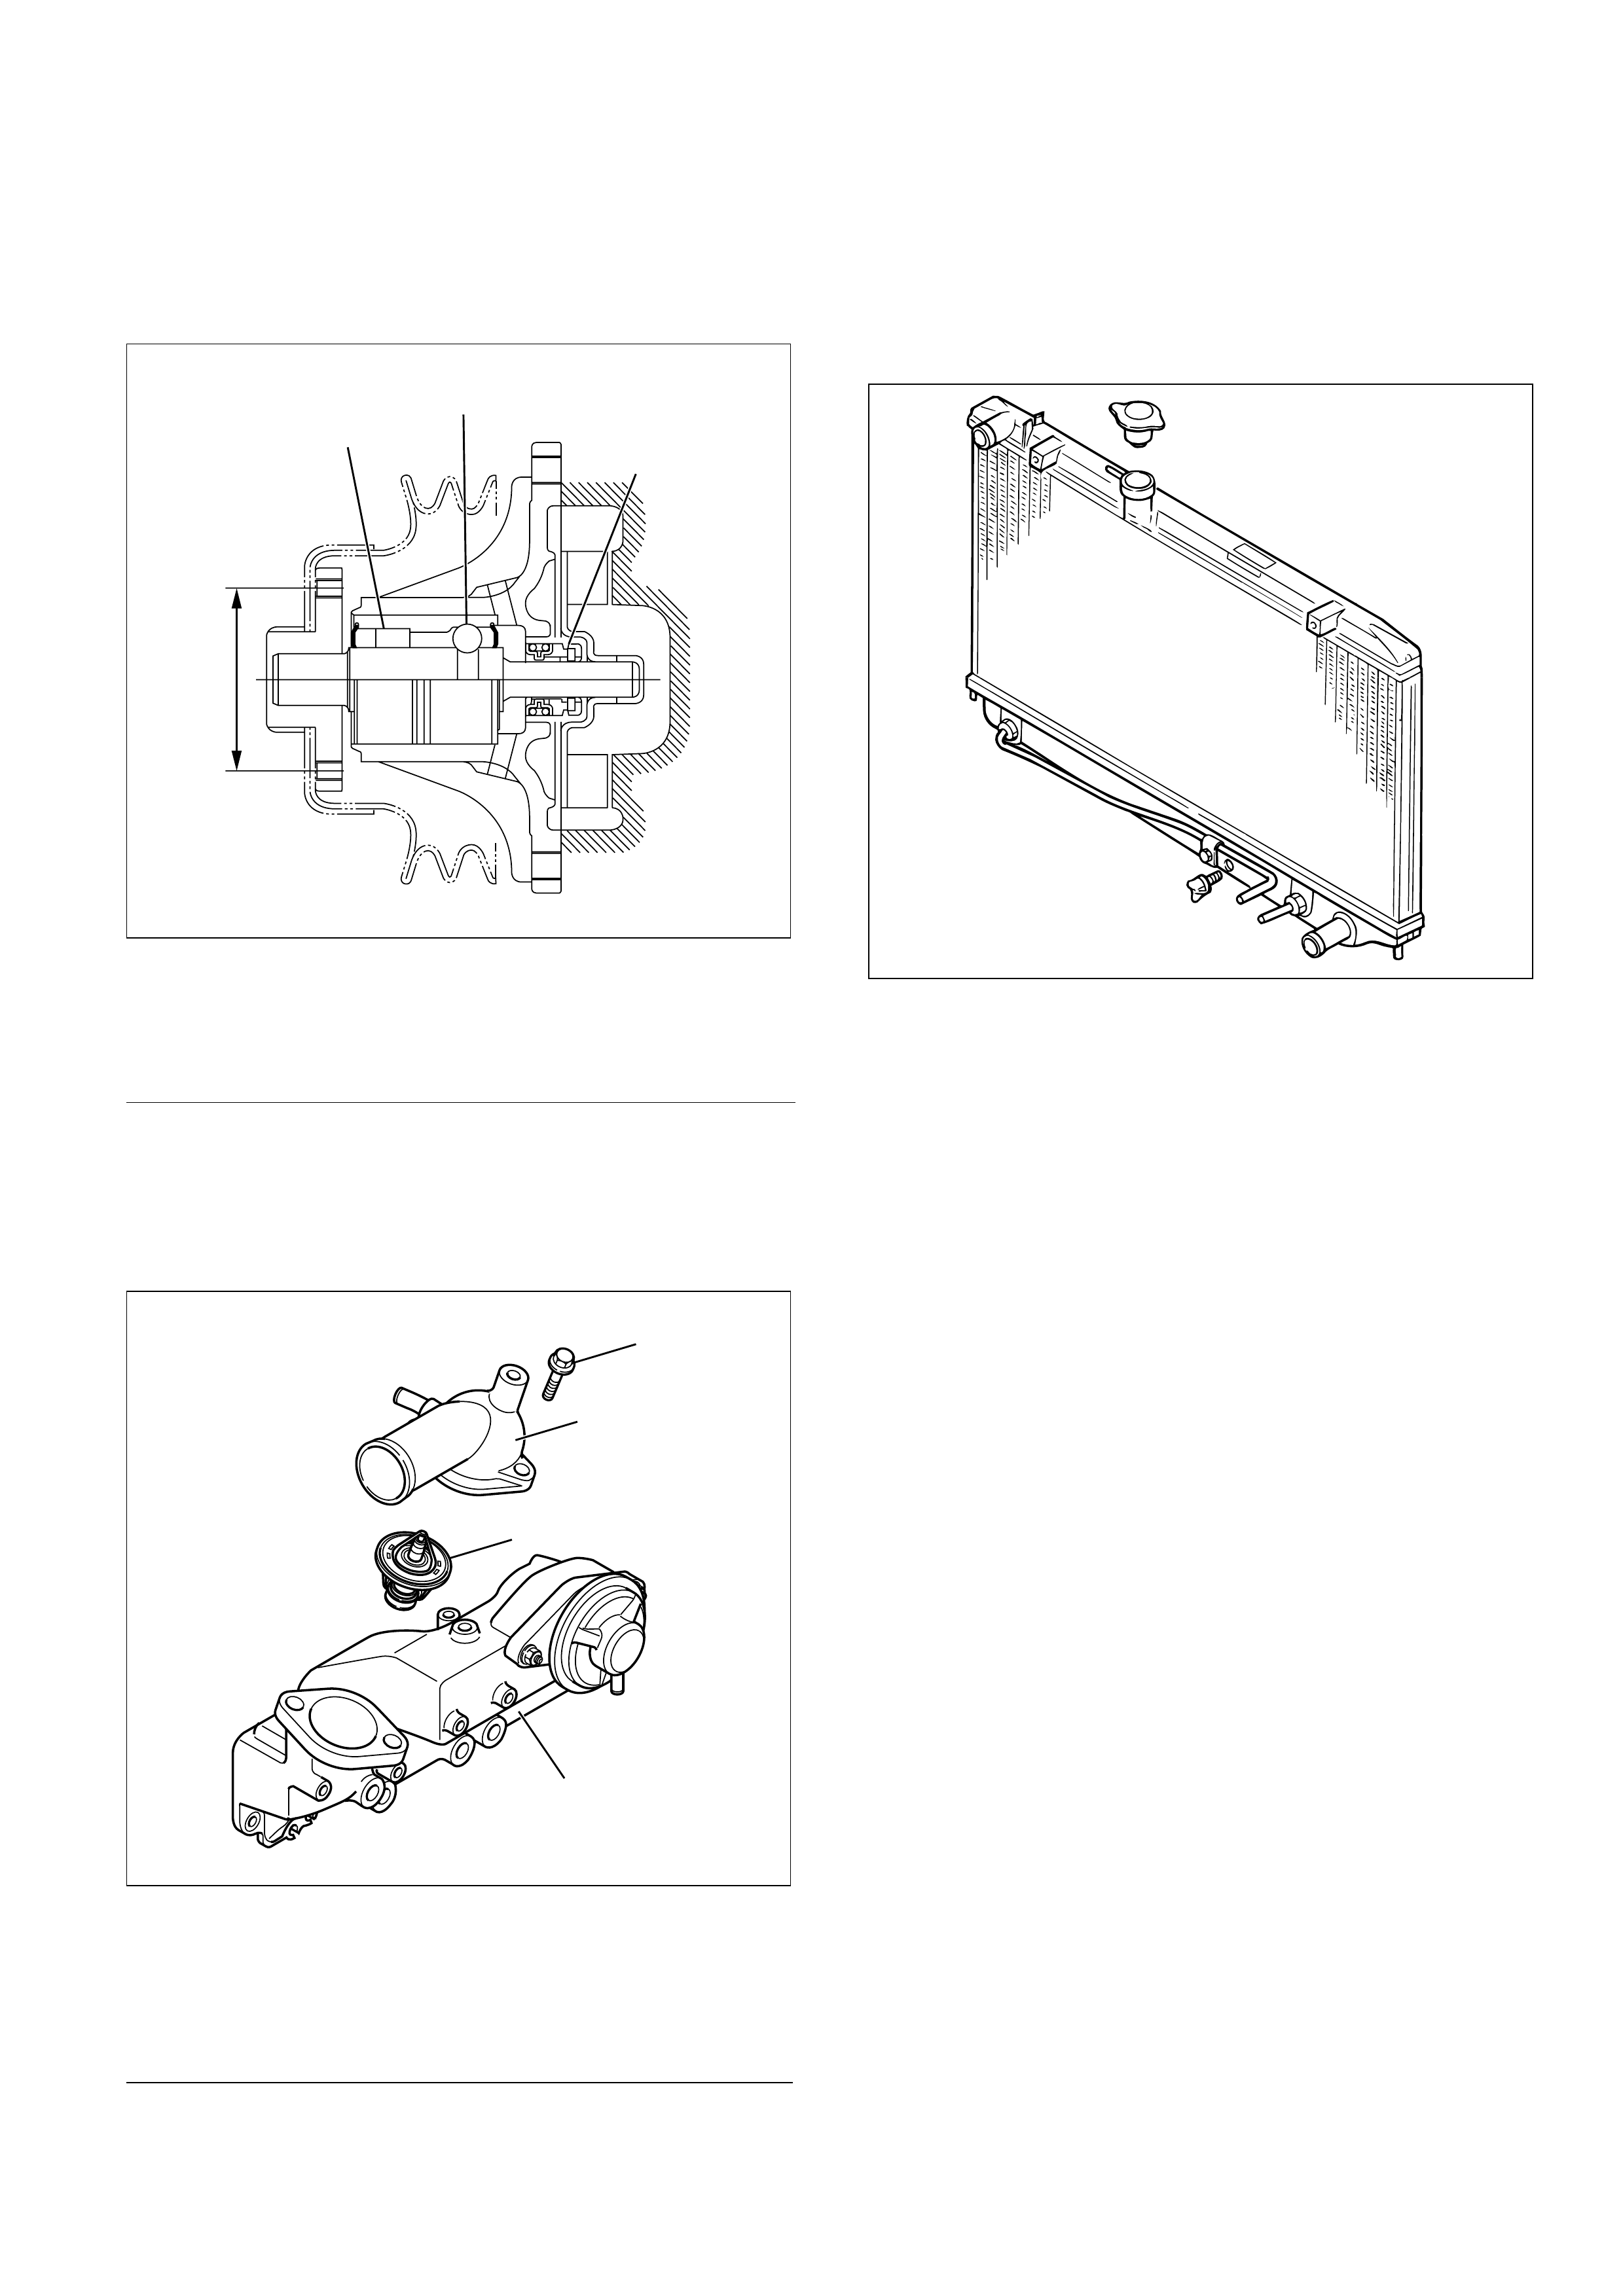
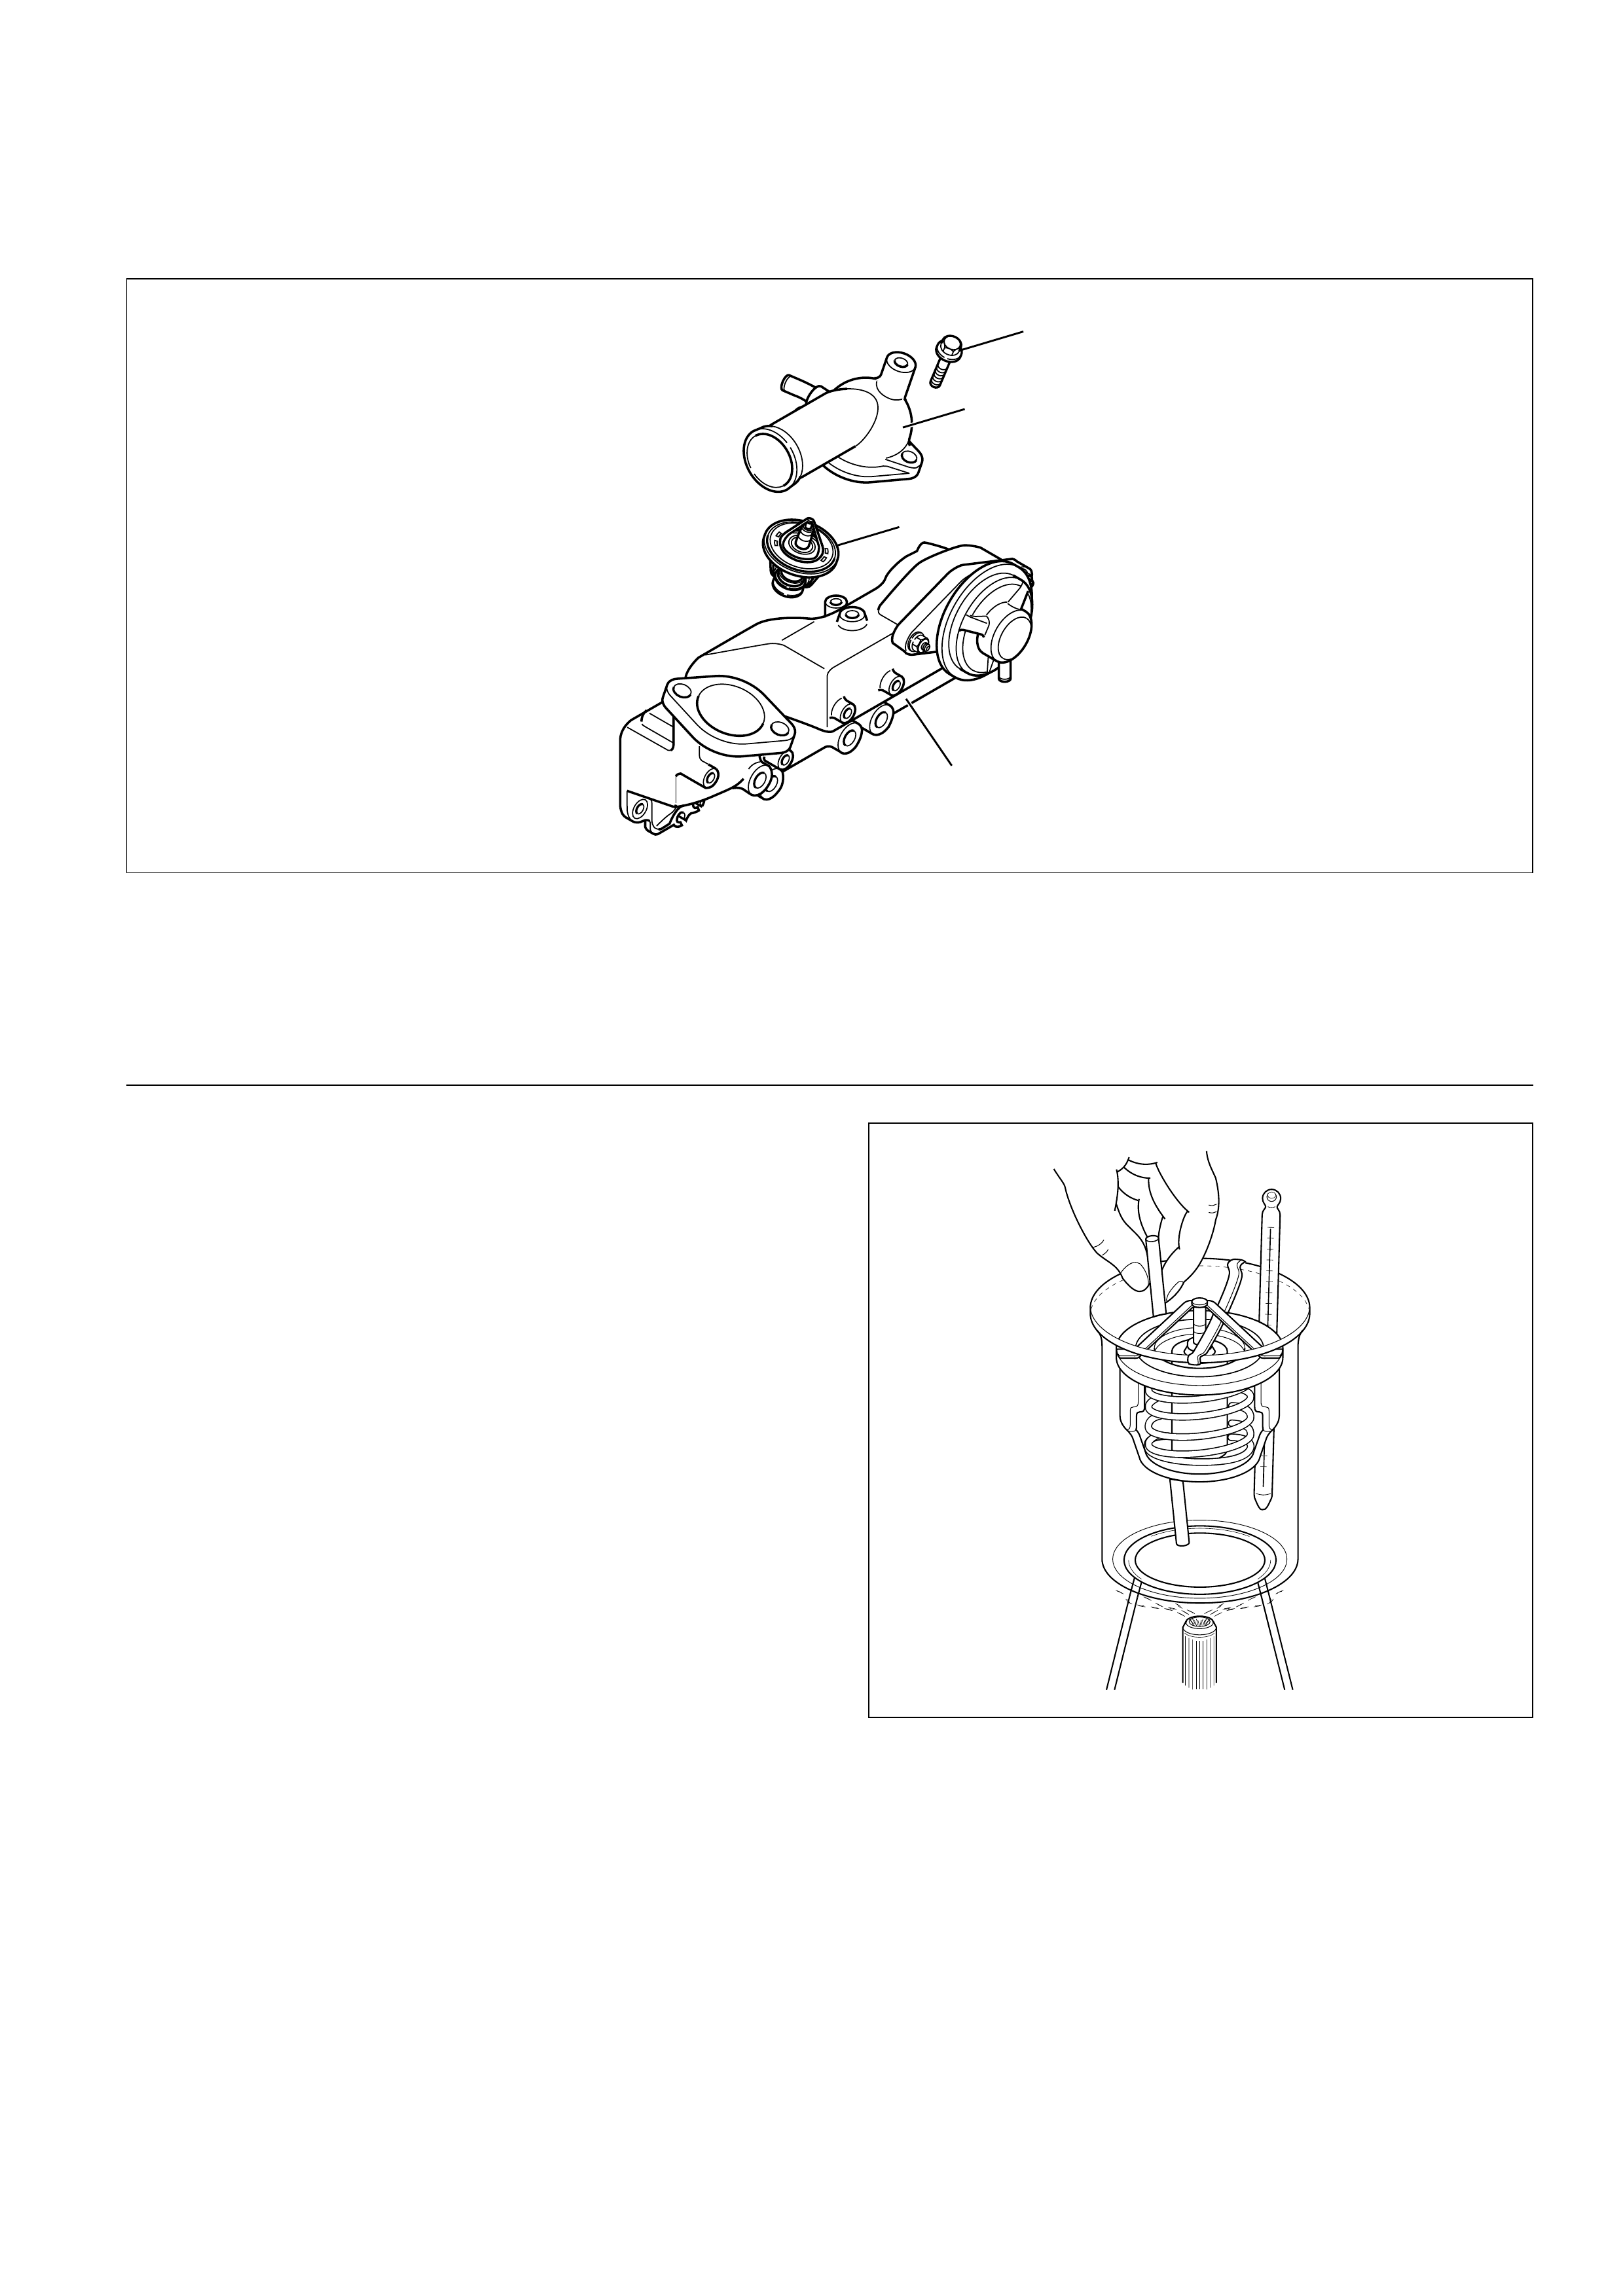
THERMOSTAT
The thermostat is a wax pellet type with a jiggle valve
and is installed in the thermostat housing.
Legend
(1) Bolt
(2) Thermostat Housing
(3) Thermostat
(4) Intake Manifold
RADIATOR
The radiator is a tube type with corrugated fins. In order
to raise the boiling point of coolant, the radiator is fitted
with a pressure cap.
13
2
PCD 60
A06RW024
1
2
3
4
032RW002
110RS001

ENGINE COOLANT CHANGE
PROCEDURE
1. To change engine coolant, make sure that the
engine is cool.
WARNING:
When the coolant is heated to a high temperature,
be sure not to loosen or remove the radiator cap.
Otherwise you might get scalded by hot vapor or
boiling water . To open the radiator cap, put a piece
of thick cloth on the cap and loosen the cap slowly
to reduce the pressure once the coolant has
become cooler .
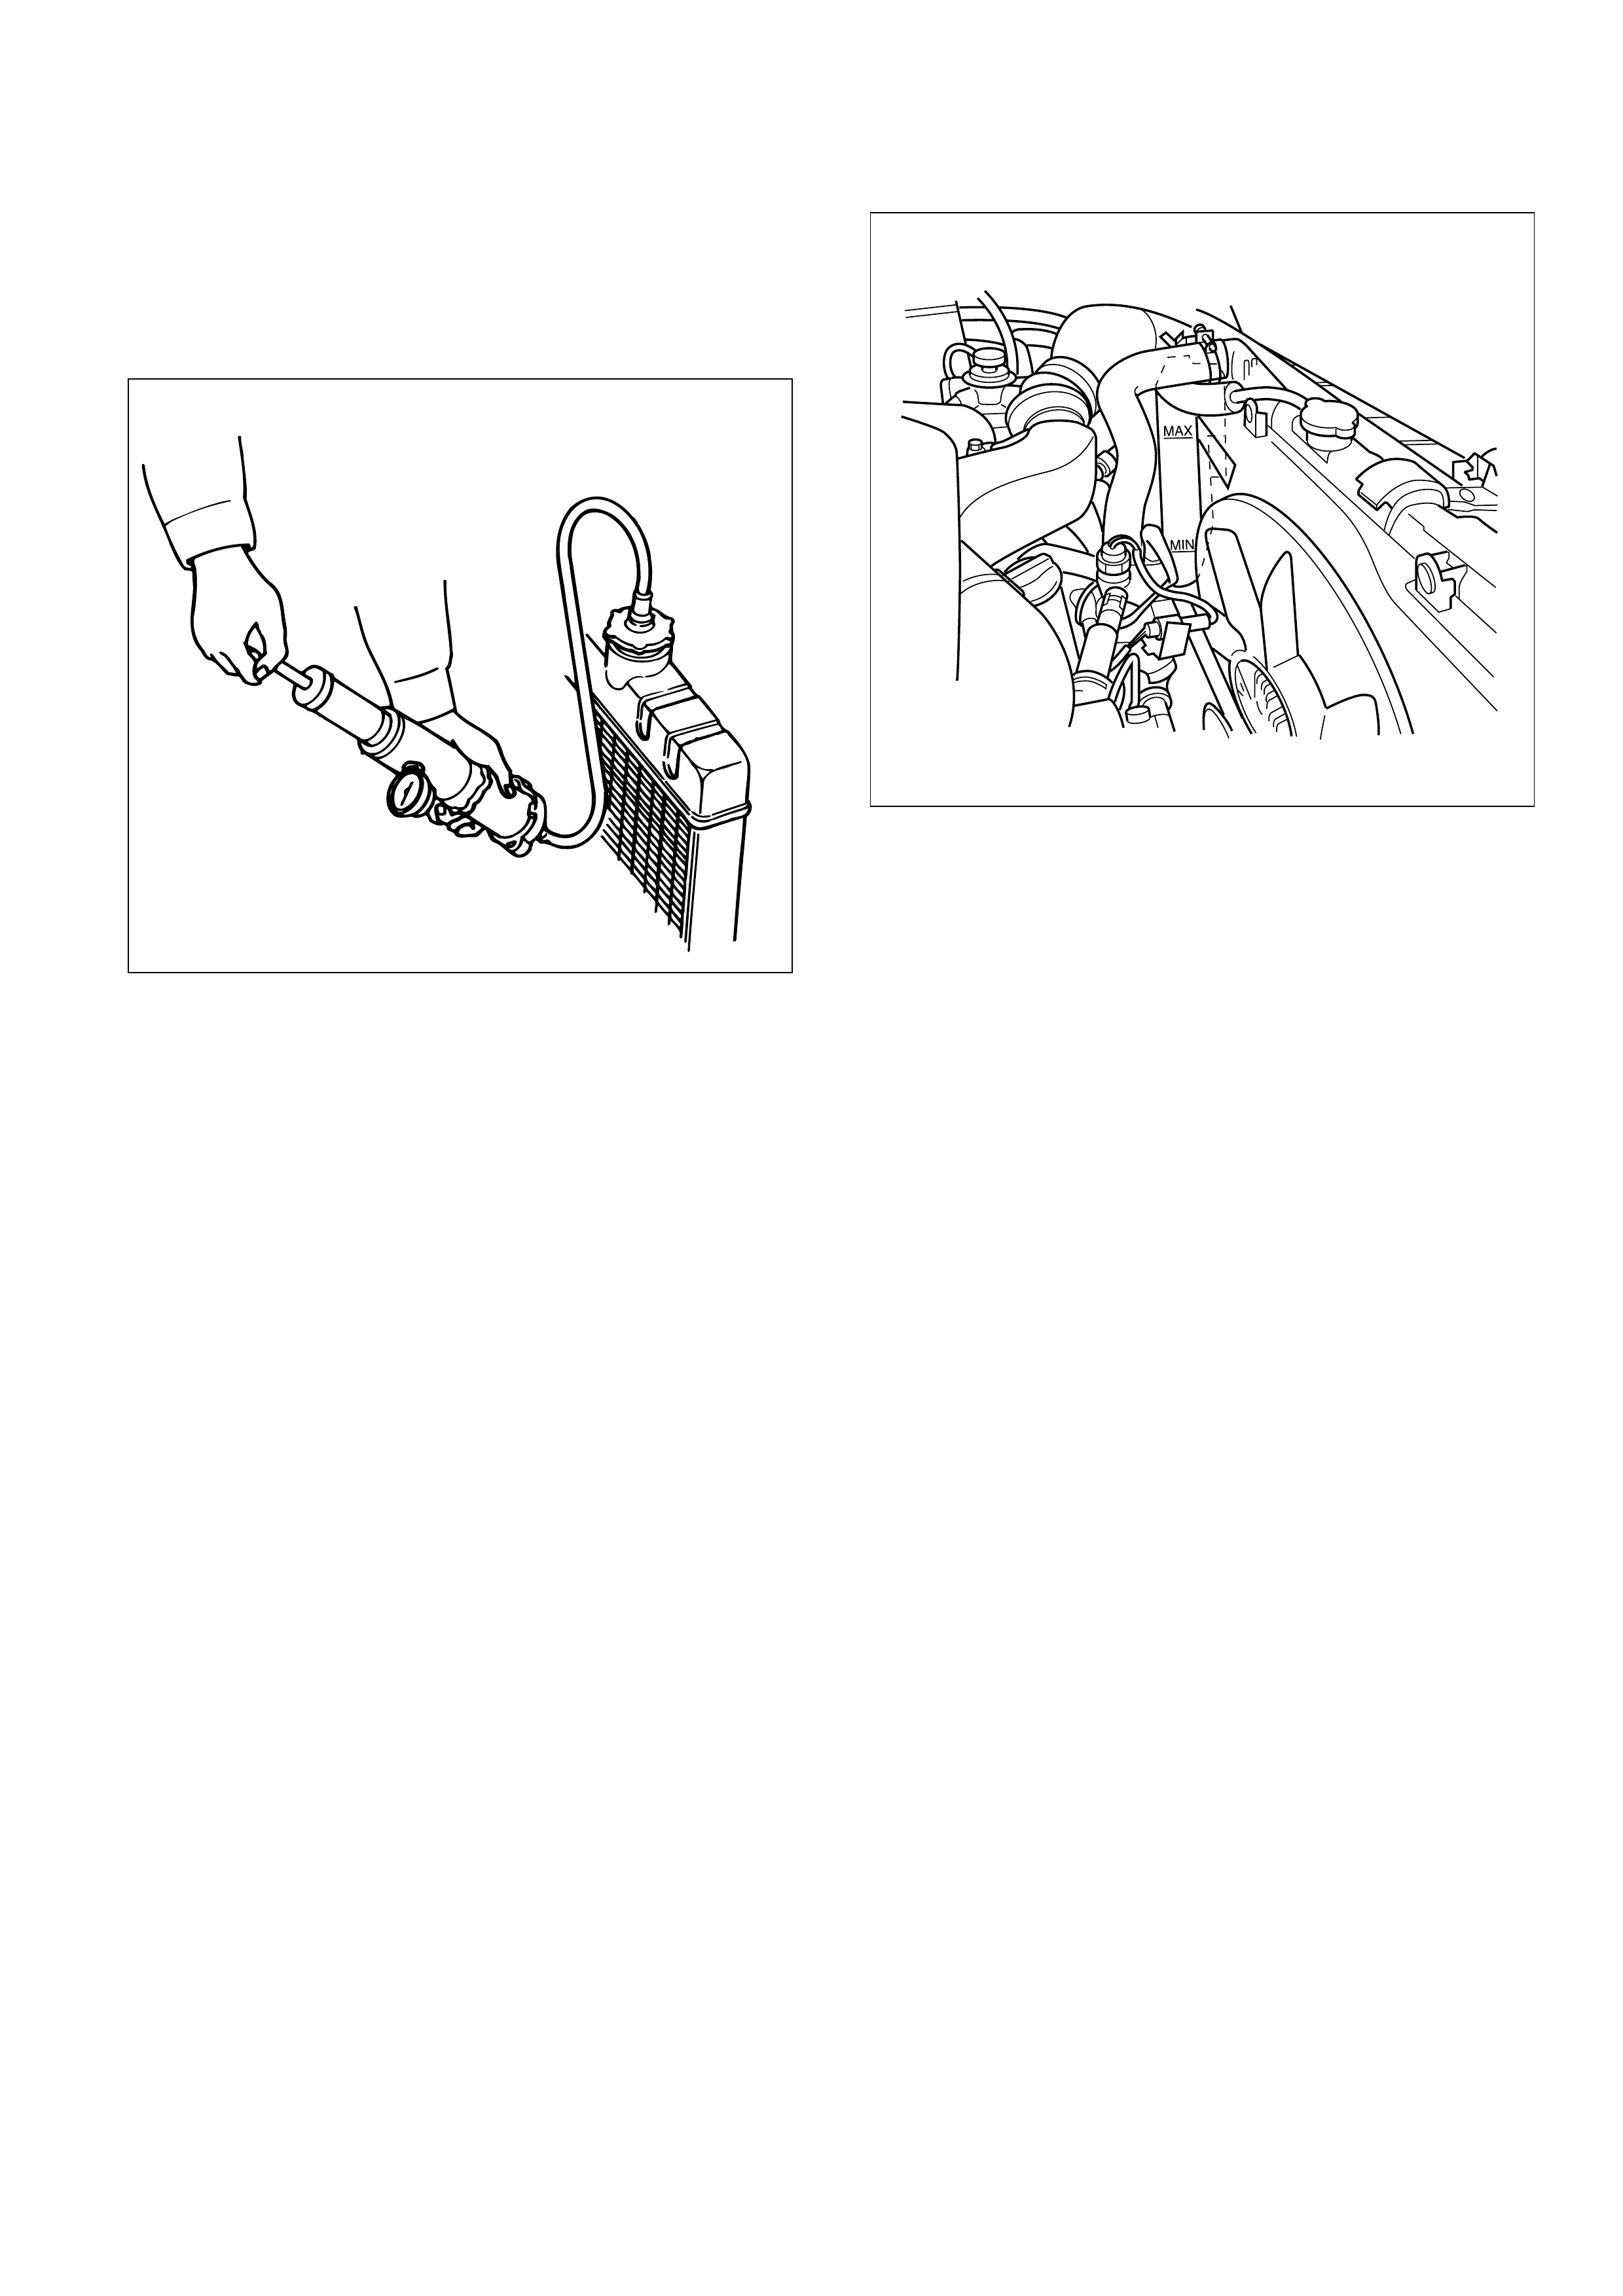
2. Open radiator cap and drain the cooling system by
loosening the drain valve on the radiator and on the
cylinder block.
COOLANT SPECIFICATION
50% water and 50% coolant conforming to Holden
HN2217 specification.
COOLANT CAPACITY
MY1998-2002 Euro-2: Approximately 9.3 litres
MY2003 Euro-3: Approximately 9.8 litres
.
CAUTION:
A failure to correctly fill the engine cooling system
in changing or topping off coolant may sometimes
cause the coolant to overflow from the filler neck
even before the engine and radiator are completely
full.
If the engine runs under this condition, shortage of
coolant may possibly result in engine overheating.
To avoid such trouble, the following precautions
should be taken in filling the system.
3. To refill engine coolant, pour coolant up to filler neck
using a filling hose which is smaller in outside
diameter than the filler neck. Otherwise air between
the filler neck and the filling hose will block entry,
preventing the system from completely filling up.
4. Keep a filling rate of 9 liter/min. or less. Filling over
this maximum rate may force air inside the engine
and radiator.
And also, the coolant overflow will increase, making
it difficult to determine whether or not the system is
completely full.
5. After filling the system full, pull out the filling hose
and check to see if air trapped in the system is
dislodged and the coolant level goes down. Should
the coolant level go down, repeat topping-off until
there is no more drop in the coolant level.
6. Directly after filling the radiator, fill the reservoir to
the maximum level.
7. Install and tighten radiator cap and start the engine.
After idling for 2 to 3 minutes, stop the engine and
reopen radiator cap. If the water level is lower,
replenish.
WARNING:
When the coolant is heated to a high temperature,
be sure not to loosen or remove the radiator cap.
Otherwise you might get scalded by hot vapor or
boiling water . To open the radiator cap, put a piece
of thick cloth on the cap and loosen the cap slowly
to reduce the pressure once the coolant has
become cooler .
8. After tightening radiator cap, warm up the engine at
about 2,000 rpm.
Set heater adjustment to the highest temperature
position, and let the coolant circulate also into
heater water system.
9. Check to see the thermostat has opened by the
needle position of a water thermometer, conduct a
5-minute idle again and stop the engine.
10. When the engine has been cooled, check filler neck
for water level and replenish if required. Should
extreme shortage of coolant be found, check the
coolant system and reservoir tank hose for leakage.
11. Fill the coolant into the reservoir tank up to MAX
line.
Techline
REMOVAL
1. Drain coolant.
2. AC Generator Drive Belt
1) Loosen AC Generator mounting bolt, adjust
plate lock bolt, and remove the drive belt.
3. Cooling Fan Assembly
1) Remove lock nut and take out cooling fan
assembly with cooling fan clutch.
4. Water Pump Assembly
INSPECTION
Make necessary repair and parts replacement if
excessive wear or damage is found during inspection.
Should any of the following problems occur, the entire
water pump assembly must be replaced.
1) Cracks in the water pump body
2) Coolant leakage from the seal unit
3) Play or abnormal noise in the bearing
4) Cracks or corrosion in the impeller
INSTALLATION
1. Gasket
1) Set gasket to gear case.
2. Water Pump Assembly
1) Install water pump assembly, and tighten to
specified torque.
Torque: 20 N·m (2.0 kg·m/14.5 lb ft)
3. Cooling Fan Assembly
1) Install cooling fan assembly, and tighten to
specified torque.
Torque: 8 N·m (0.8 kg·m/5.8 lb ft)
4. AC Generator Drive Belt
1) Install AC Generator drive belt and adjust belt
tension.
Torque: 40 N·m (4.1 kg·m/29.7 lb ft)
For ACG to bracket
20 N·m (2.0 kg·m/14.5 lb ft)
For ACG to adjust plate
5. Fill coolant to specified capacity.
12
Legend
(1) Fan Pulley
(2) Water Pump Assembly
030RW009
ON-VEHICLE SERVICE
WATER PUMP
THERMOSTAT
REMOVAL
1. Disconnect battery ground cable.
2. Drain coolant from the radiator and engine.
3. Thermostat housing
1) Remove mounting bolt and remove thermostat
housing together with radiator hose.
4. Gasket
5. Thermostat
INSPECTION
Make necessary repair and parts replacement if
excessive wear or damage is found during inspection.
Submerge the thermostat assembly in the water.
Place wooden blocks on the bottom of the water
container.
Do not heat the thermostat directly.
Gradually increase the water temperature. Stir the
water so that the entire water is the same temperature.
1) Make sure that valve begins to open at the
specified temperature.
Valve Opening Temperature: 85°C (185°F)
2) Make sure that valve opens fully at the specified
temperature.
Valve Full Open Temperature: 100°C (212°F)
1
2
3
4
Legend
(1) Bolt
(2) Thermostat Housing
(3) Thermostat
(4) Intake Manifold
035RW002
031RS003

INSTALLATION
1. Thermostat
1) The jiggle valve of the thermostat must face the
cylinder head side.
2. Gasket
3. Install thermostat housing and tighten bolt to the
specified torque.
Torque: 20 N·m (2.0 kg·m/14.5 lb ft)
4. Reconnect water hose
1) Fill coolant to full level.
2) Reconnect battery ground cable.
5. Start the engine check for coolant leakage.
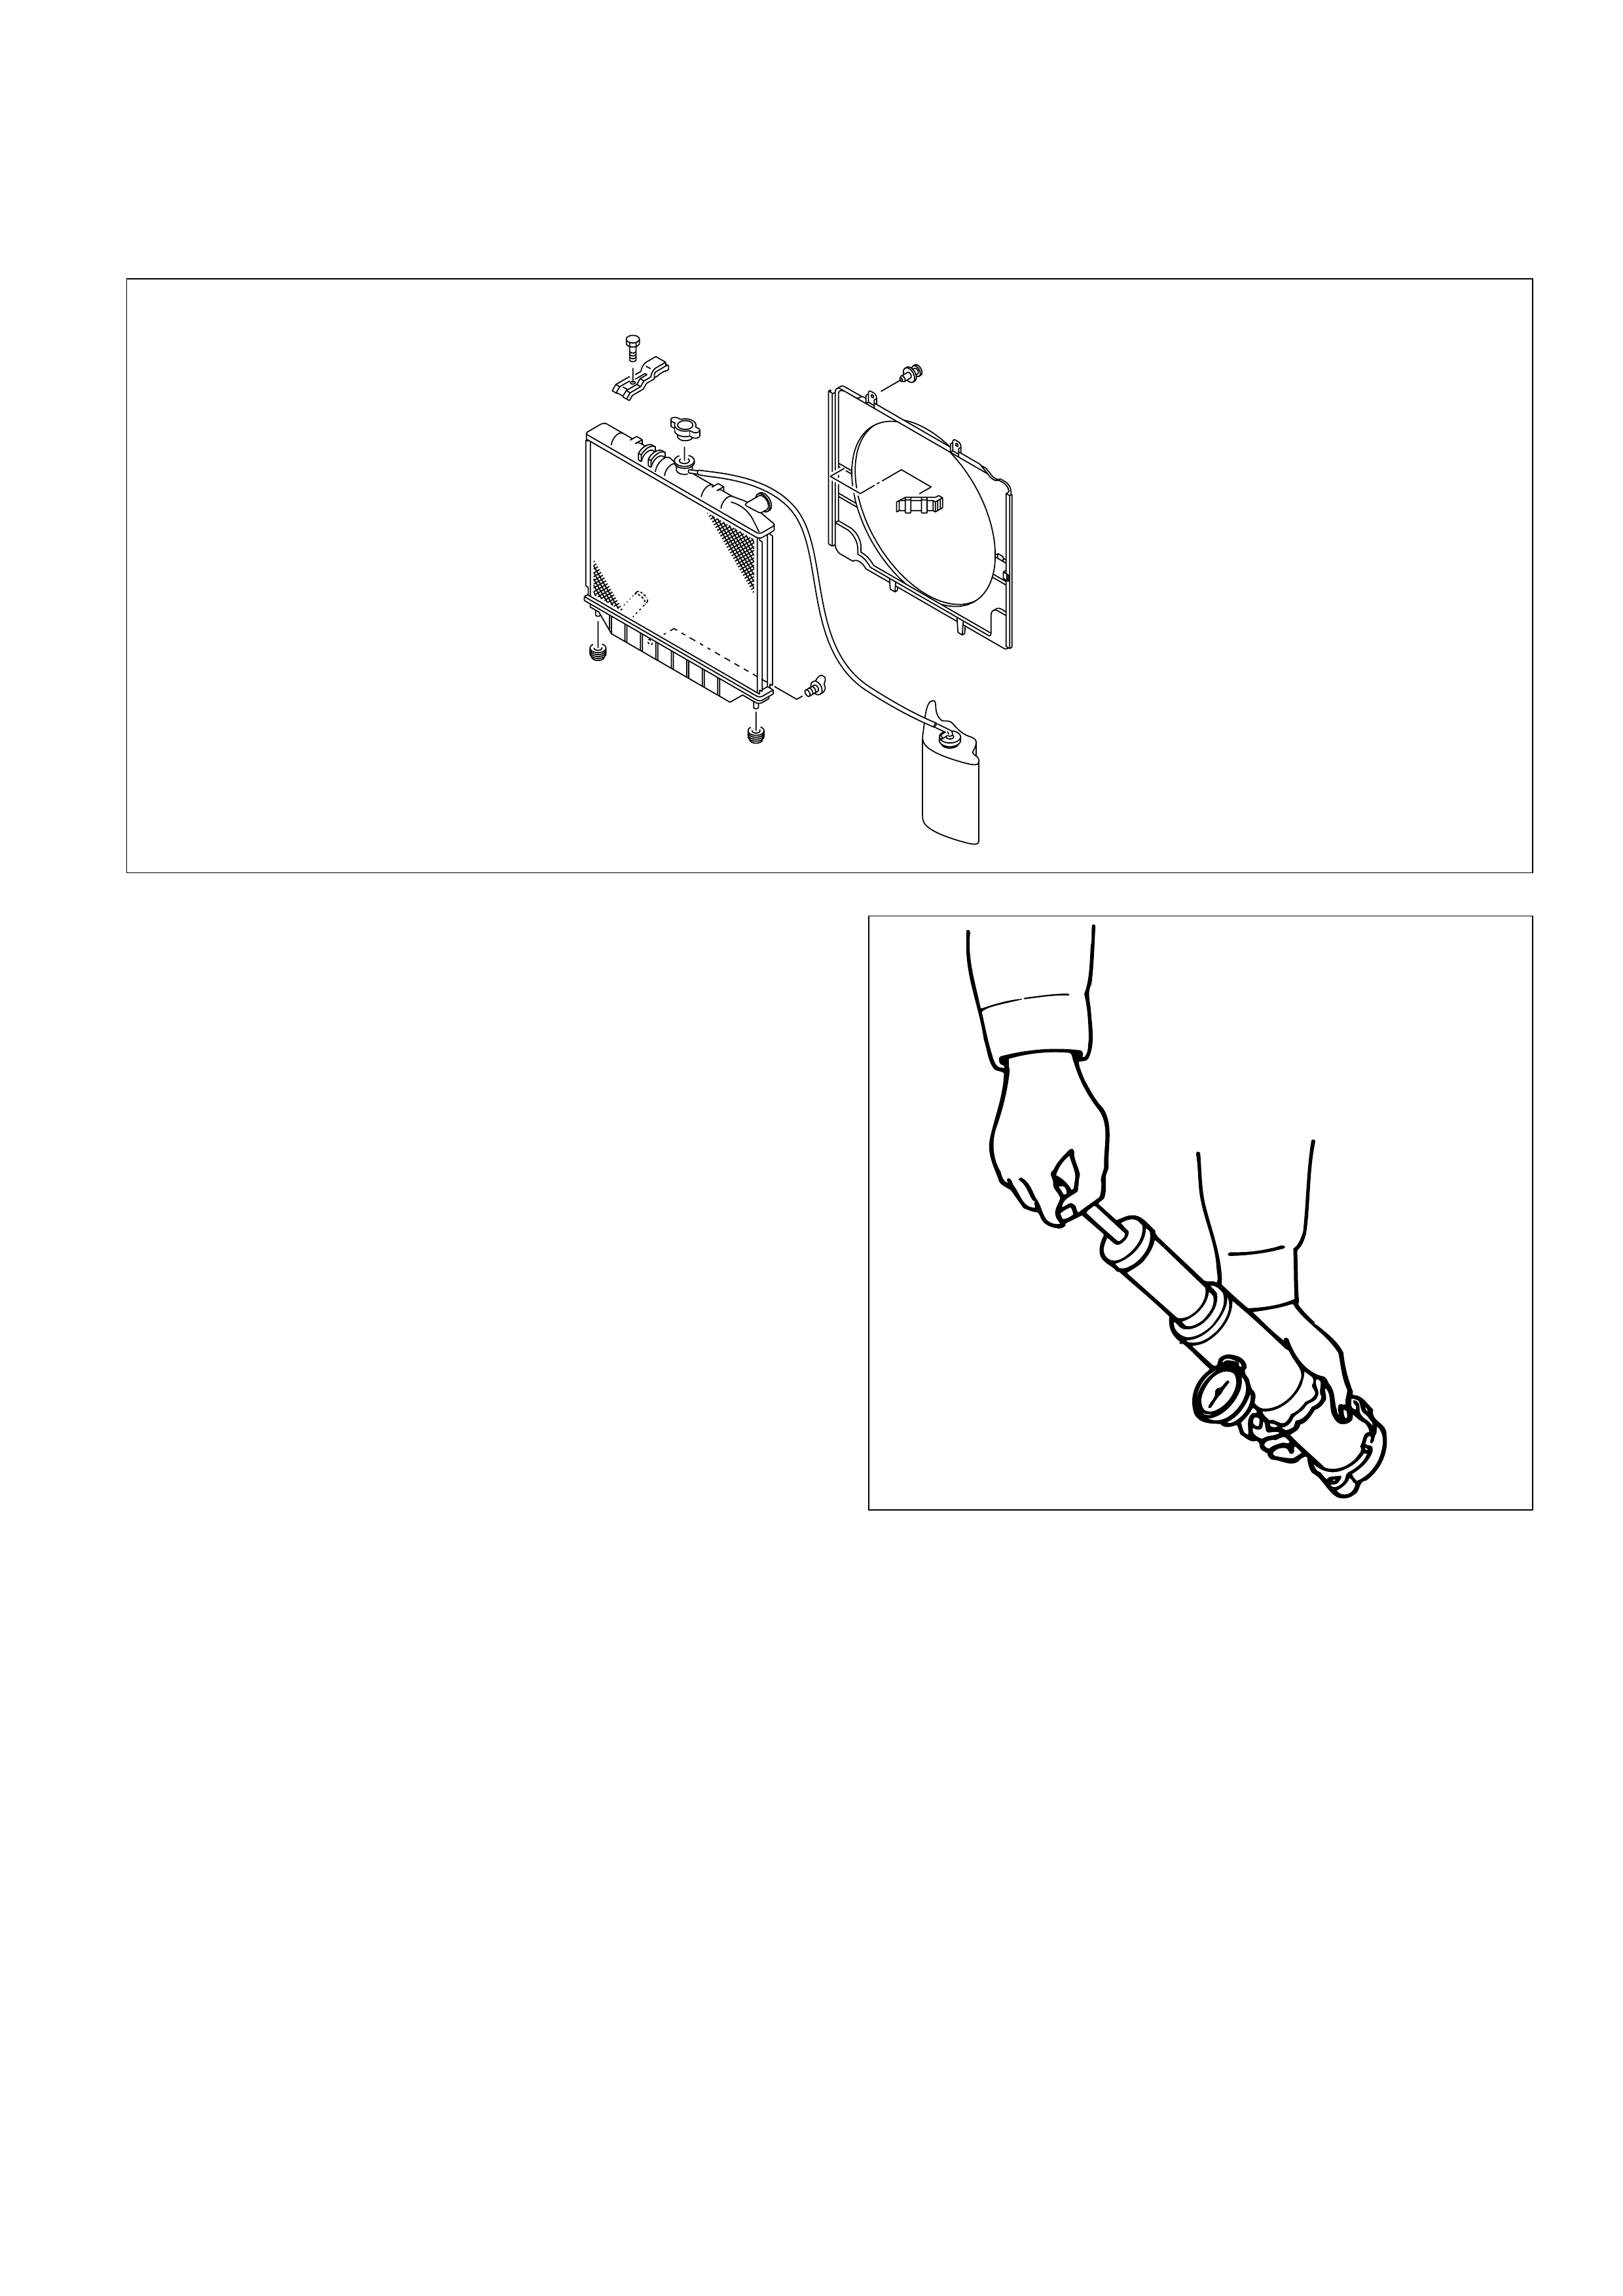
RADIATOR
REMOVAL
1. Disconnect battery ground cable
2. Loosen drain plug to drain coolant.
3. Radiator Hose
1) Disconnect lower hose and upper hose from the
engine.
4. Fan Guide
1) Remove clips on both sides and the bottom lock.
5. Reservoir Tank Hose
1) Disconnect the hose from radiator.
6. Bracket
7. Radiator Assembly
1) Remove the radiator assembly upward by the
hoses taking care not to damage the radiator
core by the fan blade.
2) Remove rubber cushions on both sides of the
bottom.
INSPECTION
Radiator Cap
1) Measure the valve opening pressure with the
radiator cap tester. Replace the radiator cap if it
exceeds the standard.
Valve opening pressure: 93.2 – 122.7 kPa
(0.95 – 1.25 kg/cm2/
13.5 – 17.8 psi)
Check the condition of the negative pressure valve in
the center of the valve seat side of the cap. If the valve
seat does not move smoothly due to rust or dust, clean
and replace the radiator cap.
Radiator Core
1) Deformed radiator fins could reduce radiation
effects, resulting in overheating. Straighten the fins.
In such a case, take care not to damage the fin
roots.
2) Remove dust and other foreign materials.
Flushing the Radiator
1) Wash the inside of radiator and the coolant
passage with water and a neutral detergent.
Remove all scales and rust.
110RW017
110RS006
Checking for Coolant Leakage
1) Check the cooling system for leakage with the
radiator cap tester by applying 196.0 kPa (28.4 psi)
air pressure from filler neck to inside the radiator.
INSTALLATION
1. Radiator Assembly
1) Install rubber cushions on both sides of radiator
bottom.
2) Install radiator assembly with hose, taking care
not to damage the radiator core by a fan blade.
2. Bracket
1) Support the radiator upper tank with the bracket
and fix the radiator.
3. Reserve Tank Hose
4. Fan Guide, Lower
5. Radiator Hose
1) Connect inlet hose and outlet hose to the
engine.
2) Connect battery ground cable.
3) Pour coolant up to filler neck of radiator, and up
to MAX mark of reserve tank.
4) Start engine to warm up, and check for coolant
level. Replenish coolant if it does not reach the
radiator filler neck, and tighten the cap
completely.
110RS005
012RW080
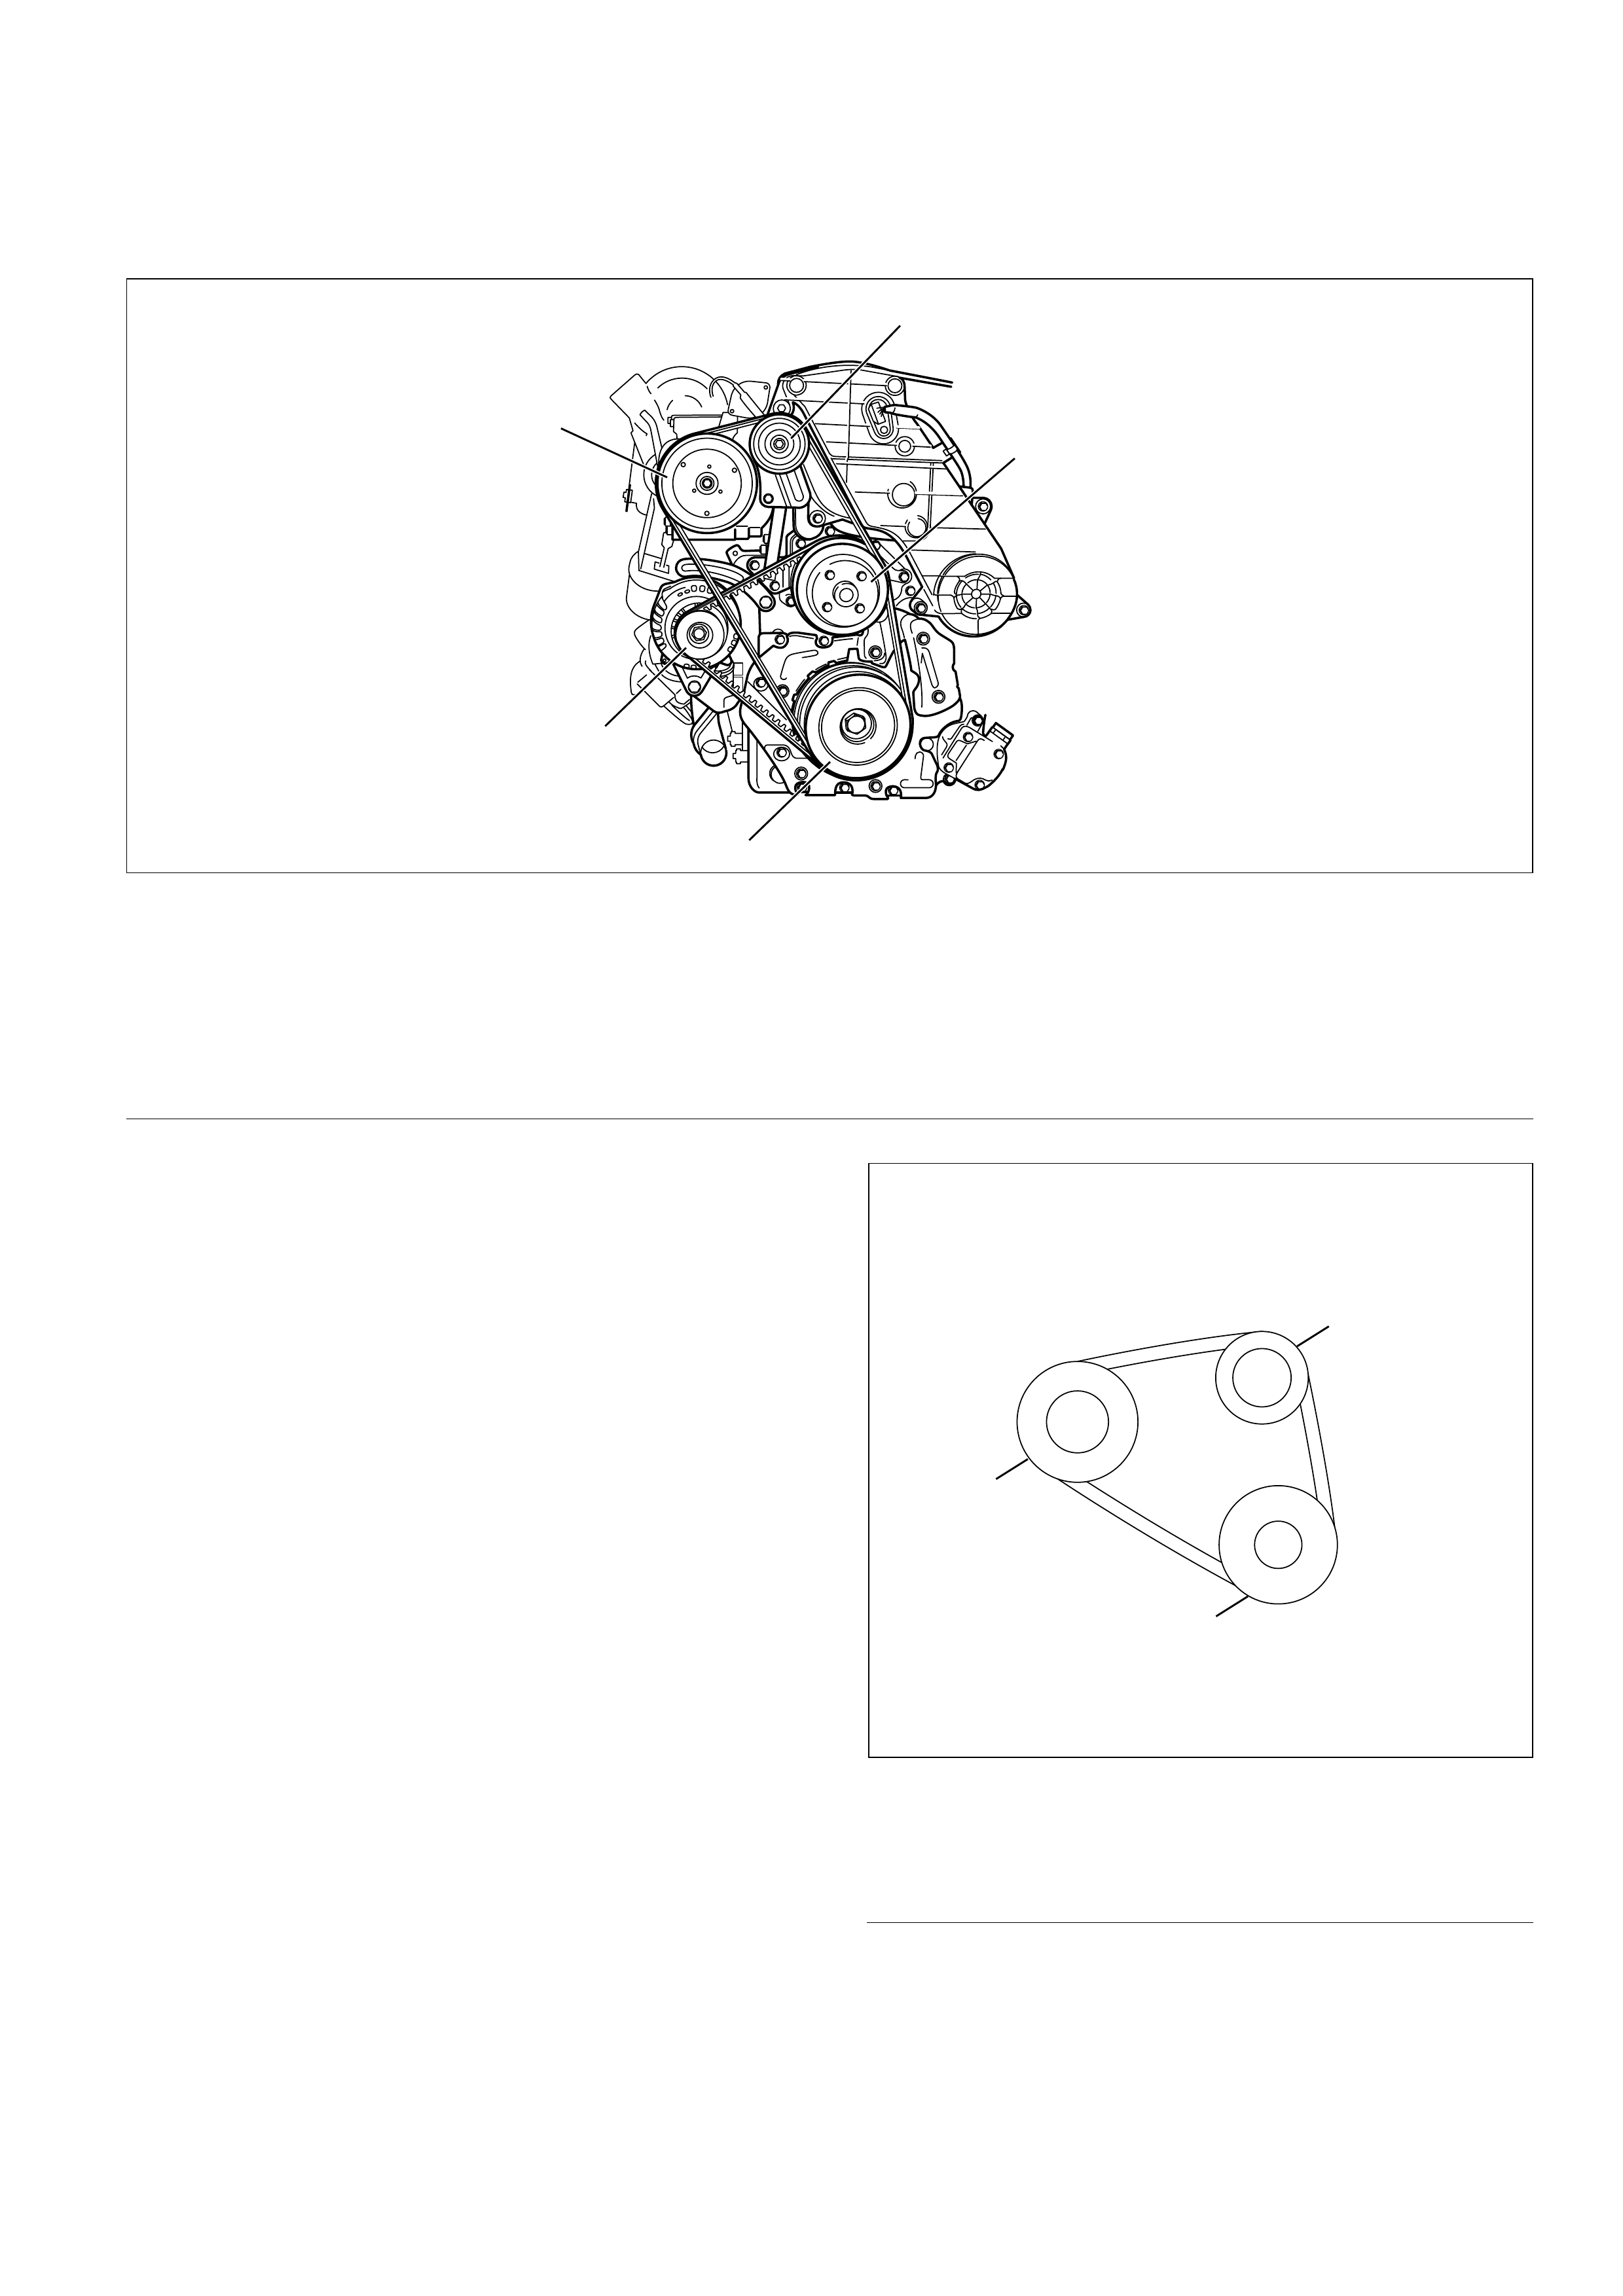
DRIVE BELT ADJUSTMENT
INSPECTION
Check drive belts for wear or damage, and replace with
new ones as necessary. Check belts for tension, and
adjust as necessary.
1) Check drive belt tension.
2) Push the middle of belt with a force of 98 N
(10 kg/22 lb) and check each belt for deflection.
Standard deflection:
For A.C. generator & fan pulley drive belt
Initial tension : 8 – 12 mm (0.31 – 0.47 in)
Tension at readjustment : Same as above.
For A/C compressor drive belt
Initial tension : 7 – 10 mm (0.28 – 0.38 in)
Tension at readjustment : 5 – 8 mm (0.20 – 0.31 in)
TENSION ADJUSTMENT
1) Loosen AC generator mounting bolt to move AC
generator, adjust belt tension and tighten to the
specified torque. Legend
(1) Crankshaft Pulley
(2) A.C. Generator Pulley
(3) Cooling Fan Pulley
5
3
1
2
4
Legend
(1) Crankshaft Pulley
(2) A.C. Generator
(3) Cooling Fan Pulley
(4) A/C Compressor
(5) Belt Tensioner Pulley
012RW085
3
2
1
012RW084
Torque:
For A.C. Generator fixing bolt
40 N·m (4.1 kg·m/29.7 lb ft)
For Adjusting plate fixing bolt
24 N·m (2.4 kg·m/17.4 lb ft)
For Adjusting plate lock bolt
19 N·m (1.9 kg·m/13.7 lb ft)
2) Adjust the A/C compressor drive belt by tightening
the belt tensioner bolt.
Legend
(1) Crankshaft Pulley
(2) A.C. Generator Pulley
(3) Cooling Fan Pulley
(4) A/C Compressor Pulley
(5) Belt Tensioner Pulley
5
3
2
4
1
012RW110