
SECTION 8C1 - ENGINE EXHAUST - 6VE1
Service Precaution
General Description
Front Exhaust Pipe
Front Exhaust Pipe and Associated Parts
Removal
Installation
Three Way Catalytic Converter
Removal
Installation
Exhaust Silencer
Exhaust Silencer and Associated Parts
Removal
Installation
Rear Exhaust pipe
Rear Exhaust pipe and Associated Parts
Removal
Installation
Main Data and Specifications
Service Precaution
WARNING: IF SO EQUIPPED WITH A
SUPPLEMENTAL RESTRAINT SYSTEM (SRS),
REFER TO THE SRS COMPONENT AND WIRING
LOCATION VIEW IN ORDER TO DETERMINE
WHETHER YOU ARE PERFORMING SERVICE ON
OR NEAR THE SRS COMPONENTS OR THE SRS
WIRING. WHEN YOU ARE PERFORMING SERVICE
ON OR NEAR THE SRS COMPONENTS OR THE SRS
WIRING, REFER TO THE SRS SERVICE
INFORMATION. FAILURE TO FOLLOW WARNINGS
COULD RESULT IN POSSIBLE AIR BAG
DEPLOYMENT, PERSONAL INJURY, OR
OTHERWISE UNNEEDED SRS SYSTEM REPAIRS.
CAUTION: Always use the correct fastener in the
proper location. When you replace a fastener, use
ONLY the exact part number for that application.
HOLDEN will call out those fasteners that require a
replacement after removal. HOLDEN will also call
out the fasteners that require thread lockers or
thread sealant. UNLESS OTHERWISE SPECIFIED,
do not use supplemental coatings (Paints, greases,
or other corrosion inhibitors) on threaded fasteners
or fastener joint interfaces. Generally, such
coatings adversely affect the fastener torque and
the joint clamping force, and may damage the
fastener. When you install fasteners, use the
correct tightening sequence and specifications.
Following these instructions can help you avoid
damage to parts and systems.

General Description
50RW059
For Isuzu General Motors (IGM)
150RW058
When inspecting or replacing exhaust system
components, make sure there is adequate clearance
from all points on the underbody to prevent overheating
the floor pan and possible damage to the passenger
compartment insulation and trim materials.
Check complete exhaust system and nearby body
areas and rear compartment lid for broken, damaged,
missing or mispositioned parts, open seams, holes,
loose connections or other deterioration which could
permit exhaust fumes to seep into the rear compartment
or passenger compartment. Dust or water in the rear
compartment may be an indication of a problem in one
of these areas. Any faulty areas should be corrected
immediately.
Hangers
Various types of hangers are used to support exhaust
system(s). These include conventional rubber straps,
rubber rings, and rubber blocks.
The installation of exhaust system supports is very
important, as improperly installed supports can cause
annoying vibrations which can be difficult to diagnose.
Three Way Catalytic Converter
The three way catalytic converter is an emission control
device added to the exhaust system to reduce
pollutants from the exhaust gas stream.
CAUTION: The catalytic converter requires the use
of unleaded fuel only.
Periodic maintenance of the exhaust system is not
required. If the vehicle is raised for other service, it is
advisable to check the condition of the complete
exhaust system.
A dual bed monolith catalytic converter is used in
combination with three way catalytic converter.
Catalytic Types:
Three way (Reduction/Oxidation) catalyst
The catalyst coating on the three way (reduction)
converter contains platinum and rhodium which lowers
the levels of nitrous oxide (NOx) as well as
hydrocarbons (HC) and carbon monoxide (Co).
Gasket
The gasket must be replaced whenever a new exhaust
pipe, muffler or catalytic converter is installed.
Front Exhaust Pipe
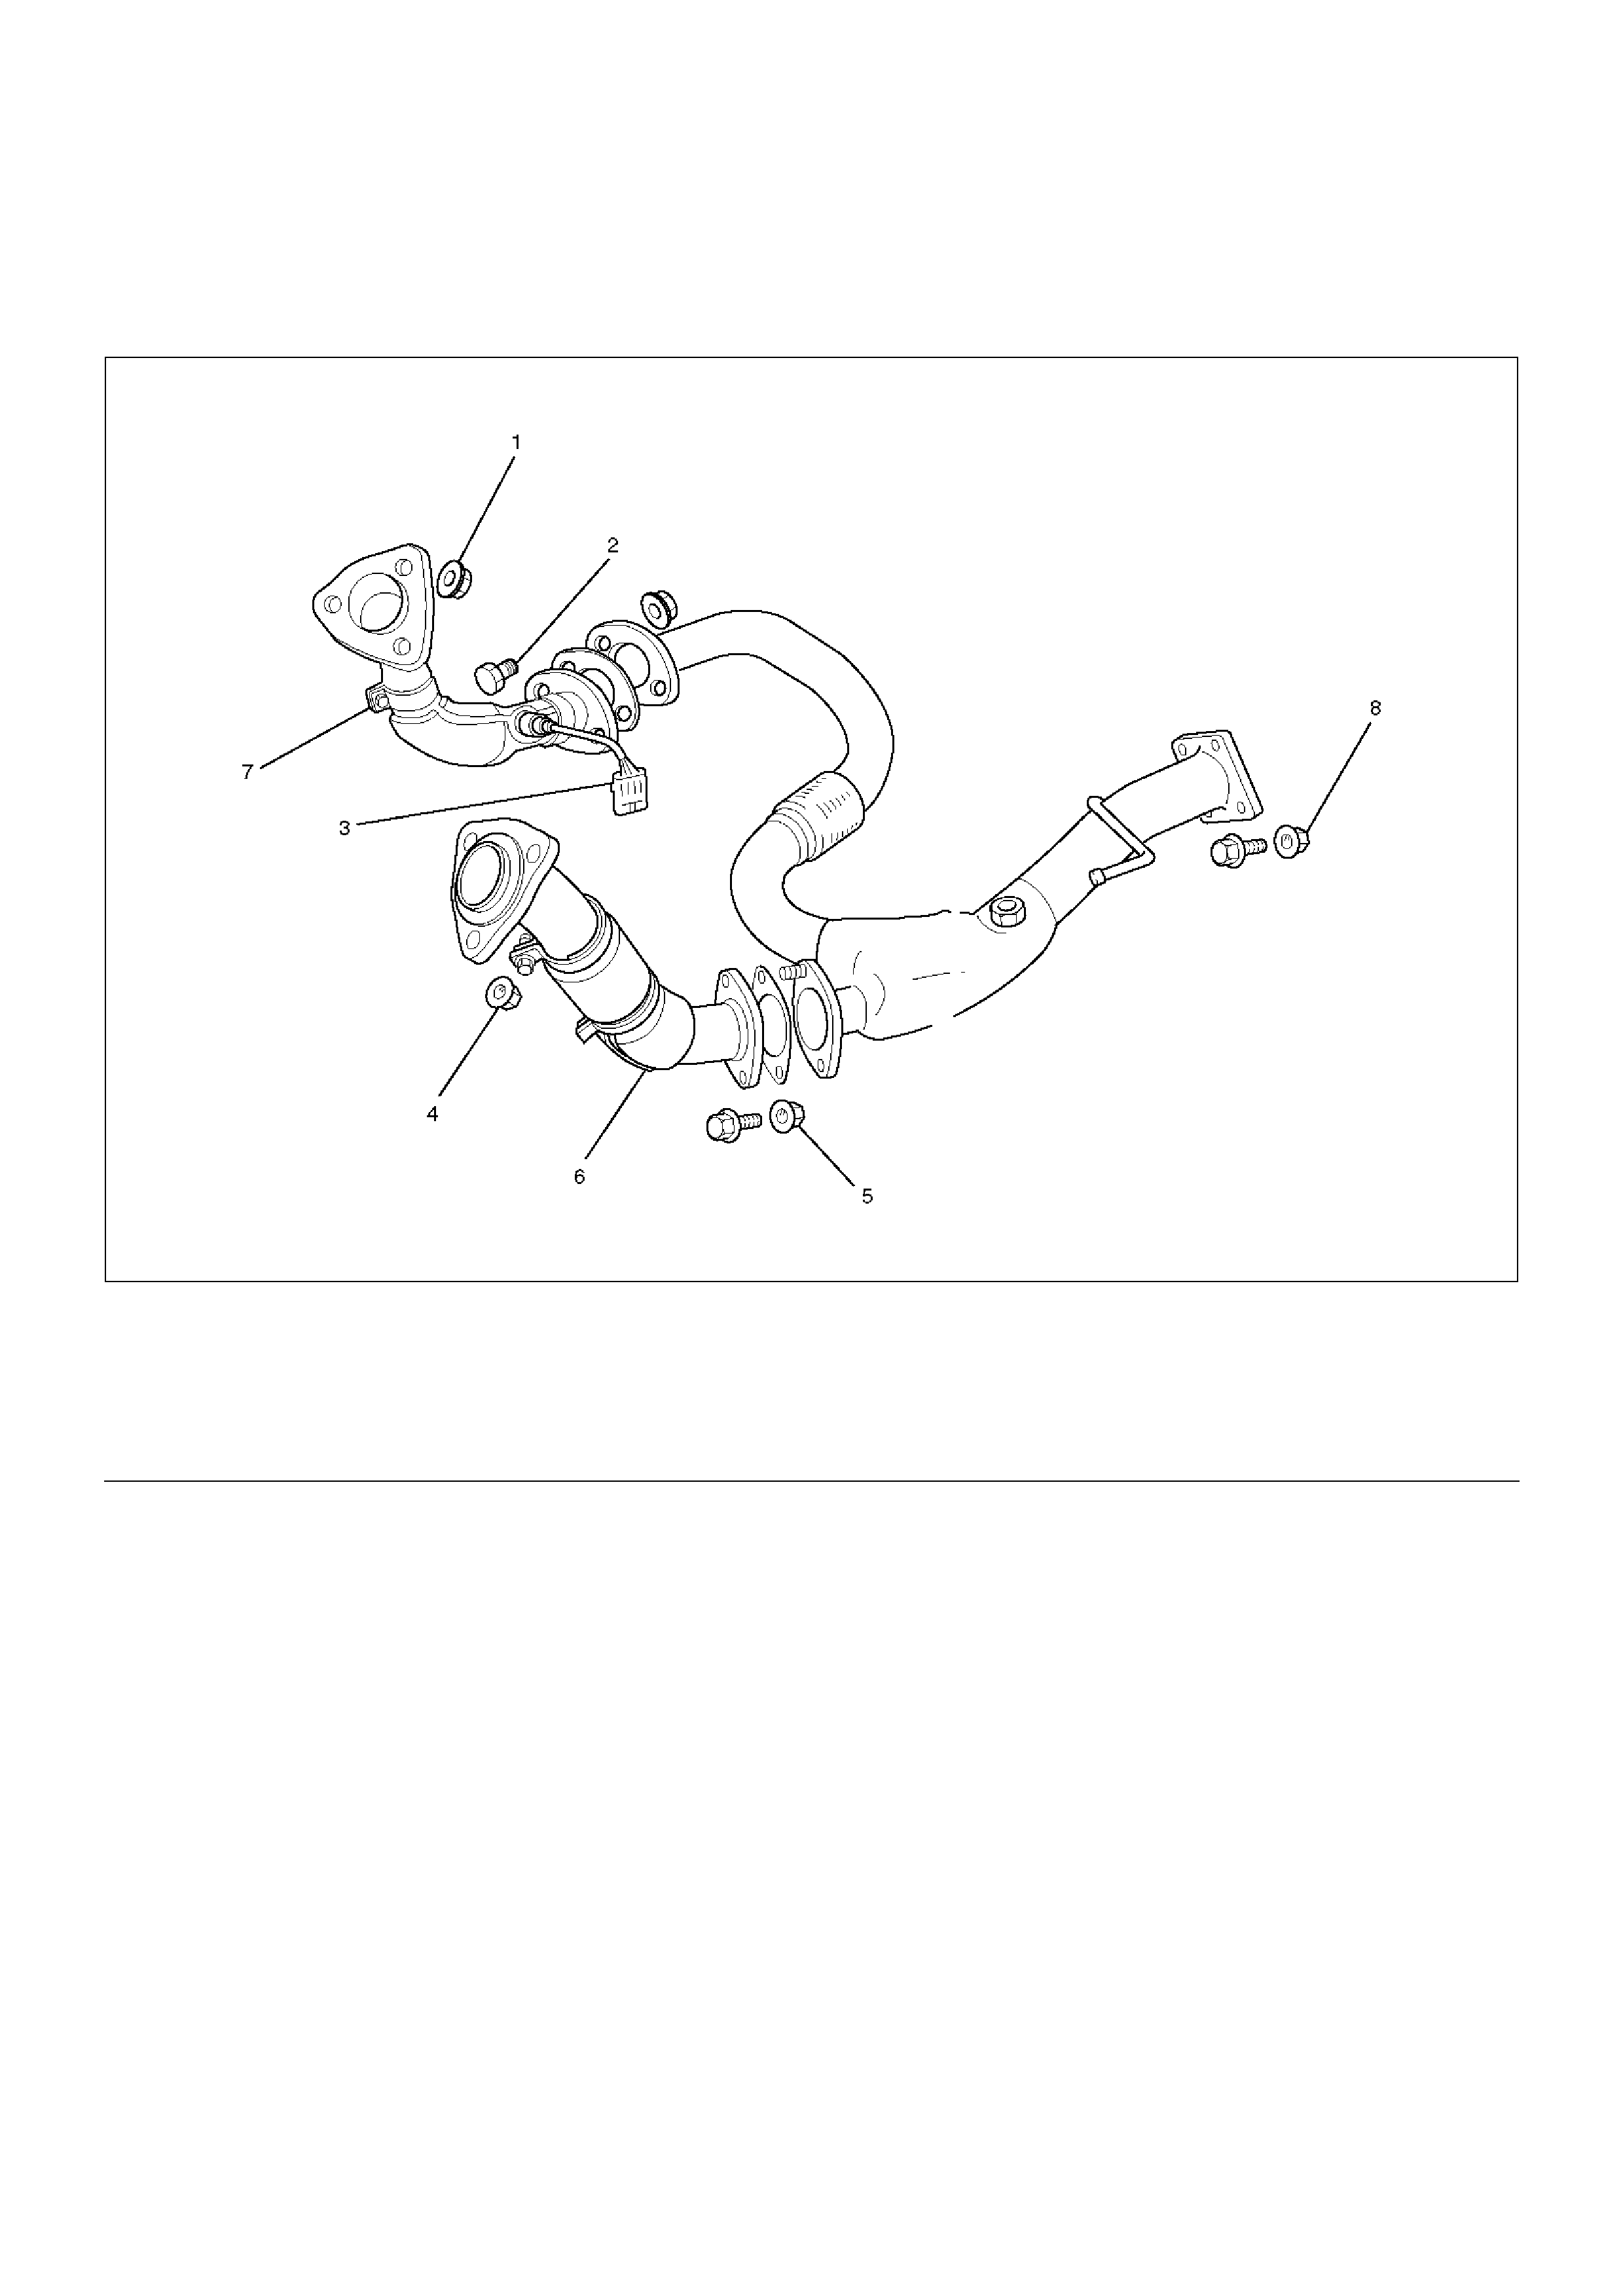
Front Exhaust Pipe and Associated Parts
150RW063
EndOFCallout
Removal
1. Disconnect battery ground cable.
2. Raise the vehicle and support with suitable safety
stands.
3. Disconnect O2 sensor harness connector (3).
4. Remove front exhaust pipe fixing nuts and three
way Exhaust Pipe Fixing Bolts and Nuts (2)(5)(8).
5. Remove front exhaust pipe fixing three stud nuts
from exhaust manifold (1)(4).
6. Remove front exhaust pipe (6)(7).
Installation
1. Install front exhaust pipe (6)(7) and tighten three
stud nuts (1)(4) and nuts (2)(5)(8) to the specified
torque.
Torque
Stud Nuts : 67 N·m (6.8 Kg·m/49 lbft)
Nuts : 43 N·m (4.3 Kg·m/32 lbft)
2. Reconnect O2 sensor harness connector (3).
Legend
(1) Front Exhaust Pipe RH Fixing Nuts
(2) Front Exhaust Pipe RH Fixing Bolts and Nuts
(3) O2 Sensor Terminal Connector (for IGM)
(4) Front Exhaust Pipe LH Fixing Nuts
(5) Front Exhaust Pipe LH Fixing Bolts and Nuts
(6) Front Exhaust Pipe LH
(7) Front Exhaust Pipe RH
(8) Three way Exhaust Pipe Fixing Bolts and Nuts
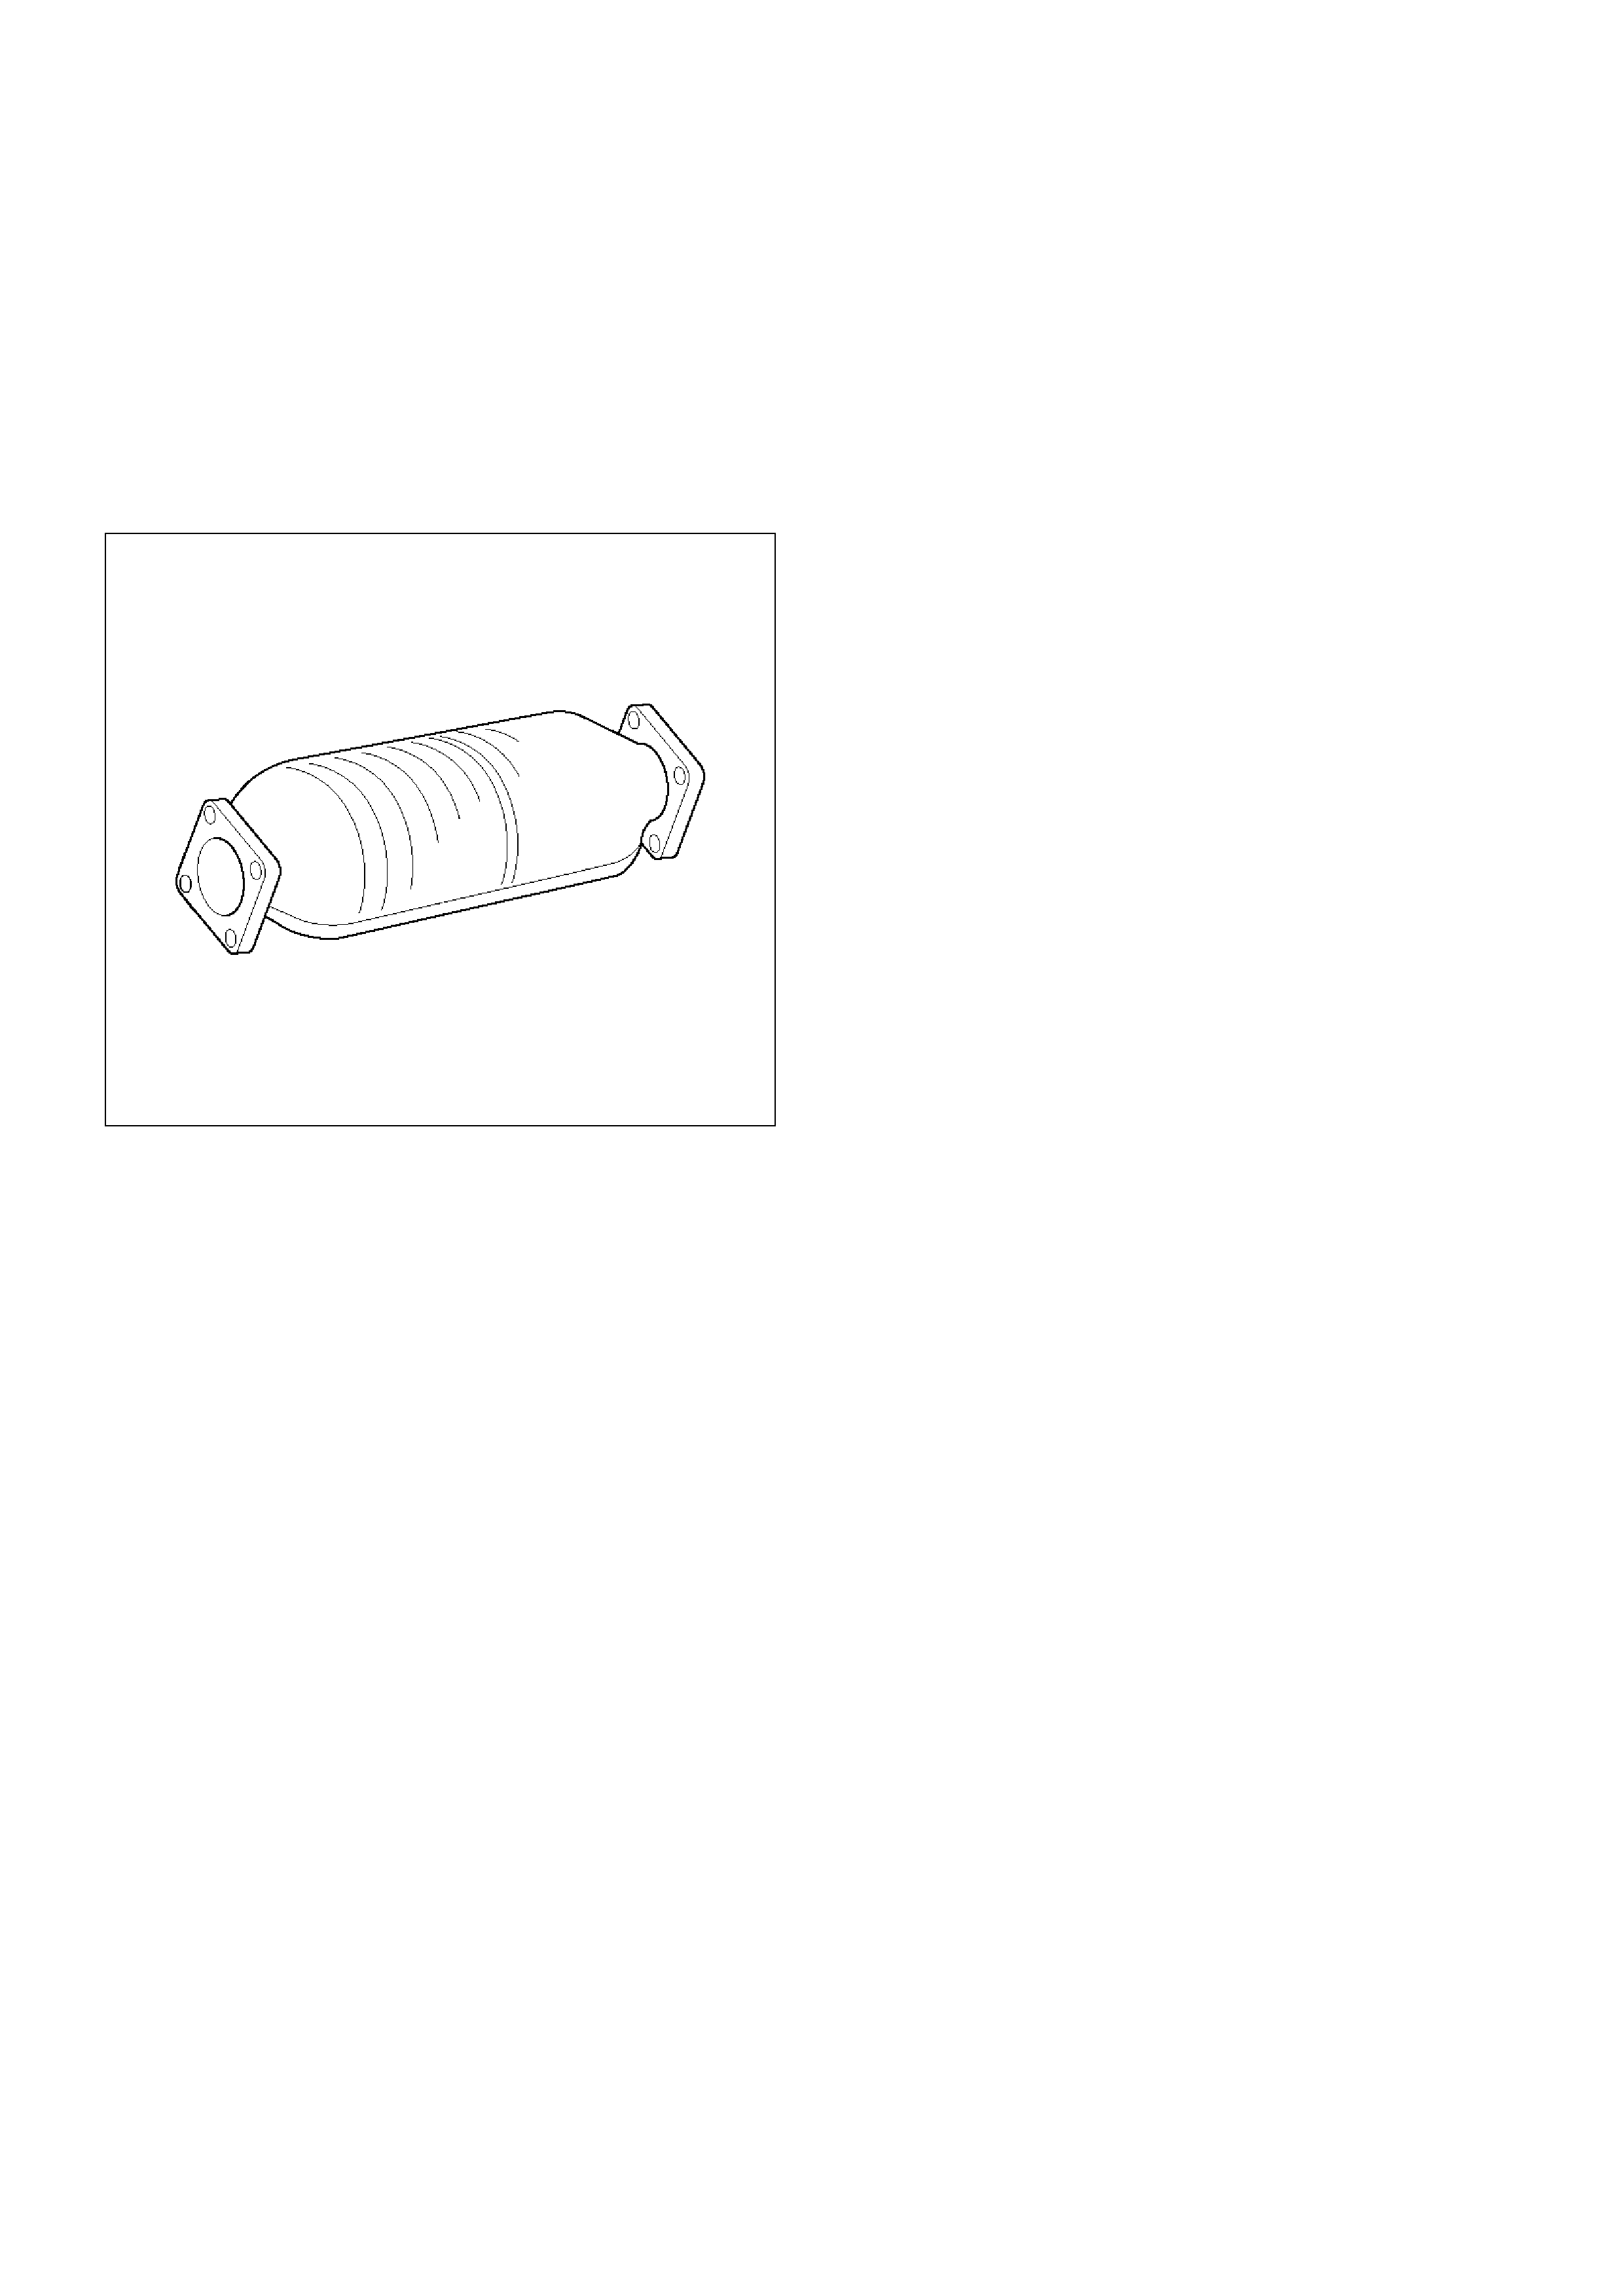
Three Way Catalytic Converter
Removal
1. Disconnect battery ground cable.
2. Raise the vehicle and support with suitable safety
stands.
3. Remove three way exhaust pipe fixing bolts and
nuts.
150RW065
Installation
1. Install three way catalytic converter between three
way exhaust pipe and silencer.
2. Tighten nuts to the specified torque.
Torque
Nuts : 43 N·m (4.4 Kg·m/32 lbft)
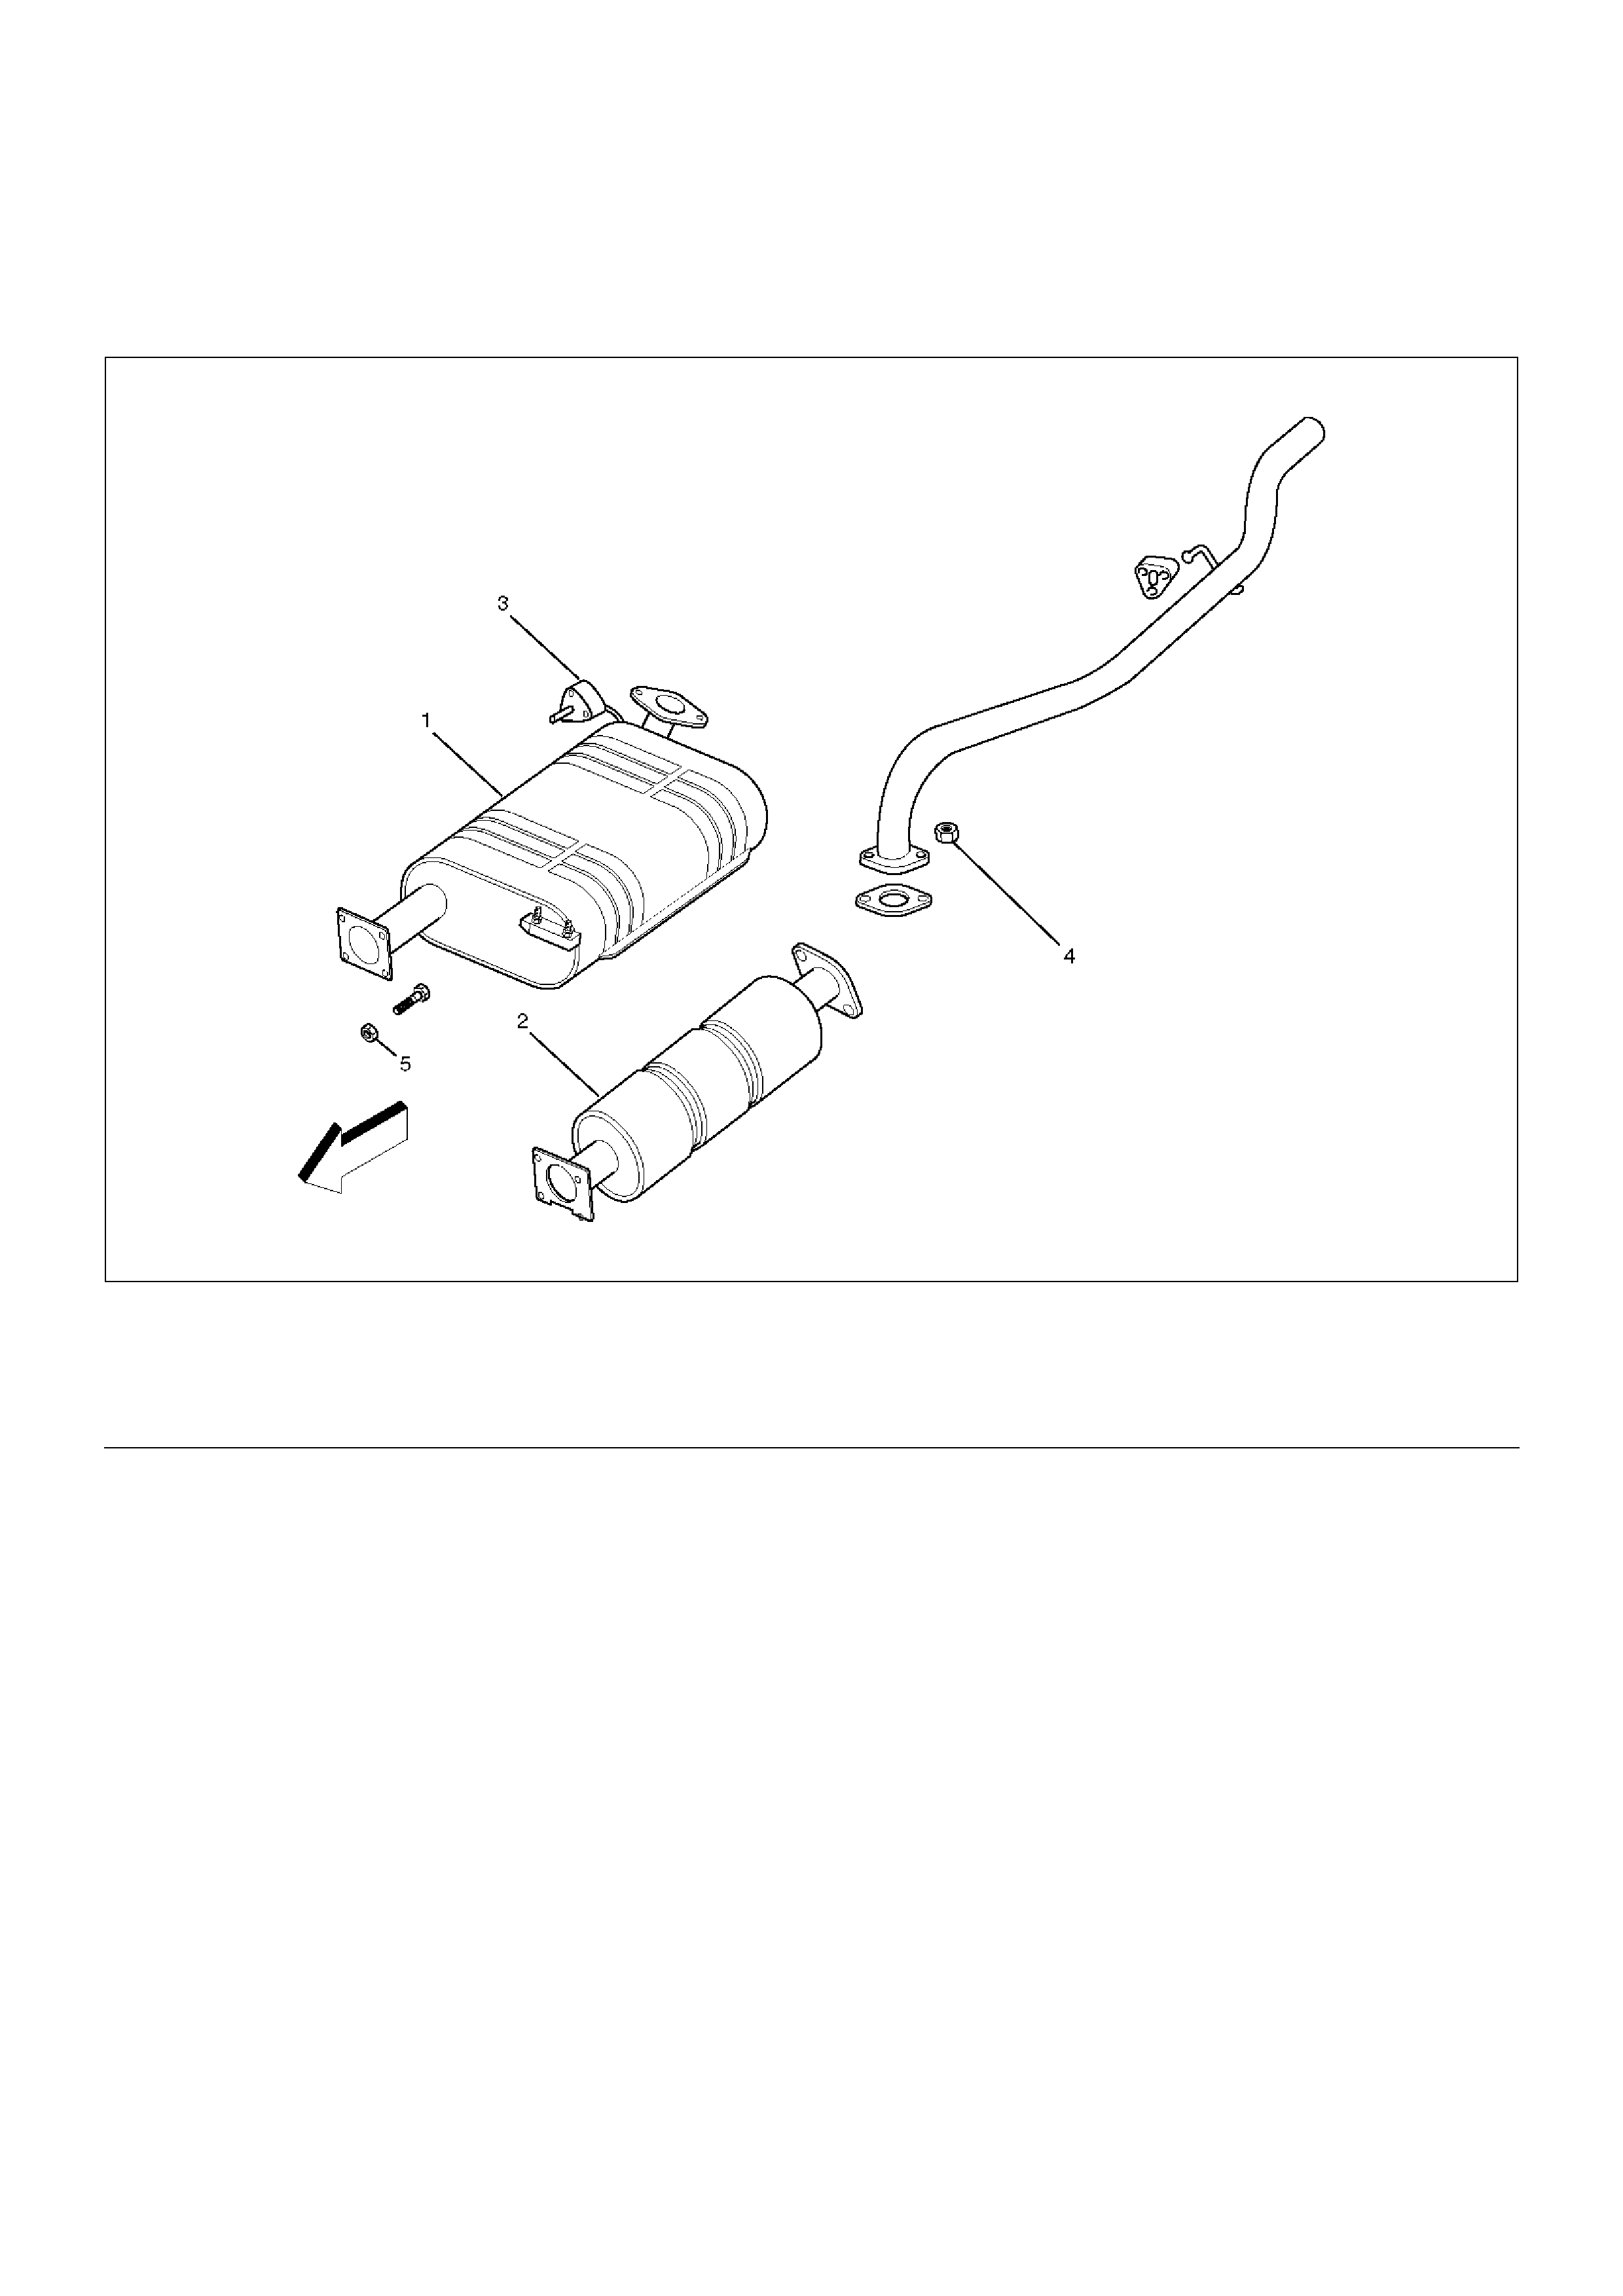
Exhaust Silencer
Exhaust Silencer and Associated Parts
E06RW031
EndOFCallout
Removal
1. Disconnect battery ground cable.
2. Raise the vehicle and support with suitable safety
stands.
3. Remove exhaust silencer fixing nuts (4) then
disconnect rear exhaust pipe from exhaust silencer.
4. Remove exhaust silencer fixing nuts (5) then
disconnect exhaust silencer from three way exhaust
pipe.
5. Remove exhaust silencer mounting nuts from
chassis side then remove exhaust silencer (1)(2).
Installation
1. Install the exhaust silencer (1)(2) chassis side and
tighten nuts to the specified torque.
Nuts: 16 N·m (1.6 Kg·m/12 lbft)
2. Install the exhaust silencer and tighten nuts (5) on
front exhaust pipe to specified torque.
Nuts: 43 N·m (4.4 Kg·m/32 lbft)
3. Install the rear exhaust pipe and tighten fixing nuts
on exhaust silencer to specified torque.
Nuts: 43 N·m (4.4 Kg·m/32 lbft)
Legend
(1) Exhaust Silencer
(2) Exhaust Silencer
(3) Mounting Rubber
(4) Exhaust Silencer Fixing Nuts
(5) Exhaust Silencer Fixing Bolts

Rear Exhaust pipe
Rear Exhaust pipe and Associated Parts
E06RW033
EndOFCallout
Removal
1. Disconnect battery ground cable.
2. Raise the vehicle and support with suitable safety
stands.
3. Remove rear exhaust pipe fixing nuts (3), then
disconnect rear exhaust pipe from exhaust silencer.
4. Remove mounting rubber (1).
5. Remove rear exhaust pipe (2).
Installation
1. Install the mounting rubber (1).
2. Install the exhaust pipe (2) and tighten two nuts (3)
on exhaust silencer to specified torque.
Nuts: 43 N·m (4.4 Kg·m/32 lbft)
Legend
(1) Mounting Rubber
(2) Rear Exhaust Pipe
(3) Rear Exhaust Pipe Fixing Nuts

Main Data and Specifications
Torque Specifications
N·m (Kg·m/lbft)
E06RW047