
Exterior Ornamentation Page 1A9–1
Page 1A9–1
Section 1A9
Exterior Ornamentation
ATTENTION
Before performing any service operation or other procedure described in this Section, refer to Section 00
Warnings, Cautions and Notes for correct workshop practices w i th regard to safety and/or property damage.
1 General Information...............................................................................................................................2
1.1 Pictorial Index – Domestic .................................................................................................................................... 2
2 Service Operations, Sedan....................................................................................................................4
2.1 Rear Compartment Lid Moulding Assembly........................................................................................................ 4
Remove................................................................................................................................................................... 4
Reinstall.................................................................................................................................................................. 4
2.2 Rear Compartment Lid Name Plates, RH............................................................................................................. 6
Executive, Acclaim, S, SV8, SS, Berlina, Calais, Series II .................................................................................. 6
Remove.............................................................................................................................................................. 6
Reinstall ............................................................................................................................................................. 6
3 Service Operations, Wagon...................................................................................................................8
3.1 Liftgate Name Plates, RH....................................................................................................................................... 8
Executive, Acclaim, Berlina, Series II................................................................................................................... 8
Remove.............................................................................................................................................................. 8
Reinstall ............................................................................................................................................................. 8
4 Service Operations, Utility...................................................................................................................10
4.1 Endgate Name Plates, RH ................................................................................................................................... 10
S, SS, Series II...................................................................................................................................................... 10
Remove............................................................................................................................................................ 10
Reinstall ........................................................................................................................................................... 10
5 Torque Wrench Specifications ...........................................................................................................11

Exterior Ornamentation Page 1A9–2
Page 1A9–2
1 General Information
With the following exceptions, MY 2004 VY and V2 Series Exterior Ornamentation information carries over from MY 2003
VY Series vehicles:
• Rear compartment lid moulding assembly
• Rear compartment lid Series II name plate
• Liftgate Series II name plate
• Endgate Series II name plate
For Exterior Ornamentation information not contained within this Section, refer to Section 1A9 Exterior Ornamentation in
the MY 2003 VY and V2 Series Service Information.
A new rear compartment lid moulding assembly is fitted to the lower edge of the rear compartment lid on Executive and
Acclaim Sedan vehicles.
All MY 2004 VY Series Domestic vehicles are fitted with a Series II name plate which is located below the right-hand
name plate on the rear compartment lid, liftgate or endgate.
NOTE
Due to the addition of the Series II name plate,
the adjacent name plate on the right-hand side of
the rear compartment lid and the endgate has
been repositioned.
To aid in identification and service procedure location, refer to the pictorial index diagram on the following page.
Many of the components are affixed to the
vehicle with double-sided adhesive tape. It is
imperative that the correct materials, as
specified in this Section, are used when
reinstalling these parts. Use of materials o ther
than those specified may lead to premature
failure.
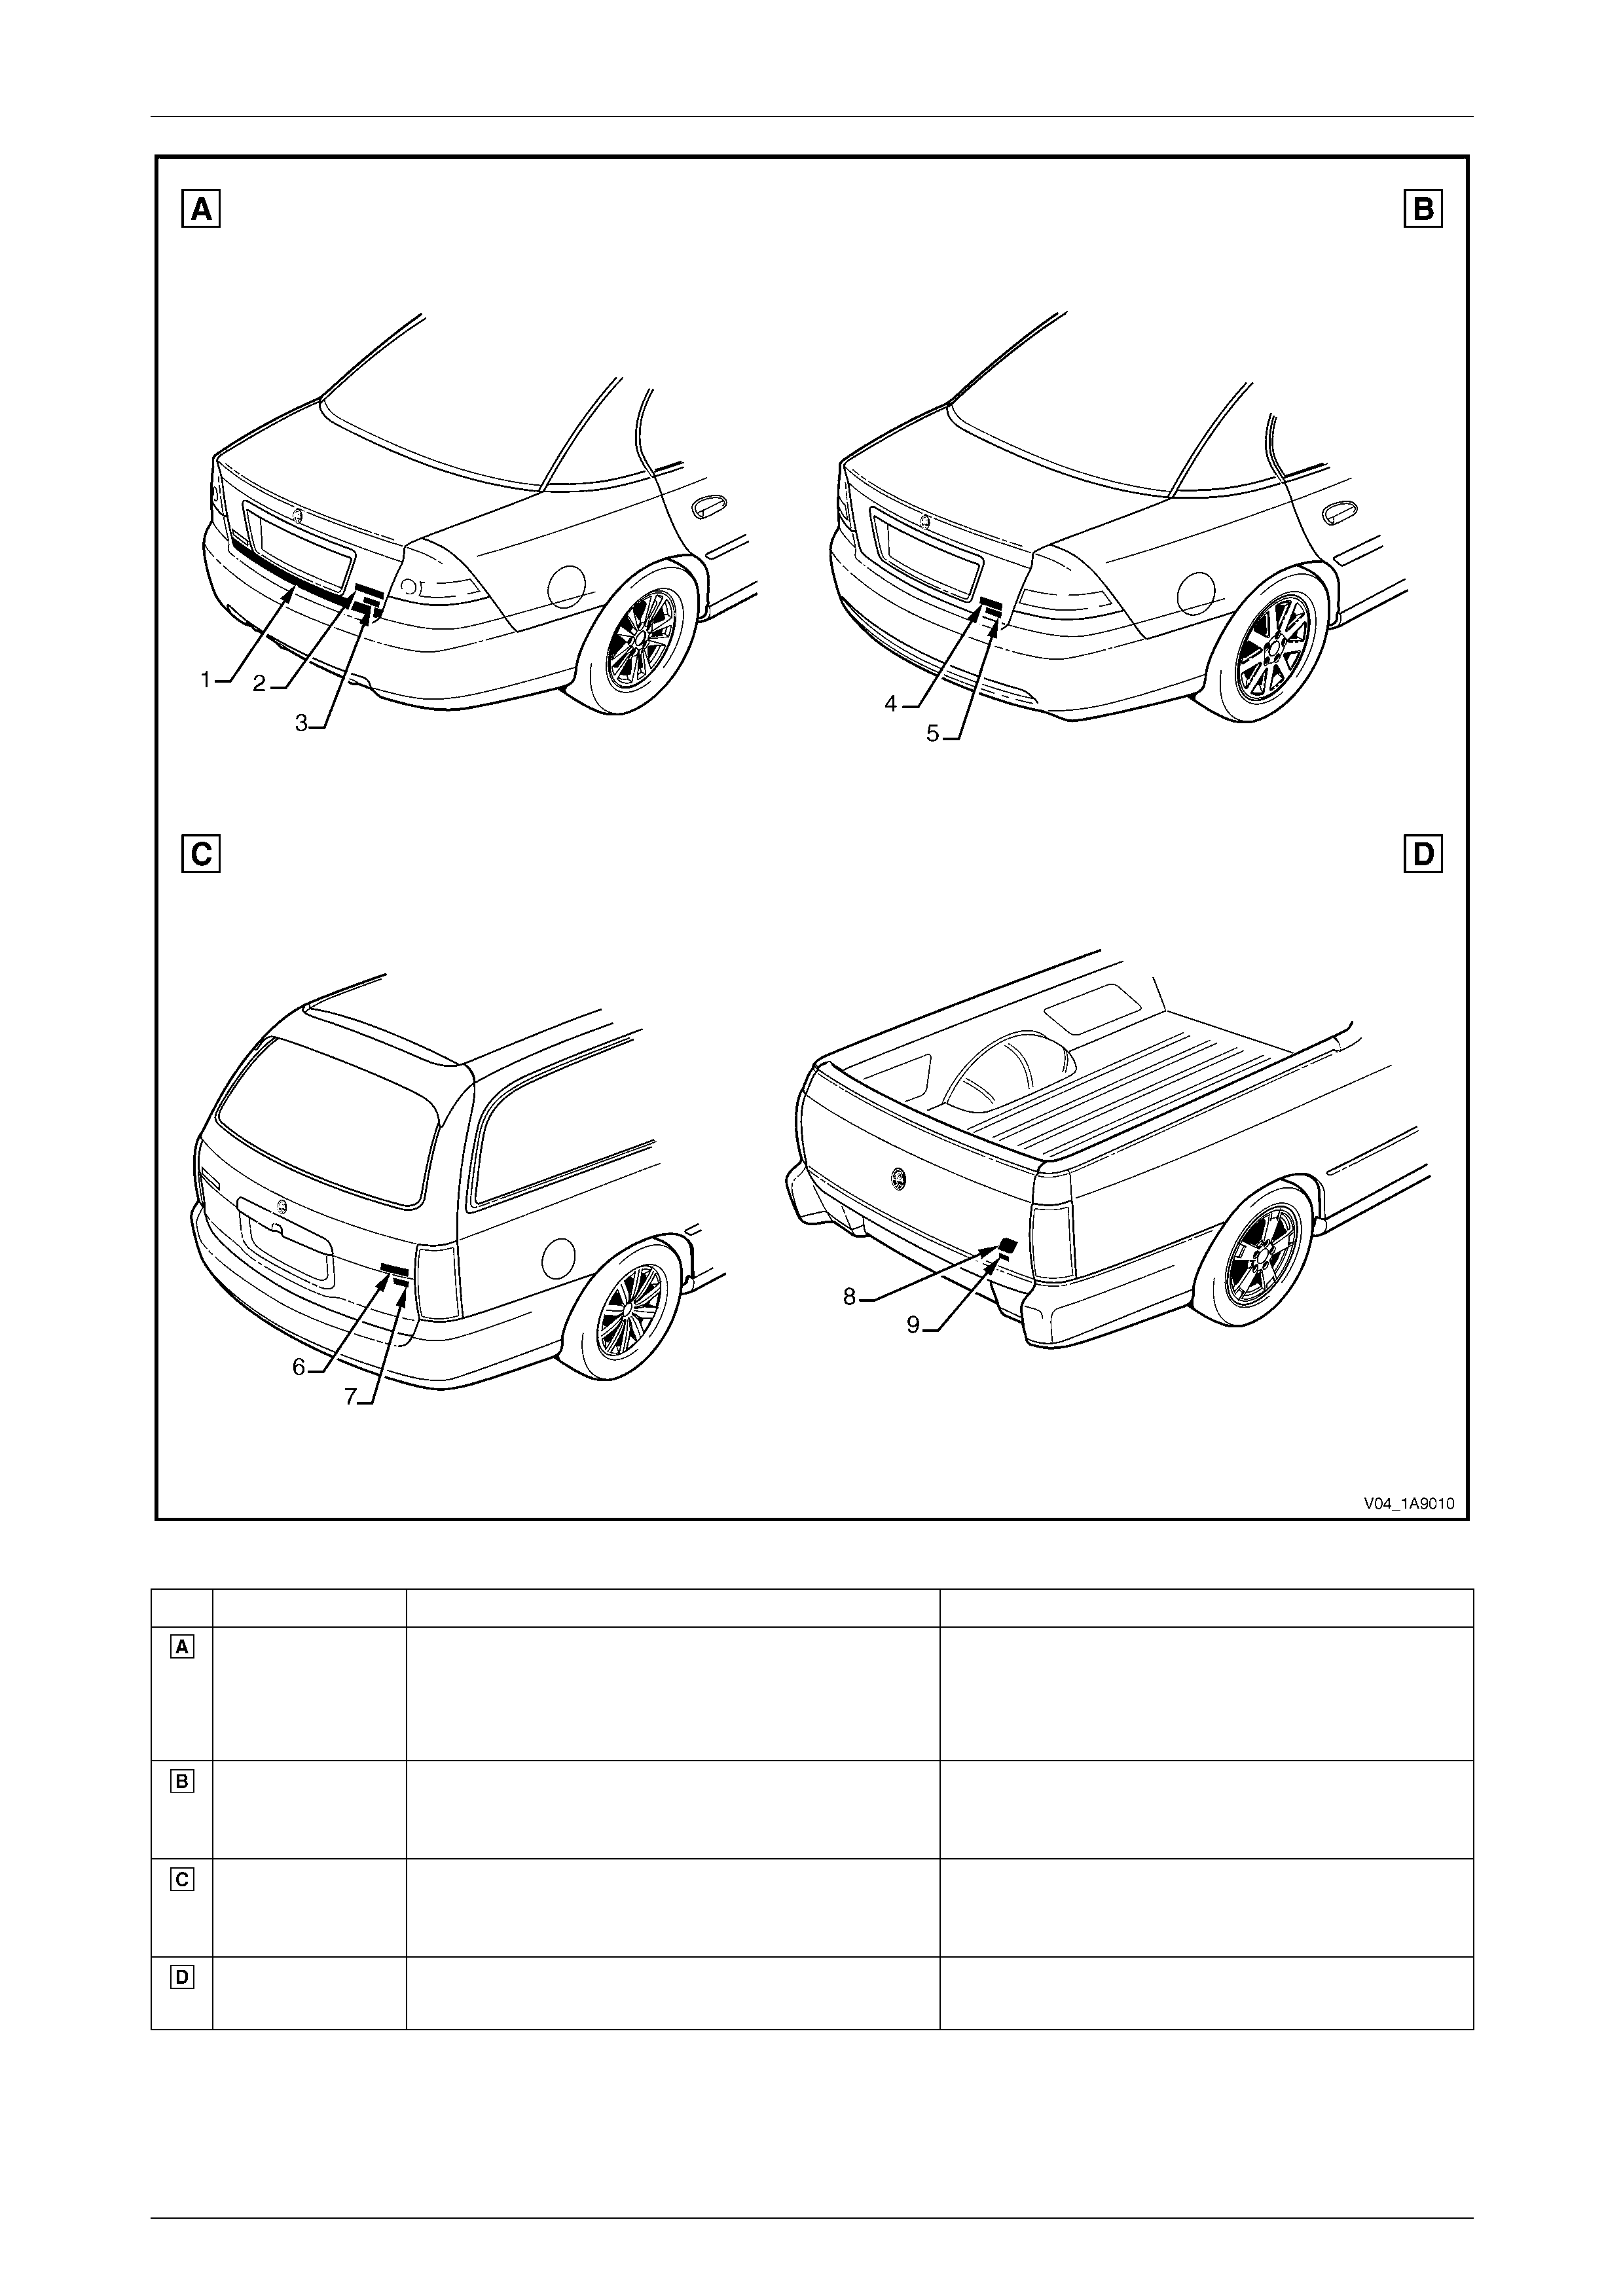
1.1 Pictorial Index – Domestic
The following diagram provides a quick reference to the correct service procedures for the exterior ornamentation
components.
Simply locate the component in Figure 1A9 – 1, cross-reference it in the accompanying table and using the reference
listed, go to the appropriate service procedure. For components not indicated in the diagram, refer to Section 1A9
Exterior Ornamentation in the MY 2003 VY and V2 Series Service Information.
Exterior Ornamentation Page 1A9–3
Page 1A9–3
Figure 1A9 – 1
Ref. Body Type Description Refer To:
Sedan – Executive
& Acclaim 1 Rear Compartment Lid Moulding Assembly
2 Rear Compartment Lid Name Plate: Executive,
Acclaim
3 Rear Compartment Lid Name Plate: Series II
2.1 Rear Compartment Lid Moulding Assembly
2.2 Rear Compartment Lid Name Plates, RH
2.2 Rear Compartment Lid Name Plates, RH
Sedan – Except
Executive &
Acclaim
4 Rear Compartment Lid Name Plate: S, SV8,
SS, Berlina, Calais
5 Rear Compartment Lid Name Plate: Series II
2.2 Rear Compartment Lid Name Plates, RH
2.2 Rear Compartment Lid Name Plates, RH
Wagon 6 Liftgate Name Plate: Executive, Acclaim,
Berlina
7 Liftgate Name Plate: Series II
3.1 Liftgate Name Plates, RH
3.1 Liftgate Name Plates, RH
Utility 8 Endgate Name Plate: S, SS
9 Endgate Name Plate: Series II
4.1 Endgate Name Plates, RH
4.1 Endgate Name Plates, RH
Exterior Ornamentation Page 1A9–4
Page 1A9–4
2 Service Operations, Sedan
2.1 Rear Compartment Lid Moulding
Assembly
Remove
The following component will require
replacement when performing th is operation.
• Nut and washer assembly, five places.
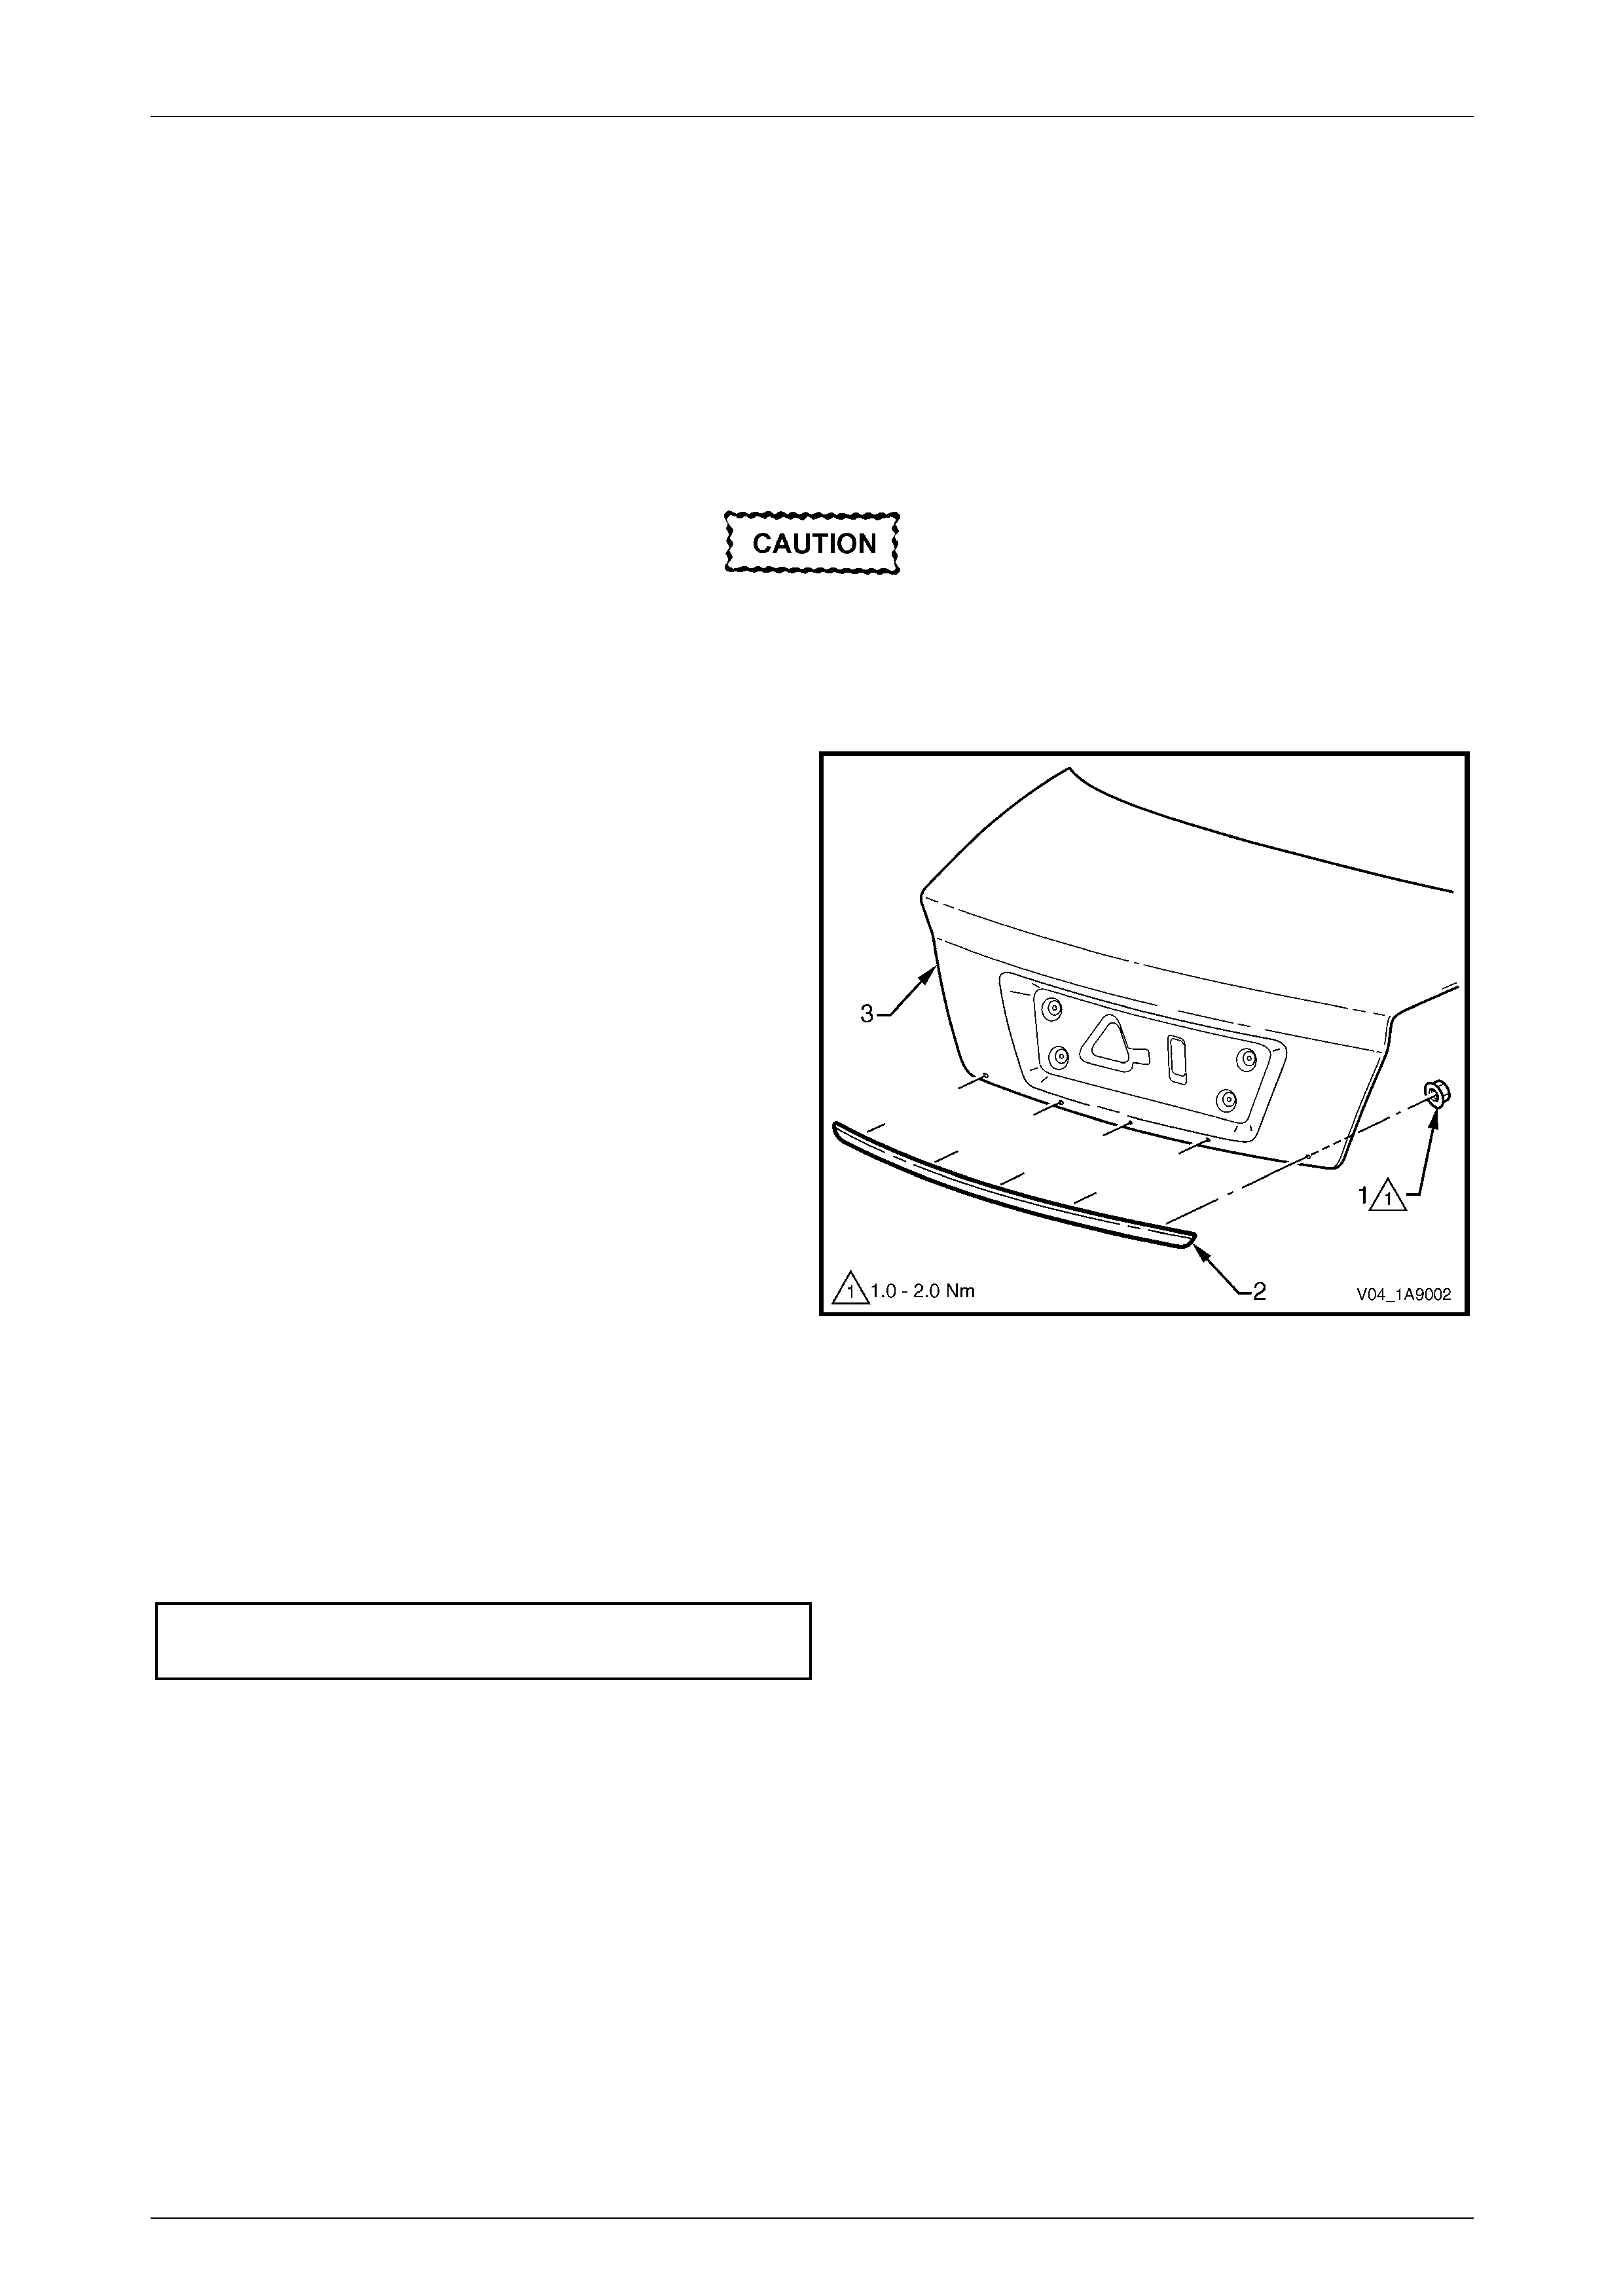
1 Open the rear compartment lid.
2 From the underside of the rear compartment lid,
remove the nut (1), five places, attaching the rear
compartment lid moulding assembly (2).
3 Remove the moulding assembly.
Figure 1A9 – 2
Reinstall
Reinstallation of the rear compartment lid moulding assembly is the reverse of the removal procedure, noting the
following.
1 Tighten the attaching nuts to the correct torque specification, beginning at the centre nut and working outward.
Rear compartment lid moulding assembly
attaching nut torque specification................1.0 – 2.0 Nm
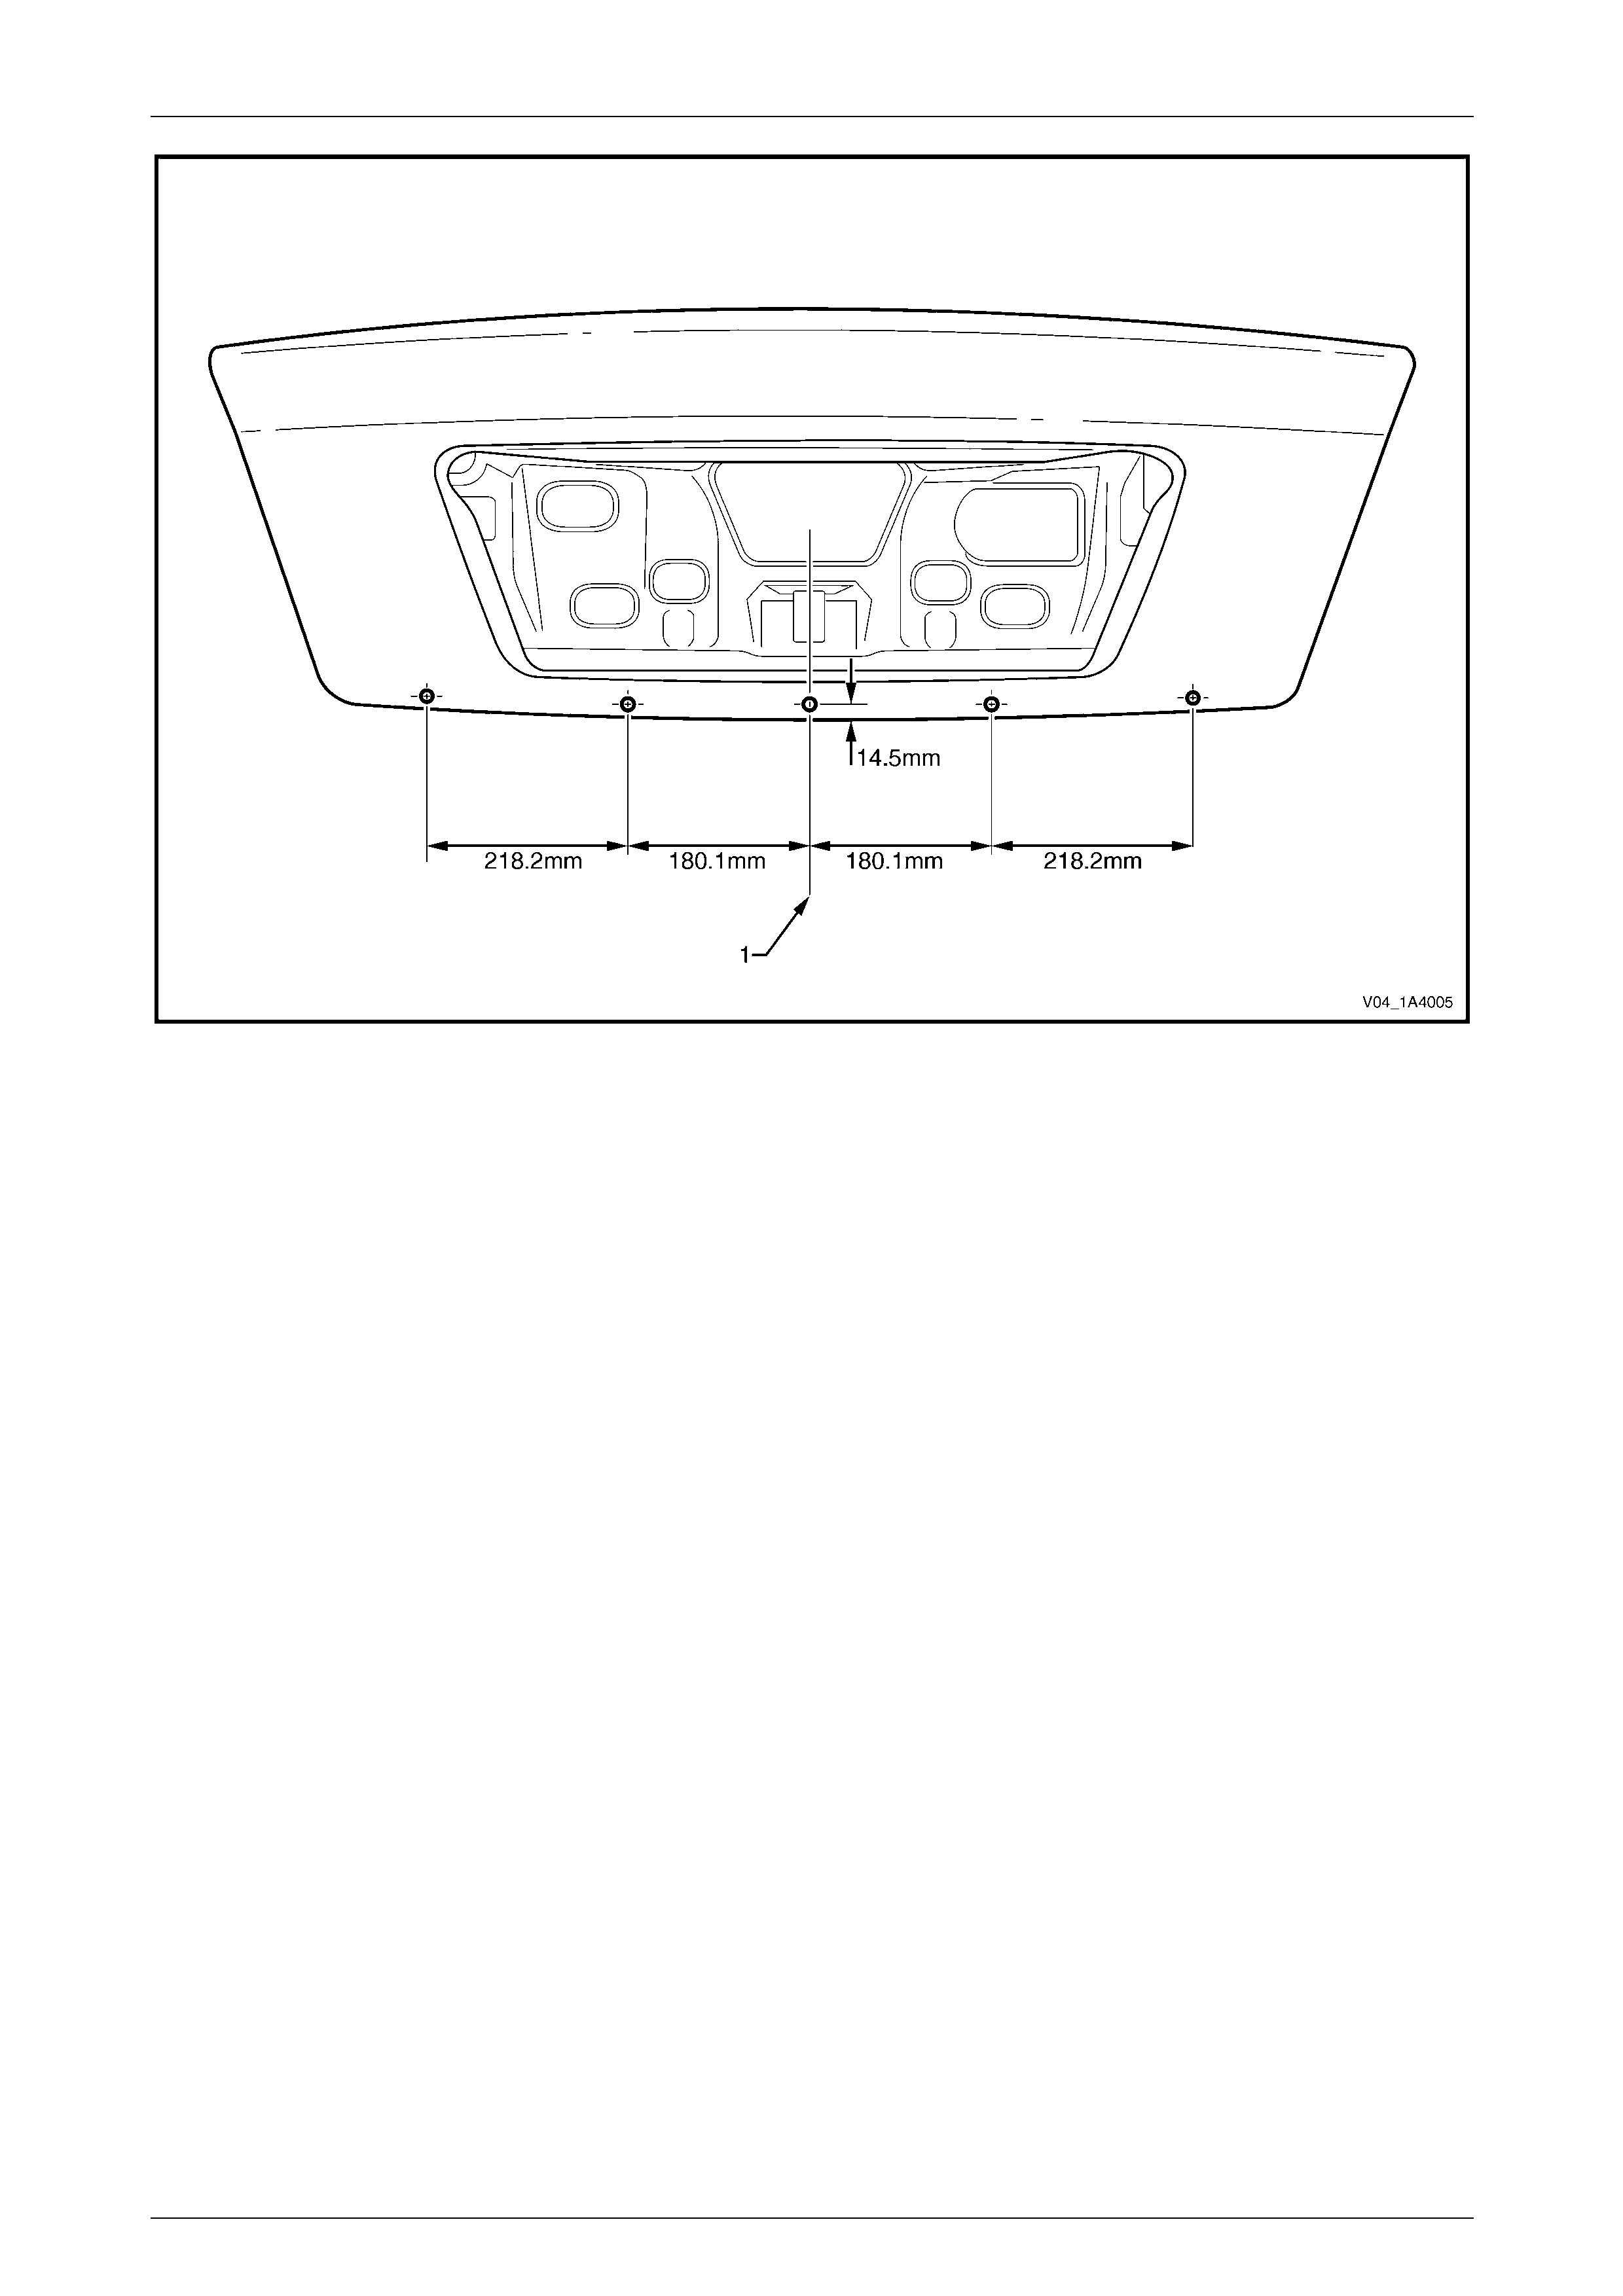
2 If the rear compartment lid has been replaced, prior to painting, holes must be drilled in the outer panel for the rear
compartment lid moulding assembly.
a Determine the rear compartment lid lower surface centre point (1), refer to Figure 1A9 – 3.
b Measure 14.5 mm from the lower edge and mark the centre hole centre point.
c Mark the centre points for the remaining four holes, measuring from the centre point and also 14.5 mm from
the lower edge.
Exterior Ornamentation Page 1A9–5
Page 1A9–5
Figure 1A9 – 3
d Seat the moulding in position and check the hole alignment.
e Carefully drill a 3 mm pilot hole at the centre of each point.
f Drill out the holes to 6 mm.
g With the 6 mm drill bit, elongate the four outer holes to approximately 10 mm horizontally.
h Remove any burrs.
i Prime any bare metal and refinish the rear compartment lid as required.
Exterior Ornamentation Page 1A9–6
Page 1A9–6
2.2 Rear Compartment Lid Name Plates, RH
Executive, Acclaim, S, SV8, SS, Berlina, Calais, Series II
Remove
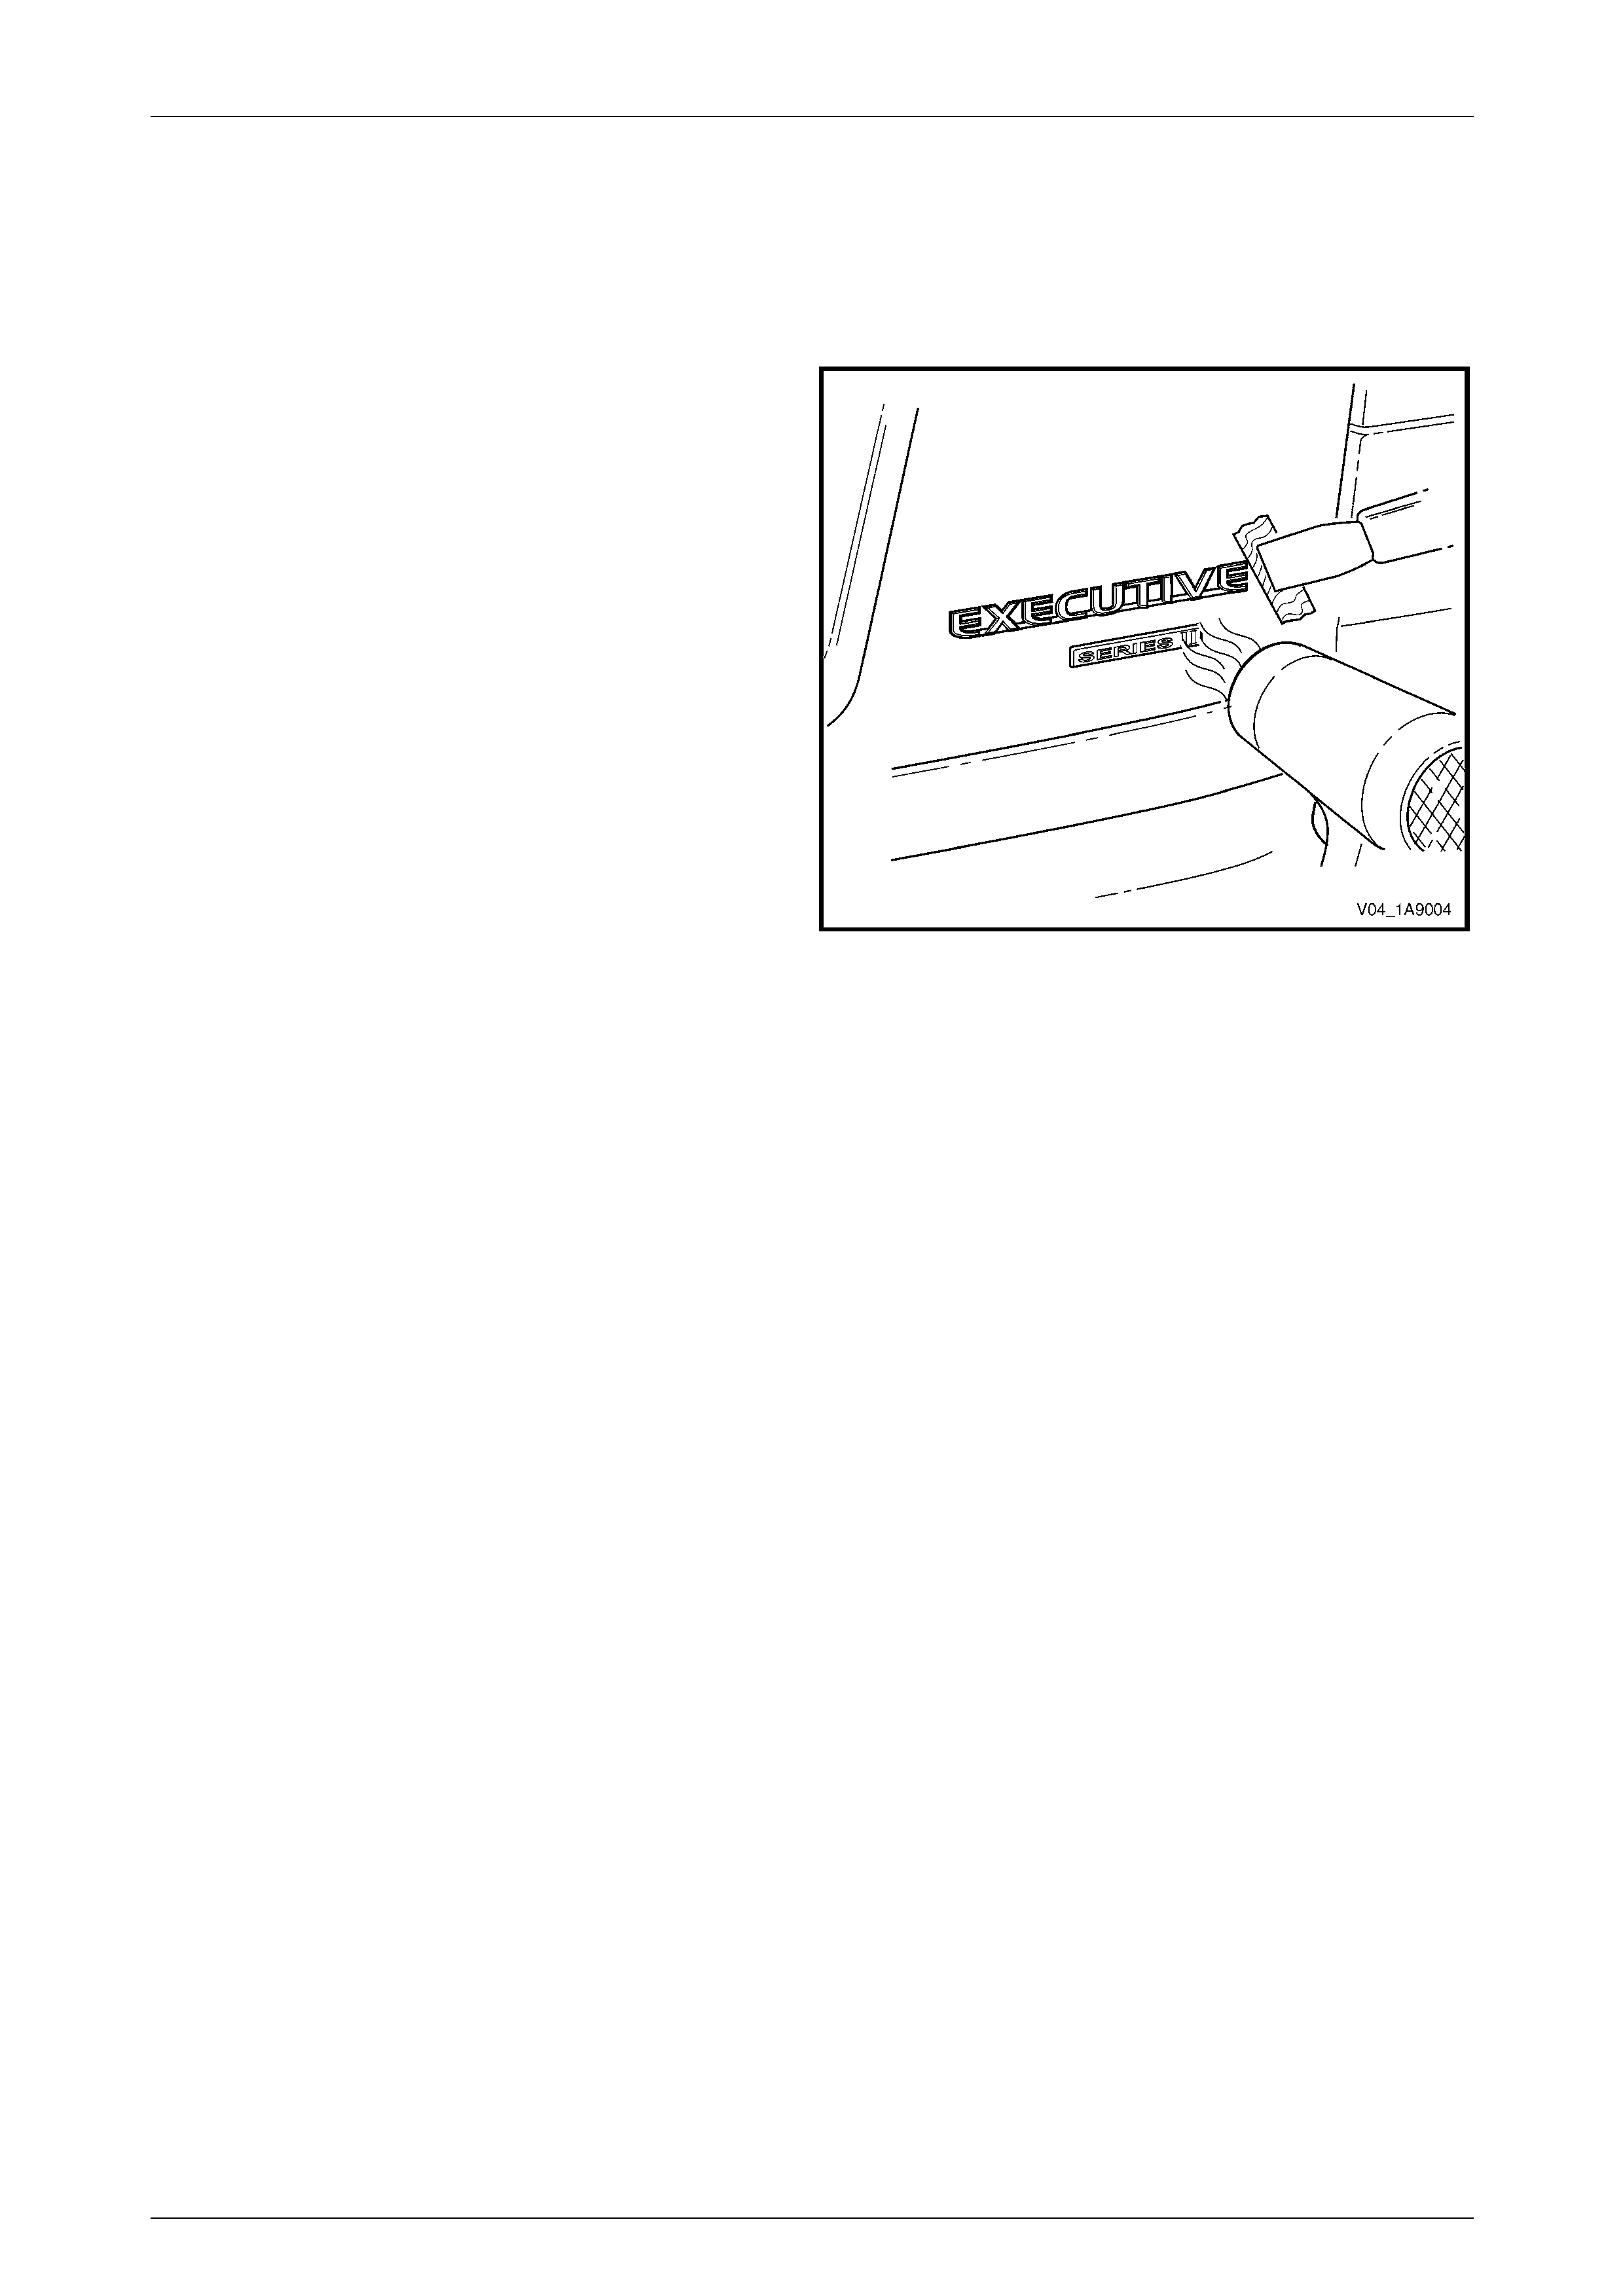
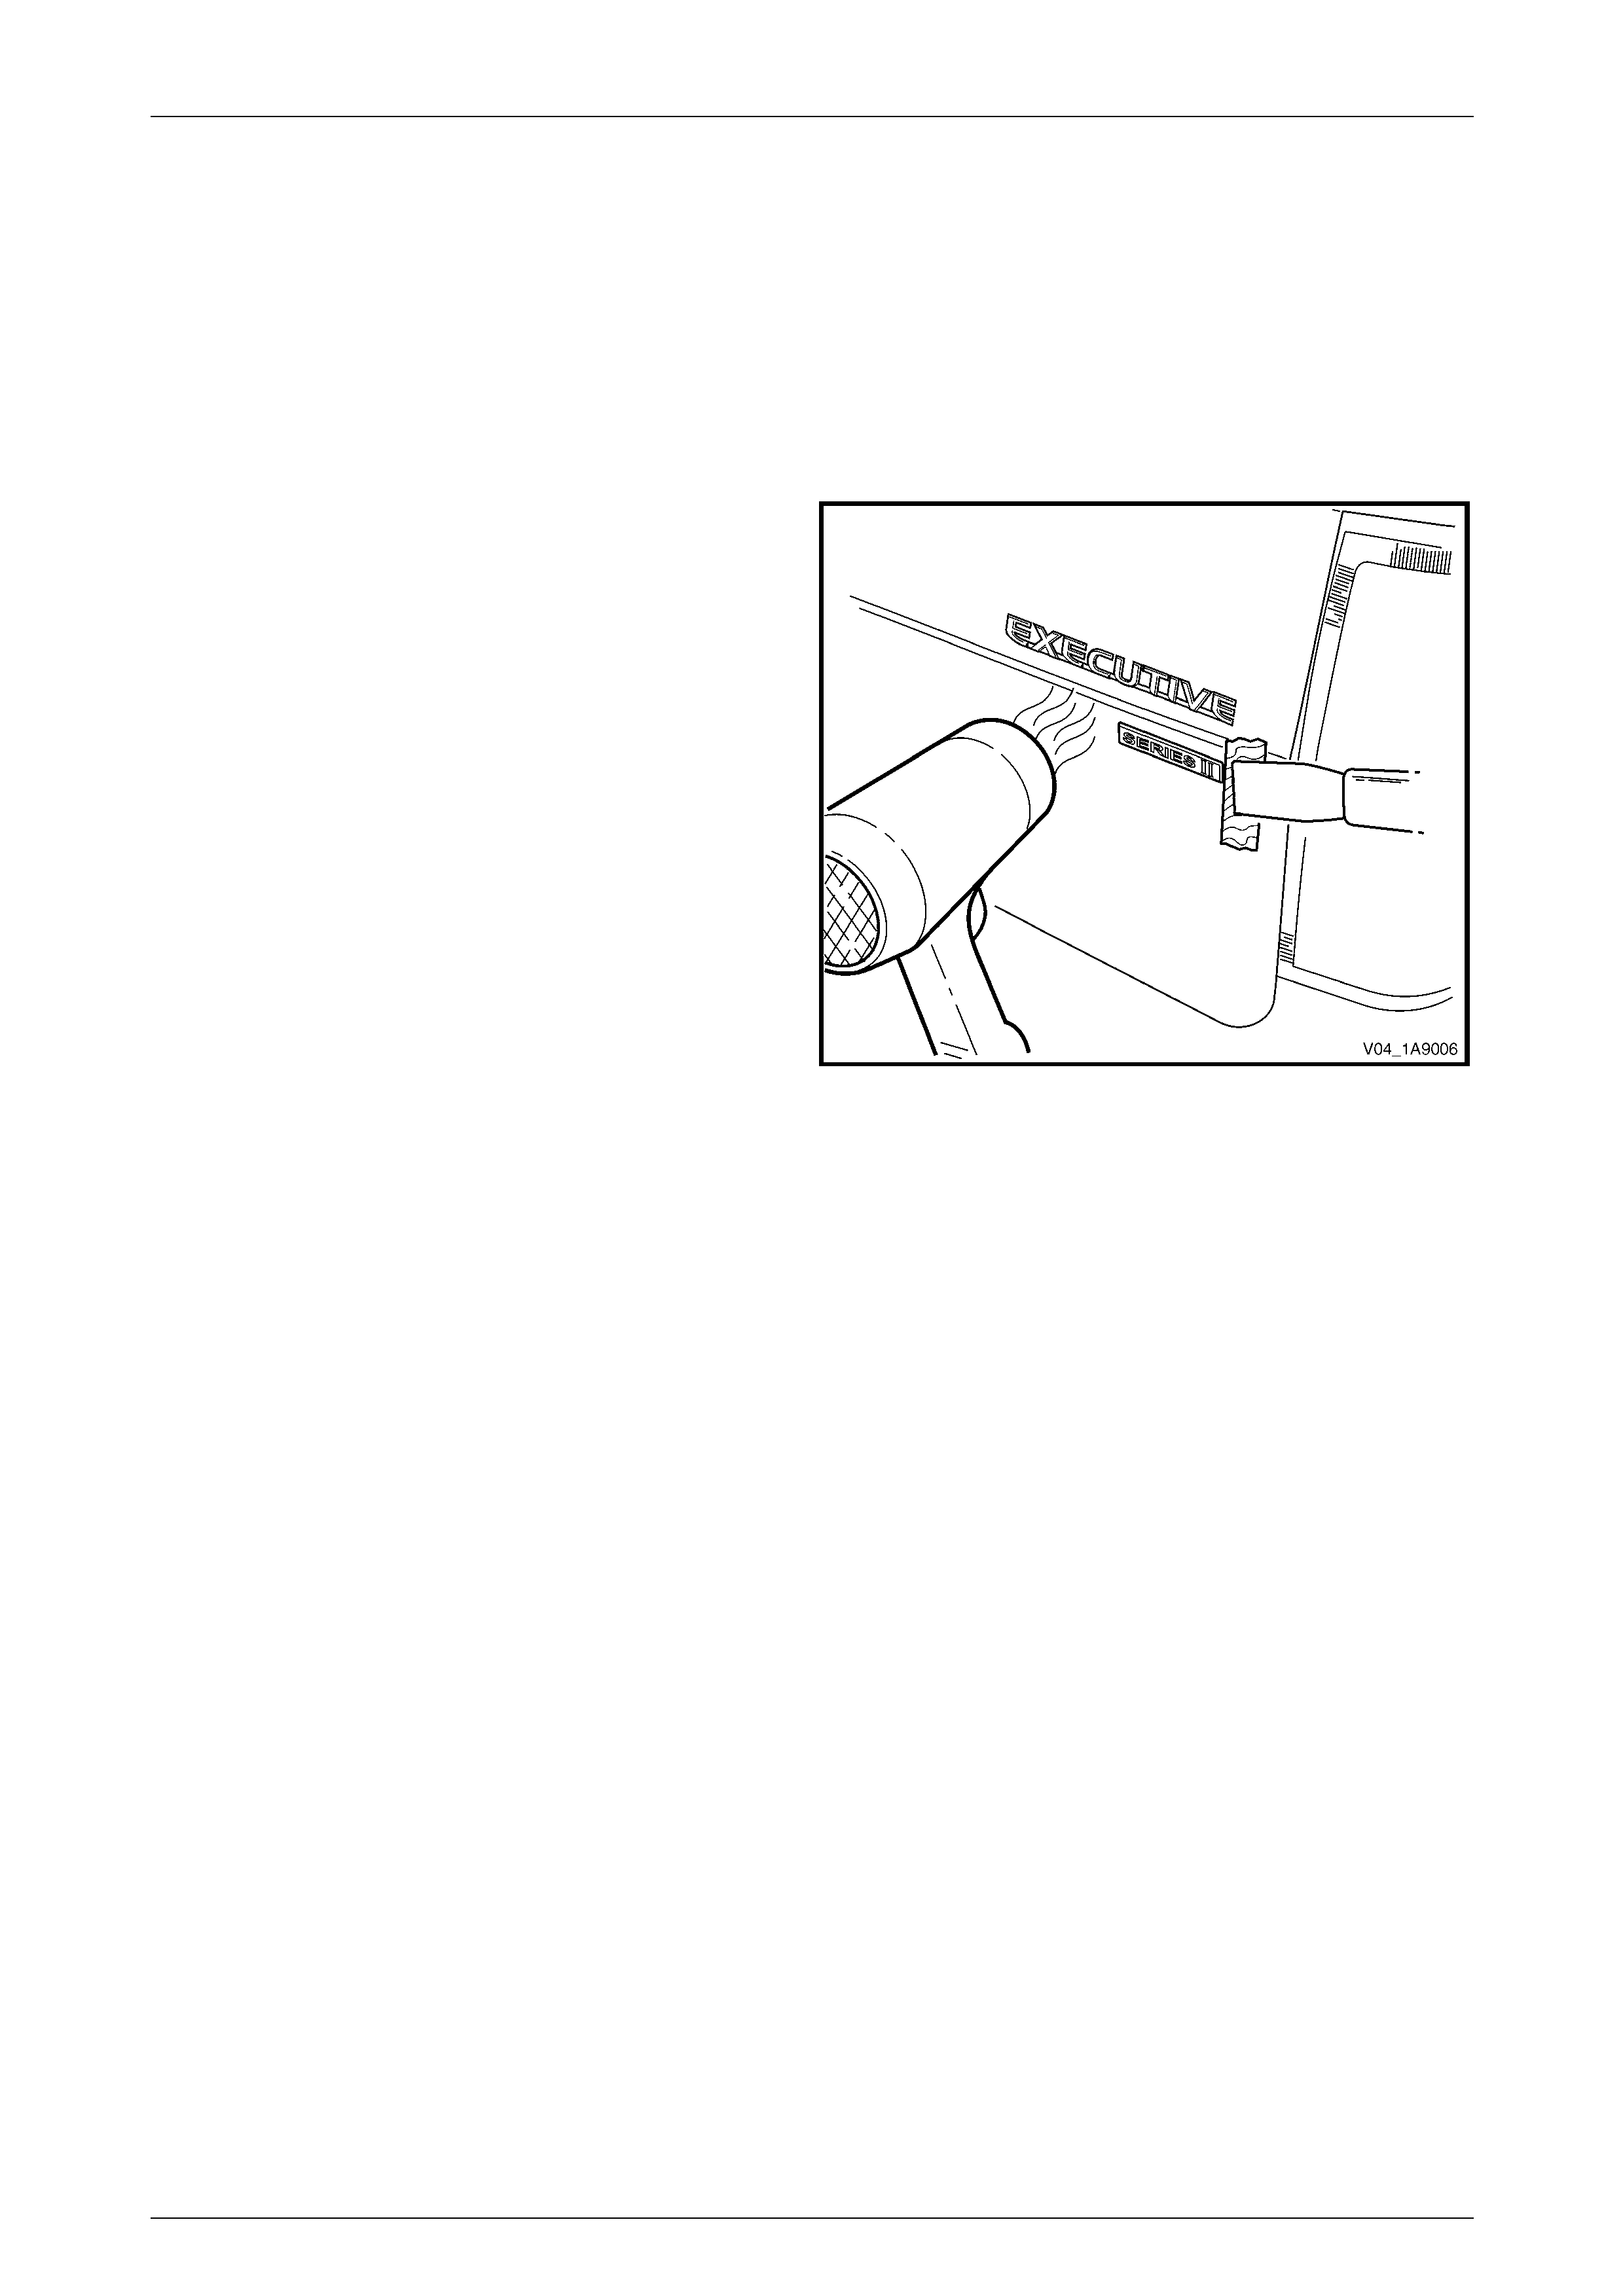
1 Protect the paint and bodywork with tape or a rag.
2 To assist removal, warm the name plate(s) with a
heat-lamp or heat-gun to soften the adhesive.
3 Using a paint scraper or similar, carefully prise the
name plate(s) from the rear compartment lid as
required.
4 Remove any remaining double-sided tape from the
name plate(s) and/or rear compartment lid and clean
the surfaces with Prepsol or equivalent.
Figure 1A9 – 4
Reinstall
1 If reusing the name plate(s), apply new polyethylene double-sided tape such as 3M 4428 or equivalent to the back
and the trim edges of the tape slightly in from the edge of the name plate.
2 Clean the panel surface with Prepsol or equivalent.
3 Remove the backing paper from the double-sided tape.
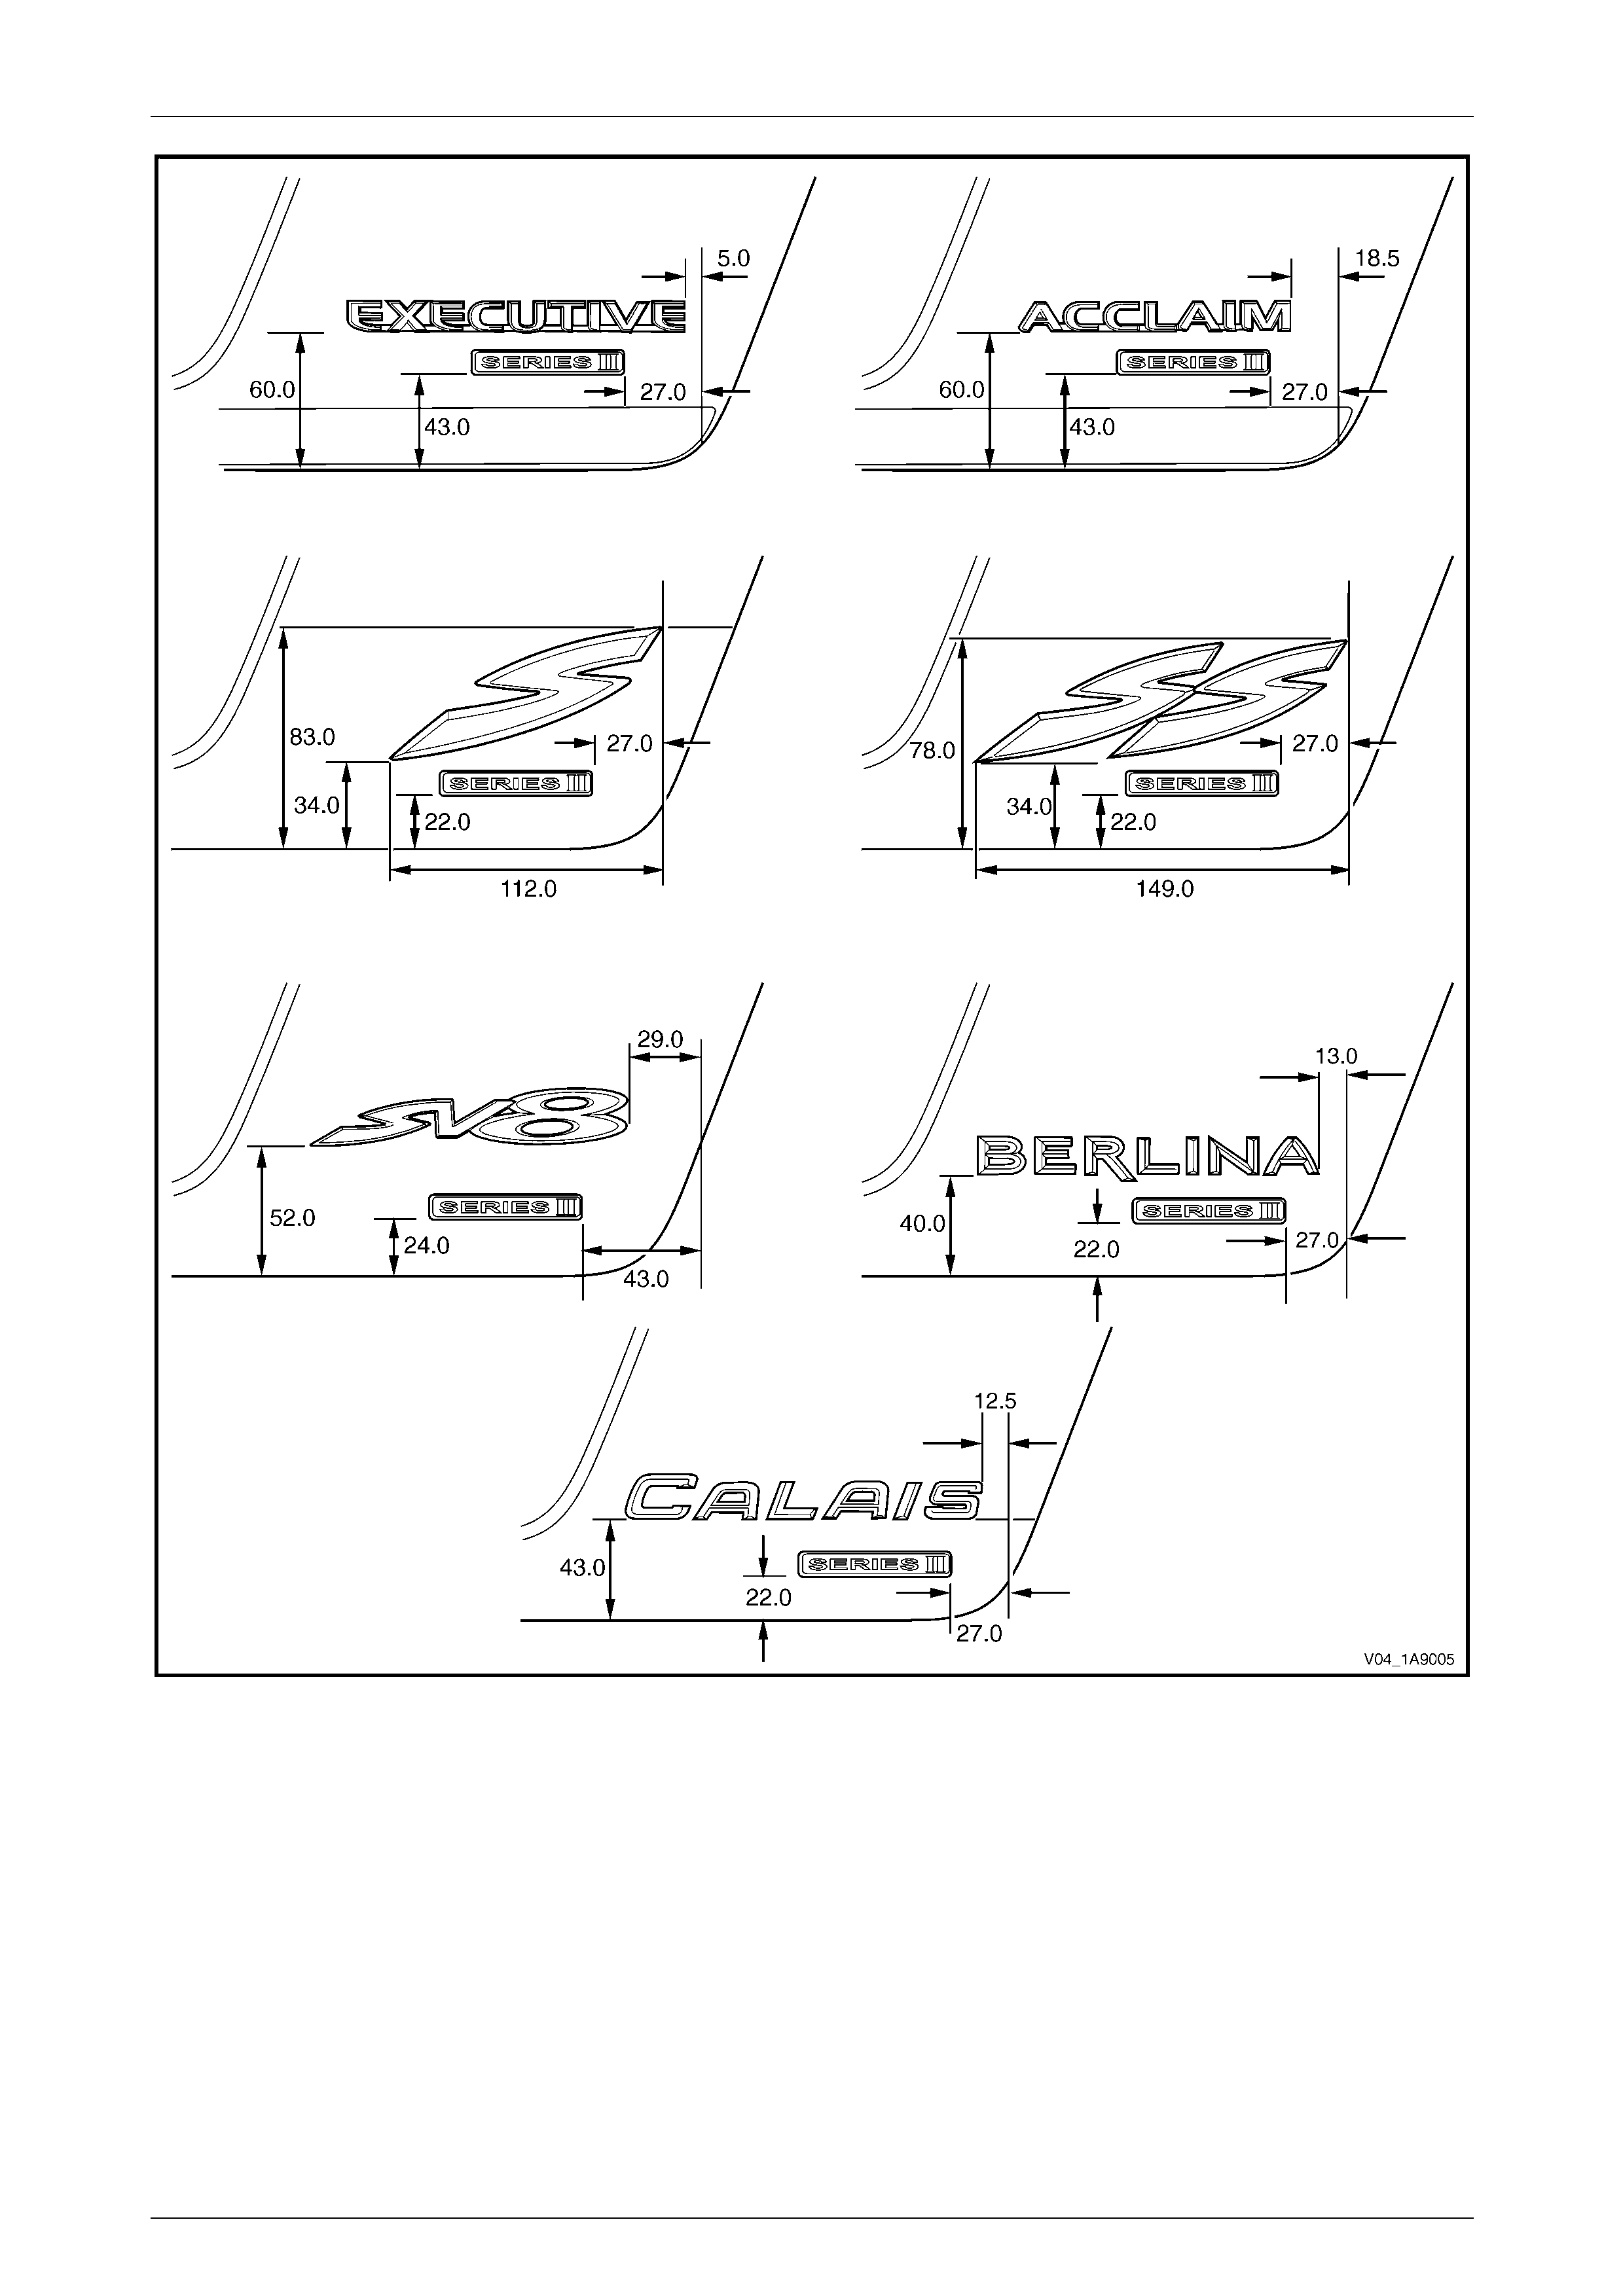
4 Apply each name plate onto the right-hand side of the rear compartment lid in the position shown, measuring from
the edge of the rear compartment lid. Ensure it is positioned parallel, refer to Figure 1A9 – 5.
5 Press firmly over the entire plate for at least 10 seconds to ensure maximum adhesion.
Exterior Ornamentation Page 1A9–7
Page 1A9–7
Figure 1A9 – 5
Exterior Ornamentation Page 1A9–8
Page 1A9–8
3 Service Operations, Wagon
3.1 Liftgate Name Plates, RH
Executive, Acclaim, Berlina, Series II
Remove
1 Protect the paint and bodywork with tape or a rag.
2 To assist removal, warm the name plate(s) with a
heat-lamp or heat-gun to soften the adhesive.
3 Using a paint scraper or similar, carefully prise the
name plate(s) from the liftgate as required.
4 Remove any remaining double-sided tape from the
name plate(s) and/or liftgate and clean the surfaces
with Prepsol or equivalent.
Figure 1A9 – 6
Reinstall
1 If reusing the name plate(s), apply new polyethylene double-sided tape such as 3M 4428 or equivalent to the back
and the trim edges of the tape slightly in from the edge of the name plate.
2 Clean the panel surface with Prepsol or equivalent.
3 Remove the backing paper from the double-sided tape.
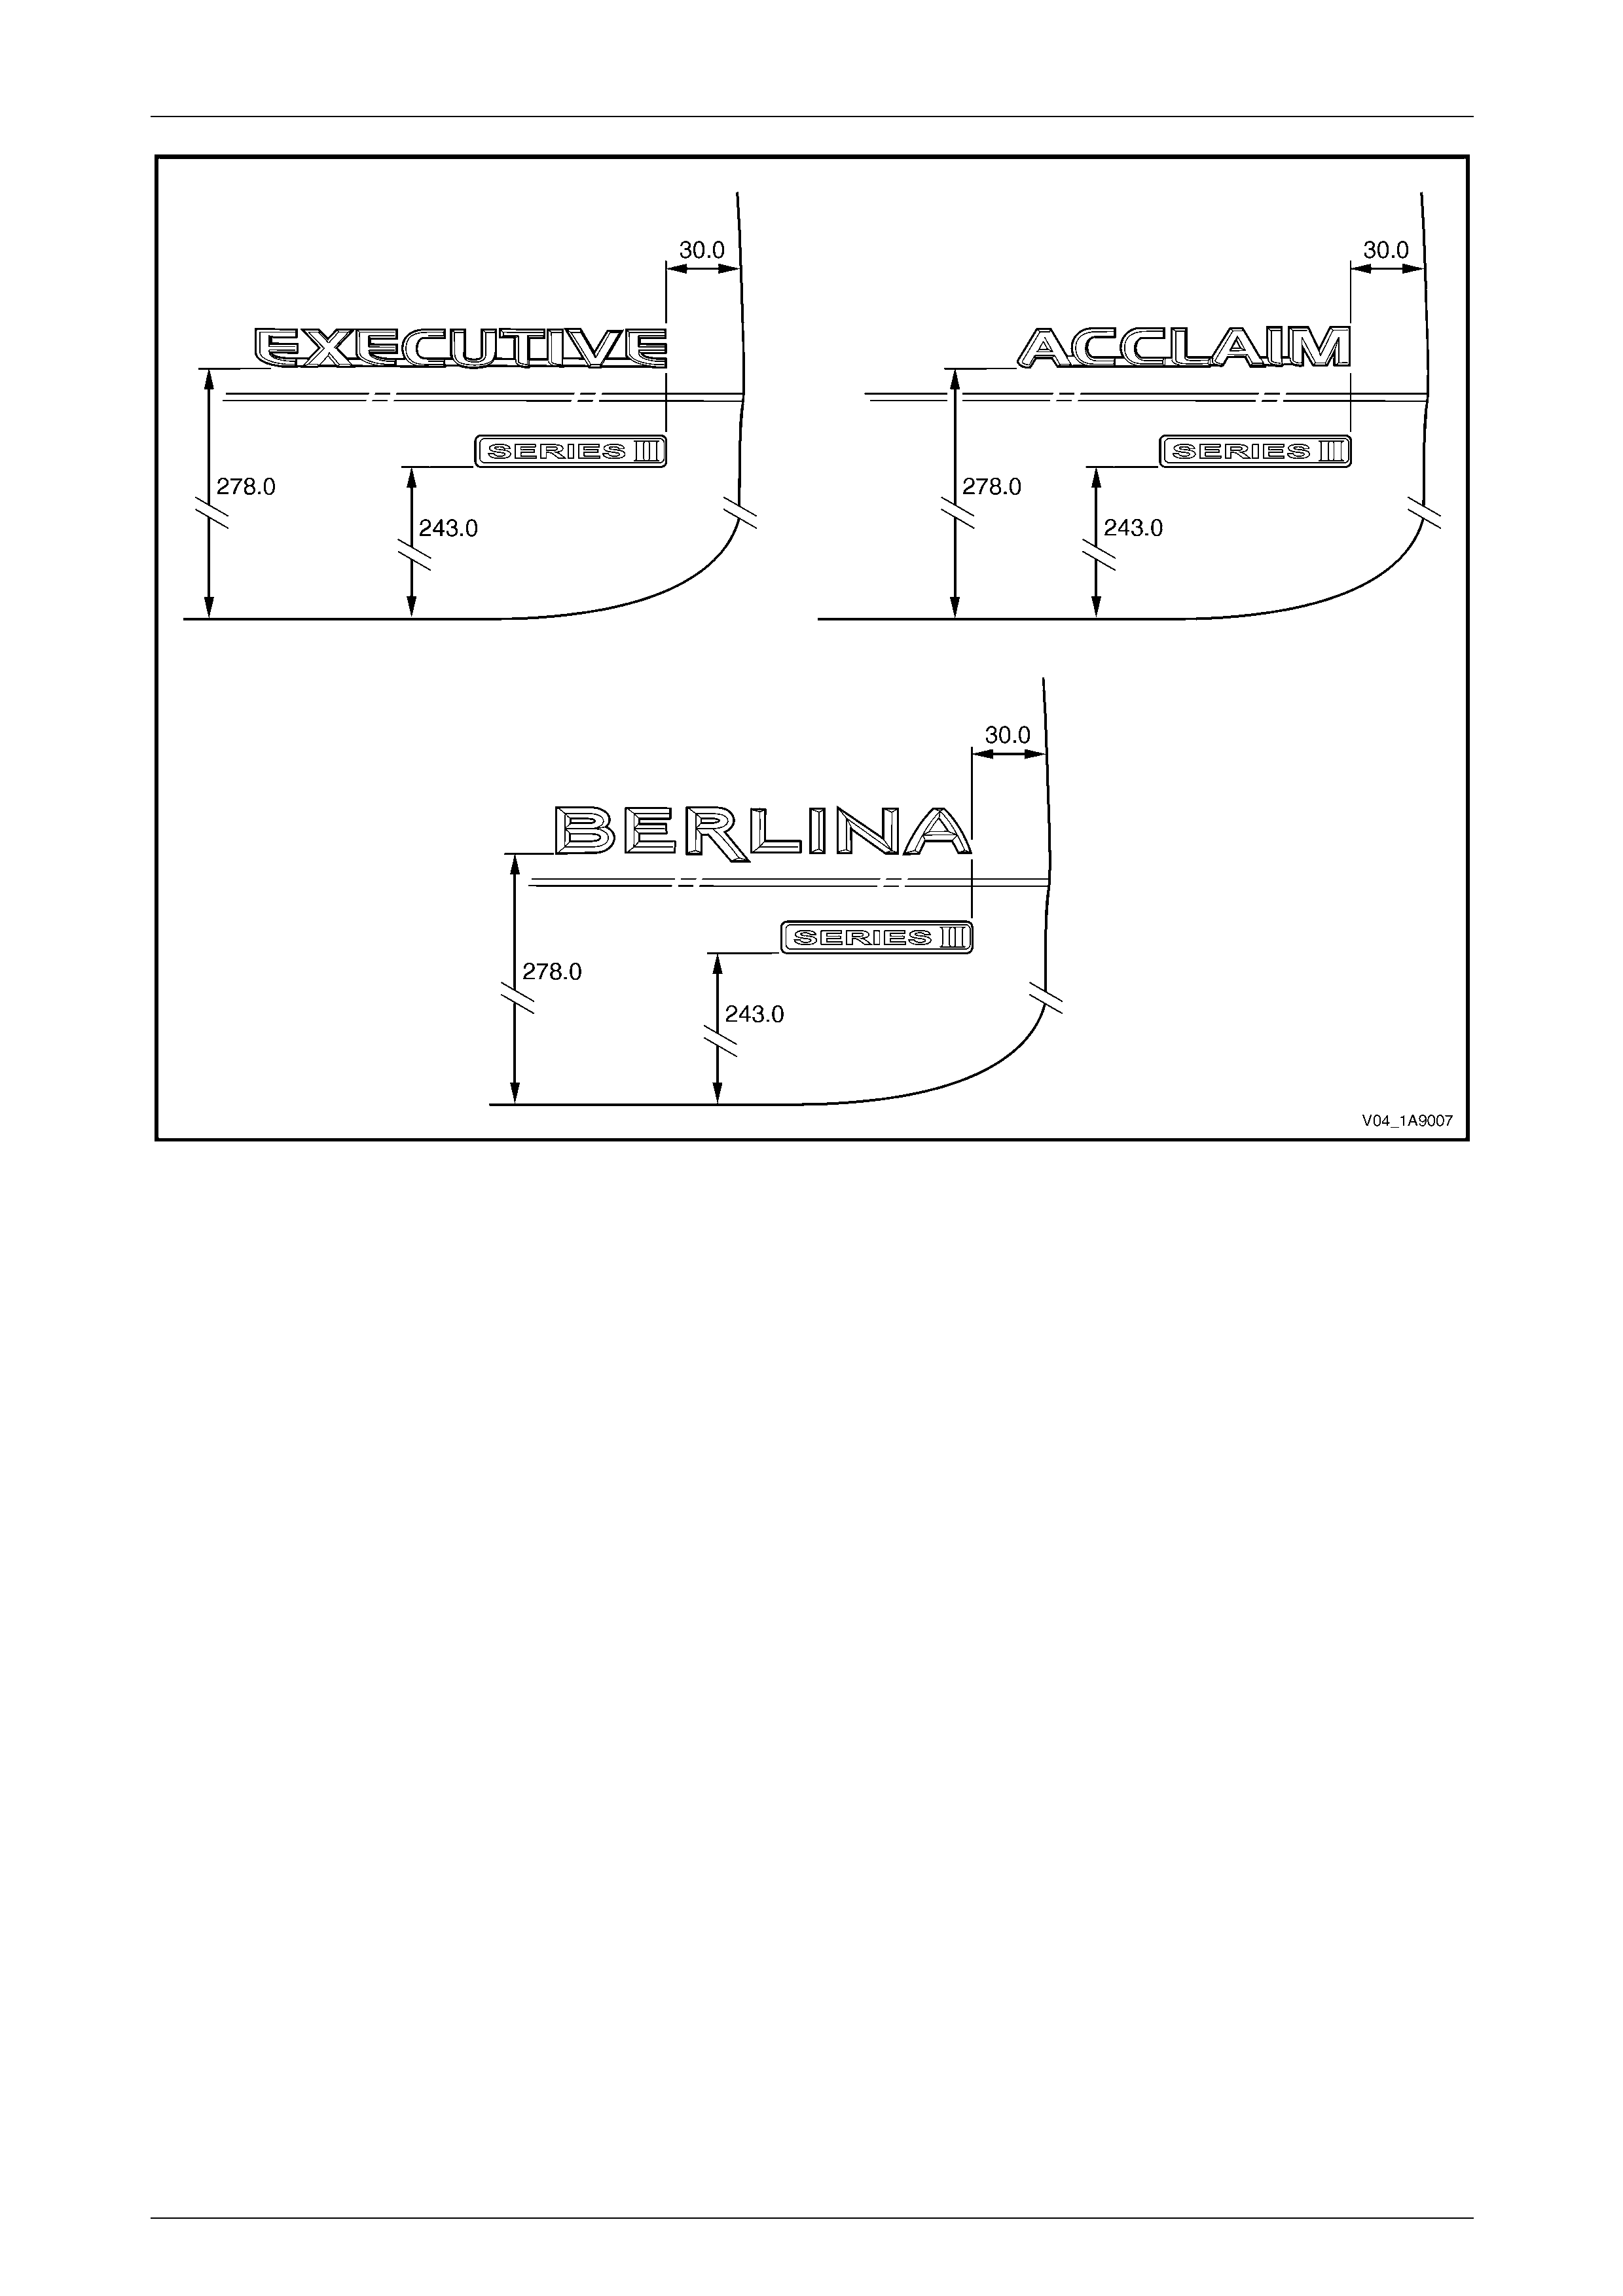
4 Apply each name plate onto the right-hand side of the liftgate in the position shown, measuring from the edge of the
liftgate. Ensure it is positioned parallel, refer to Figure 1A9 – 7.
5 Press firmly over the entire plate for at least 10 seconds to ensure maximum adhesion.
Exterior Ornamentation Page 1A9–9
Page 1A9–9
Figure 1A9 – 7
Exterior Ornamentation Page 1A9–10
Page 1A9–10
4 Service Operations, Utility
4.1 Endgate Name Plates, RH
S, SS, Series II
Remove
1 Protect the paint and bodywork with tape or a rag.
2 To assist removal, warm the name plate(s) with a
heat-lamp or heat-gun to soften the adhesive.
3 Using a paint scraper or similar, carefully prise the
name plate(s) from the endgate as required.
4 Remove any remaining double-sided tape from the
name plate(s) and/or endgate and clean the surfaces
with Prepsol or equivalent.
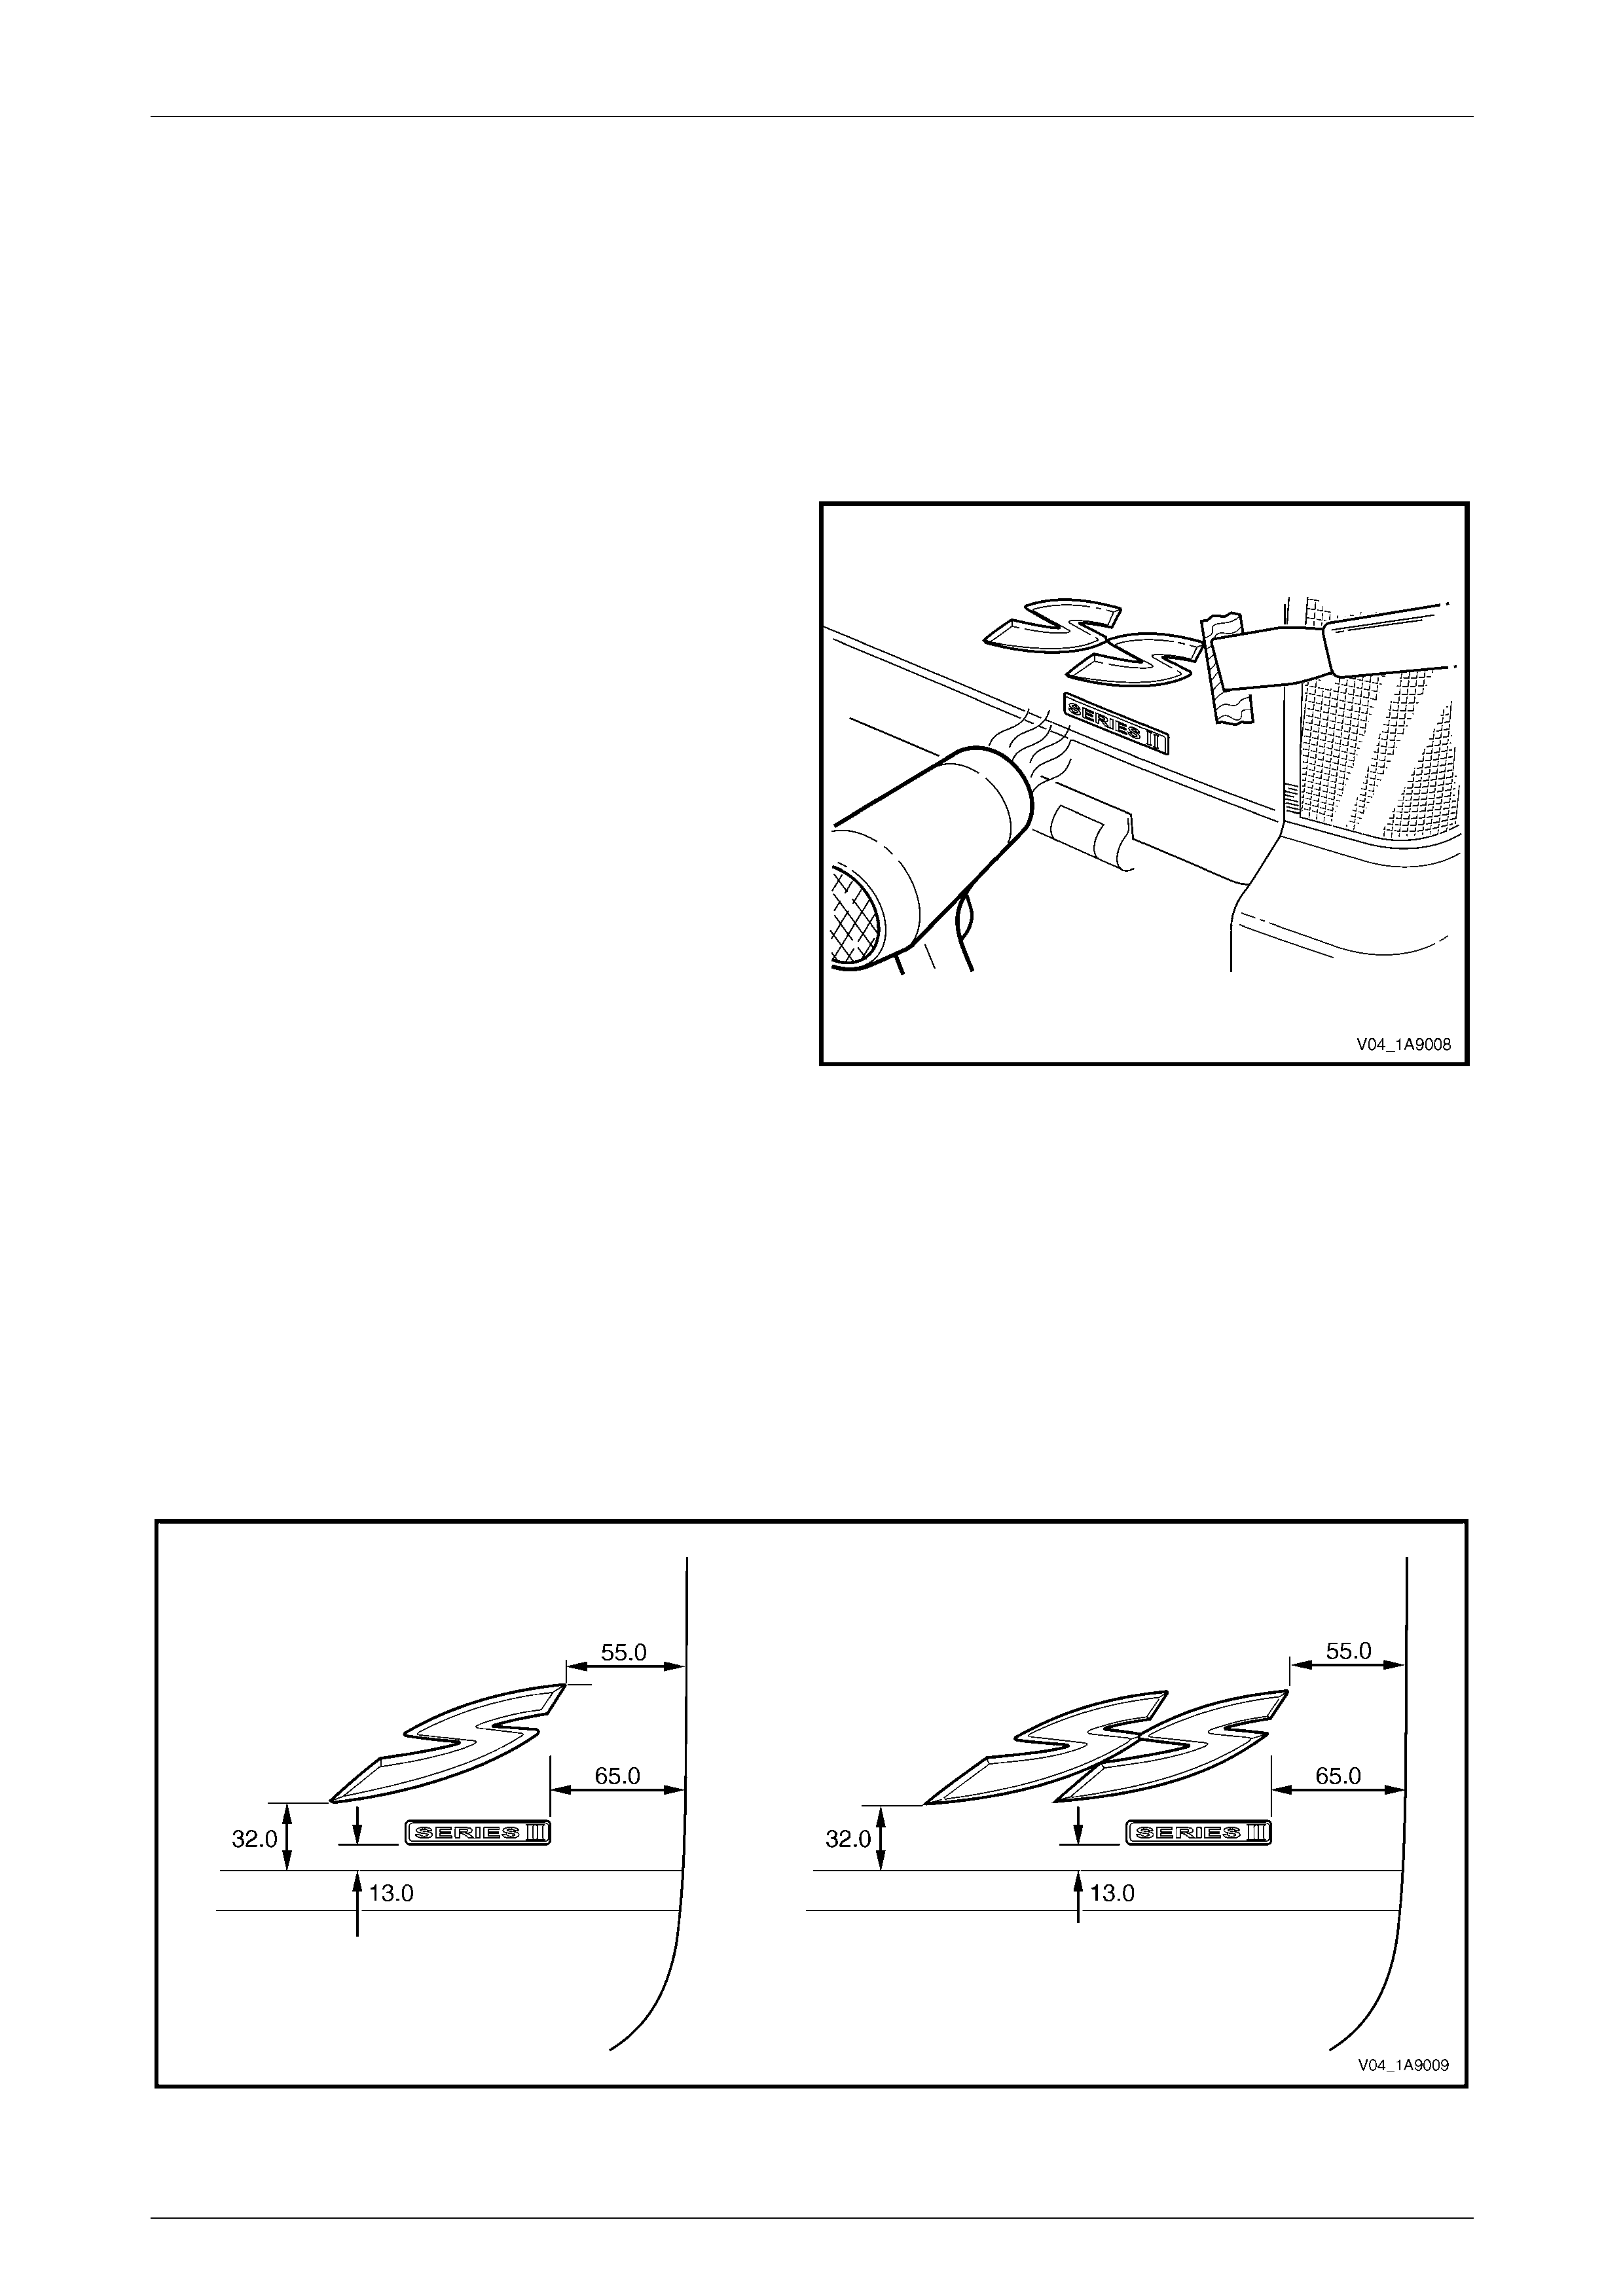
Figure 1A9 – 8
Reinstall
1 If reusing the name plate(s), apply new polyethylene double-sided tape such as 3M 4428 or equivalent to the back
and the trim edges of the tape slightly in from the edge of the name plate.
2 Clean the panel surface with Prepsol or equivalent.
3 Remove the backing paper from the double-sided tape.
4 Apply each name plate onto the right-hand side of the endgate in the position shown, measuring from the edge of
the endgate. Ensure it is positioned parallel, refer to Figure 1A9 – 9.
5 Press firmly over the entire plate for at least 10 seconds to ensure maximum adhesion.
Figure 1A9 – 9

Exterior Ornamentation Page 1A9–11
Page 1A9–11
5 Torque Wrench Specifications
Rear Compartment Lid Moulding Assembly Attaching Nut..........1.0 – 2.0 Nm