
Radiator Grille Page 1C–1
Page 1C–1
Section 1C
Radiator Grille
ATTENTION
Before performing any service operation or other procedure described in this Section, refer to Section 00
Warnings, Cautions and Notes for correct workshop practices with regard to safety and/or property damage.
1 General Information............................................................................................................................... 2
2 Service Operations................................................................................................................................3
2.1 Radiator Grille Assembly.......................................................................................................................................3
Remove ...................................................................................................................................................................3
Disassemble ...........................................................................................................................................................3
Radiator Grille Emblem.......................................................................................................................................3
Radiator Grille Inner and Outer...........................................................................................................................4
Reinstall ..................................................................................................................................................................4
2.2 Lower Radiator Grille Assembly...........................................................................................................................5
Remove ...................................................................................................................................................................5
Disassemble ...........................................................................................................................................................6
Fog Lamp Bezel..................................................................................................................................................6
Reinstall ..................................................................................................................................................................7
3 Torque Wrench Specifications............................................................................................................. 8

Radiator Grille Page 1C–2
Page 1C–2
1 General Information
With the following exceptions, MY 2004 VY and V2 Series Radiator Grille information carries over from MY 2003 VY
Series vehicles. For Radiator Grille information not contained within this Section, refer to Section 1C Radiator Grille in
the MY 2003 VY and V2 Series Service information.
Domestic Level 3:
• Radiator grille assembly
• Lower radiator grille assembly
• Fog lamp bezel
New radiator grille and lower radiator grille assemblies are fitted to Domestic MY 2004 VY Level 3 vehicles.
The radiator grille features a single horizontal bar and honeycomb type mesh. A new chrome outer, which is similar to
MY 2003 VY Level 3, is attached to the inner grille. The removal and installation procedures for the radiator grille carry-
over from MY 2003 VY Level 3 vehicles; only the disassembly is unique.
The new lower radiator grille also features a honeycomb type mesh. Its attachment to the front bumper fascia is unique
and the service procedures are described in this Section. Depending on production date, the fog lamp bezels are
attached to the lower radiator grille with either double-sided tape or heat-stakes. Both methods are described in this
Section.
The fog lamp assembly is now attached to the bumper fascia, for service operations refer to Section 1D Bumper Bars.
Fog lamp assemblies are now also fitted to Level 2 vehicles and are the same units previously fitted to MY 2003 VY
Level 3 vehicles. For service operations, refer to Sect ion 1C R adiator Grill e and/or Section 12B Lighting System in the
MY 2003 VY and V2 Series Service information.
For Model Level designations refer to Section 0A General Information.
Radiator Grille Page 1C–3
Page 1C–3
2 Service Operations
2.1 Radiator Grille Assembly
Remove
For removal of the radiator grille assembly, refer to Section 1C, 2.1 Radiator Grille Assembly in the MY 2003 VY and V2
Series Service Information.
Disassemble
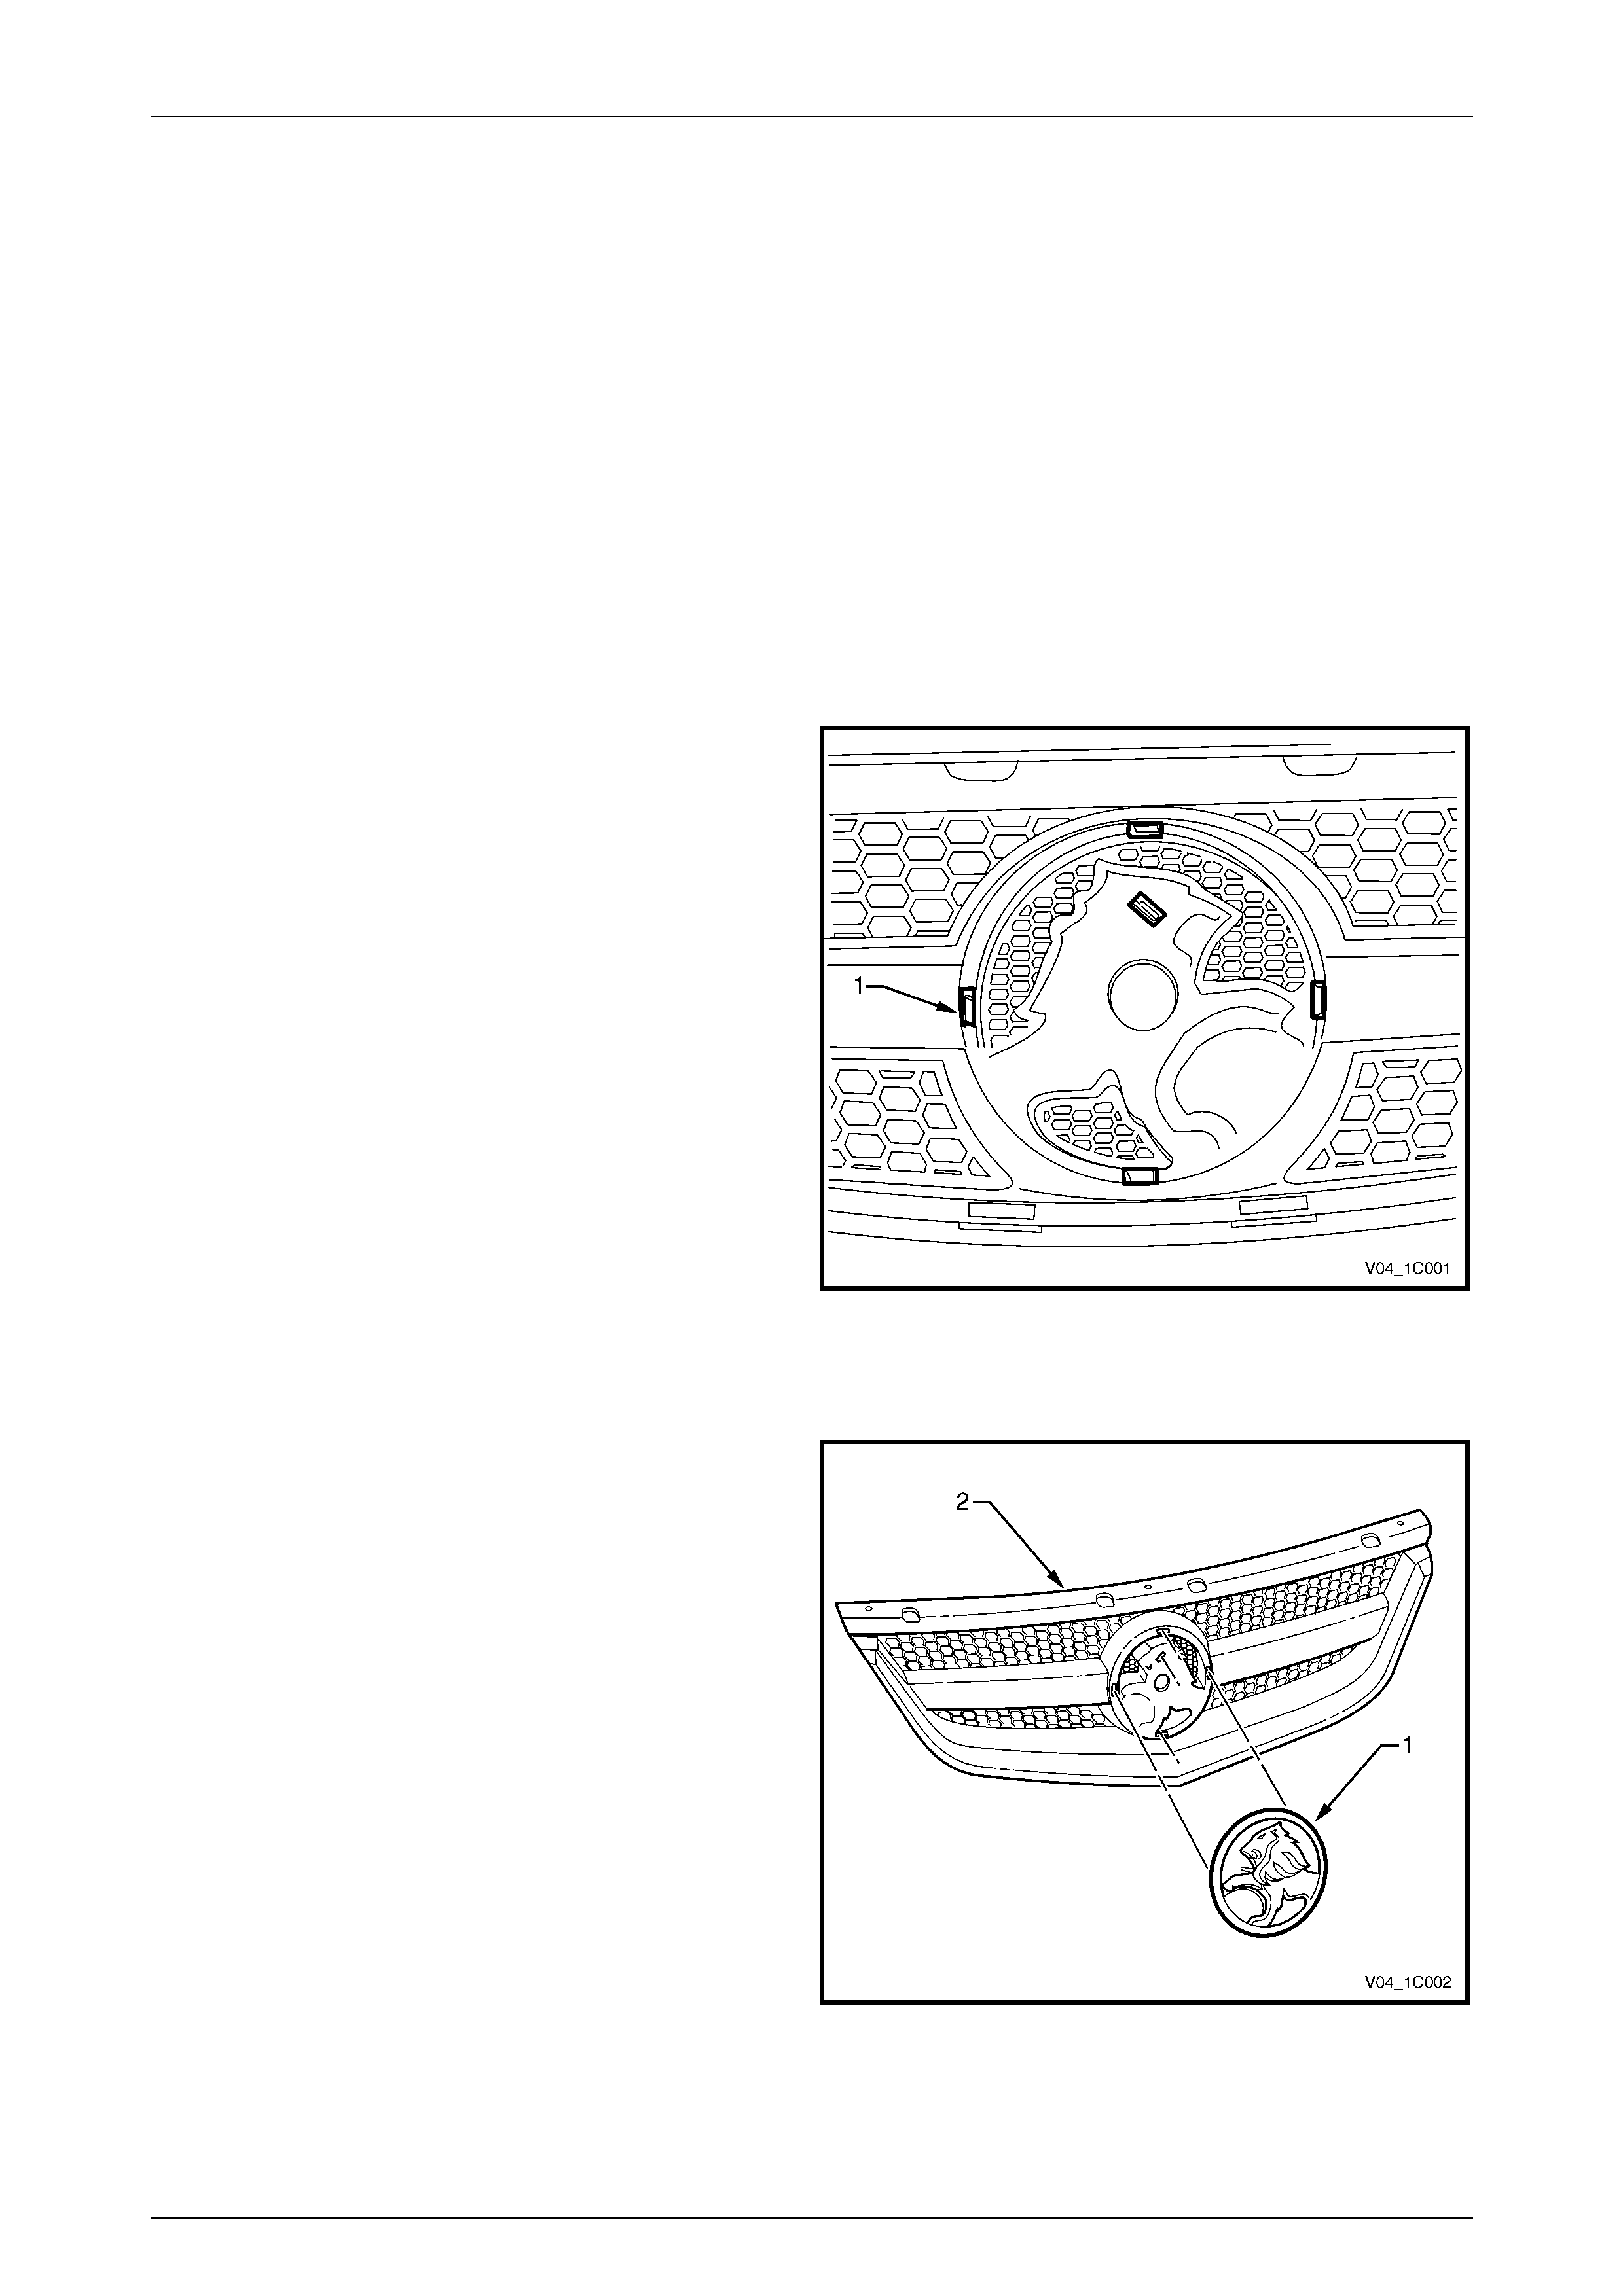
Radiator Grille Emblem
Remove
1 From the rear of the radiator grille assembly, depress
the retainer (1), five places, and remove the radiator
grille emblem from the grille assembly.
Figure 1C – 1
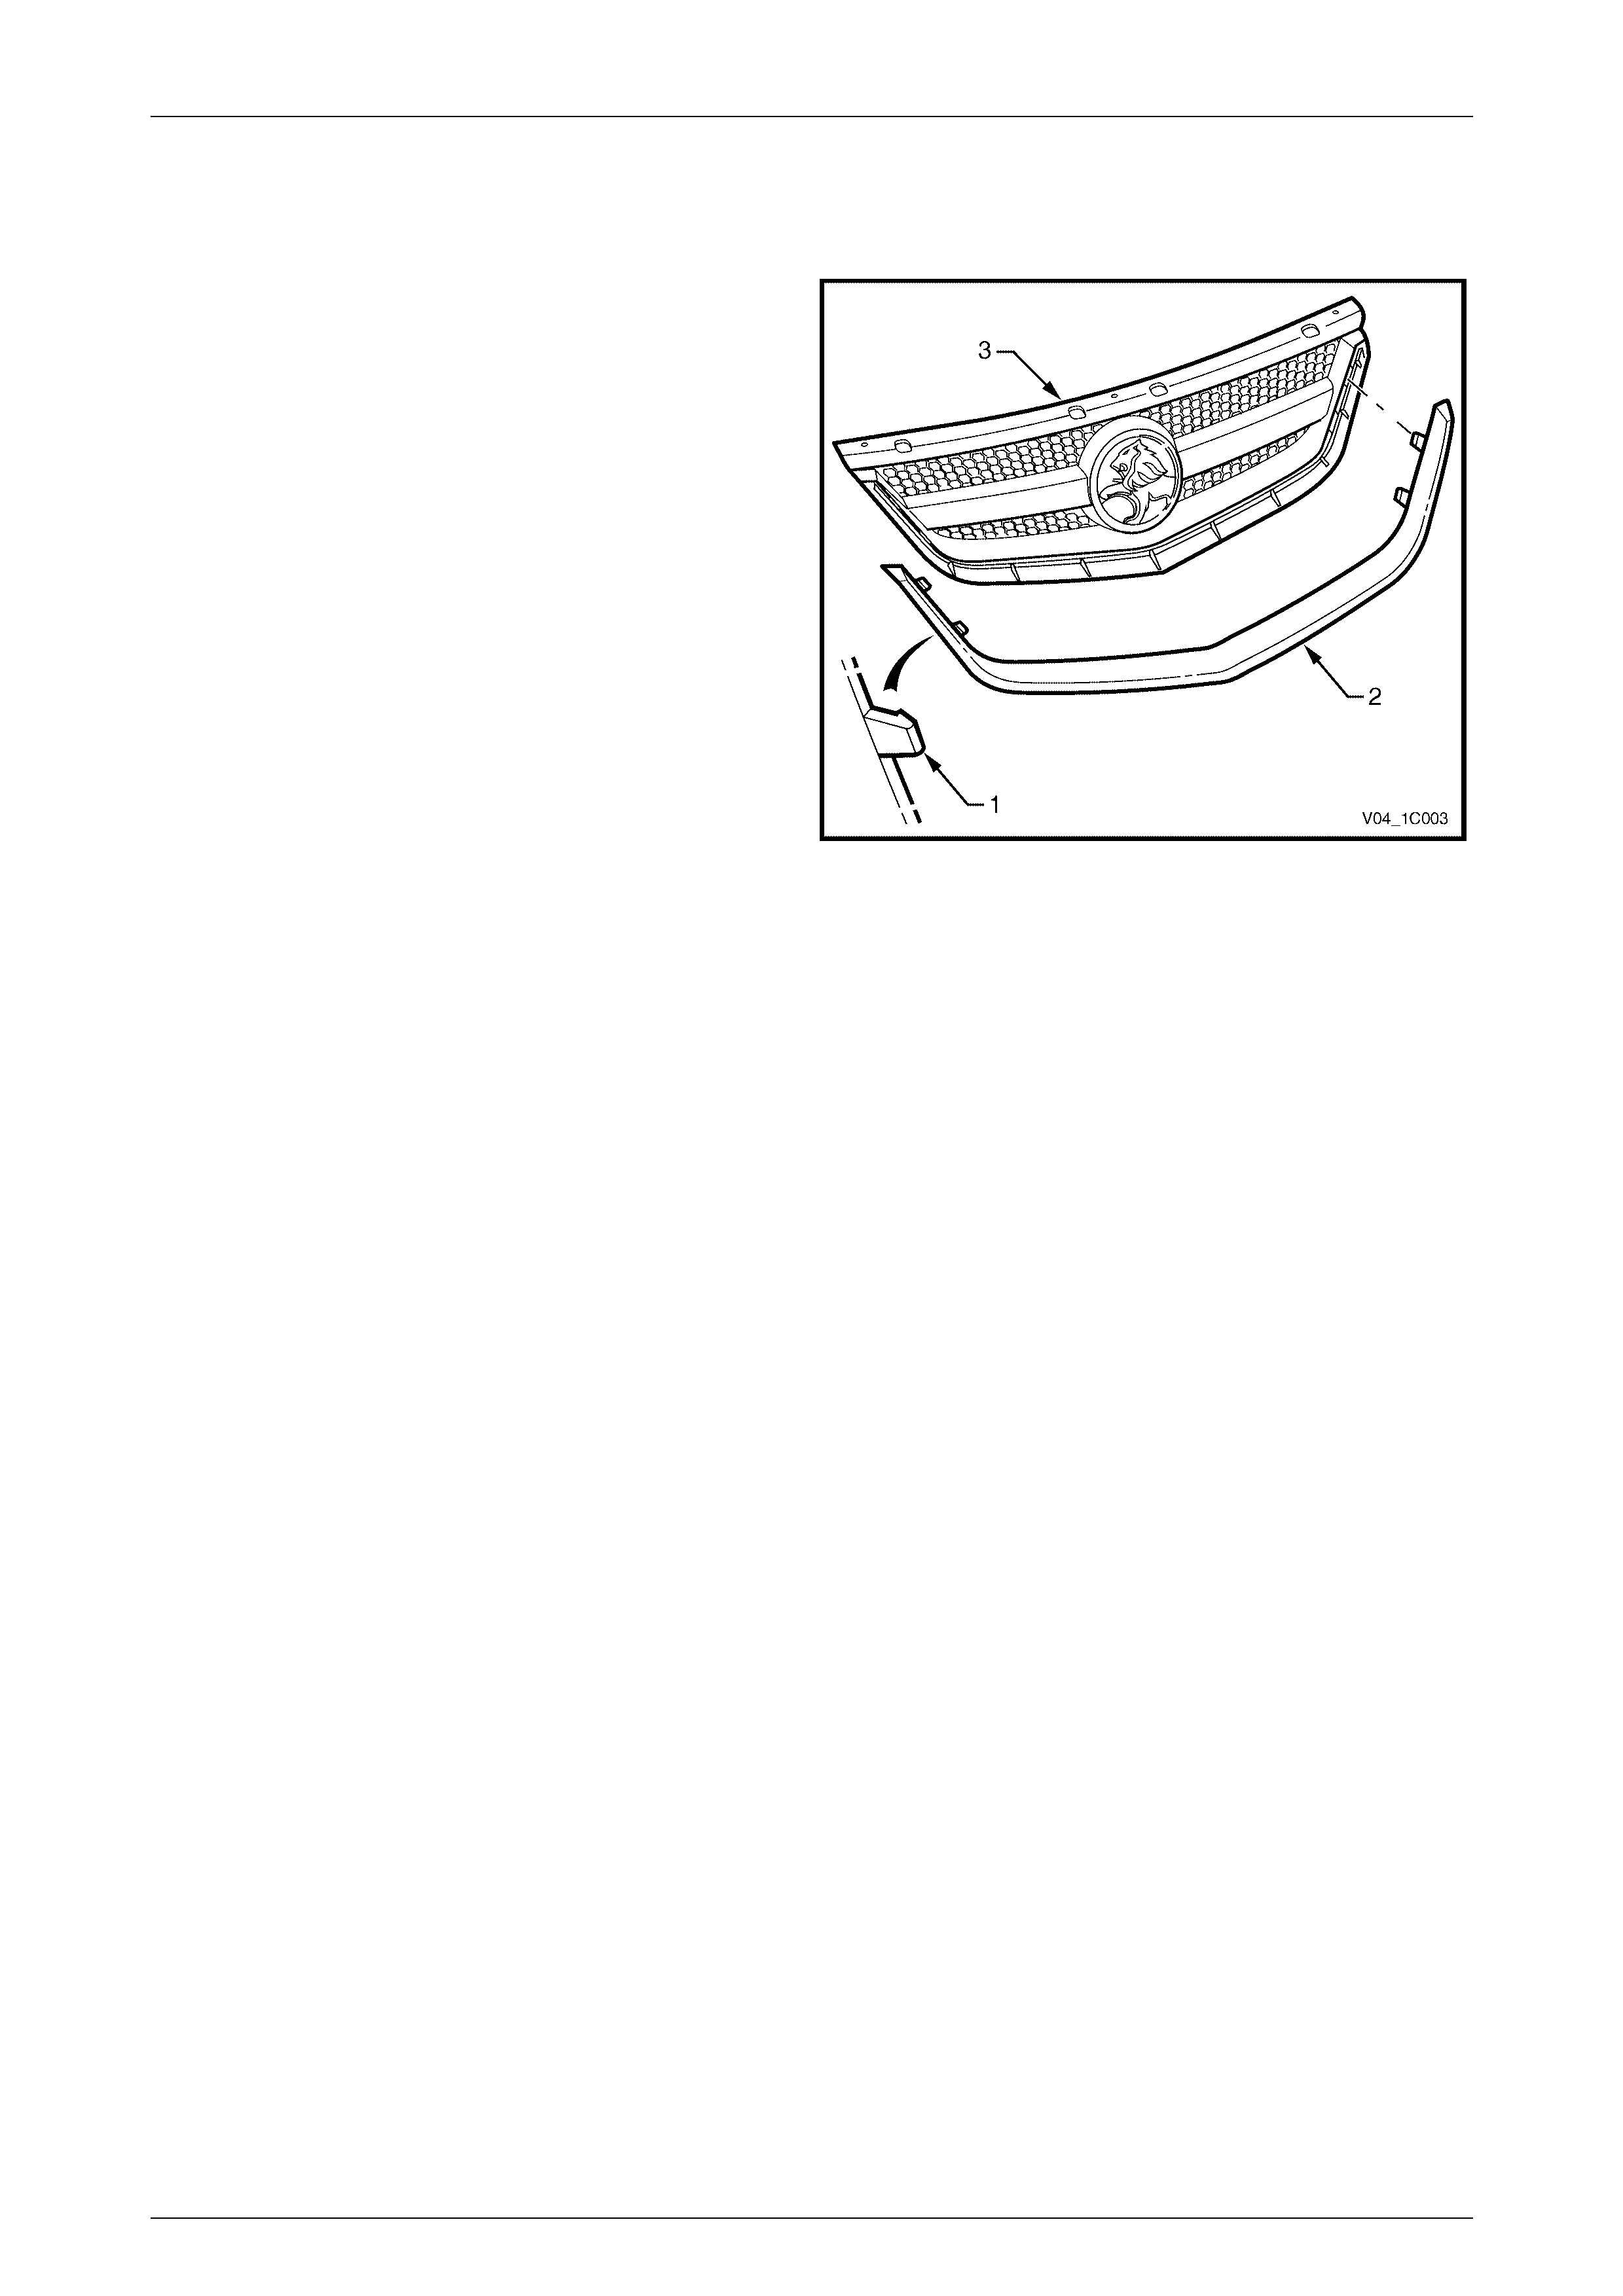
Reinstall
1 Align the emblem (1) by locating the retainers with
their corresponding holes in the grille assembly (2).
2 Fit the components together and ensure the retainers
are seated correctly.
Figure 1C – 2
Radiator Grille Page 1C–4
Page 1C–4
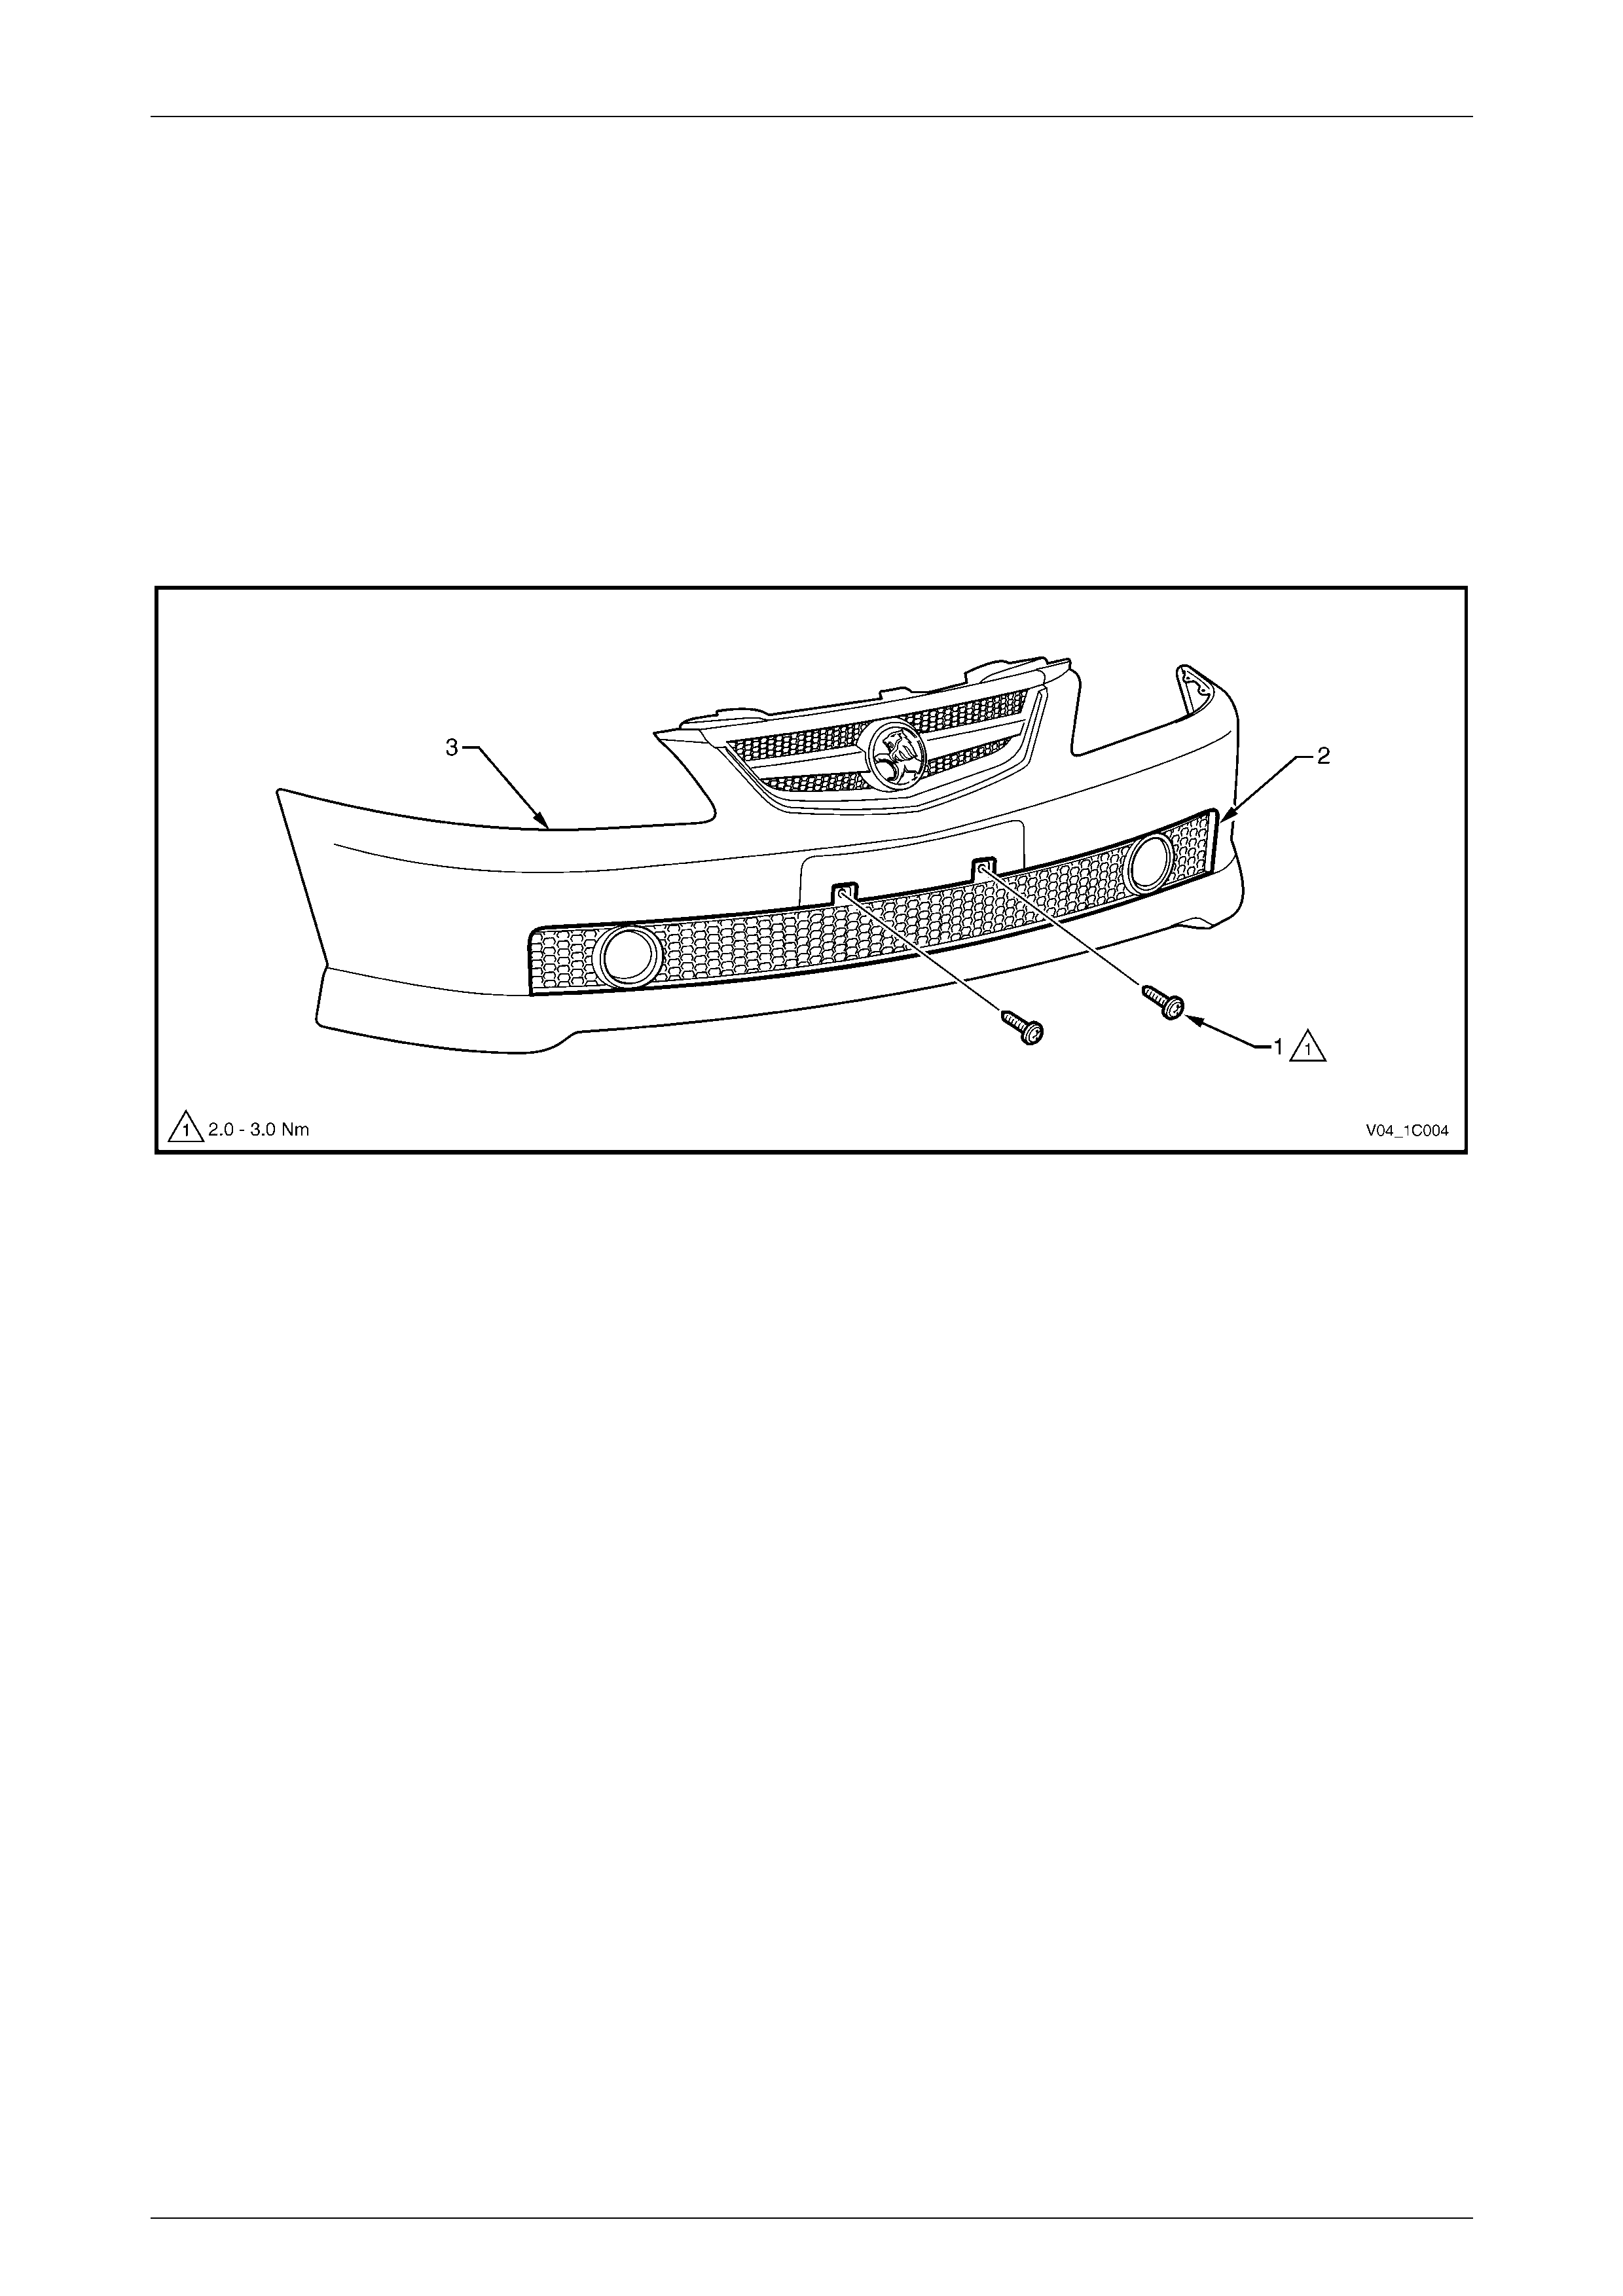
Radiator Grille Inner and Outer
Remove
1 From the rear of the radiator grille assembly, depress
the retainer (1), four places, and remove the radiator
grille outer (2) from the radiator grille inner (3).
3 Slide the outer from the inner.
Reinstall
1 Align the radiator grille outer retainers with their
corresponding slots in the radiator grille inner.
2 Fit the two components together and ensure the
retainers are correctly seate d.
Figure 1C – 3
Reinstall
For reinstallation of the radiator grille assembly, refer to Section 1C, 2.1 Radiator Grille Assembly in the MY 2003 VY and
V2 Series Service Information.
Radiator Grille Page 1C–5
Page 1C–5
2.2 Lower Radiator Grille Assembly
LT Section – 07-500
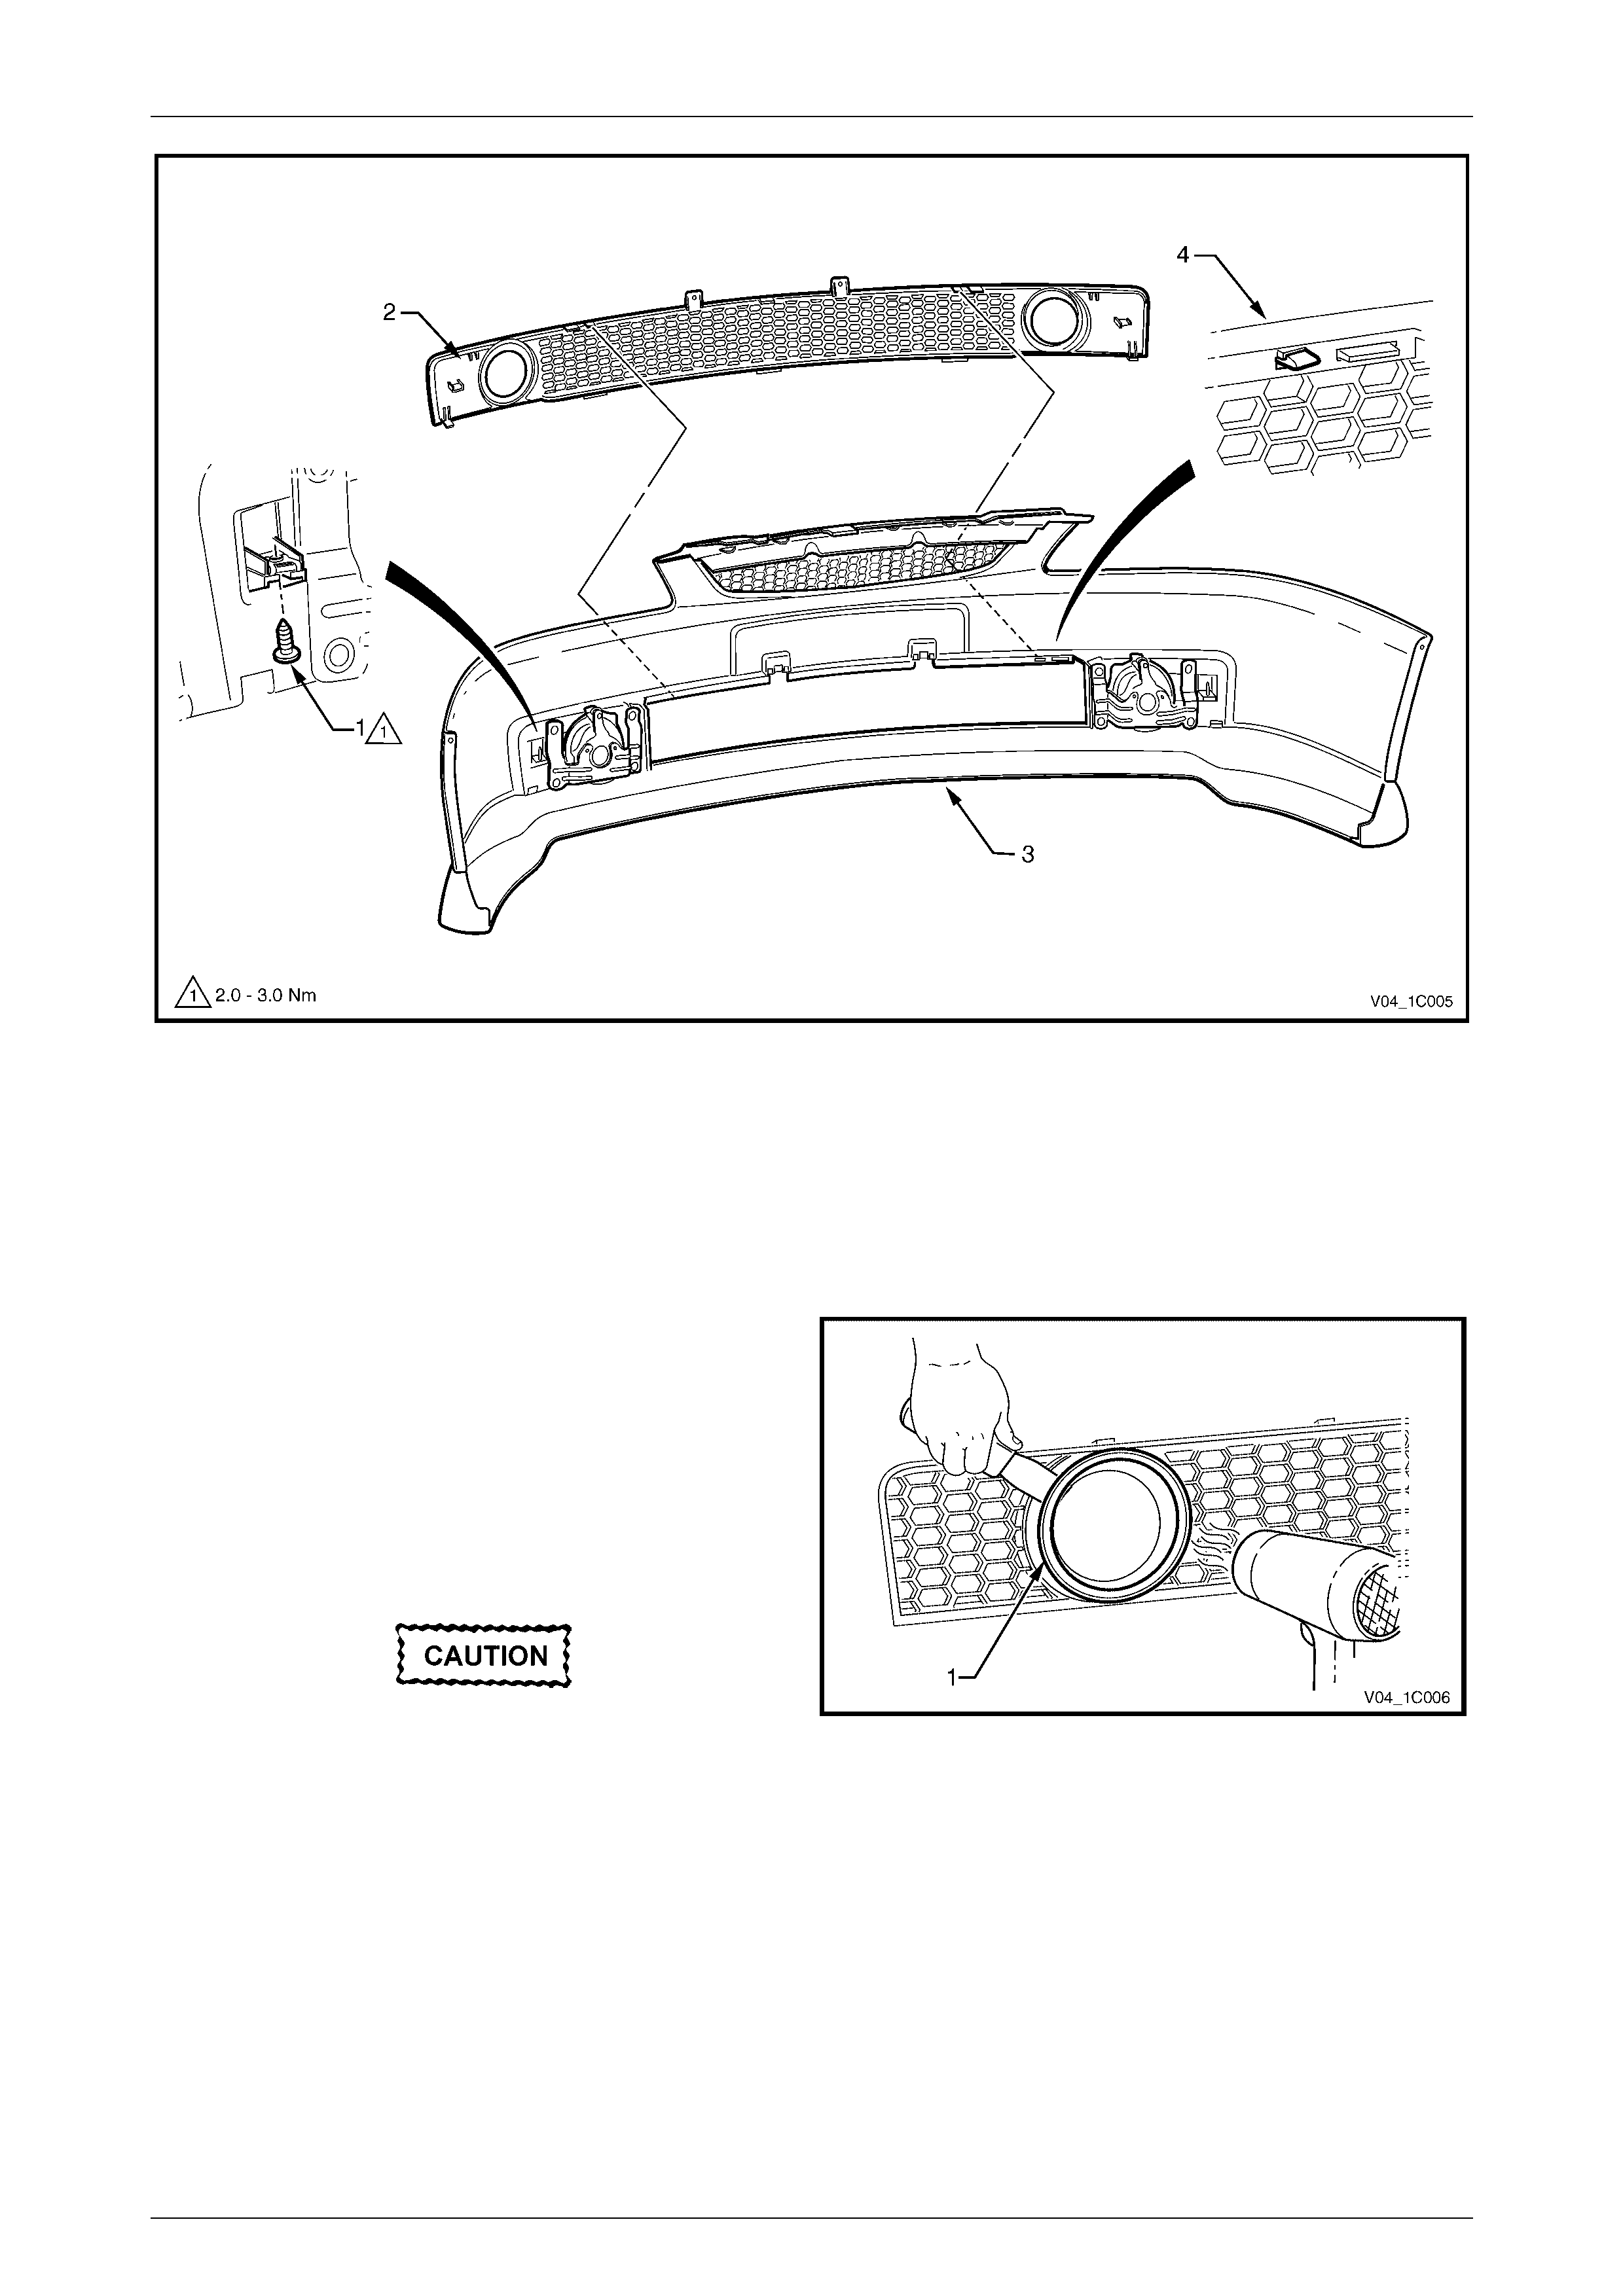
Remove
1 If required, remove the front bumper fascia, refer to Section 1D, 2.1 Front Bumper Fascia Assembly.
2 Remove the licence plate, if fitted.
3 Remove screw (1), two places, attaching the lower radiator grille assembly (2) to the front bumper fascia (3), refer
to Figure 1C – 4.
Figure 1C – 4
4 From the rear of the bumper fascia, remove the screw (1), one place each side, attaching the grille assembly to the
bumper fascia (3).
5 Unclip the retainer (4), four places along the top edge, securing the grille assembly to the bumper fascia.
6 Tilt the top of the grille assembly forward slightly and lift the grille out of the bumper fascia to release the lugs along
the lower edge.
Radiator Grille Page 1C–6
Page 1C–6
Figure 1C – 5
Disassemble
Fog Lamp Bezel
Remove
If the fog lamp bezel is attached to the grille with double-
sided tape:
1 To assist removal, warm the fog lamp bezel with a
heat-lamp or heat-gun to soften the adhesive.
2 Using a knife or paint scraper, carefully remove the
bezel from the grille, cutting the double-sided tape.
If the fog lamp bezel is heat staked to the grille:
The bezel will be damaged during the
removal procedure and must be replaced.
1 From the rear of the grille, cut the heat stakes with a
knife and remove the bezel.
Figure 1C – 6
Reinstall
If reinstalling the fog lamp bezel with double-sided tape:
1 If reinstalling the existing bezel, remove any remaining double-sided tape and clean the surface with wax and
grease remover such as Prepsol or equivalent. Apply new polyethylene double-sided tape such as 3M 4428 or
equivalent.
Radiator Grille Page 1C–7
Page 1C–7
2 Clean the surface of the grille assembly with wax and grease remover such as Prepsol or equivalent.
3 Remove the backing paper from the double-sided tape.
4 Align the bezel and locate the lugs with their corresponding holes in the grille assembly.
5 Affix the bezel and press firmly over the entire bezel for at least 10 seconds to ensure sound adhesion.
If reinstalling the fog lamp bezel by heat staking:
1 Align the bezel and locate the lugs with their corresponding holes in the grille assembly.
2 Melt over the heat stakes with a soldering iron.
Reinstall
1 Locate the lugs on the lower edge of the lower grille assembly into their corresponding slots in the bumper fascia
and clip the grille assembly into place.
2 Tighten the screws to the specified torque.
Lower radiator grille assembly attaching
screw torque specification.........................2.0 – 3.0 N.m

Radiator Grille Page 1C–8
Page 1C–8
3 Torque Wrench Specifications
Lower Radiator Grille Assembly Attaching Screw.........................2.0 – 3.0 N.m