
SECTION 1A9 - EXTERIOR ORNAMENTATION
IMPORTANT
Before performing any Service Operation or other procedure described in this Section, refer to Section
00 CAUTIONS AND NOTES for correct workshop practices with regard to safety and/or property damage.
1. GENERAL I NFORMATI O N
1.1 VX SERIES II MODELS
Exterior ornamentation on VX Series II Models carries over from VX Series I Models, noting the following:
• The rear nameplates and decals have been relocated from the lower edge of the decor panel to the decklid
above the decor panel on Berlina and Calais Models.
• The nameplate fitted to the decklid/tailgate on Berlina models has been redesigned.
• The nameplate fitted to the decklid on Calais models has been redesigned.
• A Series II nameplate has been added to the rear of all VX Series II Models.
• A new Lum ina sedan and W agon (Production option A8Y) was added to the VX Series II Model line up during
October, 2001.
• A new Equipe sedan and Wagon (Production option A8S) was added to the VX Series II Model line up during
April, 2002.
For information relating to the exterior ornamentation as fitted to VX Series II Models not covered in this Section,
refer to Section 1A9 EXTERIOR ORNAMENTATION in the VX Series I Service Information in conjunction with
Section 1A9 EXTERIOR ORNAMENTATION in the VT Series I and VT Series II Service Information.
Techline
Techline
Techline

1.2 VU SERIES II MODELS
Exterior ornamentation on VU Series II Models carries over from VU Series I Models, noting the following:
• A Series II nameplate has been added to the rear of all VU Series II Models.
• To commemorate the fiftieth anniversary of the Holden Utility, the SS Fifty (Production option A9J) was added to
the VU Series II Model line up during late October, 2001.
• The new ‘Storm’ Utility (Production Option A8U) was added to the VU Series II Model line up during June, 2002.
For information relating to the exterior ornamentation as fitted to VU Series II Models not covered in this Section,
refer to Section 1A9 EXTERIOR ORNAMENTATION in the VU Series I Service Information.

1.3 WH SERIES II MODELS
Exterior ornamentation on WH Series II Models carries over from WH Series I Models, noting the following:
• The chrome section in the drip and belt mouldings have been increased in width.
• The nameplate f itted to the deck lid on Statesm an m odels has been redesigned to include a Series II designator
and improve legibility from a distance.
• The nameplate fitted to the decklid on Caprice m odels has been redesigned to include a ‘Series II’ designator
and improve legibility from a distance.
• The new ‘V8 International Statesman’ (Production Option A8X) was added to the WH Series II Model line up
during March 2002.
• The new ‘International LS8 Statesm an’ (Production Option A8T) was added to the W H Series II Model line up
during November, 2002.
For information relating to the exterior ornamentation as fitted to W H Series II Models not covered in this Section,
refer to Section 1A9 EXTERIOR ORNAMENTATION in the WH Series I Service Information.

2. SERVICE OPERATIONS
2.1 SERVICE NOTES
Numerous clips, fasteners, retainers, bushes, screws, nuts and contact adhesives are used to secure the various
exterior ornam entation components to the vehicle body. To locate the service inform ation applicable to a particular
component, refer to 2.2 PICTORIAL INDEX in this Section.
When removing, handling or installing exterior ornamentation components, the following care should be exercised:
• Finishers adjacent to the component being removed should be covered with masking tape to prevent damage
to panels and paintwork.
• Removal of adhesive bonded nameplates and emblems is more easily achieved with the aid of a heat lamp
positioned adjacent to the part to be removed.
NOTE: Ensure that the heat lamp is not located too close to the body, or the heat to intense so as to adversely
affect the paint finish.
• Holes in body panels f or s cr ews, bolts , clips , etc . that c ould permit water entry into the body mus t be adequately
sealed with either a non-hardening sealer or presealed screws, clips, etc.
• Using a clean cloth, clean the area of body surface where emblems, mouldings, etc. are to be applied with
Prepsol solvent or equivalent.
• It is essential that the body temperature of the vehicle be at least 21°C before adhering adhesive bonded
components to the vehicle.

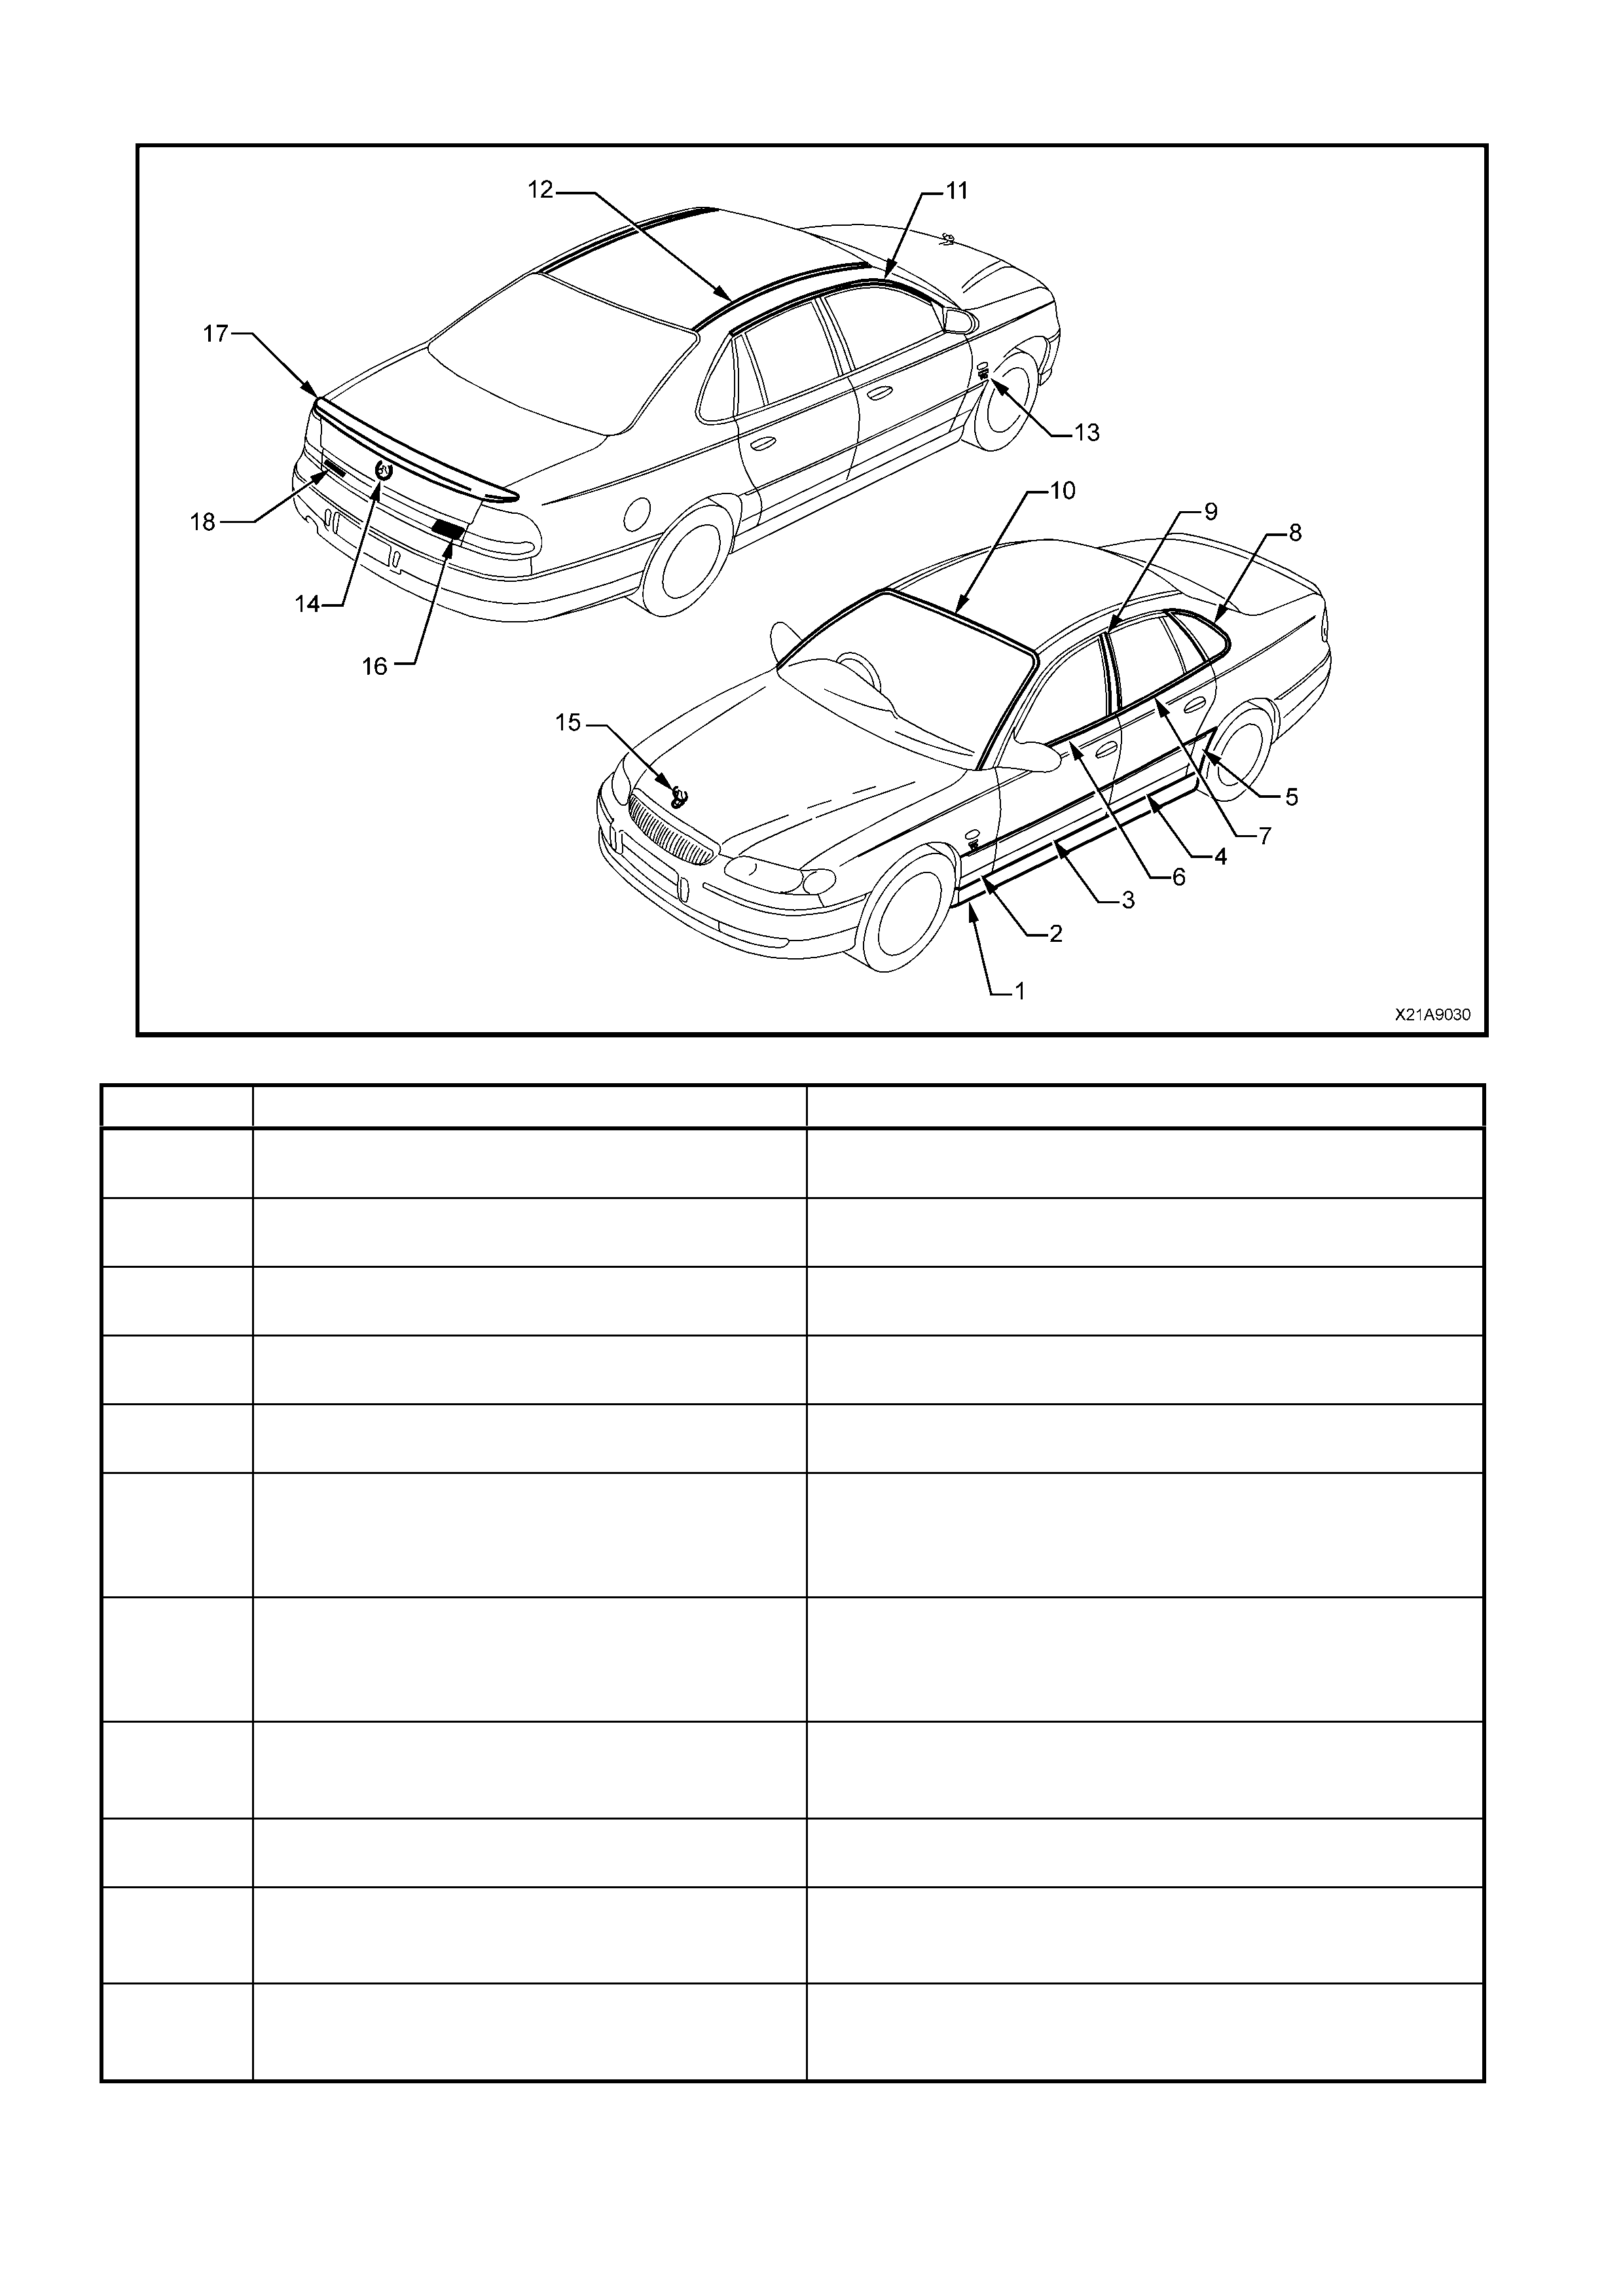
2.2 PICTORIAL INDEX
The following pictograph indexes provide a quick guide to finding the correct service procedure for the applicable
exterior ornamentation component in Figures 1A9-1/2/3/4 or 5. Within this Section, simply locate the appropriate
component and cross-reference it in the table below the Figure.
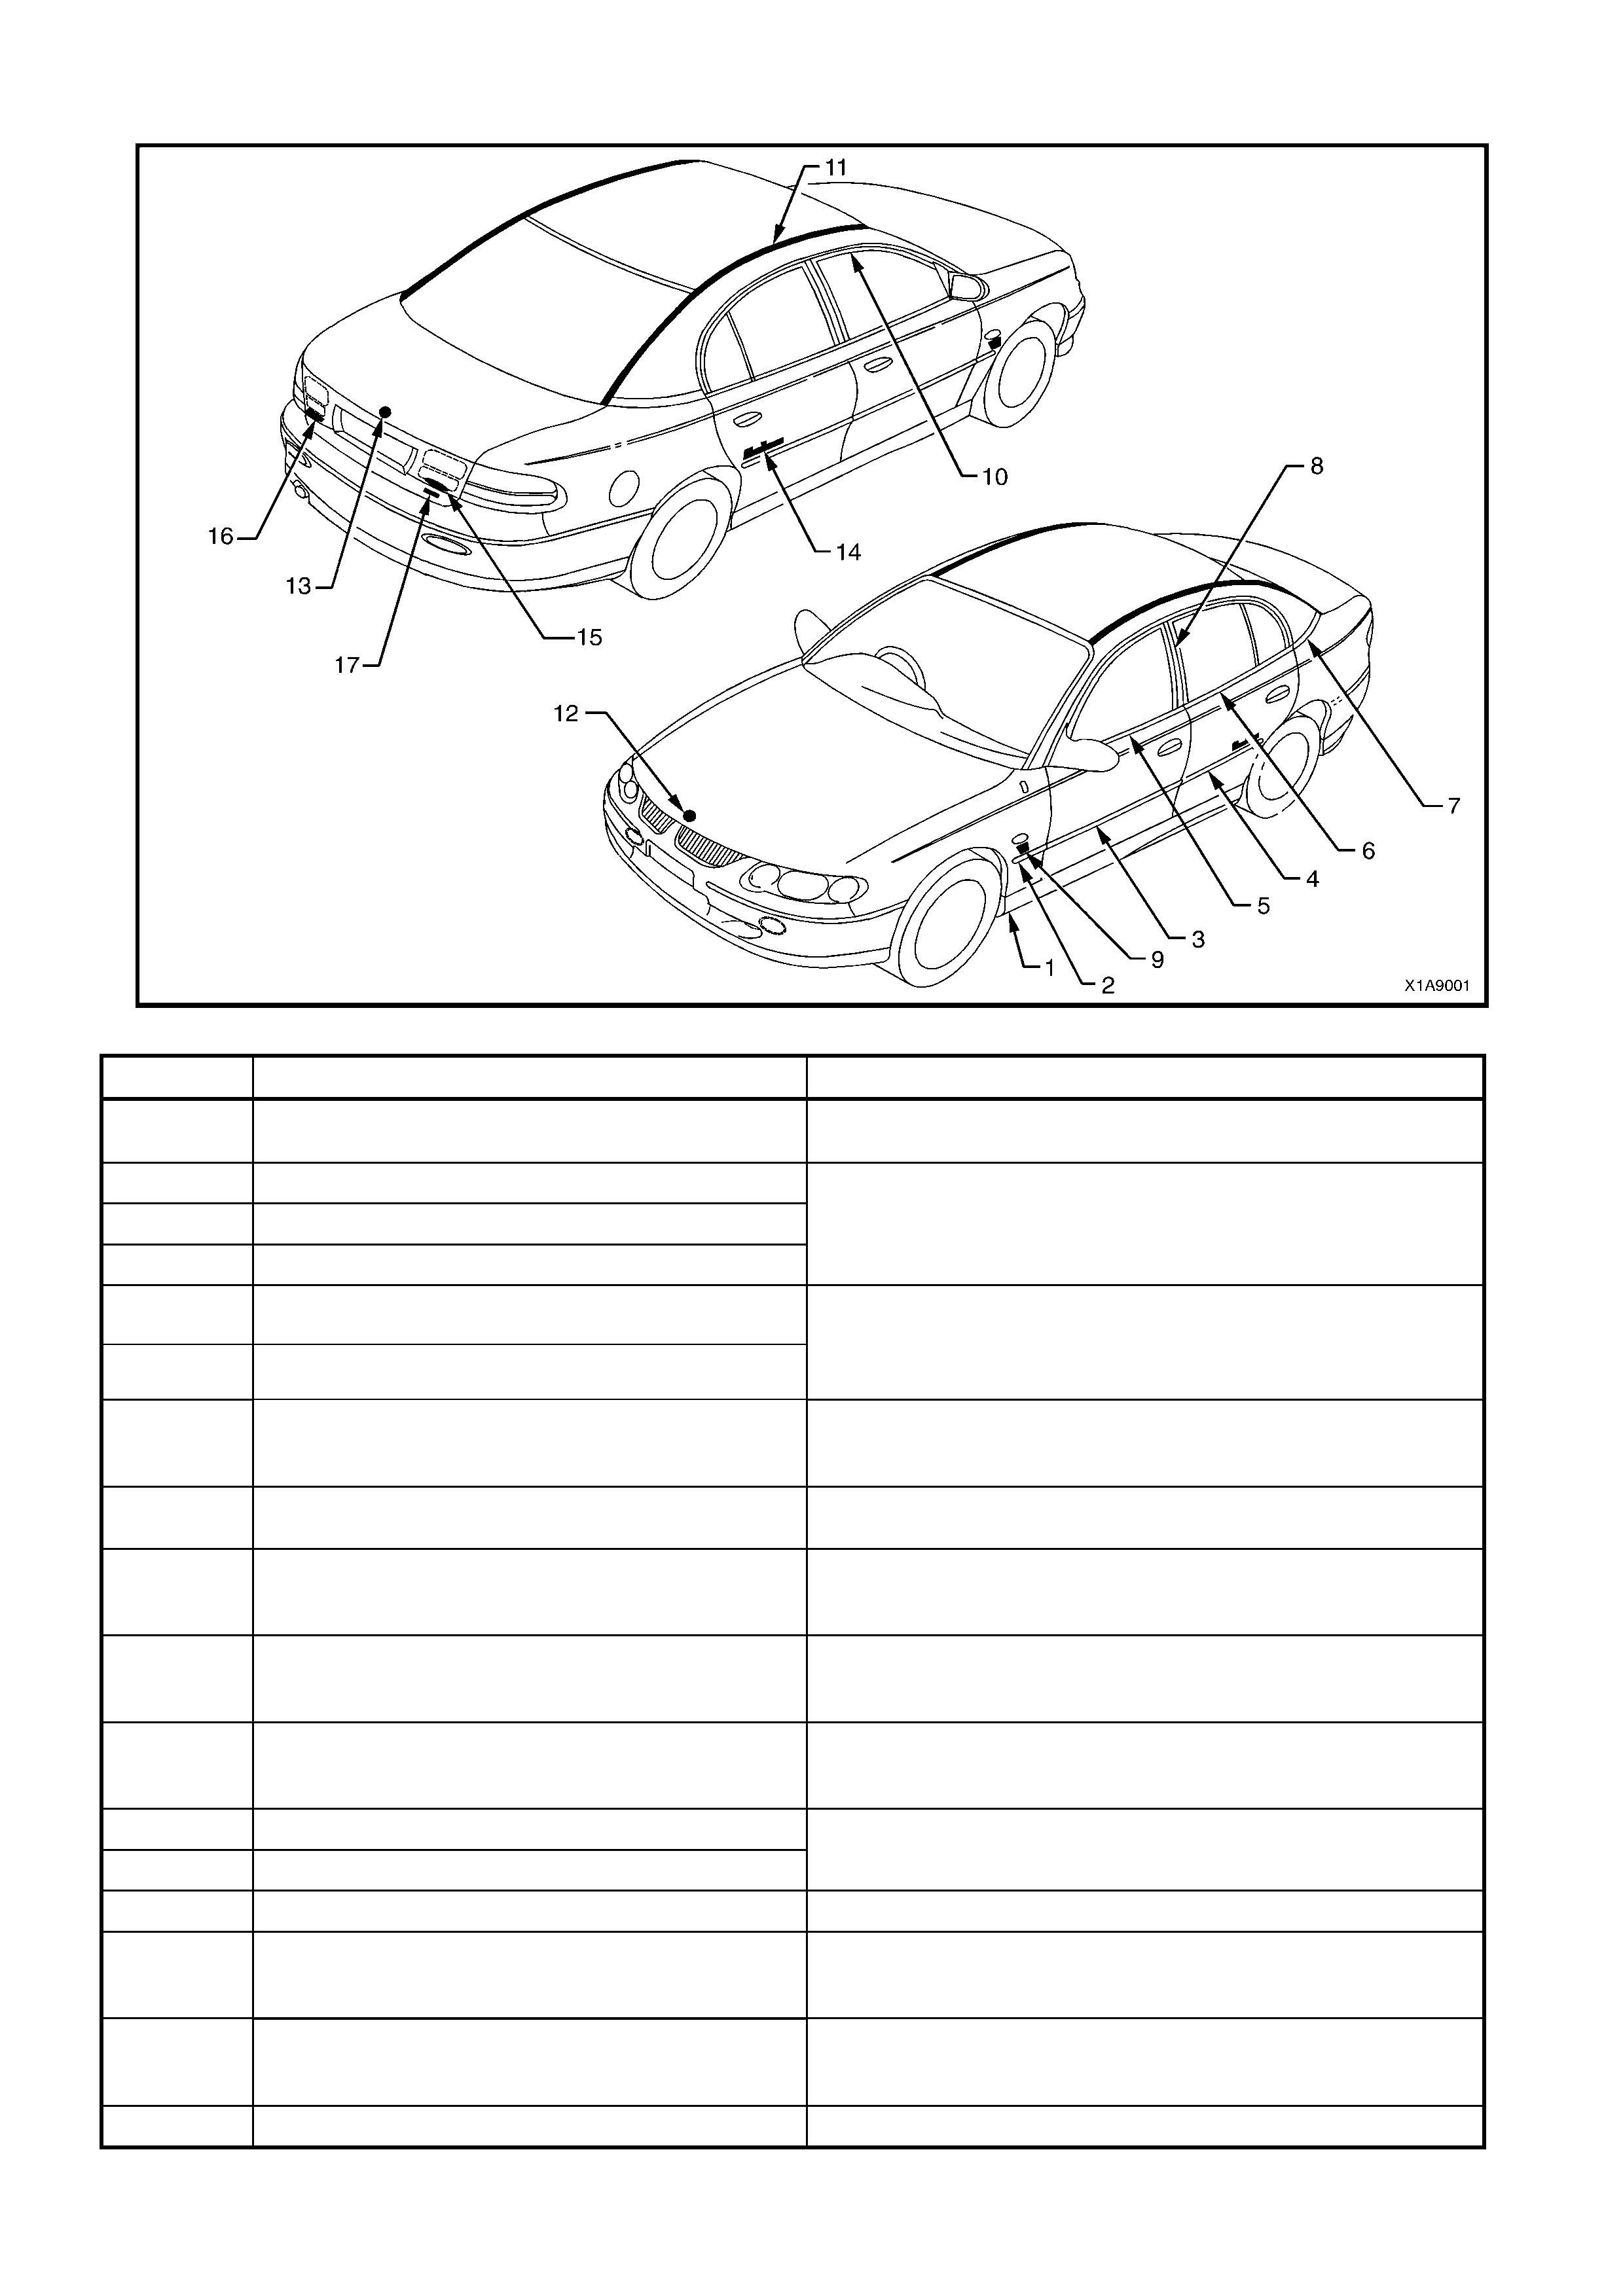
SWB SEDAN - EXCLUDING S AND SS
Figure 1A9-1
ITEM DESCRIPTION REFERENCE
1 Rocker panel skirt 2.3 ROCKER PANEL SKIRT, Section 1A9 EXTERIOR
ORNAMENTATION in the VT Series I Service Information
2 Front fender side moulding
3 Front door side moulding
4 Rear door side moulding
2.3 BODY SIDE MOULDINGS, in the VX Series I Service
Information
5 Front door belt moulding
6 Rear door belt moulding
2.16 FRONT AND REAR DOOR BELT WEATHERSTRIP
AND MOULDING ASSEMBLY, Section 1A5 FRONT AND
REAR DOOR ASSEMBLIES, in the VT Series I Service
Information
7 Quarter panel to roof moulding 2.5 QUARTER PANEL TO ROOF MOULDING
ASSEMBLY, Section 1A9 EXTERIOR ORNAMENTATION
in the VT Series I Service Information
8 B pillar moulding 2.6 B PILLAR MOULDING, Section 1A9 EXTERIOR
ORNAMENTATION in the VT Series I Service Information
9 Name plate: engine type 2.5 NAME PLATES AND DECALS, Section 1A9
EXTERIOR ORNAMENTATION in the VT Series II Service
Information
10 Door frame opening moulding 2.8 DOOR FRAME OPENING MOULDING, Section 1A9
EXTERIOR ORNAMENTATION in the VT Series I Service
Information
11 Roof finisher moulding 2.9 ROOF FINISHER MOULDING – SEDAN, Section 1A9
EXTERIOR ORNAMENTATION in the VT Series II Service
Information
12 Emblem: Lion (engine hood)
13 Emblem: Lion (decklid)
2.12 LION EMBLEM, Section 1A9 EXTERIOR
ORNAMENTATION in the VT Series I Service Information
14 Name plate: Calais 2.3 NAME PLATES AND DECALS, in this Section
15 Name plate: Executive, Equipe, Acclaim,
Lumina, Berlina or Calais 2.3 NAME PLATES AND DECALS, in this Section
16 Name plate: Commodore 2.4 NAME PLATES AND DECALS, Section 1A9
EXTERIOR ORNAMENTATION in the VX Series I Service
Information
17 Name plate: Series II 2.3 NAME PLATES AND DECALS, in this Section
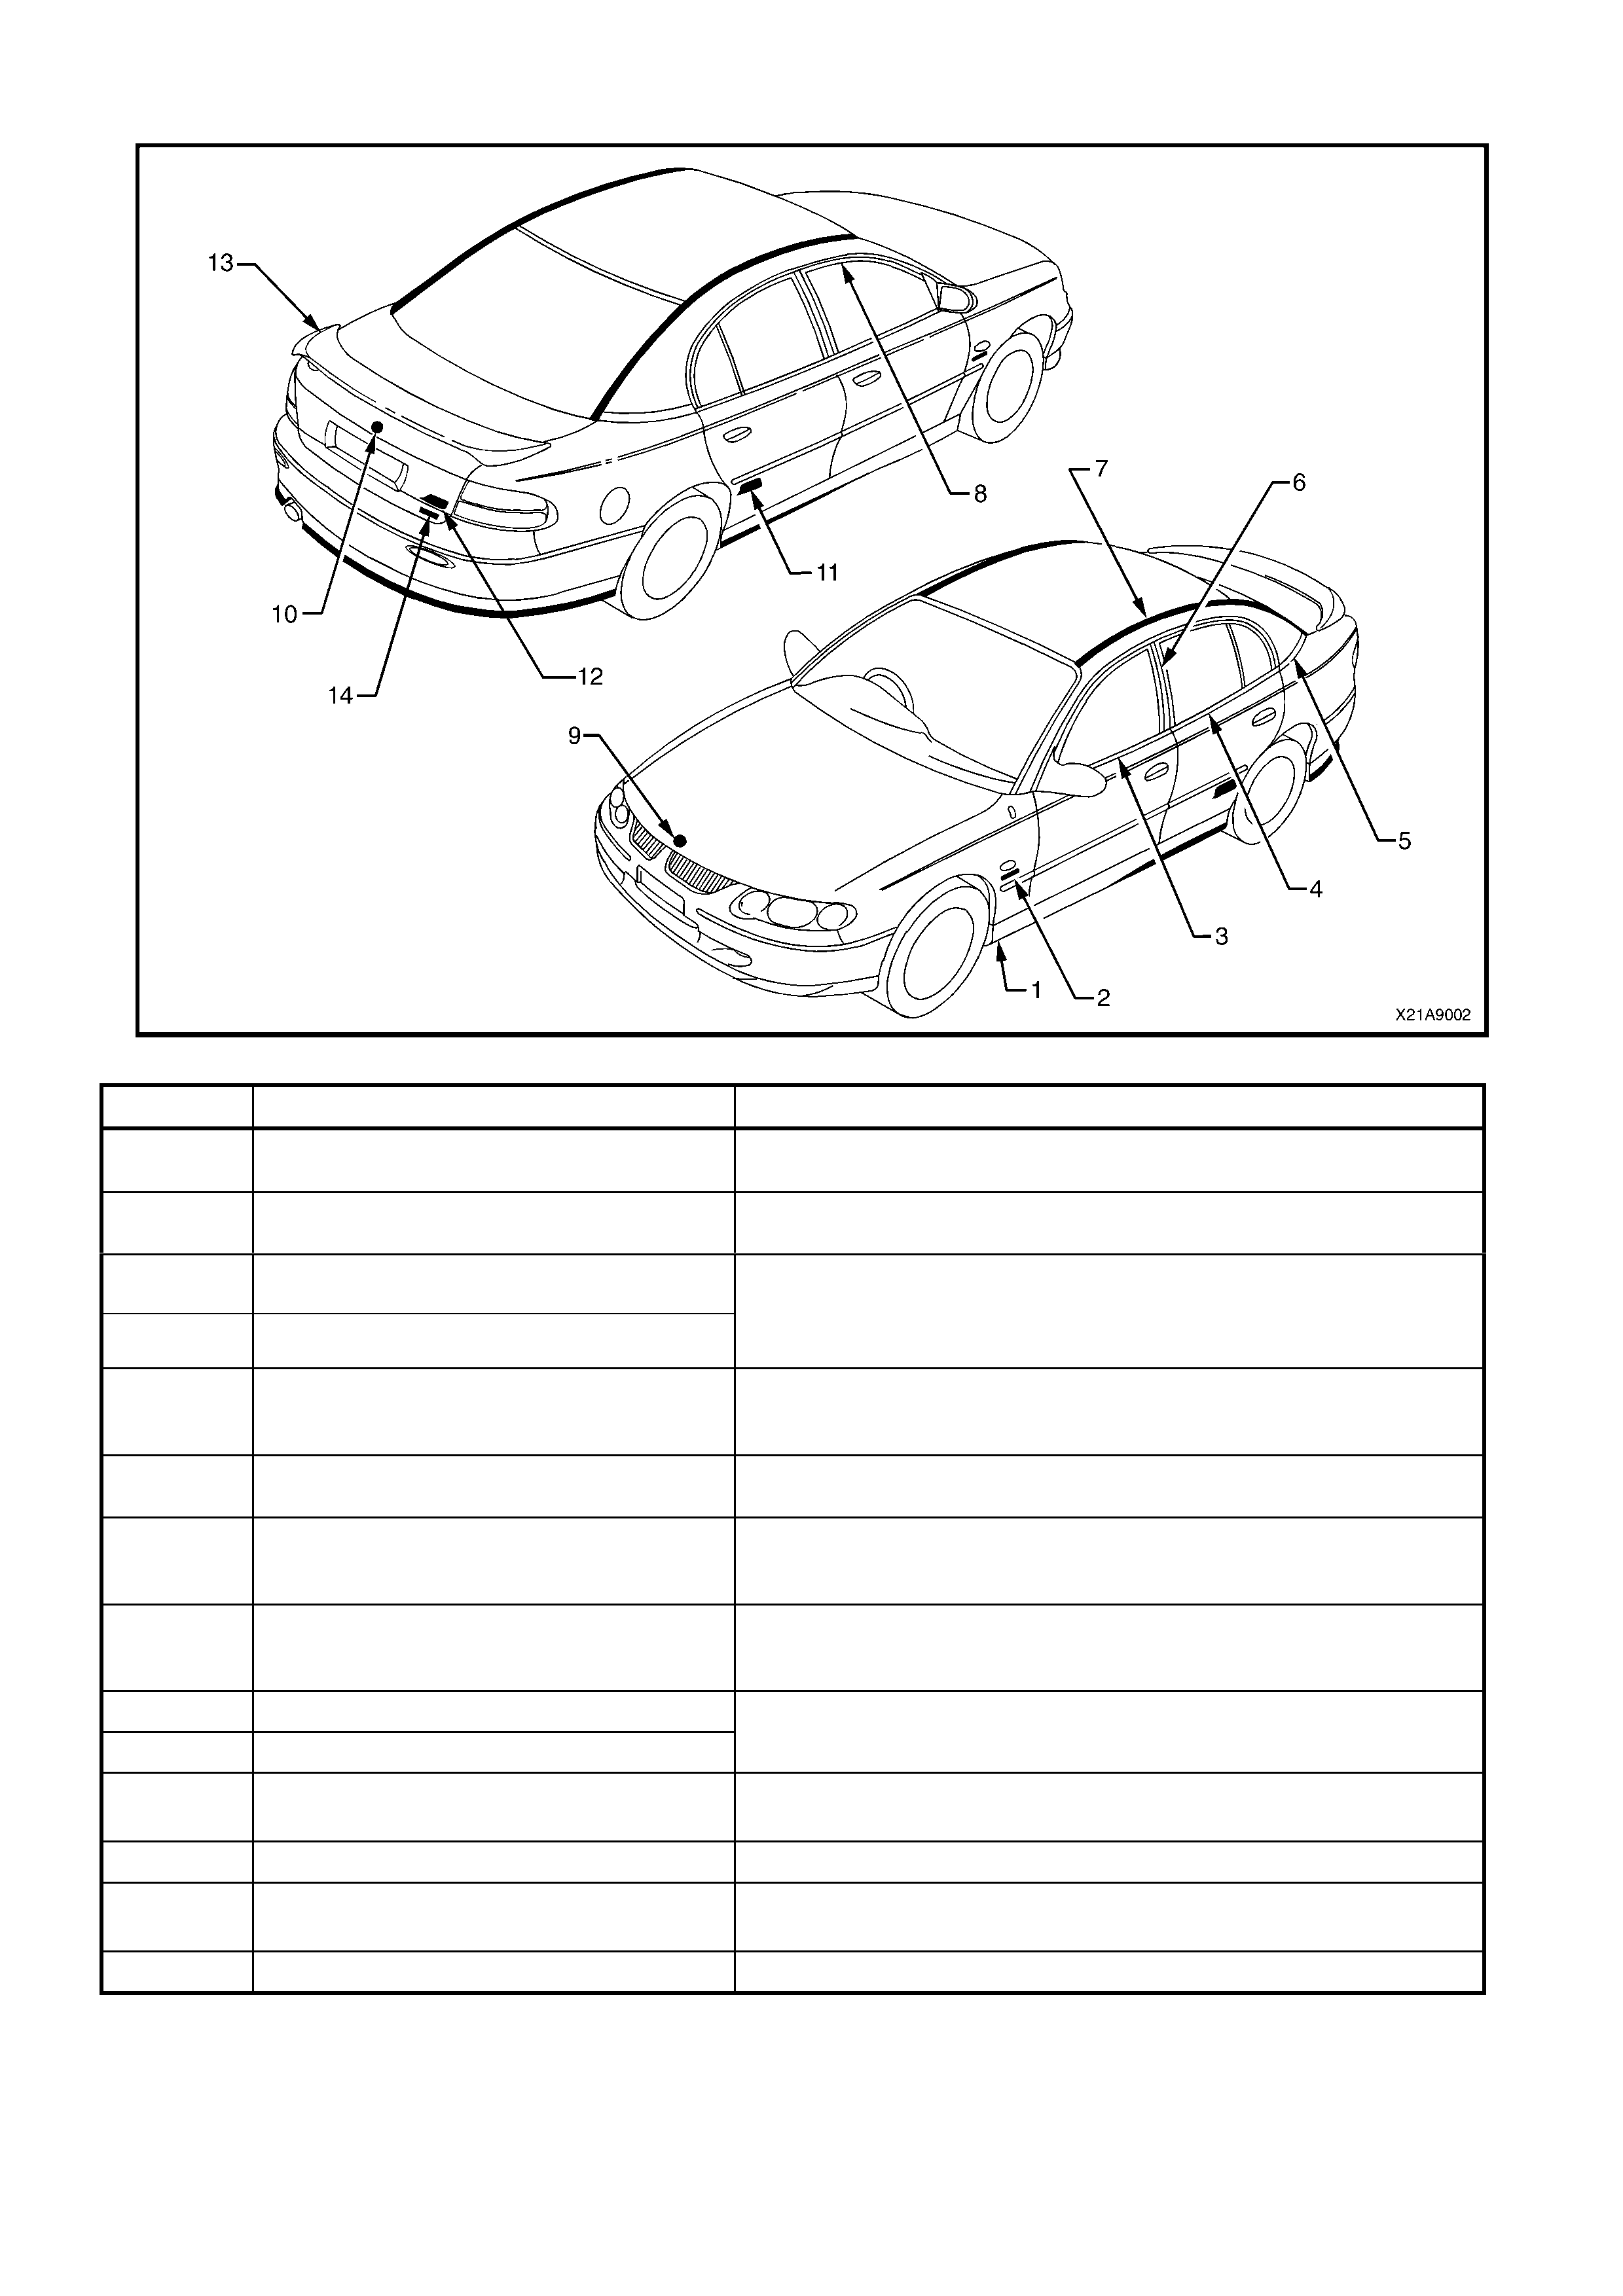
SWB SEDAN - S AND SS
Figure 1A9-2
ITEM DESCRIPTION REFERENCE
1 Rocker panel skirt 2.3 ROCKER PANEL SKIRT, Section 1A9 EXTERIOR
ORNAMENTATION in the VT Series I Service Information
2 Name plate: engine type 2.5 NAME PLATES AND DECALS, Section 1A9 EXTERIOR
ORNAMENTATION in the VT Series II Service Information
3 Front door belt moulding
4 Rear door belt moulding
2.16 FRONT AND REAR DOOR BELT WEATHERSTRIP AND
MOULDING ASSEMBLY, Section 1A5 FRONT AND REAR
DOOR ASSEMBLIES, in the VT Series I Service Information
5 Quarter panel to roof moulding 2.5 QUARTER PANEL TO ROOF MOULDING ASSEMBLY,
Section 1A9 EXTERIOR ORNAMENTATION in the VT Series I
Service Information
6 B pillar moulding 2.6 B PILLAR MOULDING, Section 1A9 EXTERIOR
ORNAMENTATION in the VT Series I Service Information
7 Roof finisher moulding 2.9 ROOF FINISHER MOULDING – SEDAN, Section 1A9
EXTERIOR ORNAMENTATION in the VT Series II Service
Information
8 Door frame opening moulding 2.8 DOOR FRAME OPENING MOULDING, Section 1A9
EXTERIOR ORNAMENTATION in the VT Series I Service
Information
9 Emblem: Lion (engine hood)
10 Emblem: Lion (decklid)
2.12 LION EMBLEM, Section 1A9 EXTERIOR
ORNAMENTATION in the VT Series I Service Information
11 Decal SS 2.4 NAME PLATES AND DECALS, in Section 1A9 EXTERIOR
ORNAMENTATION in the VX Series I Service Information
12 Name plate: SS 2.3 NAME PLATES AND DECALS in this Section
13 Decklid Air spoiler 2.15 DECKLID AIR SPOILER, Section 1A9 EXTERIOR
ORNAMENTATION in the VT Series I Service Information
14 Name plate: Series II 2.3 NAME PLATES AND DECALS, in this Section
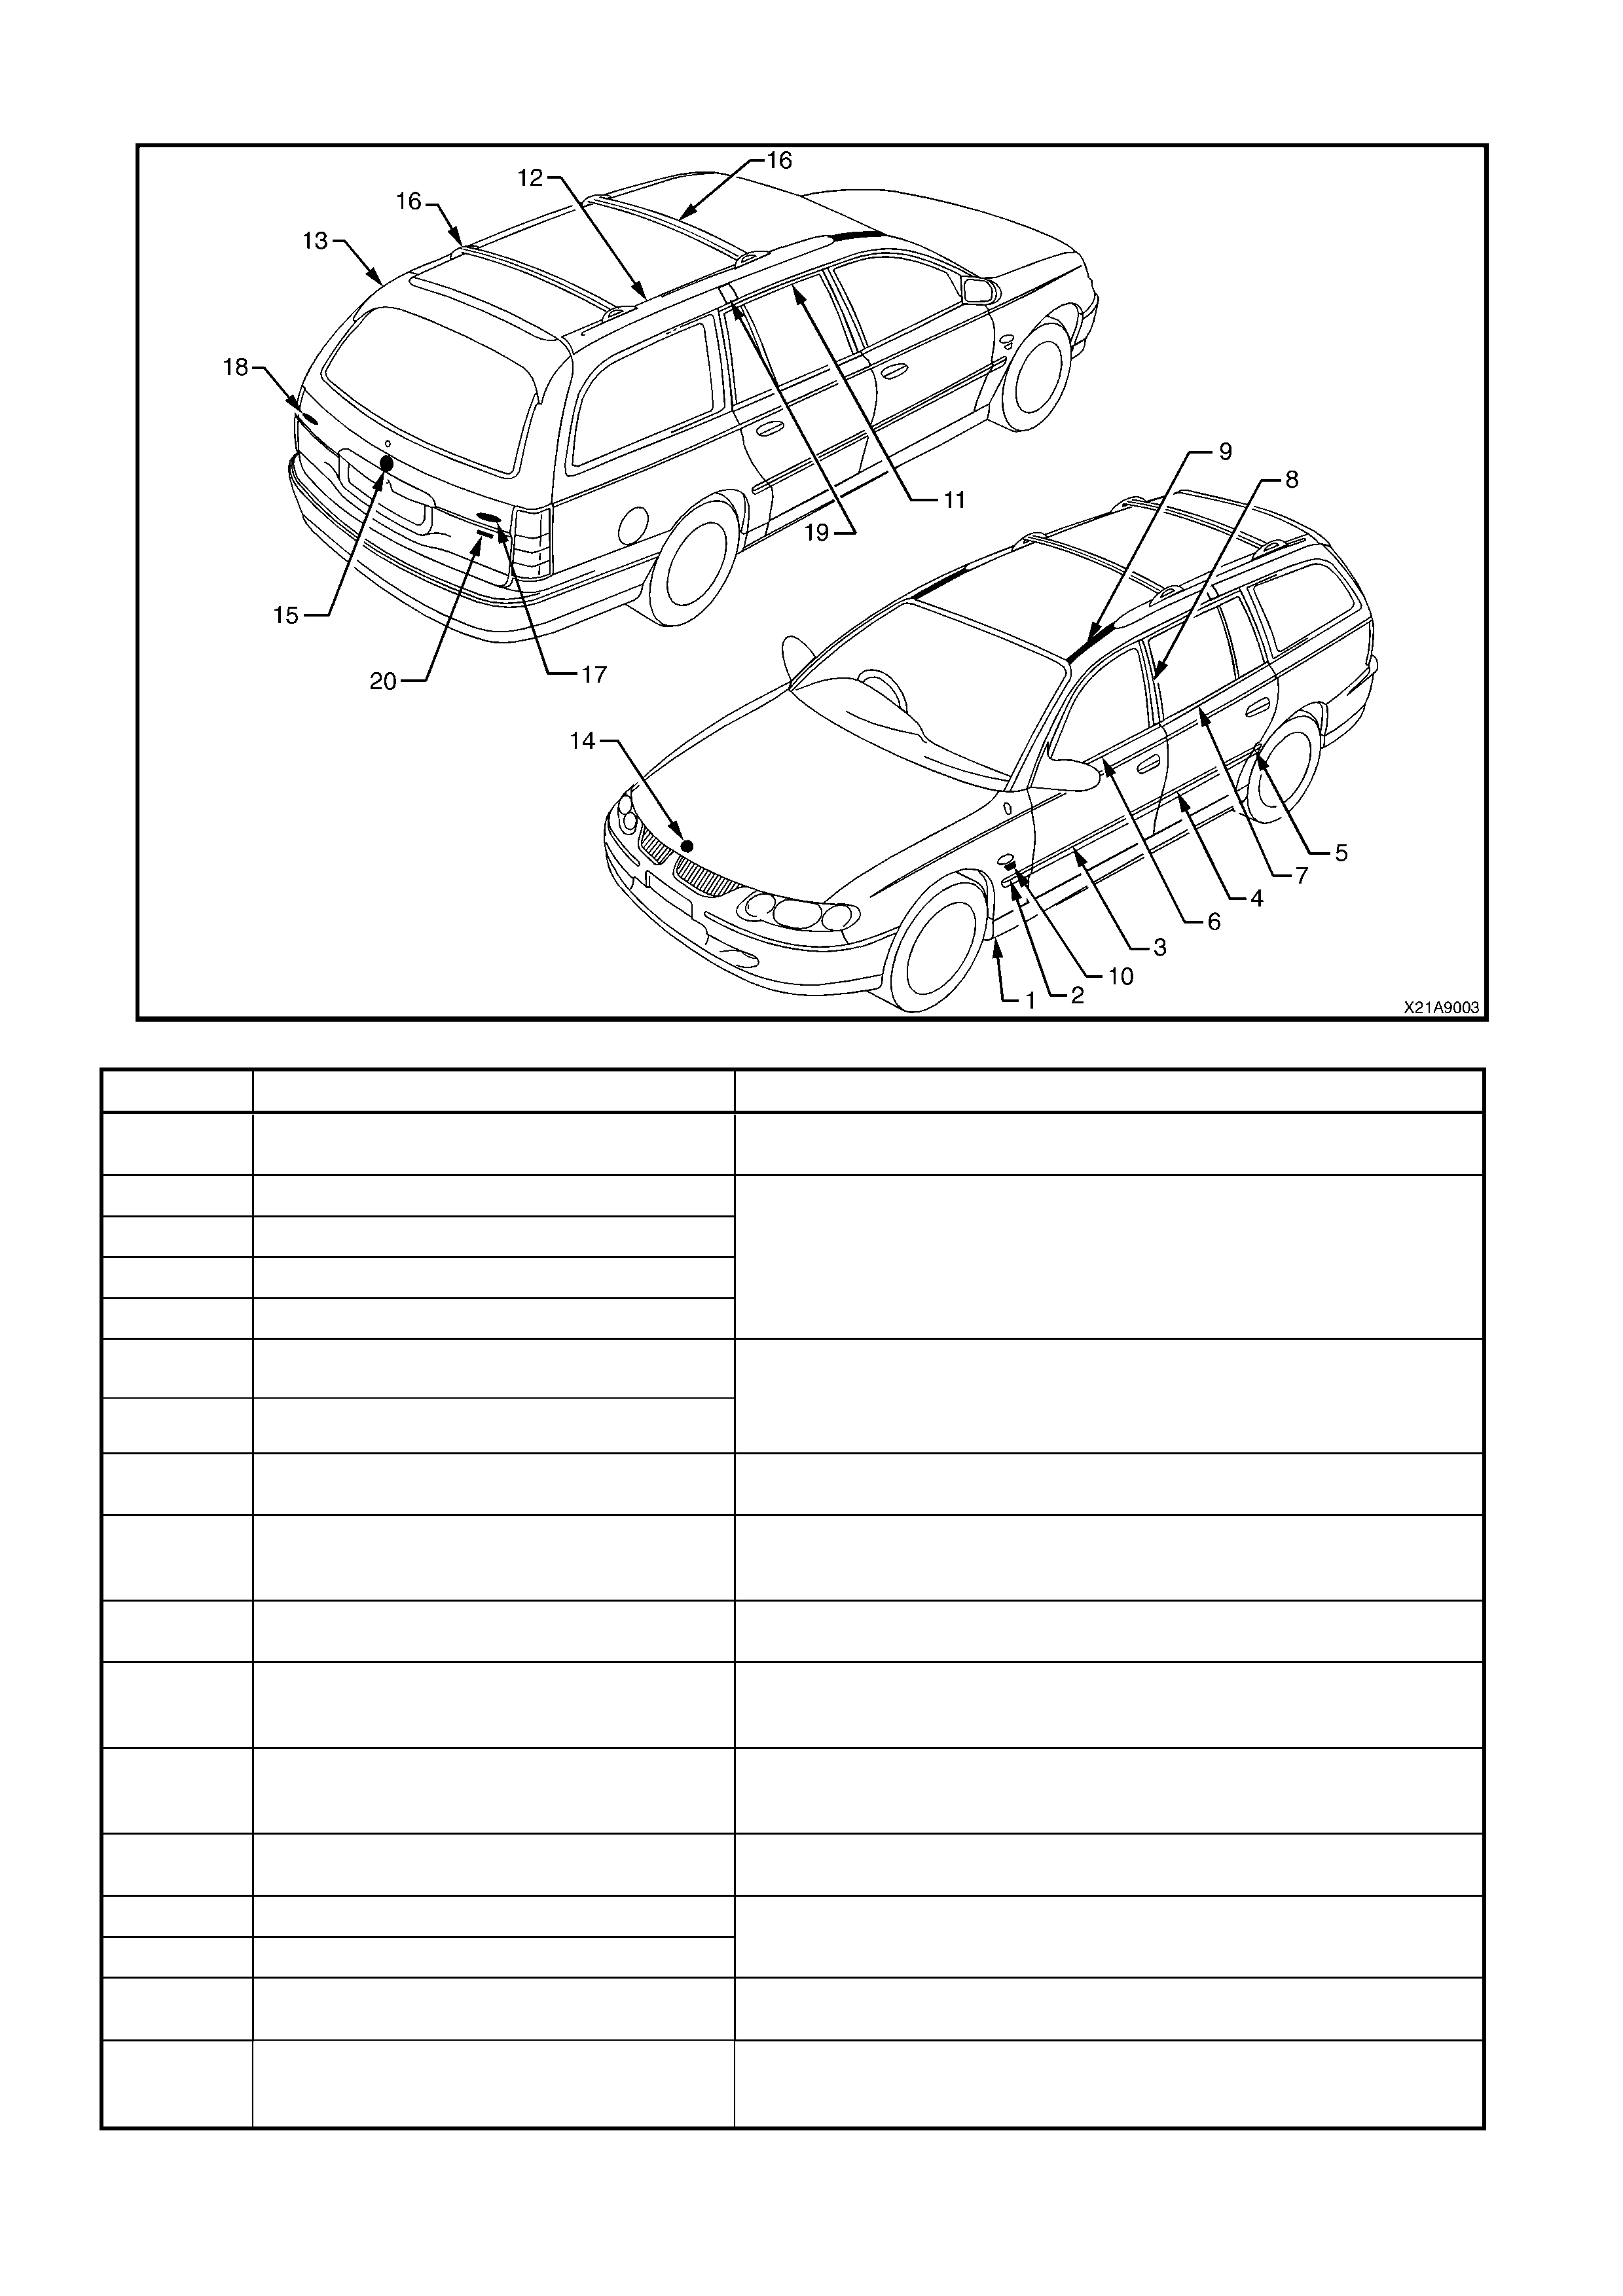
WAGON – ALL MODELS
Figure 1A9-3
ITEM DESCRIPTION REFERENCE
1 Rocker panel skirt 2.3 ROCKER PANEL SKIRT, Section 1A9 EXTERIOR
ORNAMENTATION in the VT Series I Service Information
2 Front fender side moulding
3 Front door side moulding
4 Rear door side moulding
5 Quarter panel side moulding
2.3 BODY SIDE MOULDINGS, Section 1A9 EXTERIOR
ORNAMENTATION in the VX Series I Service Information
6 Front door belt moulding
7 Rear door belt moulding
2.16 FRONT AND REAR DOOR BELT WEATHERSTRIP AND
MOULDING ASSEMBLY, Section 1A5 FRONT AND REAR
DOOR ASSEMBLIES, in the VT Series I Service Information
8 B pillar moulding 2.6 B PILLAR MOULDING, Section 1A9 EXTERIOR
ORNAMENTATION in the VT Series I Service Information
9 Roof finisher moulding 2.10 ROOF FINISHER MOULDING – WAGON, Section 1A9
EXTERIOR ORNAMENTATION in the VT Series I Service
Information
10 Name plate: engine type 2.5 NAME PLATES AND DECALS, Section 1A9 EXTERIOR
ORNAMENTATION in the VT Series II Service Information
11 Door frame opening moulding 2.8 DOOR FRAME OPENING MOULDING, Section 1A9
EXTERIOR ORNAMENTATION in the VT Series I Service
Information
12 Roof side moulding 2.11 ROOF SIDE MOULDING – WAGON, Section 1A9
EXTERIOR ORNAMENTATION in the VT Series I Service
Information
13 Tailgate air deflector 2.5 TAILGATE AIR DEFLECTOR, Section 1A9 EXTERIOR
ORNAMENTATION IN THE VX Series I Service Information
14 Emblem: Lion (engine hood)
15 Emblem: Lion (tailgate)
2.12 LION EMBLEM, Section 1A9 EXTERIOR
ORNAMENTATION in the VT Series I Service Information
16 Roof racks 2.6 ROOF RACKS – WAGON, Section 1A9 EXTERIOR
ORNAMENTATION in the VX Series I Service Information
17 Name plate: Executive, Equipe, Acclaim,
Lumina or Berlina 2.3 NAME PLATES AND DECALS in this Sect ion

ITEM DESCRIPTION REFERENCE
18 Name plate: Commodore 2.4 NAME PLATES AND DECALS, Section 1A9 EXTERIOR
ORNAMENTATION in the VX Series I Service Information
19 Roof joint moulding 3.9 ROOF JOINT MOULDING – WAGON, Section 3 BODY
CONSTRUCTION OF VX SERIES AND WH U4B SERVICE
MANUAL SUPPLEMENT – BODY STRUCTURE REPAIR
20 Name plate: Series II 2.3 NAME PLATES AND DECALS in this Section
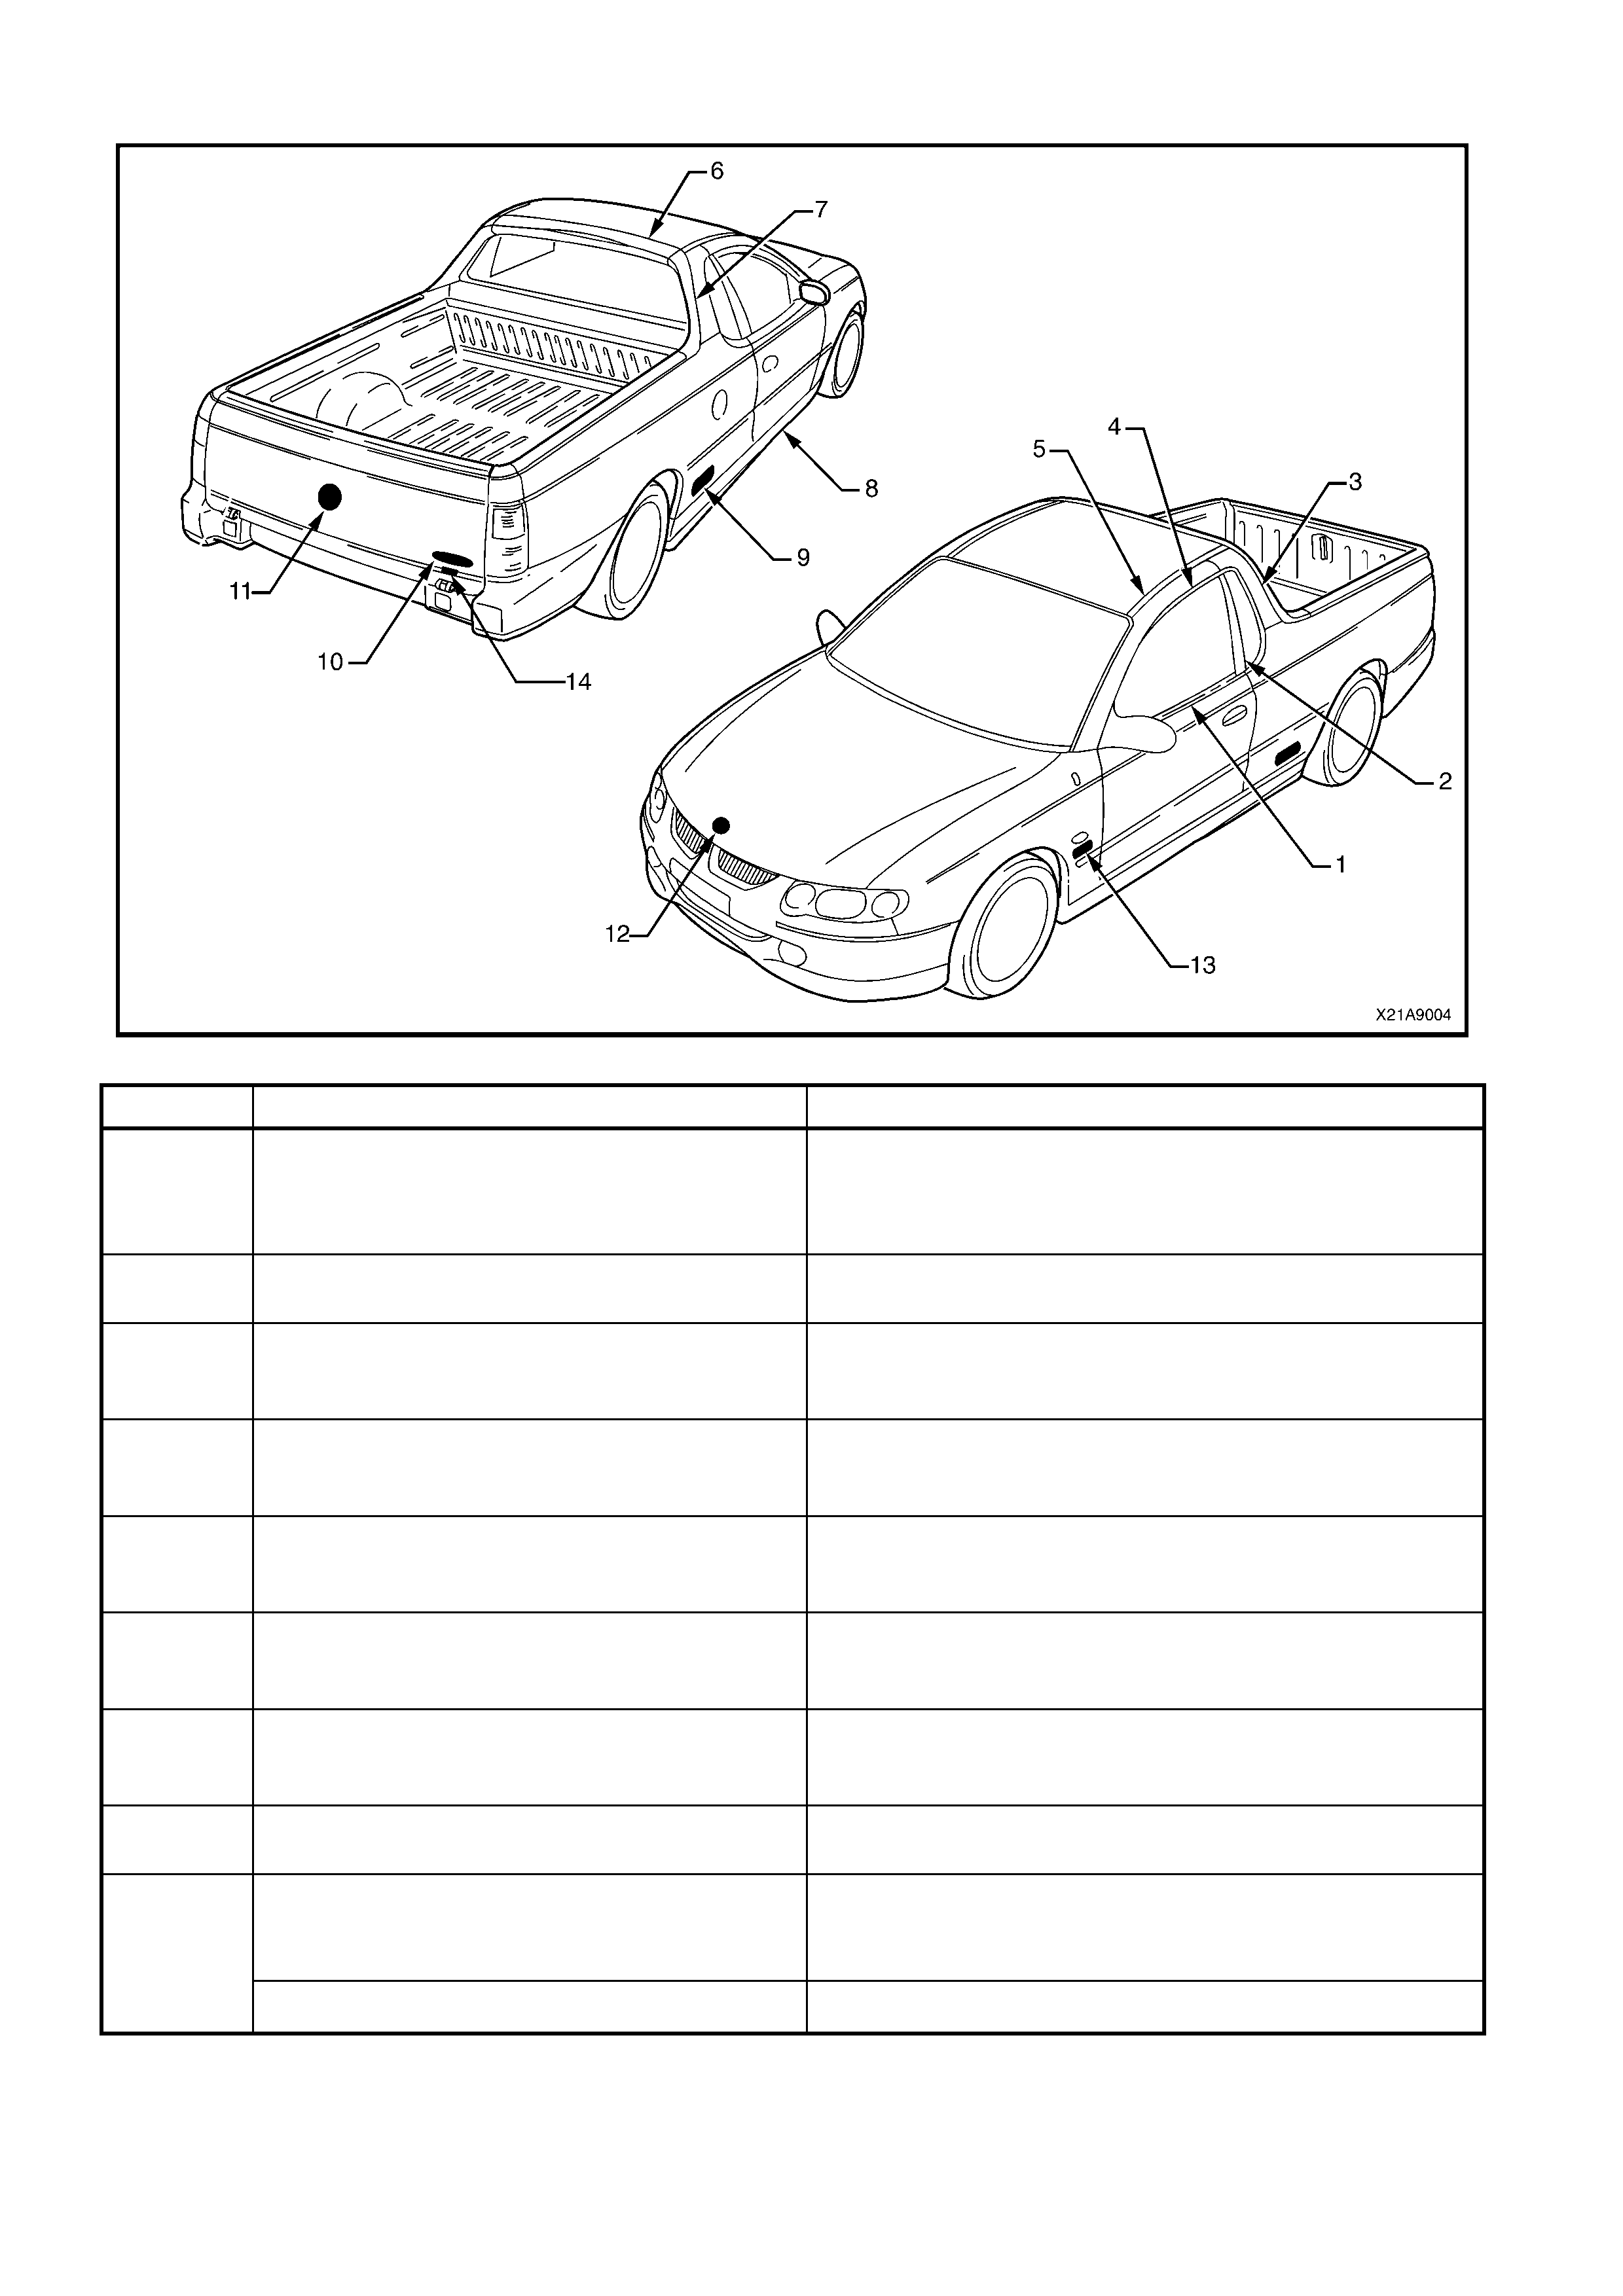
UTILITY – ALL MODELS
Figure 1A9-4
ITEM DESCRIPTION REFERENCE
1 Door belt moulding 2.16 FRONT AND REAR DOOR BELT WEATHERSTRIP
AND MOULDING ASSEMBLY, Section 1A5 FRONT AND
REAR DOOR ASSEMBLIES, in the VT Series I Service
Information
2 B pillar moulding 2.4 B PILLAR MOULDING, Section 1A9 EXTERIOR
ORNAMENTATION in the VU Series I Service Information
3 Quarter panel upper moulding 2.1 QUARTER PANEL UPPER MOULDING, Section 1A4
LOAD COMPARTMENT AND ENDGATE in the VU Series I
Service Information
4 Door frame opening moulding 2.5 DOOR FRAME OPENING MOULDING, Section 1A9
EXTERIOR ORNAMENTATION in the VU Series I Service
Information
5 Roof finisher front moulding 2.6 ROOF FINISHER MOULDING, Section 1A9
EXTERIOR ORNAMENTATION in the VU Series I Service
Information
6 Roof centre rear cap 2.1 QUARTER PANEL UPPER MOULDING, Section 1A4
LOAD COMPARTMENT AND ENDGATE in the VU Series I
Service Information
7 Roof side cap 2.1 QUARTER PANEL UPPER MOULDING, Section 1A4
LOAD COMPARTMENT AND ENDGATE in the VU Series I
Service Information
8 Rocker panel skirt 2.3 ROCKER PANEL SKIRT, Section 1A9 EXTERIOR
ORNAMENTATION in the VU Series I Service Information
SS badge 2.8 NAME PLATES AND DECALS, Section 1A9
EXTERIOR ORNAMENTATION in the VU Series I
Service Information
9
Storm or SS Fifty badge 2.3 NAME PLATES AND DECALS in this Section

ITEM DESCRIPTION REFERENCE
S or SS badge 2.8 NAME PLATES AND DECALS, Section 1A9
EXTERIOR ORNAMENTATION in the VU Series I
Service Information
10
Storm or SS Fifty badge 2.3 NAME PLATES AND DECALS in this Section
11 Emblem: Lion (Endgate) 2.8 NAME PLATES AND DECALS, Section 1A9
EXTERIOR ORNAMENTATION in the VU Series I Service
Information
12 Emblem: Lion (Engine hood) 2.7 LION EMBLEM – ENGINE HOOD, Section 1A9
EXTERIOR ORNAMENTATION in the VU Series I Service
Information
13 V6 or GEN III V8 Engine Badges 2.8 NAME PLATES AND DECALS, Section 1A9
EXTERIOR ORNAMENTATION in the VU Series I Service
Information
14 Name plate: Series II 2.3 NAME PLATES AND DECALS in this Section
LWB SEDAN – ALL MODELS
Figure 1A9-5
ITEM DESCRIPTION REFERENCE
1 Rocker panel skirt 2.3 ROCKER PANEL SKIRT, Section 1A9 EXTERIOR
ORNAMENTATION in the WH Series I Service Information
2 Front fender side moulding 2.4 BODY SIDE MOULDINGS, Section 1A9 EXTERIOR
ORNAMENTATION in the WH Series I Service Information
3 Front door side moulding 2.4 BODY SIDE MOULDINGS, Section 1A9 EXTERIOR
ORNAMENTATION in the WH Series I Service Information
4 Rear door side moulding 2.4 BODY SIDE MOULDINGS, Section 1A9 EXTERIOR
ORNAMENTATION in the WH Series I Service Information
5 Rear quarter side moulding 2.4 BODY SIDE MOULDINGS, Section 1A9 EXTERIOR
ORNAMENTATION in the WH Series I Service Information
6 Front door belt moulding 2.15 FRONT AND REAR DOOR BELT WEATHERSTRIP
AND MOULDING ASSEMBLY, Section 1A5 FRONT AND
REAR DOOR ASSEMBLIES in the WH Series I Service
Information
7 Rear door belt moulding 2.15 FRONT AND REAR DOOR BELT WEATHERSTRIP
AND MOULDING ASSEMBLY, Section 1A5 FRONT AND
REAR DOOR ASSEMBLIES in the WH Series I Service
Information
8 Quarter window frame moulding 3.3 REAR QUARTER WINDOW, Section 1A6
STATIONARY GLASS in the WH Series I Service
Information.
9 B pillar moulding 2.5 B PILLAR MOULDING, Section 1A9 EXTERIOR
ORNAMENTATION in the WH Series I Service Information.
10 Windshield moulding cover 2.7 WINDSHIELD MOULDING COVER, Section 1A9
EXTERIOR ORNAMENTATION in the W H Se ries I Service
Information
11 Door frame opening moulding 2.8 DOOR FRAME OPENING MOULDING, Section 1A9
EXTERIOR ORNAMENTATION in the W H Se ries I Service
Information
ITEM DESCRIPTION REFERENCE
12 Roof finisher moulding 2.9 ROOF FINISHER MOULDING, Section 1A9
EXTERIOR ORNAMENTATION in the W H Se ries I Service
Information
Engine Badge (Excluding V8 International) 2.11 NAME PLATES AND DECALS, Section 1A9
EXTERIOR ORNAMENTATION in the W H Se ries I Service
Information
13
V8 International Engine Badge 2.3 NAME PLATES AND DECALS in this Section
14 Emblem: Lion (Decklid) 2.4 LION EMBLEM, DECKLID – STATESMAN/CAPRICE in
this Section
15 Ornament: Lion (Engine hood) 2.10 ‘LION’ ORNAMENT/ EMBLEM – ENGINE HOOD
Section 1A9 EXTERIOR ORNAMENTATION, the WH
Series I Service Information
16 Nameplate: Statesman Series II or Caprice
Series II 2.3 NAME PLATES AND DECALS in this Sect ion
17 Decklid Air spoiler 2.5 DECKLID AIR SPOILER – STATESMAN V8
INTERNATIONAL/INTERNATIONAL LS8 in this Section
18 Nameplate: Statesman V8 International or
International LS8 2.3 NAME PLATES AND DECALS in this Sect ion
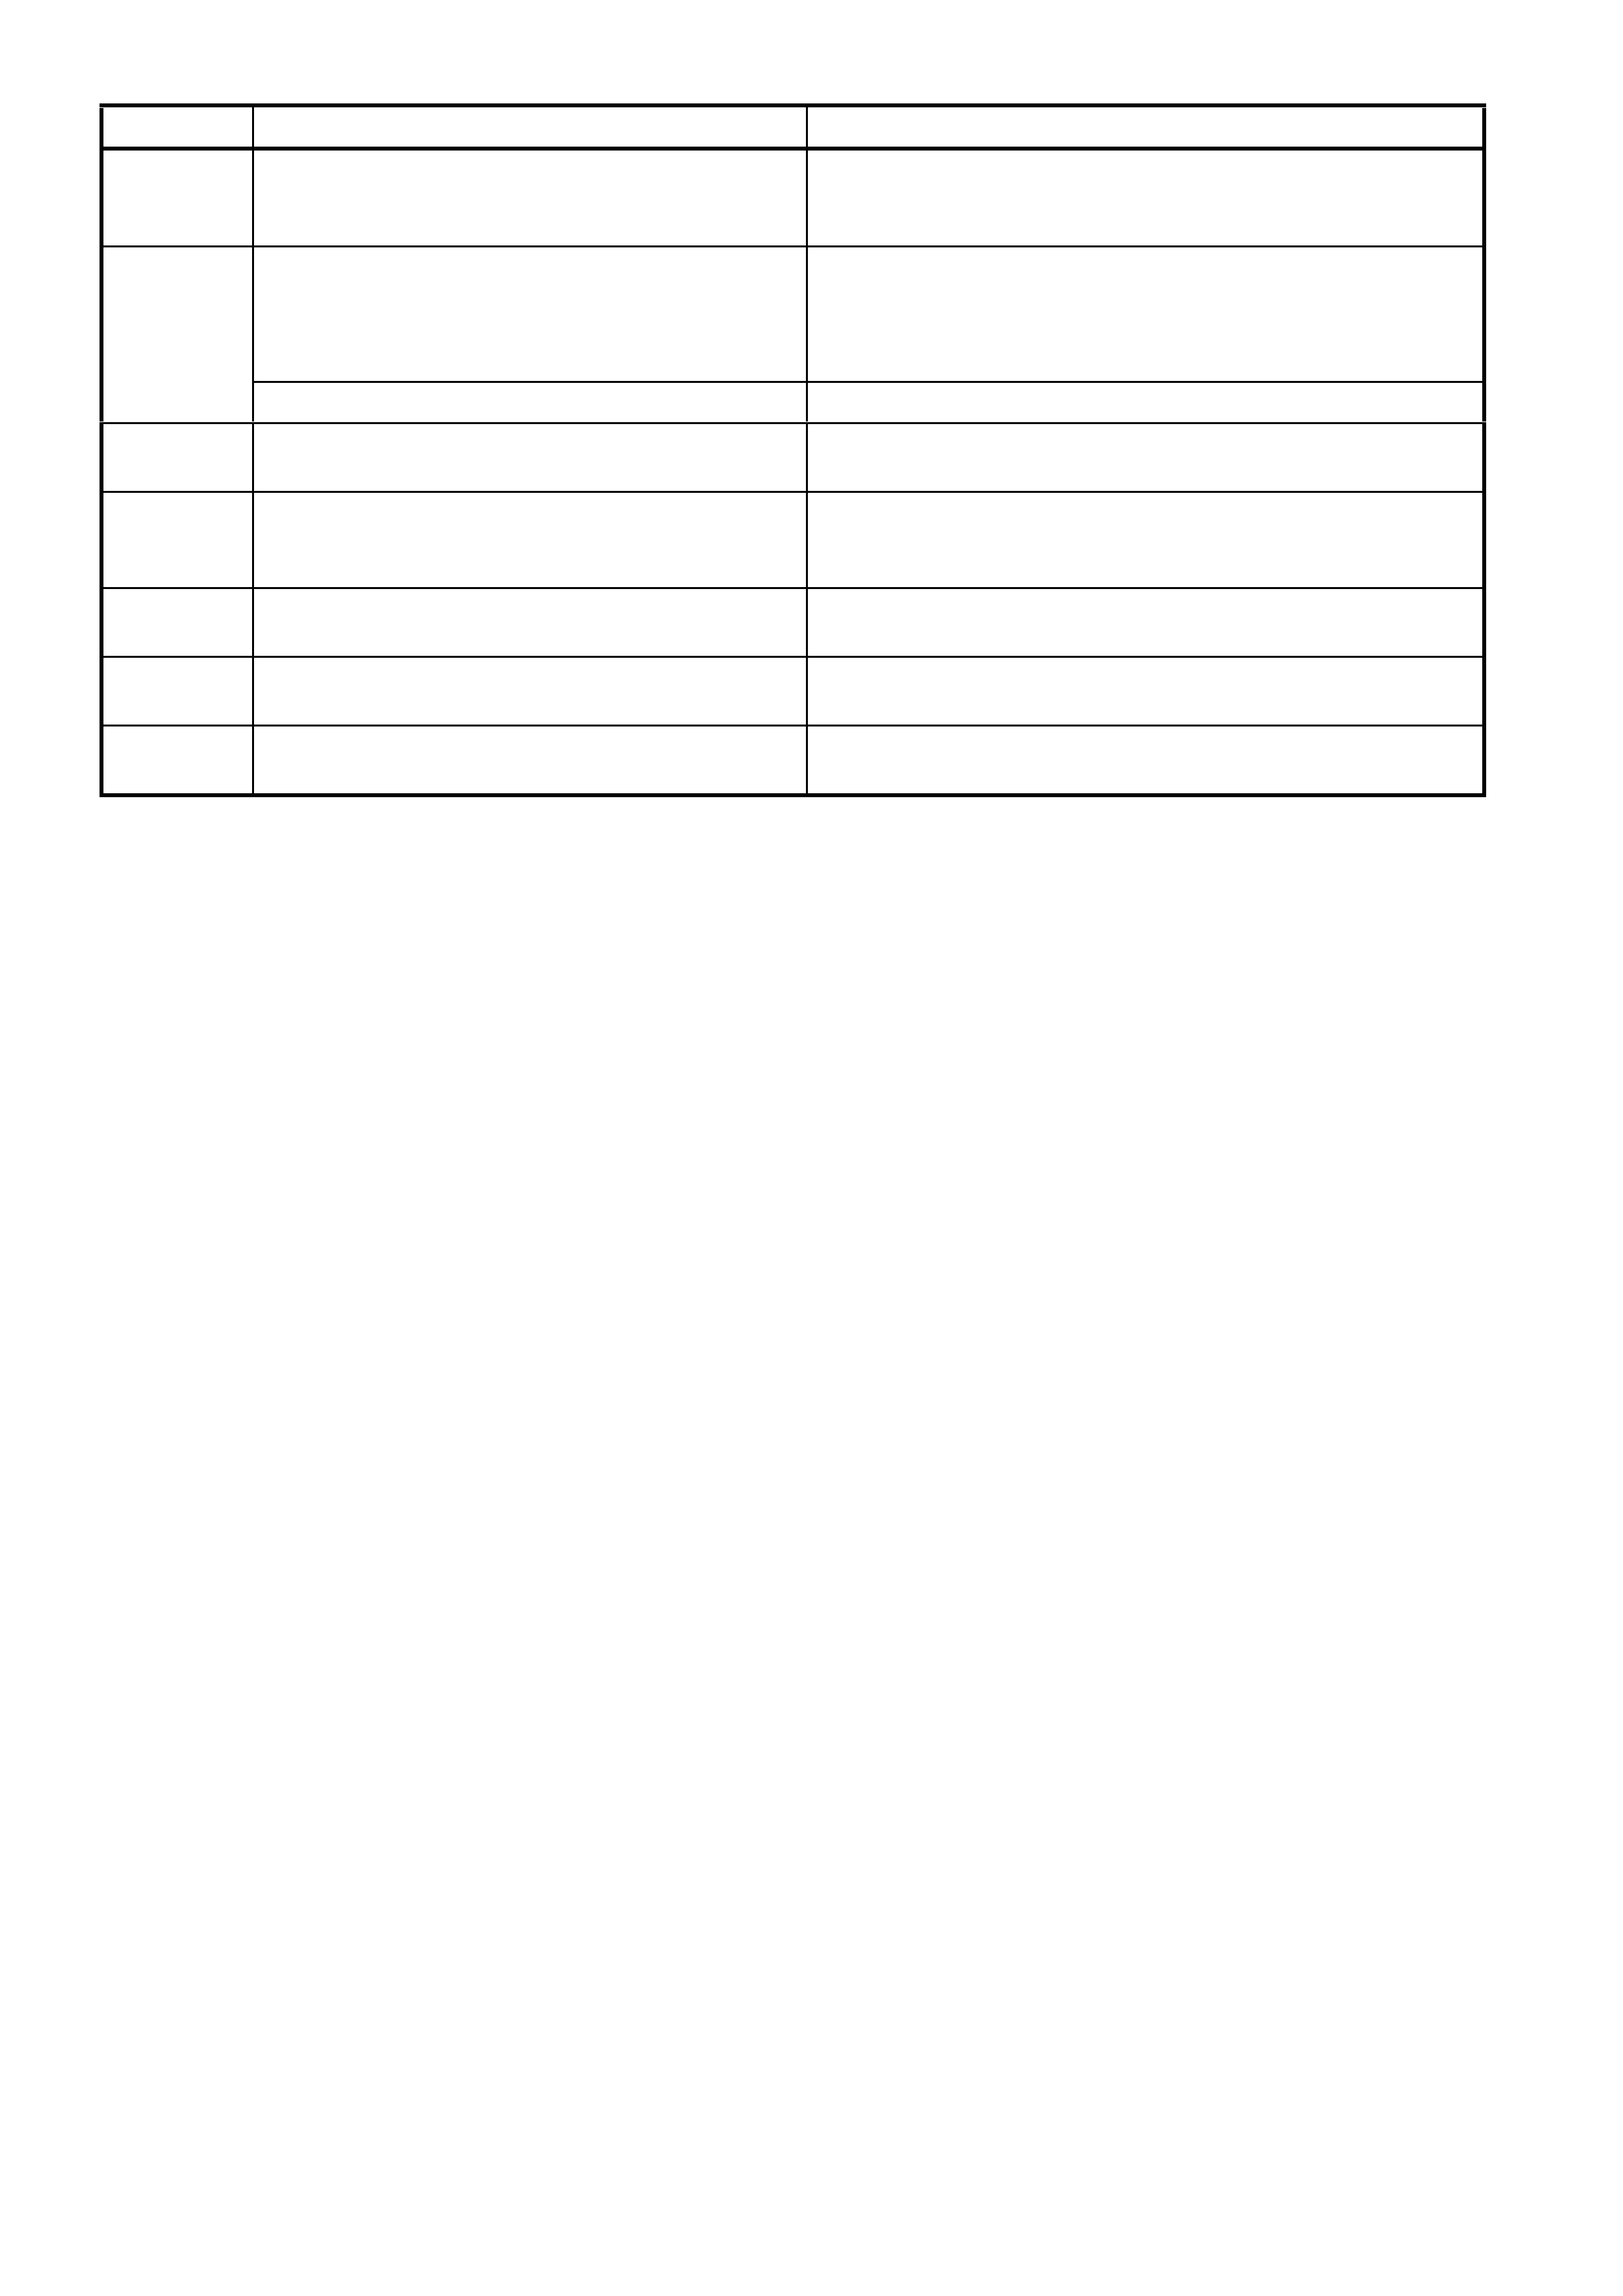
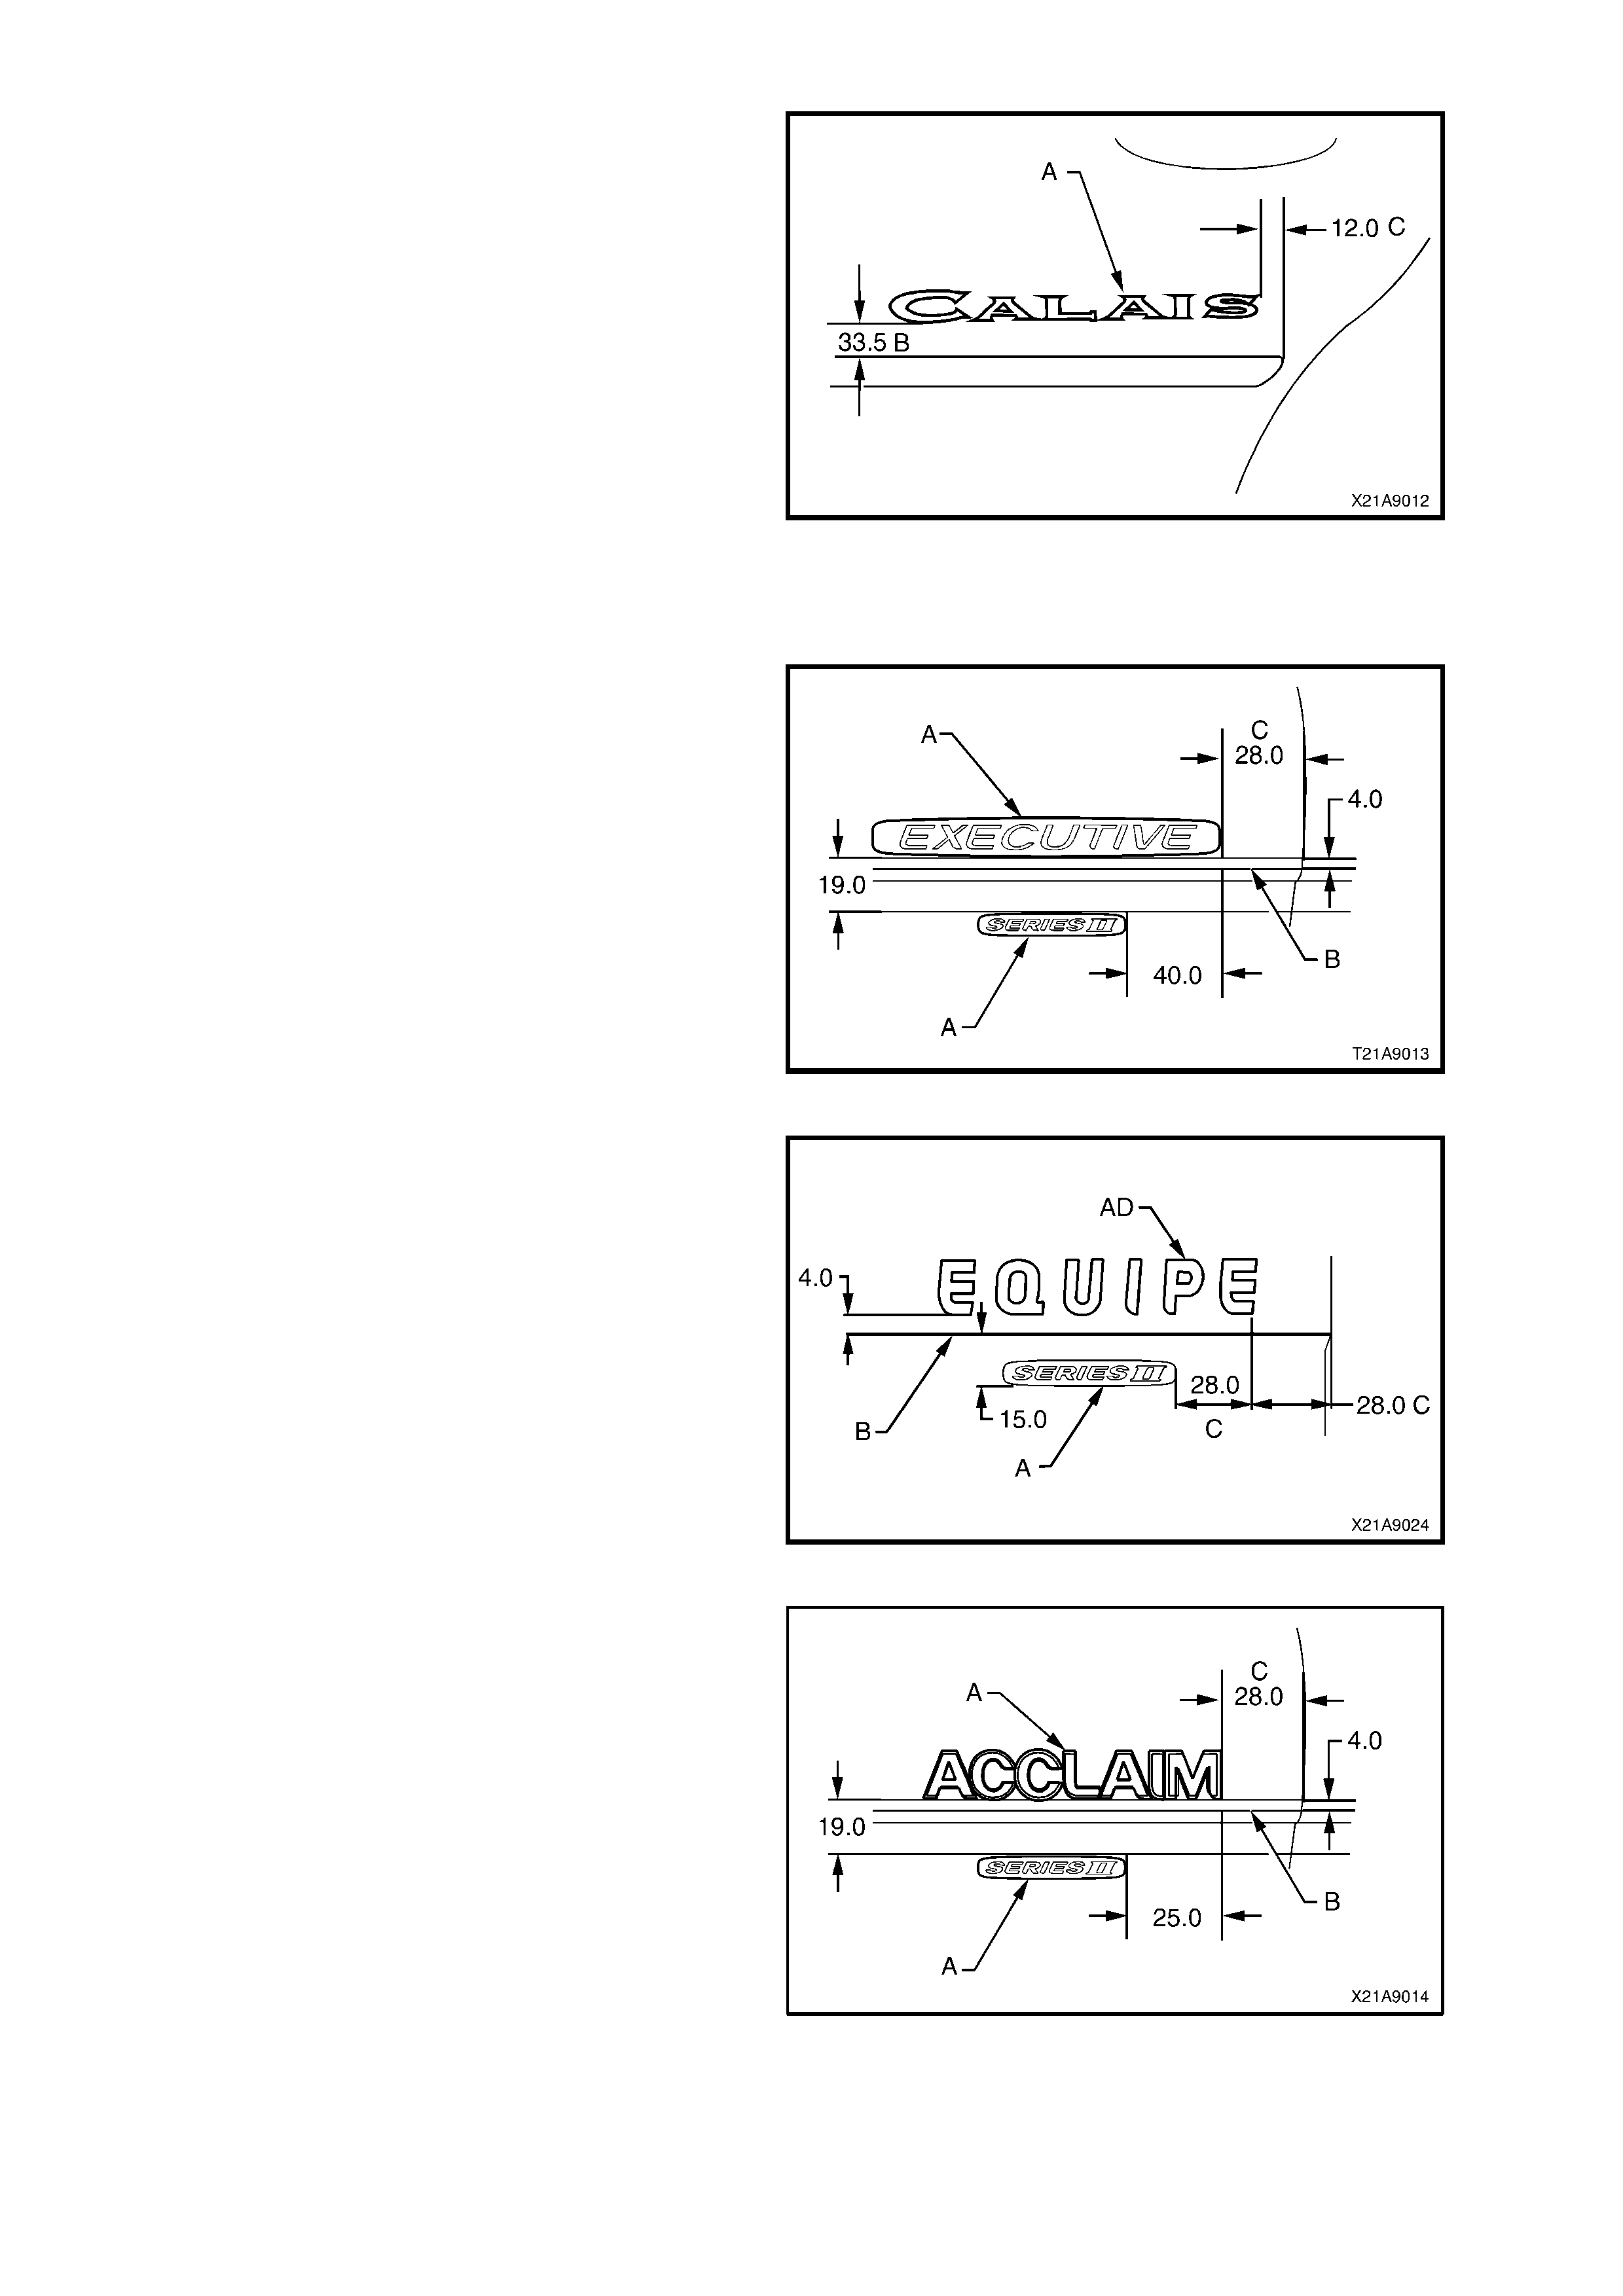
2.3 NAME PLATES AND DECALS
‘EXECUTIVE SERIES II’ - EXECUTIVE SEDAN
RH side view of decklid
NOTE: All measurements are in mm.
A Before installation, remove release paper.
B Measured from lower edge of rear quarter
lamp.
Figure 1A9-6
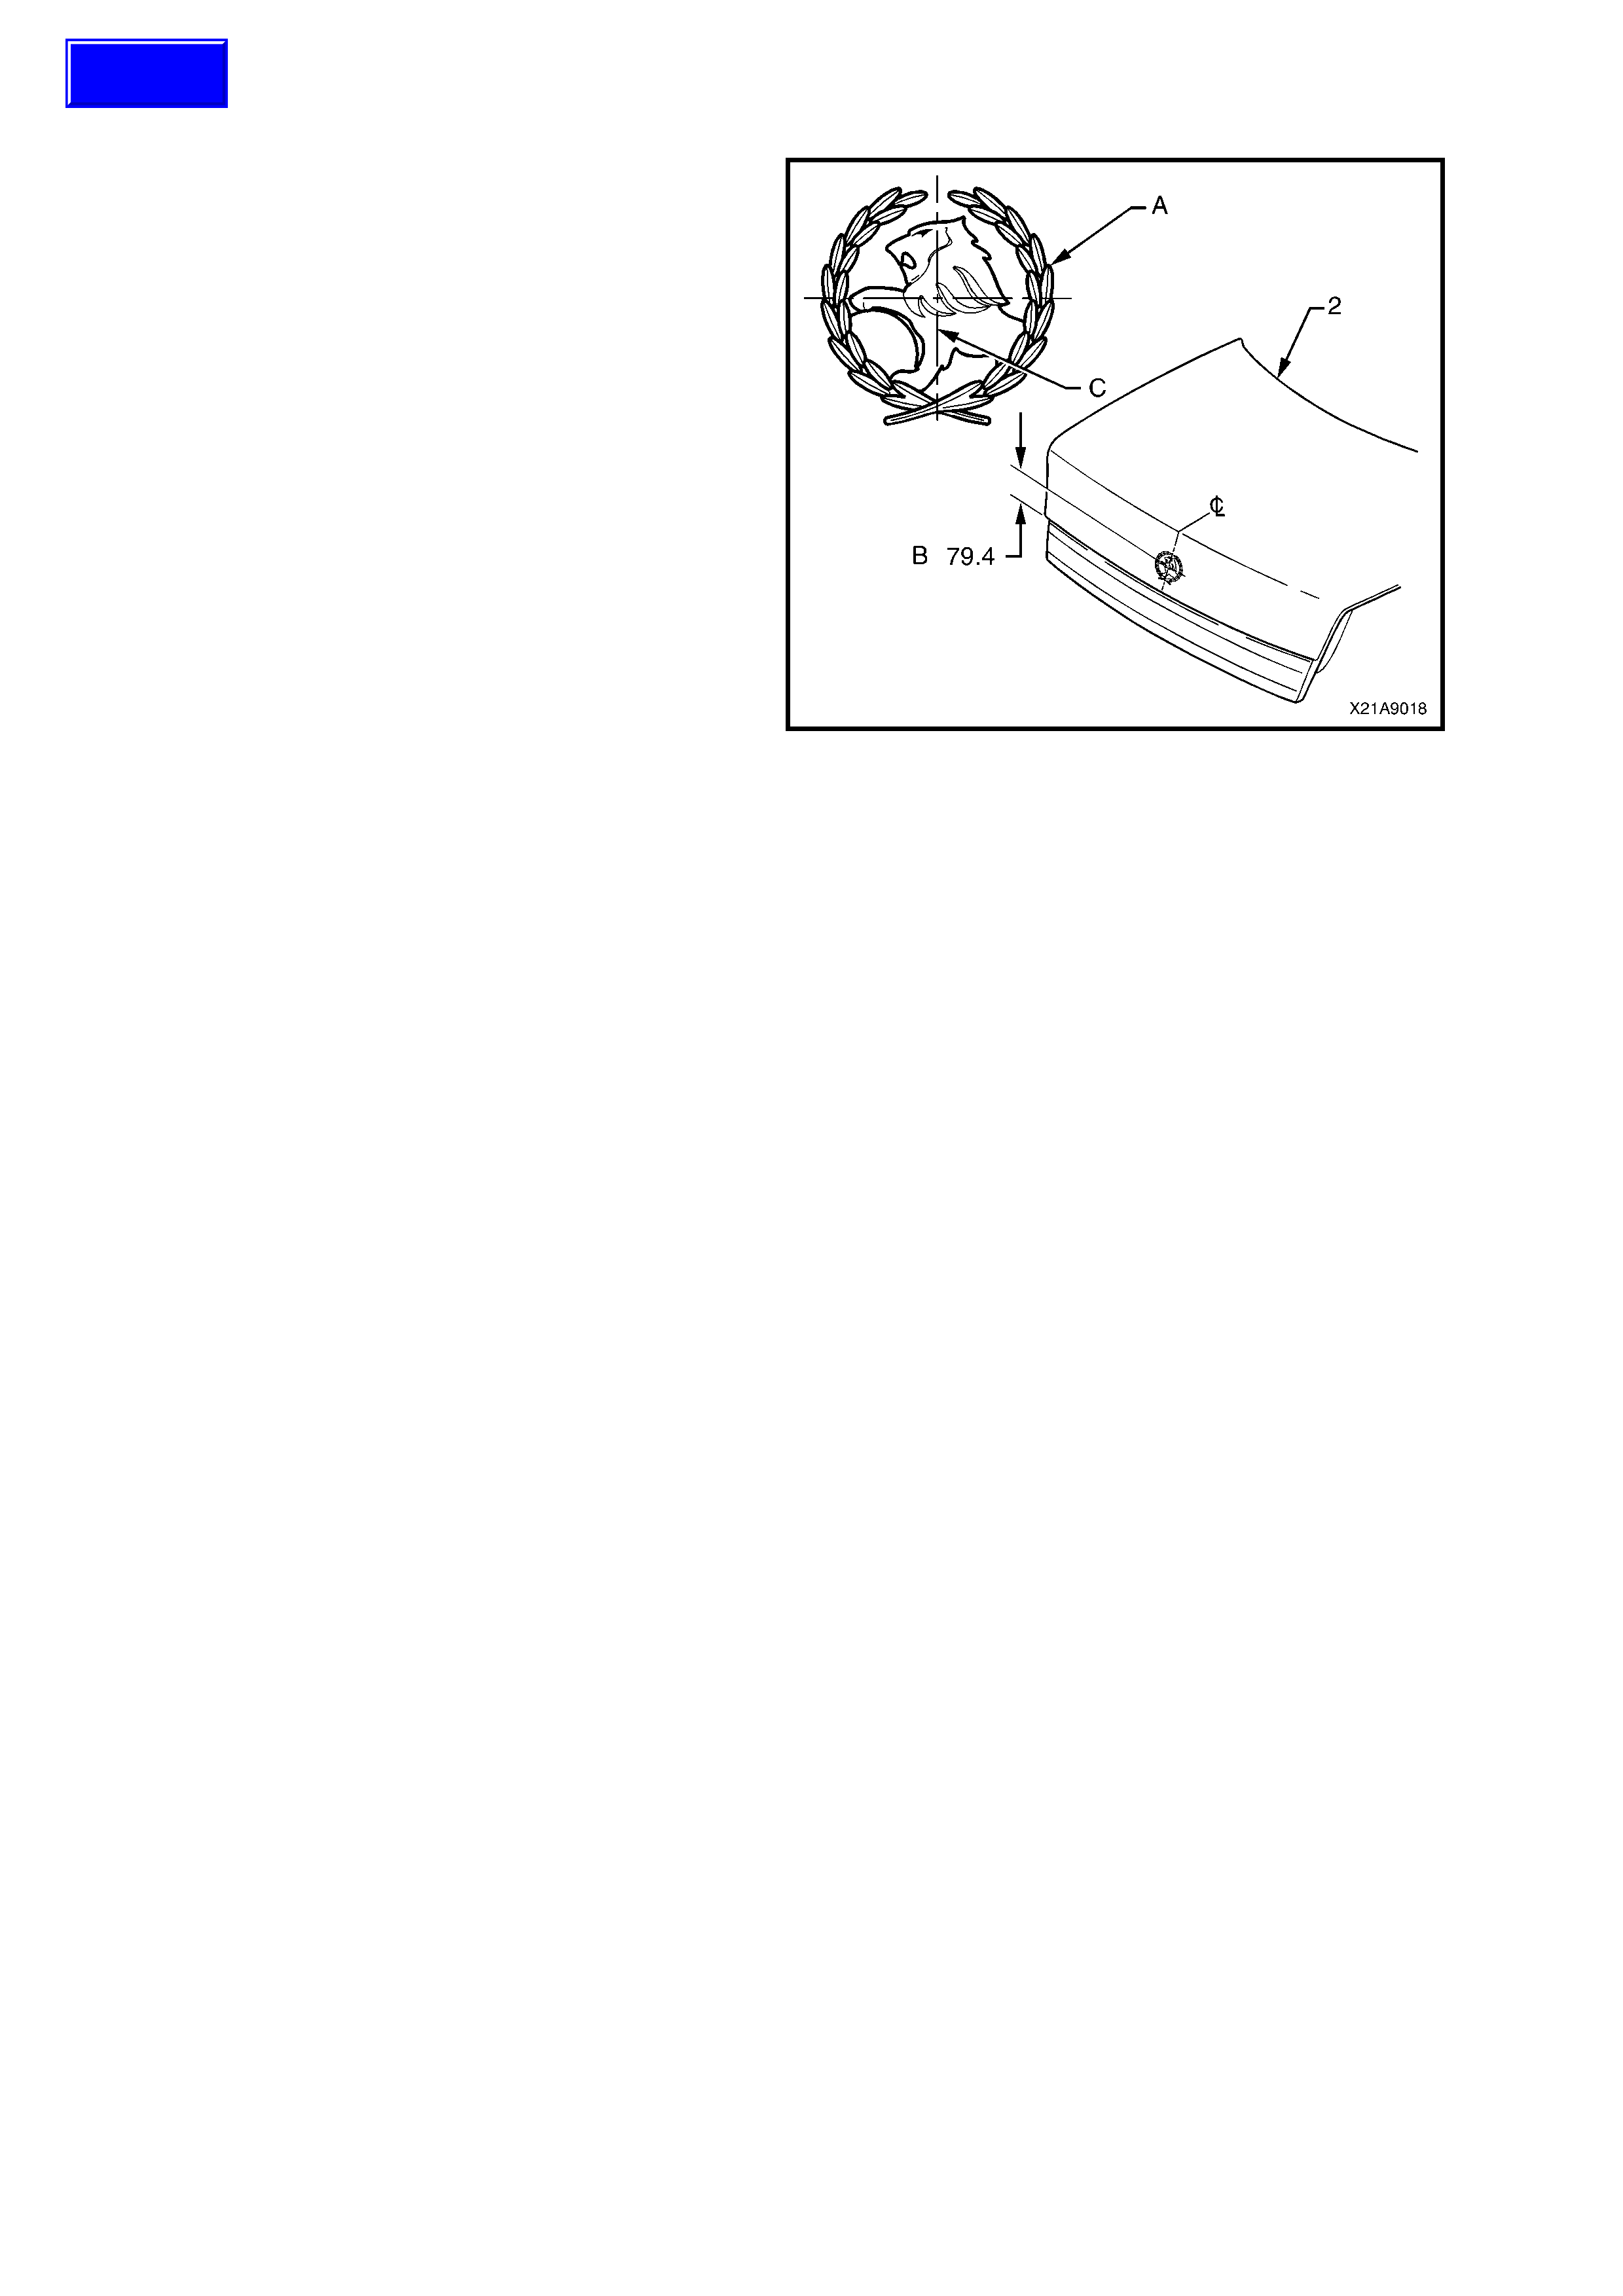
‘EQUIPE SERIES II’ - EQUIPE SEDAN
RH side view of decklid
NOTE: All measurements are in mm.
A Before installation, remove release paper.
B Measured from lower edge of rear quarter
lamp.
C Letters of nameplate are individual items held
in correct relationship by a carrier film. This
carrier film is also used as a positioning
template. After installation, remove carrier film.
Figure 1A9-7
‘ACCLAIM SERIES II’ - ACCLAIM SEDAN
RH side view of decklid
NOTE: All measurements are in mm.
A Before installation, remove release paper.
B Measured from lower edge of rear quarter
lamp.
Figure 1A9-8
‘LUMINA SERIES II’ - LUMINA SEDAN
RH side view of decklid
NOTE: All measurements are in mm.
A Before installation, remove release paper.
B Measured from lower edge of rear quarter
lamp.
C Letters of nameplate are individual items held
in correct relationship by a carrier film. This
carrier film is also used as a positioning
template. After installation, remove carrier film.
Figure 1A9-9
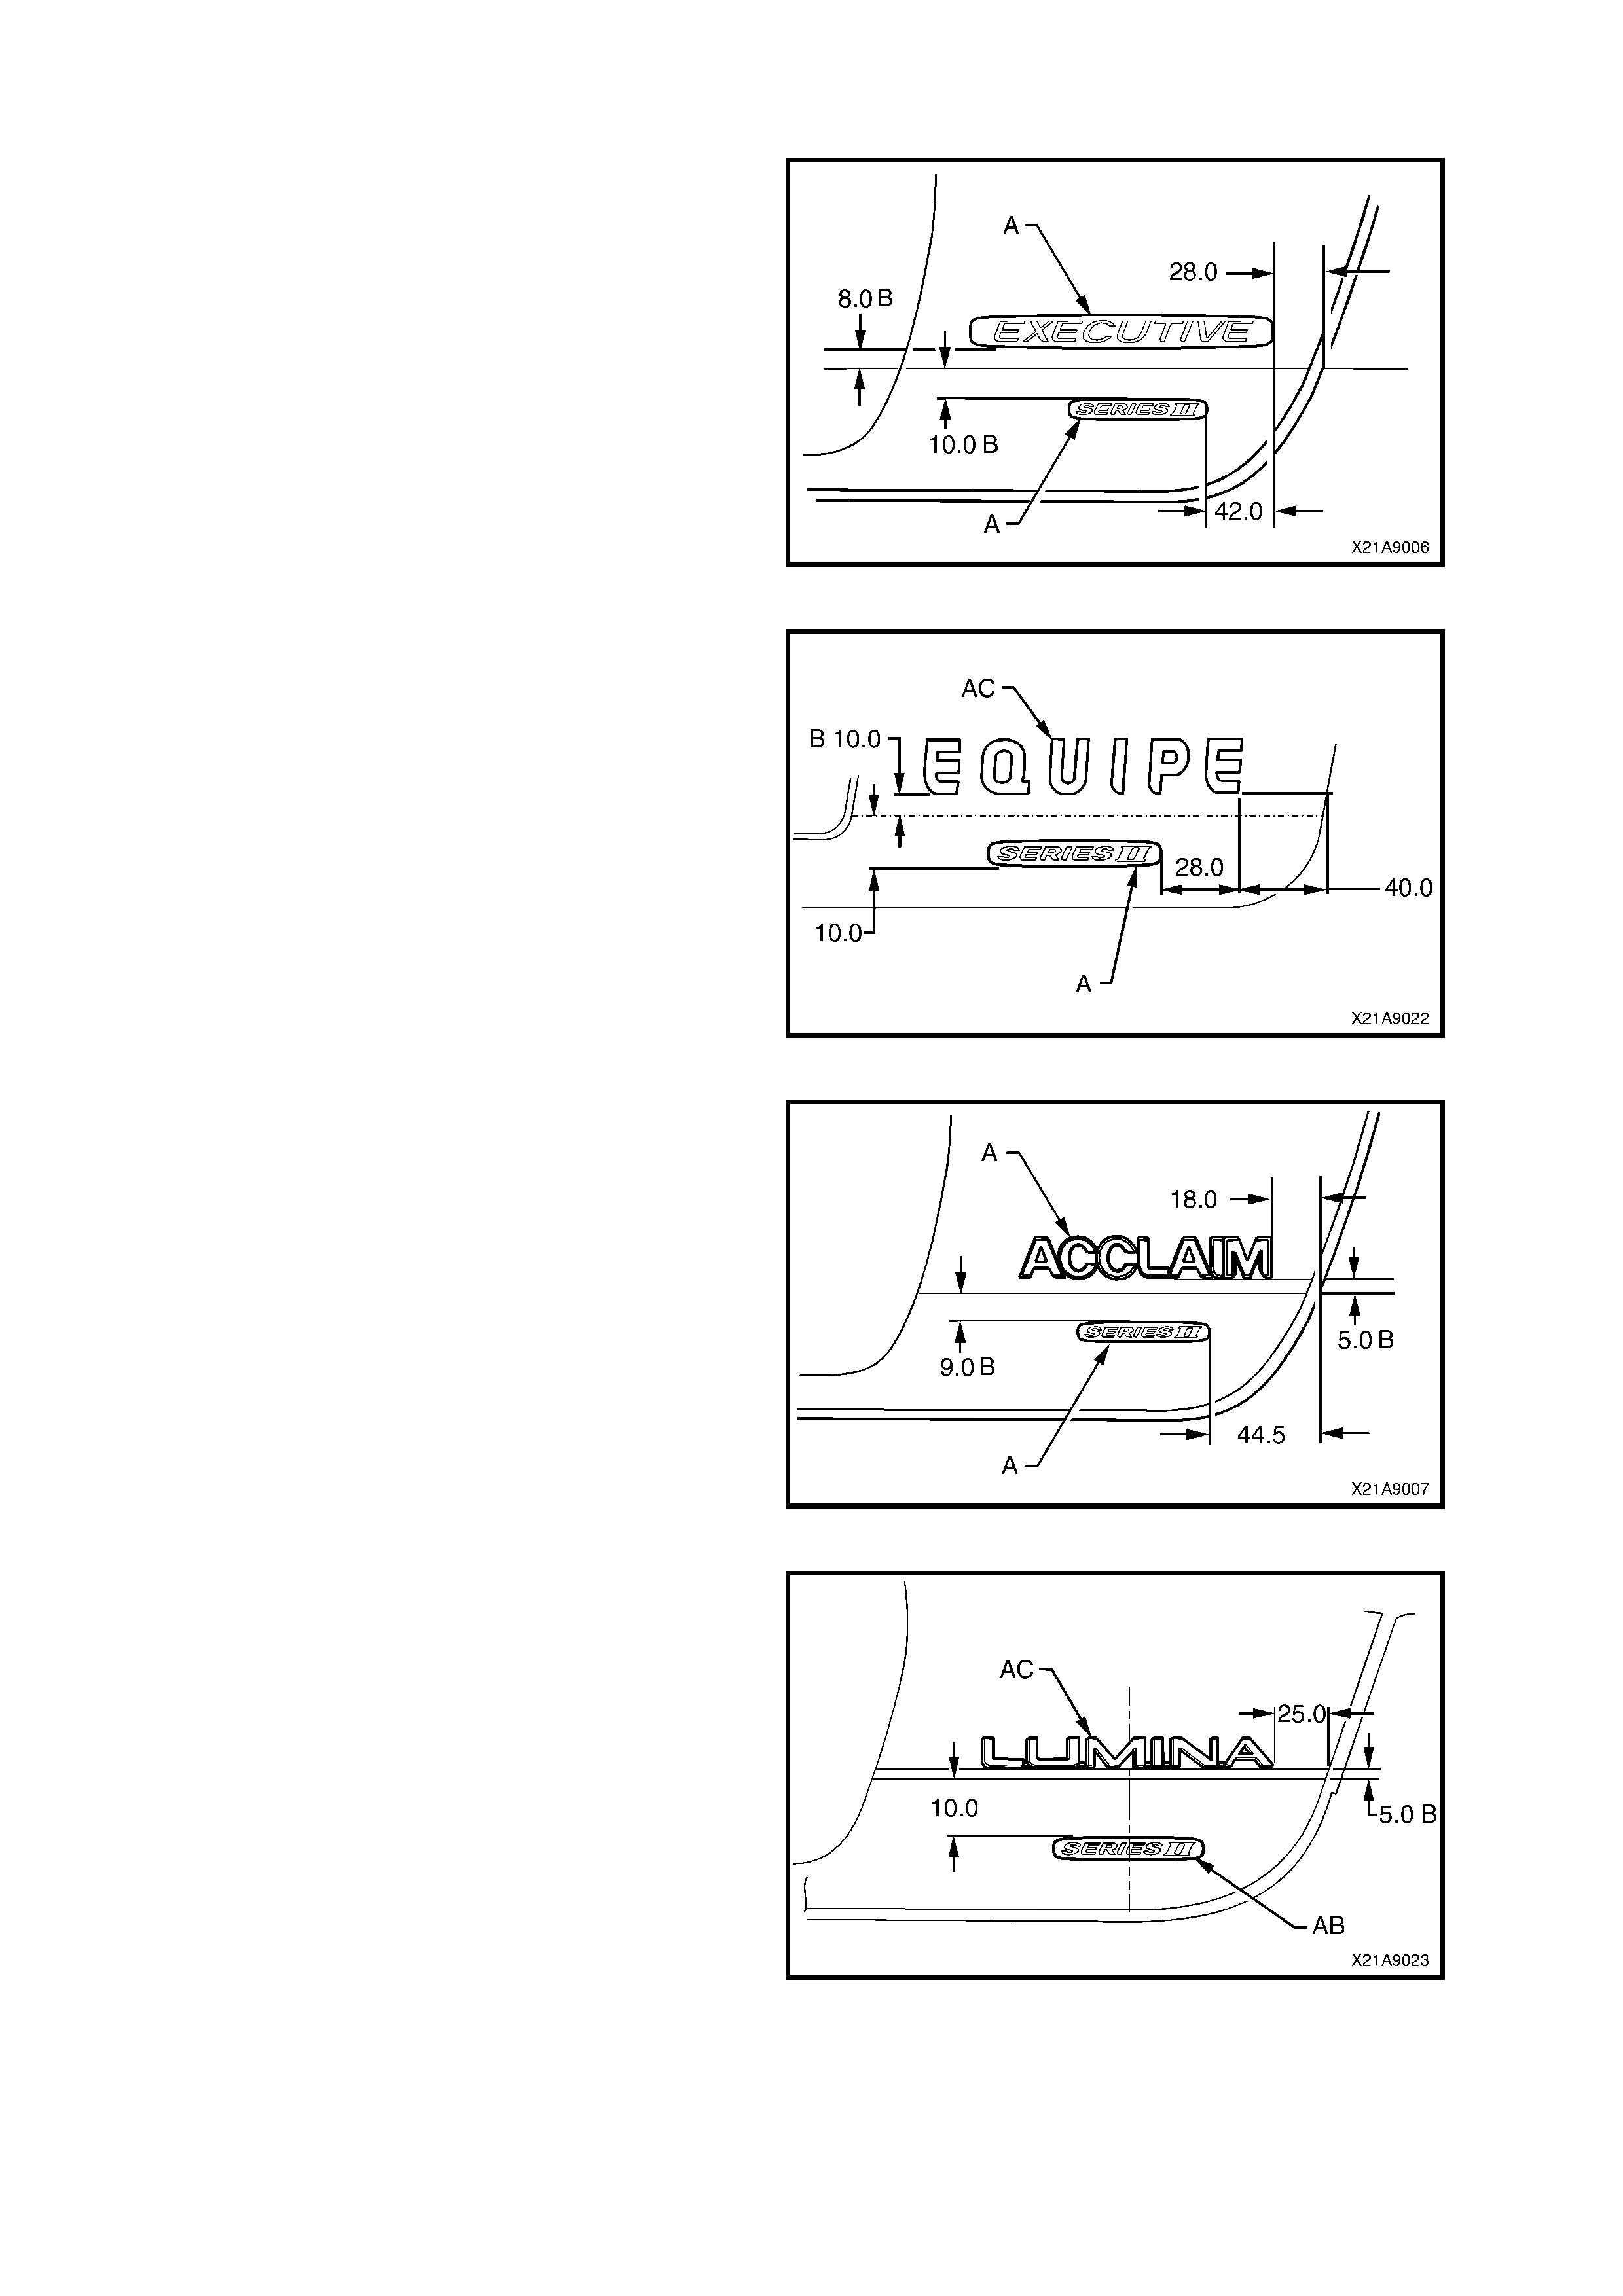
‘S SERIES II’ – S SEDAN
RH side view of decklid
NOTE: All measurements are in mm.
A Before installation, remove release paper.
B Measured from lower edge of rear quarter
lamp.
Figure 1A9-10
‘SS SERIES II’ – SS SEDAN
RH side view of decklid
NOTE: All measurements are in mm.
A Before installation, remove release paper.
B Measured from lower edge of rear quarter
lamp.
Figure 1A9-11
‘BERLINA SERIES II’ - BERLINA SEDAN
RH side view of decklid
NOTE: All measurements are in mm.
A Before installation, remove release paper.
B Measured from lower edge of rear decor panel.
Figure 1A9-12
‘CALAIS SERIES II’ - CALAIS
RH side view of decklid
NOTE: All measurements are in mm.
A Before installation of nameplate, remove
release paper. Letters of nameplate are
individual item s held in c orrec t relations hip by a
carrier film. This carrier film is also used as a
positioning template. After installation, remove
carrier film.
B Measurement from lower edge of rear decor
panel.
Figure 1A9-13
LH rear door
NOTE 1: All measurements are in mm.
NOTE 2: All dimensions are measured on surface
of rear door.
NOTE 3: RH rear door opposite.
A Before installation of nameplate, remove
release paper. Letters of nameplate are
individual item s held in c orrec t relations hip by a
carrier film. This carrier film is also used as a
positioning template. After installation, remove
carrier film.
B Measurement from upper edge of rear door
moulding.
C Measurement from rear edge of rear door
moulding.
Figure 1A9-14
‘EXECUTIVE SERIES II’ - EXECUTIVE WAGON
RH side view of tailgate
NOTE: All measurements are in mm.
A Before installation, remove release paper.
B Crease in tailgate panel
C Measured from edge of tailgate panel.
Figure 1A9-15
‘EQUIPE SERIES II’ - EQUIPE WAGON
RH side view of tailgate
NOTE: All measurements are in mm.
A Before installation, remove release paper.
B Crease in tailgate panel.
C Measured from edge of tailgate panel.
D Letters of nameplate are individual items held
in correct relationship by a carrier film. This
carrier film is also used as a positioning
template. After installation, remove carrier film.
Figure 1A9-16
‘ACCLAIM SERIES II’ - ACCLAI M WAGON
RH side view of tailgate
NOTE: All measurements are in mm.
A Before installation, remove release paper.
B Crease in tailgate panel.
C Measured from edge of tailgate panel.
Figure 1A9-17

‘LUMINA SERIES II’ - LUMINA WAGON
RH side view of tailgate
NOTE: All measurements are in mm.
A Before installation, remove release paper.
B Crease in tailgate panel.
C Measured from edge of tailgate panel.
Figure 1A9-18
‘BERLINA SERIES II’ - BERLINA WAGON
RH side view of decklid
NOTE: All measurements are in mm.
A Before installation, remove release paper.
B Centre line of crease in tailgate panel.
C Measured from edge of tailgate panel.
Figure 1A9-19
‘SERIES II’ - UTILITY
RH side view of endgate
NOTE: All measurements are in mm.
A Before installation, remove release paper.
B Measured from crease in endgate panel.
C Measured from edge of endgate panel.
Figure 1A9-20
‘S SERIES II’ – S UTILITY
RH side view of endgate
NOTE: All measurements are in mm.
A Before installation, remove release paper.
B Measured from crease in endgate panel.
C Measured from edge of endgate panel.
Figure 1A9-21
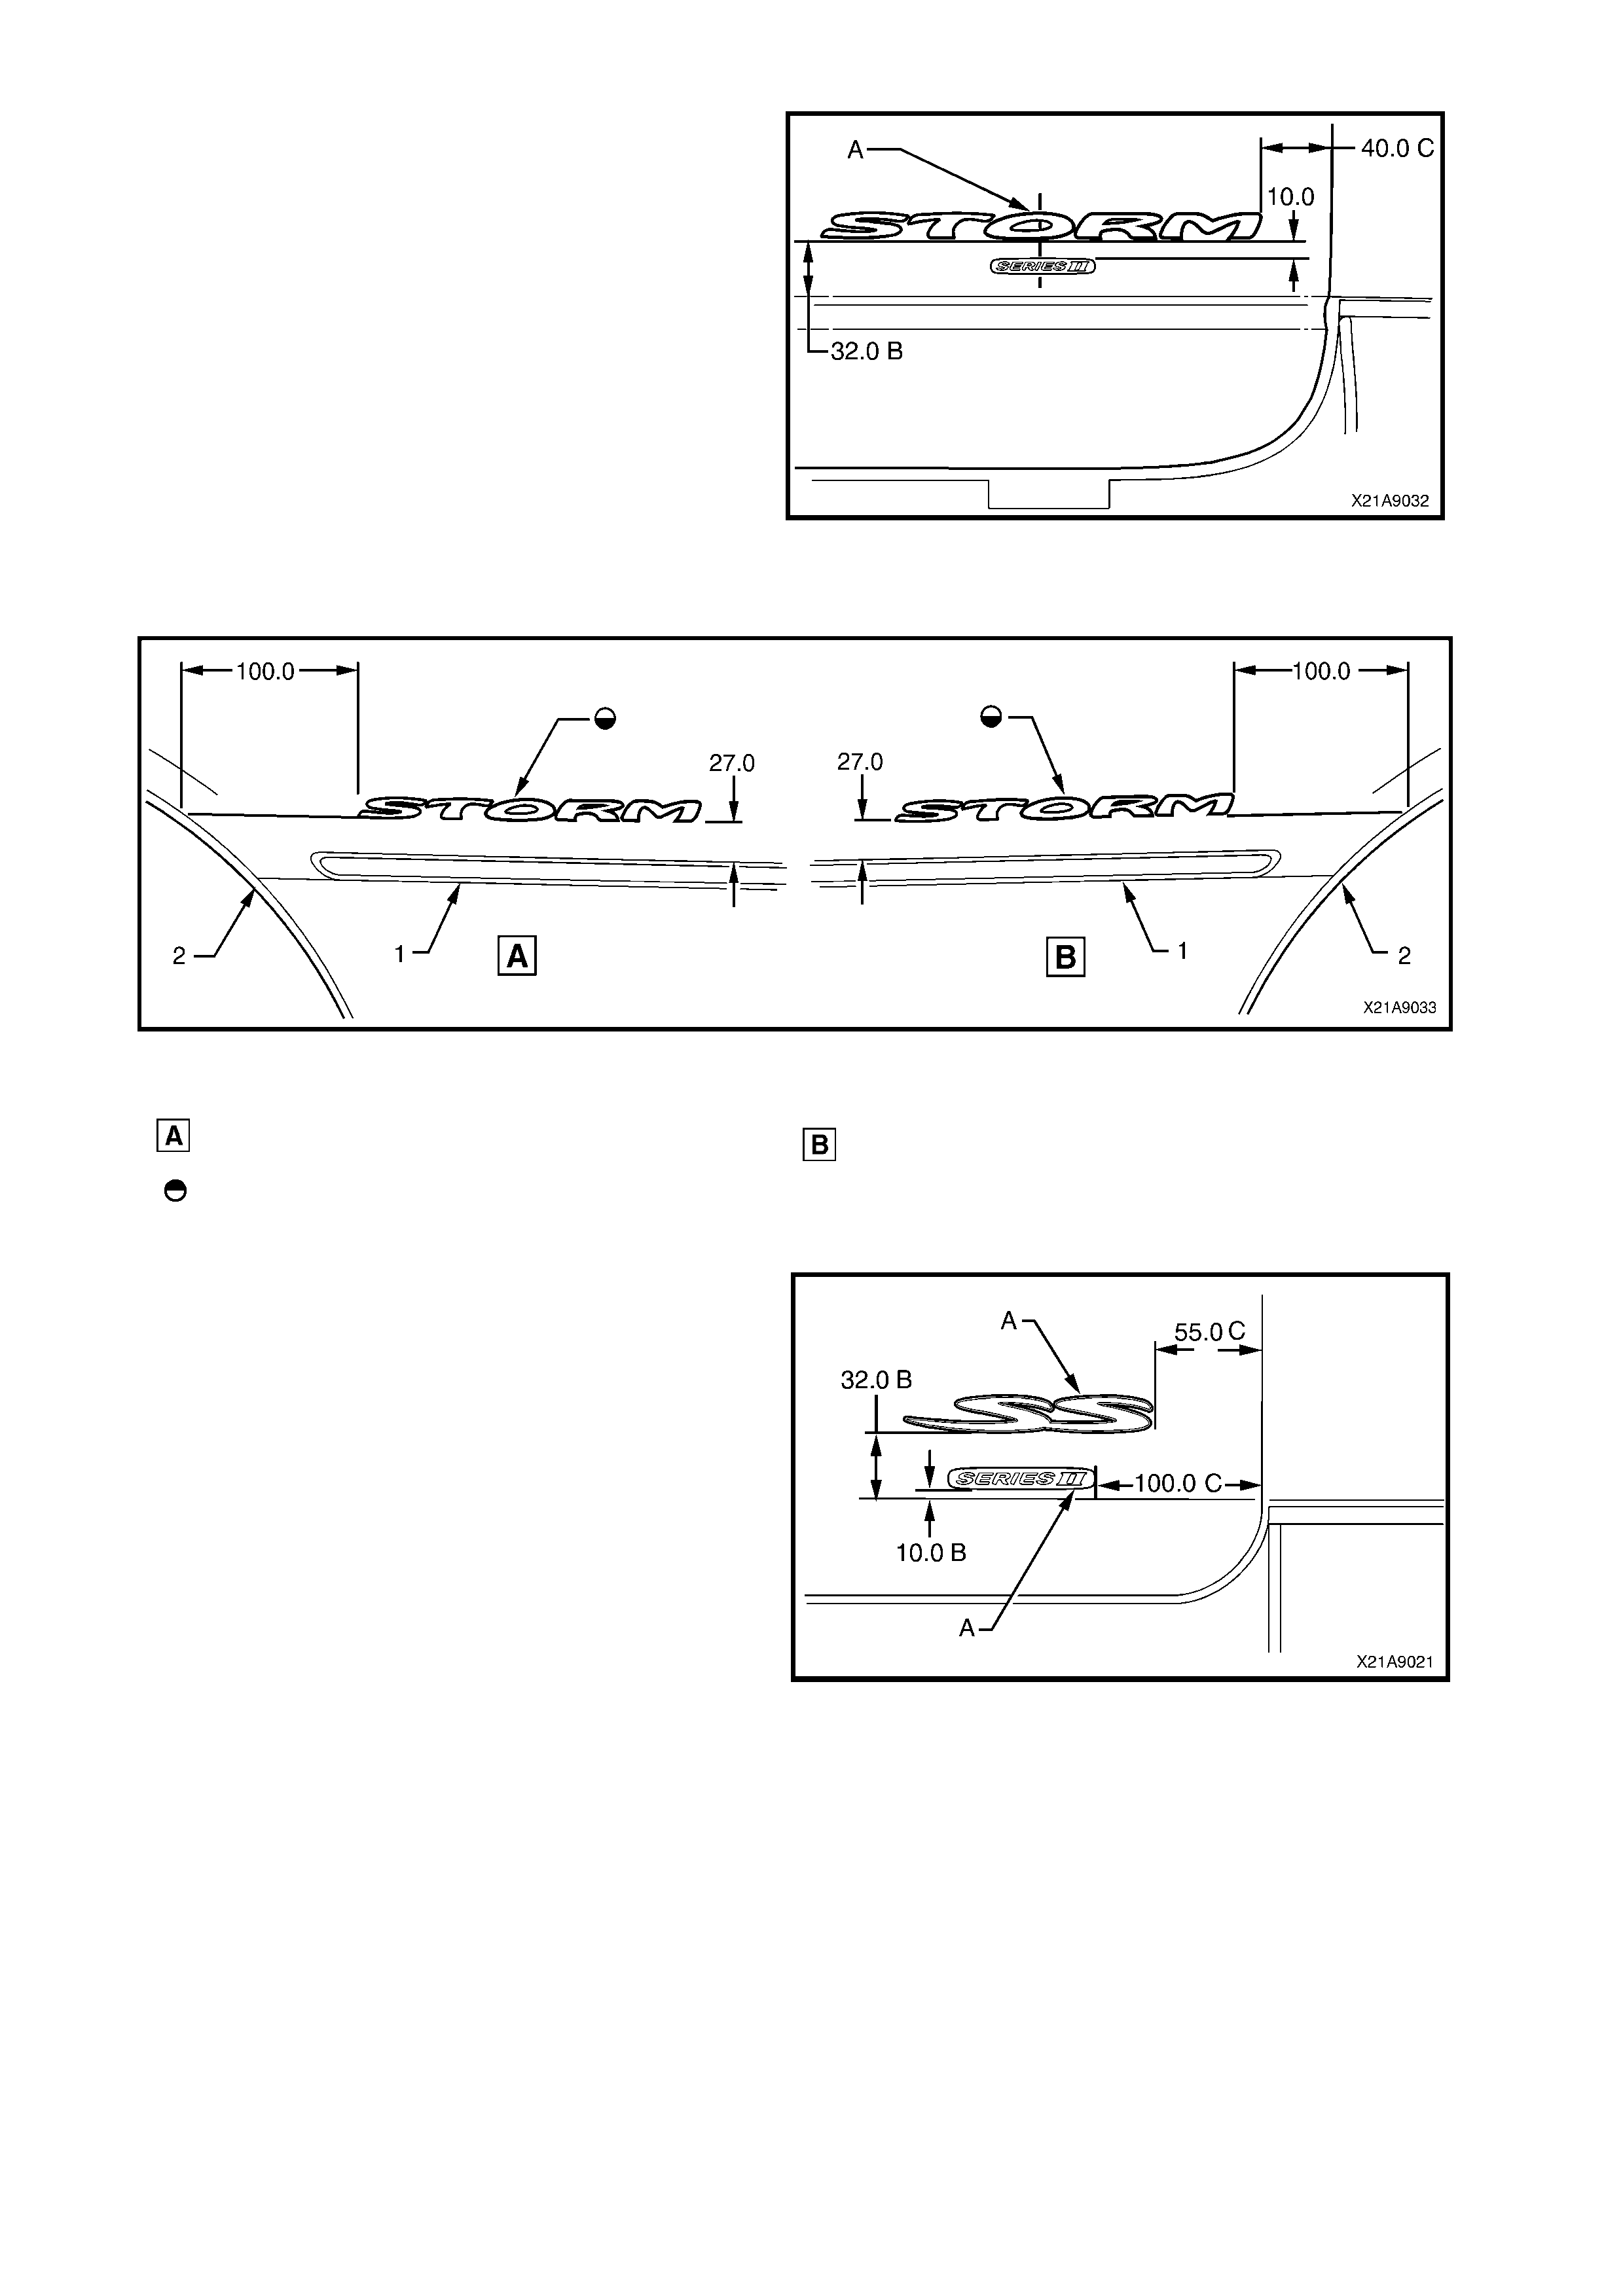
‘STORM’ – S UTILITY
RH side view of endgate
NOTE: All measurements are in mm.
A Before installation, remove release paper.
B Measured from crease in endgate panel.
C Measured from edge of endgate panel.
Figure 1A9-22
Rear quarter Panel
Figure 1A9-23
Legend
RH side outer panel
Before installation remove release paper.
LH side outer panel
1. Body side moulding groove
2. Rear wheelarch
‘SS SERIES II’ – SS UTILITY
RH side view of decklid
NOTE: All measurements are in mm.
A Before installation, remove release paper.
B Measured from crease in endgate panel.
C Measured from edge of endgate panel.
Figure 1A9-24

‘SS FIFTY’ – SS FIFTY UTILITY
RH side view of decklid
NOTE: All measurements are in mm.
A Before installation, remove release paper.
B Measured from crease in endgate panel.
C Measured from edge of endgate panel.
Figure 1A9-25
Rear quarter Panel
Figure 1A9-26
Legend
LH side outer panel SS models
Before installation remove release paper.
RH side outer panel SS models
1. Body side moulding groove
2. Rear wheel arch
‘STATESMAN SERIES II’ – STATESMAN
RH side view of decklid
NOTE: All measurements are in mm.
A Before installation, remove release paper.
B Measured from RH edge of rear decor panel.
C Measured form lower edge of rear decor panel.
Figure 1A9-27
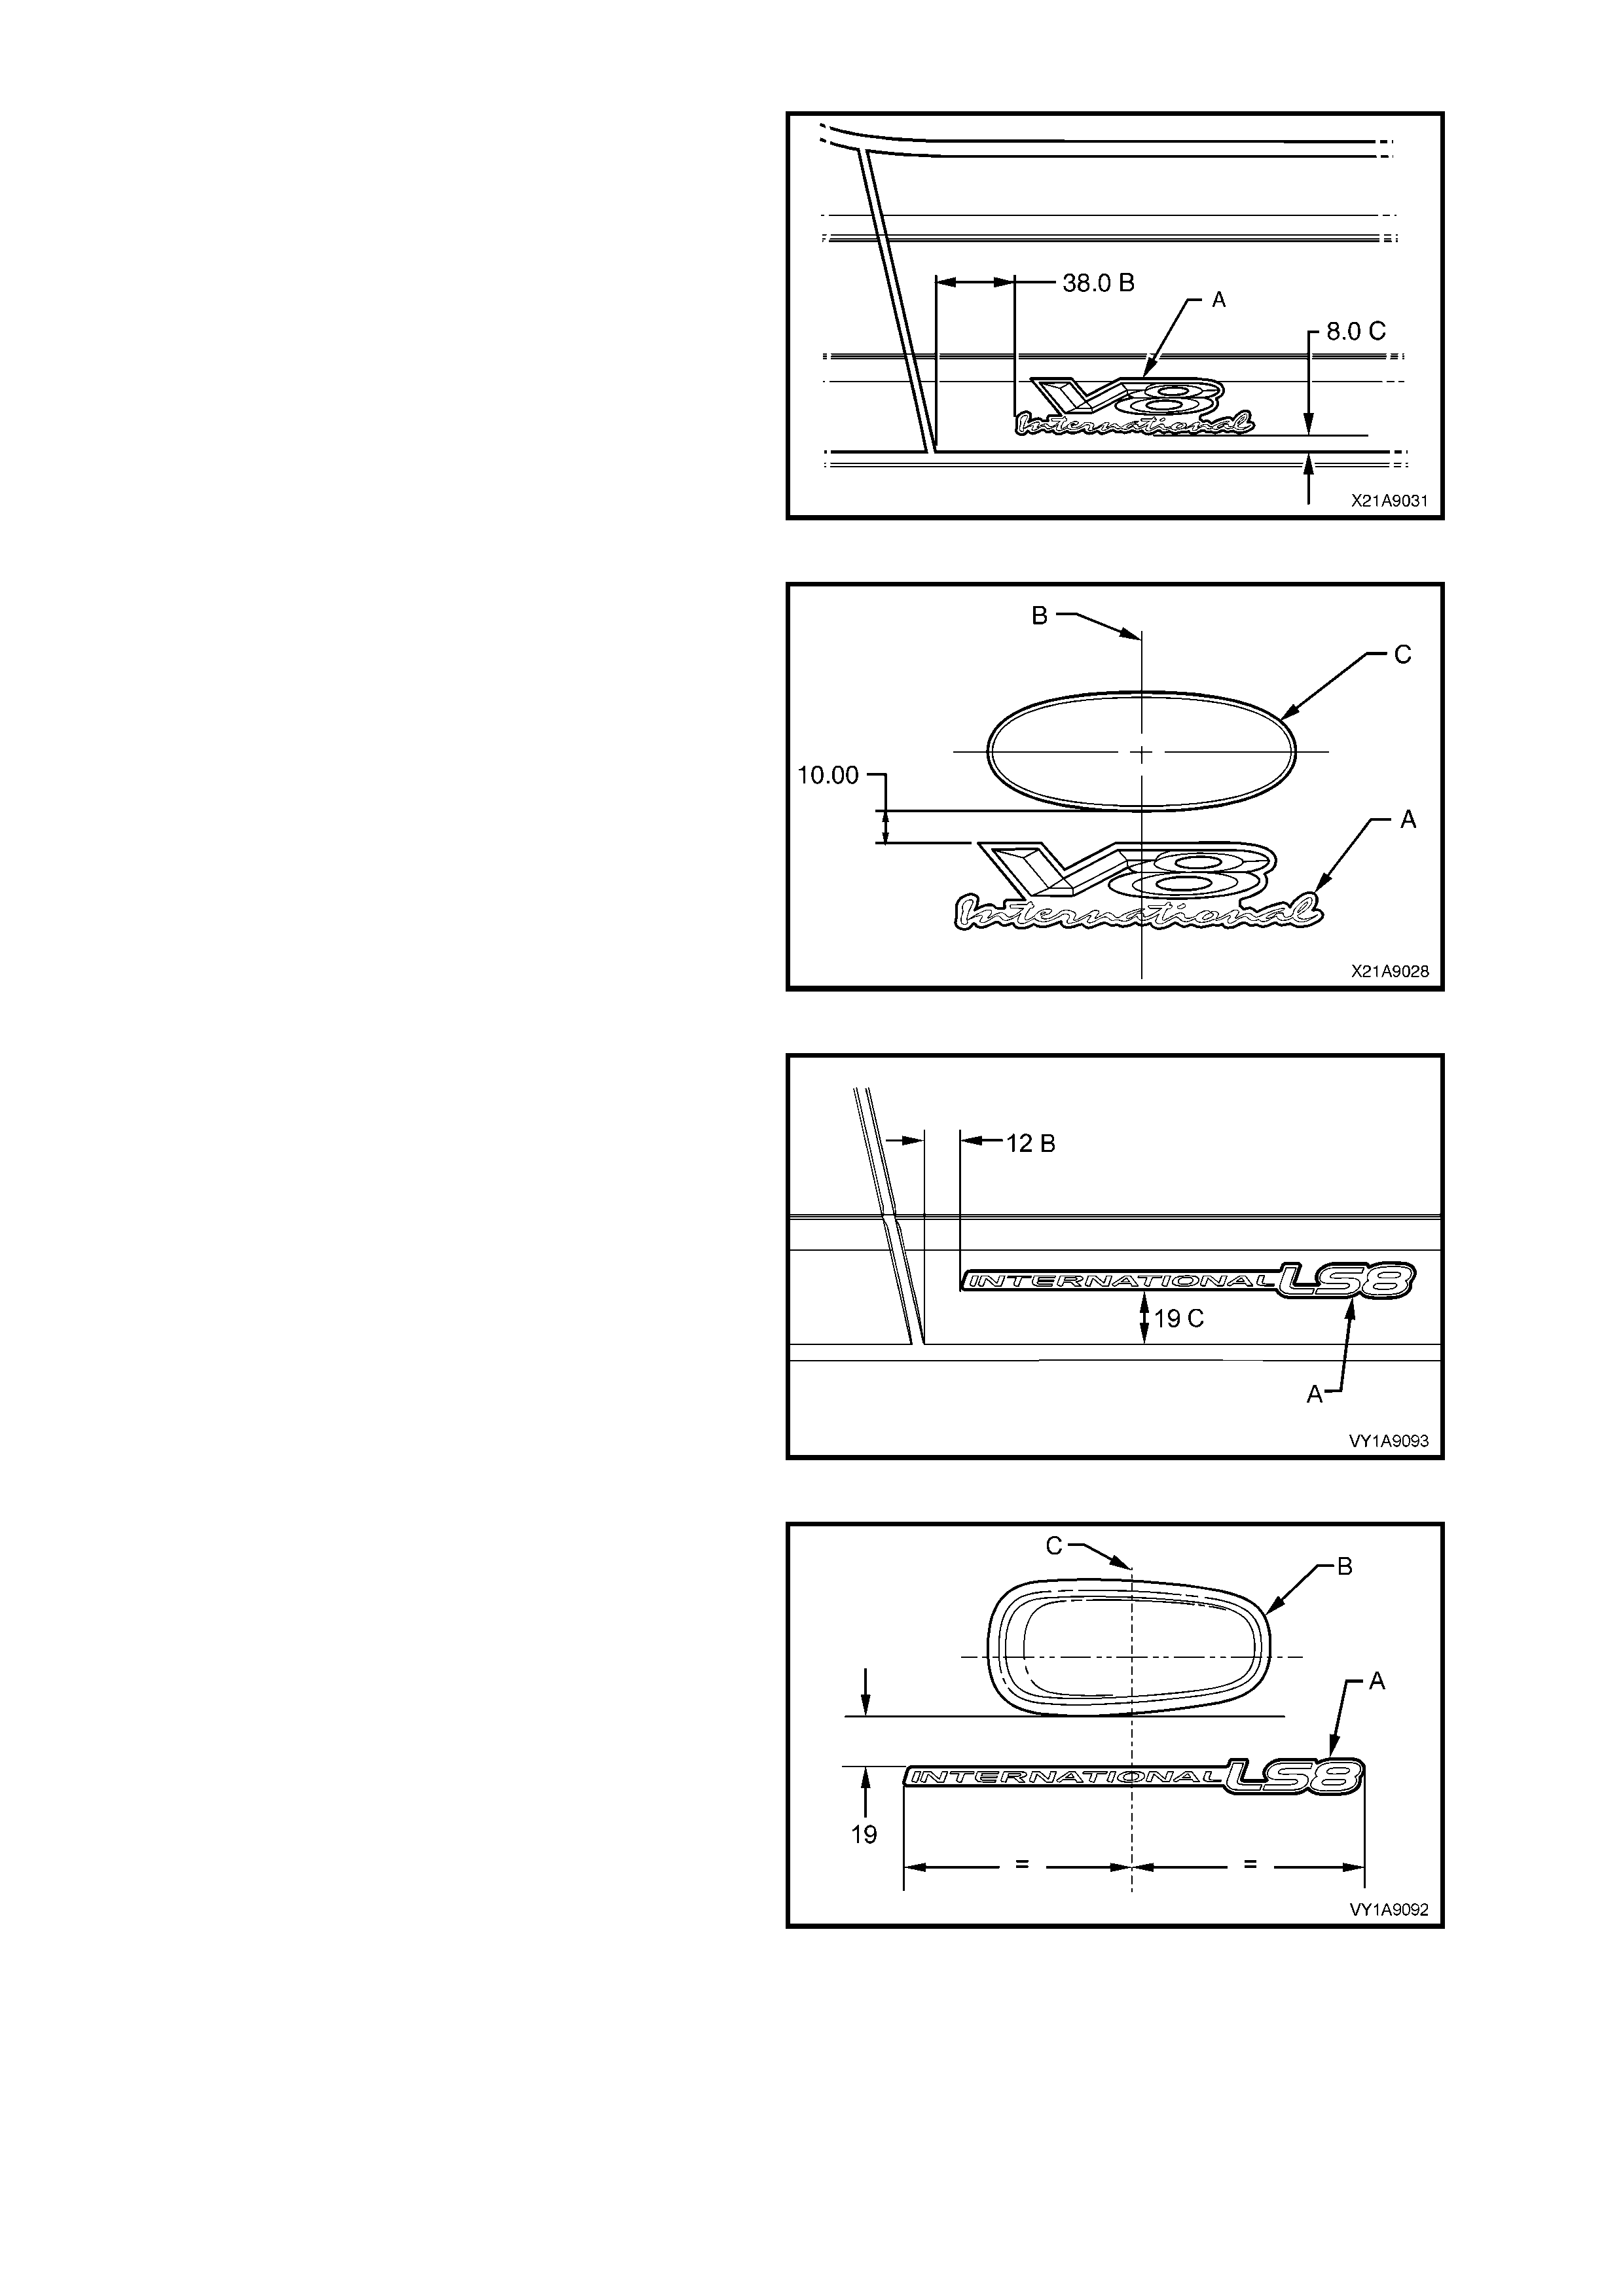
‘V8 INTERNATIONAL’ - STATESMAN
LH side view of decklid
NOTE: All measurements are in mm.
A Before installation, remove release paper.
B Measured from lower LH corner of rear decor
panel.
C Measured form lower edge of rear decor panel.
Figure 1A9-28
Front quarter panel
NOTE: All measurements are in mm.
A Before installation, remove release paper.
B Centre line of side repeater lamp.
C Side repeater lamp.
Figure 1A9-29
‘INTERNATIONAL LS8’ - STATESMAN
LH side view of decklid
NOTE: All measurements are in mm.
A Before installation, remove release paper.
B Measured from lower LH corner of rear decor
panel.
C Measured form lower edge of rear decor panel.
Figure 1A9-30
Front quarter panel
NOTE: All measurements are in mm.
A Before installation, remove release paper.
B Centre line of side repeater lamp.
C Side repeater lamp.
Figure 1A9-31
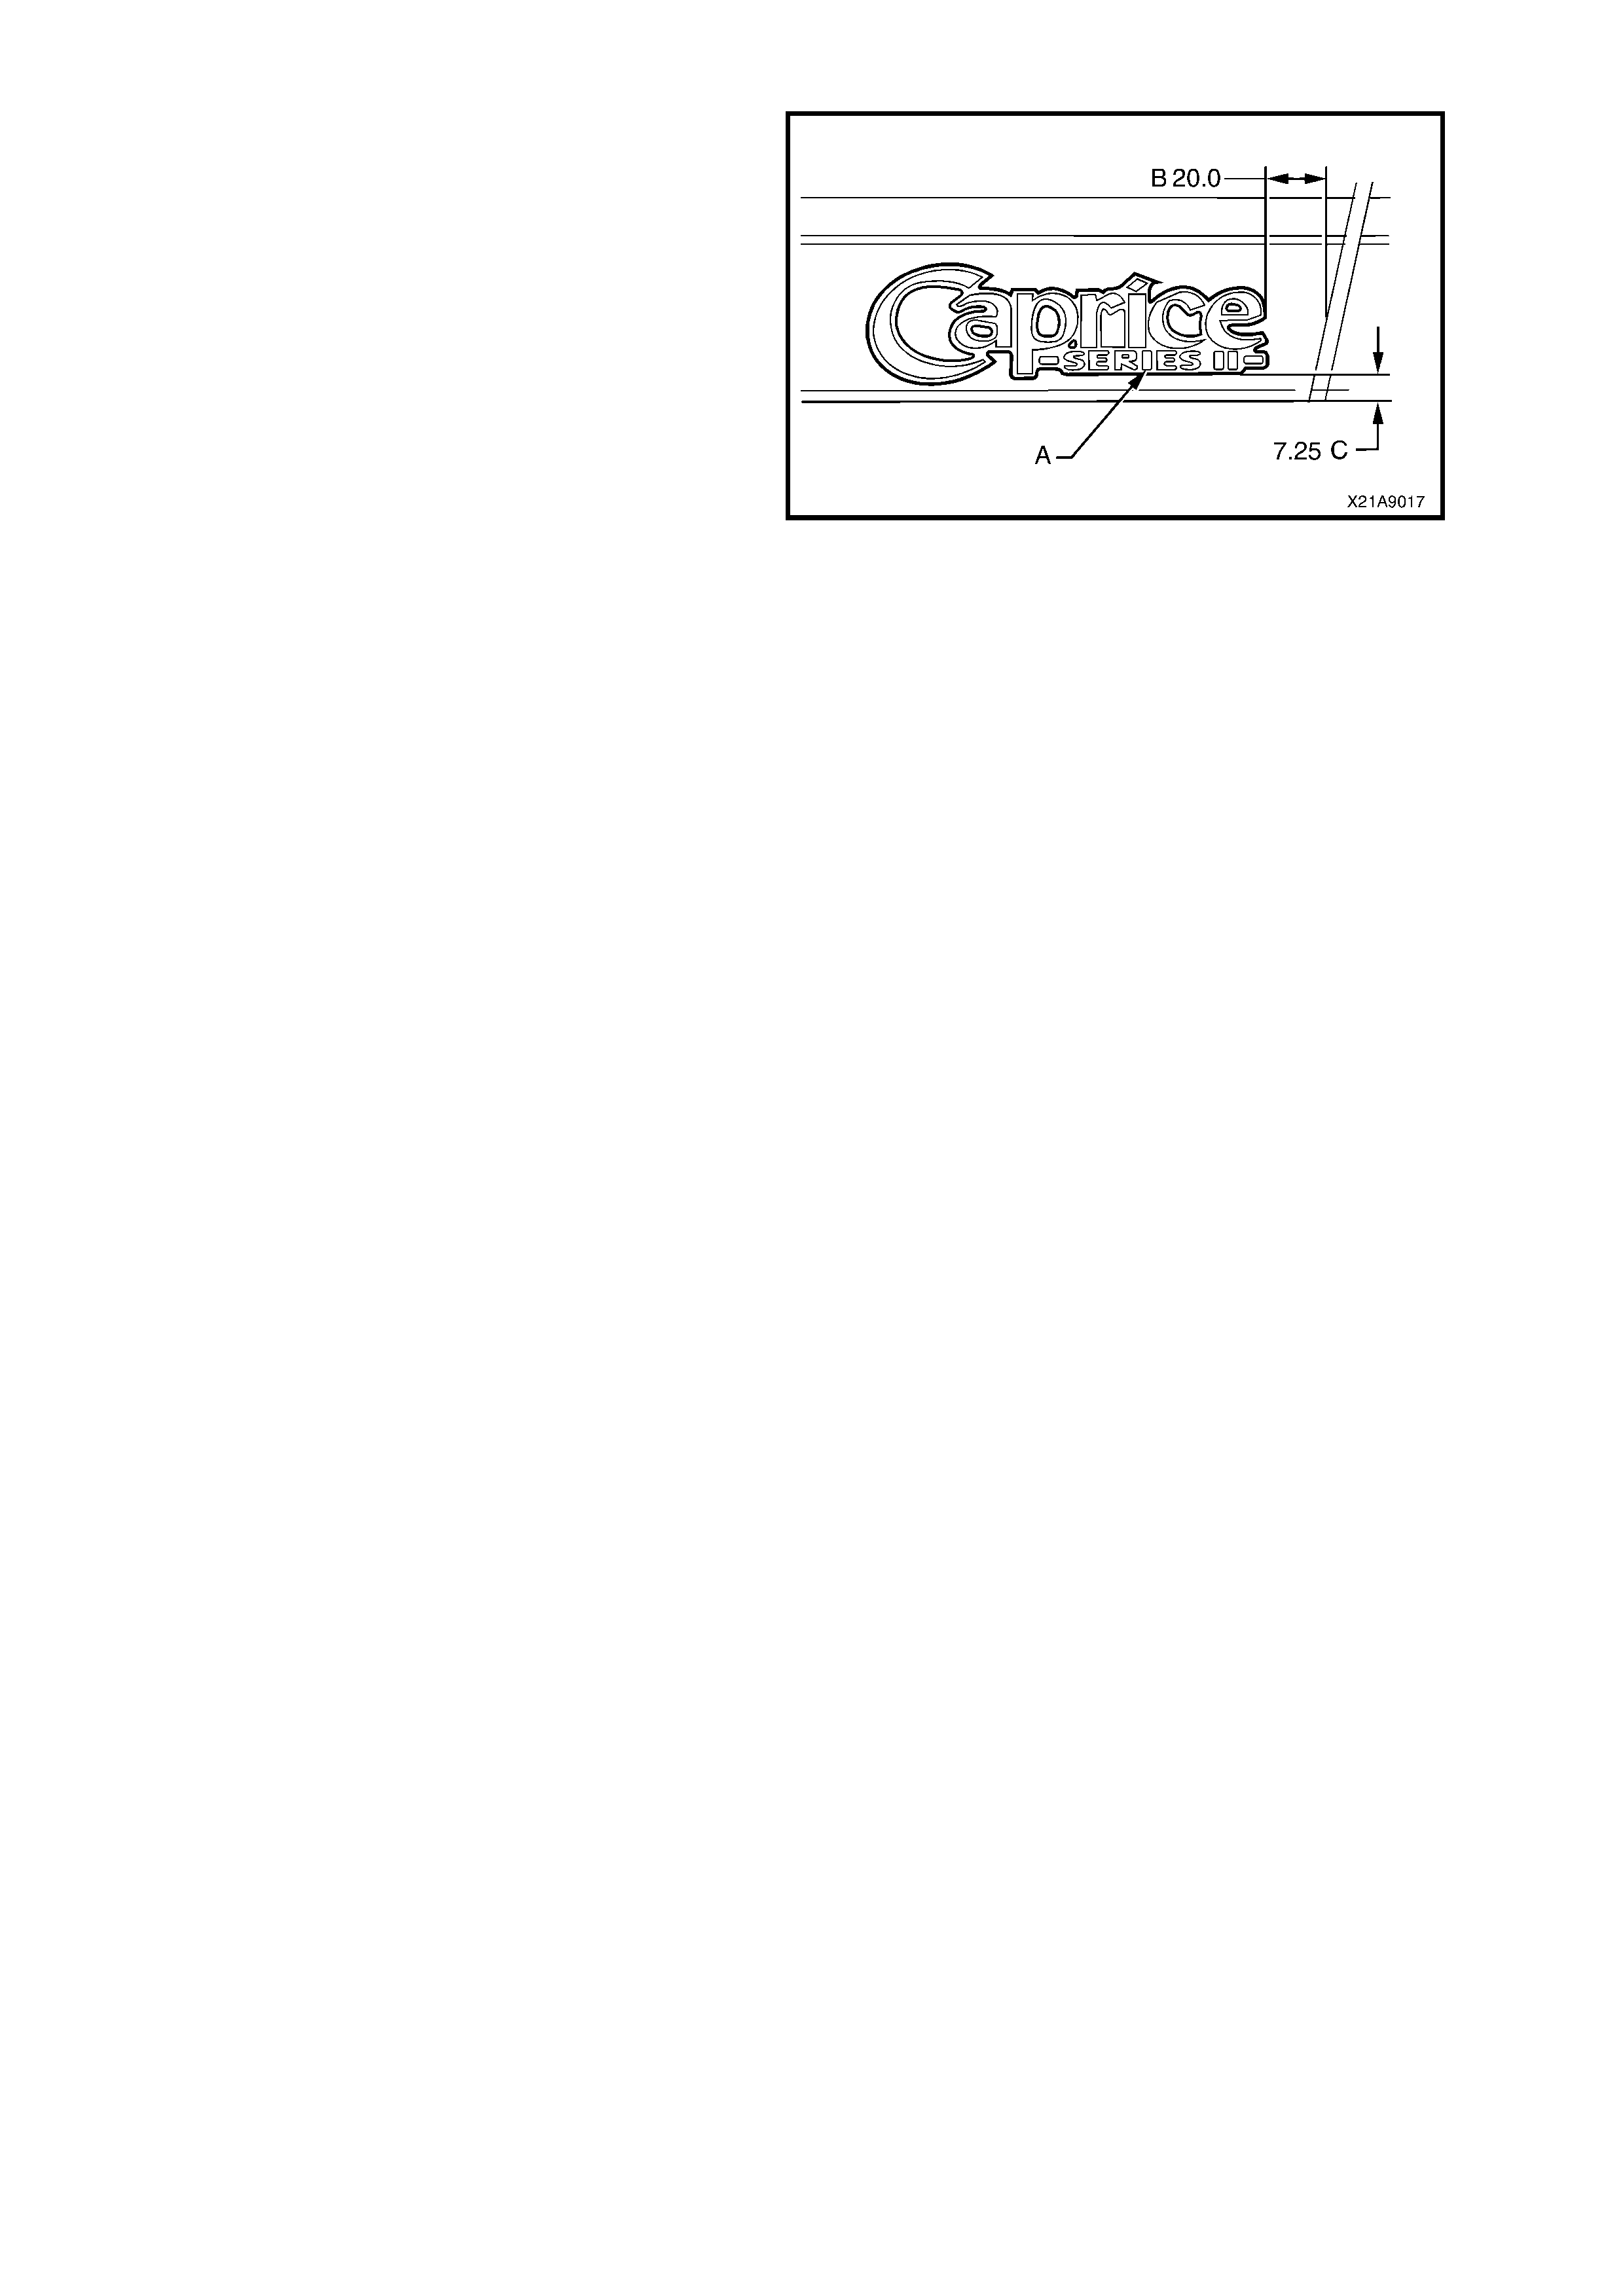
‘CAPRICE SERIES II’ - CA PRICE
RH side view of decklid
NOTE: All measurements are in mm.
A Before installation, remove release paper.
B Measured from RH edge of rear decor panel.
C Measured form lower edge of rear decor panel.
Figure 1A9-32
2.4 LION EMBLEM, DECKLID – LWB SEDAN
RH side view of decklid
NOTE: All measurements are in mm.
A Before installation, remove release paper.
B Measured f rom upper edge of rear dec or panel
to horizontal centre line of emblem.
C Align vertical centre line of em blem with centre
line of decklid.
Figure 1A9-33
Techline
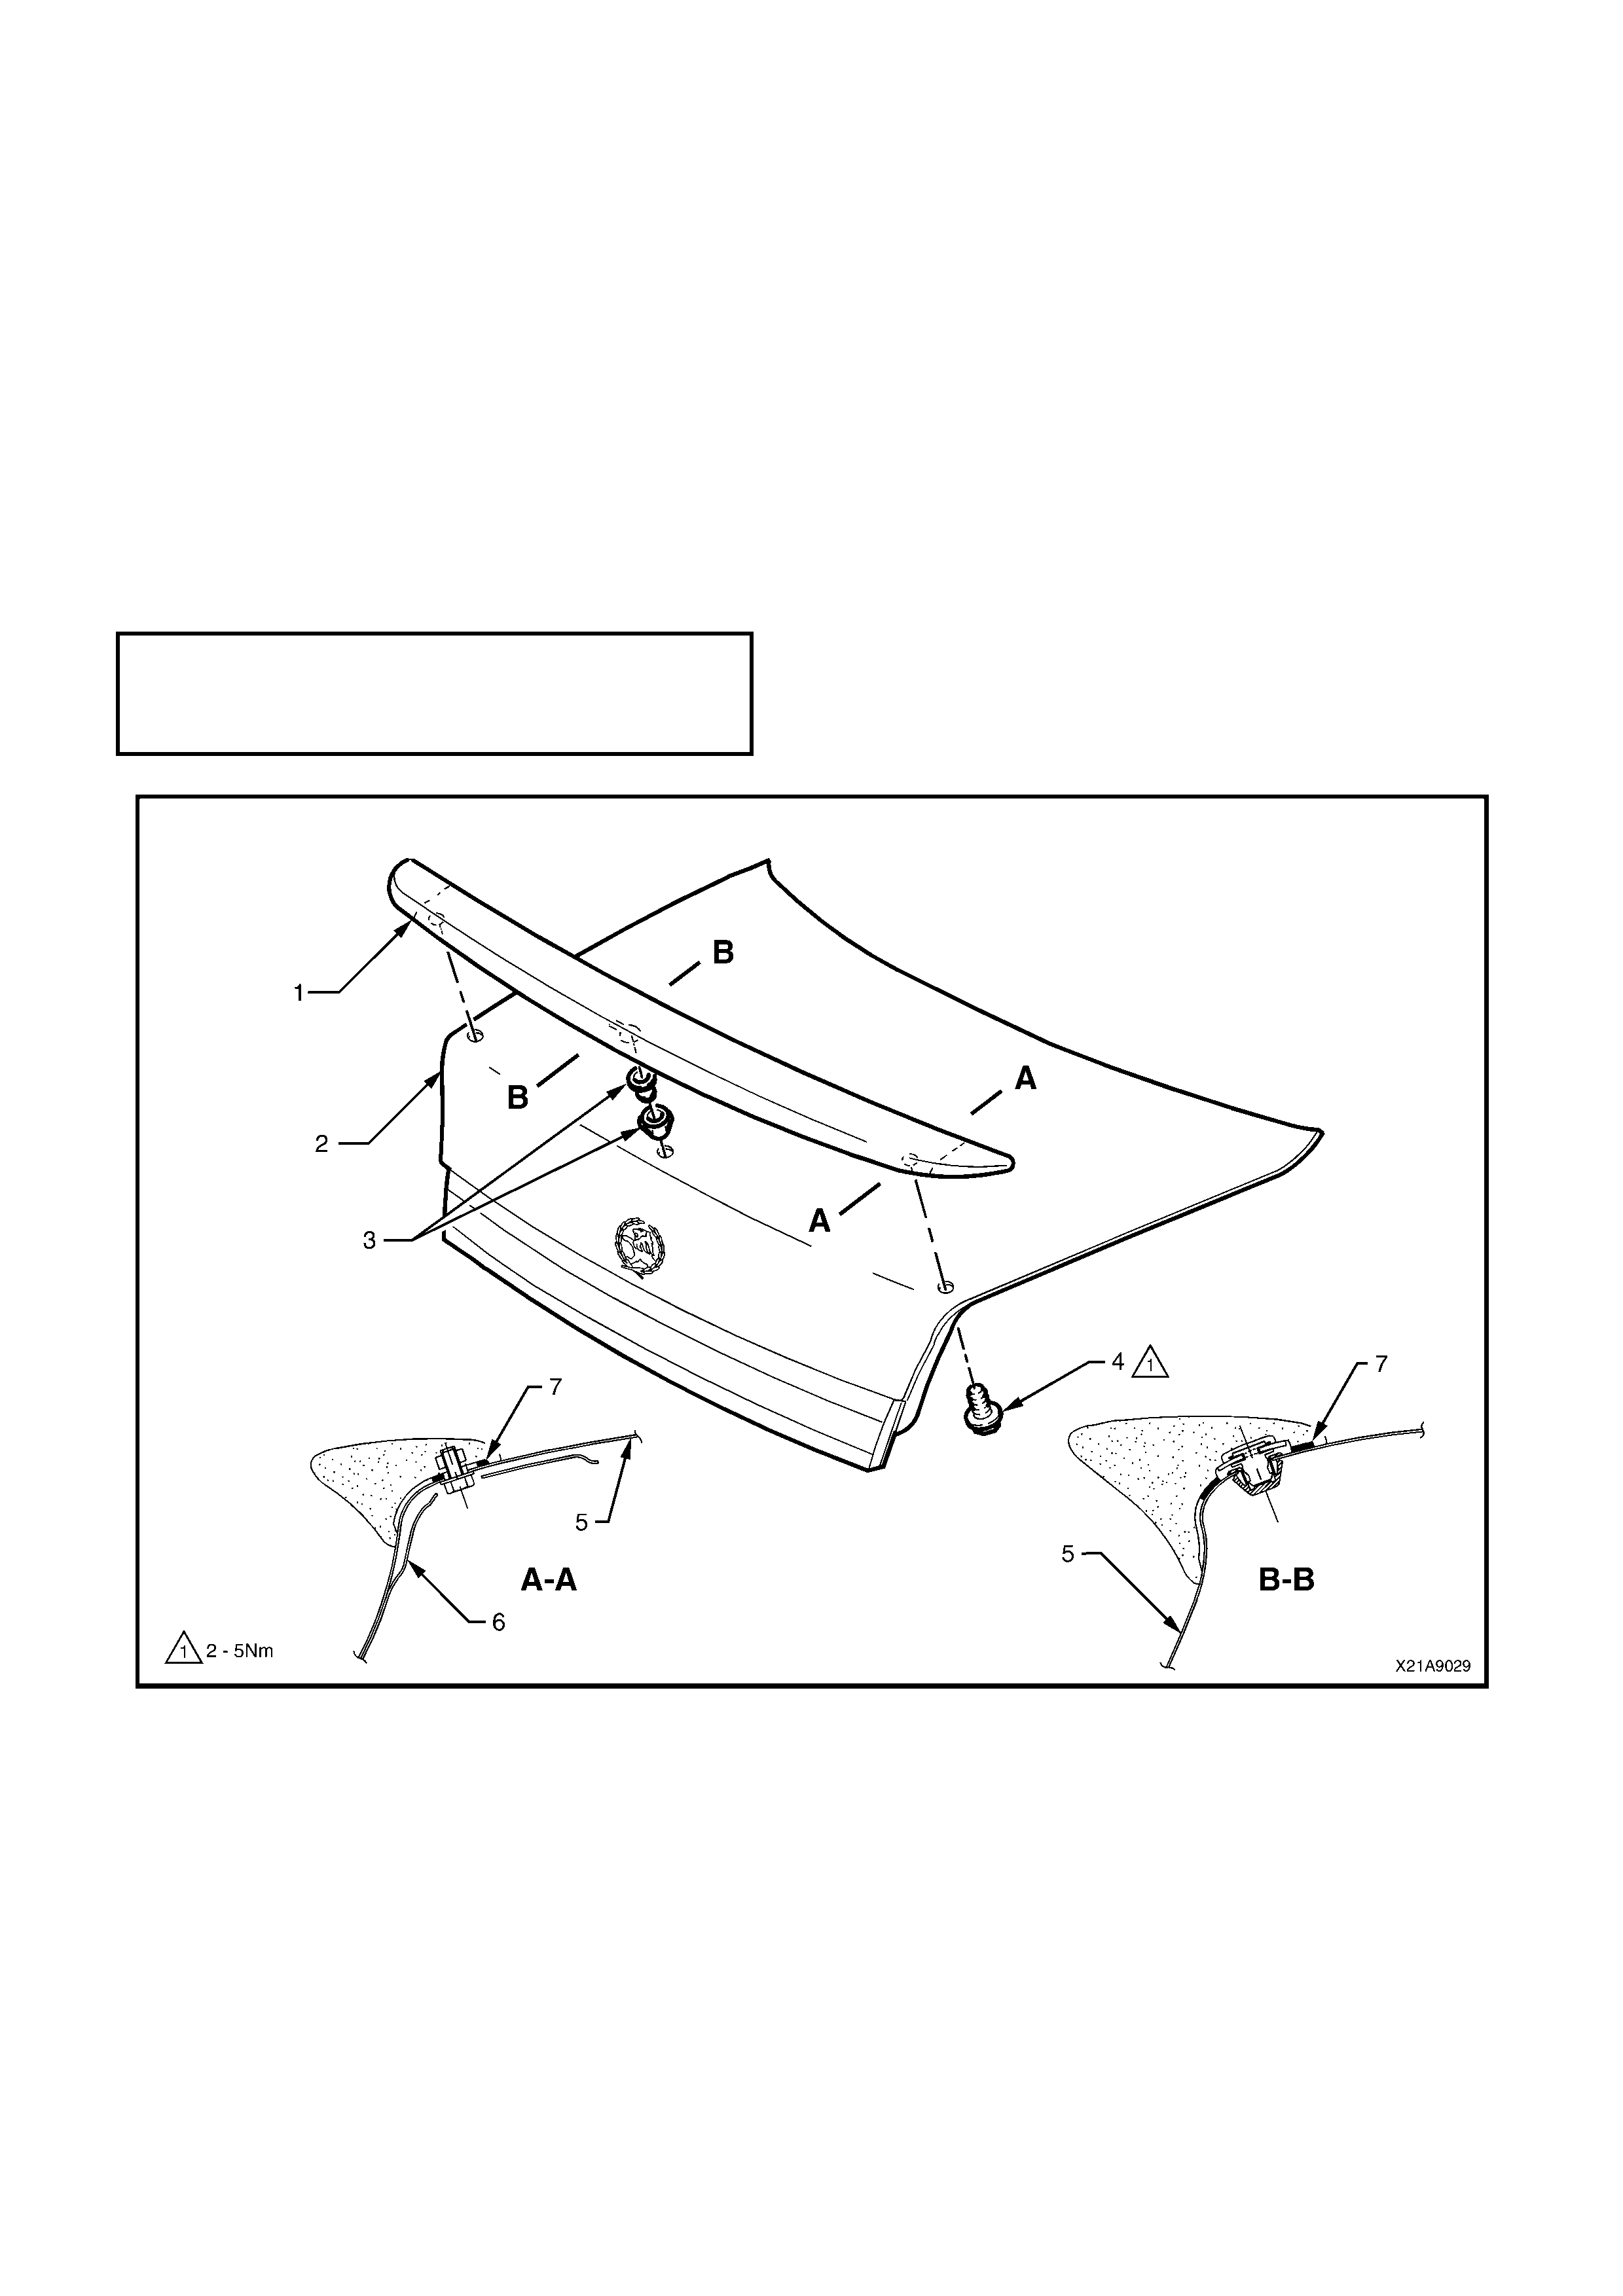
2.5 DECKLID AIR SPOILER — STATESMAN V8 INTERNATIONAL\
INTERNATIONAL LS8
REMOVE
1. With the rear compartment lid raised, remove the two bolts (4) securing the spoiler (1) to the rear
compartment lid (2).
2. Access the snap fitting (3) through the internal access hole and squeeze the fitting while lifting the spoiler
from rear compartment lid
REINSTALL
Installation of the rear compartment lid air spoiler is the reverse of the removal procedure, noting the following:
1. Ensur e the f oam seals ar e inst alled between the rear c ompartment lid air s poiler and the r ear c ompartment
lid, refer to Fig. 1A9-34.
2. Ensure all fasteners are tightened to the correct torque specification.
SPOILER ASSEMBLY TO
REAR COMPARTMENT LID
RETAINING BOLT
TORQUE SPECIFICATION 2 – 5 Nm
Figure 1A9-34
Legend
1. Air spoiler 5. Rear compartment lid outer panel
2. Rear compartment lid 6. Rear compartment lid inner panel
3. Snap fitting (1 place) 7. Foam seal (3 places)
4. Retaining bolt (2 places)
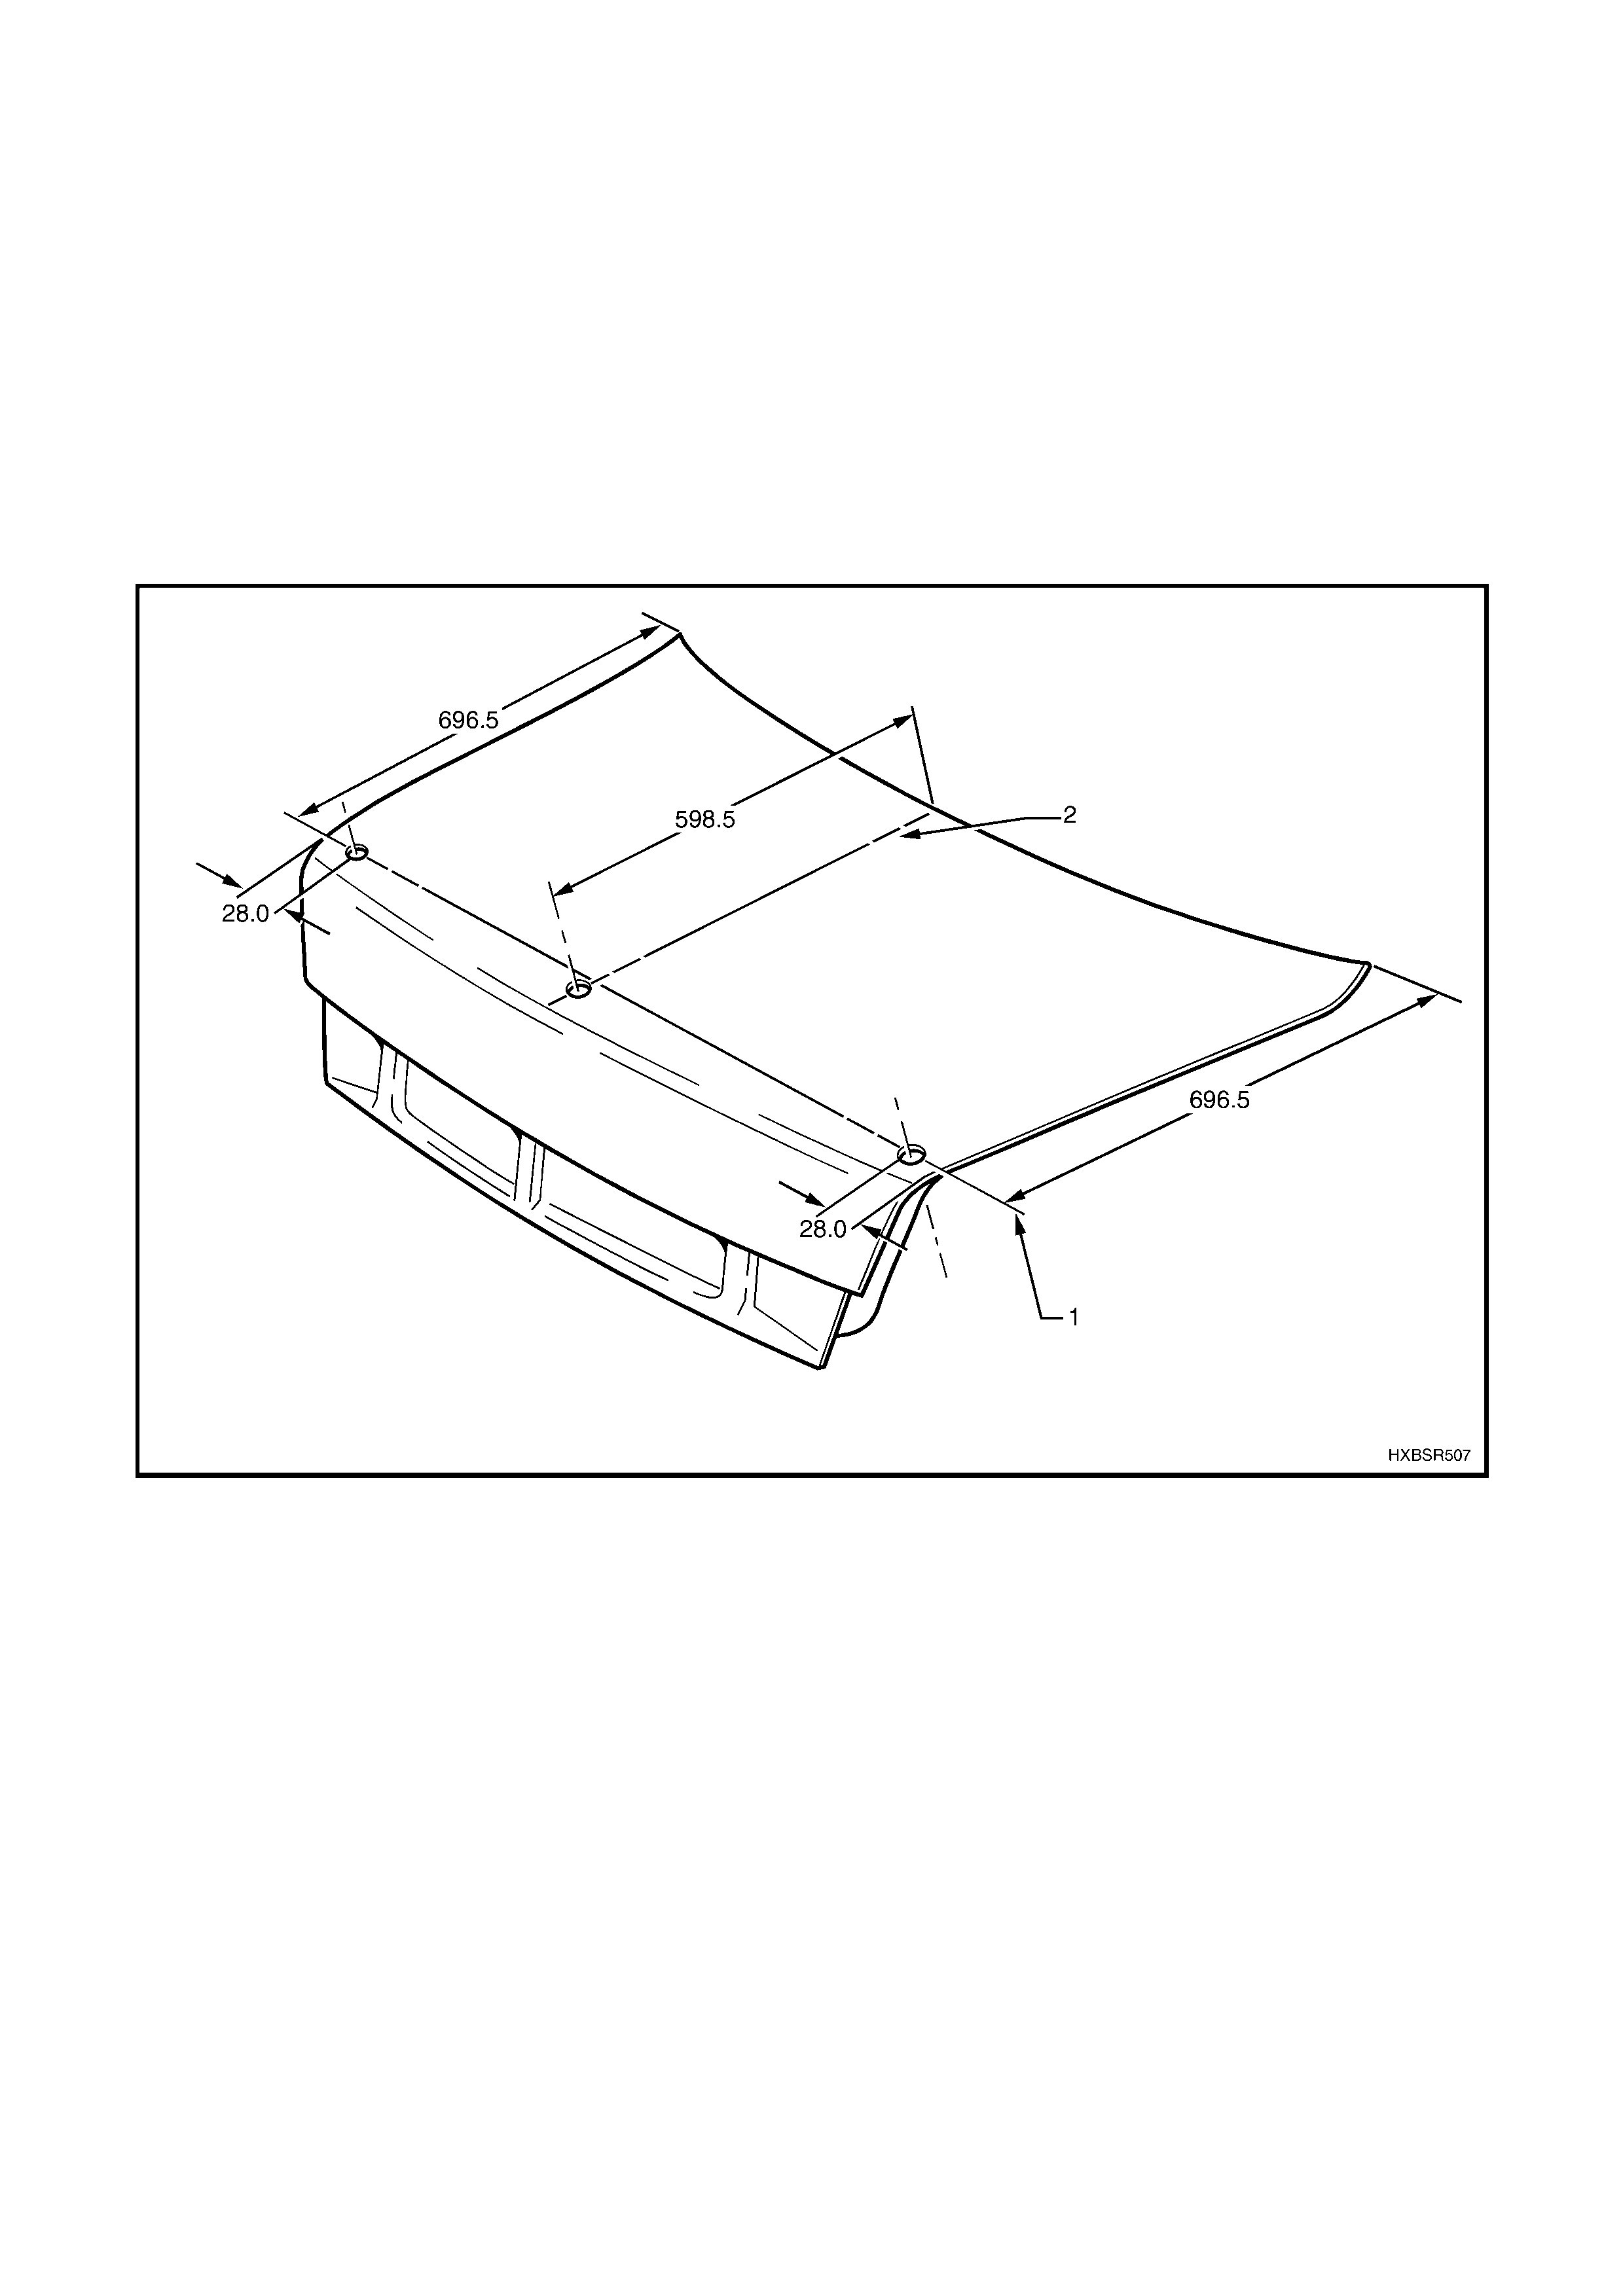
DECKLID AIR SPOILER MOUNTING HOLES
1. Mark a point on the edge of the decklid, 696.5 mm rearward of each front corner, refer Fig. 1A9-35.
2. Plot a line across the decklid (1) between the marks.
3. Place a mark 28 mm in from each edge of the decklid.
4. Mark a centre line (2) on the decklid.
5. Place a mark on the centre line, 598.5 mm rearward of the front edge of the decklid.
6. Temporarily fit the air spoiler in position and check that the mount studs align with the marks on the decklid.
7. Drill a 3 mm pilot hole at each of the three points marked.
8. For the outer holes, drill the pilot holes out to 12 mm. Continue the drill through the inner panel.
9. For the centre hole, drill the pilot hole out to 7 mm. Drill the outer panel only.
10. Debur the drill holes and apply zinc-rich primer to the bare metal surfaces.
11. Install the decklid spoiler as per the previous instructions.
Figure 1A9-35