
SECTION 1C - RADIATOR GRILLE
IMPORTANT
Before perfo rming any Service Operation or other procedu re described in this Section , refer to Section 00
CAUTIONS AND NOTES for correct workshop practices with regard to safety and/or property damage.
CONTENTS
1. GENERAL DESCRIPTION
2. SERVICE OPERATIONS
2.1 RADIATOR GRILLE ASSEMBLY, EXCEPT S SEDAN & SS
REMOVE
DISASSEMBLE
REINSTALL
2.2 RADIATOR GRILLE ASSEMBLY, S SEDAN & SS
REMOVE
DISASSEMBLE
REINSTALL
2.3 LOWER RADIAT OR GRILLE, LEVEL 1, EXCEPT S SEDAN & SS
REMOVE
REINSTALL
2.4 LOWER RADIAT OR GRILLE, LEVEL 2 & 3
REMOVE
DISASSEMBLE
REINSTALL
2.5 LOWER RADIATOR GRILLE, COUPE
REMOVE
REINSTALL
3. TORQUE WRENCH SPECIFICATIONS

1. GENERAL DESCRIPTION
This Section describes the replacement of the radiator grille and lower radiator grille assemblies fitted to MY 2003
VY and V2 Series vehicles.
With the ex c eption of Coupe vehic les, the r adiator gr ille ass embly is attached to the front bumper f as c ia. For Coupe
it is moulded as part of the front bum per fascia and reference should be made to Section 1D BUMPER BARS for
servicing procedures. Four key styles are offered for Sedan, Wagon and Utility vehicles depending on Model Level.
• Model Level 1, except S Sedan and SS – A one piece, two bar design for domestic vehicles or a one piece
single bar design with a separate centre escutcheon for export vehicles.
• S Sedan and SS – A one piece, single bar design with a separate centre escutcheon for export vehicles.
• Model Level 2 and expor t Model Level 3 – A two piece assem bly featuring a s eparate inner and a f ull perim eter
outer trim . A two bar design for dom estic vehicles or a s ingle bar des ign with a separate centre escutcheon for
export vehicles.
• Domestic Model Level 3 – A two piece assembly featuring a separate two bar inner and an outer trim for the
side and lower edges.
Three styles of lower radiator grilles are offered that also attach the front bumper fascia.
• Model Level 1 except S Sedan & SS, – A two bar design attached to the rear of the bumper fascia.
• Model Level 2 & 3 – A full width single bar design attac hed to the r ear of the bumper fascia. Level 3 is the same
as Level 2 but is modified to accommodate the front fog lamp assemblies.
• Coupe – A full width single bar design incorporating fog lamp openings, attached to the front of the bumper
fascia.
S Sedan and SS vehicles are not fitted with a separate lower radiator grille assembly.
As the Model Level 1, 2 and 3 lower radiator gr ille assem blies attach to the rear of the bumper fasc ia assem bly, the
fascia assembly must be removed first, refer to Section 1D BUMPER BARS.
For Model Level designation details, refer to Section 0A GENERAL INFORMATION.
2. SERVICE OPERATIONS
2.1 RADIATOR GRILLE ASSEMBLY, EXCEPT S SEDAN & SS
LT Section – 07-500
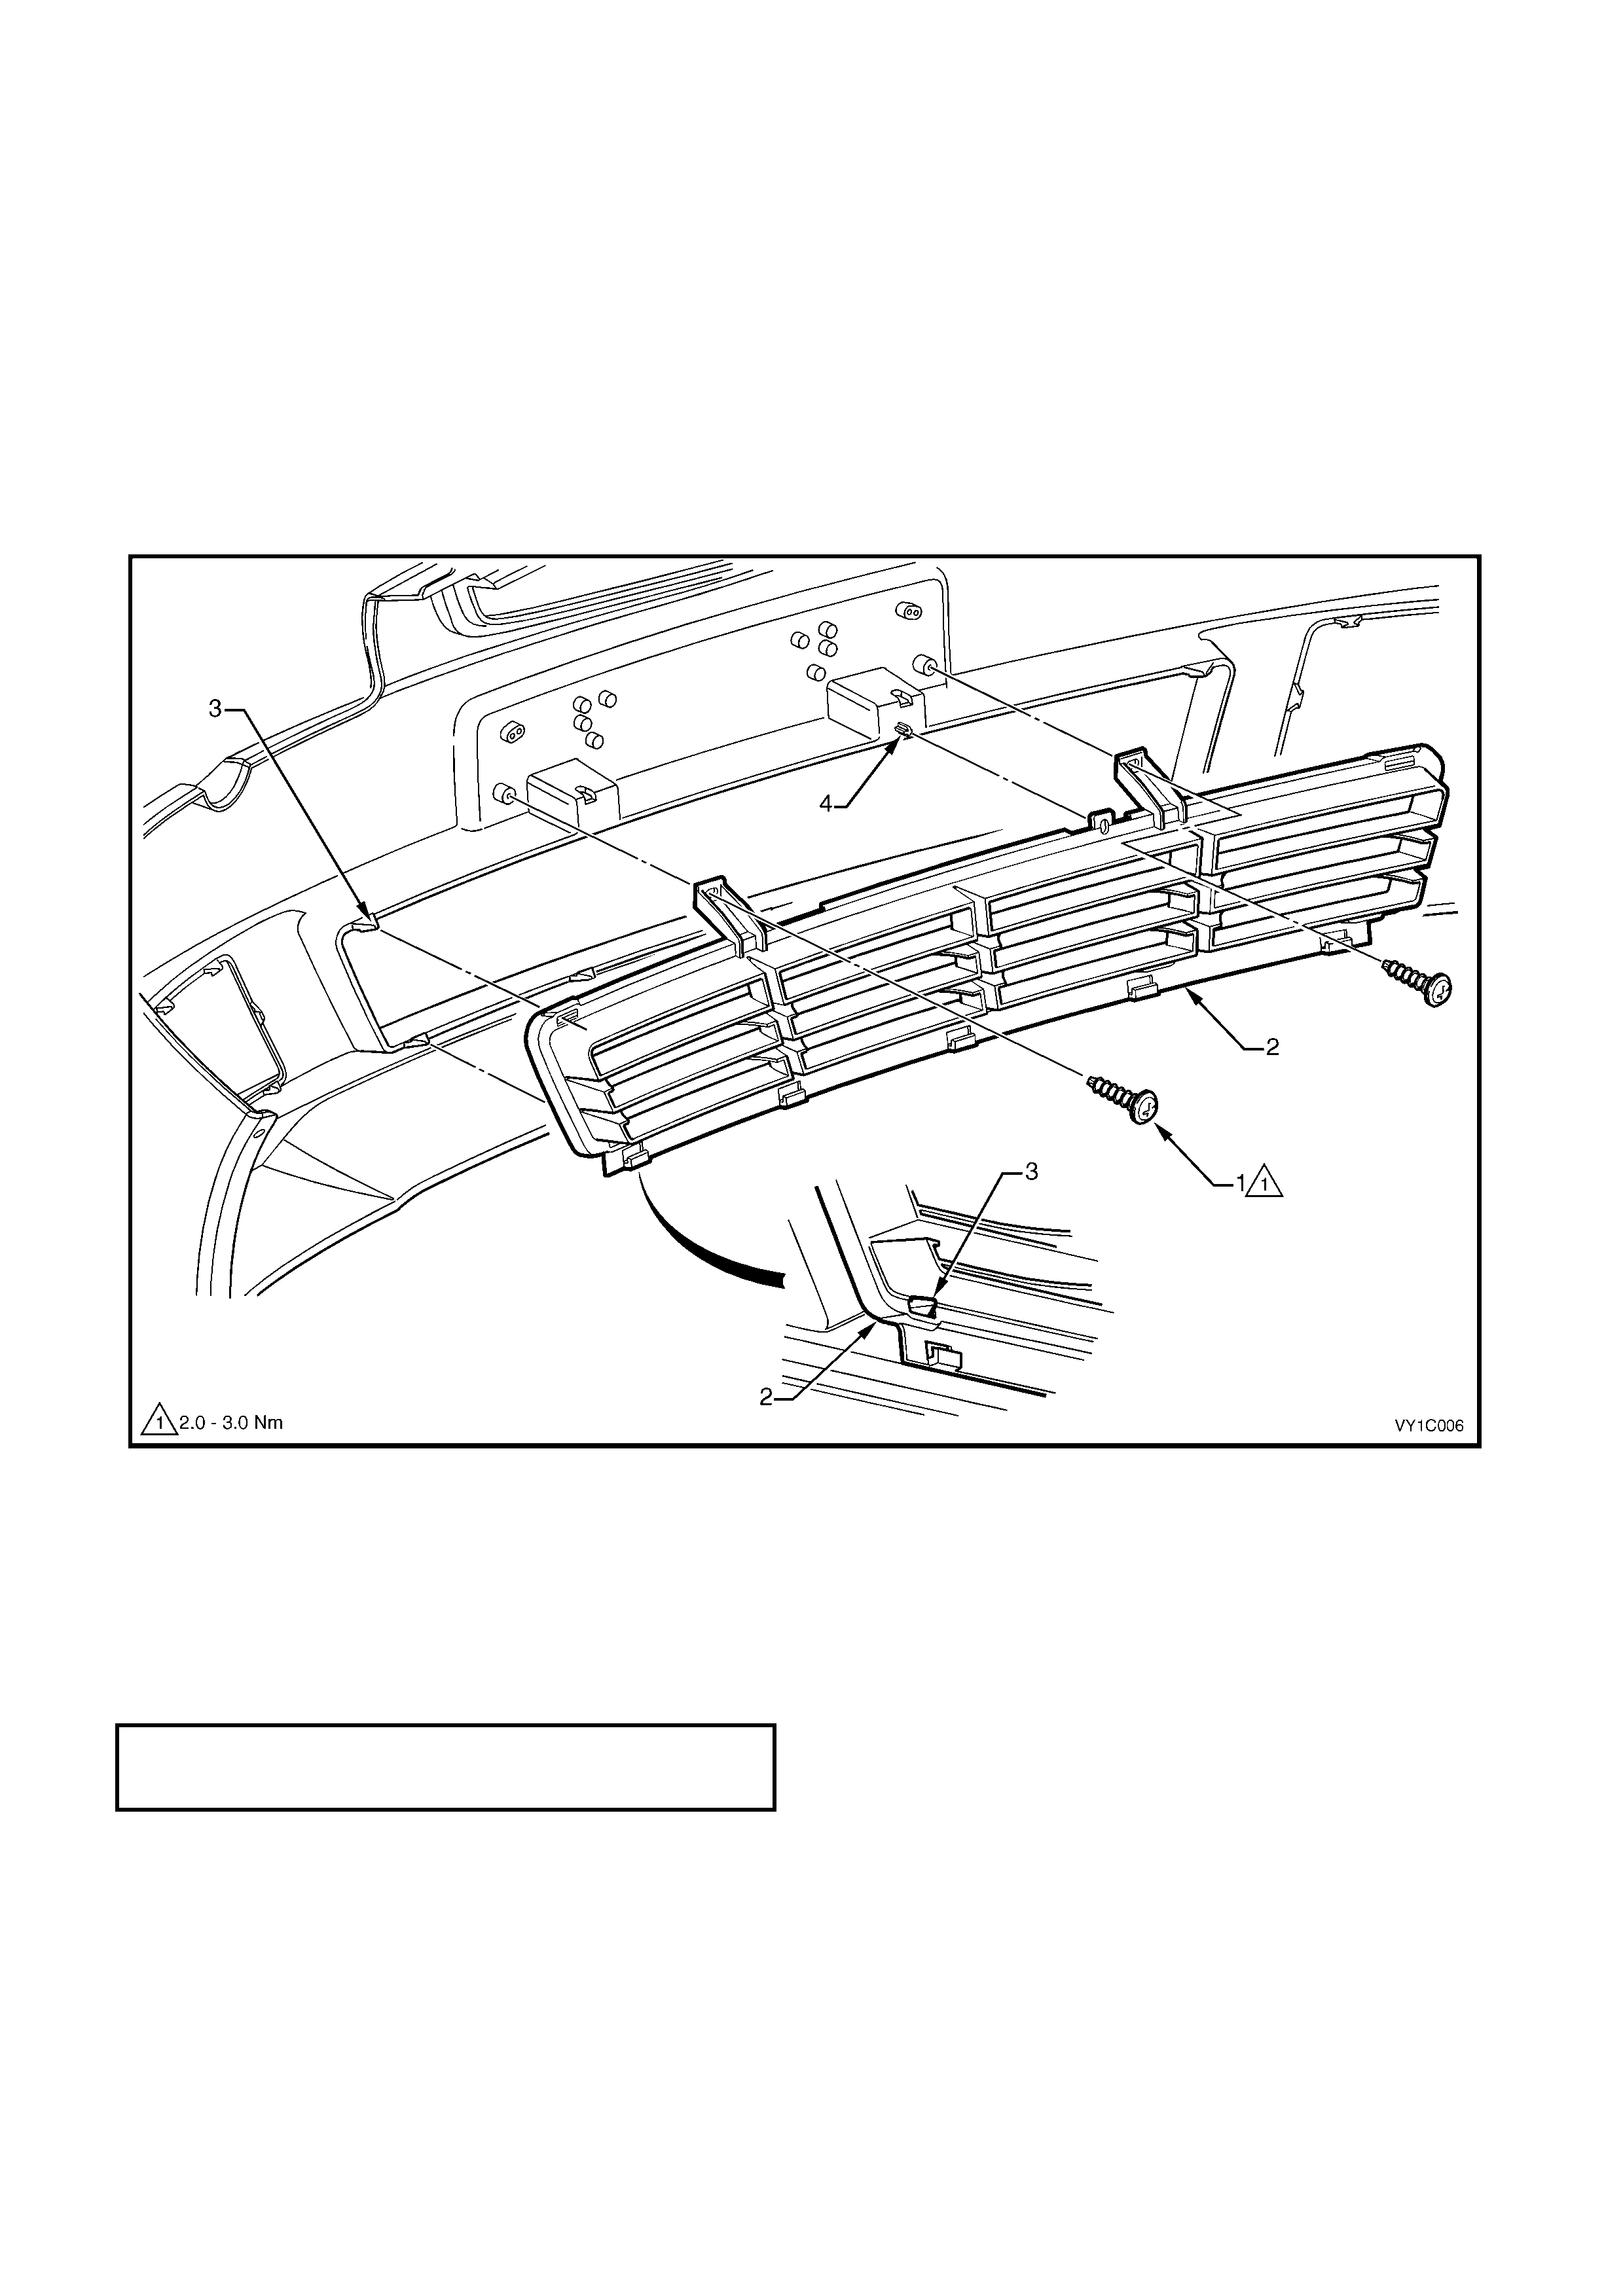
REMOVE
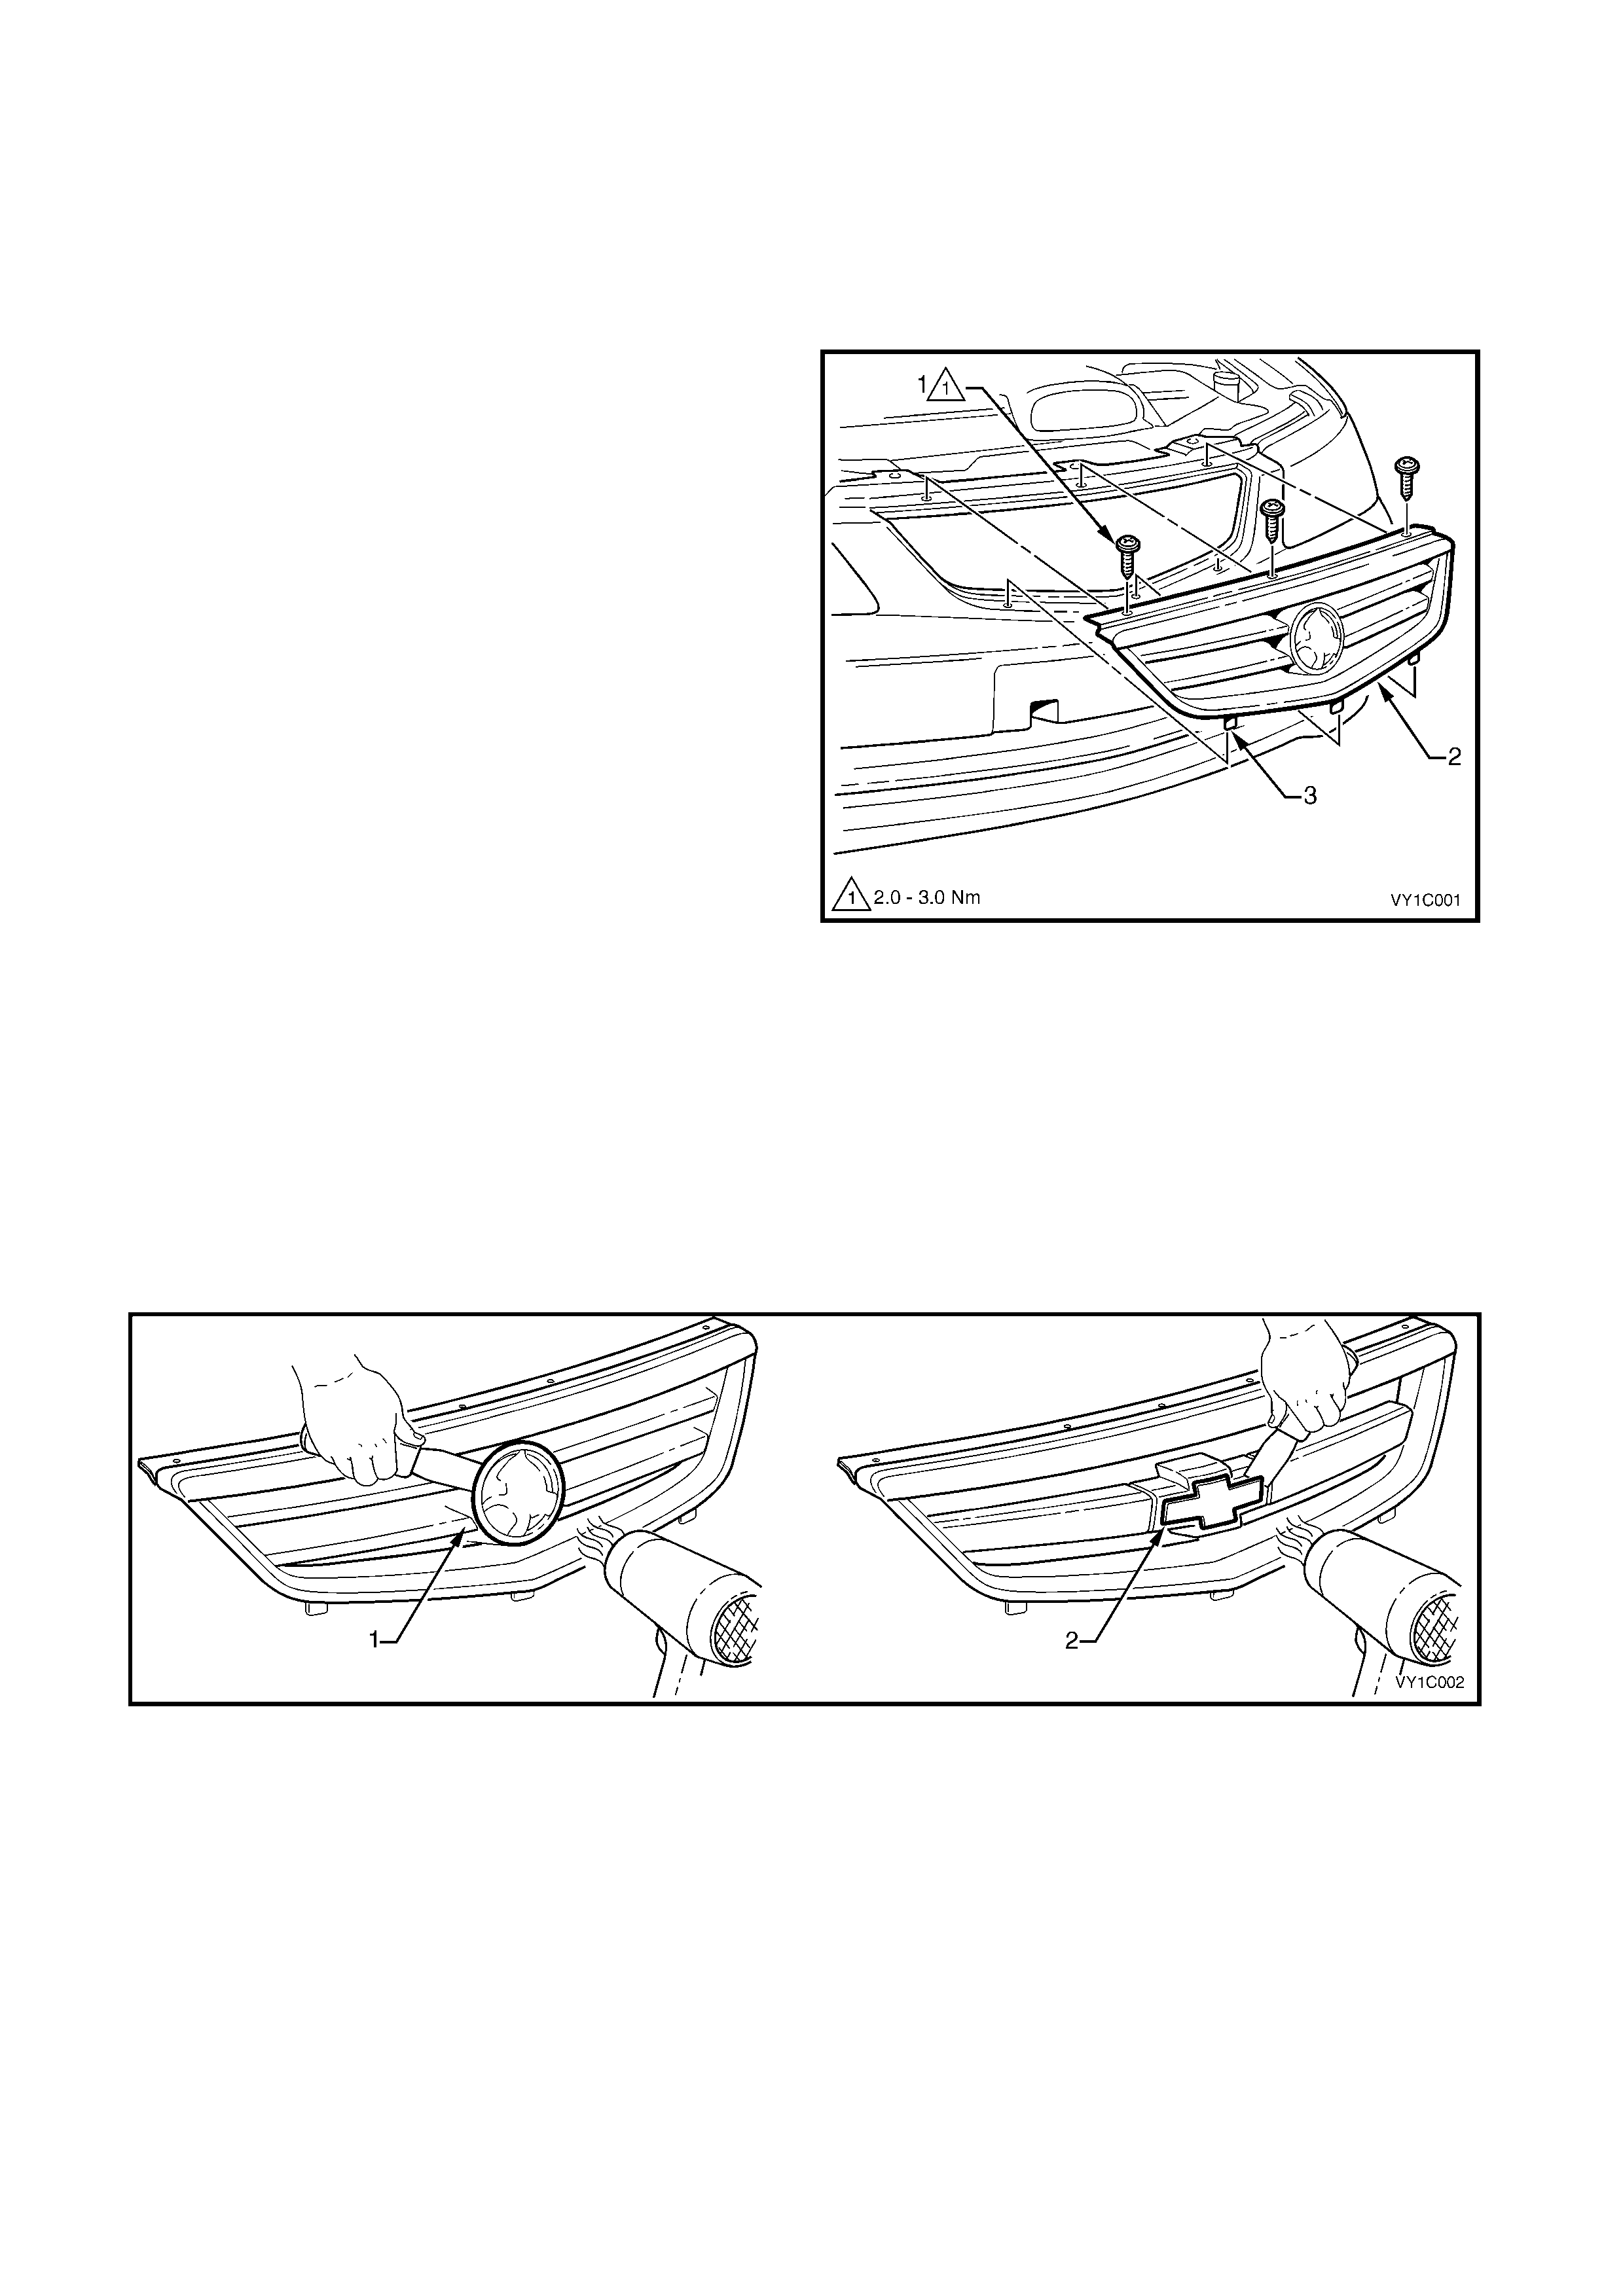
1. Open the hood.
2. Remove the three s cr ews (1) attaching the radiator
grille assembly (2) to the bumper fascia.
3. Tilt the top of the grille assembly forward slightly
and lift it out of the bumper fascia to release the
three pins (3) along the lower edge.
Figure 1C-1
DISASSEMBLE
RADIATOR GRILLE EMBLEM ASSEMBLY
Remove
1. To assist removal, warm the emblem with a heat-lamp or heat-gun to soften the adhesive.
2. Using a knif e or paint sc r aper, c ar ef ully remove the emblem asse mbly (1–domestic or 2–ex por t) f r om the grille
assembly, cutting the double-sided tape, refer to Figure 1C-2.
NOTE: The domestic emblem has two locating lugs which must not be cut if the emblem is to be reused.
3. Remove any remaining double-sided tape as required.
Figure 1C-2
Reinstall
1. If reinstalling the existing em blem , remove the exis ting double-sided tape and clean the surf ace with wax and
grease rem over such as Prepsol or equivalent. Apply new polyethylene double- sided tape such as 3M 4428 or
equivalent.
2. Clean the surface of the grille assembly with wax and grease remover such as Prepsol or equivalent.
3. Remove the backing paper from the double-sided tape.
4. Align the em blem . For dom estic vehicles, loc ate the lugs with their corres ponding holes in the grille assembly.
For export vehicles, align the emblem within its recess in the grille assembly.
5. Affix the emblem and press firmly over the entire emblem for at least 10 seconds to ensure sound adhesion.
RADIATOR GRILLE ESCUTCHEON, EXPORT
Remove
1. From the rear of the grille assembly, depress the
retaining tab (1), one place each end and (2), one
place each side of centre, attaching the radiator
grille escutcheon (3).
2. Remove the escutcheon from the grille.
Reinstall
1. Align the escutcheon retainers with their
corresponding slots in the grille.
2. Fit the two components together and ensure the
retainers are correctly seated.
Figure 1C-3
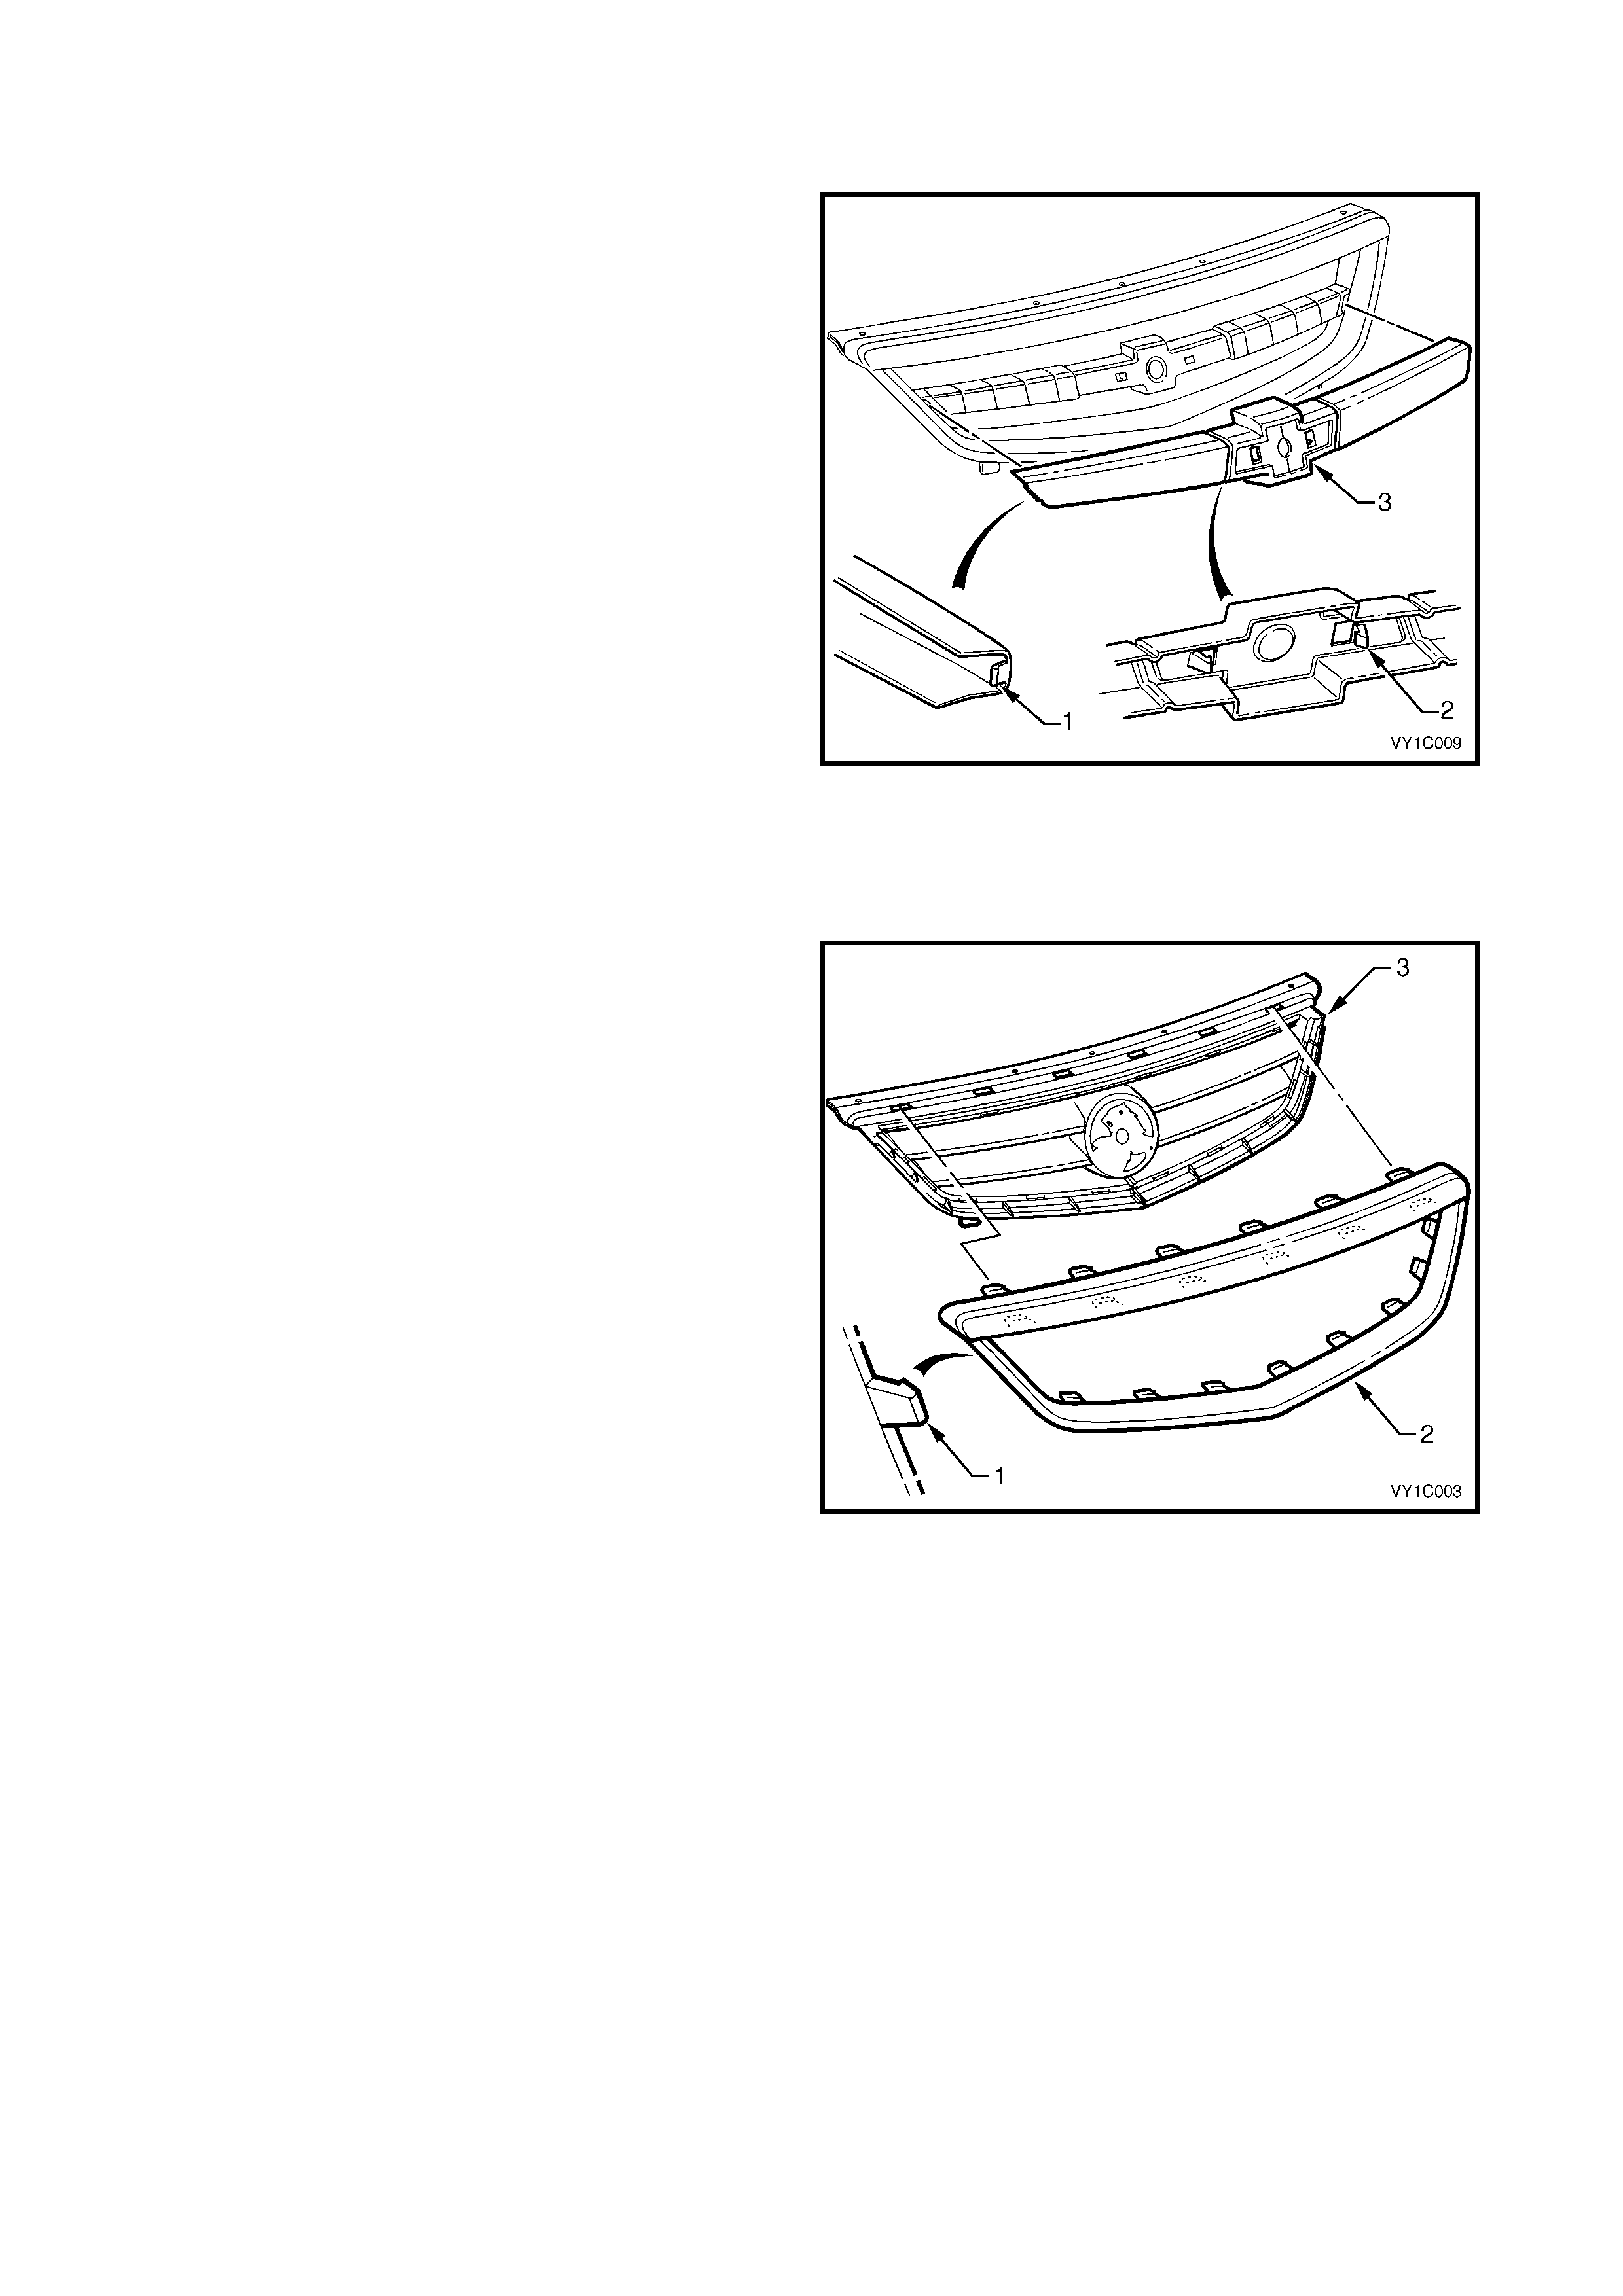
RADIATOR GRILLE INNER & OUTER,
ALL LEVEL 2 & EXPORT LEVEL 3
Remove
1. From the rear of the grille assembly, depress the
retainers (1), 22 places, to remove the grille outer
(2) from the grille inner (3).
2. Slide the grille outer from the grille inner.
Reinstall
1. Align the grille outer retainers with their
corresponding slots in the grille inner.
2. Fit the two components together and ensure all of
the retainers are correctly seated.
Figure 1C-4
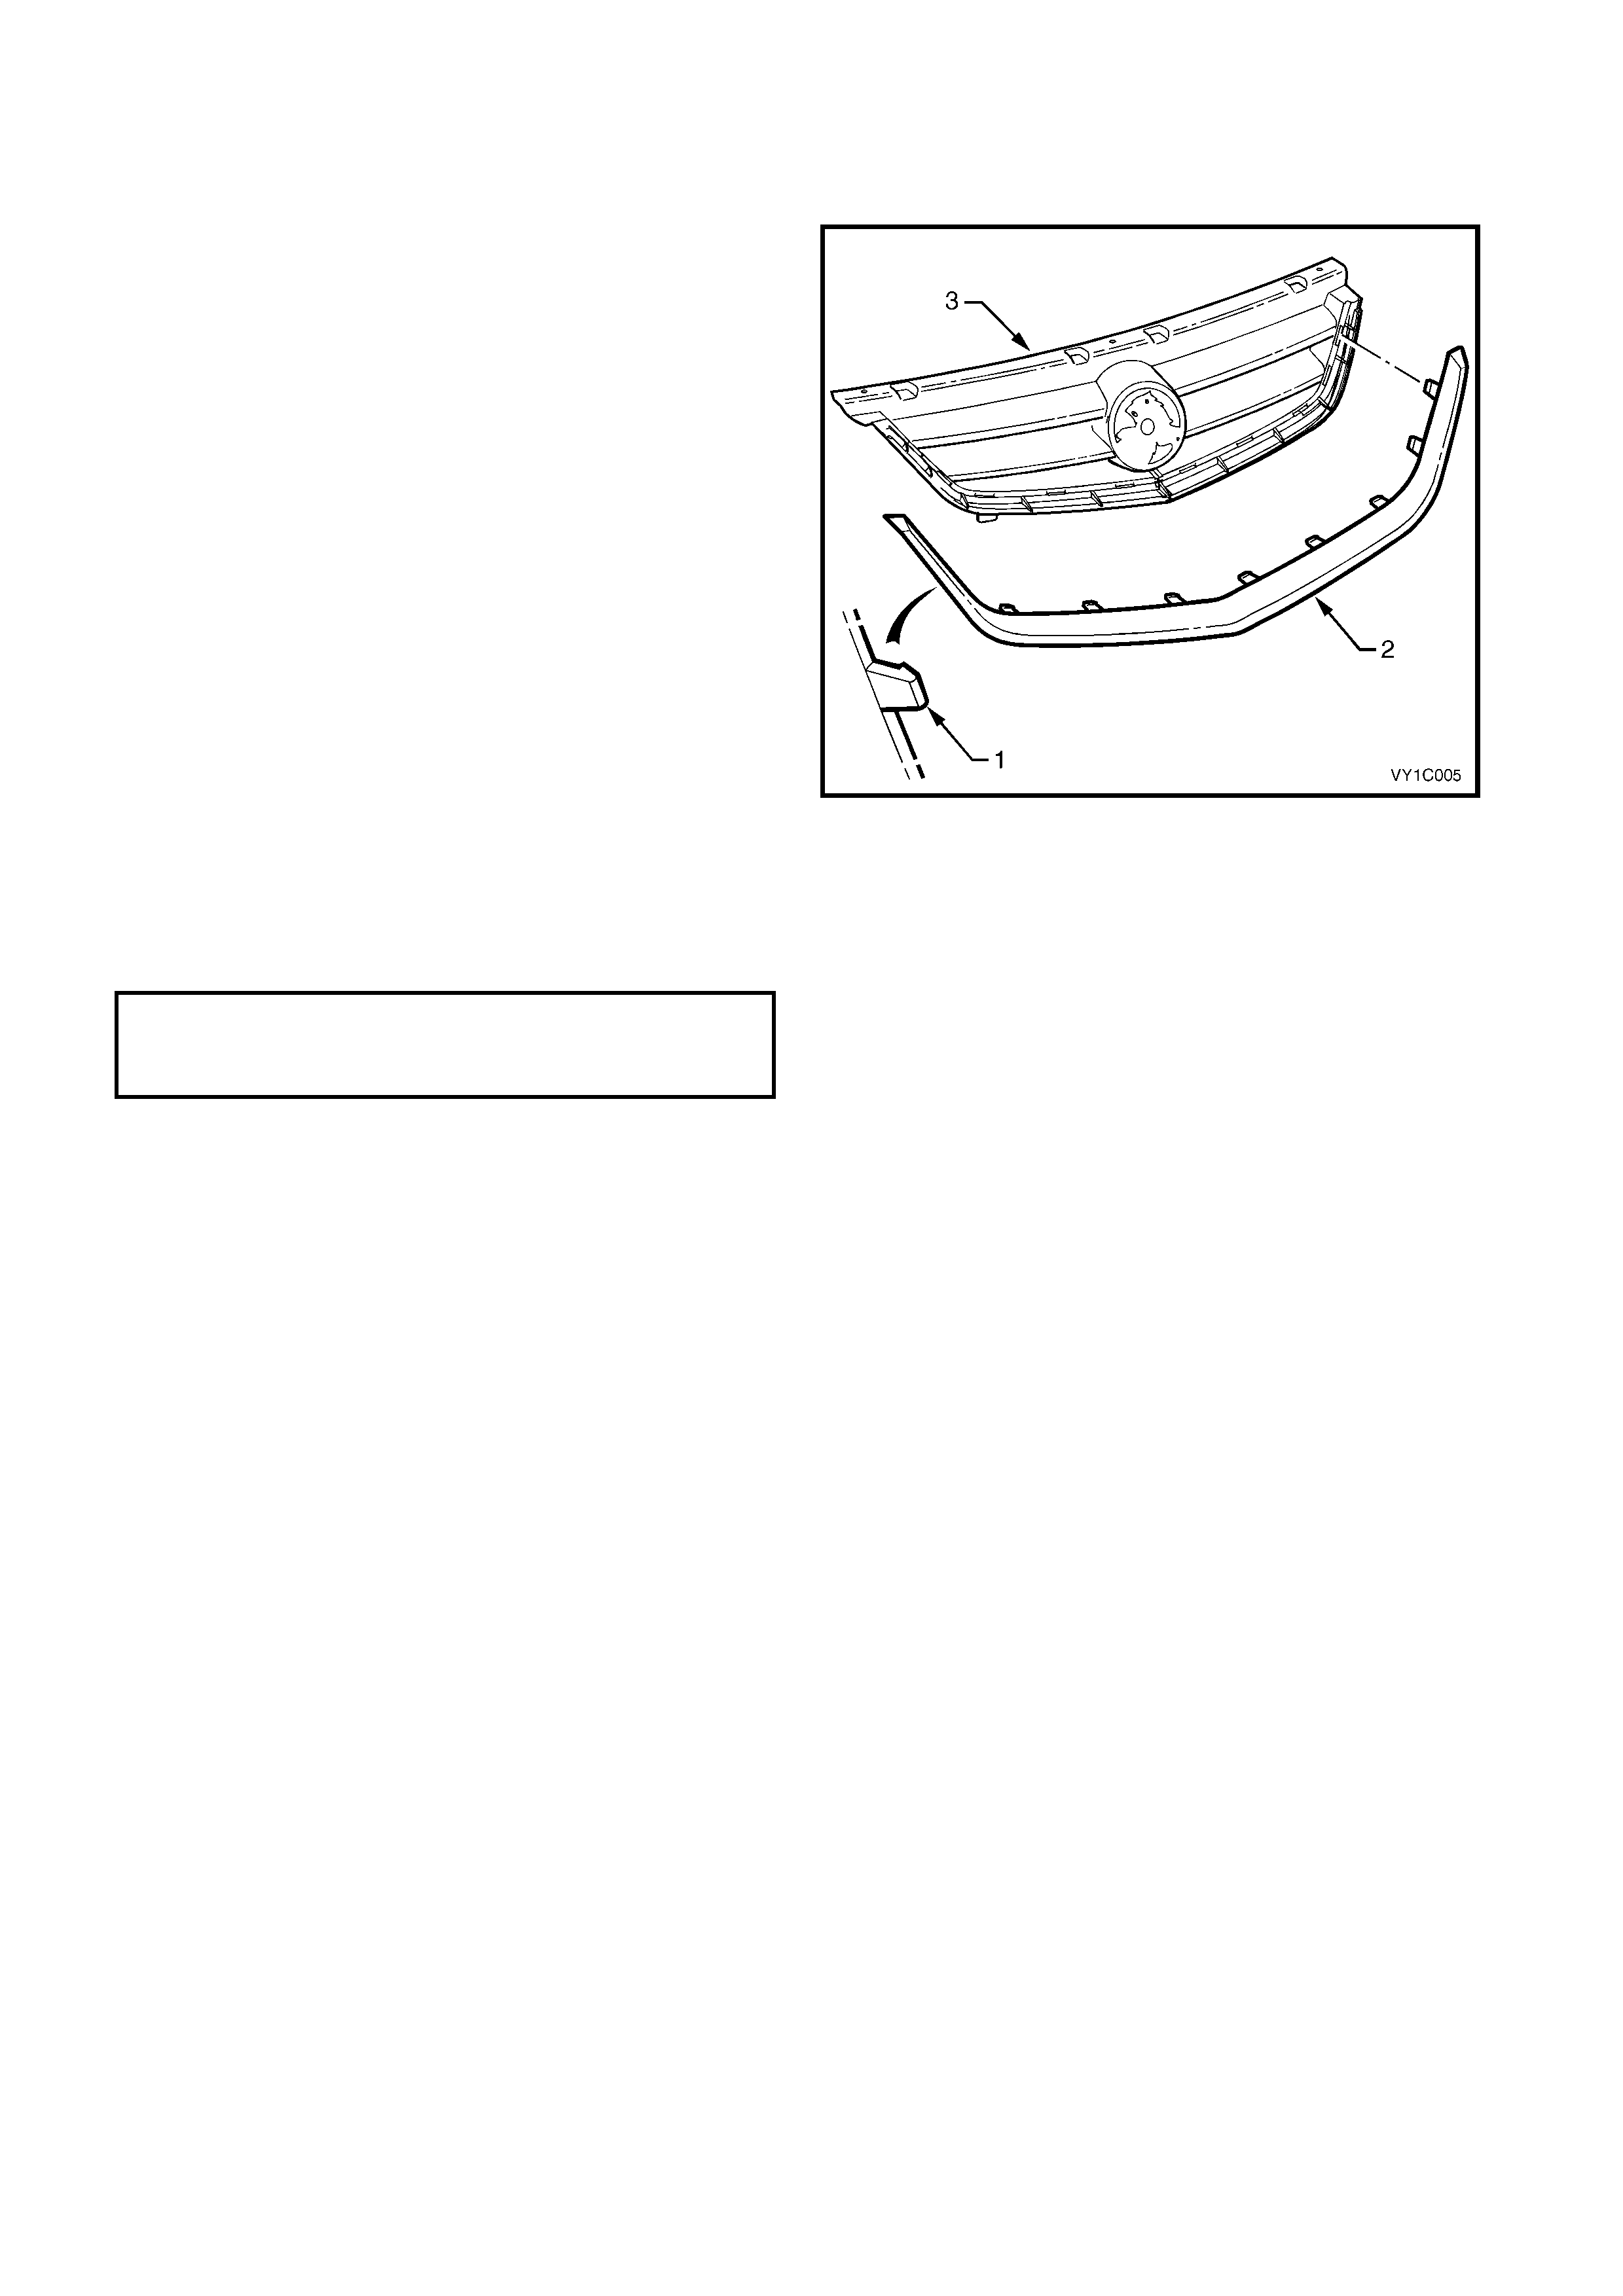
RADIATOR GRILLE INNER & OUTER,
DOMESTIC LEVEL 3
Remove
1. From the rear of the grille assembly, depress the
retainers (1), 10 places, to remove the grille outer
(2) from the grille inner (3).
2. Slide the grille outer from the grille inner.
Reinstall
1. Align the grille outer retainers with their
corresponding slots in the grille inner.
2. Fit the two components together and ensure all of
the retainers are correctly seated.
Figure 1C-5
REINSTALL
Installation is the reverse of removal. Tighten the
screws to the specified torque.
RADIATOR GRILLE ASSEMBLY ATTACHING
SCREW TORQUE SPECIFICATION,
EXCEPT S SEDAN & SS 2.0 – 3.0 Nm
2.2 RADIATOR GRILLE ASSEMBLY, S SEDAN & SS
LT Section – 07-500
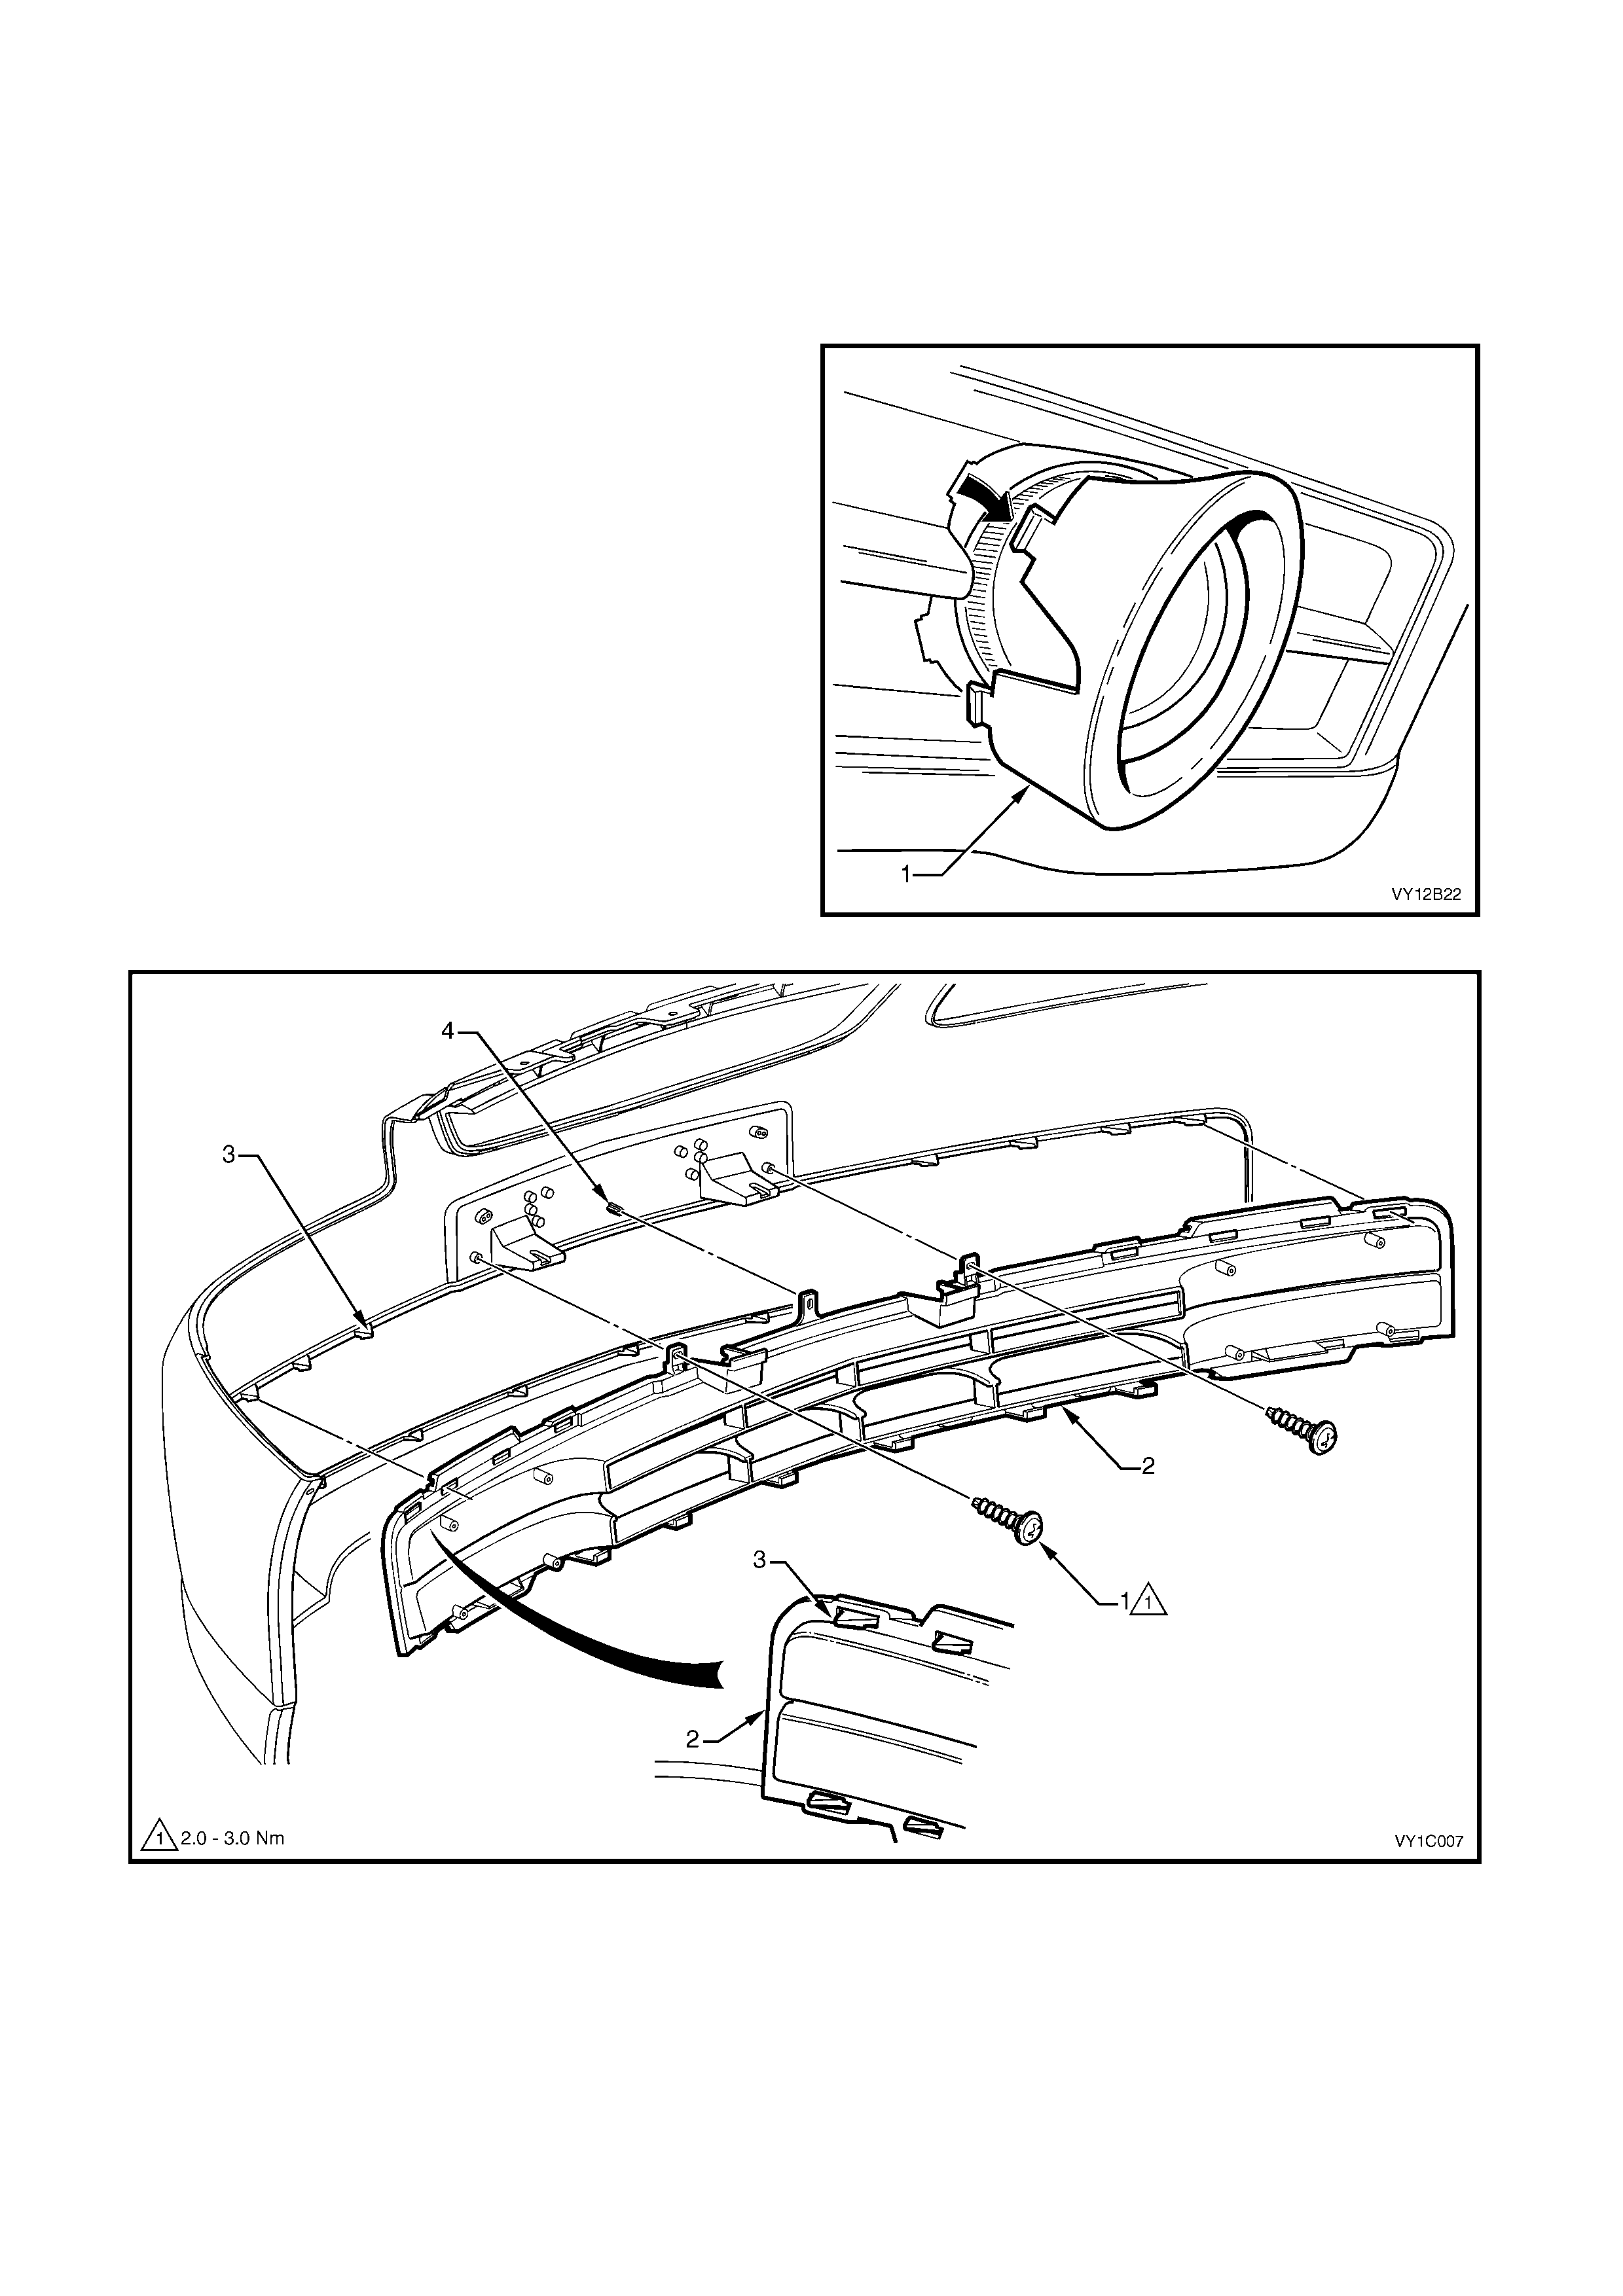
REMOVE
1. Open the hood.
2. Remove the screw (1) attaching the radiator grille
assembly (2) to the front upper panel.
3. Remove the two screws (3) attaching the grille
assembly to the bumper fascia and front upper
panel.
4. Tilt the top of the grille assembly forward slightly
and lift it out of the bumper fascia to release the
two lugs (4) on the lower edge.
Figure 1C-6
DISASSEMBLE
RADIATOR GRILLE ESCUTCHEON, EXPORT
Remove
1. From the rear of the grille assembly, depress the
retaining tab (1), nine places, attaching the radiator
grille escutcheon (2).
2. Remove the escutcheon from the grille.
Reinstall
1. Align the escutcheon retainers with their
corresponding slots in the grille.
2. Fit the two components together and ensure the
retainers are correctly seated.
Figure 1C-7
REINSTALL
Installation is the reverse of removal. Tighten the
screws to the specified torque.
RADIATOR GRILLE ASSEMBLY ATTACHING
SCREW TORQUE SPECIFICATION,
S SEDAN & SS 2.5 – 4.0 Nm
2.3 LOWER RADIATOR GRILLE, LEVEL 1 EXCEPT S SEDAN & SS
LT Section –
REMOVE
1. Remove the f ront bumper f as cia assembly, refer to
Section 1D BUMPER BARS.
2. Remove the two screws (1) attaching the lower
radiator grille (2) to the rear of the bumper fascia,
refer to Figure 1C-8.
3. Unclip the retainers (3) securing the lower grille to
the bumper fascia, seven places.
4. Remove the lower grille.
Figure 1C-8
REINSTALL
1. Locate the lower radiator grille onto the stud (4)
and then clip it into place, refer to Figure 1C-8.
2. Install the two screws and tighten to the specified
torque.
LOWER RADIATOR GRILLE ATTACHING
SCREW TORQUE SPECIFICATION 2.0 – 3.0Nm
2.4 LOWER RADIATOR GRILLE, LEVEL 2 & 3
LT Section –
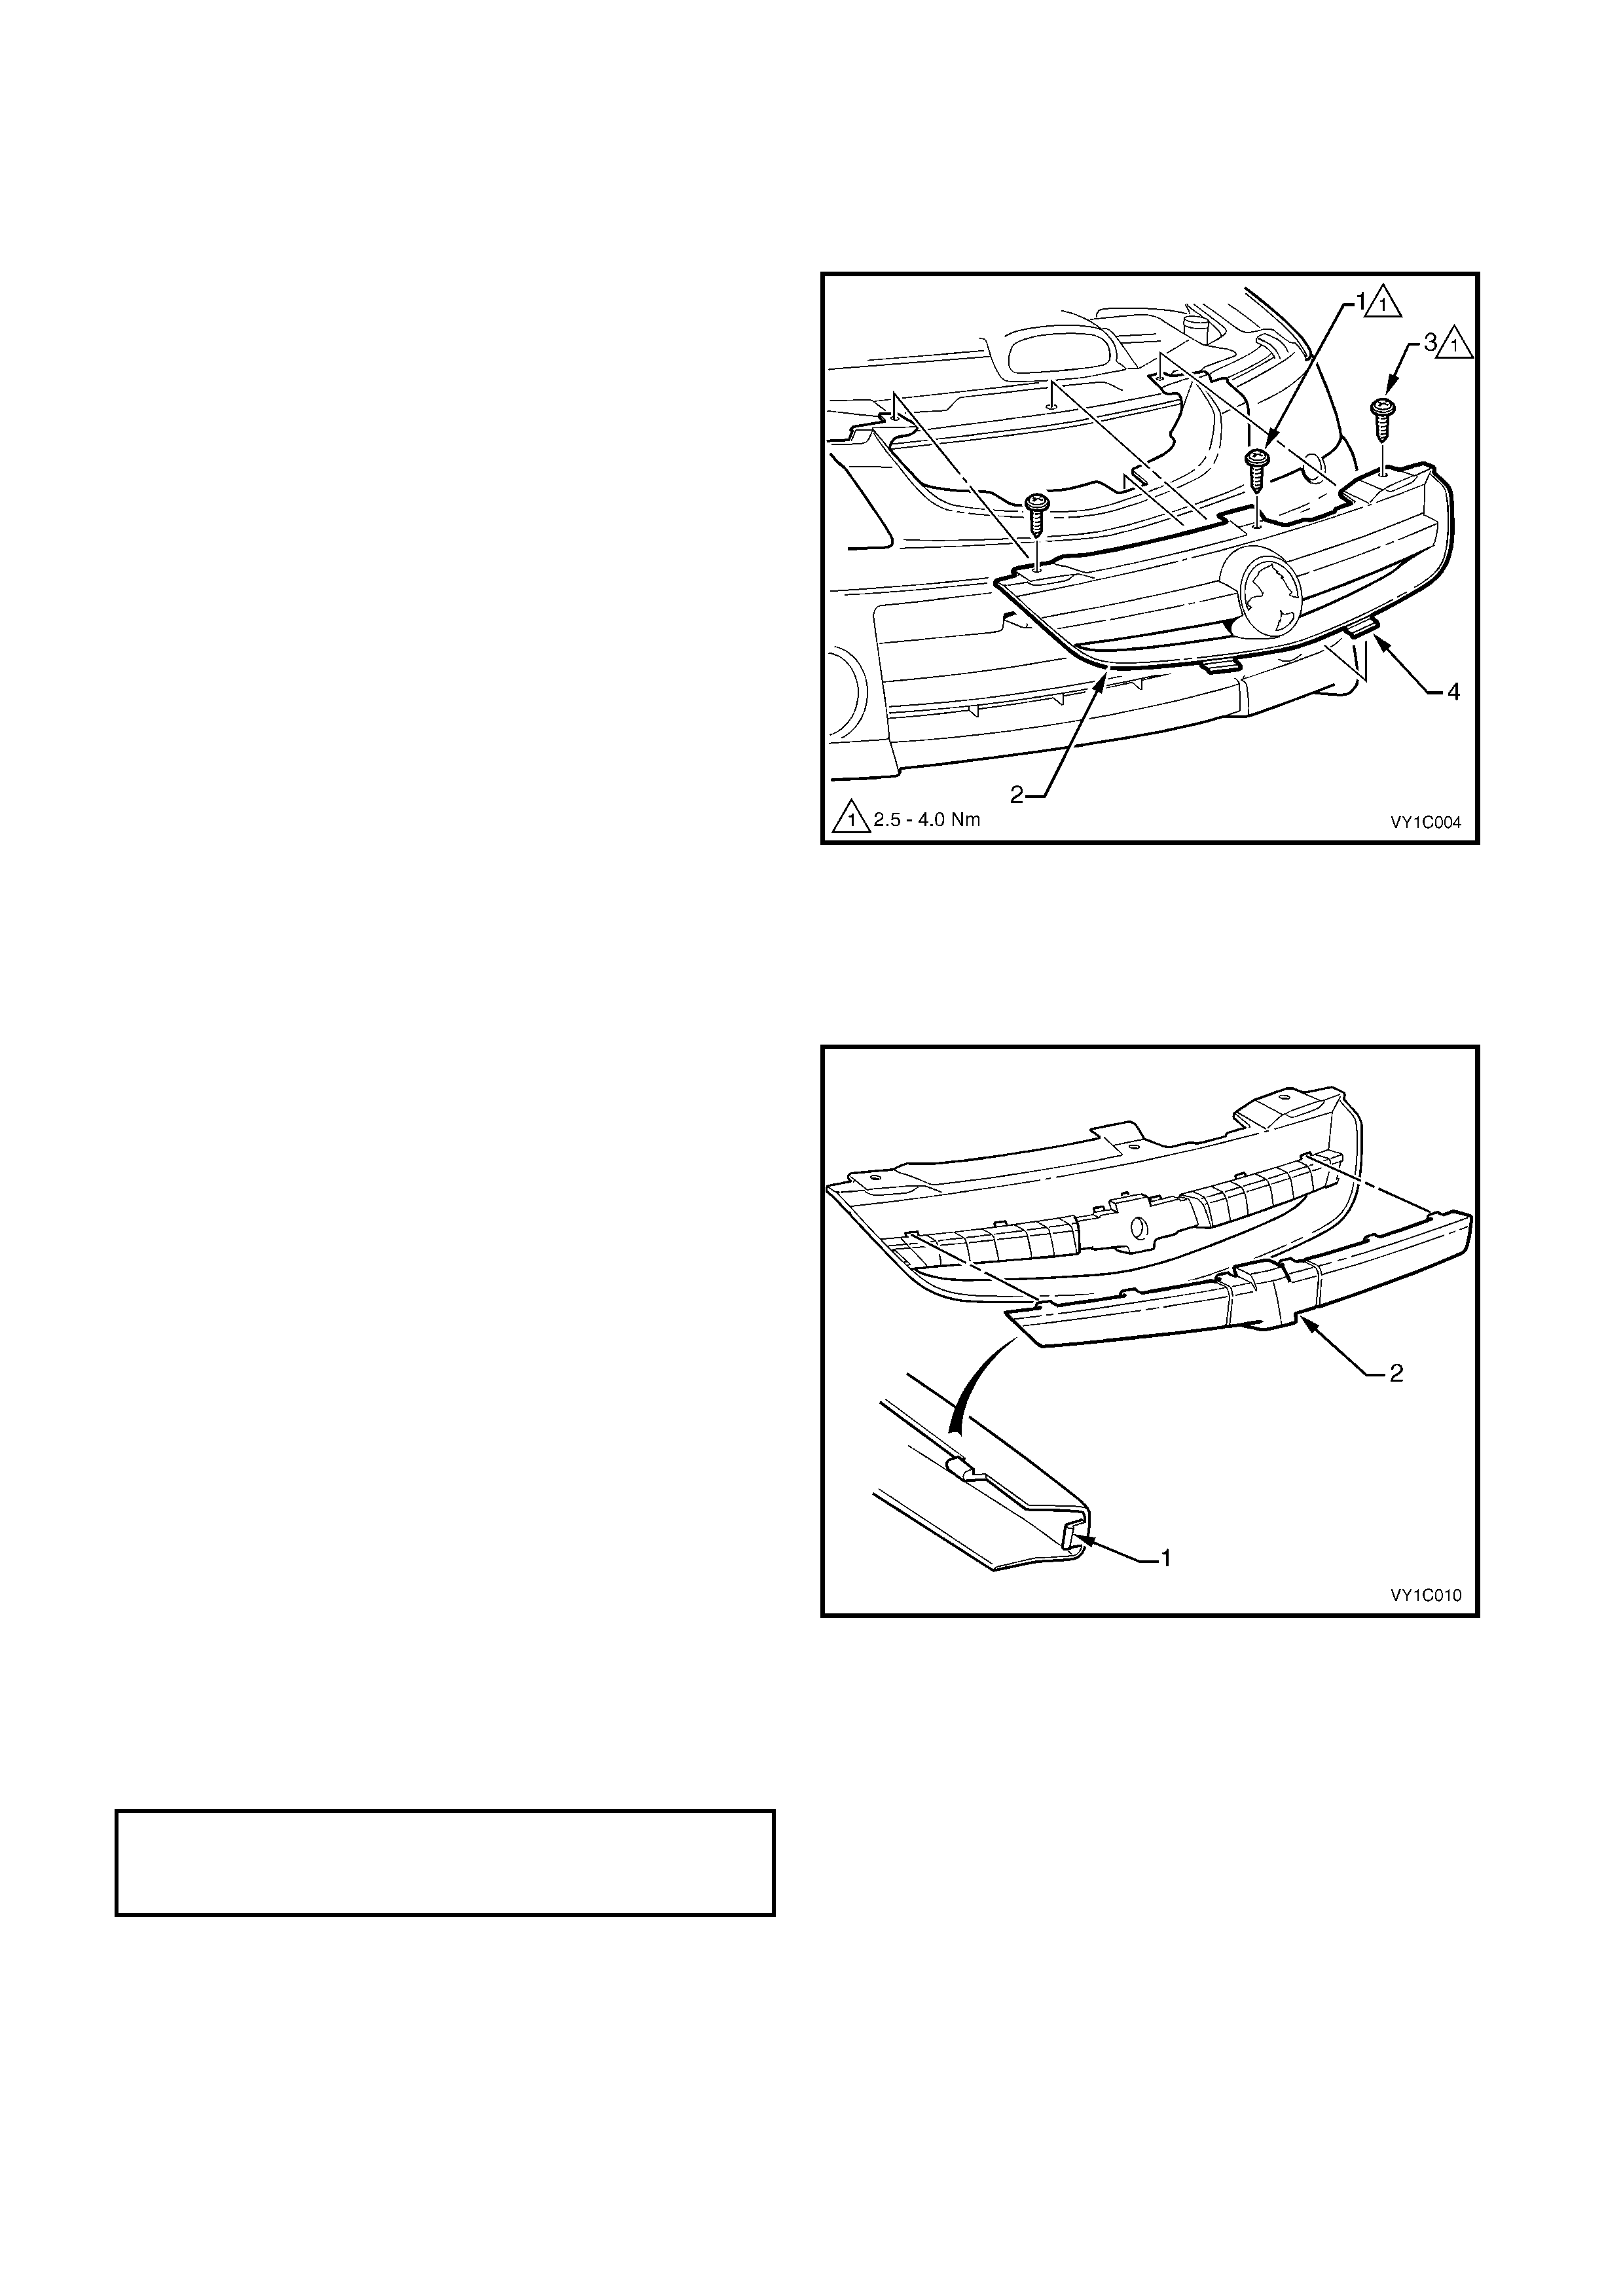
REMOVE
1. Remove the f ront bumper f as cia assembly, refer to
Section 1D BUMPER BARS.
2. Where fitted, remove the front foglamp bezel
assem bly (1). Depress the inner tabs attaching the
bezel assem bly to the lower grille, rotate the bezel
outwards and disengage the outer tabs.
3. Remove the two screws (1) attaching the lower
radiator grille (2) to the bumper fascia, refer to
Figure 1C-10.
4. Unclip the retainers (3) securing the lower grille to
the bumper fascia, 19 places.
5. Remove the lower grille.
Figure 1C-9
Figure 1C-10
DISASSEMBLE
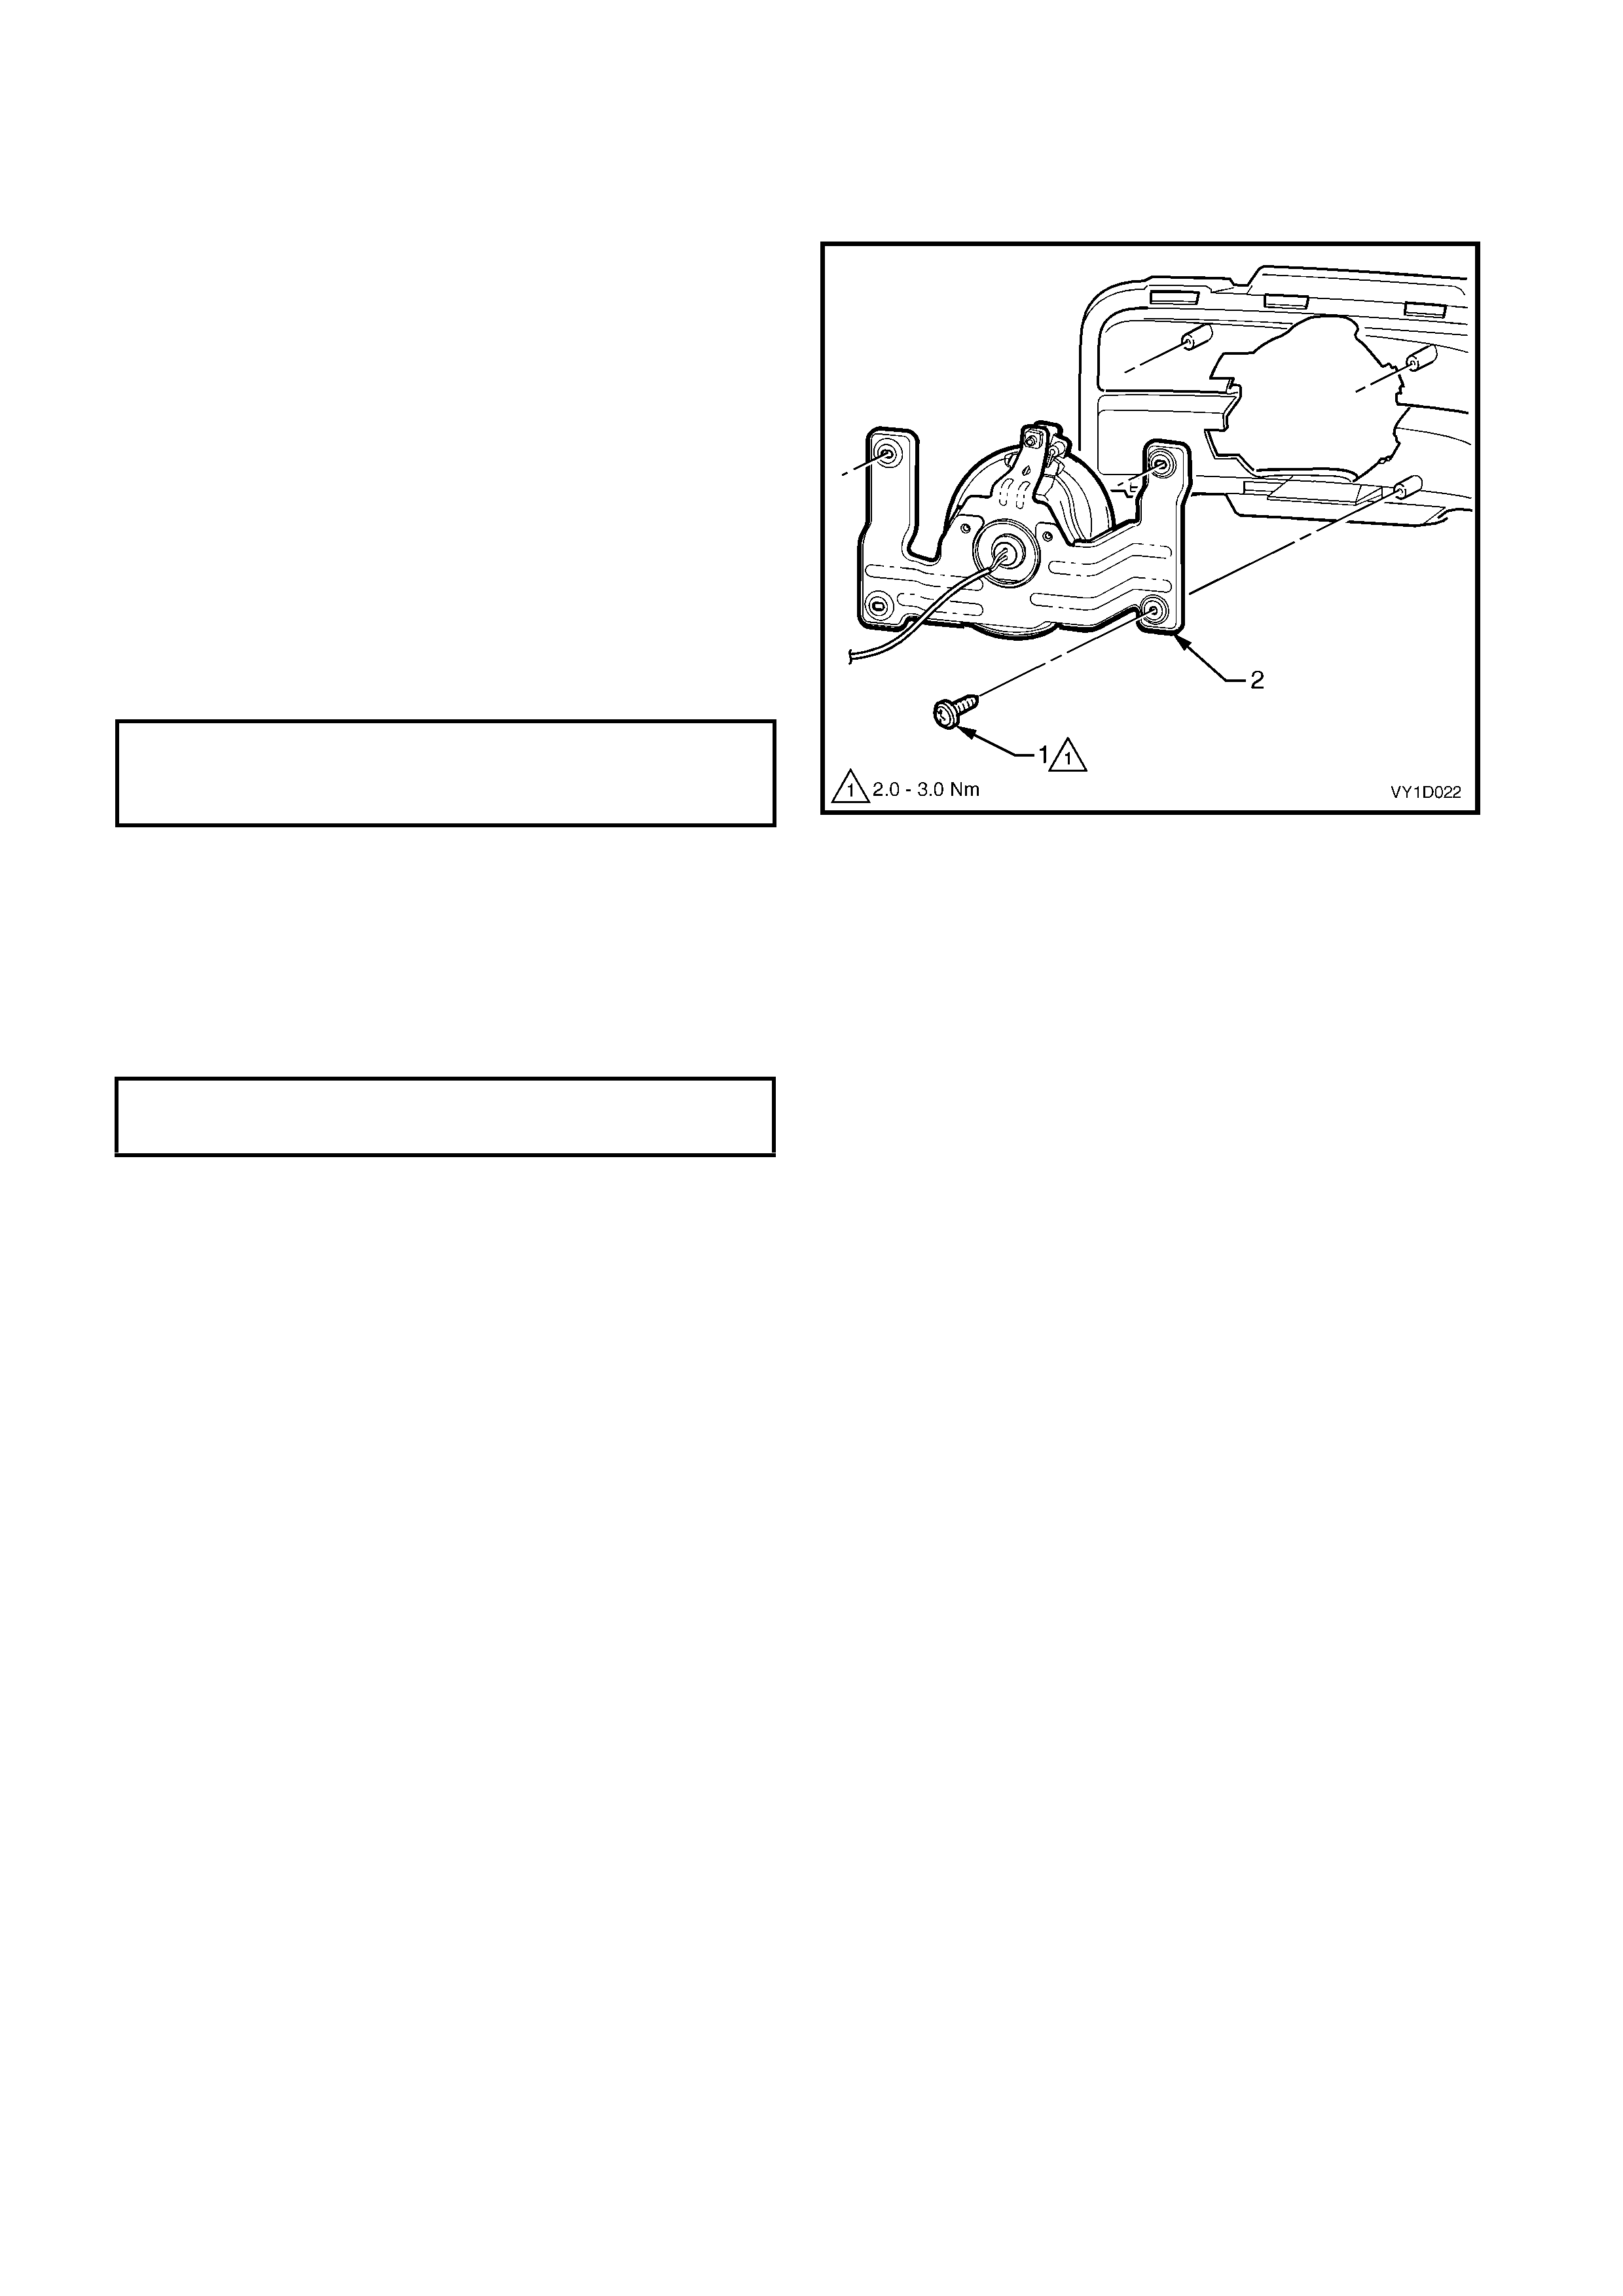
FRONT FOG LAMP ASSEMBLY, LEVEL 3
Remove
1. Remove the four screws (1) attaching the lamp
assembly (2) to the lower radiator grille.
2. Remove the lamp assembly from the rear of the
lower grille.
NOTE: For further servicing of the front fog lamp
assembly refer to Section 12B, LIGHTING SYSTEM.
Reinstall
Installation is the reverse of removal. Tighten the
screws to the specified torque.
NOTE: Following installation of the bumper fascia
assembly and prior to installing the front foglamp
bezel, aim the fog lamps, refer to Section 12B,
2.1 HEADLAMP & FOG LAMP AIMING.
Figure 1D-11
REINSTALL
1. Locate the lower radiator grille onto the stud (4)
and then clip it into place, refer to Figure 1C-10.
2. Install the two screws and tighten to the specified
torque.
FRONT FOG LAMP ASSEMBLY
ATTACHING SCREW TORQUE
SPECIFICATION, LEVEL 3 2.0 – 3.0 Nm
LOWER RADIATOR GRILLE ATTACHING
SCREW TORQUE SPECIFICATION 2.0 – 3.0Nm
2.5 LOWER RADIATOR GRILLE, COUPE
LT Section –
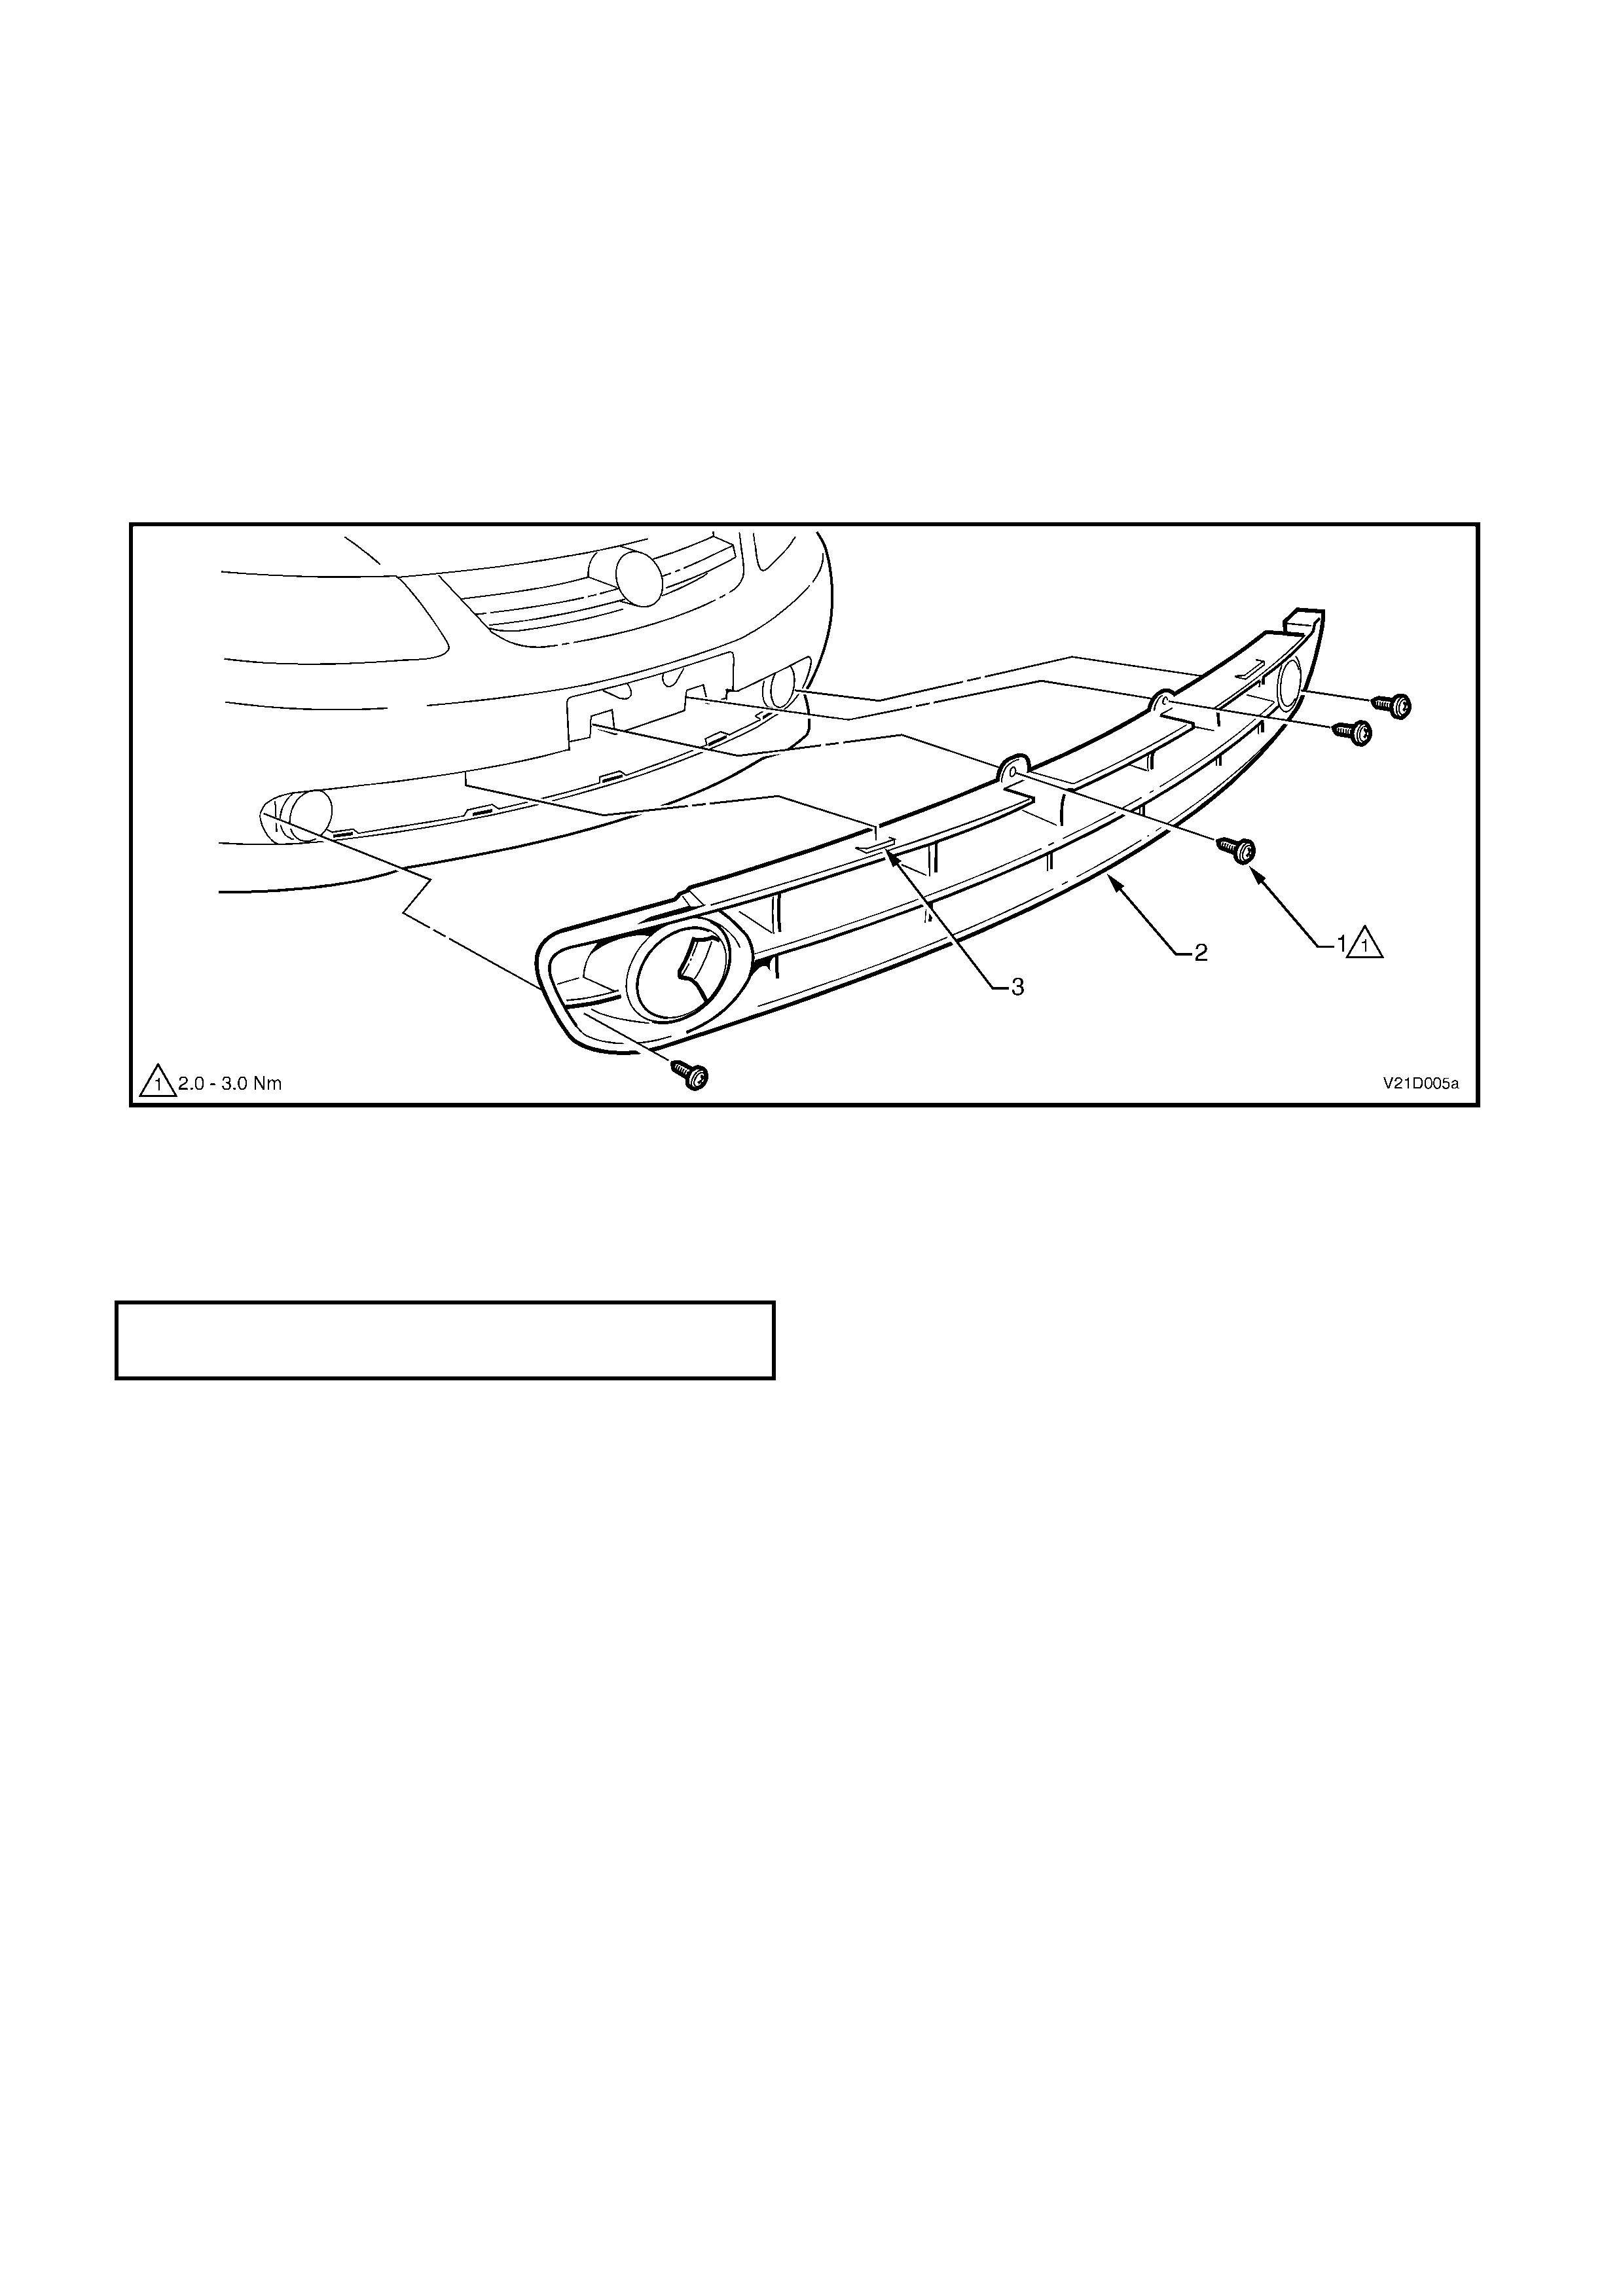
REMOVE
1. Remove the licence plate.
2. Remove the four screws (1) attaching the lower
radiator grille (2) to the front bumper fascia
assembly.
3. Unclip the lower grille from the bumper fascia
several places along the upper and lower edges.
4. Remove the lower grille.
Figure 1C-12
REINSTALL
Installation of the lower gr ille is the reverse of rem oval.
Tighten the screws to the specified torque.
LOWER RADIATOR GRILLE ATTACHING
SCREW TORQUE SPECIFICATION 2.0 – 3.0 Nm

3. TORQUE WRENCH SPECIFICATIONS
Radiator grille assembly to bumper fascia attaching screw, except S Sedan & SS.......2.0 – 3.0 Nm
Radiator grille assembly to front upper panel attaching screw, S Sedan & SS..............2.5 – 4.0 Nm
Lower radiator grille attaching screw..............................................................................2.0 – 3.0 Nm
Front fog lamp assembly attaching screw......................................................................2.0 – 3.0 Nm