
SECTION 6D1-2 - STARTING SYSTEM –
V6 AND V6 S/C ENGINES
IMPORTANT
Before p erforming any Serv ice Operation or other procedure d escribed in this Section , refer to Section 00,
CAUTIONS AND NOTES in this Service Information for correct workshop practices with regard to safety
and/or property damage.
CONTENTS
1. GENERAL INFORMATION
SOLENOID SWITCH
PLANETARY DRIVE TRAIN
ARMATURE
BRUSHES
1.1 OPERATION
CIRCUIT OVERVIEW
2. MINOR SERVICE OPERATIONS
2.1 SAFETY PRECAUTIONS
2.2 MAINTENANCE AND ON-VEHICLE TESTING
REGULAR CHECKS
ON-VEHICLE CHECKS
3. MAJOR SERVICE OPERATIONS
3.1 STARTER MOTOR
REMOVE
STARTER MOTOR BENCH TESTS
DISASSEMBLE
CLEANING AND INSPECTION
REASSEMBLE
REINSTALL
4. DIAGNOSIS
CIRCUIT DIAGRAM
5. SPECIFICATIONS
6. TORQUE WRENCH SPECIFICATIONS
7. SPECIAL TOOLS

1. GENERAL INFORMATION
The V6 engines are fitted with a Bosch DW starter motor. This consists of a solenoid switch on a DC motor. The
motor has permanent magnet excitation, which has the advantage of low weight with high output torque and is
visually identifiable by the absence of pole-shoe retaining screws.
The Bosch DW starter motor does not have field coil windings or pole shoes. These parts have been replaced by
six permanent magnets that are held in the pole housing by clips. The positive brushes are now part of the brush
plate assembly.
SOLENOID SWITCH
The solenoid switch is used to activate the DC motor and has two windings; the pull-in winding and the hold-in
winding. The pull-in winding has heavier wire and is grounded through the DC motor winding and brushes. The
hold-in winding is grounded to the solenoid casing.
PLANETARY DRIVE TRAIN
The planetary drive train cons ists of an inter nally toothed ring gear and three planetary gear wheels which rotate on
needle bearings on the planetary drive shaft. The ring gear is keyed into the drive-end housing and is made from
high-grade polyamide with mineral additives.
W hen the starter motor operates, the armature turns the planetary gears inside the fixed planetary ring gear. This
drives the planetary shaft at a reduced speed ratio (approximately 4.36:1) which turns the drive assembly. A fork
lever in the drive-end housing forces the drive assem bly forward to engage with the flexplate/flywheel ring gear on
the engine and transmit cranking torque.
An internal clutch allows the drive assembly pinion gear to rotate freely when the engine starts. This prevents the
armature from being driven at excessive speed by the engine.
ARMATURE
The armature shaft is supported at each end by oil absorbent, sintered metal bushes; one in the commutator end
shield and one in the planetar y drive shaf t. These bushes require lubrication only at the time of over haul. The front
end of the arm ature has a gear profile. T his m eshes with the three planetary gear wheels. These in turn m esh with
the internal teeth of the ring gear.
BRUSHES
A brush plate suppor ts f our com m utator brushes . This plate is f ixed to the comm utator end shield with two retaining
screws. Two negative brushes are grounded to the pole housing. The two positive brushes are insulated from the
pole housing and connected to the solenoid switch M terminal.
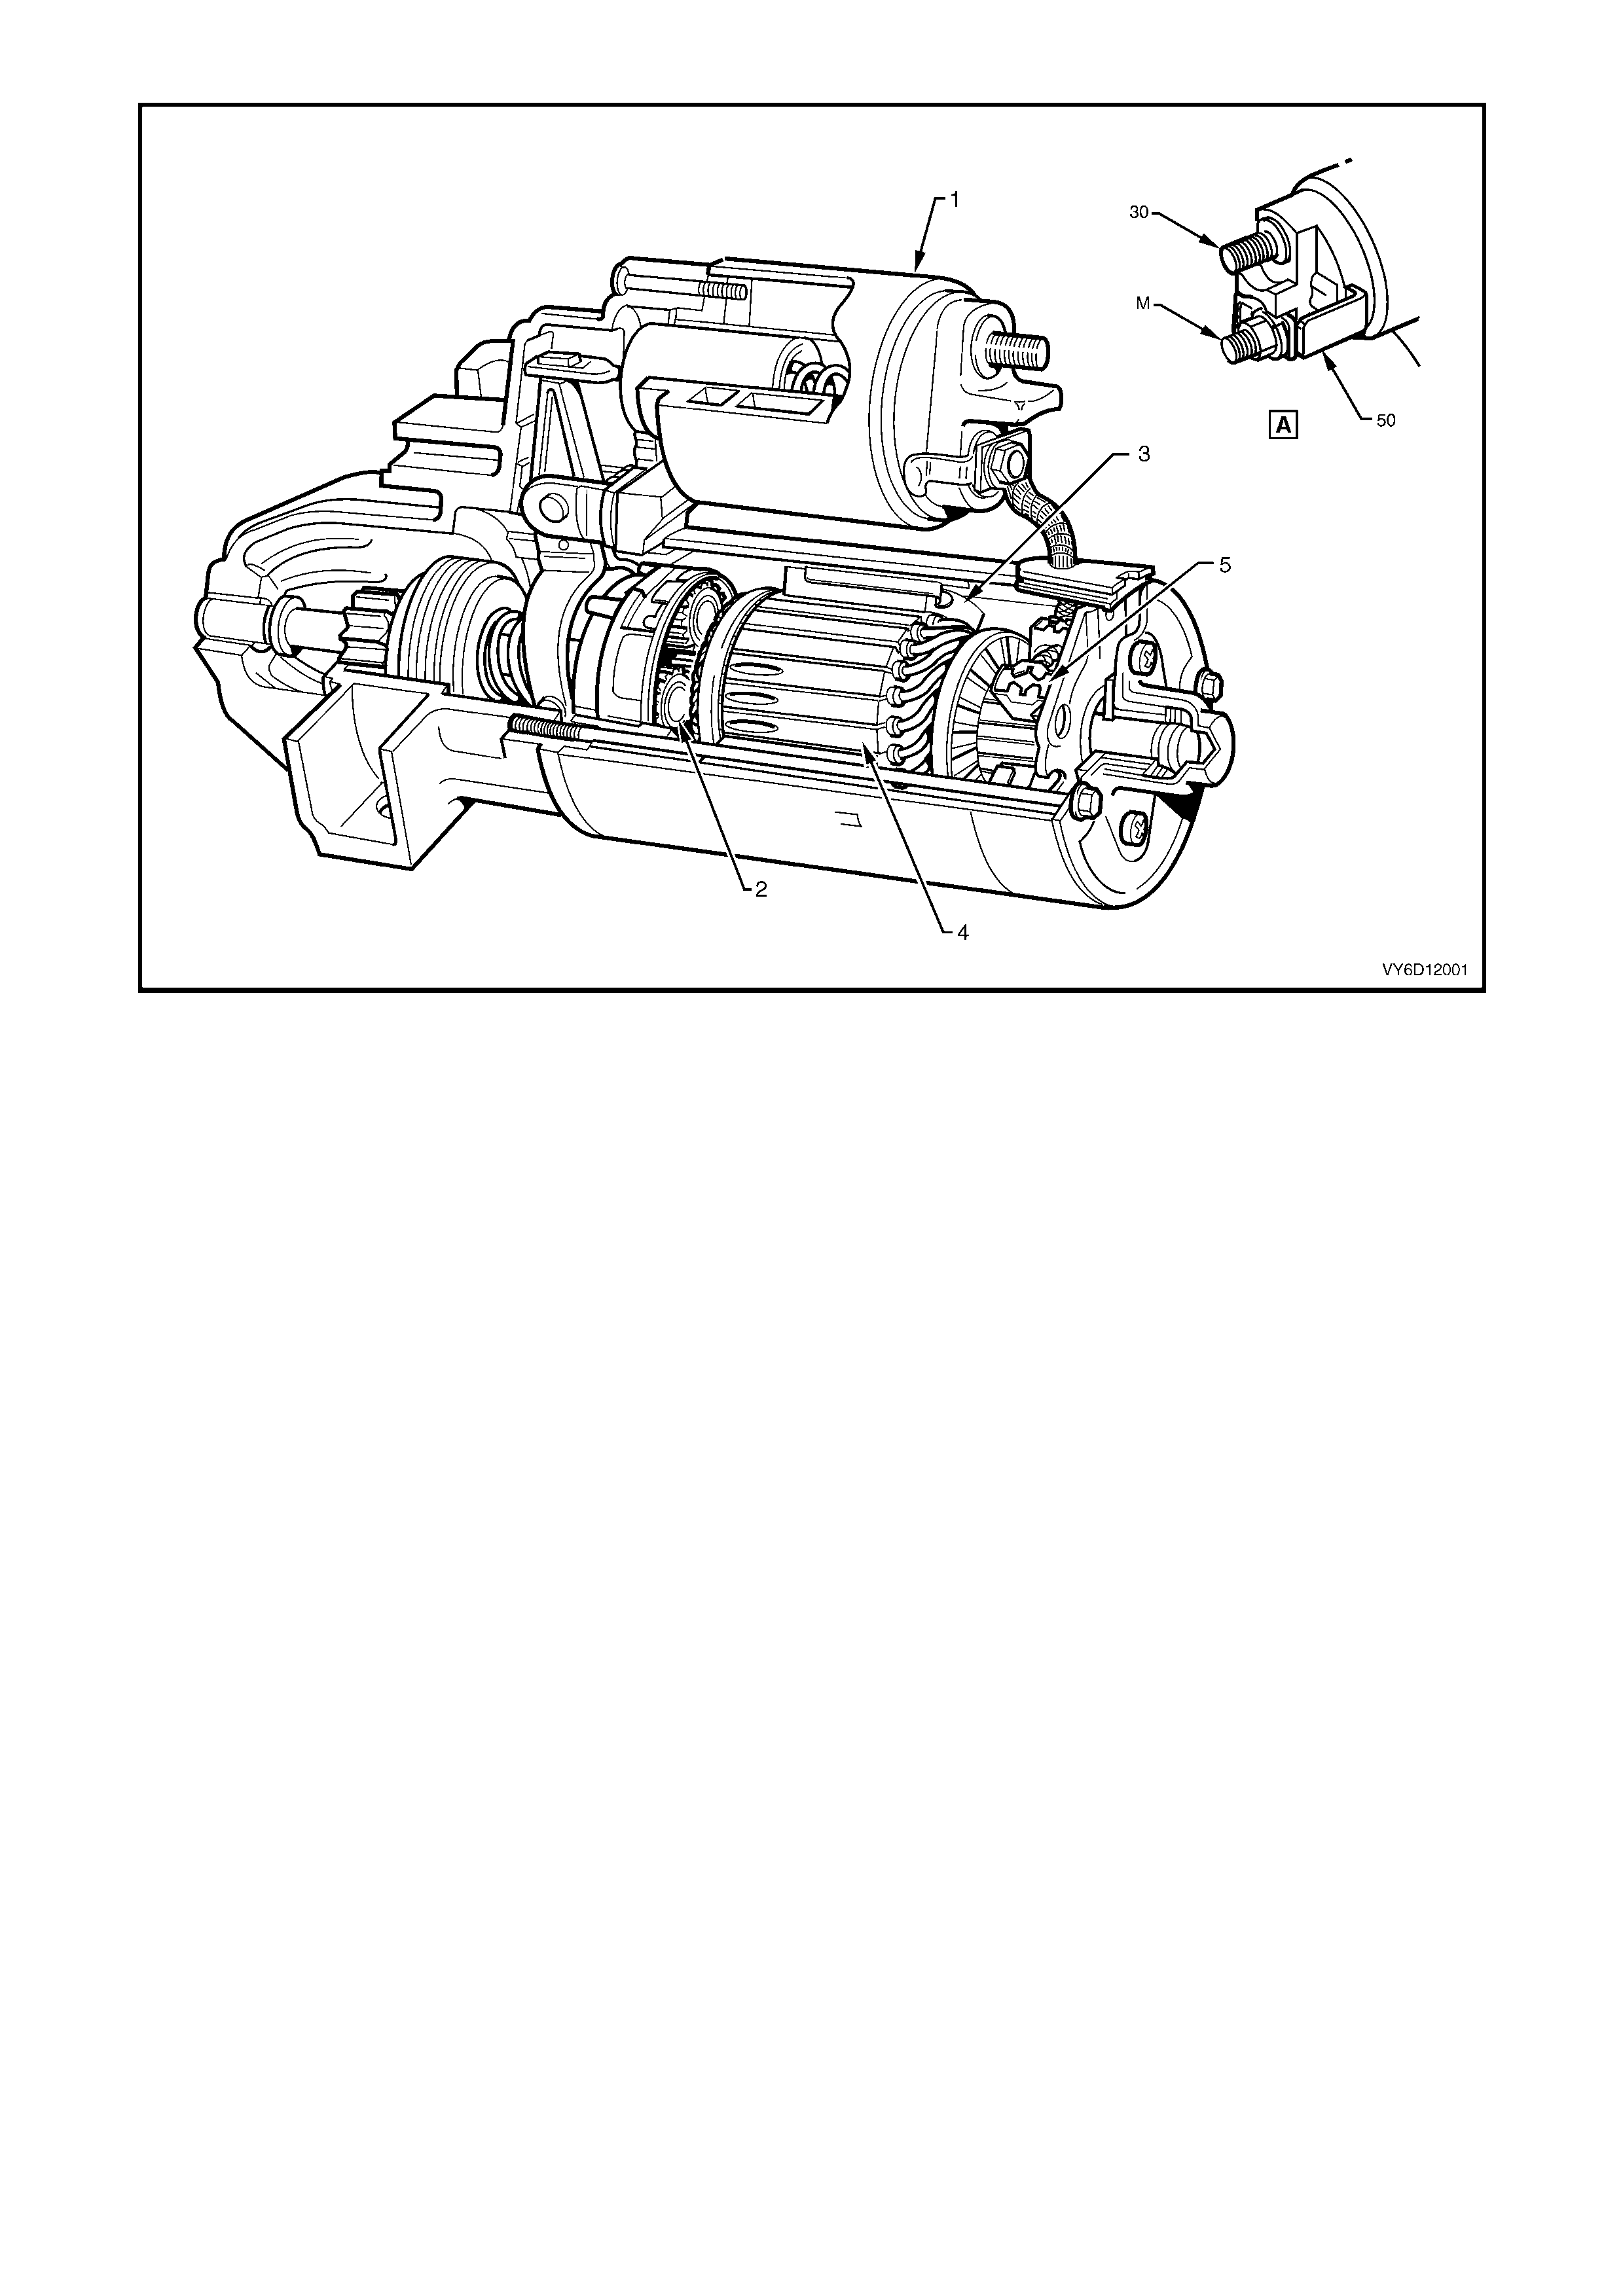
Figure 6D1-2-1
Legend
A. Solenoid switch connections.
1. Solenoid switch 4. Armature
2. Planetary gears 5. Brush (1 of 4)
3. Permanent magnet

Figure 6D1-2-2
Legend
1. Drive-end Housing Bush 12. Cover Plate 23. Brush Holder Spring
2. Solenoid Switch Mounting Screw 13. Planetary Drive Shaft 24. Brush Holder
3. Drive-end Housing 14. Drive Assembly Bush 25. Thrust Washer
4. Solenoid Plunger 15. Planetary Drive Shaft Retaining Washer 26. Dust Cover Retaining Screw
5. Plunger Return Spring 16. Planetary Drive Shaft Retaining Clip 27. Through-bolt
6. Solenoid Switch 17. Drive Assembly 28. Commutator End Shield
7. M Terminal Washer 18. Stop Ring Retainer 29. Dust Cover
8. M Terminal Nut 19. Stop Ring 30. Dust Cover Seal
9. Sealing Rubber 20. Pole Housing/Permanent Magnet Asm. 31. Horseshoe Clip
10. Fork Lever Pivot 21. Armature 32. Adjustment Washer
11. Fork Lever 22. Brush Plate Assembly 33. Commutator End Shield Bush
1.1 OPERATION
CIRCUIT OVERVIEW
This starting system comprises:
•
••
•
battery
•
••
•
starter motor
•
••
•
ignition switch
•
••
•
neutral/back-up switch (on vehicles with automatic transmission)
•
••
•
theft deterrent engine crank inhibitor (function of theft deterrent system)
•
••
•
wiring.
The battery cable supplies a c onstant connec tion fr om the battery to terminal 30 of the solenoid switch. T he ignition
switch (and the neutral-start switch for automatic vehicles) control the activation of the start relay.
With the ignition switch in the START position and the automatic transmission in P (park) or N (neutral), current
flows via the star t relay to term inal 50 of the s olenoid s witch. T his ac tivates the s olenoid s witch windings. T he pull- in
winding develops powerful m agnetism to pull in the solenoid switch plunger. The hold-in winding holds the plunger
in and the pull-in winding deactivates.
The solenoid switch simultaneously closes the switch contacts to connect terminal 30 to the DC motor pivots the
fork lever to engage the drive assembly to the flexplate/flywheel ring gear.
With the solenoid switch contacts closed, current flows from the battery through the DC motor, which spins and
provides cranking torque.
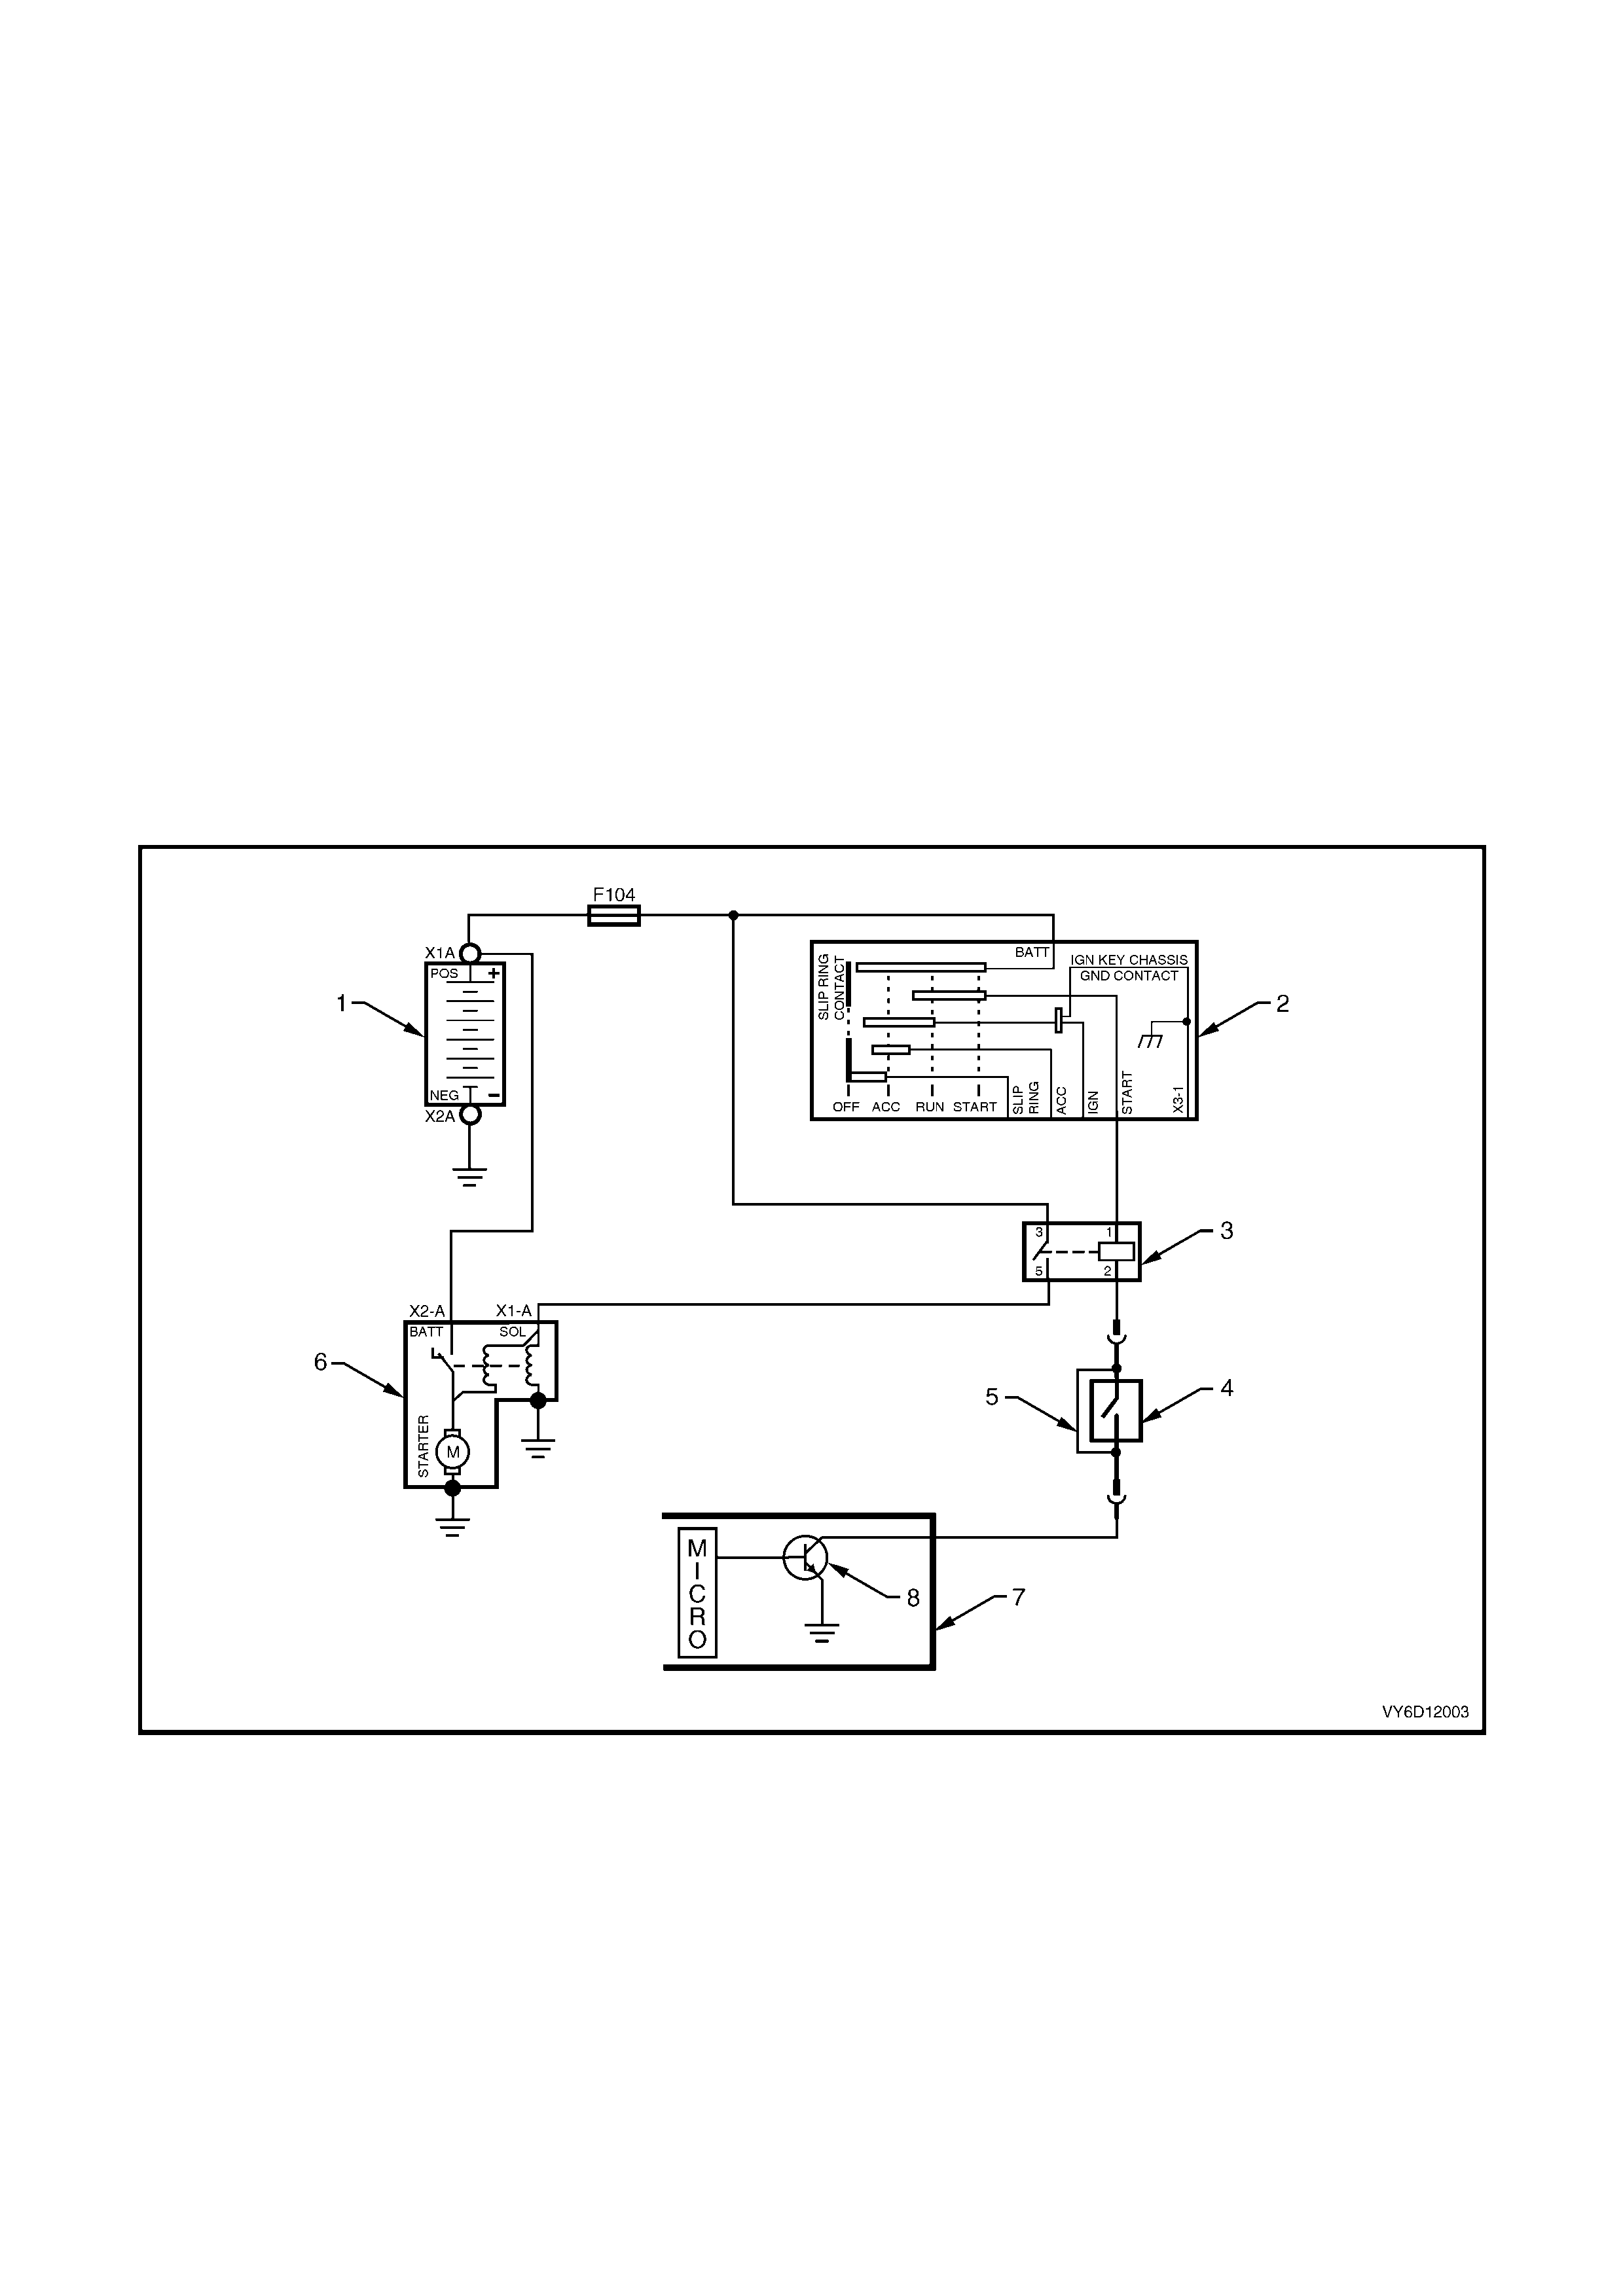
Figure 6D1-2-3
Legend
1. Battery 4. Neutral Start Switch (Back-up) 7. V6 PCM
2. Ignition Switch 5. Neutral Start Bypass (Manual Trans) 8. Start Enable Transistor
3. Start Relay 6. Starter Motor

2. MI NOR SERVICE OPERATIONS
2.1 SAFETY PRECAUTIONS
Observe the following precautions:
•
••
•
Refer to Section 00, CAUTIONS AND NOTES in this Service Information before disconnecting the battery.
•
••
•
Use the starter motor on a negative ground system only.
•
••
•
When installing a battery, fit the positive (+) cable to the battery first. Then fit the negative cable.
•
••
•
When using a slave battery for starting purposes, ensure that both batteries are connected in parallel, ie.
positive to positive terminals and negative to negative.
•
••
•
Only use jumper leads that have surge protection.
2.2 MAINTENANCE AND ON-VEHICLE TESTING
REGULAR CHECKS
Check the following at regular intervals:
•
••
•
Starter motor terminals – for corrosion and loose connectors.
•
••
•
Wiring – for damaged insulation.
•
••
•
Mounting bolts – for tightness.
•
••
•
Battery terminals – for clean and secure connections.
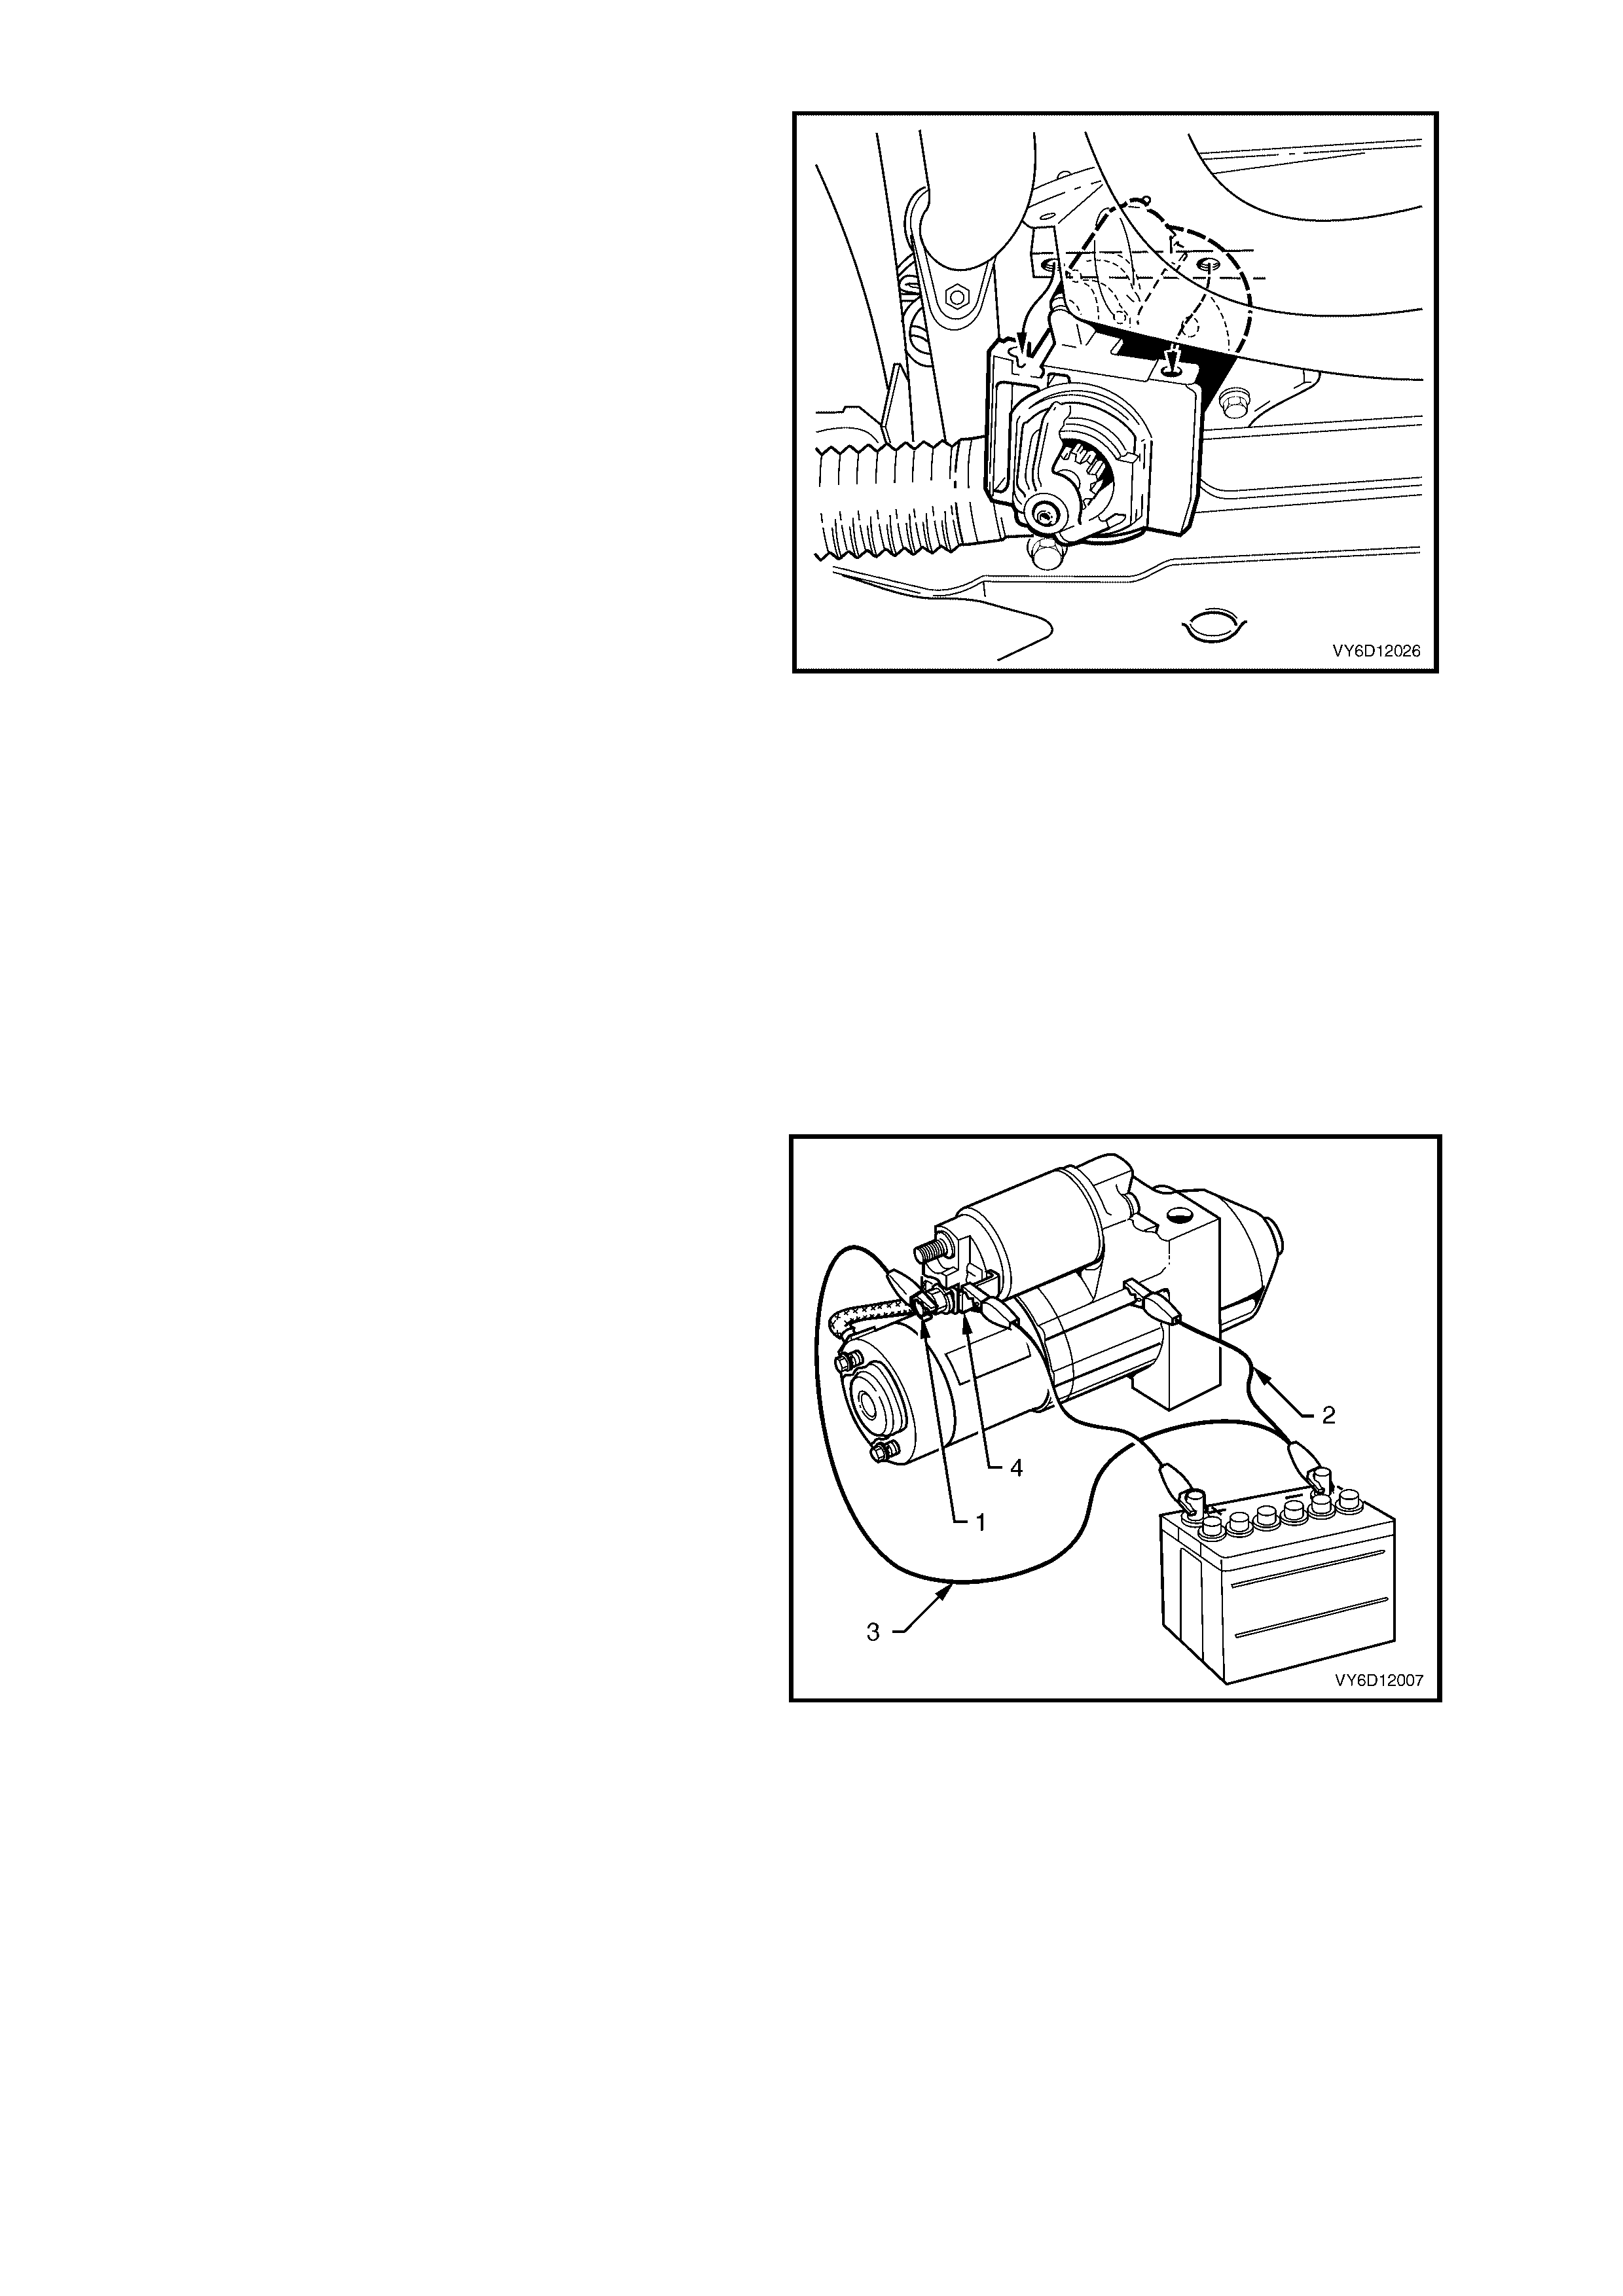
ON-VEHICLE CHECKS
Prerequisites
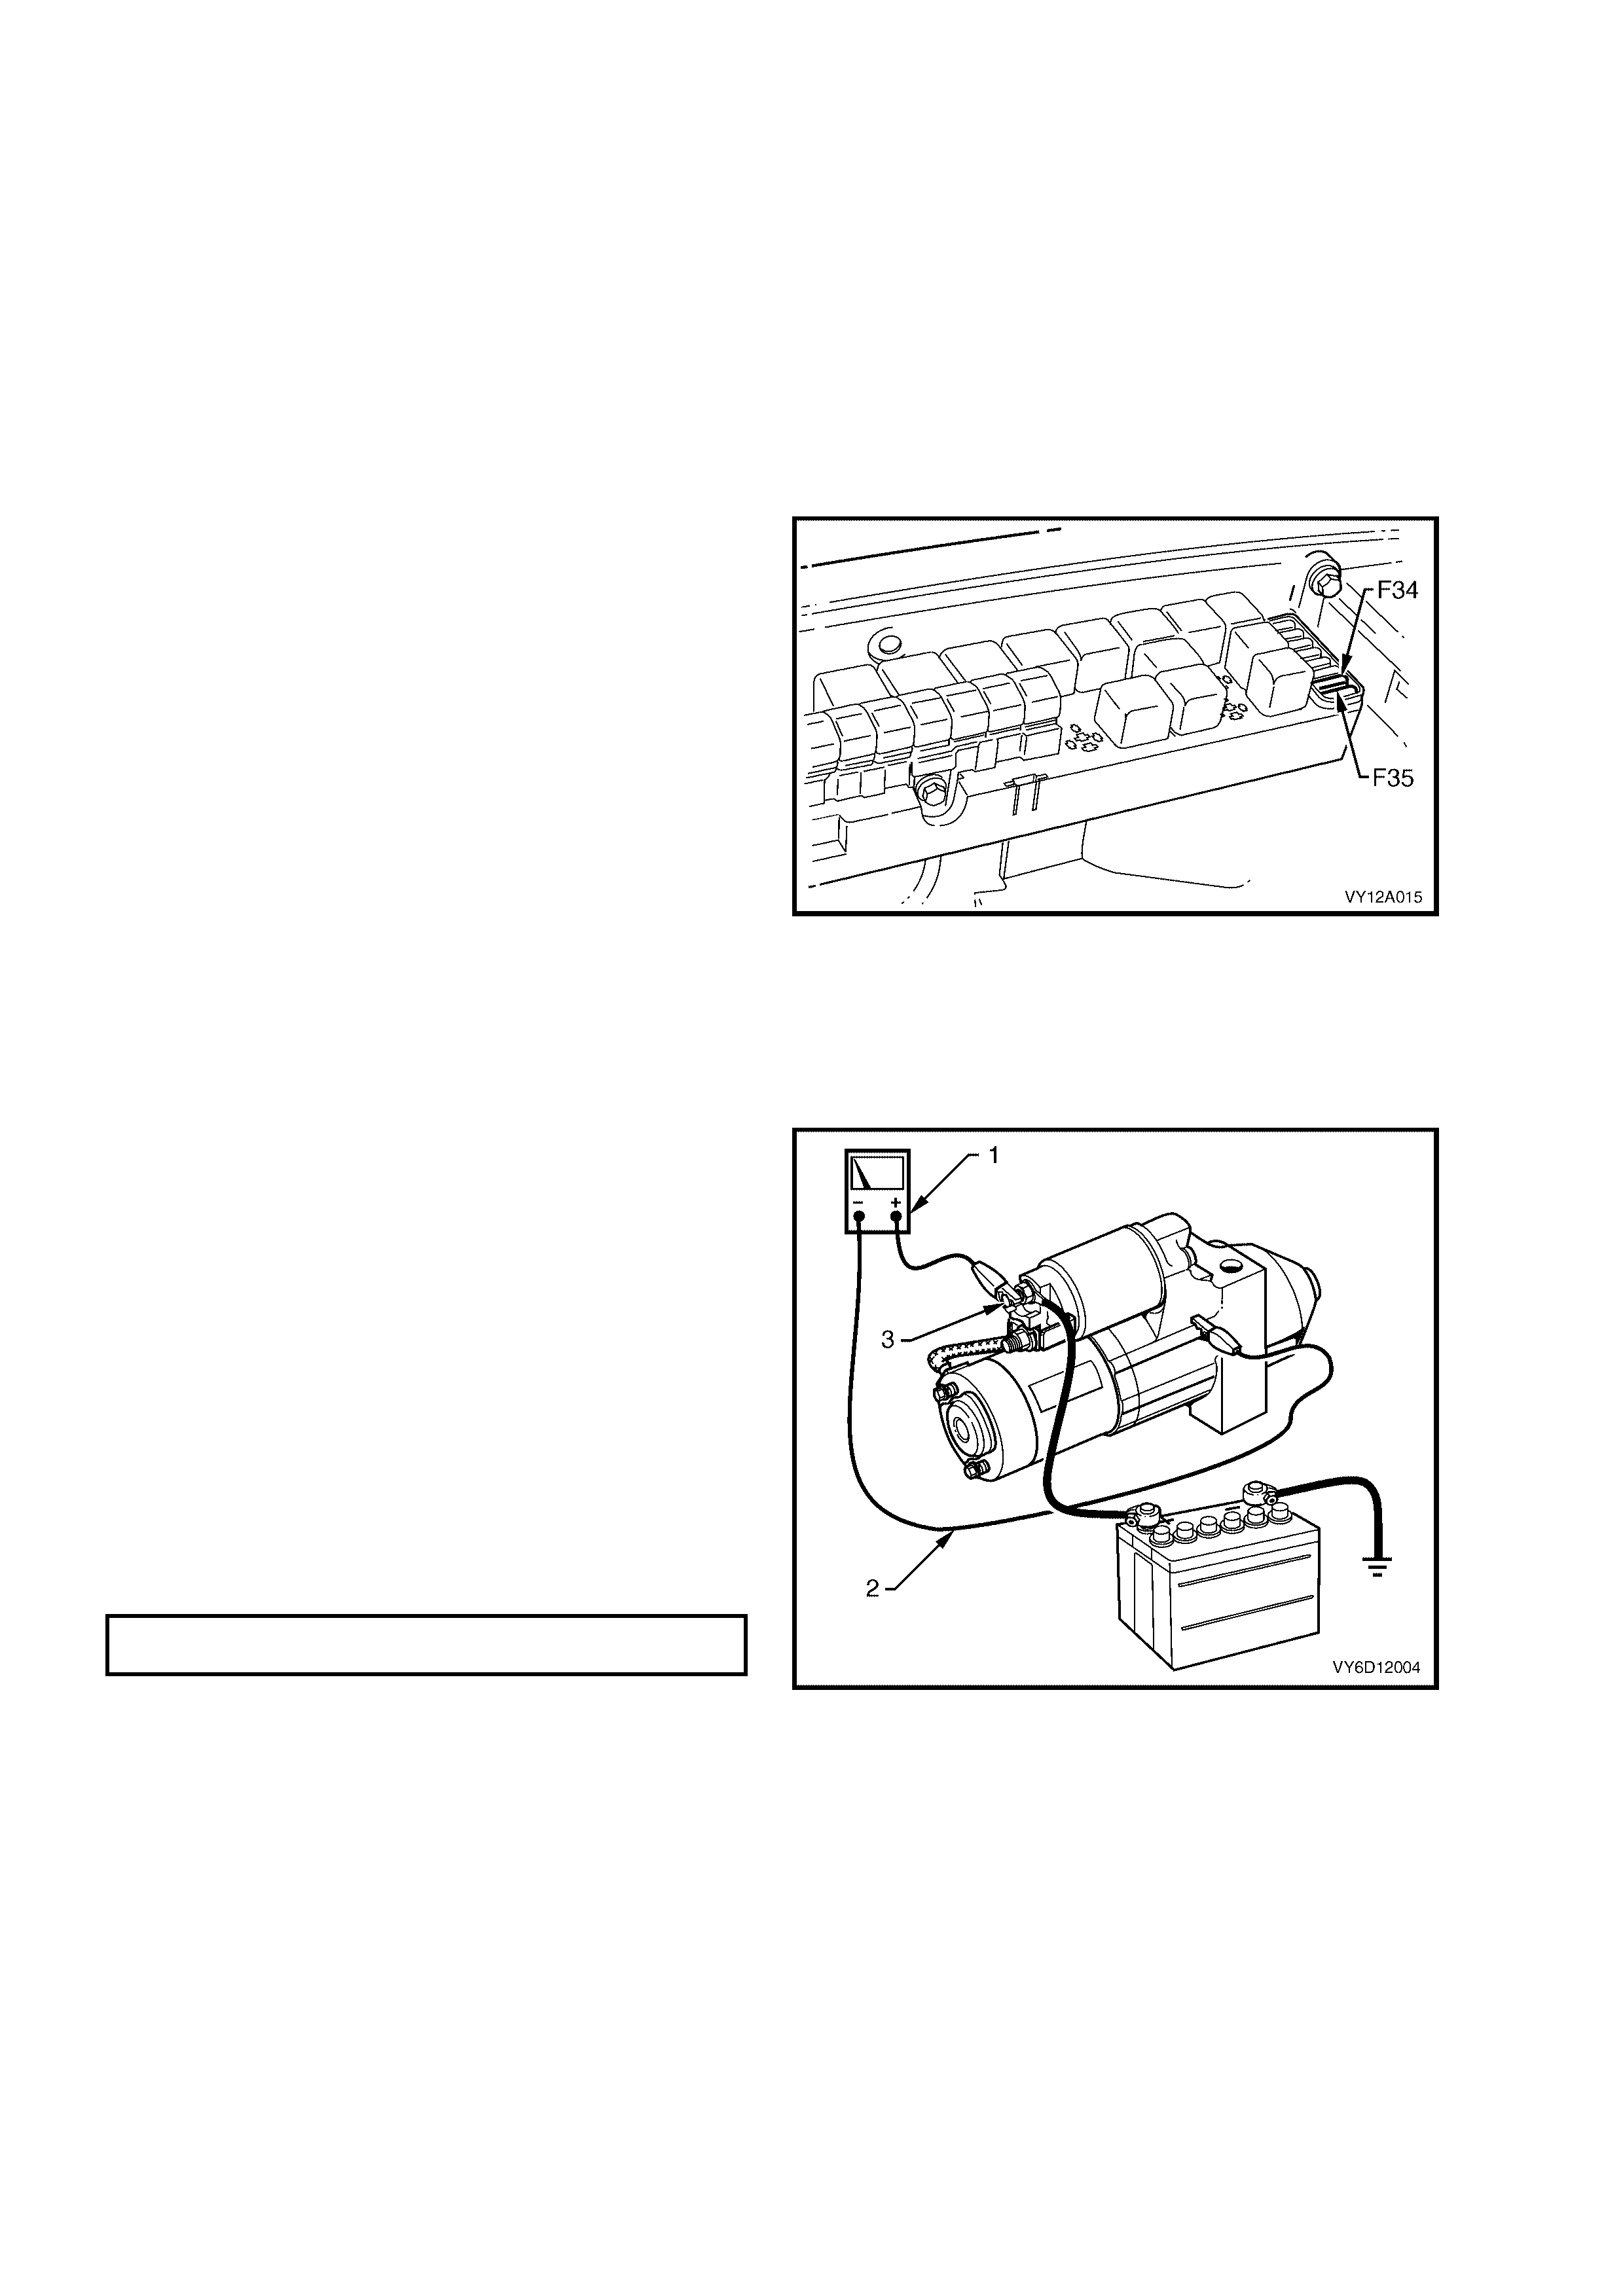
1. Remove fuses F34 and F35 from the engine
compartment fuse box to disable the ignition
and prevent the engine from starting. Refer to
Section 12O, FUSES AND WIRING
HARNESSES.
Figure 6D1-2-4
2. Chock the wheels.
3. Ensure that the transm ission is in P ( park ) or N
(neutral) and that the hand brake is applied.
Cranking Voltage Test
4. Connect the negative lead of a voltmeter (1) to
ground (2).
5. Connect the positive lead to terminal 30 (3) of
the solenoid switch.
NOTE: Do not crank the engine for more than
30 seconds at a time. Allow two minutes for the
starter motor to cool down between tests.
6. Crank the engine.
7. Record the voltage that displayed during
cranking.
8. Remove and repair the starter motor if the
voltage is below the specifications and cranks
poorly. Refer to 3. MAJOR SERVICE
OPERATIONS in this Section.
MINIMUM CRANKING
VOLTAGE 9 volts
Figure 6D1-2-5
Bad-Connection Test
A bad connection appears as a voltage reading when the voltm eter leads are connec ted to two differ ent positive (or
negative) connections.
1. Connect the voltmeter positive lead to the positive battery post.
2. Connect the negative lead to the solenoid switch M terminal.
3. Record the voltage that displayed during cranking.
4. Repeat this for the solenoid switch terminal 50, the positive battery terminal at the cable strands and the positive
battery terminal connector.
5. Restore all connections that show a significant resistance (voltage reading).

Starter Motor Ground Test
1. Connect the voltmeter positive lead (1) to the
negative battery post.
IMPORTANT: Connect the lead to the actual
battery post and not to the cable or connector.
2. Connect the voltmeter negative lead (2) to the
starter motor housing.
3. Crank the engine.
4. Record the voltage that displayed during
cranking.
5. Repeat this for the negative battery terminal at
the cable strands and the negative battery
terminal connector.
6. Restore all ground connections that show a
significant resistance.
Figure 6D1-2-6
Switching Circuit Test
1. Connect the negative lead (1) of a voltm eter to
the solenoid switch terminal 50.
2. Connect the positive lead (2) to the positive
battery post.
3. Crank the engine.
4. Record the voltage that displayed during
cranking.
5. If the voltage is above the specif ic ation, test the
solenoid switching cir cuit to locate the cause of
the high resistance and restore the connection.
MAXIMUM SWI TCHI N G
CIRCUIT VOLTAGE DIFFERE NCE 2.5 volts
Figure 6D1-2-7
Current Draw Test
IMPORTANT: The battery must be fully charged and in serviceable condition before beginning this test.
1. Connect the positive lead of a voltmeter to the positive battery post.
2. Connect the negative lead of the voltmeter to the negative battery post.
3. Connect the positive lead of an ammeter to the positive battery post.
4. Connect the negative lead of the ammeter to a battery loading device, e.g. a carbon pile.
5. Connect the free lead of the battery loading device to the negative battery terminal.
6. Set the battery loading device to maximum resistance (open).
7. Crank the engine.
8. Record the voltage that displayed during cranking.
9. With the ignition in the OFF position, adjust the battery loading device so that the voltmeter reading matches the
reading recorded in the last step.
10. Record the current draw from the battery loading device.
11. Set the battery loading device back to ‘open’.
12. Check that the current draw is within specifications.
CRANKING CURRENT RANGE
(V6 and V6 SUPERCHARGED) 130 – 160 amps
13. Remove and service the starter motor if the current draw is outside the specification.
4. MAJOR SERVICE OPERATIONS
3.1 STARTER MOTOR
LT Section – 02-070
REMOVE
1. Refer to Section 00, CAUT IONS AND NOTES
in this Service Inf or mation befor e disc onnecting
the battery.
2. Disconnect the battery ground lead.
3. Jack up the front of the vehicle. For jacking
locations, refer to Section 0A, GENERAL
INFORMATION.
4. Put safety stands in place.
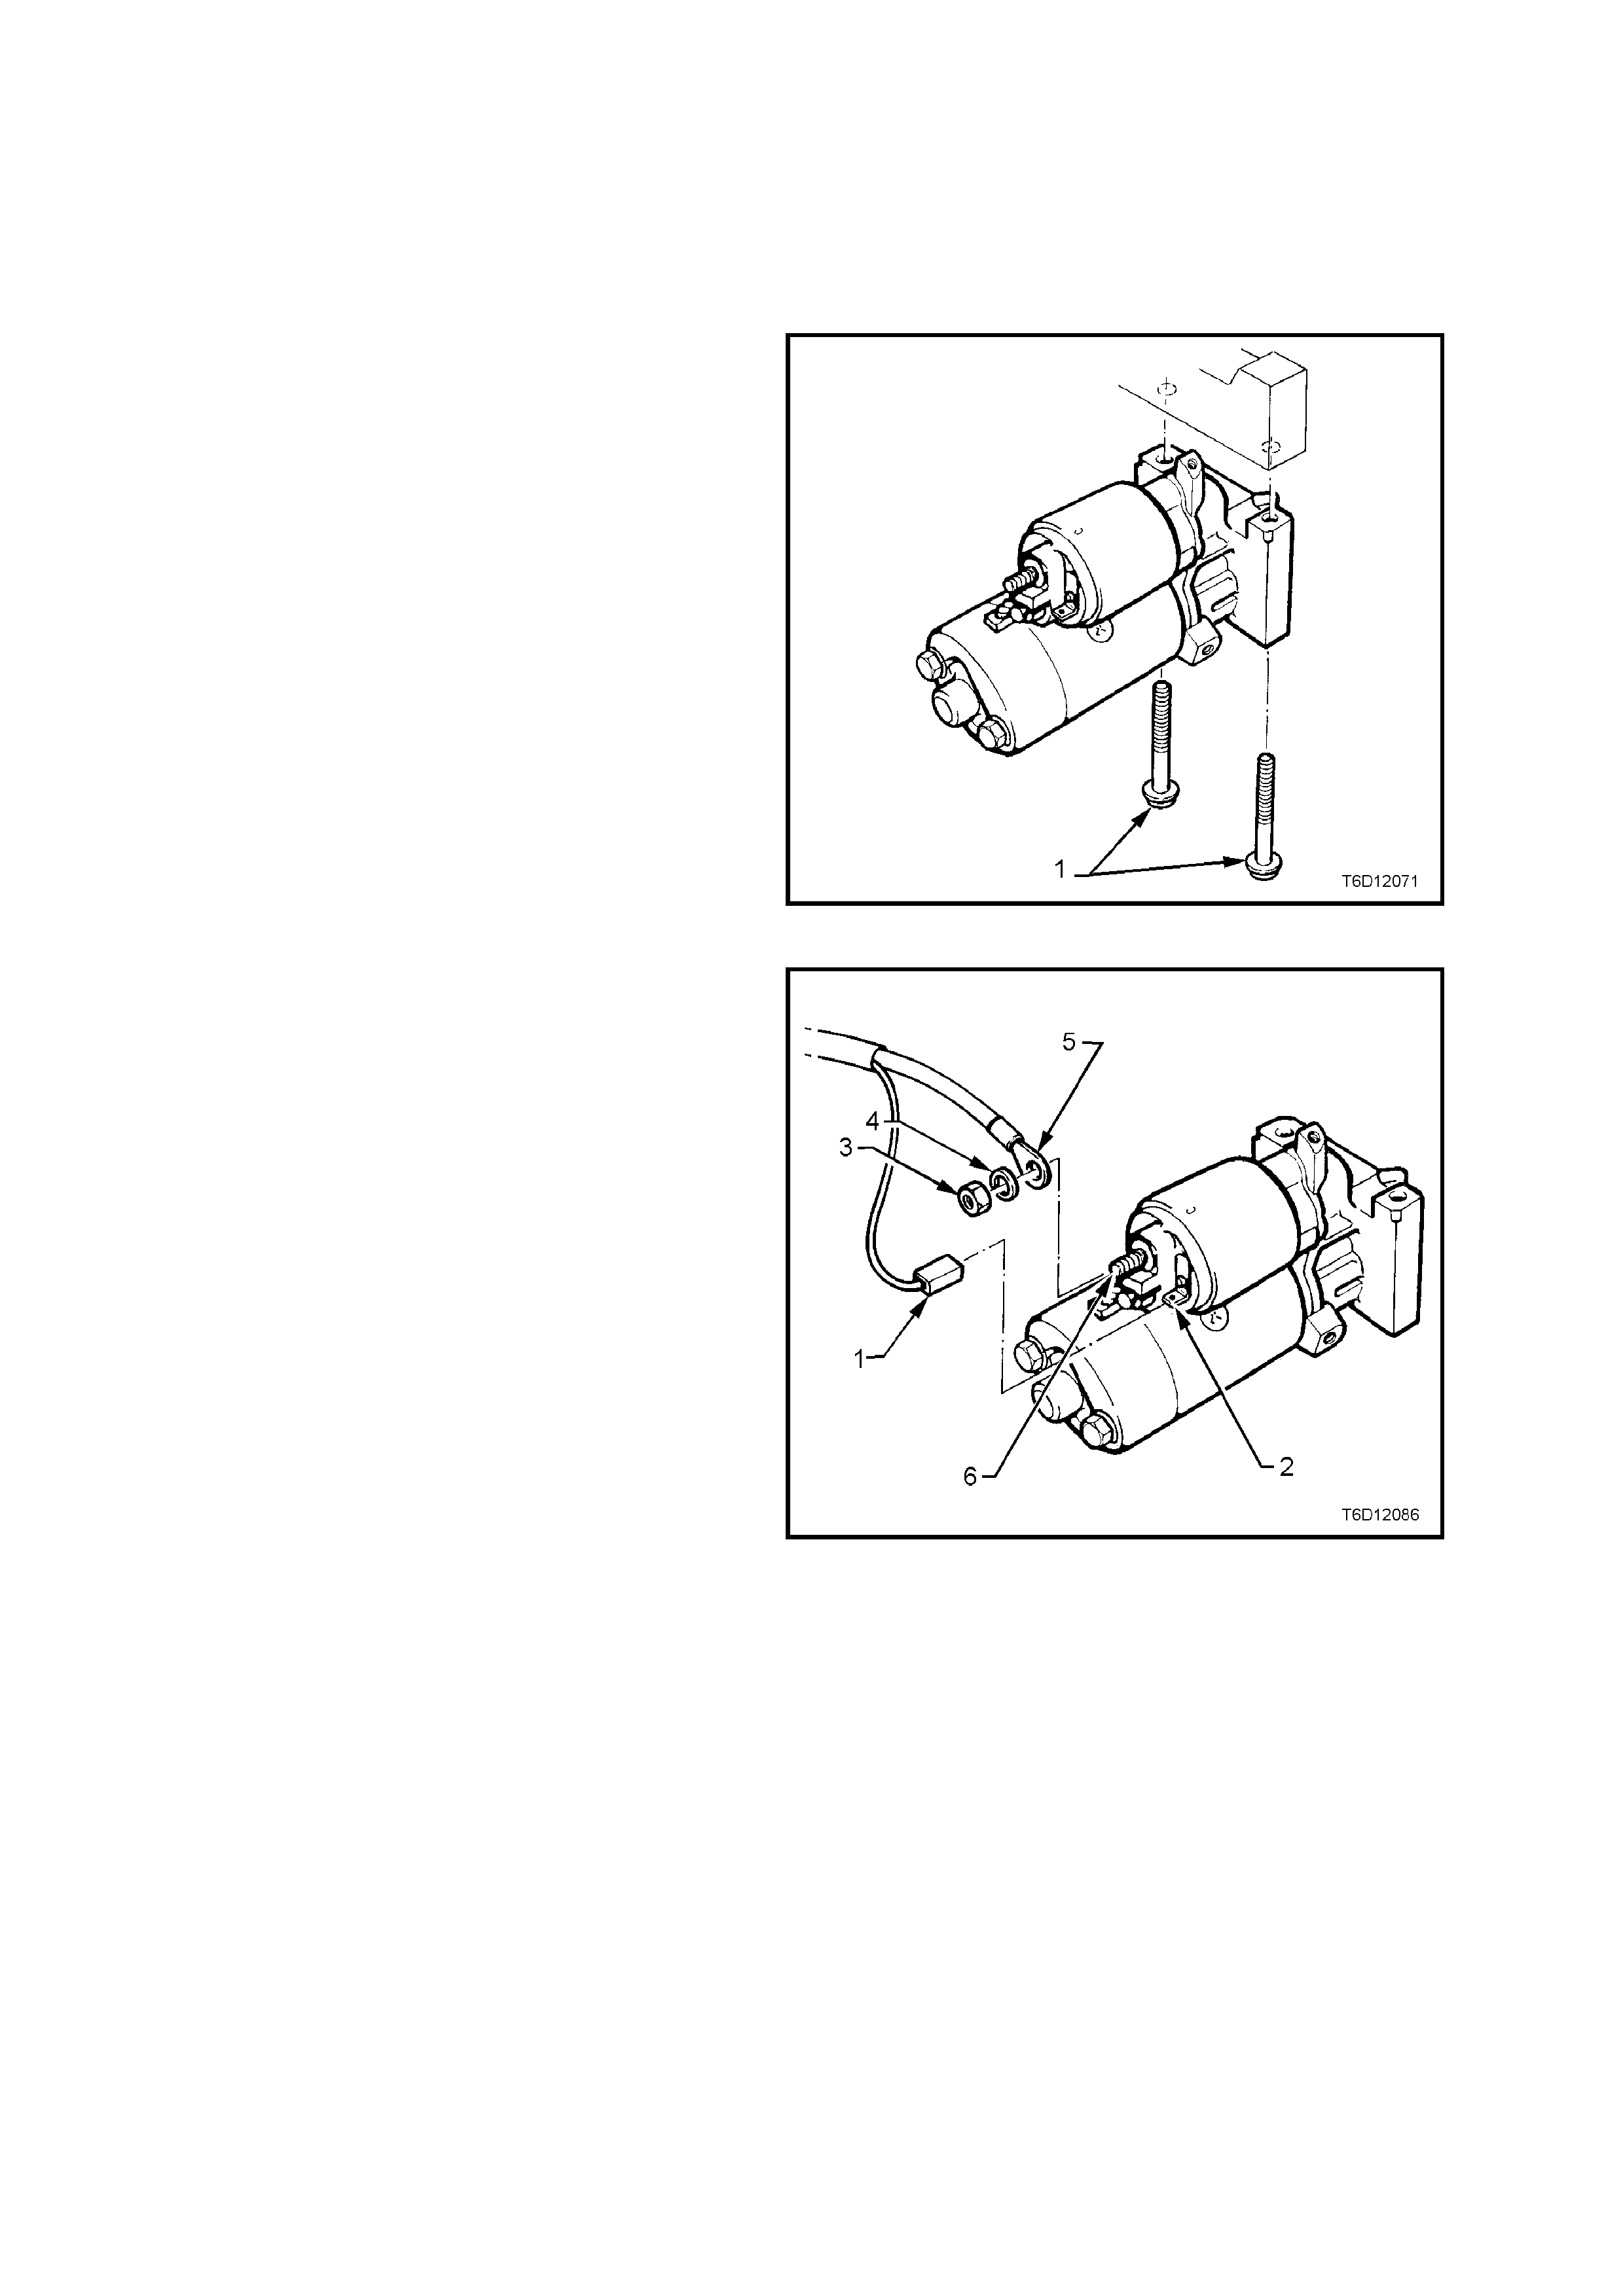
5. Remove the starter motor mounting bolts (1).
6. Lower the starter motor as far as possible to
gain access to the wiring harness connections.
Figure 6D1-2-8
7. Remove the wiring harness connector (1) from
terminal 50 (2) of the solenoid switch.
8. Remove the nut (3), washer (4) and battery
lead (5) from terminal 30 (6) of the solenoid
switch.
Figure 6D1-2-9
9. Lift out the starter motor.
Figure 6D1-2-10
STARTER MOTOR BENCH TESTS
Preliminary Checks
1. Check that the drive assembly is fully retracted.
2. Check that the drive assembly pinion turns freely on the planetary drive shaft.
3. Use a screwdriver to pry the drive assembly pinion to check that the planetary drive and armature rotate freely.
4. Perform the No Load Test (outlined in the following pages) if the drive assembly is not fully retracted or the
planetary drive and armature do not rotate freely.
5. Disassemble and service the starter motor if it fails the No Load test. Refer to 3. MAJOR SERVICE
OPERATIONS in this Section.
Pull-In Test
1. Remove the nut and washer from the M
terminal (1) of the solenoid switch.
2. Remove the field coil braided cable from the
M terminal.
3. Insulate the field coil braided cable.
4. Connect the starter motor to an auxiliary
battery, as follows:
5. Connect the battery negative post to the starter
motor housing (2) and the solenoid switch (3).
6. Connect the battery positive post to a free end
that can reach the solenoid switch.
7. Momentarily hold the free end to terminal 50 (4)
of the solenoid switch.
8. Check that the solenoid switch activates and
the drive assembly moves outward.
9. Disassemble and service the starter motor if
the solenoid switch activates but the drive
assembly does not move. Refer to 3. MAJOR
SERVICE OPERATIONS in this Section.
10. Replace the solenoid switch if it does not
activate (there is no sound or movement).
Figure 6D1-2-11
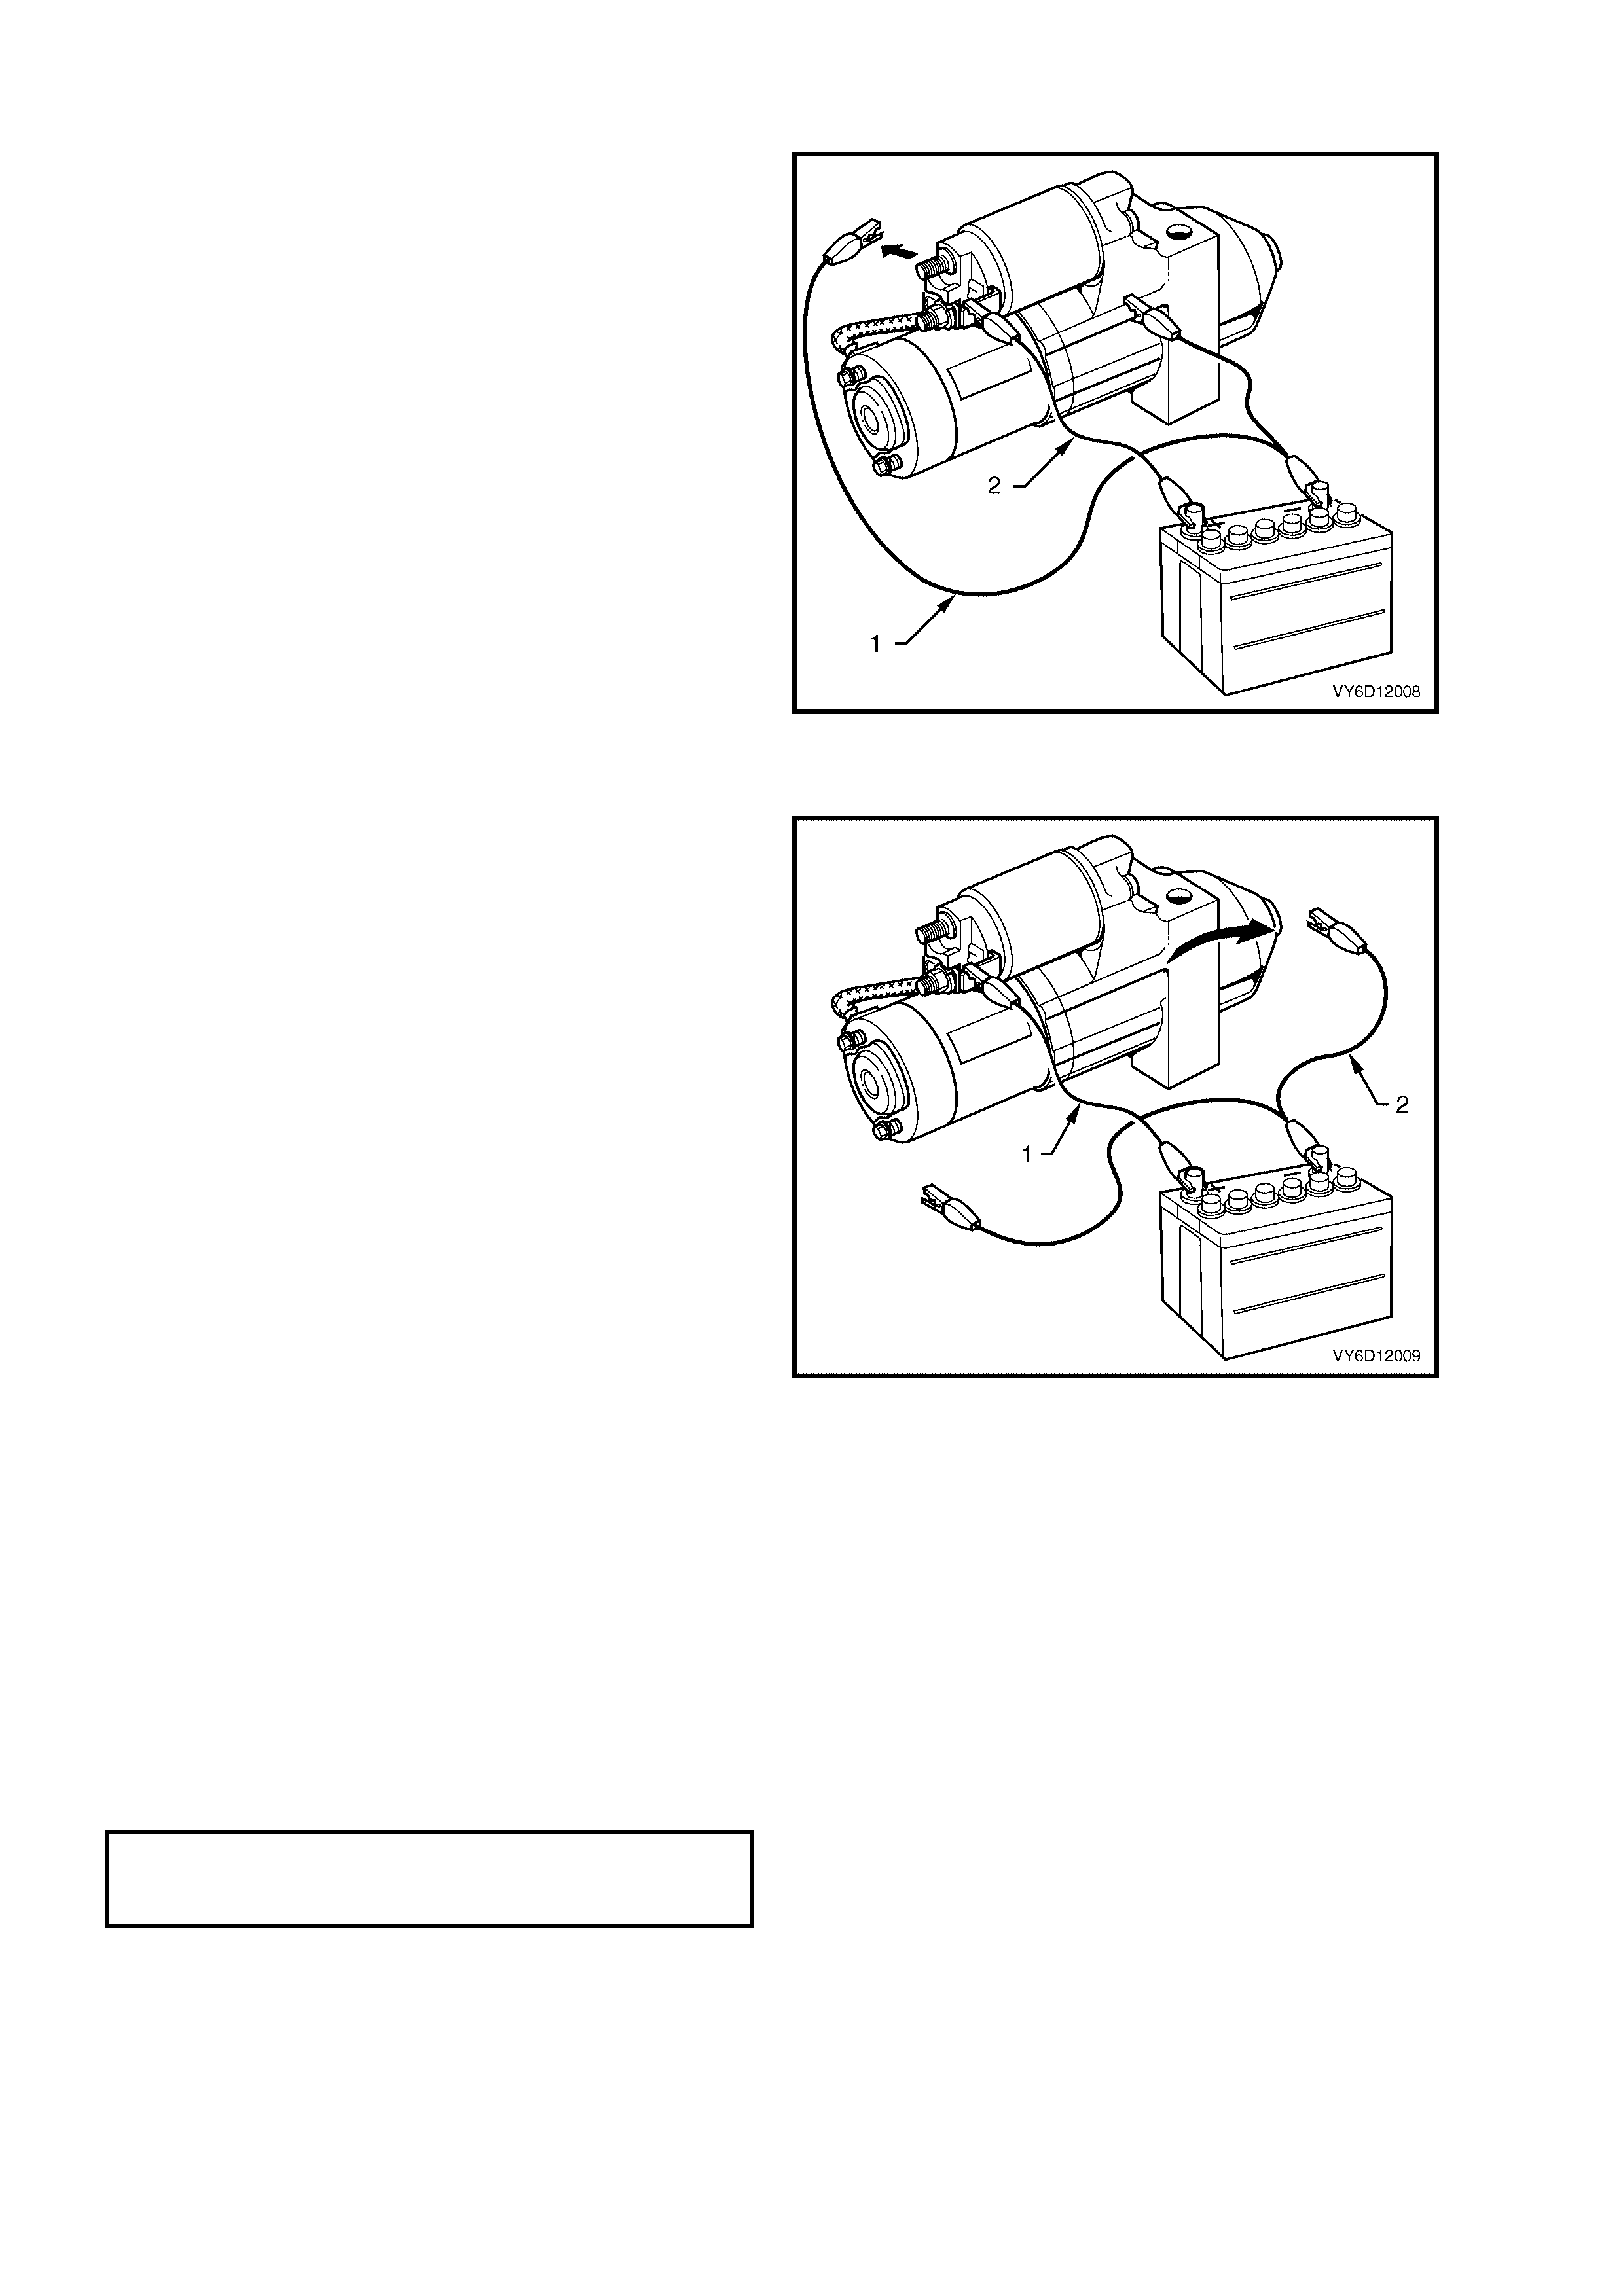
Hold-In Test
1. Connect the battery to the starter motor and
solenoid switch as for the Pull-In Test.
2. Disconnect the negative lead (1) from the
M terminal of the solenoid switch.
3. Connect the lead (2) from the battery positive
post to terminal 50 of the solenoid switch.
4. Check that the drive assembly remains
extended.
5. Dis c onnec t the test lead f r om terminal 50 of the
solenoid switch.
6. Replace the solenoid switch if the drive
assembly returns back into the starter motor.
Figure 6D1-2-12
Drive Assembly Return Test
1. Connect the battery to the starter motor and
solenoid switch as for the Hold-In Test.
2. Connect the test lead (1) from the battery
positive post to terminal 50 of the solenoid
switch.
3. Disconnect the negative lead (2) from the drive-
end housing.
4. Check that the drive assembly returns back
into the starter motor.
5. Replace the solenoid switch if the drive
assembly does not retract.
Figure 6D1-2-13
No Load Test
1. Clamp the starter motor securely to a test
bench.
2. Connect the starter motor as shown in
Figure 6D1-2-14.
3. Close the start switch to activate the starter
motor.
4. Record the speed of the planetary drive shaft,
current draw and the voltage.
5. Check that the readings are within the
specifications.
RPM 3300
MAXIMUM CURRENT DRAW 65 amp s
M TERMINAL VOLTAGE 12 ± 0.1 volts
6. Disassemble and service the starter motor if
the readings are not within the specifications.
Refer to 3. MAJOR SERVICE OPERATIONS
in this section.
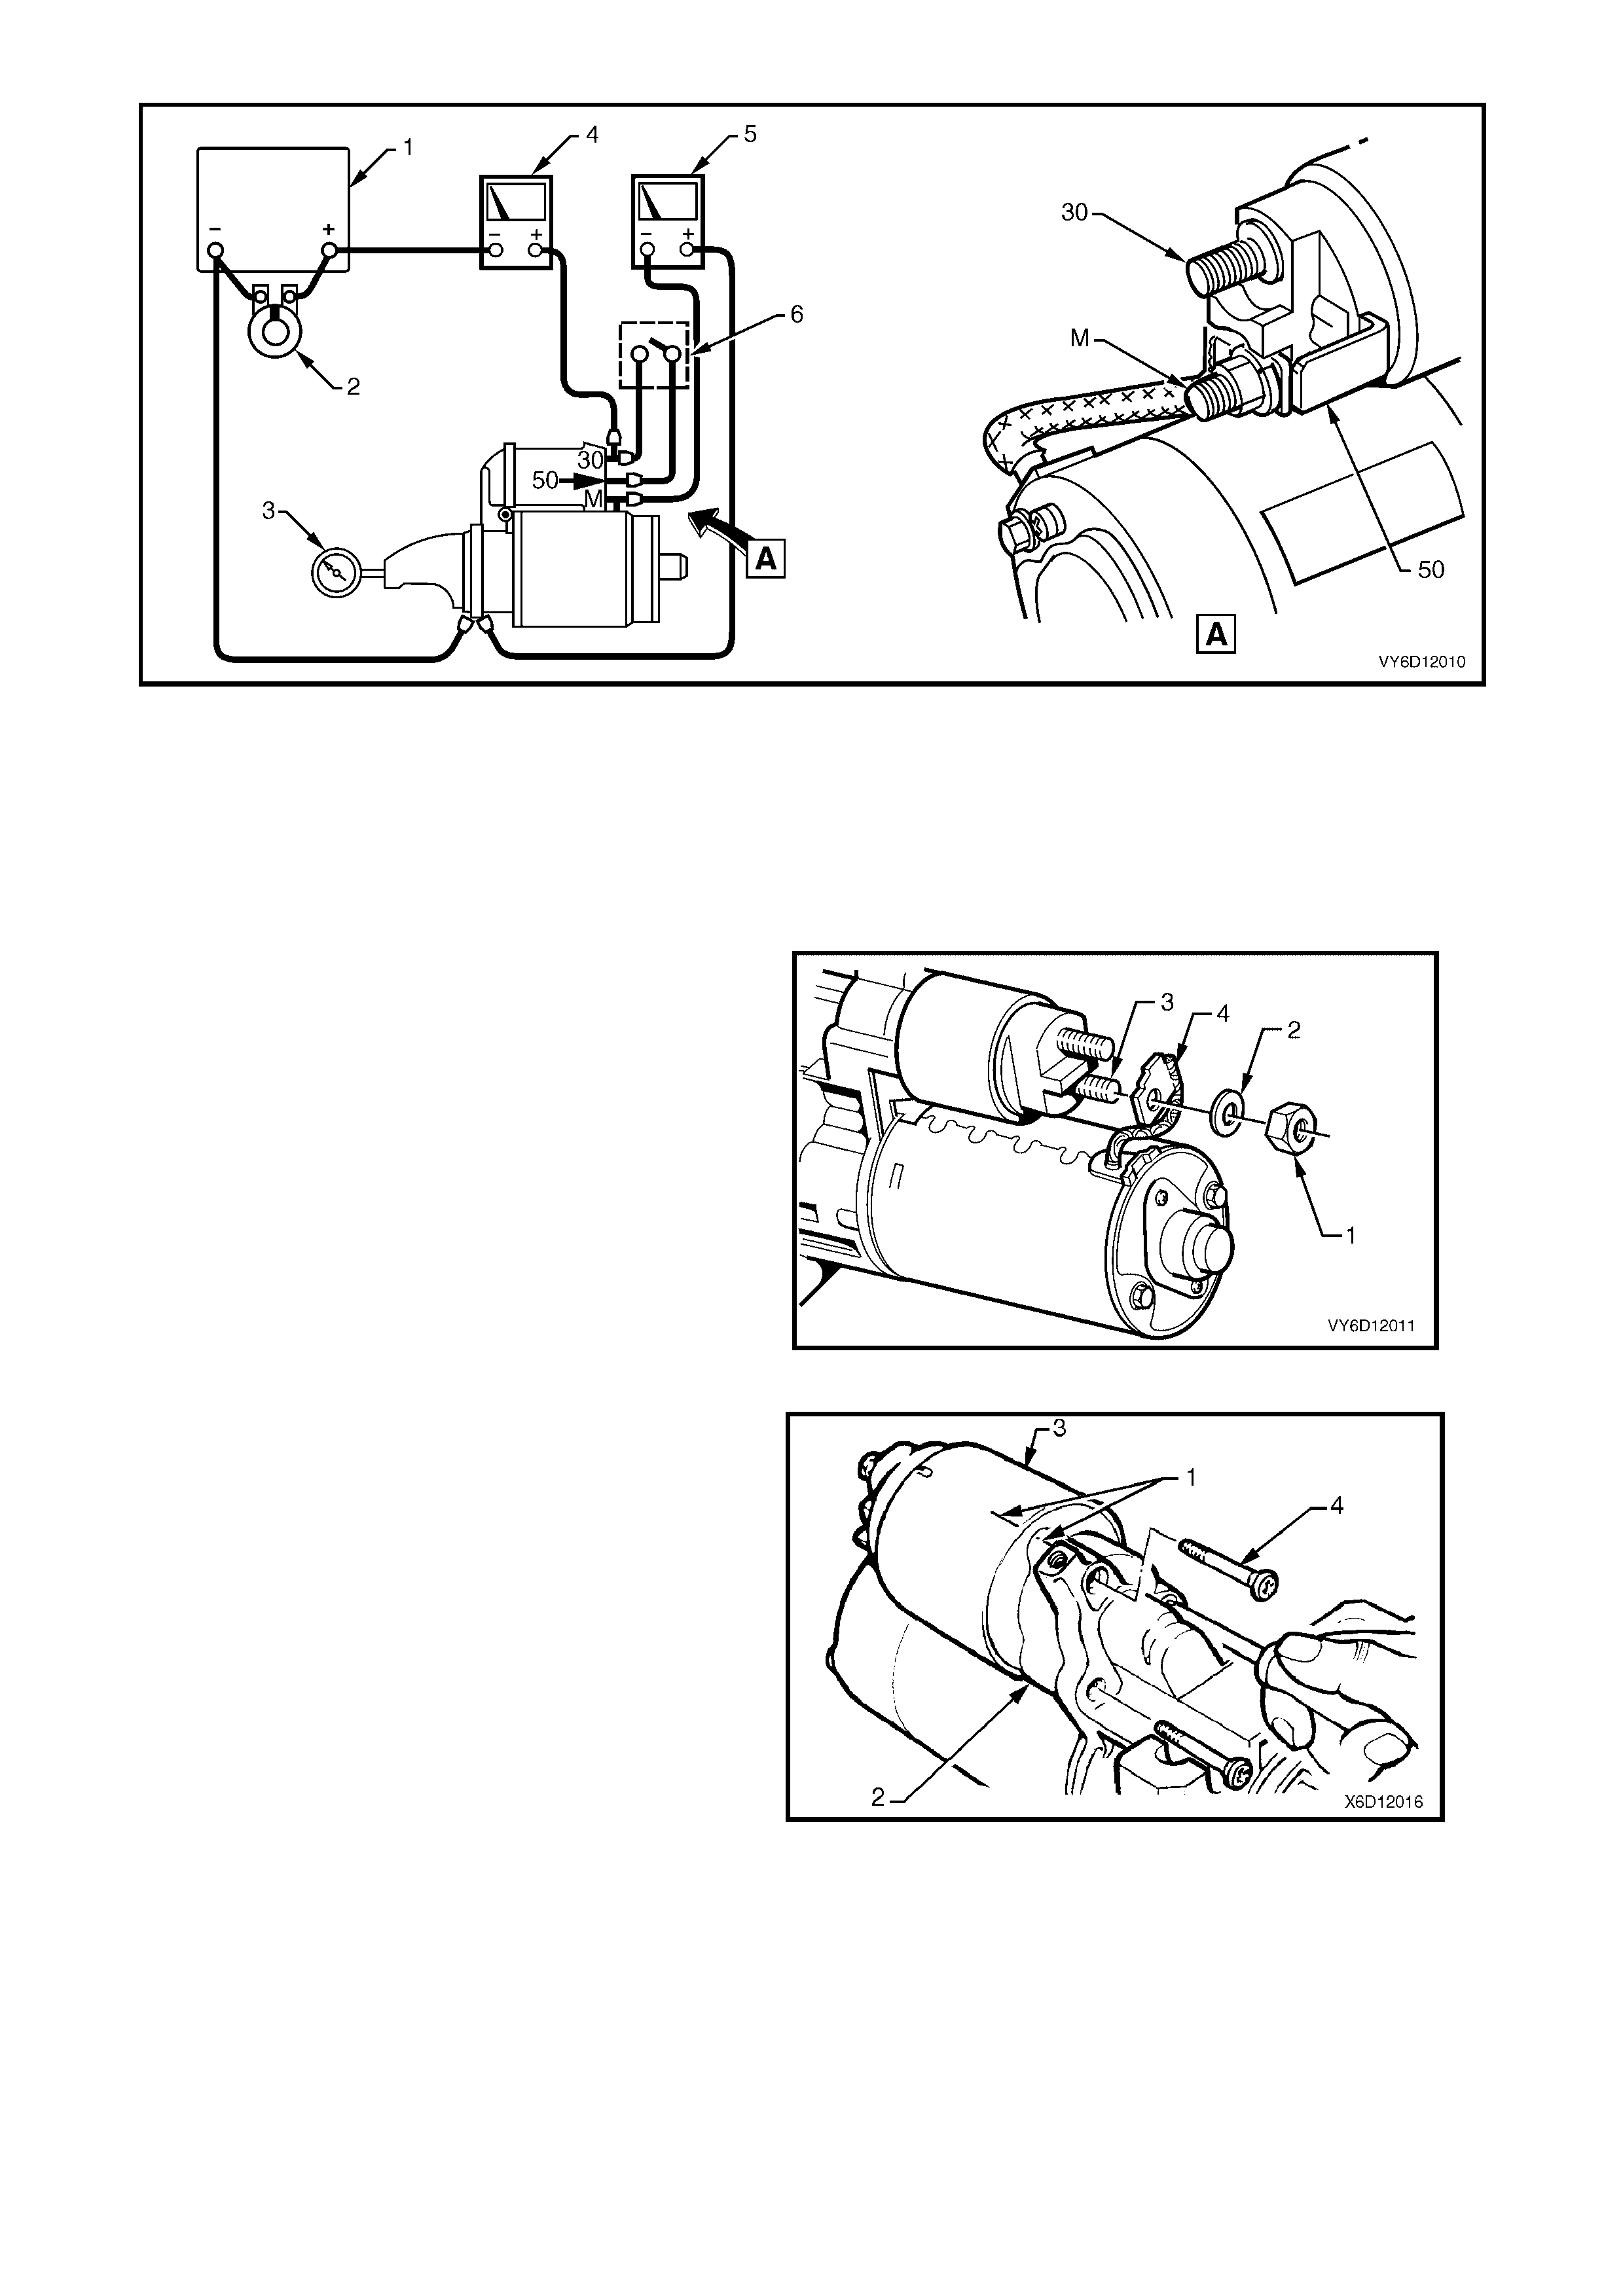
Figure 6D1-2-14
Legend
A. View of solenoid connections
1. Battery 3. Shaft Speed Indicator 5. Voltmeter
2. Carbon Pile 4. Ammeter 6. Start Switch
DISASSEMBLE
1. Clam p the star ter m o tor, by the mounting lug in
the drive-end housing, in a vice with soft jaws.
2. Remove the nut (1) and washer (2) from the
solenoid switch M terminal (3).
3. Remove the braided cable (4) from the M
terminal.
Figure 6D1-2-15
4. Scribe aligning marks (1) on the drive-end
housing (2) and the solenoid switch housing ( 3)
to aid reassembly.
5. Remove the three solenoid switch mounting
screws (4). It may be necessary to loosen the
mounting screws using an impact driver.
NOTE: When using an impact driver, avoid
damaging the drive-end housing or rounding the
screw slots.
Figure 6D1-2-16
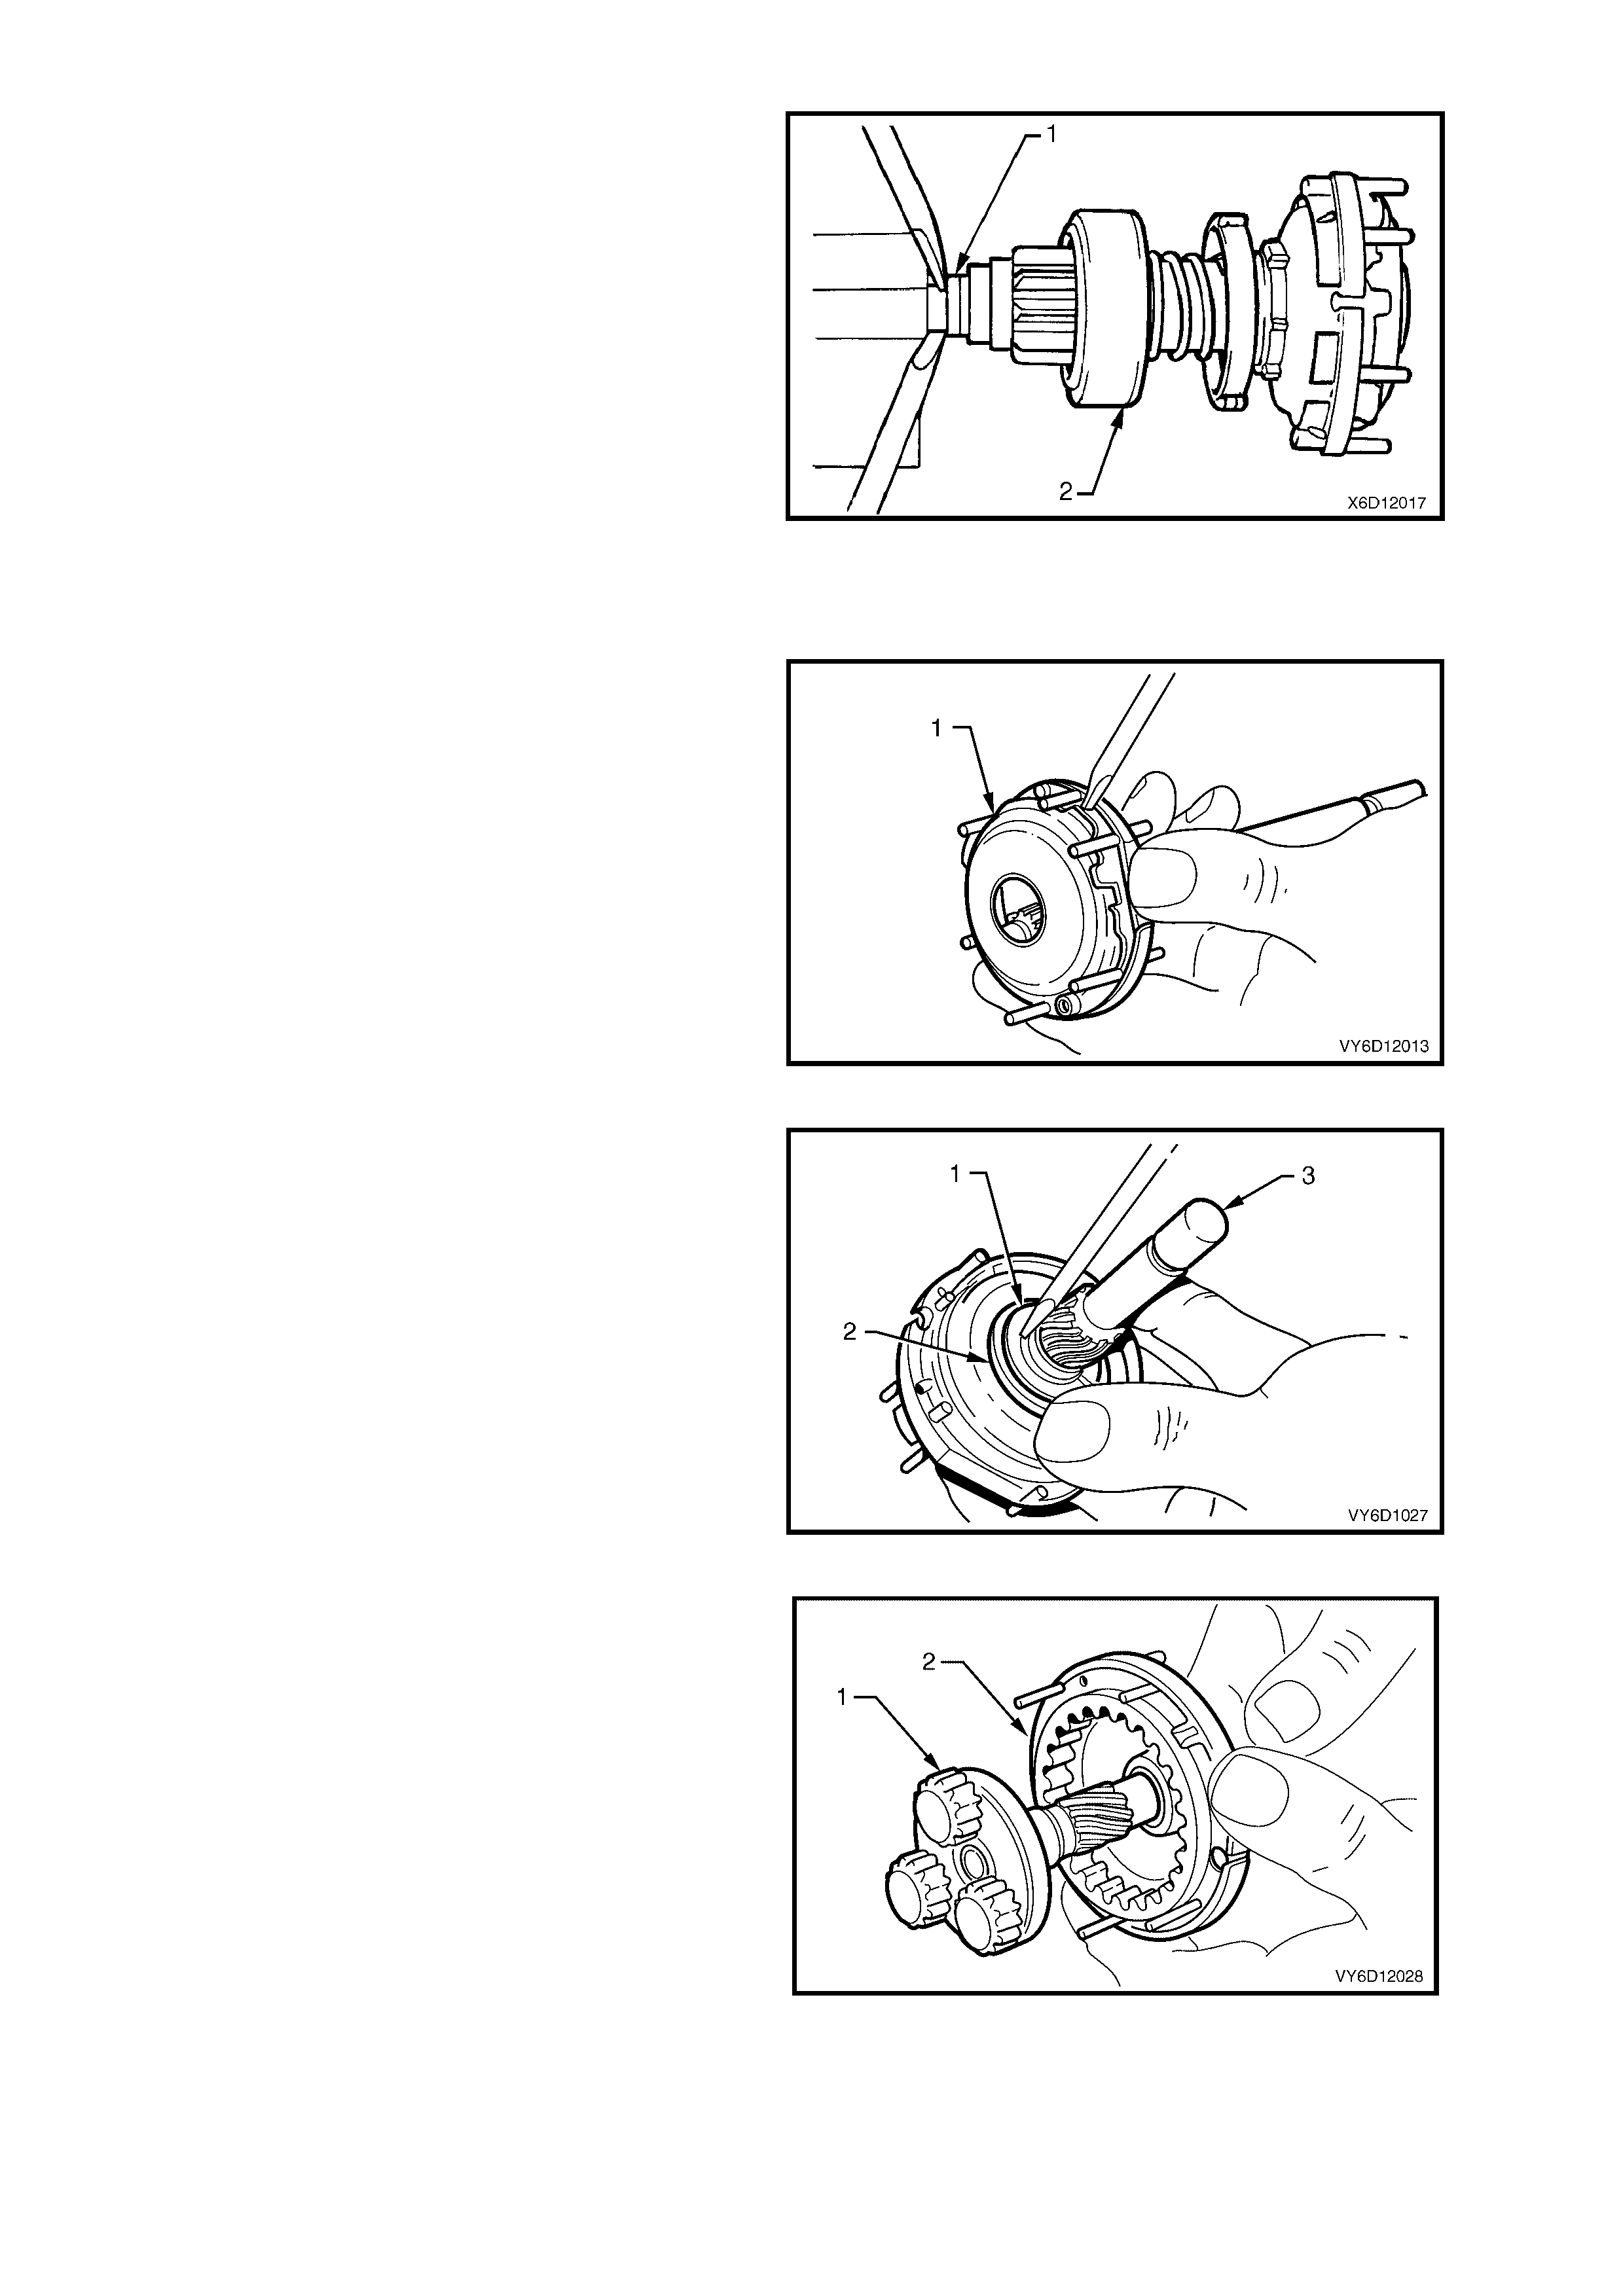
6. Remove the s olenoid switch fr om the drive- end
housing.
IMPORTANT: Do not lose the plunger return
spring.
7. Unhook and remove the solenoid switch
plunger (1) from the drive assembly fork lever
(2).
Figure 6D1-2-17
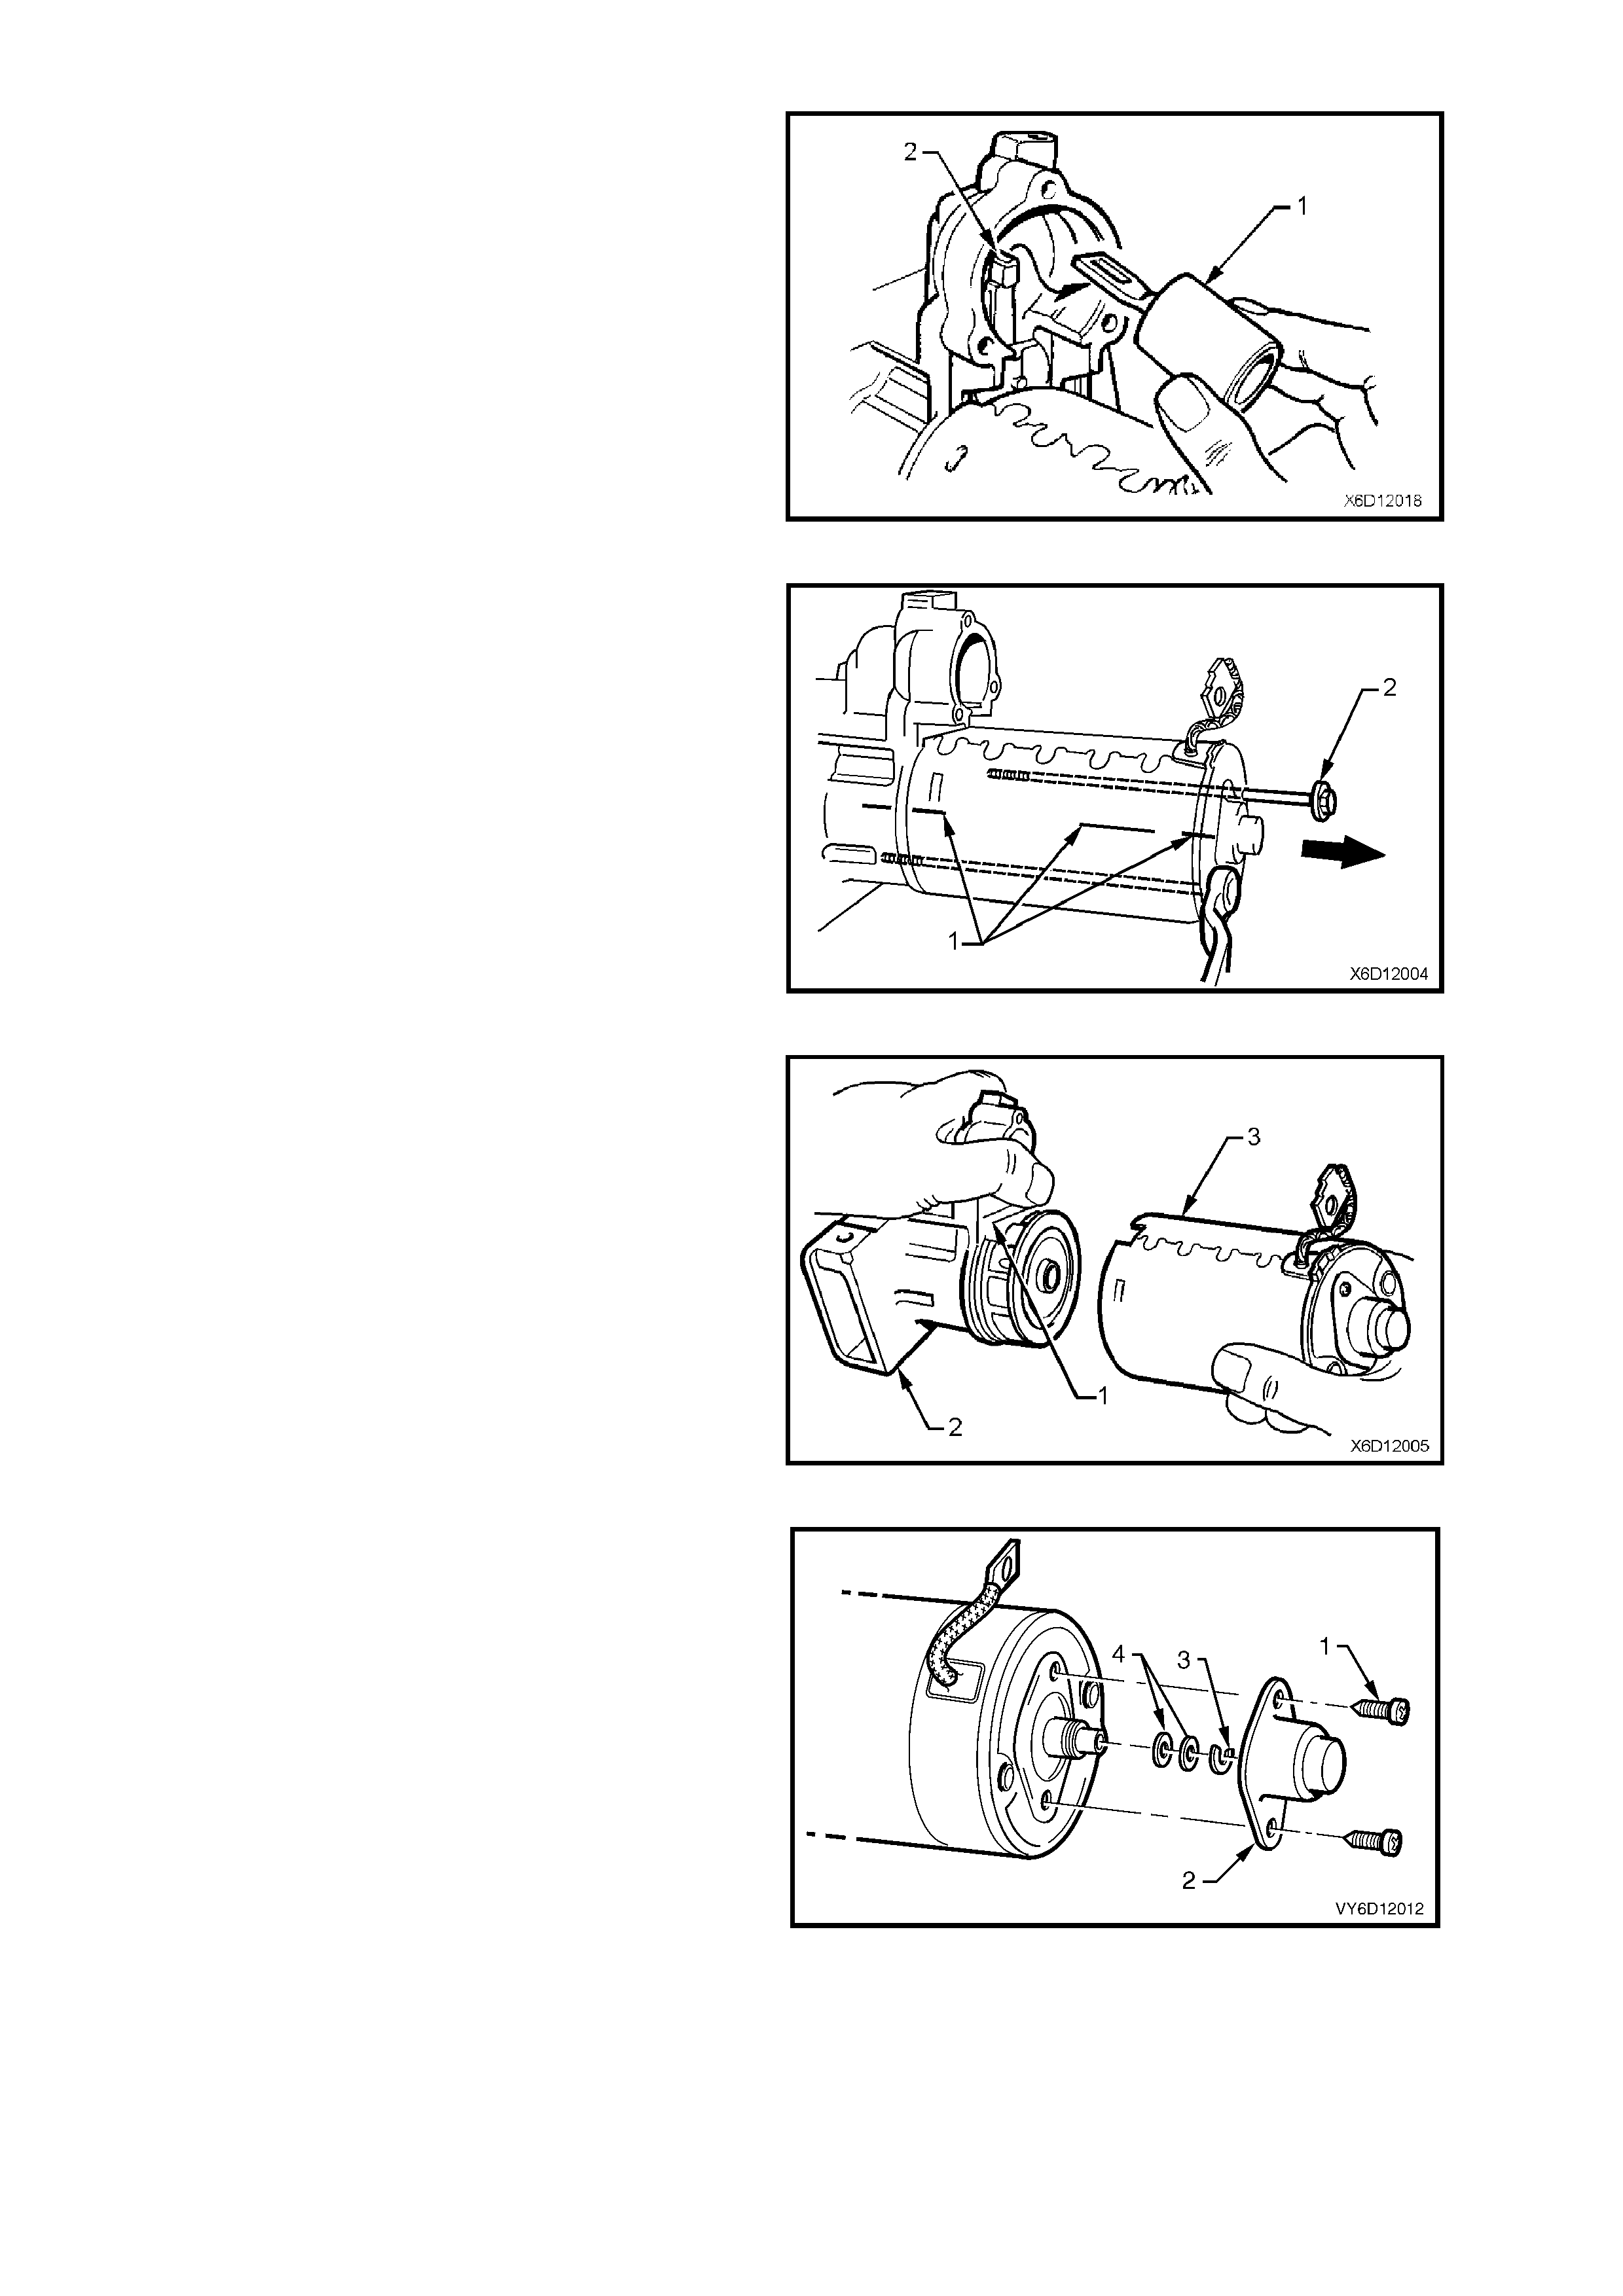
8. Scribe aligning marks (1) on the drive-end
housing, pole housing and commutator end
shield to aid reassembly.
9. Remove the two through-bolts (2).
Figure 6D1-2-18
10. Hold the sealing rubber (1) and the drive-end
housing (2) securely.
11. Remove the pole housing ( 3) com plete with the
armature and commutator end shield.
Figure 6D1-2-19
12. Remove the two screws (1) securing the dust
cover (2).
13. Remove the horseshoe clip (3) and any
adjustment washers (4).
Figure 6D1-2-20
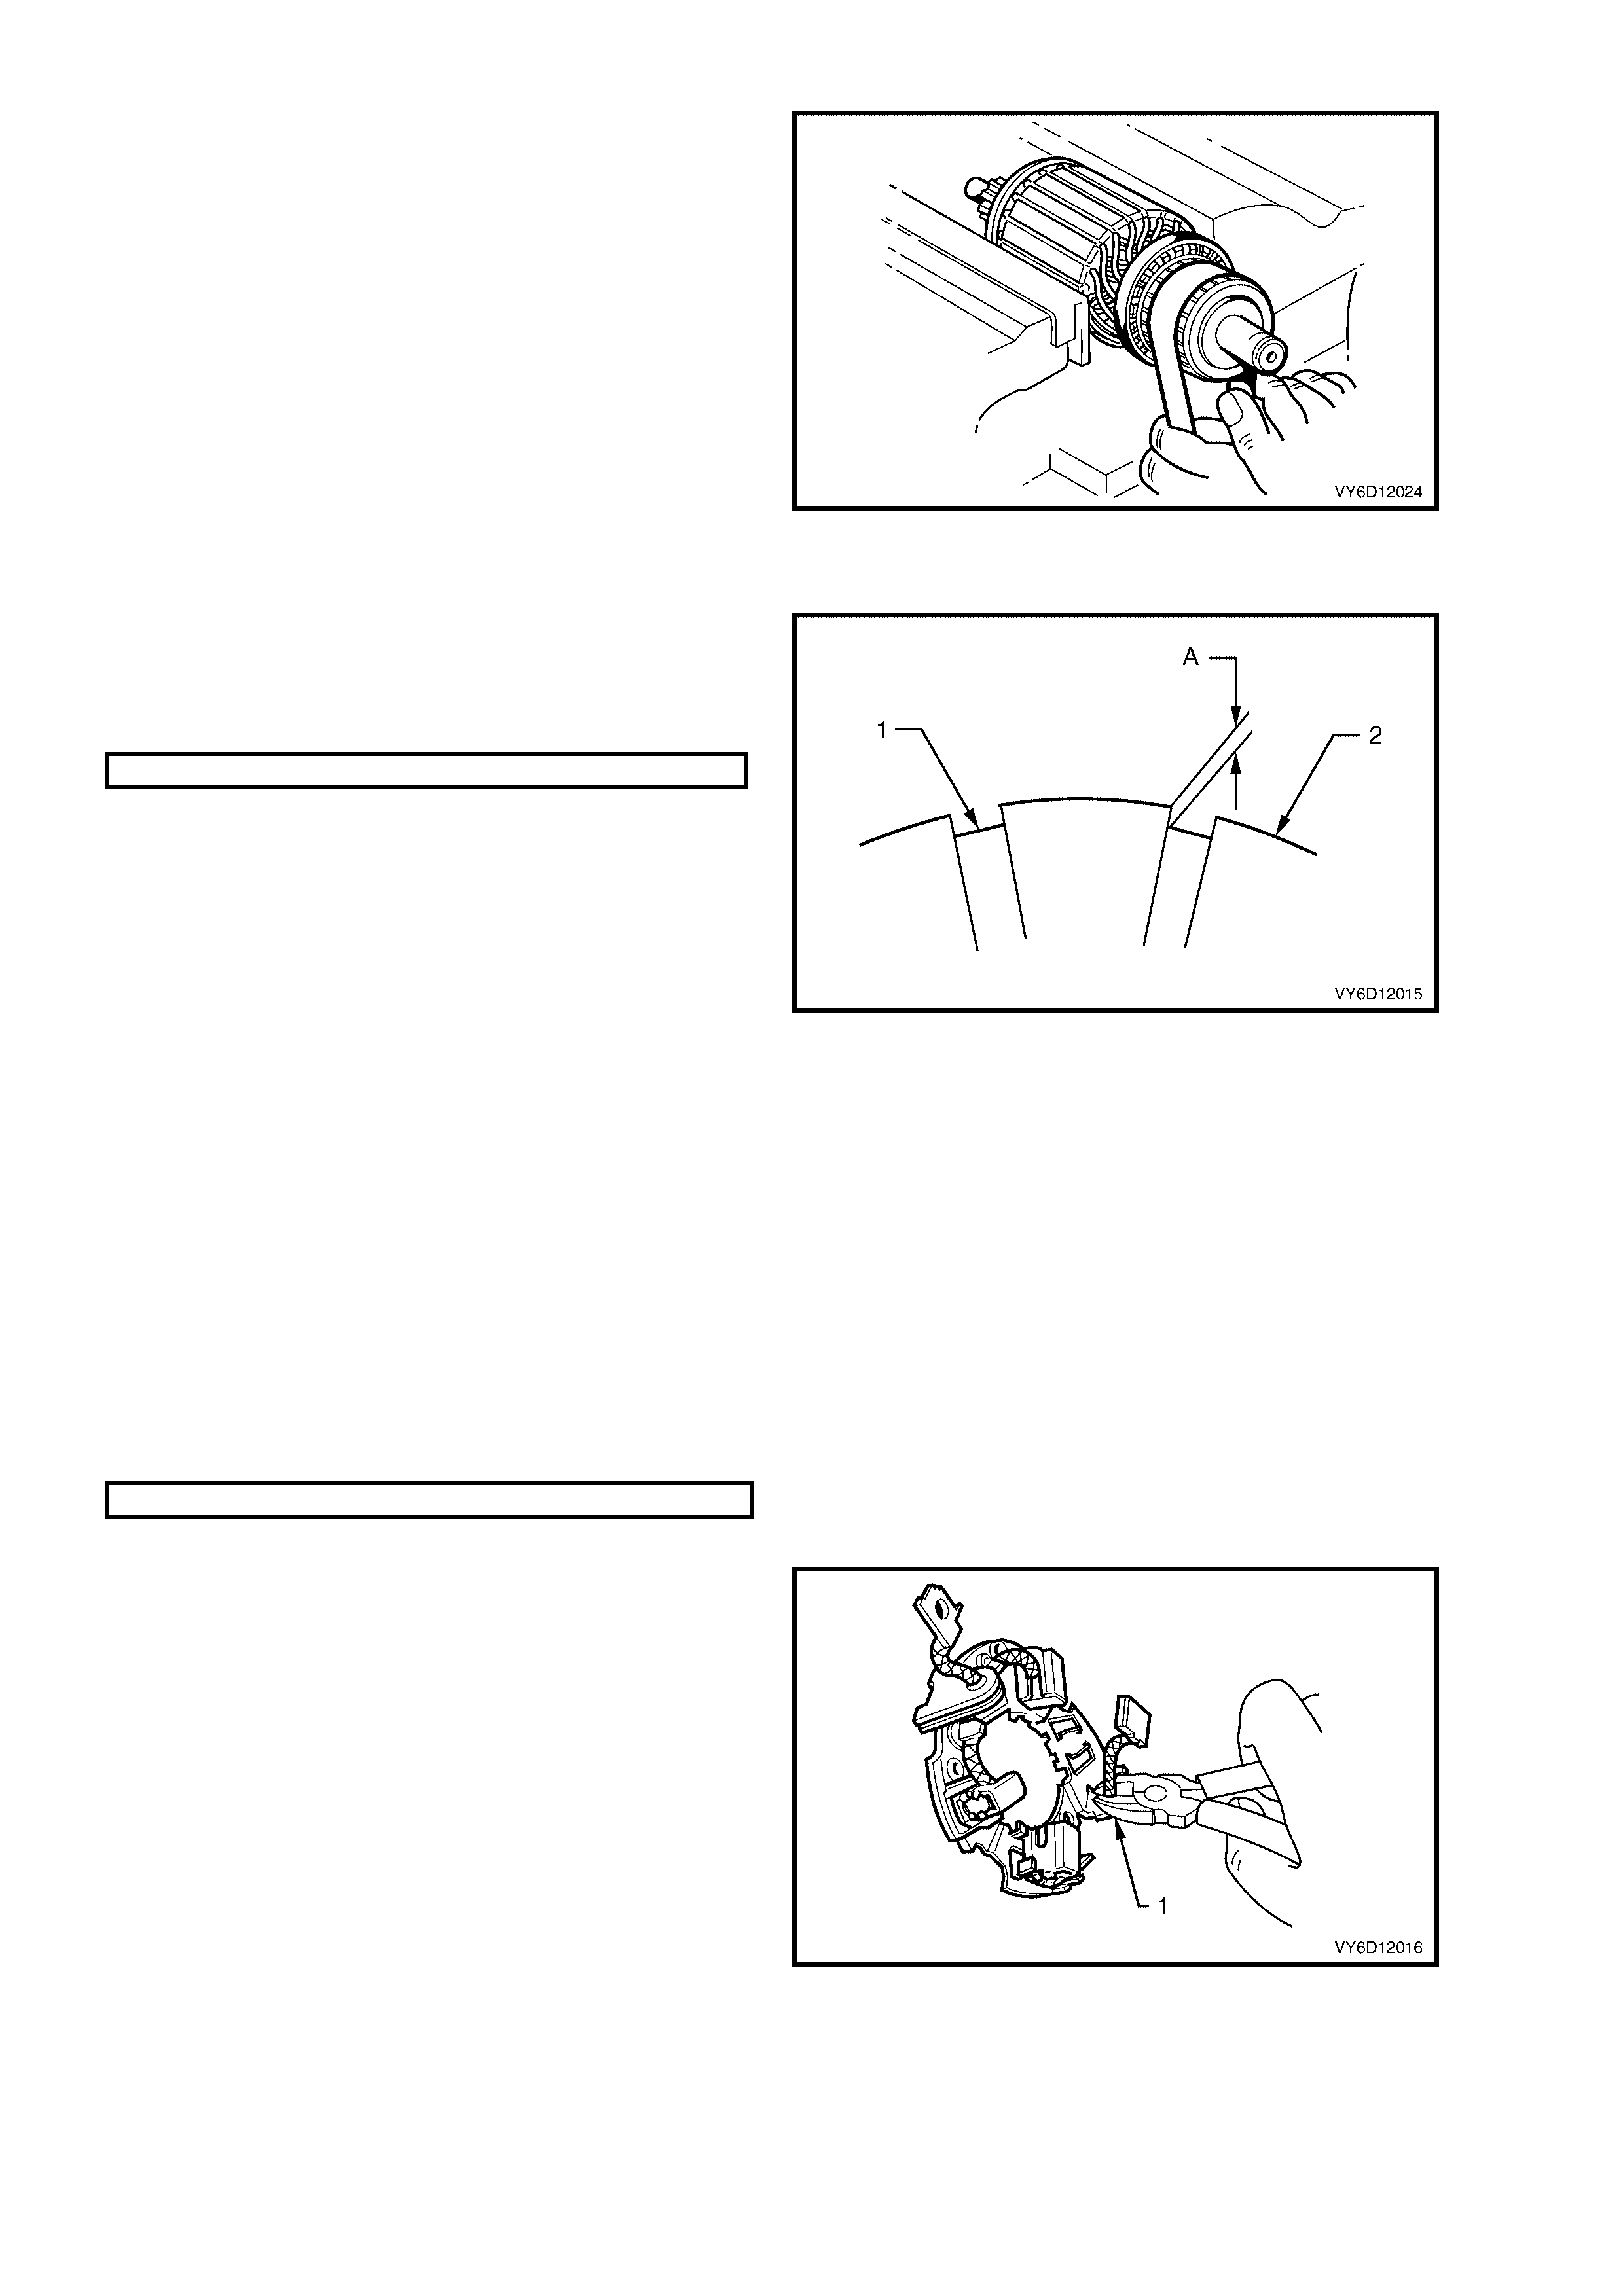
14. Use the armature to carefully push the
commutator end shield (1) and cable grommet
(2) from the pole housing (3).
15. Remove the commutator end shield from the
armature.
Figure 6D1-2-21
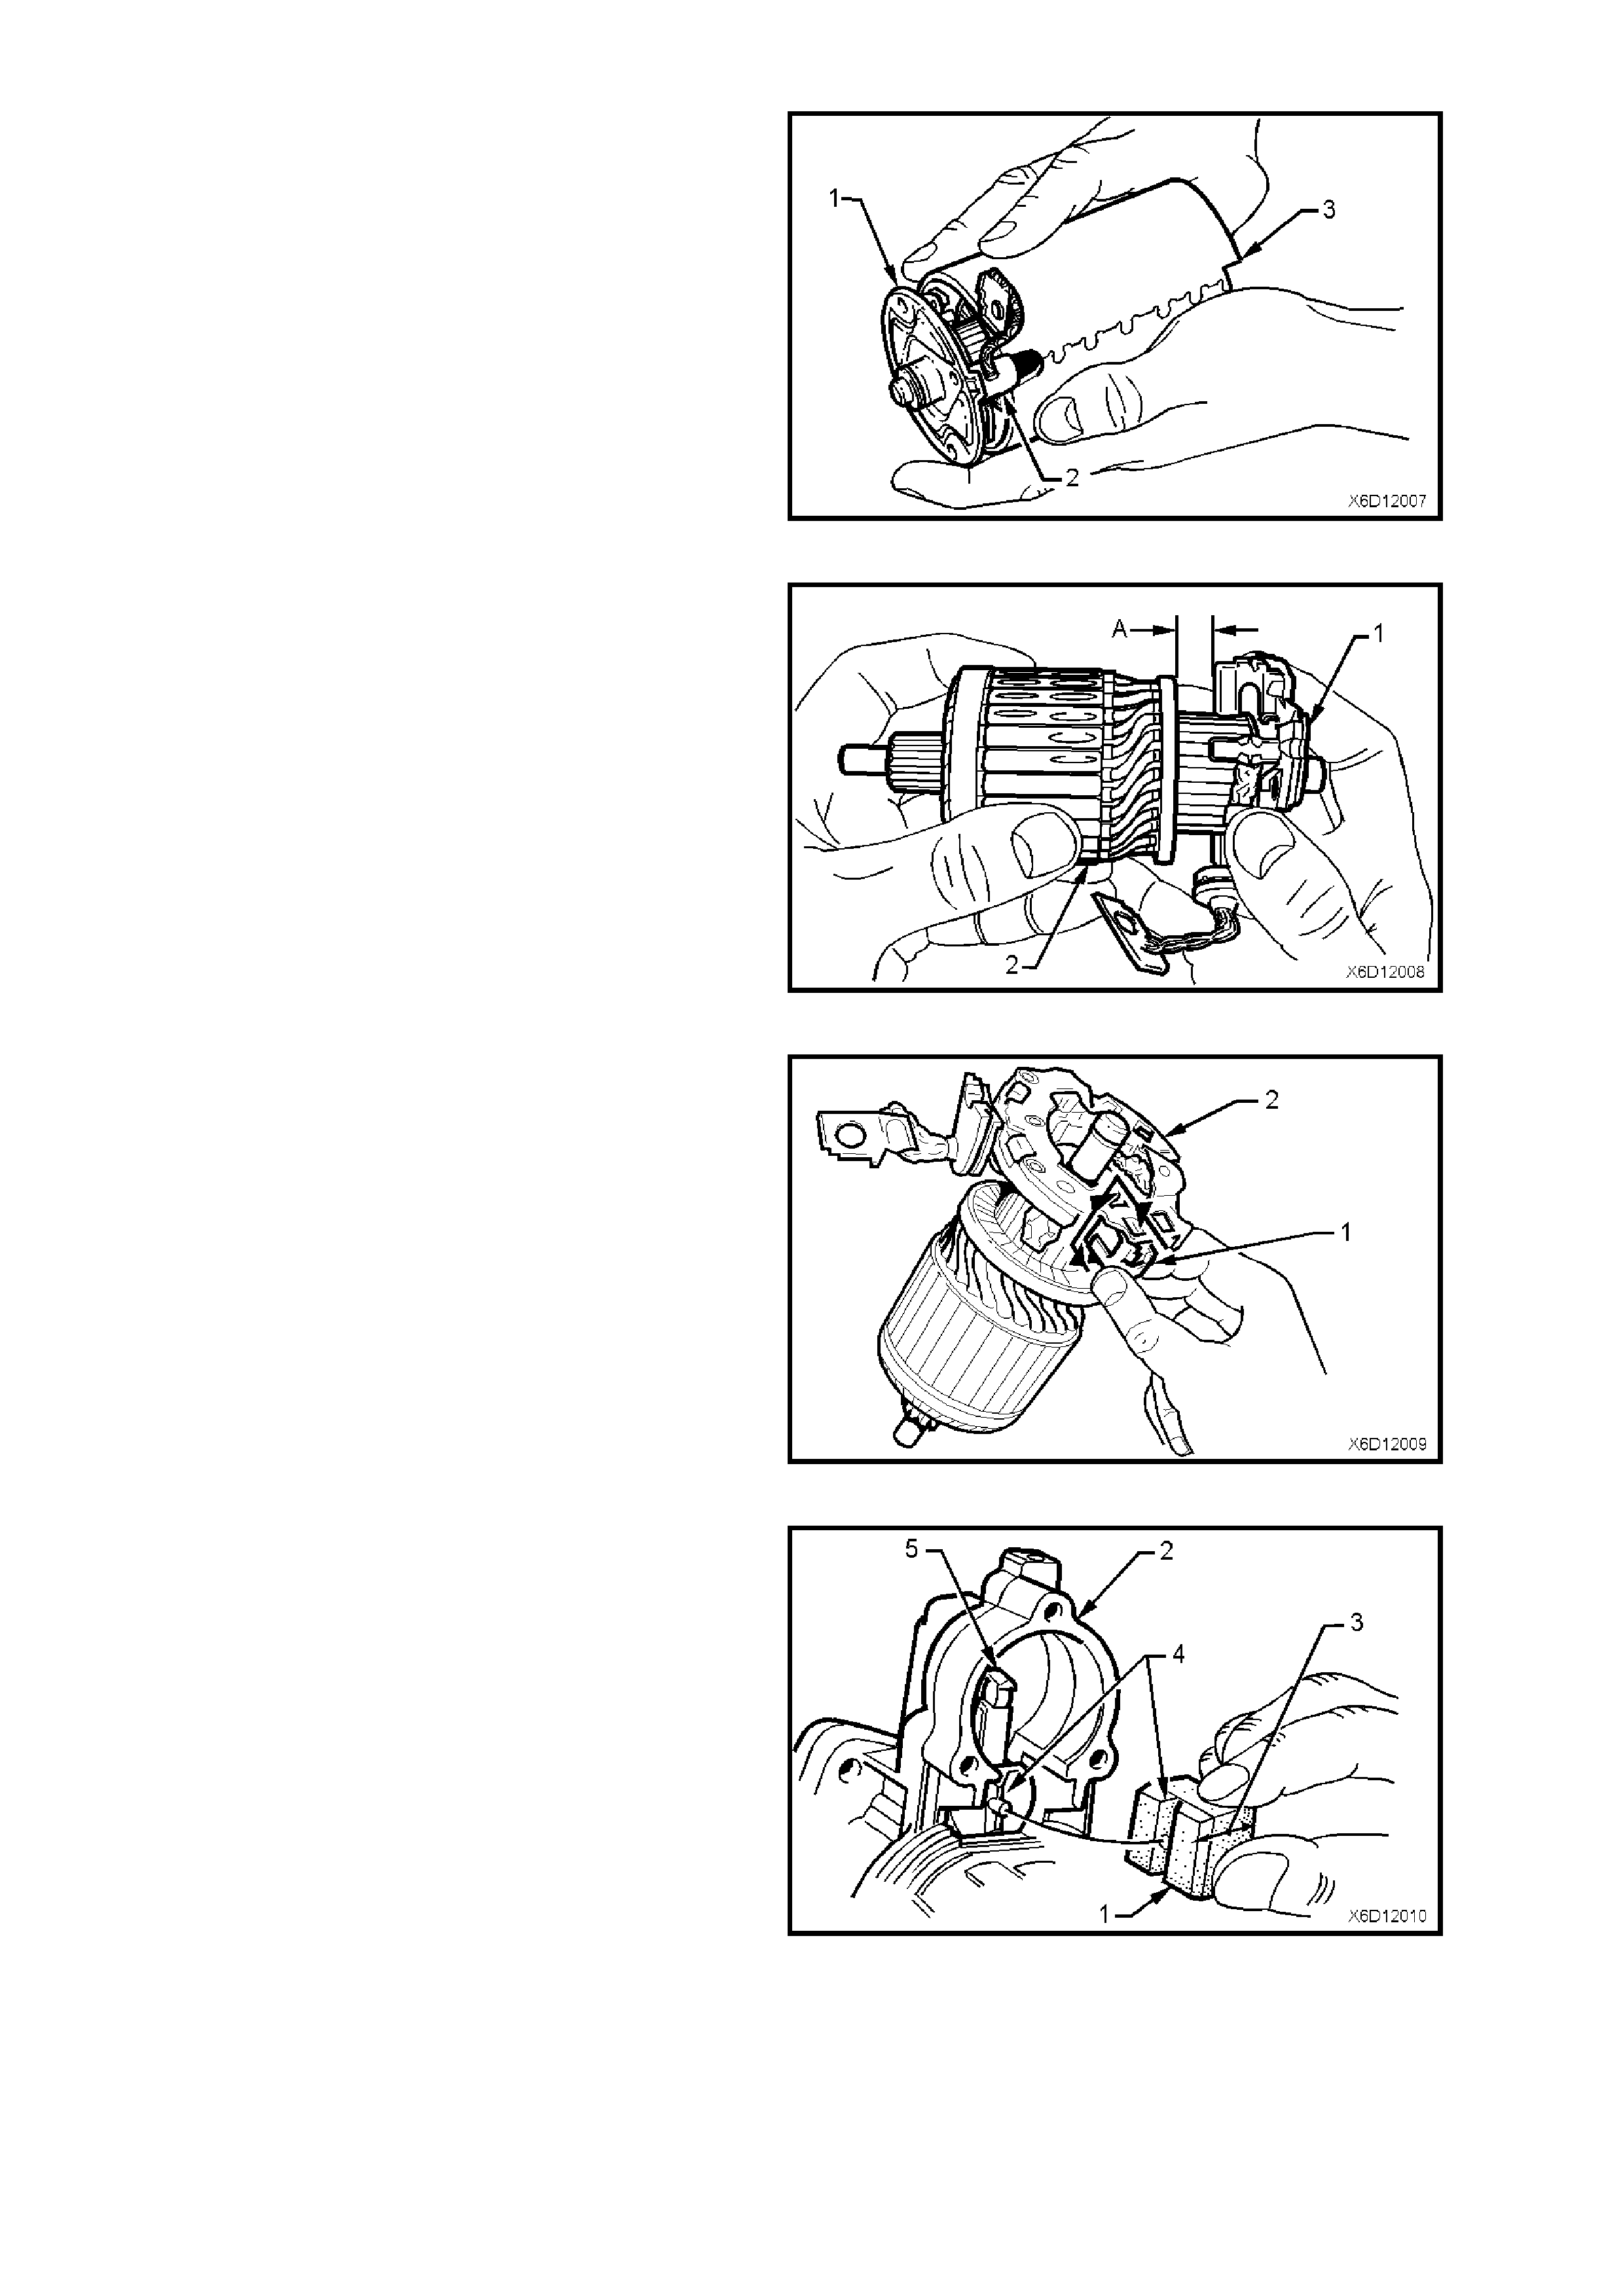
16. Remove the brush plate assembly (1) from the
armature (2). Use Bosch Tool No. 0 986 617
139 or continue as follows:
a. Pull the brush plate assembly along the
com mutator until it is approx imately 10 m m
from the armature windings (dimension A).
Figure 6D1-2-22
b. Push each brush holder (1) in turn towards
the centre of the brush plate assembly (2),
then down and back. This releases the
brush holder lugs from the assembly.
Figure 6D1-2-23
17. Take note of the orientation of the sealing
rubber (1) in the drive-end housing (2). The
thick section of the sealing rubber (3) is facing
outwards and the V-groove (4) is facing
towards the fork lever (5).
18. Remove the rubber from drive-end housing.
19. Remove the drive assembly, fork lever and
planetary drive assembly from the drive-end
housing.
20. Rem ove the for k lever fr om the drive ass embly
by carefully spreading a fork lever arm just
beyond the pivot and disengaging the for k from
the drive assembly pivots.
Figure 6D1-2-24
21. Clamp the end of the planetary drive shaft in a
vice fitted with soft jaws.
22. Prise the stop ring retainer (1) towards the
drive assem b ly (2). Us e Bosch T ools No. 0 986
617 138 and 0 986 617 113 or use two
screwdrivers pivoting on the vice jaws.
23. Remove the planetary drive shaft and drive
assembly from the vice.
24. Expand the stop ring using circlip pliers and
slide it from the planetary drive shaft.
IMPORTANT: Do not damage the planetary drive
shaft in any way.
25. Remove any burrs from the planetary drive
shaft, particularly in the area of the stop ring
groove. This avoids damage to the drive shaft
bush when removing the drive assembly.
Figure 6D1-2-25
26. Slide the stop ring retainer and the drive
assembly from the planetary drive shaft.
27. Gently prise the cover plate (1) from the ring
gear.
Figure 6D1-2-26
28. Remove the retaining clip (1) and washer (2)
from the planetary drive shaft (3).
Figure 6D1-2-27
29. Push the planetary drive shaft (1) from the ring
gear (2) and separate the components.
Figure 6D1-2-28
CLEANING AND INSPECTION
1. Clean and thoroughly inspect the disassembled components.
2. Wash all components (except the armature, brushes, solenoid switch and drive assembly) in a suitable cleaning
agent.
NOTE: Do not clean the armature or permanent m agnets with cleaning solvent. This c an damage the insulation or
contaminate the surfaces.
3. Clean the armature and permanent magnets with clean shop rags and compressed air.
NOTE: Do not clean the drive pinion assembly in solvent. This washes out the lubricant and can cause the drive
assembly to slip.
CAUTION: Use a non-volatile agent in a well ventilated area. Observe the safety regulations and
precautions issued by the manufacturer of the cleaning agent.
Check the Pole Housing
1. Inspect the pole housing and permanent magnet assembly for signs of damage, cracks and chips.
2. Replace the assembly if there are signs of damage.
Check the Armature
1. Check the armature insulation resistance to
ground using a meggar or similar tester. A
reading of 1 Megohm or greater is required.
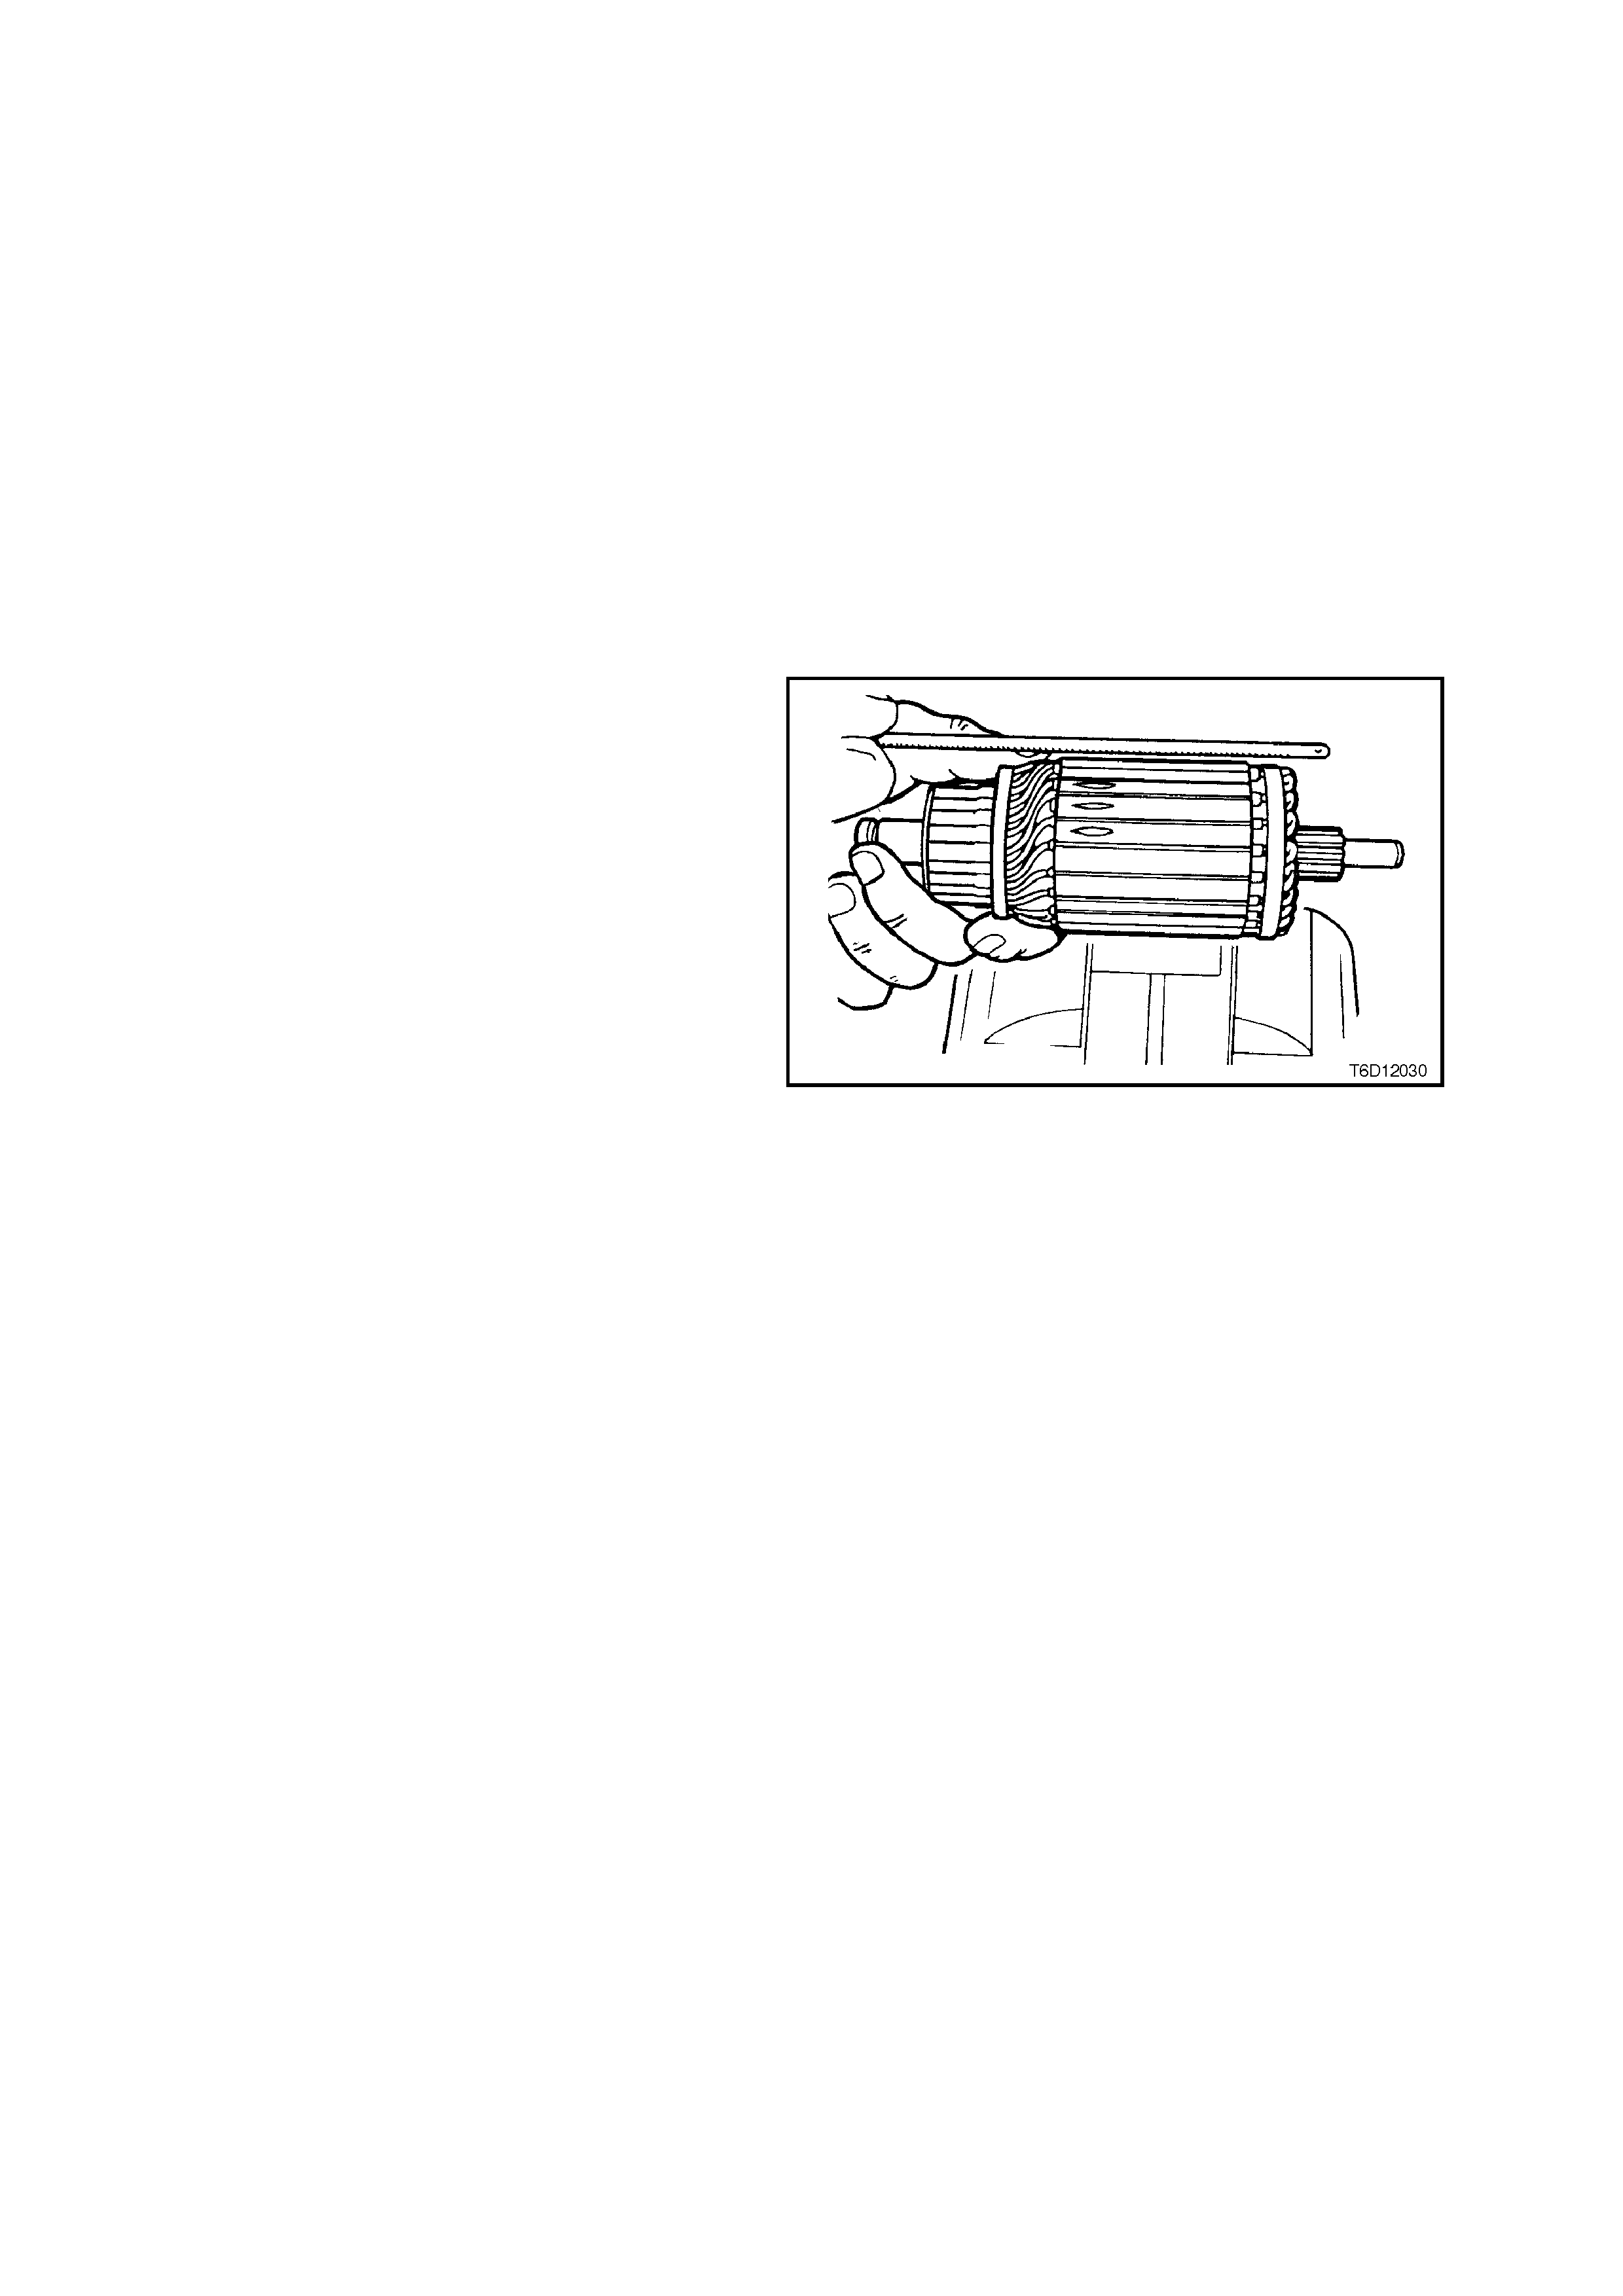
2. Check the armature for a short circuit.
3. Place the armature on a growler.
4. Switch the growler on.
5. Hold a hacksaw blade approximately 6 mm
above armature core and rotate the armature.
6. If the hacksaw blade vibrates significantly,
undercut the commutator, as follows:
a. Use a suitable small file.
Undercut between each commutator segment
to a depth of approximately 0.8 mm.
Re-check the armature in the growler.
7. Replace the armature if the hacksaw blade still
vibrates significantly.
Figure 6D1-2-29
8. Exam ine the c om m utator f or burnt or dar k ened
segments. This indicates an open circuit
winding relative to that segment.
9. Replace the armature if a segment is burnt or
darkened.
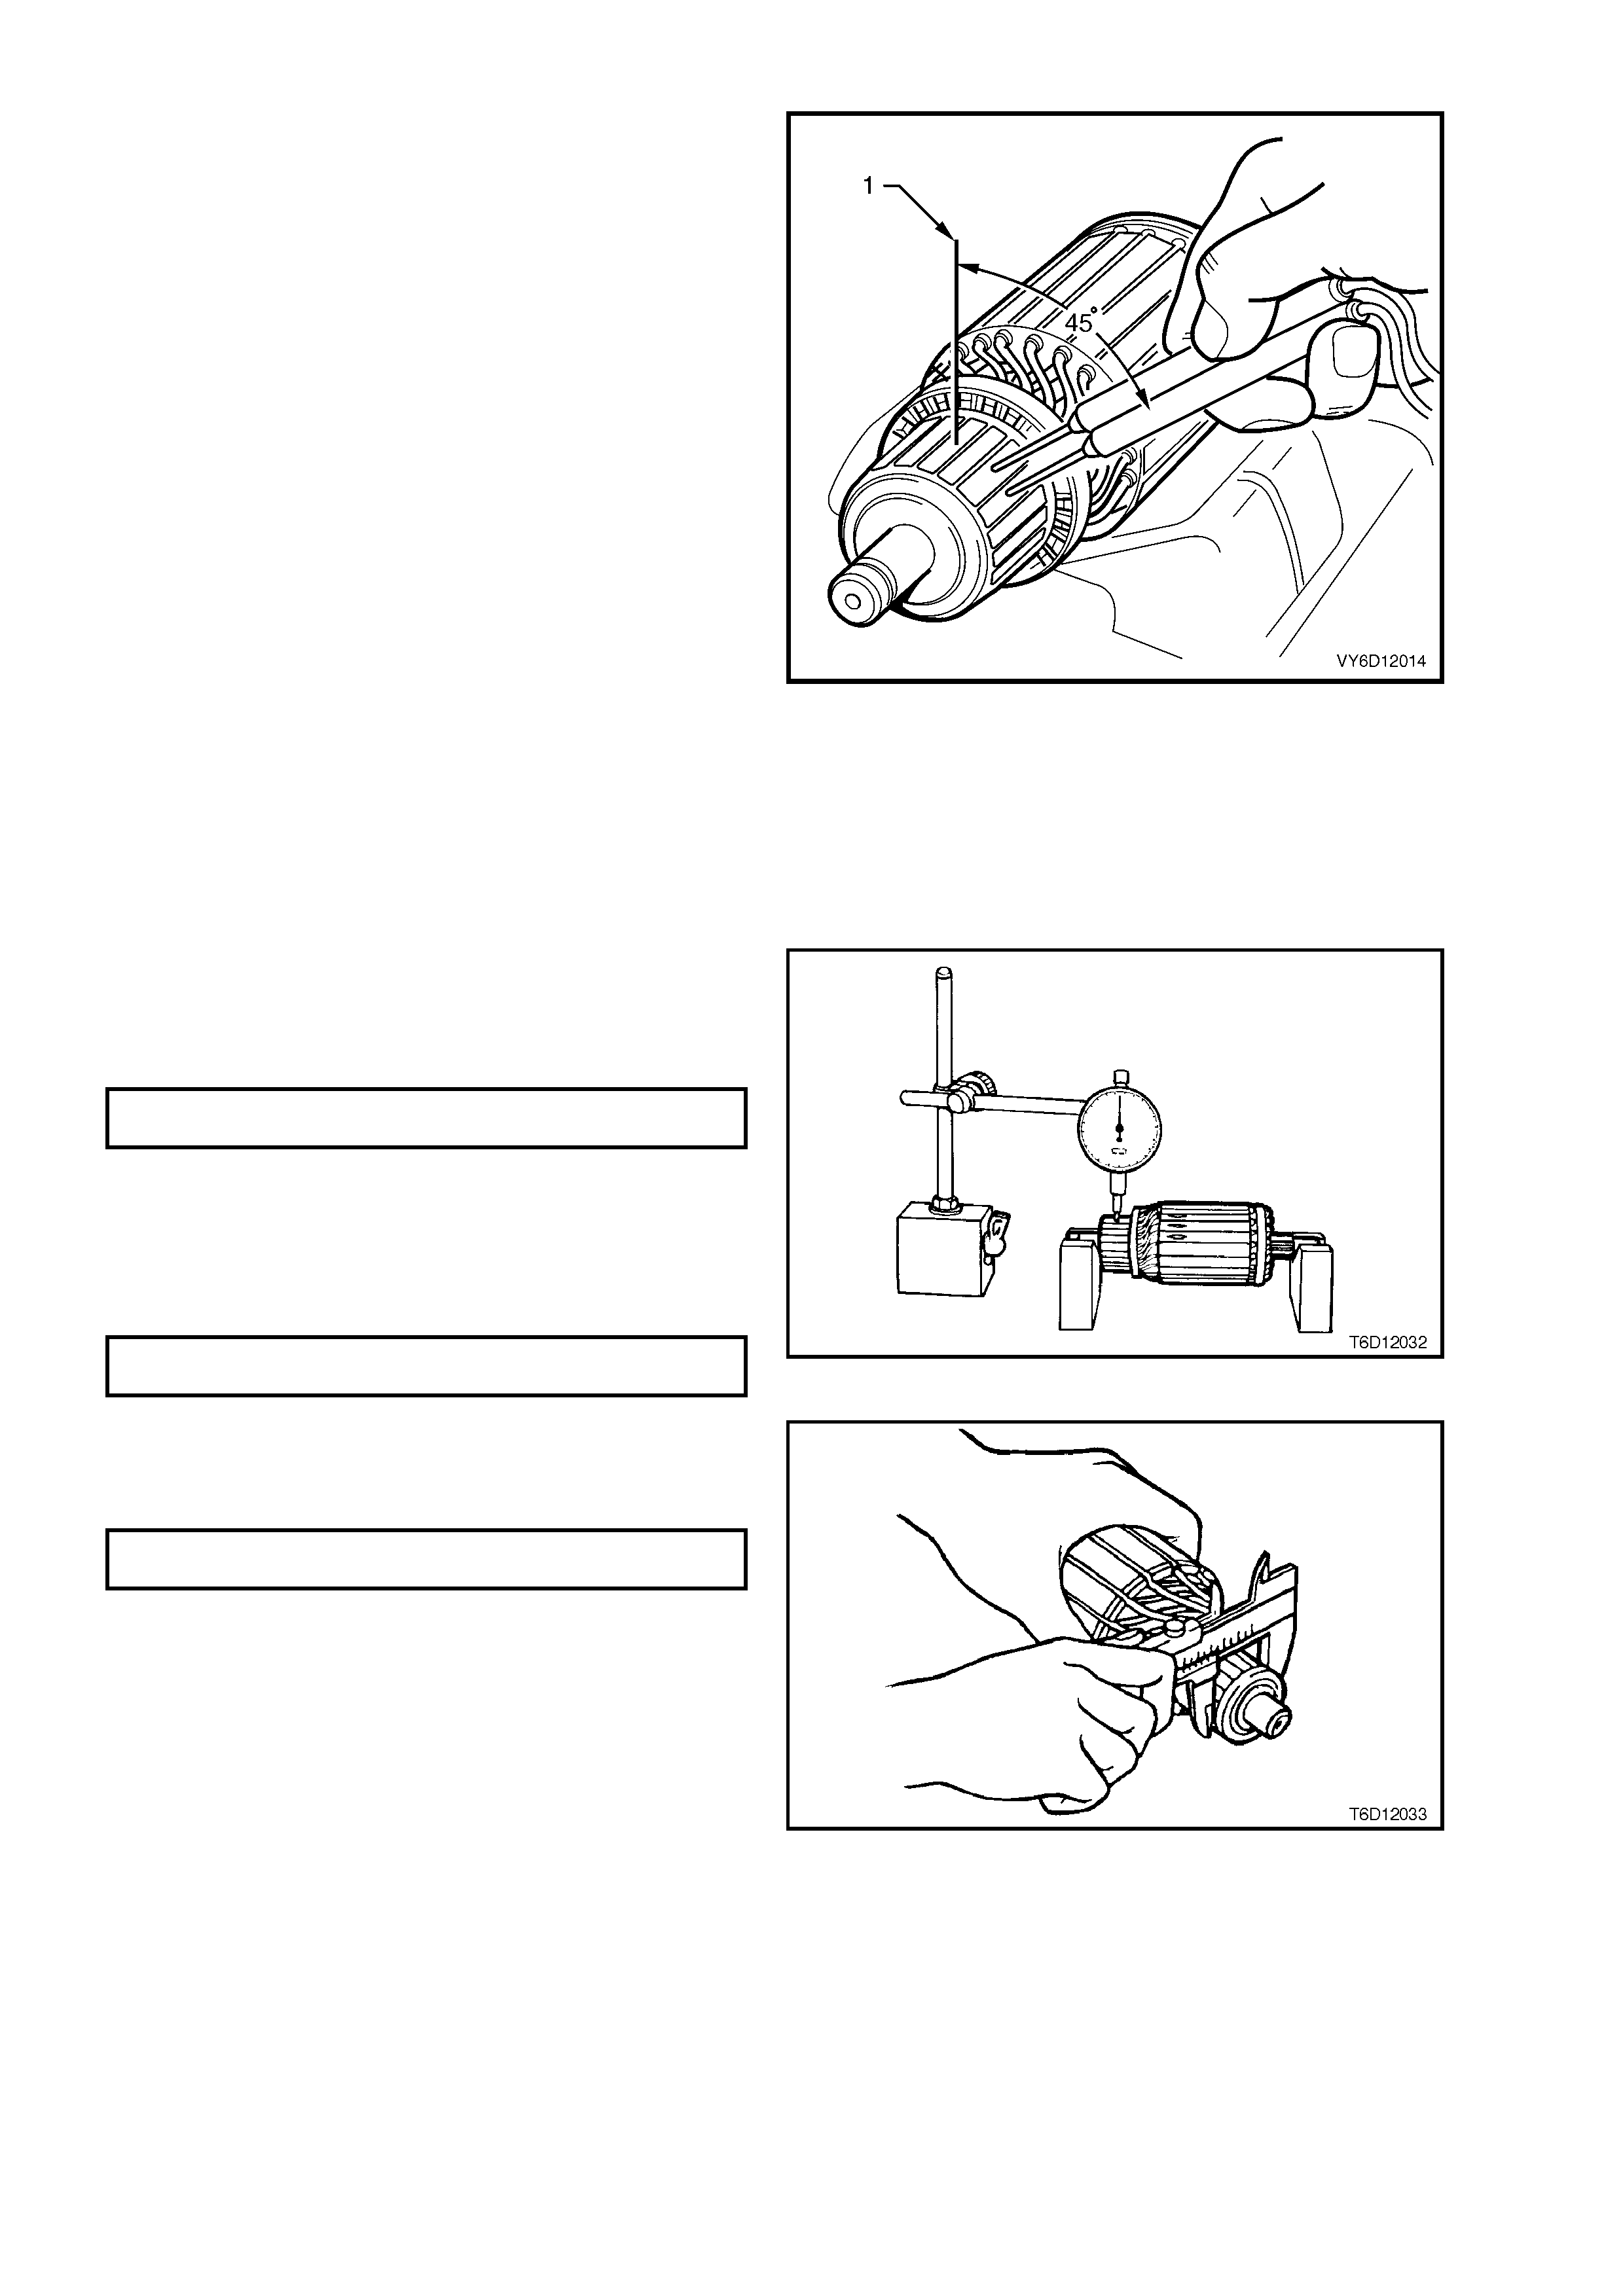
10. Place the armature on a growler.
11. Use a voltmeter to measure the voltage
induced into the armature windings, as follows:
a. Choose two adjacent segments that are
approximately 45 degrees from the top of
the commutator (1).
b. Connect the voltmeter between the two
commutator segments.
12. Record the reading.
13. Rotate the armature in the growler so that the
next two commutator segments are in the
same position as the previous two.
14. Measure the voltage across these segments.
15. Record the reading.
16. Repeat these steps to measure the voltage
reading of all adjacent segments. The voltage
reading s hould be the sam e f or each pair when
positioned in the growler in the equivalent
location.
17. Replace the armature if a voltage reading
across any adjacent set of segments differs
significantly. This indicates that the armature
winding has an open circuit.
Figure 6D1-2-30
Check the Commutator
1. Check the armature laminations for out-of-
round using a dial gauge.
2. Replace the armature if the laminations are
out-of-round beyond specification.
MAXIMUM OUT-OF-ROUND OF
ARMATURE LAMINATIONS 0.5 mm
3. Check the commutator for worn or burnt
segments, high insulation between the
segments and for out-of-round.
4. Machine the commutator if any flaws exist or
the out-of-round value is outside specification.
MAXIMUM OUT-OF-ROUND
OF C OMMUTATOR 0.1mm
Figure 6D1-2-31
5. Check the commutator diameter.
6. Replace the armature if the commutator
diameter is below the specification.
MINIMUM COMMUT ATOR
DIAMETER 31.2 mm
Figure 6D1-2-32
7. Machine the commutator, as follows:
NOTE: Do not clamp the armature by the
laminations when machining the commutator.
a. Turn the commutator in two stages; pre-
turning and finish turning.
b. Finish cut the com mutator using a f ine tool
of no more than 0.03 mm.
c. Polish the surface using 500 – 600 grade
emery cloth (1).
d. Brush out the commutator segment slots
using a stiff brush.
e. Check the diameter of the commutator.
8. Replace the armature if the diameter of the
commutator is less than the specification.
Figure 6D1-2-33
9. Check the depth of the insulating m ica (1) fr om
commutator surface (2).
10. Undercut the mica if the depth (A) is less than
0.2 mm.
DEPTH OF UNDERCUT 0.5 to 0.8 mm.
CAUTION: Use dust extraction when
undercutting.
11. Clean all dirt and debris from the commutator
segment slots.
12. Lightly polish the commutator to remove any
burrs.
13. Clean the commutator and armature thoroughly
with compressed air.
Figure 6D1-2-34
Check the Brushes
1. Check the brush holder springs for breakage and corrosion.
2. Replace the brush holder springs as necessary.
3. Check that each brush slides smoothly in the holder.
4. Check that the brush connections are good.
5. Check that the brushes are clean.
6. Check that the brushes are not chipped.
7. Replace all of the brushes if a fault exists in any one of the brushes.
8. Check the length of each brush.
9. Replace all of the brushes if any brush is below specification.
MINIMUM BRUSH LENGTH 8 mm
Replace the Brushes
1. Pay special attention to the position and
direction that each lead is soldered to the plate.
2. Cut each brush lead at the lowest point of the
flexible braid (1).
3. Clean the brush lead remnants (still on the
brush plate).
4. Tin the brush lead remnants with 60/40 resin-
cored solder.
Figure 6D1-2-35
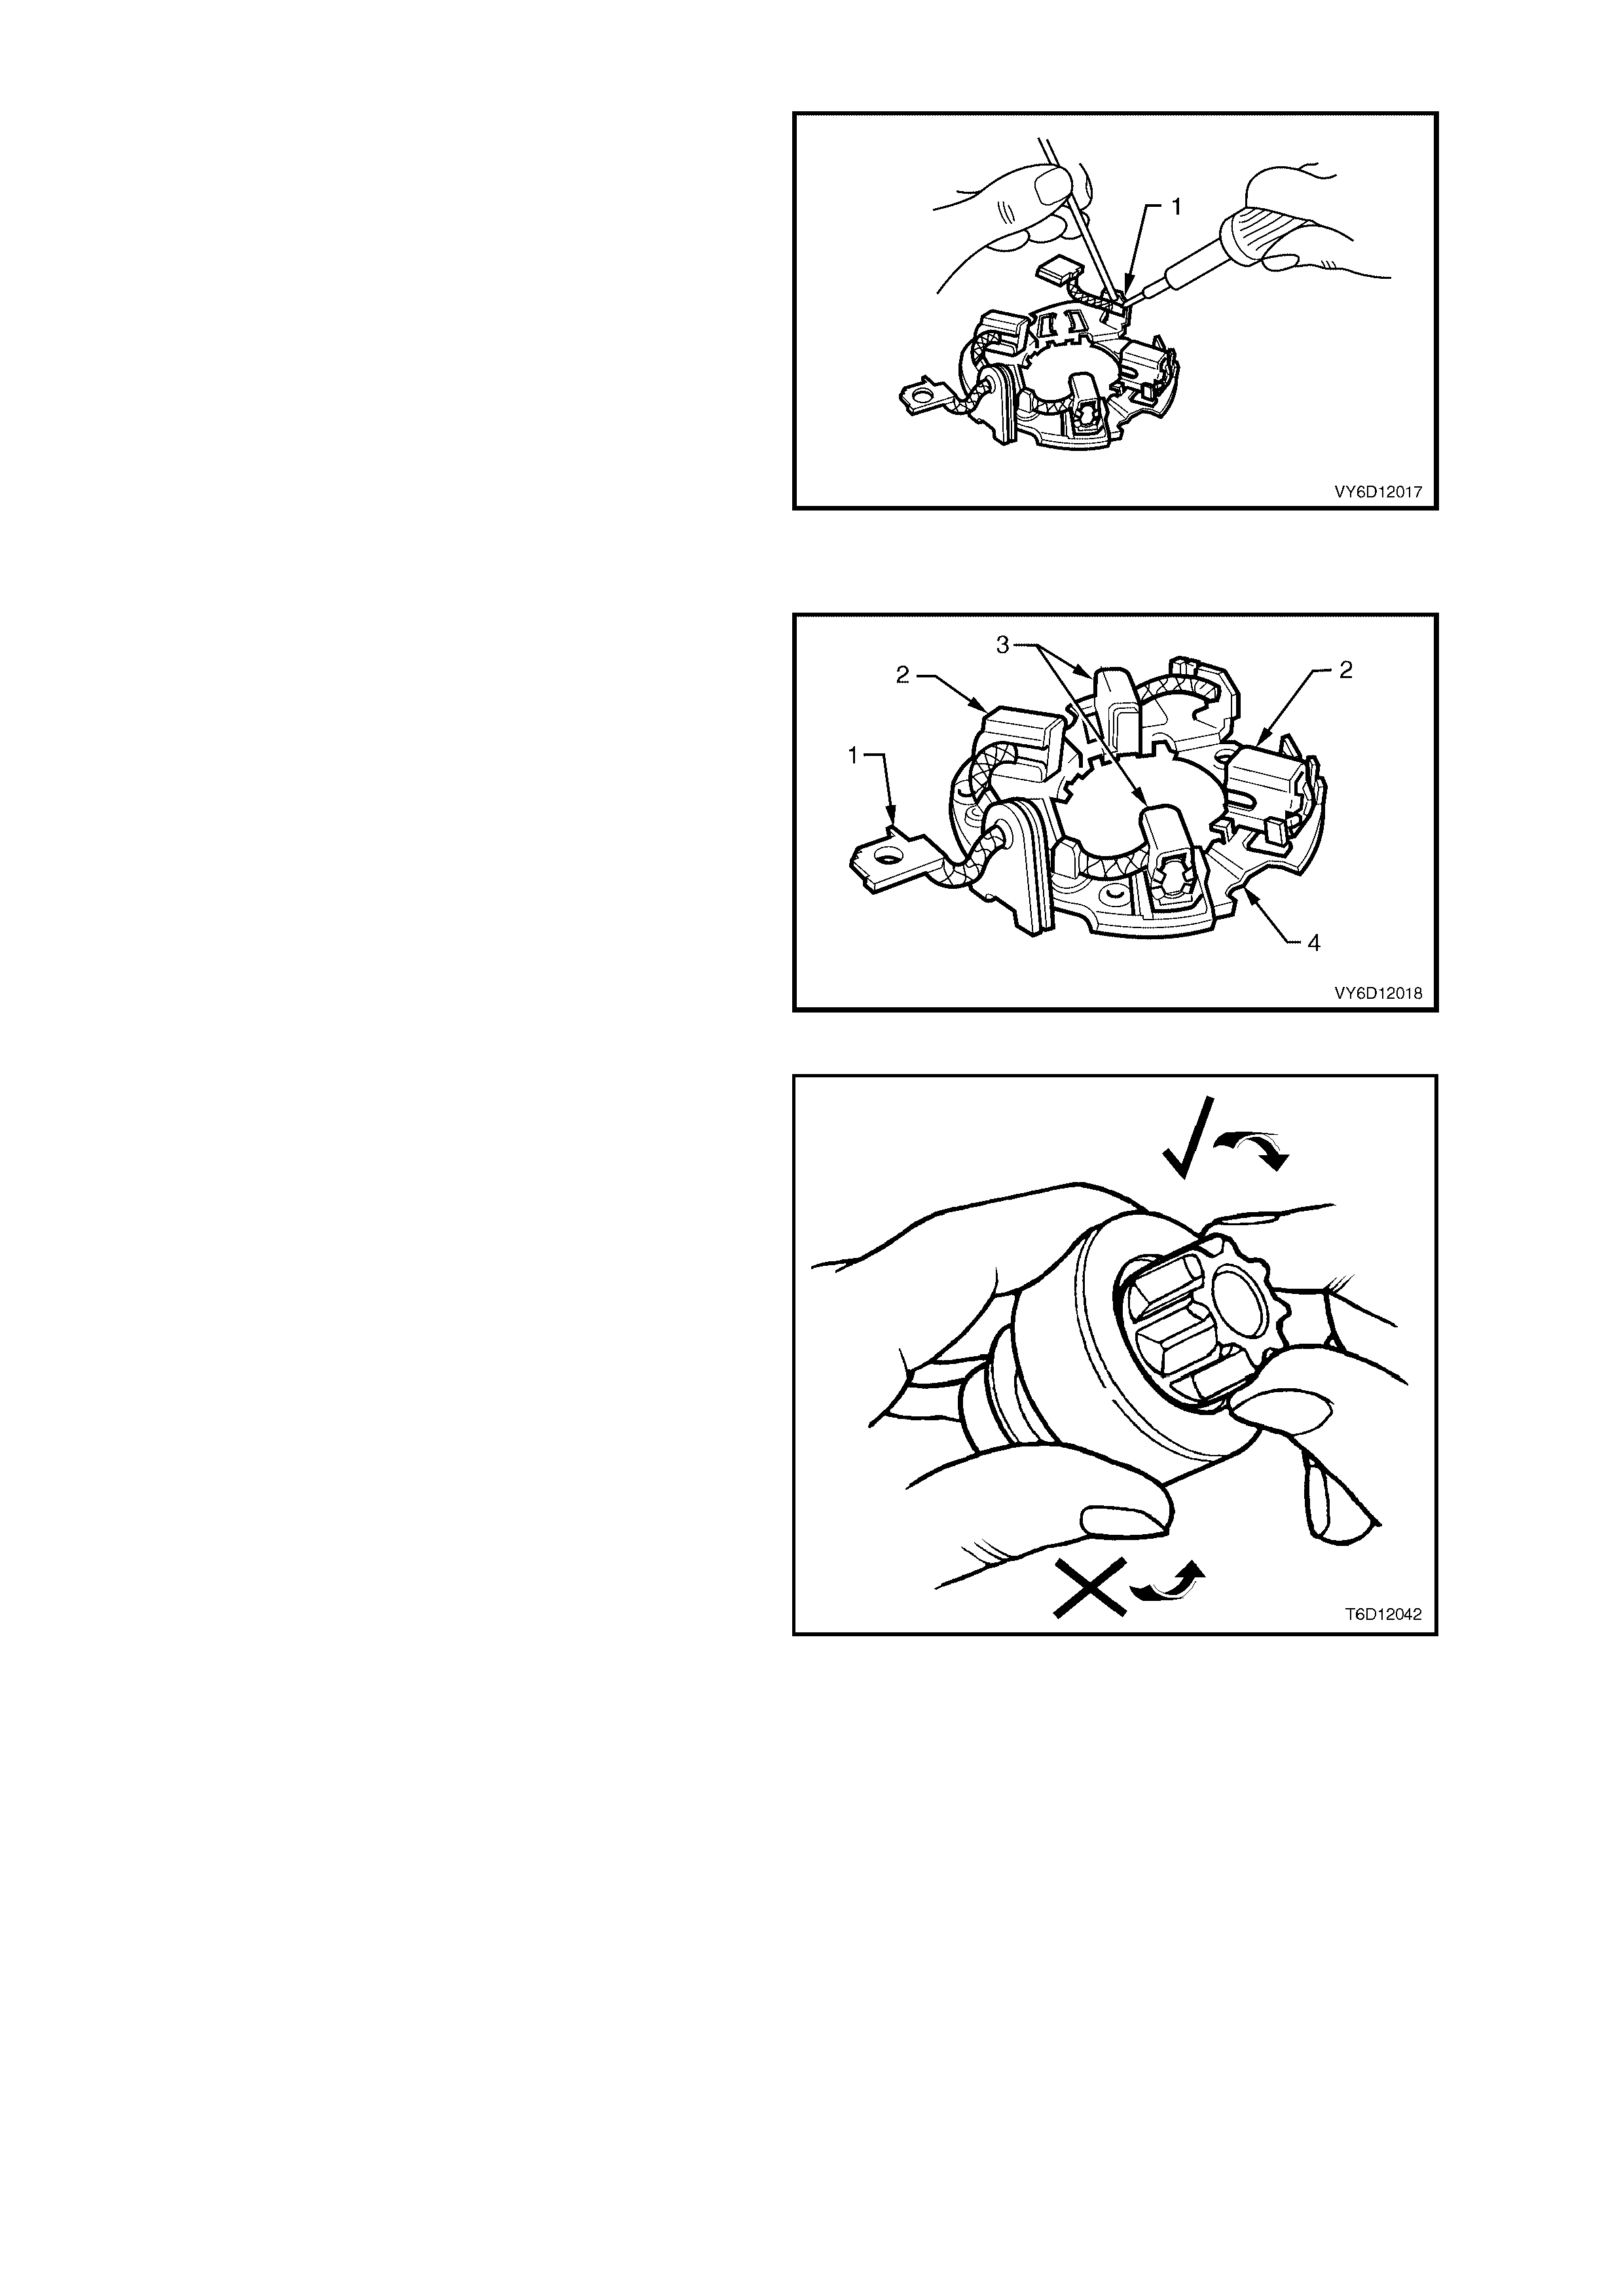
5. Hold the new brush lead in position on the
tinned, cut-off lead (1) using a pair of pointy-
nosed pliers.
IMPORTANT: Mak e sure the lead is pointing in the
correct direction.
6. Solder the new brush lead in place.
IMPORTANT: Ensure that the solder does not run
up the lead. This reduces the flexibility of the lead
and prevents correct brush movement.
Figure 6D1-2-36
Check the Brush Plate Assembly
1. Connect an ohmmeter between the positive
brush terminal (1) and the positive brushes (2).
2. Record the resistance.
3. Connect the ohmmeter between the negative
brushes (3) and the brush plate assembly
base (4).
4. Record the resistance.
5. Replace the brush plate assembly if a
significant resistance exists.
IMPORTANT: Replace the complete brush plate
assembly if attaching the new brushes is not
successful.
Figure 6D1-2-37
Check the Drive Assembly
1. Inspec t the drive ass em bly pinion gear for worn
or chipped teeth or burrs.
2. Replace the drive assembly and inspect the
flexplate/flywheel ring gear teeth if the pinion
gear is damaged or broken. Refer to
Section 6A1-1, ENGINE MECHANICAL – V6.
3. Check the operation of the pinion gear. Ensure
that it rotates freely and smoothly in a
clockwise direction.
4. Check that the pinion gear does not rotate in an
anti-clock wise direction. Refer to F igure 6D1-2-
38.
5. Examine the internal bush of the pinion for
wear or scoring.
6. Replace the drive assembly if there is any sign
of damage or it rotates in both directions.
7. Inspect the fork lever contact surfaces and
pivots.
8. Replace the fork lever if it is damaged or
significantly worn.
Figure 6D1-2-38
Check the Bushes
1. Check the fit of the armature shaft in the commutator end shield.
2. Check the fit of the planetary drive shaft in the drive-end housing.
3. Replace the bushes if they are damaged or excessively worn.
4. Check the bush housings for wear from the shaft and for out-of-round.
5. Replace the housing if it is damaged or out-of-round.
Replace the Bushes
1. Remove the bushes, as follows:
a. Support the end shield using a very gentle
grip in the vice.
b. Carefully tap the bush out with a suitable
mandrel.
c. Repeat these steps for the drive-end bush.
2. Oil the new bushes as follows:
a. Seal the end of the bush.
b. Fill the bush with oil.
c. Seal the top of the bush.
d. Pressur ise the oil until it seeps through the
bush.
3. Gently press or tap each bush into position with
a shouldered mandrel.
IMPORTANT: Do not ream sintered bushes.
Test the Solenoid Switch
1. Inspect the solenoid switch for any external
damage.
2. Replace the solenoid switch if it displays
significant damage.
3. Install the return spring and plunger into the
solenoid switch.
4. Check the movement of the plunger, as
follows:
a. Depress the plunger fully.
b. Release the plunger.
c. If the plunger sticks or binds in the switch
bore, clean or replace the solenoid switch
assembly as required.
Figure 6D1-2-39
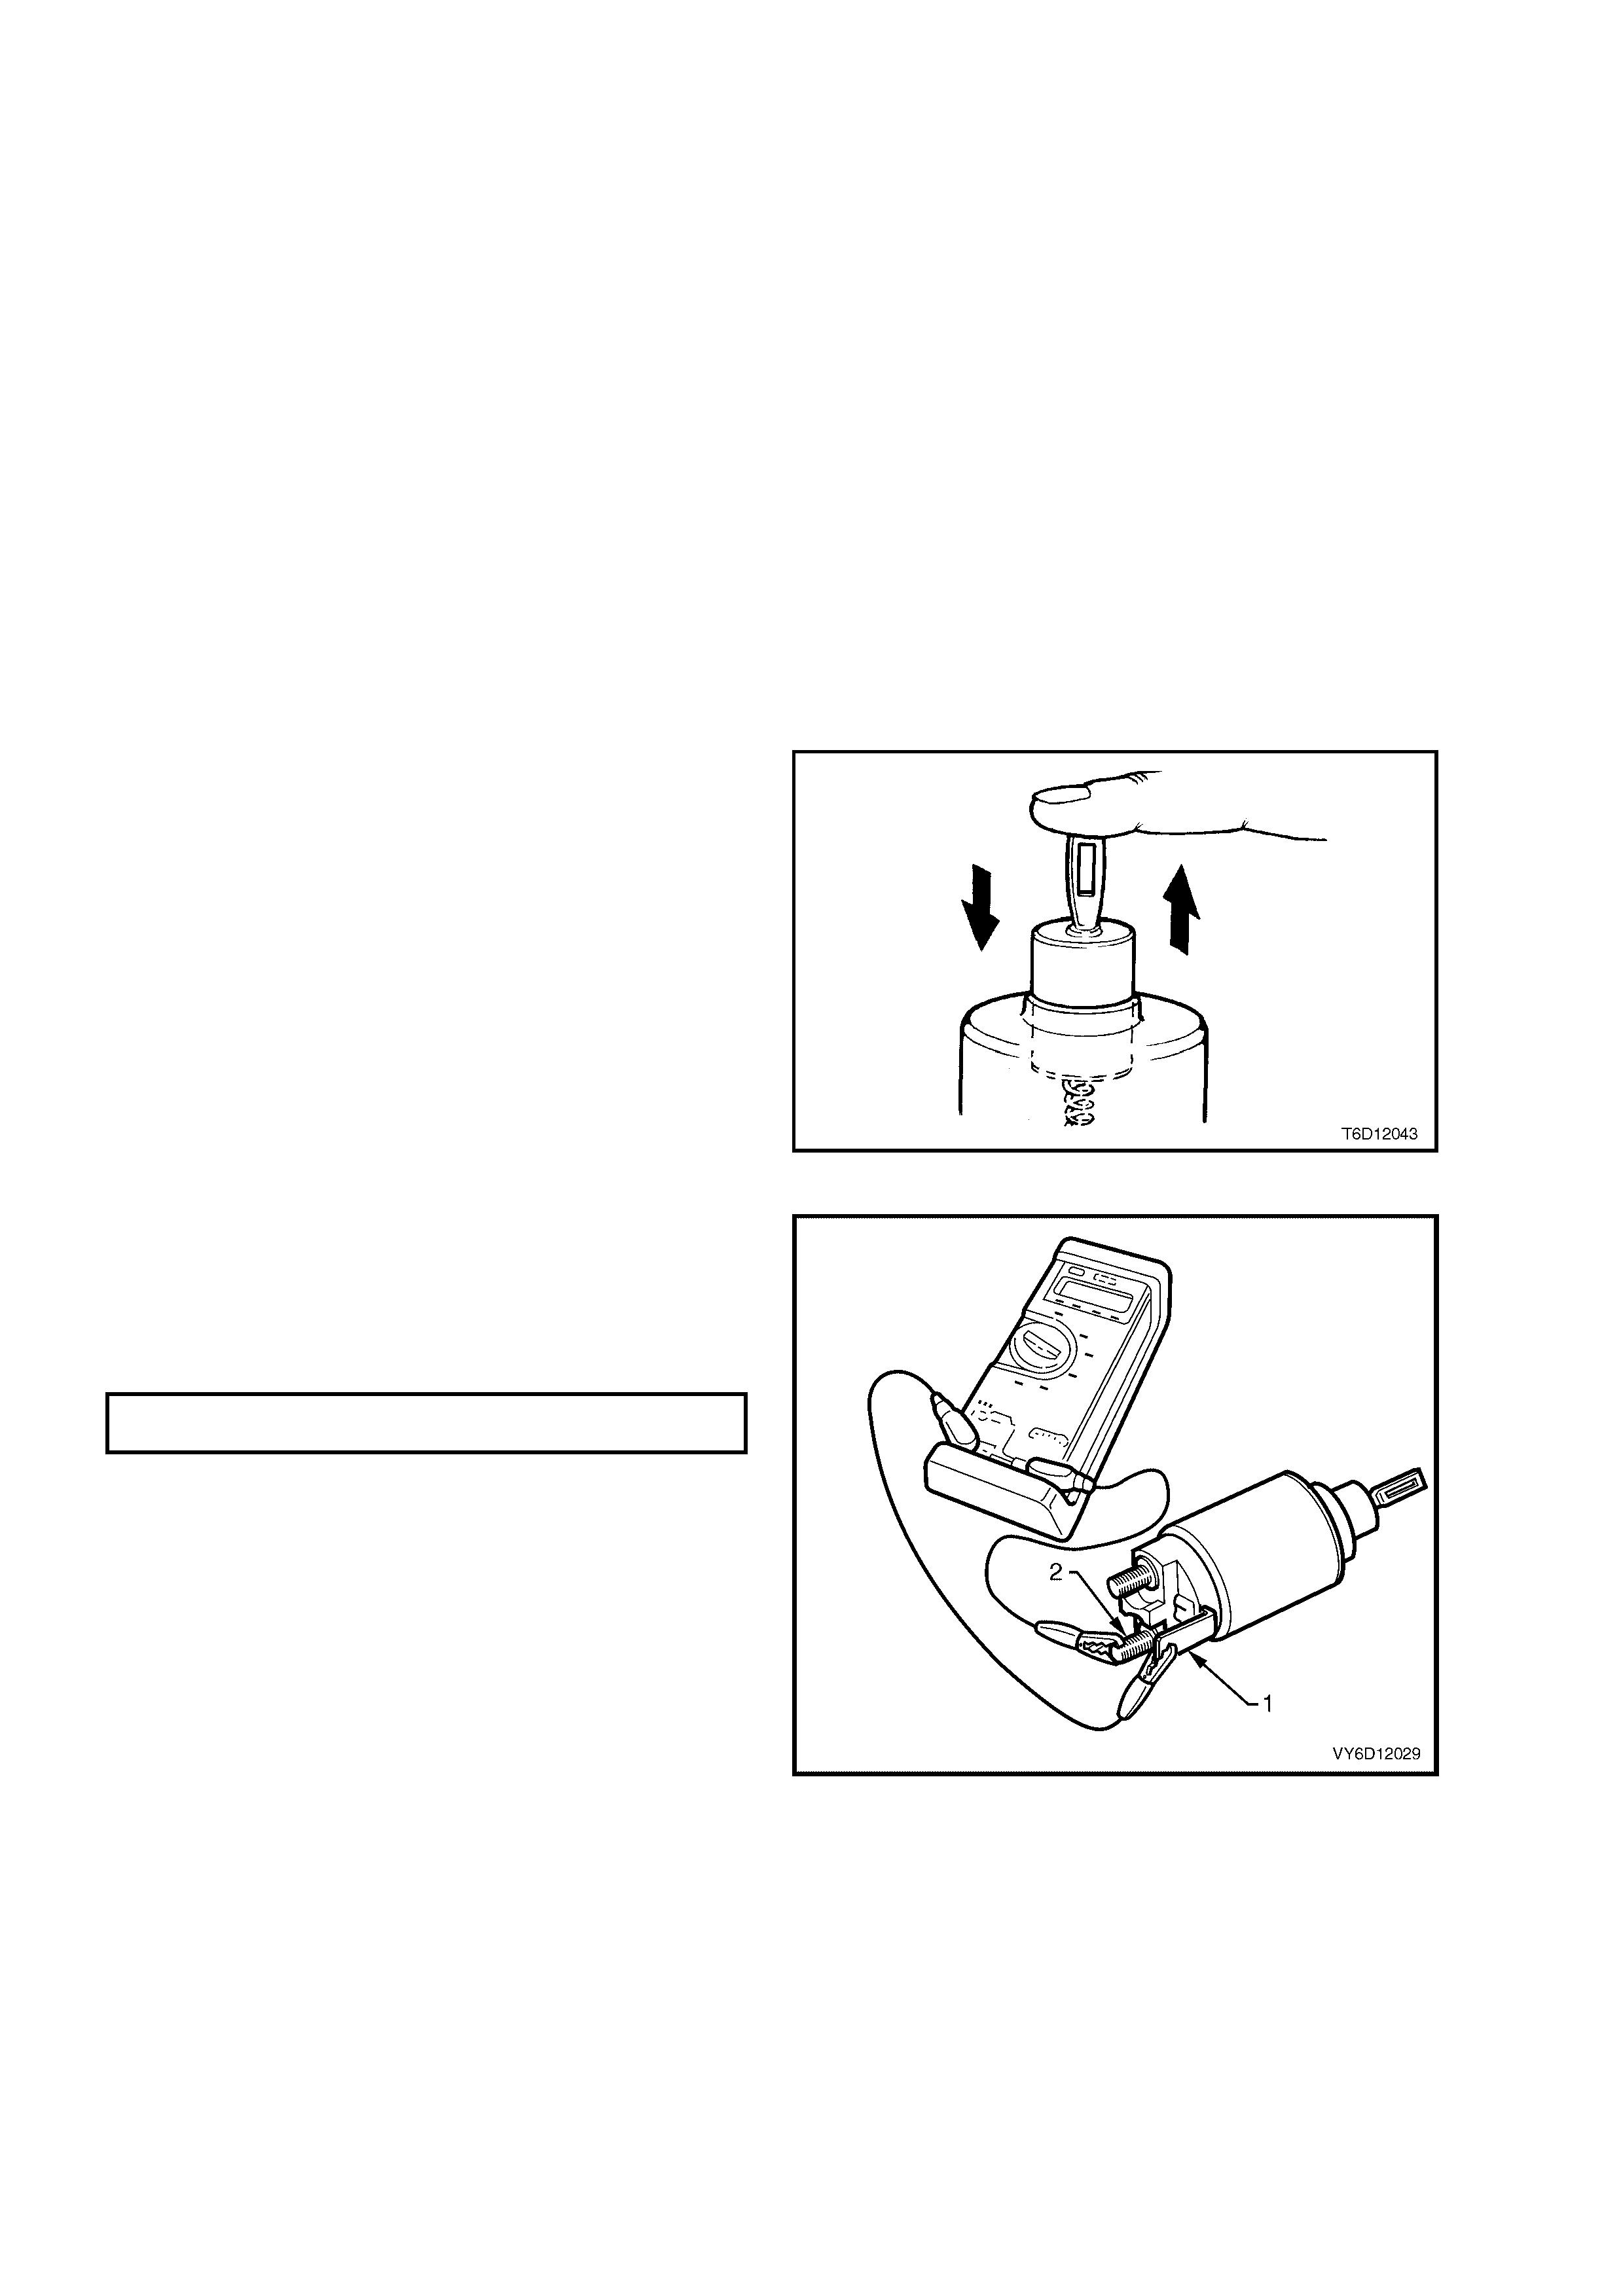
5. Connect an ohmmeter between the M terminal
(1) and terminal 50 (2).
6. Record the resistance reading.
7. Replace the solenoid switch if the resistance is
outside the specification.
PULL-IN WINDING RESISTANCE
@ 20° C 0.203 – 0.543 ohm
Figure 6D1-2-40
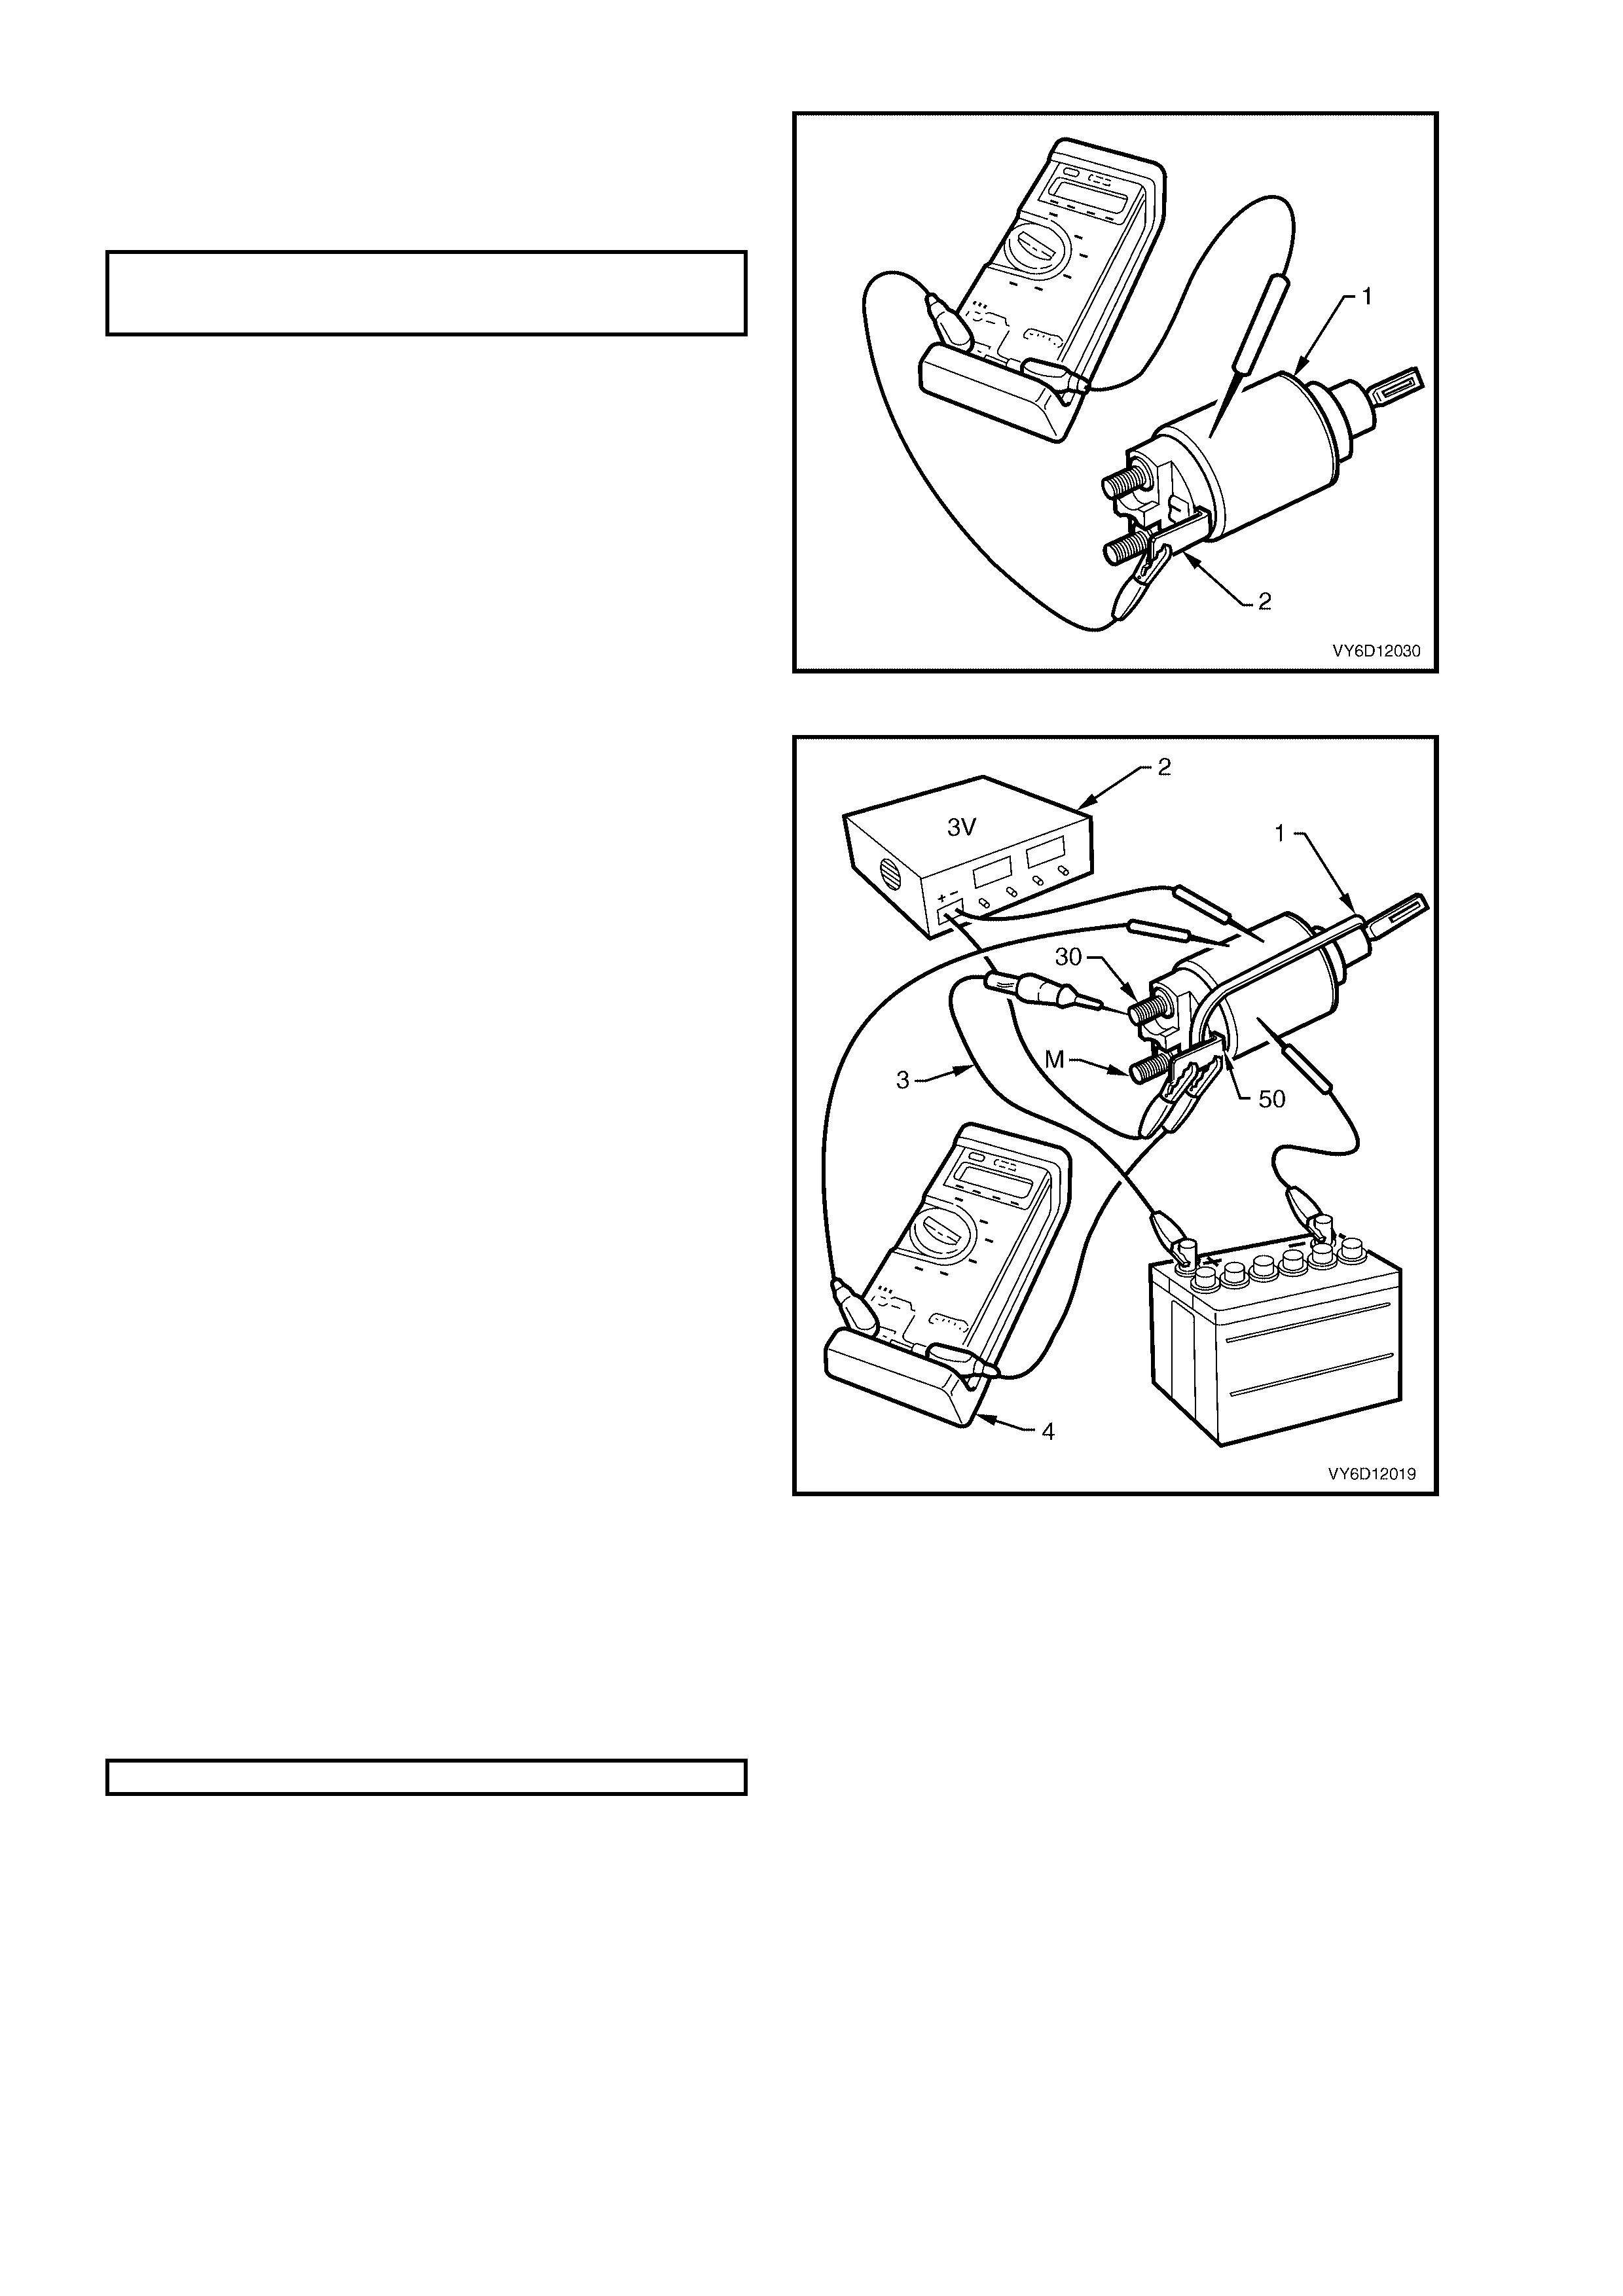
8. Connect an ohmmeter between the solenoid
switch housing (1) and terminal 50 (2).
9. Replace the solenoid switch if the resistance is
outside the specification.
HOLD-IN WI NDING
RESISTANCE
@ 20° C 1.563 – 1.703 ohms
Figure 6D1-2-41
10. Fit a rubber band (1) around the plunger and
switch housing to avoid ejecting the plunger.
11. Hold the solenoid switch vertically with the
plunger pointing upwards.
12. Use a power supply (2) capable of supplying
30 amps or use a battery and a variable
resistor.
13. Set the power supply to 3.0 volts.
14. Connect the power supply negative lead to the
solenoid switch body.
15. Connect the power supply positive lead to
terminal 50.
16. Connect a 12 volt test lamp (3) between
terminal 30 and the battery.
17. Connect a voltmeter (4) between terminal 50
and the solenoid switch housing.
18. Pres s the solenoid plunger in until the tes t lam p
illuminates.
19. Allow the plunger to move out by 8 – 10 mm.
20. Hold the plunger in this position.
NOTE: The test duration for the following step
should be no more than TWO SECONDS.
21. Slowly increase the voltage on term inal 50 until
the plunger pulls in.
22. Record the voltmeter reading and reduce the
voltage applied to terminal 50.
23. Replace the solenoid switch if the voltage
reading is significantly higher than the
specification.
PULL-IN VOLTAGE @ 20°C 7.8 volts
24. Check the continuity across the main contacts
in the switch.
25. Increase the voltage on terminal 50 until the
plunger pulls in.
26. Ensure that the test lamp illuminates fully.
27. Replace the solenoid switch if the test lamp
illuminates poorly.
Figure 6D1-2-42
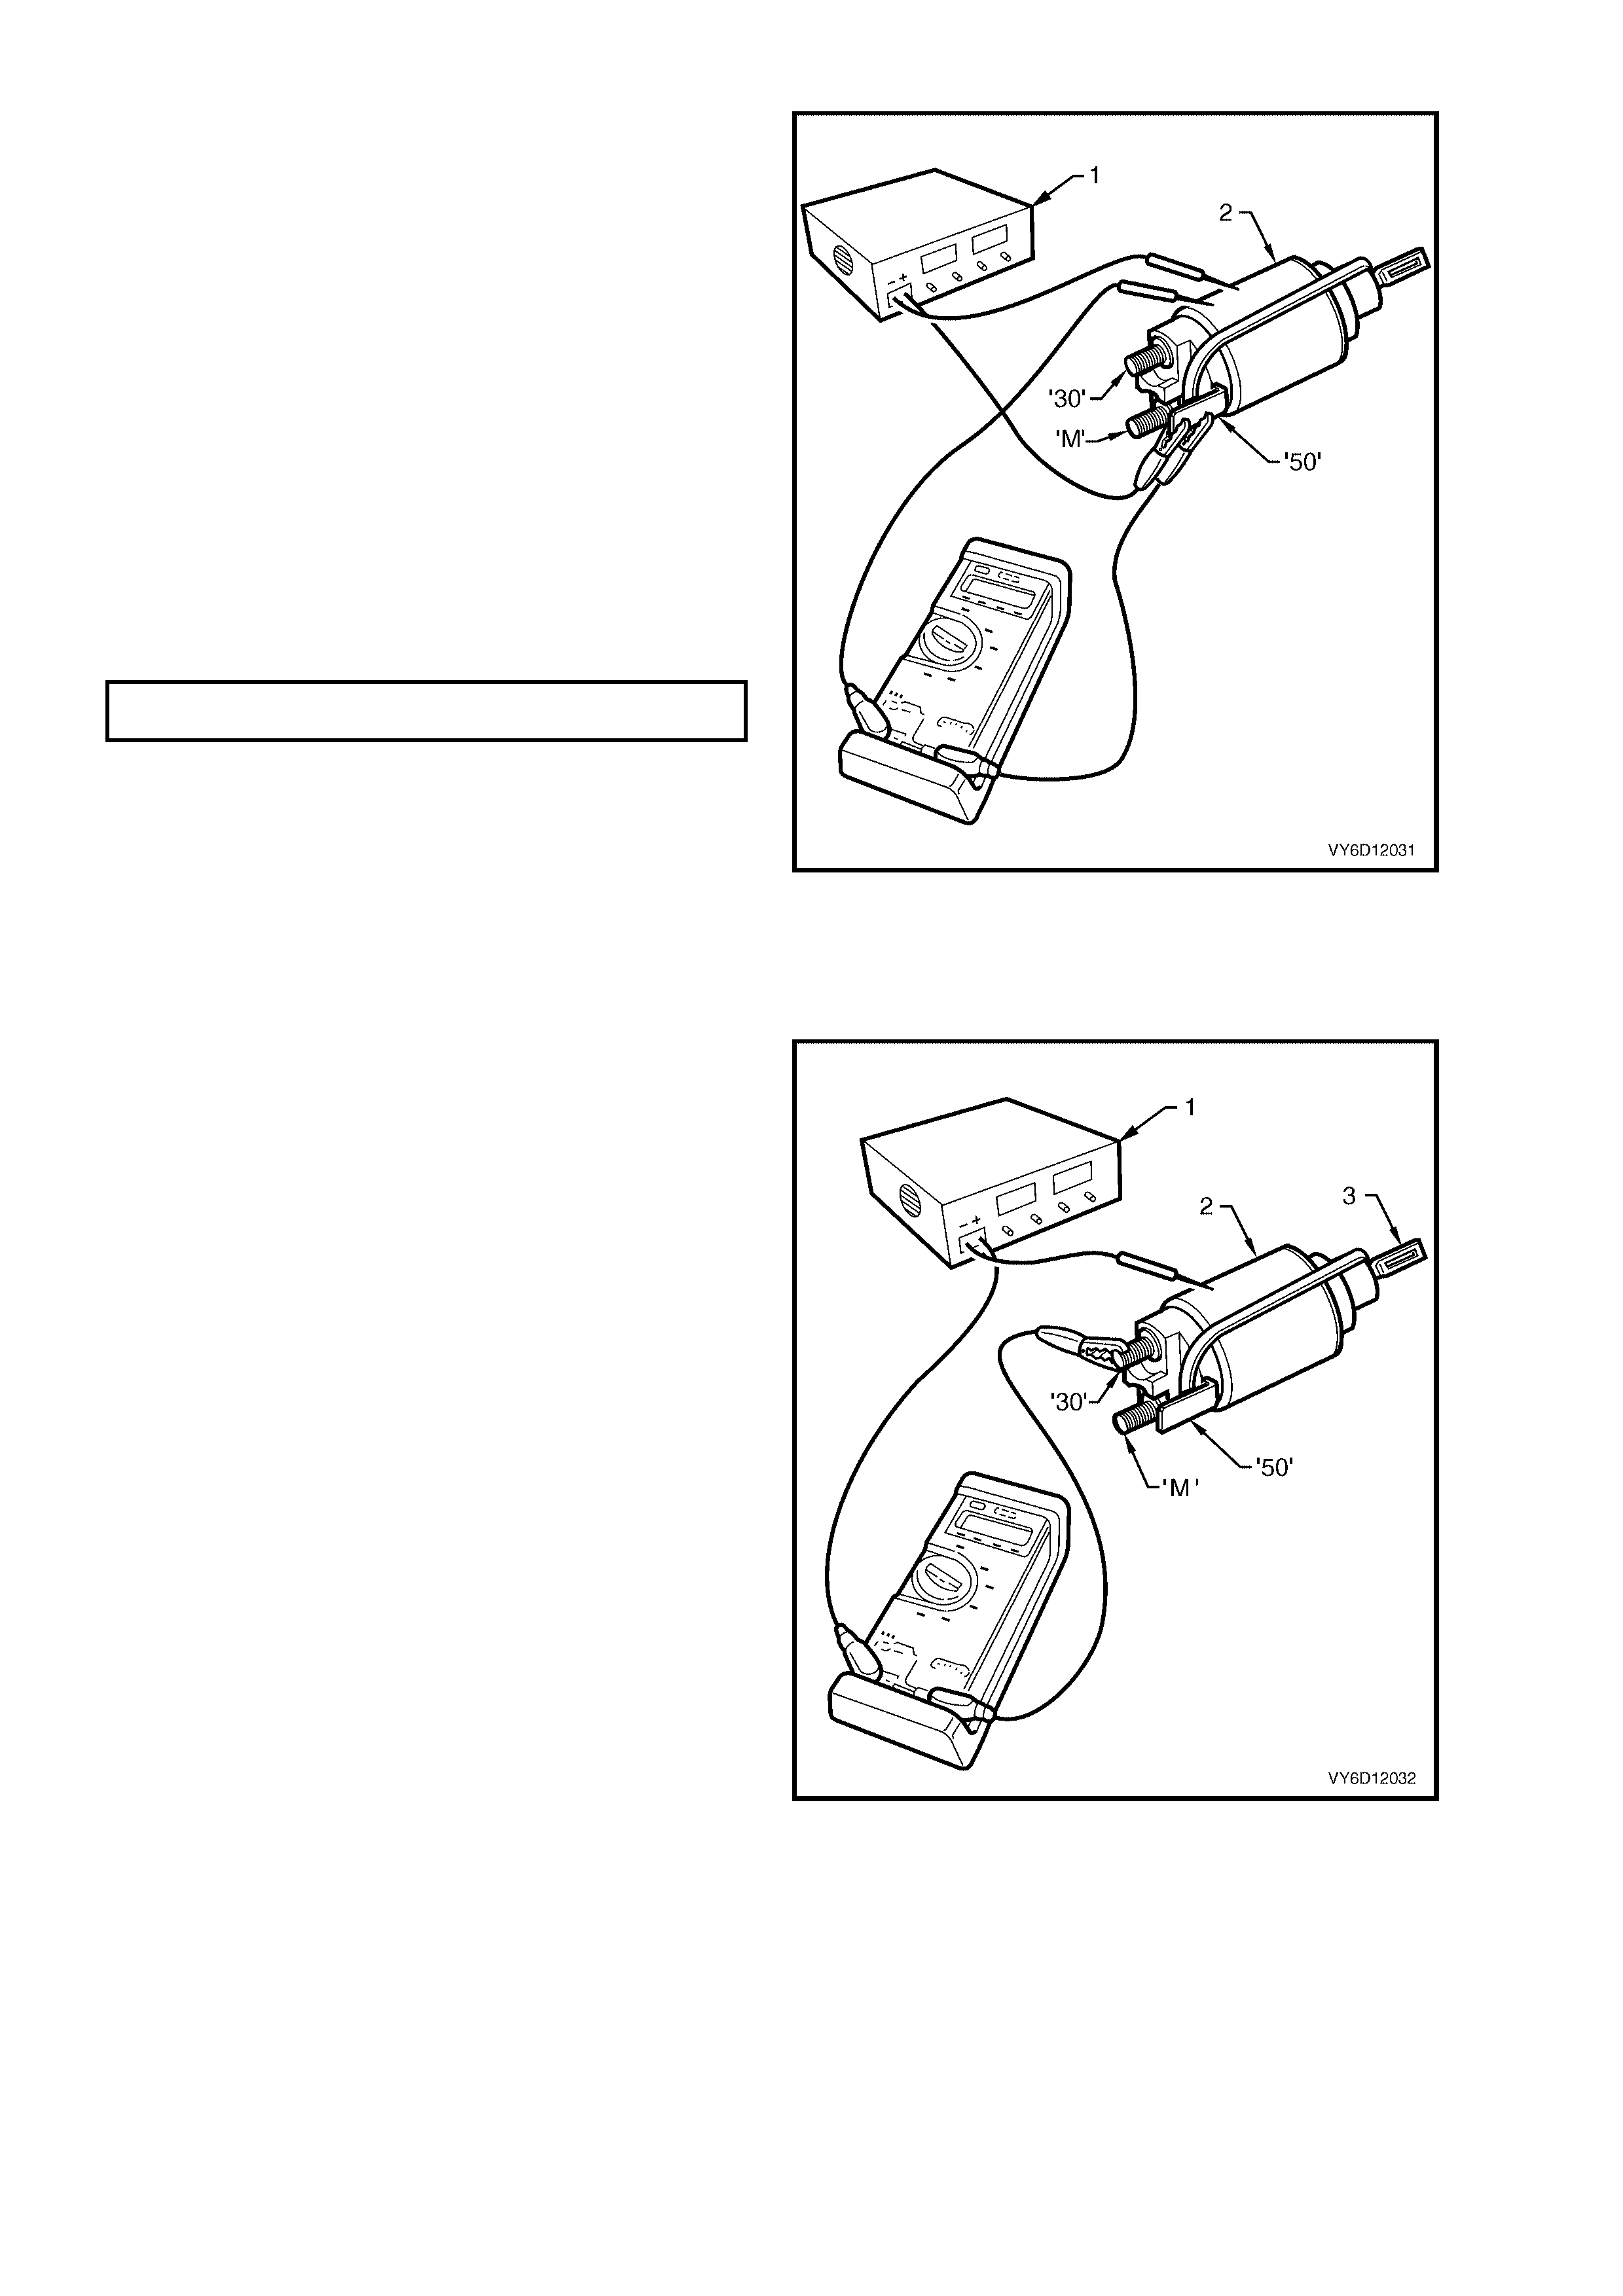
28. Set the power supply to 12 volts (1).
29. Connect the power supply positive lead to
terminal 50.
30. Connect the power supply negative lead to the
solenoid switch housing (2).
31. Press the plunger in fully.
32. Release the plunger. The hold-in winding
should hold the plunger in.
33. Replace the solenoid s witch if the winding does
not hold the plunger.
34. Decrease the voltage until the plunger
releases.
35. Record the voltmeter reading.
36. Replace the solenoid switch if the voltage
reading is significantly higher than the
specification.
HOLD-IN VOLTAGE
SPECIFICATION @ 20°C 0.2 – 2.0 volts
37. Connect a 12 volt test lamp between terminal
30 and the 12 volt power supply.
38. Press the plunger in until the test lamp
illuminates.
39. Attempt to press the plunger into the solenoid
switch housing a further 1 mm.
40. Replace the solenoid switch if the plunger can
not move at least a further 1 mm.
Figure 6D1-2-43
41. Connect the positive lead of a 24 volt power
supply to the voltmeter positive lead.
42. Connect the negative lead of a 24 volt power
supply to the solenoid switch housing (2).
43. Connect the voltm eter negative lead to term inal
30 of the solenoid.
44. Press the plunger in fully.
45. Release the plunger. T he plunger should return
to its rest position.
46. Replace the solenoid switch if the plunger does
not return. This indicates that the windings
have inter-winding short circuit. When the
solenoid switch is connected in this way, the
winding fields are in opposition to each other.
Figure 6D1-2-44

REASSEMBLE
Refer to Figure 6D1-2-2 for identification of
components.
1. Reassemble the starter motor in the reverse
order of the disassembly procedure noting the
following points.
CAUTION: Dry all parts thoroughly before
assembly, taking care not to breathe in any
vapours.
2. Lubricate the drive-end bush, commutator end
shield bush and the drive assembly to
planetary drive bush with clean engine oil.
3. Lightly coat the following parts with
Molybdenum Disulphide grease (Holden
Specification HN 1271) or equivalent.
a. armature shaft helix
b. helix inside the drive assembly
c. inside of the ring gear
d. armature to commutator end shield
washers (thrust and adjustment).
4. Half fill the commutator end shield dust cover
with grease.
5. Fit the commutator end thrust washer (1) onto
the armature.
6. Fit the end shield (2), adjustment washer/s (3)
and the horseshoe clip (4).
Figure 6D1-2-45
7. Measure the clearance (1) between the
adjustment washer/s (2) and the commutator
end cover (3) using feeler gauges.
8. Add, change or omit adjustment washers until
the armature end play is within specification.
ARMATURE END PLAY
SPECIFICATION 0.05 – 0.4 mm
9. Remove the commutator end shield from the
armature.
Figure 6D1-2-46
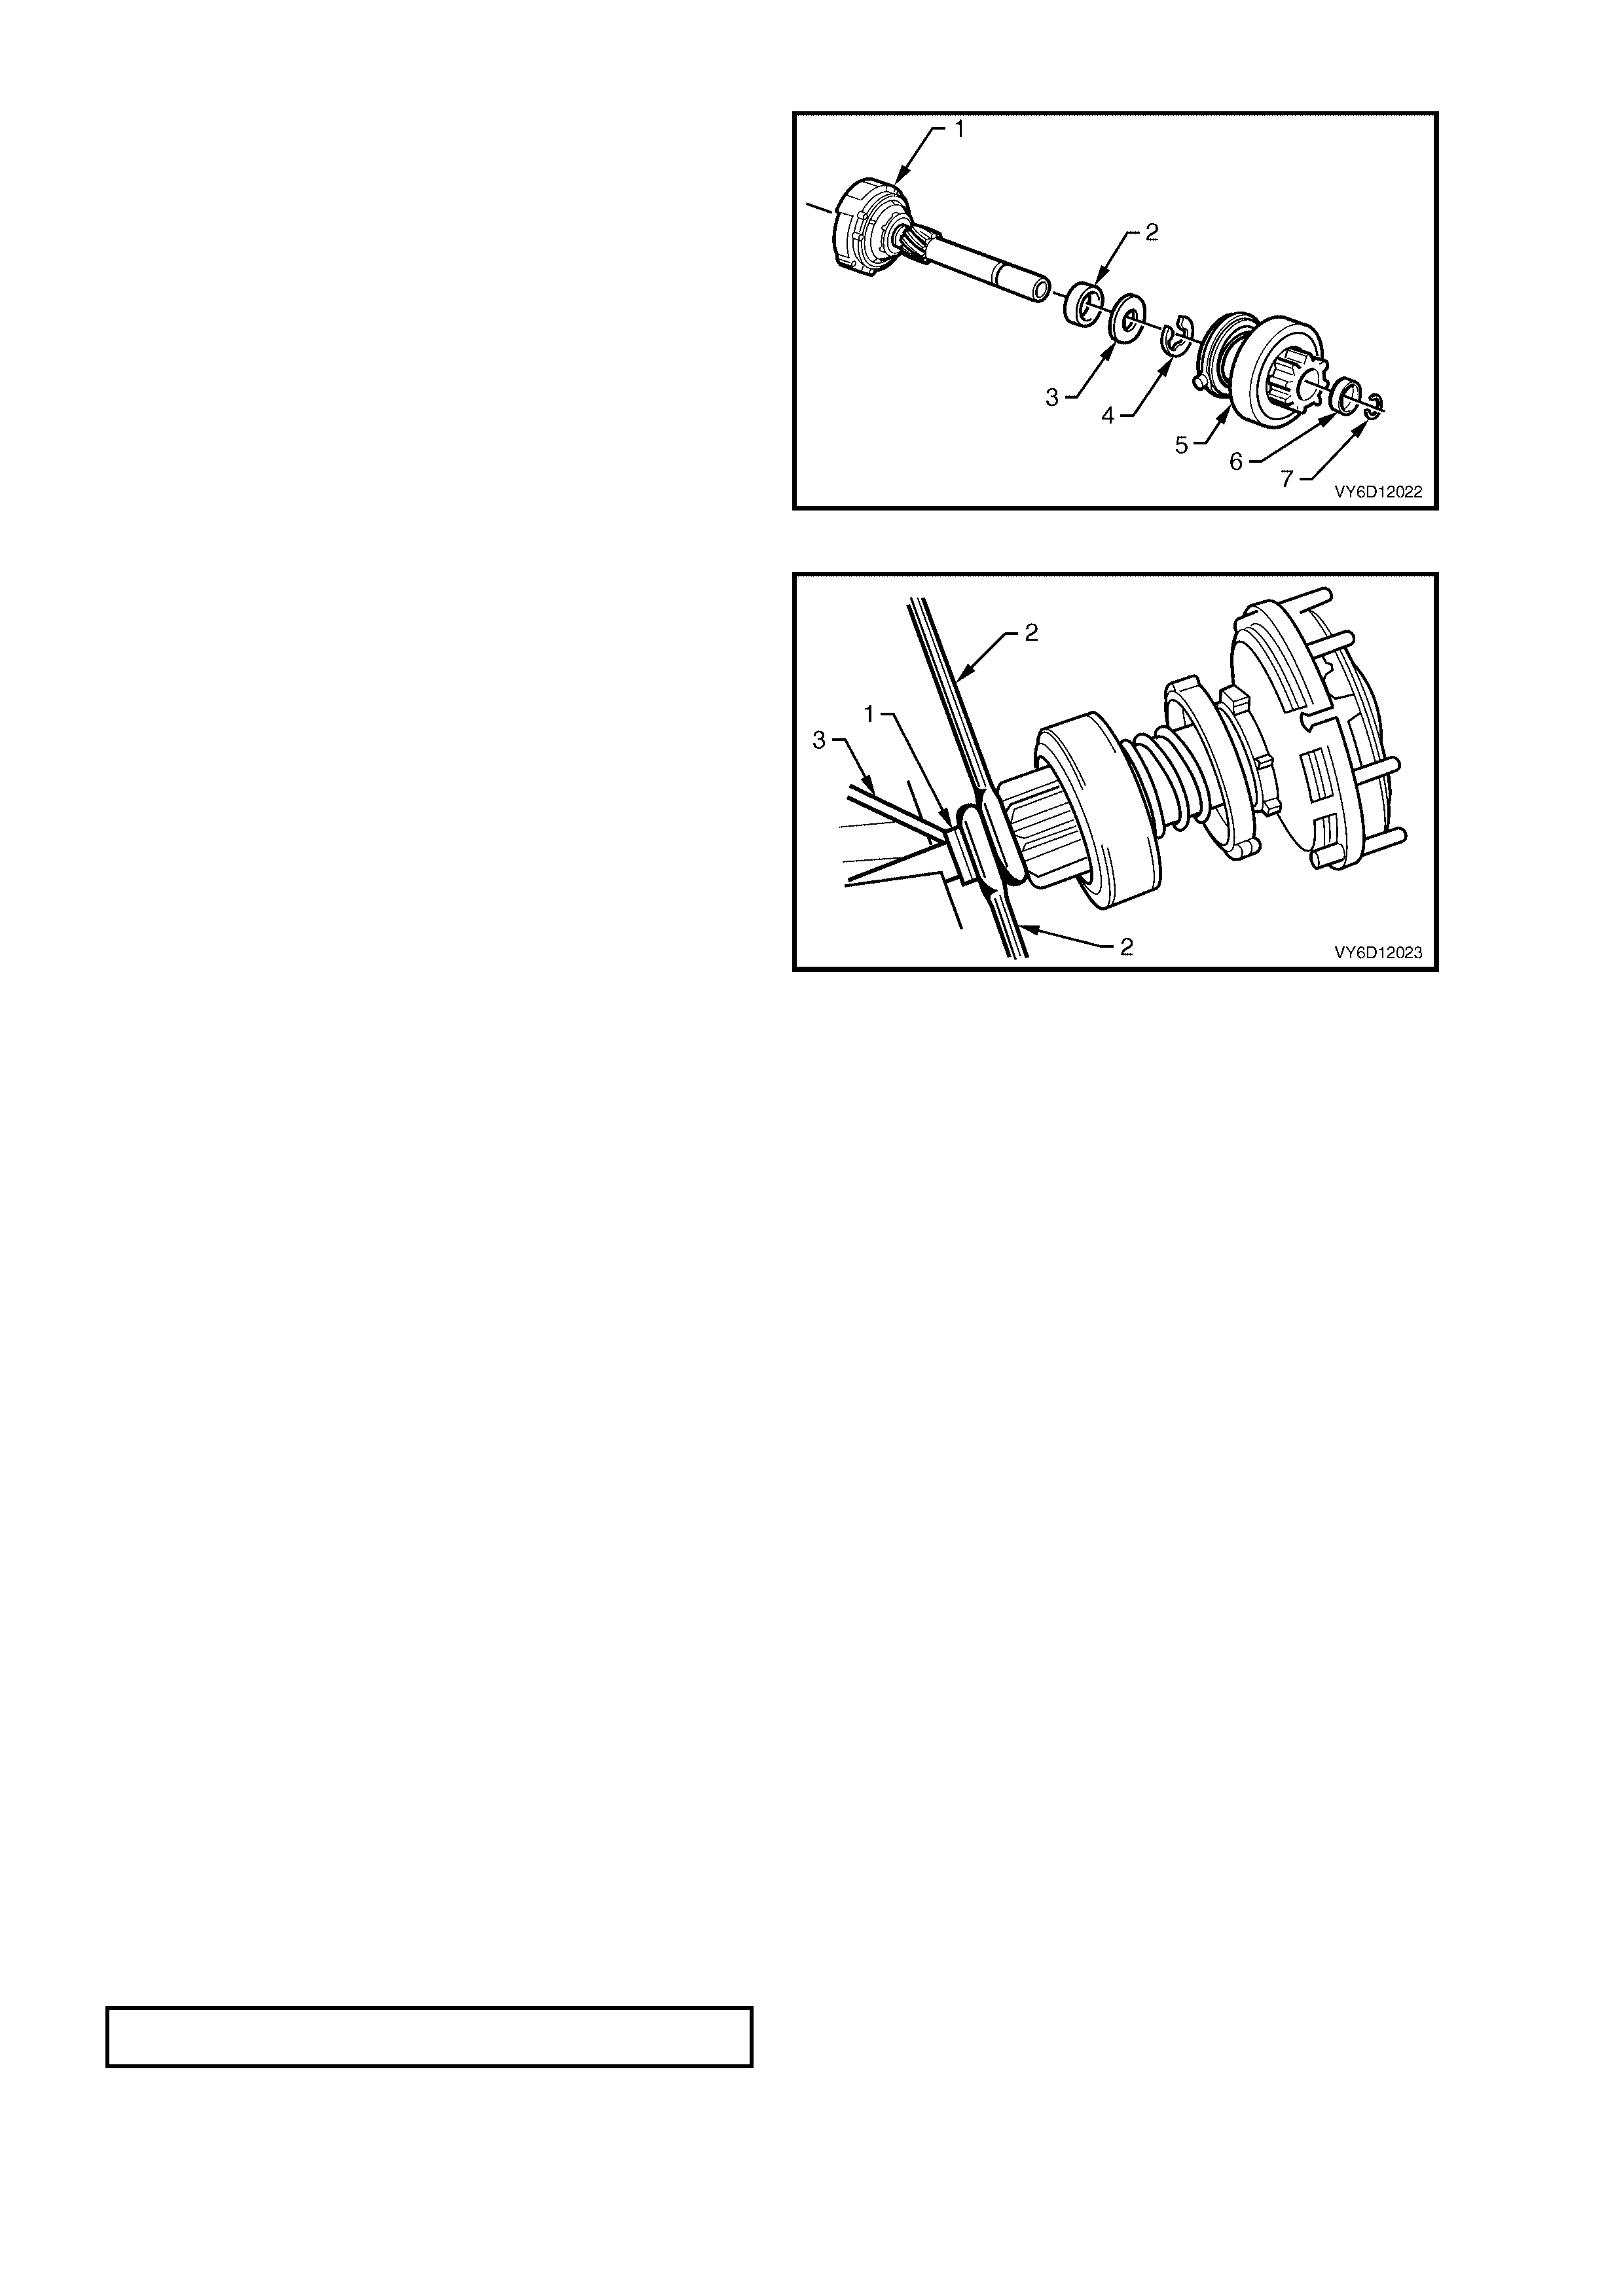
10. Assemble the drive components onto the
planetary drive shaft (1) in the following order:
a. drive assembly bush (2)
b. drive shaft retaining washer (3)
c. drive shaft retaining clip (4)
d. drive assembly (5)
e. stop ring retainer (6)
f. stop ring (7).
Figure 6D1-2-47
11. Secure the stop ring retainer (1) over the stop
ring, as follows:
a. Clamp the front end of the planetary drive
shaft in a vice fitted with soft jaws.
b. Slide the stop ring retainer up to the stop
ring.
c. Fit two open-ended spanners (2) in
between the stop ring retainer and the drive
assembly.
d. Using a pin punch (3) lightly tap the stop
ring into the drive shaft groove.
e. Lever the spanners against the retainer
until it clicks over the stop ring.
Figure 6D1-2-48
12. Check that the drive assembly moves freely up and down the planetary drive shaft.
13. Check the drive assembly clutch action.
14. Fit the fork lever, as follows:
a. Hold the fork lever with the pivot facing away from the drive gear.
b. Position one side of the fork lever onto a drive assembly pivot.
c. Gently expand the fork lever arms
d. Position the other side of the fork lever.
15. Slide the planetary drive assembly into the drive-end housing.
IMPORTANT: Rotate the planetary drive ring-gear to position it correctly in the drive-end housing.
16. Position the fork lever pivot into the drive-end housing.
17. Install the sealing rubber behind the fork lever pivot aligning the V-groove to the fork lever pivot.
18. Install the brush plate assembly onto the commutator, as follows:
a. Lightly grip the armature shaft in a vice with soft jaws.
b. Position the brush plate assembly onto the commutator.
c. Place the brush holder springs into the brush holders.
d. Install the brush holders and springs onto the brushes.
19. Check that the brush leads locate into the slots on the side of each holder.
20. Locate the brush holder retaining lugs into the brush plate assembly (in reverse to disassembly). Use Bosch tool
No. 0 986 617 139.
21. Remove the armature from the vice.
22. Slide the commutator end shield onto the armature shaft.
23. Install the adjustment washer/s and horseshoe clip as previously measured.
24. Assemble the dust cover and dust cover seal onto the commutator end shield.
25. Align the screw holes in the dust cover, commutator end shield and the brush plate assembly.
26. Install the dust cover retaining screws .
DUST COVER SECURING SCREW
TORQUE SPECIFICATION 1.7 Nm

27. Slide the armature and commutator end shield into the pole housing.
28. Position the brush cable grommet into the pole housing.
29. Assemble the pole housing to the drive-end housing.
30. Align the cutout in the pole housing with the sealing rubber in the drive-end housing.
31. Carefully fit the armature into the planetary drive.
32. Rotate the pinion gear slightly to enable the armature gear to engage the planetary gears. (Do not force this.)
33. Install the through-bolts.
34. Tighten the through-bolts to the correct torque specification.
THROUGH-BOLT
TORQUE SPECIFICATION 7.25 Nm
35. Lightly coat the solenoid switch plunger with Molybdenum Disulphide grease (Holden Specification HN 1271 or
equivalent).
IMPORTANT: Excess grease is might enter the contact chamber of the solenoid switch and cause contact
problems. Do not use too much grease.
36. Hook the plunger over the fork lever.
37. Insert the return spring into the plunger.
38. Slide solenoid switch over the plunger.
39. Align the solenoid switch with drive-end housing ensuring that terminal 30 faces away from the pole housing.
40. Install and tighten the solenoid switch mounting screws.
SOLENOID SWITCH
MOUNTING SCREW
TORQUE SPECIFICATION 5.0 Nm
NOTE: The brushes are designed for use in one direction; the leading edge of each brush consists of a harder
compound.
41. Position each brush with the c entral raised section loc ated into the brush spring and the sec ond raised section
facing the brush plate assembly.
42. Fit the positive brush braided cable onto the M terminal.
43. Fit the washer and nut to the M terminal.
M TERMINAL NUT
TORQUE SPECIFICATION 8.0 Nm
44. With the starter motor reassembled, perform a No Load Test. Refer to 3.1 STARTER MOTOR in this section.
45. If the starter motor fails the No Load Test specification, check for tight brushes, dirty brushes and high
resistance connections.
46. Diagnose and repair all faults.
REINSTALL
1. Install the starter motor by following the removal procedure in reverse.
NOTE: Tighten all fasteners to the correct torque specification.
STARTER MOTOR MOUNTING BOLT
TORQUE SPECIFICATION 43.0 Nm
TERMINAL 30 NUT (B+)
TORQUE SPECIFICATION 10.0 Nm
2. Check that the starter motor operates correctly.

4. DIAGNOSIS
Many starting problems can be categorised as follows:
•
••
•
The starter motor will not crank the engine.
•
••
•
The engine cranks at normal speed, but will not start.
•
••
•
The starter motor cranks the engine very slowly.
W hen investigating a starting problem, f irst check the Probable Faults below; removing the starter motor might not
be neces sary. If the engine crank s over at the nor mal speed but will not star t, the problem is in the ignition system,
the fuel system or the engine.
SYMPTOM PROBABLE FAULT
Speed, torque and current low. •
••
•
High resistance in the motor. Poor positive brush terminal connection or
brush condition. Burnt segments on the commutator.
Speed and torque low, current high. •
••
•
Tight or worn bearings, bent armature shaft, insufficient end-play, armature
polling, short-circuit in the armature or grounded armature.
Armature does not rotate. No
current. •
••
•
Open circuit in the armature, positive brushes or solenoid. If the commutator
is burnt, there may be poor contact between the brushes and the commutator
and excessively worn or sticking brushes.
Armature does not rotate. High
current. •
••
•
Short-circuit in the solenoid switch. Armature physically prevented from
rotating.
Excessive brush movement
causing arcing at commutator. •
••
•
Low brush spring tension, worn or out-of-round commutator, thrown or high
segment on the commutator or insulation protruding between commutator
segments.
Excessive arcing at commutator. •
••
•
Defective armature winding, sticking brushes or dirty commutator.
Armature rotates but pinion does
not mesh with flexplate/flywheel
ring gear.
•
••
•
Pinion bearing fouled or burred. Damaged flexplate/flywheel ring gear or
broken pinion teeth.
NO CRANKING, NO SOUND FROM SOLENOID
STEP ACTION VALUE(S) YES NO
1 Turn headlamps and dome lamps on, turn ignition to
start position. Lamps dim Go to Step 2 Go to Step 3
2 1. Check battery
2. Charge battery
3. Check generator
4. Check current draw
5. Check cranking voltage at battery posts
Is 9.6 volts
present? Go to Step 7 Test battery.
If OK repair starter
motor.
3 6. Turn on radio. Operate OK Go to Step 4 Go to Step 6
4 7. Check voltage at solenoid switch terminal 50. Is 7.0 volts
present? Repair starter Go to Step 5
5 8. With key in start position, check at ignition
terminal 50. Is 7.0 volts
present? Repair wiring
ignition switch
starter motor
Replace ignition
switch
6 9. Check engine main wiring harness fusible link
and ignition connections. All OK Go to Step 7 Repair as
necessary and
recheck starting
system
7 10. Check voltage from engine block to battery
negative terminal, with key in start position
(positive lead on block).
Is 0.5 volts
or more
present?
Clean and
tighten negative
cable connection
and/or replace
cable
Go to Step 8
8 11. Check cranking voltage at starter ‘B’ terminal. Is 9.0 volts
present? Check fuse and
engine to main
wiring harness
connectors
Clean and tighten
positive cable
connection and/or
replace cable
SLOW CRANKING, SOLENOID CLICKS OR CHATTERS
Ensure that the battery, cables and connections are in good order. Refer to Section 12A, BATTERY AND CABLES
in this Service Information.
IMPORTANT: Remove fuses F34 and F35 from the engine compartment relay & fuse housing. This prevents fuel
injection or ignition during engine cranking. Refer to Section 12O, in this Service Information.
Make all voltmeter readings with the ignition key in the START position.
Ensure that the engine is at room temperature or normal operating temperature and in good working order.
STEP ACTION RESULT YES NO
1. 1. Measure the cranking voltage at the battery posts. 9.6 volts or
more? Go to Step 2 Go to Step 3
2. 2. Measure the voltage from the battery negative
terminal to the engine block (positive lead on block). 0.5 volts or
more? Repair negative
cable and
connections
Go to Step 4
3. 3. Charge and load test the battery. Battery OK? Repair starter Replace battery
4. 4. Measure the voltage at terminal 30 of the solenoid
switch.
5. Clean and tighten the starter motor connections.
9.0 volts or
more? Repair starter Go to Step 5
5. 6. Clean and tighten the positive cable connections. Connections
OK? Replace cable
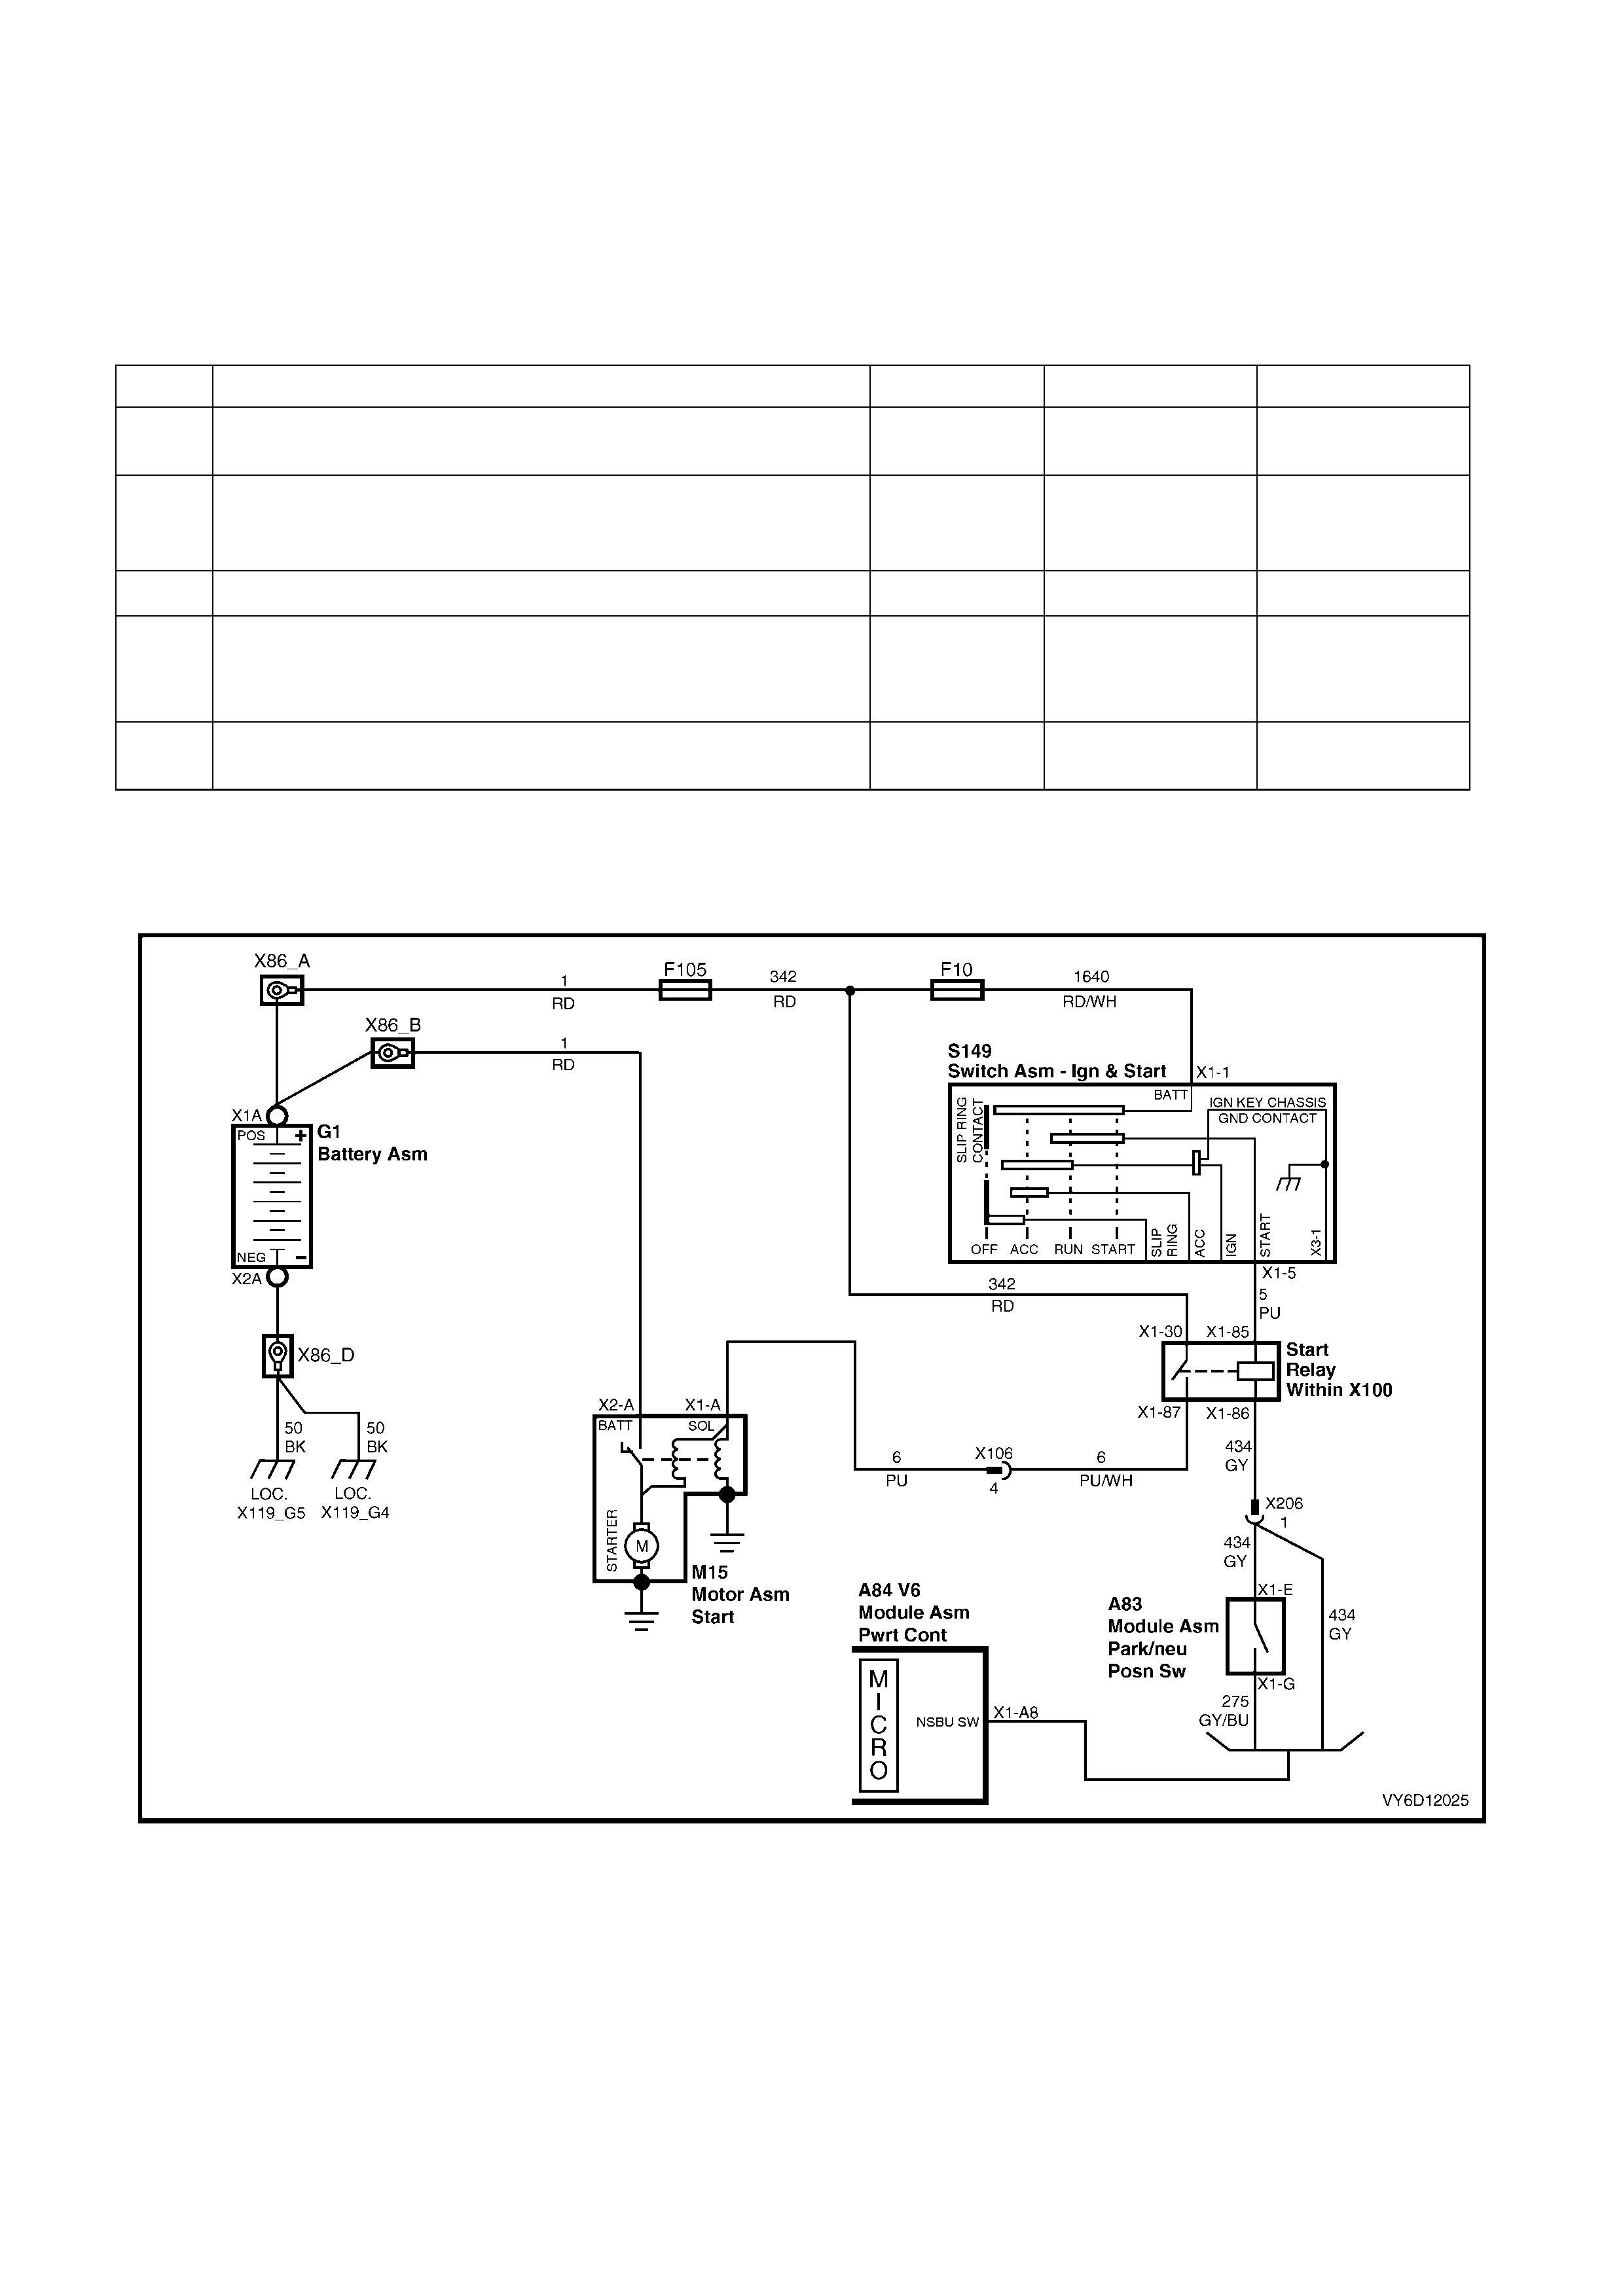
CIRCUIT DIAGRAM
Refer to the following starting circuit diagrams (Figure 6D1-2-49 for the V6 engine and Figure 6D1-2-50 for the
V6 supercharged engine) to assist with diagnosing starting system faults.
Figure 6D1-2-49
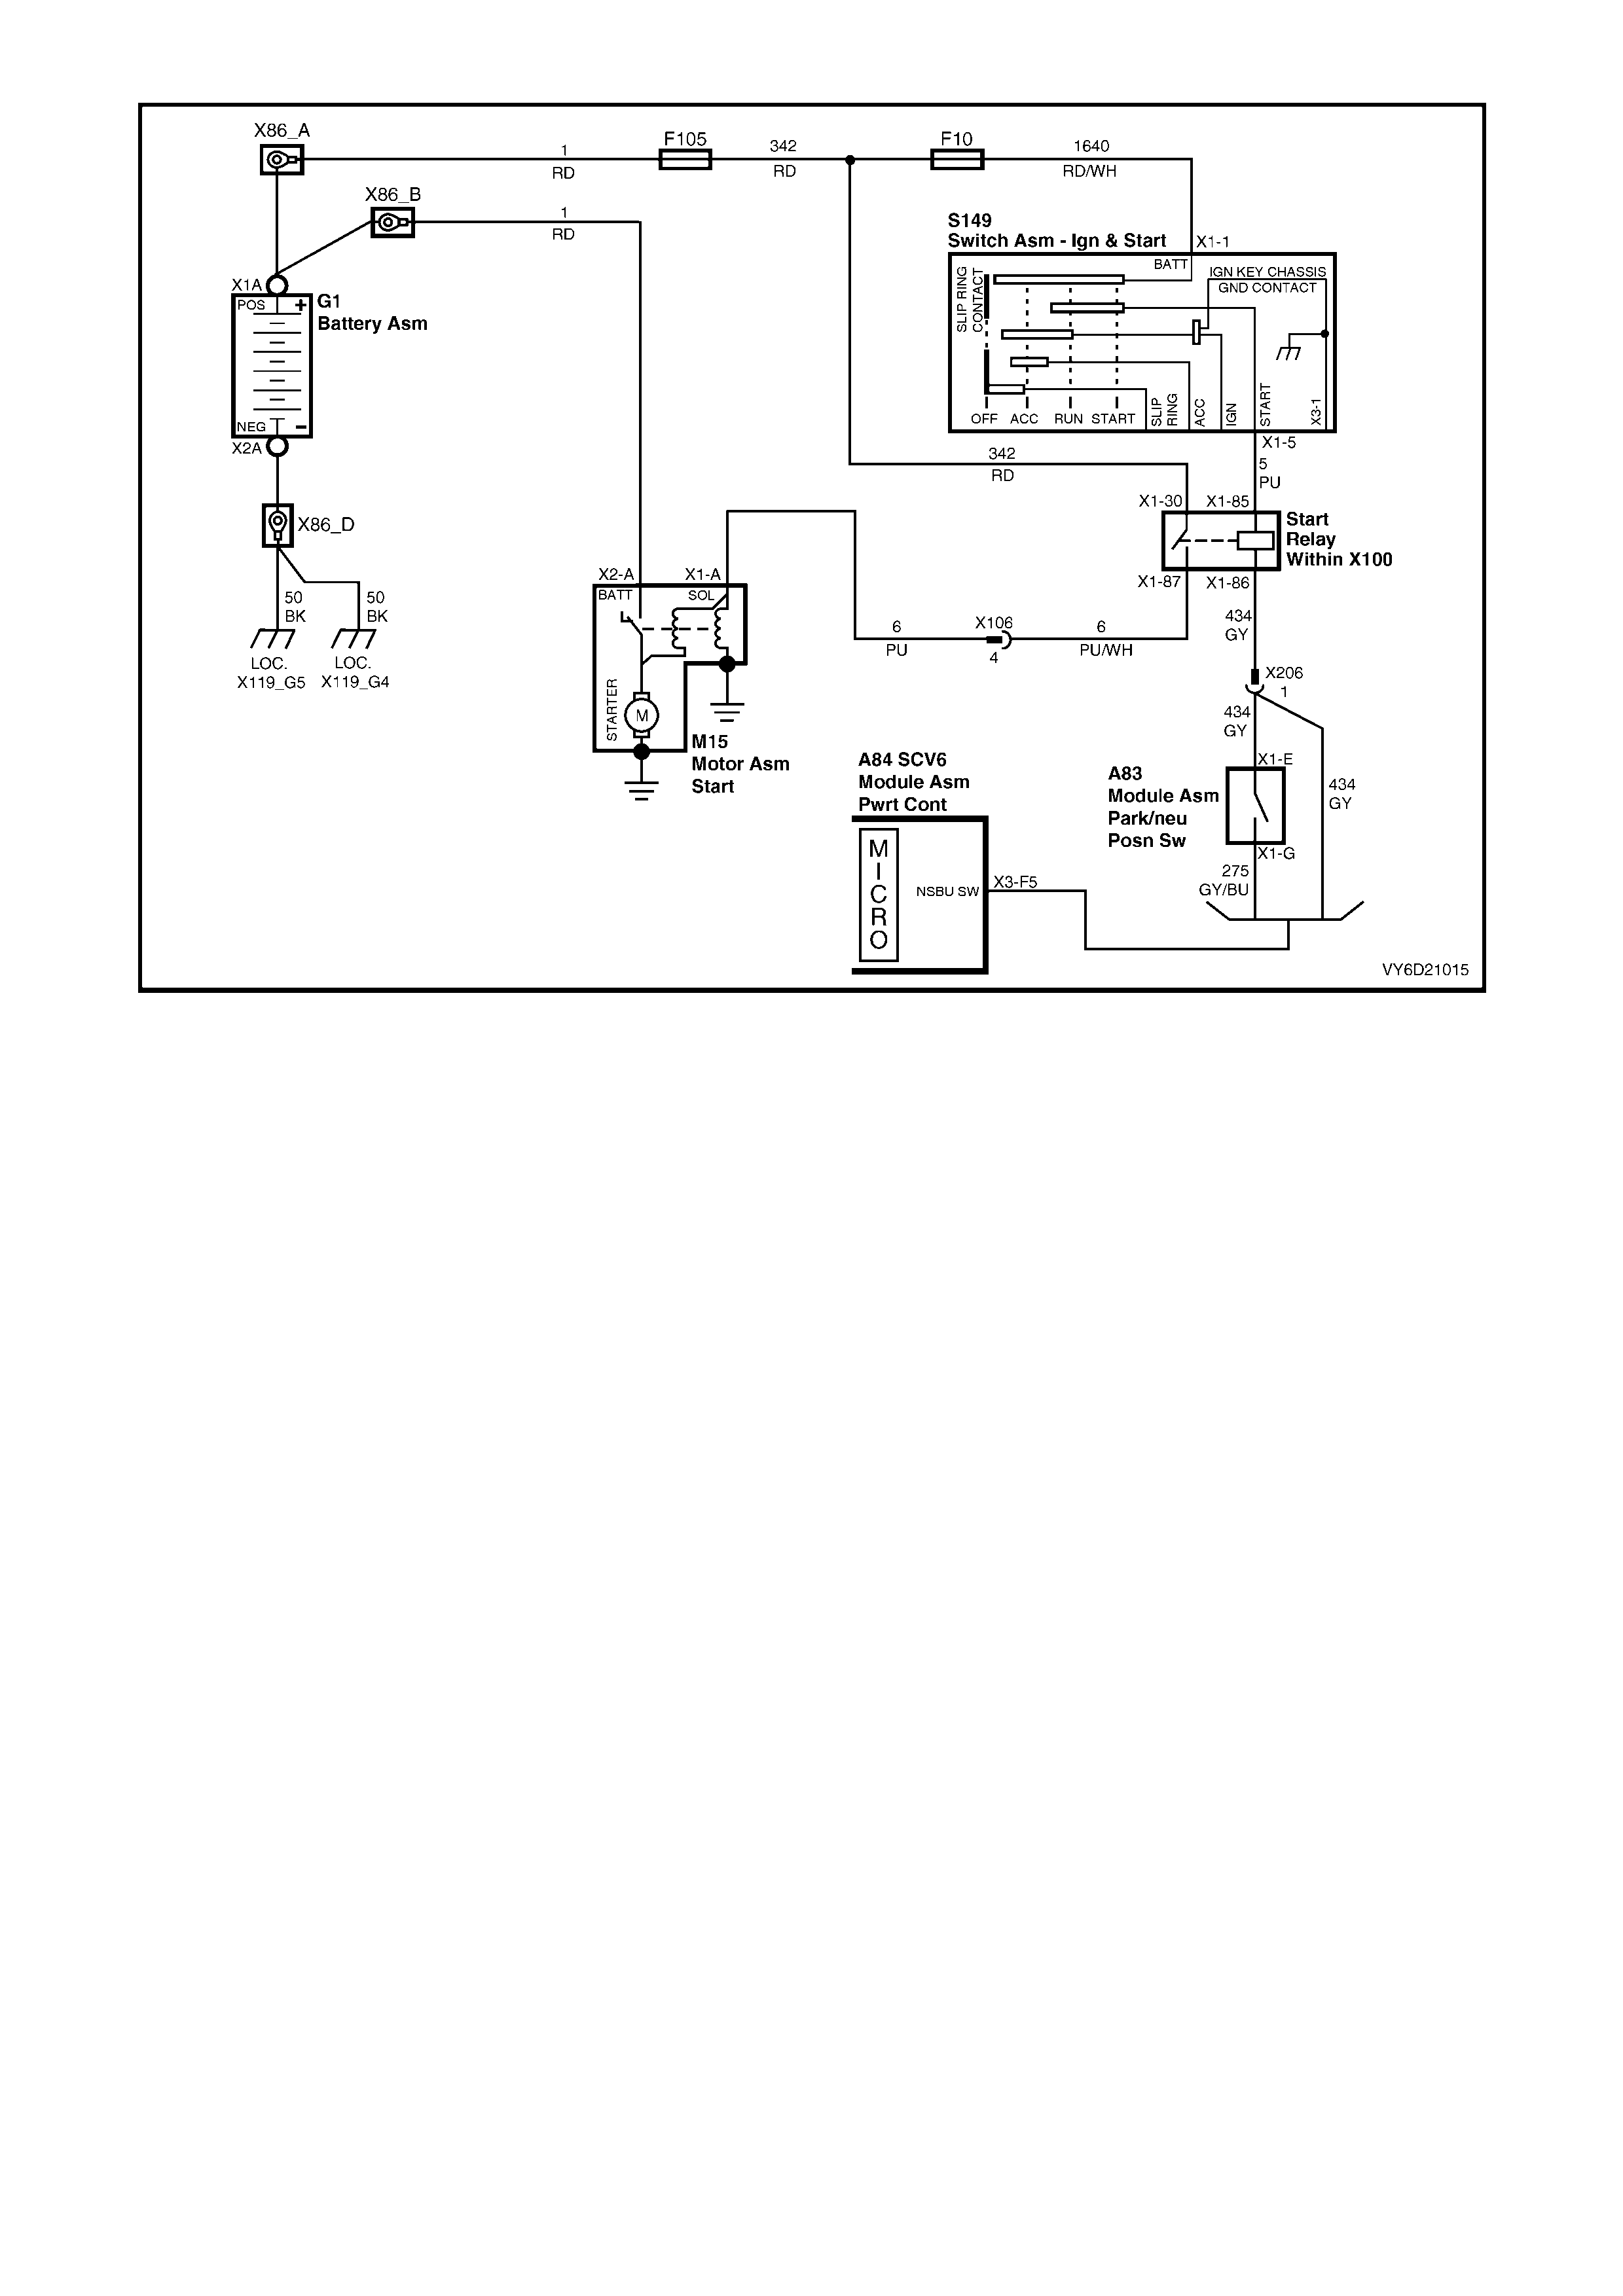
Figure 6D1-2-50

5. SPECIFICATIONS
Type ......................................................................... Six Pole Permanent Magnet, Four Brush, Planetary Drive
Rotation (Drive-End View).......................................... Clockwise
Number of Pinion Teeth ............................................. 9
NO LOAD:
RPM ......................................................................... 3300
Maximum Current Draw............................................. 65 amperes at 12.0 ± 0.1 volts
M Terminal Voltage.................................................... 12 ± 1 volts
LOCKED:
Maximum Current (Including Solenoid)...................... 660 amperes
M Terminal Voltage.................................................... 4 volts
Minimum Torque........................................................ 13.5 Nm
SOLENOID DETACHED:
Pull-In Winding Resistance @ 20°C........................... 0.203 – 0.543 ohm
Hold-In Winding Resistance @ 20°C......................... 1.563 – 1.703 ohms
Pull-In Voltage @ 20°C .............................................. 7.8 volts
Hold-In Voltage @ 20°C............................................. 0.2 – 2.0 volts
ARMATURE:
Maximum Out-Of-Round of Laminations ................... 0.5 mm
End Play..................................................................... 0.05 – 0.4 mm
COMMUTATOR:
Maximum Out-Of-Round............................................ 0.1 mm
New Diameter............................................................. 32.3 mm
Minimum Diameter..................................................... 31.2 mm
Depth of Undercut...................................................... 0.8 mm
BRUSHES:
Minimum Length......................................................... 8.0 mm

6. TORQUE WRENCH SPECIFICATIONS
Nm
Through-Bolt.................................................................... 7.25
Dust Cover Securing Screw............................................. 1.7
Solenoid Switch Mounting Screw..................................... 5.0
M Terminal Nut ................................................................ 8.0
Starter Motor Mounting Bolt............................................. 43.0
Terminal 30 Nut ............................................................... 10.0
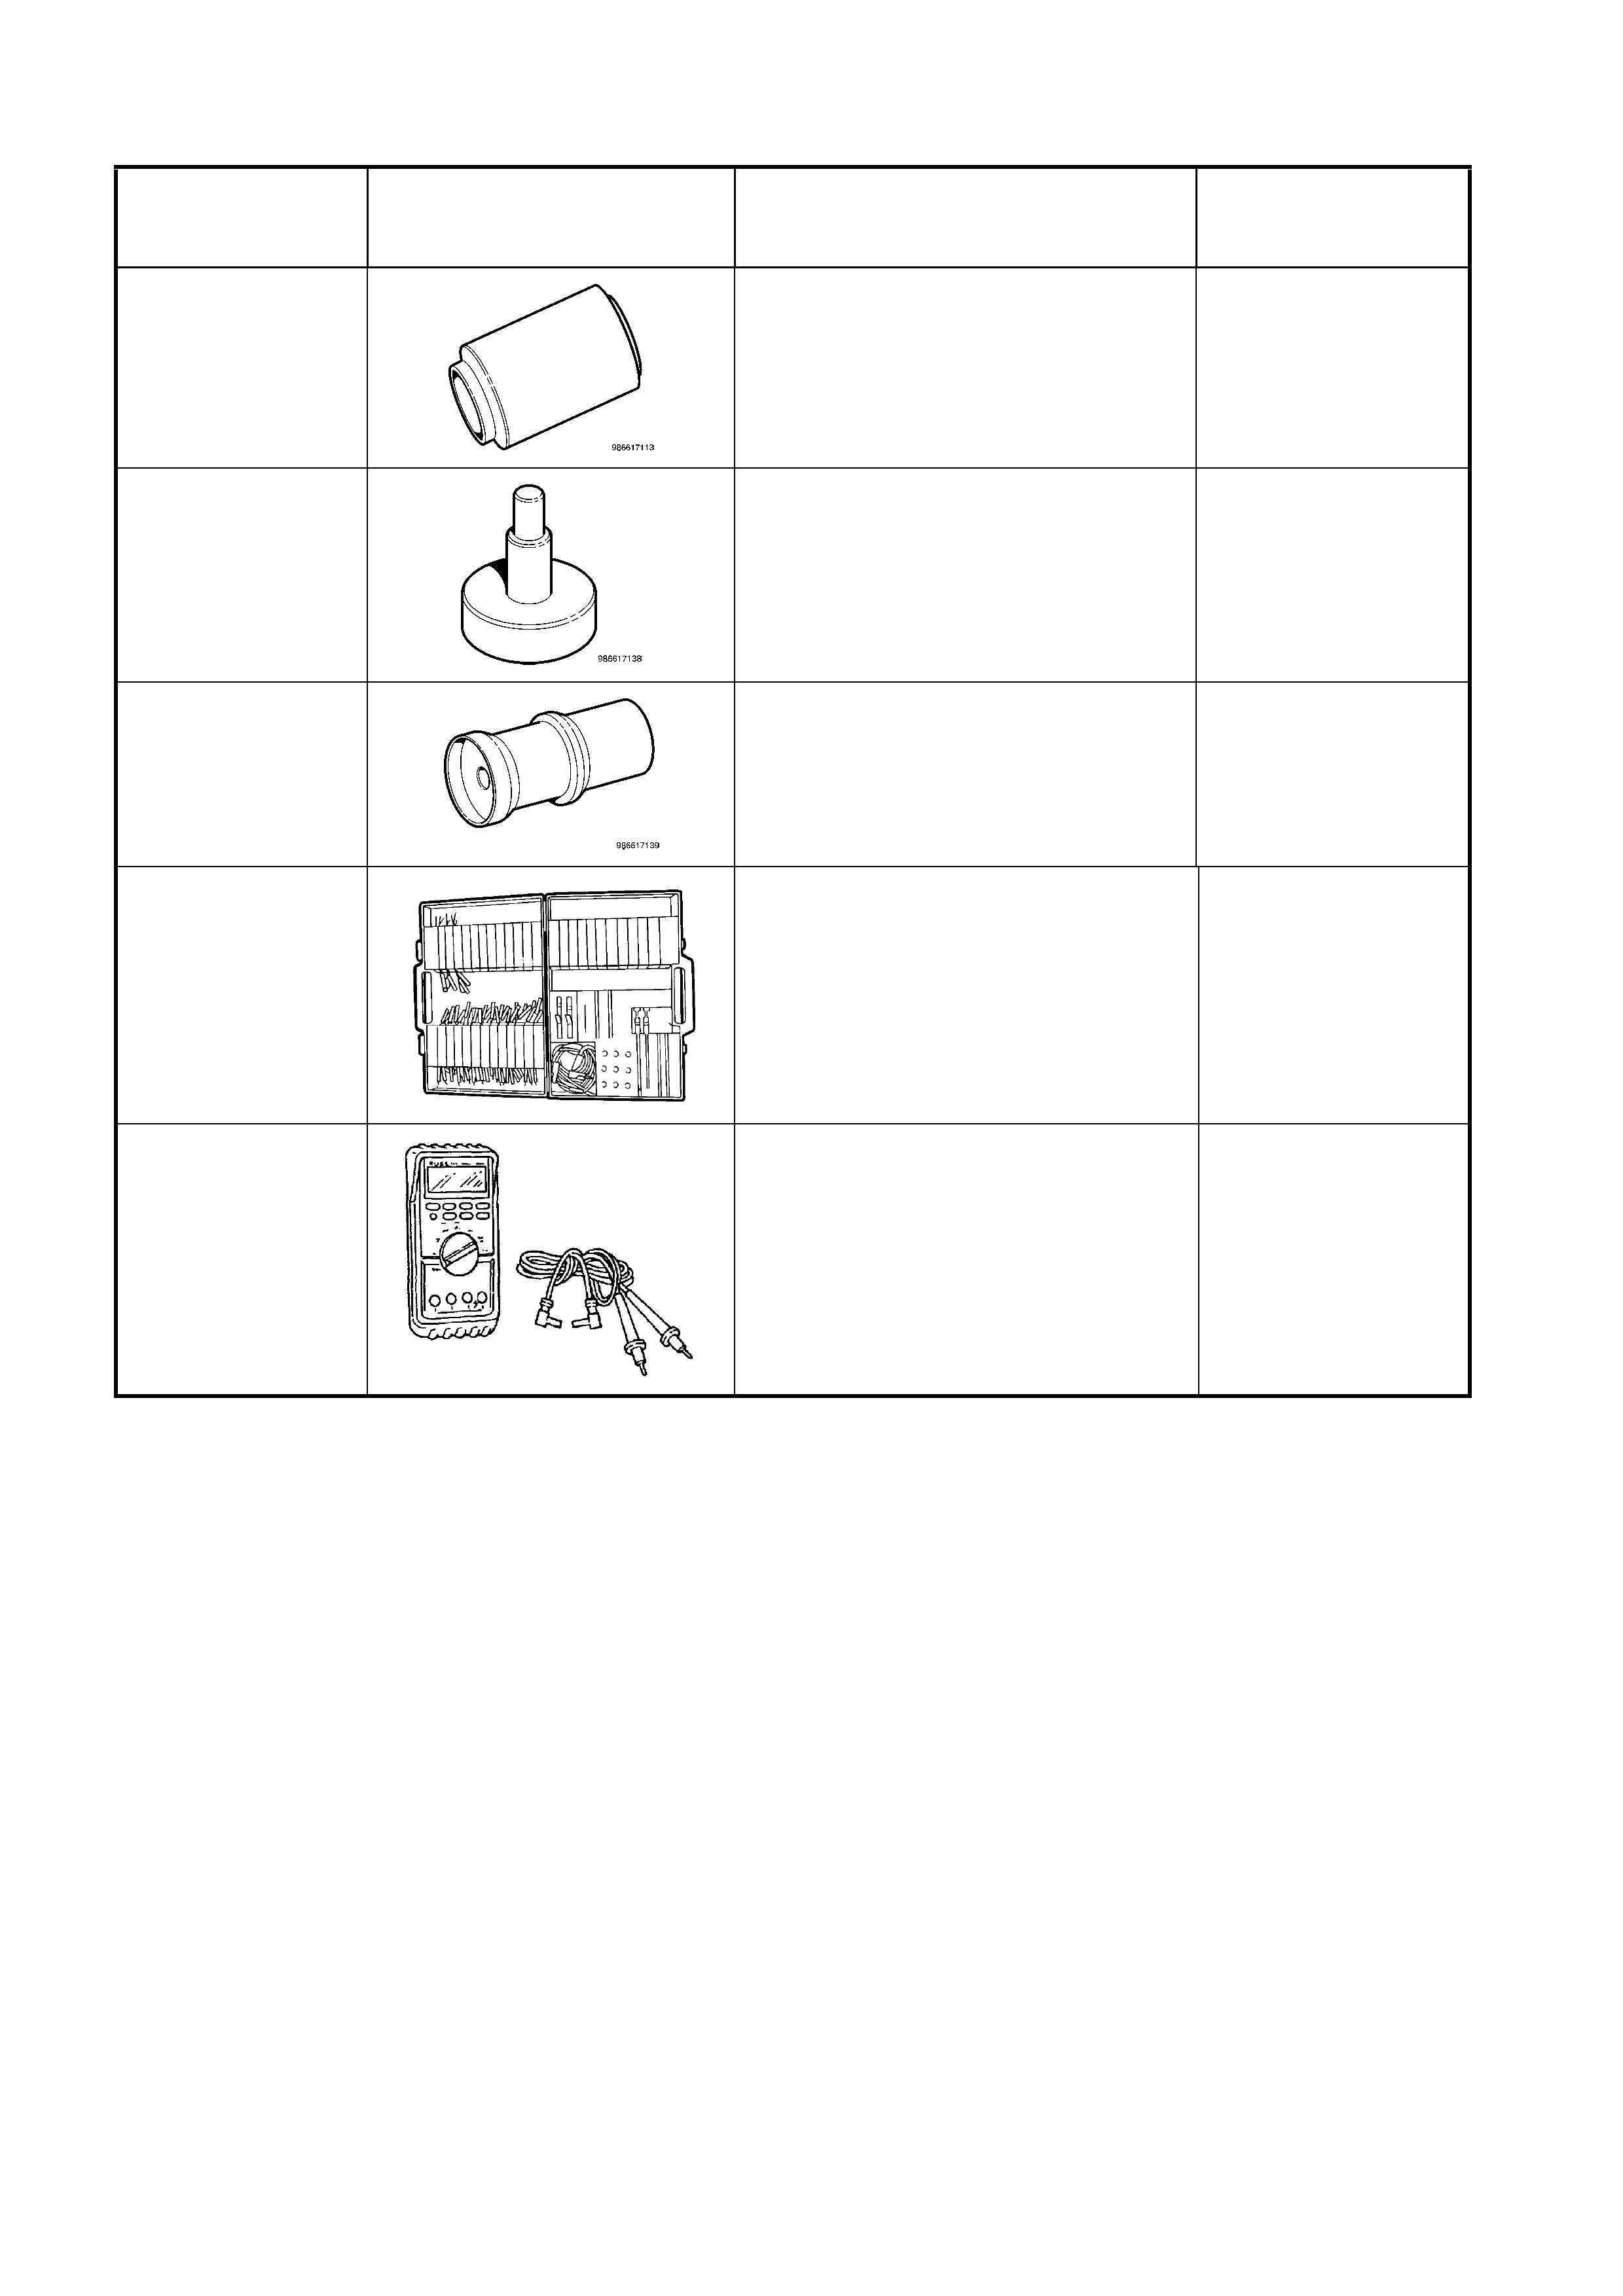
7. SPECIAL TOOLS
TOOL NUMBER ILLUSTRATION DESCRIPTION TOOL
CLASSIFICATION
0 986 617 113
Used in conj unction with tool no. 0 986 617
138 for the removal of the starter motor
drive-end stop-ring and retainer.
Desirable
0 986 617 138
Used in conj unction with tool no. 0 986 617
113 for the removal of the starter motor
drive-end stop-ring and retainer.
Desirable
0 986 617 139
Used to as sist i n brush plate ass embly on
starter motors. Desirable
J35616-A
(KM609)
CONNECTOR TEST ADAPTOR
KIT
Used when carrying out electrical
diagnostic circuit checks.
Previously released.
Desirable
3588
(J39200)
DIGITAL MULTIMETER
Must have at least 10 MΩ input
impedance and be capable of
reading frequencies.
Previously released.
Available