
Front & Rear Door Assemblies Page 1A5–1
Page 1A5–1
Section 1A5
Front & Rear Door Assemblies
ATTENTION
Before performing any Service Operation or other procedure described in this Section, refer to Section 00
WARNINGS, CAUTIONS AND NOTES for correct workshop practices with regard to safety and/or property
damage.
1 General Information............................................................................................................................... 2
2 Service Operations................................................................................................................................3
2.1 Front Door Trim Panel Assembly..........................................................................................................................3
Remove ...................................................................................................................................................................3
Disassemble ...........................................................................................................................................................3
Armrest Insert Applique......................................................................................................................................4
Reassemble ............................................................................................................................................................4
Armrest Insert Applique......................................................................................................................................4
Reinstall ..................................................................................................................................................................4
2.2 Rear View Mirror Module .......................................................................................................................................5
Remove ...................................................................................................................................................................5
Reinstall ..................................................................................................................................................................5
2.3 Rear Door Trim Panel Assembly...........................................................................................................................6
Remove ...................................................................................................................................................................6
Disassemble ...........................................................................................................................................................6
Armrest Insert Applique......................................................................................................................................7
Reassemble ............................................................................................................................................................7
Armrest Insert Applique......................................................................................................................................7
Reinstall ..................................................................................................................................................................7
Techline
Techline
Techline
Techline
Techline
Techline
Techline
Techline

Front & Rear Door Assemblies Page 1A5–2
Page 1A5–2
1 General Information
With the following exceptions, MY 2004 WK Series Front and Rear Door Assemblies information carries over from
MY 2003 VY Series vehicles. For information not contained within this Section, refer to Section 1A5 Front And Rear Door
Assemblies in the MY 2003 VY and V2 Series Service Information.
• Front door trim panel assembly
• Rear view mirror module
• Rear door trim panel assembly
The front and rear door trim panel assemblies are carry over from the MY 2003 VY and V2 Series Vehicles, except for
the armrest insert applique fitted to Level 2, 3, 4 and 5 vehicles. The applique is a plastic trim that sits flush with the top
seam of the armrest insert.
Level 5 cars are fitted with a rear view mirror module which is fitted to the front driver side door behind the trim panel.
For diagnosis of the rear view mirror module, refer to Section1A7 Seat Assemblies.
Front & Rear Door Assemblies Page 1A5–3
Page 1A5–3
2 Service Operations
2.1 Front Door Trim Panel Assembly
Remove
As required, first remove the following components:
1 Front door trim panel assembly, refer to Section 1A5, 2.6 Front Door Trim Panel Assembly in the MY 2003 VY and
V2 Series Service Information.
Disassemble
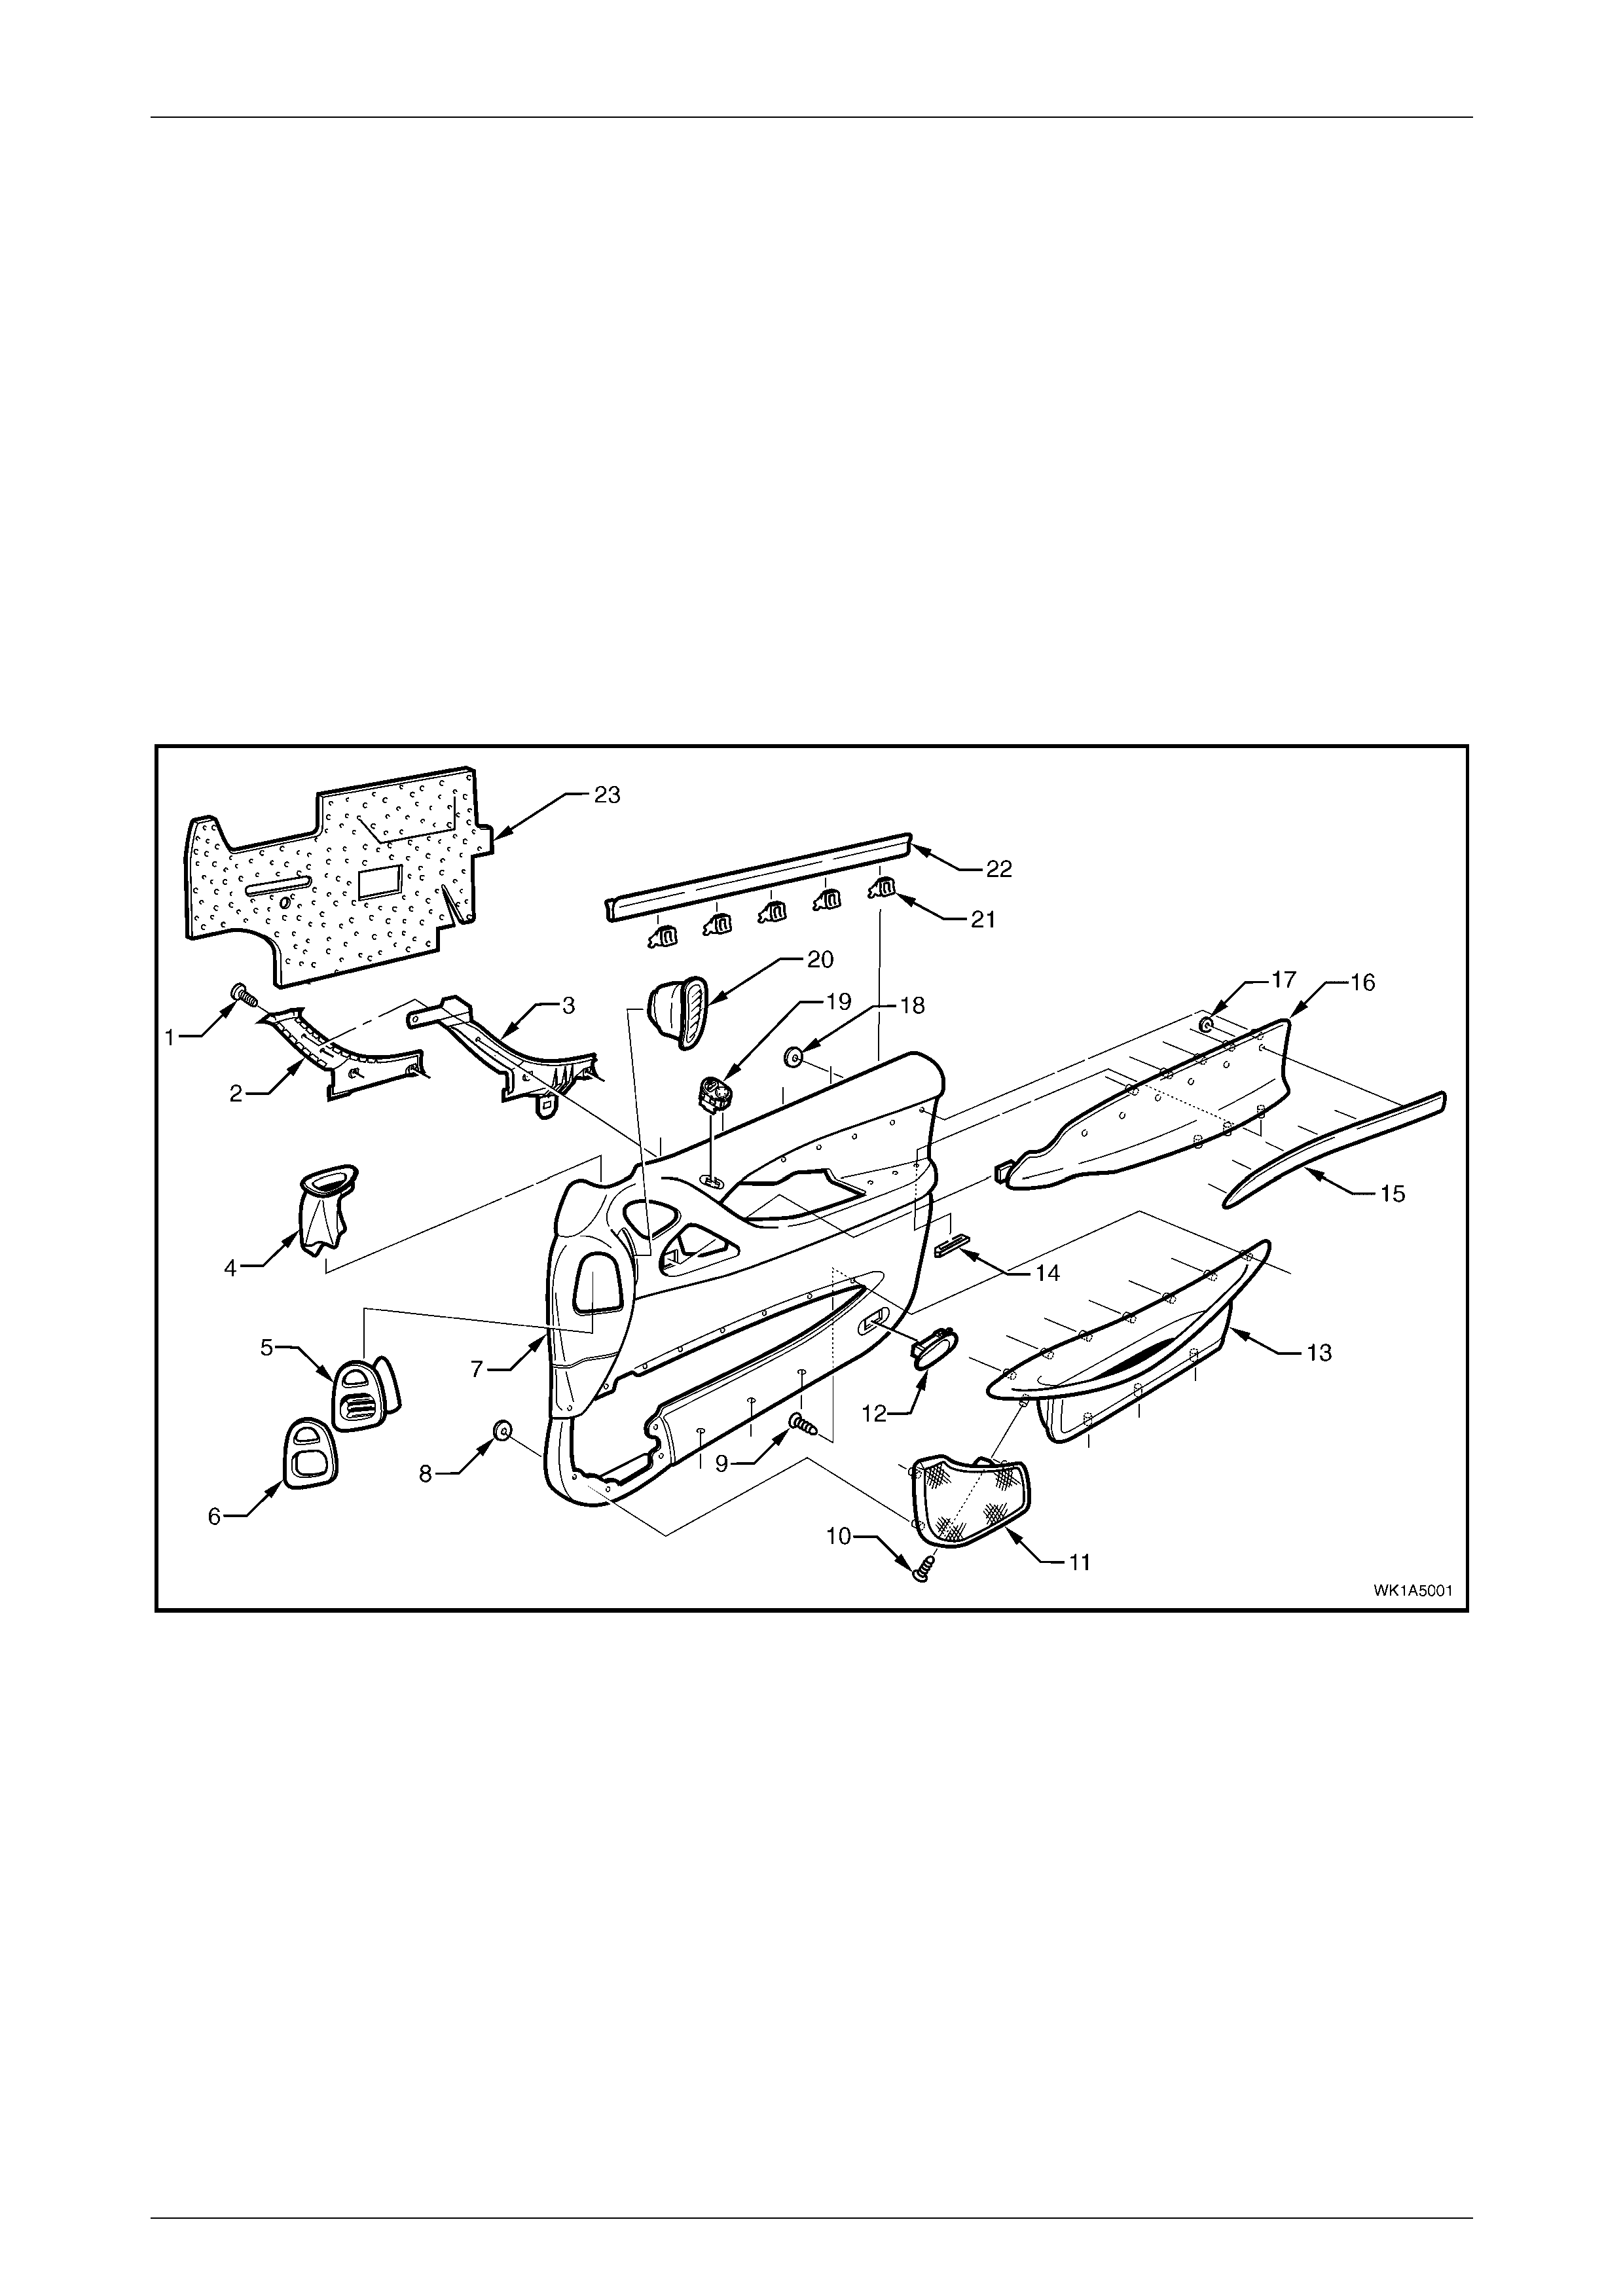
The following diagram is provided for reference only. Refer to Section 1A5, 2.6 Front Door Trim Panel Assembly in the
MY 2003 VY and V2 Series Service Information for the front door trim panel assembly disassembly procedure not
contained in this Section.
Figure 1A5 – 1
Front & Rear Door Assemblies Page 1A5–4
Page 1A5–4
Legend
1 Front door inside handle screw (4 places )
2 Front door inside handle cover
3 Front door inside handle bracket
4 Side window defogger air duct
5 Front door air duct assembl y
6 Front door air duct seal
7 Front door trim foundation assembly
8 Radio front door speaker grille retainer (6 places)
9 Front door map pocket assemb l y screw (7 places )
10 Radio front door speaker grille screw
11 Radio front door speaker grille
12 Front door courtesy lamp
13 Front door map pocket assembl y
14 Insert assembly door armrest retainer (3 places)
15 Door armrest applique
16 Front door armrest insert ass embly
17 Door armrest applique ret ai ner (6 plac es)
18 Insert assembly door armrest retainer (5 places)
19 Rear view mirror s witch (driver’s side only)
20 Front door air outlet assembl y
21 Front window inner sealing strip ass embly ret ai ner (5 plac es)
22 Front window inner sealing strip ass embly
23 Front door insulator assembly
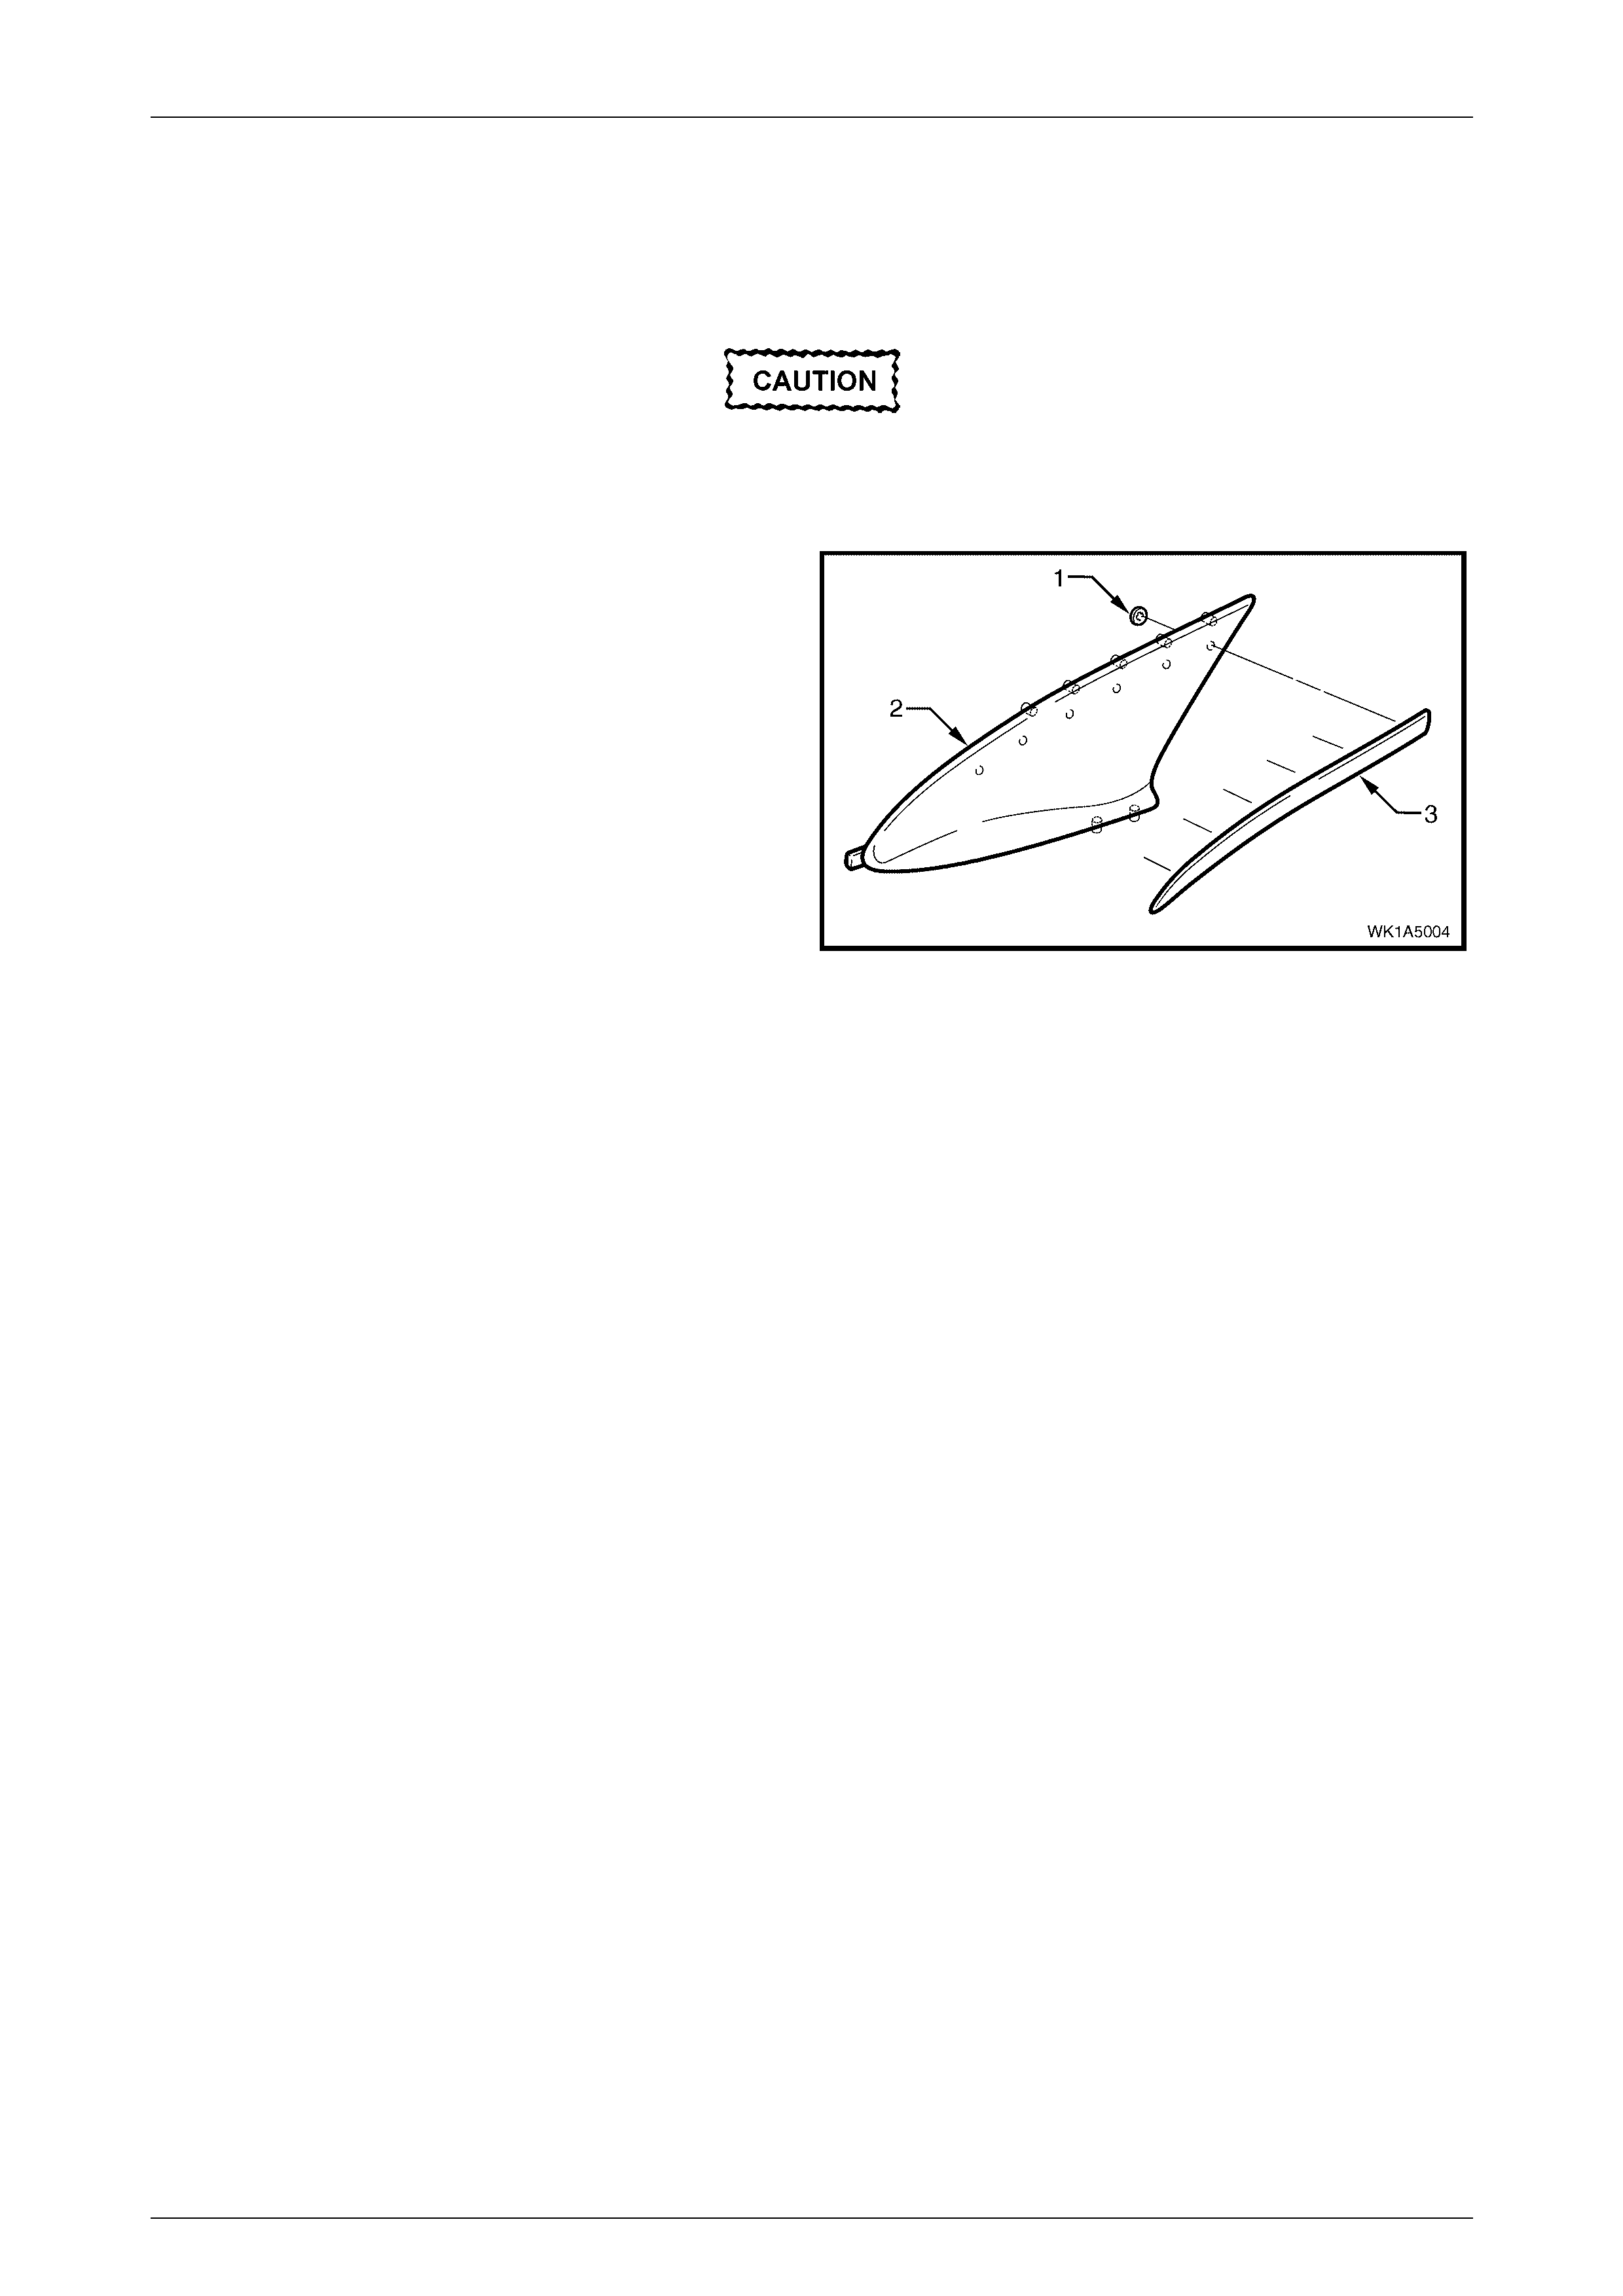
Armrest Insert Applique
1 Remove the armrest insert assembly, refer to Section 1A5, 2.6 Front Door Trim Panel Assembly in the MY 2003 VY
and V2 Series Service Information.
The applique retainers will break the lugs
requiring a replacement applique if care is not
taken with their removal.
2 Remove the retainer (1), six places by gently prising
them away from the armrest insert assembly (2).
3 Withdraw the applique (3) from the armrest insert.
Figure 1A5 – 2
Reassemble
Armrest Insert Applique
Reassembly of the applique is the reverse of the disassembly procedure, noting the following.
1 The applique assembly, must be sitting flush against the armrest insert assembly, along the entire top contacting
surface.
Reinstall
As required, reinstall the front door trim panel assembly, refer to Section 1A5, 2.6 Front Door Trim Panel Assembly in the
MY 2003 VY and V2 Series Service Information.
Front & Rear Door Assemblies Page 1A5–5
Page 1A5–5
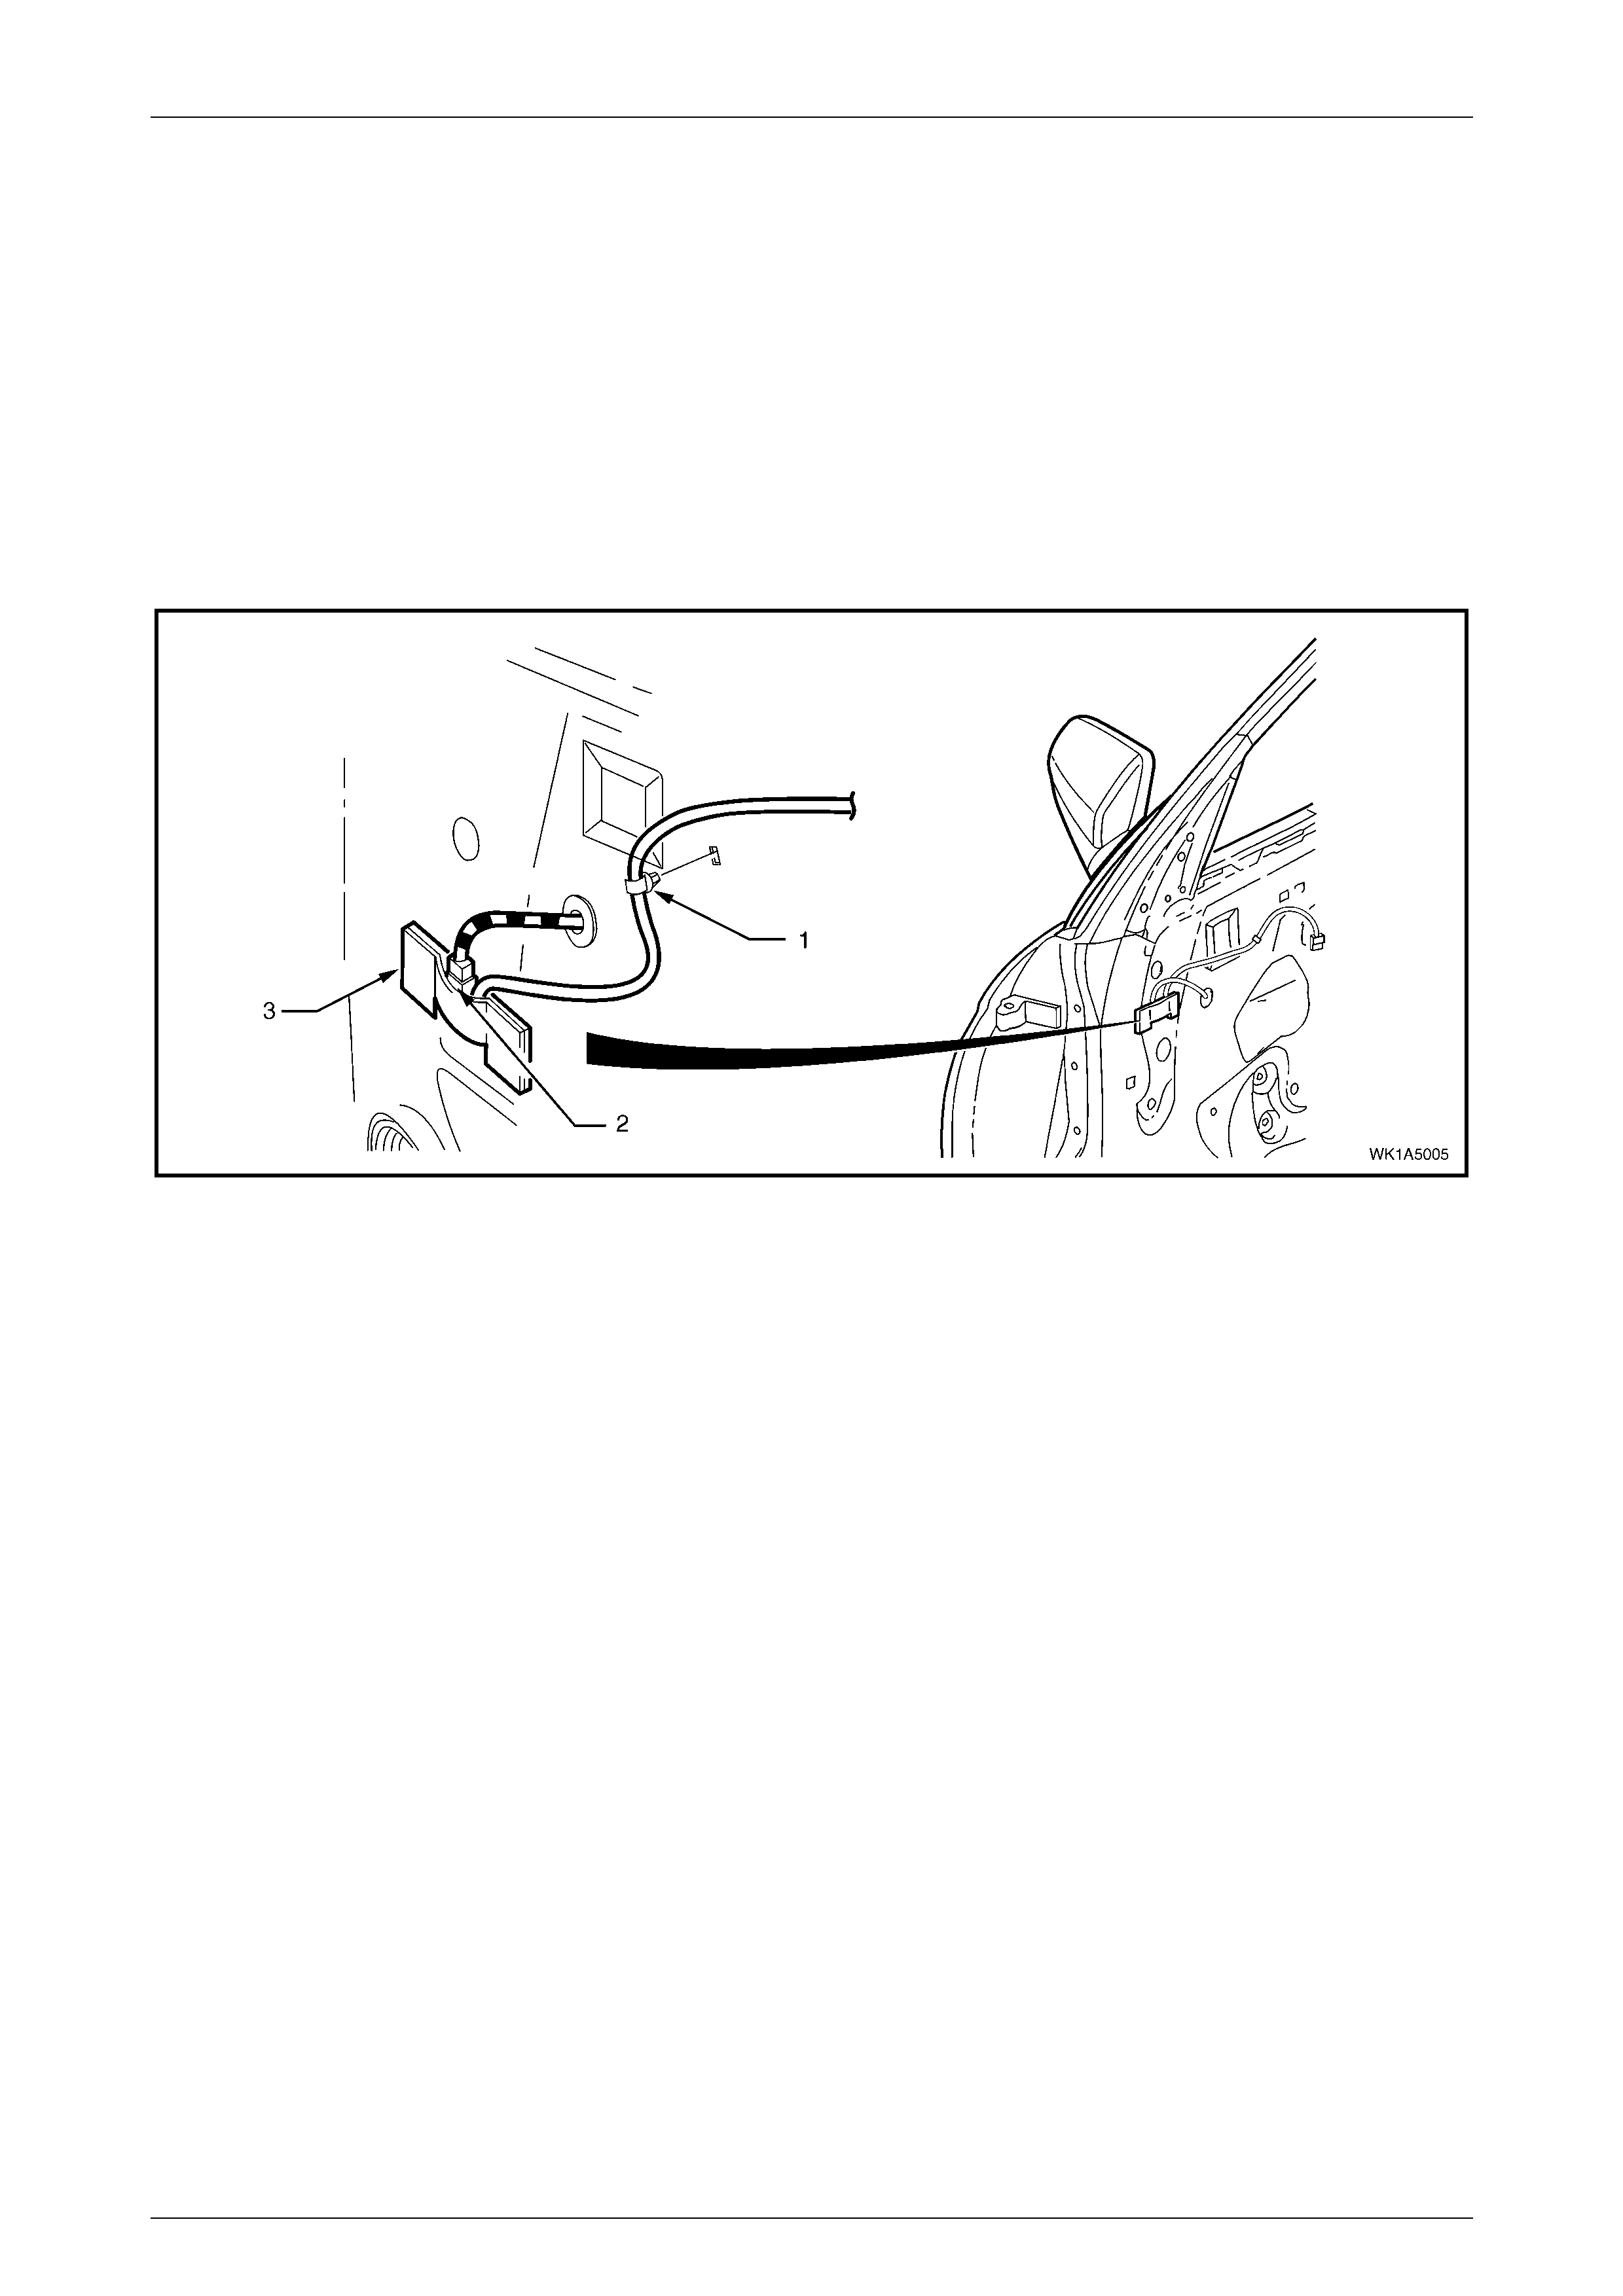
2.2 Rear View Mirror Module
Remove
1 Remove the driver side door trim assembly, refer to Section 1A5, 2.6 Front Door Trim Panel Assembly in the
MY 2003 VY and V2 Series Service Information.
2 Unclip the rear view mirror module harness retainer (1) from the door panel, refer to Figure 1A5 – 3.
3 Disconnect the door harness connector (2) from the module (3).
4 Carefully peel the module from the door.
5 For diagnosis of the rear view mirror module, refer to Section1A7, Seat Assemblies.
Figure 1A5 – 3
Reinstall
Reinstall atio n of the mirror mo dule is the r everse of remov al notin g the following:
1 If required, use a commercially available contact adhesive to reattach the module to the door panel.
Front & Rear Door Assemblies Page 1A5–6
Page 1A5–6
2.3 Rear Door Trim Panel Assembly
Remove
As required, first remove the following components:
1 Rear door trim panel assembly, refer to Section 1A5, 3.6 Rear Door Trim Panel Assembly in the MY 2003 VY and
V2 Series Service Information.
Disassemble
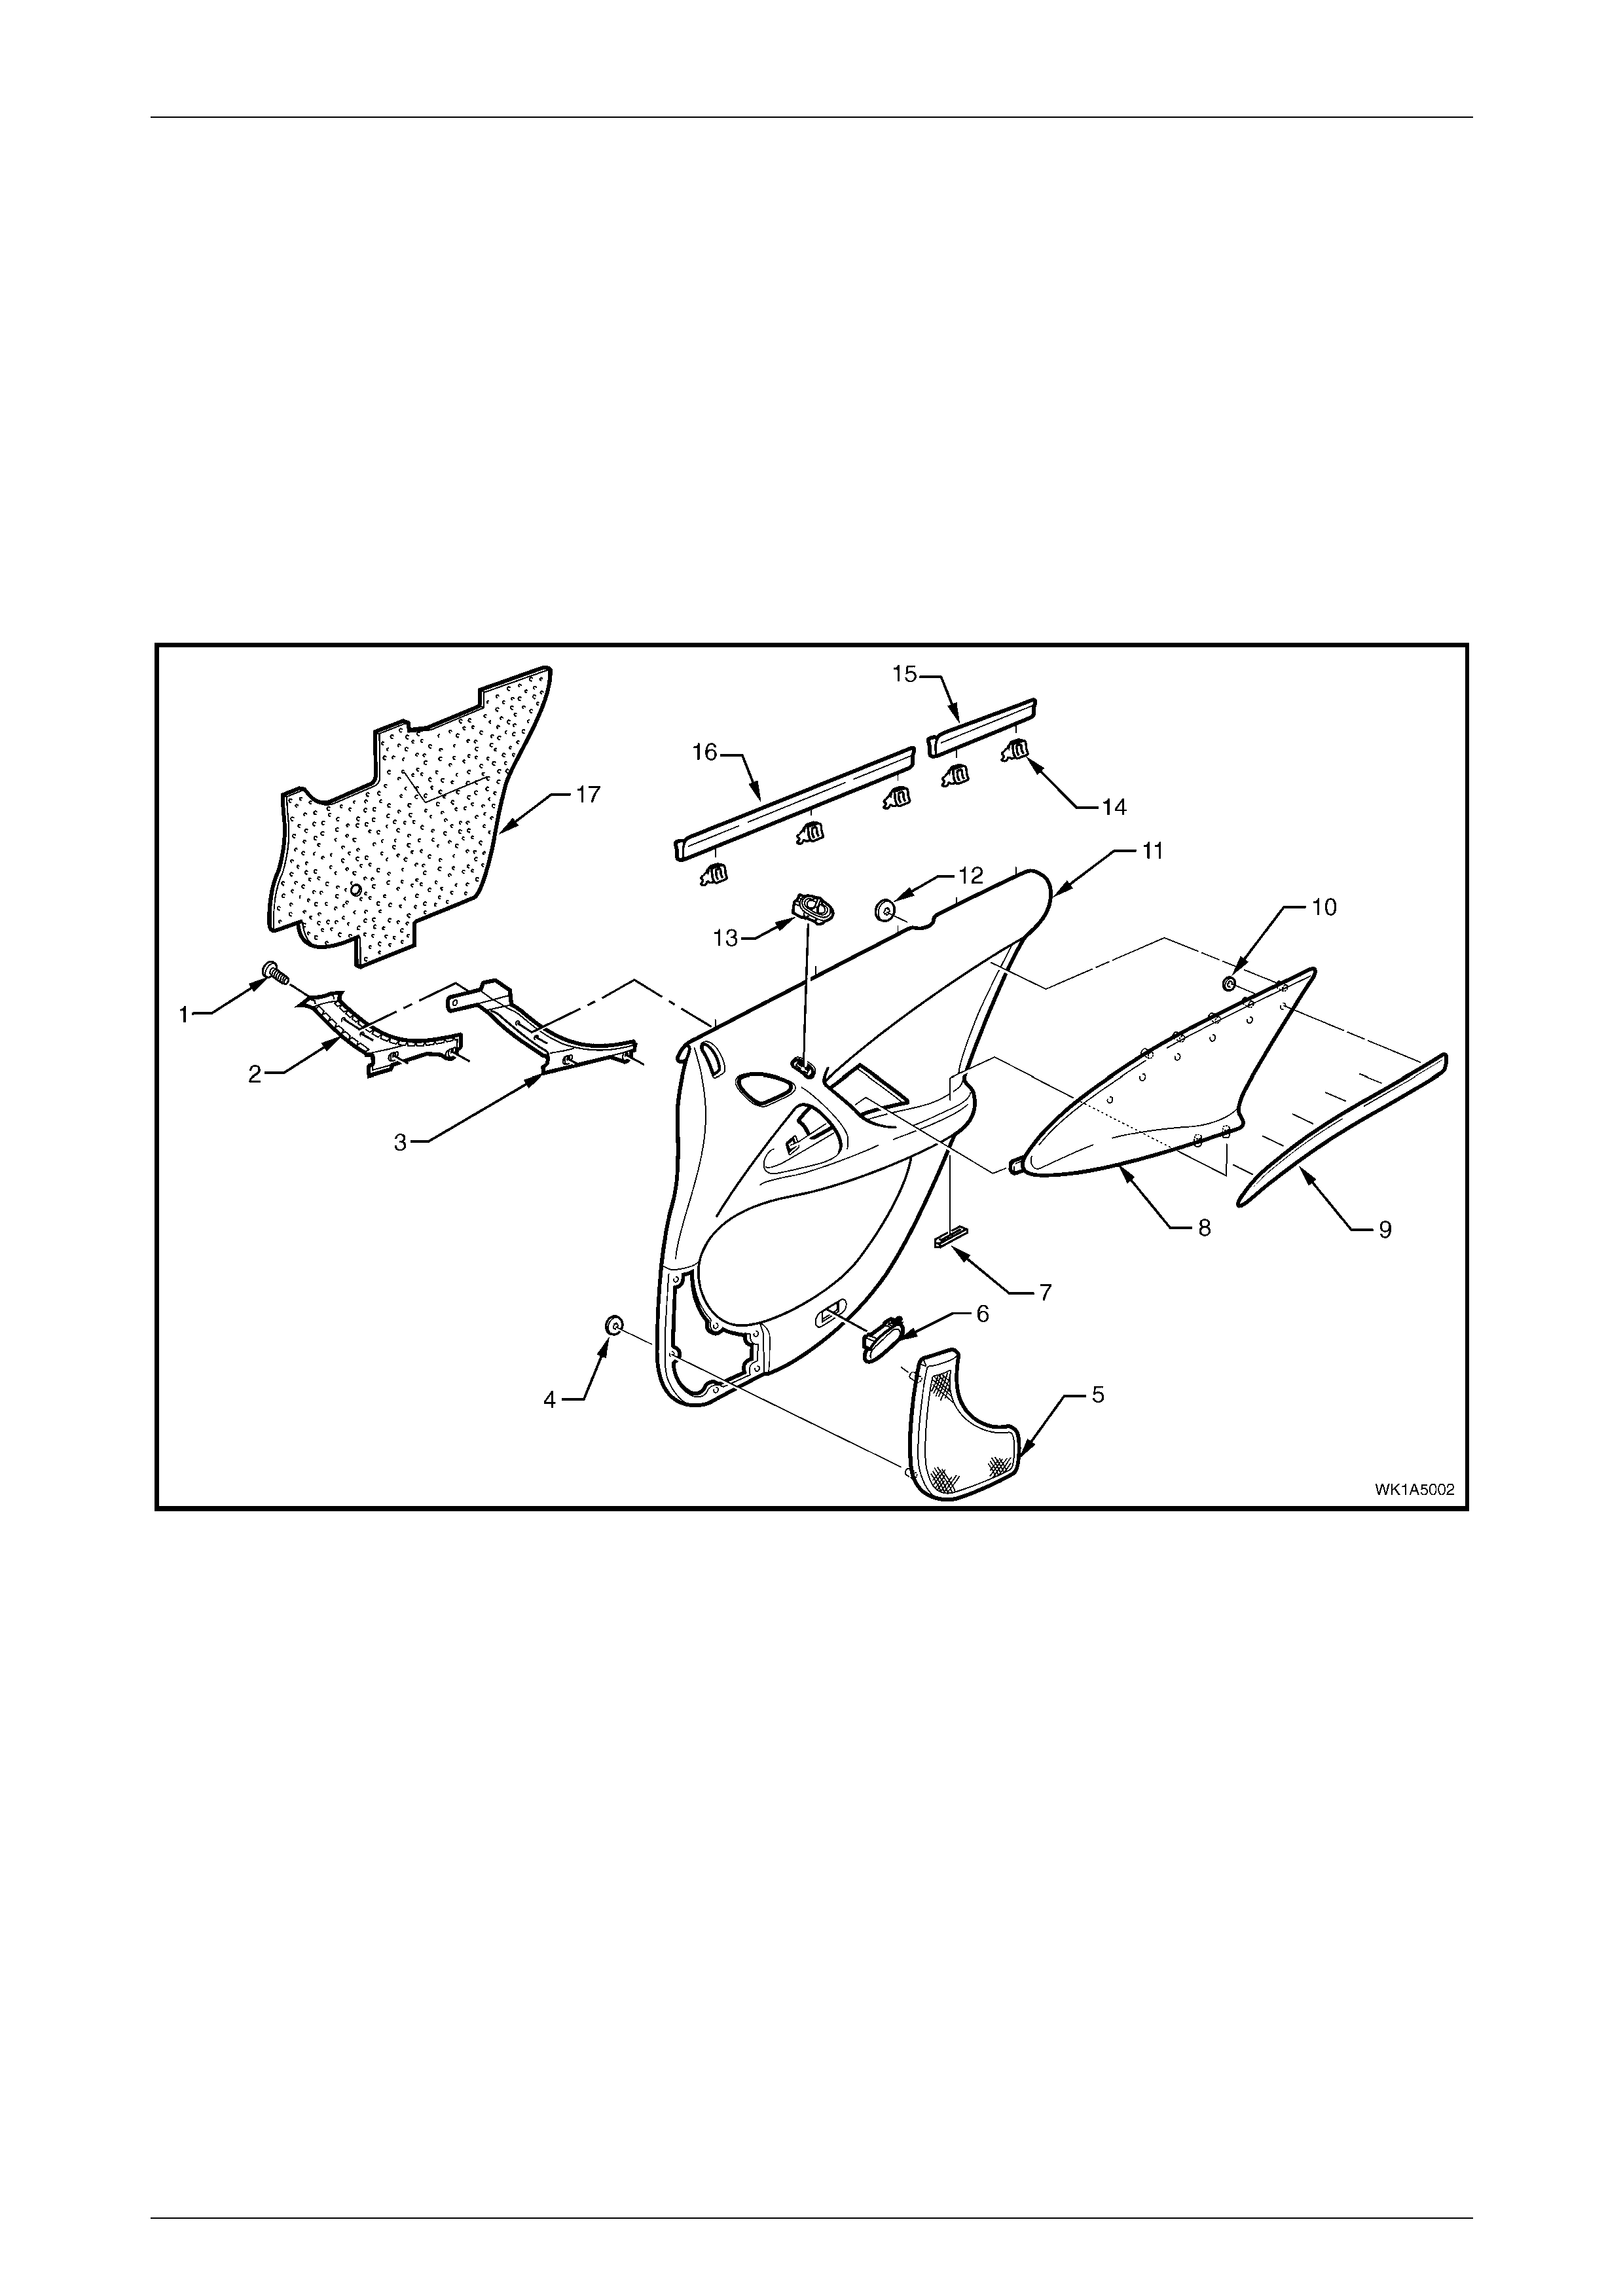
The following diagram is provided for reference only. Refer to Section 1A5, 3.6 Rear Door Trim Panel Assembly in the
MY 2003 VY and V2 Series Service Information for the rear door trim panel assembly disassembly procedure not
contained in this Section.
Figure 1A5 – 4
Legend
1 Rear door inside handle screw (4 places)
2 Rear door inside handle cover
3 Rear door inside handle bracket
4 Radio rear door speaker grille retainer (7 places)
5 Rear door radio grille speaker
6 Rear door courtes y lamp
7 Door armrest ins ert ass em bly retainer (2 plac es)
8 Rear door inside armrest insert assembly
9 Door armrest applique
10 Door armrest applique ret ai ner (6 plac es)
11 Rear door trim panel foundat i on assembly
12 Insert assembly door armrest retainer (5 places)
13 Rear door window switch
14 Rear window inner sealing stri p retainer (5 pl aces)
15 Rear window inner rear sealing stri p
16 Rear window inner front seal i ng strip
17 Rear door insulat or assem bl y
Front & Rear Door Assemblies Page 1A5–7
Page 1A5–7
Armrest Insert Applique
1 Remove the rear door armrest insert assembly, refer to Section 1A5, 3.6 Rear Door Trim Panel Assembly in the
MY 2003 VY and V2 Series Service Information.
The applique retainers will break the lugs
requiring a replacement applique if care is not
taken with their removal.
2 Remove the retainer (1), six places by gently prising
them away from the armrest insert assembly (2).
3 Withdraw the applique (3) from the armrest insert.
Figure 1A5 – 5
Reassemble
Armrest Insert Applique
Reassembly of the applique is the reverse of the disassembly procedure, noting the following.
1 The applique assembly, must be sitting flush against the armrest insert assembly, along the entire top contacting
surface.
Reinstall
As required, reinstall the rear door trim panel assembly, refer to Section 1A5, 3.6 Rear Door Trim Panel Assembly in the
MY 2003 VY and V2 Series Service Information.