
Stationary Windows Page 1A6–1
Page 1A6–1
Section 1A6
Stationary Windows
ATTENTION
Before performing any Service Operation or other procedure described in this Section, refer to Section 00
WARNINGS, CAUTIONS AND NOTES for correct workshop practices with regard to safety and/or property
damage.
1 General Information............................................................................................................................... 2
2 Service Operations................................................................................................................................3
2.1 Quarter Window Assembly....................................................................................................................................3
Remove ...................................................................................................................................................................3
Reinstall ..................................................................................................................................................................4
2.2 Rear Window Assembly.........................................................................................................................................6
Remove ...................................................................................................................................................................6
Reinstall – Short Method .......................................................................................................................................8
Description..........................................................................................................................................................8
Preparation.........................................................................................................................................................8
Reinstall..............................................................................................................................................................9
Reinstall – Long Method......................................................................................................................................11
Description........................................................................................................................................................11
Preparation.......................................................................................................................................................12
Rear Window Opening Check ..........................................................................................................................12
Reinstall............................................................................................................................................................13
2.3 Rear Window Lower Finisher..............................................................................................................................16
Remove .................................................................................................................................................................16
Reinstall ................................................................................................................................................................16
3 Torque Wrench Specifications........................................................................................................... 17
Techline

Stationary Windows Page 1A6–2
Page 1A6–2
1 General Information
With the following exceptions, MY 2004 WK Series Stationary Windows information carries over from MY 2003 VY
Series vehicles. For information not contained within this Section, refer to Section 1A6 STATIONARY WINDOWS in the
MY 2003 VY and V2 Series Service Information.
• Quarter window assembly
• Rear window assembly
• Rear window lower finisher
The quarter window assembly is secured to the vehicle using plastic nuts and a self adhesive foam weatherstrip is
attached to the glass to seal the window opening.
The rear window is surrounded by a one piece rubber weatherstrip. The join is on the vertical centre line at the base of
the window assembly.
A moulded plastic finisher is fitted between the rear window weatherstrip and the rear compartment lid weatherstrip.
Toughened safety glass is used for all the windows except the windshield assembly.

Stationary Windows Page 1A6–3
Page 1A6–3
2 Service Operations
2.1 Quarter Window Assembly
LT Section No. – 11-030
Safety glasses and work gloves must be worn
at all times when operating with glass.
Care must be taken during any operation
involving the quarter window assembly
removal or installation, not to exert any load
on the window. Failure to observe this may
result in damage to the window.
NOTE
The following component WILL REQUIRE
REPLACEMENT when performing this operation:
• Quarter window nut.
If required, first remove the body lock pillar garnish, refer to Section 1A8, 2.2 BODY LOCK PILLAR GARNISH.
Remove
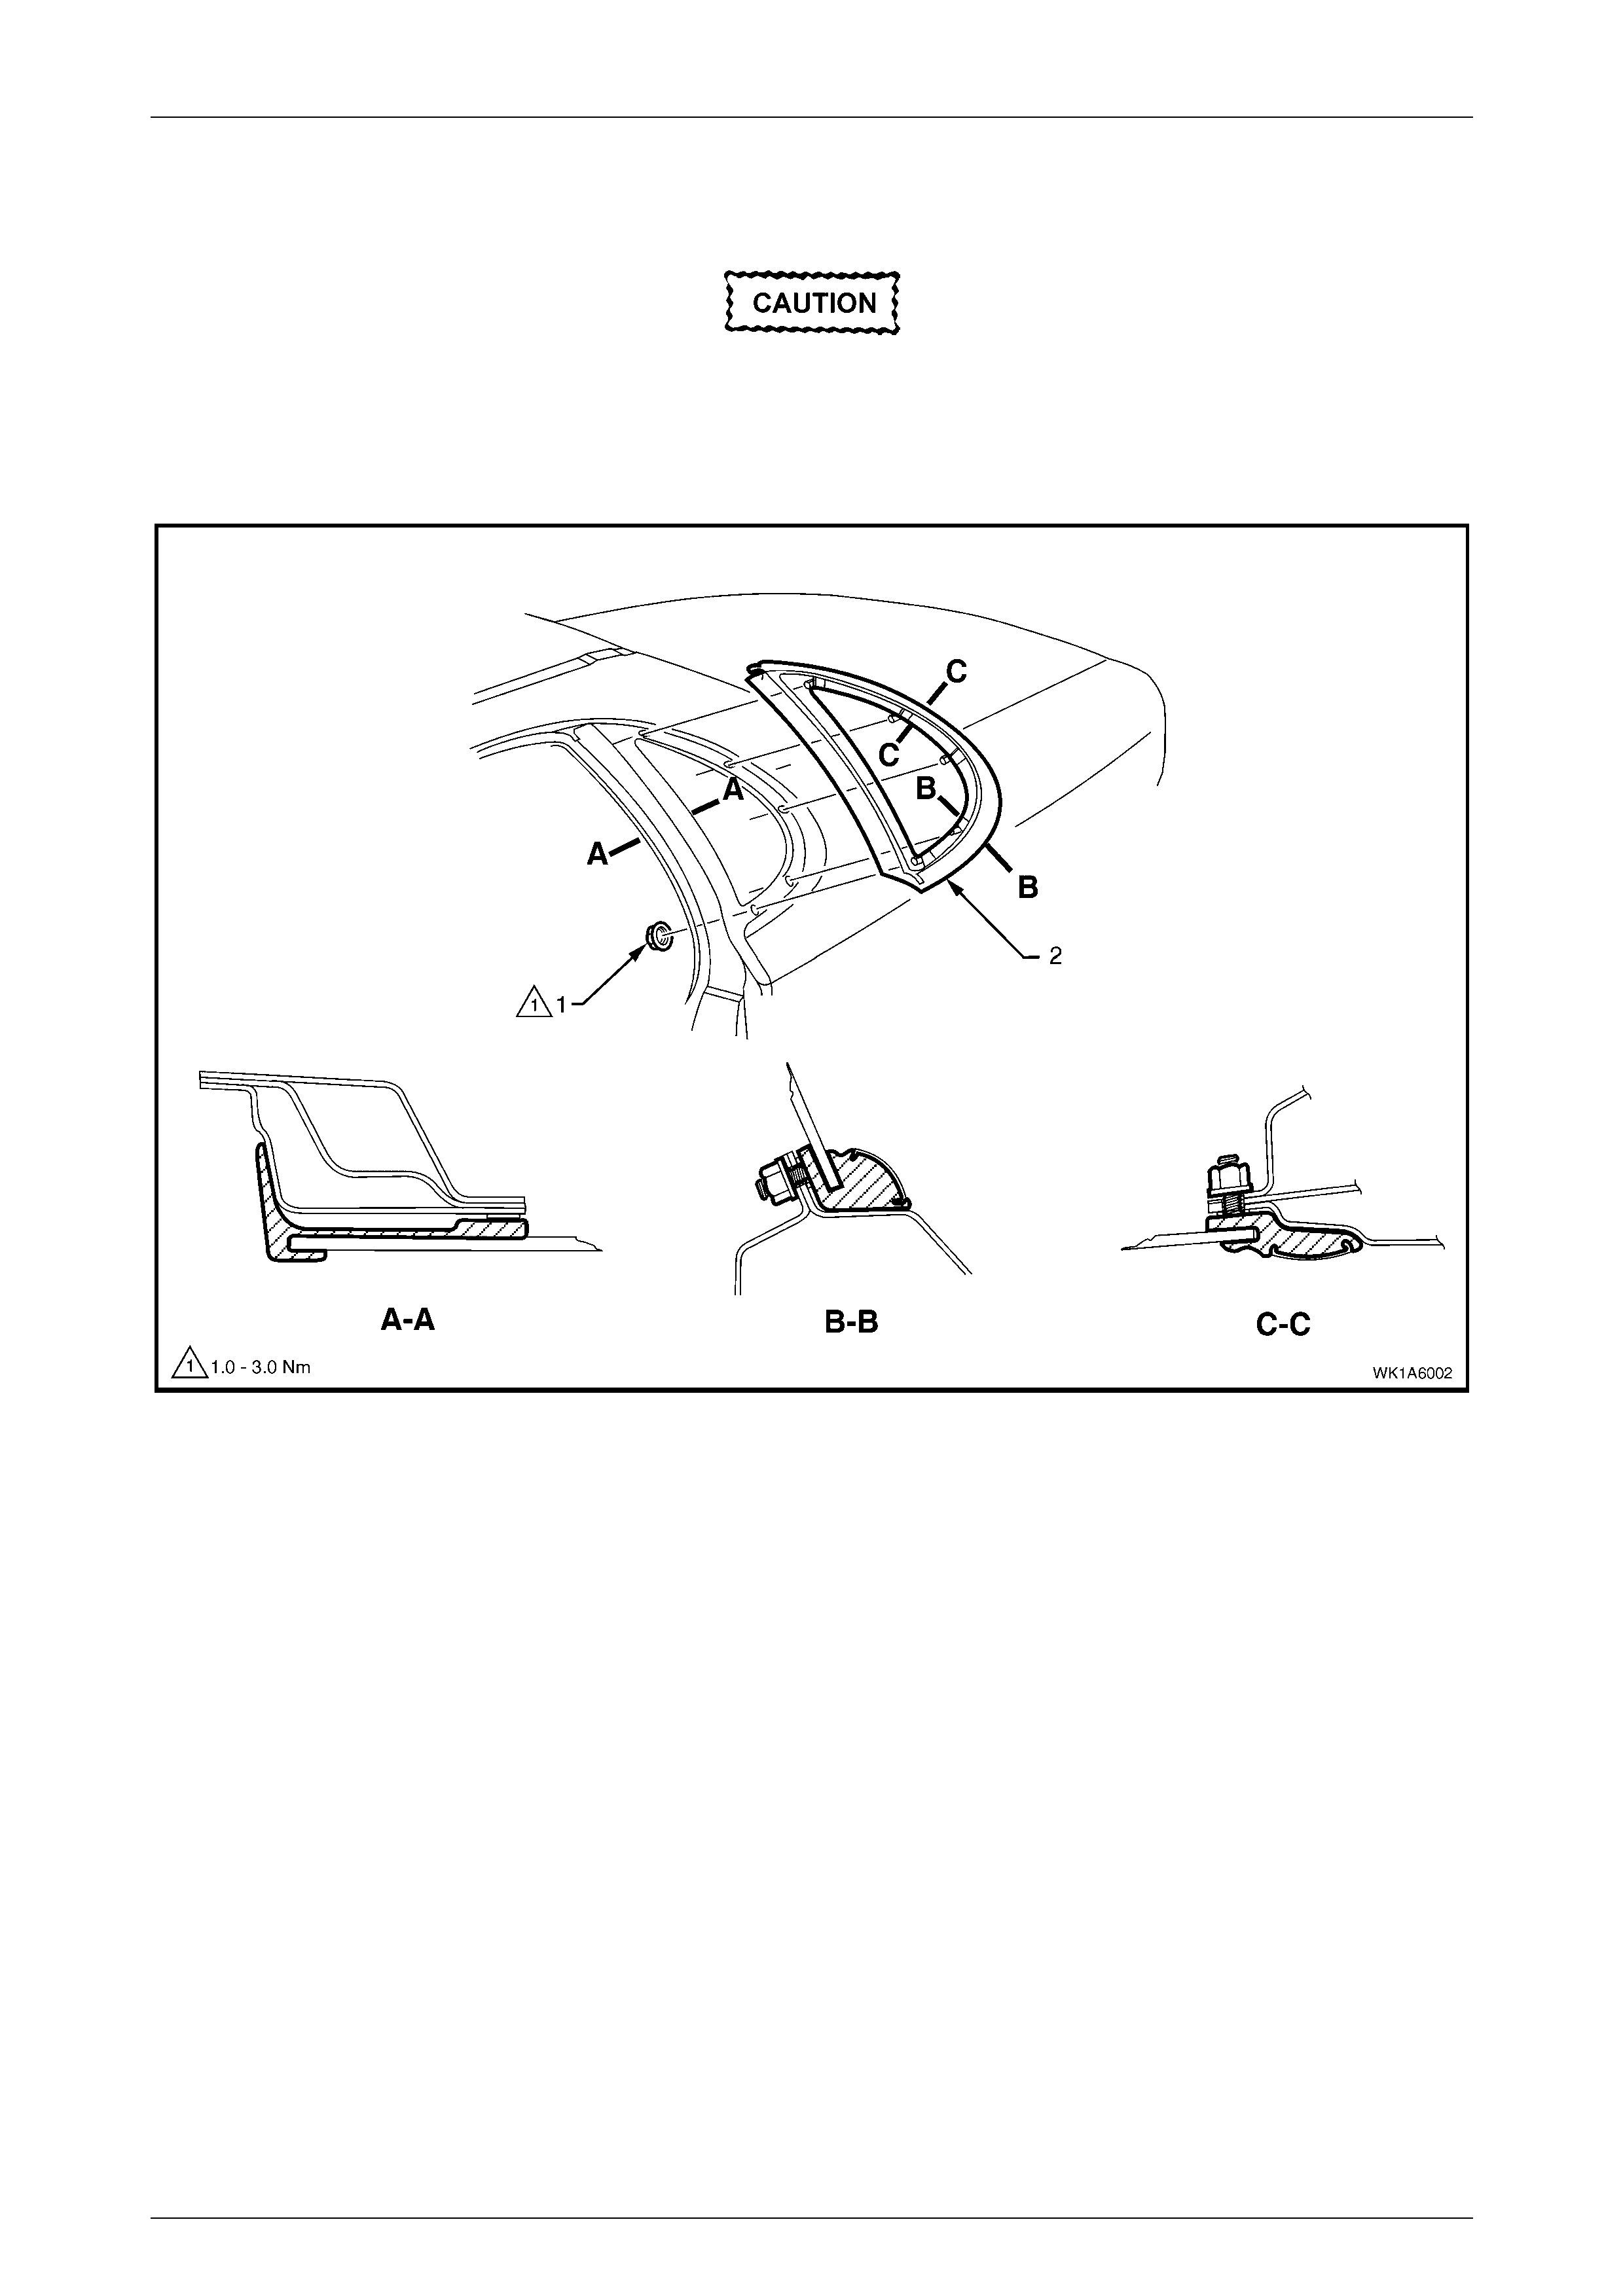
1 Remove the three screws (1) from the rear door
opening and partially remove the rear section of the
door opening moulding (2), disengaging it from the
quarter window assembly tab (3).
Figure 1A6 – 1
Stationary Windows Page 1A6–4
Page 1A6–4
2 Remove the quarter window nut (1) five places, securing the quarter window assembly (2) to the body opening,
refer to Figure 1A6 – 2.
Take care when removing the quarter window
from the body opening that the attaching pins
are clear of the outer body.
3 Carefully lift the window from the vehicle.
Figure 1A6 – 2
Legend
1 Quarter Window Nut (5 places) 2 Quarter Window Assembly
Reinstall
Reinstallation of the quarter window assembly is the reverse of removal procedure noting the following:
1 Use new quarter window nuts (five places).
2 Leave the nuts loose, until the door opening moulding is fastened into position.
3 Install the door opening moulding screws and tighten to the specified torque.
NOTE
The screws are encapsulated with a wax sealer.
It is recommended that the screws be replaced
once removed, however if this is impractical apply
a small amount of sealer to the end of the thread.
4 Position the quarter window assembly and tighten the nuts to the correct torque specification.
5 Reinstall the body lock pillar garnish as required.

Stationary Windows Page 1A6–5
Page 1A6–5
Door opening moulding retaining
screws torque specification .......................1.0 – 2.0 N.m
Quarter window assembly retaining nut
torque specific atio n ...................................1.0 – 3.0 N.m
Stationary Windows Page 1A6–6
Page 1A6–6
2.2 Rear Window Assembly
LT Section No. – 11-020
Safety glasses and work gloves must be worn
at all times when operating with glass.
Care must be taken during any operation
involving the rear window assembly removal
or installation not to exert any load on the
window. Failure to observe this may result in
damage to the window.
Only use urethane adhesives such as
Betaseal 15685 or equivalent for rear window
installation. It is imperative that the
procedures in this Section for replacing
bonded windows are followed, as incorrect
installation may lead to injury or death.
NOTE
The following component WILL REQUIRE
REPLACEMENT when performing this operation:
• Rear Win dow M ouldin g.
The rear window assembly removal procedure is the same for both the short and long installation methods, with one
exception. If the short method installation is to be used, care must be taken during removal to ensure that an even
surface of the original urethane remains in the body opening. This will serve as a base for the new urethane bead and
the replacement rear window.
To prevent damage and to minimise clean up of the paint finish and the trim, mask-up and place protective covers over
parts adjacent to the rear window.
If required, remove the following components:
1 Roof joint moulding, refer to Section 1A9, 2.8 ROOF JOINT MOULDING.
2 Body lock pillar garnish, refer to Section 1A8, 2.4 BODY LOCK PILLAR GARNISH.
Remove
A high mount stop lamp assembly is installed
below the rear window trim panel assembly.
Care must be taken to avoid damage to the
lamp assembly during window removal
procedure. It is not necessary to remove the
lamp assembly, but to ensure that it is clear of
any debris before window installation.
1 Carefully disconnect the rear window electrical demister connectors and cellular telephone antenna if fitted.
2 If the rear window is broken, carefully remove all fragments of glass from the window opening.
Stationary Windows Page 1A6–7
Page 1A6–7
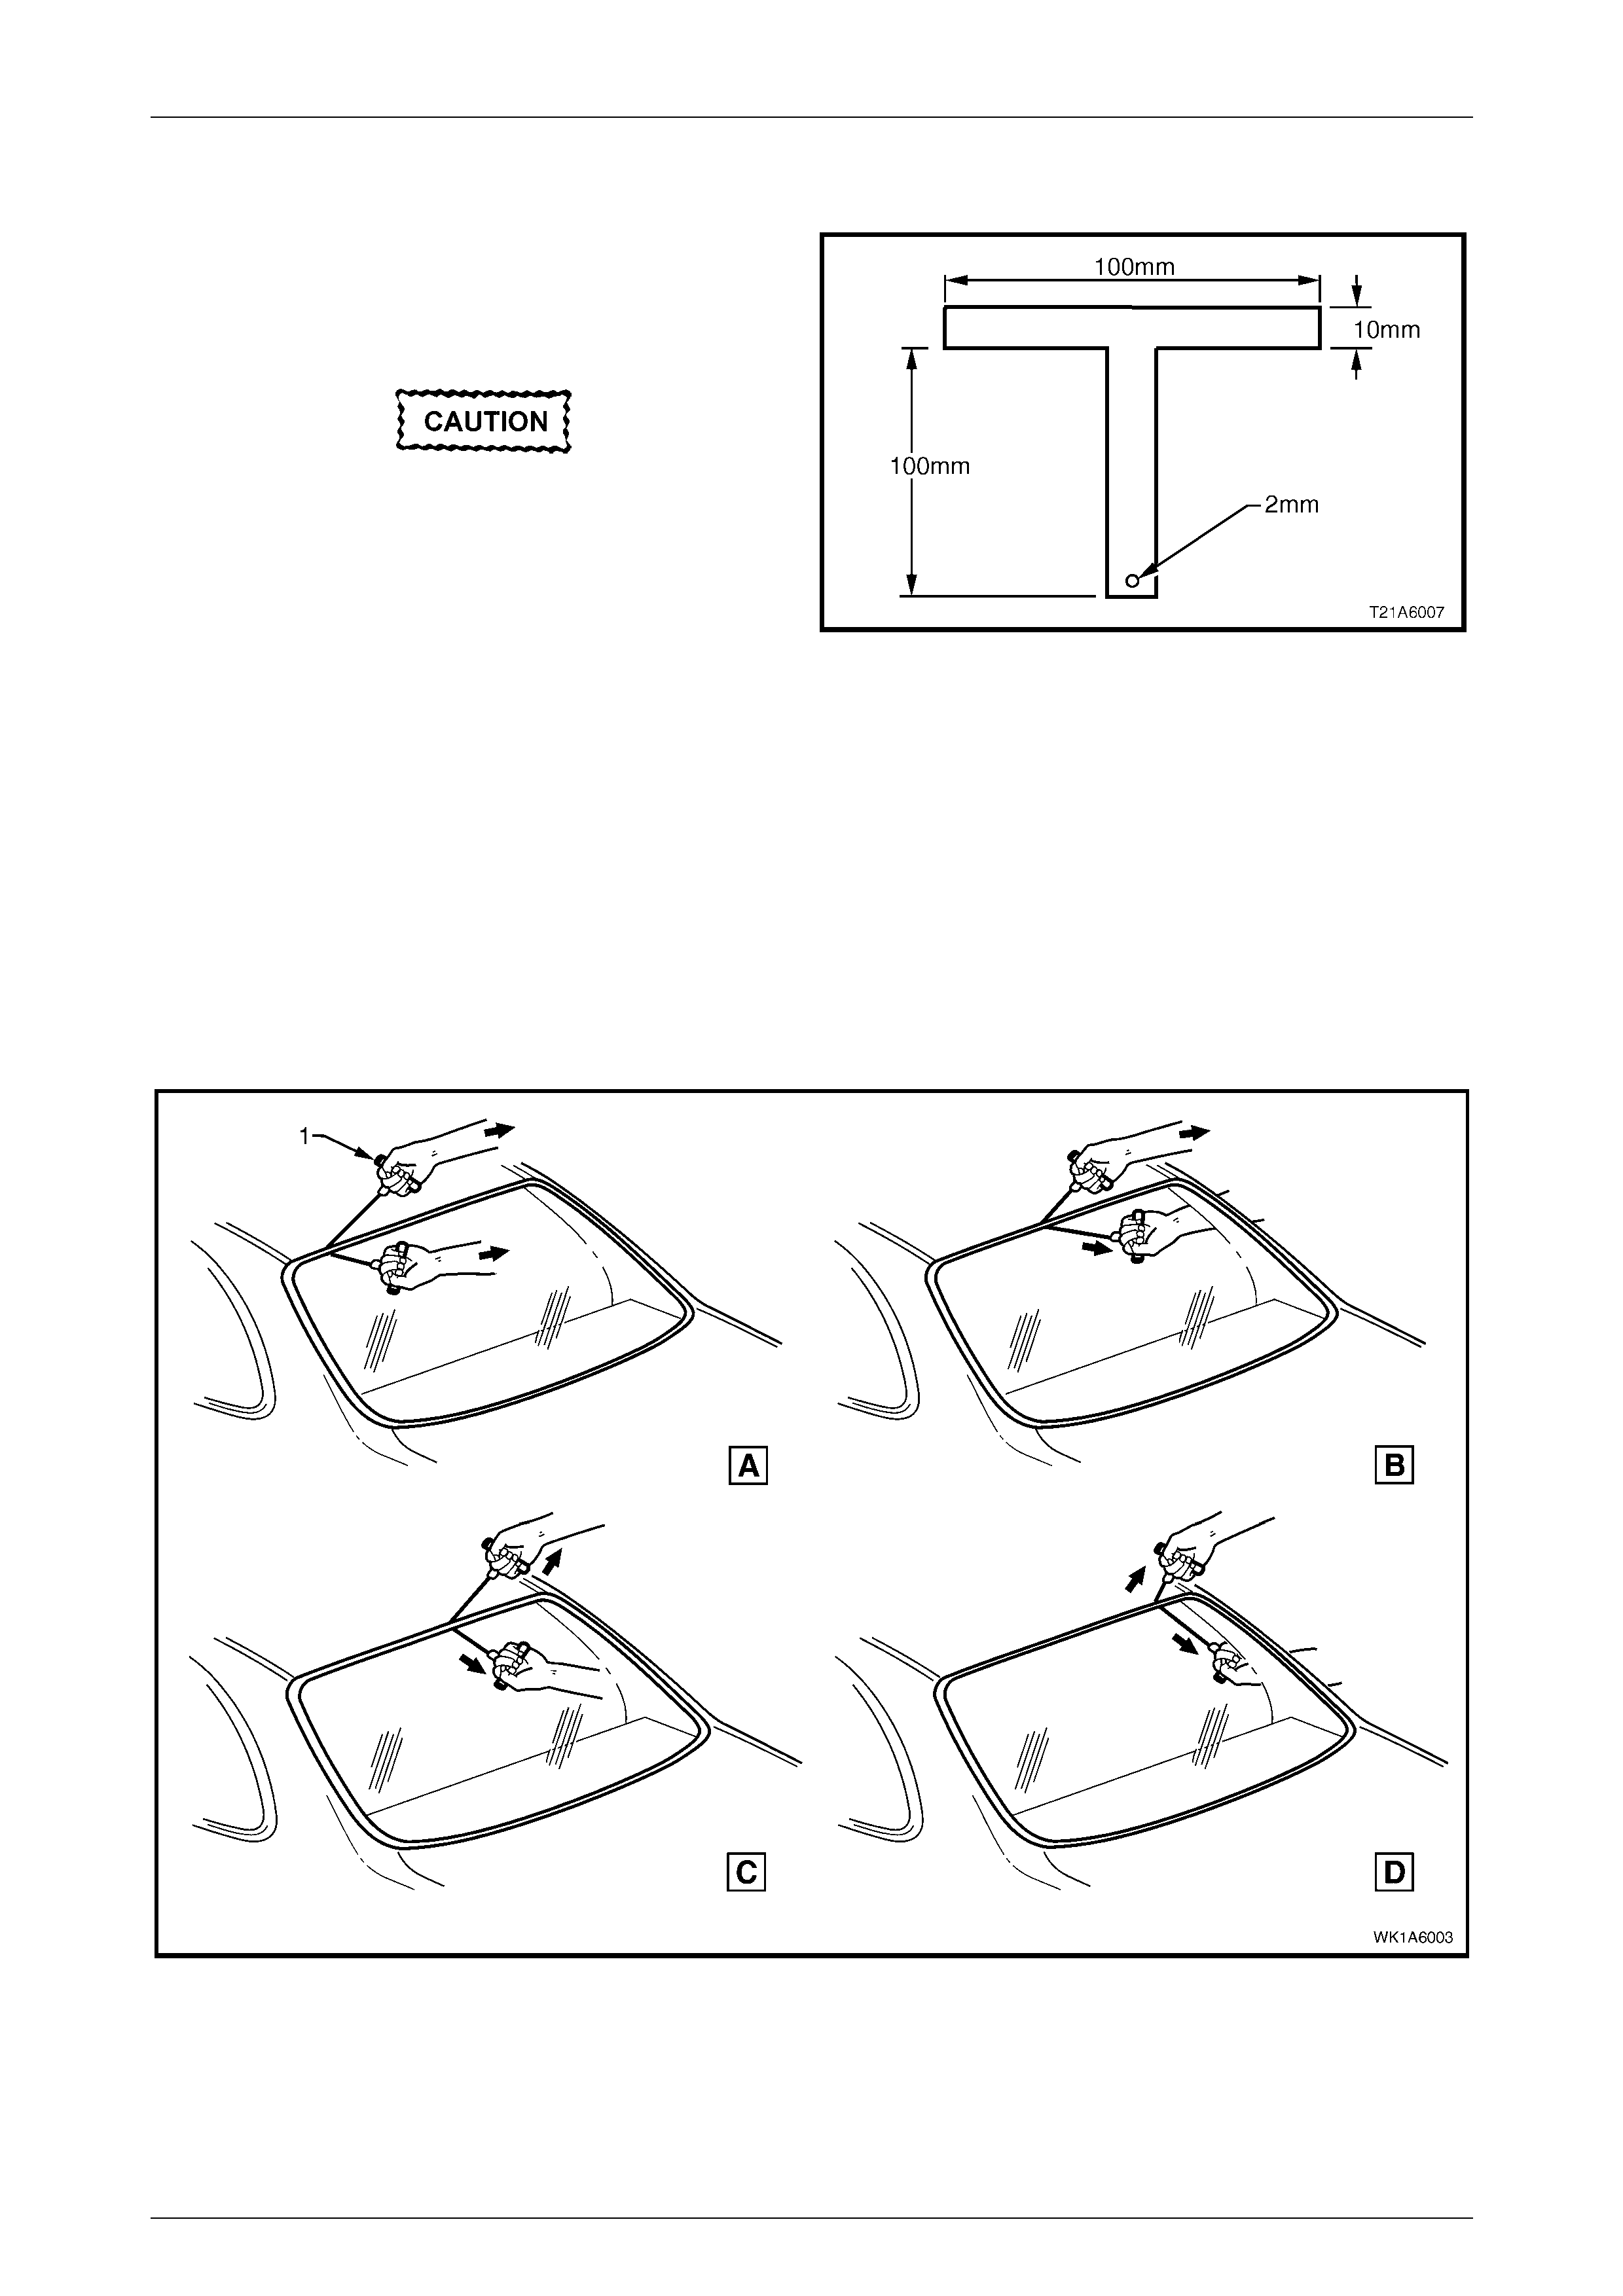
3 Using special tool J36020, thread one end of the piano wire through the urethane, starting at the windshield upper
corner, pulling the end of the wire through with pliers.
4 Alternately, manufacture two T-handles to the
dimensions shown. Secure at least 700mm of piano
wire to one handle, thread the other end of the wire
through the urethane as previously described.
Ensure that the headlining and other trim
items are not damaged.
Figure 1A6 – 3
5 Connect the wire to the remaining T-handle and with the aid of an assistant, commence cutting the urethane bead,
keeping the outside T-handle (1) parallel to the edge of the window using the full length of the wire to prevent heat
build-up in the wire, refer to Figure 1A6 – 4.
NOTE
To minimise damage to the interior of the vehicle,
the operator inside the vehicle should act as an
anchor point, holding the T-handle as close as
possible to the window at all times. The outside
operator pulls the wire up to the interior T-handle
in a 'walking' motion, refer to Figure 1A6 – 4.
Figure 1A6 – 4
6 Carefully lift the rear window out of the rear opening. If there is evidence of the window adhering to the urethane,
cut the area again with the piano wire.
7 If the original rear window is to be installed again, place the window on a clean protected surface or a holding
fixture.

Stationary Windows Page 1A6–8
Page 1A6–8
NOTE
The use of suction cups will greatly assist in the
handling of the rear window.
NOTE
All traces of urethane must be removed from the
rear window for the 'long method' of reinstallation.
It is not necessary to remove all traces of the
original urethane from the body opening for the
‘short method’ of reinstallation, however, any
original urethane remaining must be smooth and
firm.
Reinstall – Short Method
Ensure that door windows are partially
lowered to eliminate pressure build up which
can be caused by slamming doors. A curing
time of 24 hours is recommended, although
the vehicle may be driven after 5 hours,
providing it is driven only on a smooth road at
speeds not exceeding 80 km/h with the door
windows partially lowered.
Description
The short method installation involves the maximum amount of the original urethane being left intact on the rear window
opening to form a sound base for the replacement urethane and rear window assembly.
This method is recommended when replacing a cracked or broken window, or a leak condition that cannot be overcome
by using minor water leak repair procedures, refer to Section 1A6, 2.1 MINOR WATER LEAK CORRECTION in the
MY 2003 VY and V2 Series Service Information.
If material other than urethane has been used for previous servicing of the rear window, the long method installation
procedure (complete removal of adhesive) is mandatory to achieve an effective window to metal bond.
Care should be taken to ensure that the rear
window does not strike the rear window
opening. Chipped edges can lead to
subsequent breakage of the window.
Do not use petroleum based solvents to clean
the rear window assembly or the rear opening
flange, as the presence of the oil in the
solvent will prevent the adhesion of the new
urethane.
Preparation
1 Using a sharp scraper, carefully remove any original urethane from around the rear window. Clean the rear window
to be installed with a suitable oil free cleaning agent.
Stationary Windows Page 1A6–9
Page 1A6–9
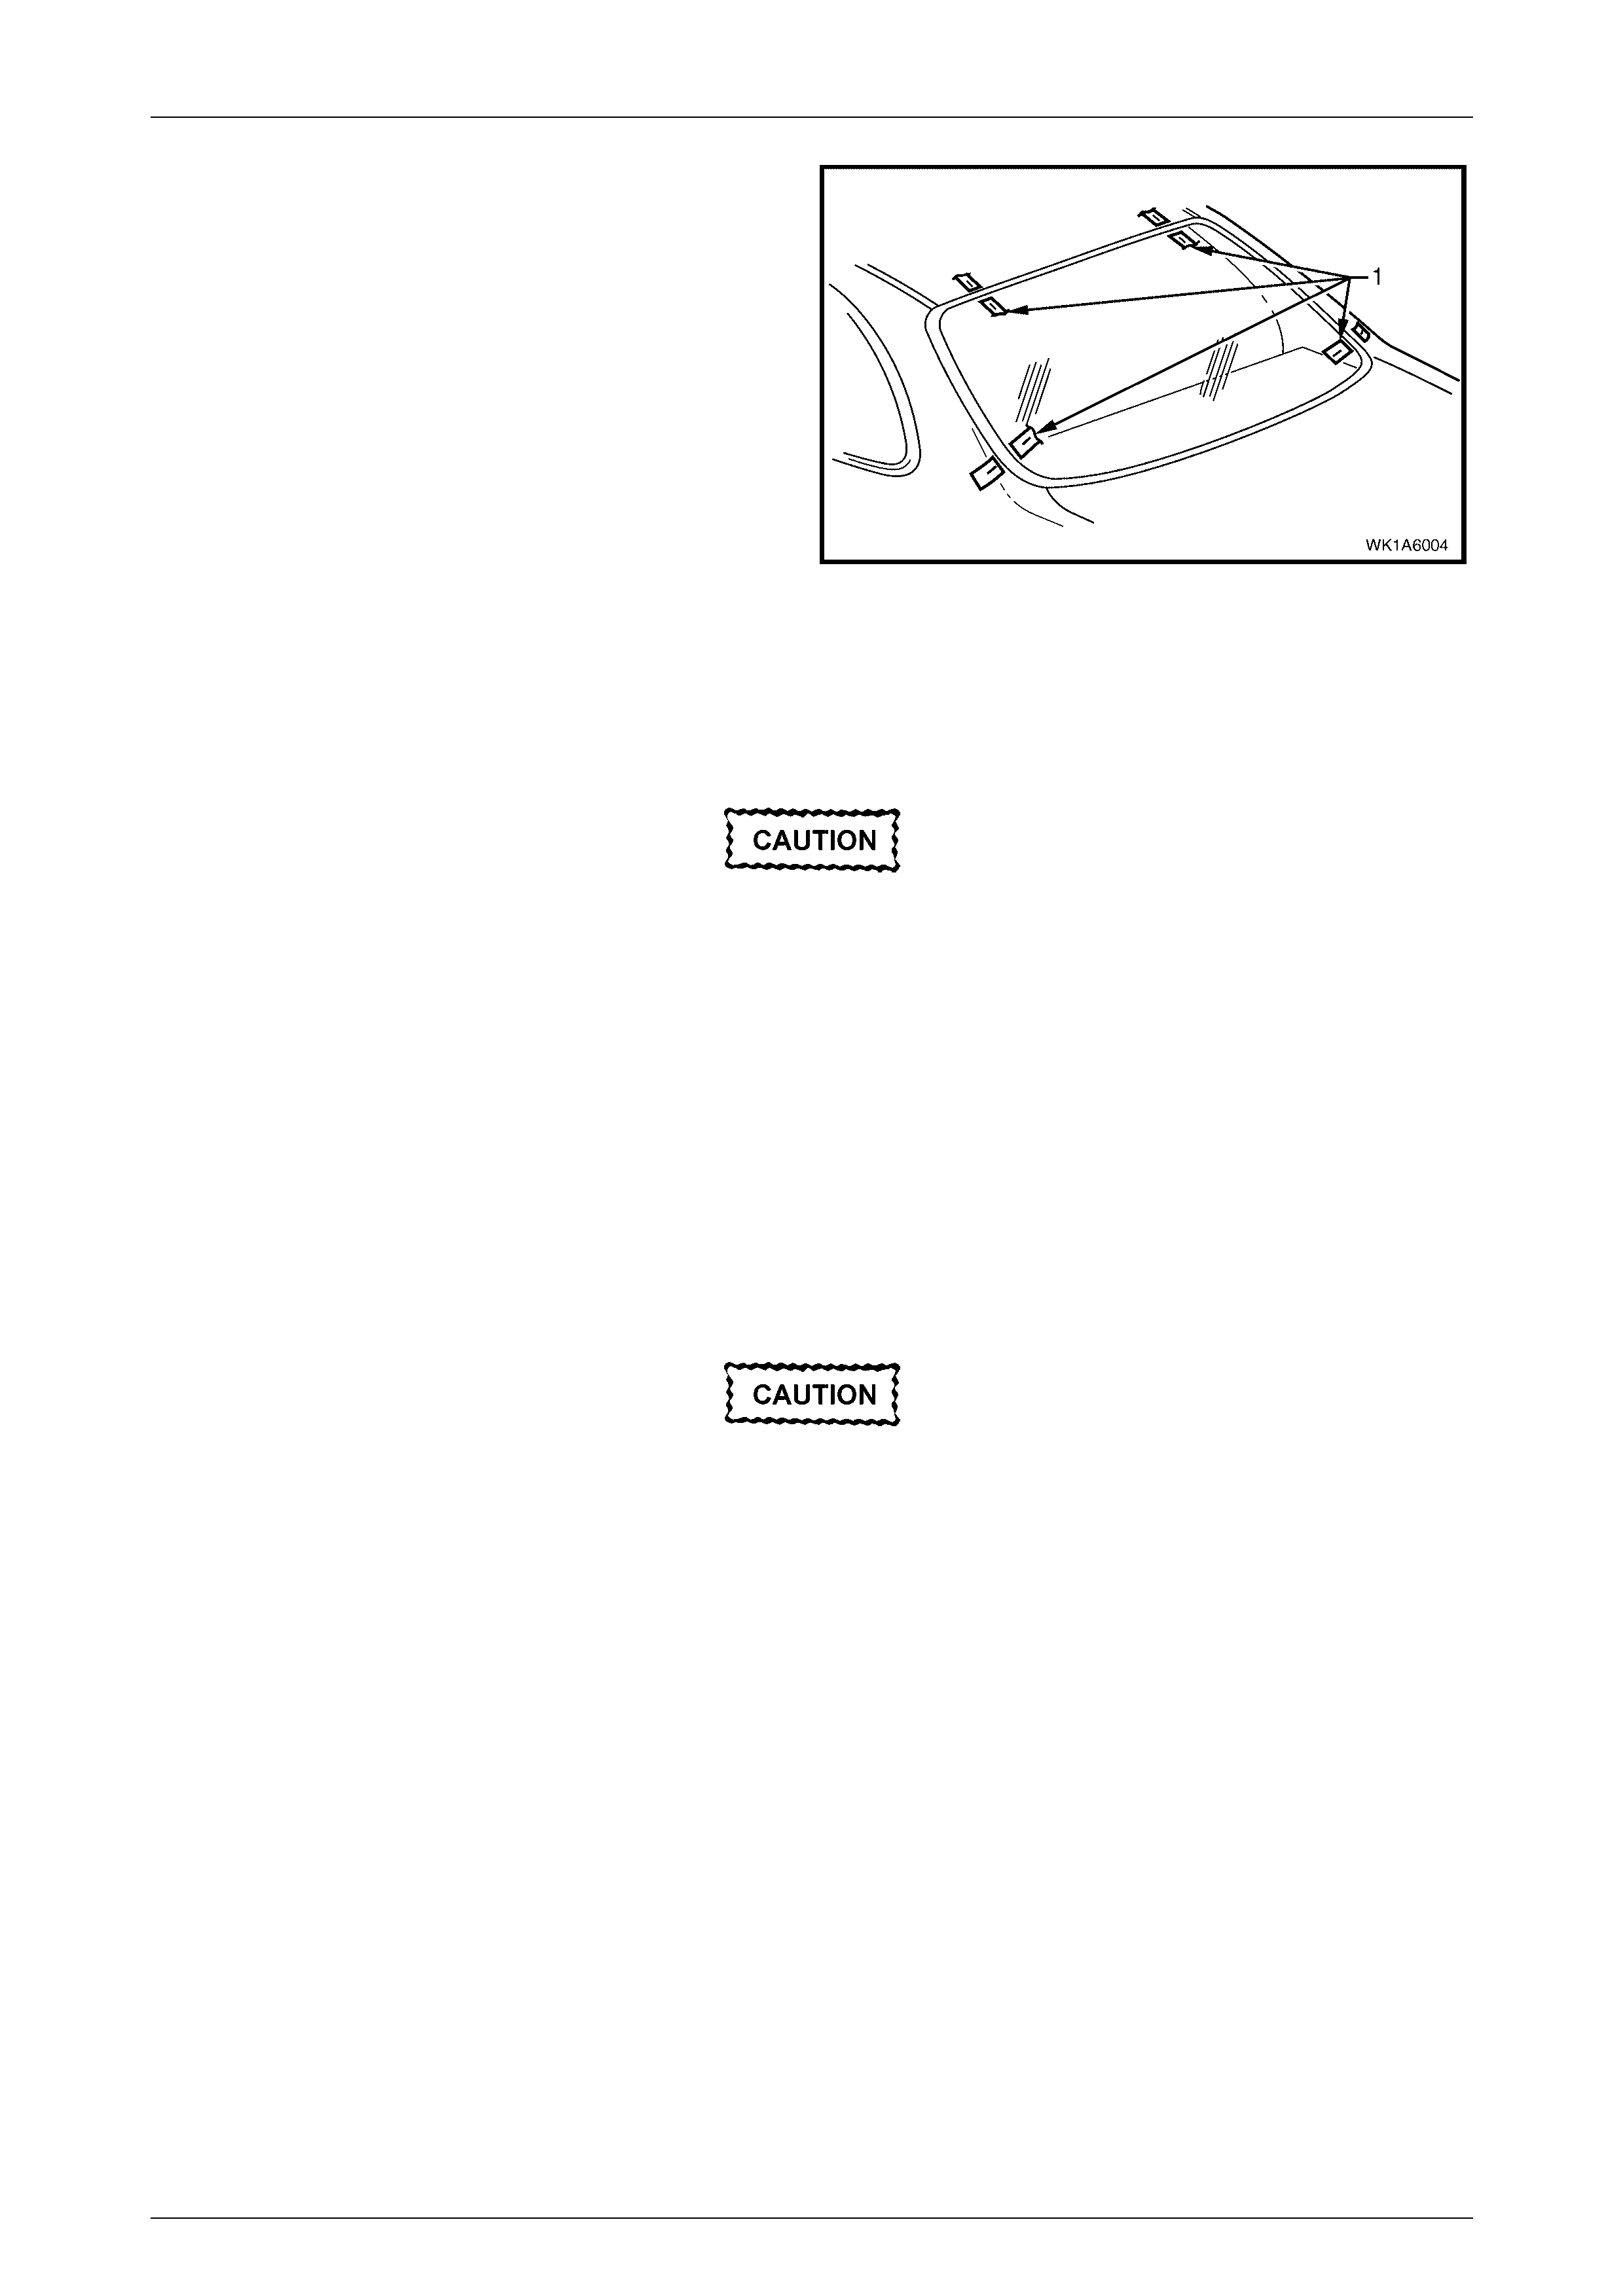
2 To check for correct alignment, temporarily place the
rear window in the body opening.
3 Ensure the rear window is centralised in the body
opening left to right, by checking that the gaps
between the rear window and body opening are even
on both sides of the vehicle.
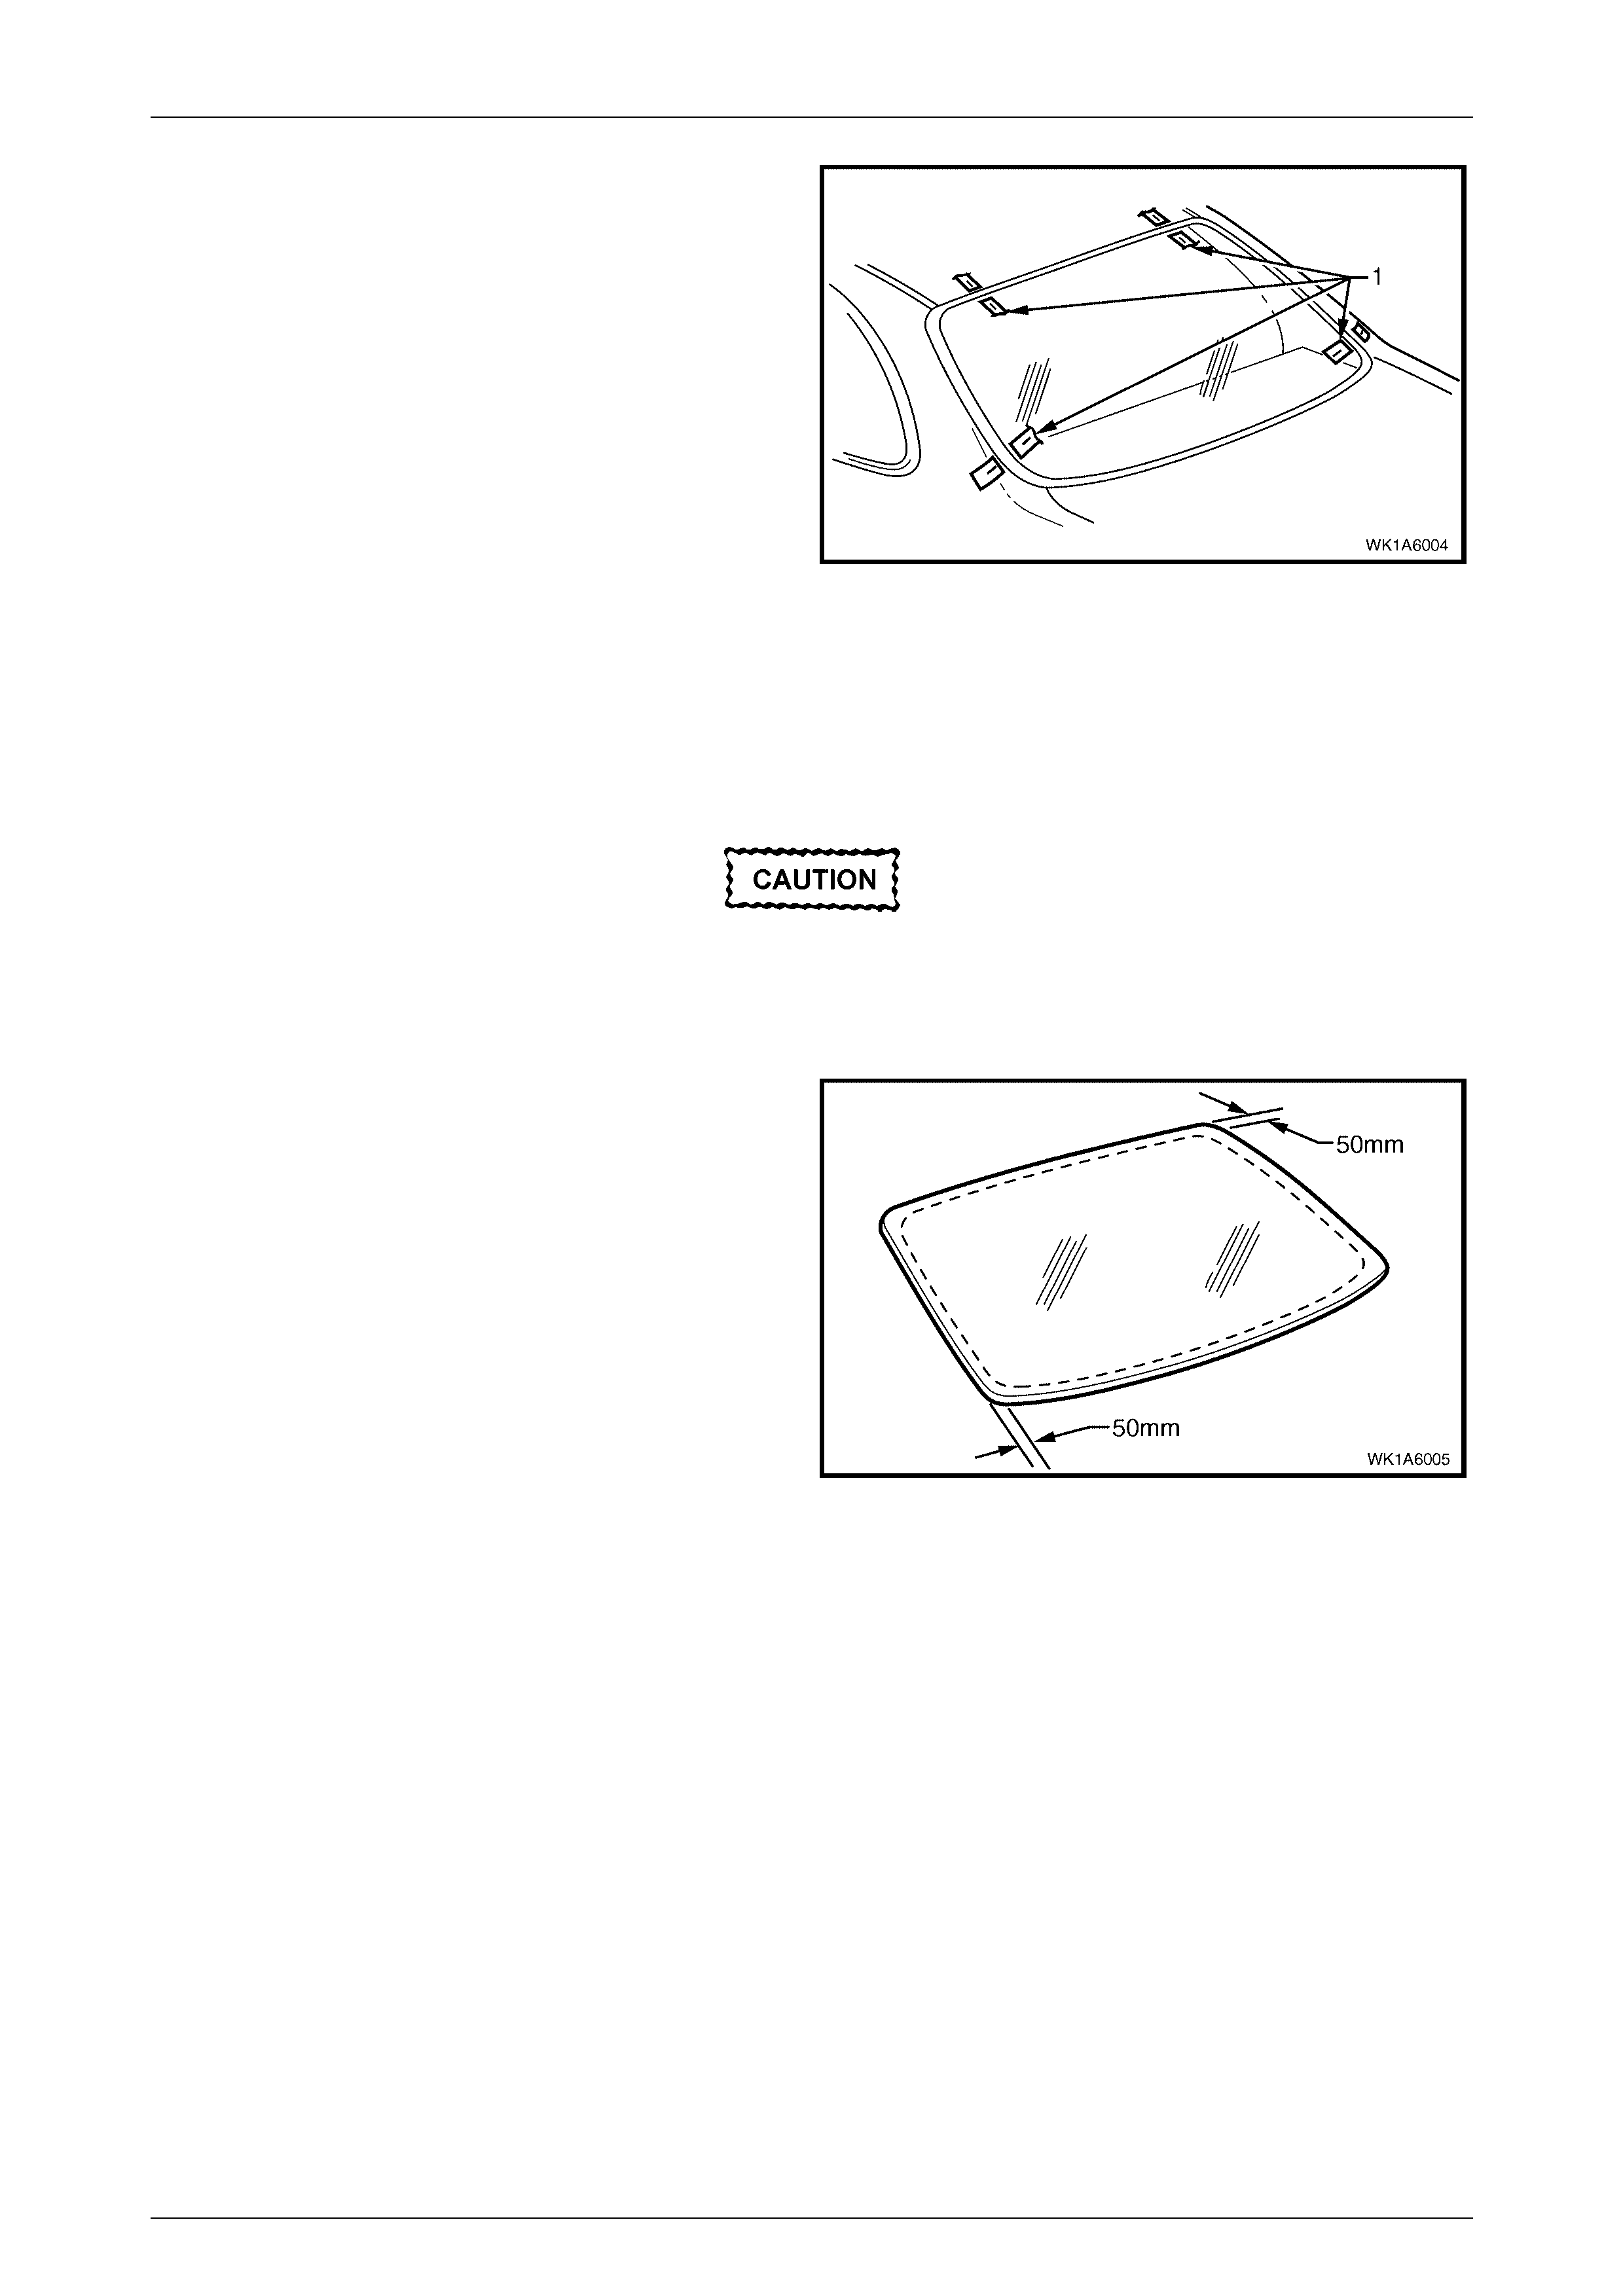
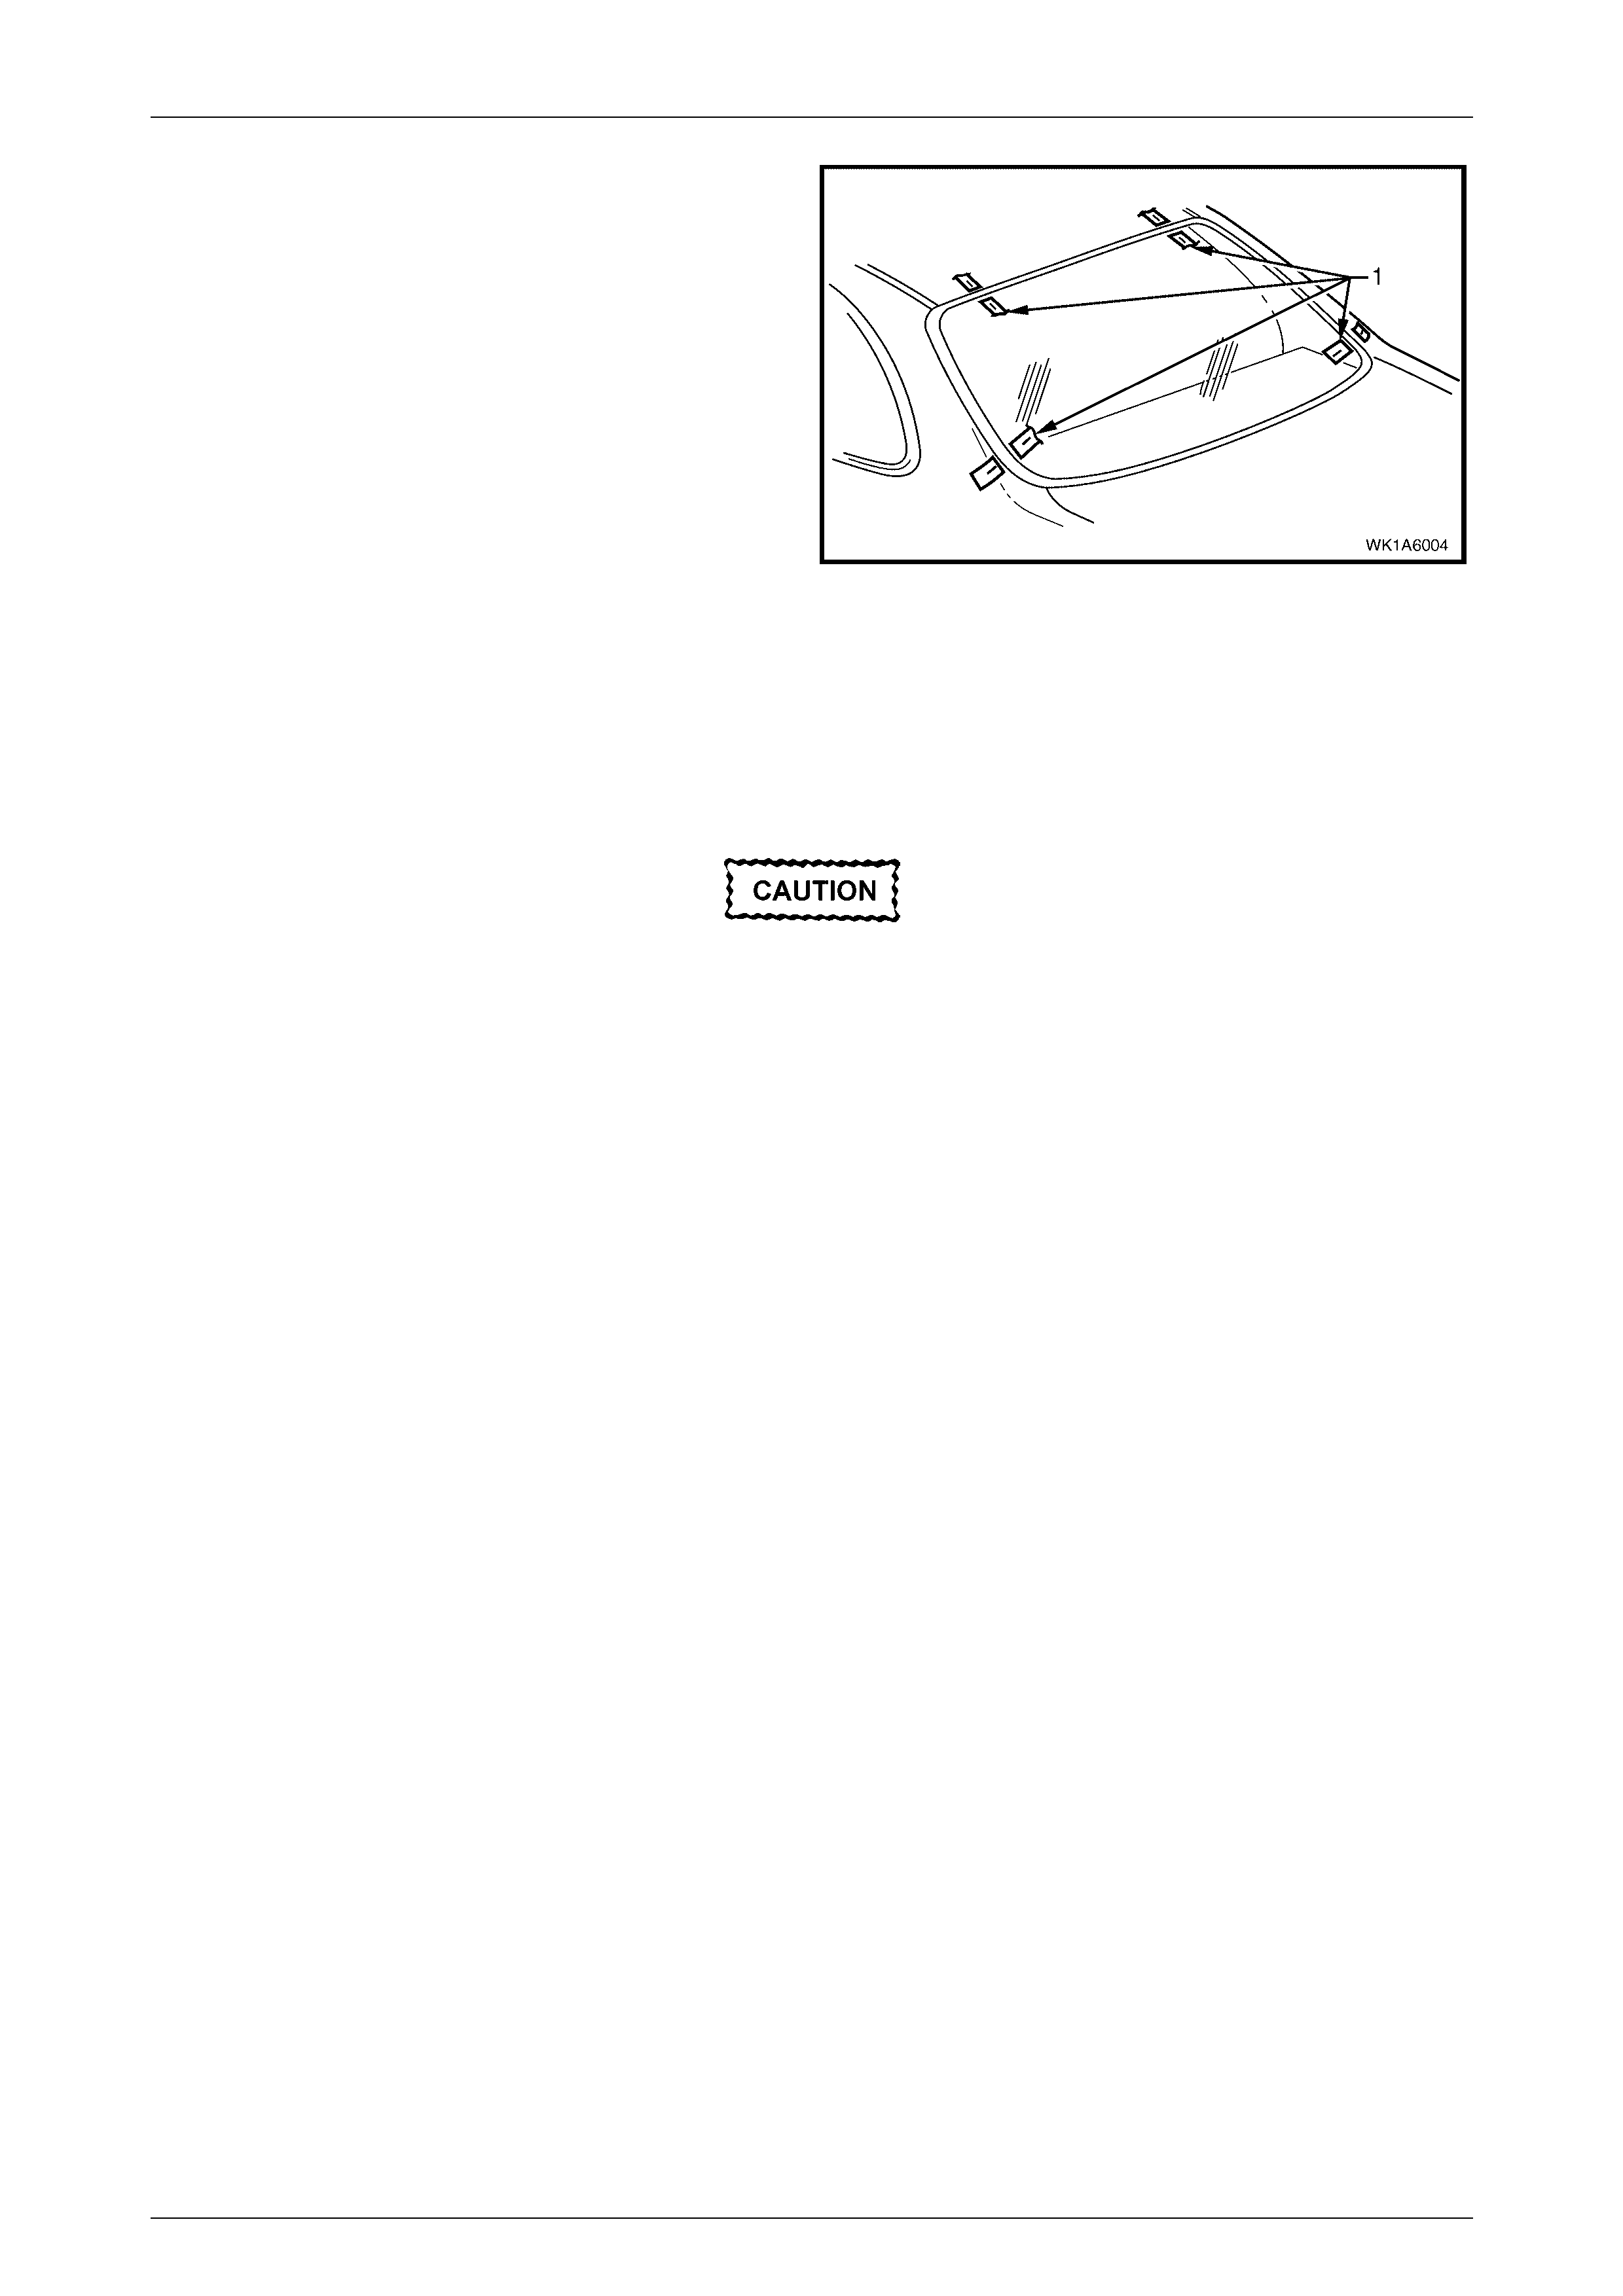
4 With masking tape (1), mark the outer top of the roof
and the rear quarter panel.
NOTE
This procedure will assist in the alignment of the
window in the correct horizontal and vertical
plane during final window installation.
5 Remove and place the rear window assembly face
down on a clean protected surface or fixture.
Figure 1A6 – 5
Reinstall
1 Thoroughly clean the inner surface and edges of the rear window assembly to which the urethane is to be applied,
using clean lint-free cloths and a suitable oil free cleaning solvent.
Do not use petroleum based solvents to clean
the rear window assembly or the rear opening
flange as the presence of the oil in the solvent
will prevent the adhesion of the new urethane.
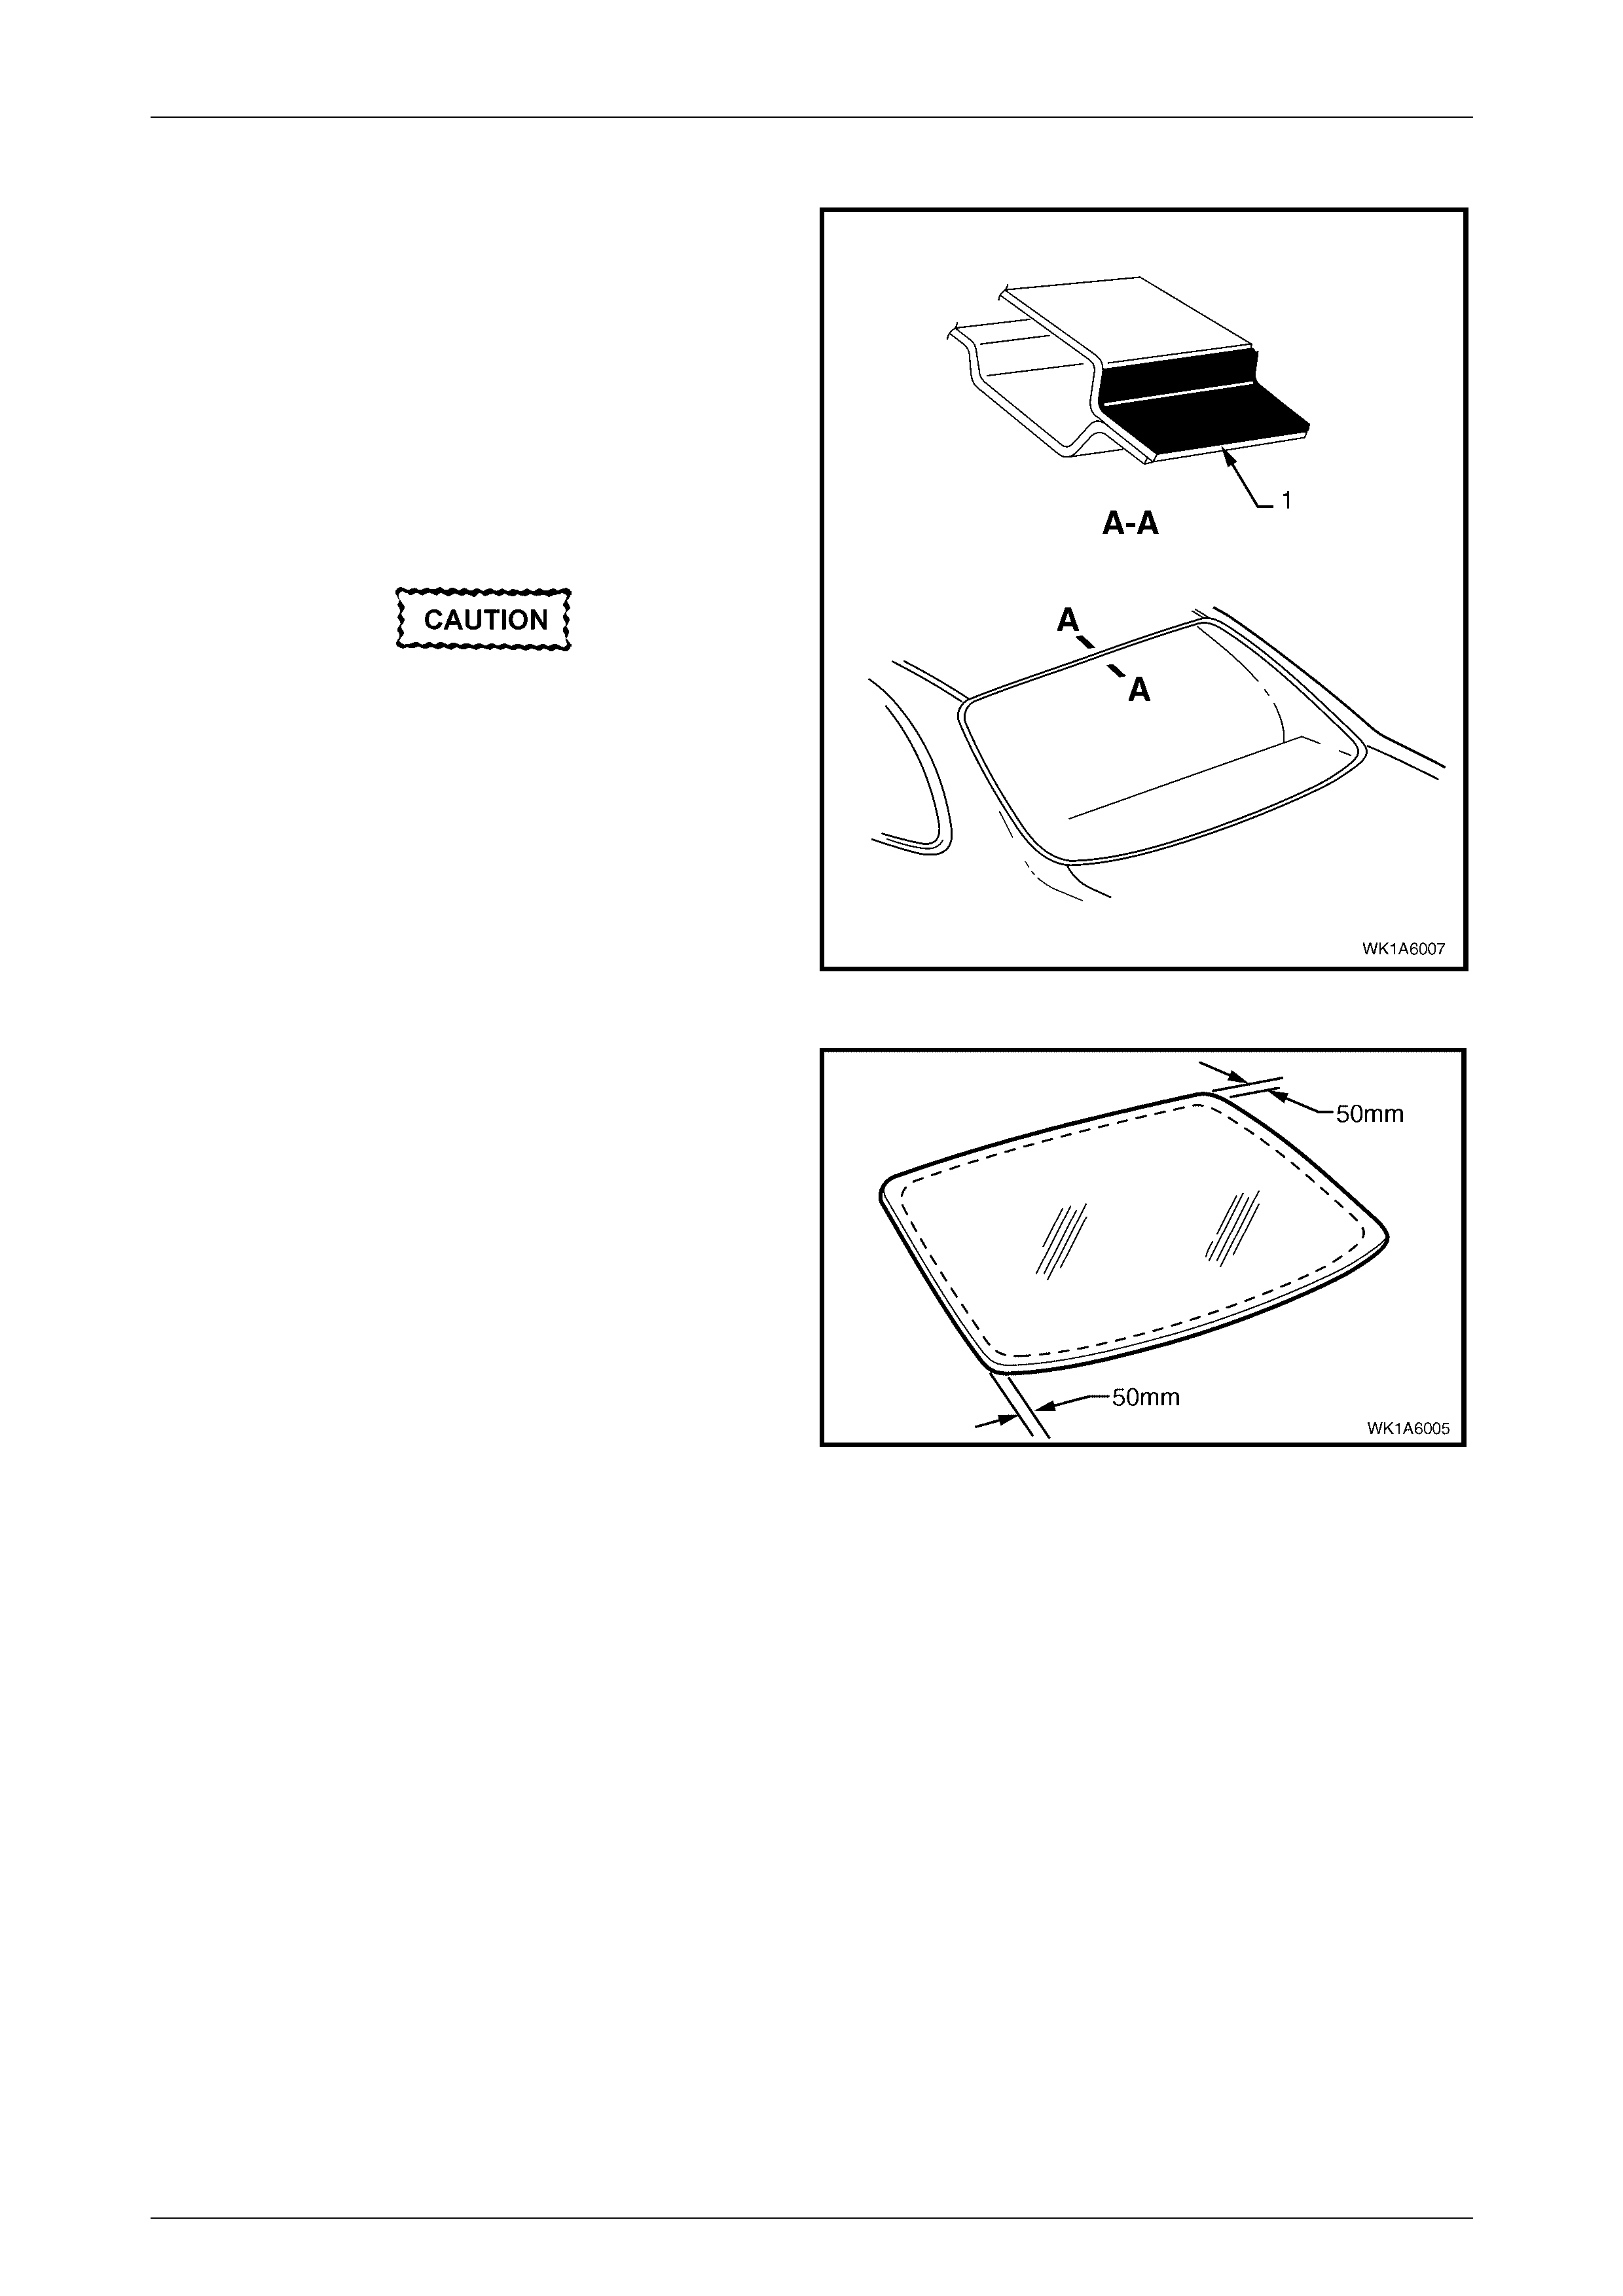
2 Apply clear window adhesive primer, over the width of
the solid black ceramic pattern (or a width of 50 mm),
to the inner surface around the perimeter of the rear
window. Immediately wipe off with a lint-free cloth.
3 Remove the old rear window moulding and replace.
Figure 1A6 – 6
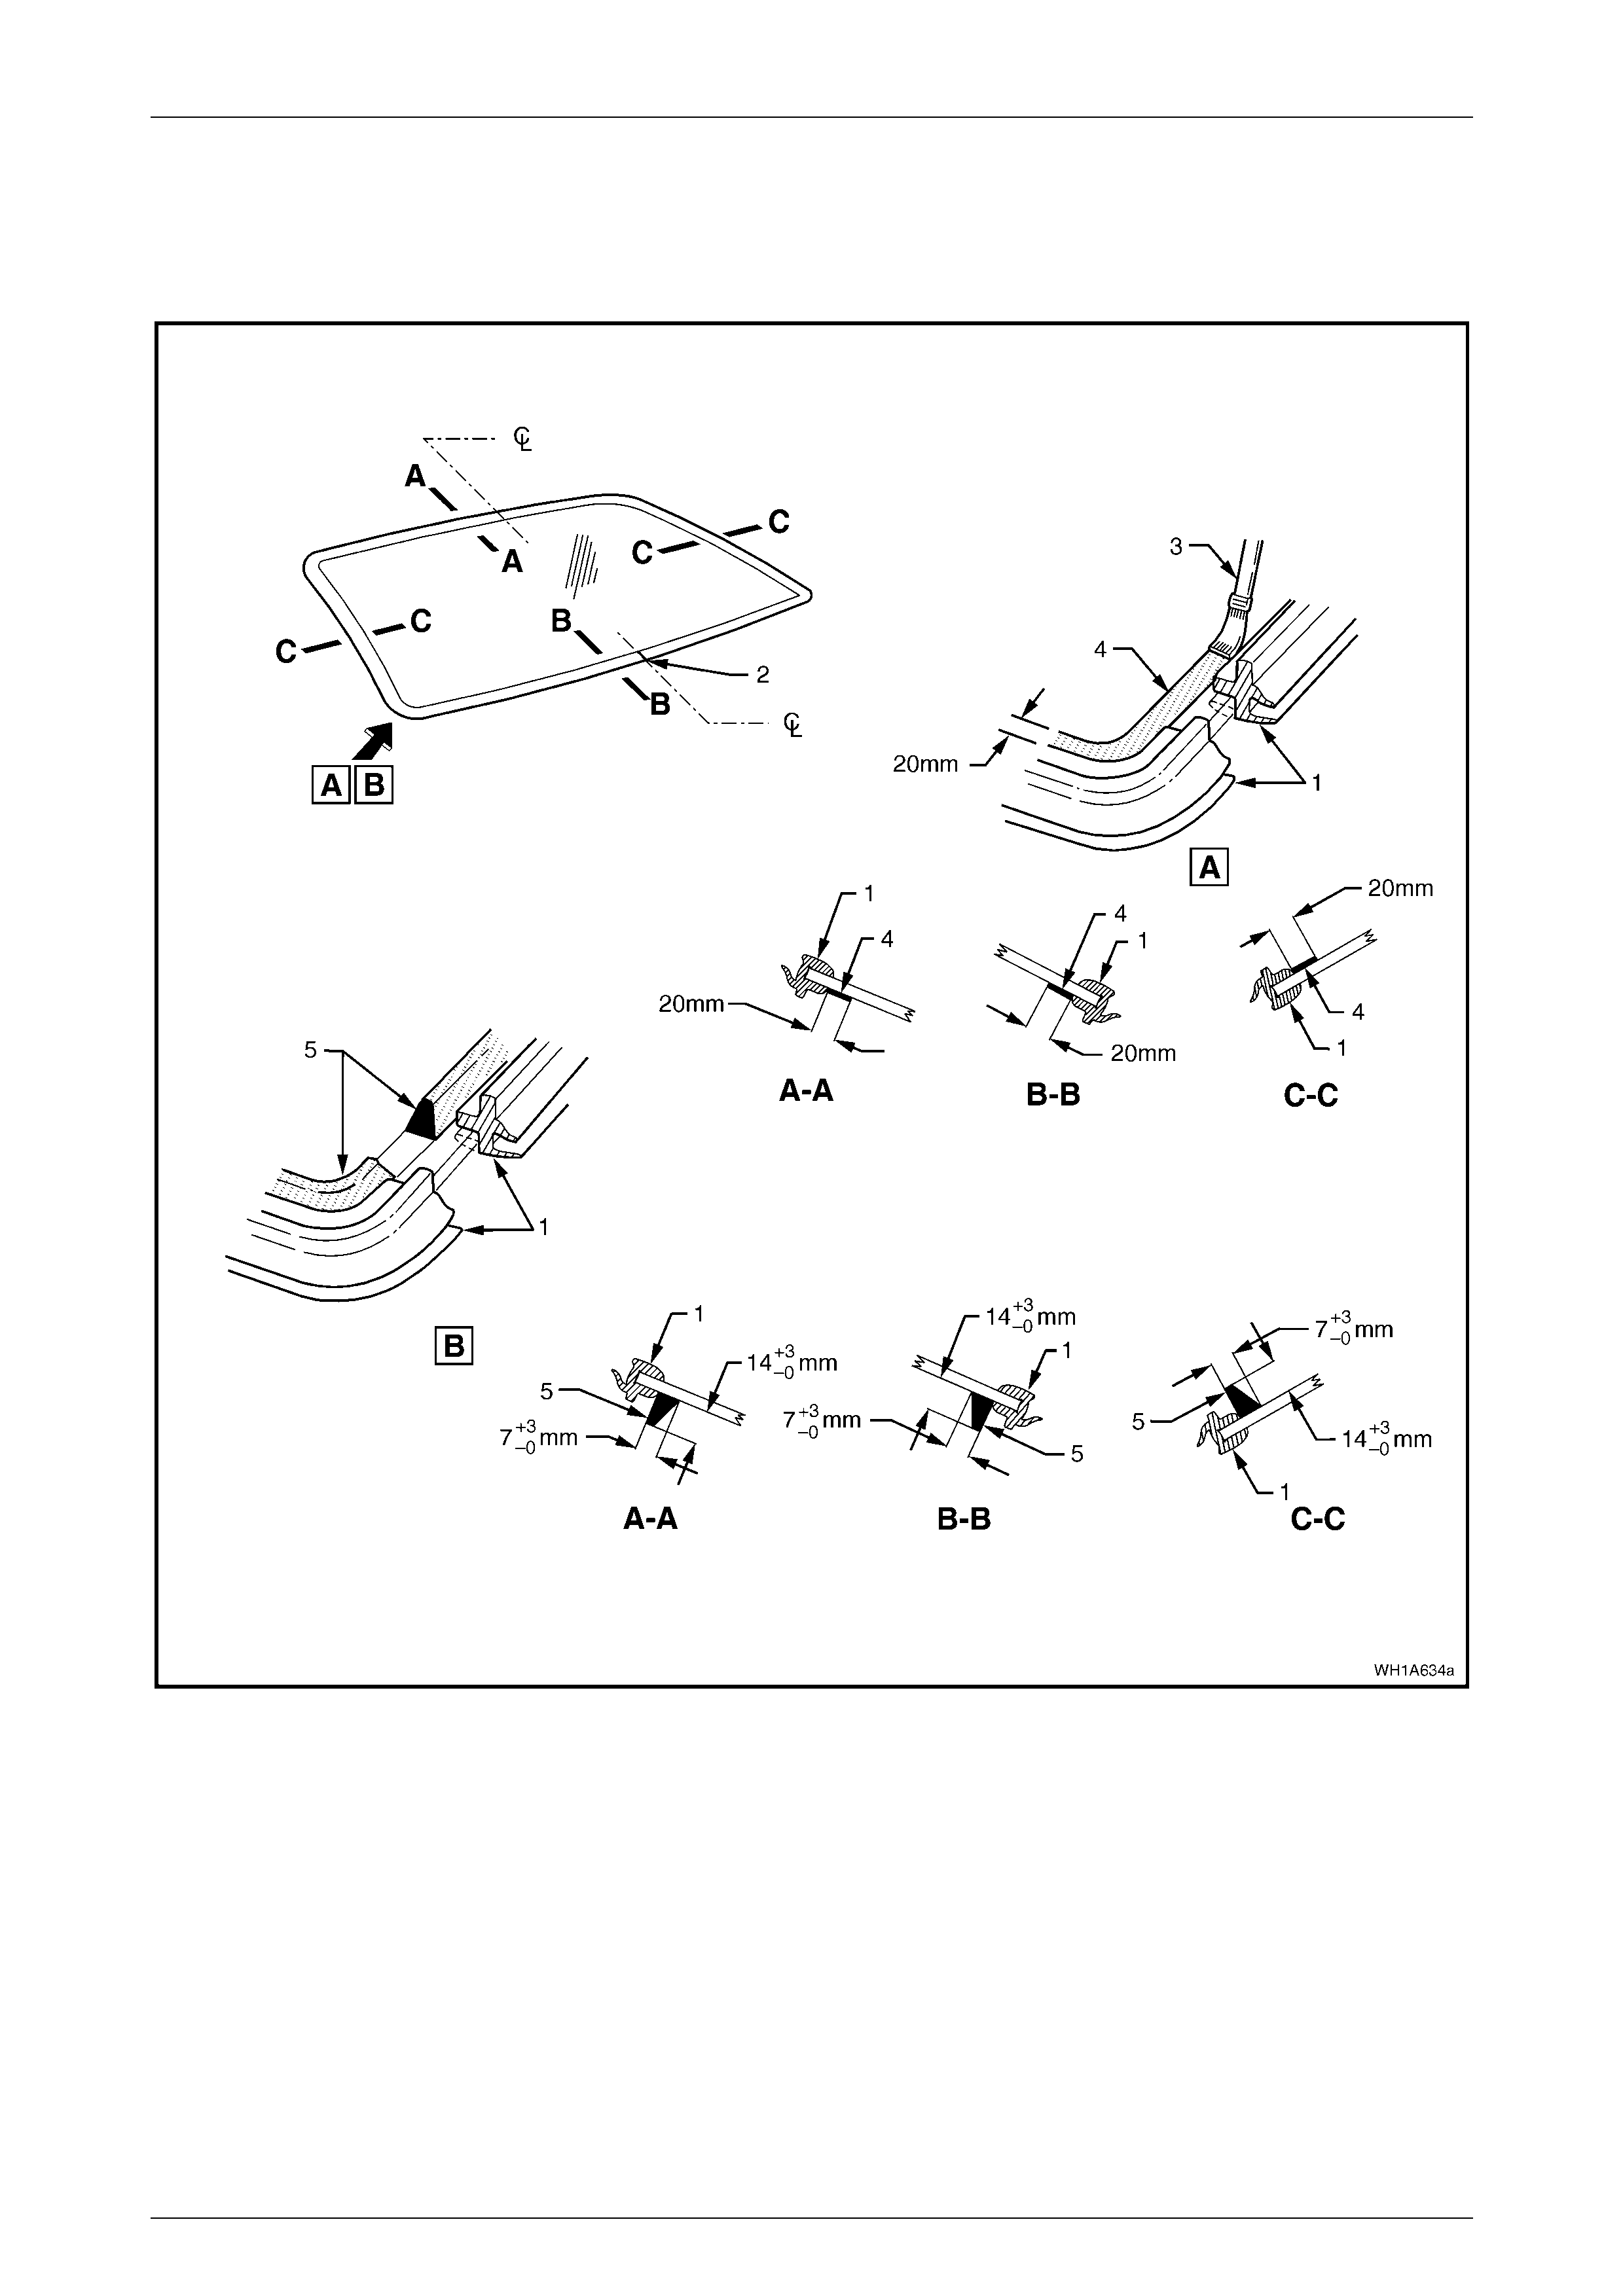
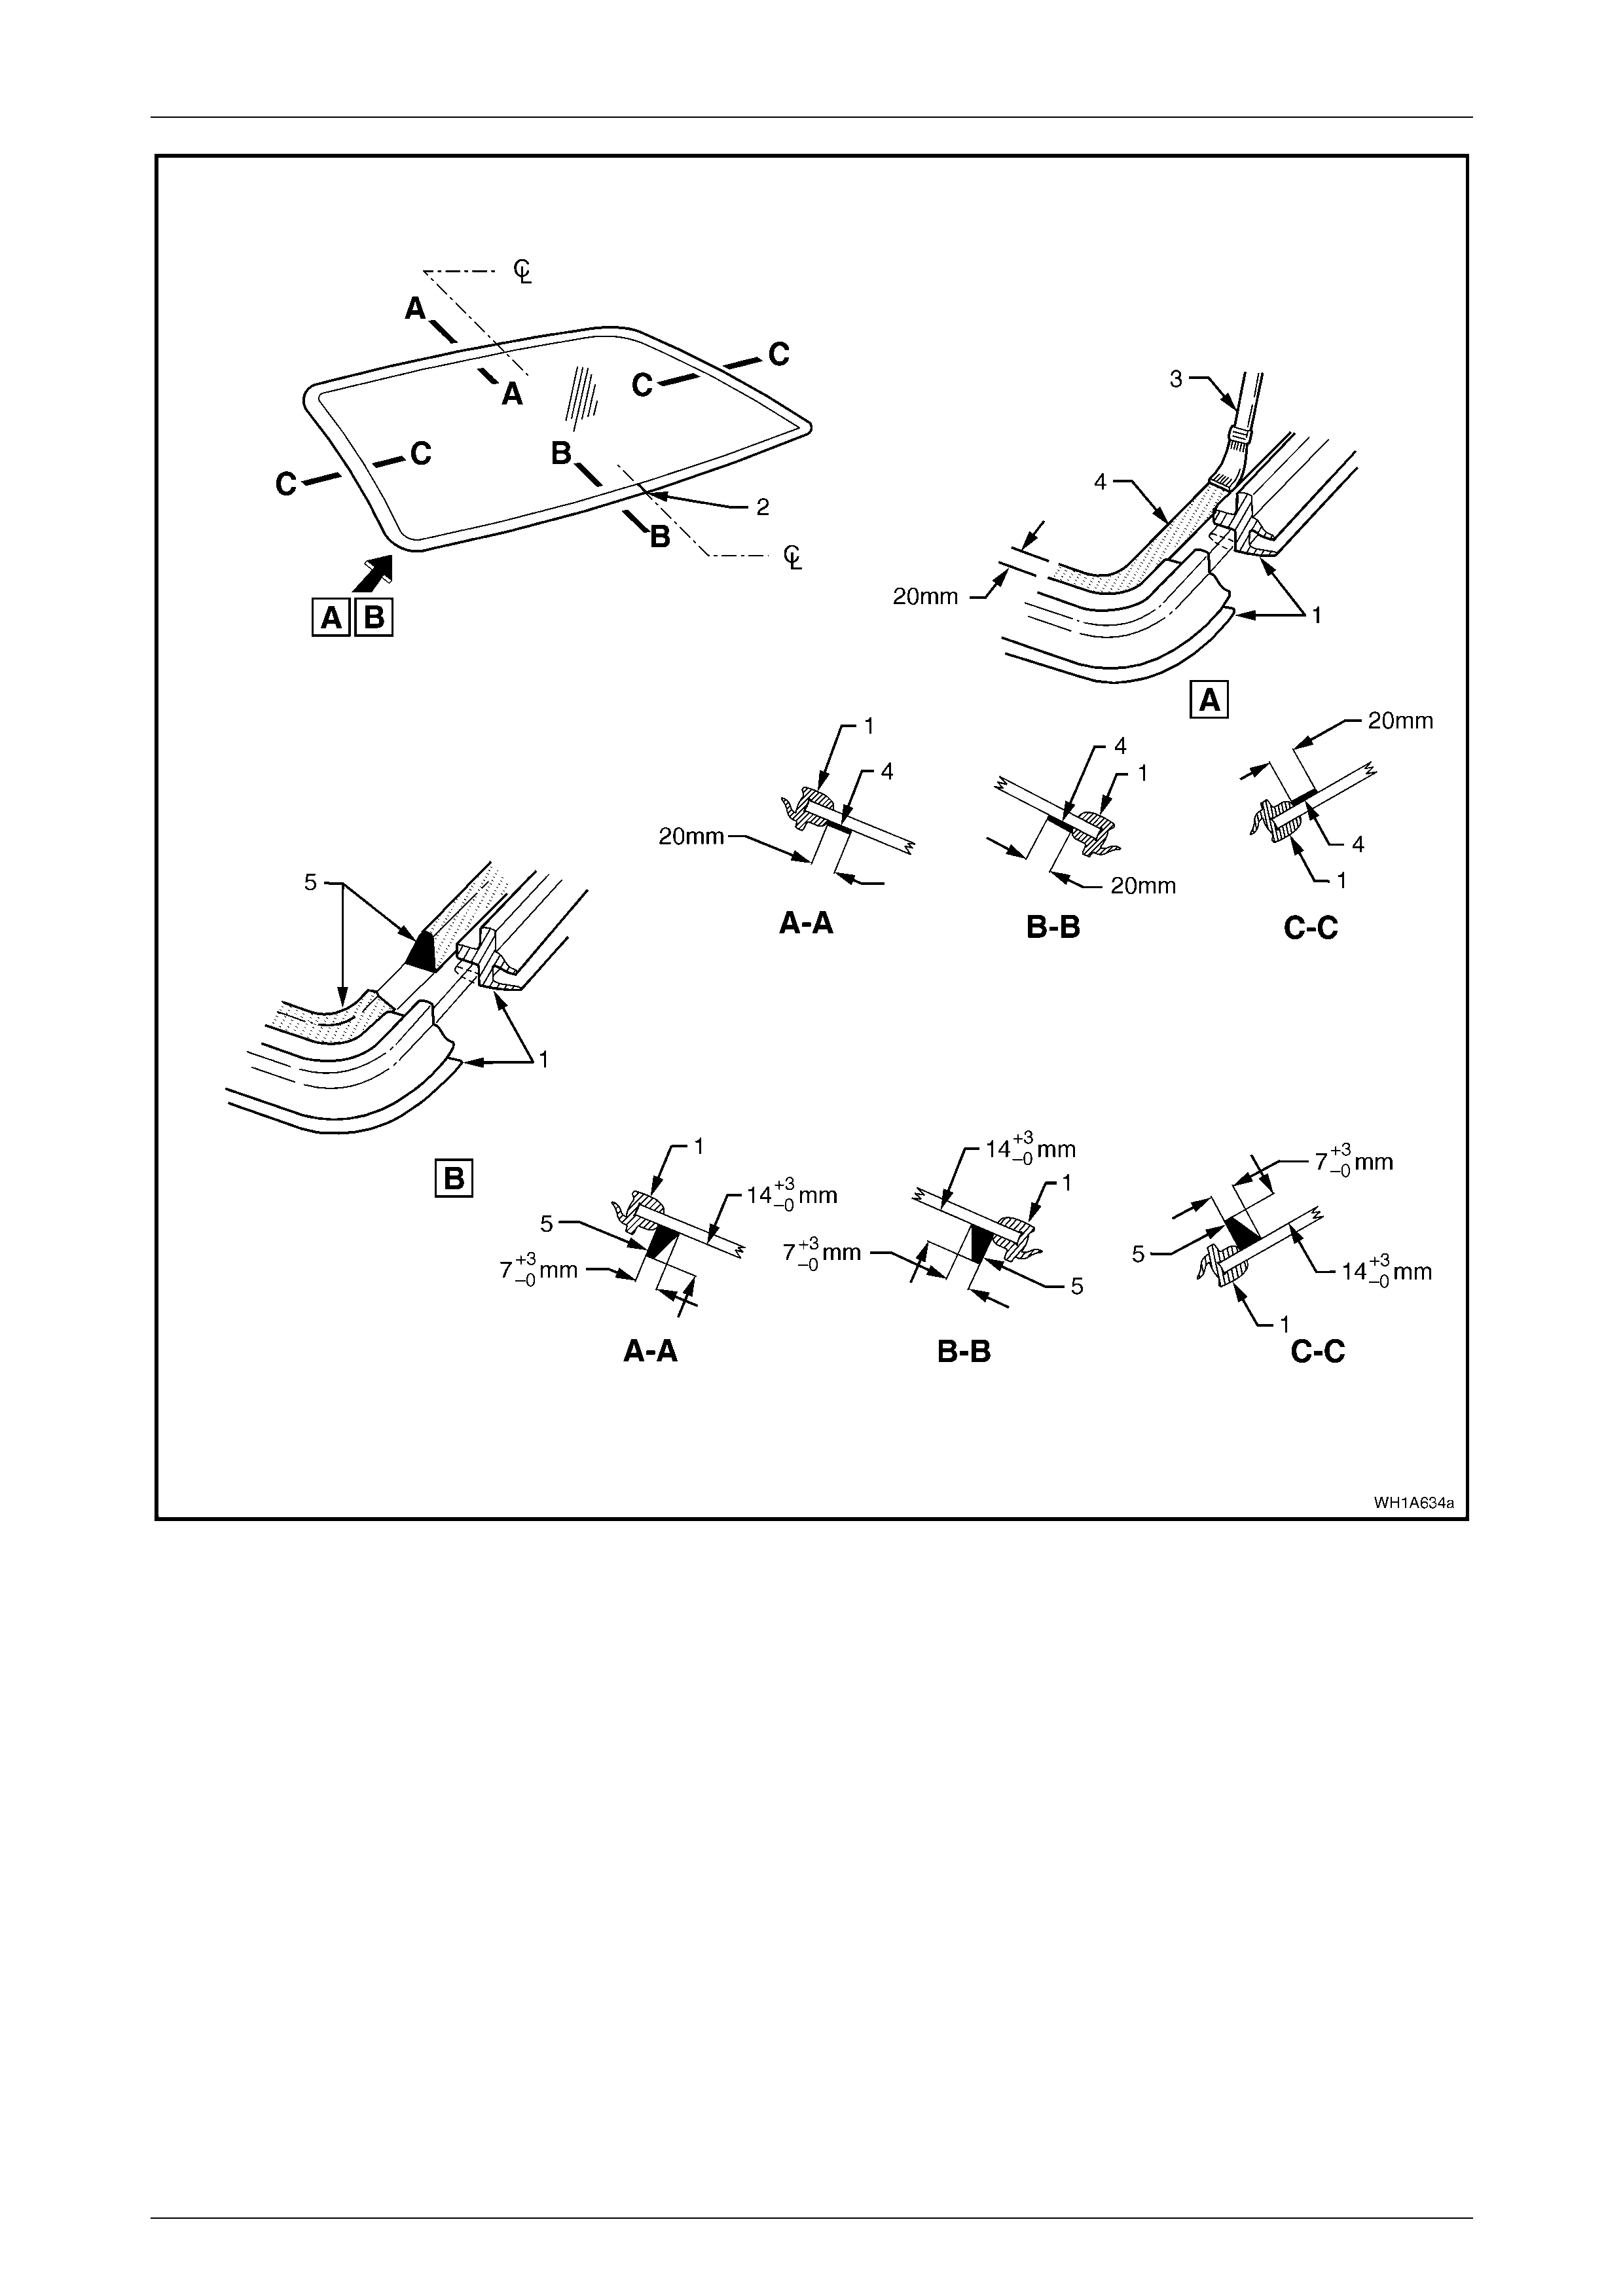
4 Install the rear window moulding (1) over the edge of the window. Ensure the moulding is fitted correctly to the
glass with the moulding joint at the bottom middle (2) of the rear window, refer to Figure 1A6 – 7.
5 Check the condition of the original urethane around the window opening flange for voids or looseness and cut away
any loose pieces.
6 Using a suitable spatula, spread fresh urethane smoothly into any voids or uneven sections.
7 Using the applicator (3) included in the service kit, apply black window adhesive primer (4) to the inner surface of
the rear window over a width of 20 mm, along the inside edge of the window moulding (1).
8 Using a hand or automatic applicator, apply a smooth continuous bead of window adhesive (urethane) (5), such as
Betaseal 15685 or equivalent, around the perimeter of the window, along the inside edge of the moulding (1). The
bead dimensions are shown in Figure 1A6 – 7.
NOTE
Depending on the amount of original urethane
remaining on the body opening flange, the
amount of the new urethane should be reduced
accordingly, while maintaining adequate strength
and sealing properties. The dimensions shown
are the maximum allowable and are only for
reference.
Stationary Windows Page 1A6–10
Page 1A6–10
NOTE
In cold weather, the placement of cartridges
adjacent to a source of warmth will assist in the
flow of urethane when using a hand applicator.
Figure 1A6 – 7
Legend
1 Moulding
2 Moulding Joint Position (on Centre Line)
3 Applicator
4 Black Glass Primer
5 Urethane Adhesive
Stationary Windows Page 1A6–11
Page 1A6–11
9 With the aid of an assistant, install the rear window
assembly, using the previously attached masking tape
(1) on the roof and the rear quarter panel to ensure
accurate align ment.
NOTE
Ensure the rear window is centralised in the
body opening left to right by checking that the
gaps between the window moulding and body
opening are even on both sides of the vehicle.
10 Press the rear window firmly into position.
Figure 1A6 – 8
11 Check effectiveness of sealing from inside the vehicle. Should any gaps in the sealing exist, apply additional
urethane to fill these gaps.
12 Wait two hours then water test the rear window, using a moderate spray of water.
Do not direct a heavy stream of water onto
freshly applied urethane. If a water leak is
evident, apply additional urethane to the leak
area, using a spatula to work the urethane
into the source of the leak.
13 Clean off any excess urethane using Prepsol or white spirit. Clean the rear window, then remove the masking tape
previously installed.
14 Connect the electrical demist connectors and cellular telephone antenna if fitted.
15 Reinstall the trim and hardware as required.
Reinstall – Long Method
Ensure that door windows are partially
lowered to eliminate pressure build up which
can be caused by slamming doors. A curing
time of 24 hours is recommended, although
the vehicle may be driven after 5 hours,
providing it is driven only o n a smooth road at
speeds not exceeding 80 km/h with the door
windows partially lowered.
Description
The long method for the rear window assembly replacement is used when the original urethane adhesive material cannot
serve as a base for the replacement rear window.
This method should be used on vehicles requiring metal or paint repair to the rear window opening when the original
adhesive is completely removed and replaced with new urethane for the window installation.
This method is also used when the rear window has been previously replaced using the short method. In such instances,
the build-up of urethane could position the window assembly too high in the opening.
Stationary Windows Page 1A6–12
Page 1A6–12
Do not use petroleum based solvents to clean
the rear window or the rear opening flange, as
the presence of the oil in the solvent will
prevent the adhesion of the new urethane.
Preparation
1 Using a sharp scraper, carefully remove any original urethane from around the rear window. Clean the wi ndow to
be installed with a suitable oil free cleaning agent.
2 Using a knife or sharp scraper, remove the original urethane from around the entire perimeter of the window
opening flange. Avoid the removal of paint when removing urethane from opening flange.
Rear Window Opening Check
1 Thoroughly check the rear window opening flange for any irregularities before installing the rear window assembly.
Care should be taken to ensure that the rear
window does not strike the rear window
opening. Chipped edges can lead to
subsequent breakage of the window
assembly.
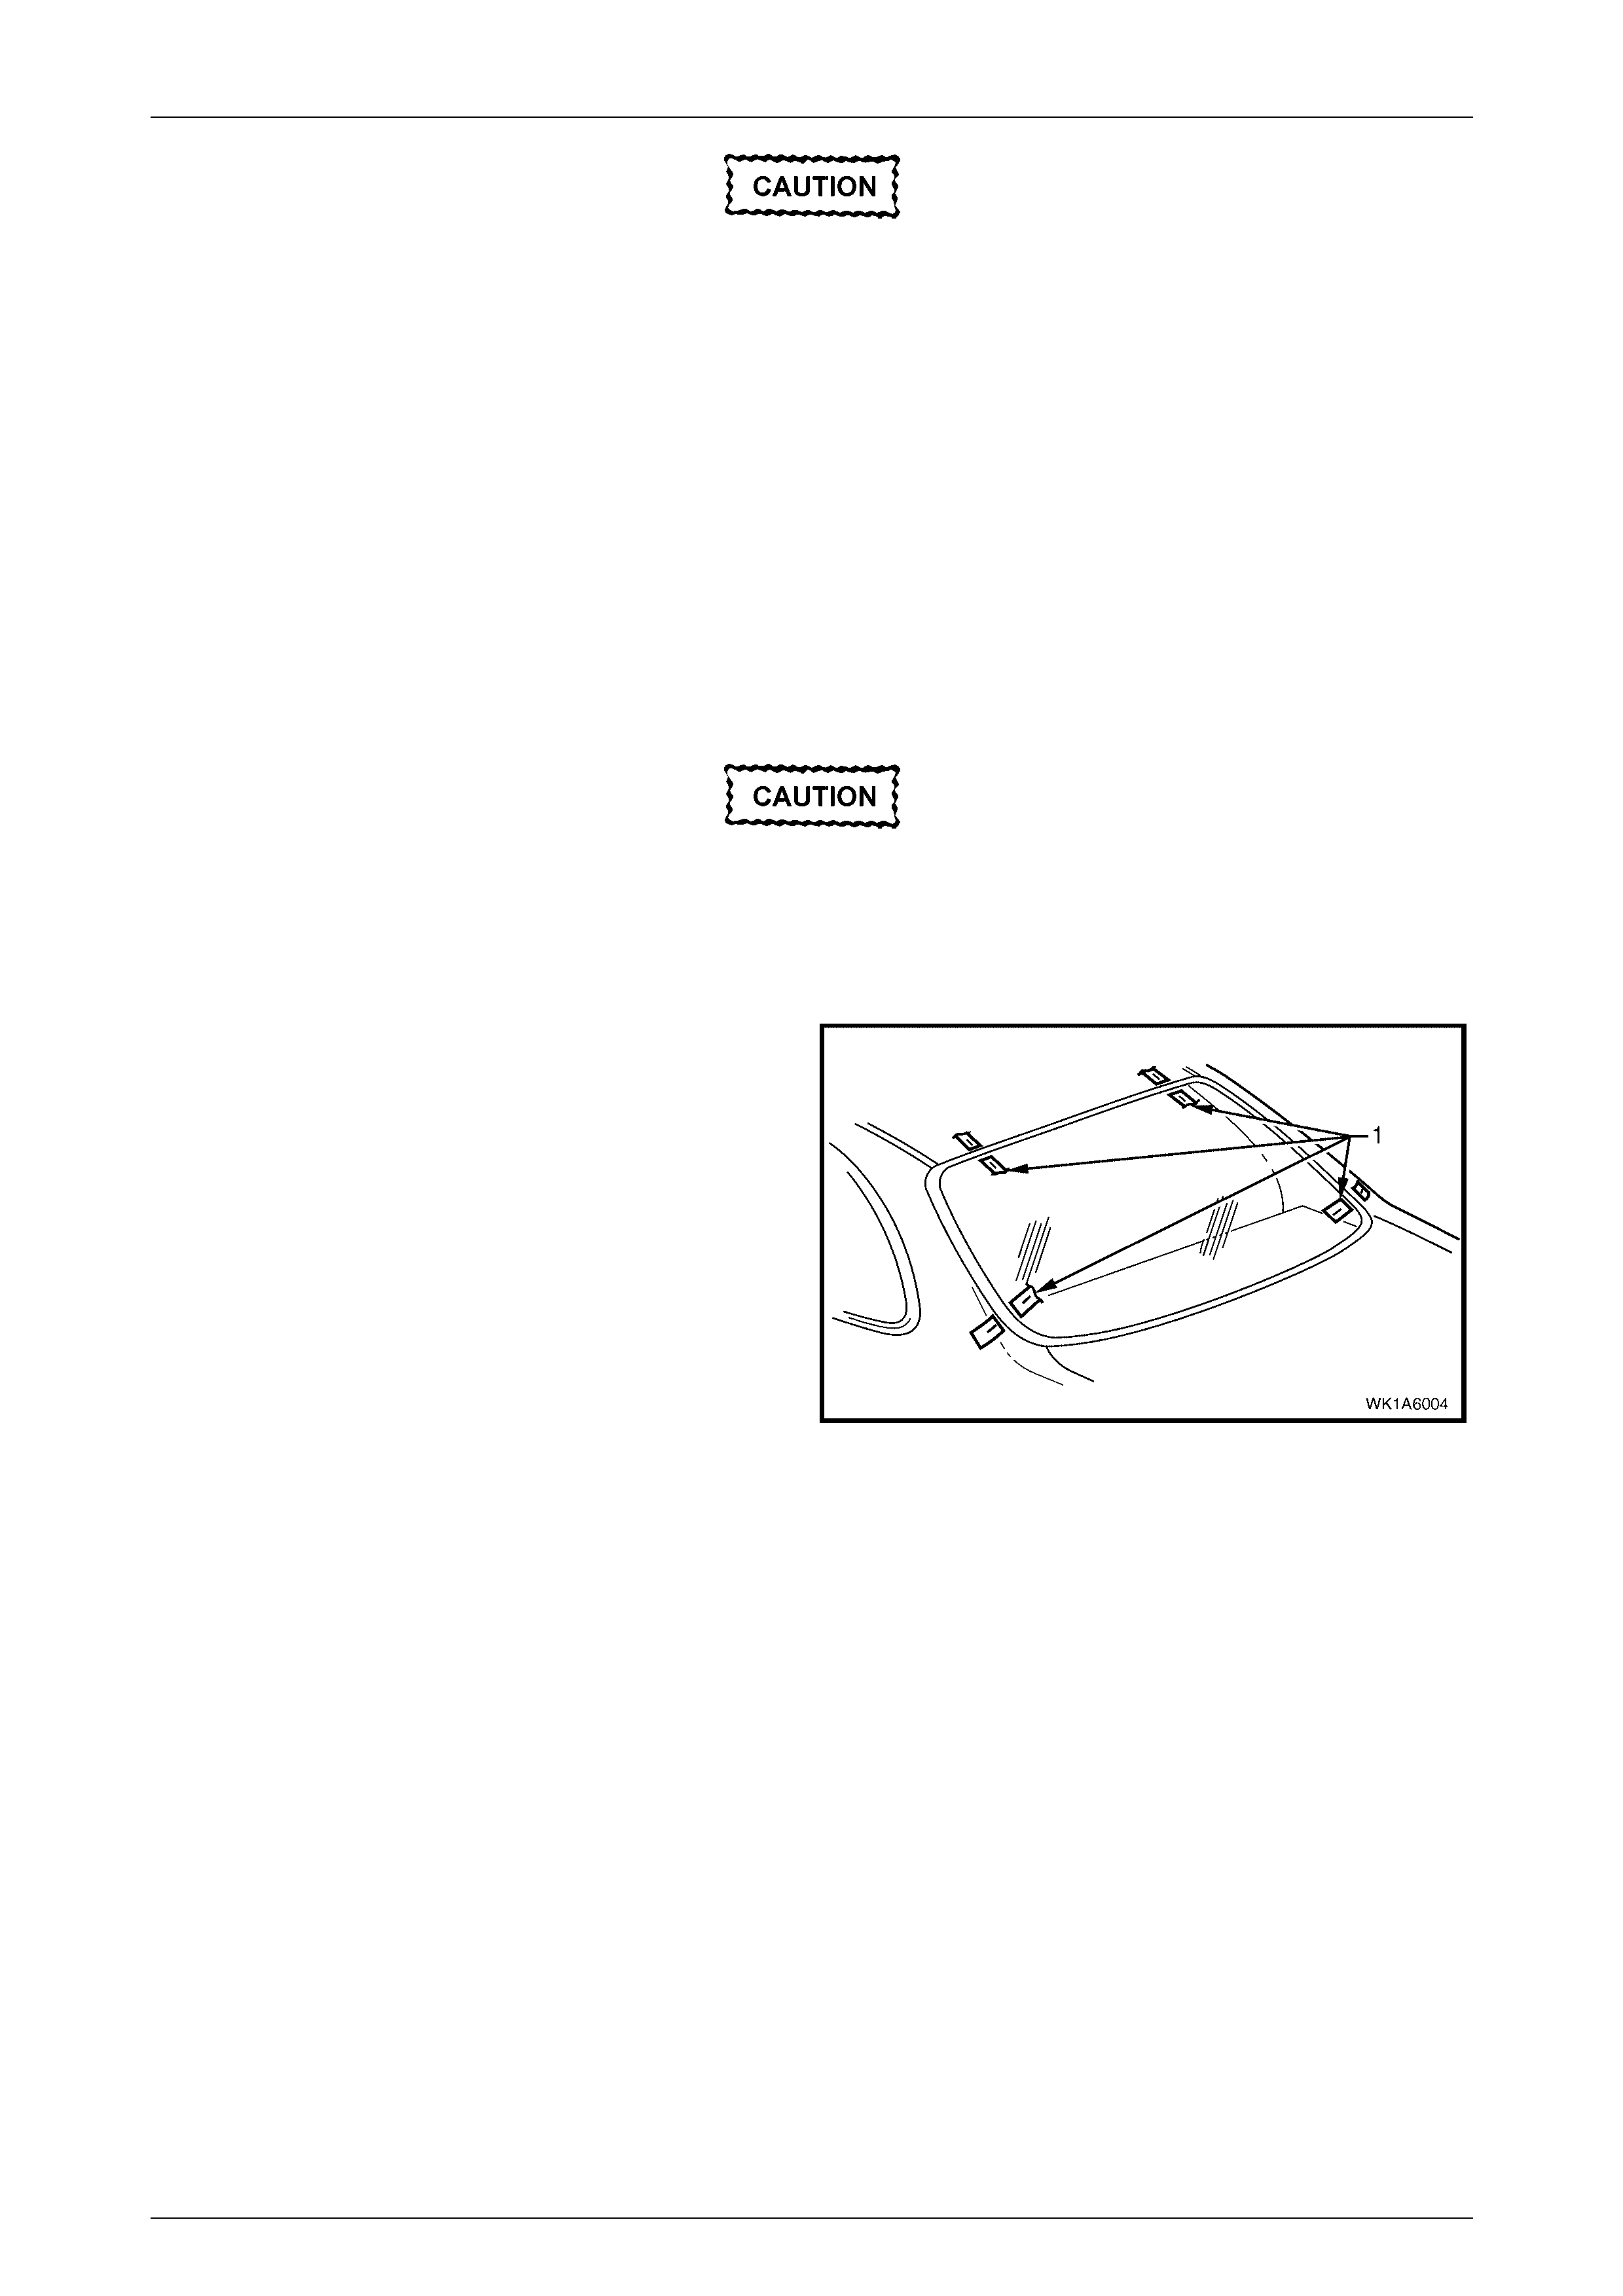
2 To check for correct alignment, temporarily place the
rear window in the body opening.
3 If necessary, re-form the rear window opening flange
to produce a uniform flange to the window contour.
4 Ensure the rear window is centralised in the body
opening left to right, by checking that the gaps
between the rear window and body opening are even
on both sides of the vehicle.
5 With masking tape (1), mark the outer top of the roof
and the rear quarter panel.
NOTE
This procedure will assist in the alignment of the
window in the correct horizontal and vertical
plane during final window installation.
6 Remove and place the rear window assembly face
down on a clean protected surface or fixture.
Figure 1A6 – 9
Stationary Windows Page 1A6–13
Page 1A6–13
Reinstall
NOTE
Flange primer is NOT required if using the
recommended urethane adhesive Betaseal
15685.
If not using Betaseal 15685, a nd are using an equiv al ent
system, refer to technical data supplied by the
manufacturer.
If required by the manufacturer, apply flange primer (1) as
directed.
Do not use petroleum based solvents to
clean the rear window assembly, or the rear
opening flange as the presence of the oil in
the solvent will prevent the adhesion of the
new urethane.
1 Thoroughly clean the inner surface and edges of the
rear window assembly to which the urethane is to be
applied, using cle an lint-free cloths and a suitable oil
free cleaning solvent.
Figure 1A6 – 10
2 Apply clear window adhesive primer, over the width of
the solid black ceramic pattern (or a width of 50 mm),
to the inner surface around the perimeter of the rear
window. Immediately wipe off with a lint-free cloth.
3 Remove the old rear window moulding and replace.
Figure 1A6 – 11
4 Install the rear window moulding (1) over the edge of the window. Ensure the moulding is fitted correctly to the
window with the moulding joint at the bottom middle (2) of the rear window, refer to Figure 1A6 – 12.
5 Check the condition of the original urethane around the window opening flange for voids or looseness.
6 Use the applicator (3) included in the service kit, to apply black window adhesive primer (4) to the rear window as
described in the following step.
7 Apply black window adhesive primer (4) to the inner surface, around the perimeter of the window over a width of
20 mm, along the inside edge of the window moulding (1).
8 Using a hand or automatic applicator, apply a smooth continuous bead of window adhesive (urethane) (5), such as
Betaseal 15685 or equivalent, around the perimeter of the window, along the inside edge of the mouldings (1). The
bead dimensions are shown in Figure 1A6 – 12.
NOTE
In cold weather, the placement of cartridges
adjacent to a source of warmth will assist the flow
of urethane when using a hand applicator.
Stationary Windows Page 1A6–14
Page 1A6–14
Figure 1A6 – 12
Legend
1 Moulding
2 Moulding Joint Position (on Centre Line)
3 Applicator
4 Black Glass Primer
5 Urethane Adhesive
Stationary Windows Page 1A6–15
Page 1A6–15
9 With the aid of an assistant, install the rear window
assembly, using the previously attached masking tape
(1) on the roof and the rear quarter panel to ensure
accurate instal lati on.
NOTE
Ensure the rear window is centralised in the
body opening left to right by checking that the
gaps between the window moulding and the
body opening are even on both sides of the
vehicle.
Figure 1A6 – 13
10 Press the rear window firmly into position.
11 Check effectiveness of sealing from insi de the vehicle. Should any gaps in the sealing exist, apply additional
urethane to fill these gaps.
12 Wait two hours then water test the rear window, using a moderate spray of water.
Do not direct a heavy stream of water onto
freshly applied urethane. If a water leak is
evident, apply additional urethane to the leak
area, using a spatula to work the urethane
into the source of the leak.
13 Clean off any excess urethane using Prepsol or white spirit. Clean the rear window, then remove the masking tape
previously installed.
14 Connect the electrical demist connectors and cellular telephone antenna if fitted.
15 Reinstall the trim and hardware as required.
Stationary Windows Page 1A6–16
Page 1A6–16
2.3 Rear Window Lower Finisher
Remove
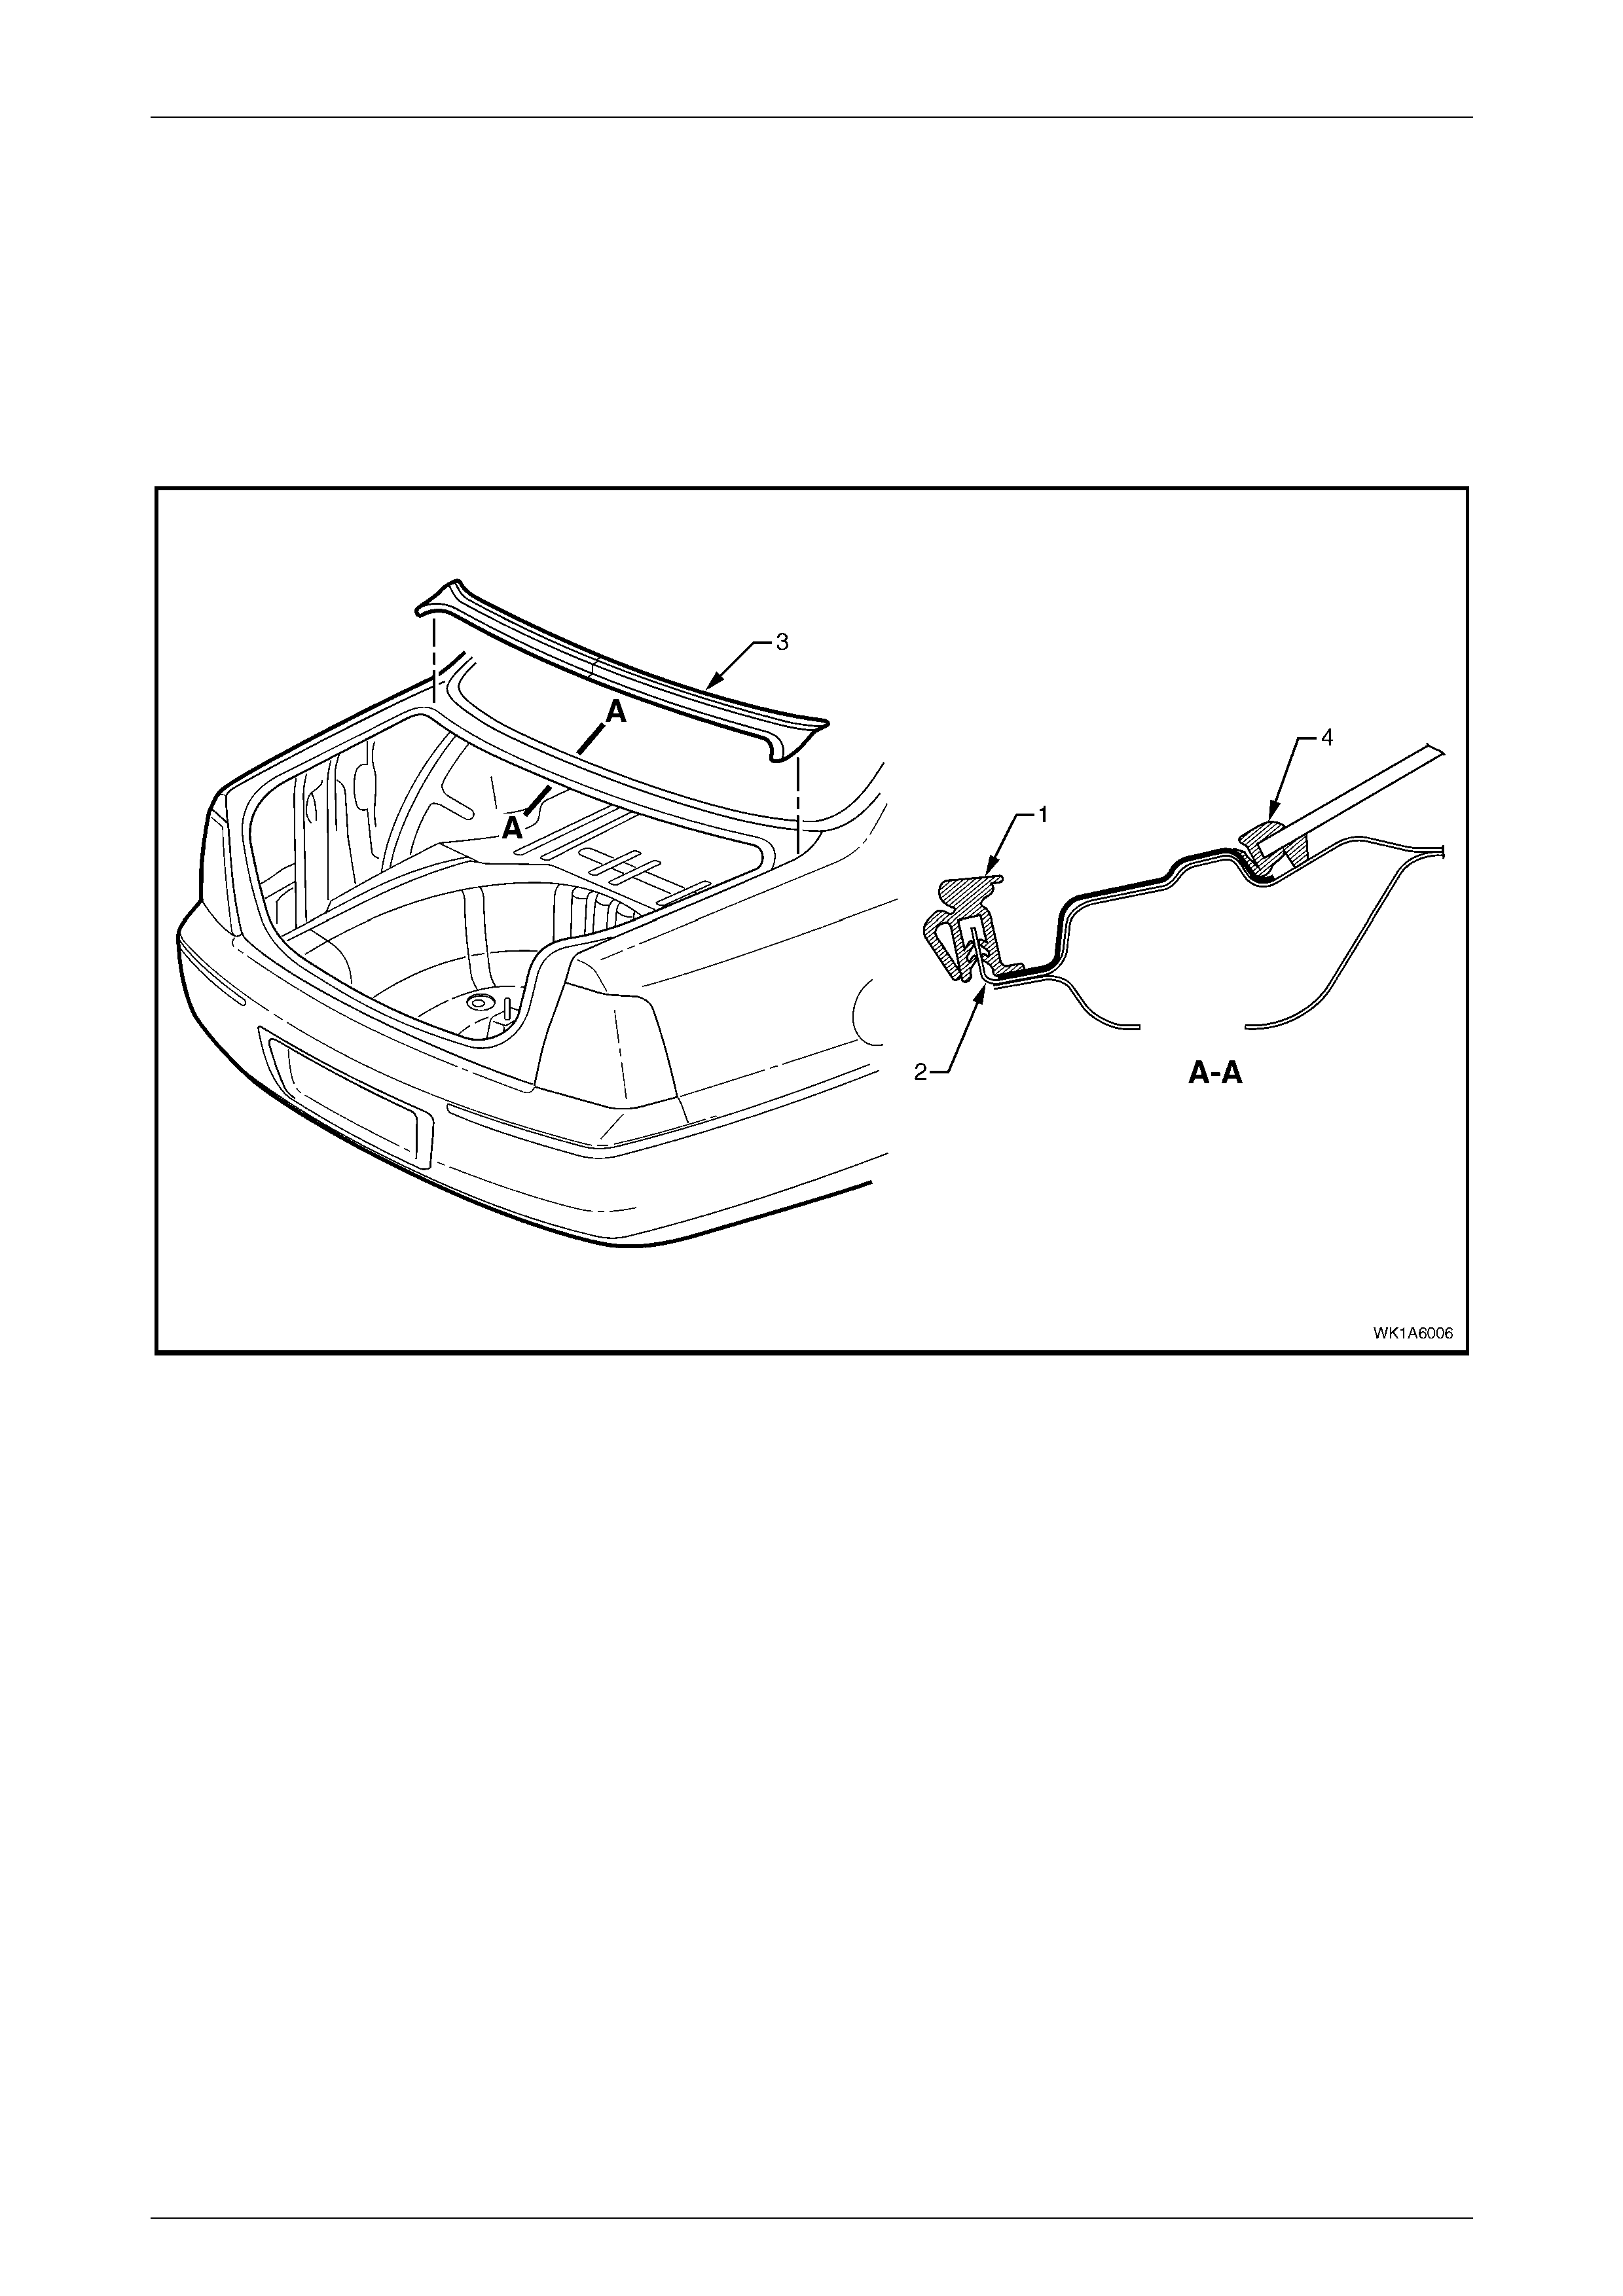
1 Remove the rear compartment lid weatherstrip (1) from around the lip flange of the rear compartment (2), refer to
Figure 1A6 – 14.
2 Starting from one end, carefully remove the rear wi ndow lower finisher (3) by pulling it out from under the rear
window weatherstrip (4).
Figure 1A6 – 14
Reinstall
1 Gently lift the rear window weatherstrip using a fine bladed screw driver and insert the lower finisher underneath it.
2 Reinstall the rear compartment lid weatherstrip on the lip flange around the rear compartment.

Stationary Windows Page 1A6–17
Page 1A6–17
3 Torque Wrench Specifications
Door opening moulding retaining screw........................................1.0 – 2.0 N.m
Quarter window assembly retaining nut........................................1.0 – 3.0 N.m