
1. DIAGNOSIS
1.1 GENERAL DIAGNOS IS
Since prob lems in steering, suspensi on, wheels and tyres could involve several syst ems , t hey must all be con-
sidered when diagnosing a complaint. To avoi d incorrect diagnosis, alwa ys road test the vehicle first. Proceed
with the foll owi ng preliminary inspection and correct any def ects which are found.
1. Inspect tyres for proper pressure and uneven wear.
2. Raise vehicle on a hoist and inspect front and rear suspension and steering system for loose or damaged
parts.
3. Spin front wheels. Inspect for out-of-round tyres, out-of-balance tyres, bent rims, loose and/or rough
wheel bearings.
DIAGNOSIS TABLE
Condition P ossible Cause Correction
Veh icle Pulls (Leads) Mismatched or uneven tyres Replace tyre.
Tyres not adequately inflated Adju st tyre pressure.
Broken or s aggi ng spring s Re place sprin g.
Radial tyre lateral force Replace tyre.
Disturbed wheel alignment Check and adjust front wheel
alignment.
Brak e dragging in one road wheel Repair brake.
Loose, bent or broken f ront or rear suspension
parts Tighten or replace suspension
parts.
Abnormal or
Excessive Tyre W ear Sagging or broken spring Replace sp rin g.
Tyre out of balance Adju st balance or replace tyre.
Disturbed wheel alignment Check and adjust front wheel
alignment.
Faulty strut (shock abso rber) Re place strut.
Hard driving Replace tyre.
Overloaded vehicle Replace tyre .
Not rota ting tyr e Replace or rota te tyr e.
Worn or loose wheel bearing Re place wheel bear ing .
Wobbly wheel or tyre Replace wheel or tyre.
Tyres not adequately inflated Adju st tyre pressure.
W hee l Tramp Blister or bump on tyre Replace tyre.
Improper strut (shock absorber) action Replace str ut.
S himmy, S h a ke o r
Vibration Tyre or wheel out of balance Balance wheels or replace tyre
and/o r wheel.
Loose wheel bearin gs Replace wheel bearing .
Worn tie rod ends Replace tie rod end.
Worn lower ball joints Replace front susp ension ar m .
Excessive wheel runout Repair or replace wheel and/or
tyre.
Blister or bump on tyre Replace tyre.
Excessively loaded radial runout of tyre/wheel
assembly Replace tyre or wheel.
Disturbed wheel alignment Check and adjust front wheel
alignment.
Loose or worn steerin g linkage Tighten or replace steer ing link-
age.
Loose steering gear case bolts Tighten c ase bolts.
Hard Steering Tyre not adequately inflated Inflate tyres to proper pressure.
Malfunction of power steering sy stem Ch eck and correct.
Bind in tie rod end ball studs or lower ball joints Replace tie rod end or front sus-
pens ion ar m.
Disturbed front wheel alignment Check and adjust front wheel
alignment.
Rack and pinion adjustment Check and adjust rack and pinion
torque.
Bind in steering column Repair or replace.
Too Much Play i n
Steering Wheel bearings worn Replace.
Loose steering gear case bolts Tighten.
Rack and pinion adjustments Check and adjust rac k and pinion
torque.
Worn steering shaf t joints Replace joint.
Worn tie rod ends or tie rod inside ball joints Replace tie rod end or tie rod.
Worn lower ball joints Replace front suspens ion control
arm.
Poor Returnabil it y Bind in tie rod end ball studs Replace tie rod end.
Bind in ball joi nts Replace.
Bind in steering column Repair or replace.
P oorly lubricated rac k and pinion Check, repair or lubricate rack and
pinion.
Disturbed front end alignmen t Ch eck and adjust fr on t end align-
ment.
Rack and pinion adjustment Check and adjust rack and pinion
torque.
Tyres not adequate ly inflated Adju st tyre pressure.
R a ck and Pinion
Noise
(Rattle or Chuckle)
Loose steering gear case bolts Tighten.
Worn rack bush Replace.
Rack and pinion adjustment Check and adjust rack and pinion
torque.
Abnormal Noise,
Front End Worn, sticky or loose tie rod ends, low er ball
join ts, tie rod in s ide ball jo int s o r drive shaft
joints
Replace tie rod end, suspens ion
ar m , tie rod or drive sh aft joint.
Damaged str uts or mountings Repair or replace.
Worn suspension arm bushings Replace.
Loose stab iliser bar Tighten bolt s or nuts, replace
bushes.
Loose wheel nuts Tighten wheel nuts.
Loose suspens ion bolts or nuts Tighten s uspens ion bolts or nuts.
Broken or otherwise damaged wheel bearings Replace.
Broken suspension springs Replace.
Poorl y lubricat ed or worn str ut bear ings Replace strut bear ing.
Condition P ossible Cause Correction
Wand er or Poo r
Steer ing Stab ility Mismatched or uneve n tyres Re place or in flate tyres to proper
pressure.
Loose ball joints and tie rod ends Replace suspension arm or tie rod
end.
Fa ulty s tru ts o r mo u ntin gs Repl a c e stru t o r repa ir m o u nting .
Loose stabiliser bar Tighten or replace stabiliser bar or
bush.
Broken or s aggi ng spring s Re place sprin g.
Rack and pinion adjustment Check and adjust rack and pinion
torque.
Disturbed front wheel alignment Check and adjust front wheel
alignment.
Erratic Steering When
Braking Worn wheel bearing s Re place.
Broken or s aggi ng spring s Re place coil spring.
Tyres are inflated unequally Inflate tyres to proper pressure.
Disturbed front end alignmen t Ch eck and adjust fr on t end align-
ment.
Brak es not working in unison Check and adjustment brake sys-
tem.
Leaking wheel cylinder or caliper Repair or replace wheel cylinder or
caliper.
Wa rped discs Replace brake disc.
Badly worn brake linings Re place brake shoe lining.
Drum is out of round in some brakes Replace brake drum.
Defe ctive wheel cylinders Replace or repair wheel cylinder.
Low or Uneven Tr im
Height
Re fer NOTE * 1.
Broken or s aggi ng spring s Re place.
Over loaded Check loading.
Incorrect springs Replace.
Ride Too Soft Faulty struts (shock absorbe r) Replace str ut.
Suspension Bottoms Overloade d Ch eck loading.
Faulty struts (shock absorbe r) Replace str ut.
Incorrect, broken or sa gging springs Replace.
Body Leans or Sways
in Corners Loose stabiliser bar Tighten stabiliser bar bolts or nuts,
or replace bu shes.
Faulty struts (shock absorbers) or moun tings Re place str ut or tighten mount ing.
Broken or s aggi ng spring s Re place.
Overloade d Ch eck loading.
C upped Ty res Front str uts defe ctive Replace.
Worn wheel bearing s Re place.
Excessive tyre or wheel run-out Replace tyre or wheel disc.
Worn ball joints Replace front su spension arm .
Tyre out of balance Adjust tyre balance.
Condition P ossible Cause Correction

NOTE: 1: Right-to-left trim height (“H”) difference should be
within 15 mm with vehi cle at curb weight (same with rear).
1.2 TYRE DIAGNOSIS
IRREGULAR AND/OR PREMATURE WEAR
Irregular and premature wear has many causes. Some of
them are: incorrect inflation pressu res, lack of tyre rotation,
dr ivin g habits, improper alignme nt.
If the following conditions are noted, rotation is necessary:
• Front tyre wear is diffe rent from rear.
• Uneven wear exists across the tread of any tyre.
• F ront tyre wear is unequal between the right and left.
• Rea r tyre wear i s unequal between the ri ght and left.
• There is cupping, flat spotting, etc.
A wheel alignment check is necessary if following condi-
tion s are noted:
• F ront tyre wear is unequal between the right and left.
• Wear is uneven acro ss the tread of any f ront tyre.
• Front tyre treads have scuffed appearance with
“fe athe r” edges on one side of tread ribs or blocks.
Tyre wear as i ndicated in (A) could be a re su lt of hard cor-
nerin g, unde r inflation or lack of tyre rotation.
Tyre wear as indicated in (B) could be a result of incorrect
wheel alignment, tyre construction not uniform or heavy
acceleration.
WEAR INDICATORS
Original equipm ent t yres h ave built-in tread wear indi cators
(1) to show when they need replacement.
These indicators (1) will appear as 12 mm wide bands
when the tyre tread depth becomes 1.6 mm.
When the indicators (1) appear in 3 or more grooves at 6
locations, tyre replacement is recommended.
“H”

RADIAL TYRE WADDLE
Waddle is side to s ide movement at the f ront and/or rear of
the vehicle. It is caused by the steel belt not being straight
within the t yre. It is m os t not iceable at a low speed, 8 to 48
km/h.
It is possible to locate the faulty tyre by road testing the
vehicle. If it is on the rear, the rear end of the vehicle
shakes from side to side or “waddles”. To the driver in the
seat, it feels as though someone is pushing on the side of
vehicle.
If the faulty tyre is on the front, waddling is more visual. The
front sheet metal appea rs to be moving back an d for th and
the dr iver feels as though he is at the pivo t point in veh icle.
Waddle can be qu ickly diagno sed by using a Tyre Problem
Detector (TPD) and fol lowi ng the equipment manufacturer’s
recommendations.
If a TPD is no t available, an alter native method of substitut-
ing known -g ood tyre/whee l assemblies can be used a s fol-
lows, although it takes a l onger time.
1. Drive vehicle to determine whether the front or rear
waddles.
2. I nstall tyres and wheels that are known to be good (on
similar vehicle) in place of those on waddling end of
vehicle. If waddling end cannot be id entified, subs titute
rear ones.
3. Road test again. If improvement is noted, reinstall
originals one at a ti me until w addle causal tyre is f ound.
If no improvem ent is noted, install known-good tyres in
place of all four. Then reinstall originals in the same
manner as above.
RADIAL TYRE LEAD
“Lead” is t he deviation of the vehicle from a s traight path on a l eve l, eve n road wit h no pres sure on the s t eer-
i ng wheel.
Lead is usually caused by:
•Incorrect alignment.
•Uneven brake ad justment.
•Tyre c onstr uction.
The way i n which a tyre i s built can produc e l ead in a vehicle. An example of this is pl ac eme nt of the belt. Off
centre belts on radial tyres can cause the tyre to develop a side force while rolling straigh t down the road. If
one side of the tyre has a little larger diameter than the other, the tyre will tend to roll to one side. This will
develop a side force which can produce vehicle lead.
The procedure in the fo llowing Lead Dia gnosis table should be used to make sure that fron t alignment is not
mistaken for tyre lead.
•Part of the lead diagnosis procedure is diff erent f rom the proper tyre rotation pattern currently in the owner
and service manuals. I f a medium to high mileage tyre is moved to the other side of the vehicle , be sure to
check that ride roughness has not developed
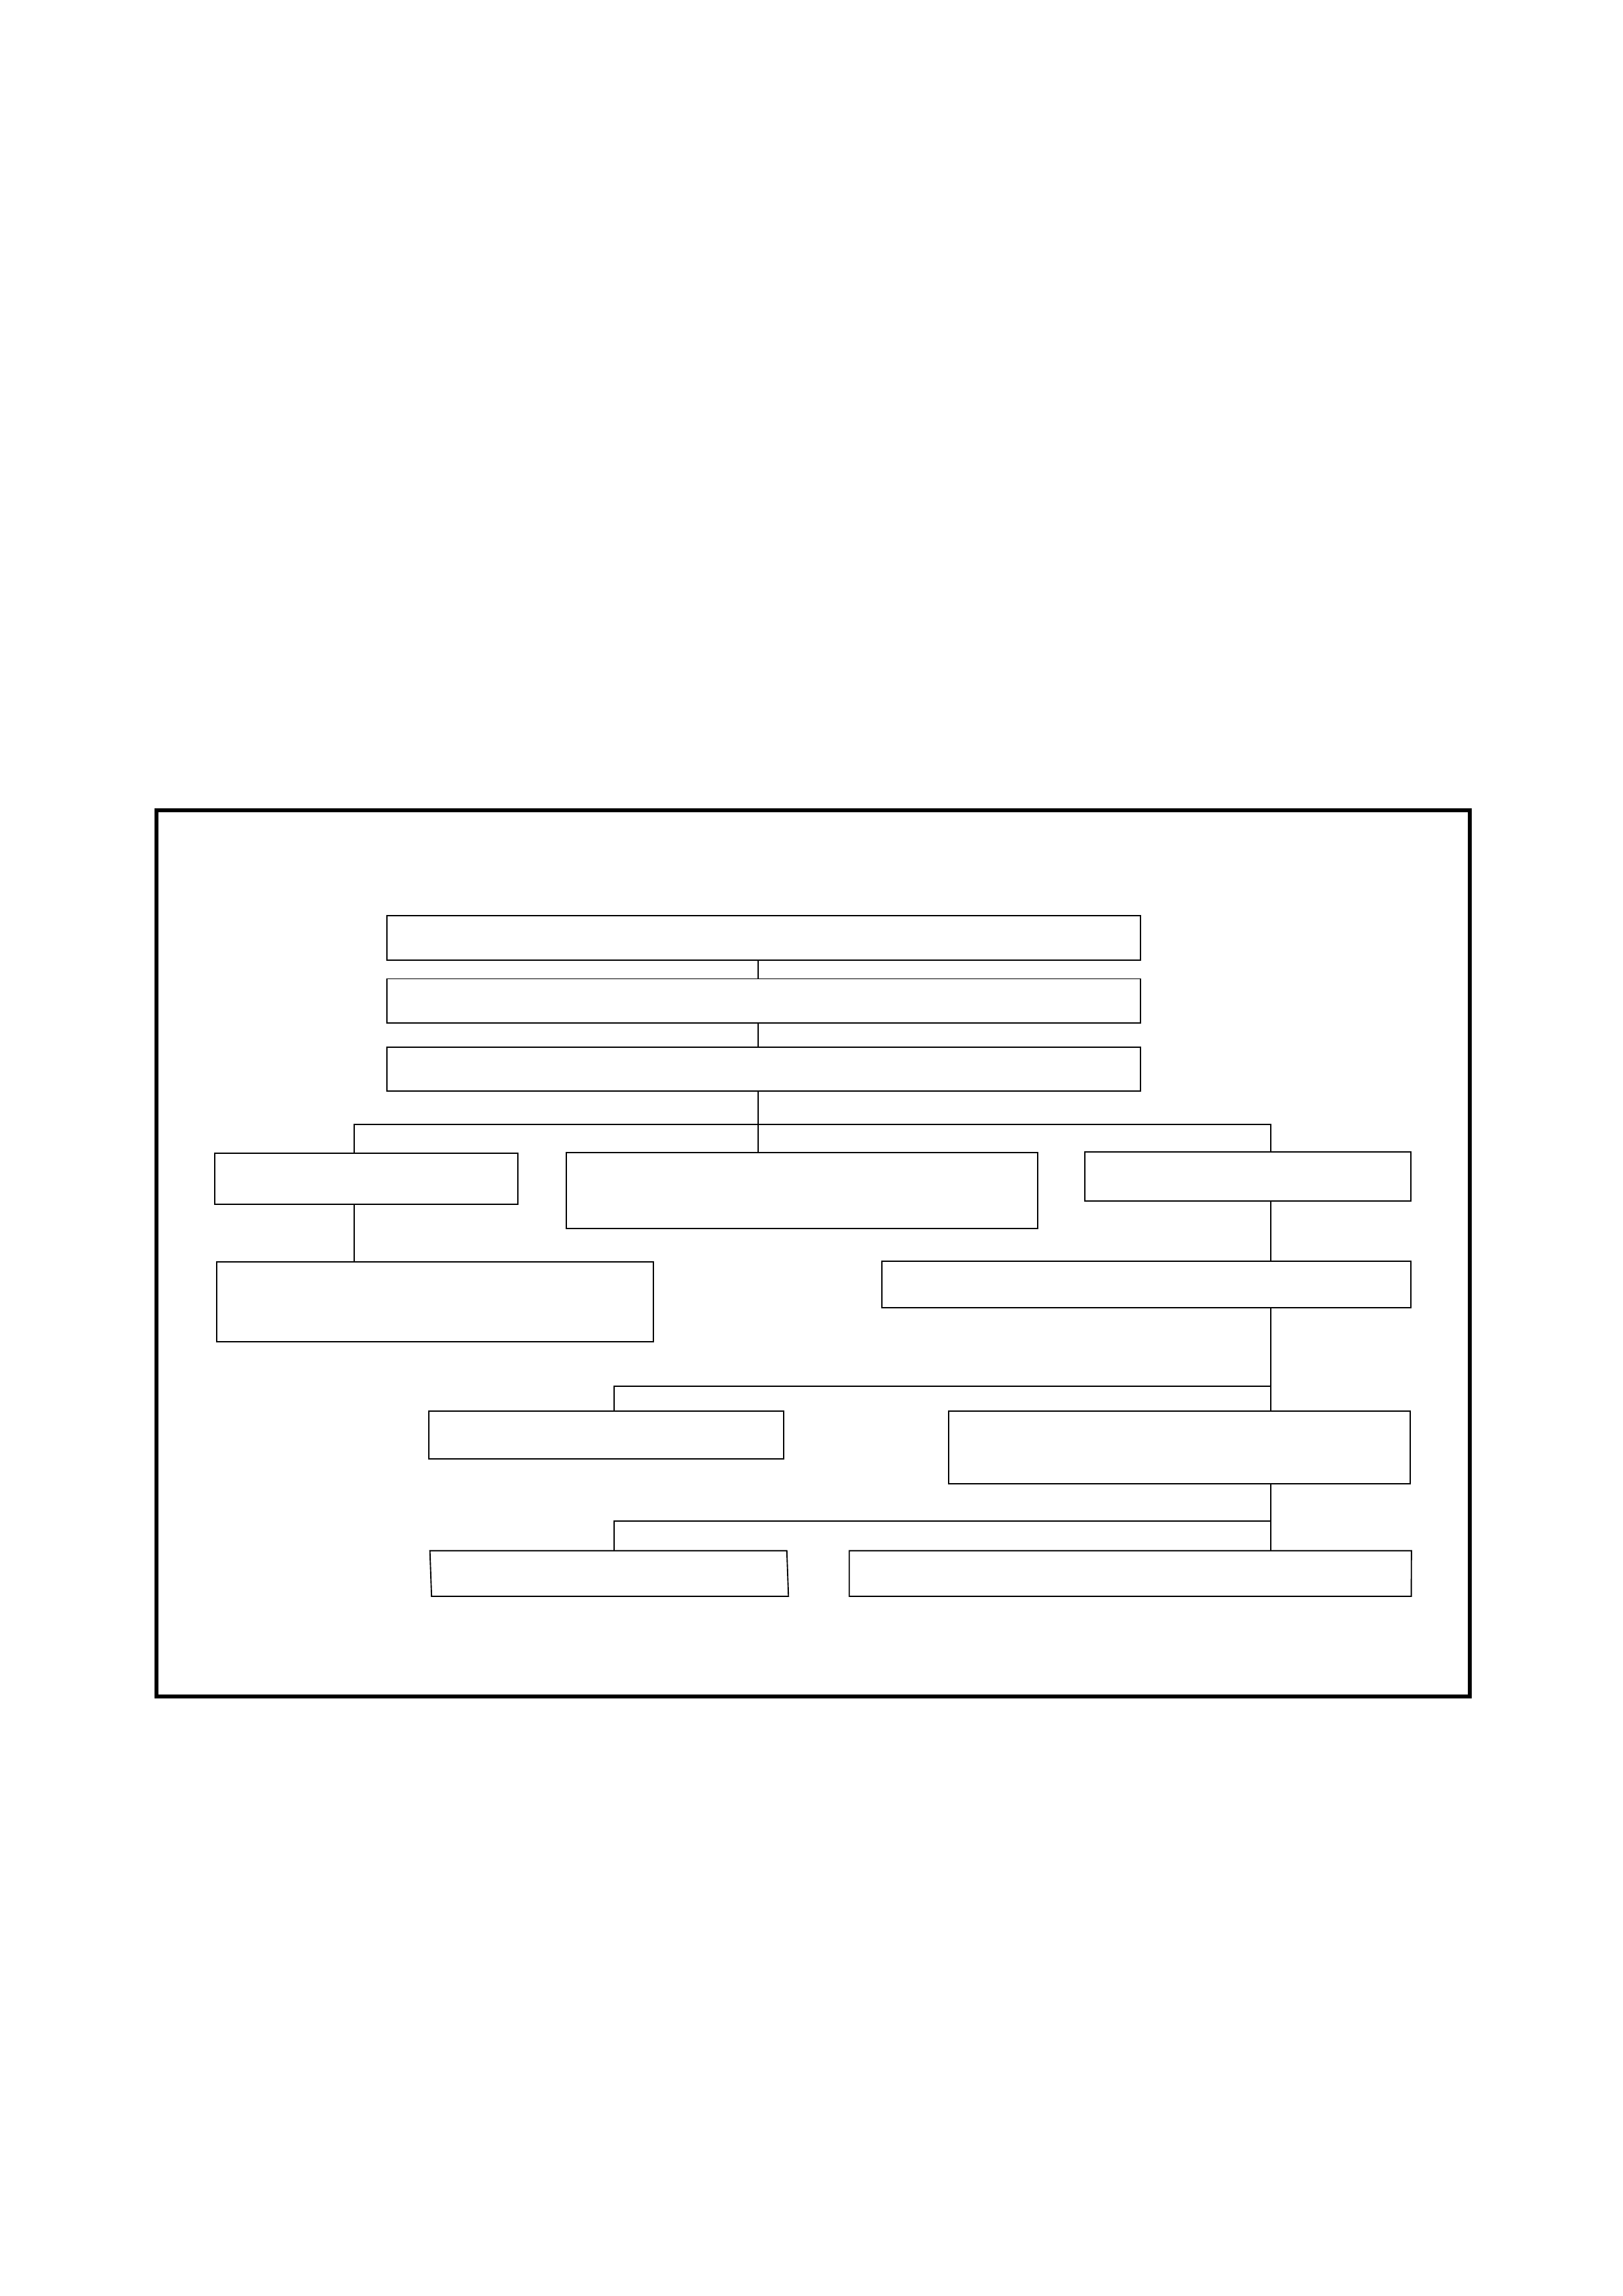
Rear tyres will not cause lead. LEAD DIAG NO SIS TABLE
Inflate tyres to recommended pressure
Road test vehicle on level uncrowned road in both directions
Switch front tyres side to side and road test again
Lead corrected,
if roughness results, replace tyres
Leads in same direction Leads reverses direction
Put tyres back in original position
and check alignment Install a known-good tyre on one front side
Lead remains install a known-good
tire in place of other front tyre
Lead remains known-good tyres are not goodLead corrected replace tyre
Lead corrected replace tyre
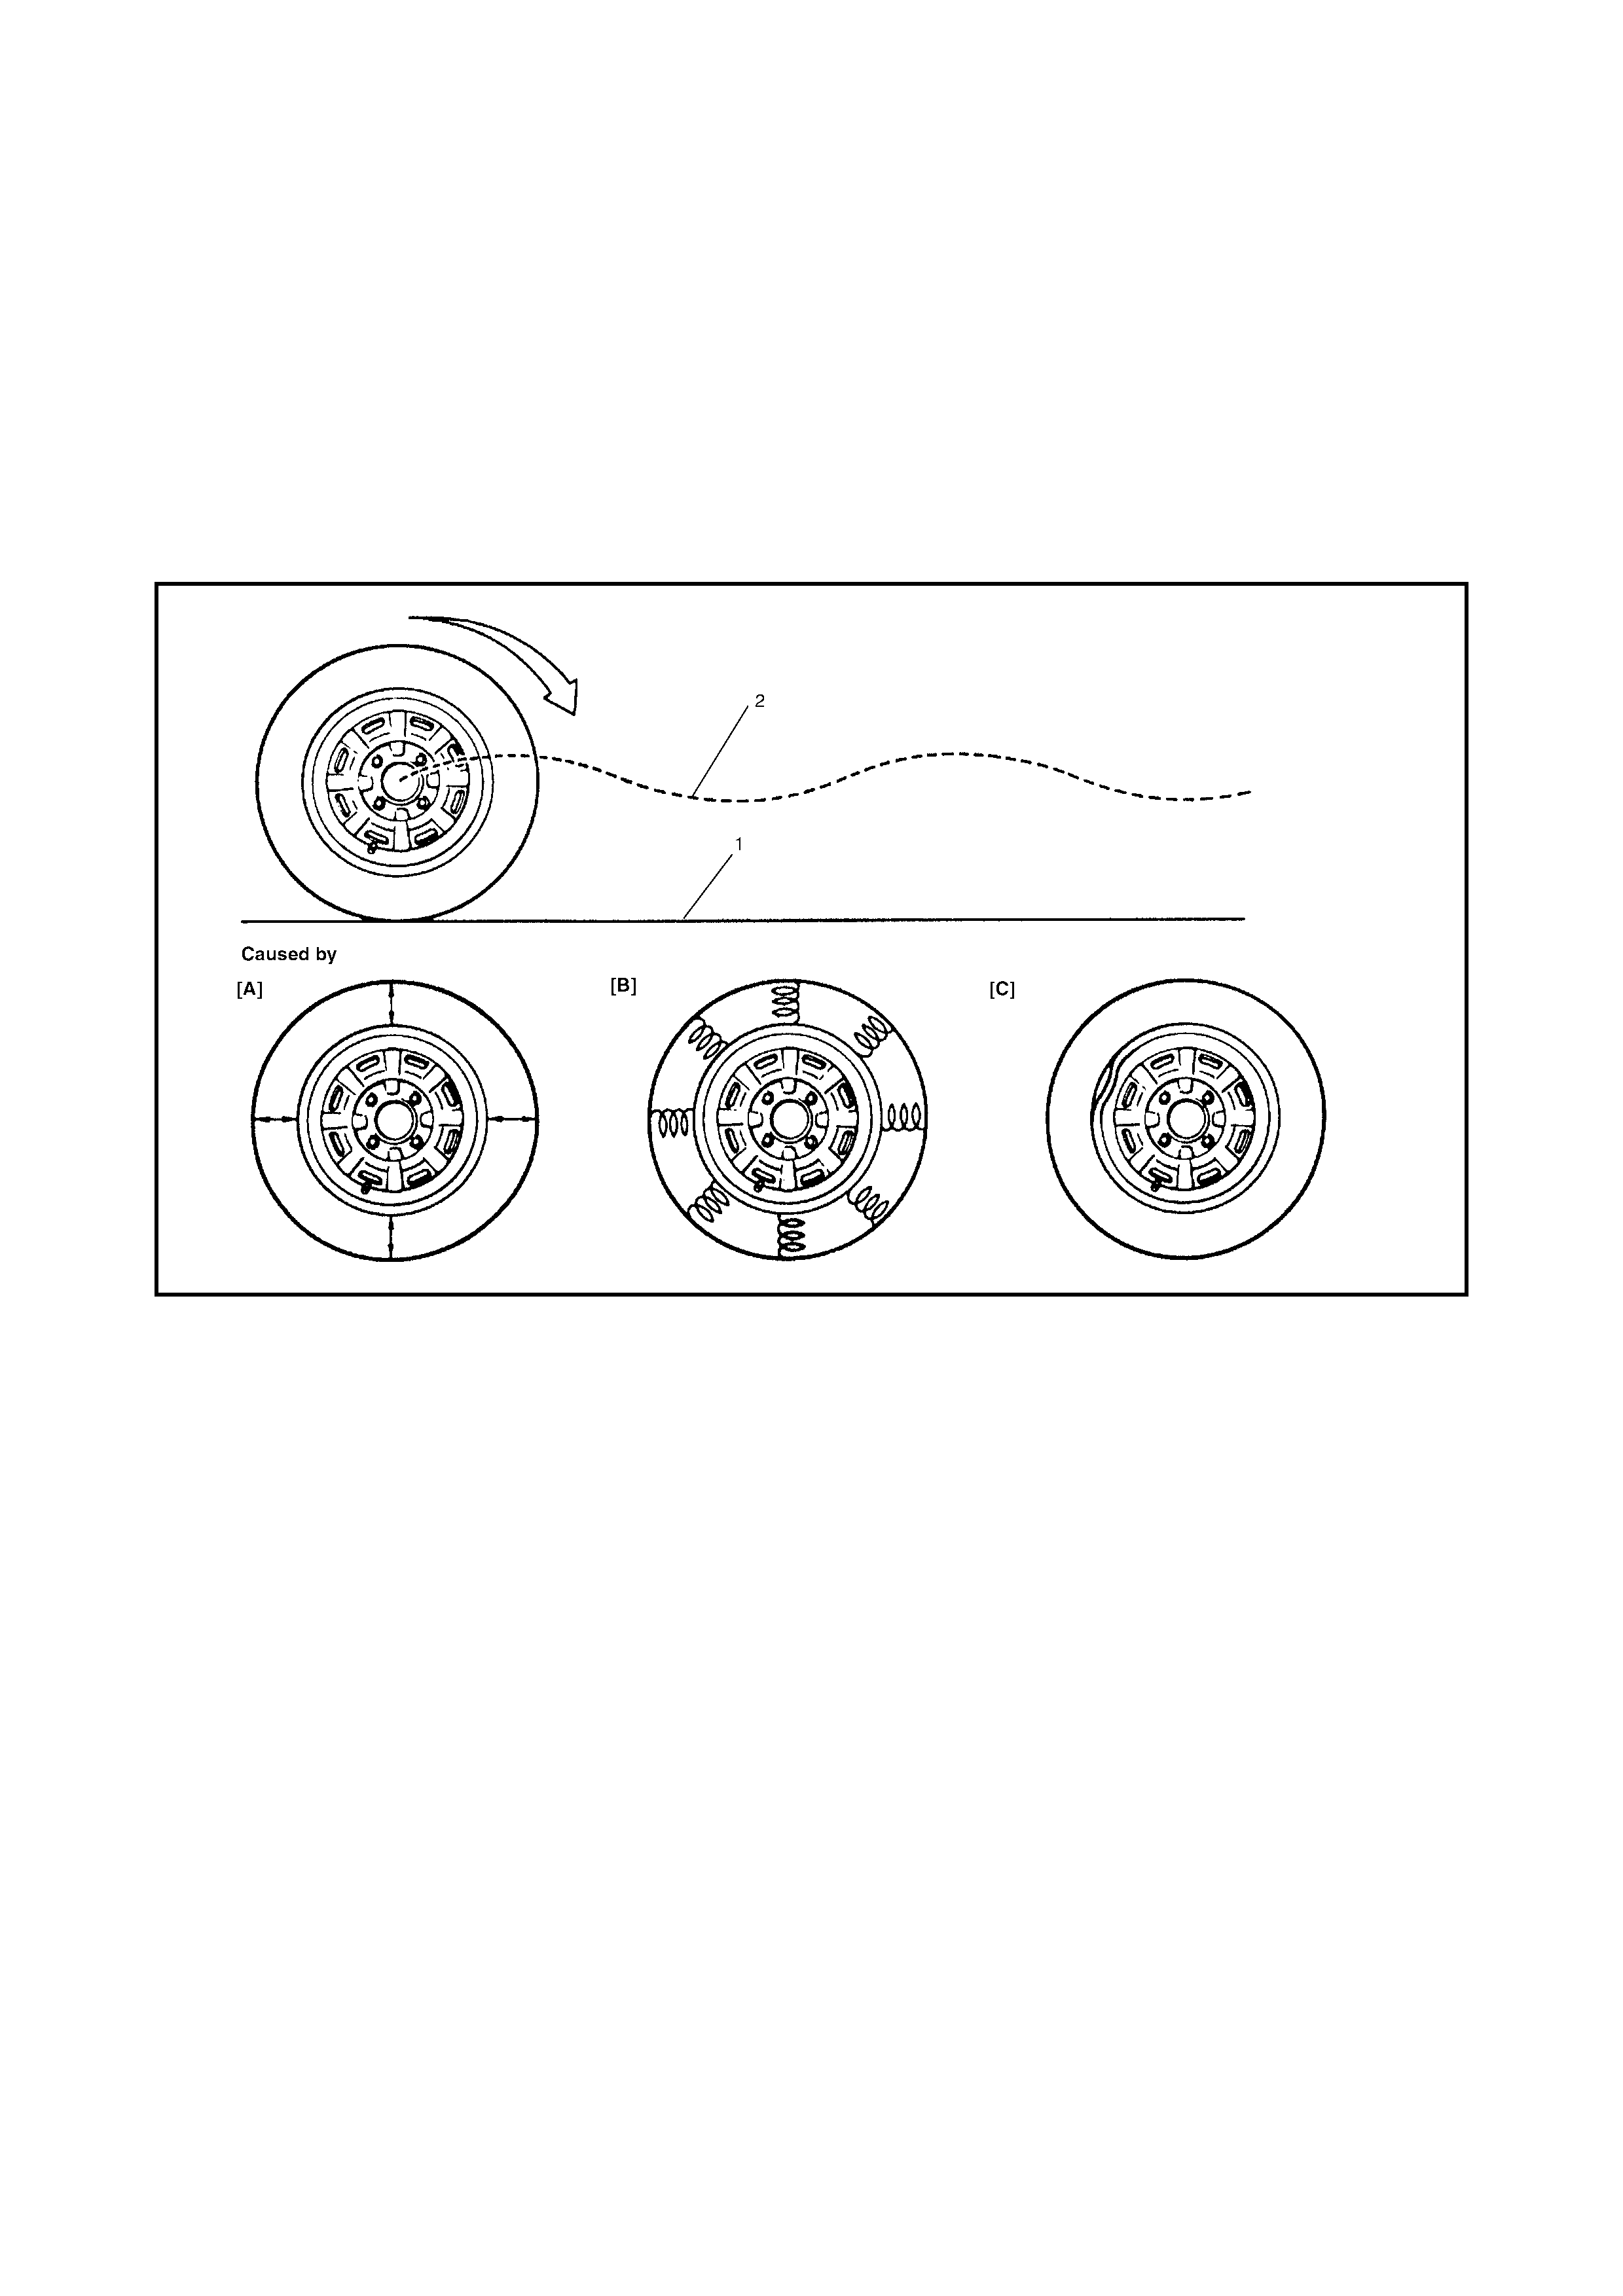
1.3 VIBRATION DIAGNOSIS
Wheel unbal ance causes most of the hi ghway speed vibration proble ms. If a vibration remains after dynamic
balancing, its possible causes are as follows .
•Tyre runout.
•Wheel runo ut.
•Tyre s tiffness variation.
Measuring tyre and/or wheel free runout will uncover only part of the problem. All three causes, known as
loaded radia l r unout , must be checked by us ing a Tyre Problem Det ecto r (TPD). If TPD is not availabl e, alter-
native method of substituting known-good tyre and wheel assemblies on the problem vehicle can be used,
although it takes a longer time.
Legend
[A] : Tyre out of round 1. Smooth road
[B] : Tyre stiffness variation 2. Suspension m ovement
(loaded runout)
[C] : Rim bent or out of round